TENDA TECHNOLOGY A302 Wireless N300 Universal Range Extender User Manual Copyright Statement
SHENZHEN TENDA TECHNOLOGY CO., LTD. Wireless N300 Universal Range Extender Copyright Statement
User Manual
Wireless Range Extender
I

Wireless Range Extender
II
Copyright Statement
is the registered trademark of Shenzhen Tenda Technology Co.,
Ltd. All the products and product names mentioned herein are the
trademarks or registered trademarks of their respective holders. Copyright of
the whole product as integration, including its accessories and software,
belongs to Shenzhen Tenda Technology Co., Ltd. No part of this publication
can be reproduced, transmitted, transcribed, stored in a retrieval system, or
translated into any language in any form or by any means without the prior
written permission of Shenzhen Tenda Technology Co., Ltd. If you would like
to know more about our product information, please visit our website at
http://www.tendacn.com .

Wireless Range Extender
III
Disclaimer of Warranties
Pictures, images and product specifications herein are for references only.
To improve internal design, operational function, and/or reliability, Tenda
reserves the right to make changes to the products described in this
document without obligation to notify any person or organization of such
revisions or changes. Tenda does not assume any liability that may occur
due to the use or application of, the product or circuit layout(s) described
herein. Every effort has been made in the preparation of this document to
ensure accuracy of the contents, but all statements, information and
recommendations in this document do not constitute the warranty of any kind,
express or implied.

Wireless Range Extender
IV
Preface
Thank you for purchasing Tenda wireless range extender. Before configuring
it, please read this user guide carefully.
Conventions
Note: Information you need to pay attention to.
Tip: Additional information to help you save time or resources.
Technical Support
Website: http://www.tendacn.com
Email: support02@tenda.com.cn
Skype: tendasz
YouTube: Tendasz1999
Hotline:
1-800-570-5892 (USA) (061) 1300787922 (Australia)
(044)197-780-6119 (UK) (0852)36120883 (HongKong)
(064) 800787922 (New Zealand)

Wireless Range Extender
V
Contents
Chapter 1 Product Overview ............................................................................. 1
1 Package Contents ........................................................................................... 1
2 Getting to Know Your Wireless Range Extender ................................................ 1
LED ................................................................................................................ 1
Interfaces and Buttons ................................................................................... 2
Label ............................................................................................................. 3
3 Position Your Wireless Range Extender ............................................................ 3
Chapter 2 Internet Connection Setup ................................................................. 4
1 Preparation .................................................................................................... 4
2 Hardware Installation ..................................................................................... 4
3 Setup by Button .............................................................................................. 5
4 Internet Connection Setup .............................................................................. 6
Configure IP ................................................................................................... 6
Configure the wireless range extender Login ................................................... 6
5 Verify Internet Connection ............................................................................ 11
6 Join Your Wireless Connection ...................................................................... 14
Win7 OS ....................................................................................................... 14
Windows XP OS ............................................................................................ 16
Chapter 3 Advanced Settings ........................................................................... 18
1 Wizard ......................................................................................................... 18
2 System Status ............................................................................................... 18
3 Wireless ....................................................................................................... 18
3.1 Wireless Basic Settings ........................................................................... 18
3.2 Wireless Security .................................................................................... 20
3.3 Access Control ........................................................................................ 21
3.4 Wireless Connection Status ..................................................................... 22
4 Tools ............................................................................................................ 23
4.1 Time Settings ......................................................................................... 23
4.2 Upgrade ................................................................................................. 23
4.3 Backup/Restore ...................................................................................... 24
4.4 Restore to Factory Default ...................................................................... 25
4.5 Change Password .................................................................................... 26
4.6 Syslog .................................................................................................... 26
4.7 Reboot ................................................................................................... 27
Chapter 4 Appendix ........................................................................................ 28
Appendix 1 Configure IP .................................................................................. 28

Wireless Range Extender
VI
Win7 OS ....................................................................................................... 28
Windows XP OS ............................................................................................ 30
Appendix 2 Default Settings ............................................................................. 32
Appendix 3 FAQs ............................................................................................. 33
Appendix 4 Remove Wireless Network from Your PC ......................................... 34
Appendix 5 Safety and Emission Statement ....................................................... 36
Chapter 1 Product Overview
1
Chapter 1 Product Overview
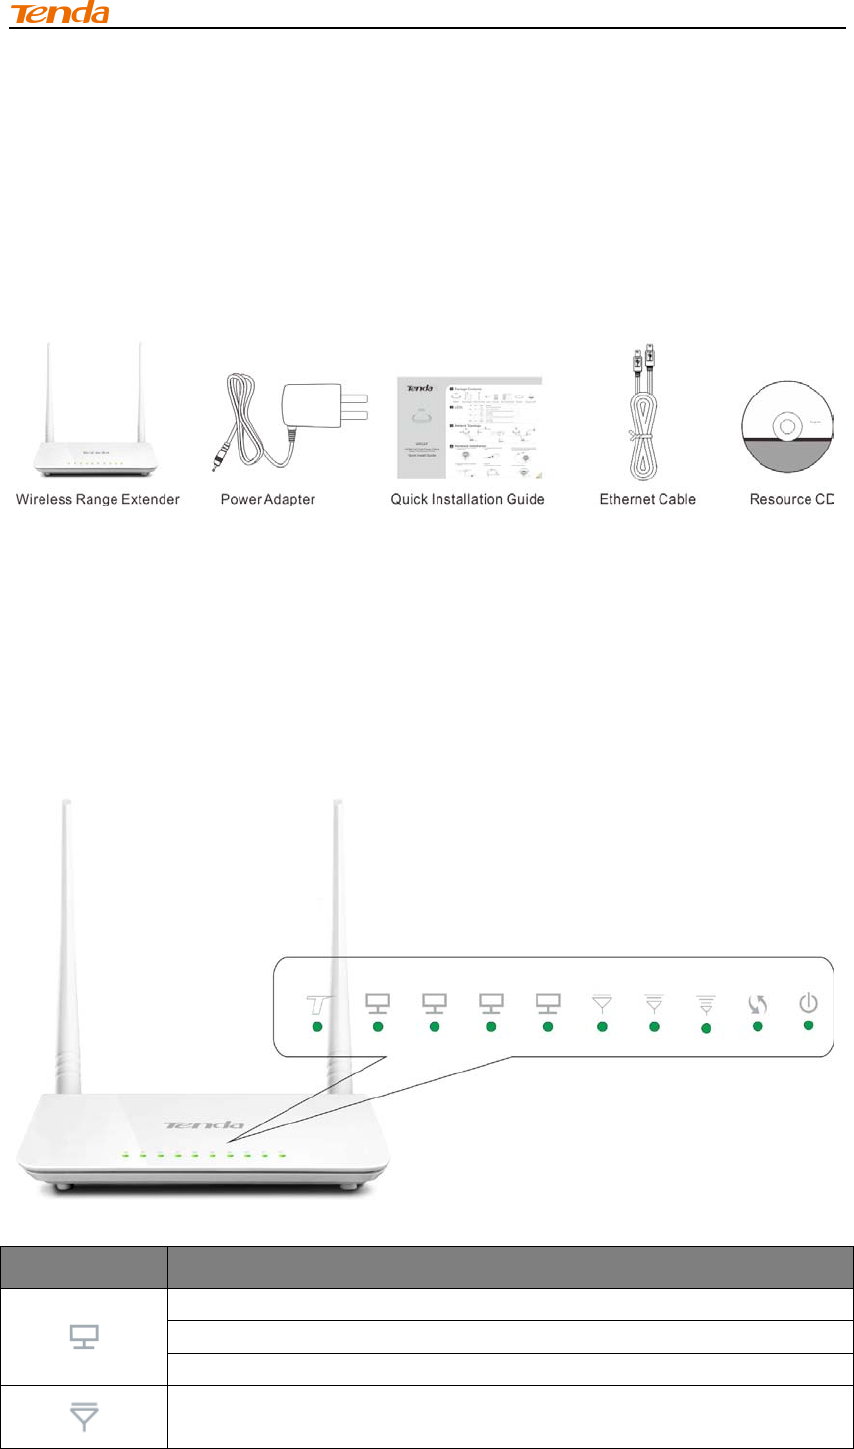
1 Package Contents
Unpack the package carefully and verify the following items are included:
If any of the above items are incorrect, missing, or damaged, please contact
your Tenda reseller for immediate replacement.
2 Getting to Know Your Wireless Range Extender
LED
LED Description
Solid: Proper connection is established on the LAN port.
Blinking: Transferring data on the LAN port.
Off: No connection is established on the LAN port.
Weak signal strength (-80dBm~-61dBm).
Chapter 1 Product Overview
2
Medium signal strength (-60dBm~-41dBm).
Strong signal strength (within -40dBm).
Blinking: Negotiating key.
Solid: Bridged successfully.
Off: Not bridged.
Solid: Proper connection to power supply.
Blinking: The system is functioning properly.
Off: Improper connection to power supply.
This icon is for decoration only.
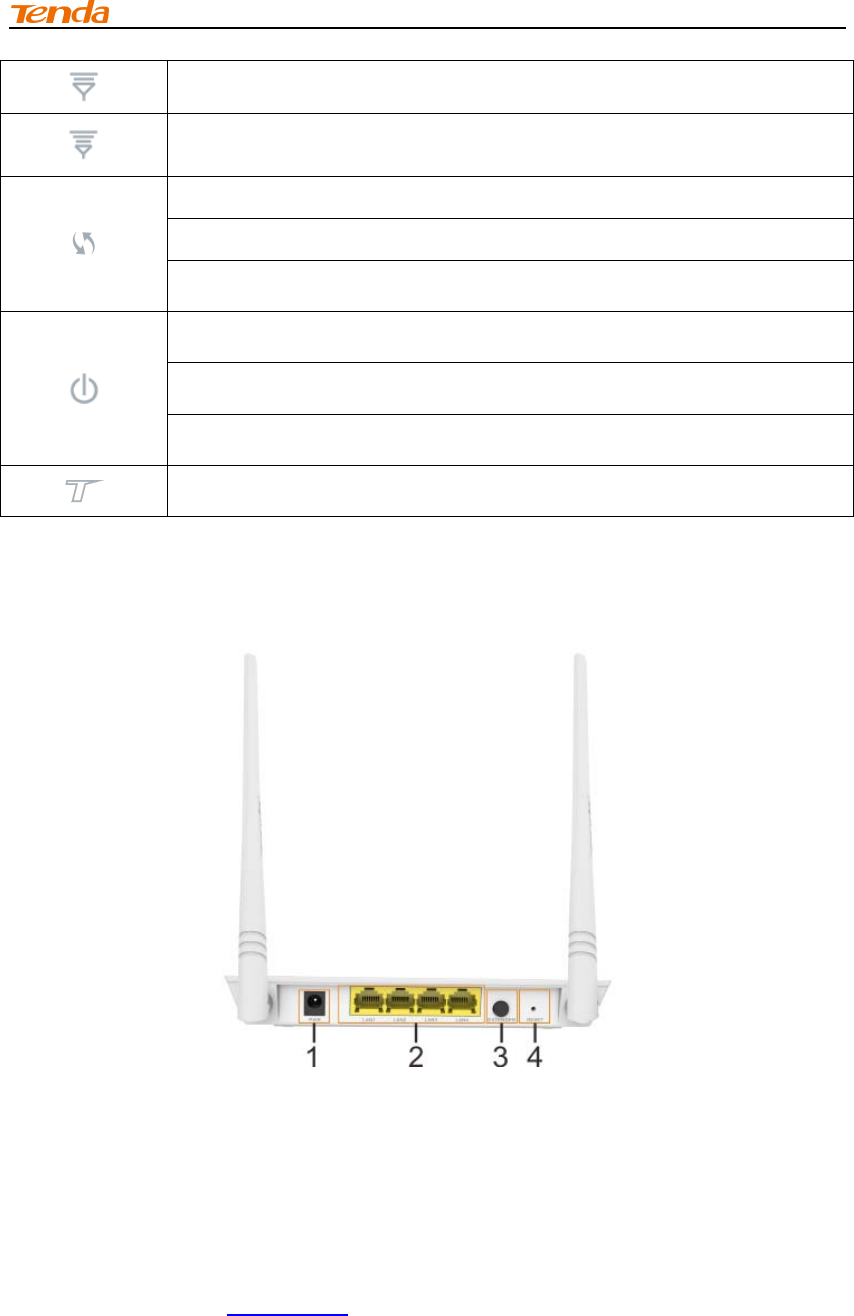
Interfaces and Buttons
1 PWR: Port for connecting to power supply.
2 LAN(1/2/3/4): Ports for connecting to PCs, switches or routers.
3 EXTENDER:Press the WPS or QSS button for about 1~3 seconds and
then press this button within 2 minutes for network connection. When the
EXTENDER LED displays a solid light, bridged successfully.
4 RESET: Press it for about 10 seconds until the Power/SYS LED is no
longer blinking to restore default factory settings. For default settings,
please refer to Appendix 2 .
Chapter 1 Product Overview
3
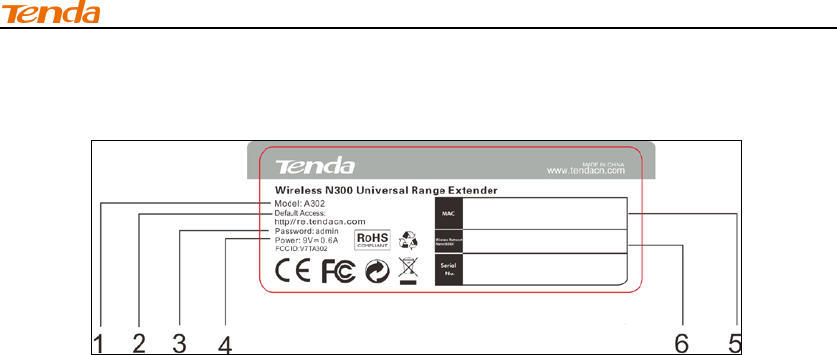
Label
You can acquire the following information from Label:
1. Model: Displays the product model.
2. Default Access: The default web login is http://re.tendacn.com.
3. Password: The default password is admin.
4. Power: The power specification is 9V 0.6A.
5. MAC: Displays the device's default MAC address.
6. Default SSID: Displays the device's default SSID name.
3 Position Your Wireless Range Extender
For best performance, please place your wireless range extender:
1. Near the center of the area where your computers and other devices
operate, and preferably within line of sight to your wireless devices.
2. Accessible to an AC power outlet and near Ethernet cables for wired
computers.
3. In an elevated location such as a high shelf, keeping the number of walls
and ceilings between the range extender and your other devices to a
minimum.
4. Away from electrical devices that are potential sources of interference,
such as ceiling fans, home security systems, microwaves, PCs, the base
of a cordless phone, or a 2.4GHz cordless phone.
5. Away from any large metal surfaces, such as a solid metal door or
aluminum studs. Large expanses of other materials such as glass,
insulated walls, fish tanks, mirrors, brick, and concrete can also affect
your wireless signal.
Chapter 2 Internet Connection Setup
4
Chapter 2 Internet Connection Setup
1 Preparation
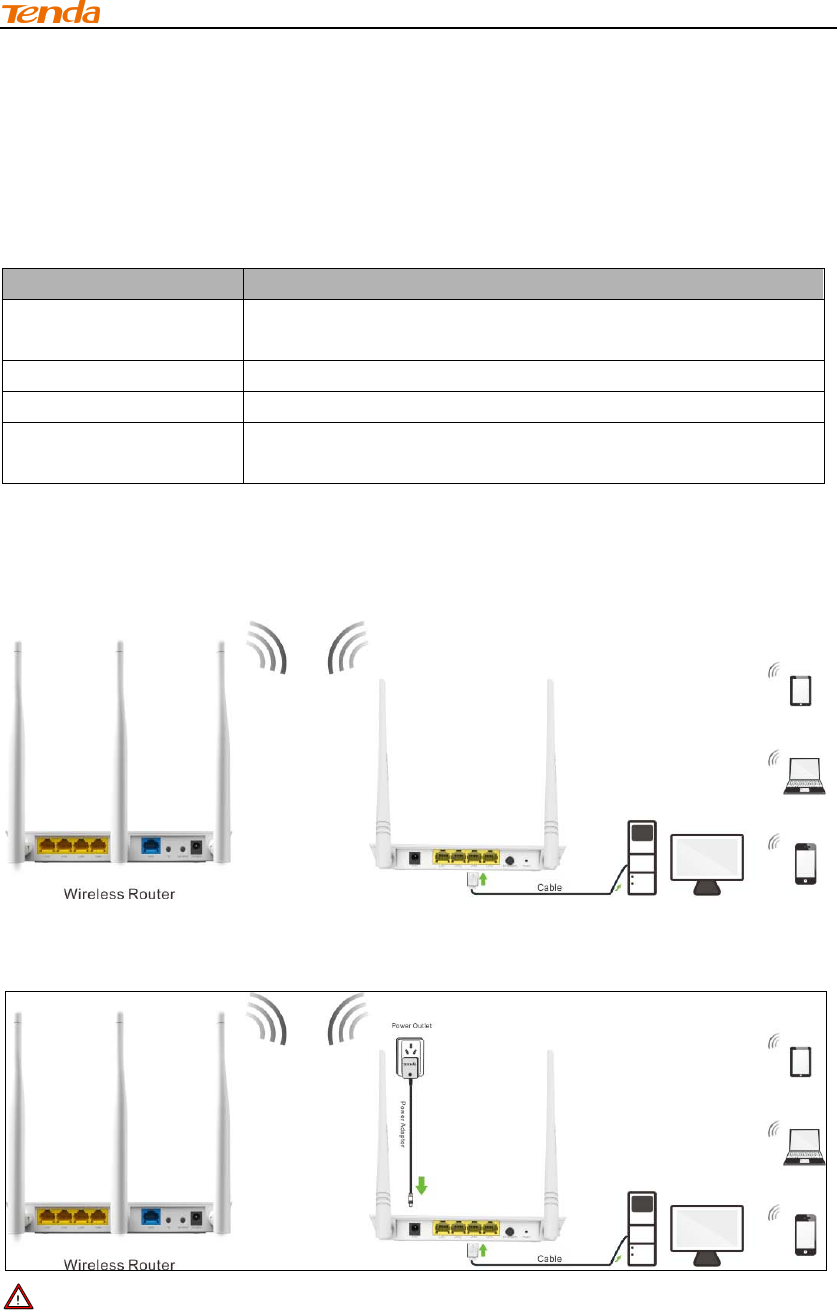
Before connecting Ethernet cables, please verify the following items:
Item
Description
Wireless Range
Extender
Inculded in the package
Wireless Router Purchased by yourself
PC
Installed with IE8 or other better web browsers.
Ethernet Cables Used for connecting PC to the wireless range
extender
2 Hardware Installation
1. Connect the wireless range extender to your PC wirelessly or with an Ethernet cable;
2. Connect to power supply with the provided power adapter. For better
performance, place the device near the center of the area where your
computers and other devices operate.
Note-------------------------------------------------------------------------------------
Please use the provided power adapter, otherwise the device may be
damaged.
-----------------------------------------------------------------------------------------------
Chapter 2 Internet Connection Setup
5
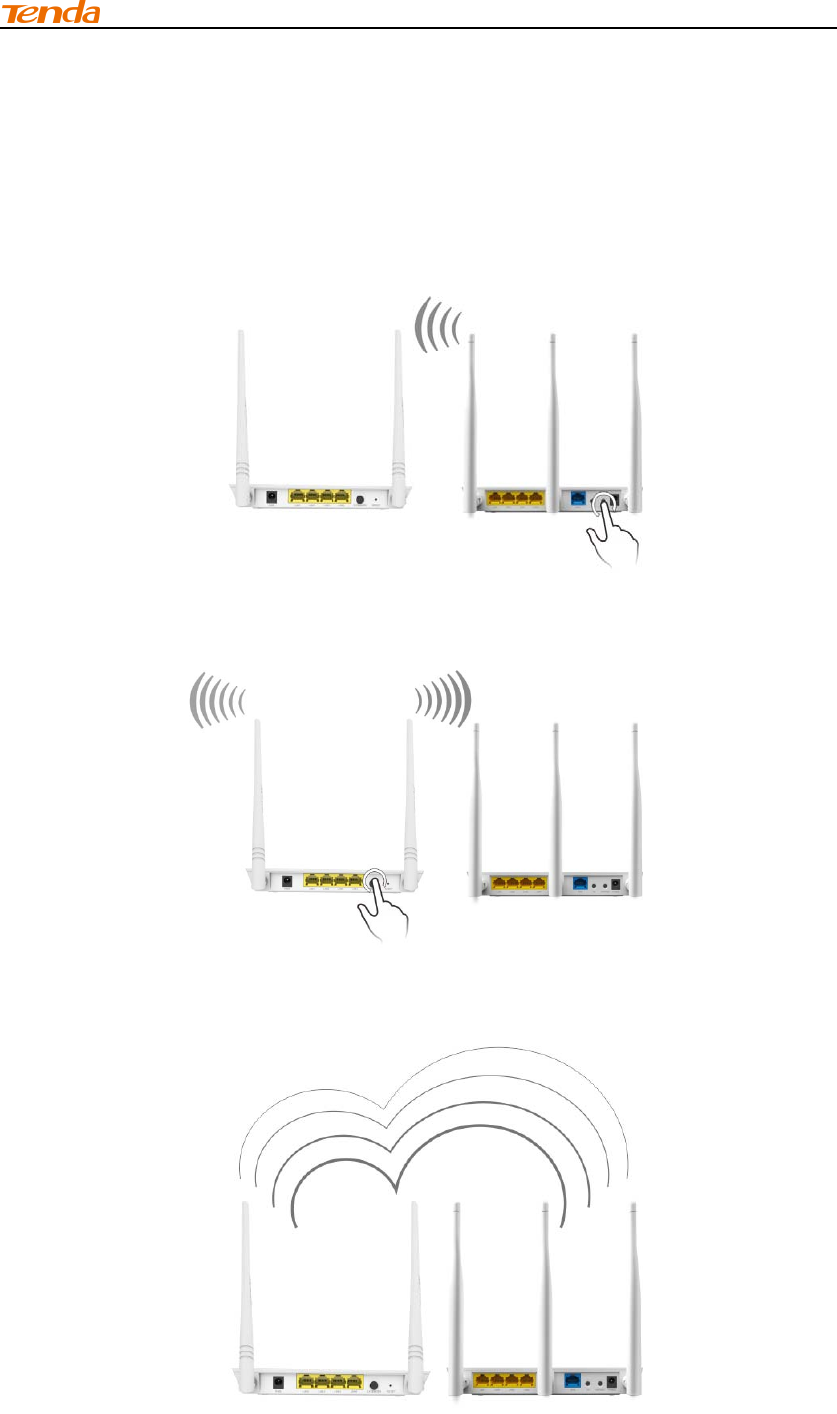
3 Setup by Button
By pressing the EXTENDER button, you can achieve wireless bridging for
extending wireless network without complicated procedures. This feature will
only be effective in range extender mode.
Configuration procedures:
1. Press the WPS or QSS button on your wireless router for 1~3 seconds;
2. Press the EXTENDER button on the wireless range extender for 1~3
seconds within 2 minutes;
3. When the Range Extender LED is solid light, the wireless range extender
will be connected to your desired router successfully. You can also login
to the web management interface to check bridge status.
Chapter 2 Internet Connection Setup
6
Tip--------------------------------------------------------------------------------------
Ensure the wireless range extender is placed near the wireless router for
better performance.
--------------------------------------------------------------------------------------------
4 Internet Connection Setup
Configure IP
Configure your PC obtain IP address automatically. If you are not clear about
this, please refer to Appendix 1 Configure IP .
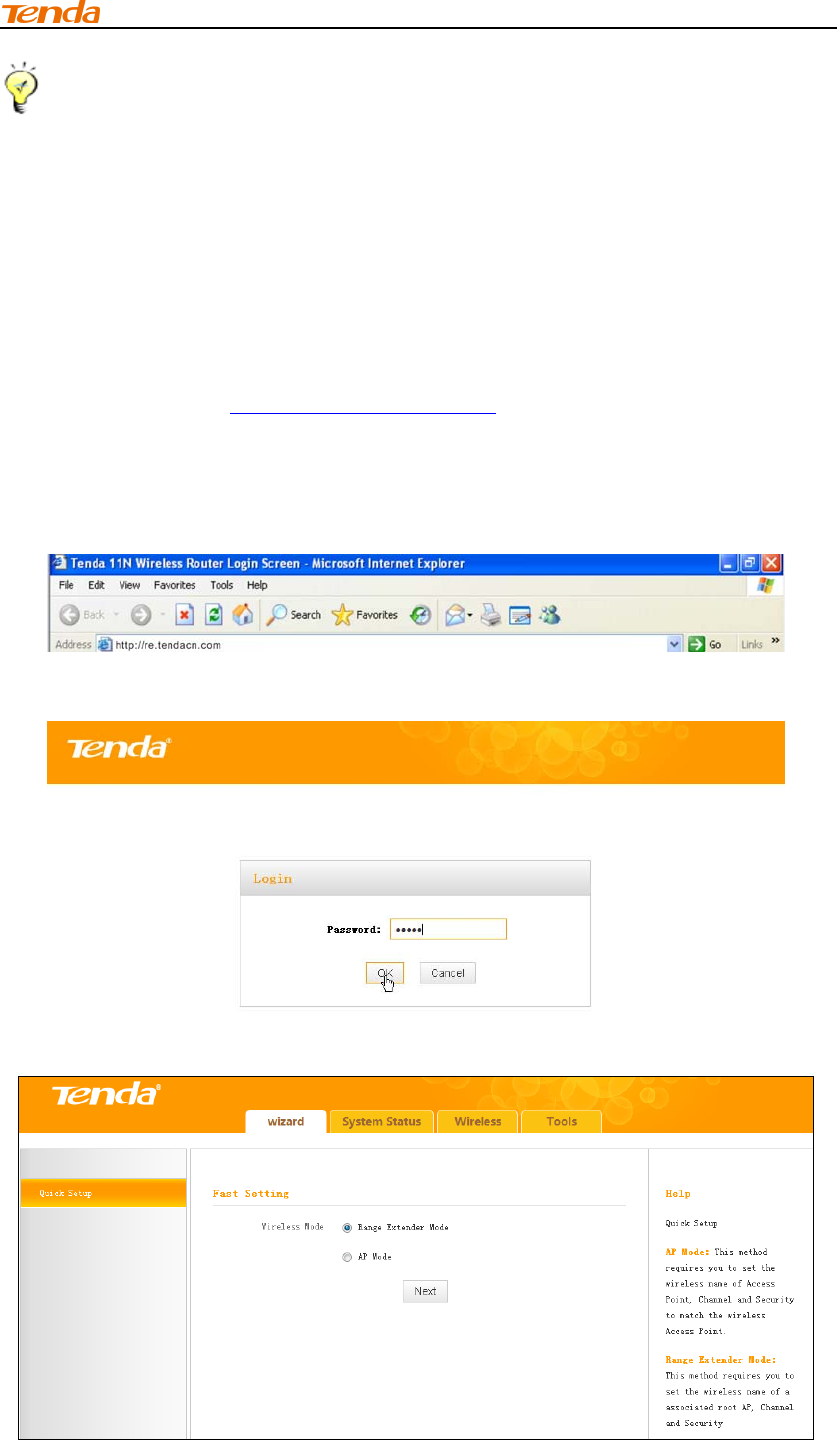
Configure the wireless range extender Login
1. Launch a browser, and usually it will login automatically. If not, input
http://re.tendacn.com in the address bar and press Enter.
2. Enter the default password admin and click OK.
3. Then the following page will appear.
Chapter 2 Internet Connection Setup
7
Internet Connection Setup
Two working modes are available here: range extender mode and AP mode.
The default is range extender mode.
Range Extender Mode
Wireless bridging allows a wireless network to be expanded using multiple
access points. The network topology is shown below:
In this mode, you just need to configure the wireless range extender
unilaterally as below:
1. Range Extender Mode Setup: Bridging the remote device for wireless
extension.
Tip--------------------------------------------------------------------------------------
Before configuring it by web-based management page, make sure you have
the following information:
1. Remote router's SSID, security mode, cipher type and security key.
2. Remote router's LAN IP address.
-----------------------------------------------------------------------------------------------
Range extender application example:
Assuming the remote wireless router has the following information:
SSID: Tenda_130518
Chapter 2 Internet Connection Setup
8
Security Mode: WPA-PSK
Cipher Type: AES
Security Key: 12345678
LAN IP Address: 192.168.0.1
Configuration procedures:
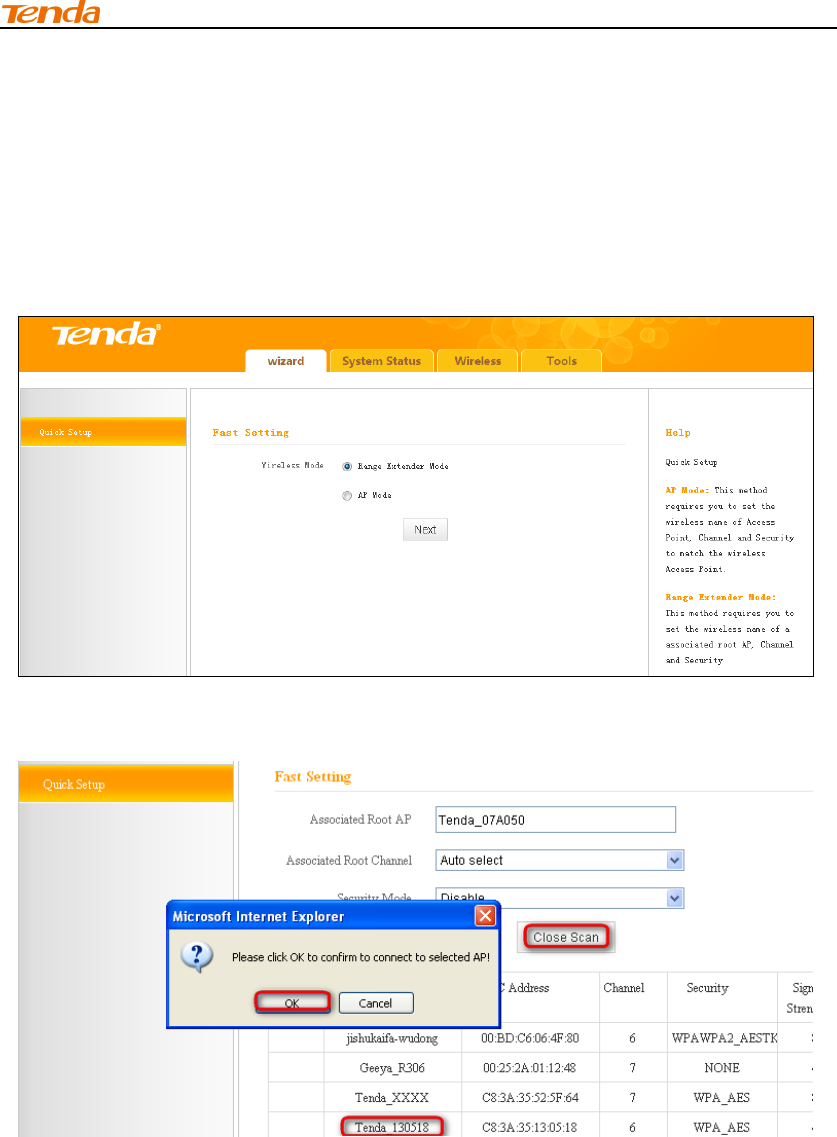
1. Click Wizard, select Range Extender Mode and click Next;
2. Click Open Scan, select the remote router's wireless network (SSID),
say Tenda_130518, click OK and Close Scan.
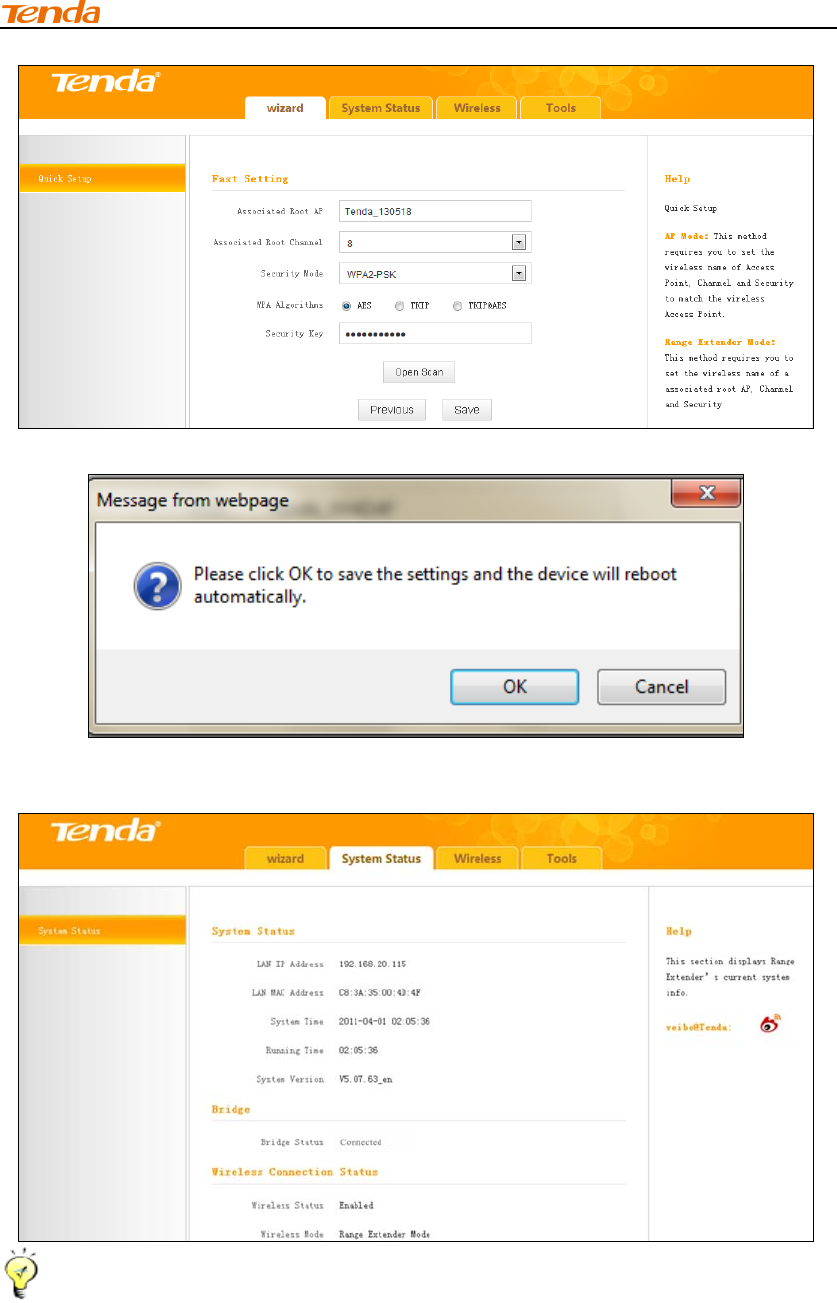
3. Enter the remote device’s security key and click Save;
Chapter 2 Internet Connection Setup
9
4. In the appearing dialogue box click OK;
5. Click System Status to check the bridge status. When the bridge status
displays Connected, bridged successfully.
Tip -------------------------------------------------------------------------------------
1. If the wireless range extender is connected to the remote router within 20
seconds, the wireless range extender’s DHCP server will be disabled
automatically. Thus, the wireless range extender will get the IP assigned
from the remote router and then you can access to the Internet.
Chapter 2 Internet Connection Setup
10
2. If the wireless range extender isn’t connected to the remote router within
20 seconds, the wireless range extender’s DHCP server will be enabled
automatically. The wireless range extender will get the IP assigned from
the wireless range extender itself. Thus, you can’t access to the Internet.
3. When bridged successfully, the range extender’s SSID and security mode
will be the same as that of the remote router.
-----------------------------------------------------------------------------------------------
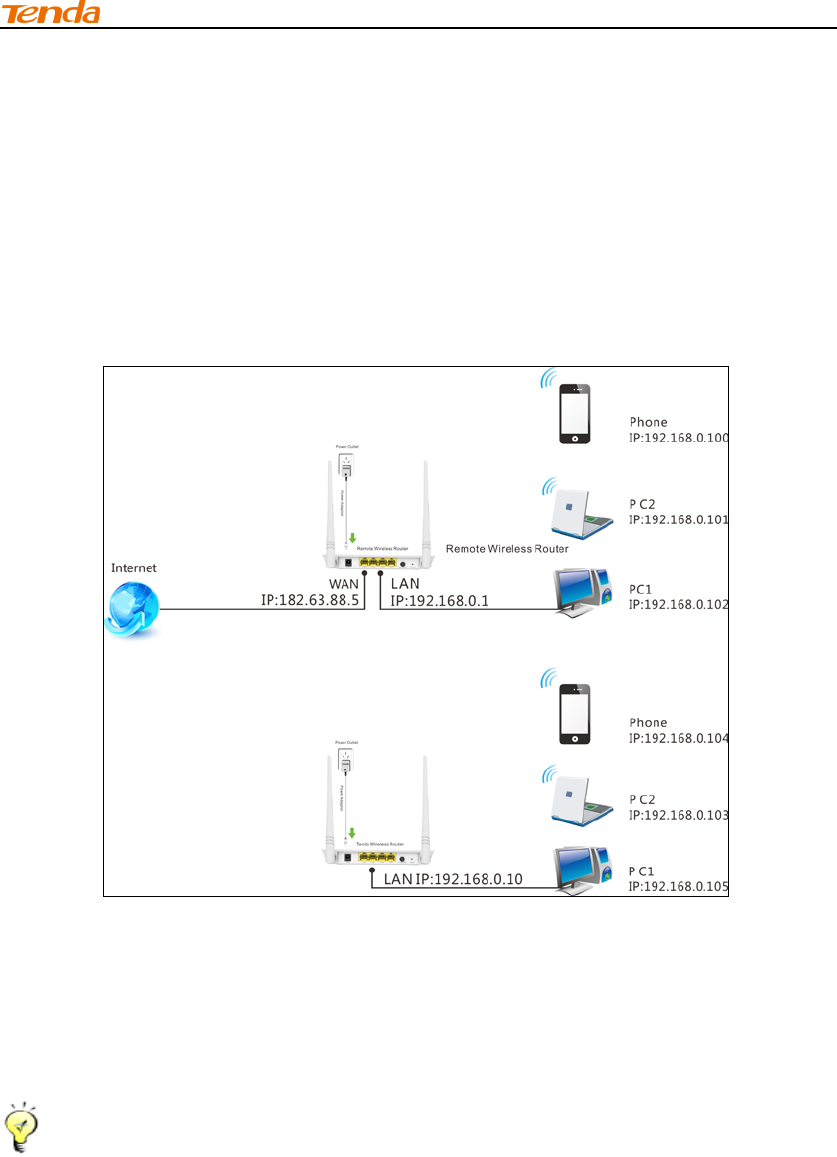
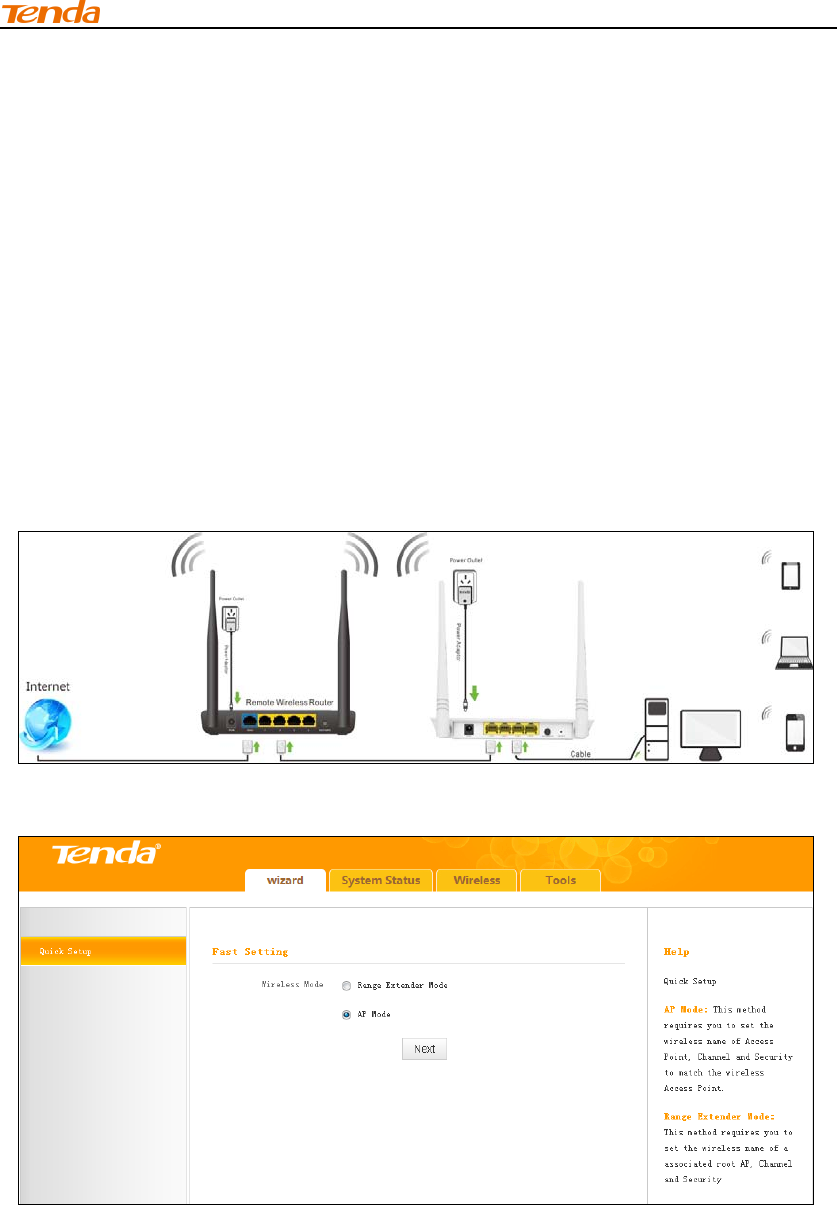
AP Mode
In this mode, the wireless range extender is connected to the remote router
for Internet access via an Ethernet cable. And your PC is connected to the
wireless range extender via a wired or wireless connection. The network
topology is shown below:
Configuration procedures:
1. Select AP Mode and click Next;
2. Configure the fast settings: channel, security mode and security key.
Click Save.

Chapter 2 Internet Connection Setup
11
3. In the appearing dialogue box click OK.
Tip---------------------------------------------------------------------------------------
1. Configure your PC obtain IP address automatically. For specific
procedures, please refer to Appendix 1 Configure IP .
2. Gateway of the PC (client) is assigned from the remote router.
-----------------------------------------------------------------------------------------------
5 Verify Internet Connection
Range Extender Mode
After the above configurations, you can verify the connection by pinging the
remote router’s IP. Steps are as follows (Take Windows XP OS for example):
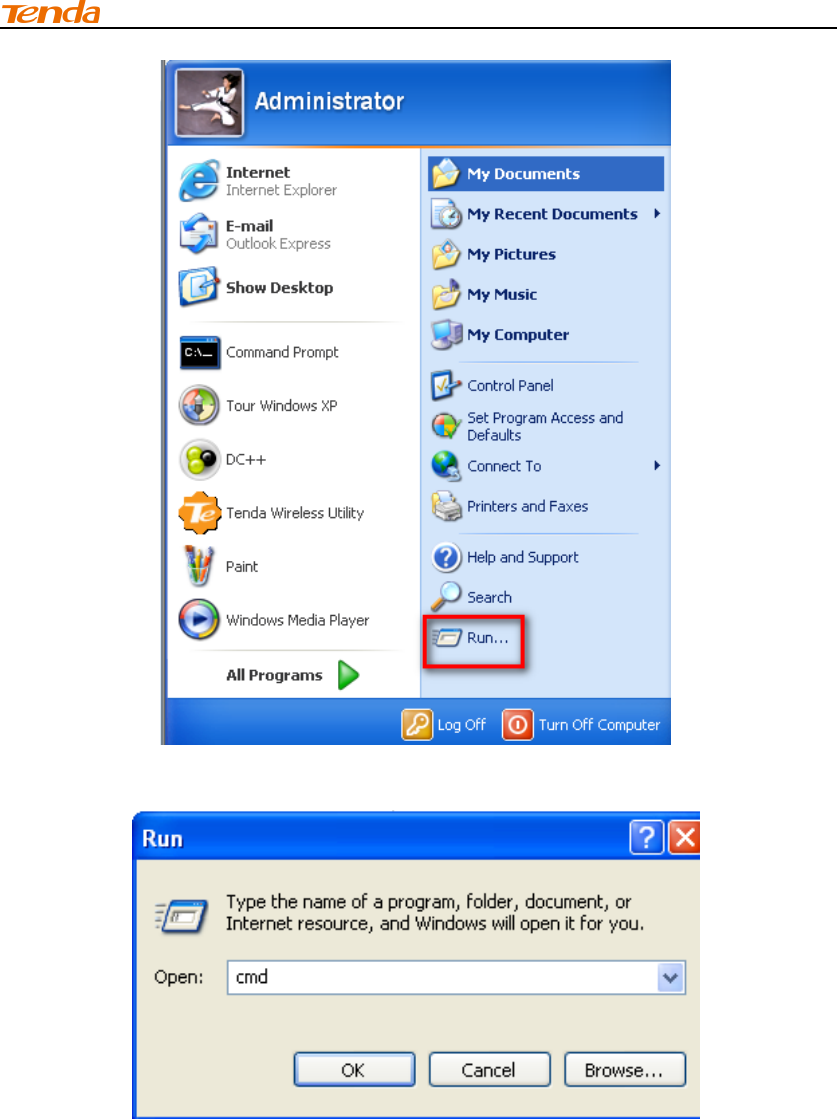
1. Click Start>Run;
Chapter 2 Internet Connection Setup
12
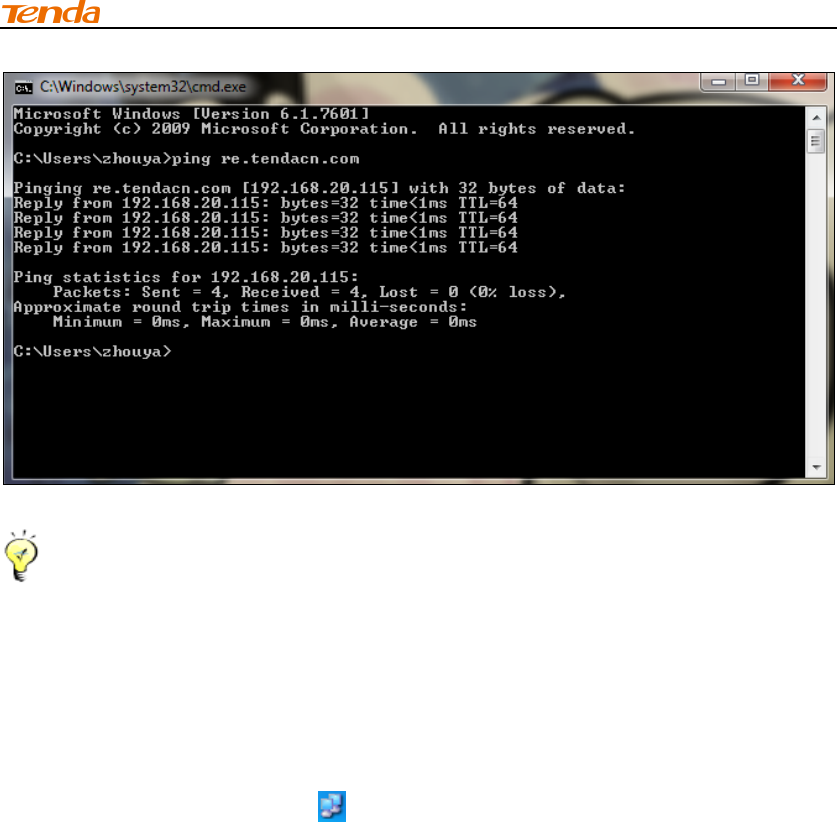
2. Enter cmd and click OK;
3. Enter "ping re.tendacn.com" and press Enter. If you see a similar screen,
the bridge is established successfully.
Chapter 2 Internet Connection Setup
13
Tip --------------------------------------------------------------------------------------
If ping failed, repair the IP address on your PC to ensure the gateway is
assigned from the remote router.
-----------------------------------------------------------------------------------------------
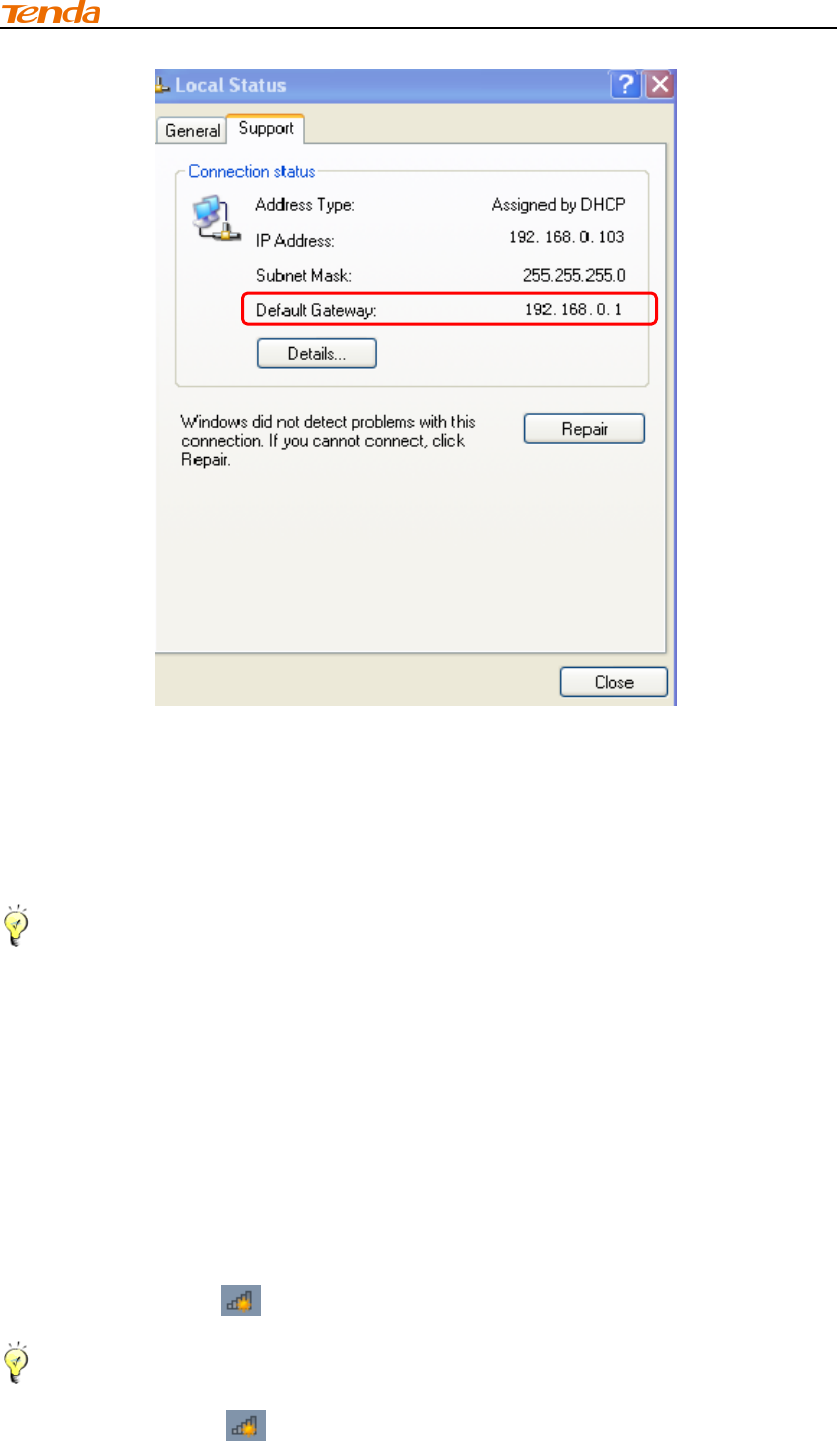
AP Mode
Check whether the gateway of your PC is assigned from the remote router
(take Windows XP OS for example).
1. Double click on the icon at the right corner of your desktop;
2. In the appearing dialogue box click Support to check the connection
status. If the default gateway is the LAN IP address of the remote router,
you can access to the Internet; if not, click Repair.
Chapter 2 Internet Connection Setup
14
6 Join Your Wireless Connection
Having finished above settings, you can search for the device's default
wireless network (SSID) from your wireless devices (notebook, iPad, iPhone,
etc) and enter a security key to connect to it wirelessly.
Tip --------------------------------------------------------------------------------------
1. The range extender 's SSID is Tenda_XXXXXX by default. You can find it
on the label on the bottom of the range extender.
2. Also, you can find the MAC address on label on the bottom of the range
extender.
3. To join your wireless network, the PC you use must have an installed
wireless network adapter. If not, install one.
-----------------------------------------------------------------------------------------------
Win7 OS
1. Click on the icon at the bottom of the right corner on your desktop;
Tip -------------------------------------------------------------------------------------
If you cannot find the icon, try disabling the wired network adapter or unplug the
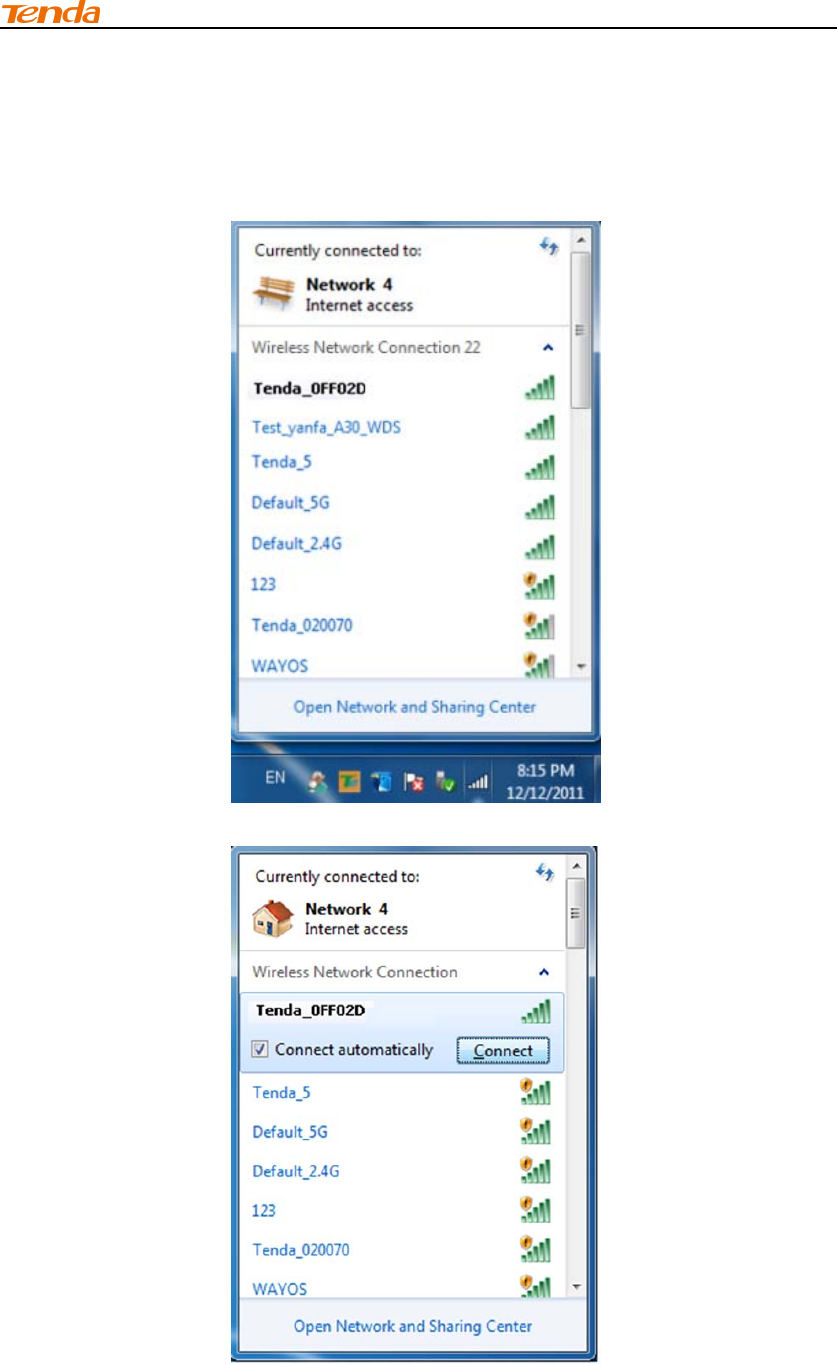
Chapter 2 Internet Connection Setup
15
Ethernet cable from the wired network adapter of your PC and refresh your desktop. If
the problem remains unsolved, click Start>Control Panel>Network and Internet>Network
and Sharing Center, right click Wireless Network Connection and select Connect/Disconnect.
Steps for follow-up are similar to the following.
-----------------------------------------------------------------------------------------------
2. Select the wireless network you wish to connect and click Connect.
Chapter 2 Internet Connection Setup
16
3. Enter the security key and click OK.
4. When you see Connected displayed next to the wireless network you
selected, you have connected to the wireless network successfully.
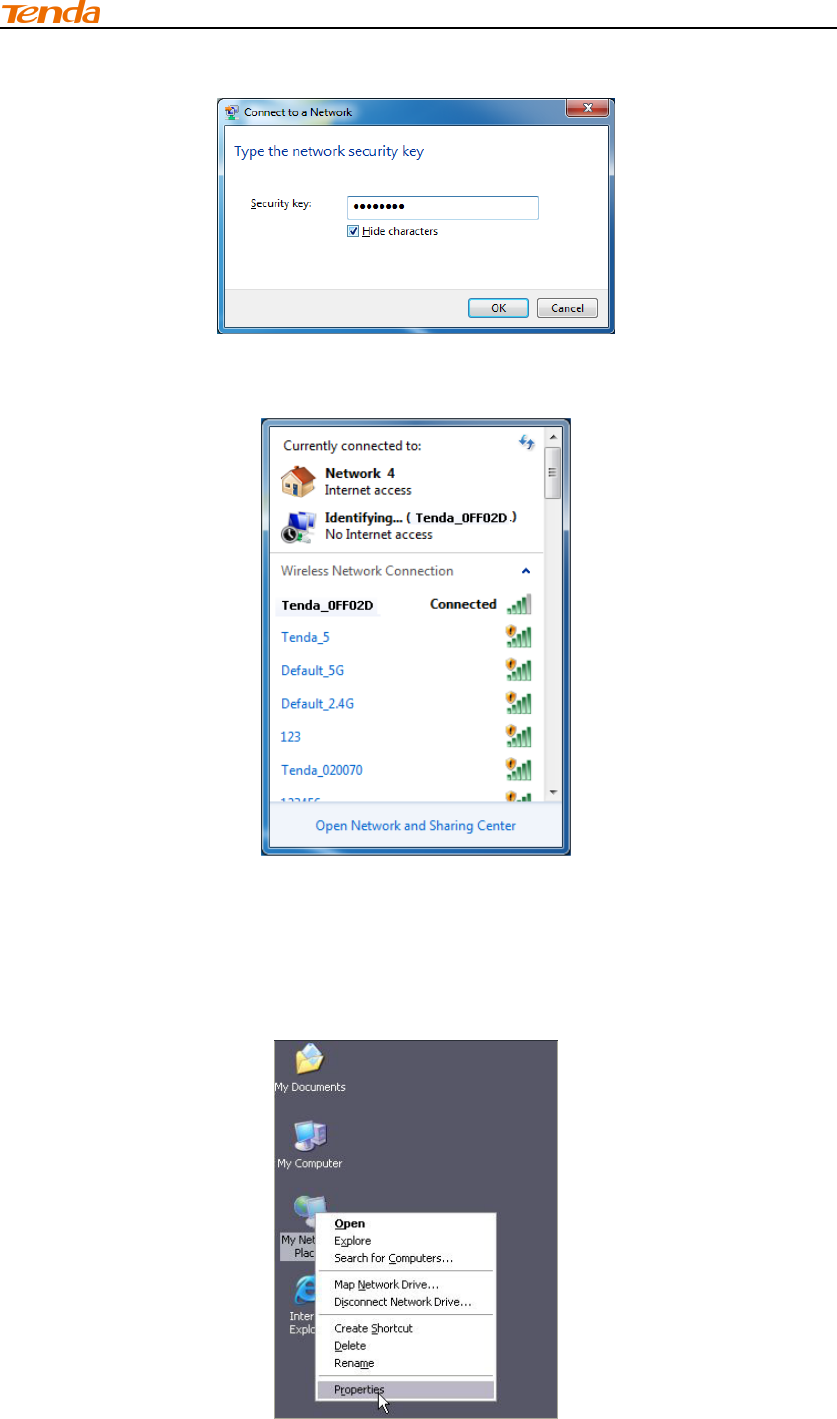
Windows XP OS
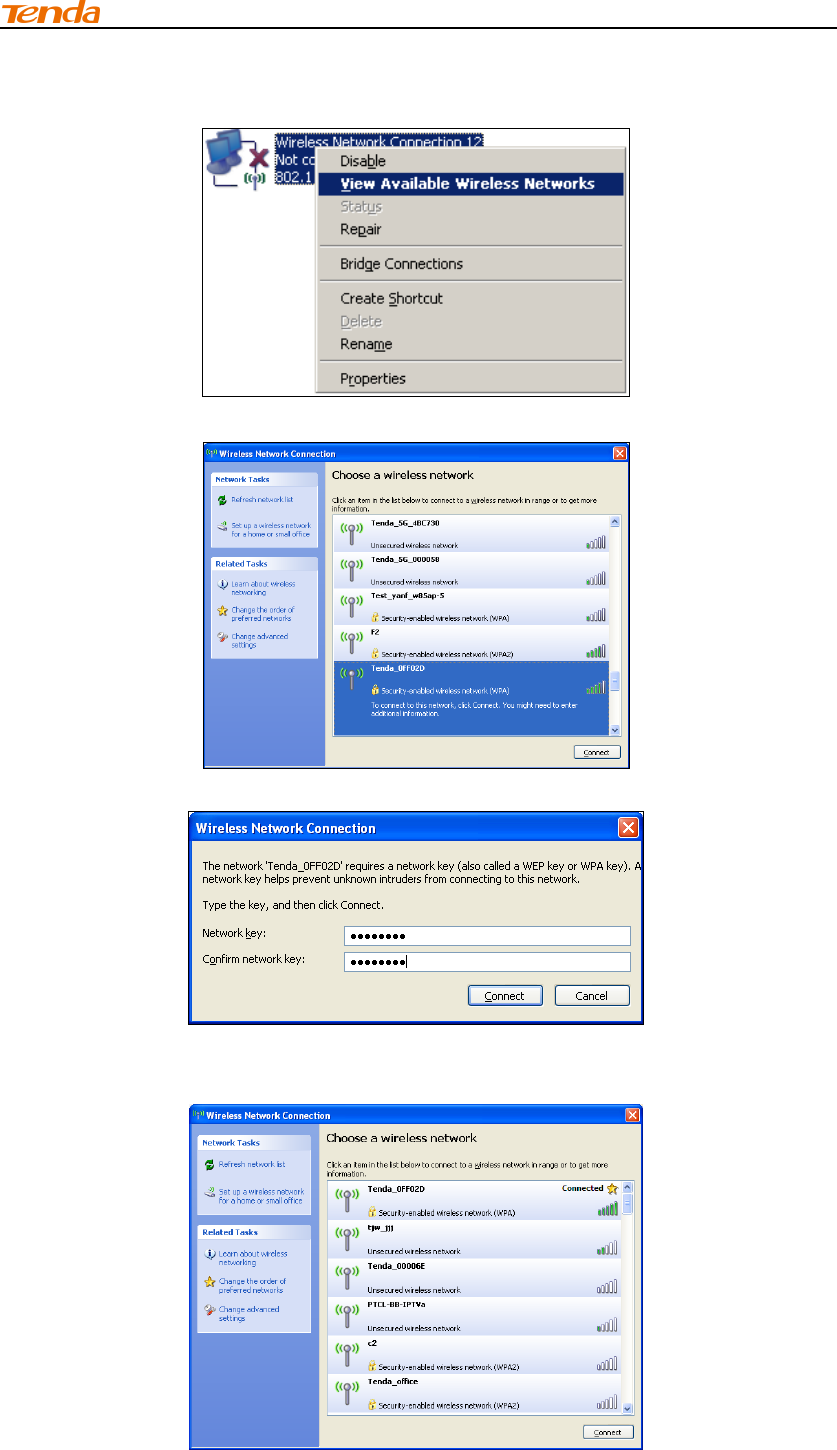
1. Right click My Network Places from your PC's desktop and select
Properties.
Chapter 2 Internet Connection Setup
17
2. Right click Wireless Network Connection and select View Available
Wireless Networks.
3. Double click the wireless network you wish to connect.
4. Enter the security key and click Connect.
5. When you see Connected displayed next to the wireless network you
selected, you have connected to the wireless network successfully.
Chapter 3 Advanced Settings
18
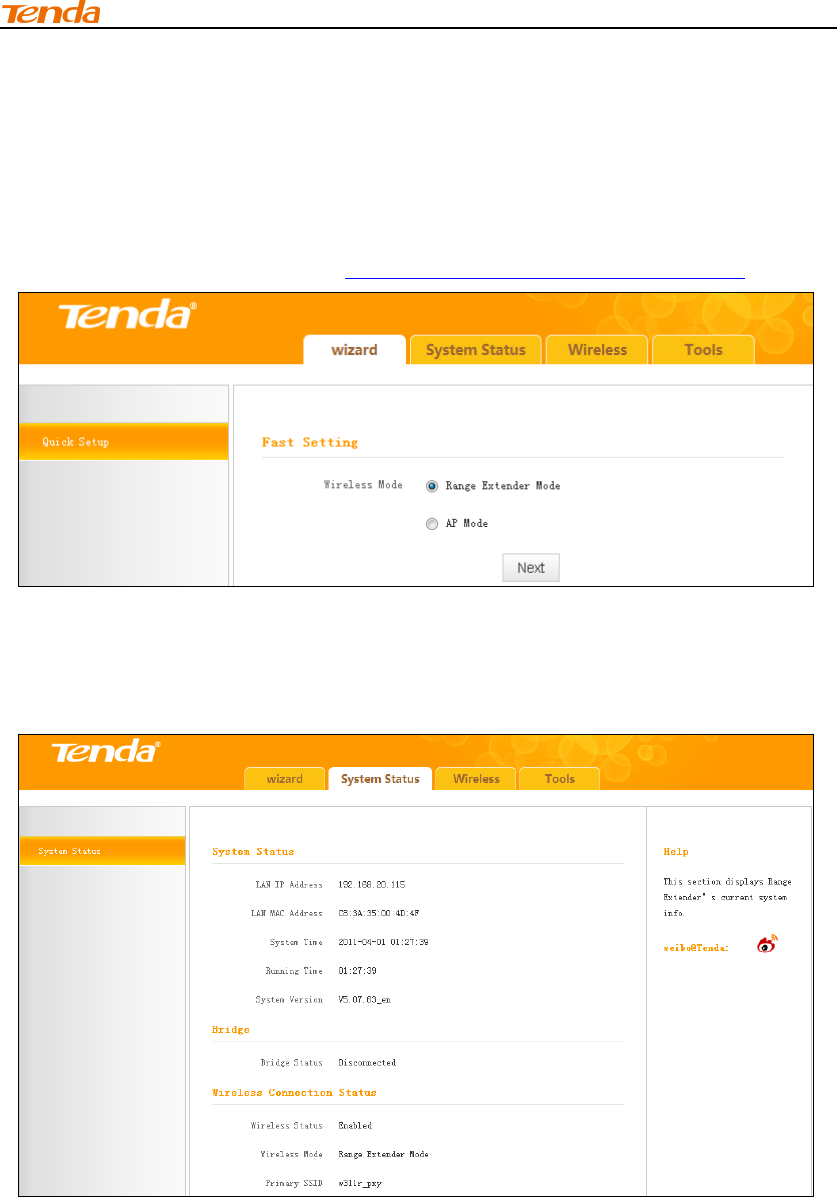
Chapter 3 Advanced Settings
1 Wizard
Here you can configure the device’s working mode. For specific
configurations, please refer to Chapter 2 Internet Connection Setup .
2 System Status
This section displays the device’s current system info.
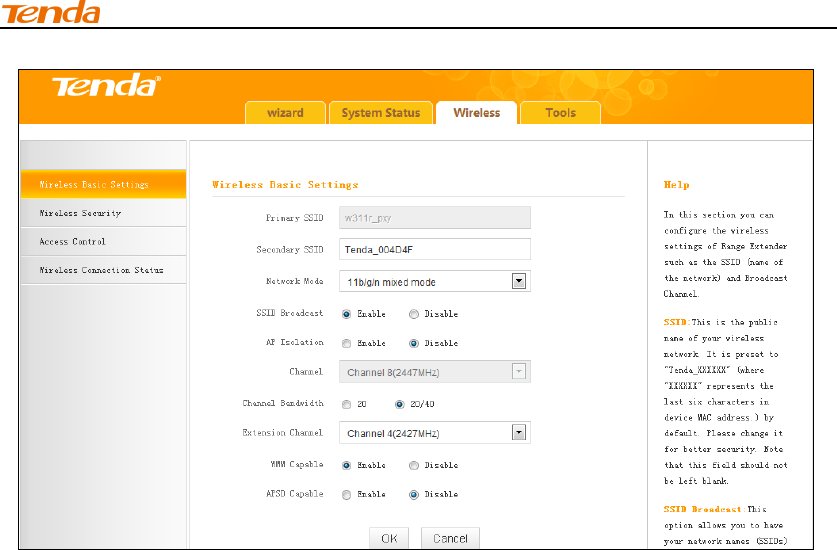
3 Wireless
3.1 Wireless Basic Settings
This section allows you to manage your wireless network.
Chapter 3 Advanced Settings
19
1. SSID: This is the public name of your wireless network. It is preset to
"Tenda_XXXXXX" (where "XXXXXX" represents the last six characters in
device MAC address.) by default. Please change it for better security.
Note that this field should not be left blank.
2. Network Mode: Select a correct mode according to your wireless clients.
11b mode: Select it if you have only 11b wireless devices in your
wireless network. Up to 11Mbps wireless rate is supported on this mode.
11g mode: Select it if you have only 11g wireless devices in your
wireless network. Up to 54Mbps wireless rate is supported on this mode.
11b/g mixed mode: Select it if you have 11b and 11g wireless devices in
your wireless network. Up to 54Mbps wireless wireless rate is supported
on this mode.
11b/g/n mixed mode: Select it if you have 11b, 11g and 11n wireless
devices in your wireless network. In this mode wireless connection rate
is negotiated. Up to 300Mbps wireless rate is supported on this mode.
3. SSID Broadcast: Select Enable/Disable to make your wireless network
visible/ invisible to any wireless clients within coverage when they
perform a scan to available networks. When disabled, wireless clients
will have to first know this SSID and manually enter it on their devices if
they want to connect to the SSID.
4. AP Isolation: When it’s enabled, clients connected to the same SSID will
be isolated.
5. Channel: For optimal wireless performance, you may select the least
used channel. It is advisable that you select an unused channel from the
drop down list, or “Auto” to let the range extender detect and select the
best possible channel for your wireless network to operate on.
6. Channel Bandwidth: Select a proper channel bandwidth to enhance
wireless performance. Available only in 11b/g/n mixed mode.
Chapter 3 Advanced Settings
20
7. Extension Channel:Available only in 11b/g/n mixed mode.
8. WMM-Capable: WMM is QoS for your wireless network. Enabling this
option may better stream wireless multimedia data (such as video or
audio).
9. ASPD Capable:Select to enable/disable the auto power saving mode.
We recommend you disable it.
Tip --------------------------------------------------------------------------------------
1.The default primary SSID is Tenda_XXXXXX. XXXXXX is the last 6
characters of the MAC address, which you can get from the label on the
device.
2.If you are not familiar with these configurations, it is advisable that only the
primary SSID and channel should be modified.
-----------------------------------------------------------------------------------------------
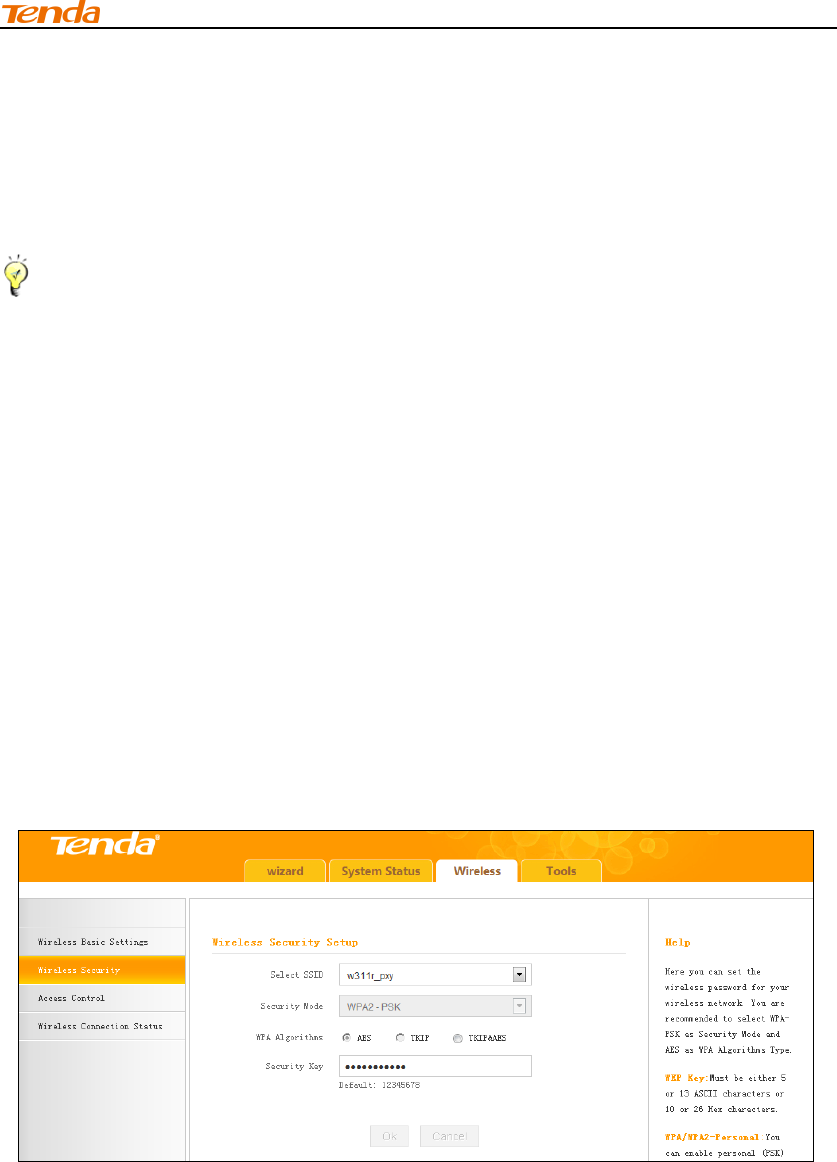
3.2 Wireless Security
This section allows you to encrypt your wireless network to block
unauthorized accesses and malicious packet sniffing.
To secure your wireless network:
1. Select the SSID you wish to secure;
2. Configure its security mode, WPA Algorithms and security key;
3. Click OK to save your settings.
1. Open:Wireless speed can reach up to 54Mbps if Open is selected.
2. Shared: Wireless speed can reach up to 54Mbps if Shared is selected.
3. Default Key: Select a key to be effective for the current WEP encryption.
For example, if you select Key 1, wireless clients must join your wireless
network using this Key 1.
4. WPA-PSK:WPA personal, supports AES, TKIP and TKIP+AES cipher
types. Note: Usually TKIP&AES is not optional.
5. WPA2-PSK:WPA2 personal, support AES, TKIP and TKIP+AES cipher
types.
Chapter 3 Advanced Settings
21
6. Mixed WPA/WPA2-PSK: If selected, both WPA-PSK and WPA2-PSK
secured wireless clients can join your wireless network.
7. AES: If selected, wireless speed can reach up to300Mbps.
8. TKIP: If selected, wireless speed can reach up to 54Mbps.
9. TKIP+AES: If selected, both AES and TKIP secured wireless clients can
join your wireless network.
10. Security Key: Must be between 8~63 case-sensitive ASCII characters or
8~64 Hex characters.
Tip --------------------------------------------------------------------------------------
For better security, compatibility and wireless speed, we recommend the
WPA-PSK and AES.
-----------------------------------------------------------------------------------------------
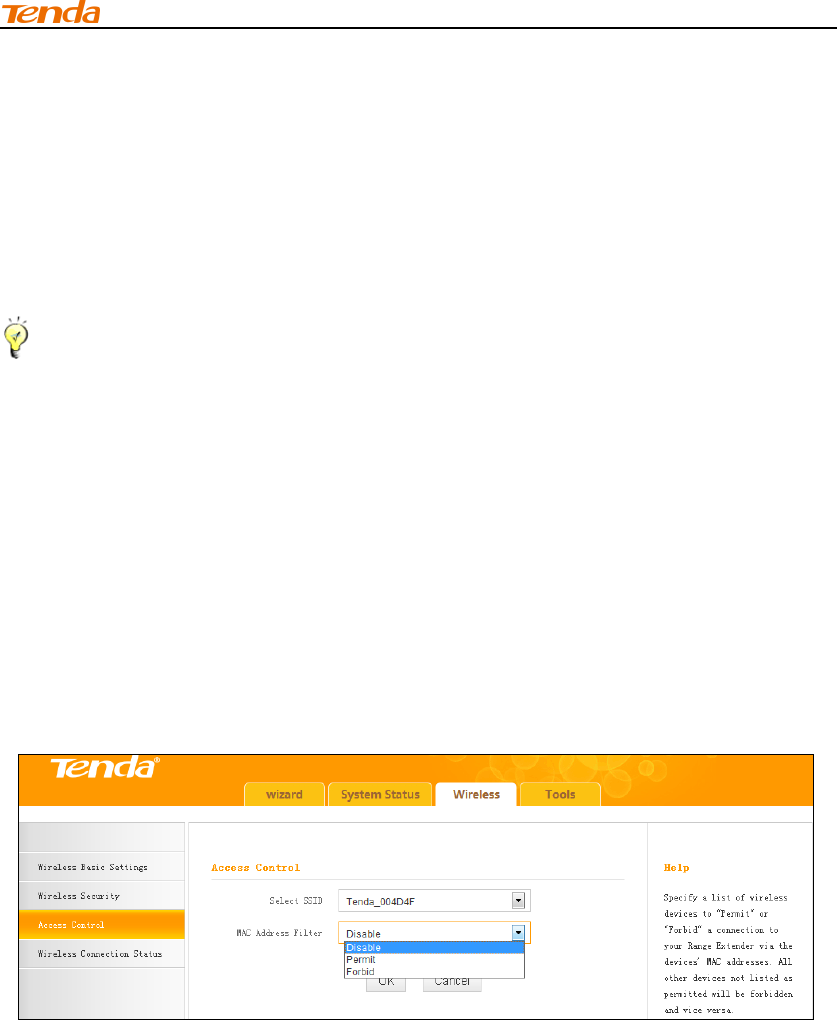
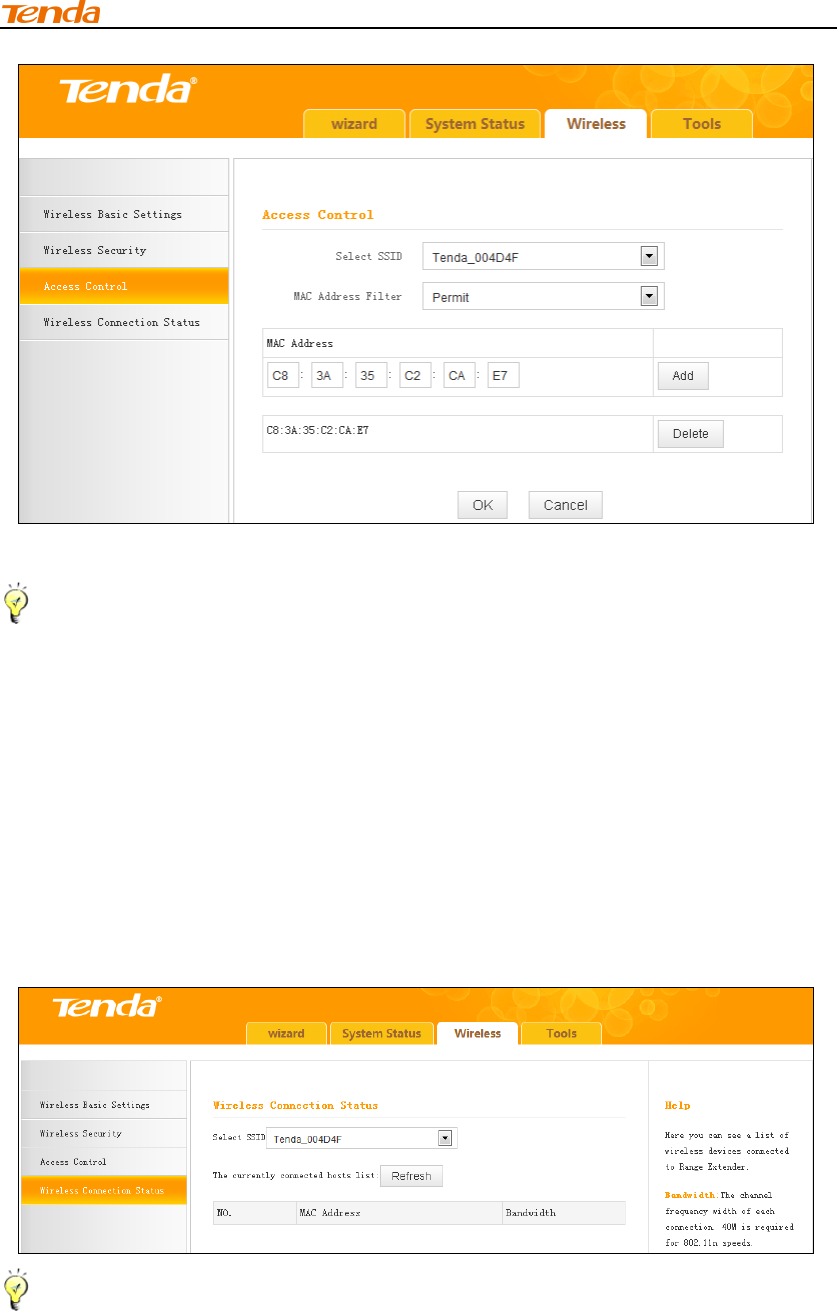
3.3 Access Control
Specify a list of devices to "Permit" or "Forbid" a connection to your wireless
network via the devices’ MAC Addresses. Click Wireless -> Access Control
to enter the configuration screen.
There are three options available: Disable, Forbid and Permit.
Wireless Access Control Application Example:
To only allow your own notebook at the MAC address of C8:3A:35:C2:CA:E7
to join your wireless network.
Configuration procedures:
1. Select the SSID you wish to configure access control;
2. Select Permit;
3. Enter the MAC address and click Save.
4. Click Add;
Chapter 3 Advanced Settings
22
5. Click OK to save your settings;
Tip -------------------------------------------------------------------------------------
1. Up to 16 wireless MAC addresses can be configured.
2. If you don't want to configure the complex wireless security settings and
want to disallow others to join your wireless network, you can configure a
wireless access control rule to allow only your own wireless device.
-----------------------------------------------------------------------------------------------
3.4 Wireless Connection Status
Click Wireless > Wireless Connection Status. Here you can see a list of
wireless devices connected to the range extender.
Tip -------------------------------------------------------------------------------------
You can know whether there are unauthorized accesses to your wireless
network by viewing the wireless client list.
-----------------------------------------------------------------------------------------------
Chapter 3 Advanced Settings
23
4 Tools
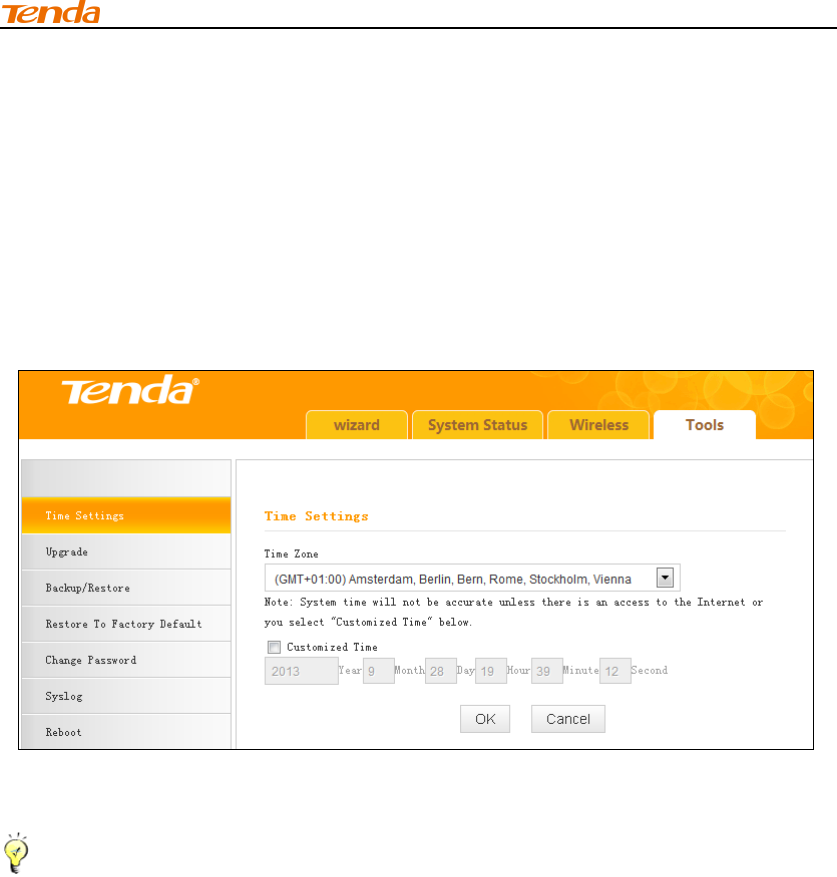
4.1 Time Settings
This section lets you configure, update, and maintain the correct time on the
internal system clock. You can either select to set the time and date
manually or automatically obtain the GMT time from Internet. Note that the
GMT time is obtained only when the range extender is connected to the
Internet.
1. Time Zone: Select your current time zone.
2. Customized Time: Check it to customize time.
Tip--------------------------------------------------------------------------------------
When the device is disconnected from power supply, time settings on this
page will be lost. However, it will be updated automatically when the device
reconnects to Internet.
----------------------------------------------------------------------------------------------
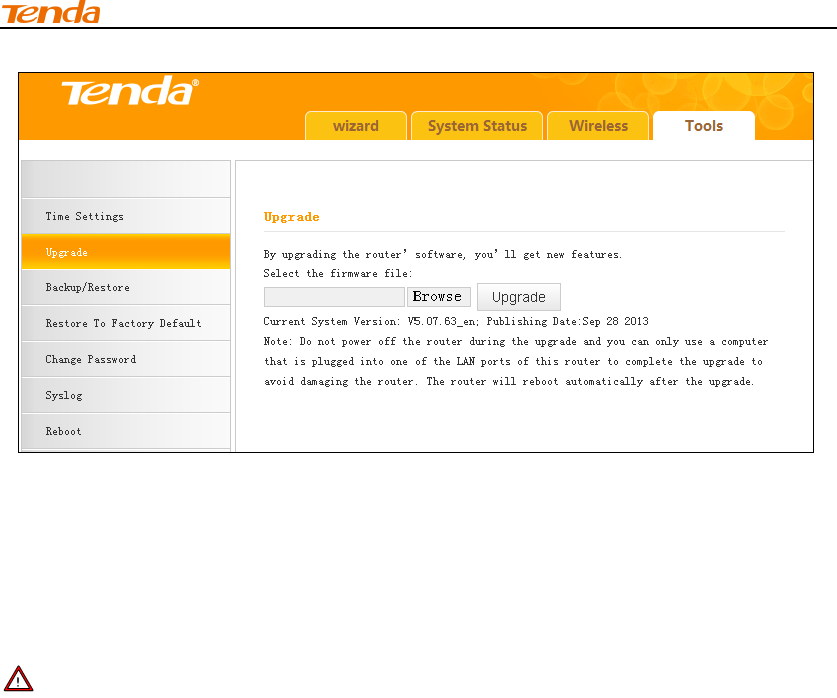
4.2 Upgrade
Upgrade is released periodically to improve the functionality of your device,
and also to add any new features. If you run into a problem with a specific
feature of the range extender you could log on to our website
(www.tendacn.com) to download the latest firmware to update your device.
Chapter 3 Advanced Settings
24
To upgrade firmware, do the following:
1. Click Browse to locate and select the firmware file and Upgrade to update
your range extender.
2. Device restarts automatically when the upgrade process is completed.
Note-------------------------------------------------------------------------------------
1. Please verify the firmware is correct.
2. DO NOT power off the range extender when the upgrade is in process
otherwise the range extender may be permanently damaged. When the
upgrade is completed, the range extender will automatically reboot. The
firmware upgrade may take a few minutes to complete so please wait for
the process to finish. Note that you need to update the device's firmware
via a wired connection.
-----------------------------------------------------------------------------------------------
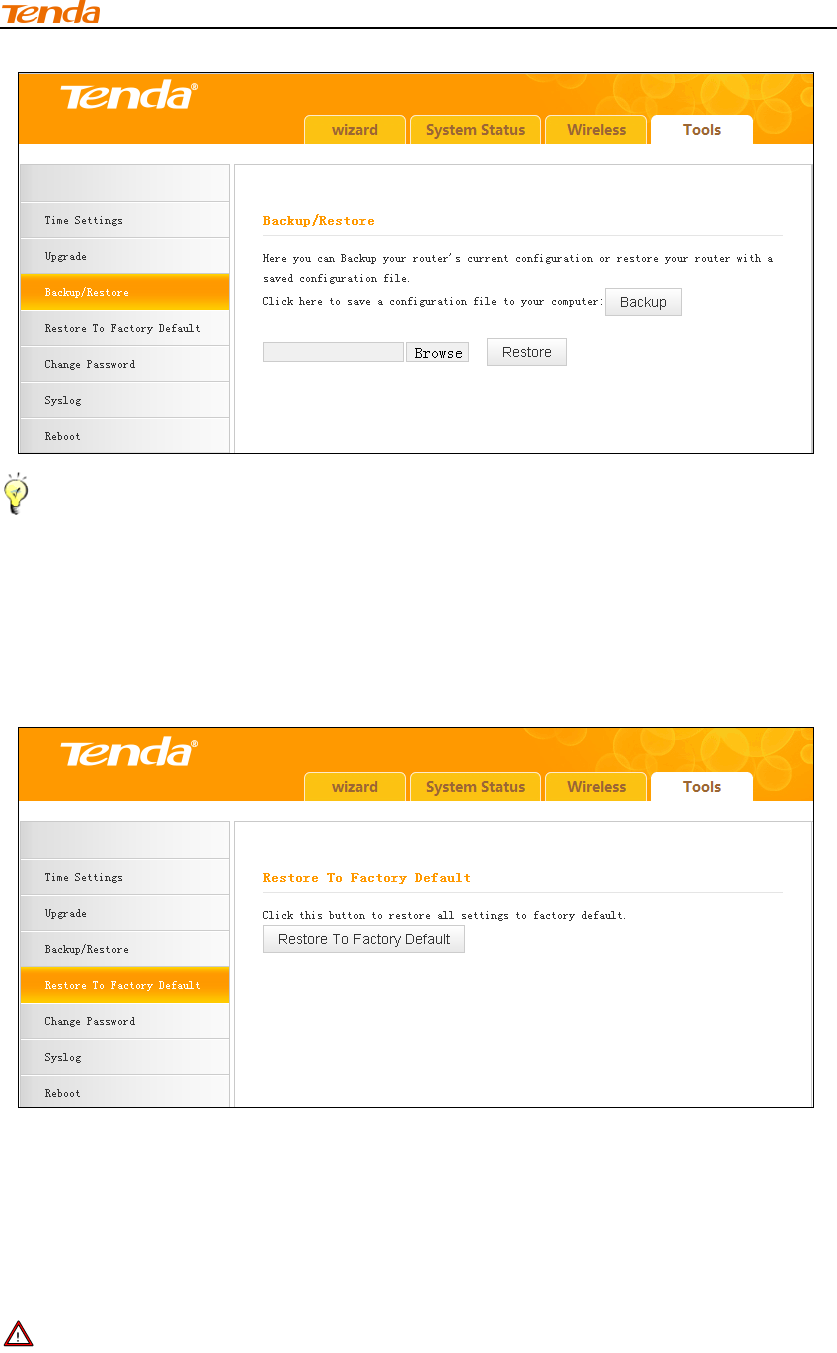
4.3 Backup/Restore
This feature allows you to backup and restore current settings. Once you
have configured the range extender, you can save these settings to a
configuration file on your local hard drive. The configuration file can later be
imported to your range extender in case the range extender is reset to
factory default settings.
Chapter 3 Advanced Settings
25
Tip----------------------------------------------------------------------------------------
The default configuration file name is “RouterCfm.cfg”. You can change it
as you like. For safety purpose, do not change the file extension.
-----------------------------------------------------------------------------------------------
4.4 Restore to Factory Default
Click the Restore To Factory Default button to reset the range
extender to its factory default settings.
1. Default IP Address: 192.168.0.254
2. Default Subnet Mask: 255.255.255.0
3. Default Password: admin
Note-------------------------------------------------------------------------------------
1. Once restored to factory default, you need to reconfigure the device for
Internet access as well as many other settings including wireless settings.
Chapter 3 Advanced Settings
26
2. It is not advisable to restore the device to factory default settings unless
our technical supporters recommend you do so.
-----------------------------------------------------------------------------------------------
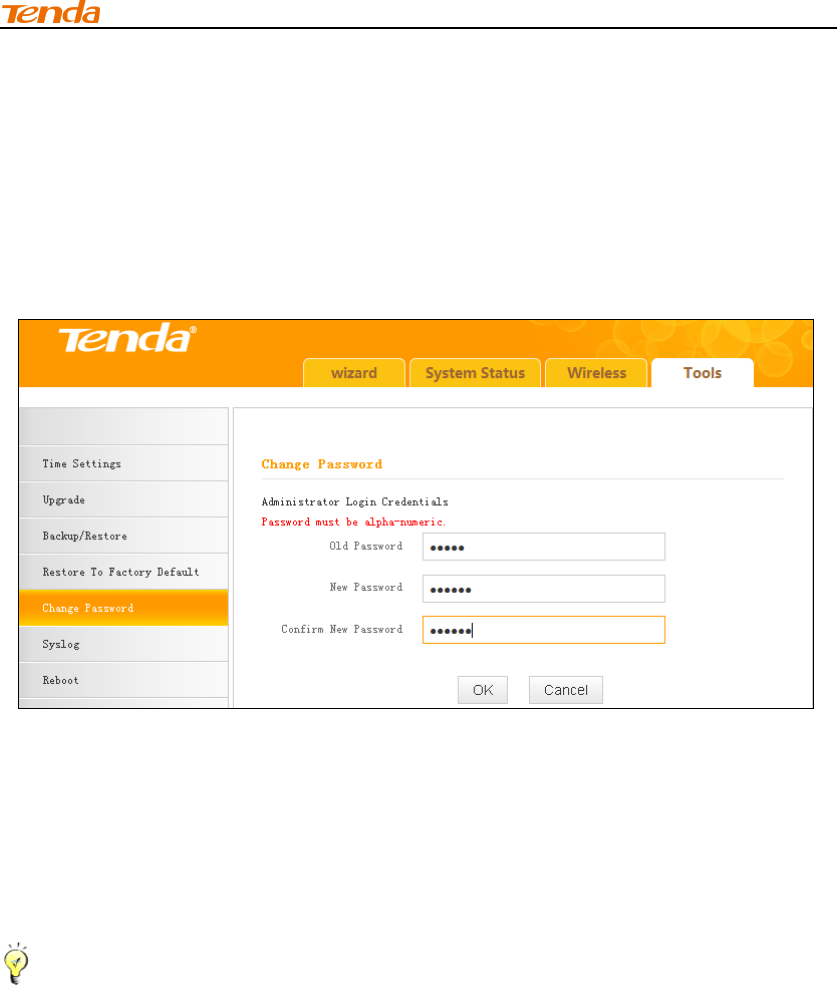
4.5 Change Password
This section allows you to change login password and user name for
accessing the device’s Web-based management interface.
1. Old Password: Enter the old password. If you use the device for the first
time, the password is admin by default. (Note: Password cannot be
retrieved once forgot) If you already changed the password and
unfortunately forget, restore the device to factory defaults.
2. New Password: Input a new password. Password must include 1 ~ 12
characters without any space.
3. Confirm New Password: Re-enter the new password for confirmation.
Tip -------------------------------------------------------------------------------------
1. For security purpose, it is highly recommended that you change the
default login password as part of the initial configuration of your range
extender.
2. Only numbers and alphabets can be included in the password (1~12
characters). If no character entered, it has no password.
----------------------------------------------------------------------------------------------
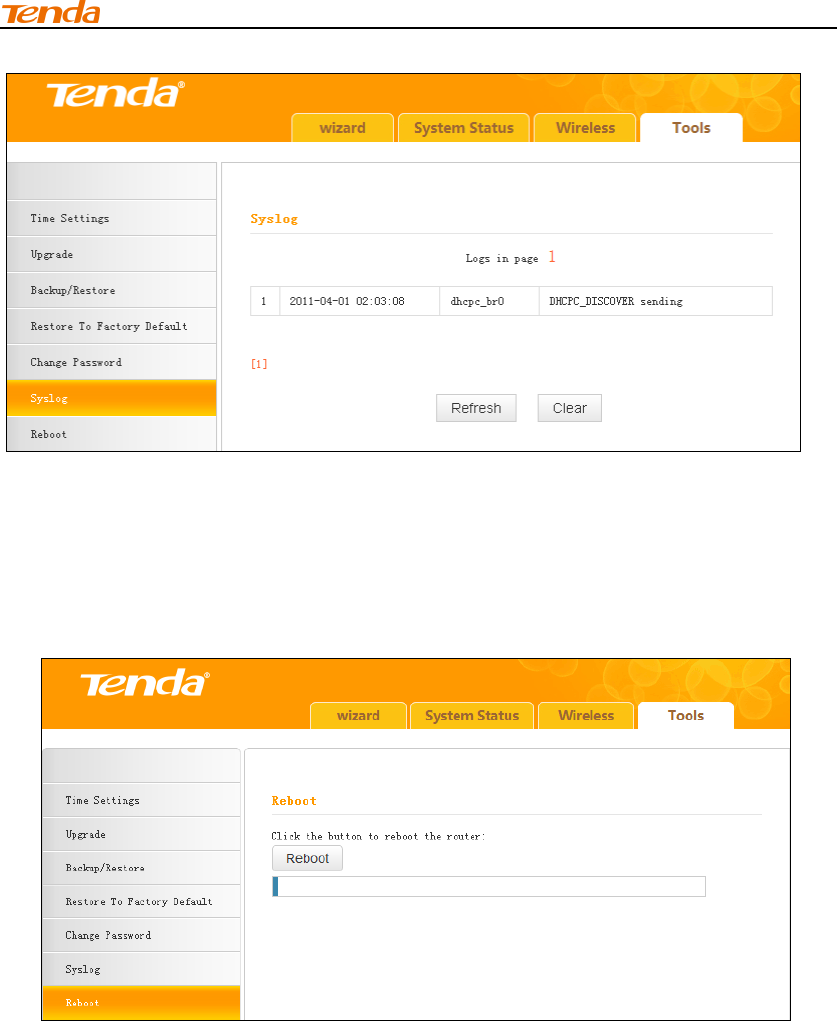
4.6 Syslog
Here you can view the history of the device’s actions. After 150 entries,
the earliest logs will be cleared automatically.
Chapter 3 Advanced Settings
27
4.7 Reboot
This section allows you to reboot the device. Rebooting the device will
activate any modified settings on this device. While rebooting, all
connections will be lost and reconnected automatically later.
Chapter 4 Appendix
28
Chapter 4 Appendix
Appendix 1 Configure IP
In this section we explain how to configure your PC’s TCP/IP settings.
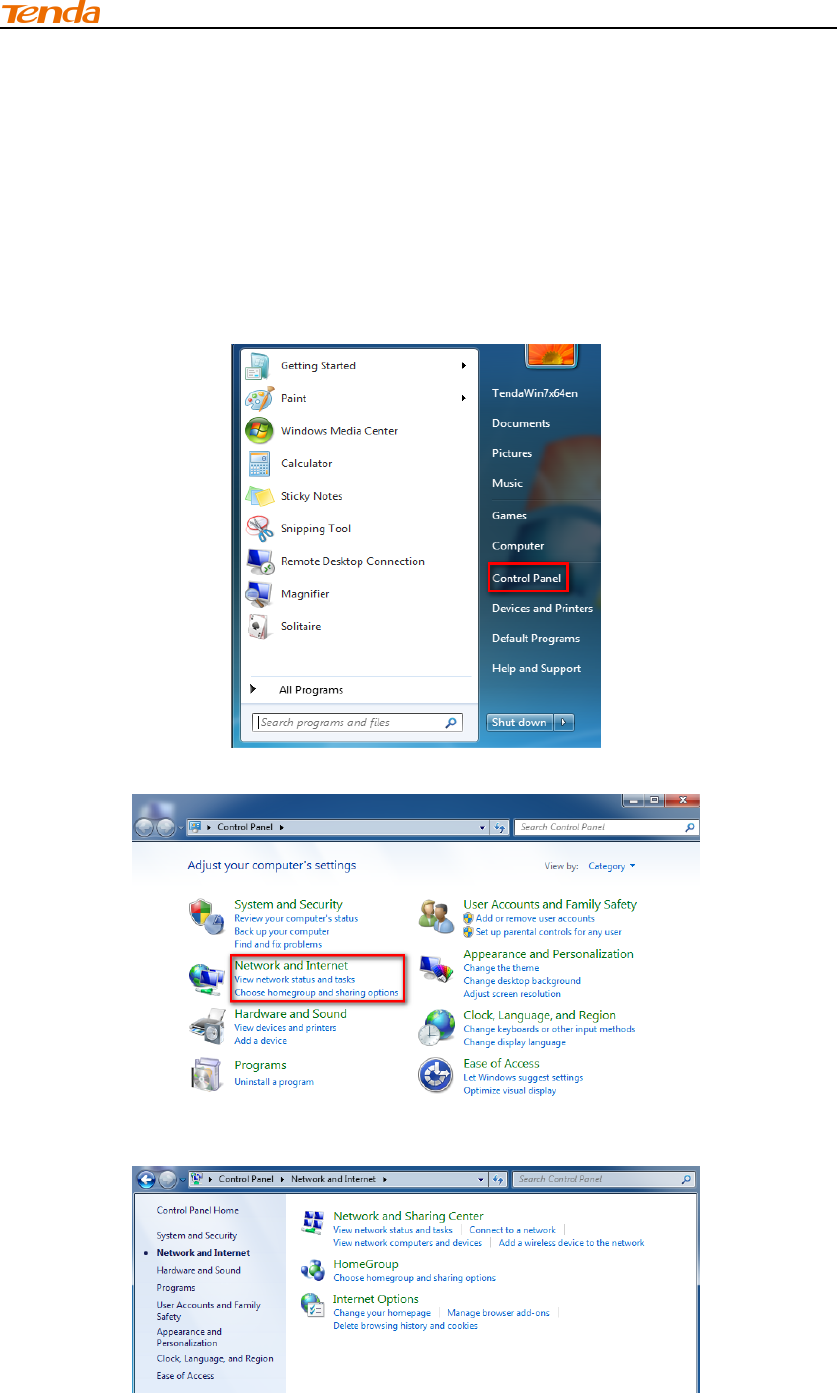
Win7 OS
1. Click Start>Control Panel;
2. Enter Control Panel and click Network and Internet;
3. Click Network and Sharing Center;
4. Click Change adapter settings;
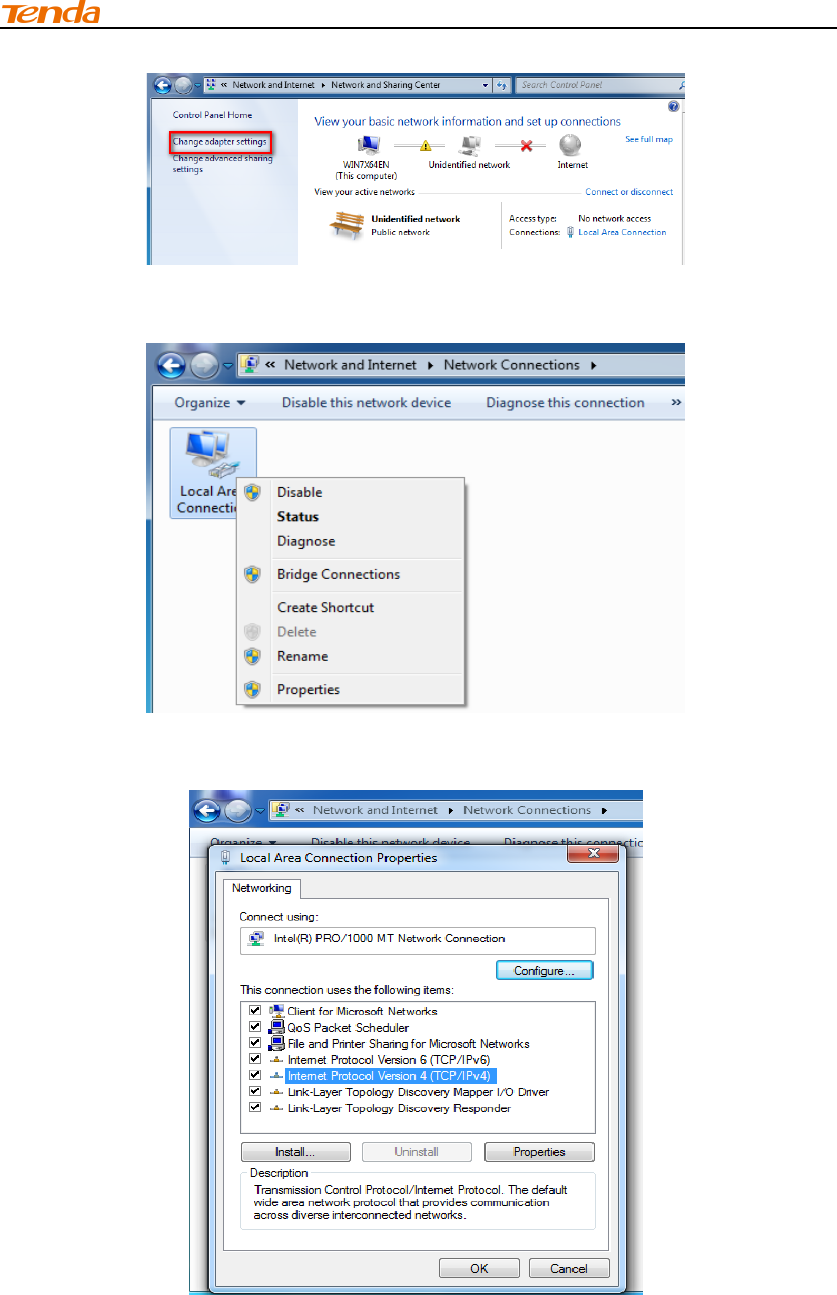
Chapter 4 Appendix
29
5. Right click Local Area Connection and select Properties;
6. Select Internet Protocol Version 4(TCP/IPv4) and click Properties;
7. Select Obtain an IP address automatically and click OK to save the
Chapter 4 Appendix
30
configurations.
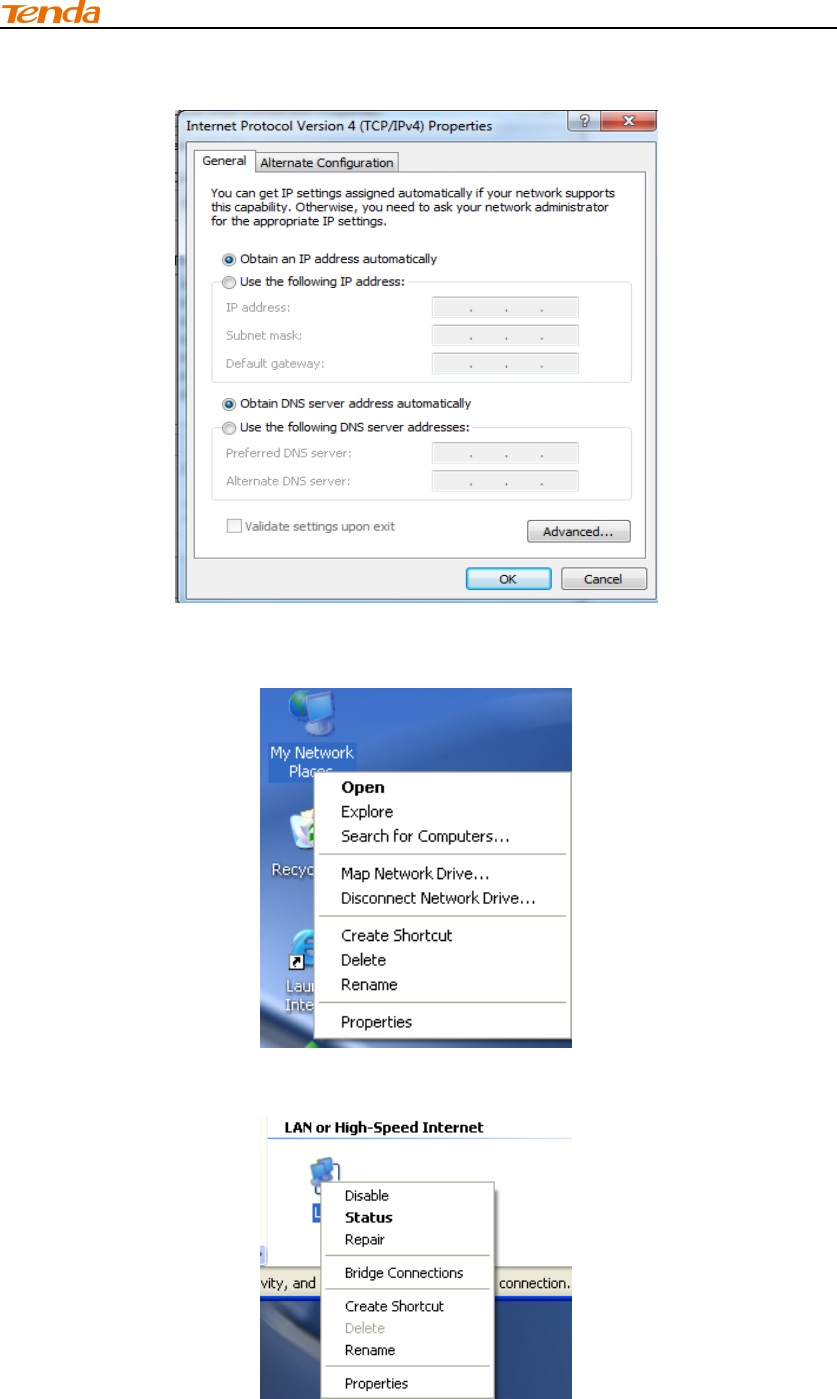
Windows XP OS
1. Right click My Network Places and select Properties;
2. Right click Local and select Properties;
Chapter 4 Appendix
31
3. Select Internet Protocol (TCP/IP) and click Properties;
4. Select Obtain an IP address automatically and click OK to save the
settings.

Chapter 4 Appendix
32
Appendix 2 Default Settings
Parameters Default Settings
Web Login Address http://re.tendacn.com
Wireless
Settings
Wireless Setup Enabled
Primary SSID
Tenda_XXXXXX (XXXXXX is the last 6
characters of the MAC address)
Working Mode 11/b/g/n Mixed
SSID Broadcast Enabled
AP Isolation Disabled
Channel Auto
Channel
Bandwidth 20/40
Extension
Channel Auto
WMM Capable Enabled
APSD Capable Disabled
Security Mode Disabled
Tools Time (GMT+08:00)
Beijing, Chongqing, Hong
Kong, Urumqi
Password admin

Chapter 4 Appendix
33
Appendix 3 FAQs
This section provides solutions to problems that may occur during installation and
operation of the device. Read the following if you are running into problems. If your
problem is not covered here, please feel free to go to www.tendacn.com to find a
solution or email your problems to: support@tenda.com.cn or support02@tenda.com.cn.
We will be more than happy to help you out as soon as possible.
1. Q: I entered the device’s LAN IP address in the web browser but
cannot access the utility. What should I do?
a. Check whether device is functioning correctly. The Power/SYS LED
should blink after device is powered up. If it does not light up, then some
internal faults may have occurred.
b. Verify physical connectivity by checking whether a corresponding port’s
link LED lights up. If not, try a different cable.
c. Verify your PC obtains IP address automatically or configure the IP
manually by keeping the IP in the same network segment with the LAN IP
(192.168.0.1~192.168.0.253).
d. Press the RESET button with something pointed for about 10 seconds to
restore the device to factory default settings and re-login.
2. Q: What should I do if I forget the login password to my device?
Reset your device by pressing the Reset button for over 10 seconds.
3. Q: My computer shows an IP address conflict error after having
connected to the device. What should I do?
a. Check if there are other DHCP servers present in your LAN. If there are
other DHCP servers except your range extender, disable them
immediately.
b. The default IP address of the device is http://re.tendacn.com; make sure this
address is not used by another PC or device. In case that two computers
or devices share the same IP addresses, change either to a different
address.
Chapter 4 Appendix
34
Appendix 4 Remove Wireless Network from Your
PC
If you change wireless settings on your wireless device, you must remove
them accordingly your PC; otherwise, you may not be able to wirelessly
connect to the device. Below describes how to do remove a wireless network
from your PC.
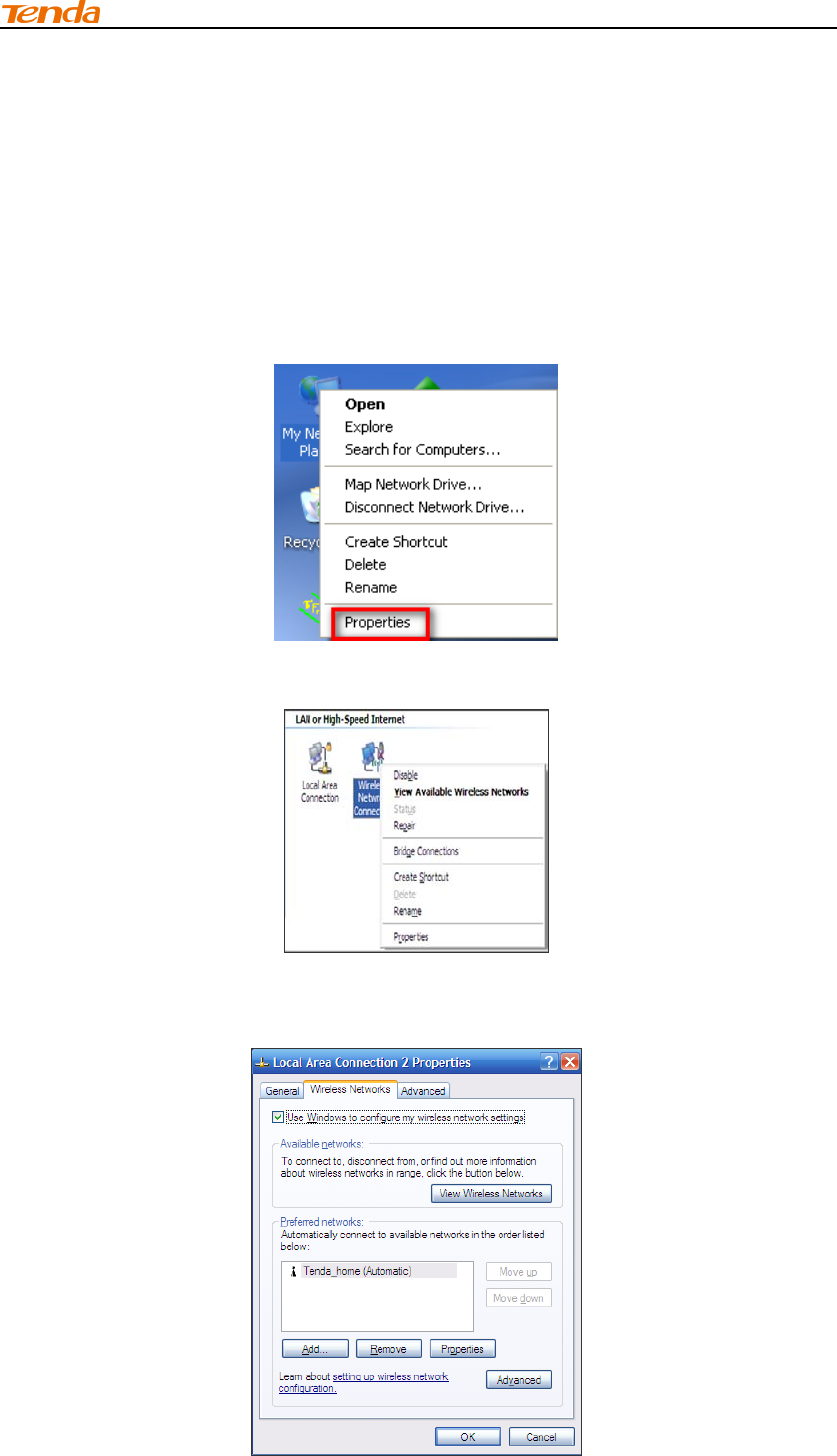
If you are using Windows XP, do as follows:
1.Right click My Network Places and select Properties.
2.Click Wireless Network Connection and then select Properties.
3.Click Wireless Networks, select the item under Preferred networks and
then click the Remove button.
Chapter 4 Appendix
35
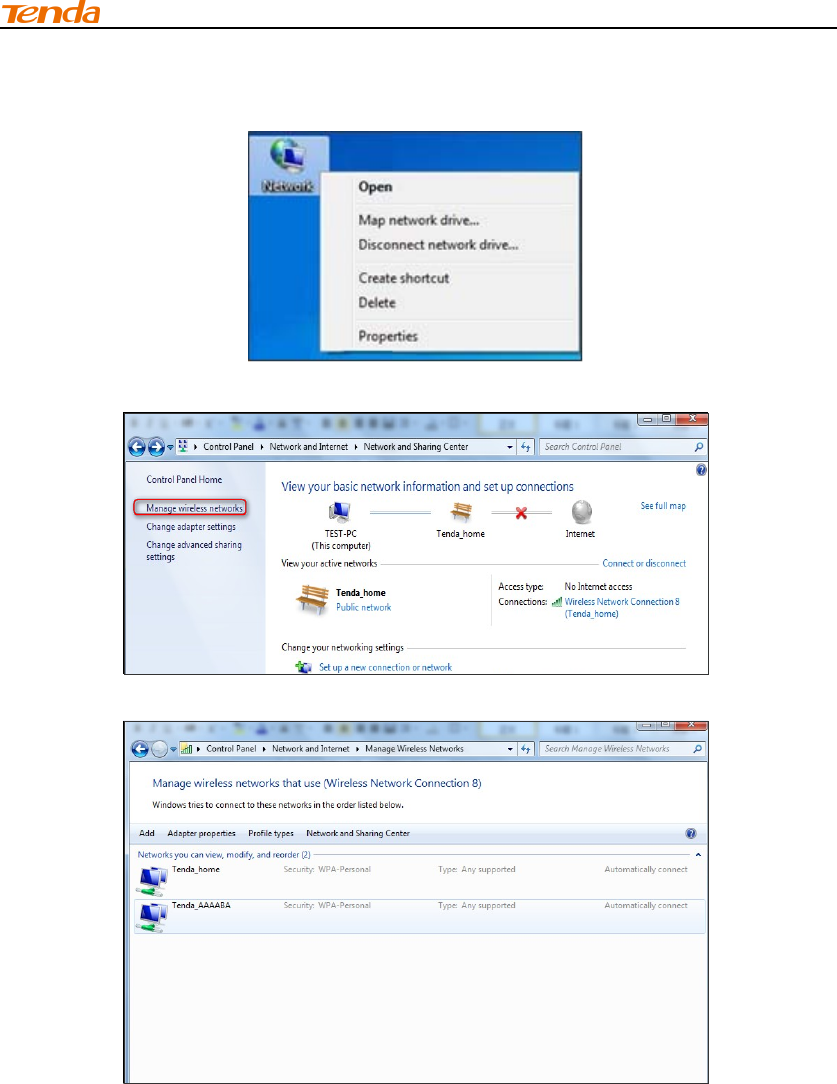
If you are using Windows 7, do as follows:
1.Click Network from your desktop and select Properties.
2.Select Manage Wireless Networks.
3. Click the wireless connection and select Remove network.

Chapter 4 Appendix
36
Appendix 5 Safety and Emission Statement
CE Mark Warning
This is a Class B product in a domestic environment, this product may cause
radio interference, in which case the user may be required to take adequate
measures. This device complies with EU 1999/5/EC.
NOTE: (1) The manufacturer is not responsible for any radio or TV
interference caused by unauthorized modifications to this equipment. (2) To
avoid unnecessary radiation interference, it is recommended to use a
shielded RJ45 cable.
FCC Statement
This device complies with Part 15 of the FCC Rules. Operation is subject to
the following two conditions: (1) This device may not cause harmful
interference, and (2) this device must accept any interference received,
including interference that may cause undesired operation.
This equipment has been tested and found to comply with the limits for a
Class B digital device, pursuant to Part 15 of the FCC Rules. These limits
are designed to provide reasonable protection against harmful interference
in a residential installation. This equipment generates, uses and can radiate
radio frequency energy and, if not installed and used in accordance with the
instructions, may cause harmful interference to radio communications.
However, there is no guarantee that interference will not occur in a particular
installation. If this equipment does cause harmful interference to radio or
television reception, which can be determined by turning the equipment off
and on, the user is encouraged to try to correct the interference by one of the
following measures:
-Reorient or relocate the receiving antenna.
-Increase the separation between the equipment and receiver.
-Connect the equipment into an outlet on a circuit different from that to
which the receiver is connected.
-Consult the dealer or an experienced radio/TV technician for help.
FCC Caution: Any changes or modifications not expressly approved by the
party responsible for compliance could void the user's authority to operate
this equipment.
This transmitter must not be co-located or operating in conjunction with any

Chapter 4 Appendix
37
other antenna or transmitter.
The manufacturer is not responsible for any radio or TV interference caused
by unauthorized modifications to this equipment.
Radiation Exposure Statement
This equipment complies with FCC radiation exposure limits set forth for an
uncontrolled environment. This equipment should be installed and operated
with minimum distance 20cm between the radiator & your body.
NOTE: (1) The manufacturer is not responsible for any radio or TV
interference caused by unauthorized modifications to this equipment. (2) To
avoid unnecessary radiation interference, it is recommended to use a
shielded RJ45 cable.