TENDA TECHNOLOGY A8 Wireless N150 Portable Router User Manual 1
SHENZHEN TENDA TECHNOLOGY CO., LTD. Wireless N150 Portable Router 1
Contents
- 1. User manual_1
- 2. User manual_2
User manual_1
Wireless N150/N300 Portable Router
I

Wireless N150/N300 Portable Router
II
Copyright Statement
is the registered trademark of Shenzhen Tenda Technology Co., Ltd. All the
products and product names mentioned herein are the trademarks or registered trademarks of
their respective holders. Copyright of the whole product as integration, including its accessories
and software, belongs to Shenzhen Tenda Technology Co., Ltd. No part of this publication can
be reproduced, transmitted, transcribed, stored in a retrieval system, or translated into any
language in any form or by any means without the prior written permission of Shenzhen Tenda
Technology Co., Ltd. If you would like to know more about our product information, please visit
our website at http://www.tendacn.com.
Disclaimer
Pictures, images and product specifications herein are for references only. To improve internal
design, operational function, and/or reliability, Tenda reserves the right to make changes to the
products described in this document without obligation to notify any person or organization of
such revisions or changes. Tenda does not assume any liability that may occur due to the use or
application of, the product or circuit layout(s) described herein. Every effort has been made in
the preparation of this document to ensure accuracy of the contents, but all statements,
information and recommendations in this document do not constitute the warranty of any kind,
express or implied.
Wireless N150/N300 Portable Router
III
Preface
Thank you for choosing Tenda! Please read this user guide before you start! This user guide
instructs you to install and configure your device.
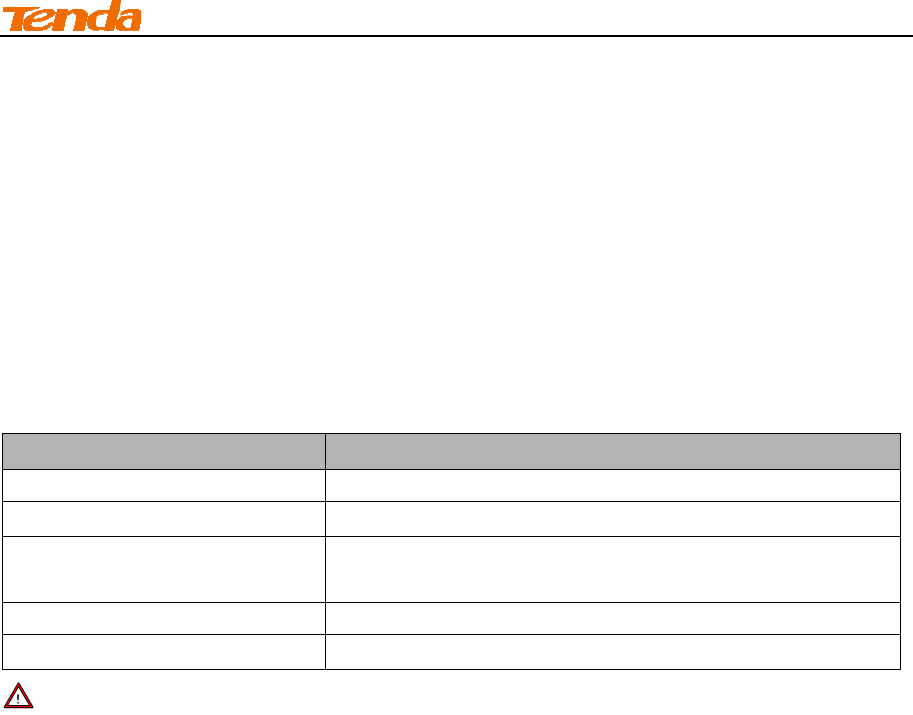
This user guide uses the following formats to highlight special
messages:
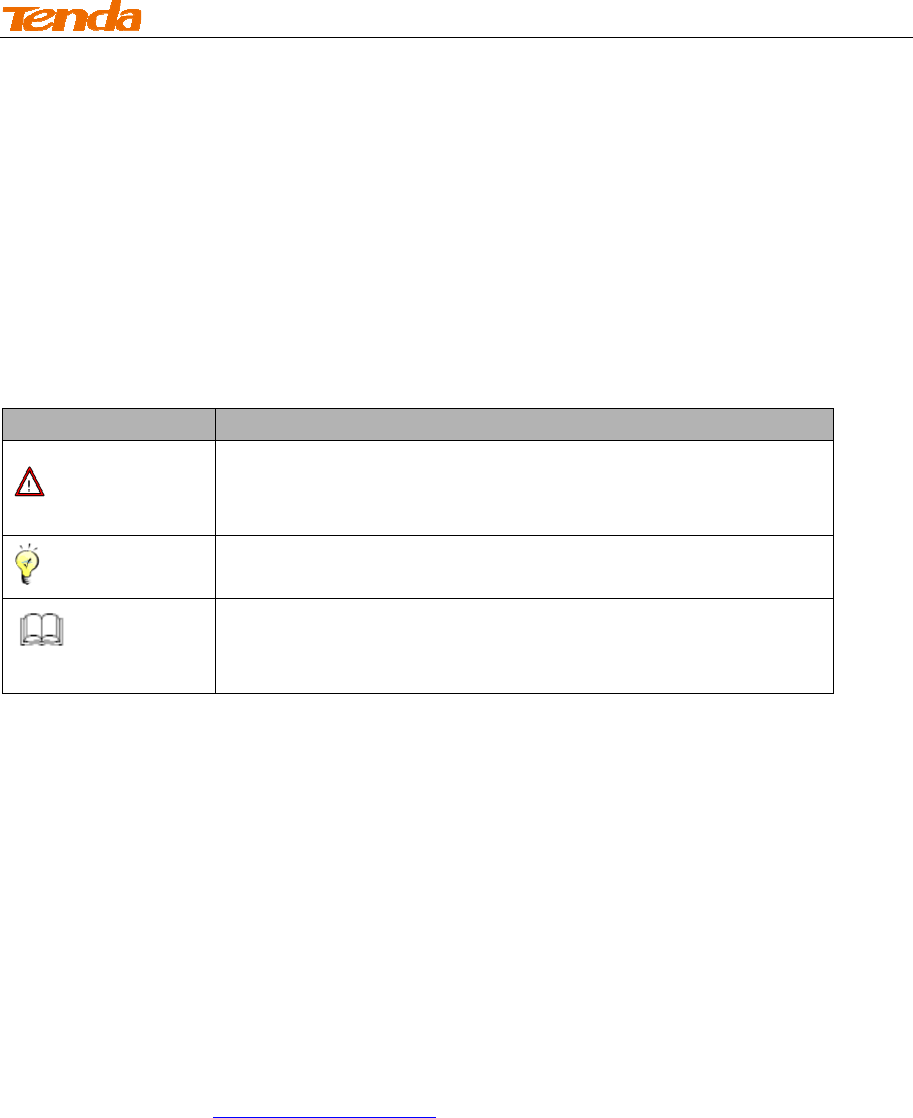
Icon Description
Note:
This format is used to highlight information of importance or
special interest. Ignoring this type of note may result in
ineffective configurations, loss of data or damage to device.
Tip
This format is used to highlight a procedure that will save time or
resources.
Knowledge Center
Description of fields on the device GUI.
Technical Support
support02@tenda.com.cn
YouTube: Tendasz1999
Hotline:
1-800-570-5892 (USA) (061) 1300787922 (Australia)
(044)197-780-6119 (UK) (0852)36120883 (HongKong)
(064) 800787922 (New Zealand)
Website: http://www.tendacn.com

Wireless N150/N300 Portable Router
IV
Contents
Preface.........................................................................................................................................................III
Contents.....................................................................................................................................................IV
IProductOverview........................................................................................................................................1
1PackageContent..............................................................................................................................................1
2Gettingtoknowyourrouter............................................................................................................................1
LED..................................................................................................................................................................1
Button&Interface..........................................................................................................................................2
Label...............................................................................................................................................................3
IIQuickInternetSetup...................................................................................................................................4
1GettingPrepared..............................................................................................................................................4
2Install................................................................................................................................................................4
3ConnecttoRouter............................................................................................................................................6
3.1ConfigurePCTCP/IPSettings....................................................................................................................6
3.2JoinYourWirelessNetwork......................................................................................................................6
4Auto‐detectingInternetConnectionType.....................................................................................................12
5InternetSetup................................................................................................................................................14
5.1WebLogin...............................................................................................................................................14
5.2ManualInternetSetup&WirelessSecuritySetup..................................................................................15
6VerifyInternetConnectivity...........................................................................................................................27
IIIFeatures&Configurations.......................................................................................................................30
1AdvancedSettings..........................................................................................................................................30
1.1Status......................................................................................................................................................30
1.2.InternetSetup........................................................................................................................................31
1.3MACClone..............................................................................................................................................35
1.4WANSpeed.............................................................................................................................................35
1.5LANSettings............................................................................................................................................36
1.6DNSSettings............................................................................................................................................37
1.7DHCPServer............................................................................................................................................38
1.8DHCPClientList......................................................................................................................................39
2WirelessSettings............................................................................................................................................42
2.1WirelessBasicSettings...........................................................................................................................42
2.2WirelessSecurity....................................................................................................................................56
2.3WirelessAccessControl..........................................................................................................................57
2.4WirelessClients.......................................................................................................................................58
3BandwidthControl.........................................................................................................................................58
3.1BandwidthControl..................................................................................................................................58
3.2TrafficStatistics.......................................................................................................................................60

Wireless N150/N300 Portable Router
V
4SpecialApplications.......................................................................................................................................61
4.1PortRangeForwarding...........................................................................................................................61
4.2DMZHost................................................................................................................................................63
4.3DDNS.......................................................................................................................................................64
4.4UPNP.......................................................................................................................................................67
4.5StaticRouting..........................................................................................................................................67
4.6RoutingTable..........................................................................................................................................72
5Security..........................................................................................................................................................72
5.1URLFilter.................................................................................................................................................72
5.2MACFilter...............................................................................................................................................74
5.3ClientFilter..............................................................................................................................................75
6Tools...............................................................................................................................................................77
6.1Reboot....................................................................................................................................................77
6.2RestoretoFactoryDefaultSettings........................................................................................................77
6.3Back/Restore...........................................................................................................................................78
6.4Logs.........................................................................................................................................................82
6.5RemoteWebManagement....................................................................................................................82
6.6Time........................................................................................................................................................84
6.7LoginPassword.......................................................................................................................................86
6.8FirmwareUpgrade..................................................................................................................................86
IVAppendix.................................................................................................................................................89
1ConfigurePCTCP/IPSettings.........................................................................................................................89
Windows7....................................................................................................................................................89
WindowsXP..................................................................................................................................................95
2DefaultSettings..............................................................................................................................................98
3FAQs.............................................................................................................................................................100
4RemoveWirelessNetworkfromYourPC....................................................................................................102
Windows7..................................................................................................................................................102
WindowsXP................................................................................................................................................103
5SafetyandEmissionStatement....................................................................................................................105
I Product Overview
1
I Product Overview
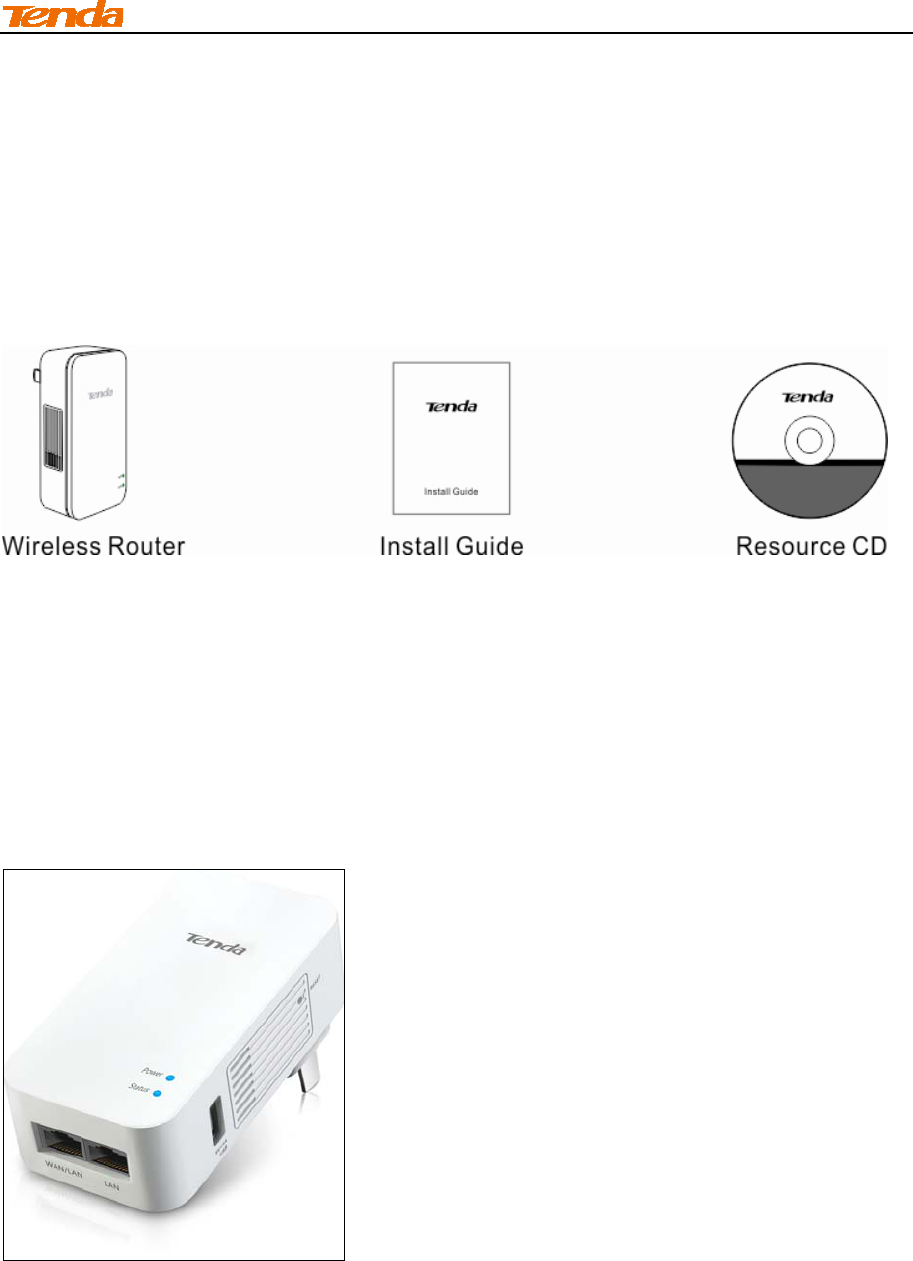
1 Package Content
Unpack the package. Your box should contain the following items:
If any of the parts are incorrect, missing, or damaged, contact your dealer. Keep the carton,
including the original packing materials, in case you need to return the product for repair.
2 Getting to know your router
LED

I Product Overview
2
LED Status Description
Power
Solid The device is functioning correctly.
Off Power is not supplied to the router. Make sure the
device is properly connected to power outlet.
Status
A green and blinking light Device is currently operating in hotel mode and WAN
port is NOT properly connected
A green and solid light Device is currently operating in hotel mode and WAN
port is connected
A blinking blue light Device is currently operating in residence mode and
WAN port is NOT properly connected
A solid blue light Device is currently operating in residence mode
and WAN port is connected
A light blue and blinking
light
Device is currently operating in Universal Repeater
Mode and is not connected to a wireless hotspot
A light blue and solid light Device is currently operating in Universal Repeater
Mode and is connected to a wireless hotspot.
Button & Interface
I Product Overview
3
1→RST: Pressing it for over 10seconds restores the device to factory default settings. For device's
factory default settings, see Appendix 3 Factory Default Settings.
2→USB: The USB port that charges terminal devices such as a smart phone or an iPad over a
USB cable.
3→LAN: The local (LAN) 100M Ethernet ports are for cabling the device to local computers,
switches, etc.
4→WAN/LAN: 100M LAN/WAN interchangeable interface, which functions as: a) a WAN interface
for connecting to an Internet-enabled DSL modem or other uplink network device when operating
in Residence Mode or Hotel Mode; or b) a LAN interface for connecting to a PC or an Ethernet
switch when operating in Universal Repeater Mode.
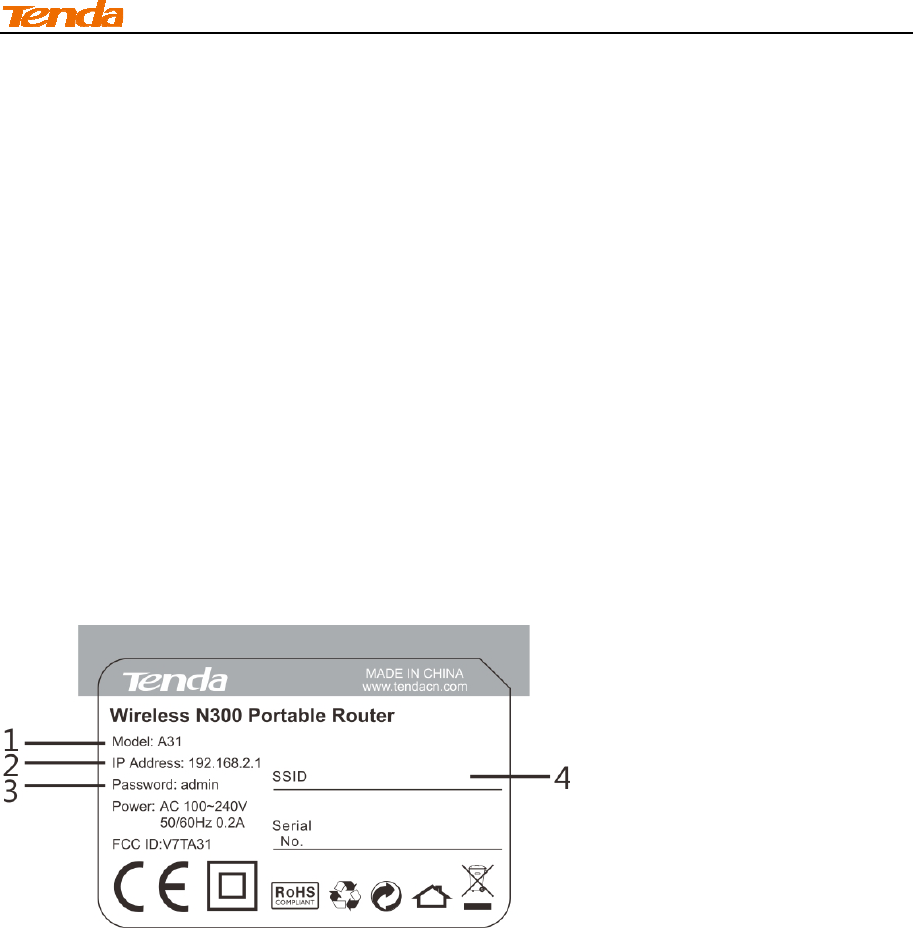
Label
1→ Product Model
2→ Default Login IP address. This IP address is to be used to access the router’s settings through
a web browser. If you change it, you have to open a new connection to the new IP address and log
in again.
3→ Default login password
4→ Default wireless network name (SSID).

II Quick Internet Setup
4
II Quick Internet Setup
1 Getting Prepared
Before you start the installation process, you need to prepare the following:
Item Description
Router Find it in your package
PC Should have a installed IE8 or higher browser
Ethernet Cable You will need it to connect your PC to the router
Ethernet Cable from
the incoming Internet
side
This is provided by your ISP
Gather ISP
Information
Your Internet service provider (ISP) should have provided you with all
of the information needed to connect to the Internet. If you cannot
locate this information, ask your ISP to provide it.
If your ISP uses a PPPoE Internet connection, you will need ISP
login name and password.
If you use a DHCP Internet connection, no information is needed.
If your ISP gives you a fixed or static IP address for Internet
connection, you will need to gather the following information:
1) IP Address
2) Subnet Mask
3) Gateway
4) DNS Server
5) Alternate DNS Server (Optional)
2 Install
Note----------------------------------------------------------------------------------------------------------------------
Before you start, make sure you can access Internet by directly connecting the Ethernet cable
from the incoming Internet side to your PC.
---------------------------------------------------------------------------------------------------------------------------------
① Plug the device into a power outlet (For better wireless performance, place it near the center of
the area where your computers, smart phones and other devices operate, and preferably within
line of sight to your wireless devices.)

II Quick Internet Setup
5
② Connect the NIC port on your PC to one LAN port on the router using an Ethernet cable or
connect to the router wirelessly.
③ Connect the Ethernet cable from the incoming Internet side to the WAN port on the router.

II Quick Internet Setup
6
3 Connect to Router
If you use a wired NIC, refer to 3.1 Configure PC TCP/IP Settings and then 4 Auto-switch
Mode.
3.1 Configure PC TCP/IP Settings
If your computer is set to a static or fixed IP address (this is uncommon), change it to "Obtain an IP
address automatically" and "Obtain DNS server address automatically" from the device.
Tip ------------------------------------------------------------------------------------------------------------------------
If you are unsure, see Appendix1 Configure PC TCP/IP Settings.
---------------------------------------------------------------------------------------------------------------------------------
3.2 Join Your Wireless Network
Tip-------------------------------------------------------------------------------------------------------------------------
1. The device's SSID is "Tenda_xxxxxx" by default (You can find it on the attached label).
2. If you secure your wireless network, you must use the security key to join it.
3. To join your wireless network, the PC you use must have an installed wireless network adapter.
If not, install one.
II Quick Internet Setup
7
Windows 7
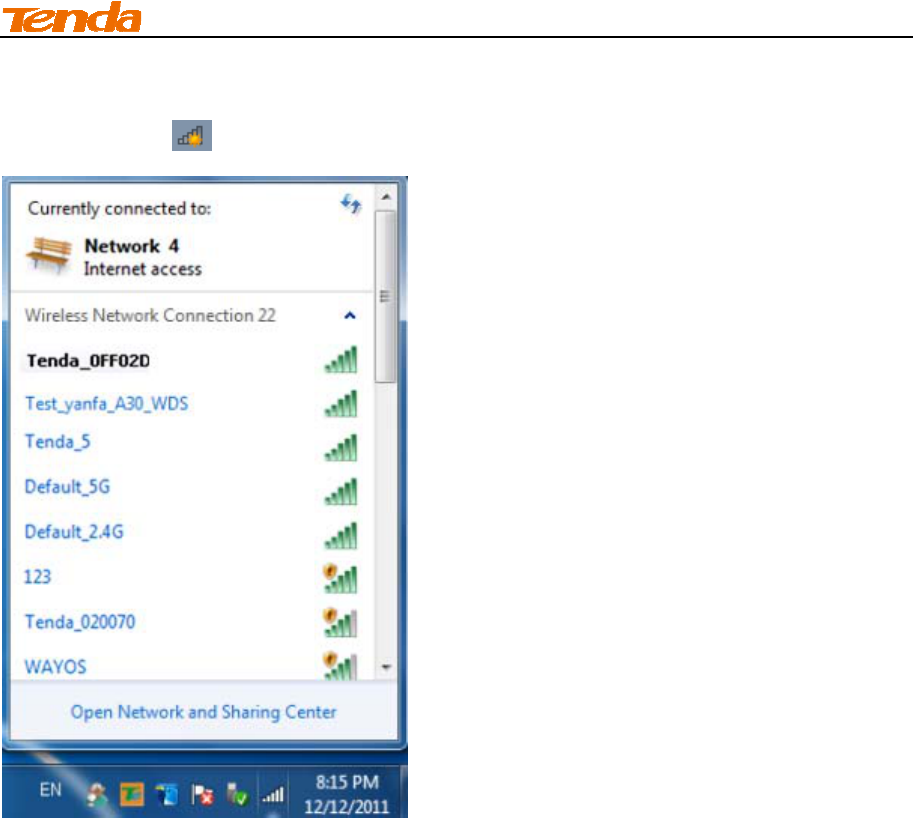
① Click the icon on the notification area on the bottom right corner.
II Quick Internet Setup
8
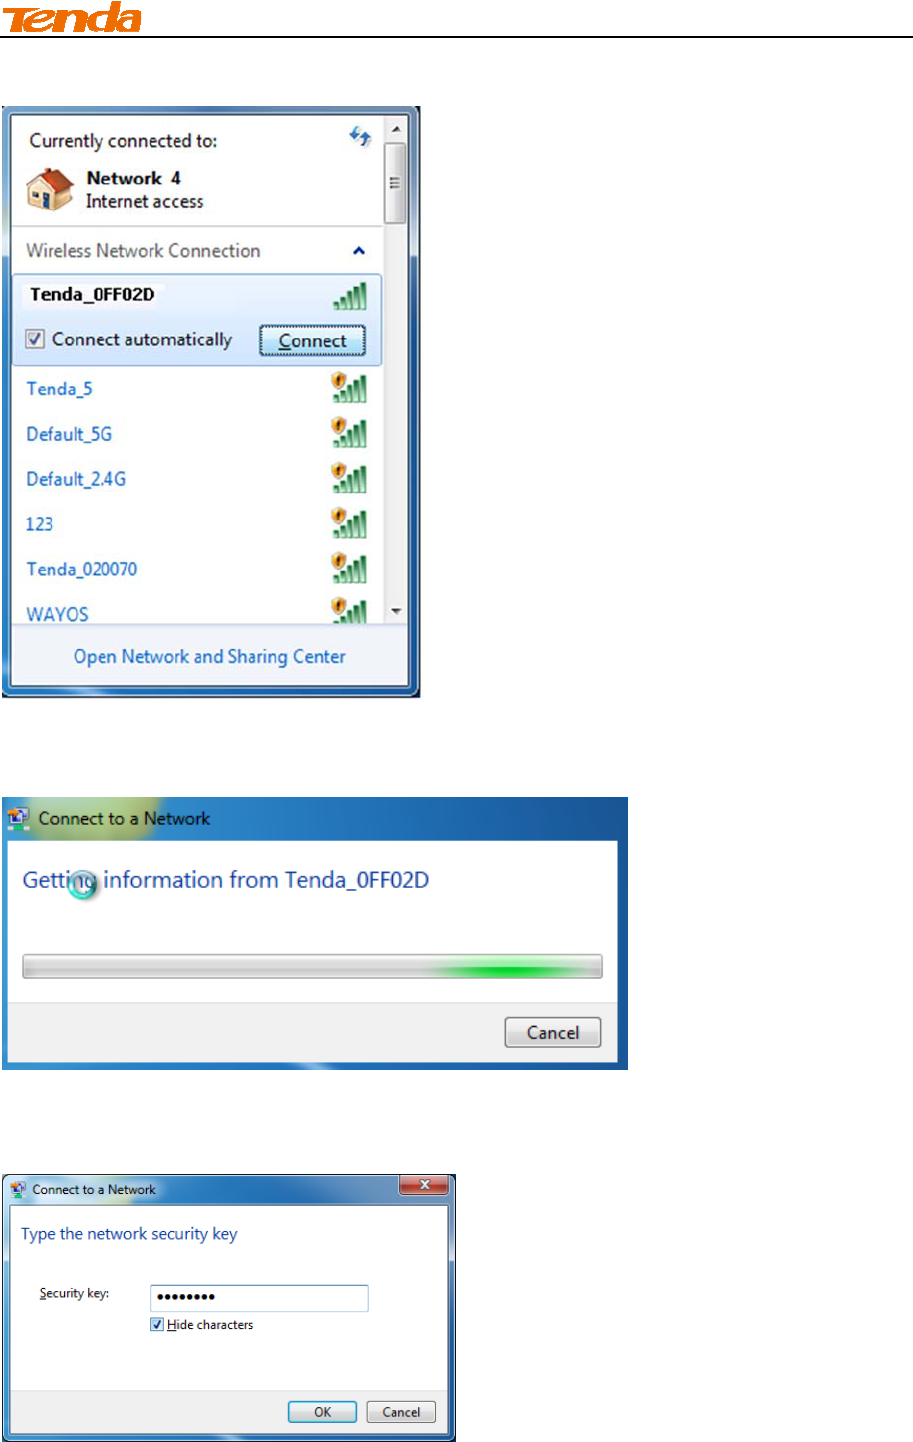
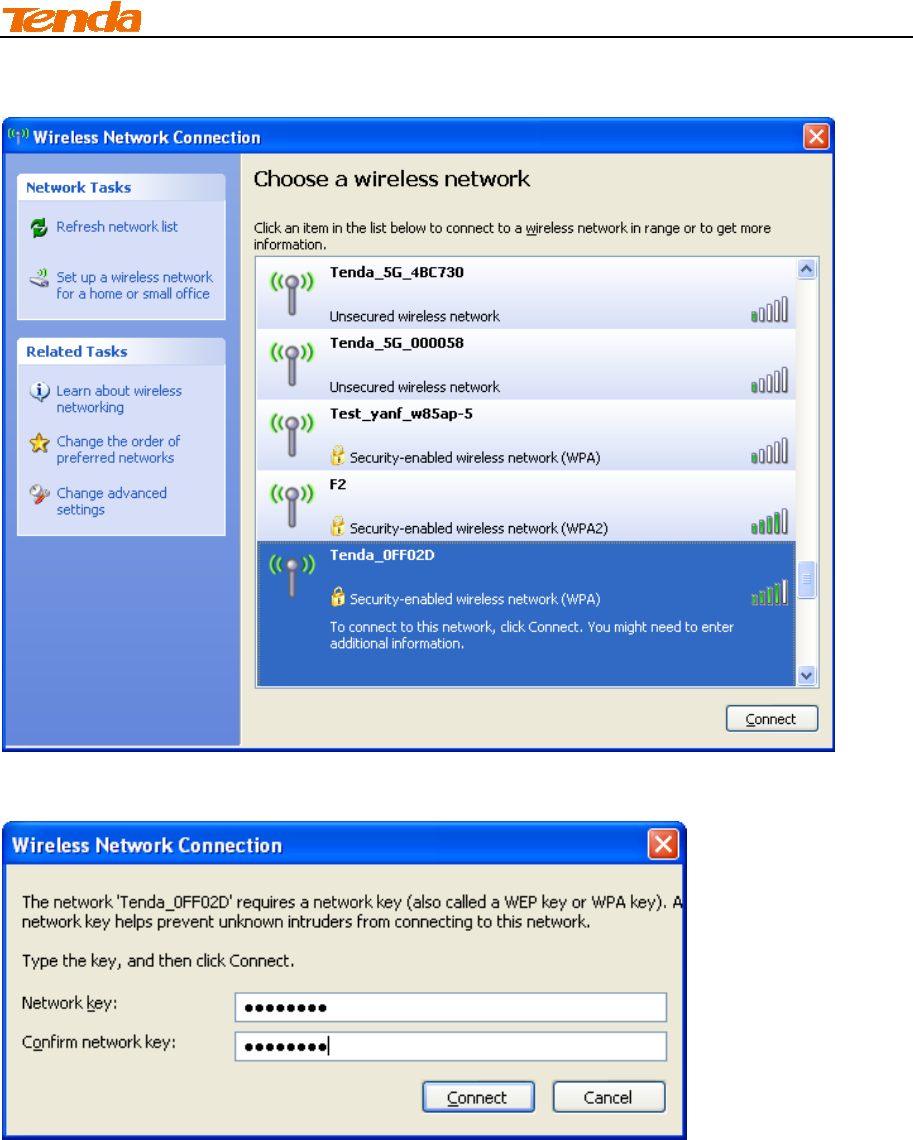
② Select the wireless network you wish to connect and click Connect.
③ If you see the screen below, you are connecting to the wireless network.
④ Enter the security key and click OK.
II Quick Internet Setup
9
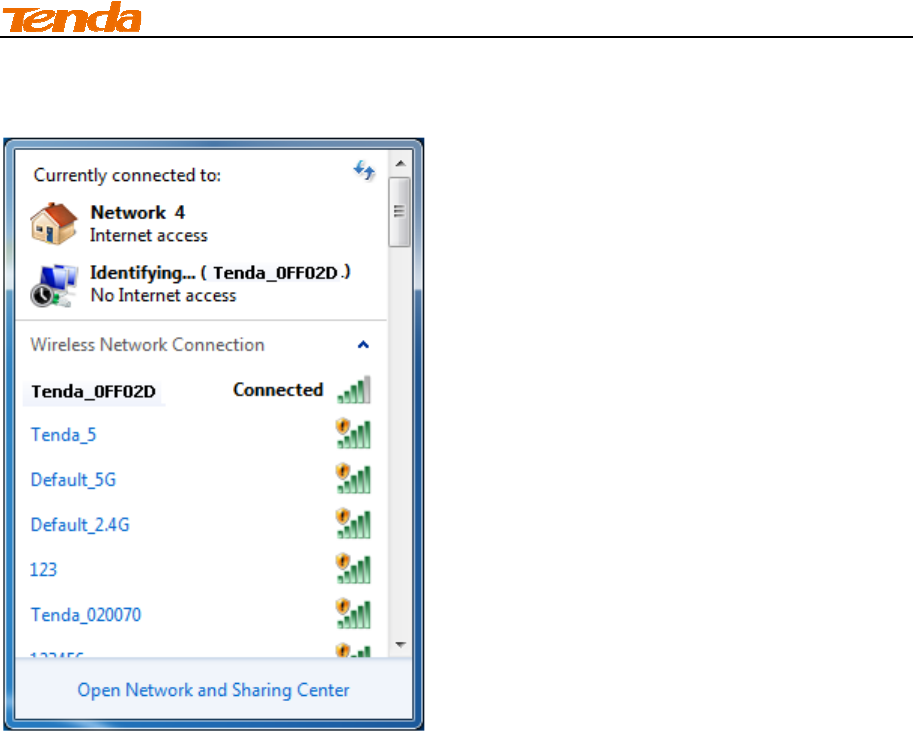
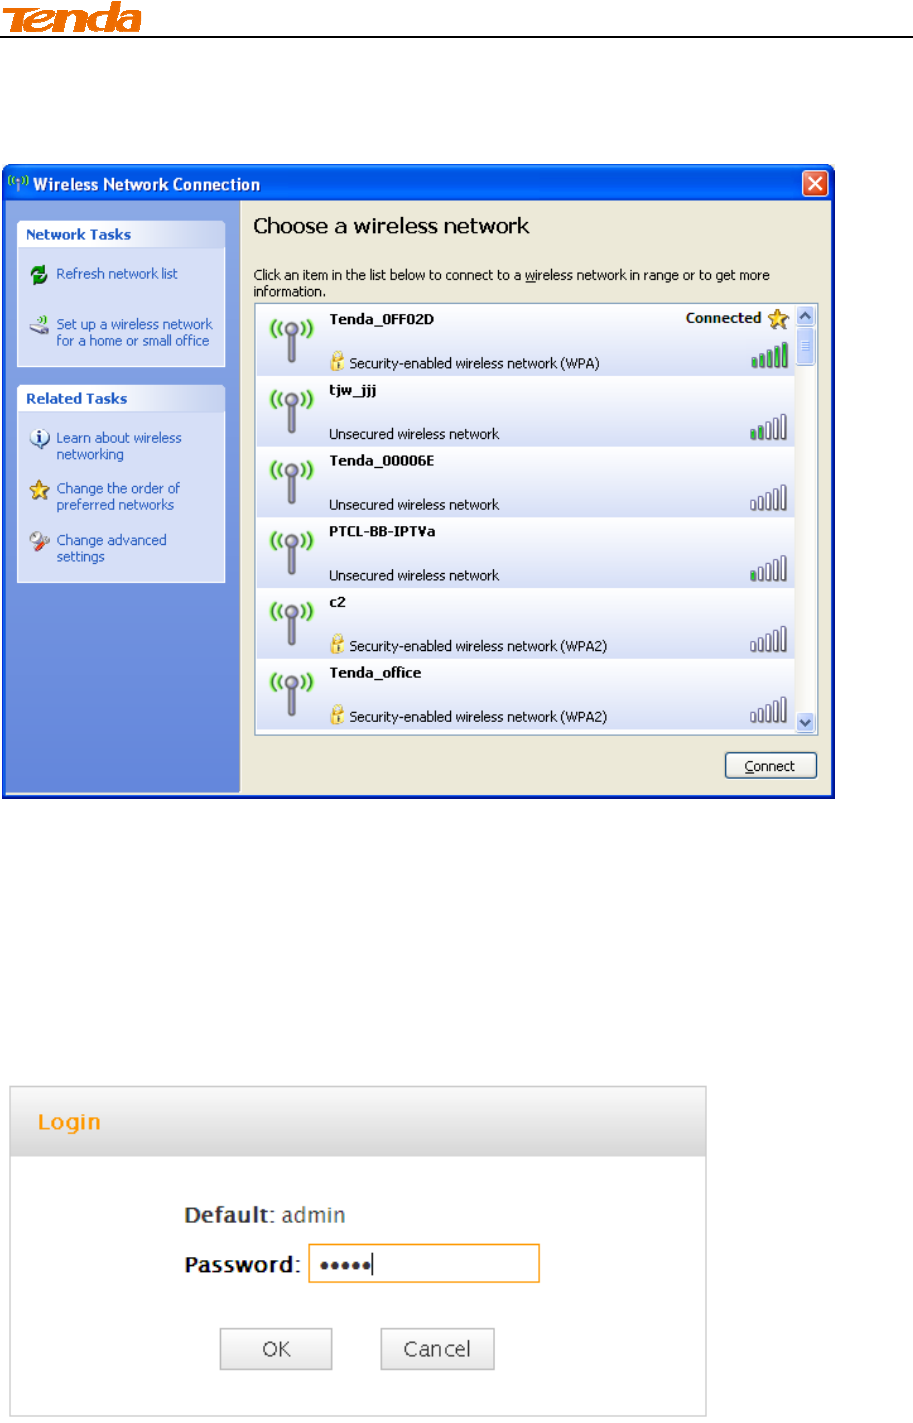
When you see Connected displayed next to the wireless network you selected, you have
connected to the wireless network successfully.
II Quick Internet Setup
10
Windows XP
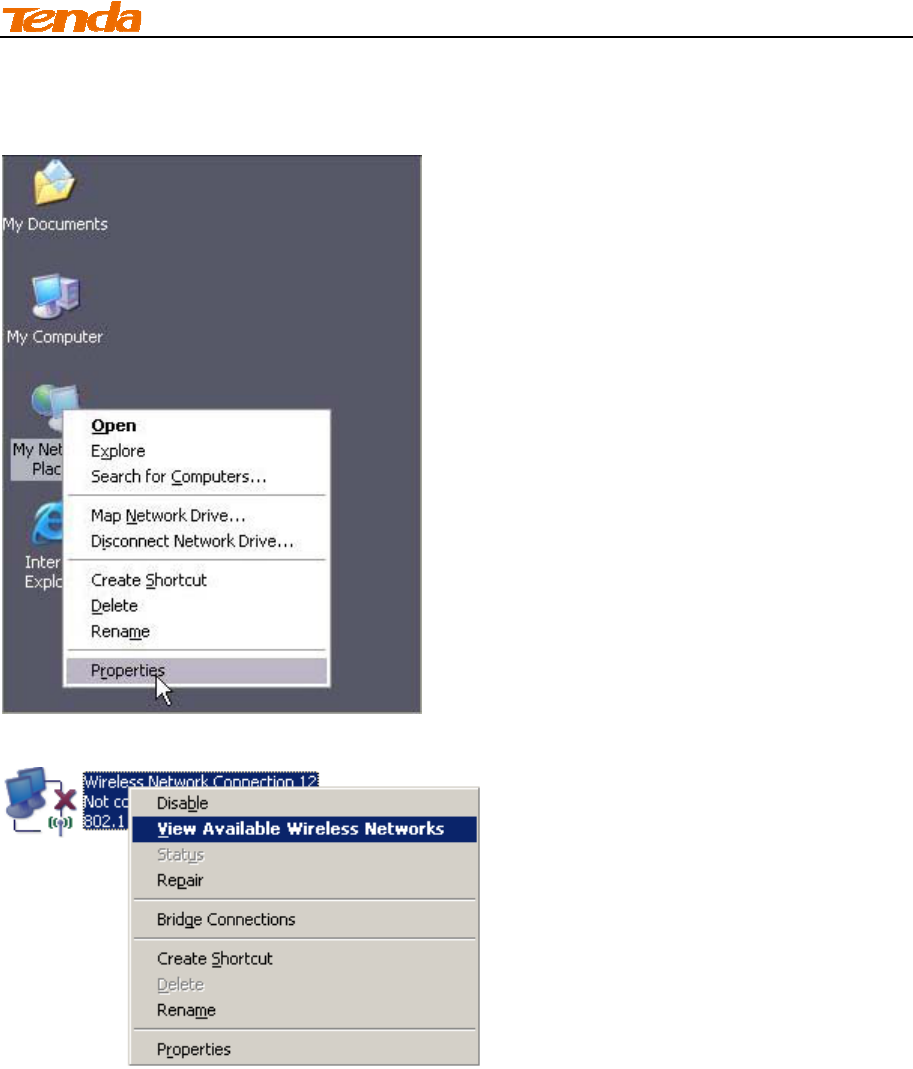
① Right click My Network Places from your PC's desktop and select Properties.
② Right click Wireless Network Connection and select View Available Wireless Networks.
II Quick Internet Setup
11
③ Double click the wireless network you wish to connect.
④ Enter the security key and click Connect.
II Quick Internet Setup
12
⑤ When you see Connected displayed next to the wireless network you selected, you have
connected to the wireless network successfully.
4 Auto-detecting Internet Connection Type
By default, this device automatically detects and switches between DHCP and PPPoE according
to actual environment. To test Internet connectivity:
① Launch a web browser and enter the device's IP address. Input the default password (admin)
and click OK on the login window.
II Quick Internet Setup
13
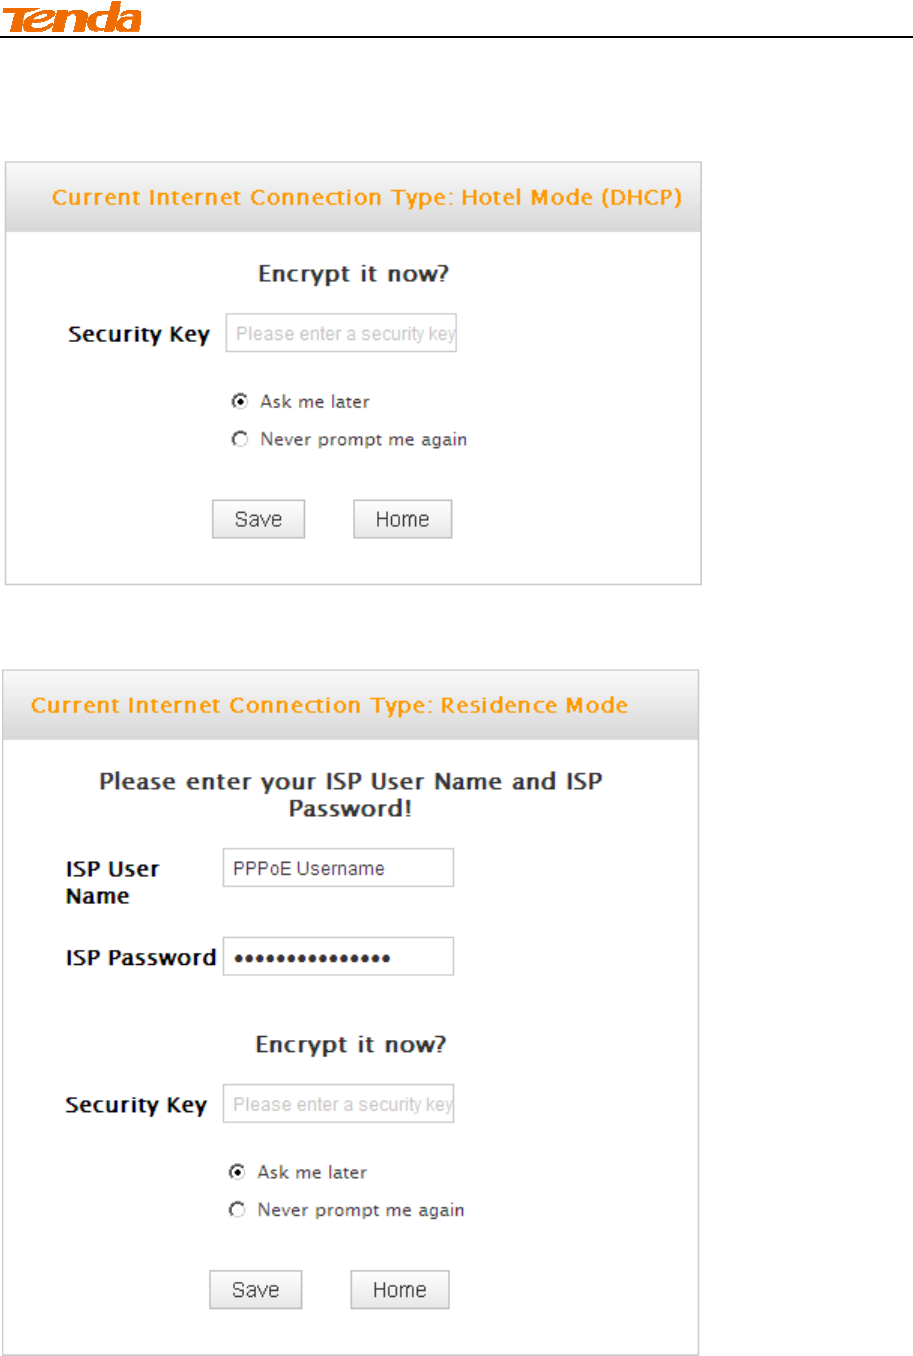
② The following screen appears if DHCP Internet connection type is detected. Simply specify a
wireless security key, click Save and then close the browser.
The following screen appears if PPPoE Internet connection type is detected. Enter the ISP login
name and password, specify a wireless security key, and then click Save.
II Quick Internet Setup
14
③ See whether you can access Internet (See 3.2 Join Your Wireless Network, if you use a
wireless NIC), if not, refer to 5 Internet Setup.
Tip-------------------------------------------------------------------------------------------------------------------------
If the Auto-switch feature is disabled, the device will automatically detect and switch to the right
Internet connection type in case of an Internet connection failure.
---------------------------------------------------------------------------------------------------------------------------------
5 Internet Setup
Read this section only when you fail to access Internet after you tried the above mentioned steps
or you can access Internet and want to change the SSID (wireless network name) and security key
of this device.
5.1 Web Login
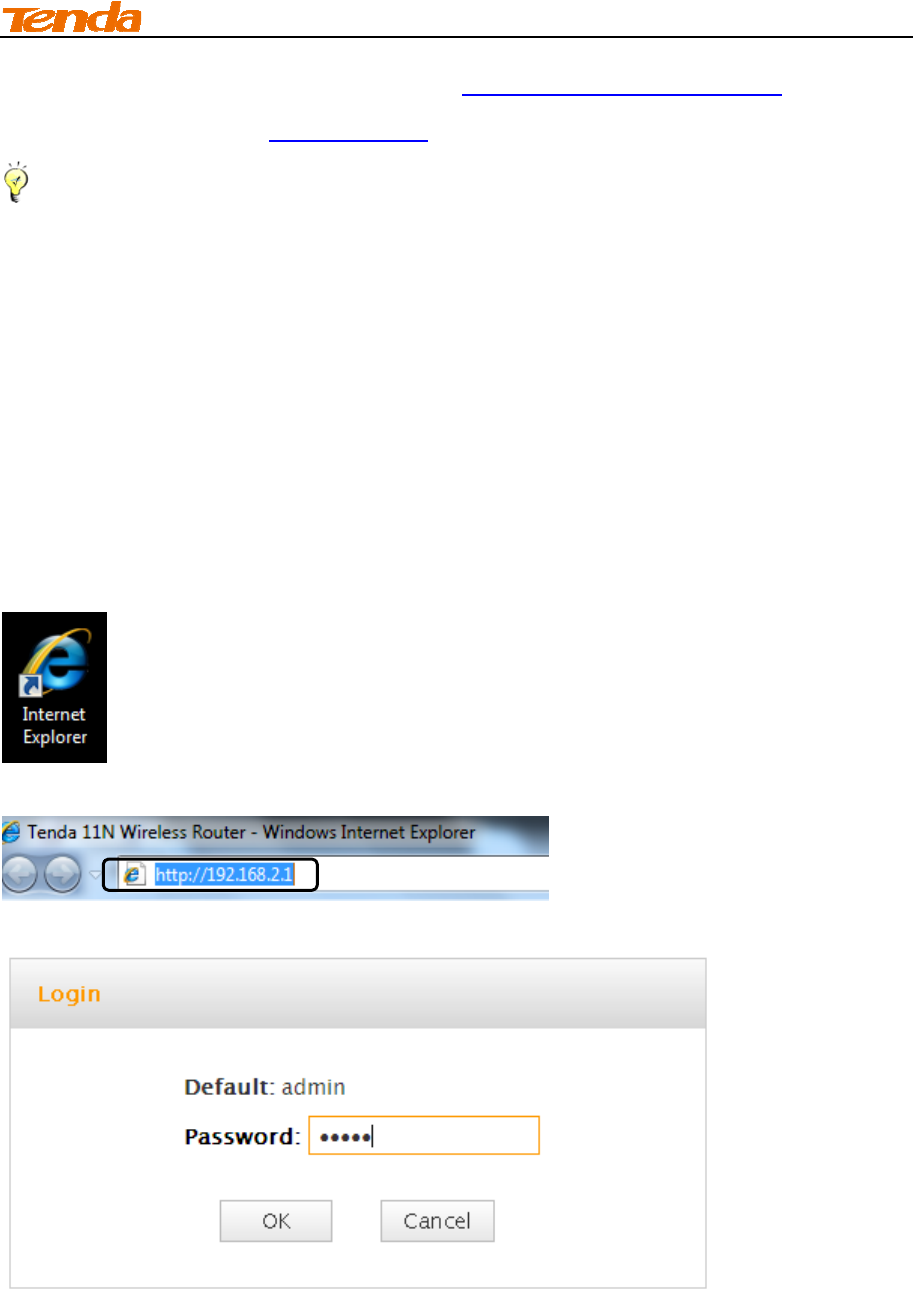
① Launch a web browser, say, IE.
② In the address bar, input 192.168.2.1, and press "Enter".
③ Enter the login password and click OK. The default password is admin.

II Quick Internet Setup
15
④ Click Home on the appearing screen.
⑤ The Setup Wizard screen appears.
Tip-------------------------------------------------------------------------------------------------------------------------
1. If you access Internet by connecting to the Ethernet cable from the incoming Internet side, see
Static IP.
2. If you don't want to use the Auto-switch feature, check the Disable Auto-switch mode box.
3. You can also enable the Auto-switch mode feature after you manually set up Internet and your
wireless network so that your router can fit different environment, eliminating manual intervention.
---------------------------------------------------------------------------------------------------------------------------------
5.2 Manual Internet Setup& Wireless Security Setup
Read the following and determine your Internet connection type. Then follow the right setup
wizard.
A. If your ISP provides you with an Ethernet cable from the incoming Internet side but no ISP login
account or IP information, your ISP uses a DHCP connection. See DHCP.
B. If your ISP provides you with an Ethernet cable from the incoming Internet side and ISP login
account, your ISP uses a PPPoE connection. See PPPoE.
II Quick Internet Setup
16
C. If your ISP provides you with an Ethernet cable from the incoming Internet side IP information
(IP address, subnet mask, gateway IP address, DNS server address), your ISP uses a static IP
connection. See Static IP .
D. If you acquire Internet access from a remote AP on an existing network see Universal
Repeater Mode.
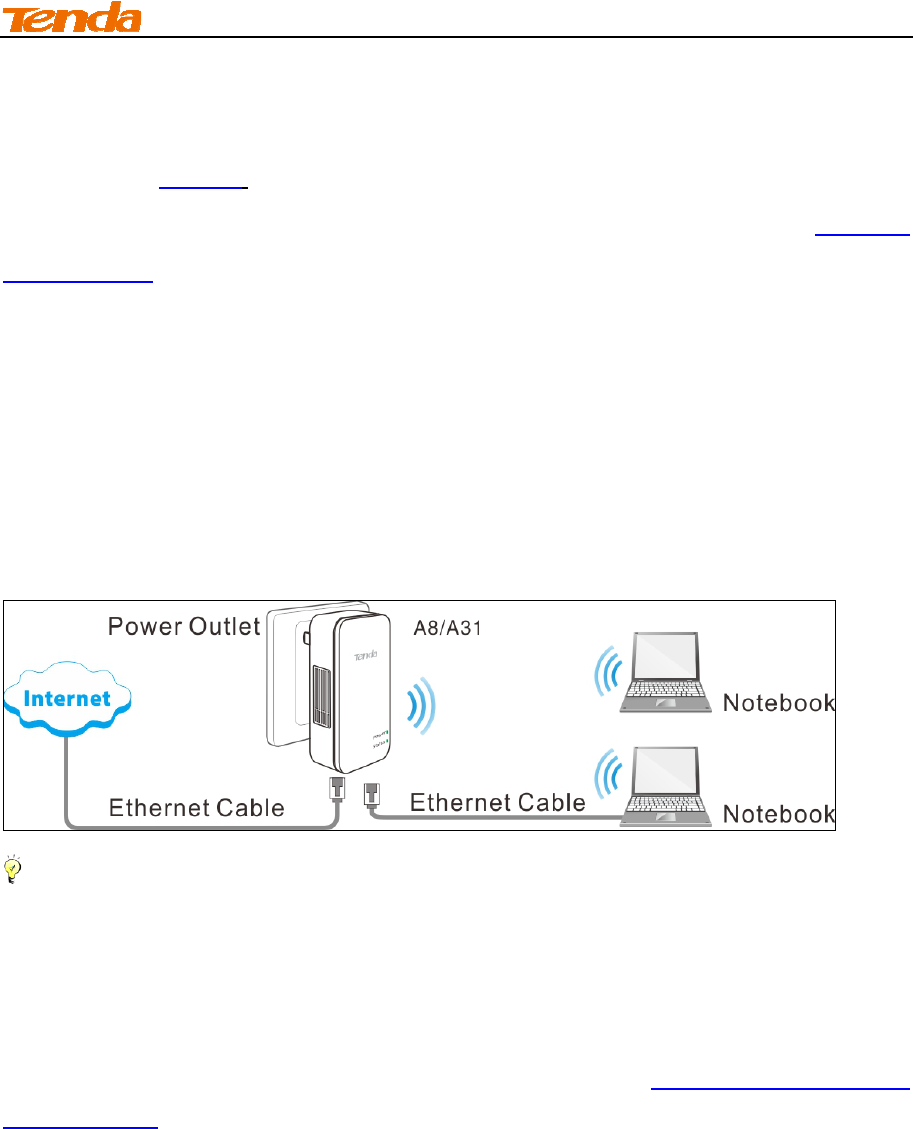
Hotel Mode (DHCP)
If your ISP does not give you any IP or user name/password info (your ISP uses a DHCP
connection), simply connect the network cable from the incoming Internet side to the router and
the router to your PC or simply search for and connect to your wireless router from your notebook.
No configuration needed, simply plug and play.
For typical network topology, see below:
Tip------------------------------------------------------------------------------------------------------------------------
1. If you already have a wired router, you can use this wireless router (operating in this mode) to
convert the wired network into a wireless network. Simply connect the WAN port on this wireless
router to a LAN port on the wired router and a wireless access point will be created instantly.
2. If your computer is set to a static or fixed IP address (this is uncommon), change it to obtain an
IP address automatically from the router. For more information, see Appendix 1 Configure PC
TCP/IP Settings.
---------------------------------------------------------------------------------------------------------------------------------
II Quick Internet Setup
17
Configuration Procedures:
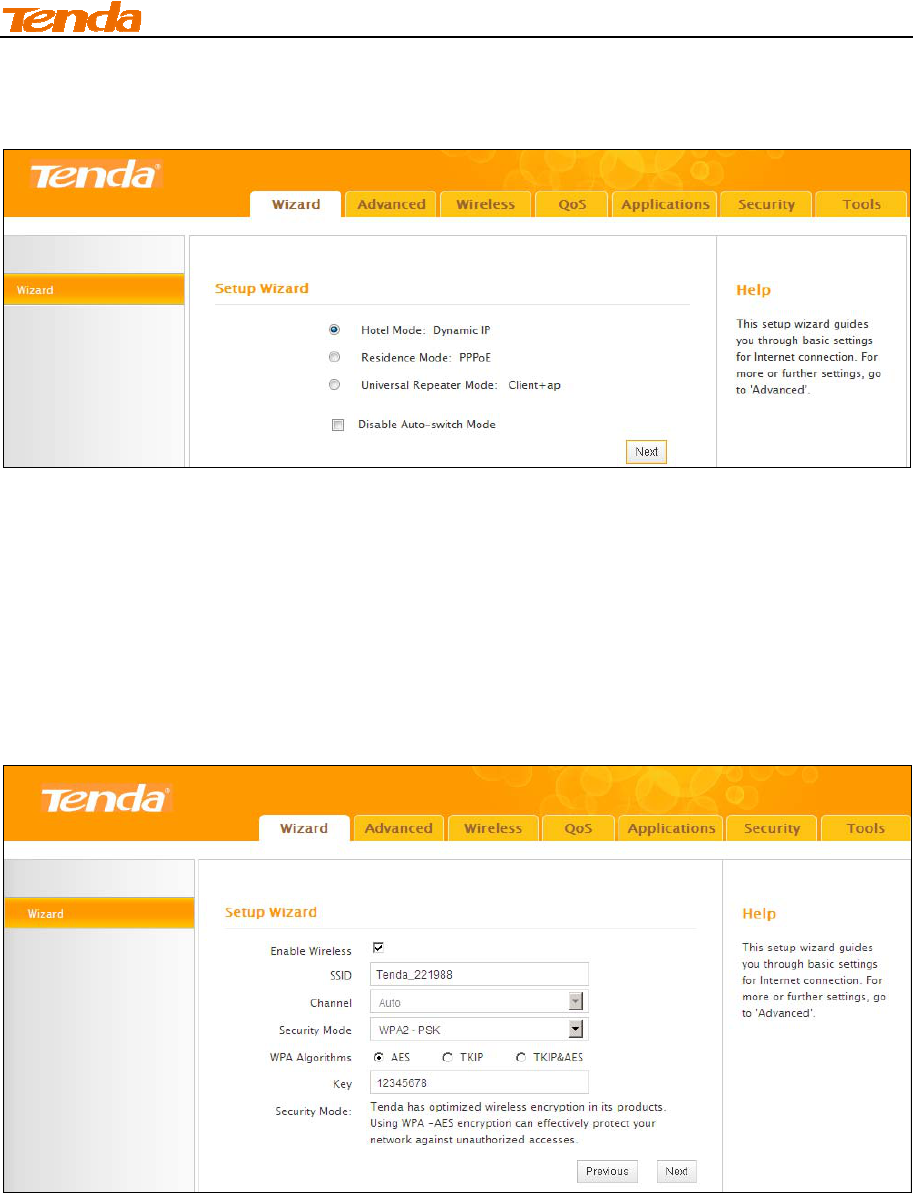
① Select Hotel Mode: Dynamic IP and click Next.
② Configure your wireless network: SSID, channel, security settings and then click Next.
SSID: Tenda_221988
Channel: 6
Security Mode: WPA-PSK
Cipher Type: AES
Security Key: 12345678
II Quick Internet Setup
18
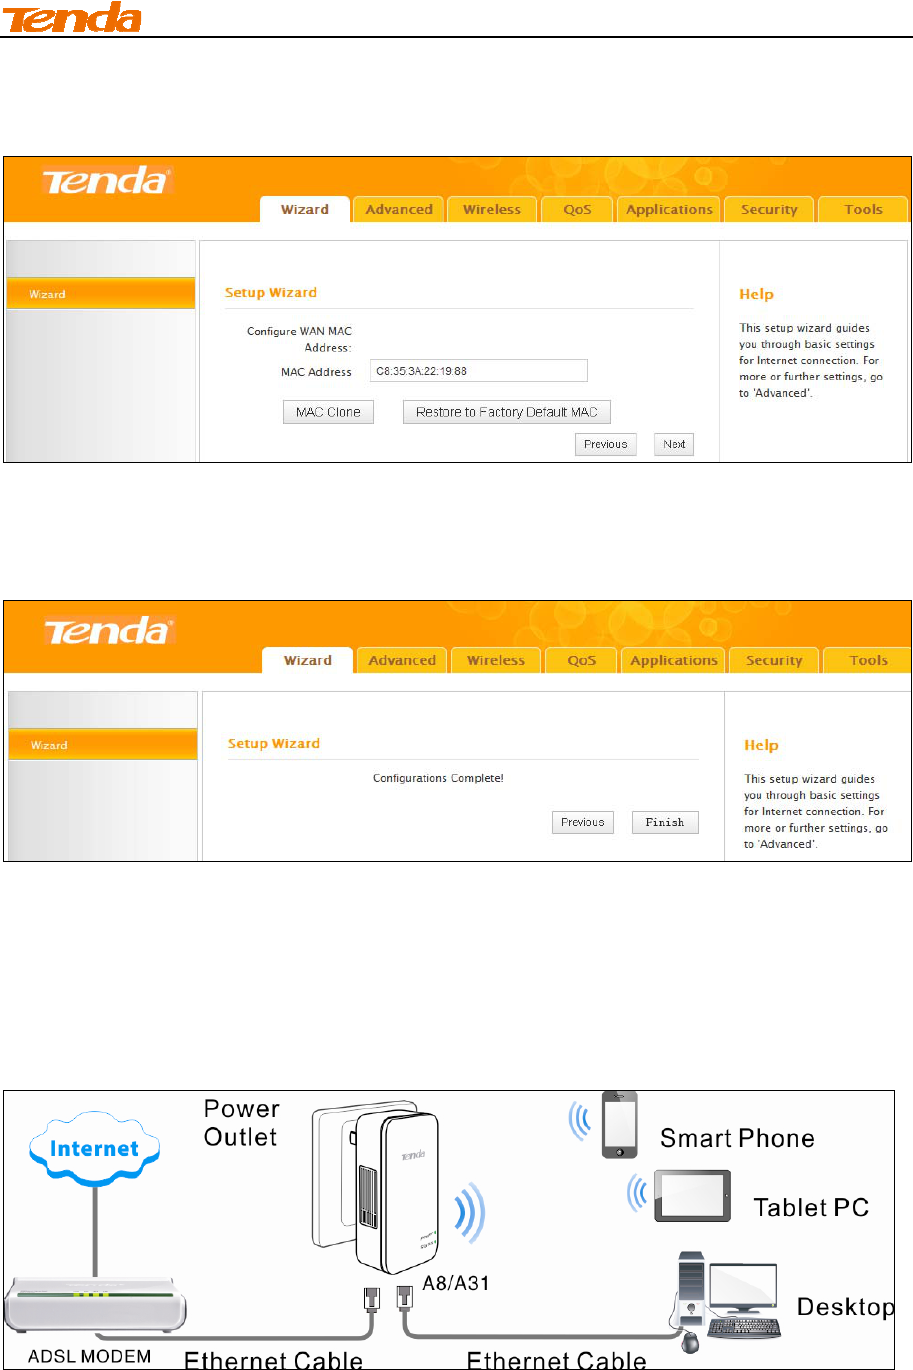
③ MAC Clone Setup: Enter the computer or broadband modem authorized by your ISP. Then
click Next.
④ Click Finish and wait for the device to restart automatically. After reboot, reconnect to this
device wirelessly or using an Ethernet cable and you will be able to access Internet.
Residence Mode
If your ISP uses a PPPoE Internet connection (Router operates in Residence Mode), you will need
ISP login name and password.
For common application scenario, see below:
II Quick Internet Setup
19
Configuration Procedures:
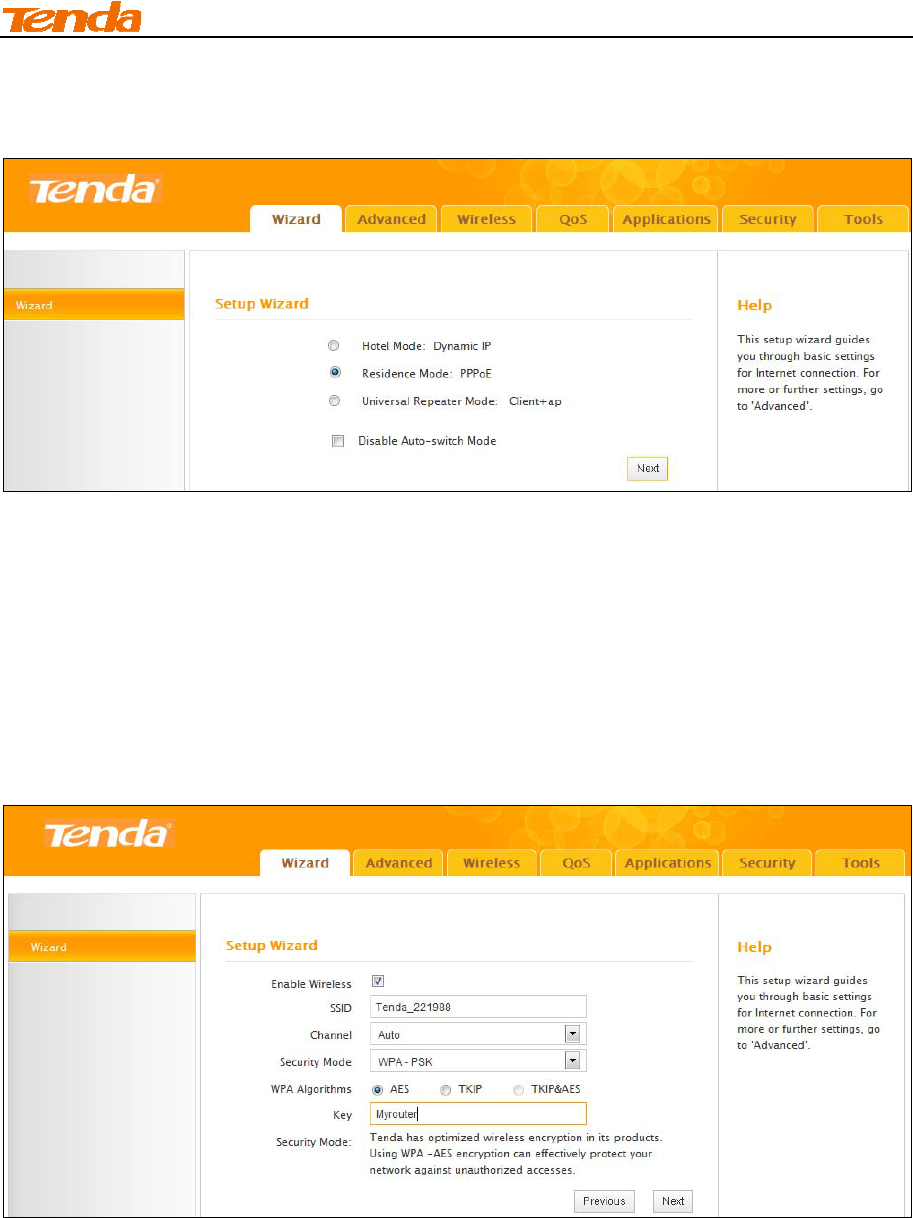
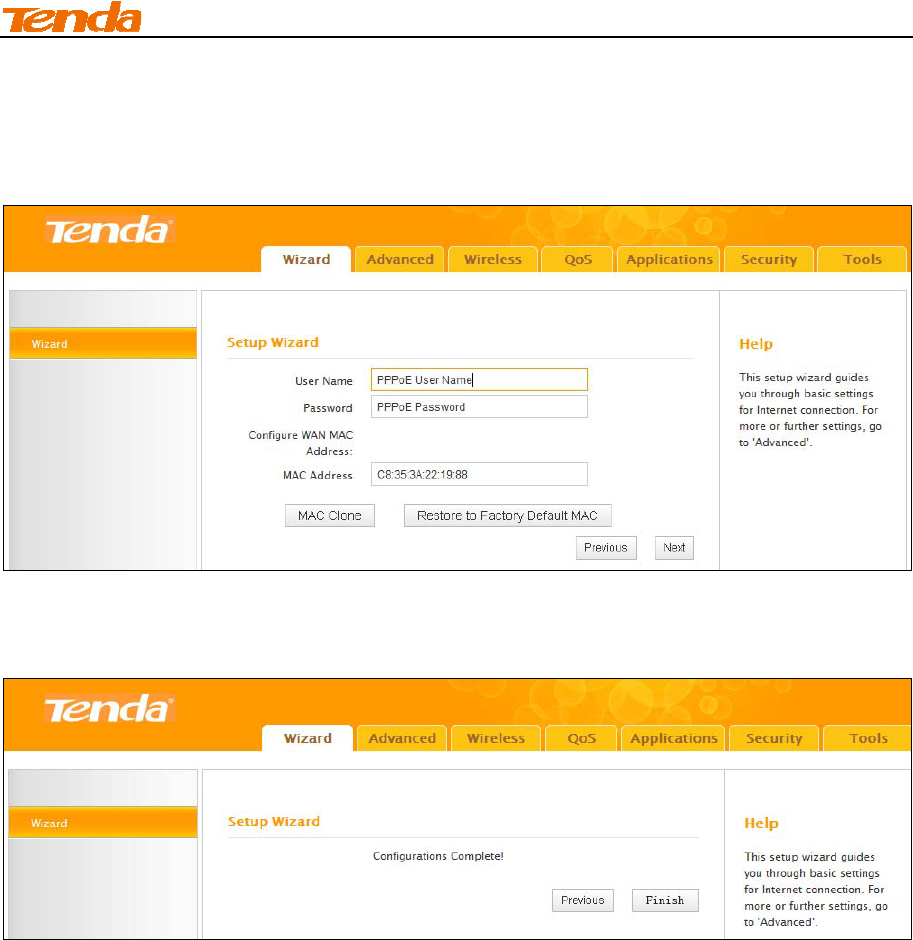
① Select Residence Mode: PPPoE and click Next.
② Configure your wireless network: SSID, channel, security settings and then click Next.
SSID:Tenda_221988
Channel: 6
Security Mode: WPA-PSK
Cipher Type: AES
Security Key: Myrouter
II Quick Internet Setup
20
③ Internet Setup & MAC Clone: Enter your ISP login user name and password (case sensitive)
and the MAC address of the computer or broadband modem authorized by your ISP. Then click
Next.
④ Click Finish and wait for the device to restart automatically. After reboot, reconnect to this
device wirelessly or using an Ethernet cable and you will be able to access Internet.

II Quick Internet Setup
21
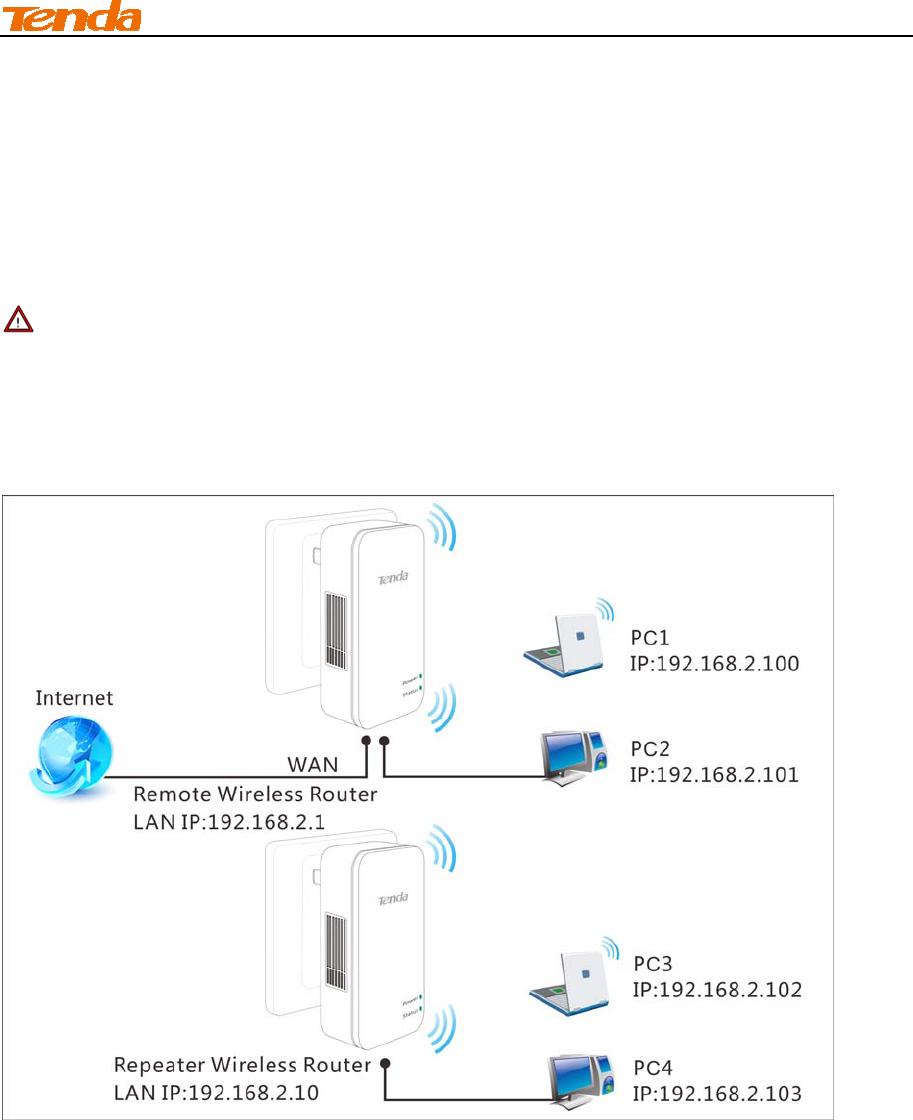
Universal Repeater Mode
Use this universal repeater mode to extend your existing wireless network coverage.
For application scenario, see below:
In this mode, you only need to configure the following settings on the repeater wireless router:
Configure LAN IP: Specify an IP address that is in the same subnet as yet different from the
remote wireless router for this Tenda wireless router.
Universal Repeater: Configure this router to bridge the remote wireless router for extended
network coverage.
Tip ---------------------------------------------------------------------------------------------------------------------
Before you start, make sure you have the following information:
1. Remote router's SSID, security mode, cipher type and security key.
2. Remote router's LAN IP address.
3. No Ethernet cable is connected to the Repeater wireless router's WAN port.
II Quick Internet Setup
22
Universal Repeater Application Example:
Step 1 Gather information of the remote wireless router:
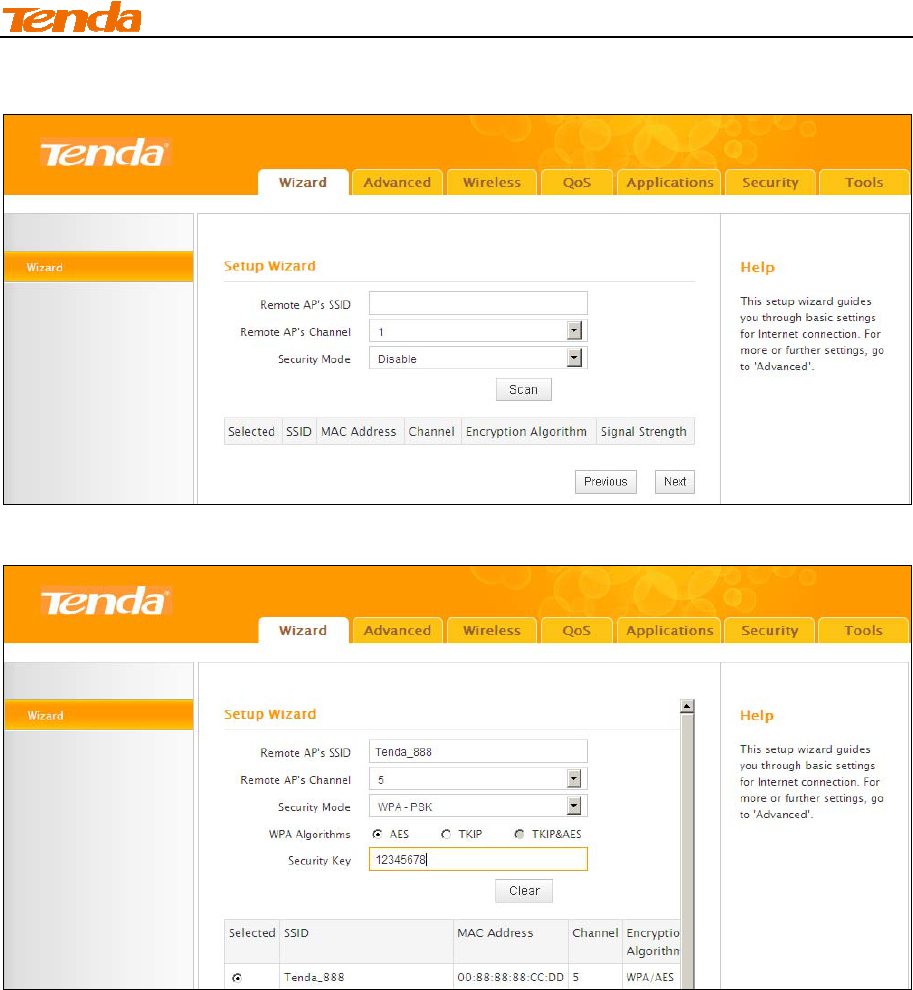
SSID: Tenda_888
Security Mode: WPA-PSK
Cipher Type: AES
Security Key: 12345678
LAN IP Address: 192.168.2.1
Step 2 Configure Repeater Wireless Router:
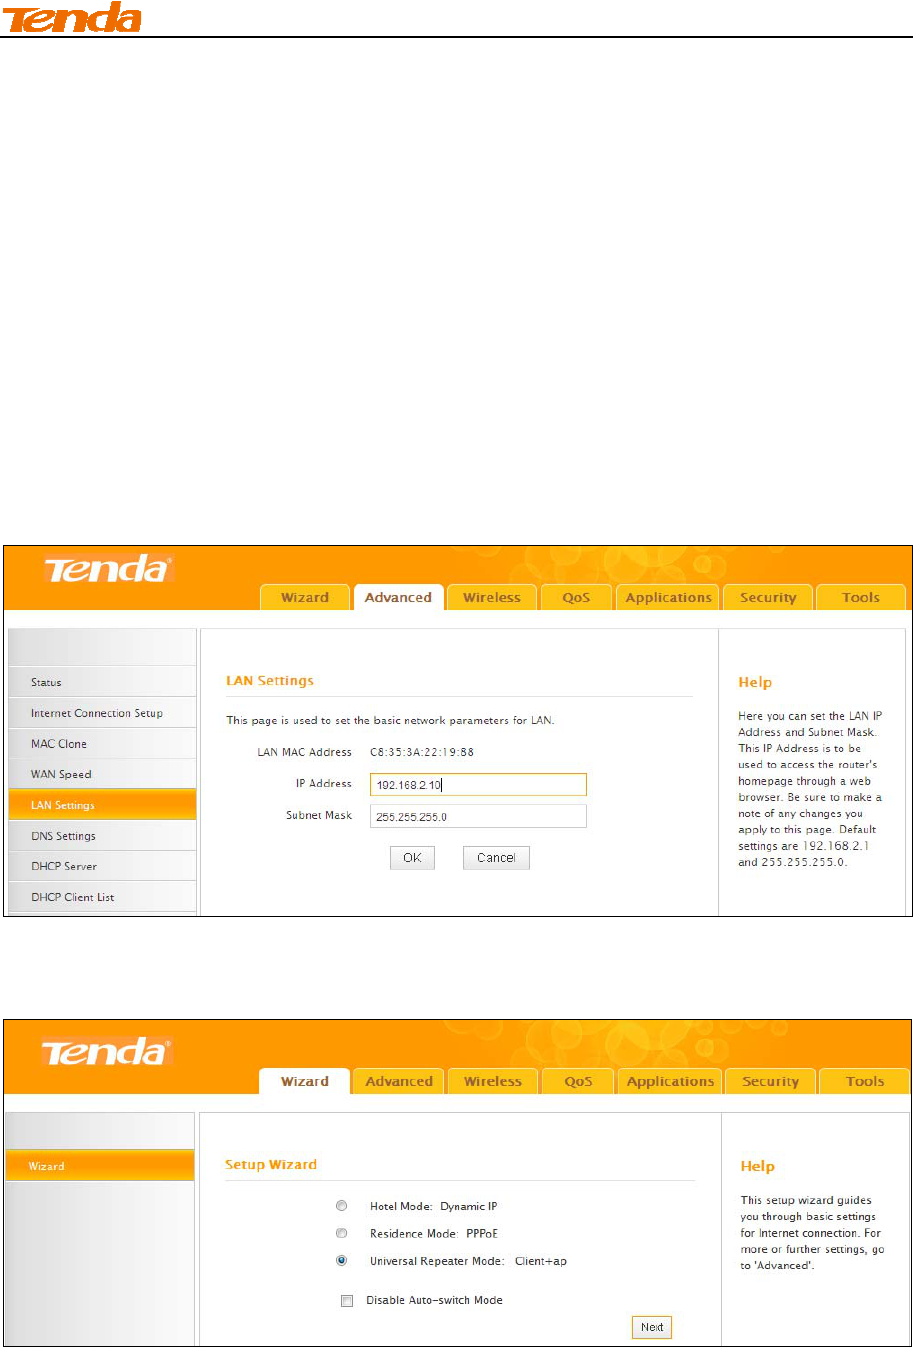
① Click Advanced -> LAN Settings to configure an IP address that is in the same subnet as yet
different from the remote wireless router for this Tenda wireless router.
② Click OK in the appearing screen.
③ Select Universal Repeater Mode: Client +AP and click Next.
II Quick Internet Setup
23
④ Click here to search for available APs.
⑤ Select the wireless network you wish to connect to.
⑥ The information of the remote AP will be added automatically. You only need to enter the
security key.
II Quick Internet Setup
24
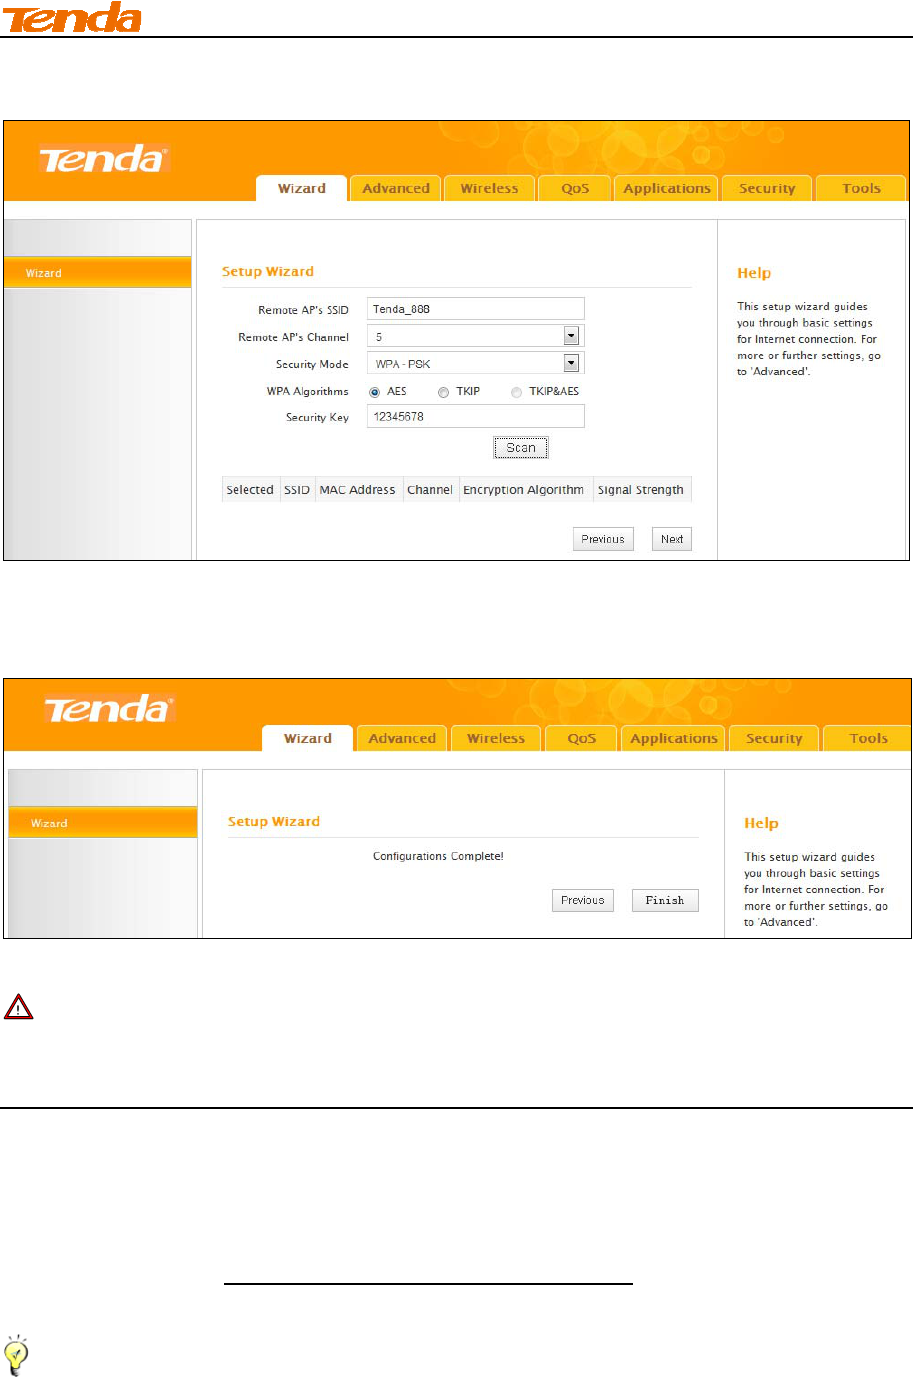
⑦ Click Clear and Next.
⑧ Click Finish and wait for the device to restart automatically. After reboot, reconnect to this
device wirelessly or using an Ethernet cable and you will be able to access Internet.
Note----------------------------------------------------------------------------------------------------------------------
When the Universal Repeater is configured successfully, wireless clients need to join the repeater
wireless router's SSID for Internet access.
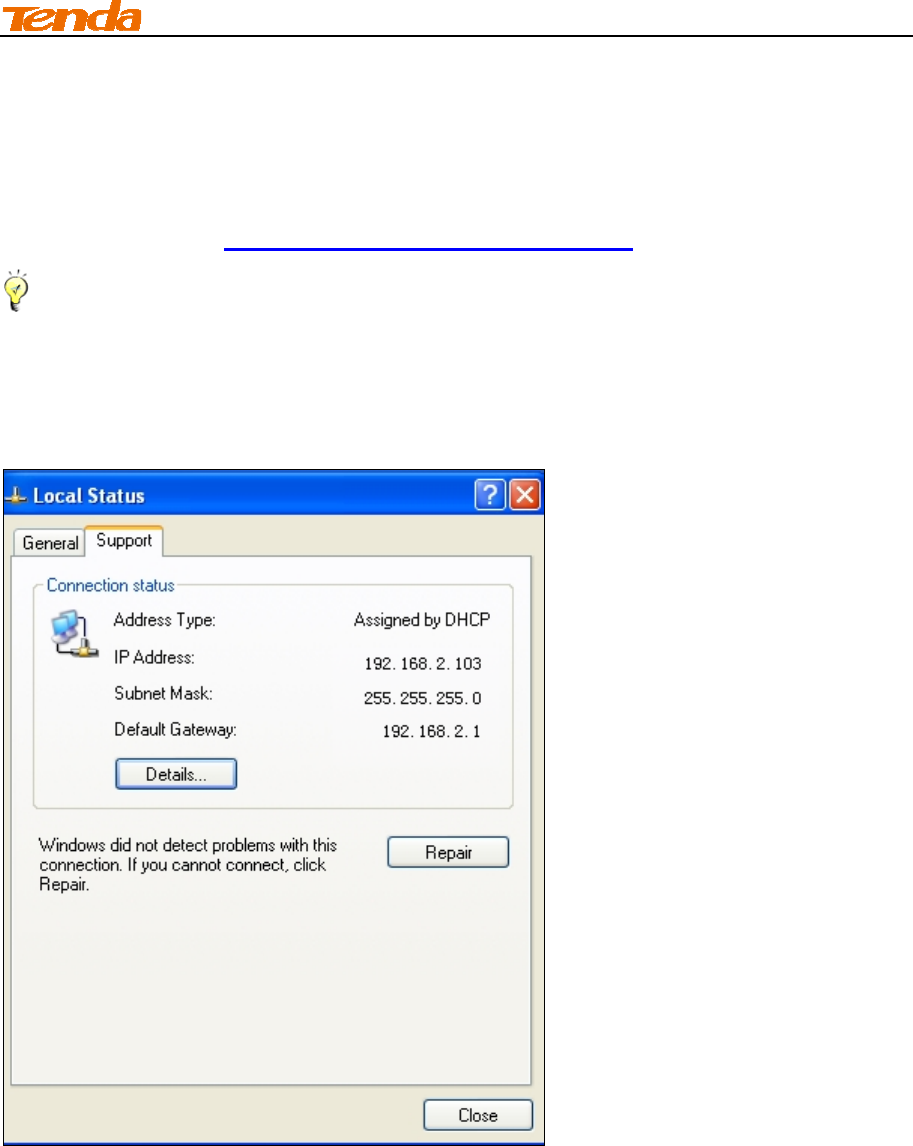
Step 3: Configure PC3 & PC4
① If PC 3 and PC 4 are set to static or fixed IP addresses (This is uncommon), change them to
"Obtain an IP address automatically" and "Obtain DNS server address automatically" from the
device. For details, see Appendix 1Configure PC TCP/IP Settings.
Tip------------------------------------------------------------------------------------------------------------------------
If PC 3 and PC 4 are already set to "Obtain an IP address automatically" and "Obtain DNS
II Quick Internet Setup
25
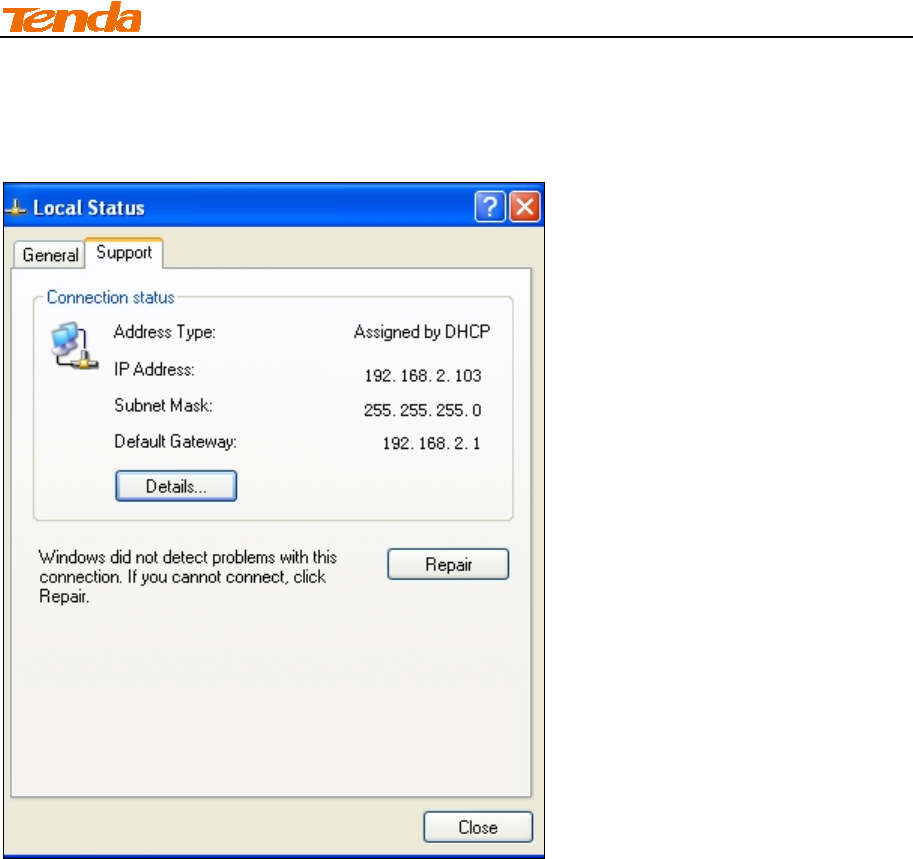
server address automatically" from the device, click Repair to repair the IP settings.
--------------------------------------------------------------------------------------------------------------------------------
② Wait until your PC successfully obtains an IP address.
II Quick Internet Setup
26
Verify Connectivity:
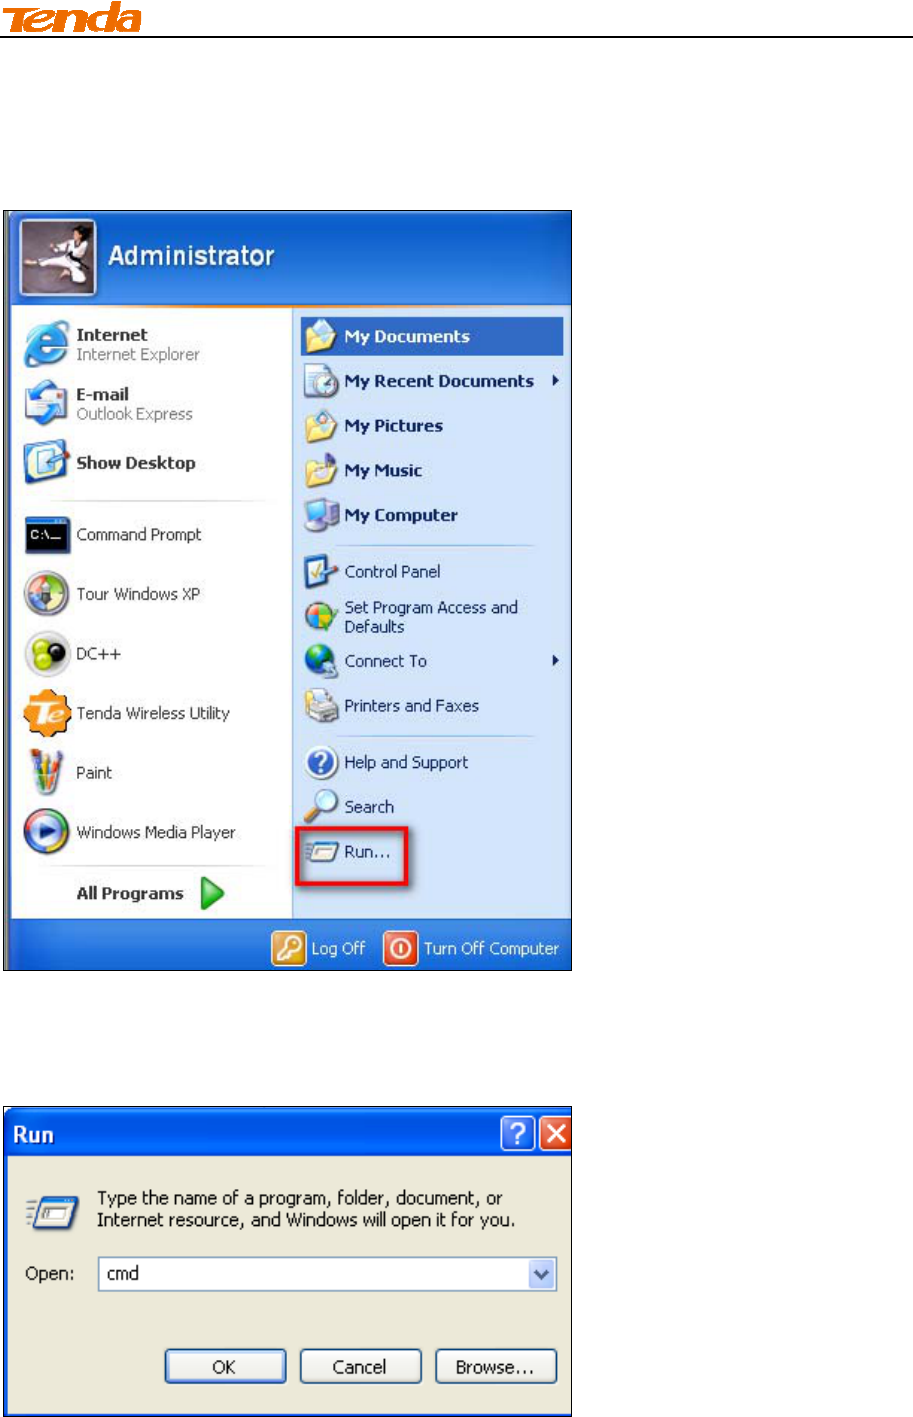
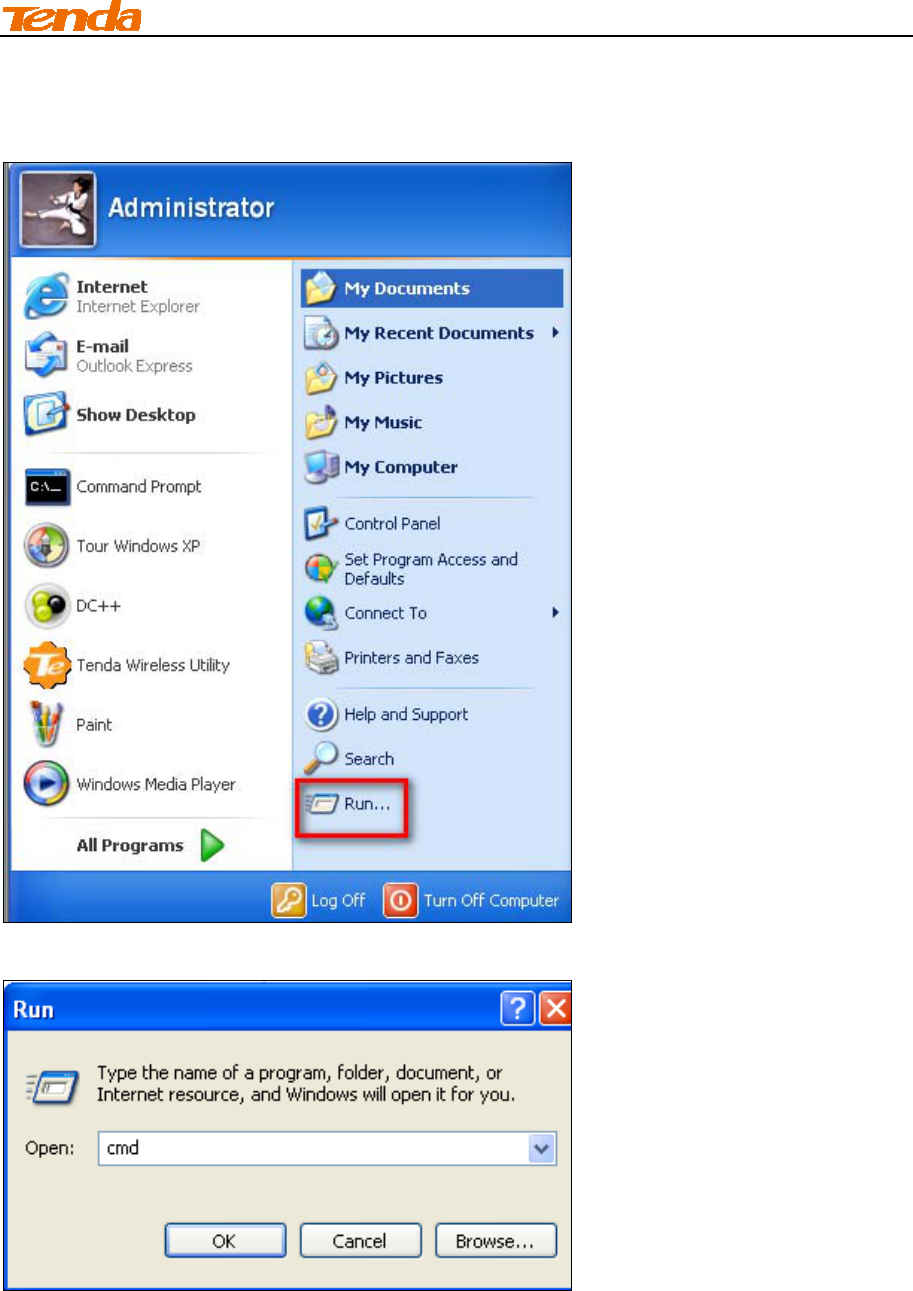
① On PC 3 or PC4, Click Start -> Run.
② Enter cmd and click OK.
II Quick Internet Setup
27
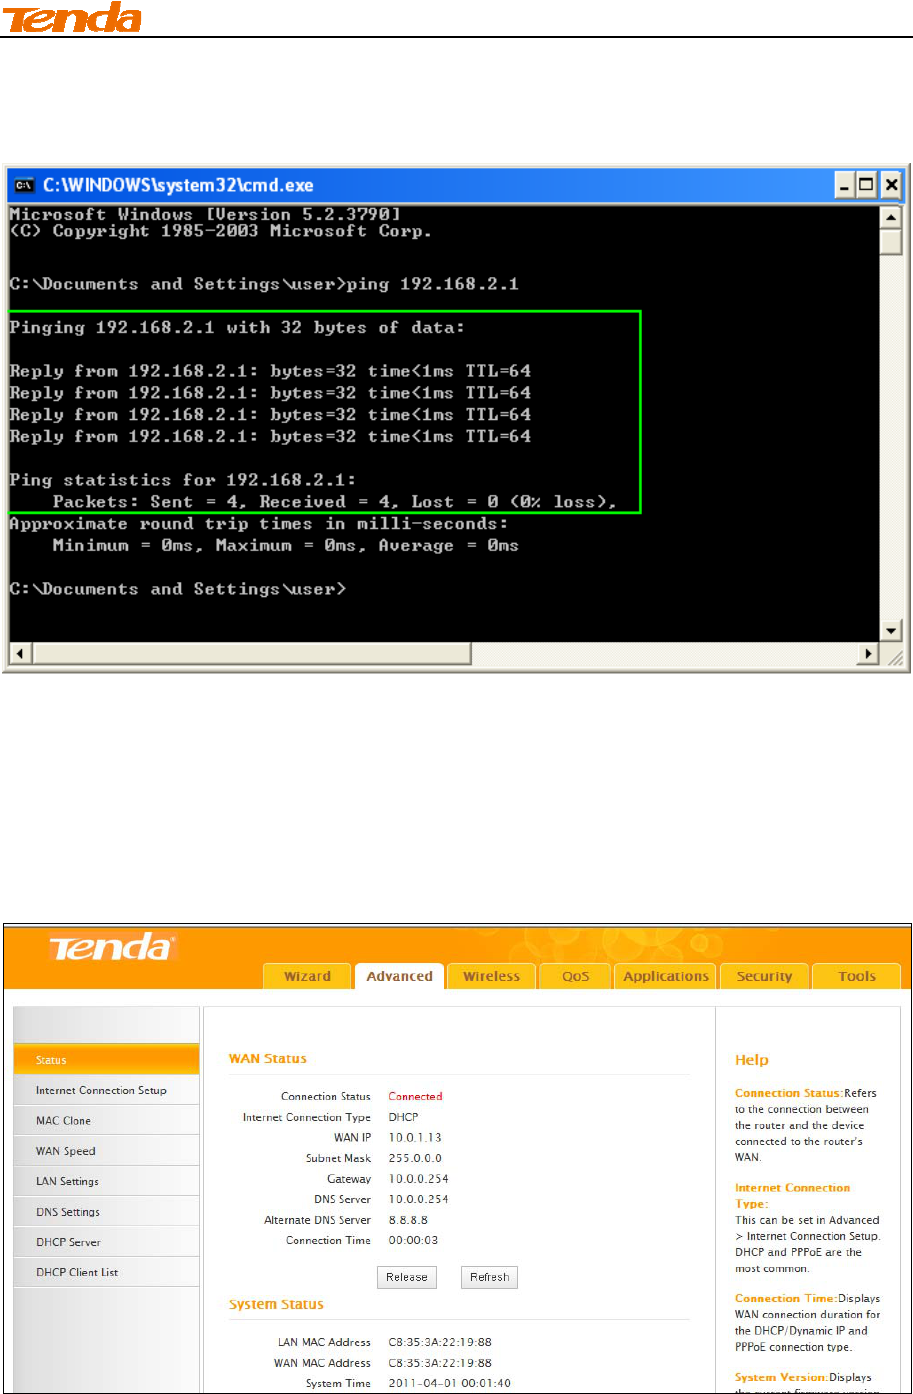
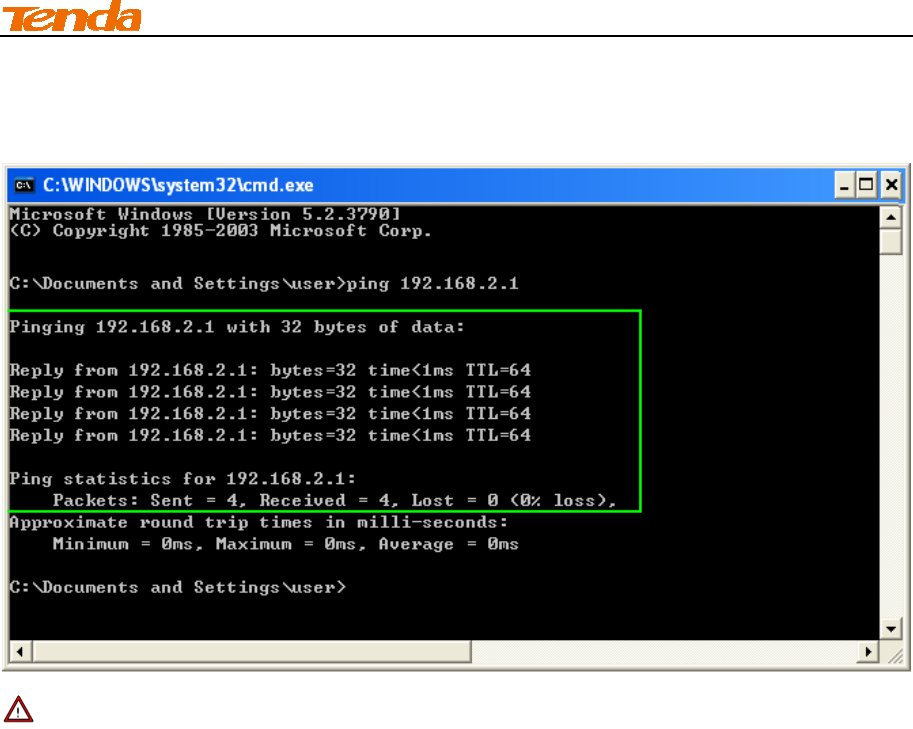
③ Input ping 192.168.2.1 and press Enter. If you get a screen as seen below, you have
successfully implemented WDS.
6 Verify Internet Connectivity
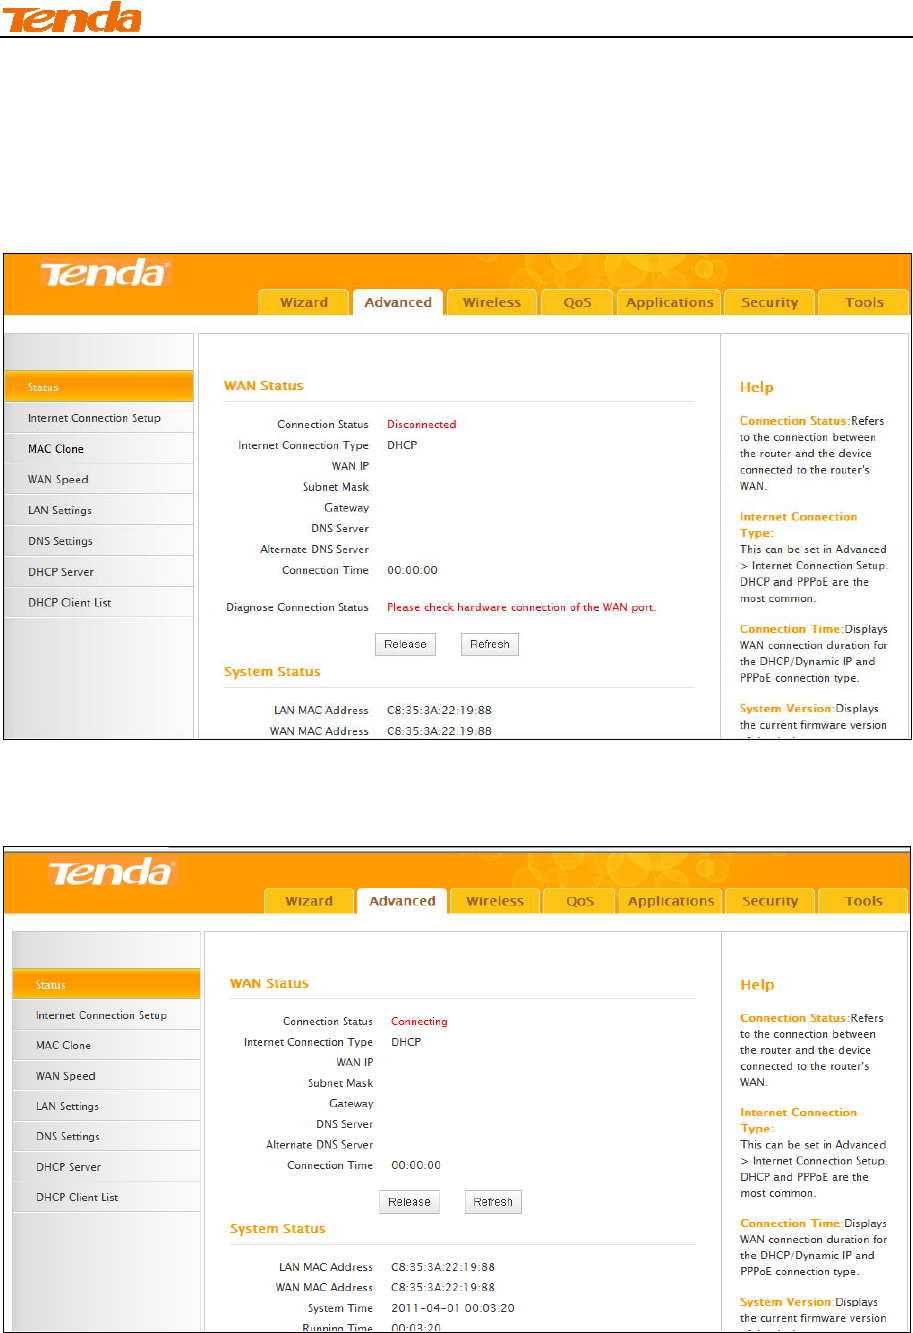
Click Advanced-> Status and check the Connection Status.
A. If connection status displays "Connected” (as shown below), you are connected to the
Internet.
II Quick Internet Setup
28
B. If connection status displays "Disconnected” (as shown below), the Ethernet cable from the
incoming Internet side to the router's WAN port may be connected improperly or disconnected.
Make sure the cable from the incoming Internet side is properly connected to the router's WAN
port. If nothing is wrong, "Connecting" or "Connected" will be displayed.
C. If connection status displays "Connecting”, wait until the webpage automatically refreshes 5
times.
And if it still displays "Connecting", try the following steps:
If you are using DHCP Internet connection type, try cloning MAC address. For more

II Quick Internet Setup
29
information, see 1.3 MAC Clone.
If you are using the PPPoE Internet connection type, read the diagnostic information next to
the Diagnose Connection Status on the screen.
III Features &Connectivity
30
III Features & Configurations
1 Advanced Settings
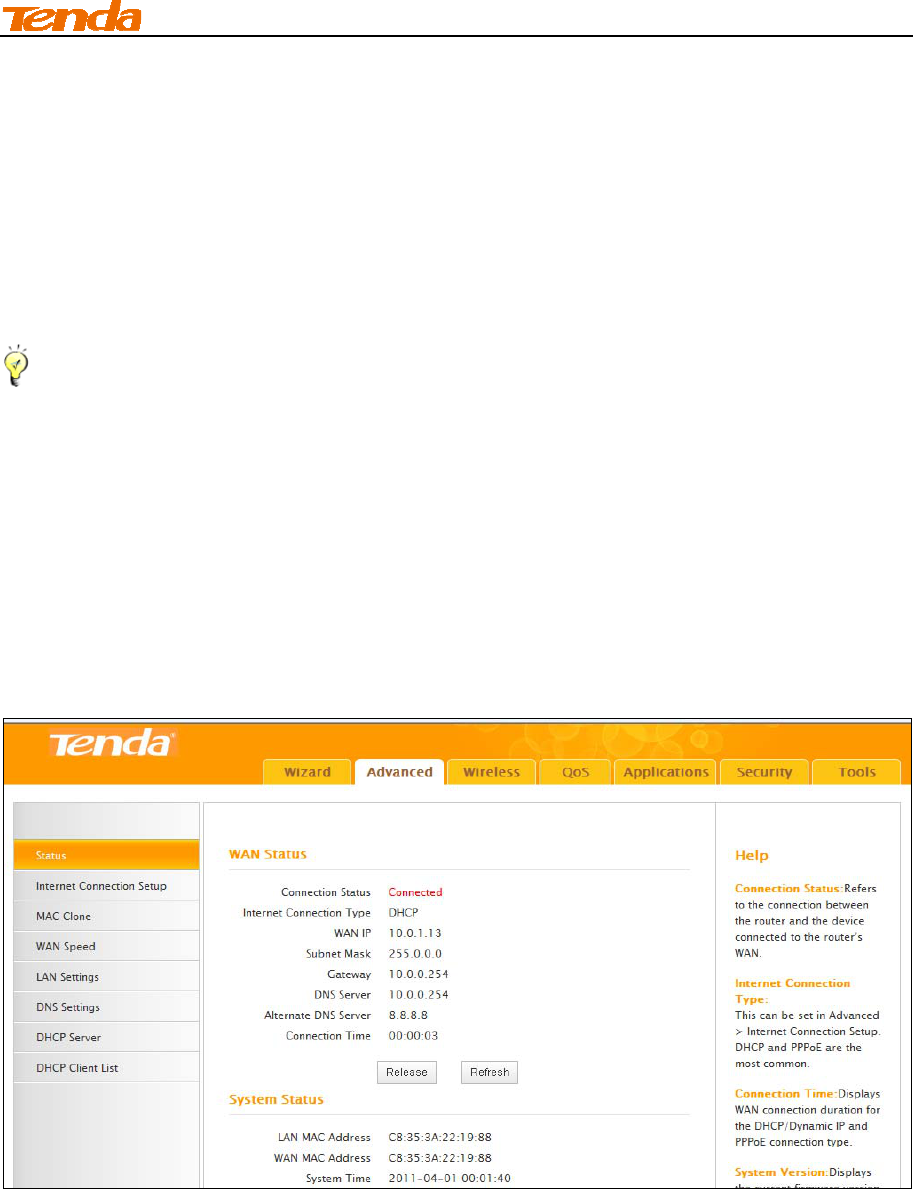
1.1 Status
Click Advanced to enter the status screen. Here you can view the router’s WAN status and
system status as noted below:
Tip----------------------------------------------------------------------------------------------------------------------
1. IP Address/Subnet Mask/WAN subnet mask/Gateway/Primary DNS Server/Secondary DNS
Server: This type of information appears only if the router successfully connects to Internet via a
PPPoE or DHCP (dynamic IP) connection. However if you connect the router to Internet with
static IP settings provided by your ISP, these fields will display the settings you entered whether
the router successfully connects to the Internet or not.
2. If nothing appears in the secondary DNS server field, there is no available secondary DNS
server.
--------------------------------------------------------------------------------------------------------------------------------
III Features &Connectivity
31
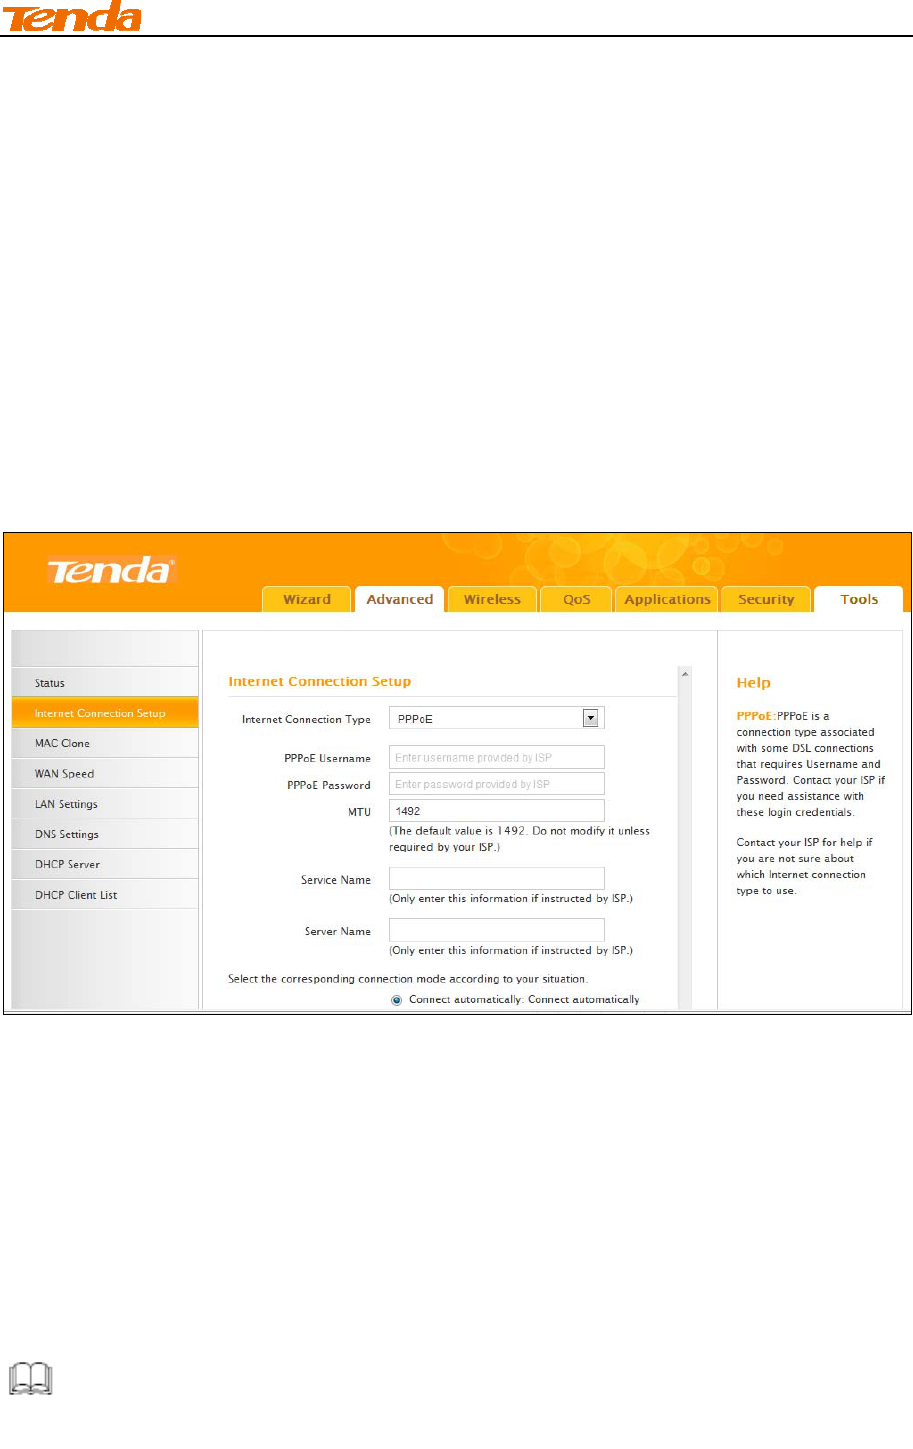
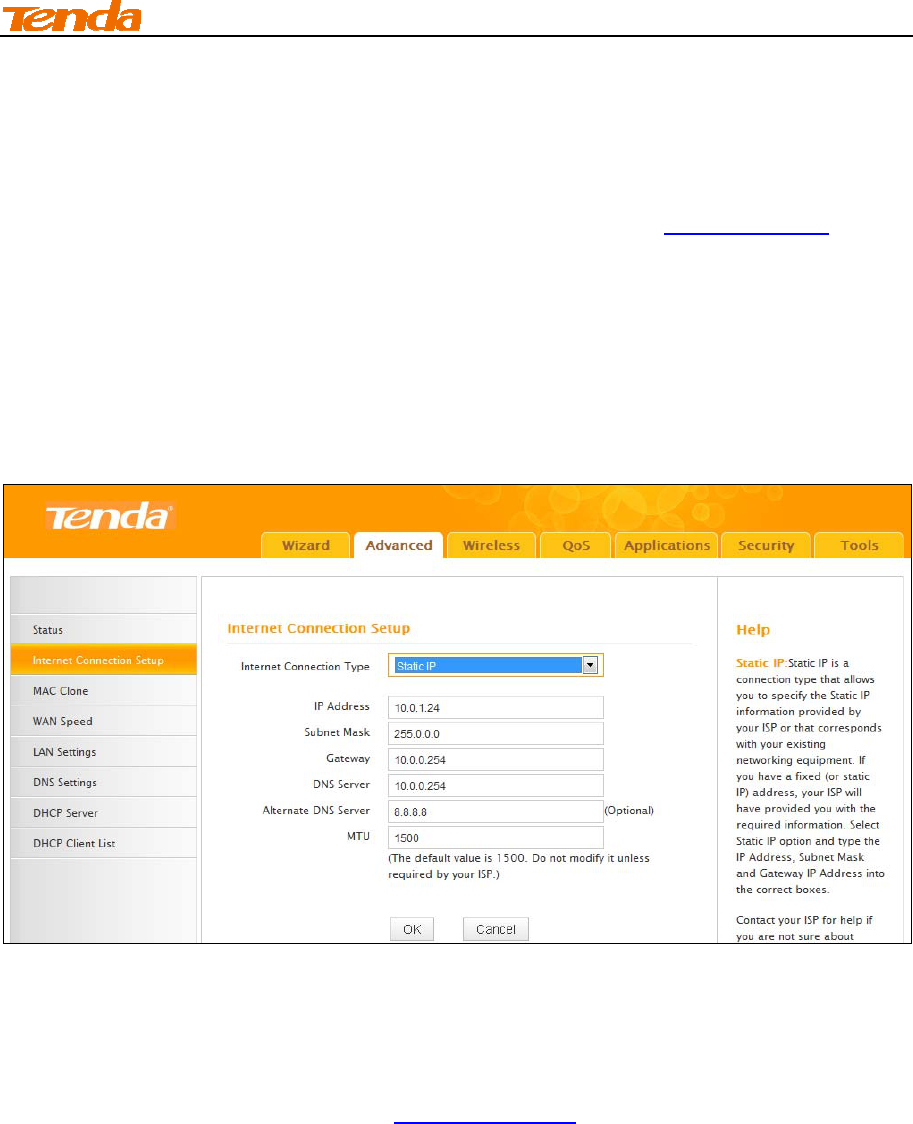
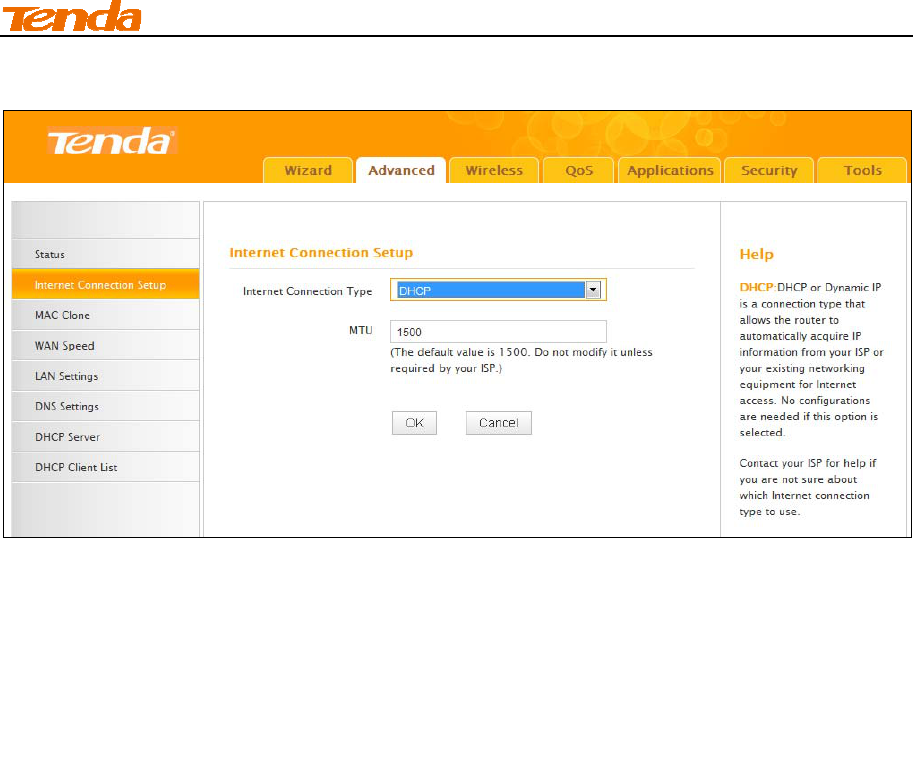
1.2. Internet Setup
Click Advanced -> Internet Connection Setup to configure your Internet connection settings.
Select your Internet connection type:
A. Select PPPoE if your ISP uses a PPPoE connection and gives you a PPPoE user name and a
PPPoE password.
B. Select Static IP if your ISP provides you with fixed or static IP address settings (special
deployment by ISP; this is rare).
C. Select DHCP (Dynamic IP) if you can access Internet simply by directly connecting your
computer to an Internet-enabled ADSL/Cable modem without configuring any settings.
PPPoE
Configuration Procedures:
① Internet Connection Type: Select PPPoE.
② PPPoE Username: Enter the ISP login name.
③ PPPoE Password: Enter the ISP login password.
④ Click OK to save your settings.
Knowledge Center----------------------------------------------------------------------------------------------
1. MTU: The MTU (maximum transmission unit) is the largest data packet a network device
III Features &Connectivity
32
transmits. The normal MTU value for most Ethernet networks is 1500 bytes, or 1492 bytes for
PPPoE connections. The best MTU value is often just the factory default value. For some ISPs,
you might need to change the MTU. This is rarely required, and should not be done unless you are
sure it is necessary for your ISP connection. For more information, see WAN MTU Setup.
2. Service Name: This is the descriptive name of the current connection. Only enter it if your ISP
provides it.
3. Server Name: This is the descriptive name of the server. Only enter it if your ISP provides it.
-------------------------------------------------------------------------------------------------------------------------------
Static IP
Configuration Procedures:
① Internet connection Type: Select Static IP.
② IP Address/Subnet Mask/WAN subnet mask/Gateway/DNS Server/Alternate DNS Server:
Enter the ISP information you gathered in 1Getting Prepared.
③ Click OK to save your settings.
III Features &Connectivity
33
DHCP
Configuration Procedures:
① Internet connection Type: Select DHCP.
② Click OK to save your settings.
WAN MTU Setup
The MTU (maximum transmission unit) is the largest data packet a network device transmits.
The normal MTU value for most Ethernet networks is 1500 bytes, or 1492 bytes for PPPoE
connections. For some ISPs, you might need to change the MTU. This is rarely required, and
should not be done unless you are sure it is necessary for your ISP connection. When one
network device communicates across the Internet with another, the data packets travel through
many devices along the way. If a device in the data path has a smaller MTU value than the other
devices, the data packets have to be "fragmented" to accommodate the device with the smallest
MTU value.
The best MTU value is often just the factory default value. In some situations, changing the MTU
value fixes one problem but causes another. Leave the MTU unchanged unless one of these
situations occurs:
A. You have problems connecting to your ISP or other Internet service, and either your ISP or our
technical support suggests changing the MTU value. Below web-based applications might require
an MTU change:
A secure website that does not open, or displays only part of a web page
III Features &Connectivity
34
Yahoo email
MSN portal
B. You use VPN and encounter serious performance problems.
C. You used a program to optimize MTU for performance reasons, and now you have connectivity
or performance problems.
If you suspect an MTU problem, try changing the MTU to 1400. If this does not help, gradually
reduce the MTU from the maximum value of 1500 until the problem disappears.
The common MTU sizes and applications are listed in the table below.
MTU Application
1500 Typical for connections that do not use PPPoE or VPN.
1492 Used in PPPoE environments.
1472 Maximum size to use for pinging. (Larger packets are
fragmented.)
1468 Used in some DHCP environments.
1436 Used in PPTP environments or with VPN.
Note ---------------------------------------------------------------------------------------------------------------------
A wrong/improper MTU value may cause Internet communication problems. For example, you
may be unable to access certain websites, frames within websites, secure login pages, or FTP or
POP servers.
---------------------------------------------------------------------------------------------------------------------------------
III Features &Connectivity
35
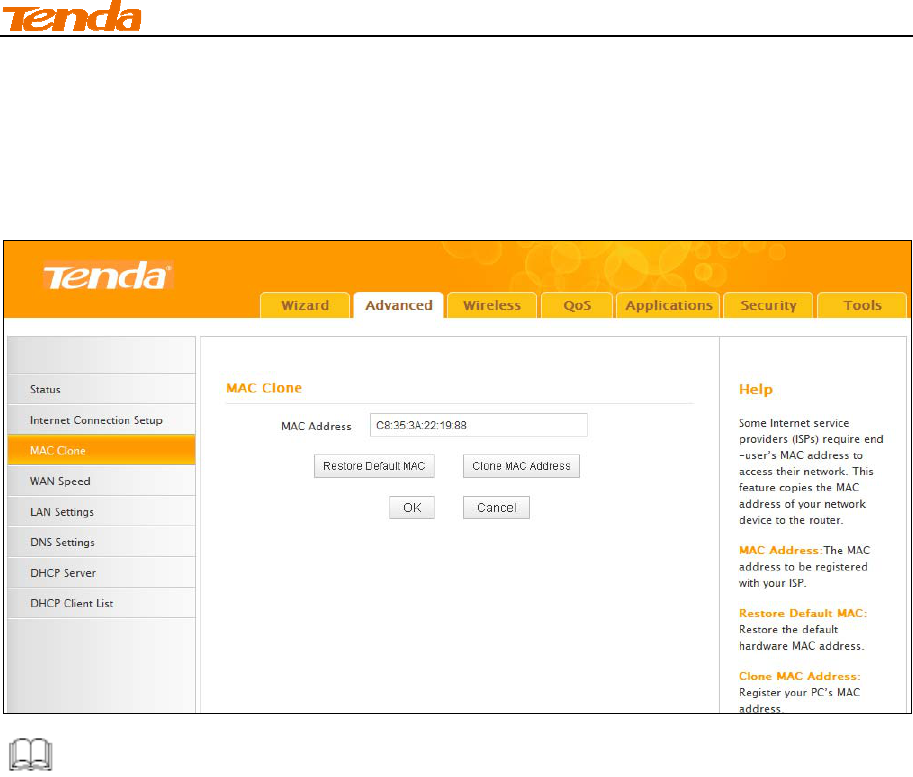
1.3 MAC Clone
Some ISPs (Internet Service Providers) require end-user's MAC address to access their network.
This feature copies your current PC's MAC address to the router. Click Advanced -> MAC Clone
to enter the configuration screen.
Knowledge Center-----------------------------------------------------------------------------------------------
1. Restore Default MAC: Reset the router’s WAN MAC to factory default.
2. Clone MAC Address: Clicking this button copies the MAC address of the computer that you
are now using to the router. Also, you can manually enter the MAC address that you want to use.
You have to use the computer whose MAC address is allowed by your ISP.
---------------------------------------------------------------------------------------------------------------------------------
To restore default MAC address:
① Click Restore Default MAC.
② Click OK to save your settings.
To clone the MAC address of the computer that you are currently using to the router:
① Click Clone MAC Address.
② Click OK to save your settings.
To manually enter the MAC address allowed by your ISP:
① Enter the MAC address allowed by your ISP.
② Click OK to save your settings.
1.4 WAN Speed
III Features &Connectivity
36
Click Advanced -> WAN Speed to enter the WAN port mode screen. Here you can configure the
router's WAN speed and duplex mode.
Tip-------------------------------------------------------------------------------------------------------------------------
1. The best port mode is often just the factory default of "Auto".
2. In some situations, you might need to change the port mode. For example, if the cable
connected to your router's WAN port is too long, you may need to use 10M full-duplex or 10M
half-duplex for better performance.
---------------------------------------------------------------------------------------------------------------------------------
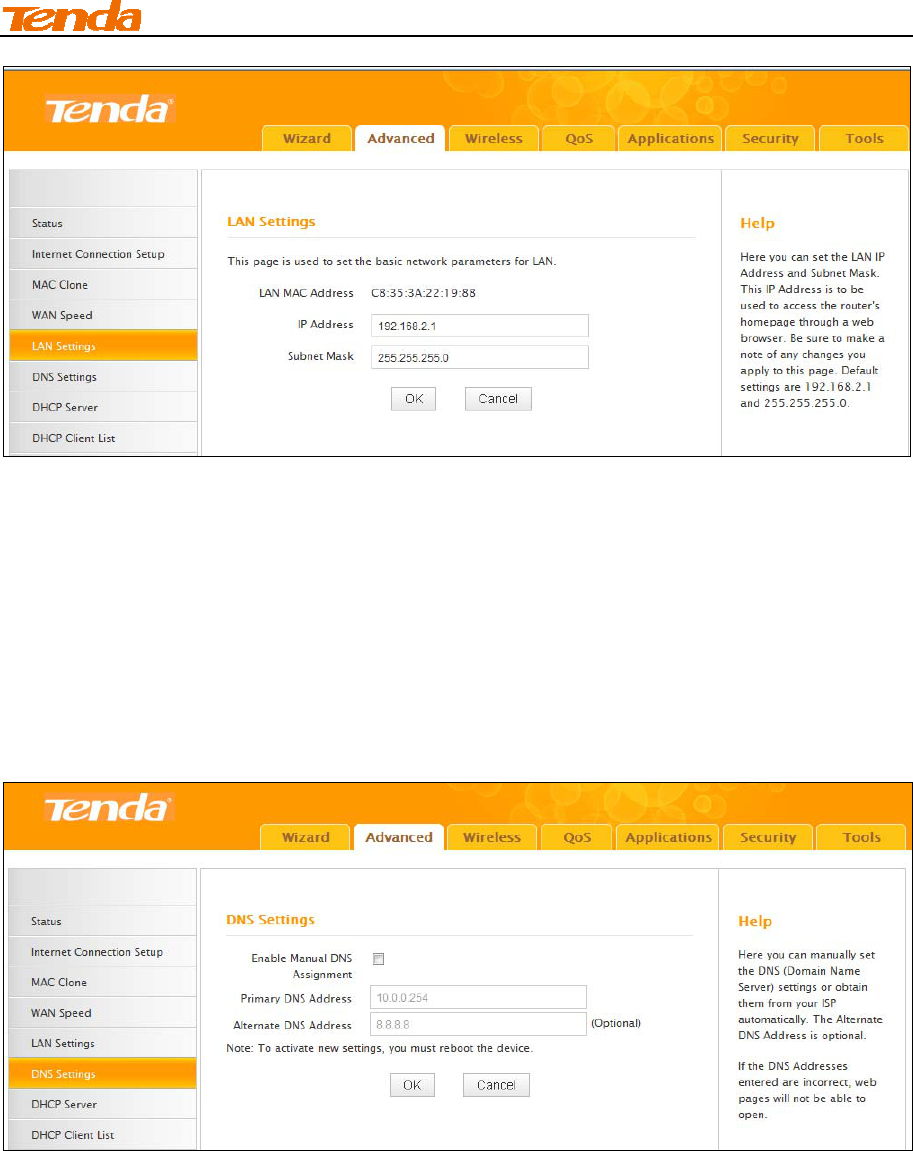
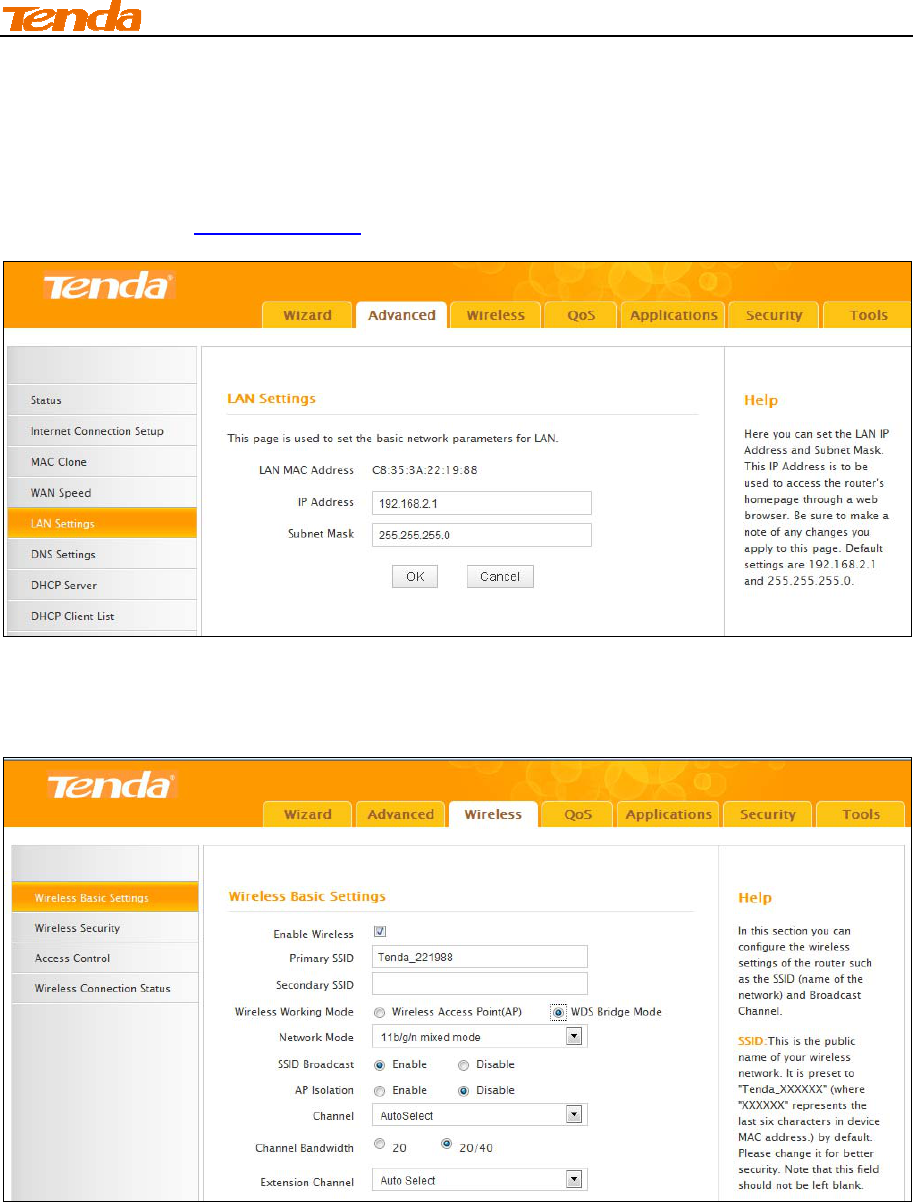
1.5 LAN Settings
Click Advanced -> LAN Settings to enter the configuration screen. Here you can configure the
LAN IP address. This IP address is to be used to access the router’s settings through a web
browser. Be sure to make a note of any changes you apply to this page.
Tip ----------------------------------------------------------------------------------------------------------------------
1. Default IP address and subnet mask are respectively 192.168.2.1 and 255.255.255.0.
2. This router does not support VLSM.
3. Be sure to make a note of any changes you apply to this page. If you change the LAN IP
address of the router, you have to open a new connection to the new IP address and log in
again.
---------------------------------------------------------------------------------------------------------------------------------
III Features &Connectivity
37
Configuration Procedures:
① Change the IP address to the one you wish to use, for example, 192.168.10.1.
② Click OK to save your settings.
1.6 DNS Settings
Click Advanced -> DNS Settings to enter the configuration screen. Here you can set the DNS
(Domain Name Server) settings. The DNS server is used to look up site addresses based on their
names.
Configuration Procedures:
① Enable Manual DNS Assignment: Check to enable the DNS settings.
② Primary DNS Server: Enter the IP address of your ISP’s primary DNS server.
③ Alternate DNS Address: If a secondary DNS server address is available, enter it here. This
field is optional.
④ Click OK to save your settings.
III Features &Connectivity
38
Note --------------------------------------------------------------------------------------------------------------------
The default DNS settings are recommended. Only change the DNS default settings if you know
that your ISP requires specific servers. If incorrect DNS settings are configured, webpages will be
unable to open.
---------------------------------------------------------------------------------------------------------------------------------
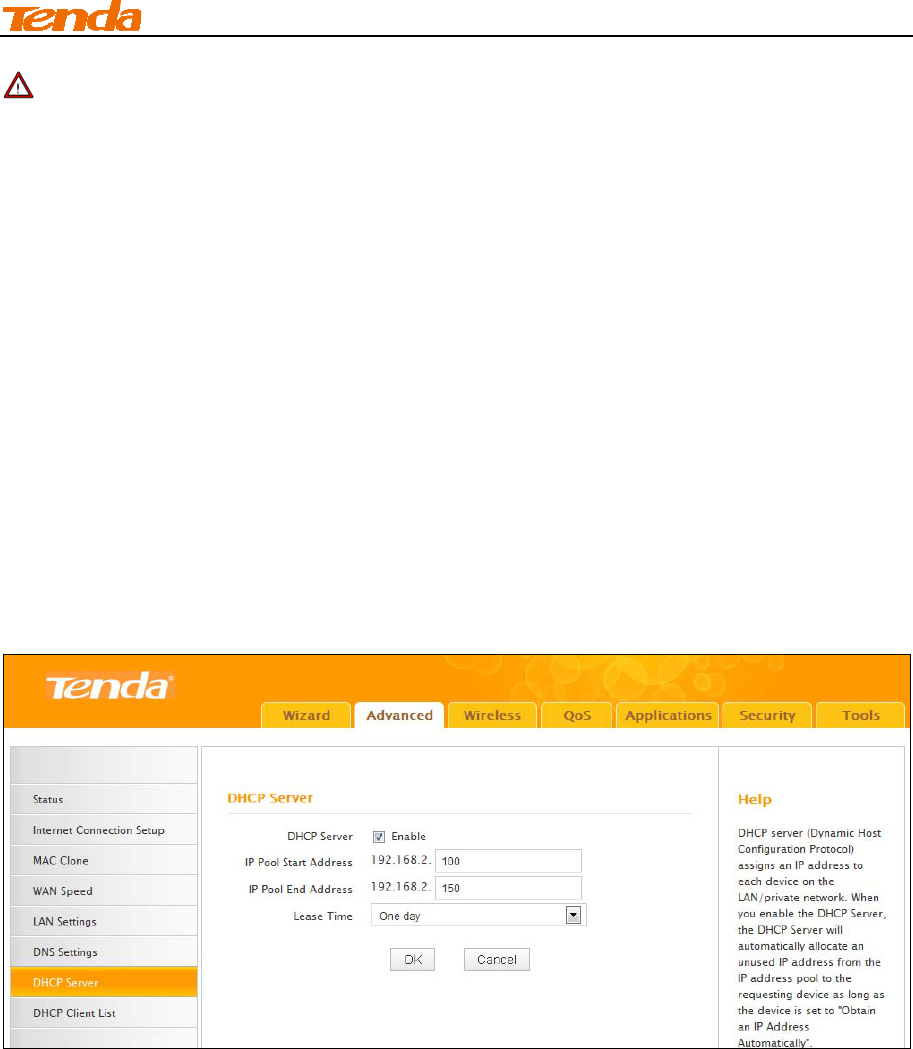
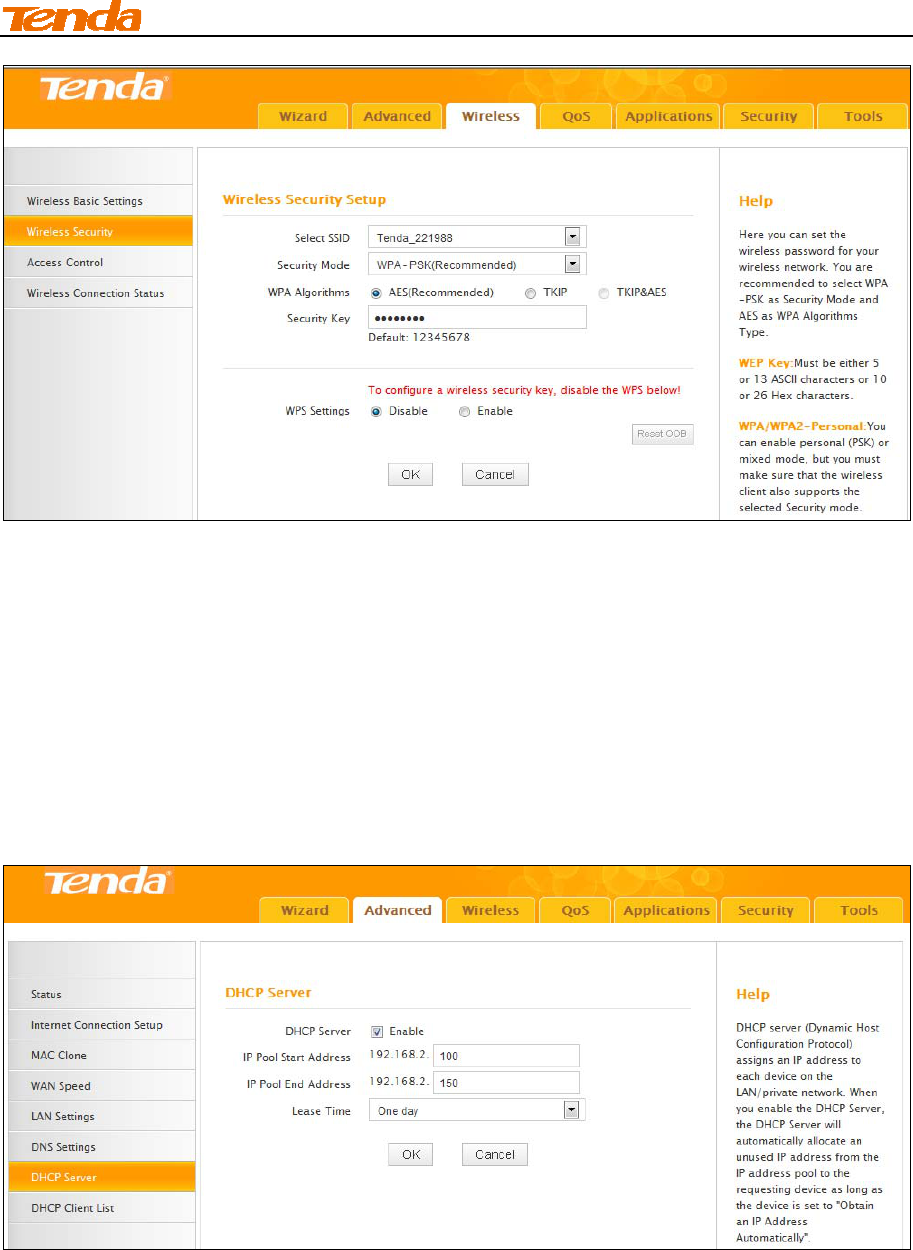
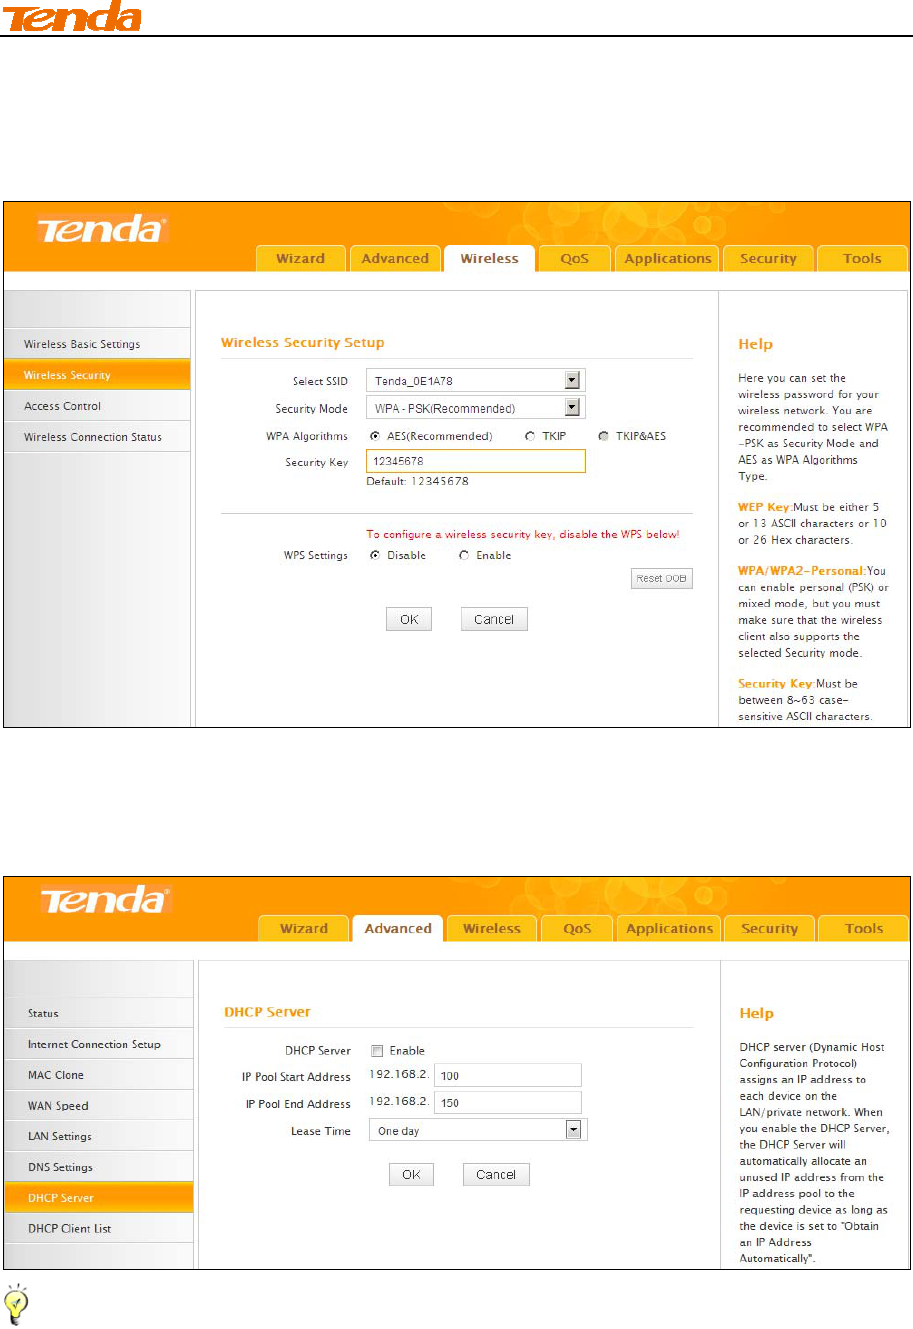
1.7 DHCP Server
DHCP (Dynamic Host Configuration Protocol) assigns an IP address to each device on the
LAN/private network. When you enable the DHCP Server, the DHCP Server will automatically
allocate an unused IP address from the IP address pool specified in this screen to the requesting
device as long as the device is set to "Obtain an IP Address Automatically". If you disable this
feature, you have to manually configure the TCP/IP settings for all PCs on your LAN to access
Internet.
Click Advanced -> DHCP Server to enter the DHCP Server screen. Here you can change the
DHCP IP address pool and lease time.
III Features &Connectivity
39
Configuration Procedures:
① DHCP Server: Select whether to enable or disable the DHCP server feature.
② IP Pool Start IP Address / IP Pool End IP Address: You can specify the starting and ending
address of the IP address pool here. These addresses should be part of the same IP address
subnet as the router’s LAN IP address.
③ Lease Time: The lease time is a time length that the IP address is assigned to each device
before it is refreshed.
④ Click OK to save your settings.
Tip-----------------------------------------------------------------------------------------------------------------------
1. By default, the router functions as a DHCP server. Do not disable the DHCP server feature
unless you want to manually configure the TCP/IP settings for all PCs on your LAN.
2. Lease time will be renewed automatically upon expiry. No additional configurations are
needed.
3. If you are not an advanced user, the default DHCP server settings are recommended.
---------------------------------------------------------------------------------------------------------------------------------
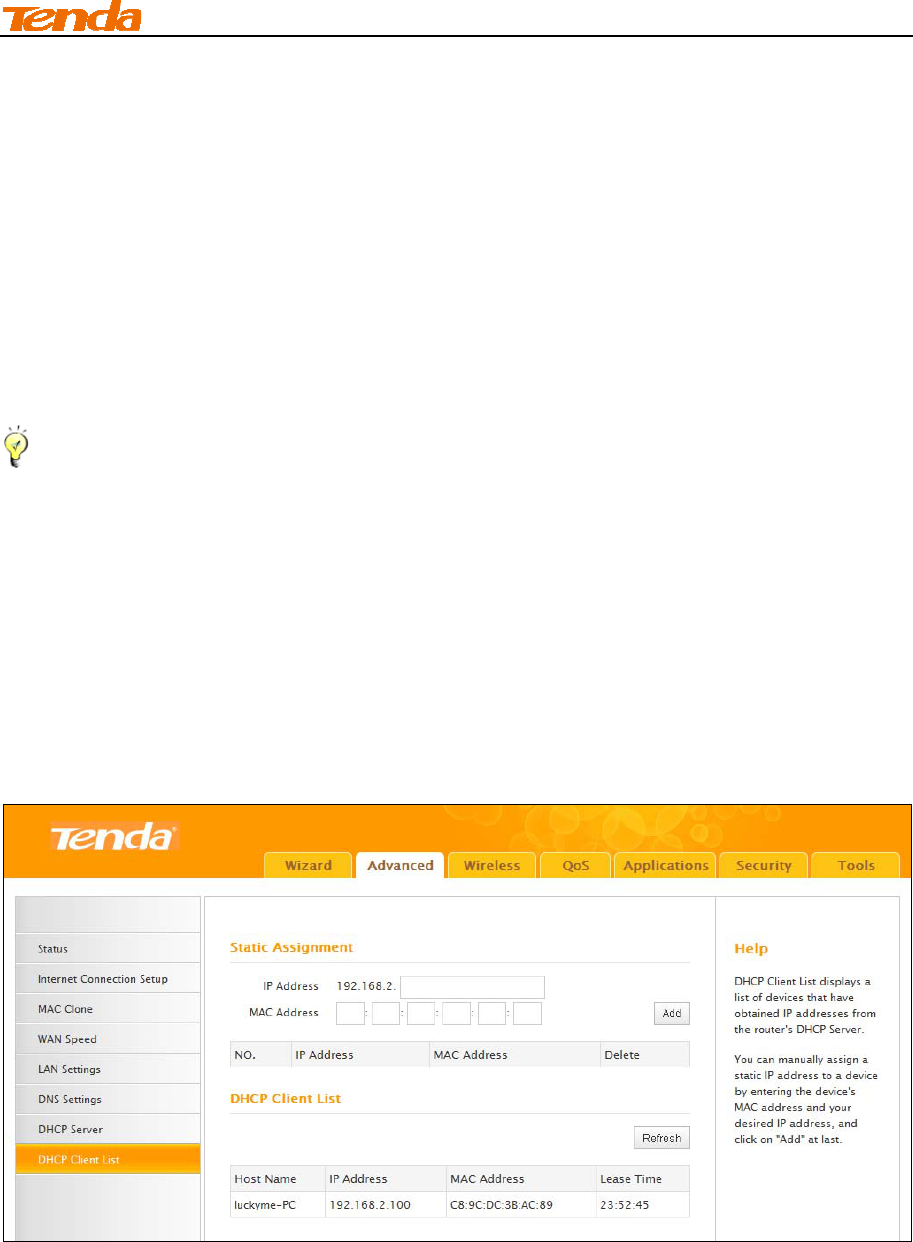
1.8 DHCP Client List
Click Advanced -> DHCP Client List. You can know whether there are unauthorized accesses by
viewing the client list.
Also, you can specify a reserved IP address for a PC in the LAN. That PC will always receive the
same IP address each time when it accesses the DHCP server. Reserved IP addresses could be
assigned to servers that require permanent IP settings.
III Features &Connectivity
40
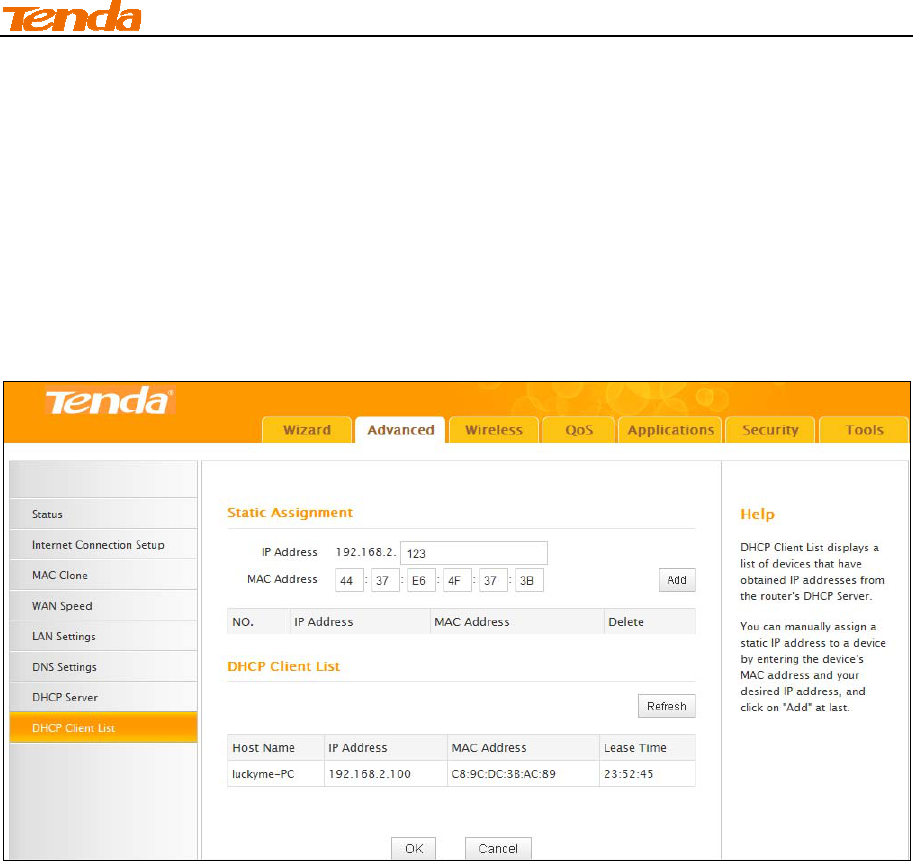
Static Assignment Application Example:
To have a PC at the MAC address of 44:37:E6:4F:37:3B always receive the same IP address of
192.168.0.123.
Configuration Procedures:
① Enter the last number of the IP address you want to reserve, for example, 123.
② Enter the MAC address of 44:37:E6:4F:37:3B.
③ Click Add.
III Features &Connectivity
41
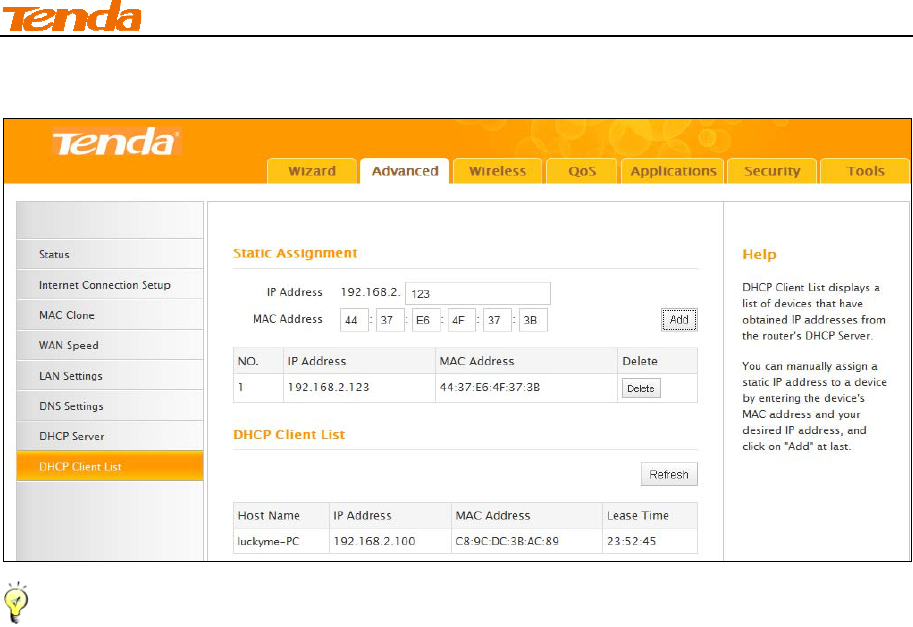
④ Click OK to save your settings.
Tip-------------------------------------------------------------------------------------------------------------------------
1. If the IP address you have reserved for your PC is currently used by another client, then you
will not be able to obtain a new IP address from the device's DHCP server, instead, you must
manually specify a different IP address for your PC to access Internet.
2. For PCs that has already obtained IP addresses, you may need to perform the Repair action
to activate the configured static IP addresses.
---------------------------------------------------------------------------------------------------------------------------------

III Features &Connectivity
42
2 Wireless Settings
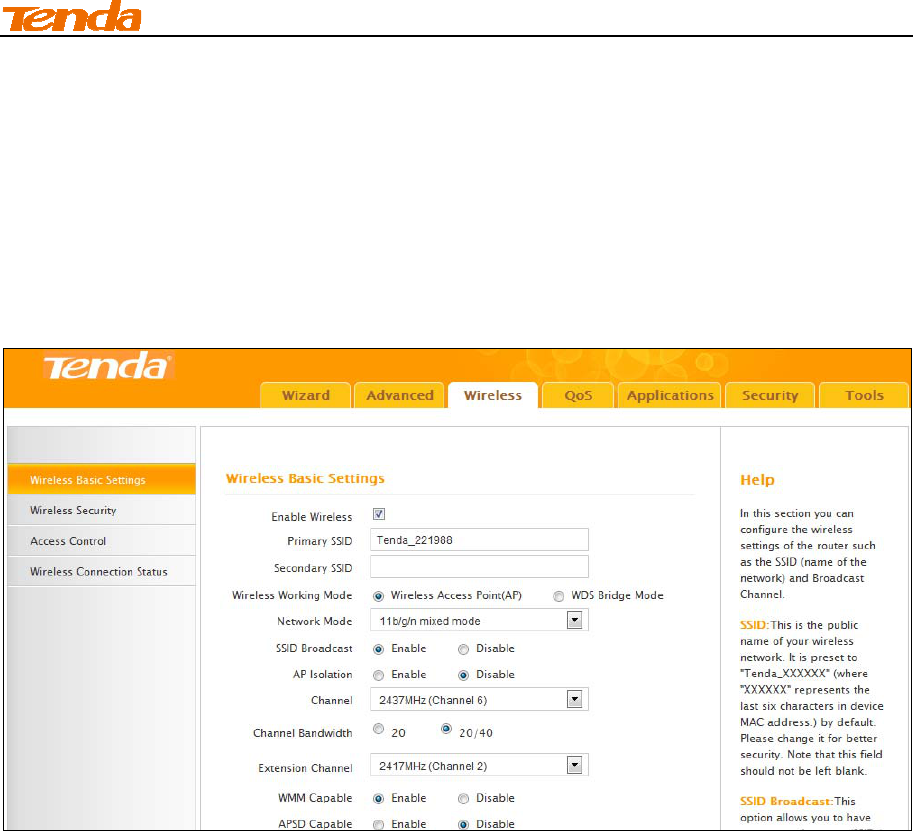
2.1 Wireless Basic Settings
Here you can configure the basic wireless settings of the router. This router supports two operating
modes: Wireless Access Point (AP) and WDS Bridge Mode.
A. To only use the wireless network delivered by this router, select Wireless Access Point (AP).
B. To extend an existing wireless network, select WDS Bridge Mode.
Wireless AP Mode
Tip-----------------------------------------------------------------------------------------------------------------------
1. By default, this device operates in the Wireless Access Point (AP) mode.
2. The primary SSID is defaulted to Tenda_XXXXXX, where XXXXXX is the last six characters in
the device's MAC address. You can find this SSID on the label attached on the bottom of the
device.
3. If you are not an advanced user, it is advisable to only change the primary SSID (name of the
network) and channel and leave other items unchanged.
4. The device supports two SSIDs: primary SSID and secondary SSID. The secondary SSID is
optional. By default, the secondary SSID is disabled.
5. Instructions to configure the primary SSID also apply to the secondary SSID. The primary SSID
is used as an example below to illustrate all wireless related features.
---------------------------------------------------------------------------------------------------------------------------------

III Features &Connectivity
43
Configuration Procedures:
① Primary SSID: This is the public name of your wireless network.
② Channel: Select a channel or select Auto to let system automatically select one for your
wireless network to operate on if you are unsure. The best selection is a channel that is the least
used by neighboring networks.
③ Click OK to save your settings.
Knowledge Center---------------------------------------------------------------------------------------------
1. Secondary SSID: This is an alternate name for your wireless network.
2. Network Mode (802.11 Mode): Select a correct mode according to your wireless clients.
11b: This network mode delivers wireless speed up to 11Mbps and is only compatible with
11b wireless clients.
11g: This network mode delivers wireless speed up to 54Mbps and is only compatible with
11g wireless clients.
11b/g mixed: This network mode delivers wireless speed up to 54Mbps and is compatible
with 11b/g wireless clients.
11b/g/n mixed: This network mode delivers wireless speed up to 300Mbps (A31)/150Mbps
(A8) and is compatible with 11b/g/n wireless clients.
3. SSID Broadcast: This option allows you to have your network names (SSIDs) publicly
broadcast or if you choose to disable it, the SSIDs will be hidden.
4. AP Isolation: When enabled, devices wirelessly connected to the same SSID will not be able
to intercommunicate.
5. Channel Bandwidth: Select a proper channel bandwidth to enhance wireless performance.
This option is available only in 802.11b/g/n. Wireless speed in the channel bandwidth of 20/40 is 2
times in 20.
6. Extension Channel: This is used to ensure N speeds for 802.11n devices on the network. This
option is available only in 11b/g/n mixed mode with channel bandwidth of 20/40.
7. WMM Capable: WMM is QoS for your wireless network. Enabling this option may better stream
wireless multimedia data (such as video or audio).
8. ASPD Capable: Select to enable/disable the auto power saving mode. This option is effective
only if WMM Capable is enabled. It is advisable to disable it.
III Features &Connectivity
44
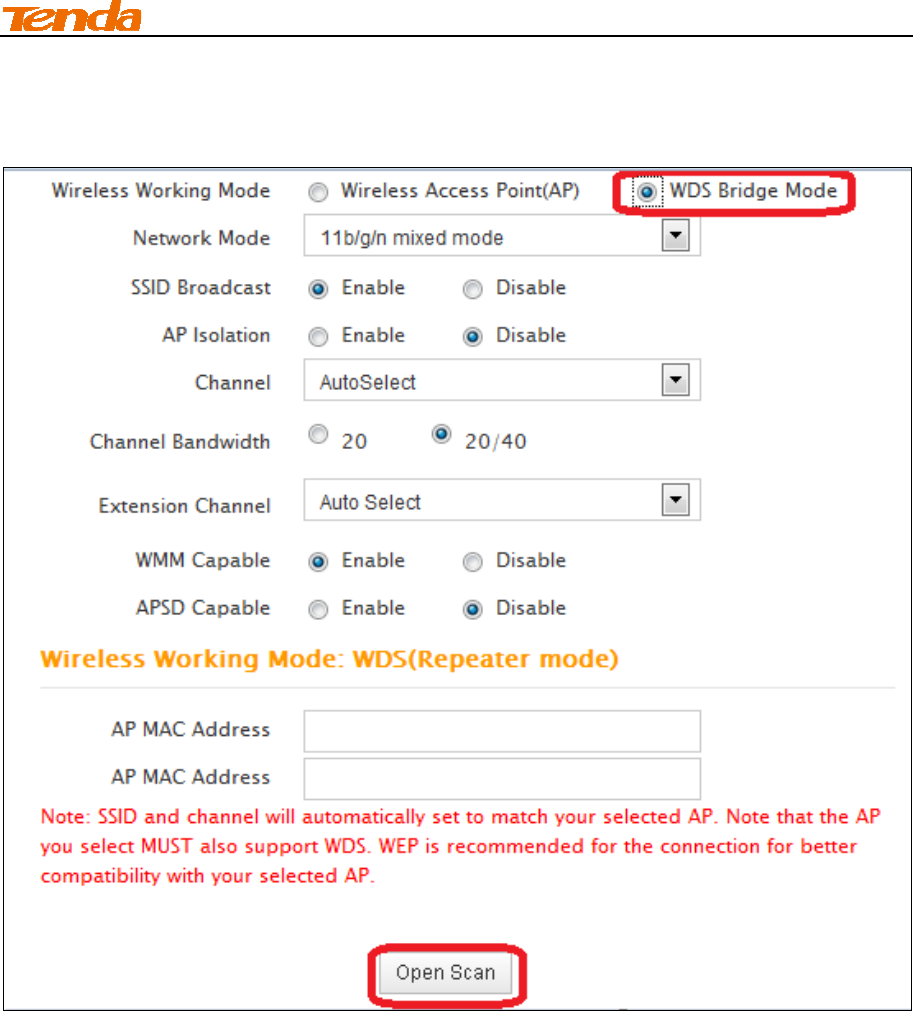
WDS Bridge Mode
WDS Bridge Mode: wireless distribution system (WDS) is a system enabling the wireless
interconnection of access points in an IEEE 802.11 network. It allows a wireless network to be
expanded using multiple access points without the traditional requirement for a wired backbone to
link them.
Note----------------------------------------------------------------------------------------------------------------------
The Access Points you select MUST support WDS.
---------------------------------------------------------------------------------------------------------------------------------
III Features &Connectivity
45
WDS Bridge Mode Application Example:
To implement WDS Bridge for the application scenario above, do as follows:
Step 1: Get Prepared
① View and note down the SSID and wireless security settings of Router 1.
Click Wireless -> Wireless Basic Settings to enter the wireless basic configuration screen. Here
you can view the SSID and channel.
SSID:Tenda_221988
Channel: 6
Click Wireless -> Security to enter the wireless security configuration screen. Here you can view
the security settings.
III Features &Connectivity
46
Security Mode: WPA-PSK
Cipher Type: AES
Password: 12345678
AP MAC (BSSID): C8:3A:35:00:01:20 (can be found on the label attached to the device)
Make sure DHCP server is enabled on router 1.
Click Advanced -> DHCP Server to enter the DHCP server configuration screen. You can view
and configure the DHCP server settings here.
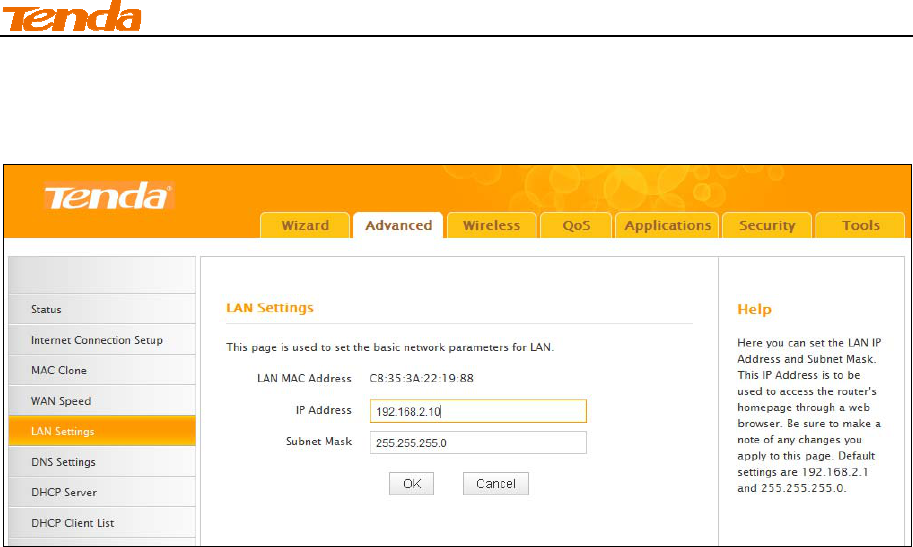
② Set the LAN IP address of Router 1 to a different address yet on the same net segment as
Router 2.
For example, Router 1: 192.168.2.1, Router 2: 192.168.2.10.
About how to configure these IP addresses, see 1.6 LAN Setting.
III Features &Connectivity
47
Step 2: Configure Router 1
① Set the LAN IP address of Router 1 (Set it to a different address yet on the same net segment
as Router 2. For example, Router 1: 192.168.2.1, Router 2: 192.168.2.10). For more
information, see 1.6 LAN Settings.
② Click Wireless -> Wireless Basic Settings to enter the configuration screen. Select WDS
Bridge Mode and click Open Scan.
III Features &Connectivity
48
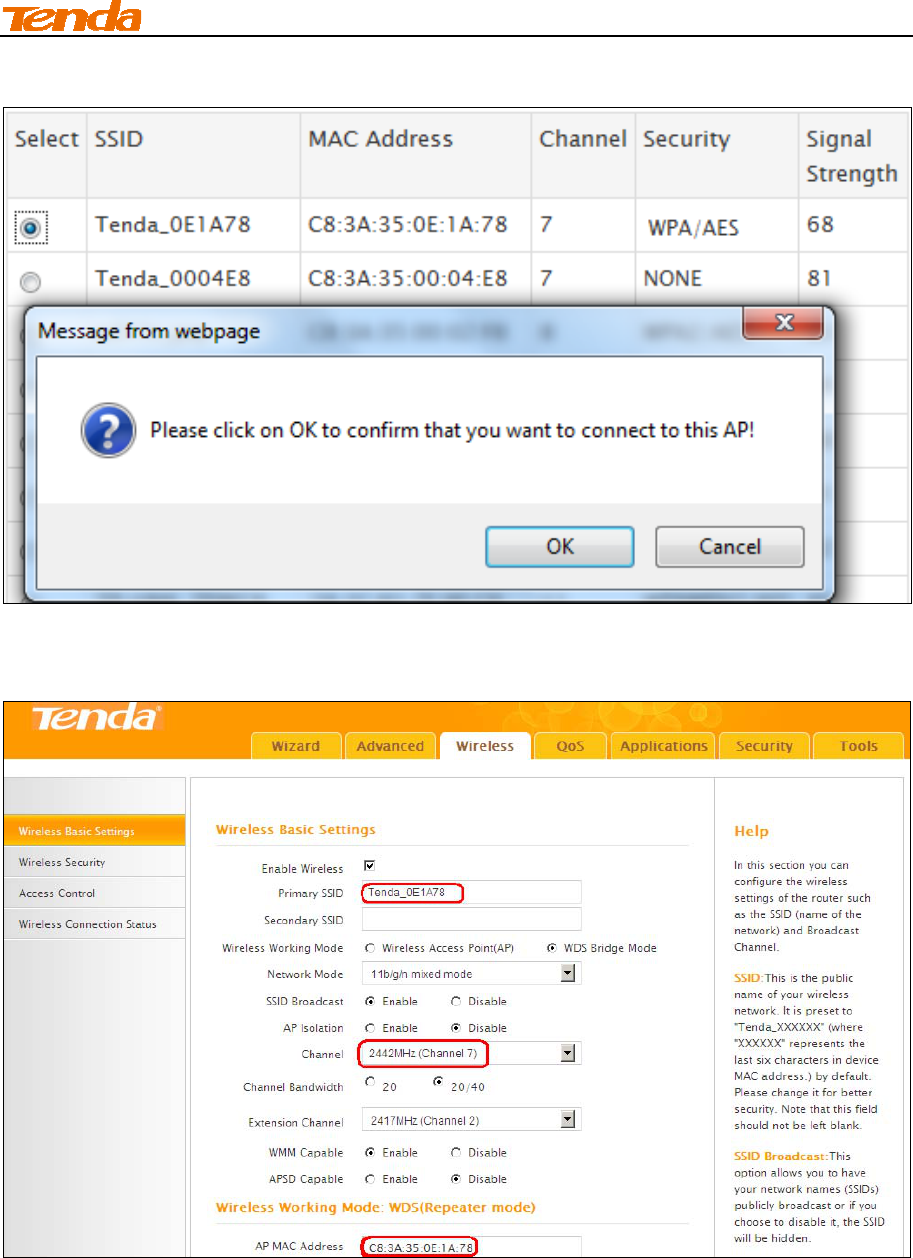
③ Select the AP you wish to connect to and click OK to confirm it and then click Close Scan.
④ Verify that the automatically populated SSID, channel and MAC address, etc. are correct and
then click OK.
III Features &Connectivity
49
Step 3: Configure Router 2
① Configure the LAN IP address of Router 2
III Features &Connectivity
50
② Click Wireless -> Wireless Basic Settings to enter the configuration screen. Select WDS
Bridge Mode and click Open Scan.
III Features &Connectivity
51
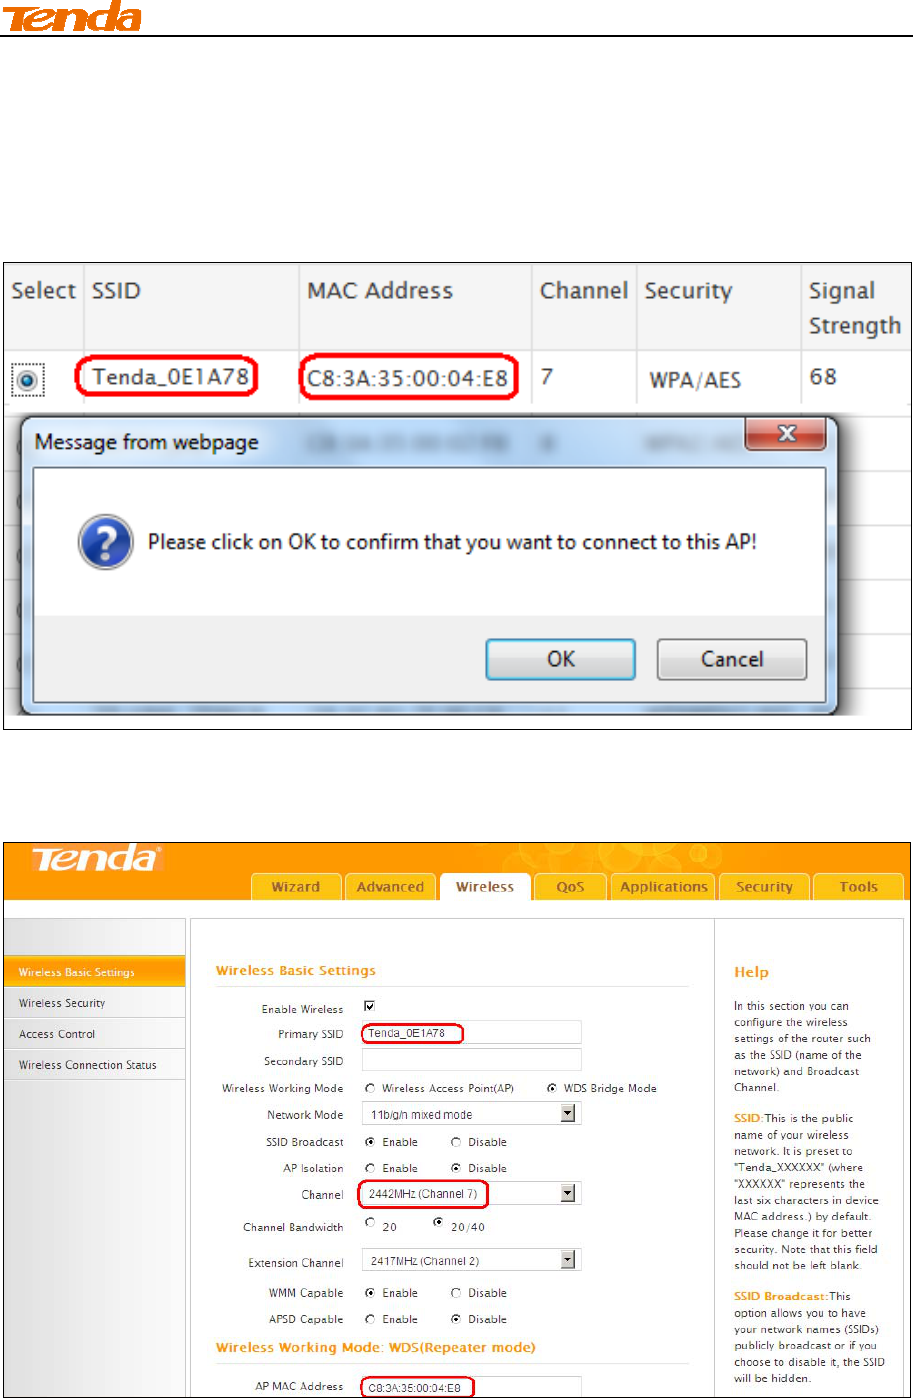
③ Select the AP you wish to connect to (The SSIDs of these two wireless networks become the
same now. You need to identify them by their MAC addresses.) . Click OK on the appearing
dialog box and then close scan.
④ Check the automatically populated SSID, channel and MAC address, etc of the remote AP.
Verify that all settings are correct and then click OK.
III Features &Connectivity
52
⑤ Set the security key of Router 2 to the same as Router 1.
Click Wireless -> Security to set the security settings to match the remote device (Security Mode:
WPA2-PSK, Cipher Type: AES, Security Key: 12345678).
⑥ Click Advanced -> DHCP Server and disable the DHCP server on Router 2 (Disable DHCP
server on the local router that is used to extend the wireless network from the remote
Internet-enabled router).
Tip-------------------------------------------------------------------------------------------------------------------------
If WDS connection fails, try a different security mode and/or cipher type.
---------------------------------------------------------------------------------------------------------------------------------
III Features &Connectivity
53
Step 4: Configure PC3 & PC4
③ If PC 3 and PC 4 are set to static or fixed IP addresses (This is uncommon), change them to
"Obtain an IP address automatically" and "Obtain DNS server address automatically" from the
device. For details, see Appendix 1Configure PC TCP/IP Settings.
Tip-----------------------------------------------------------------------------------------------------------------------
If PC 3 and PC 4 are already set to "Obtain an IP address automatically" and "Obtain DNS
server address automatically" from the device, click Repair to repair the IP settings.
--------------------------------------------------------------------------------------------------------------------------------
④ Wait until your PC successfully obtains an IP address.
III Features &Connectivity
54
Verify Bridge Connectivity:
④ On PC 3, Click Start -> Run.
⑤ Enter cmd and click OK.
III Features &Connectivity
55
⑥ Input ping 192.168.2.1 and press Enter. If you get a screen as seen below, you have
successfully implemented WDS.
Note ---------------------------------------------------------------------------------------------------------------------
1 WDS feature can only be implemented between 2 WDS-capable wireless devices. Plus, SSID,
channel, security settings and security key must be exactly the same on both such devices.
2 To ensure a proper wireless connection, do not change any settings on the two devices after
WDS is successfully implemented.
---------------------------------------------------------------------------------------------------------------------------------