TENDA TECHNOLOGY FH1201 High Power Wireless AC1200 Dual-band Router User Manual part 2 of 4
SHENZHEN TENDA TECHNOLOGY CO., LTD. High Power Wireless AC1200 Dual-band Router part 2 of 4
Contents
- 1. User Manual_part 1 of 4
- 2. User Manual_part 2 of 4
- 3. User Manual_part 3 of 4
- 4. User Manual_part 4 of 4
User Manual_part 2 of 4

High Power Wireless AC1200 Dual Band Router
36
④ Click Save to save your settings.
Knowledge Center ------------------------------------------------------------------
1. 802.11 Mode (Network Mode): Select a correct mode according to your wireless clients.
11b: This network mode delivers wireless speed up to 11Mbps and is
only compatible with 11b wireless clients.
11g: This network mode delivers wireless speed up to 54Mbps and is
only compatible with 11g wireless clients.
11b/g mixed: This network mode delivers wireless speed up to
54Mbps and is compatible with 11b/g wireless clients.
11b/g/n mixed: This network mode delivers wireless speed up to
300Mbps and is compatible with 11b/g/n wireless clients.
11ac:This network mode delivers wireless speed up to 867Mbps.
2. SSID Broadcast: This option allows you to have your network names (SSIDs) publicly
broadcast or if you choose to disable it, the SSIDs will be hidden.
3. Channel Bandwidth: Select a proper channel bandwidth to enhance wireless performance.
This option is available only in 802.11b/g/n. Wireless speed in the channel bandwidth of
20/40 is 2 times in 20.
4. Extension Channel: This is used to ensure N speeds for 802.11n devices on the net work.
This option is available only in 11b/g/n mixed mode with channel bandwidth of 20/40.
------------------------------------------------------------------------------------------------
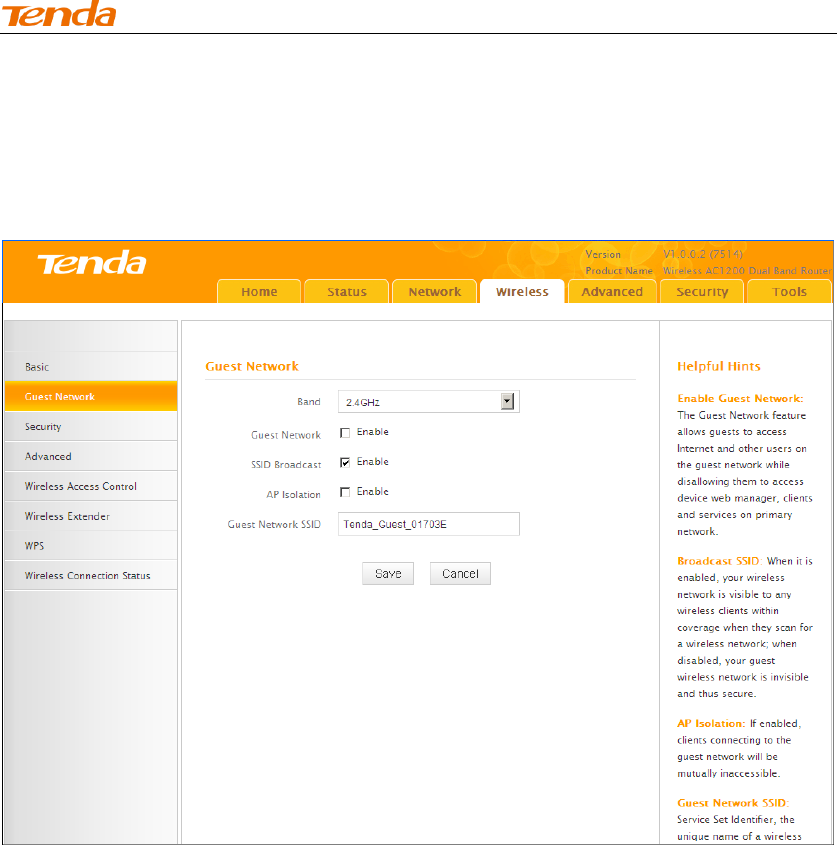
3.2 Guest Network
Click Wireless -> Guest Network to enter the Guest Network screen. The Guest
Network feature allows guests to access Internet and other users on the guest
network while disallowing them to access Device web manager, users on master
network and clients behind the LAN ports. Thus the wireless master network is
secured.
Configuration Procedures:
① Band: Select 2.4GHz or 5GHz.
High Power Wireless AC1200 Dual Band Router
37
② Guest Network: Select whether to enable or disable the Guest Network
feature. It is disabled by default.
③ Click Save to save your settings.
High Power Wireless AC1200 Dual Band Router
38
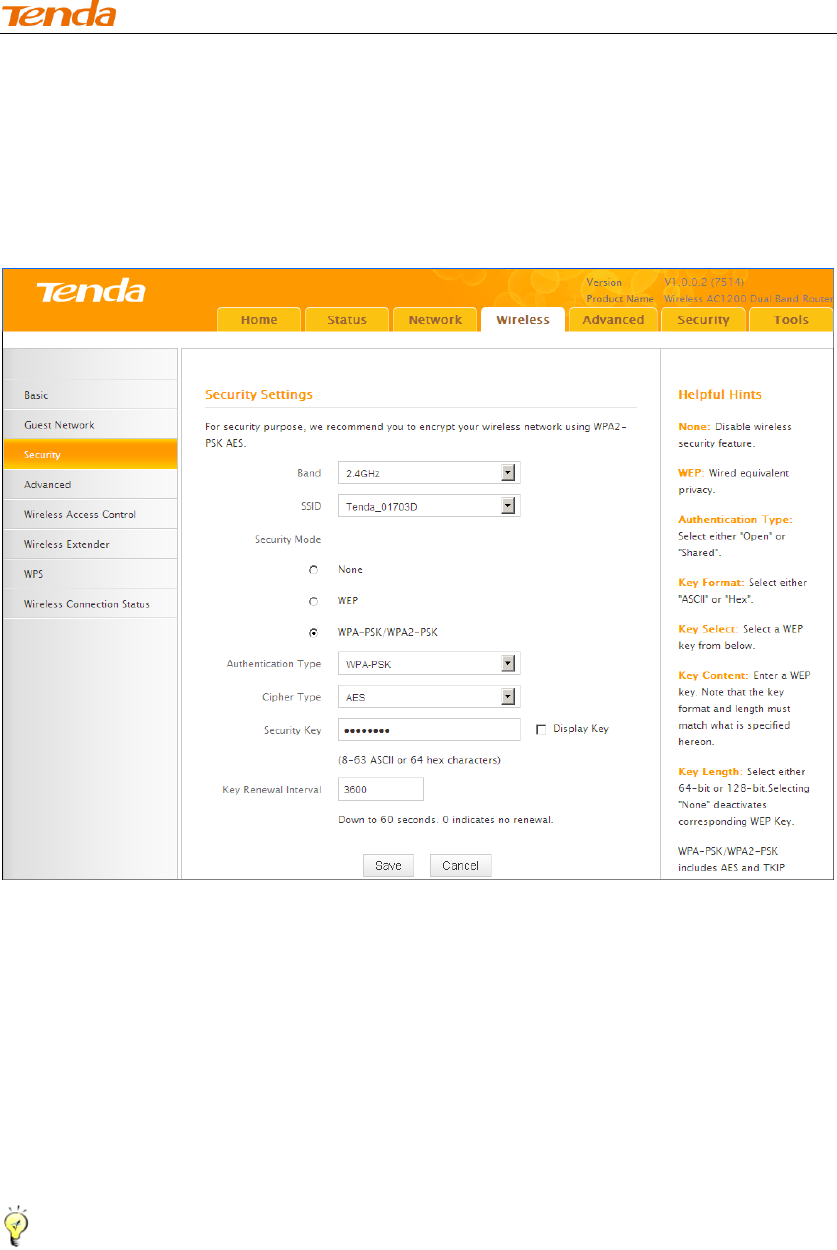
3.3 Security
Click Wireless -> Security to enter the Security screen. Here you can define a
security key to secure your wireless network against unauthorized accesses.
To secure your wireless network
① Select a band, for example, 2.4GHz.
② Select the wireless network (SSID) you wish to encrypt.
③ Select a security mode, cipher type configure a security key.
④ Click Save to save your settings.
Tip ----------------------------------------------------------------------------------------
For better security, compatibility and wireless speed, we recommend the WPA-PSK
and AES.
------------------------------------------------------------------------------------------------

High Power Wireless AC1200 Dual Band Router
39
Knowledge Center ------------------------------------------------------------------
1. WEP:Wireless speed can reach up to 54Mbps if WEP - Open is selected.
2. Key Select: Select a key to be effective for the current WEP encryption. For example, if
you select Key 1, wireless clients must join your wireless network using this Key 1.
4. WPA-PSK:WPA personal, support AES and TKIP+AES cipher types.
5. WPA2-PSK:WPA2 personal, support AES and TKIP+AES cipher types.
6. WPA/WPA2-PSK mixed: If selected, both WPA-PSK and WPA2-PSK secured
wireless clients can join your wireless network.
7. AES: If selected, wireless speed can reach up to 300Mbps.
8. TKIP: If selected, wireless speed can reach up to 54Mbps.
9. TKIP+AES: If selected, both AES and TKIP secured wireless clients can join
your wireless network.
------------------------------------------------------------------------------------------------
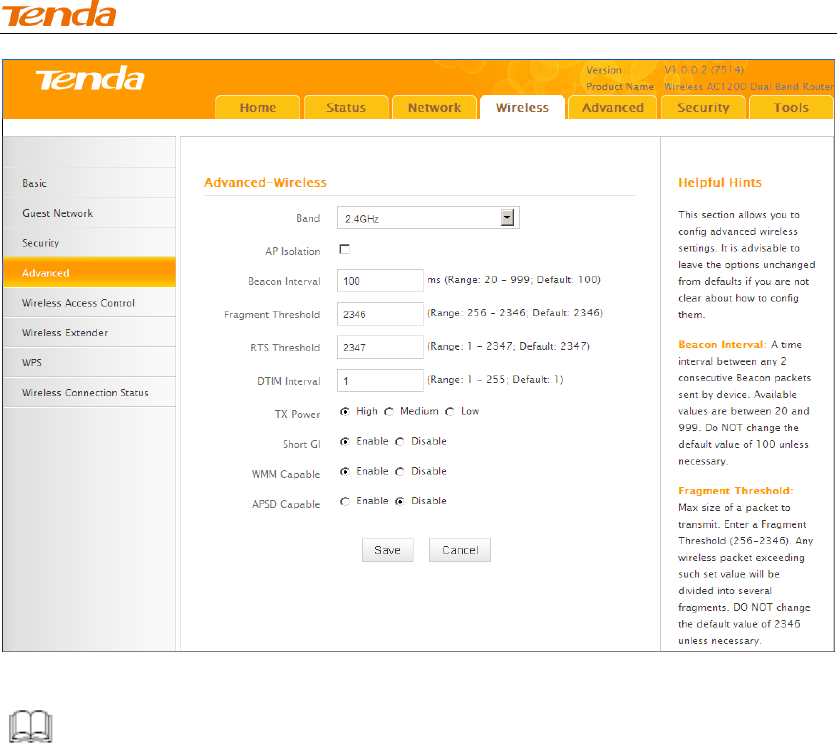
3.4 Advanced
Click Wireless -> Advanced to configure the advanced wireless settings. This
section allows you to config advanced settings, including AP Isolation, Beacon
interval, Fragment threshold, RTS threshold and DTIM interval, etc, for your
wireless networks. Normally, the default settings will work. If not, change them
according to the suggestions given by your ISP or Tenda technical staff.
High Power Wireless AC1200 Dual Band Router
40
Knowledge Center -------------------------------------------------------------------------------
1 AP Isolation: Isolates clients connecting to the primary SSID.
2 Beacon Interval: A time interval between any 2 consecutive Beacon packets sent by an
Access Point to synchronize a wireless network. Do NOT change the default value of 100
unless necessary.
3 Fragment Threshold: Specify a Fragment Threshold value. Any wireless packet
exceeding the preset value will be divided into several fragments before transmission. DO
NOT change the default value of 2346 unless necessary.
4 RTS Threshold: If a packet exceeds such set value, RTS/CTS scheme will be
used to reduce collisions. Set it to a smaller value provided that there are distant
clients and interference. For normal SOHO, it is recommended to keep the default
value unchanged; otherwise, device performance may be degraded.
5 DTIM Interval: A DTIM (Delivery Traffic Indication Message) Interval is a countdown
informing clients of the next window for listening to broadcast and multicast messages. When
the packets arrive in the router ’s buffer, the router will send DTIM (delivery traf fic
indication message) and DTIM interval to alert clients of the receiving packets.
High Power Wireless AC1200 Dual Band Router
41
6 TX Power: This option lets you adjust your wireless TX power.
------------------------------------------------------------------------------------------------
3.6 Wireless Extender
Use this wireless extender feature to extend your existing wireless network.

High Power Wireless AC1200 Dual Band Router
42
Click Wireless -> Wireless Extender to enter the following screen.
This device provides three modes to extend your wireless network:
To extend your wireless network using the universal repeater feature, see
Universal Repeater.
To extend your wireless network using the WISP client router (wireless
WAN) feature, see WISP Mode.
To establish Wireless Distribution System and extend your wireless
network, see WDS.
Tip ----------------------------------------------------------------------------------------
If "Disable" is selected, the wireless extender feature will be deactivated.
------------------------------------------------------------------------------------------------
High Power Wireless AC1200 Dual Band Router
43
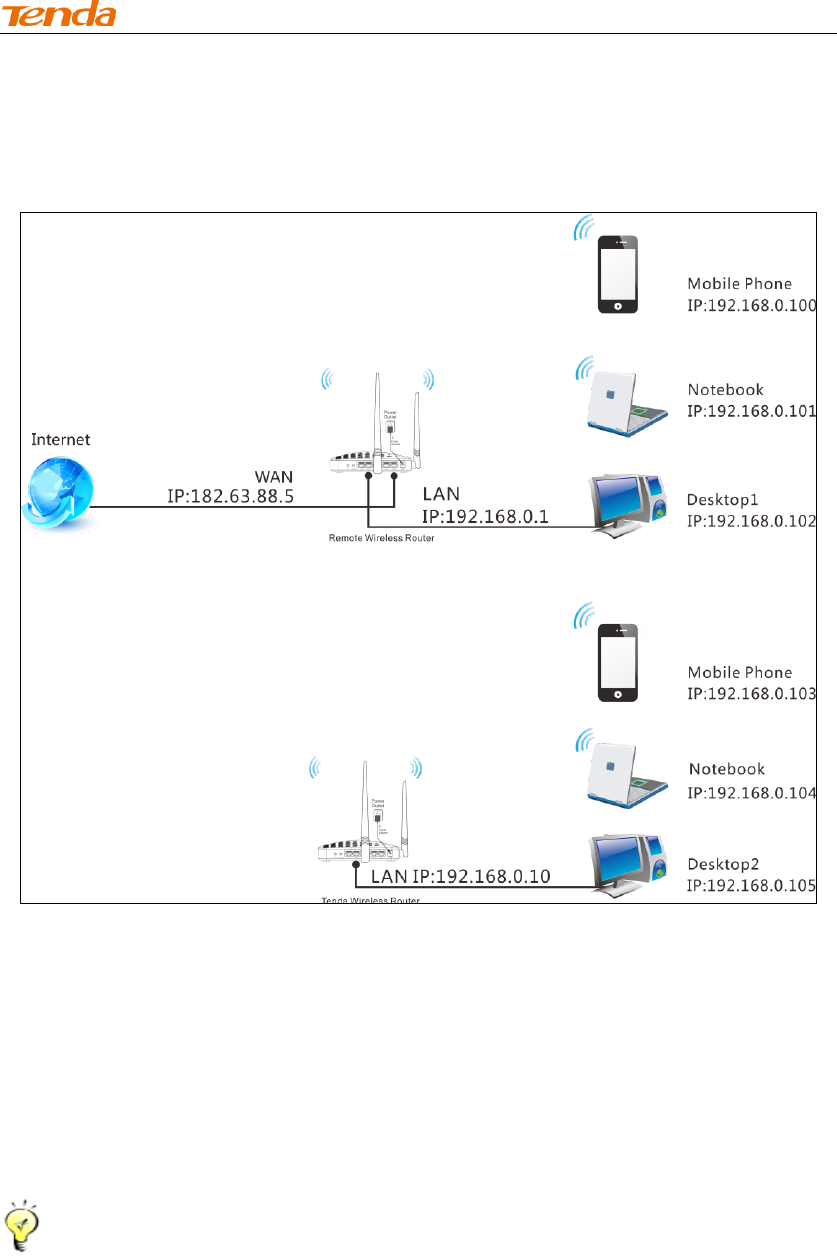
Universal Repeater Mode
Universal Repeater: Use this universal repeater mode to extend your existing
wireless network. The application scenario is shown in the figure below:
In this mode, you only need to configure the following settings on the Tenda
wireless router:
Configure LAN IP: Specify an IP address that is in the same subnet as yet
different from the remote wireless router for this Tenda wireless router.
Universal Repeater: Configure this router to bridge the remote wireless
router for extended network coverage.
Tip --------------------------------------------------------------------------------------
Before you start, make sure you have the following information:
1. Remote router's SSID, security mode, cipher type and security key.
2. Remote router's LAN IP address.
3. No Ethernet cable is connected to the Tenda wireless router's WAN port.
------------------------------------------------------------------------------------------------
High Power Wireless AC1200 Dual Band Router
44
Universal Repeater Application Example:
Assuming the remote wireless router has the following information:
SSID:Tenda_0FF02D
Security Mode: WPA-PSK
Cipher Type: AES
Security Key: 12345678
LAN IP Address: 192.168.0.1
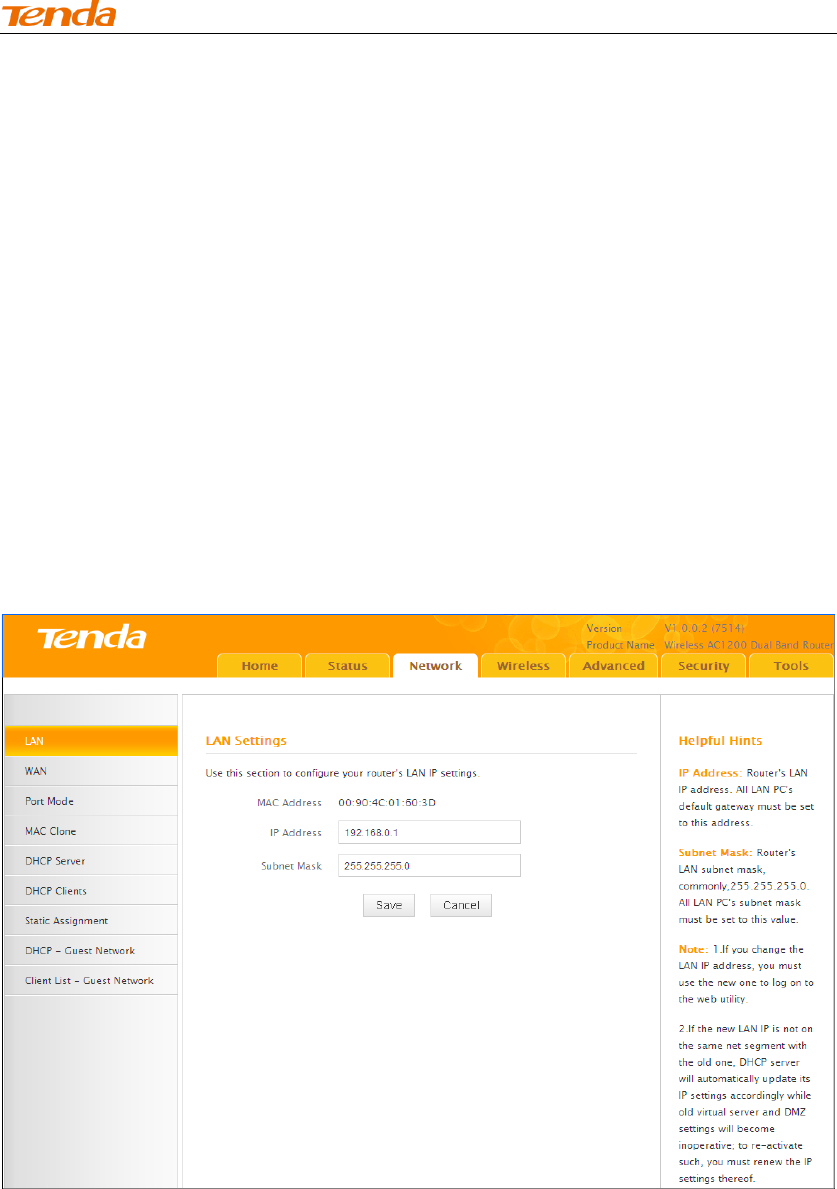
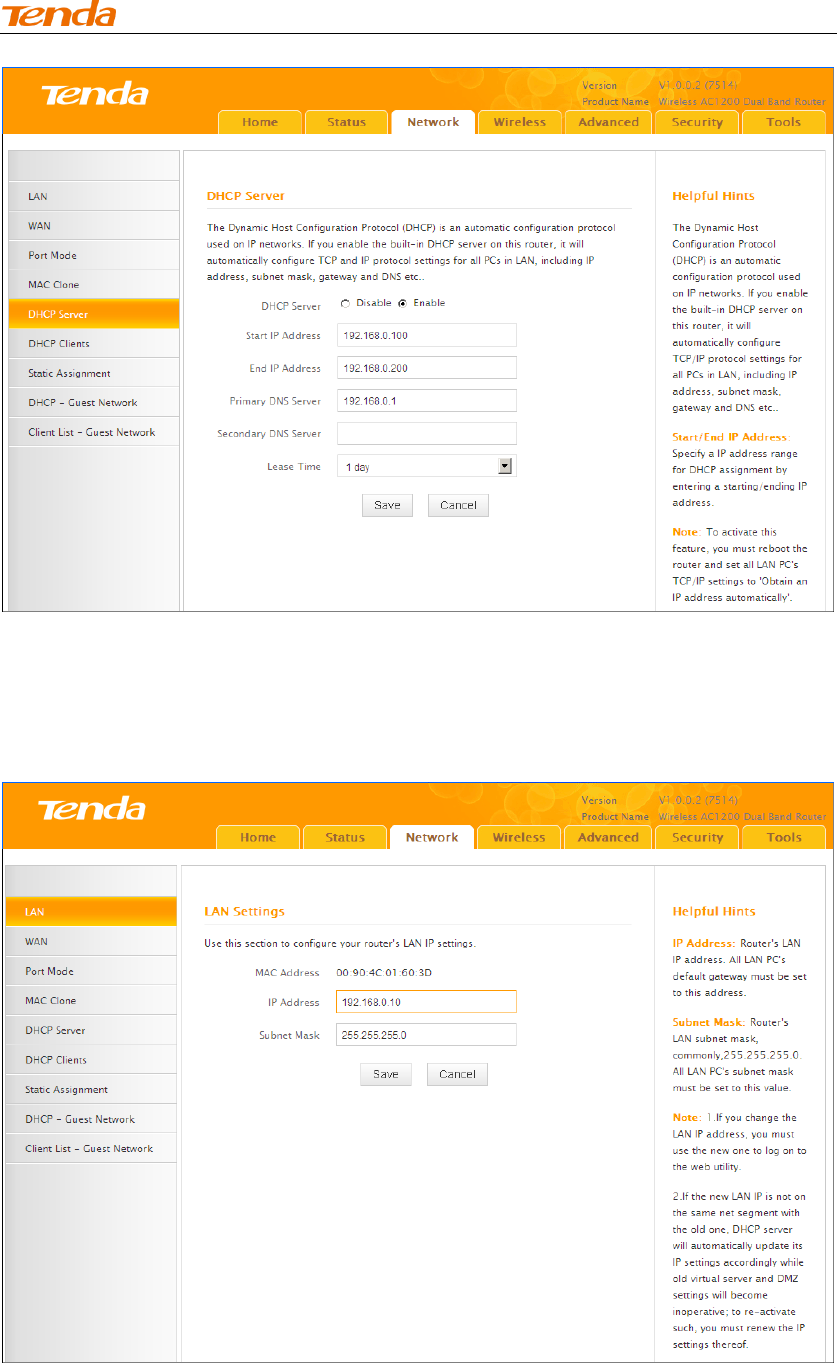
Configuration Procedures:
① Click Network -> LAN to configure an IP address that is in the same
subnet as yet different from the remote wireless router for this Tenda wireless
router.
② Click OK in the appearing screen.
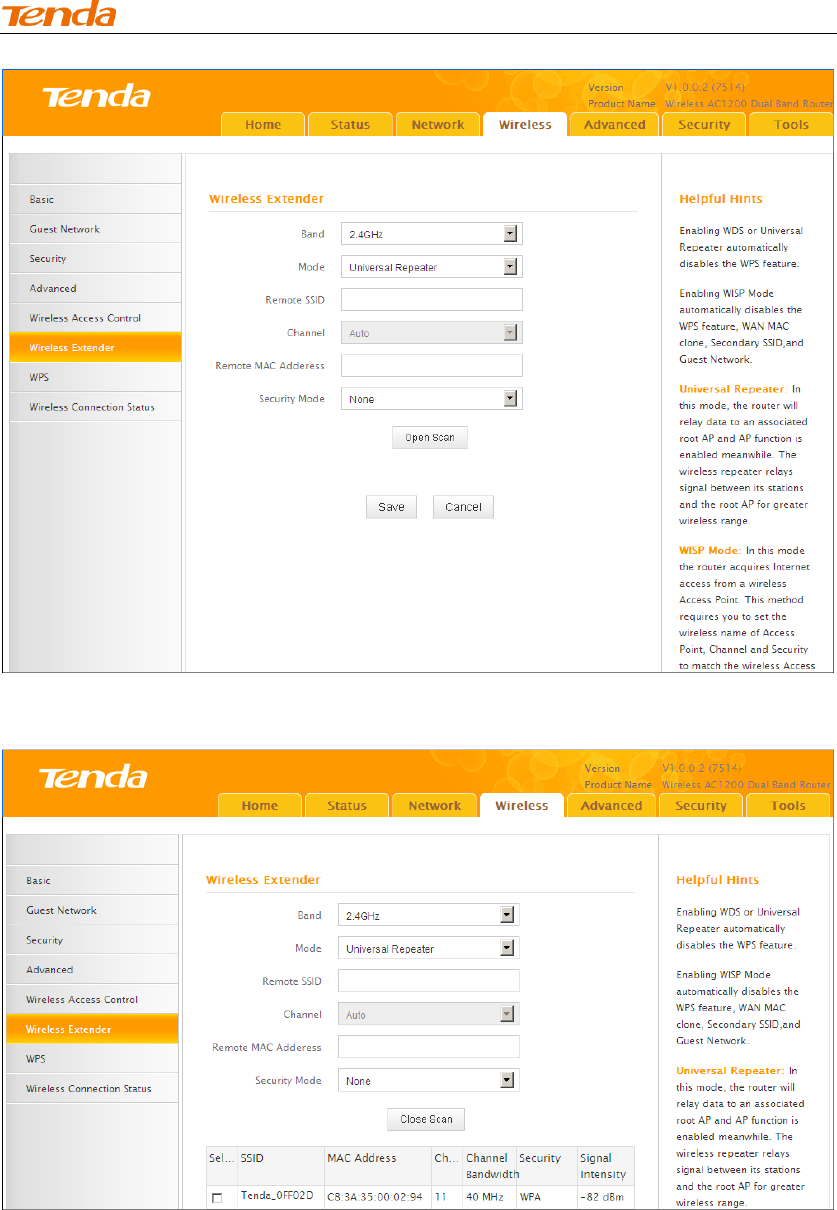
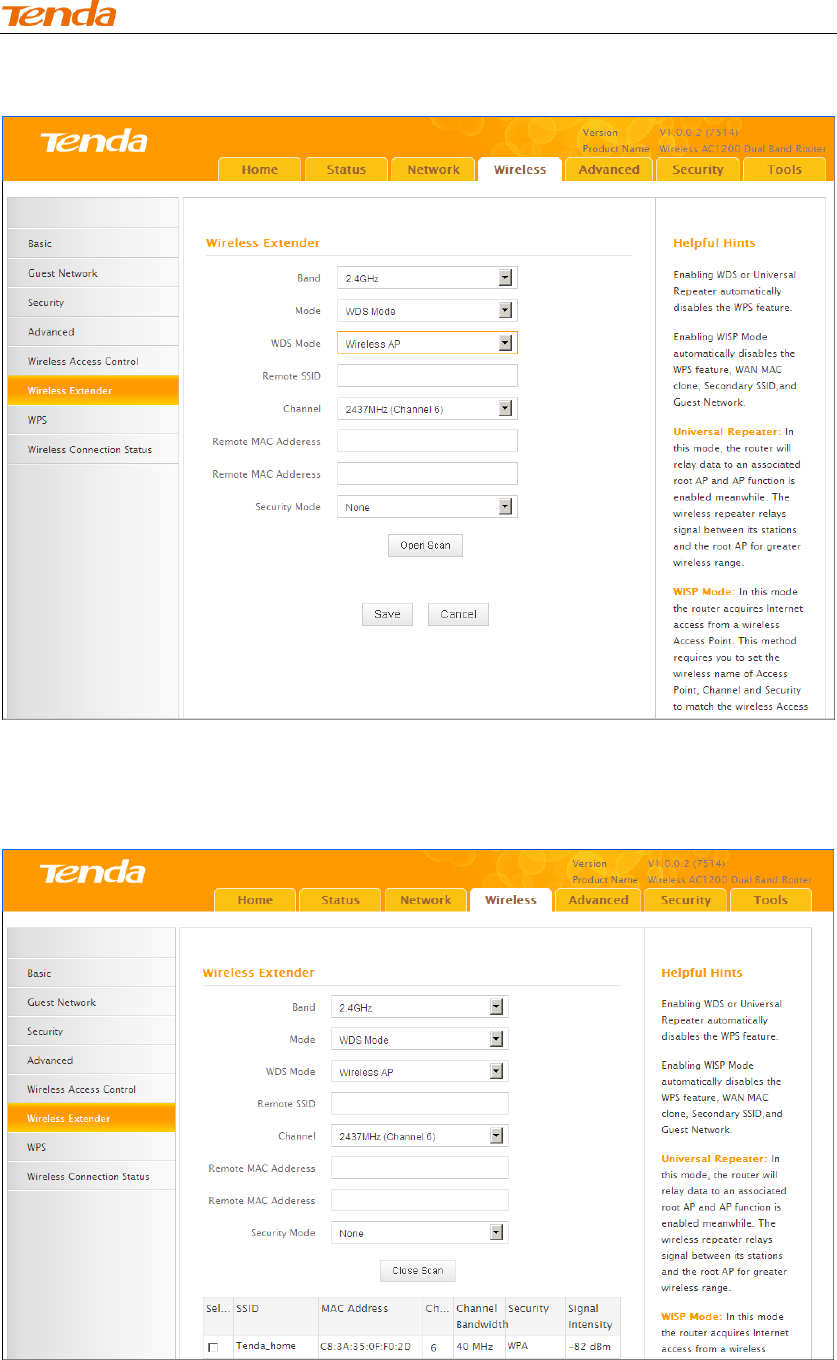
③ Select Universal Repeater and click Open Scan.
High Power Wireless AC1200 Dual Band Router
45
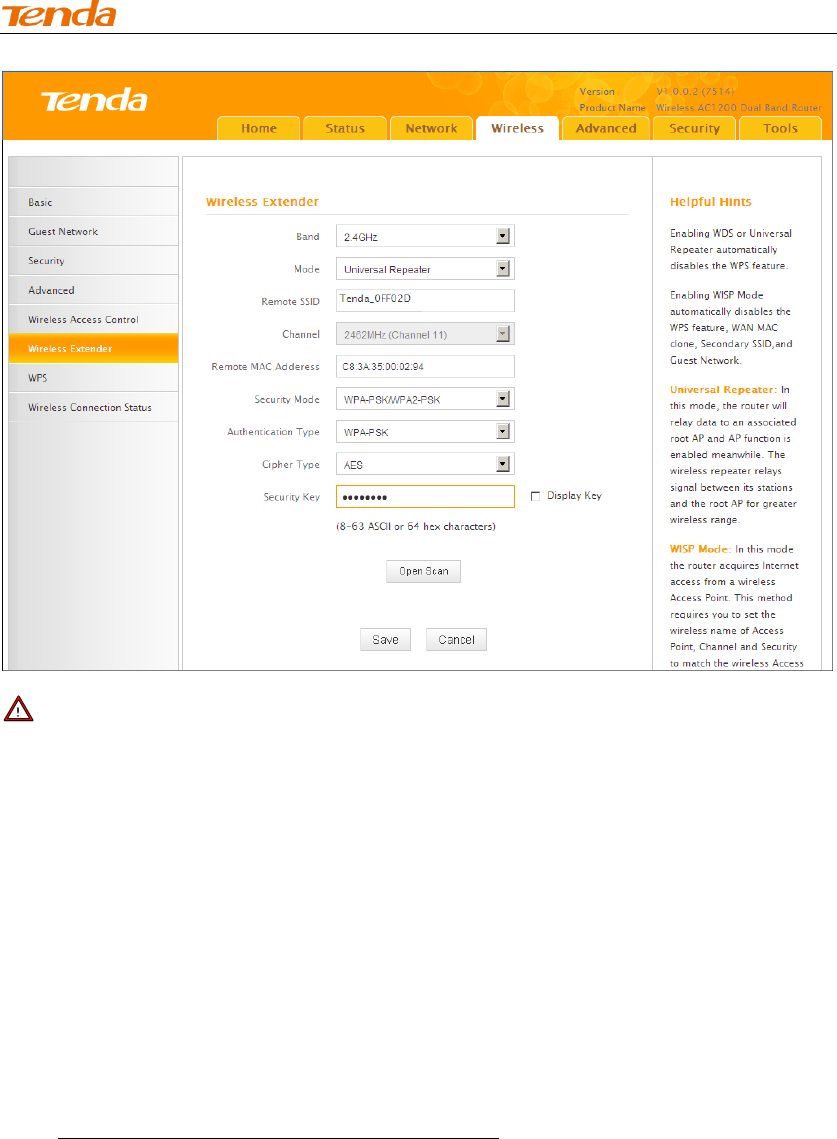
④ Select the remote router's wireless network (SSID) and click Close Scan.
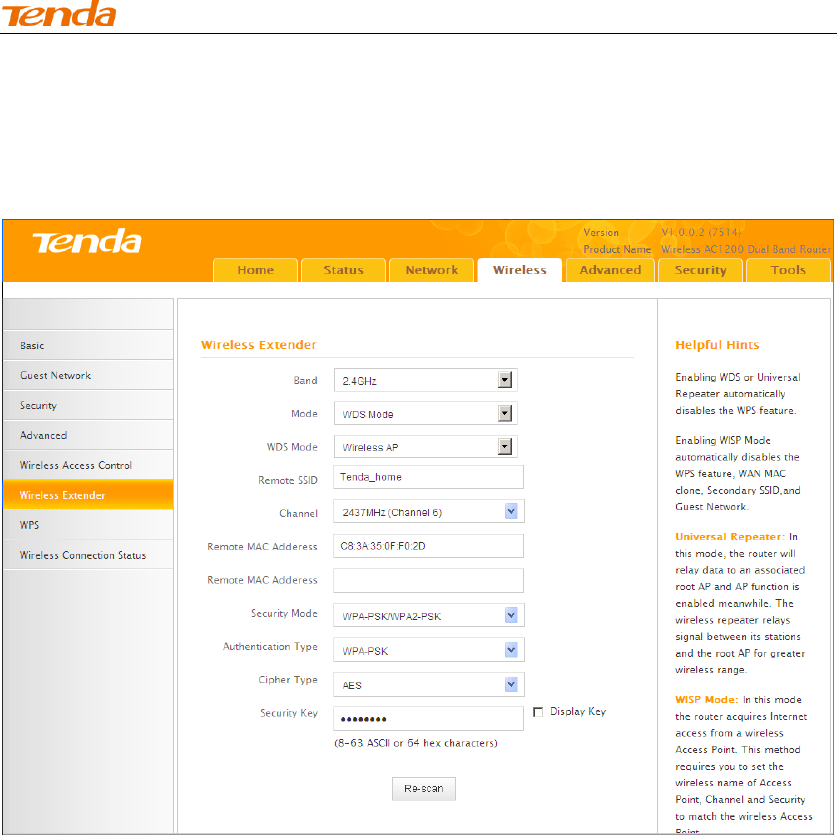
⑤ The SSID, channel, MAC address, security mode and cipher type of the
remote router will be added automatically on this page. You only need to enter
the security key and click Save.
High Power Wireless AC1200 Dual Band Router
46
Note -------------------------------------------------------------------------------------
1. This router's primary SSID will automatically change to match that of the remote
router when the Universal Repeater feature is configured successfully. Please do
not change this SSID. Changing this SSID may interrupt the wireless bridge link.
2. When the Universal Repeater is configured successfully, wireless clients need to
join this Tenda wireless router's SSID for Internet access.
------------------------------------------------------------------------------------------------
Verify Bridge Connectivity:
① Connect your PC to this Tenda wireless router via a wired or wireless
connection and set it to "Obtain an IP address automatically". If you are not clear,
see Appendix 1 Configure PC TCP/IP Settings.
② Wait until your PC successfully obtains an IP address.
High Power Wireless AC1200 Dual Band Router
47
Last number differs from that of
the remote wireless router's
LAN IP address.
This is the remote router's LAN
IP address.

High Power Wireless AC1200 Dual Band Router
48
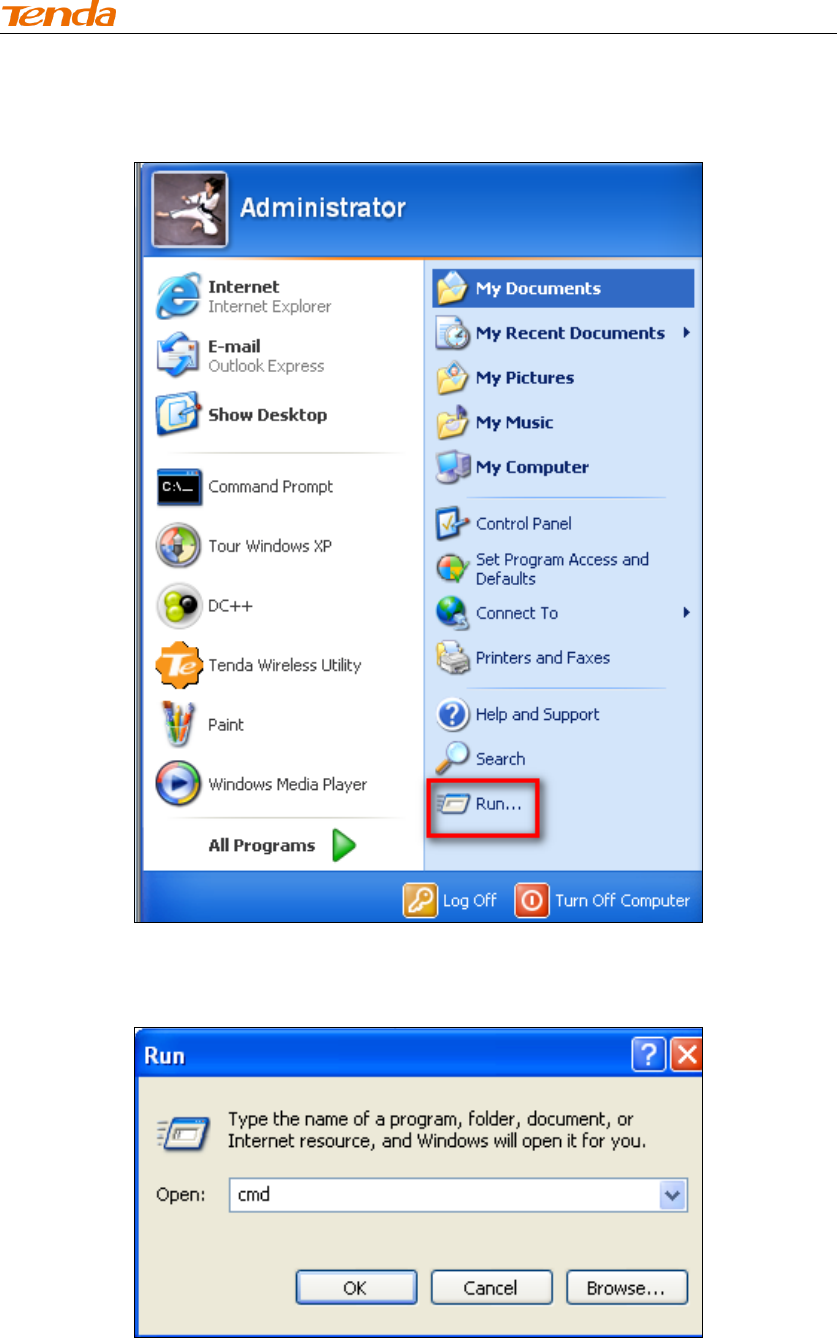
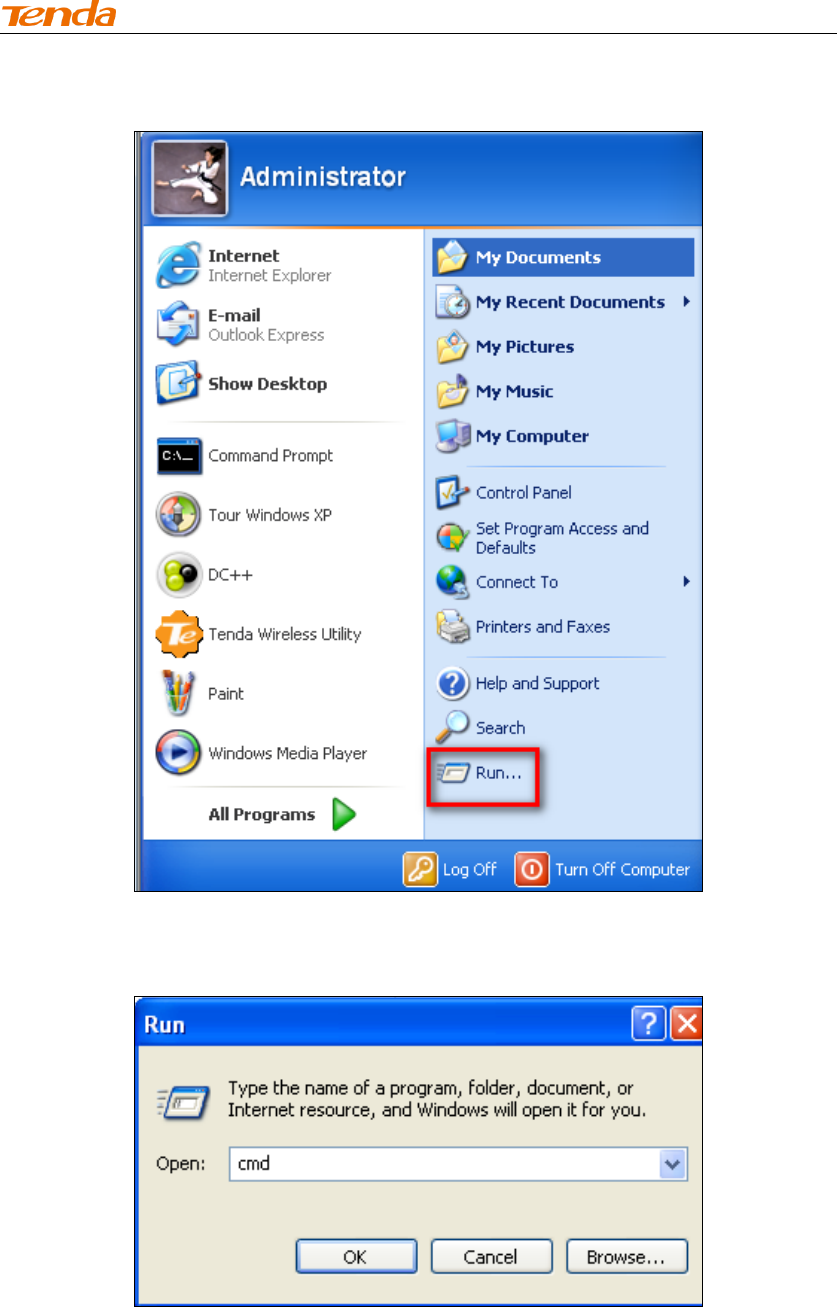
③ Click Start ->Run.
④ Enter cmd and click OK.
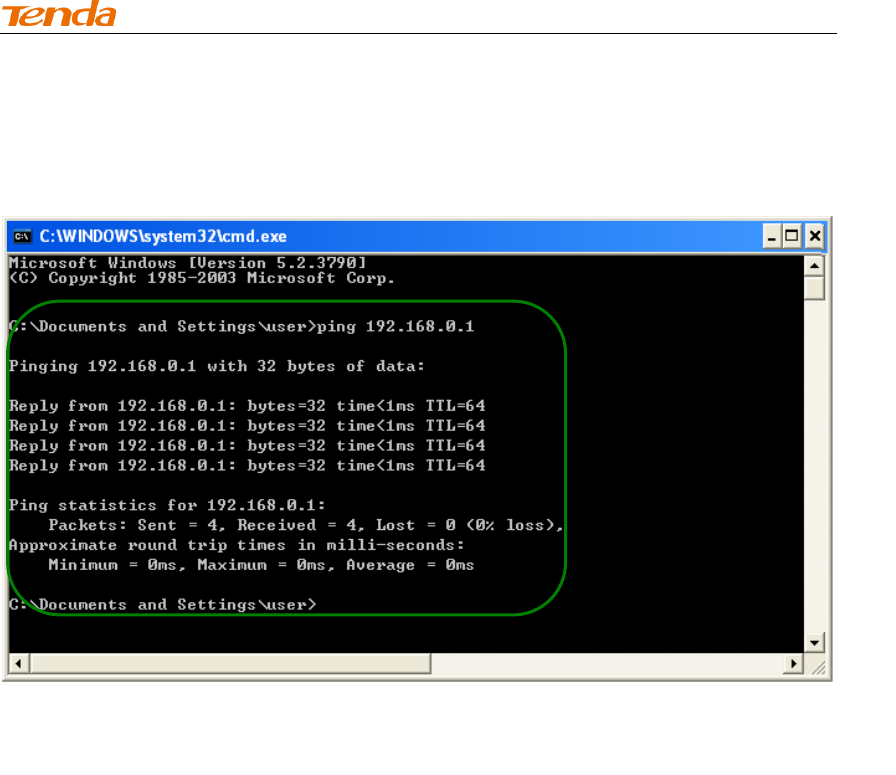
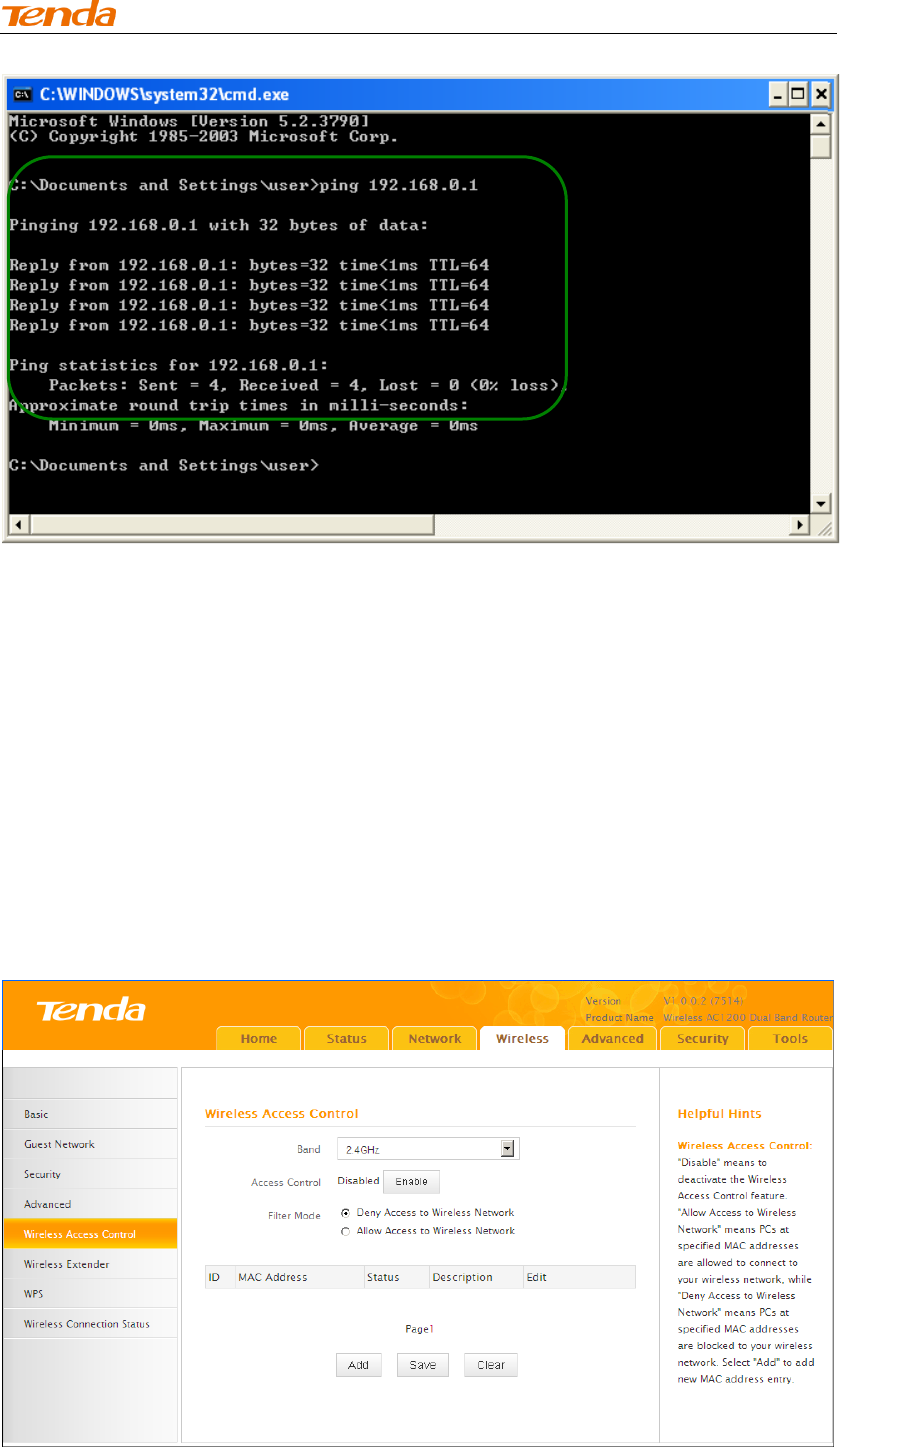
⑤ Enter "ping default gateway IP address”. Here in this example, enter "ping
192.168.0.1" and press Enter. If you see a similar screen (highlighted area), the
bridge is established successfully.

High Power Wireless AC1200 Dual Band Router
49
WISP Client Router Mode
WISP Mode: This is the WISP (Wireless Internet Service Provider) Client Router
Mode. In this mode the router acquires Internet access from your WISP AP or a
wireless Access Point on an existing network. Below shows the typical topology:
In this mode, you only need to configure the following settings on the Tenda
wireless router:

High Power Wireless AC1200 Dual Band Router
50
WISP Mode Setup: This mode establishes a wireless connection between
the wireless LAN interface of the remote wireless router and the wireless
WAN interface of your Tenda wireless router.
Internet Setup: Configure this Tenda router to access Internet.
Tip---------------------------------------------------------------------------------------
Before you start, make sure you have the following information:
1. Remote router's SSID, security mode, cipher type and security key.
2. Internet connection information provided by the remote wireless router.
3. No Ethernet cable is connected to the Tenda wireless router's WAN port.
------------------------------------------------------------------------------------------------
WISP mode (Wireless WAN feature) Application Example:
Assuming the remote wireless router provides the following information:
SSID: Tenda_home
Security Mode: WPA-PSK
Cipher Type: AES
Security Key: 12345678
Internet Connection Type (for client): DHCP (dynamic IP)
Configuration Procedures:
High Power Wireless AC1200 Dual Band Router
51
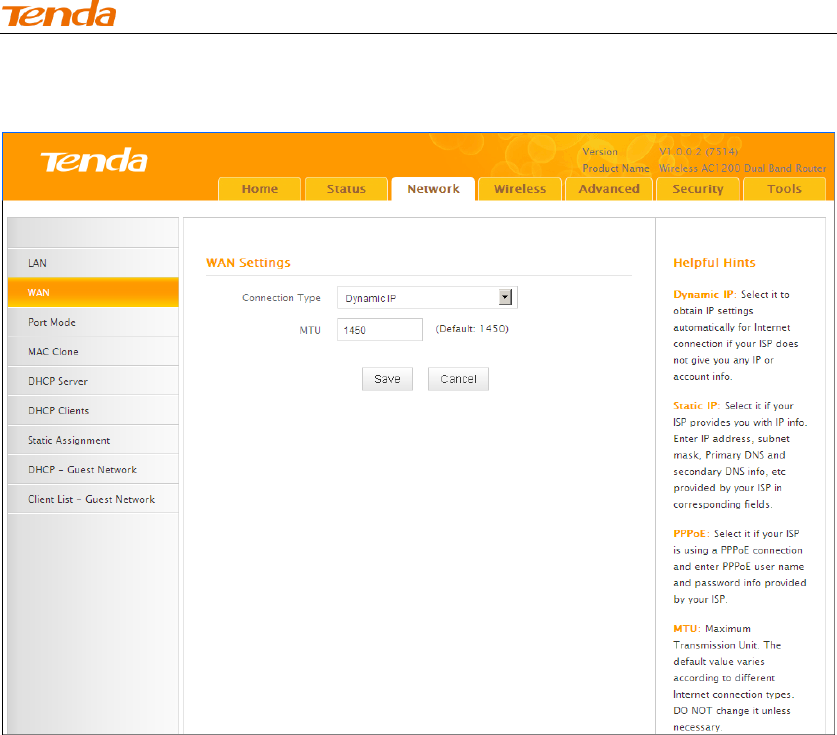
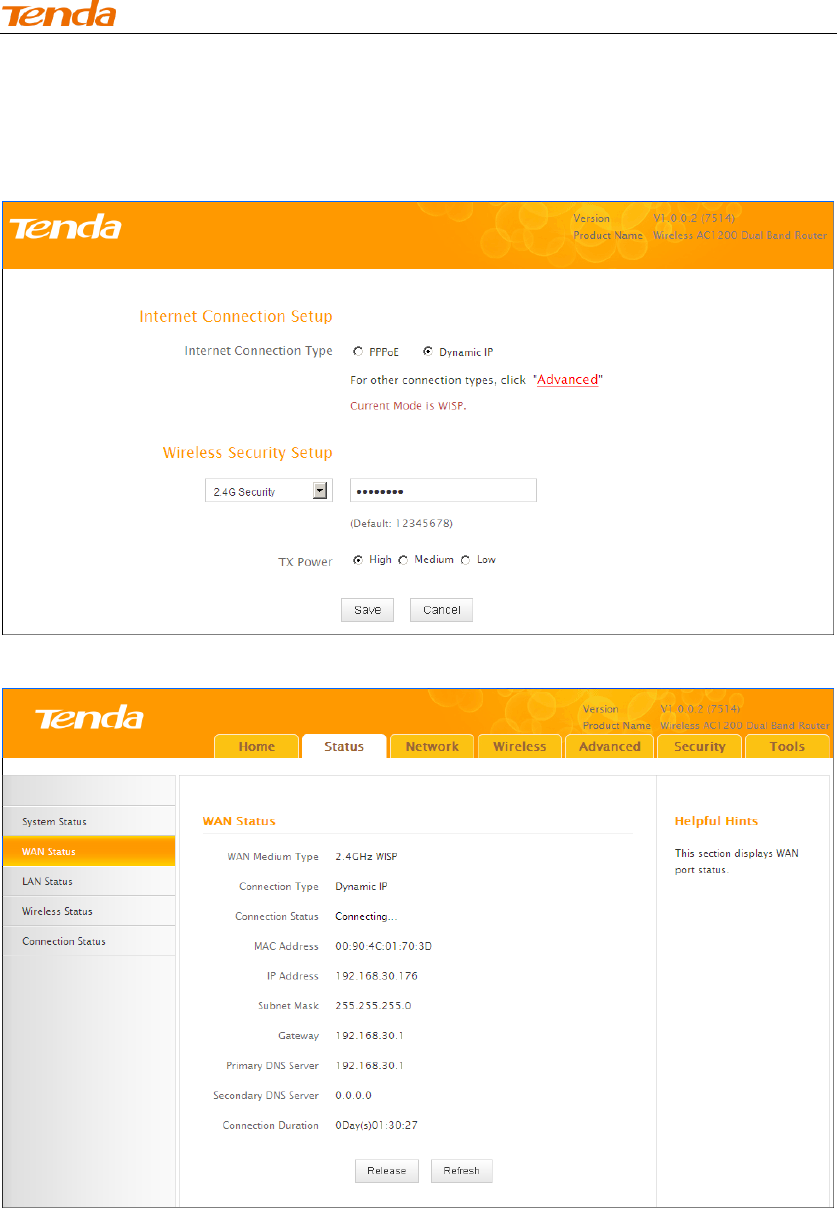
① Click Network -> WAN to configure the Internet connection.
High Power Wireless AC1200 Dual Band Router
52
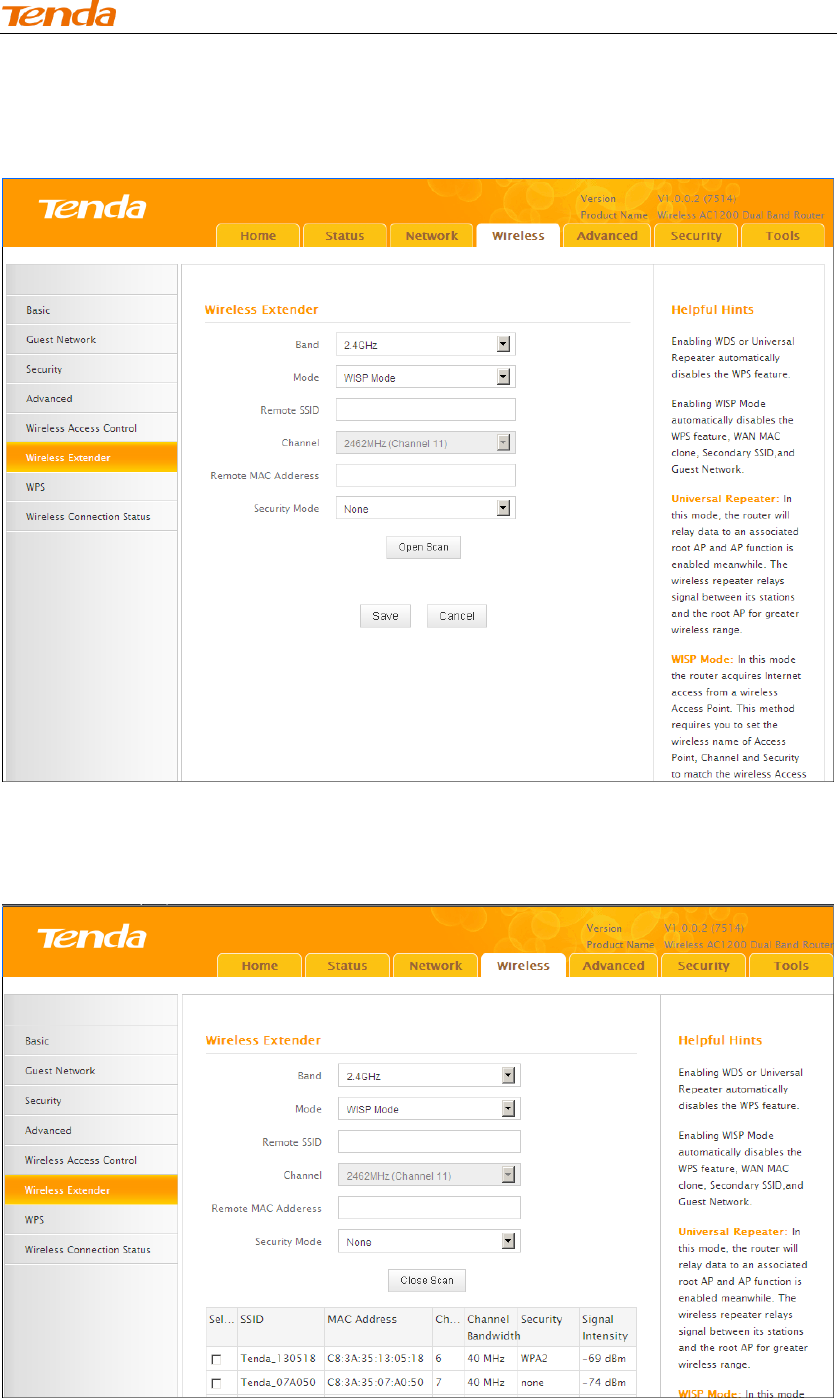
② Click Wireless -> Wireless Extender, select WISP Mode and click
Open Scan.
③ Select the remote router's wireless network (SSID) and click Close
Scan.
High Power Wireless AC1200 Dual Band Router
53
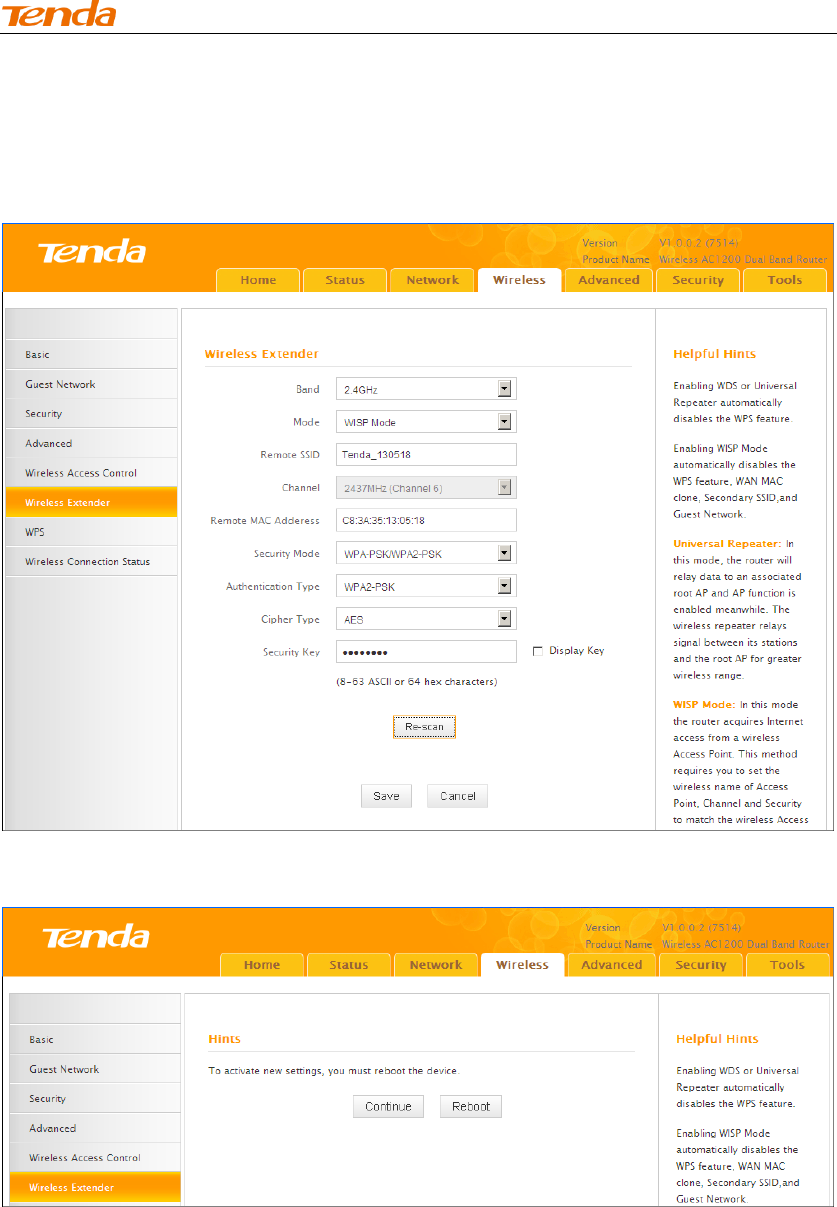
④ The SSID, channel, MAC address, security mode and cipher type of
the remote AP will be added automatically on this page. You only need to
enter the security key and click Save.
⑤ Click Reboot on the appearing screen to reboot the router.
High Power Wireless AC1200 Dual Band Router
54
⑥ System automatically enters the home page (Quick Internet Setup screen) after
reboot. Click the Advanced button there.
⑦ Click Status -> WAN Status to check the WAN status.
High Power Wireless AC1200 Dual Band Router
55
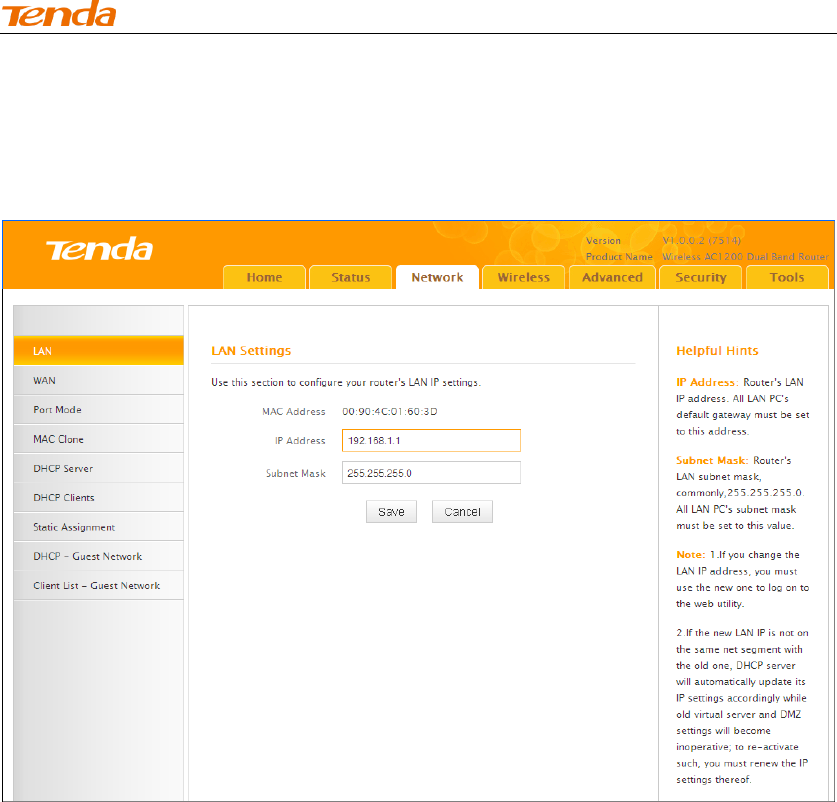
⑧ If the WAN Connection Status keeps displaying "Connecting....",
change the LAN IP address of this router to a different subnet from the
remote router's LAN IP address.
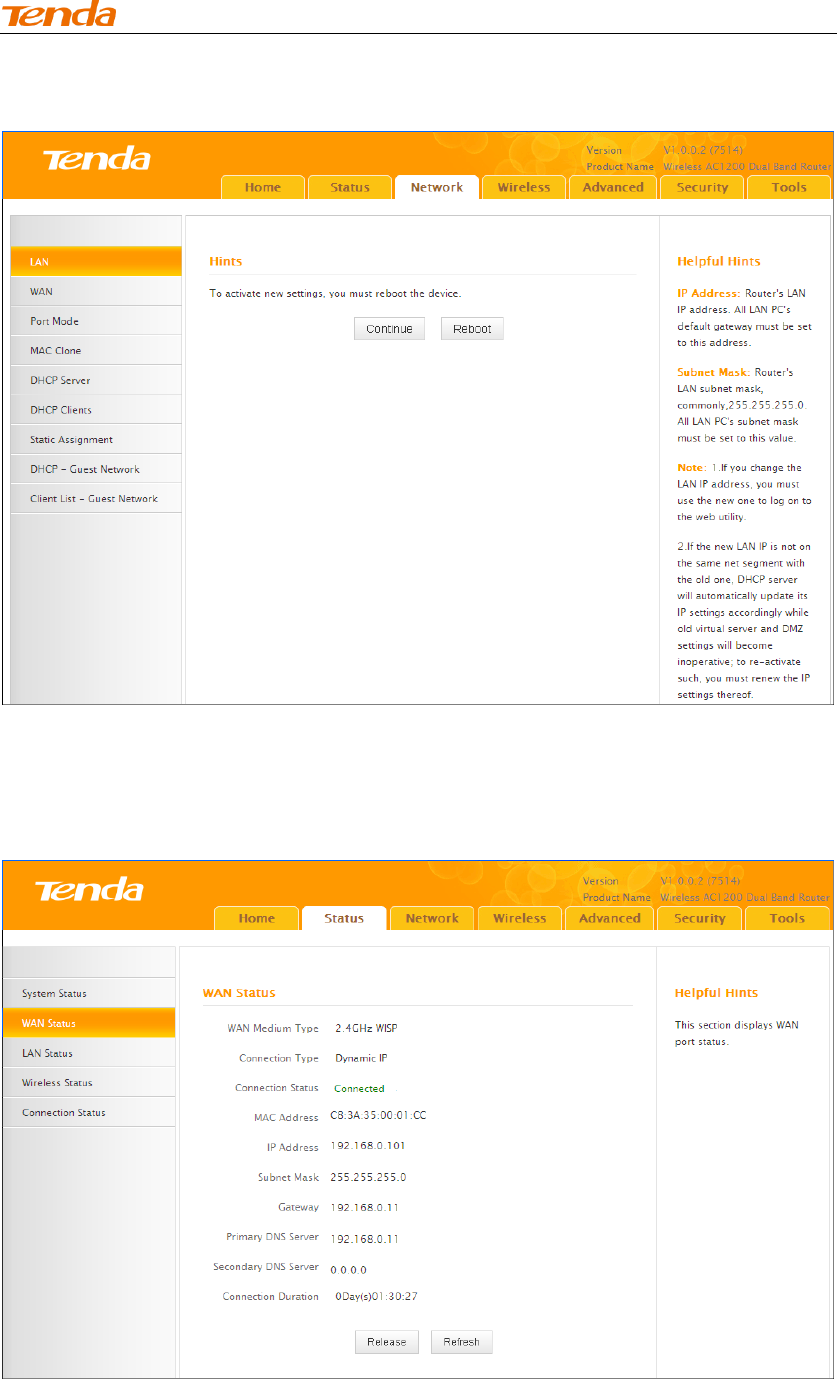
⑨ Click OK on the appearing screen to reboot the router.
High Power Wireless AC1200 Dual Band Router
56
⑩ Click Reboot on the appearing screen to reboot the router.
System automatically enters the Status screen after reboot. Check the WAN
Connection Status, if it displays "Connected", you have successfully connected to
Internet.
High Power Wireless AC1200 Dual Band Router
57
Note -------------------------------------------------------------------------------------
1. This router's primary SSID will automatically change to match that of the remote
router when the WISP (client router) mode feature is configured successfully.
Please do not change this SSID. Changing this SSID may interrupt the wireless
link.
2. When the WISP (client router) mode is configured successfully, wireless clients
need to join this Tenda wireless router's SSID for Internet access.
------------------------------------------------------------------------------------------------
Verify Bridge Connectivity:
① Connect your PC to this Tenda wireless router via a wired or wireless
connection and set it to "Obtain an IP address automatically". If you are not
clear, see Appendix 1 Configure PC TCP/IP Settings.
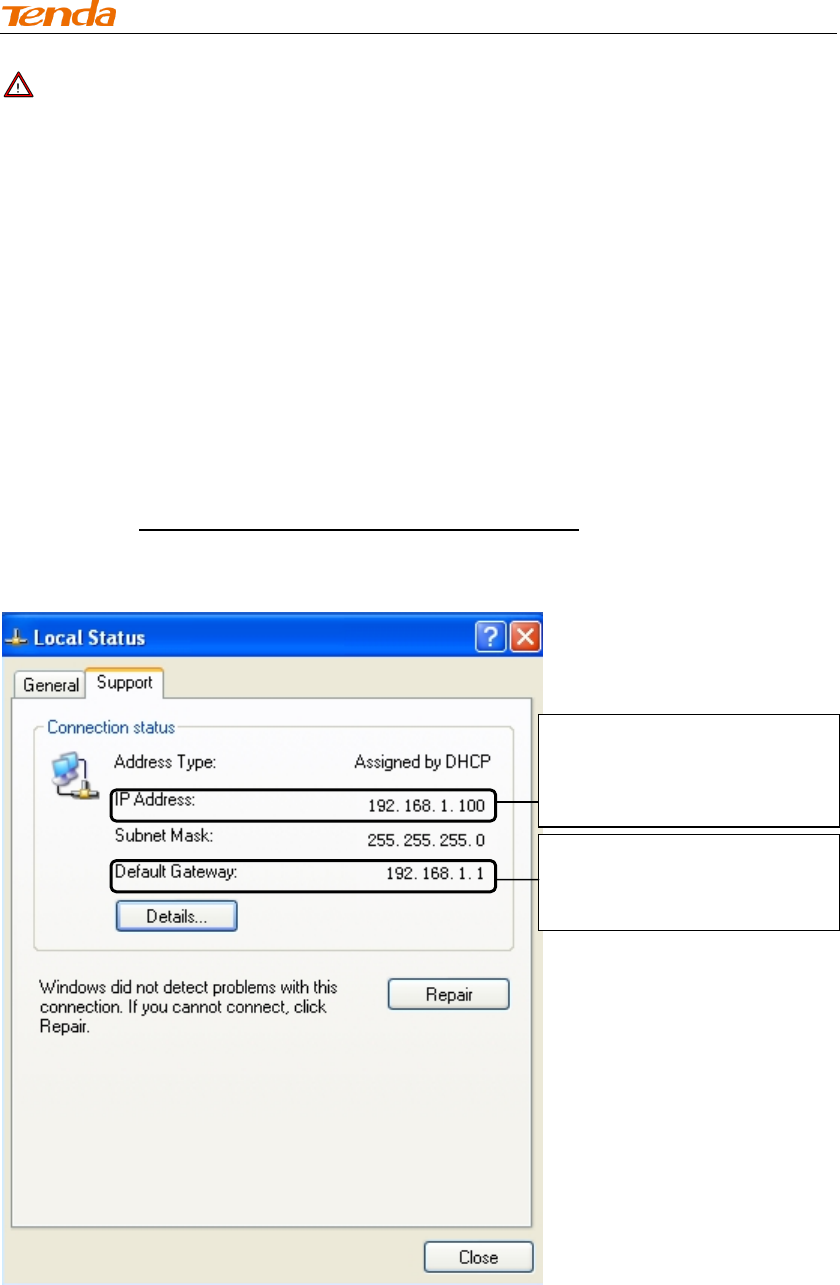
② Wait until your PC successfully obtains an IP address.
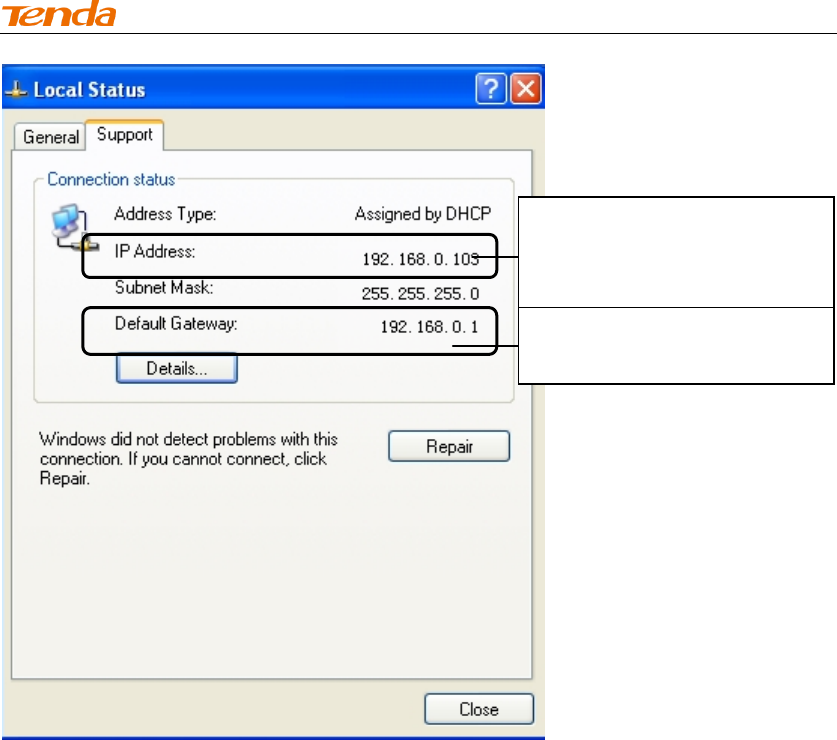
Last number differs from that
of this Tenda router's LAN IP
address.
This is the LAN IP address of
this Tenda router.
High Power Wireless AC1200 Dual Band Router
58
③ Click Start ->Run
④ Enter cmd and click OK.
High Power Wireless AC1200 Dual Band Router
59
⑤ Enter "ping Tenda router's gateway IP address". Here in this example,
enter "ping 192.168.0.1" and press Enter. If you see a similar screen
(highlighted area), the bridge is established successfully.
WDS Mode
WDS (Wireless Distribution System) includes Wireless Bridge and Wireless AP.
The differences are described as below:
Operating in Wireless AP mode, clients can access Internet by connecting to the
router via an Ethernet cable or wirelessly. Operating in Wireless Bri dge mode,
clients can access Internet by connecting to the router via an Ethernet cable or
wirelessly joining the router's secondary SSID (wireless network) or guest
network.
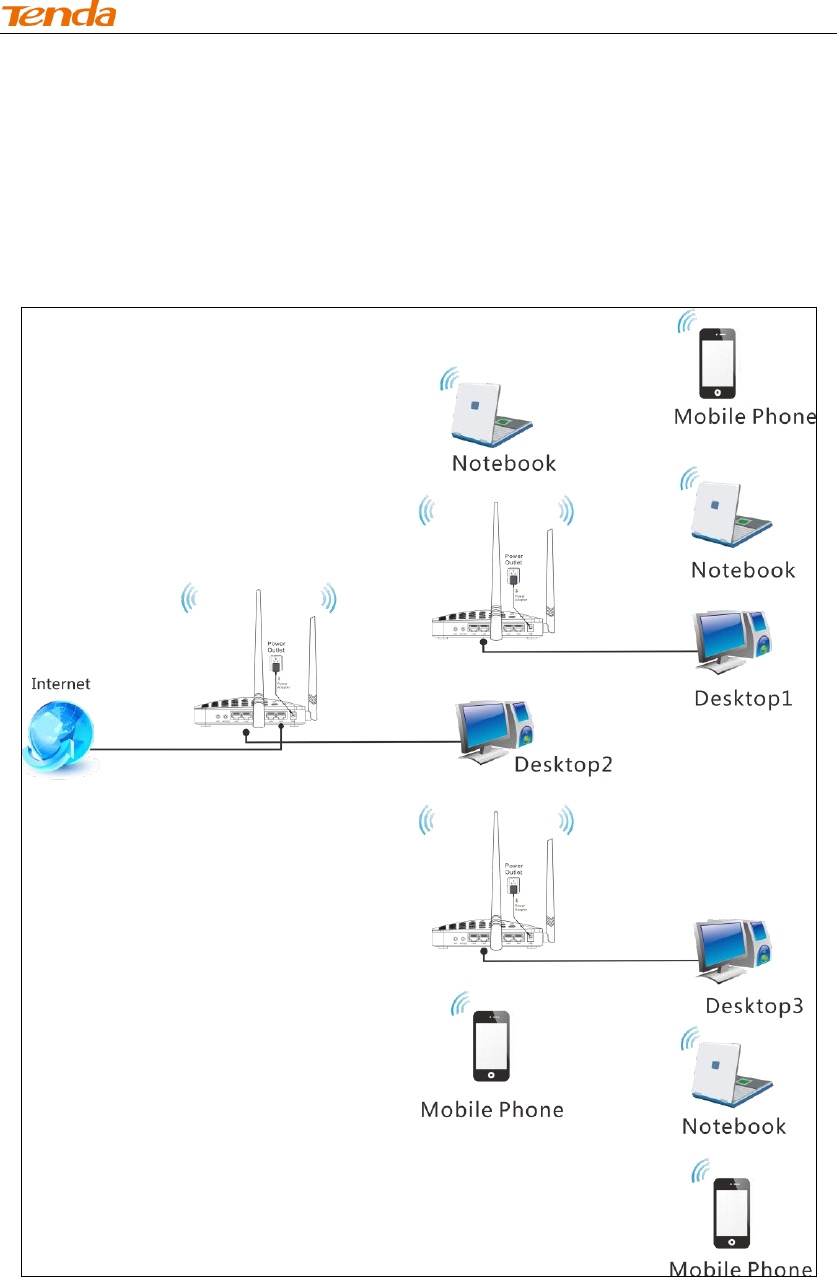
WDS: Wireless distribution system (WDS) is a system enabling the wireless
interconnection of access points in an IEEE 802.11 network. It allows a wireless
network to be expanded using multiple access points without the traditional
requirement for a wired backbone to link them. The Tenda wireless router can
function as a base station AP to create a wireless network or as a repeater AP to
repeat and extend the base station AP's wireless network to a farther and wider
High Power Wireless AC1200 Dual Band Router
60
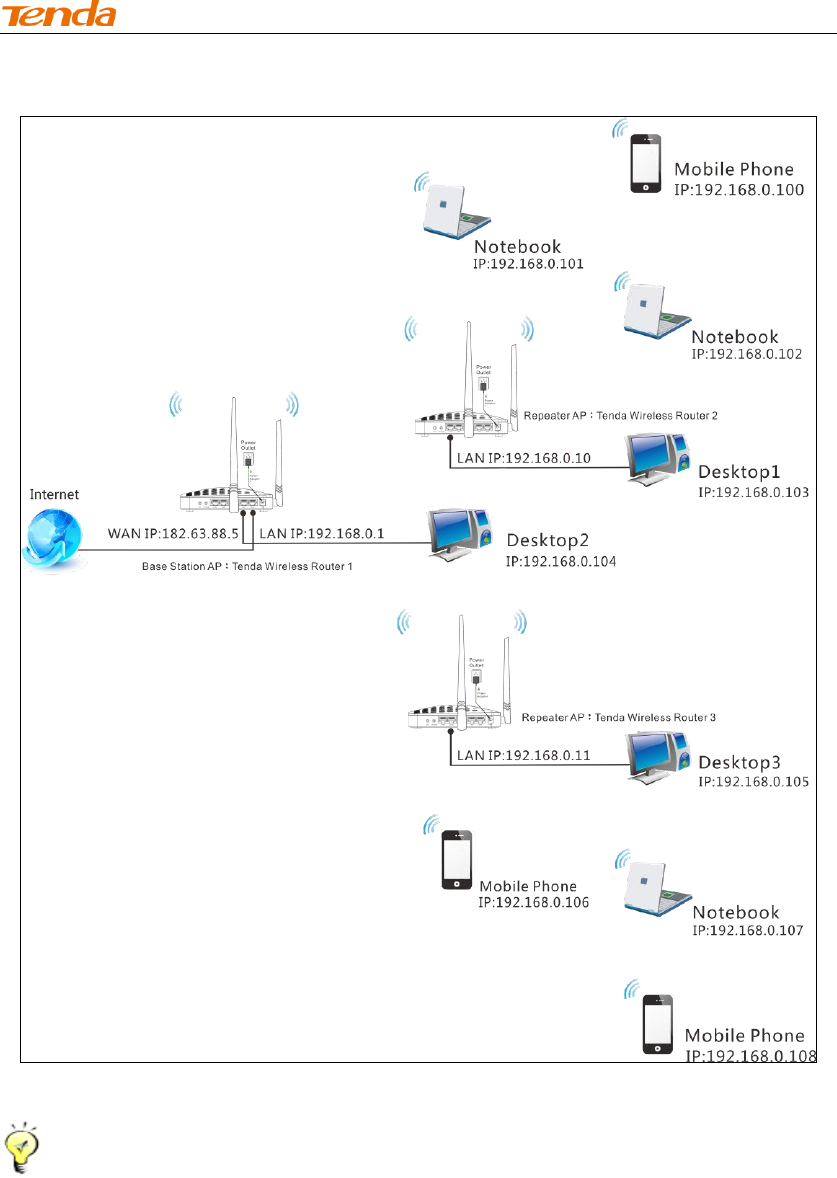
range. The following figure shows an application scenario.
In this mode, you must set up both the base station AP, and the repeater AP.
Tip---------------------------------------------------------------------------------------
Before you start, verify the following:
1. Tenda wireless router 1 that functions as a base station AP has successfully
connected to Internet.
2. No Ethernet cables are connected to the WAN ports of the repeater APs: Tenda
wireless routers 2 and 3.
------------------------------------------------------------------------------------------------
WDS Application Example (as shown in the application scenario above):
Step 1: Configure Base Station AP (Tenda Wireless Router 1)
High Power Wireless AC1200 Dual Band Router
61
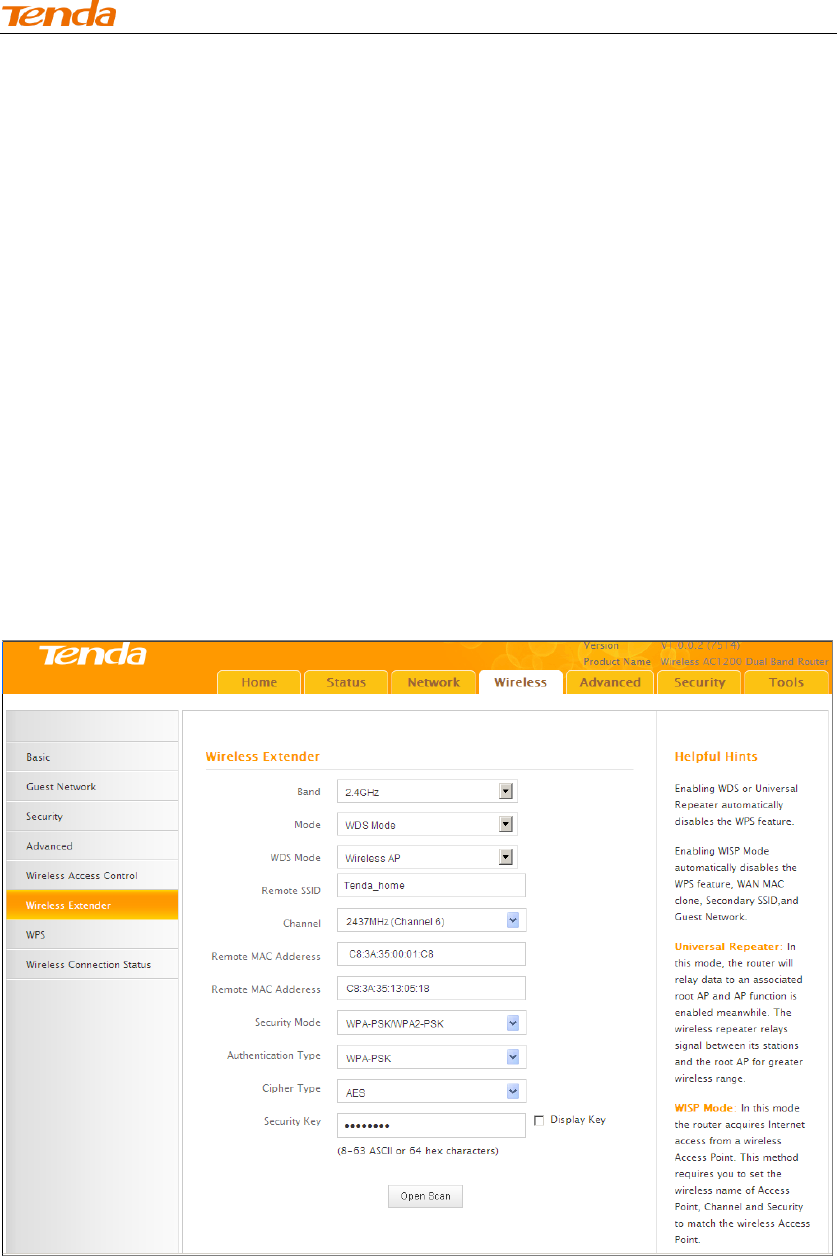
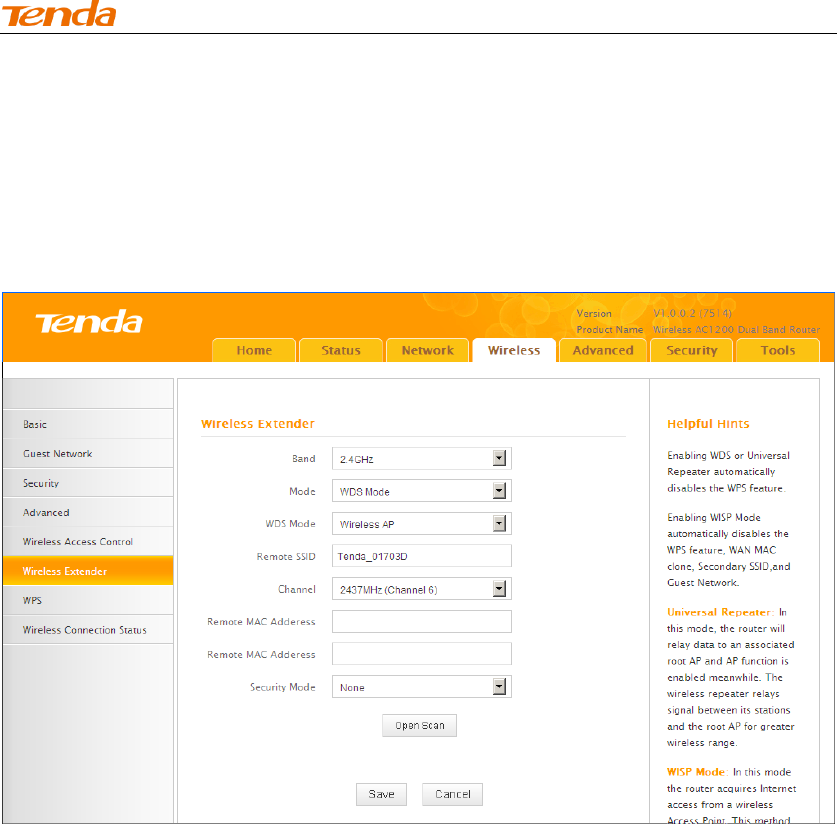
① Mode: Select WDS Mode.
② WDS Mode: Select Wireless AP.
③ SSID: Customize a SSID, for example, Tenda_home.
④ Channel: Specify a channel for the base station AP to operate on, for
example, 2437MHz (Channel 6).
⑤ Remote MAC Address: Manually enter the MAC addresses of the two
remote repeater APs (You can click Open Scan to view the MAC addresses).
⑥ Security Mode: Specify security mode/authentication type, cipher type
and security key for the base station AP.
⑦ Click Save to save your settings.
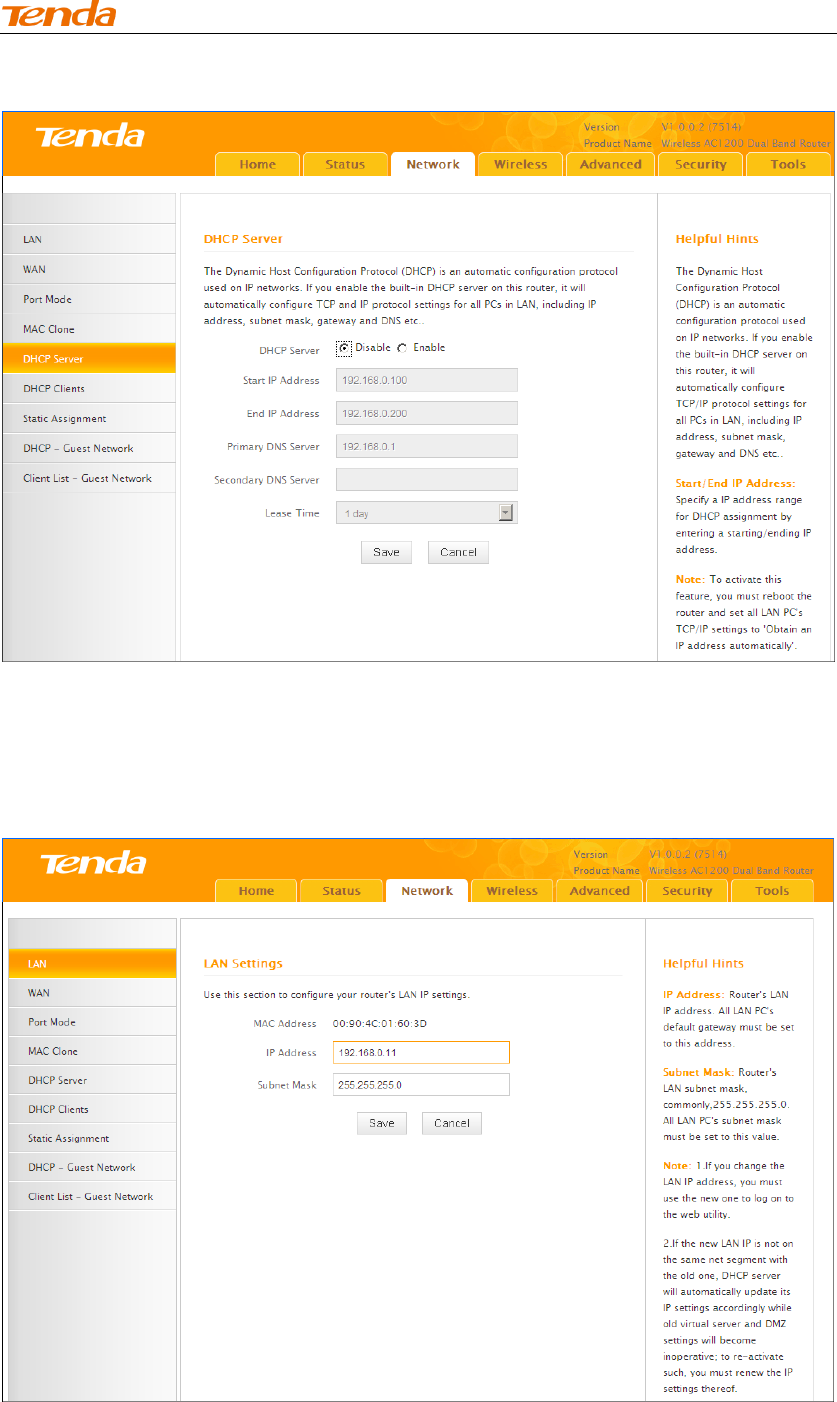
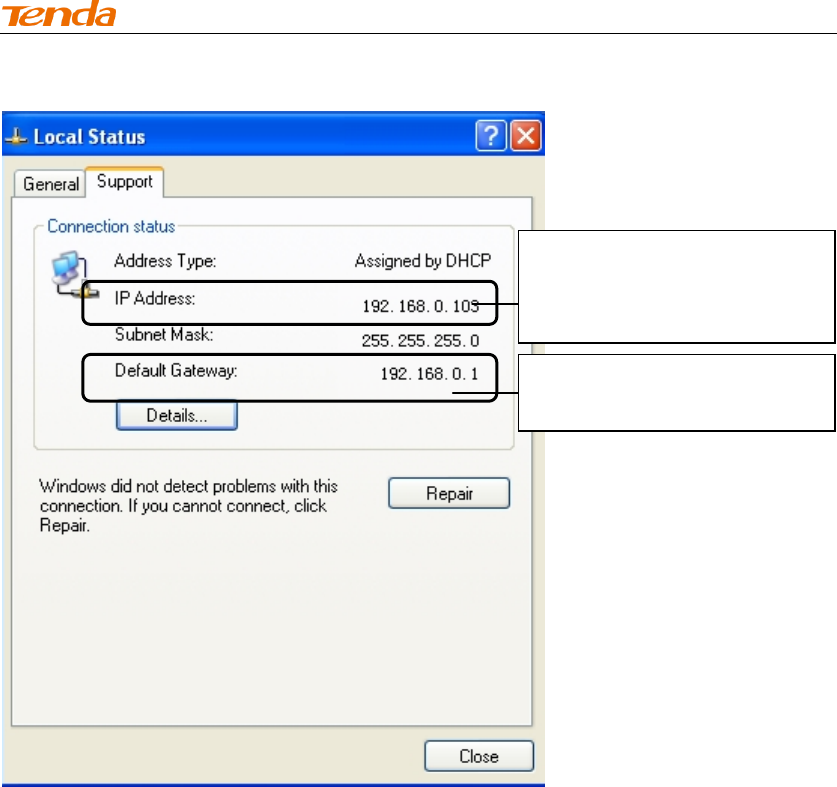
⑧ Click Network -> DHCP Server on the base AP's configuration interface
to enable the DHCP server.
High Power Wireless AC1200 Dual Band Router
62
Step 2: Configure Repeater AP (Tenda Wireless Router 2)
① Click Network -> LAN to specify a LAN IP address that is in the same
subnet as yet different from the base station AP.
Click OK in the appearing screen.
② Click Wireless -> Wireless Extender, select WDS Mode from the Mode drop-down
High Power Wireless AC1200 Dual Band Router
63
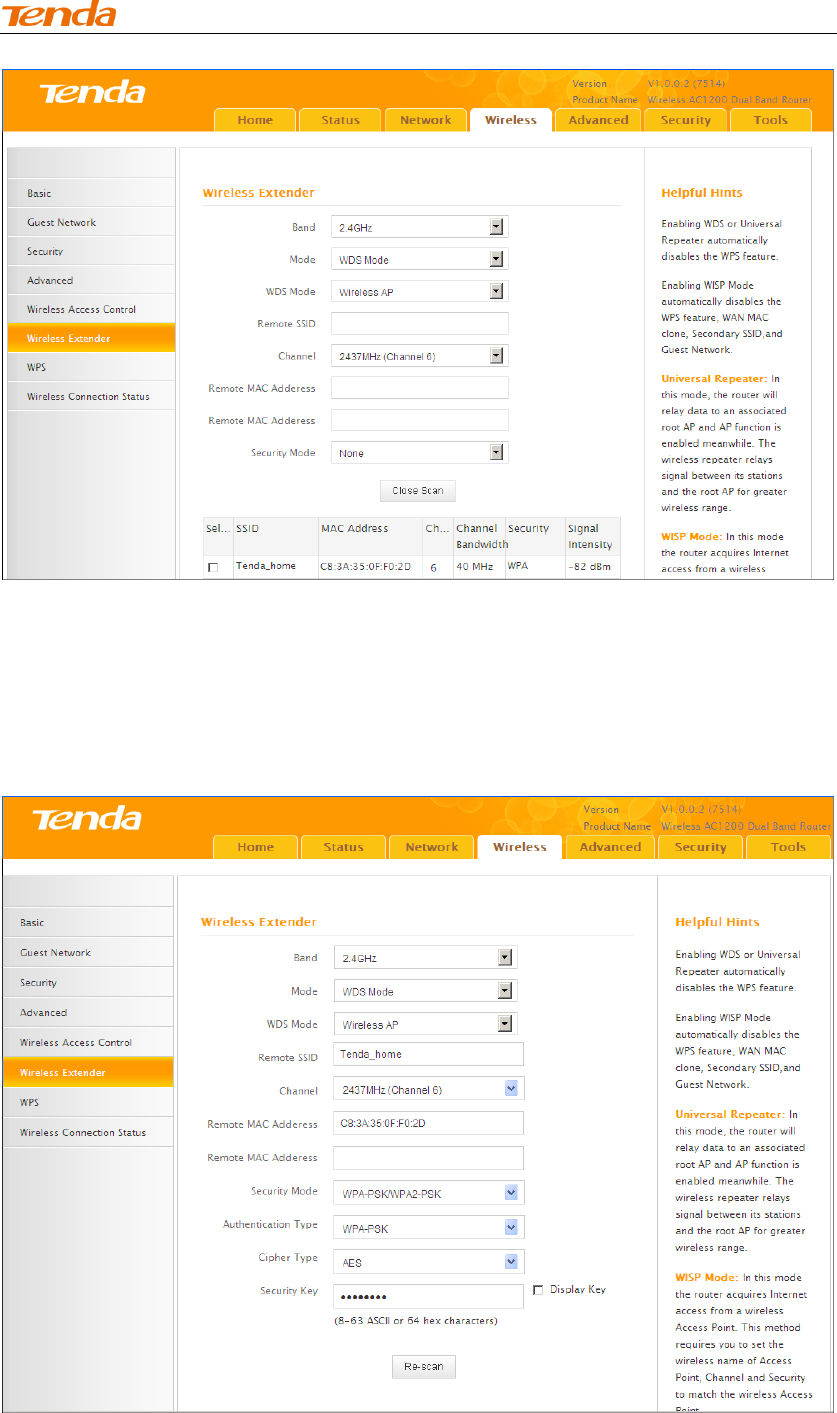
list, select Wireless AP from the WDS Mode drop-down list and then click Open Scan.
③ Search for and select the base station AP's SSID and then click Close
Scan.
High Power Wireless AC1200 Dual Band Router
64
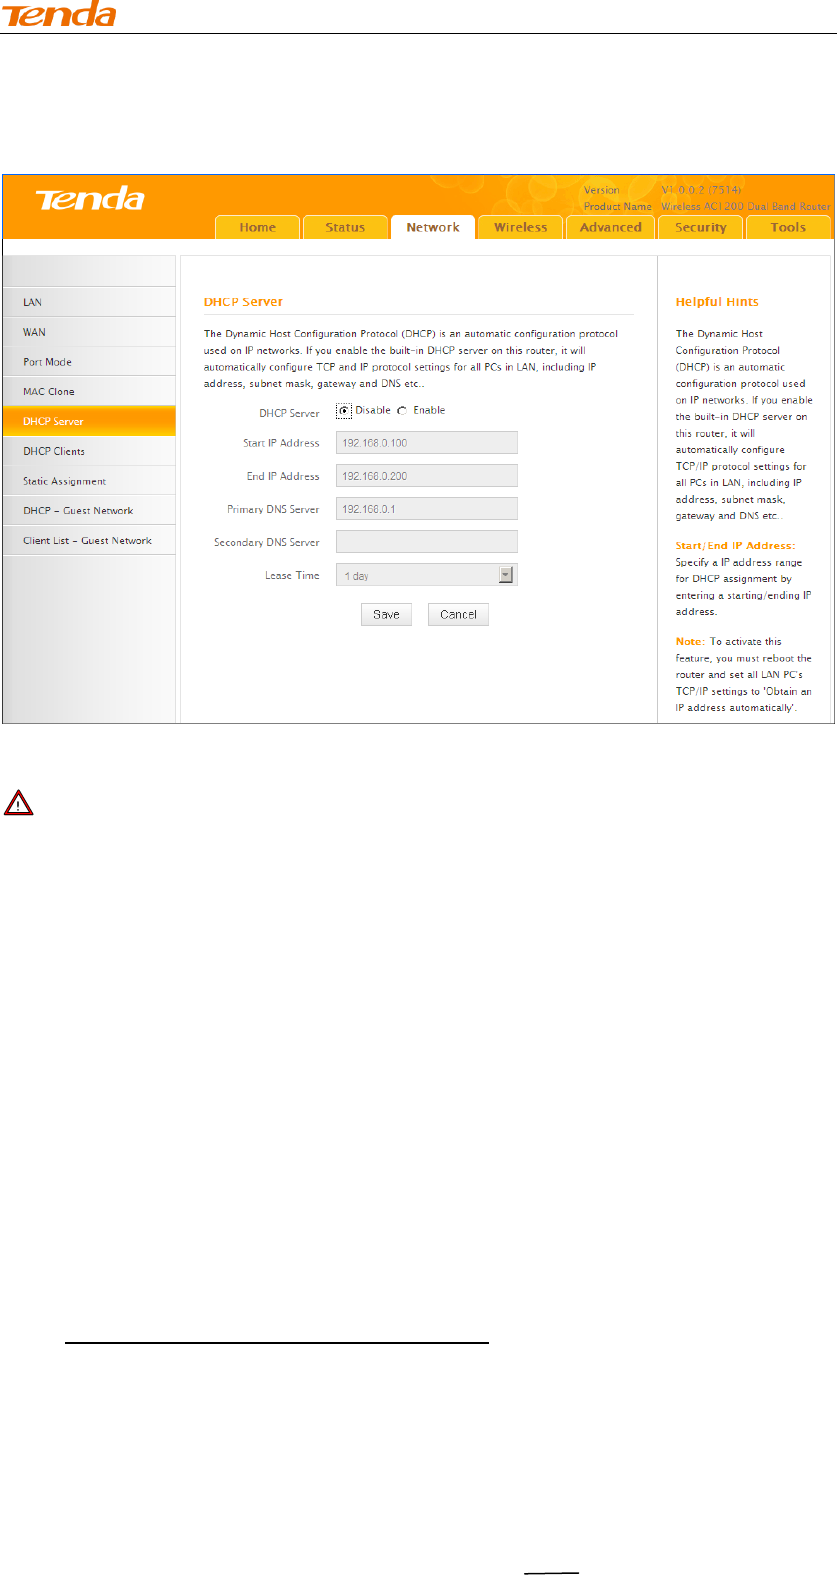
④ The SSID, channel, MAC address, security settings except security key of
the base station AP will be automatically added to the corresponding fields.
You only need to enter the security key of the base station AP and click Save.
High Power Wireless AC1200 Dual Band Router
65
⑤ Click Network -> DHCP Server, disable the DHCP server there and then click Save.
Step 3: Configure Repeater AP (Tenda Wireless Router 3)
① Click Network -> LAN to specify a LAN IP address that is in the same
subnet as yet different from the base AP and the other remote AP.
High Power Wireless AC1200 Dual Band Router
66
② Click OK in the appearing screen.
③ Click Wireless -> Wireless Extender, select WDS Mode from the
Mode drop-down list, select Wireless AP from the WDS Mode drop-down
list and then click Open Scan.
④ Search for and select the base station AP's SSID and then click Close
Scan.
High Power Wireless AC1200 Dual Band Router
67
⑤ The SSID, channel, MAC address, security settings except security
key of the base station AP will be automatically added to the correspo nding
fields. You only need to enter the security key of the base station AP and
click Save.
High Power Wireless AC1200 Dual Band Router
68
⑥ Click Network -> DHCP Server, disable the DHCP server there and
then click Save.
Note --------------------------------------------------------------------------------------
1.To set up a wireless network with WDS, both access points must be WDS
capable.
2.This router's primary SSID will automatically change to match that of the
remote router when the WDS feature is configured successfully. Please do not
change this SSID. Changing this SSID may interrupt the wireless bridge link.
3. When the WDS is configured successfully; wireless clients need to join this
Tenda wireless router's SSID for Internet access.
------------------------------------------------------------------------------------------------
Verify Bridge Connectivity:
① Connect your PC to this Tenda wireless router via a wired or wireless
connection and set it to "Obtain an IP address automatically". If you are not clear,
see Appendix 1 Configure PC TCP/IP Setting.
② Wait until your PC successfully obtains an IP address.
High Power Wireless AC1200 Dual Band Router
69
Last number differs from that of
the remote wireless router's
LAN IP address.
This is the remote router's LAN
IP address.
High Power Wireless AC1200 Dual Band Router
70
③ Click Start ->Run.
④ Enter cmd and click OK.
⑤ Enter "ping default gateway IP address".Here in this example, enter
"ping 192.168.0.1" and press Enter. If you see a similar screen (highlighted
area), the bridge is established successfully.
High Power Wireless AC1200 Dual Band Router
71
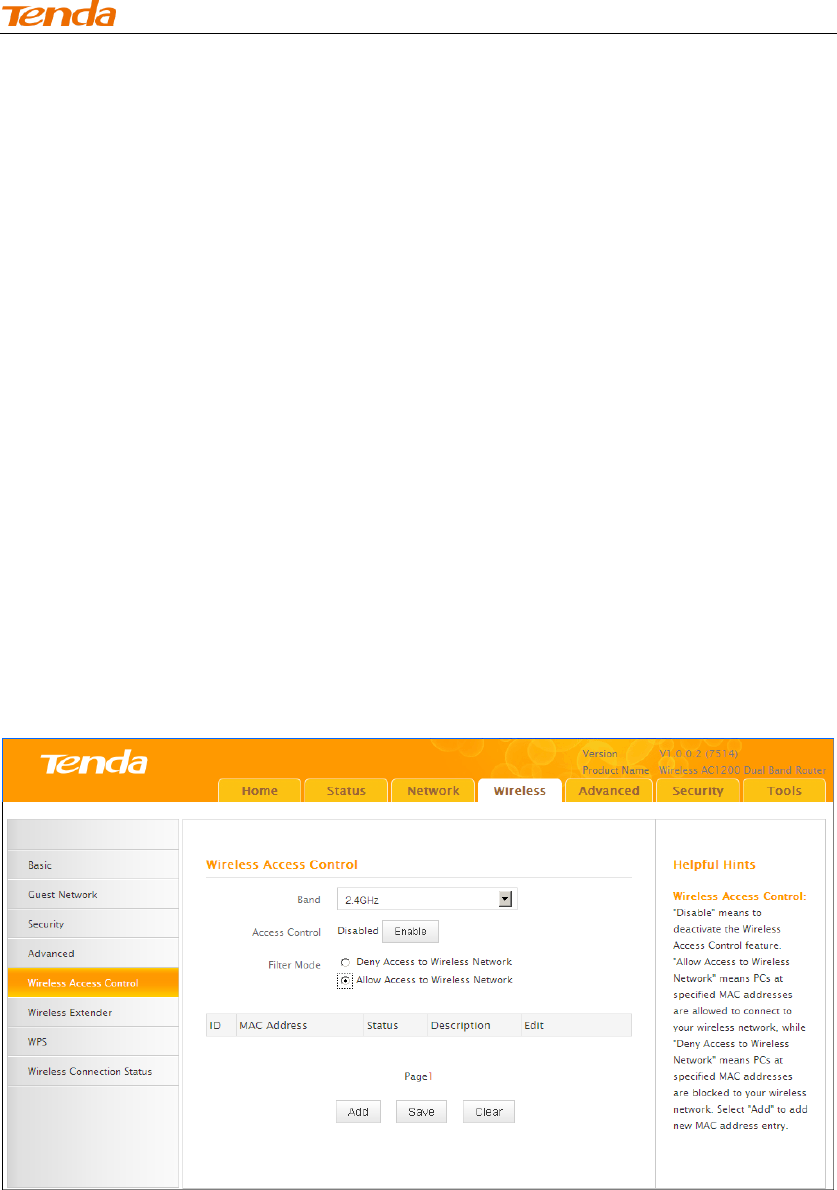
3.5 Access Control
Specify a list of devices to "Permit" or "Forbid" a connection to your wireless
network via the devices’ MAC Addresses. Click Wireless -> Wireless Access
Control to enter the configuration screen.
There are three options available: Disable, Deny Access to Wireless Network and
Allow Access to Wireless Network.
High Power Wireless AC1200 Dual Band Router
72
A. If you want to allow all wireless clients to join your wireless network, select
Disable.
B. If you want to allow ONLY the specified wireless clients to join your wireless
network, select Allow Access to Wireless Network.
C. If you want to disallow ONLY the specified wireless clients to join your
wireless network, select Deny Access to Wireless Network.
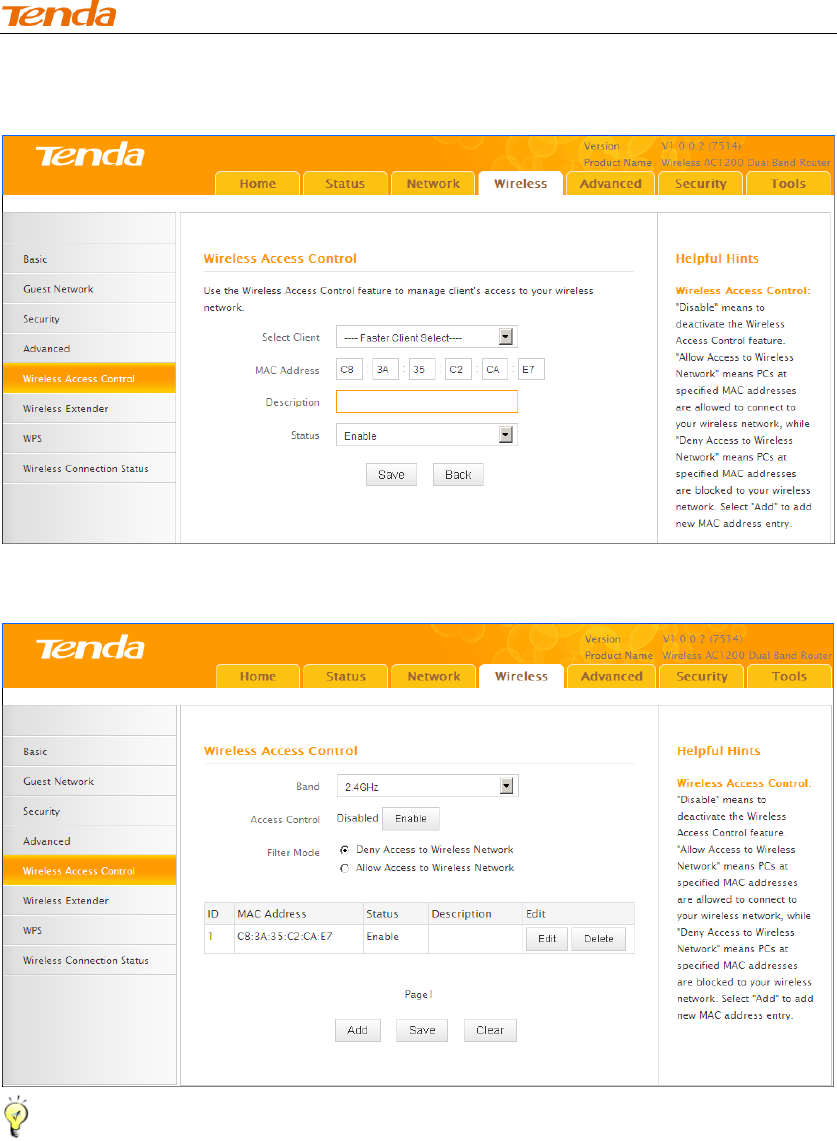
Wireless Access Control Application Example:
To only allow your own notebook at the MAC address of C8:3A:35:C2:CA:E7 to
join your wireless network (SSID:Tenda_home)
Configuration Procedures:
① Select the wireless band you wish to use, for example 2.4Ghz.
② Click Enable.
③ Select Allow Access to Wireless Network.
④ Click Add.

High Power Wireless AC1200 Dual Band Router
73
High Power Wireless AC1200 Dual Band Router
74
⑤ Select or enter your wireless MAC address and click Save.
⑥ Below screen will then appear.
Tip ----------------------------------------------------------------------------------------
1. Up to 16 wireless MAC addresses can be configured.
2. If you don't want to configure the complex wireless security settings and want
to disallow others to join your wireless network, you can configure a wireless
access control rule to allow only your own wireless device.
------------------------------------------------------------------------------------------------

High Power Wireless AC1200 Dual Band Router
75
3.7 WPS Setup
Click Wireless -> WPS to enter WPS screen. Wi-Fi Protected Setup makes it easy
for home users who know little of wireless security to establish a secure wireless
home network, as well as to add new devices to an existing network without
entering long passphrases or configuring complicated settings. Simply enter a PIN
code or press the software PBC button or hardware WPS button (if equipped) and a
secure wireless connection can be established.
A. If your wireless network is not secured, you can use the WPS to quickly
encrypt your wireless.
B. If your wireless network is secured with WPS, you can quickly join your
wireless network with a WPS capable adapter (Only WPA2-PSK and Mixed
WPA/WPA2-PSK are supported).
You can use WPS PBC or WPS PIN to establish a secure connection.
PBC: Establish WPS connection using the the software PBC button or hardware WPS
button (if equipped).
PIN: Establish WPS connection using the PIN code.
To secure a wireless network with WPS
Knowledge Center ------------------------------------------------------------------
1. Reset OOB: If clicked, the device's SSID and security mode will become unconfigured so
that WPS can reconfigure the device's SSID, security settings. When the action of Reset OOB
completes, the device's SSID will be restored to factory default, and security mode will be
disabled (none).
------------------------------------------------------------------------------------------------