TENDA TECHNOLOGY FH303 Wireless N300 High Power Router User Manual
SHENZHEN TENDA TECHNOLOGY CO., LTD. Wireless N300 High Power Router
Users Manual

FH303 Wireless N300 High Power Router

FH303 Wireless N300 High Power Router
Copyright St at em ent
is the registered tradem ark of Shenzhen Tenda Technology Co., Ltd. All t he
product s and product nam es m ent ioned herein are the t radem arks or registered
tradem arks of t heir respect ive holders. Copyright of t he whole product as integrat ion,
including it s accessories and soft ware, belongs t o Shenzhen Tenda Technology Co., Ltd.
Without prior expressed writ ten perm ission from Shenzhen Tenda Technology Co., Ltd, any
individual or party is not allowed to copy, plagiarize, reproduce, or t ranslat e it into other
languages.
All phot os and product specificat ions m ent ioned in t his m anual are for references only.
Upgrades of software and hardware m ay occur; Tenda reserves the right t o revise t his
publicat ion and t o m ake changes in t he cont ent hereof without obligat ion t o not ify any
person or organizat ion of such revisions or changes. I f you would like t o know m ore about
our product inform at ion, please visit our websit e at ht tp: / / www.t endacn.com

FH303 Wireless N300 High Power Router
Table of Cont ent s
CHAPTER 1 PRODUCT OVERVIEW ............................................................................................................... 3
1.1 PACKAGE CONTENT .................................................................................................................................... 3
1.2 PANEL OVERVIEW ....................................................................................................................................... 4
CHAPTER 2 INSTALLATION ........................................................................................................................... 6
CHAPTER 3 INTERNET CONNECTION SETUP ............................................................................................. 7
3.1 CONFIG TCP/IP SETTINGS ON YOUR PC ....................................................................................................... 7
3.2 WEB LOGIN ............................................................................................................................................... 12
3.3 QUICK INTERNET CONNECTION SETUP ....................................................................................................... 12
3.4 QUICK ENCRYPTION .................................................................................................................................. 14
CHAPTER 4 ADVANCED SETTINGS ............................................................................................................ 15
4.1 STATUS .................................................................................................................................................... 15
4.2 WAN SETTINGS ........................................................................................................................................ 17
4.3 LAN SETTINGS ......................................................................................................................................... 23
4.4 MAC CLONE ............................................................................................................................................. 23
4.5 DNS SETTINGS ......................................................................................................................................... 24
4.6 BANDWIDTH CONTROL ............................................................................................................................... 25
4.7 TRAFFIC STATISTICS .................................................................................................................................. 28
4.8 WAN SPEED ............................................................................................................................................. 29
CHAPTER 5 WIRELESS SETTINGS ............................................................................................................. 30
5.1 WIRELESS BASIC SETTINGS ....................................................................................................................... 30
5.2 WIRELESS SECURITY ................................................................................................................................. 32
5.2.1 WPS ................................................................................................................................................ 32
5.2.2 WEP ................................................................................................................................................ 33
5.2.3 WPA-PSK ........................................................................................................................................ 34
5.2.4 WPA2-PSK ...................................................................................................................................... 35
5.2.5 Mixed WPA/WPA2-PSK .................................................................................................................. 35
5.3 WIRELESS EXTENDER ................................................................................................................................ 36
5.3.1 Universal Repeater Mode ............................................................................................................... 36
5.3.2 WISP Client Mode ........................................................................................................................... 36
5.3.3 WDS ................................................................................................................................................ 39
5.4 ACCESS CONTROL .................................................................................................................................... 42
5.5 CONNECTION STATUS ................................................................................................................................ 43
CHAPTER 6 DHCP ......................................................................................................................................... 44
6.1 DHCP SETTINGS ...................................................................................................................................... 44
6.2 DHCP CLIENT LIST ................................................................................................................................... 45
CHAPTER 7 VIRTUAL SERVER .................................................................................................................... 46
7.1 PORT RANGE FORWARDING ....................................................................................................................... 46
7.2 DMZ HOST ............................................................................................................................................... 48
7.3 UPNP ...................................................................................................................................................... 49
CHAPTER 8 PARENTAL CONTROL ............................................................................................................. 50
8.1 CLIENT FILTER .......................................................................................................................................... 50
8.2 MAC FILTER ............................................................................................................................................. 52
8.3 URL FILTER .............................................................................................................................................. 54
8.4 REMOTE WEB-BASED MANAGEMENT .......................................................................................................... 56
CHAPTER 9 ROUTING SETTINGS ................................................................................................................ 57
9.1 ROUTING TABLE ........................................................................................................................................ 57
9.2 STATIC ROUTING ....................................................................................................................................... 57
CHAPTER 10 SYSTEM TOOLS ..................................................................................................................... 59
10.1 TIME SETTINGS ....................................................................................................................................... 59
10.2 DDNS .................................................................................................................................................... 59
10.3 BACKUP/RESTORE .................................................................................................................................. 61
10.4 RESTORE TO FACTORY DEFAULT SETTINGS .............................................................................................. 61
10.5 FIRMWARE UPDATE ................................................................................................................................. 62

3 FH303 Wireless N300 High Power Router
2
10.6 REBOOT .................................................................................................................................................. 62
10.7 CHANGE PASSWORD ............................................................................................................................... 63
10.8 SYSTEM LOGS ......................................................................................................................................... 63
APPENDIX 1 GLOSSARY .............................................................................................................................. 64
APPENDIX 2 PRODUCT FEATURES ............................................................................................................ 65
APPENDIX 3 TROUBLESHOOTING .............................................................................................................. 66

3 FH303 Wireless N300 High Power Router
3
Chapt er 1 Product Over view
Thanks for purchasing t his Tenda wireless rout er .
The Tenda FH303 Wireless N300 High Power Rout er is an 802.11n wireless
rout er. You j ust need sim ply connect t he device t o a cable or DSL m odem and
I nt ernet access sharing will be reachable to m ult iple com puters, gam e consoles,
and m edia players over an up t o 300Mbps WLAN t hat is secured wit h WPA and
WPA2 encrypt ion m ethods. Plus, it provides WI SP client m ode to let you access
I nt ernet wirelessly and WDS to extend your wireless coverage. Wit h high power,
the Tenda FH303 is ideal for large hom es or offices.
1 .1 Pack age Cont ent
Unpack t he box and verify the following it em s:
¾ FH303 Wireless N300 High Power Router
¾ Power Adapt er;
¾ Resource CD
¾ 3 undetachable 5dbi antennas
¾ Et hernet Cable
¾ Quick I nst allat ion Guide
I f any of t he above item s are incorrect , m issing, or dam aged, please contact your
Tenda reseller for im m ediat e replacem ent .

3 FH303 Wireless N300 High Power Router
4
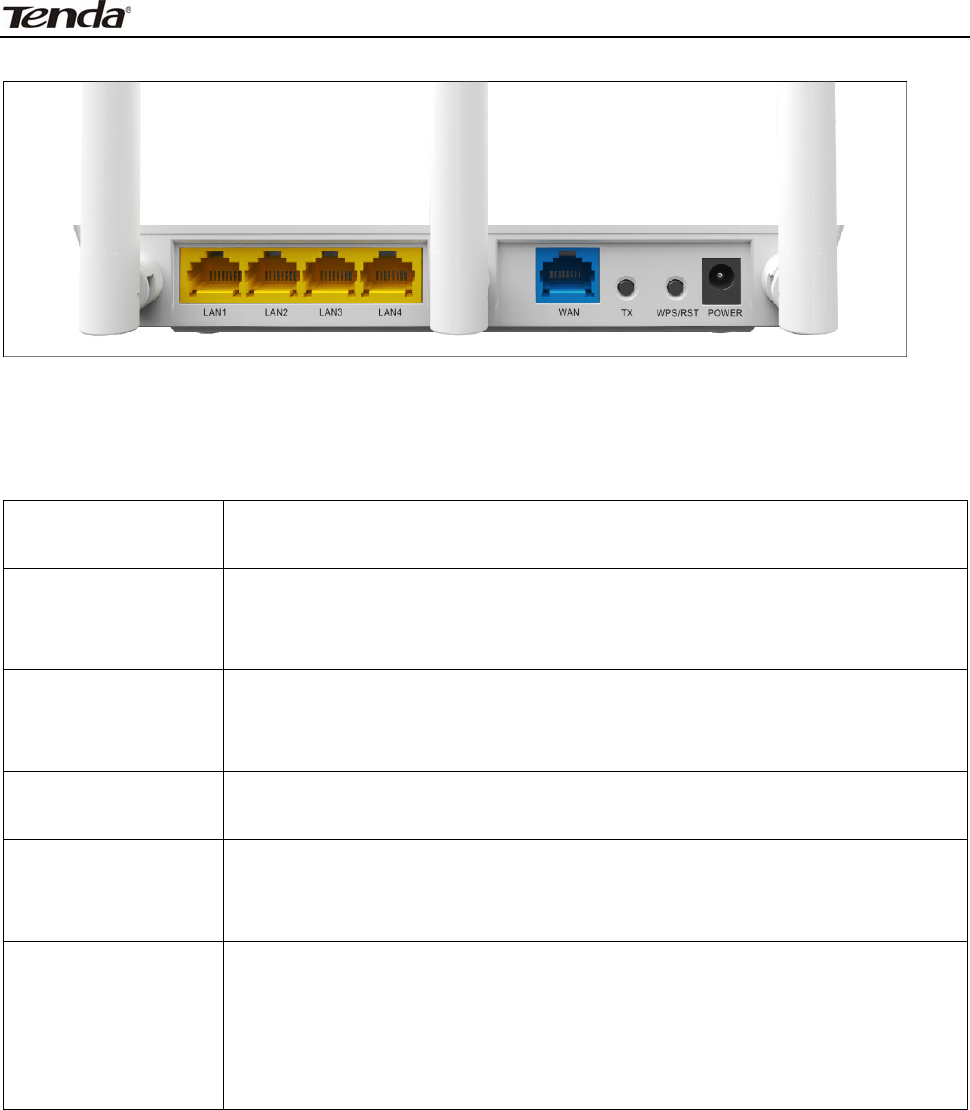
1 .2 Panel Overvie w
LED Overview :
LED
I ndicat or
St atus Descript ion
POWER On The router is powered on
WPS Flashing The router is perform ing WPS
authenticat ion wit h wireless client
On WPS is enabled
SYS Flashing The rout er is working properly
WLAN
On The wireless funct ion is enabled
Flashing the rout er is transm itt ing dat a wirelessly
WAN
LAN( 1- 4)
On
Device connect ed t o corresponding port is
working properly but no dat a is current ly
being t ransferred over the port
Flashing Sending or Receiving dat a over
corresponding port
SI GNAL
Blue The wireless signal strengt h is best
Green The wireless signal strengt h is good
3 FH303 Wireless N300 High Power Router
5
Ba ck Panel:
I nterface/ but t on overvie w :
I nt e r face
/ But t on Descript ion
POW ER
Pow e r re ceptacle. N ot e: Using a pow er supply w it h a
differe n t volt age ra t ing t han t he one included in
t he package m ay dam a ge t he r out er .
W AN
The I nt e rnet port for connect ion t o t he ca ble or t he
DSL m odem or direct I SP se r vice via an Et hernet
cable.
LAN ( 1 / 2 / 3 / 4 ) Connect Et h e r net de vice s such as com put ers,
sw it ches, a nd hubs.
RESET/ W PS
Pr e ss a nd hold t he butt on for 7 seconds t o rest ore t he
rout e r t o it s original fa ct ory defa ult set t ings or for
about 1 second t o enable t he W PS funct iona lit y.
TX
Pr e ss a nd hold the but t on for 3 seconds and t hen
rele ase , t he color of SI GN AL light w ill ch a n ge a n d t he
w irele ss signal st r e ngth w ill change also.
Blue: The w ireless signa l st re ngth is best
Green: Th e w ireless signa l st rength is good
3 FH303 Wireless N300 High Power Router
6
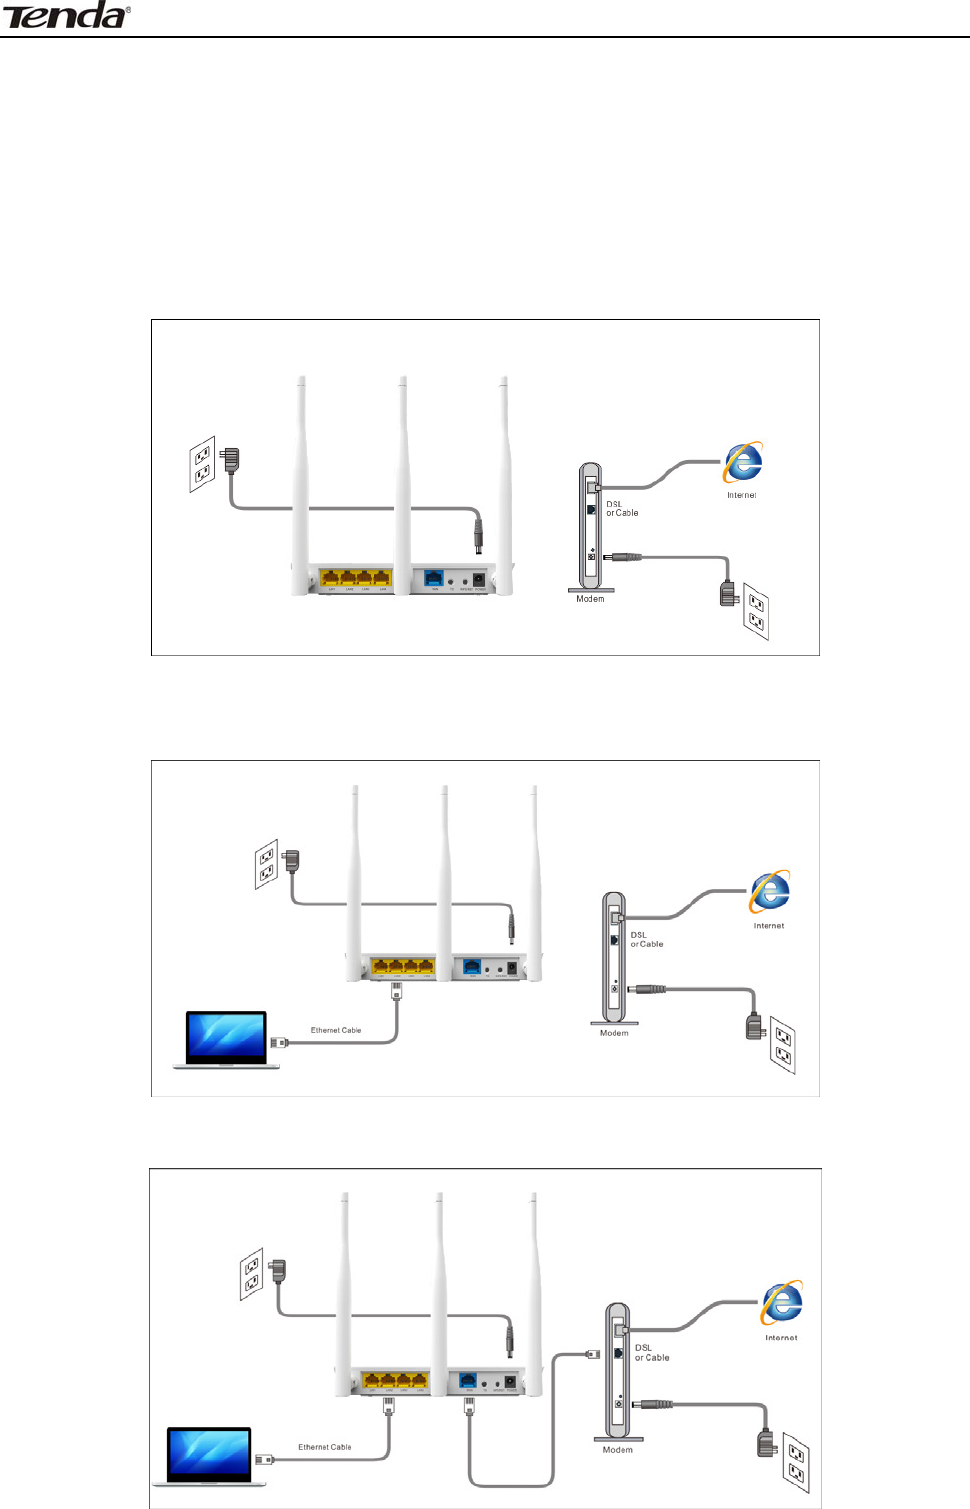
Chapt er 2 I nst alla t ion
This m anual t akes t he Tenda FH303 as an exam ple t o dem onst rat e whole
inst allat ion process, which applies to ot her products alike.
1. Connect one end of t he included power adapter t o t he Device and plug t he
other end int o a wall out let nearby. ( Using a power adapt er with a different
volt age rat ing t han t he one included in t he package m ay dam age t o t he router.)
2. Connect one of t he LAN ports on t he Rout er to t he NI C port on your PC using
an Ethernet cable.
3. Connect t he Ethernet cable from I nt ernet side to t he WAN port on t he Device.
3 FH303 Wireless N300 High Power Router
7
Chapt er 3 I nt ernet Connect ion Se t up
3 .1 Config TCP/ I P set t ings on your PC
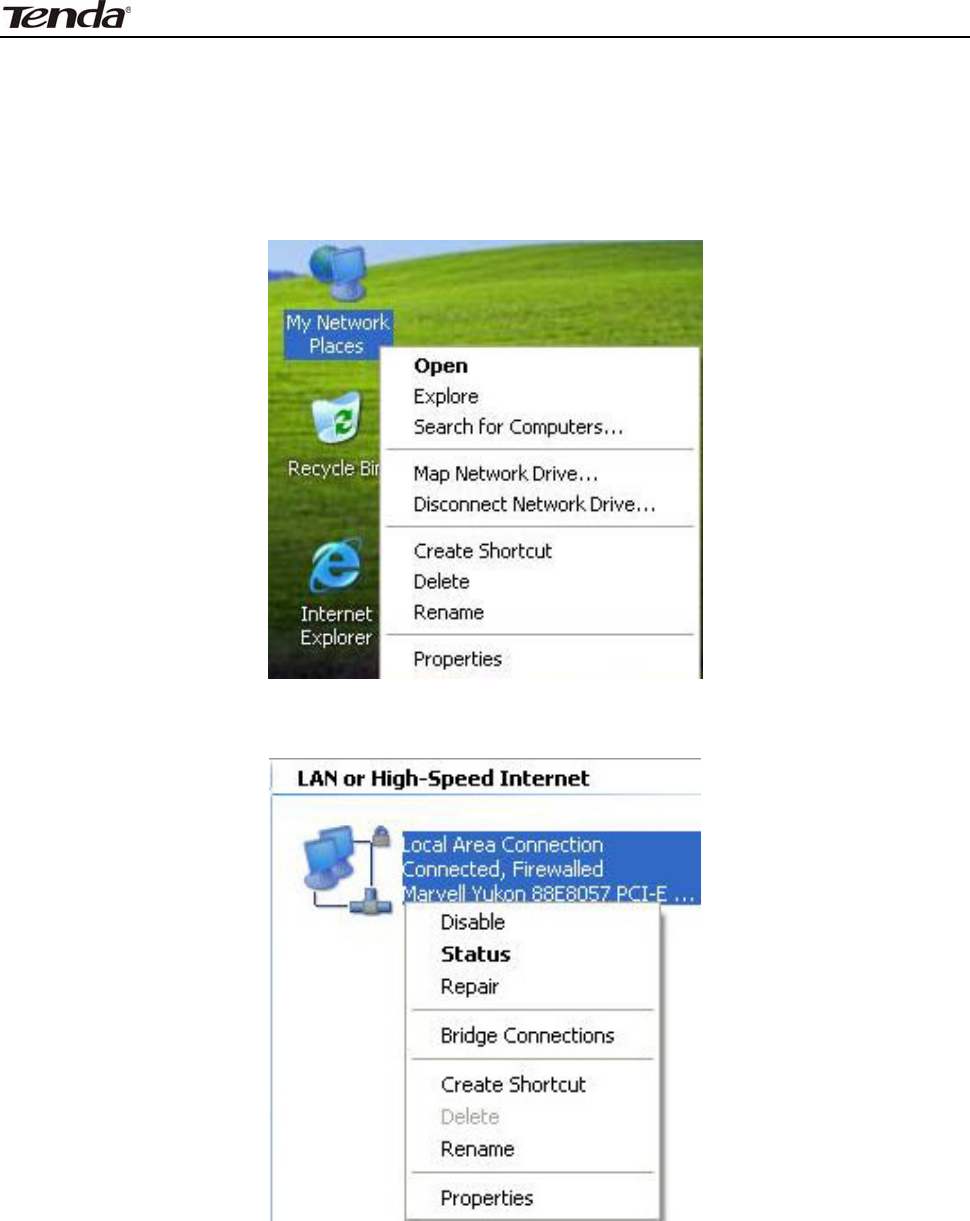
I f you a r e using W indow s XP, do as follow s:
1. From t he deskt op, right - click My Net work Places > Properties.
2. Right - click on t he Local Area Connection and select Properties.
3 FH303 Wireless N300 High Power Router
8
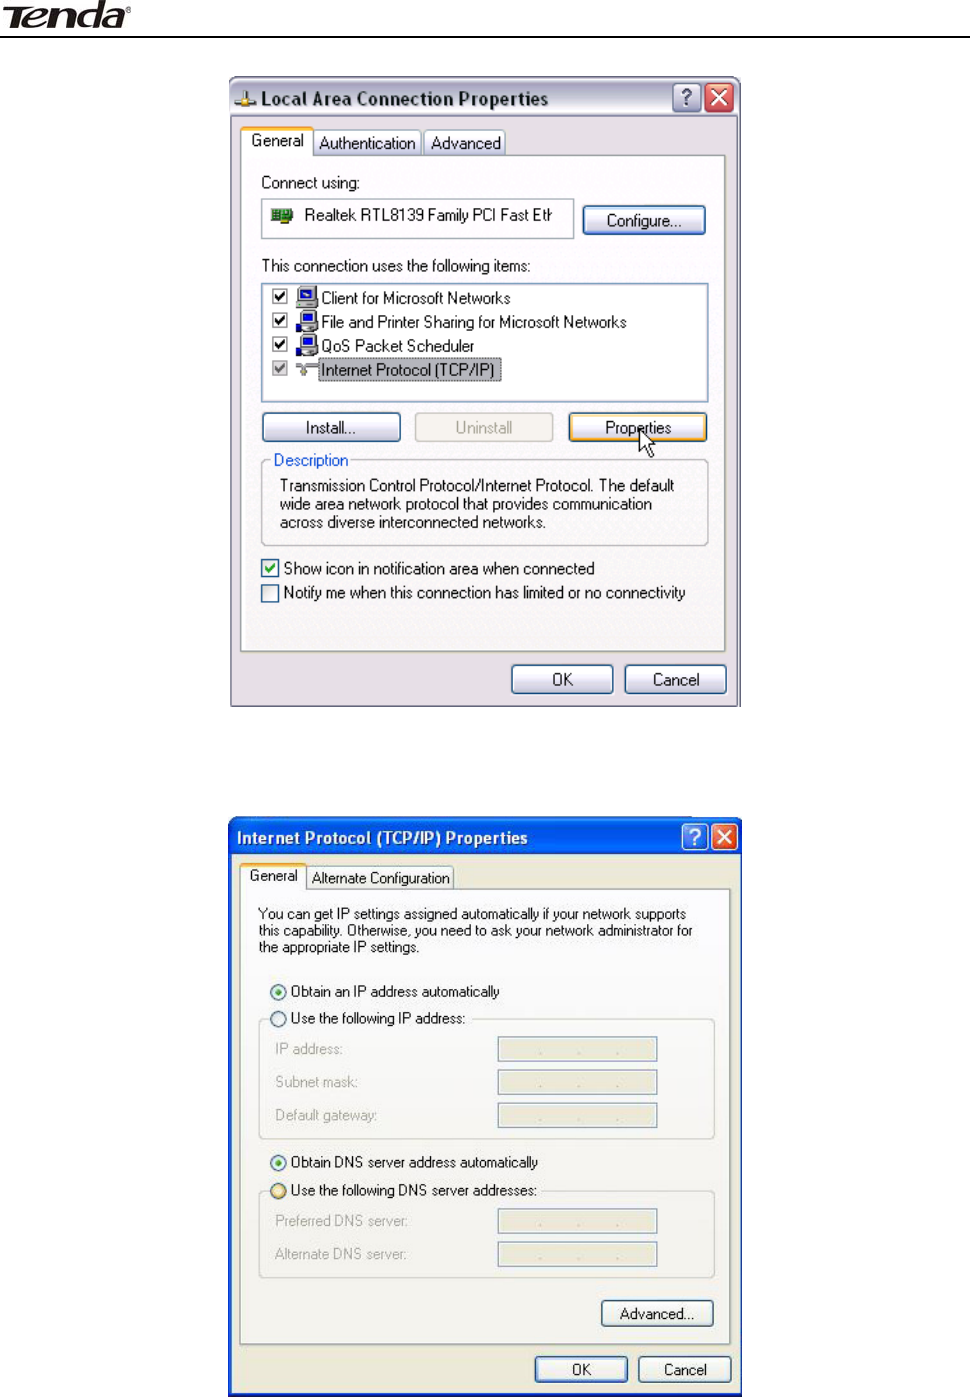
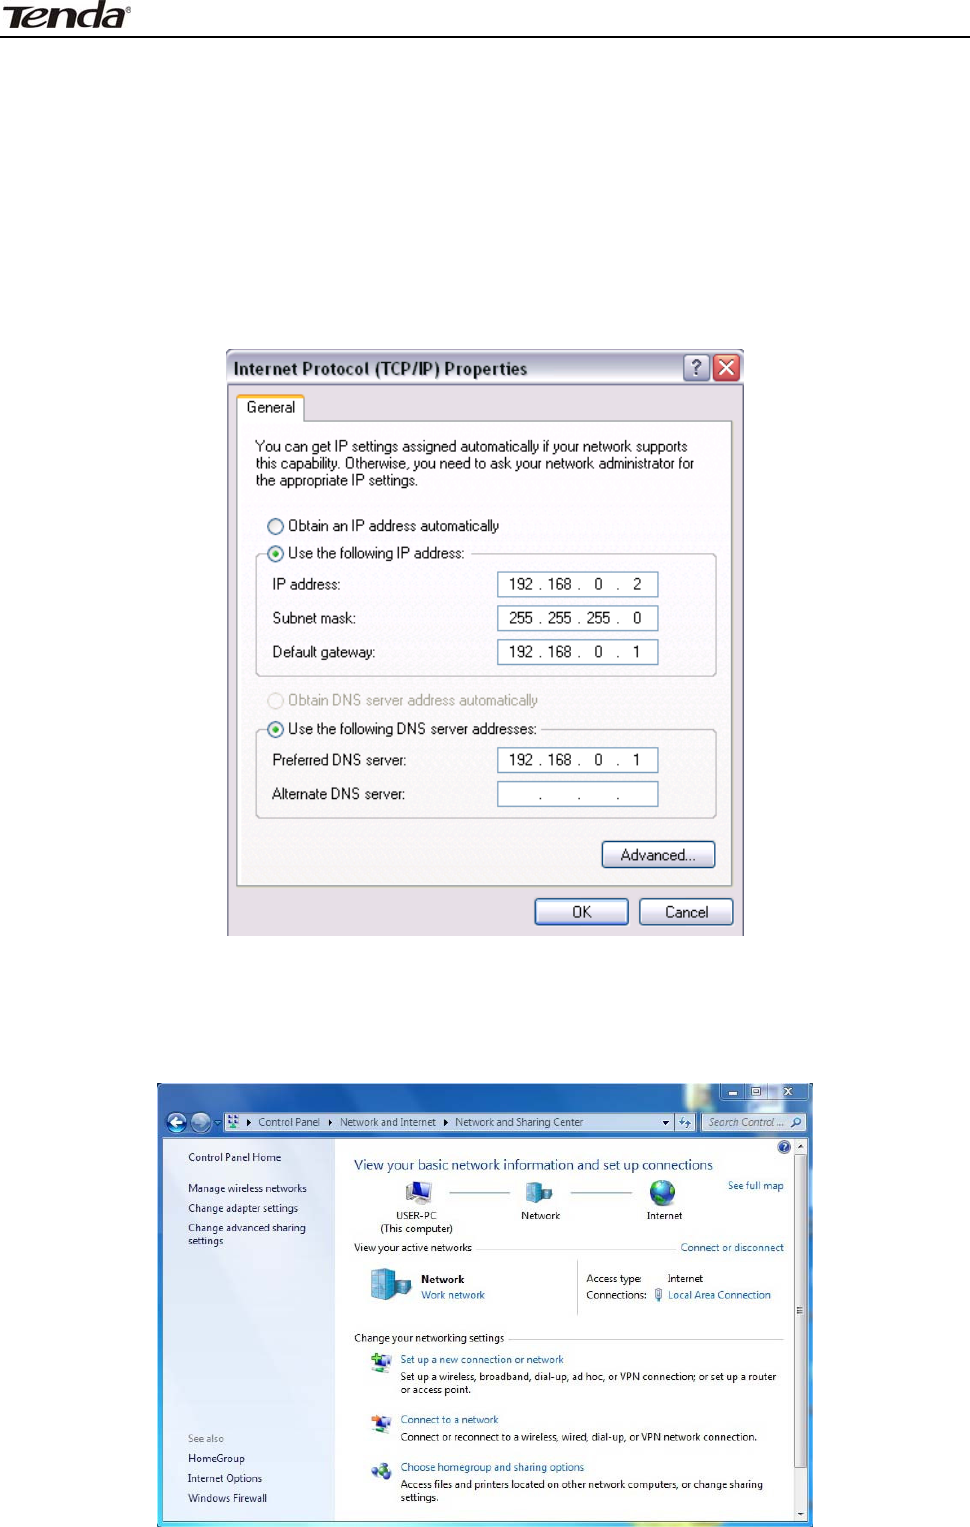
3. Select I nternet Prot ocol ( TCP/ I P) and click Properties.
4. Select " Obt ain an I P address aut om at ically" or "Use t he following I P address".
a. " Obt a in an I P a ddress a utom a t ica lly"
3 FH303 Wireless N300 High Power Router
9
b. “Use t he follow ing I P a ddr e ss”
I P address: Enter 192.168.0.xxx where xxx can be any num ber bet ween 2 and
254).
Subnet m ask: 255.255.255.0.
Default gat eway: Ent er 192.168.0.1.
Preferred DNS server: Set Preferred ( Prim ary) DNS t he sam e as the LAN I P
address of your Device ( 192.168.0.1) if you don’t know your local DNS server
address ( Or consult your I SP). The Alt ernate ( Secondary) DNS is opt ional. Click
OK twice t o save your set t ings.
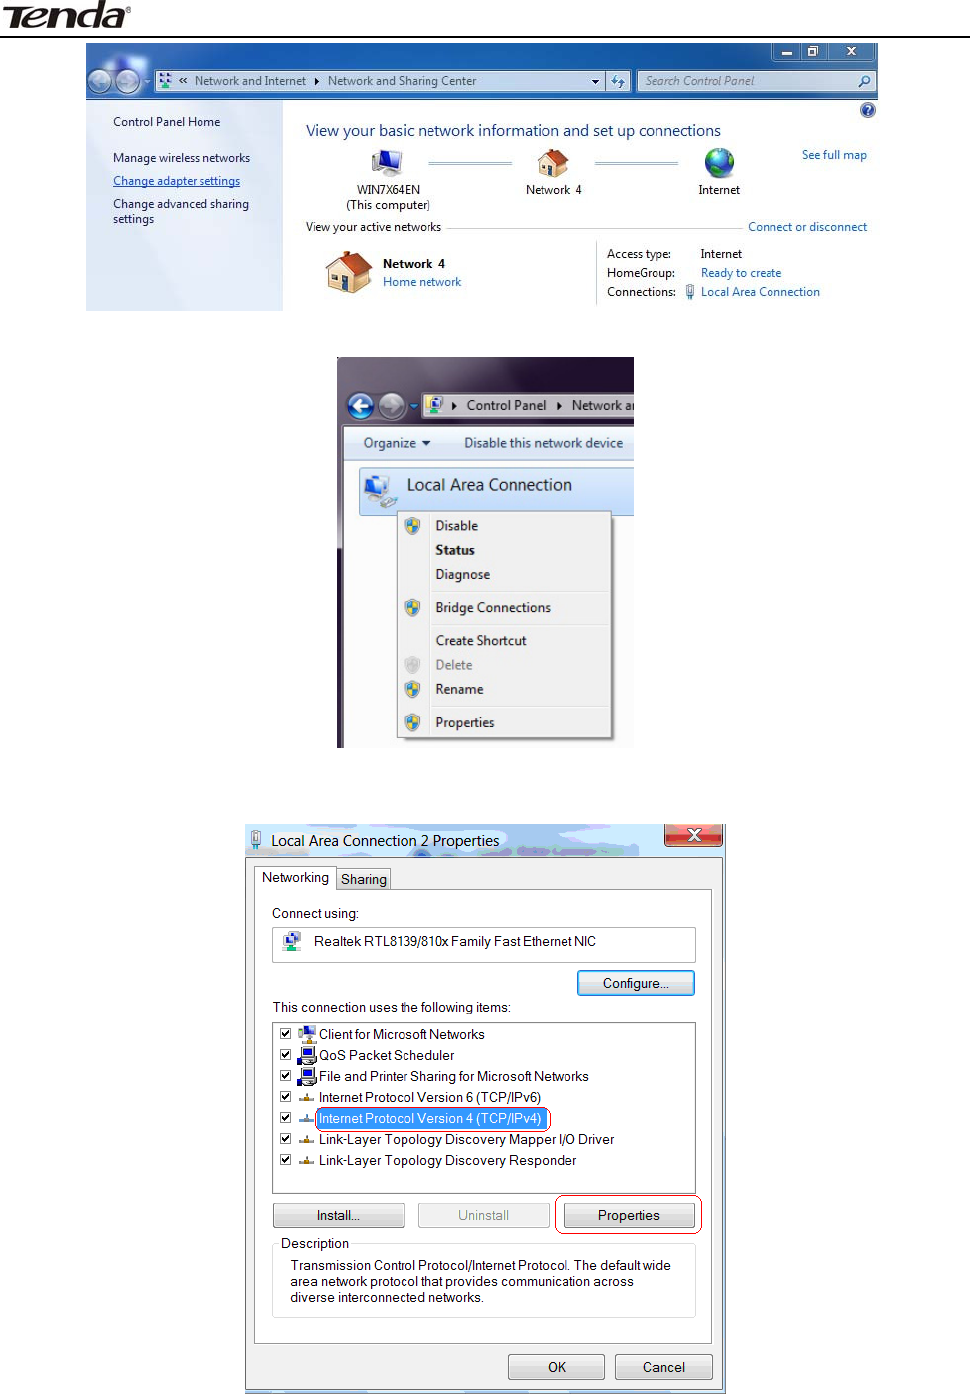
I f you a r e using W indow s 7 , do a s follow s:
1. Click on St art > Cont rol Panel > Net work and I nt ernet > Net work and Sharing
Cent er.
2. Click "Change adapt er set tings".
3 FH303 Wireless N300 High Power Router
10
3. Right - click on t he Local Area Connection and select Properties.
4. Select I nternet Prot ocol Version 4 ( TCP/ I Pv4) and click Properties or direct ly
double- click on I nt ernet Prot ocol Version 4 ( TCP/ I Pv4).
3 FH303 Wireless N300 High Power Router
11
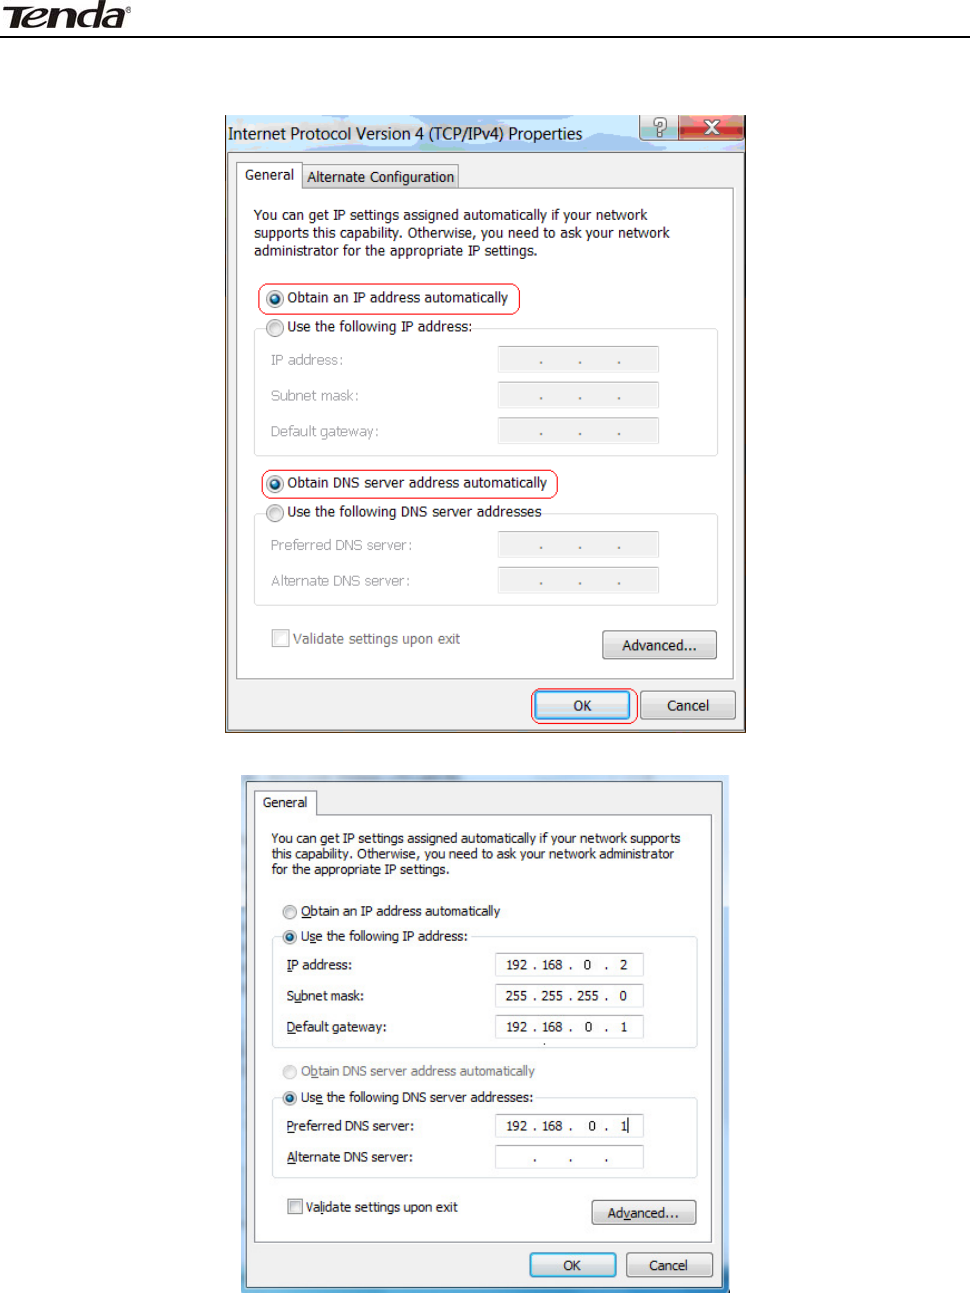
5. Select " Obt ain an I P address aut om at ically" or "Use t he following I P address".
a. " Obt a in an I P a ddress a utom a t ica lly"
b. " Use t he follow ing I P a ddr e ss"
I P address: Enter 192.168.0.xxx where xxx can be any num ber bet ween 2 and
254).
Subnet m ask: 255.255.255.0.
Default gat eway: Ent er 192.168.0.1.
Preferred DNS server: Set Preferred ( Prim ary) DNS t he sam e as the LAN I P
address of your Device ( 192.168.0.1) if you don’t know your local DNS server
address ( Or consult your I SP). The Alt ernate ( Secondary) DNS is opt ional. Click
OK t wice t o save your sett ings.
3 FH303 Wireless N300 High Power Router
12
3 .2 W e b Login
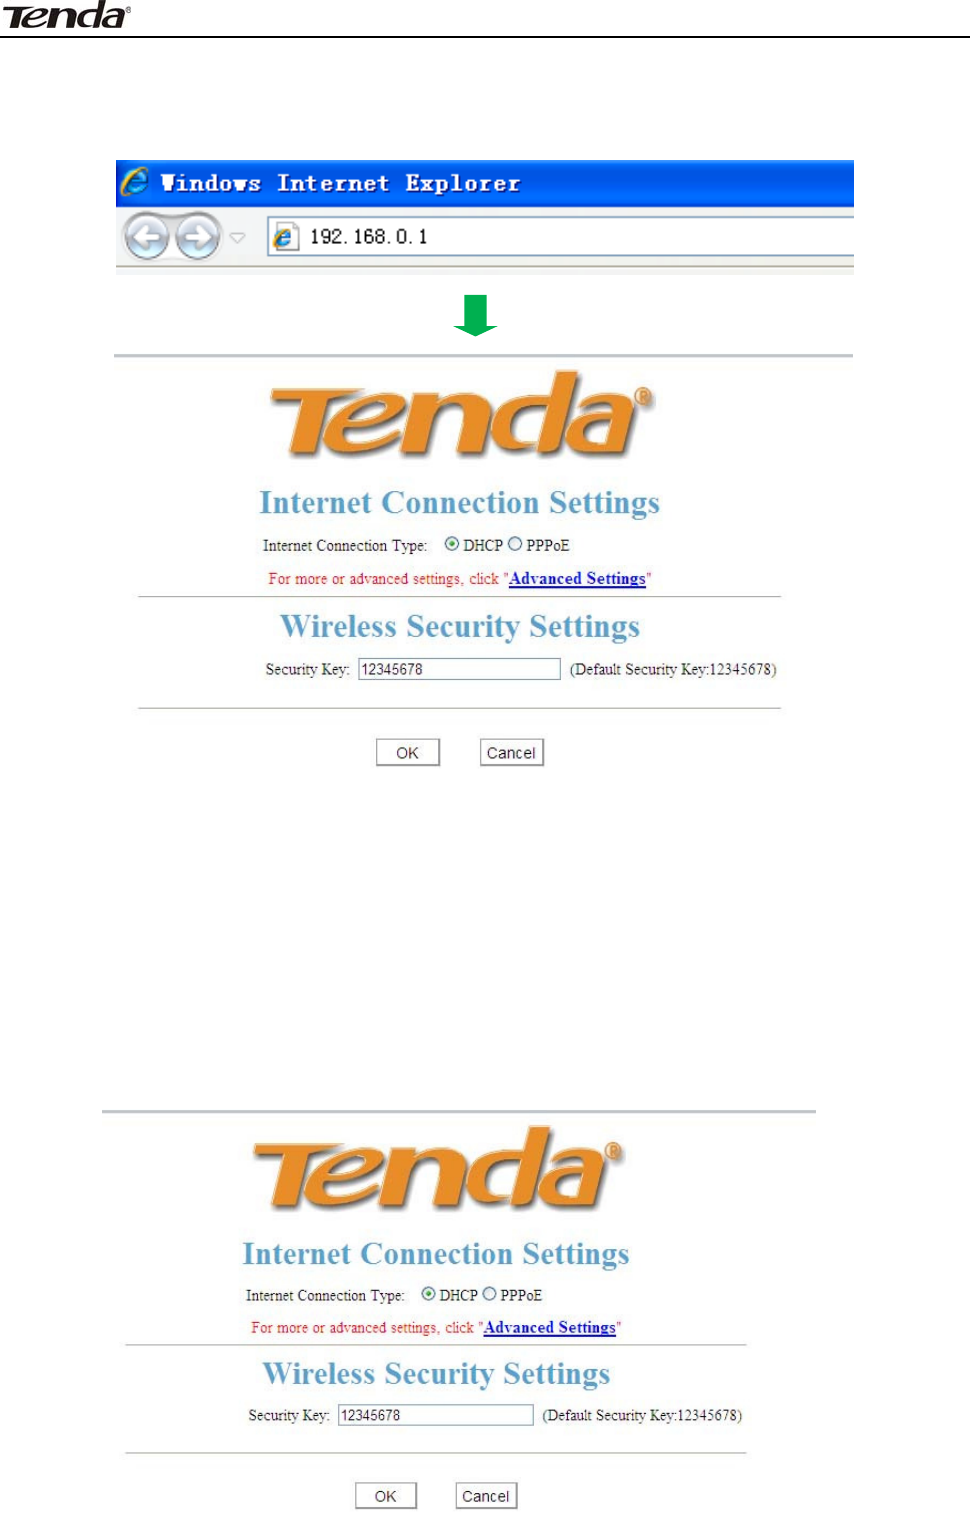
1. Open a web browser(I E, Firefox, Safari etc) , t ype 192.168.0.1 in t he address
bar and press "Ent er". Then you can log in t o t he rout er’s web m anager
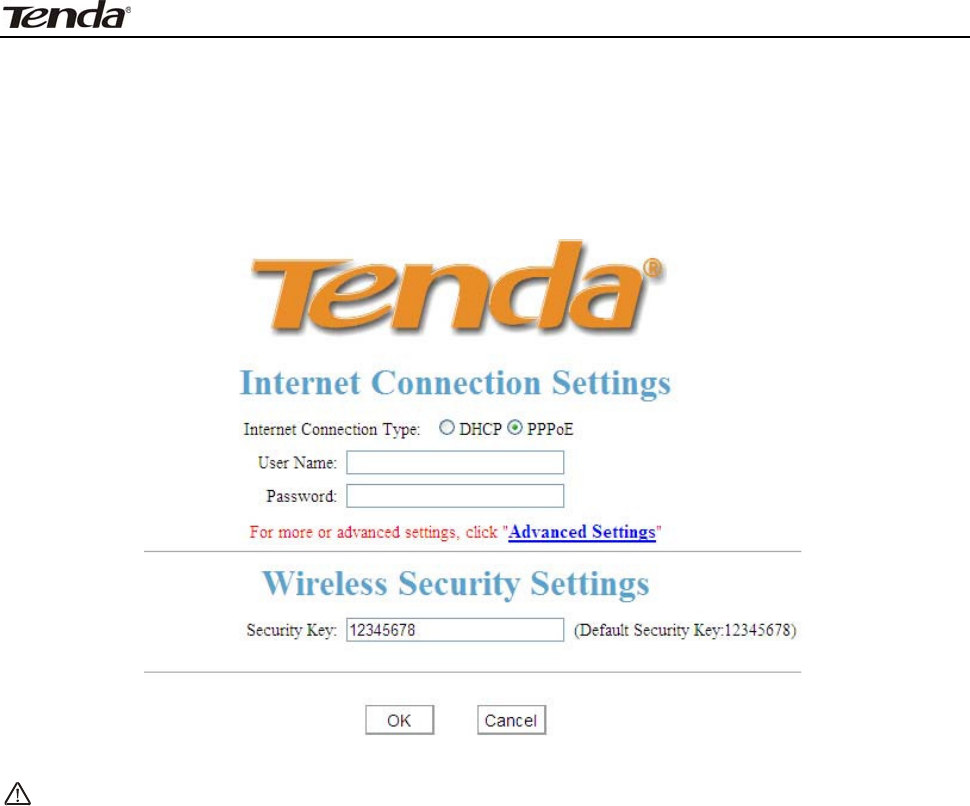
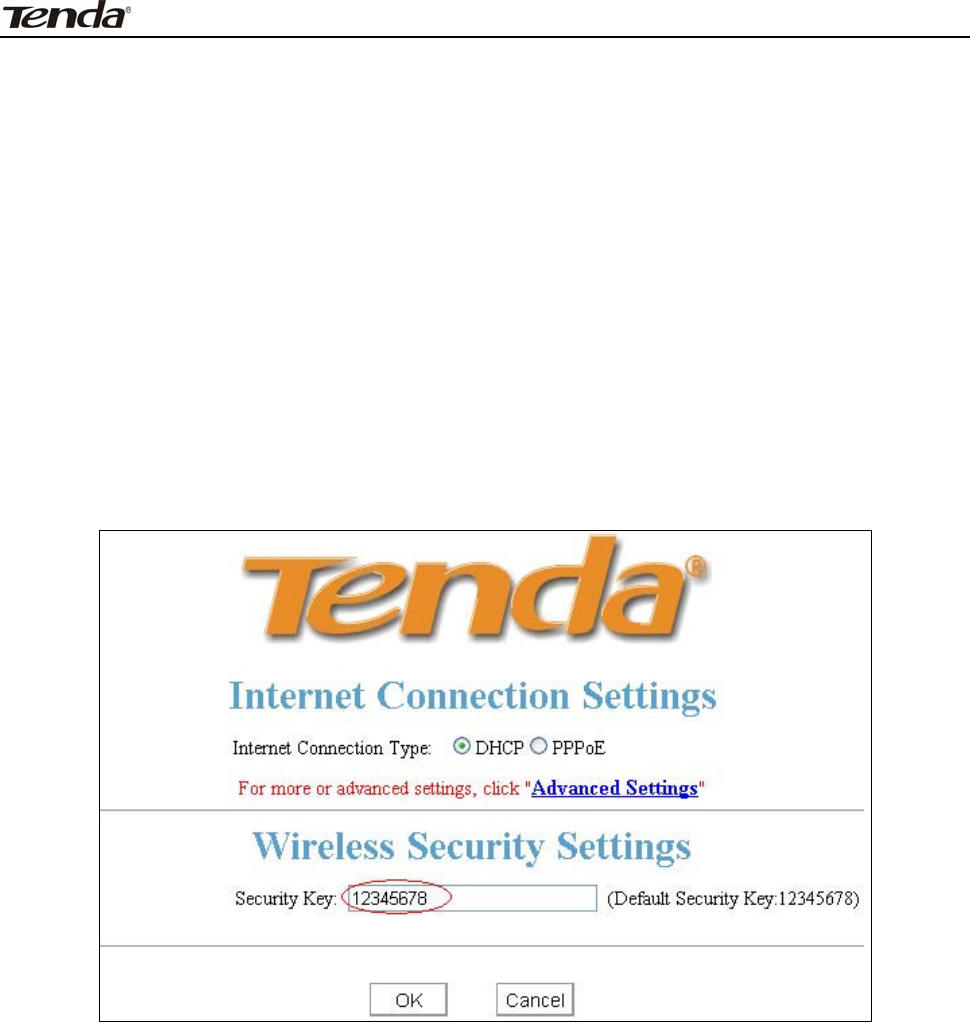
3 .3 Quick I nte r net Connect ion Set up
2 com m on I nt ernet connection types are available on t he hom e page: PPPoE
and DHCP.
DHCP: Select DHCP ( Dynam ic I P) if you can access I nt ernet as soon as your
com put er connects t o the ADSL/ Cable m odem directly, and t hen configure a
securit y key t o secure your wireless net work.
3 FH303 Wireless N300 High Power Router
13
PPPoE: Select PPPoE ( Point t o Point Prot ocol over Ethernet ) if you used to
connect t o the I nt ernet Using a Broadband Connection t hat requires a usernam e
and password. Ent er t he user nam e and password provided by your I SP and
configure a security key t o secure your wireless net work.
Not e:
DHCP is t he de fault I nter net connect ion t ype. I f you ne e d other
connect ion t ypes, please go t o Chapt er 4 - > W AN set t ings.
3 FH303 Wireless N300 High Power Router
14
3 .4 Quick Encrypt ion
Secure your wireless net work eit her by configuring a securit y key on t he
hom e page, which is quicker and sim pler, or going t o wireless securit y page
where you can cust om ize securit y m ode and Encrypt ion t ype in addition t o a
securit y key ( For t he lat t er, see section 5.2) .
N OTE: Wireless net work is not encrypt ed by fact ory default and t hus
insecure! Please secure it wit h cust om encrypt ion.
To secure your wireless net work quick and sim ple on t he hom e page.
Sim ply define a cust om securit y key. Securit y m ode and Encrypt ion t ype here
is preset to WPA- PSK and AES respect ively by default . I f you don't custom ize a
securit y key, t hen " 12345678" is populat ed aut om at ically by default as a securit y
key as seen below aft er you subm it your sett ings:

3 FH303 Wireless N300 High Power Router
15
Chapt er 4 Advanced Set t ings
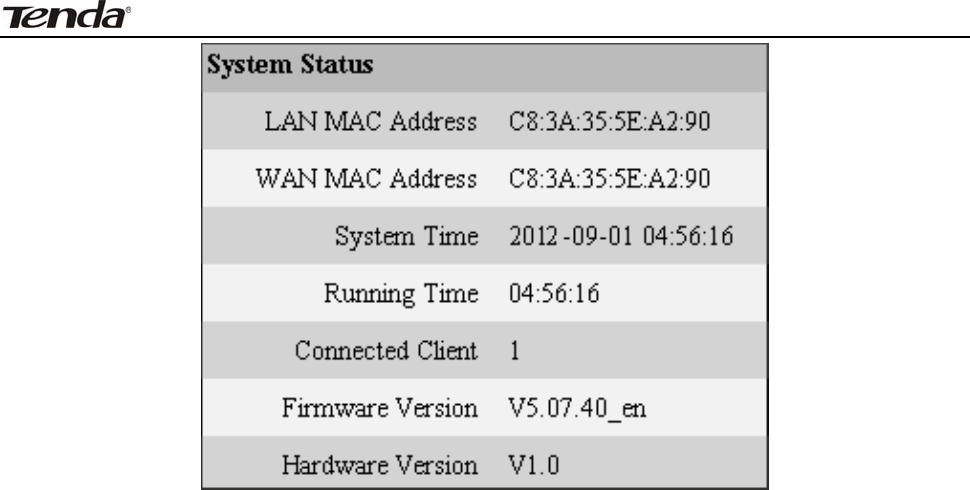
4 .1 St at us
Here you can view WAN stat us and syst em stat us.
Connect ion St a t us: Displays WAN connect ion st at us: Disconnect ed,
Connecting or Connect ed.
D isconn e ct e d: I ndicates t hat t he Ethernet cable from your I SP side is not
correctly connected to device's WAN port or the router is not logically connect ed
to your I SP.
Con ne ct ing: I ndicat es that t he WAN port is correct ly connect ed and is
request ing an I P address from your I SP.
Con ne ct ed: I ndicates that the rout er has been connect ed t o your I SP.
Connect ion Type : Displays current I nternet connect ion t ype.
W AN I P: Displays the I P address of WAN port provided by your I SP.
Subnet Mask: Displays WAN subnet m ask provided by your I SP.
Ga t e w a y: Displays WAN gat eway address.
Pr e fe r r e d DN S Se r ver: Displays t he preferred DNS Server address.
Alt e r na t e DN S Se r ver: Displays the alt ernat e DNS Server address.
3 FH303 Wireless N300 High Power Router
16
LAN M AC Addr e ss: Displays router’s MAC address of LAN interface.
W AN MAC Addr e ss: Displays router’s MAC address of WAN int erface.
Syst em Tim e: Displays rout er syst em t im e either cust om ized or updat ed from
NTP server.
Connect ed Client : Displays t he num ber of client devices.
Firm w are Version: Displays rout er’s current firm ware version.
Ha r dw are Version: Displays rout er’s current hardware version.
3 FH303 Wireless N300 High Power Router
17
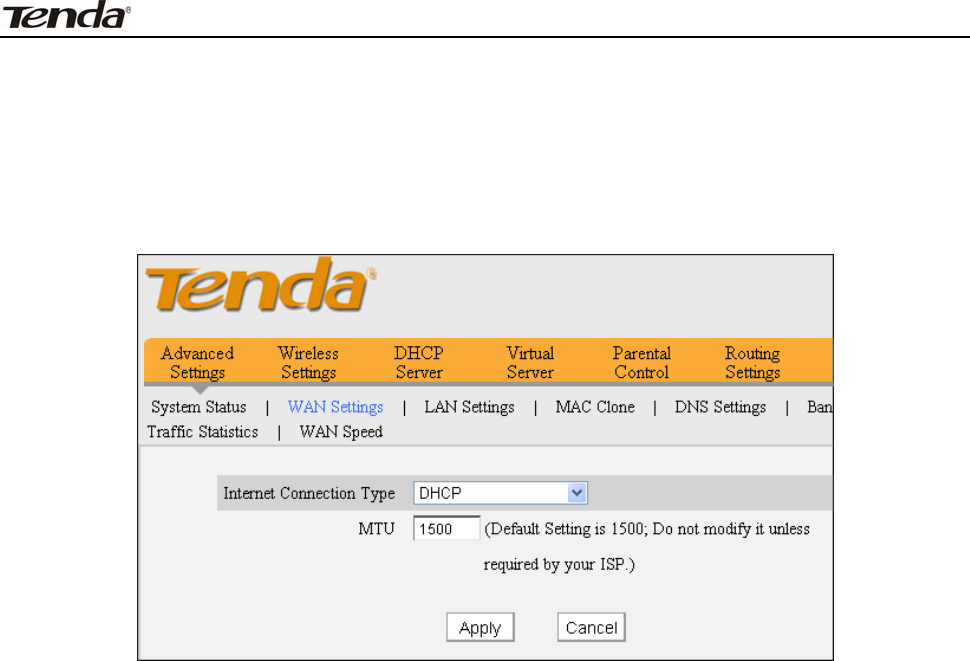
4 .2 W AN Set t ings
DHCP ( Dynam ic I P)
DHCP ( Dynam ic I P): Select t his opt ion t o let rout er obt ain I P set t ings
autom at ically from your I SP if you can access I nt ernet as soon as your com puter
connect t o the ADSL/ Cable m odem direct ly.
MTU: Maxim um Transm ission Unit . DO NOT change it from t he factory
default of 1500 unless necessary. You m ay need to change it for opt im al
perform ance wit h som e specific websit es or applicat ion soft ware t hat cannot be
opened or enabled; in t his case, t ry 1450, 1400, et c.
3 FH303 Wireless N300 High Power Router
18
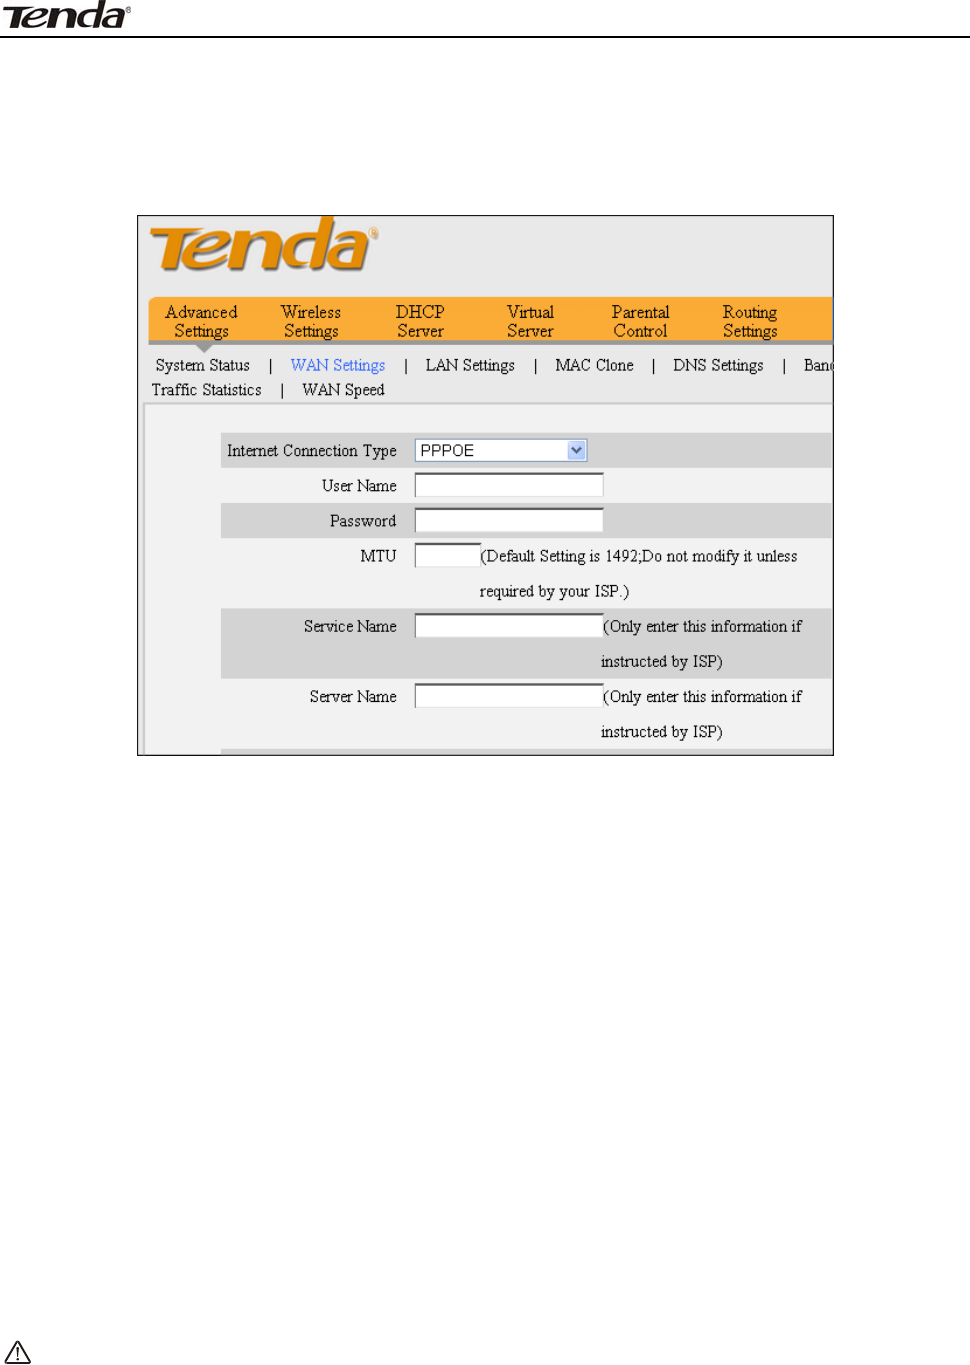
PPPoE
Use this opt ion if you used t o connect to the I nt ernet using a Broadband
Connection t hat requires a usernam e and password
I nt er net connect ion Type: Displays the current I nt ernet connection t ype.
User N am e: Enter the PPPoE User Nam e provided by your I SP.
Pa ssw ord: Enter t he PPPoE password provided by your I SP.
MTU: Maxim um Transm ission Unit . DO NOT change it from t he factory default of
1492 unless necessary. You m ay need t o change it for opt im al perform ance with
som e specific websites or applicat ion software t hat cannot be opened or enabled;
in t his case, t ry 1450, 1400, et c.
Connect Aut om at ically: Connect aut om at ically to I nt ernet upon system
startup or connection failure.
Connect M anually: Require users t o m anually connect t o I nternet upon syst em
startup or connection failure.
Connect on Dem and: Connect aut om at ically t o I nternet only when t here is dat a
being t ransferred.
Connect during Specified Tim e Period: Connect aut om at ically t o I nt ernet during
a specified t im e length.
N ote:
Be fore you ca n use t he " Connect during Specifie d Tim e Period "
fe a t ure , you m ust configur e syst em t im e ( Syst em Tools> Tim e ) .
3 FH303 Wireless N300 High Power Router
19
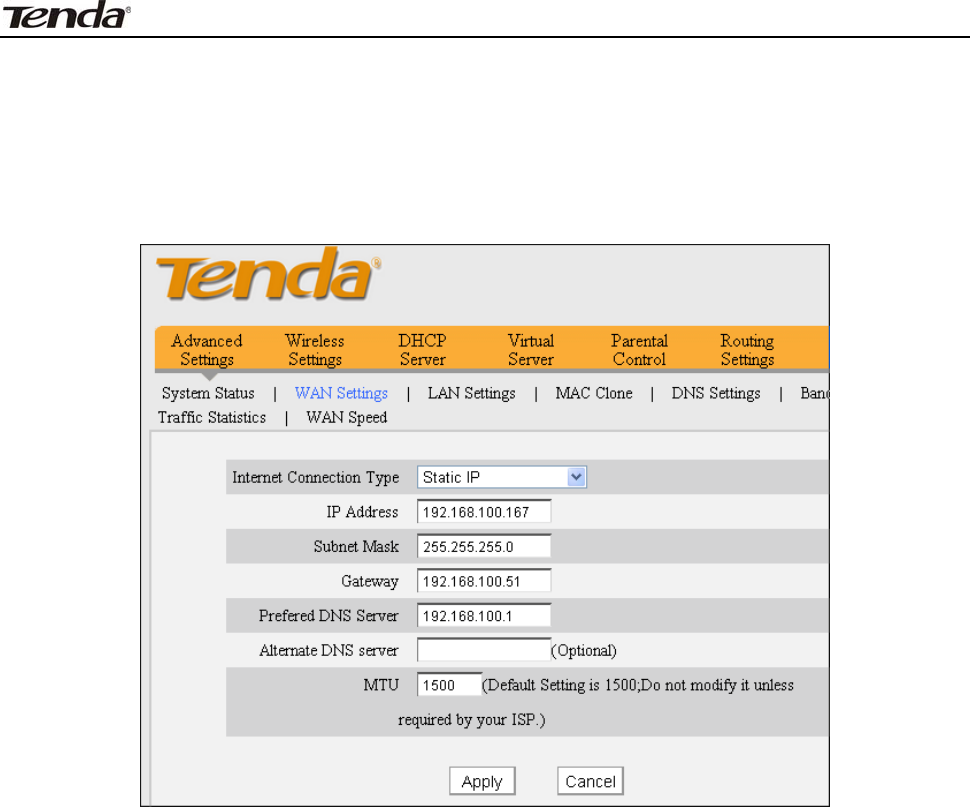
St a t ic I P
I f your I SP provides you wit h t he det ails I P address, Subnet Mask, Gat eway,
Preferred DNS Server address, Alt ernate DNS Server address ,please select
“ St at ic I P" as I nt ernet Connect ion Type and ent er them
in corresponding fields.
I nt er net connect ion Type: Displays the current I nt ernet connection t ype.
I P Address: Enter t he I P address provided by your I SP. Consult your I SP if you
are not clear.
Subnet m a sk : Ent er t he subnet m ask provided by your I SP.
Ga t e w a y: Ent er the WAN Gat eway provided by your I SP. Consult your I SP if you
are not clear.
Pr e fe r r e d DN S Ser ver: Ent er t he DNS address provided by your I SP.
Alt e r na t e DN S Se r ver: Enter the ot her DNS address if your I SP provides
( opt ional) .
MTU: Maxim um Transm ission Unit . DO NOT change it from t he factory default of
1500 unless necessary. You m ay need t o change it for opt im al perform ance with
som e specific websites or applicat ion software t hat cannot be opened or enabled;
in t his case, t ry 1450, 1400, et c.

3 FH303 Wireless N300 High Power Router
20
PPTP
PPTP: Select PPTP (Point - t o- Point-Tunneling Prot ocol) if your I SP requires. The
PPTP allows you t o connect t o the PPTP VPN server from your I SP or corporate
headquarter. For exam ple:A corporat e branch and its headquarter can use t his
connection t ype t o im plem ent m ut ual and secure access t o each ot her’s
resources.
I nt er net connect ion Type: Displays the current I nt ernet connection t ype.
PPTP Se r ver Address: Ent er t he I P address of dom ain nam e of a PPTP server.
User N am e: Enter the PPTP User Nam e provided by your I SP.
Pa ssw ord: Enter your Password.
MTU: Maxim um Transm ission Unit . DO NOT change it from t he factory default of
1452 unless necessary.
Address Mode: Select "Dynam ic" if you don’t get any I P info from your I SP,
otherwise select " St at ic". Consult your I SP if you are not clear.
I P Addr e ss: Enter t he I P address provided by your I SP. Consult your I SP if you
are not clear.
Subnet m a sk : Ent er the subnet m ask provided by your I SP.
Ga t e w a y: Ent er the WAN Gat eway provided by your I SP. Consult your I SP if you
are not clear.
3 FH303 Wireless N300 High Power Router
21
L2 TP
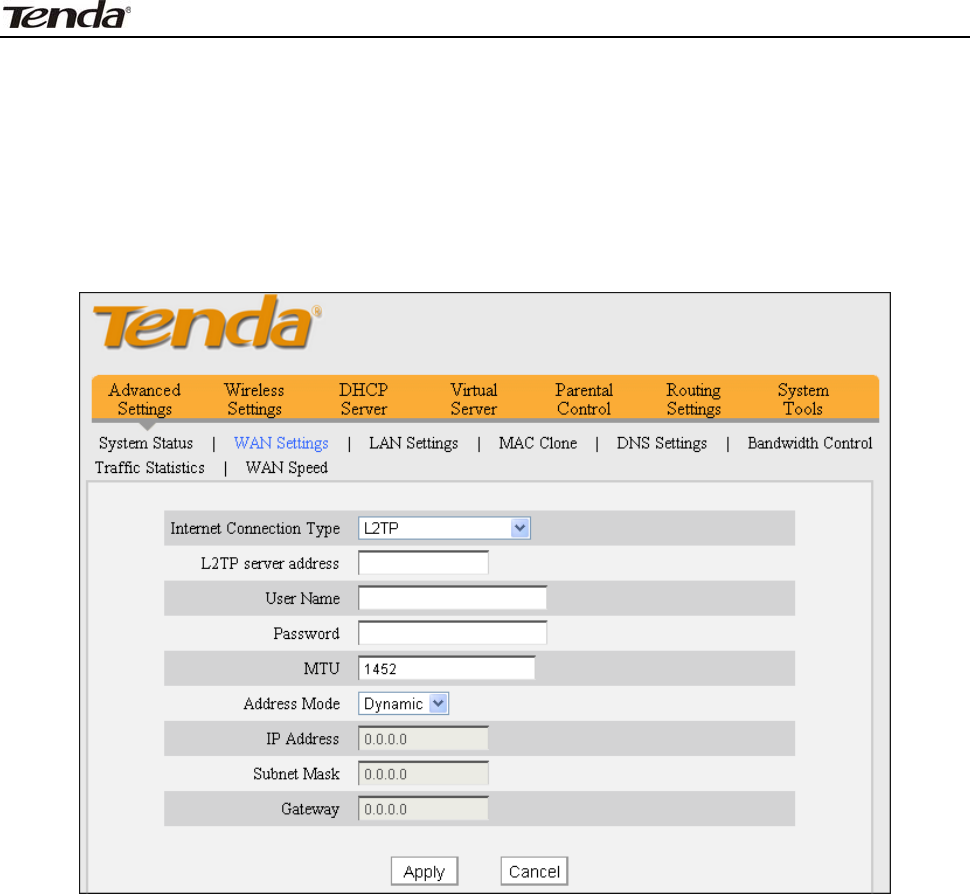
Select L2TP ( Layer 2 Tunneling Protocol) if your I SP requires. The L2TP allows
you connect t o L2TP VPN server from your I SP or corporate headquarter. For
exam ple:A corporate branch and its headquarter can use t his connection t ype t o
im plem ent m ut ual and secure access t o each ot her’s resources.
I nt er net connect ion Type: Displays the current I nt ernet connection t ype.
L2 TP Server Address: Enter t he I P address or dom ain nam e of a L2TP server.
User N am e: Enter the L2TP User Nam e provided by your I SP.
Pa ssw ord: Enter your Password.
MTU: Maxim um Transm ission Unit . DO NOT change it from t he factory default of
1452 unless necessary.
Address Mode: Select "Dynam ic" if you don’t get any I P info from your I SP,
otherwise select " St at ic". Consult your I SP if you are not clear.
I P Addr e ss: Ent er the I P address provided by your I SP. Consult your I SP if you
are not clear.
Subnet m a sk : Ent er the subnet m ask provided by your I SP.
Ga t e w a y: Ent er the WAN Gat eway provided by your I SP. Consult your I SP if you
are not clear.
3 FH303 Wireless N300 High Power Router
22
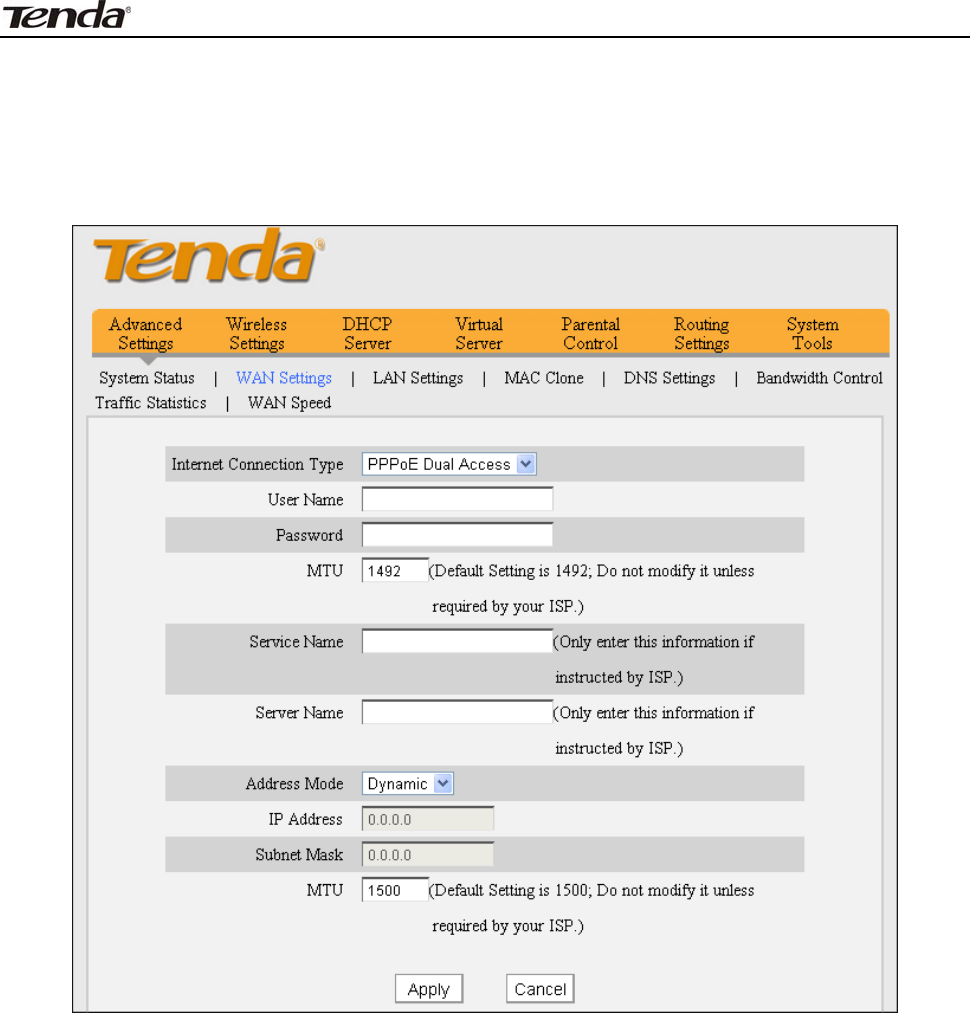
PPPoE D ual Acce ss
only support ed in special Areas e.g.Russia.
I nt er net connect ion Type: Displays a list of available I nt ernet Connection
types.
Usernam e: Ent er t he PPPOE usernam e provided by your I SP.
Pa ssw ord: Enter t he PPPOE password provided by your I SP.
Address Mode: Select "Dynam ic" if you don’t get any I P info from your I SP,
otherwise select " St at ic".
I P Addre ss: The I P address provided by your I SP. I nquire your local I SP if you
are not clear.
Subnet m a sk : The subnet m ask provided by your I SP.
MTU: Maxim um Transm ission Unit . The default value is 1492.
3 FH303 Wireless N300 High Power Router
23
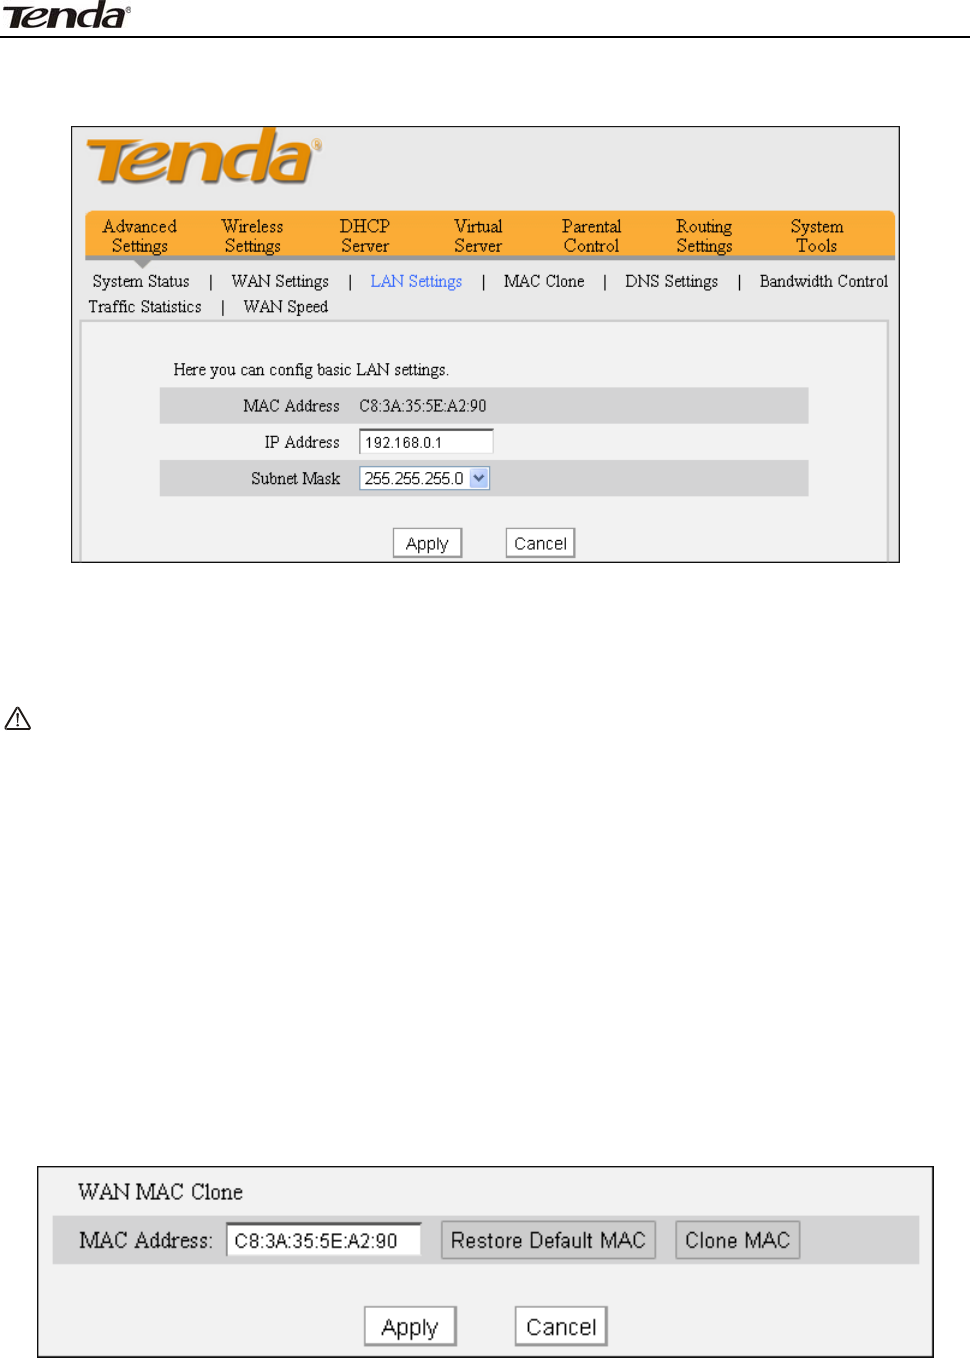
4 .3 LAN Set t ings
Click Advanced Set t ings- > LAN Set t ings t o enter below screen.
MAC Addr e ss: Displays MAC address of LAN interface, which is NOT changeable.
I P Address: Rout er's LAN I P address. The default is 192.168.0.1. You can
change it according t o your need.
Subnet Mask: Device’s LAN subnet m ask, 255.255.255.0 by default.
N ote:
I f you change t he device ’s LAN I P a ddr e ss, plea se renew t he I P
inform a t ion of t he com put er t ha t connect s t o t he rout er and use t he new
LAN I P address to re- a ccess t he rout e r ’s w e b m a na ger. t o t he w e b
m a nage m ent page .
4 .4 M AC Clone
This section allows you t o configure MAC address of rout er ’s WAN int erface.
Norm ally you don't need t o change the default WAN MAC value. However, som e
I SP m ay bind client PC’s MAC address for I nt ernet connection aut hent icat ion. I n
this case, sim ply ent er such MAC in t he WAN MAC Address field or use the MAC
clone funct ion.
MAC Addr e ss: The MAC address of rout er’s WAN interface.
Clone M AC: Click t his but t on t o clone your PC's MAC address to t he router’s WAN
int erface.
Re st ore t o Fa ct ory Default MAC: Reset rout er ’s WAN int erface’s MAC to
factory default.
3 FH303 Wireless N300 High Power Router
24
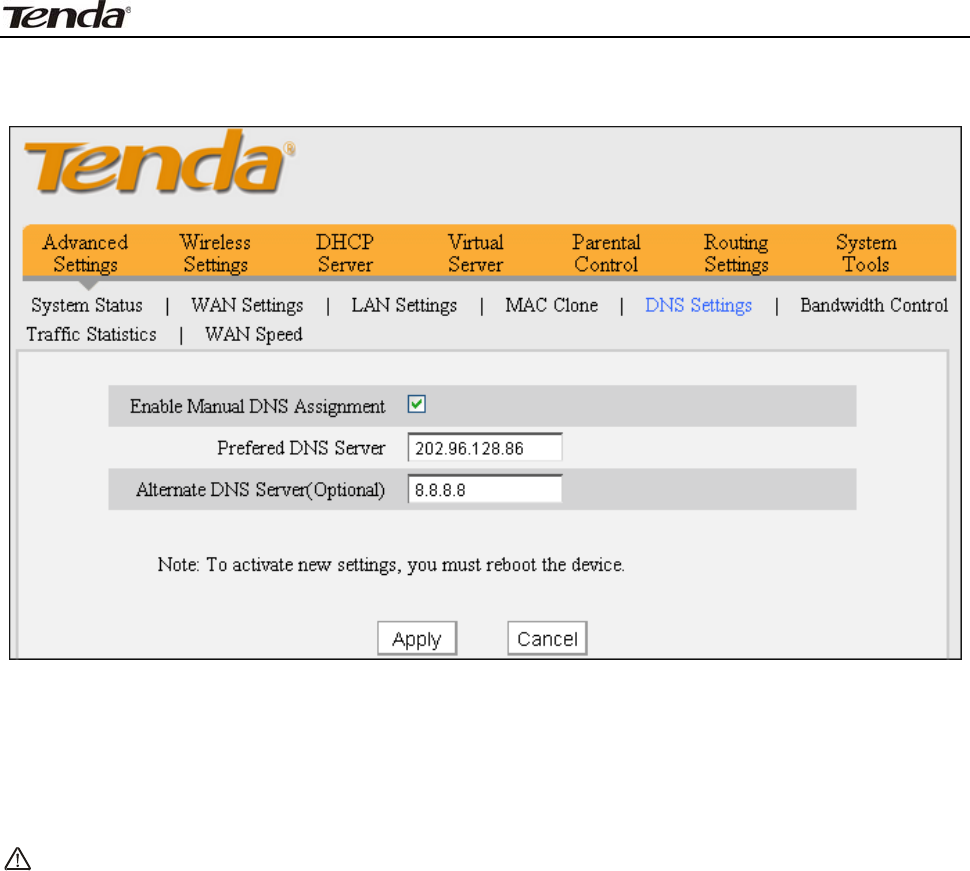
4 .5 DN S Se t t ings
DNS is short for Dom ain Nam e Syst em or Dom ain Nam e Service.
Ena ble M a nual DN S Assignm ent : Check to act ivat e DNS sett ings.
Pr e fe r r e d DN S Ser ver:Ent er t he Preferred DNS Server address provided by
your I SP.
Alt e r na t e DN S Se r ver ( Opt ional) : Ent er the Alt ernat e DNS Server address if
your I SP provides ( opt ional) .
N ot e :
W eb pages a re not be able t o open if D N S server a ddresses a r e ent ered
in cor rect ly . Do rem e m ber t o rest a r t t he device t o act ivate new se t t ings
w hen you finish all se t t ings.
3 FH303 Wireless N300 High Power Router
25
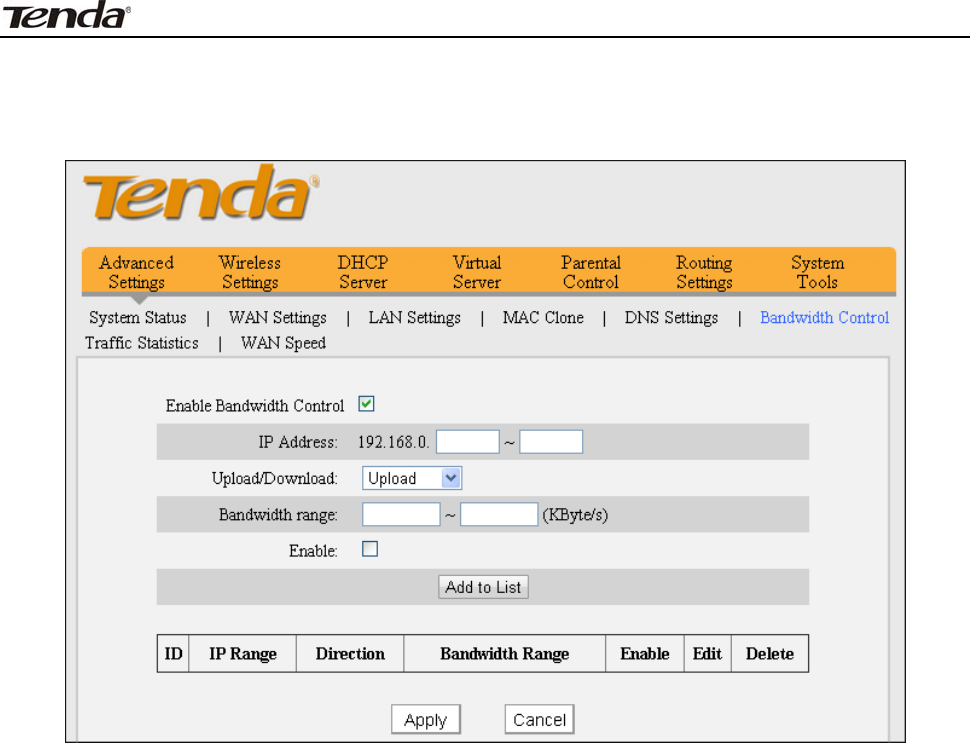
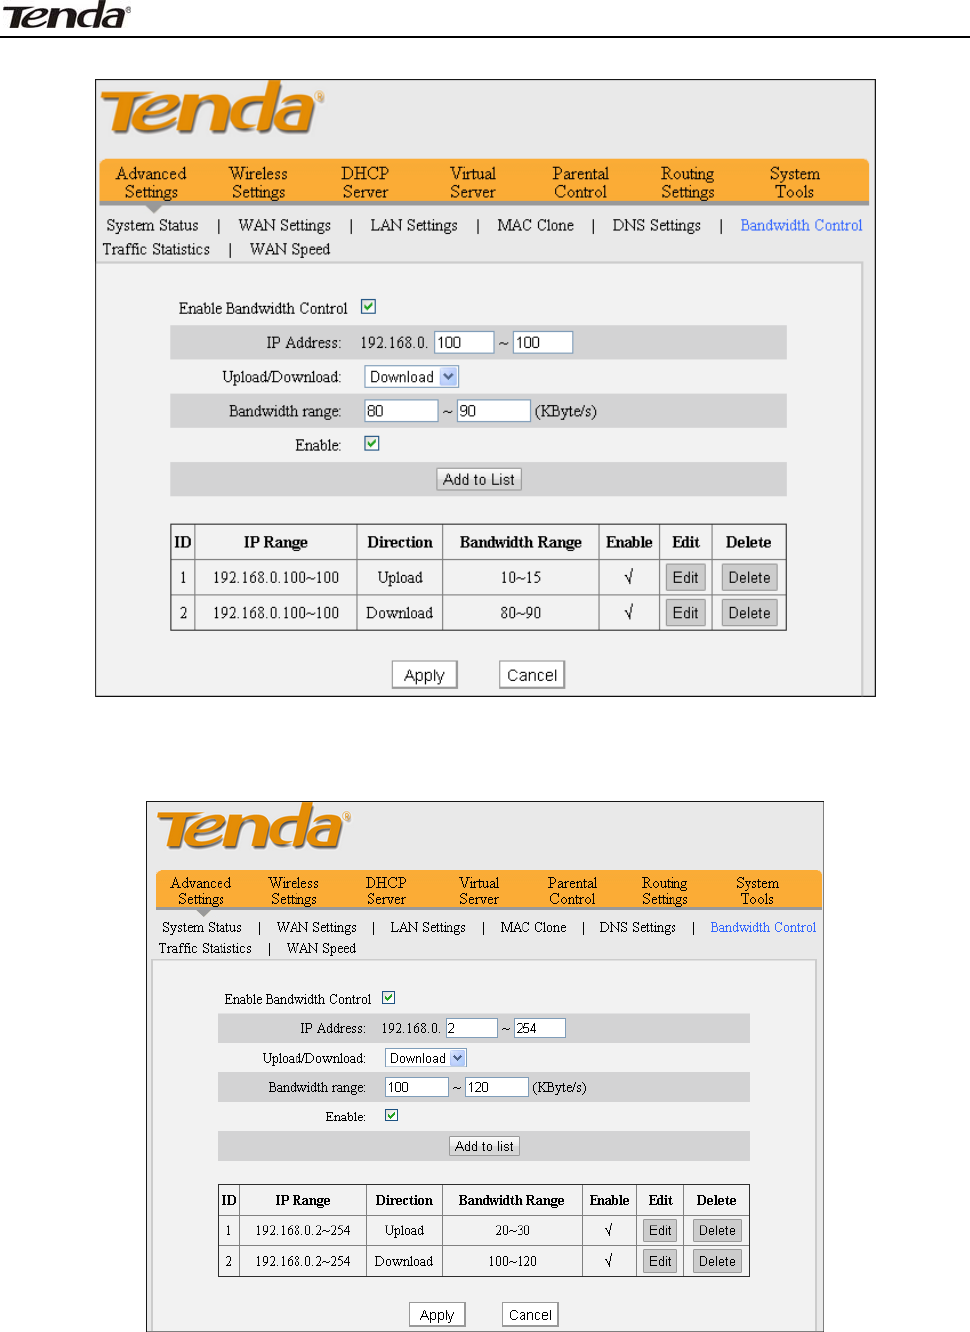
4 .6 Bandw idth Control
To bett er m anage bandwidt h allocat ion and opt im ize network perform ance,
use t he bandwidt h cont rol feat ure.
Ena ble Bandw idth Cont r ol: Check or uncheck t he box t o enable or disable t he
bandwidt h cont rol feat ure. This option is disabled by default .
I P Address: Ent er t he sam e I P or t wo different I P addresses in bot h boxes t o
specify a single I P address or an I P range t o which t he current bandwidth control
rule will apply.
Upload/ Dow nloa d: Select to control bandwidth over dat a upload or download.
Ba n dw idt h Ra n ge: Set an upload/ download bandwidth lim it on PCs wit hin a
specified I P range. Not e t hat m axim um upload/ download bandwidt h should not
exceed your rout er's WAN bandwidt h lim it. ( Consult your I SP if you are not
clear.)
Ena ble : Check/ uncheck t o enable/ disable current ent ry. When disabled,
corresponding ent ry will not t ake effect t hough exist ing in fact .
Add to List : Click t o add current bandwidth control rule t o t he rule list.
For a 2M broadband service, you m ay download and upload dat a at speeds up t o
2Mbps ( 256KByte/ ) and 512kbps ( 64KByte/ s) in t heory respectively.
3 FH303 Wireless N300 High Power Router
26
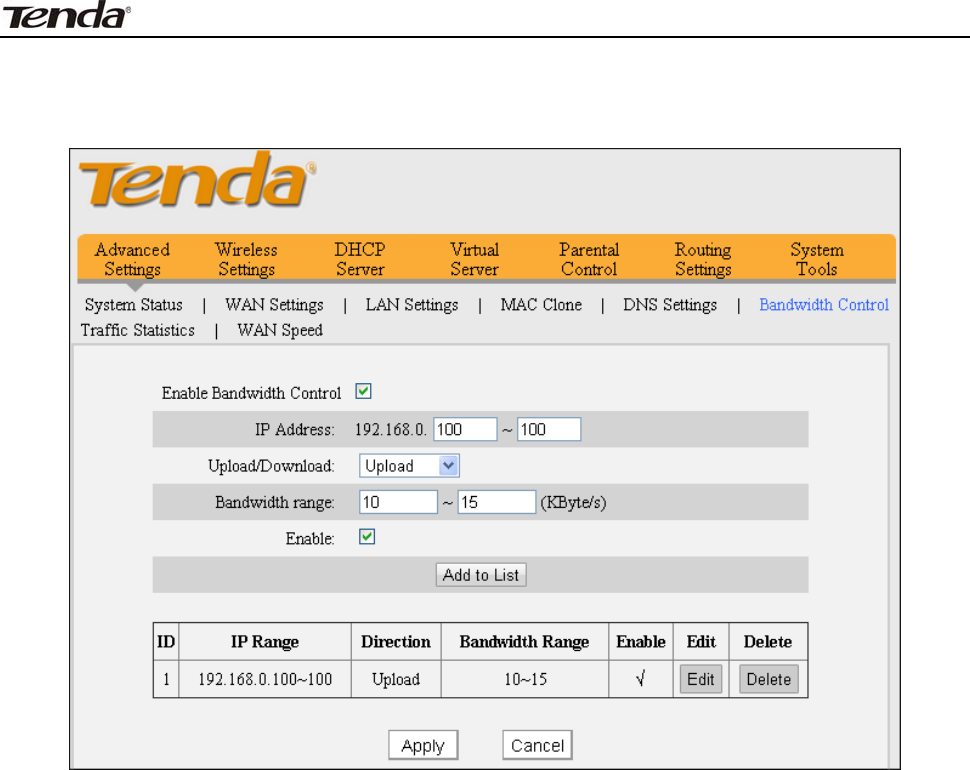
Exam ple 1: To let t he PC at the I P address of 192.168.0.100 to upload dat a at
speeds of 10- 15KByte/ s and download dat a at speeds of 80- 90KByte/ s.
To add an upload bandwidt h cont rol rule, do as follows:
1
1.
.
I nput "192.168.0.100" in corresponding I P Address fields.
2
2.
.
Select Upload.
3
3.
.
Ent er "10" and "15" in corresponding bandwidt h fields.
4
4.
.
Check "Enable".
5
5.
.
Click " Add to List ".
6
6.
.
Click Apply.
3 FH303 Wireless N300 High Power Router
27
And t hen add a download bandwidt h cont rol rule as seen below.
Exam ple 2: To let PCs within t he I P address range of 192.168.0.2-
192.168.0.254 to upload dat a at speeds of 20- 30KByte/ s and download dat a at
speeds of 100-120KByte/ s, follow instructions above.
3 FH303 Wireless N300 High Power Router
28
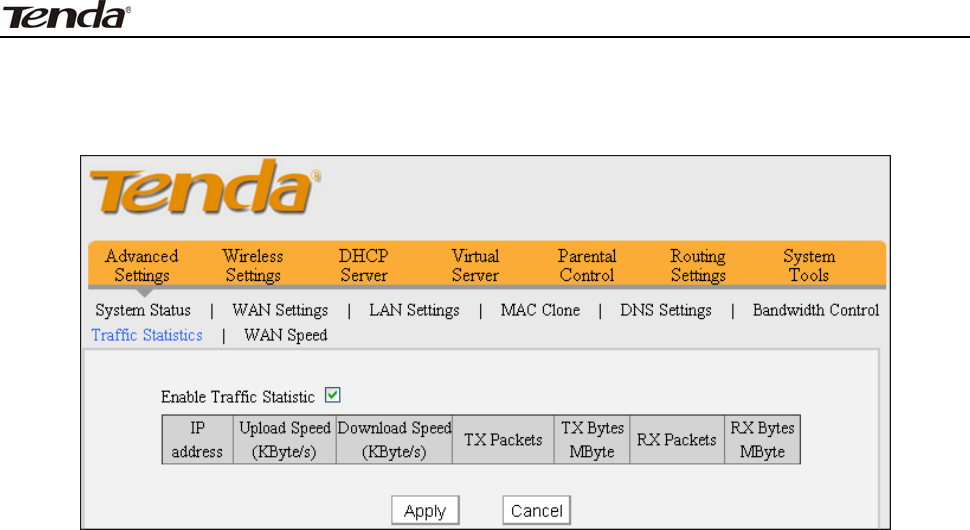
4 .7 Tra ffic St a t ist ics
Traffic Stat istics allows you t o see at a glance how m uch t raffic each device in
your net work is using.
Ena ble Tra ffic St a t ist ics: Check/ uncheck t he box t o enable/ disable t he Traffic
St atist ics feature. To see at a glance how m uch t raffic each device in your
net work is using, enable t his opt ion. However usually, disabling it m ay boost your
net work perform ance. This opt ion is disabled by default. However, once enabled
the page refreshes every five m inut es.
I P Address: Displays t he I P address of a corresponding PC.
Upload Spe e d: Displays the upload speed ( KByt e/ s) of a corresponding PC.
Dow nloa d Speed: Displays t he download speed ( KByte/ s) of a corresponding
PC.
TX Pack et s: Displays t he num ber of packet s sent by a corresponding PC via t he
device since St at ist ics is enabled.
TX Bytes: Displays the num ber of Bytes sent by a corresponding PC via t he
device since St at ist ics is enabled. The unit is MByte.
RX Pa cke t s: Displays the num ber of packet s received by a corresponding PC via
the device since St at ist ics is enabled.
RX Byt e s: Displays the num ber of Bytes received by a corresponding PC via t he
device since St at ist ics is enabled. The unit is MByte.
3 FH303 Wireless N300 High Power Router
29
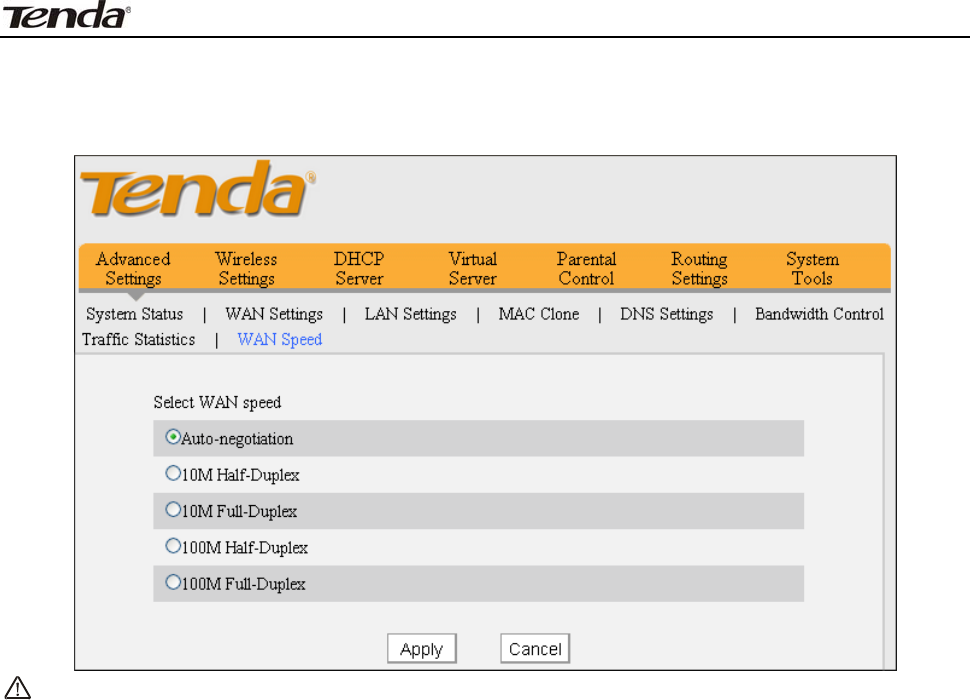
4 .8 W AN Speed
Here you can set the speed for WAN port. I t is advisable t o keep the default
“Auto” set t ing t o get the best speed.
N ote:
Aging and t he length of Et hernet ca ble m ay reduce it s t ransm ission
capabilit y. I n t his case sele ct 1 0 M Fu ll D uplex or t he m ode specified by
t he I SP from t he Speed/ Duplex drop- dow n list t o im pr ove pe r for m ance.
3 FH303 Wireless N300 High Power Router
30
Chapt er 5 W ireless Se t t ings
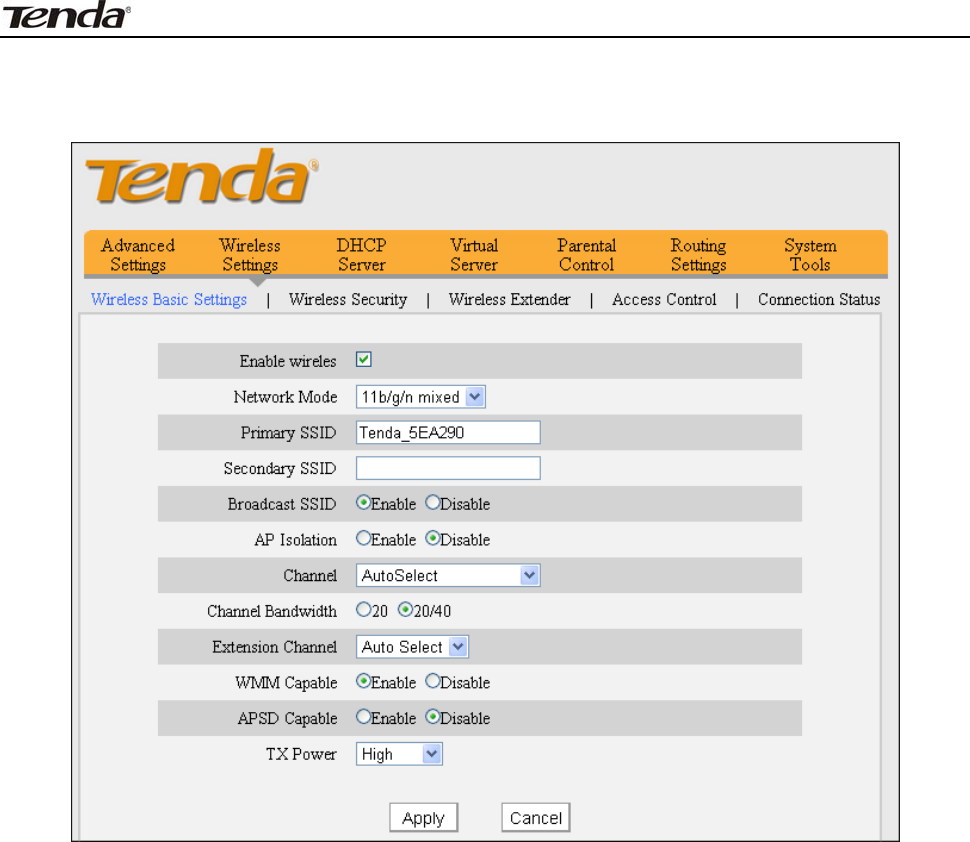
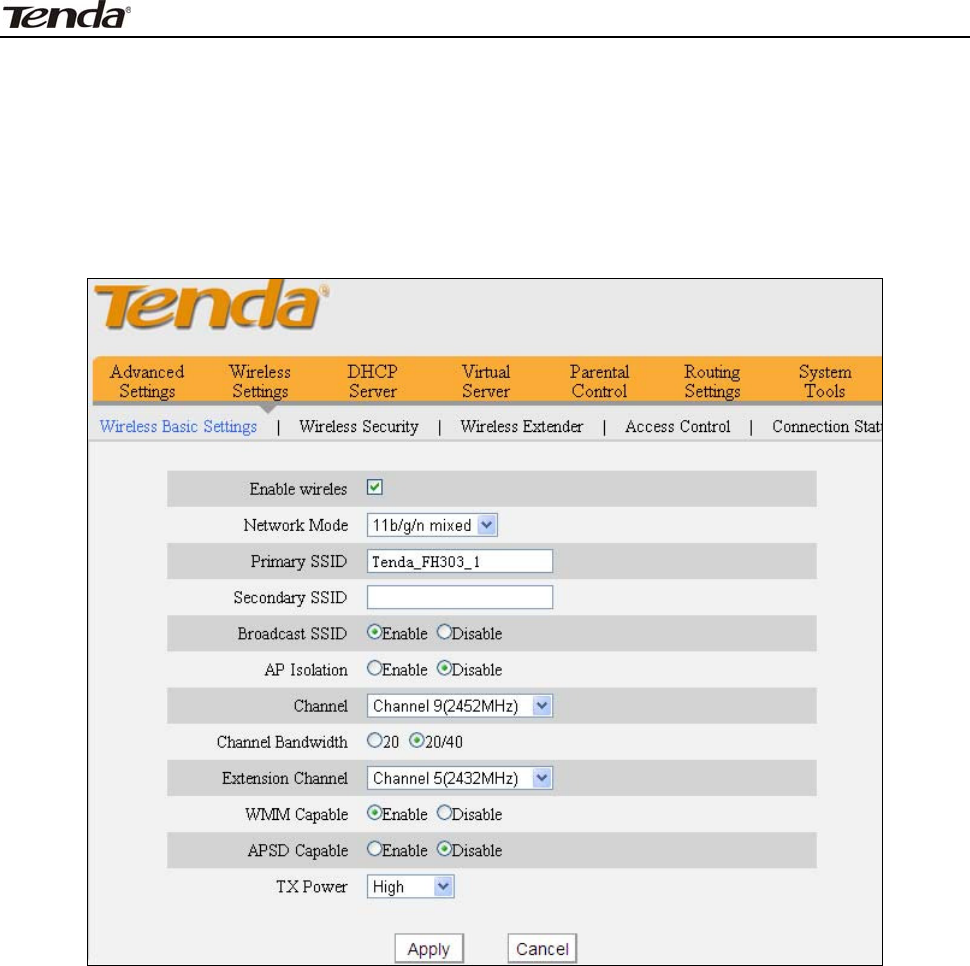
5 .1 W ire less Ba sic Se t t in gs
Ena ble W ireless: Check/ uncheck t o enable/ disable t he 2.4GHz wireless feat ure.
I f disabled, all wireless- based feat ures will be disabled accordingly.
N e t w ork M ode: Select a right m ode according t o your wireless client devices.
The default m ode is 11b/ g/ n m ixed.
1 1 b m ode : Select it if you have only 11b wireless devices in your wireless
net work.
1 1 g m ode : Select it if you have only 11g wireless devices in your wireless
net work.
1 1 b/ g m ixed m ode: Select it if you have 11b and 11g wireless devices in
your wireless net work.
1 1 b/ g/ n m ix e d m ode : Select it if you have 11b, 11g and 11n wireless
devices in your wireless net w ork.
Pr im ary SSI D: A SSI D ( Service Set I dentifier) is t he public nam e of a wireless
net work. This opt ion is configurable and can’t be em pty.
Se conda ry SSI D: This is alt ernat e public nam e of a wireless network. This
option is configurable and can be em pty.
SSI D Broa dcast : This opt ion is enabled by default . Select "Enable"/ " Disable" t o
m ake your wireless net work visible/ invisible t o any wireless client s wit hin
coverage when t hey perform a scan t o see what’s available. When disabled,
wireless client s will have t o first know t his SSI D and m anually enter it on t heir
devices if they want t o connect to the SSI D.

3 FH303 Wireless N300 High Power Router
31
AP I solat ion: Disabled by default . When enabled, wireless client s can’t share file
or com m unicat e wit h t he wireless client connect t o t he sam e SSI D.
Channel: I t is advisable t hat you select an unused channel or "Aut o" t o let device
det ect and select the best possible channel for your wireless net work t o operat e
on from t he drop- down list .
Channel Ba ndw idth: Select a proper channel bandwidt h t o enhance wireless
perform ance. When t here are 11b/ g and 11n wireless client s, please select
20/ 40M frequency band; when t here are only non- 11n wireless client s, select
20M frequency band m ode.
Ex t e nsion Channel: Available only in 11b/ g/ n m ixed m ode. I t is used t o ensure
N speed for 802.11n devices on t he network.
W M M- Capa ble : WMM is QoS for your wireless network. Enabling t his opt ion
m ay bet t er st ream wireless m ult im edia dat a such as video or audio
( recom m ended) .
ASPD Ca pa ble: Select t o enable/ disable the auto power saving m ode. By default ,
this opt ion is disabled.
TX Pow er: Select a proper power level ( High or Low) for opt im al perform ance.
3 FH303 Wireless N300 High Power Router
32
5 .2 W ire le ss Securit y
This section allows you t o secure your wireless network t o block unauthorized
accesses and m alicious packet sniffing.
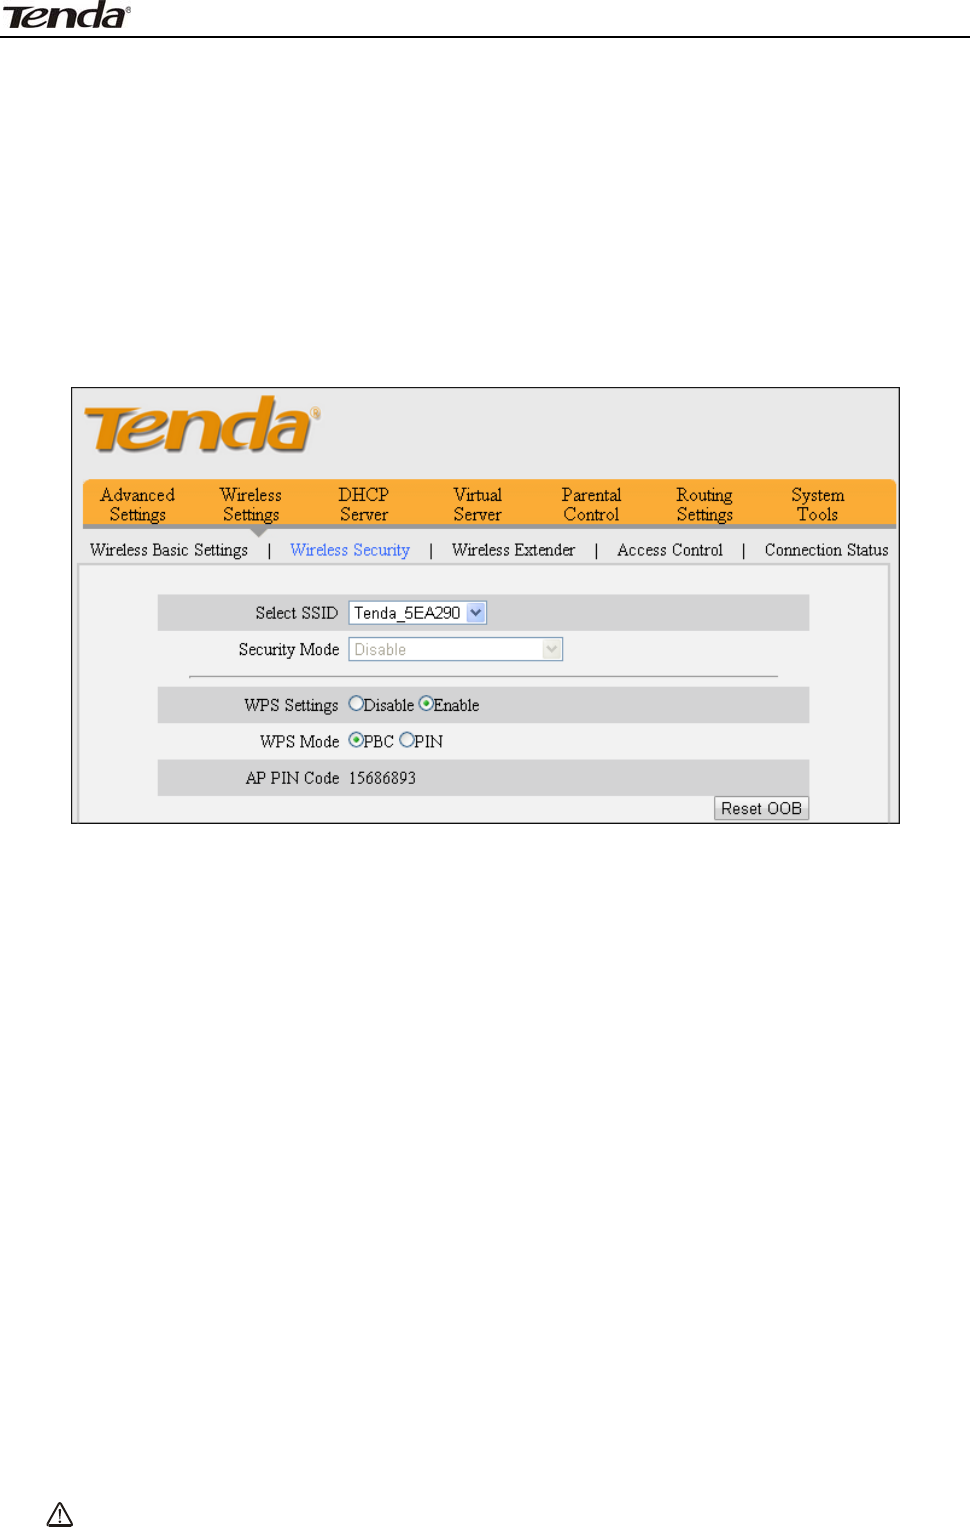
5.2.1 WPS
Wi- Fi Prot ect ed Set up m akes it easy for hom e users who know lit t le of
wireless securit y to est ablish a hom e net work, as well as to add new devices t o an
existing network wit hout ent ering long passphrases or configuring com plicated
set t ings. Sim ply ent er a PI N code or press hardware WPS but t on and a secure
wireless connect ion is established.
W PS: Select to enable/ disable t he WPS feat ure. This opt ion is disabled by
default.
W PS M ode: Select PBC (Push- But t on Configuration) or PI N.
PBC: To use t he PBC opt ion, select it and click "Save"; Then press the WPS
button on rout er's back panel for about one second while enabling WPS > PBC on
the int ended wireless client sim ult aneously.
Ope r a t ion I nst ruct ions:
PBC: I f you find t he WPS LED blinking for 2 m inutes aft er you press the
hardware WPS but ton on t he device for 1 second, it m eans t hat PBC encrypt ion
m ethod is successfully enabled. And an aut henticat ion will be perform ed bet ween
your rout er and t he WPS/ PBC- enabled wireless client device during t his t im e; if it
succeeds, the wireless client device connect s t o your rout er, and t he WPS LED
displays a solid light . Repeat st eps m ent ioned above if you want t o add m ore
wireless client devices t o t he device.
PI N : To u se t h i s o p t i o n , y o u m u s t k n o w t h e PI N code from t he wireless client and
ent er it in t he corresponding field on your device while using the sam e PI N code
on client side for such connect ion.
Re set OOB: Wireless m odule will be reset if clicked.
N ote:To use t he W PS secur it y, t he w ir e le ss client m ust be a lso
W PS- capa ble.
3 FH303 Wireless N300 High Power Router
33
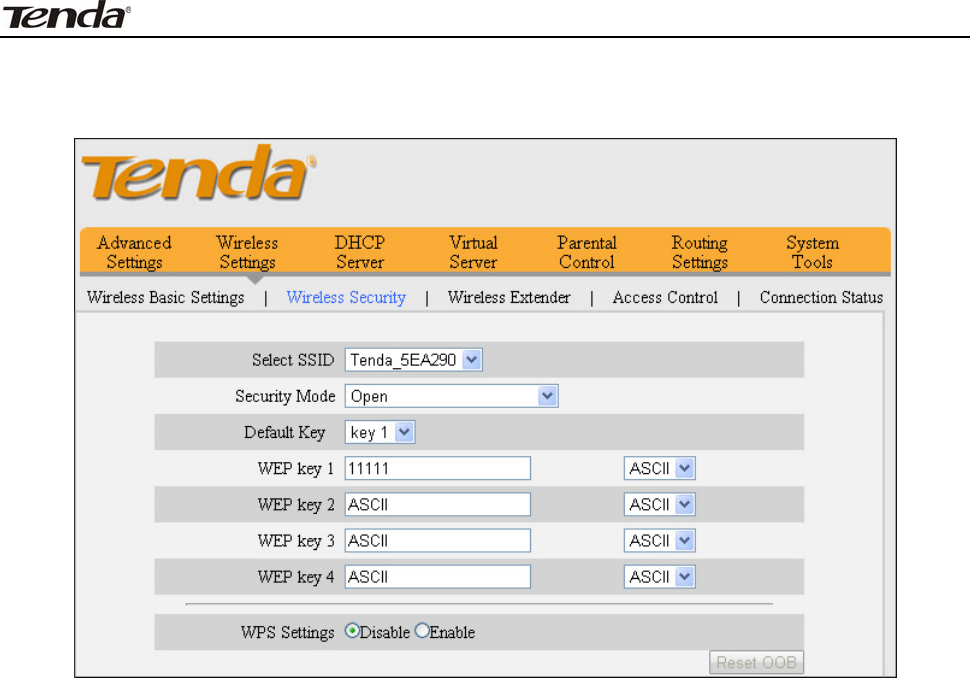
5.2.2 WEP
WEP is int ended to provide dat a confident ialit y com parable t o that of a
tradit ional wired network.
Se curit y M ode: Select a proper securit y m ode from t he drop- down list .
Defa ult Key: Select a key from the preset keys 1- 4 for current use.
3 FH303 Wireless N300 High Power Router
34
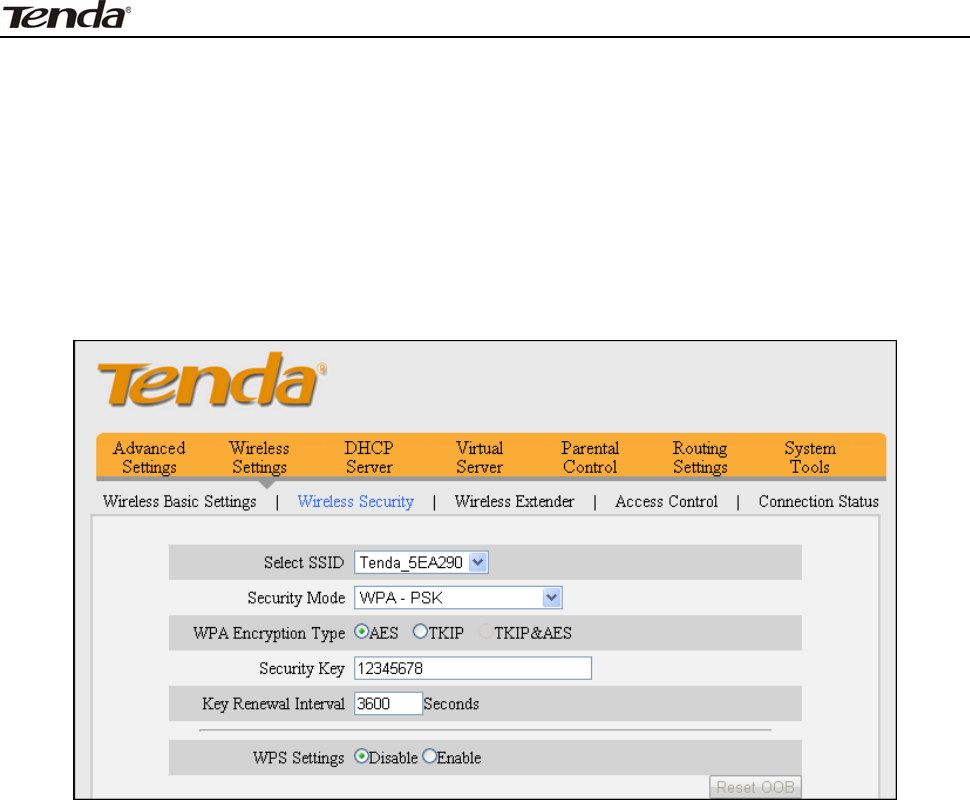
5.2.3 WPA- PSK
The WPA protocol im plem ent s t he m aj ority of t he I EEE 802.11i st andard. I t
enhances dat a encrypt ion t hrough t he Tem poral Key I ntegrity Prot ocol ( TKI P)
which is a 128- bit per- packet key, m eaning t hat it dynam ically generat es a new
key for each packet . WPA also includes a m essage int egrit y check feat ure t o
prevent data packet s from being ham pered with. Only aut horized net work users
can access t he wireless net work. WPA adopt s enhanced encrypt ion algorithm
over WEP.
W PA Encr ypt ion Type: Select AES ( advanced encrypt ion st andard) or TKI P
( t em porary key integrity prot ocol) .
Se curit y Ke y: Ent er a security key, which m ust be bet ween 8-63 ASCI I
characters long.
Key Renew a l I nt er val: Specify a valid t im e int erval for the key t o be updat ed.
3 FH303 Wireless N300 High Power Router
35
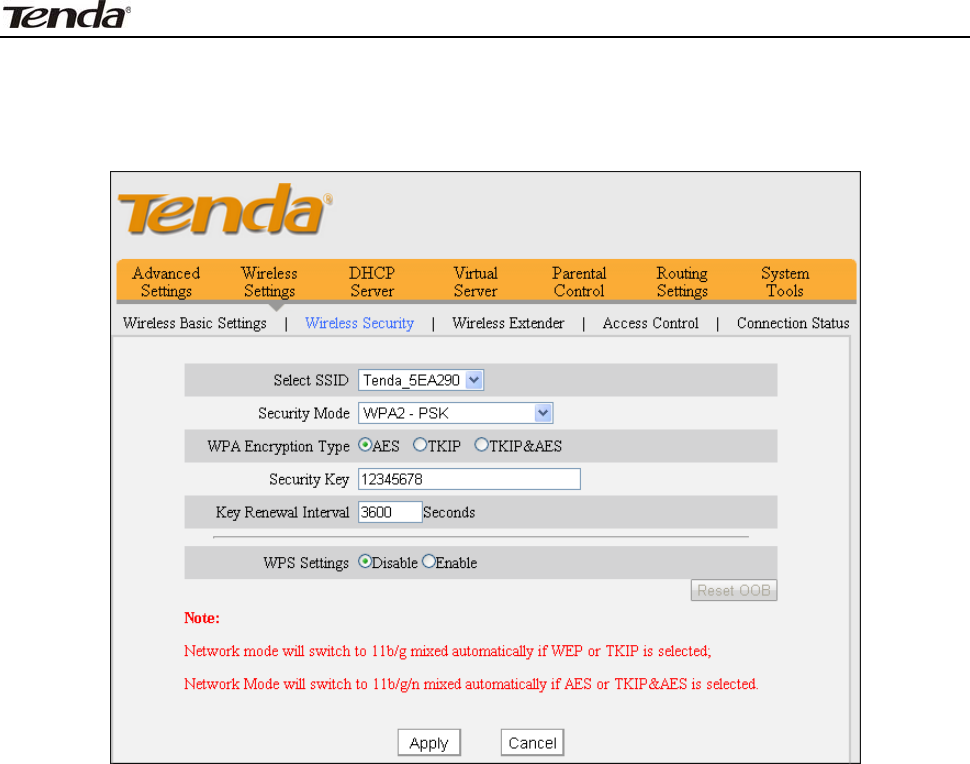
5.2.4 WPA2-PSK
WPA2 is based on 802.11i and uses Advanced Encrypt ion Standard ( AES)
inst ead of TKI P. I t is m ore secured than WPA and WEP.
W PA Encr ypt ion Type: Select one encrypt ion t ype from AES ( advanced
encrypt ion st andard) , TKI P (t em porary key integrity prot ocol) or TKI P&AES.
Se curit y Ke y: Ent er a security key, which m ust be between 8-63 ASCI I
characters long.
Key Renew a l I nt er val: Specify a valid t im e interval for t he key t o be updated.
5.2.5 Mixed WPA/ WPA2-PSK
The m ixed WPA/ WPA2- PSK securit y m ode includes WPA- PSK and
WPA2-PSK. To use t his m ode, follow instructions on WPA2- PSK sect ion.
3 FH303 Wireless N300 High Power Router
36
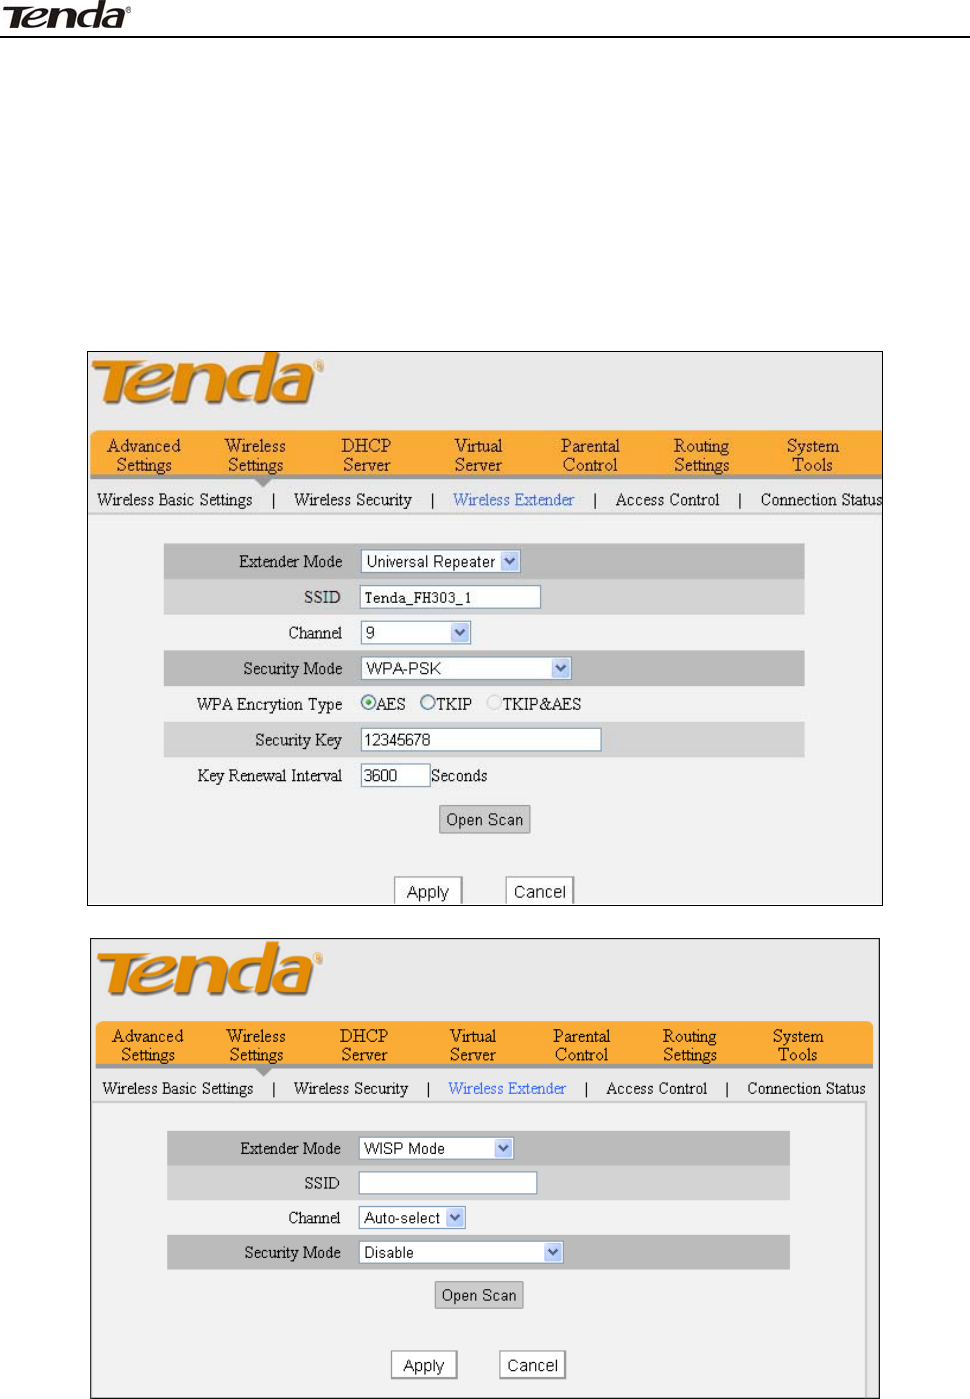
5 .3 W ire le ss Ext ender
Here you can expand your wireless coverage with t he following m odes: Universal
Repeat er, WI SP Client ( Wireless WAN) and WDS.
5.3.1 Universal Repeat er Mode
Universal Repeat er: I n t his m ode, t he device will relay dat a t o an associat ed
root AP and AP funct ion is enabled m eanwhile. The wireless repeater relays signal
bet ween it s stat ions and t he root AP for greater wireless range. ( The Universal
Repeat er m ode differs from t he WDS in t erm s t hat it requires only a one- way
connection aut hent icat ion.)
5.3.2 WI SP Client Mode
SSI D : The wireless nam e of t he uplink wireless device.
Channel: The channel used by uplink wireless device.
Se curit y M ode: The securit y m ode and key used for connection t o t he uplink
wireless device.
Ope n Scan: Click t o search available wireless networks. Take t wo FH303 routers
3 FH303 Wireless N300 High Power Router
37
as an exam ple t o illustrat e how t o im plem ent t he WI SP client feature.
Set the uplink device as below:
SSI D : Tenda_FH303_1,
Chanel: 9
Se curit y M ode: WPA- PSK
Se curit y Ke y: 12345678
LAN I P a ddress: 192.168.10.1.
Se t t he Second FH 3 0 3 as below :
SSI D : Tenda_FH303_2
Chanel: 9

3 FH303 Wireless N300 High Power Router
38
Scan t he first FH303’s wireless signal ( Tenda_FH303_1) from t he second FH303
( WI SP client device) or m anually ent er ( Tenda_FH303_1) .
Then check t he ip address of t he router’s WAN port from Syst em Stat us- > WAN
St atus.
3 FH303 Wireless N300 High Power Router
39
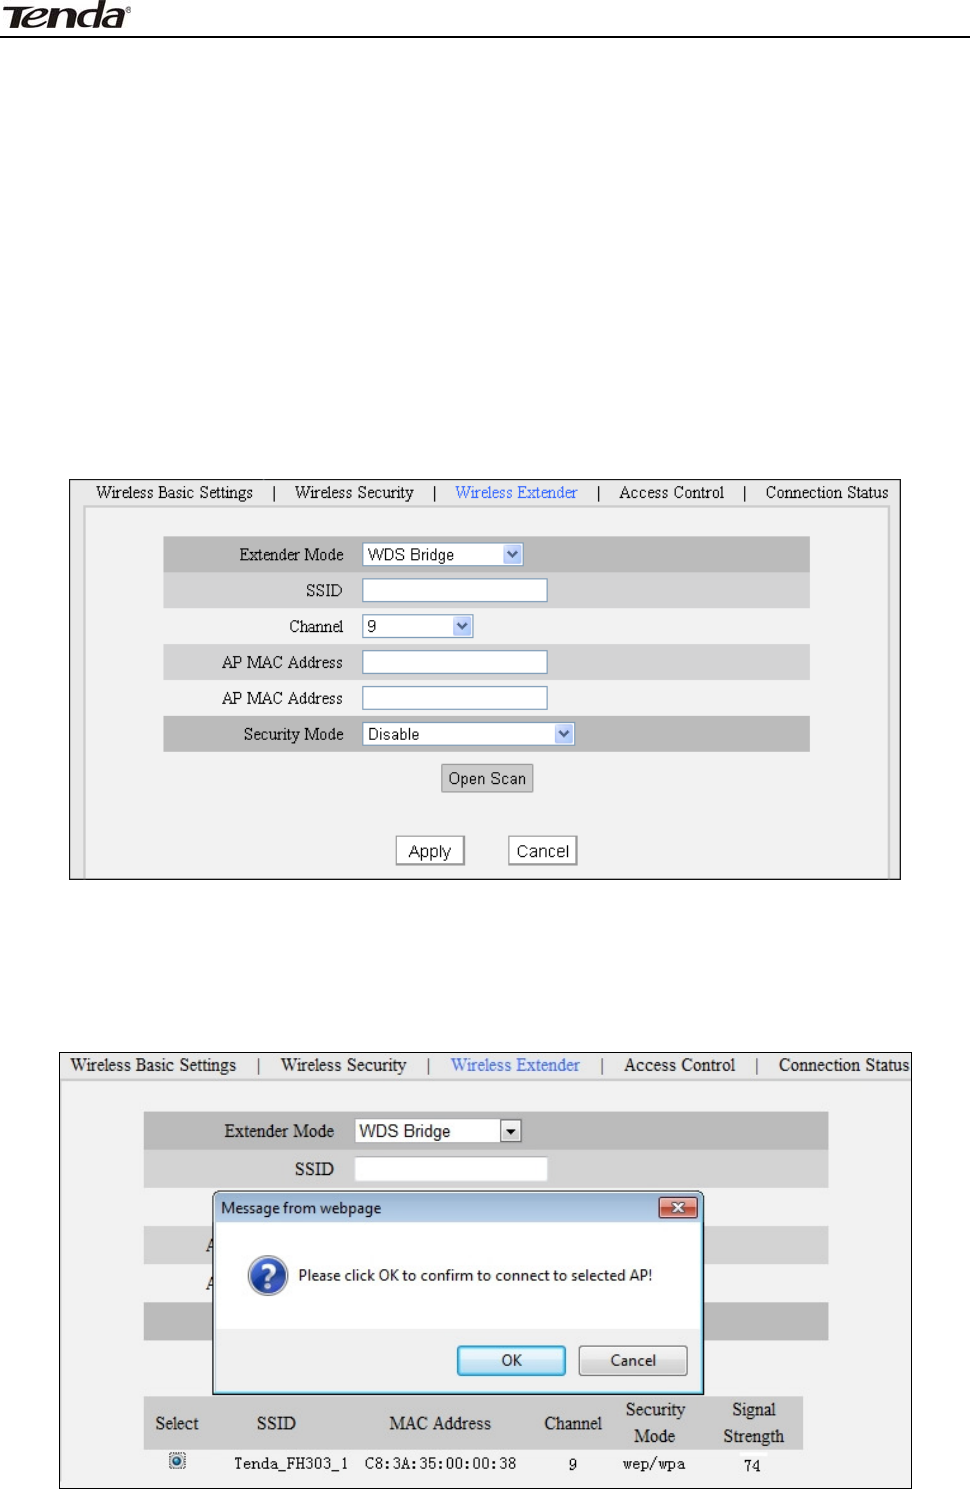
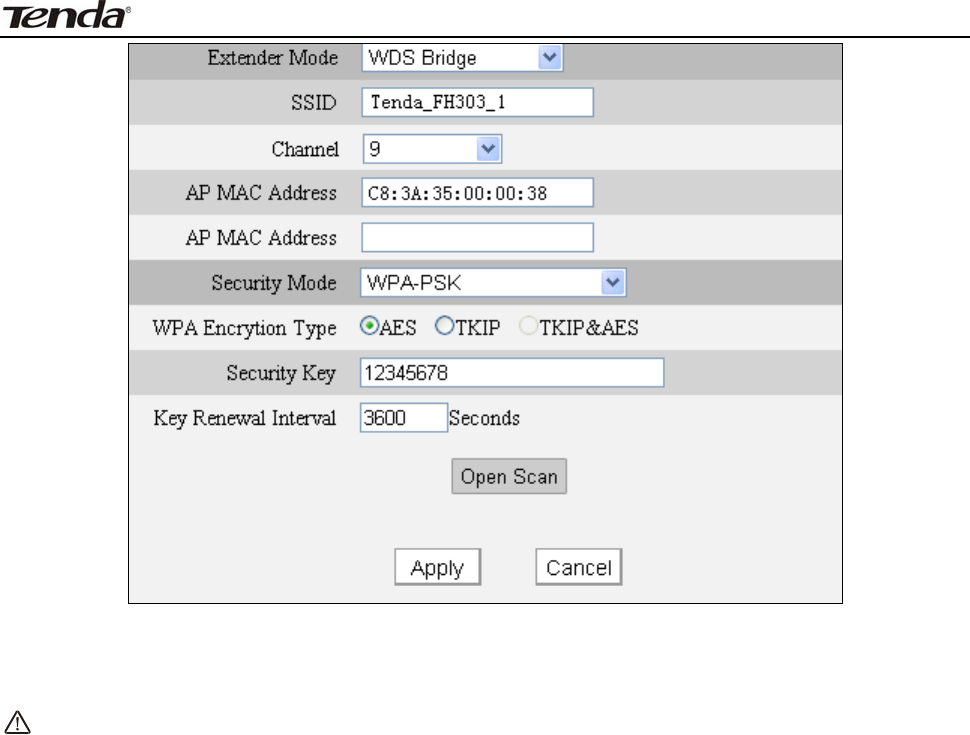
5.3.3 WDS
W DS Bridge M ode: wireless dist ribut ion syst em ( WDS) is a syst em enabling t he
wireless interconnection of access points in an I EEE 802.11 net work. I t allows a
wireless net work t o be expanded using m ult iple access points wit hout the
tradit ional requirem ent for a wired backbone t o link t hem .
Not e: Bot h wireless Access Points MUST support WDS.
3 FH303 Wireless N300 High Power Router
40
Ex t e nder M ode : Select a proper extender m ode t o use.
SSI D : Ent er the wireless net work nam e of the w ireless device you want to
connect.
Channel: The channel on which t he link partner device is current ly operat ing.
AP M AC Address: Ent er the MAC address of t he wireless device you want t o
connect.
Se curit y M ode: Select a security m ode for t he connection.
W PA Encr ypt ion Type: Select a proper encrypt ion t ype.
Se curit y Ke y: Ent er a correct securit y key.
Take t wo FH303 rout ers as exam ple t o illust rat e WDS im plem ent ation.
Choose WDS Bridge on bot h FH303 rout ers as seen below:
1 Direct ly ent er t he MAC address and SSI D of t he link partner if you already know
them and t hen configure proper securit y set tings.
2 Use t he Open Scan but t on.
1) Click " Open Scan", select the desired wireless net work and click OK. The MAC
will t hen be added aut om at ically.
2) Click OK as seen below.
3 FH303 Wireless N300 High Power Router
41
Configure t he sam e sett ings on t he ot her FH303 t he sam e way above.
Both wireless devices involved m ust be ent ered each other’s MAC address for
successful WDS connection.
N ote:
1 . W D S feat ure ca n only be im plem ent e d bet w e en 2 W D S- ca pable
w irele ss device s. Plus, SSI D, channel, se curit y set t ings and
secu r it y k e y m ust be ex a ct ly t he sa m e on both such devices.
3 FH303 Wireless N300 High Power Router
42
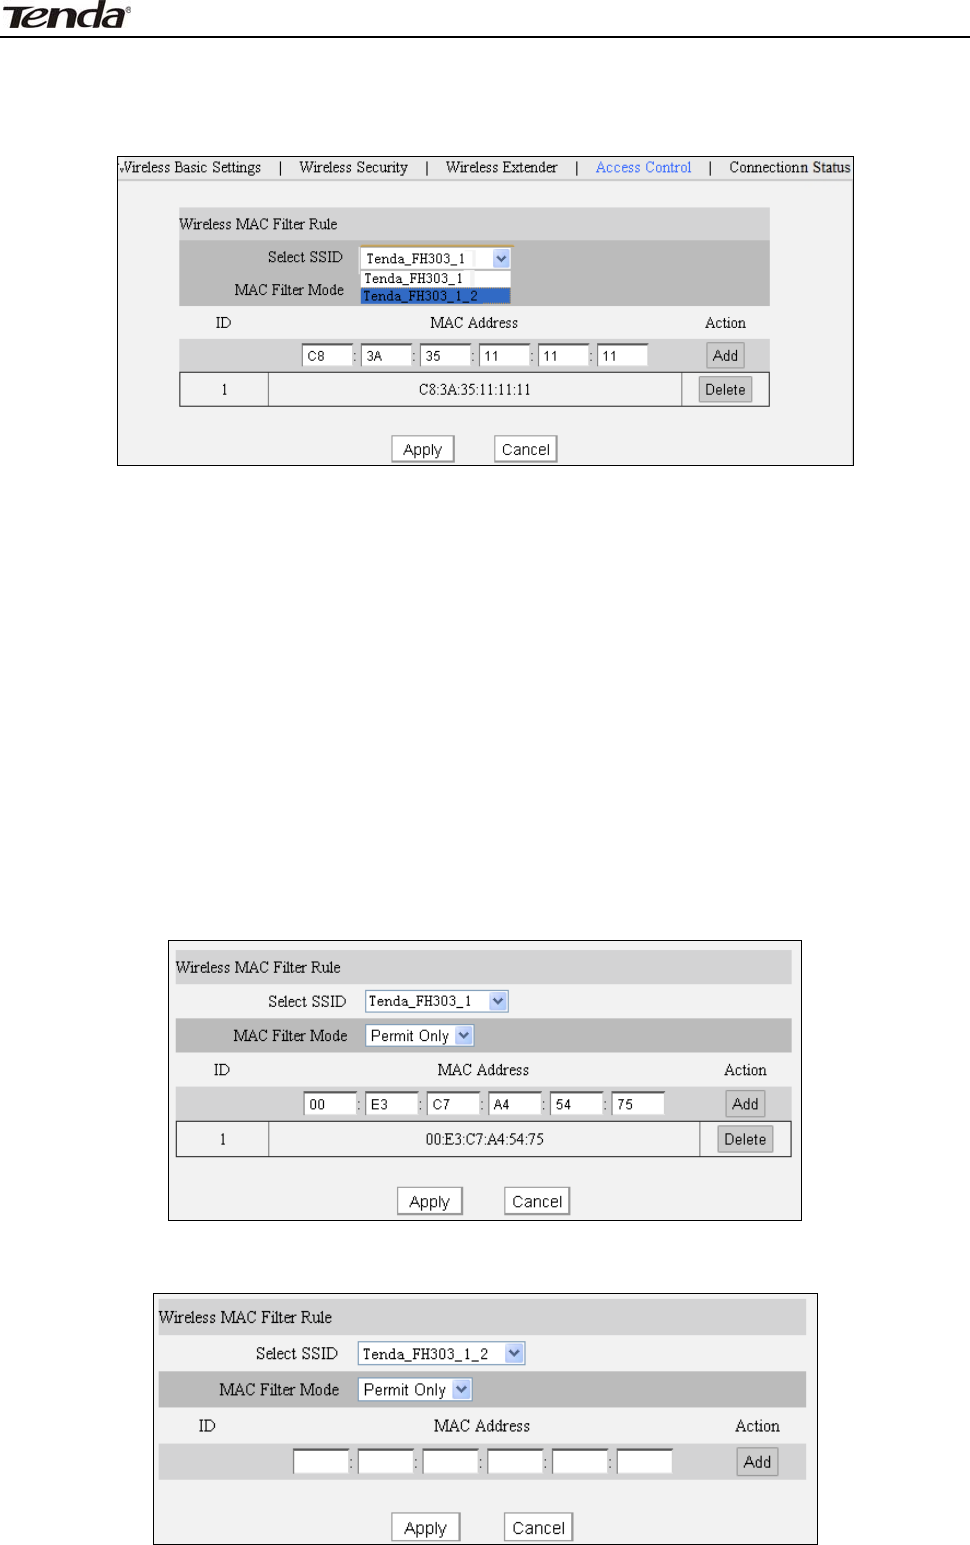
5 .4 Access Cont rol
The MAC-based Wireless Access Cont rol feat ure can be used t o perm it or forbid
clients to connect t o your wireless net work.
Se lect SSI D: Select prim ary SSI D or secondary SSI D for your filter rules t o
apply.
MAC Filt er Mode: " Perm it Only" only allows PCs at specified MAC addresses ( in
the list ) t o connect t o your wireless net work; Forbid Only: Only PCs at specified
MAC addresses list can’t connect t o your wireless network.
MAC Addr e ss: Ent er the MAC address of a wireless client which you want t o
perm it or forbid t o connect your wireless net work.
Add: Click t o add the MAC address.
MAC Addr e ss List : Displays added MAC address ent ries. You can add new
ent ries or delet e exist ing ent ries according t o your needs.
Ex am ple: To perm it only a PC at t he MAC address of 00: e3: c7: a4: 54: 75 to
connect t o your wireless net work via t he prim ary SSI D, do as follows:
A) For the prim ary SSI D: Tenda_FH303_1, configure set t ings as seen on t he
screenshot below:
B) For the secondary SSI D: Tenda_FH303_1_2, configure set t ings as seen on t he
screenshot below:
3 FH303 Wireless N300 High Power Router
43
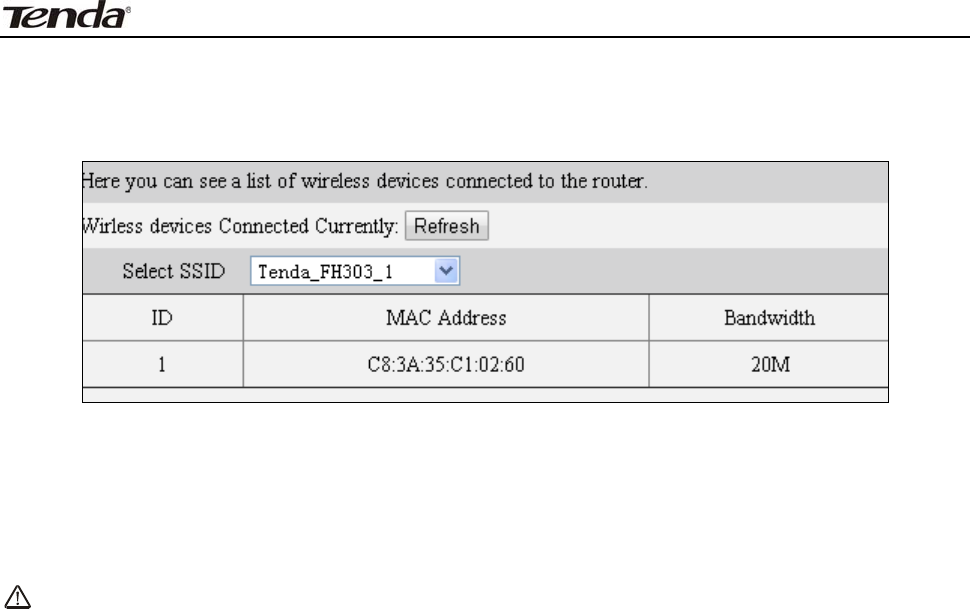
5 .5 Connect ion St at us
This section displays t he info of connect ed wireless clients including MAC
addresses and frequency widt h.
Se lect SSI D: Select the SSI D you want to view.
MAC Addr e ss: Displays MAC addresses of wireless client s connected to t he
rout er.
Ba n dw id t h: Displays channel bandwidt h used by current ly connect ed host s
( wireless client s) .
N ot e:
The bandw idth here refers t o t he channel bandw idth inst ea d of w ir e less
connect ion r a t e .
3 FH303 Wireless N300 High Power Router
44
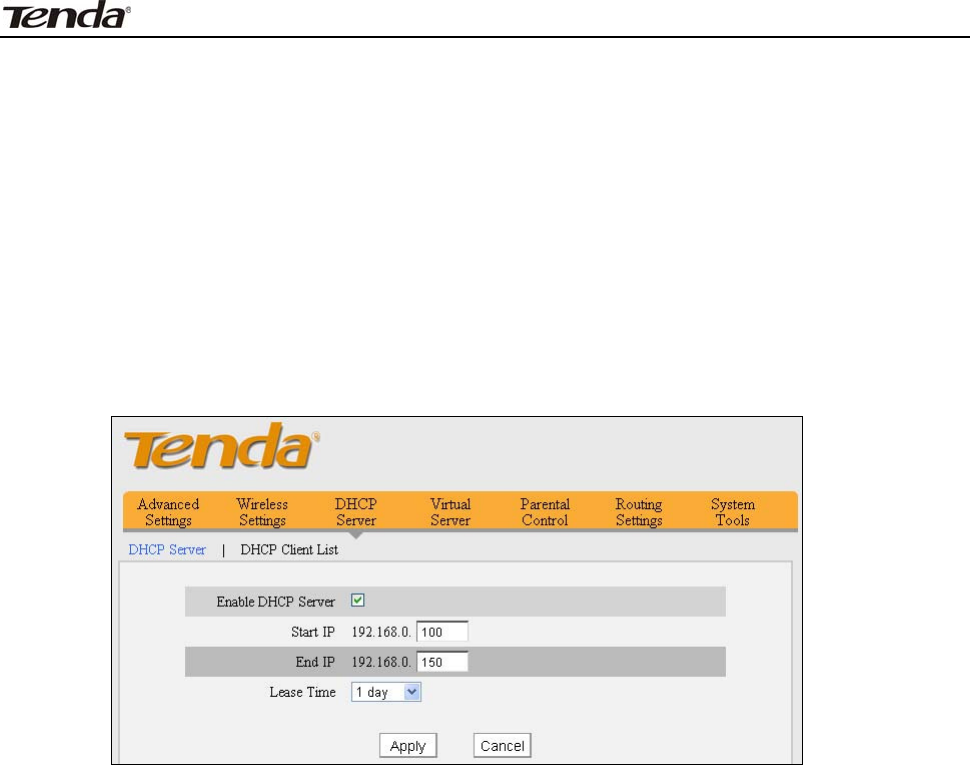
Chapt er 6 D HCP
6 .1 DH CP Se t t ings
The Dynam ic Host Configurat ion Protocol ( DHCP) is an aut om at ic
configurat ion protocol used on I P net works. I f you enable the built- in DHCP
server on t he device, it will aut om at ically configure t he TCP/ I P sett ings for all
your LAN com put ers ( including I P address, subnet m ask, gat eway and DNS et c) ,
elim inat ing t he need of m anual int ervent ion. Just be sure to set all com puters on
your LAN t o be DHCP client s by select ing "Obt ain an I P Address Aut om at ically"
respect ively on each such PC. When t urned on, these PCs will aut om at ically load
I P inform at ion from t he DHCP server.
Ena ble DH CP Se r ver: Check or uncheck t he box to enable or disable the
device’s DHCP server feature.
St a r t / End I P: Ent er t he st art ing/ ending I P address for t he DHCP server’s I P
assignm ent.
Lease Tim e: The lengt h of t im e for the I P address lease.
3 FH303 Wireless N300 High Power Router
45
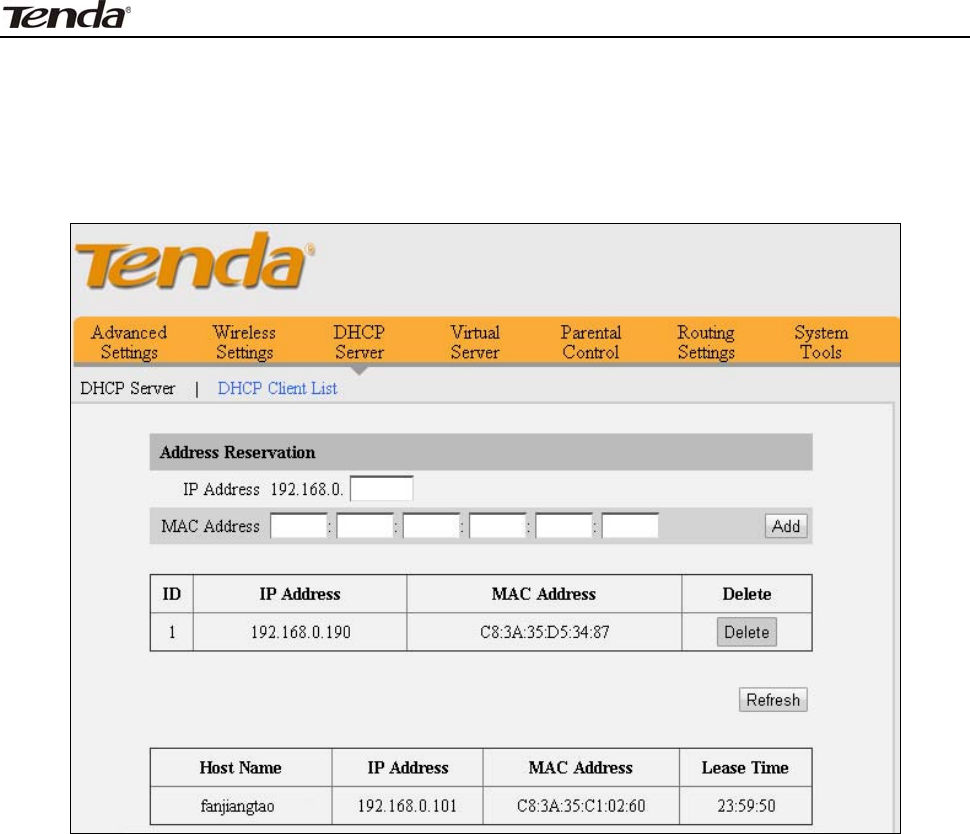
6 .2 DH CP Client List
DHCP Client List displays inform at ion of devices that have obt ained I P
addresses from t he device’s DHCP Server. I f you would like som e devices on your
net work t o get the sam e I P addresses always, you can use t his feat ure and
m anually add a stat ic DHCP Reservat ion ent ry for each such device.
I P Address: Ent er the I P address for st at ic DHCP reservat ion.
MAC Address: Enter the MAC address of a com puter t o always receive t he sam e
I P address ( t he I P you just specified) .
Host N a m e : Displays host nam e of the PC that get I P address from t he DHCP
server.
Lease Tim e: Displays rem aining t im e for a corresponding I P address lease.

3 FH303 Wireless N300 High Power Router
46
Chapt er 7 Vir t ua l Se rve r
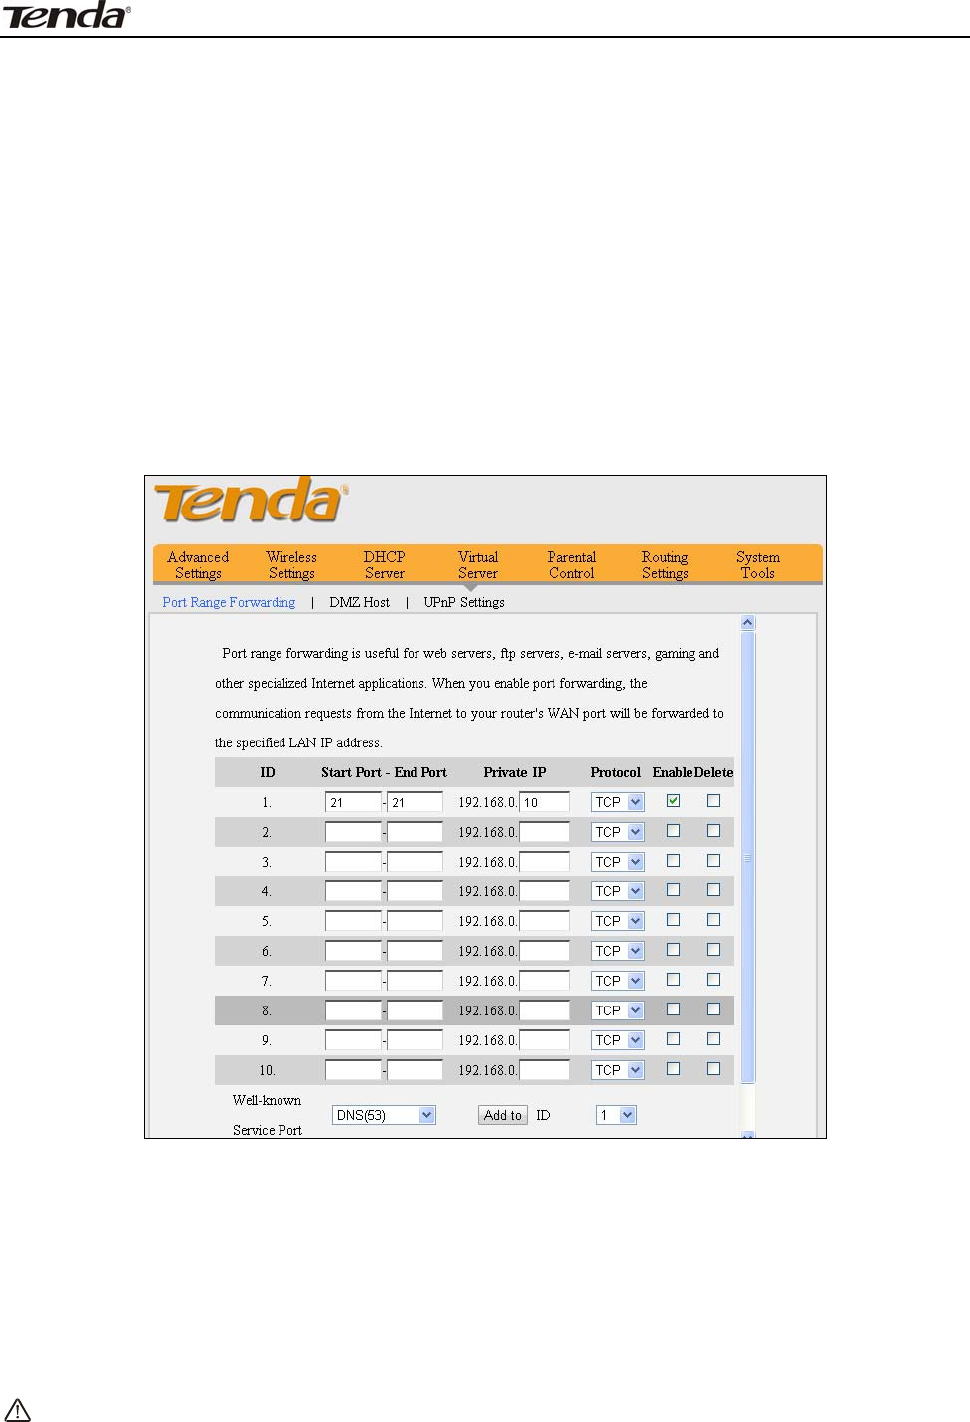
7 .1 Port Ra nge Forw a rding
St a r t / End Port : Ent er t he num ber or range of port( s) used by t he server or
I nt ernet applicat ions.
Pr ivat e I P: The I P address of a com puter used as a server in LAN.
Pr ot ocol: I ncludes TCP, UDP and Bot h. Select “ Bot h” if you are not sure about
which prot ocol to use.
Ena ble : The corresponding ent ry t akes effect only if you checked this opt ion.
Delete: Click to rem ove a corresponding entry/ rule.
W ell- Know n Service Port : The “ Well- Known Service Port ” lists widely used
prot ocol ports. Sim ply select a port , an ent ry I D and click the "Add t o" but t on t o
populat e t he select ed port t o t he corresponding fields of t he select ed ent ry. I n
case t hat you don’t find t he port you need, ent er it m anually.
3 FH303 Wireless N300 High Power Router
47
Ex am ple: You want to share som e large files with your friends who are not in
your LAN; however it is not convenient t o transfer such large files across net work.
Then, you can set up your own PC as a FTP server and use t he Port Ra nge
For w a rding feature t o let your friends access t hese files. Assum ing t hat t he
static I P address of t he FTP server ( Nam ely, your PC) is 192.168.0.10, you want
your friends t o access t his FTP server on t he default port of 21 using t he TCP
prot ocol, then do as follows:
1. Ent er 21 in bot h Start Port and End Port fields or select FTP from " Well- known
Service Port" and an ent ry I D, 21 will be aut om at ically populat ed t o
corresponding fields of t he select ed ent ry.
2. Ent er 192.168.0.10 in t he privat e field, select "TCP" and t hen select "Enable'.
3. Save your sett ings.
Now, your friends only need t o ent er ft p: / / xxx.xxx.xxx.xxx: 21 in t heir
browsers to access your FTP server. xxx.xxx.xxx.xxx is the rout er's WAN I P
address. Assum ing it is 172.16.102.89, t hen your friends need to ent er
"ftp: / / 172.16.102.89: 21" in t heir browsers.
N ote:
I f you include port 8 0 on t his sect ion, you m ust set t he port for
rem ote ( w e b- base d) m anage m ent t o a different num be r t han 8 0 , such
as 8 0 8 0 , ot herw ise t he Port Ra nge Forw a rding feat ure m ay not t a ke
effect .
3 FH303 Wireless N300 High Power Router
48
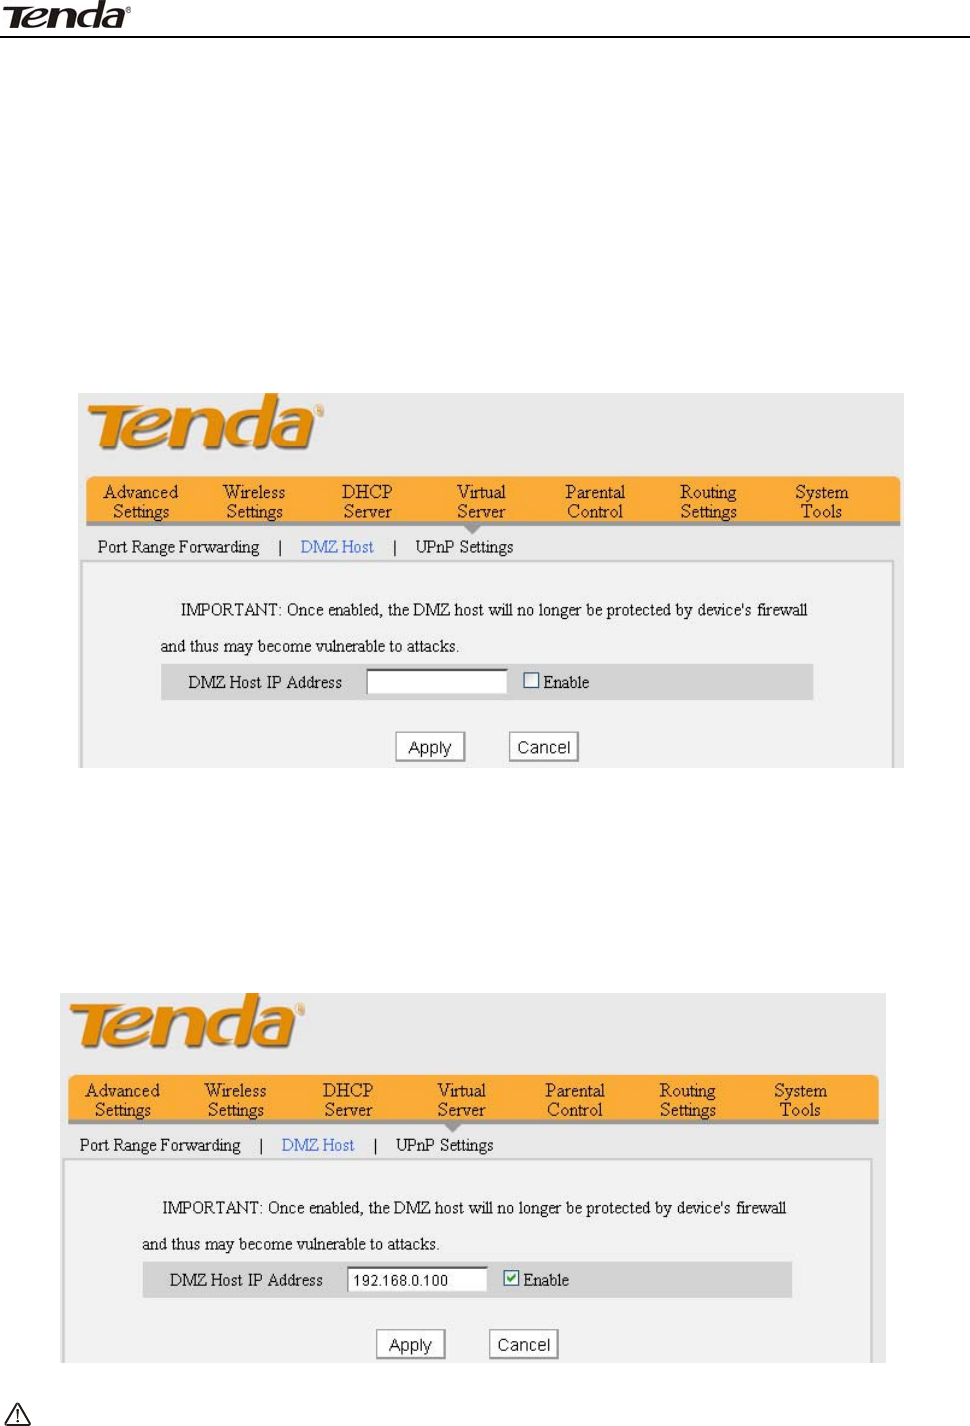
7 .2 DM Z H ost
I n som e cases such as playing I nt ernet gam es or holding video conferences,
you m ay need t o have your com put er com pletely exposed to external net works
for im plem ent at ion of a bidirectional com m unicat ion. To do so, set it as a DMZ
host . Note t hat you should assign a st at ic (fixed) I P address t o t he PC designat ed
as a DMZ host ( DHCP Server> DHCP Client List> DHCP Reservat ion ( also known
as St at ic Assignm ent on som e product s) ) before using t he feat ure. Ent er the
static I P address of t he PC on your LAN which you want to set as a DMZ host .
Enabling DMZ host m ay expose your local net work t o pot ent ial at t acks. So it is
advisable t o use it wit h caut ion.
DMZ H ost I P Addr e ss: En t e r t h e I P a d d r e s s o f c o m p u t e r o n y o u r LAN w h ich y o u
want to set t o be DMZ host .
Ena ble : Check/ uncheck t o enable/ disable t he DMZ host feat ure.
For exam ple: To set a PC at 192.168.0.100 t o a DMZ host for int ercom m unicat ion
wit h anot her host on t he I nternet , configure t he sam e set tings as shown on t he
screenshot on the device.
N ot e:
Once e nabled, t he DMZ host lose s pr otect ion from device's firew a ll a nd
be com es vulnerable t o at t ack s.
3 FH303 Wireless N300 High Power Router
49
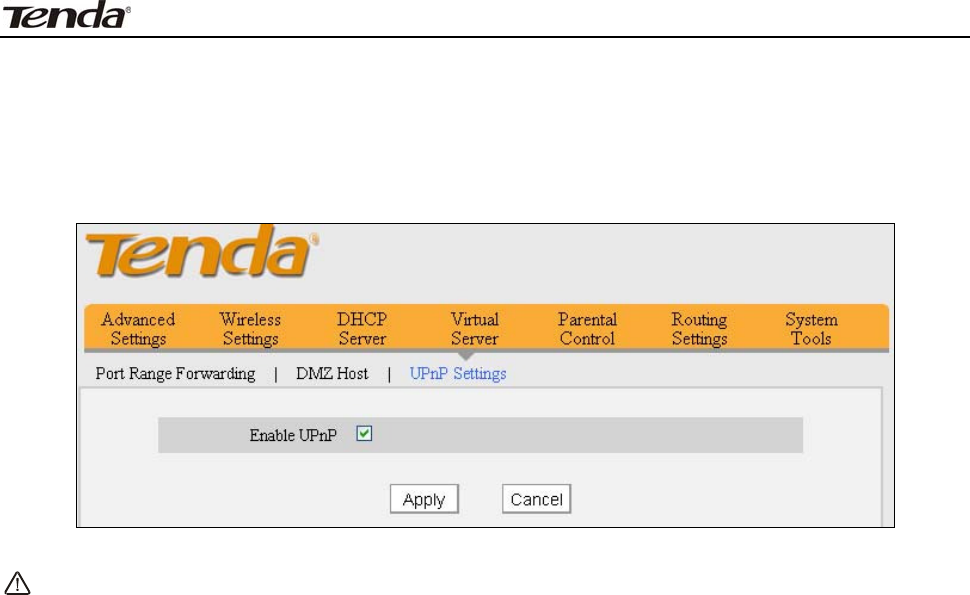
7 .3 UPN P
The Universal Plug and Play ( UPnP) feature allows net work devices, such as
com put ers from I nternet, t o access resources on local host or devices as needed.
UPnP- enabled devices can be discovered aut om at ically by t he UPnP service
applicat ion on t he LAN.
Ena ble UPnP: Check/ uncheck t o enable/ disable t he UPnP feat ure.
N ote:
N ote: UPnP w ork s in W indow s XP, W indow s ME or lat er ( N OTE:
Ope r a t ing syst em needs t o be integrat e d w it h or inst a lled w it h D irect x
9 .0 ) or in a n envir onm ent w it h in st a lled a pplicat ion softw a re t hat
support s UPnP.
3 FH303 Wireless N300 High Power Router
50
Chapt er 8 Parent a l Cont rol
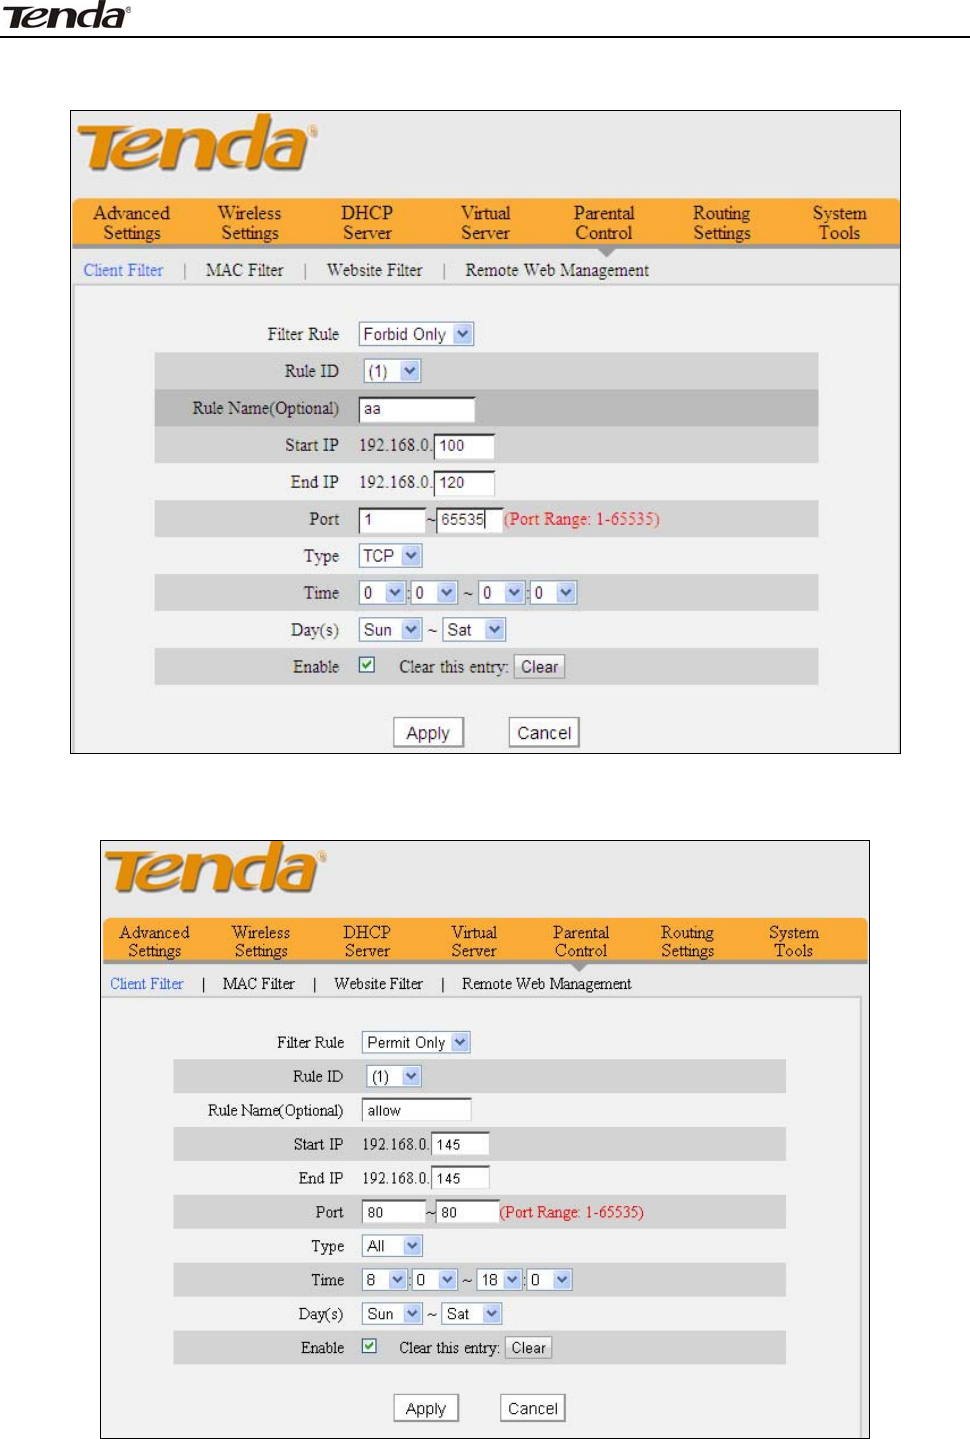
8 .1 Client Filt er
To bett er m anage PCs in LAN, you can lim it the t im e t o access int ernet
through t he Client Filter.
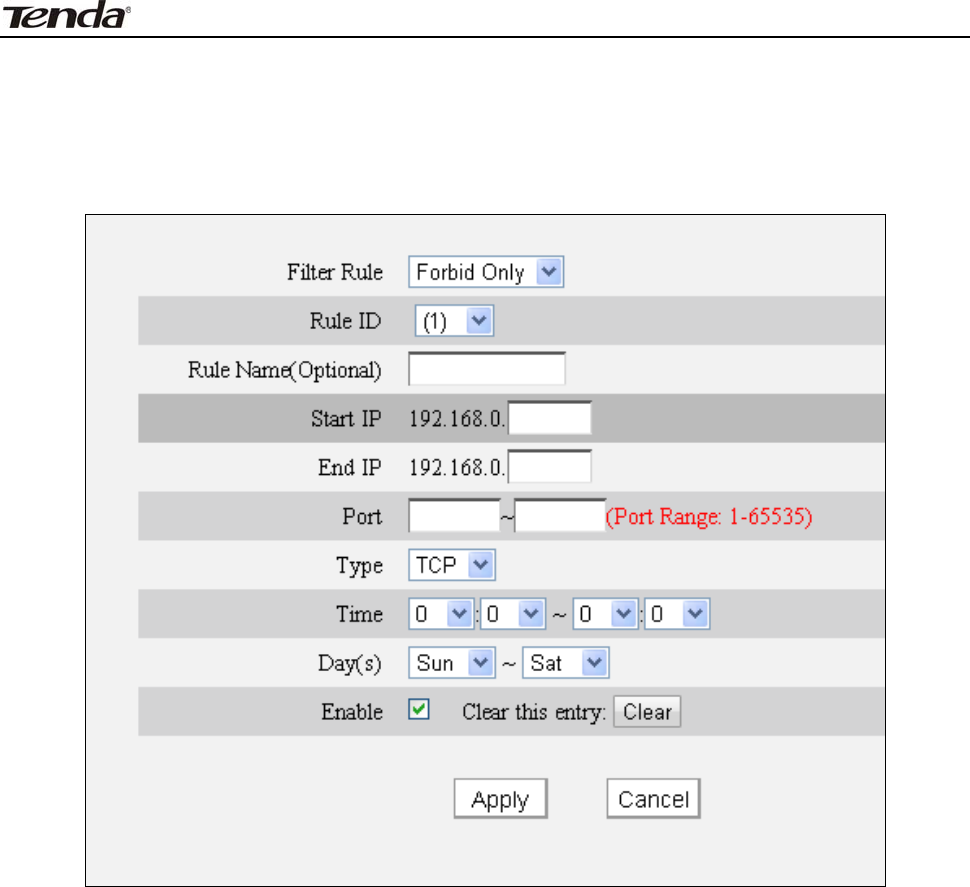
Filt e r Rule: Select Forbid Only or Perm it Only.
Rule I D: Select a rule I D from t he drop- down list .
Rule N a m e : Briefly describe t he current entry/ rule.
St a r t I P/ End I P: Ent er t he sam e I P address or 2 different I P addresses in bot h
boxes t o specify a single PC or a range of PCs for current rule t o apply to.
Port : Ent er TCP/ UDP protocol port num ber ( s) ; it can be a range of port s or a
single port.
Type ( Prot ocol) : Select a prot ocol or protocols for t he t raffic ( TCP/ UDP/ Bot h) .
Tim e : Specify a t im e range for current entry t o take effect .
Day: Select a day or several days for a current rule t o t ake effect .
Ena ble : Check t o enable or uncheck to disable a corresponding filt er rule.
3 FH303 Wireless N300 High Power Router
51
Exam ple 1: I f you want t o prohibit PCs within t he I P address range of
192.168.0.100- - 192.168.0.120 from accessing I nt ernet , do as follows:
Exam ple 2: if you want t he pc at t he I P address of 192.168. 0.145 t o only browse
web pages from 8: 00 t o 18:00, do as follows:

3 FH303 Wireless N300 High Power Router
52
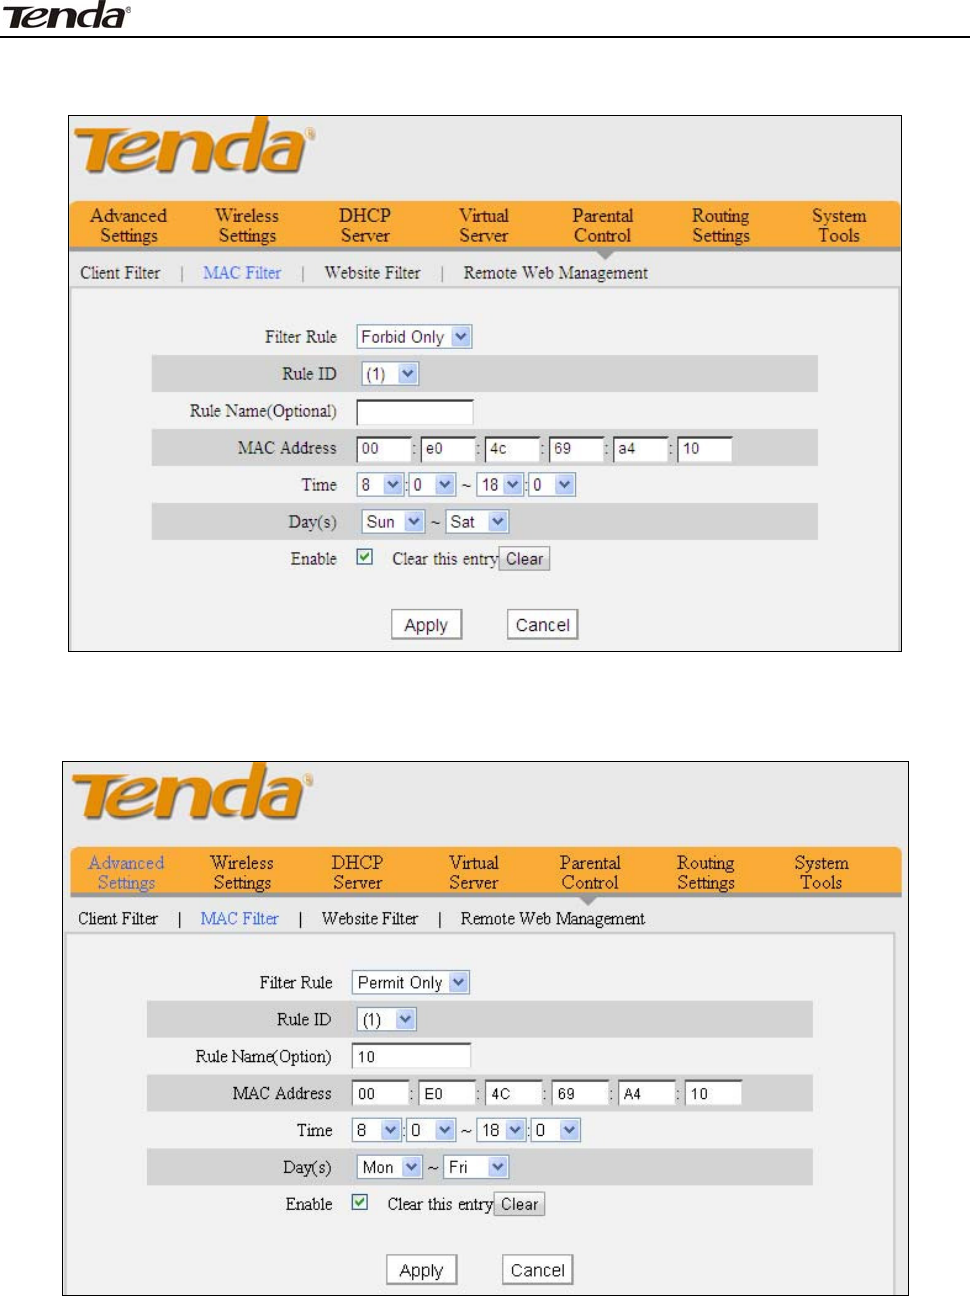
8 .2 M AC Filt e r
To bett er m anage PCs in LAN, you can lim it t he tim e to access t he internet
through MAC Filt er.
Filt e r Rule: Select Forbid Only or Perm it Only.
Rule I D: Select a rule I D from t he drop- down list .
Rule N a m e : Briefly describe t he current entry/ rule.
MAC Addr e ss: Specify a MAC address for a corresponding MAC filter rule t o
apply to.
Tim e : Specify a t im e period for a current rule to take effect.
Day: Select a day or several days for a current rule t o t ake effect .
Ena ble : Check t o enable or uncheck to disable a corresponding filt er rule .
3 FH303 Wireless N300 High Power Router
53
Exam ple1: I f you want to prohibit a PC at t he MAC address of
00: E0: 4C: 69: A4: 10 from accessing I nt ernet bet ween 8: 00 and18: 00.
Exam ple2: if you want PC at t he MAC address of 00: E0: 4C: 69: A4: 10 t o access
I nt ernet bet ween 8: 00 and18: 00 only from Monday to Friday.
3 FH303 Wireless N300 High Power Router
54
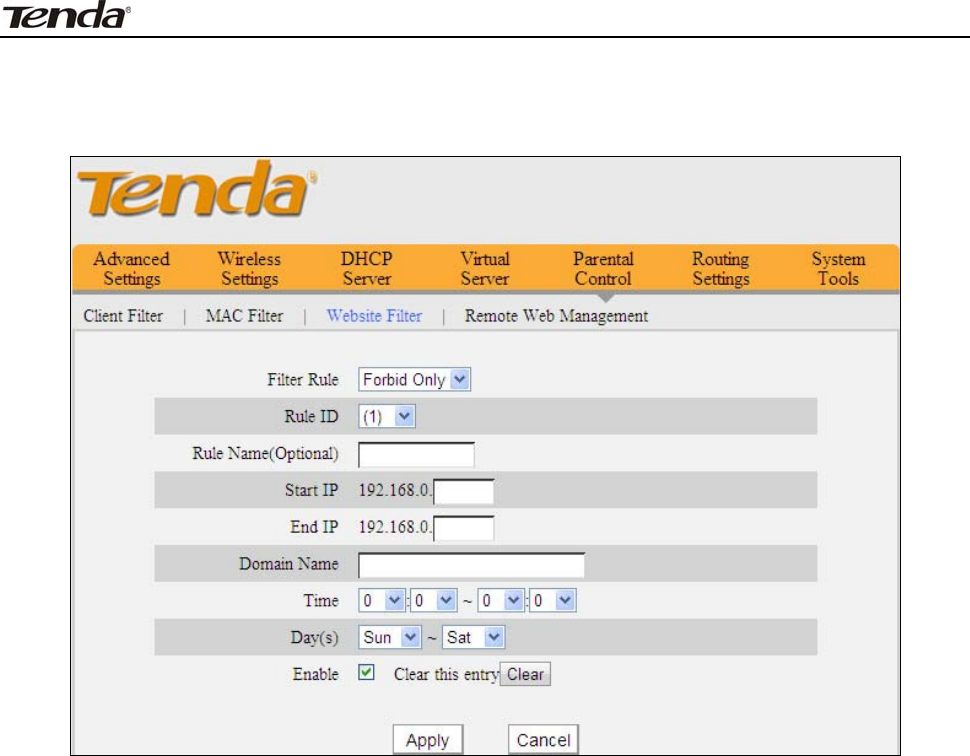
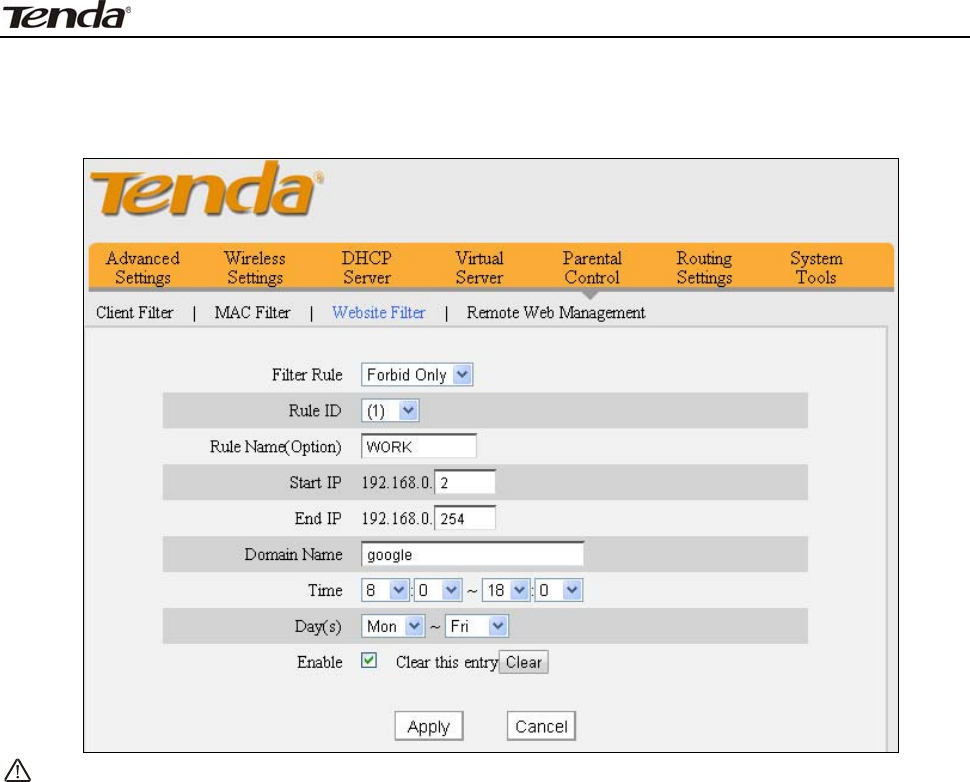
8 .3 URL Filt e r
To bett er cont rol LAN PCs, you can use t he URL filt er funct ionalit y t o allow or
disallow such PC to access certain websites wit hin a specified t im e range.
Filt e r Rule: Select Forbid Only.
Rule I D: Select a rule I D from t he drop- down list .
Rule N a m e : Briefly describe t he current entry/ rule.
St a r t I P/ End I P: Ent er t he sam e I P address or 2 different I P addresses in bot h
boxes t o specify a single PC or a range of PCs for current rule t o apply to.
Dom ain N am e: Ent er full dom ain nam e or keyword of a dom ain nam e t o be
filt ered out.
Tim e: Specify a tim e period for a current rule to take effect.
Day( s) : Select a day or several days for a current rule t o t ake effect .
Ena ble : Check t o enable or uncheck to disable a corresponding filt er rule.
3 FH303 Wireless N300 High Power Router
55
Exam ple: I f you want t o forbid t he com put ers on your LAN from accessing
“ www.google.com ” from 8:00 to 18:00 during working days: Monday- Friday,
then do as follows:
N ot e:
Ea ch r ule can only include one dom a in na m e . Sim ply a dd m ore rule s
accordingly, if you w ant t o filt er m ult iple dom ain nam es.
3 FH303 Wireless N300 High Power Router
56
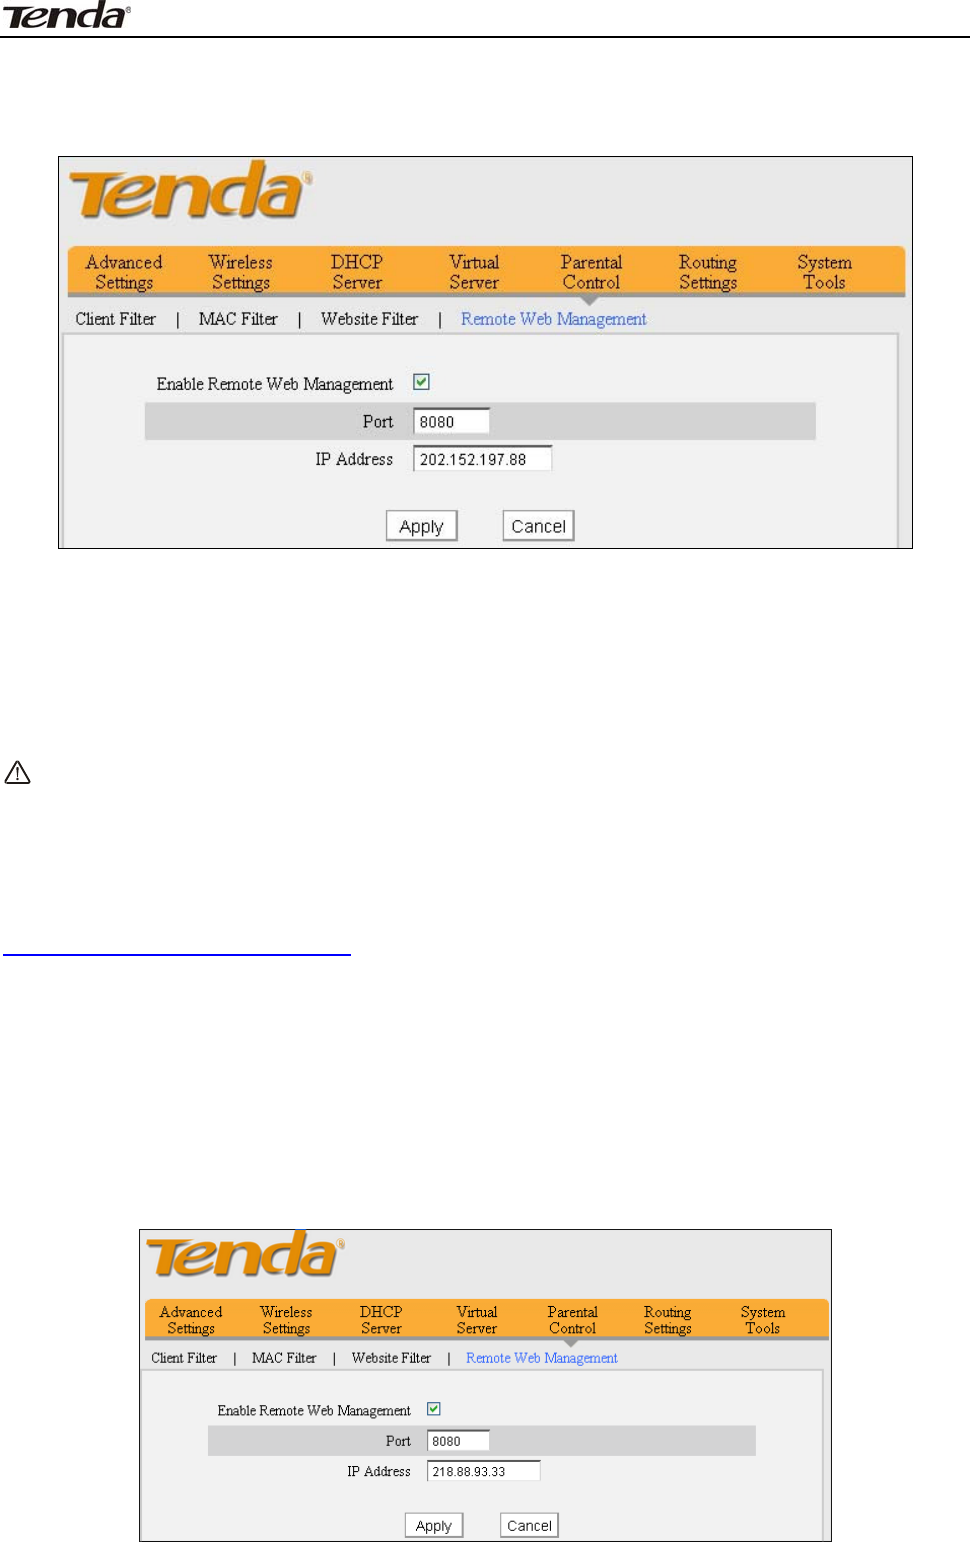
8 .4 Rem ot e W eb- base d M anage m e nt
The Rem ot e m anagem ent allows t he Rout er to be configured from t he
I nt ernet via a web browser.
Ena ble Re m ot e W e b M anagem ent : Select it to enable t he Rem ot e Web
Managem ent feature, then you can access t he router from I nt ernet .
Port: t he m anagem ent port to be open t o out side access.
I P Address: Ent er a t rust ed I P address of a PC from I nt ernet or ot her external
net works which you want to authorize t o m anage your rout er rem ot ely via a w eb
browser.
N ote:
1. To access the device via port 8080, ent er "ht t p: / / x.x.x.x: 8080" where
"x.x.x.x" represent s t he rout er's WAN I P address and 8080 is t he rem ote adm in
port. Assum ing t he device's I nt ernet I P address is 220.135.211.56, t hen,
sim ply replace t he "x.x.x.x" wit h "220.135.211.56" ( nam ely,
ht t p: / / 220.135.211.56: 8080) .
2. Leaving t he I P address field at "0.0.0.0" m akes t he device rem ot ely accessible
to all the PCs on I nt ernet or other external net works; populat ing it with a specific
I P address, say, 218.88.93.33, m akes t he device only rem otely accessible t o t he
PC at t he specified I P address.
For exam ple: I f you want to allow only t he PC at t he I P address of 218.88.93.33
from I nternet t o access Device’s web- based ut ilit y via port : 8080, then
configure t he sam e set tings as shown on t he screenshot below on t he device.
3 FH303 Wireless N300 High Power Router
57
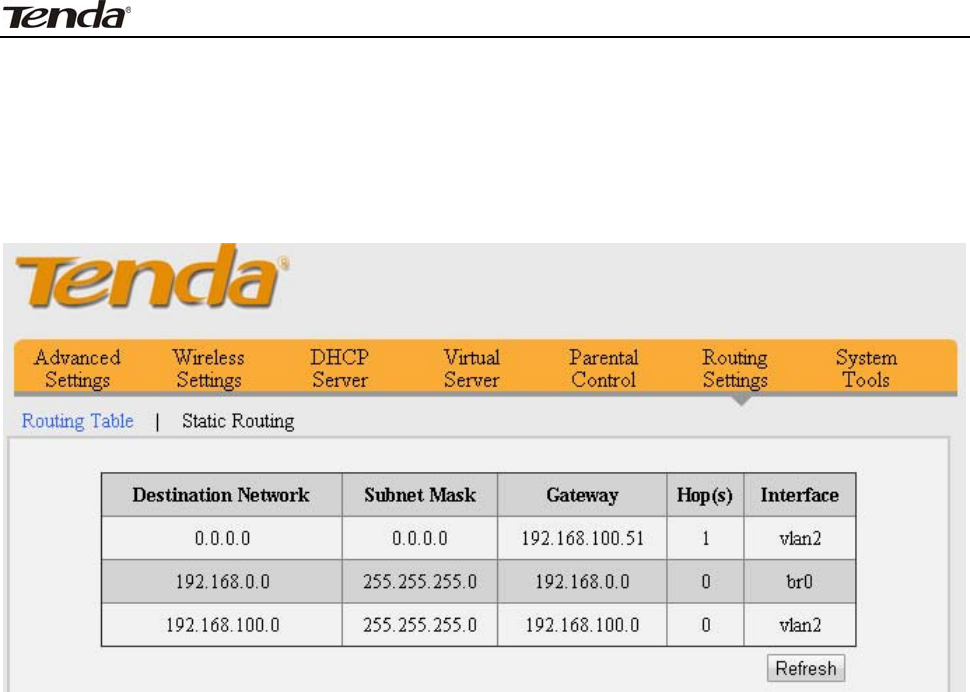
Chapt er 9 Rout ing Se t t ings
9 .1 Rout ing Table
This page displays the rout er’s routing table which list s destinat ion I P, subnet
m ask, gateway, hop count and int erface.
The principal task for a rout er is t o look for an opt im al t ransfer pat h for dat a
forwarding, and t ransfer it t o the specified destinat ion. To com plet e t his work,
the rout er st ores and m aint ains relat ed data of various t ransfer pat hs, i.e.
est ablishing a rout ing t able, for fut ure rout e selection.
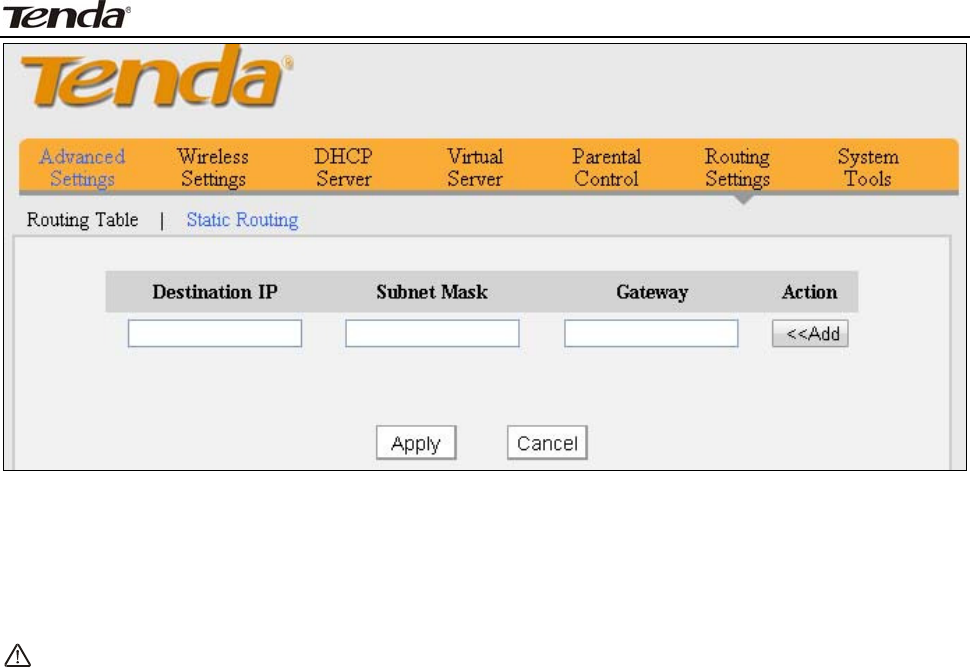
9 .2 St at ic Rout ing
When t here are several rout ers in t he net work, you m ay want t o set up st at ic
rout ing. St at ic routing det erm ines t he pat h of t h e dat a in your n et w or k . You can
use t his feat ure to allow users on different I P dom ains t o access t he I nternet via
this device. I t is not recom m ended t o use t his sett ing unless you are fam iliar wit h
static rout ing. I n m ost cases, dynam ic rout ing is recom m ended, because t his
feat ure allows t he rout er to det ect t he physical changes of t he network layout
autom at ically. I f you want t o use st at ic rout ing, m ake sure t he router’s DHCP
funct ion is disabled.
3 FH303 Wireless N300 High Power Router
58
Dest inat ion I P: The I P network segm ent of dest ination network.
Subnet Mask: Ent er t he Subnet Mask that corresponds to t he specified I P
net work.
Gat ew a y: The I P address for next hop.
N ote:
1. Gat eway m ust be on t he sam e I P net segm ent as device's LAN/ WAN I P
address.
2. Subnet Mask m ust be ent ered 255.255.255.255 if dest inat ion I P address is a
host .
3. Subnet Mask m ust be ent ered accordingly if destinat ion I P address
represent s an I P net work segm ent . I t m ust correspond t o the specified I P
address.
For exam ple: Destinat ion I P: 10.0.0.0,Subnet Mask: 255.0.0.0.
3 FH303 Wireless N300 High Power Router
59
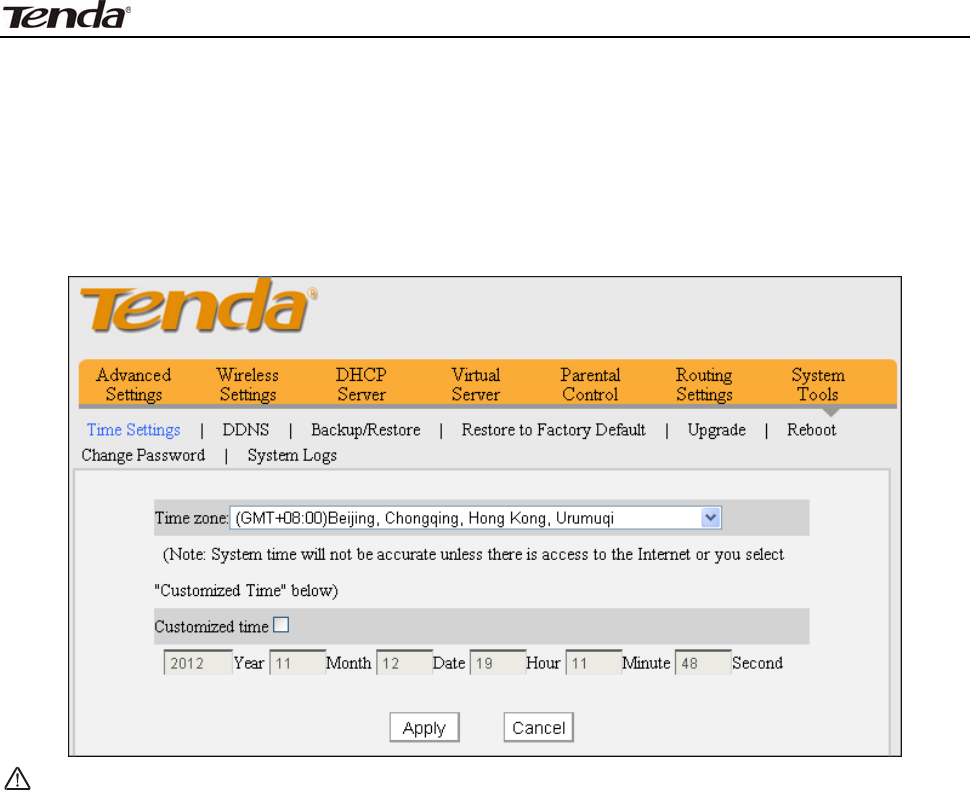
Chapt er 1 0 Syst em Tools
1 0 .1 Tim e Se t t ings
This section assists you t o set t he device’s syst em t im e and date; you can
eit her select t o set the t im e and date m anually or obtain t he GMT t im e from
I nt ernet aut om at ically.
N ote:
Configured t im e and dat e info loses when t he device is disconnected from
power supply. However, it will be updat ed autom at ically when t he device
reconnects t o I nt ernet . To activate tim e- based feat ures ( e.g. firewall) , the t im e
and dat e info shall be set correctly first, eit her m anually or aut om at ically.
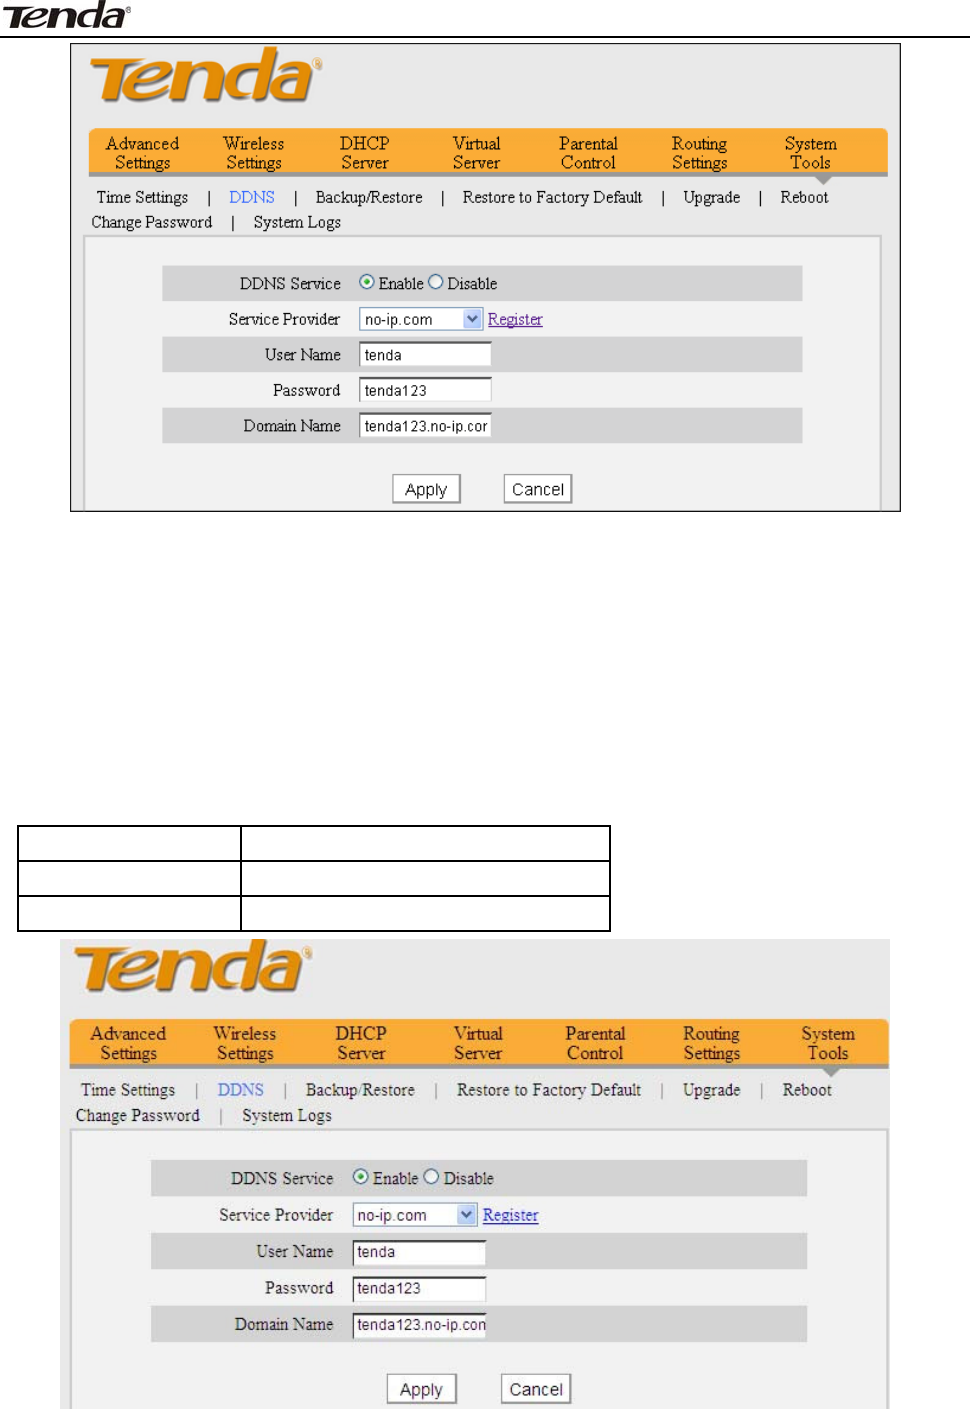
1 0 .2 D D N S
DDNS (Dynam ic DNS) Service allows you to assign a fixed dom ain nam e for
your dynam ic WAN I P Address so that you can rem otely access your LAN from t he
web.
3 FH303 Wireless N300 High Power Router
60
Se r vice Pr ovider: Select your DDNS service provider from t he drop- down
m enu.
User N am e: Ent er t he DDNS user nam e regist ered wit h your DDNS service
provider.
Pa ssw ord: Enter t he DDNS Password registered wit h your DDNS service
provider.
Dom ain N am e: Ent er t he DDNS dom ain nam e you regist er.
For exam ple: I f you have registered a dom ain nam e from no- ip.com for a web
server on t he host at 192.168.0.10 and get below info:
User Nam e tenda
Password t enda123
Dom ain Nam e tenda123.no- ip.com
Configure necessary set t ings on port forwarding int erface and ent er t he
inform at ion provided by your DDNS service provider on t he DDNS screen. Ot hers
can access your web server by sim ply ent ering ht tp: / / t enda123.no-ip.com in
their browser address bar.
3 FH303 Wireless N300 High Power Router
61
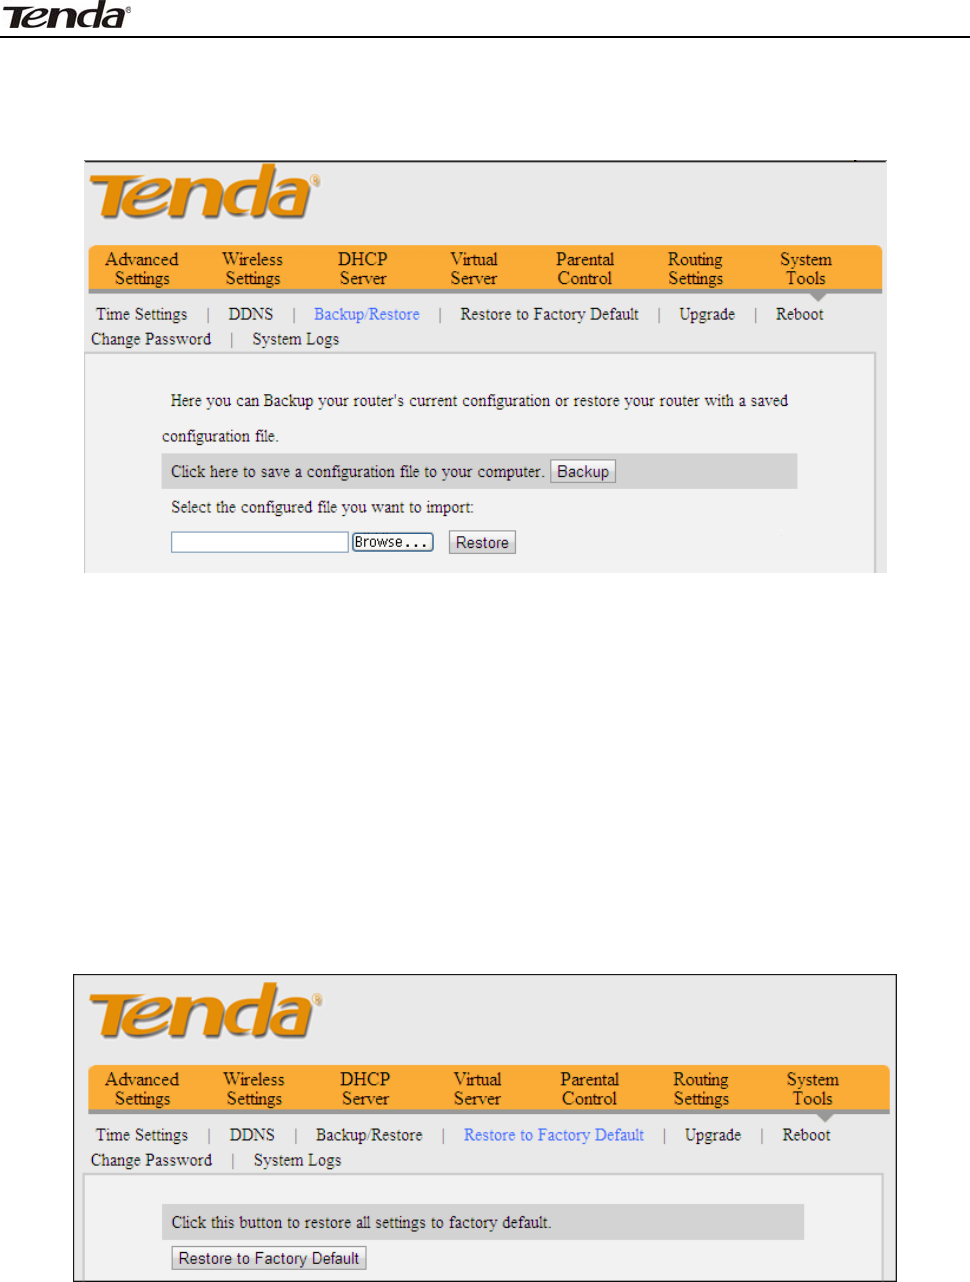
1 0 .3 Back up/ Re st ore
This section allows you t o backup the router set t ings or rest ore the set t ings you
saved t o t he rout er.
Ba ckup: Once you have configured the device the way you want it , you can save
these set t ings t o a configurat ion file on your local hard drive t hat can lat er be
im ported to your device in case that t he device is restored to fact ory default
set t ings. To do so, click t he “ Backup” but ton and specify a direct ory t o save
set t ings on your local hardware.
Re st or e : Click the "Browse" but t on t o locat e and select a configurat ion file t hat
is saved previously t o your local hard drive.
1 0 .4 Rest ore t o Fa ct ory D e fa ult Se t t ings
Click t he "Rest ore to Factory Default " button to reset Device to fact ory default
set t ings.
Factory Default Set tings:
Pa ssw ord: There is no preset password by default .
I P Address: 192.168.0.1
Subnet m a sk : 255.255.255.0.
3 FH303 Wireless N300 High Power Router
62
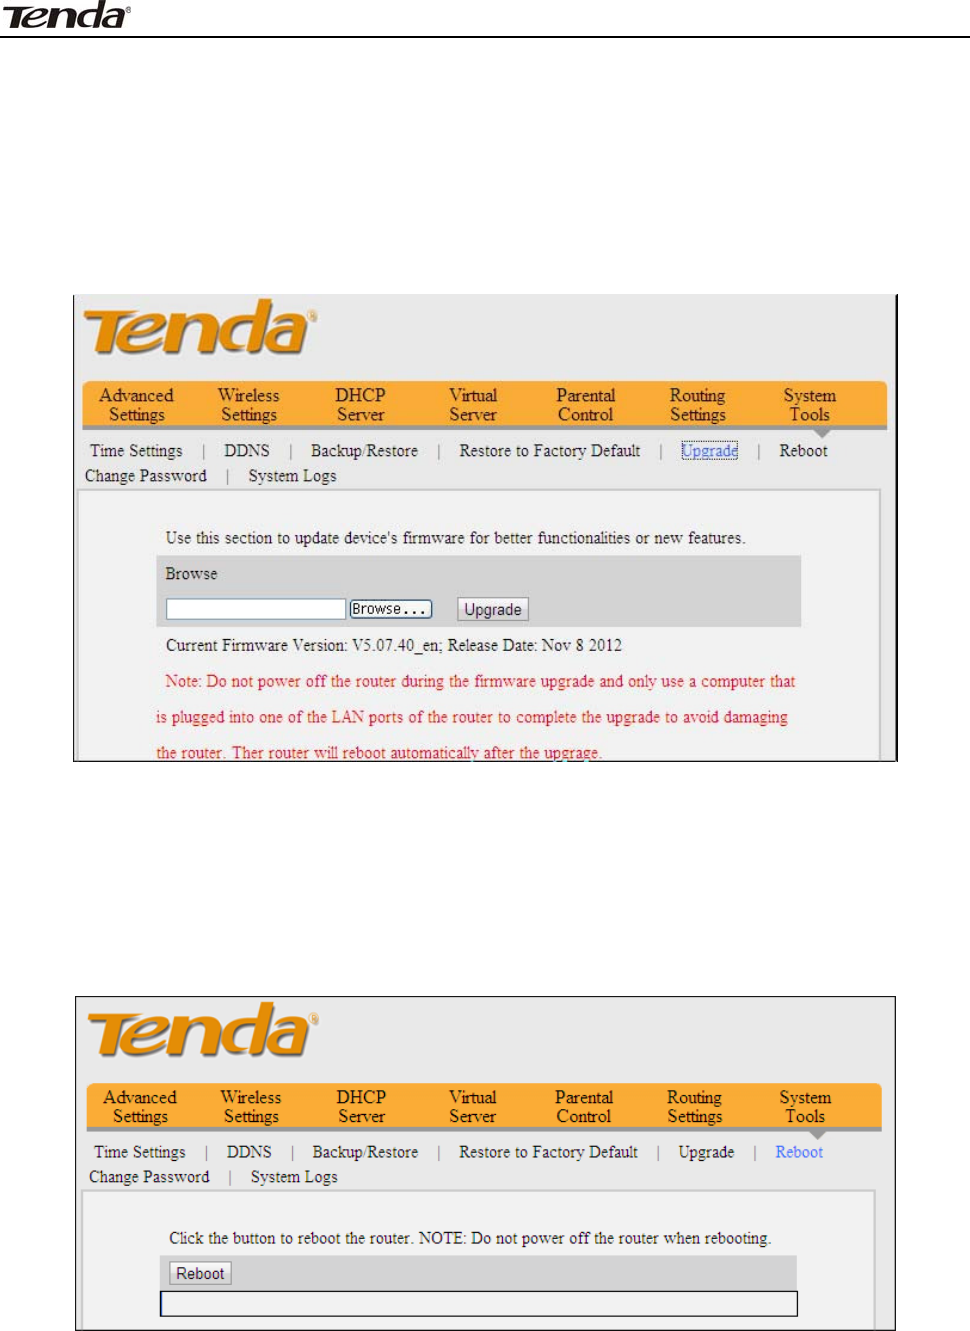
1 0 .5 Firm w are Updat e
Firm ware upgrade is released periodically to im prove t he funct ionalit y of your
device and also to add new features. I f you run int o a problem wit h a specific
feat ure of t he device, log on t o our websit e ( www.t endacn.com ) to download the
latest firm ware t o updat e your device. I f you run int o a problem wit h a specific
feat ure of t he device, log on t o our websit e ( www.t endacn.com ) to download the
latest firm ware t o updat e your device.
1. Click "Browse" t o locat e and select t he firm ware.
2. Upgrade: Click t o st art upgrading. Device will rest art autom at ically after
finish upgrading.
1 0 .6 Reboot
Reboot the device to act ivat e your set t ings. WAN connection will be disconnect ed
during reboot .
3 FH303 Wireless N300 High Power Router
63
1 0 .7 Cha nge Pa ssw or d
This section allows you t o change login password for accessing device’s
Web- based int erface.
Click Apply to subm it your new password.
N ote: For securit y purpose, it is highly recom m ended that you change Device's
default login password.
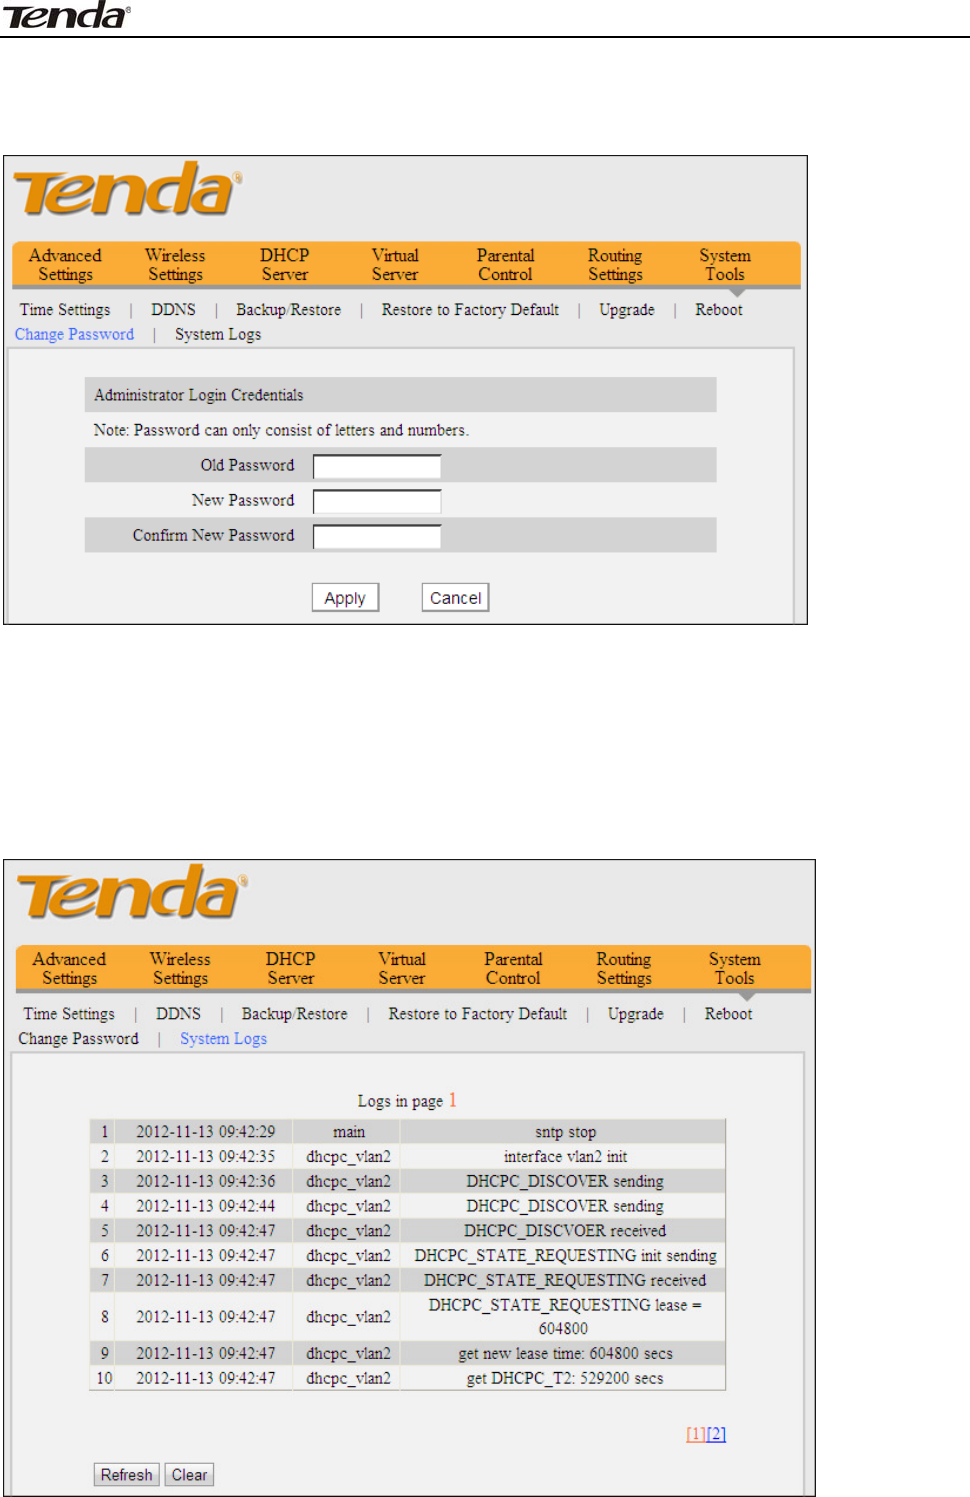
1 0 .8 Syst em Logs
The Syst em Logs option allows you t o view all event s that occur upon
syst em st artup
Re fresh: Click t o updat e current logs.
Cle a r: Click t o rem ove all logs.

3 FH303 Wireless N300 High Power Router
64
Appendix 1 Glossar y
Channel
Channel
A com m unicat ion channel, also known as channel, refers eit her to a physical
transm ission m edium such as a wire or t o a logical connection over a
m ult iplexed m edium such as a radio channel. I t is used to t ransfer an
inform at ion signal, such as a digit al bit st ream , from one or m ore transm itt ers
to one or m ore receivers. I f t here is only one AP in the range, select any
channel you like. The default is Aut o.
I f t here are several APs coexist ing in t he sam e area, it is advisable t hat you
select a different channel for each AP t o operat e on, m inim izing t he
int erference bet ween neighboring APs. For exam ple, if 3 Am erican- standard
APs coexist in one area, you can set t heir channels respect ively t o 1, 6 and 11
to avoid m ut ual interference.
SSI D
SSI D
Service set ident ifier ( SSI D) is used to ident ify a particular 802.11 wireless
LAN . I t i s t h e n a m e o f a s p ecific wireless net work. To let your wireless network
adapt er roam am ong different APs, you m ust set all Aps’ SSI D to the sam e
nam e.
W PA/ W PA2
The WPA protocol im plem ent s t he m aj ority of t he I EEE 802.11i st andard. I t
enhances dat a encrypt ion t hrough t he Tem poral Key I nt egrit y Prot ocol ( TKI P)
which is a 128- bit per- packet key, m eaning t hat it dynam ically generat es a
new key for each packet . WPA also includes a m essage integrity check feat ure
to prevent dat a packet s from being ham pered wit h. Only authorized net work
users can access the wireless net work.
The lat er WPA2 prot ocol feat ures com pliance with t he full I EEE 802.11i
standard and uses Advanced Encrypt ion Standard ( AES) in addition t o TKI P
encrypt ion prot ocol t o guarant ee bett er securit y than that provided by WEP or
WPA. Current ly, WPA is supported by Windows XP SP1.

3 FH303 Wireless N300 High Power Router
65
Appendix 2 Product Fe at ures
¾ Com pliant wit h I EEE 802.11n, I EEE 802.11g, I EEE 802.11b, I EEE 802.3 and
I EEE 802.3u st andards
¾ High gain om ni- directional ant enna delivers m ore powerful signal and
extends coverage to farther dist ance
¾ Up t o 150+ 300Mbps wireless rat e;
¾ 1 10/ 100M WAN port for I nternet connect ion;
¾ 4 10/ 100M Ethernet ports for LAN connection;
¾ Auto MDI / MDI X on each port
¾ Provides I nt ernet connect ion t ypes: Dynam ic/ st at ic I P; can be connected to
an xDSL/ Cable MODEM
¾ Com bines the funct ion of a wireless AP, rout er, 4- port switch and firewall;
¾ WPA, WPA2 and WPA&WPA2, et c to secure your wireless net work
¾ Sim ple and quick t o secure a WiFi connection at a push of t he WPS but t on;
¾ Mult iple operating m odes: WI SP Client, universal repeat er, WDS ( available
only on som e products)
¾ Provides prim ary SSI D and secondary SSI D
¾ Hidden/ invisible SSI D;
MAC- based wireless access cont rol;
¾ WMM st ream s your video and audio;
¾ SNTP t o synchronize local tim e wit h I nternet t im e servers;
¾ Supports UPnP and DDNS feat ures;
¾ WDS support for extending exist ing wireless coverage;
¾ Provides virt ual server and DMZ feat ures;
¾ Provides logs t o record device's usage st at us;

3 FH303 Wireless N300 High Power Router
66
Appendix 3 Troubleshooting
This section provides solutions t o problem s t hat m ay occur during inst allation
and operat ion of the device. Read the following if you are running into problem s.
I f your problem is not covered here, please feel free t o go t o www.t endacn.com
to find a solut ion or em ail your problem s t o support@tenda.com .cn
orsupport02@tenda.com .cn. We will be m ore t han happy t o help you out as soon
as possible.
1 . Q: I ent ered t he device ’s LAN I P a ddr e ss in t he w eb brow se r but
cannot a cce ss t he utilit y. W hat should I do?
Check whet her device is funct ioning correctly. The Sys LED should blink a few
seconds aft er device is powered up. I f it does not light up, t hen som e internal
fault s m ay have occurred.
Verify physical connectivity by checking whether a corresponding port’s link
LED lights up. I f not, t ry a different cable. Note that an illum inat ed light does NOT
ALWAYS indicate successful connect ivity.
Run t he "ping 192.168.0.1" com m and. I f you get replies from 192.168.0.1,
open your browser and verify that Proxy server is disabled. I n case t hat ping fails,
press and hold the " RESET" but t on on your device for 7 seconds t o restore fact ory
default sett ings, and then run " ping192.168.0.1" again.
4) Cont act our technical support for help if t he problem st ill exist s aft er you
tried all the above.
2 . Q: W hat should I do if I forget t he login passw ord t o m y de vice?
A: Reset your device by pressing t he Reset but t on for over 7 seconds. Not e:
All set tings will be delet ed and rest ored to fact ory default s once you pressed t he
Reset but ton.
3 . Q: My com pu t er show s an I P a ddress conflict error after having
connect ed t o t he device . W ha t should I do?
A: 1) Check if there are other DHCP servers present in your LAN. I f t here are
other DHCP servers except your rout er, disable t hem im m ediat ely. 2) The default
I P address of t he device is 192.168.0.1; m ake sure t his address is not used by
anot her PC or device. I n case t hat two com put ers or devices share t he sam e I P
addresses, change either to a different address.
4 . Q: I ca nnot access I nternet a nd se nd/ receive e m a ils; w hat should I
do?
This problem m ainly happens to users who use t he PPPoE or Dynam ic I P
I nt ernet connect ion type. You need t o change t he MTU size ( 1492 by default ) . I n
this case, go t o “ WAN Set tings” to change t he MTU value from default 1480 t o
1450 or 1400, et c.
5 . Q: How do I share resources on m y com puter w it h users on I nte r net
t hrough t he device ?
A: To let I nt ernet users access int ernal servers on your LAN such as e- m ail
server, Web, FTP, via t he device, use t he "Virtual Server" feature. To do so, follow
steps below:
St ep 1 : Creat e your int ernal server, m ake sure the LAN users can access

3 FH303 Wireless N300 High Power Router
67
these servers and you need t o know related service ports, for exam ple, port for
Web server is 80; FTP is 21; SMTP is 25 and POP3 is 110.
St ep 2 : Ent er Port Forwarding ( also called Port Range Forwarding on som e
product s) screen from device web UI .
St ep 3 : Com plete t he St art Port (also called Ext ernal/ Ext Port on som e
product s) and End Port ( also called I nternal/ I nt Port on som e products) fields,
say, 80- 80.
St ep 4 : I nput t he internal server’s I P address. For exam ple, assum ing t hat
your Web server’s I P address is 192.168. 0.10, then sim ply input it .
Select a proper prot ocol type: TCP, UDP, or Bot h depending on which
prot ocol( s) your int ernal host is using.
Click Enable and save your set tings.
For your reference, we collect ed a list of som e well- known service ports as
follows:
Server Prot ocol Service Port
Web Server TCP 80
FTP Server TCP 21
Telnet TCP 23
Net Meet ing TCP 1503、1720
MSN Messenger TCP/ UDP
File Send: 6891- 6900( TCP)
Voice: 1863、6901( TCP)
Voice: 1863、5190( UDP)
PPTP VPN TCP 1723
SMTP TCP 25
POP3 TCP 110

unauthorized modifications to this equipm
3 FH303 Wireless N300 High Power Router
68
NCC Notice
經型式認證合格之低率射頻電機,非經許可,公司商號或使用者均不得擅自變更頻率大率或變更設計之特性及
能
低率射頻電機之作用不得影響飛航安全及幹擾合法通信;經發現有幹擾現象時,應立即停用,並改善至無幹擾時方得繼續
使用前項合法通信,指依電信規定作業之無線電信低率射頻電機須忍受合法通信或工業科學及醫療用電波輻射性電
機設備之幹擾
FCC Statement
This device complies with Part 15 of the FCC Rules. Operation is subject to the following
two conditions: (1) This device may not cause harmful interference, and (2) this device
must accept any interference received, including interference that may cause undesired
operation.
This equipment has been tested and found to comply with the limits for a Class B digital
device, pursuant to Part 15 of the FCC Rules. These limits are designed to provide
reasonable protection against harmful interference in a residential installation. This
equipment generates, uses and can radiate radio frequency energy and, if not installed and
used in accordance with the instructions, may cause harmful interference to radio
communications. However, there is no guarantee that interference will not occur in a
particular installation. If this equipment does cause harmful interference to radio or
television reception, which can be determined by turning the equipment off and on, the user
is encouraged to try to correct the interference by one of the following measures:
- Reorient or relocate the receiving antenna.
- Increase the separation between the equipment and receiver.
- Connect the equipment into an outlet on a circuit different from that to which the
receiver is connected.
- Consult the dealer or an experienced radio/TV technician for help.
FCC Caution: Any changes or modifications not expressly approved by the party
responsible for compliance could void the user's authority to operate this equipment.
This transmitter must not be co-located or operating in conjunction with any other antenna
or transmitter.
Radiation Exposure Statement
This equipment complies with FCC radiation exposure limits set forth for an uncontrolled
environment. This equipment should be installed and operated with minimum distance
20cm between the radiator & your body.
NOTE: (1)The manufacturer is not responsible for any radio or TV interference caused by
ent.(2) To avoid unnecessary radiation
interference, it is recommended to use a shielded RJ45 cable
CE Mark Warning
This is a Class B product in a domestic environment, this product may cause radio
interference, in which case the user may be required to take adequate measures
NOTE: (1) The manufacturer is not responsible for any radio or TV interference caused by

3 FH303 Wireless N300 High Power Router
69
unauthorized modifications to this equipment. (2) To avoid unnecessary radiation
interference, it is recommended to use a shielded RJ45 cable
"The product can be used without restrictions in the following countries: all EU member
states except France and Norway.
The product can be used with limitations in the following countries: France (for indoor use
only) and Norway (20 km in the center of Ny-Ĺlesund)."