TENDA TECHNOLOGY W302C 300M Wireless notebook adapter User Manual W302C User Guide
SHENZHEN TENDA TECHNOLOGY CO., LTD. 300M Wireless notebook adapter W302C User Guide
User Manual
11n Wireless Notebook Adapter User Guide

11n Wireless Notebook Adapter User Guide
Copyright Statement
is the registered trademark of
Shenzhen Tenda Technology Co., Ltd. All the products
and product names mentioned herein are the
trademarks or registered trademarks of their
respective holders. Copyright of the whole product as
integration, including its accessories and software,
belongs to Shenzhen Tenda Technology Co., Ltd.
Without the permission of Shenzhen Tenda Technology
Co., Ltd, any individual or party is not allowed to copy,
plagiarize, imitate or translate it into other languages.
All the photos and product specifications mentioned in
this guide are for references only. As the upgrade of
software and hardware, there will be changes. And if
there are changes, Tenda is not responsible for
informing in advance. If you want to know more about
our product information, please visit our website at
www.tenda.cn.

11n Wireless Notebook Adapter User Guide
Table of Content
Chapter 1 Introduction........................................1
1.1 Product Feature......................................................... 2
1.2 Product Deployment................................................ 3
1.3 Package Contents ..................................................... 4
Chapter 2 Installation Guide.................................5
Chapter 3 Client Utility Interface......................... 10
3.1 Station Mode............................................................. 11
3.1.1 Station Mode Topology................................. 11
3.1.2 Status ................................................................. 12
3.1.3 Site Survey....................................................... 13
3.1.4 Profile Management....................................... 14
3.1.5 Statistics............................................................ 16
3.1.6 WPS Setting...................................................... 16
3.2 AP Mode.................................................................. 18
3.2.1 AP Mode Topology.......................................... 18
3.2.2 Basic Setting.................................................. 19
3.2.3 Security Setting.............................................. 20
3.2.4 Access Control................................................. 21
3.2.5 About .................................................................. 23
Appendix One: Acronyms and Terms ...................24
Appendix Two: How to connect with PSP.............. 27

11n Wireless Notebook Adapter User Guide
-1-
Chapter 1 Introduction
W302C employs the most advanced wireless
networking technology, IEEE802.11n (Draft 2.0). By
using the reflection signal, 802.11n's “Multiple In,
Multiple Out” (MISO) technology increases the range
and reduces “dead spots” in the wireless coverage
area. Unlike ordinary wireless networking of
802.11b/g standards that are confused by wireless
reflections, MISO can actually use these reflections to
increase four times transmission range of 802.11g
products. Besides, when both ends of the wireless link
are 802.11n products, MISO technology can utilize
twice radio band to increase three times transmission
speed of ordinary 802.11g standard products, and can
comply with backwards 802.11b/802.11g standards.
Soft AP supported by W302C can help you establish
wireless LAN networking with lowest cost. Besides,
WPS (PBC and PIN) encryption method can free you
from remembering the long passwords. Complete
WMM function makes your voice and video more
smooth.

11n Wireless Notebook Adapter User Guide
-2-
1.1 Product Feature
• Complies with IEEE 802.11n (Draft 2.0), IEEE
802.11g, IEEE 802.11b standards
• Provides 32-bit Cardbus interface
• Provides 300Mbps receiving rate and 150Mbps
sending rate
• Supports 20MHz/40MHz frequency width
• Auto-detects and changes the network
transmission rate
• Provides two work modes: Infrastructure and
Ad-Hoc
• Supports Soft AP to establish your wireless
LAN networking with lowest cost
• Supports 64/128-bit WEP, WPA, WPA2
encryption methods and 802.1x security
authentication standard
• Supports WPS (PBC and PIN) encryption
method to free you from remembering long
passwords

11n Wireless Notebook Adapter User Guide
-3-
• Supports WMM to make your voice and video
more smooth
• Supports Windows XP, 2000 operating
systems, etc.
1.2 Product Deployment
W302C Wireless Notebook Adapter offers fast,
reliable and cost-effective solution for wireless
access. Deployment as follows:
• For staff who requires higher mobility in the
office, they want to have access to traditional
wired or wireless network in any place of the
company;
• Enterprise or individual who requires often
changes in lay out of network cables;
• Companies or places which are not suitable for
LAN cable laying out because of budget or
objective building, including places of great

11n Wireless Notebook Adapter User Guide
-4-
interests, rent places or places for short-term
usage;
• Company or individual who avoids using
expensive cables, renting cables or renting
rights for access.
1.3 Package Contents
Unpack the packets, and please find the following
items:
¾ One W302C Wireless Notebook Adapter
¾ One CD-ROM
11n Wireless Notebook Adapter User Guide
-5-
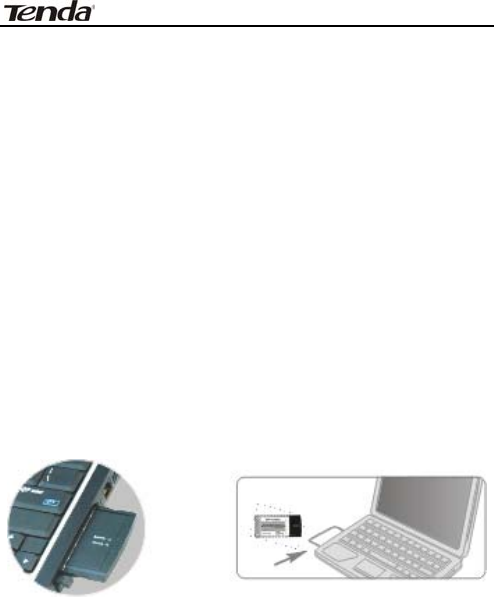
Chapter 2 Installation Guide
This chapter is to assist you how to use included the
CD-ROM which comprises the Setup Wizard and the
Client Utility Interface.
The following steps on Setup Wizard are taken the
Windows XP as example.
1. Please insert the Wireless Notebook Adapter into
the Cardbus interface of your computer.
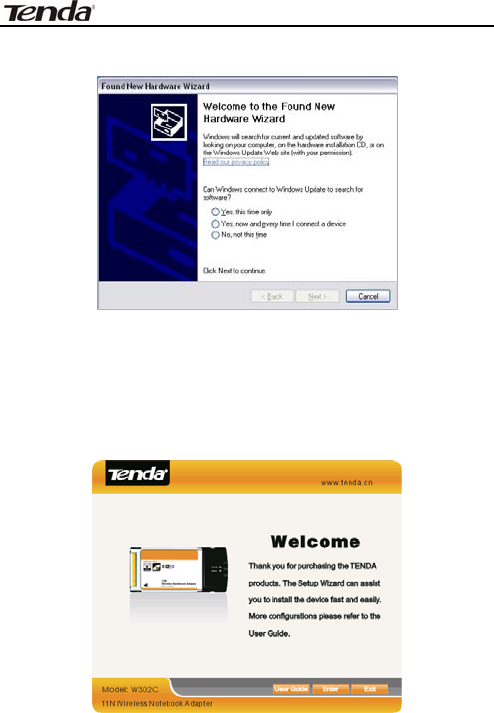
2. “Found New Hardware” system dialogue appears,
and selects “Cancel” to use the included Setup Wizard
for fast installation; of course, you also can select
“Next” to install by manual.
11n Wireless Notebook Adapter User Guide
-6-
3. Inert the included CD-ROM into the CD-ROM
drive of your computer, and the Welcome screen
appears. (If not appear, double click the
“Setup.exe” icon.)
11n Wireless Notebook Adapter User Guide
-7-
4. Click “Enter”.
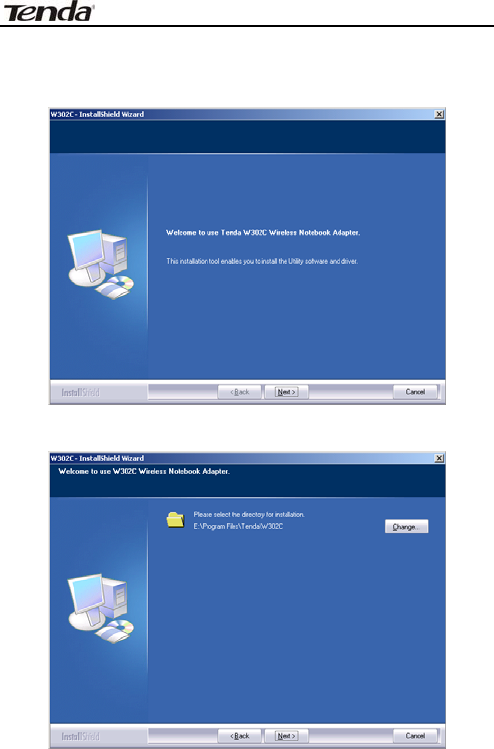
5. Click “Next” to start installing.
11n Wireless Notebook Adapter User Guide
-8-
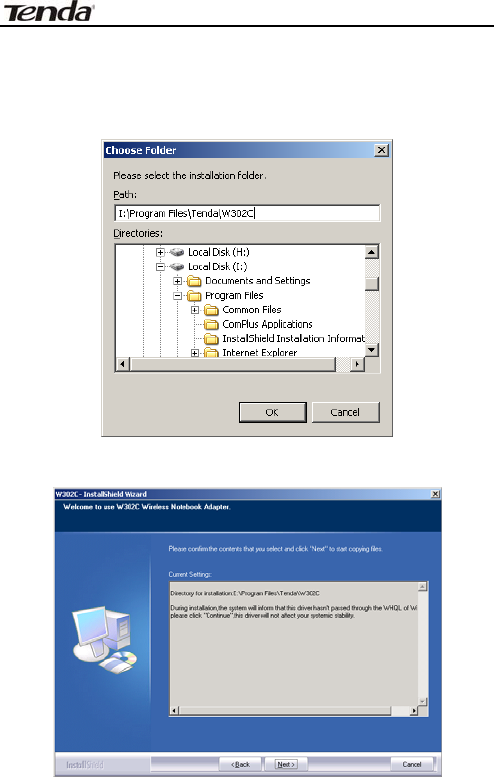
6. Click “Change…” to select the directory path, or
click “Next”.
7. Select “OK” and “Next” in the following window.
11n Wireless Notebook Adapter User Guide
-9-
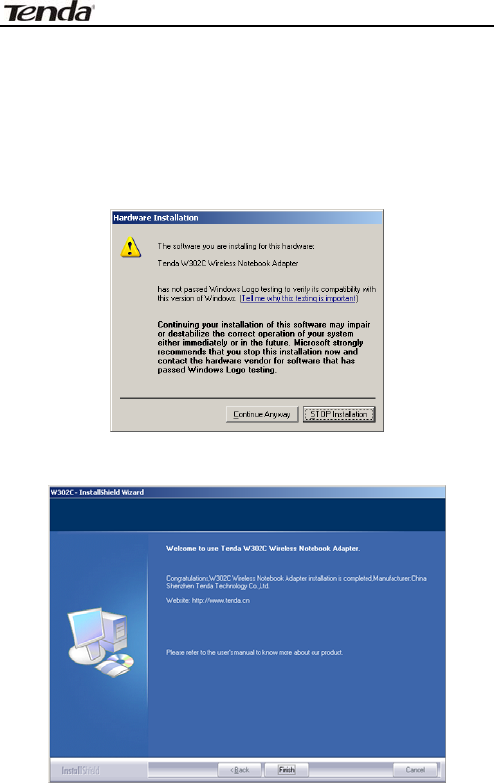
8. During the installation, the following dialogue
maybe appears. Click the “Continue Anyway” to
continue. There is no security threat to your
computer.
9. Click “Finish” to complete the installation.

11n Wireless Notebook Adapter User Guide
-10-
Chapter 3 Client Utility Interface
This software is for the W302C Wireless Notebook
Adapter management. If it does not appear, select
“Start”—“All Programs” —“TENDA”—“W302C”, or click
the shortcut on your PC’s desktop.
Note:
In the Windows XP, you can select the included
W302C Client Utility Interface or the Windows XP
internal wireless application to configure the
device.
There are two client utility applications in W302C:
Station Mode and AP Mode.
Note:
In this utility interface, Station Mode (Client Mode)
is the default access way.
11n Wireless Notebook Adapter User Guide
-11-
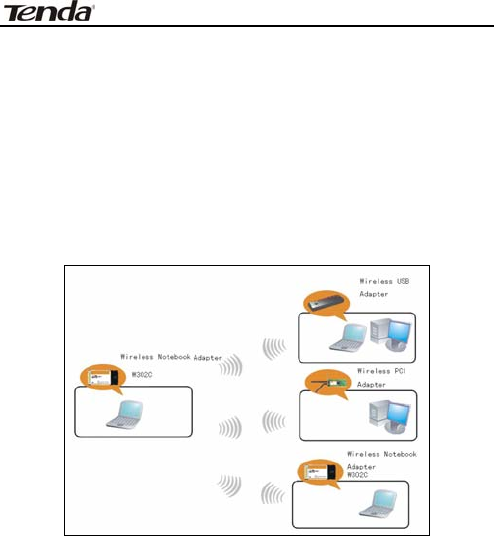
3.1 Station Mode
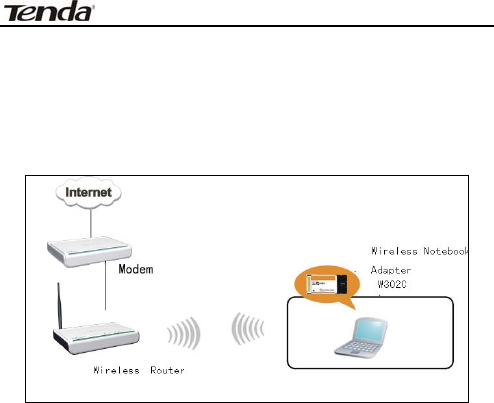
3.1.1 Station Mode Topology
In this mode, W302C serves as a client to receive
the wireless signals to access the Internet.
11n Wireless Notebook Adapter User Guide
-12-
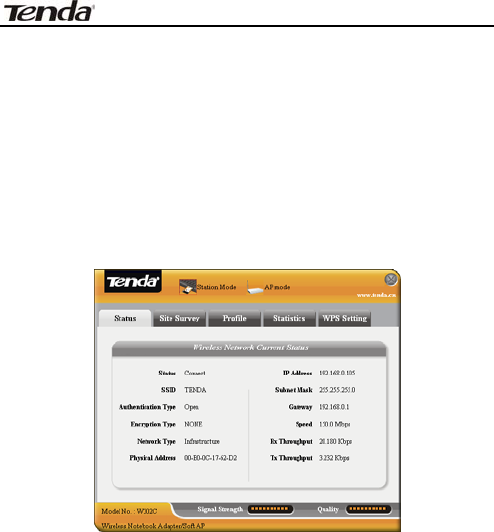
3.1.2 Status
In the Network Status window, it displays something
on wireless adapter and wireless network status,
including SSID, Authentication type, Encryption Type,
IP address, subnet mask and gateway and so on.
11n Wireless Notebook Adapter User Guide
-13-
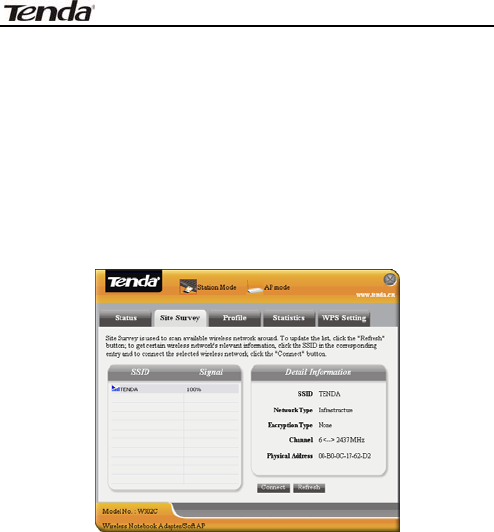
3.1.3 Site Survey
The Site Survey is used to scan the available wireless
network around, showing the wireless network’s signal
strength and other information which provides basis
for you to access which wireless network.
Connect: select one entry in the wireless network
list and click the button to connect the device with
the selected network.
Refresh: rescan the wireless network around.
11n Wireless Notebook Adapter User Guide
-14-
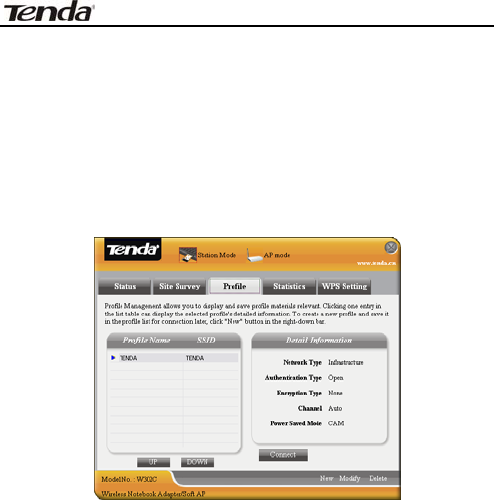
3.1.4 Profile Management
This window saves the general wireless parameters for
different profiles, which is used to fast connect the
wireless network you need.
UP/DOWN: To change the profile’s sequence in
the list.
Connect: To activate one profile.
New: To create a new profile and configure the
site status and security setting.
Modify: To modify one existing profile.
Delete: To delete one existing profile.

11n Wireless Notebook Adapter User Guide
-15-
(Site Status)
(Security Setting)
11n Wireless Notebook Adapter User Guide
-16-
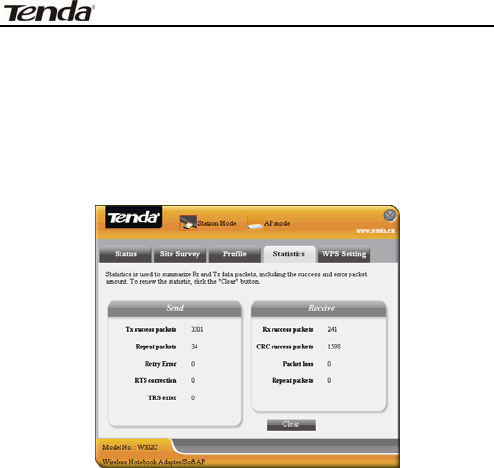
3.1.5 Statistics
Statistics is used to summarize Rx and Tx data packets,
including the success and error packet amount.
Clear: click this button to renew the statistics.
3.1.6 WPS Setting
WPS setting is enabled only on WPS-compliant
devices.

11n Wireless Notebook Adapter User Guide
-17-
PIN: Enter the Pin code and click the “PIN” to
automatically connect the wireless adapter with
wireless devices around.
PBC: Click the “PBC” to complete auto-check and
connections between wireless adapter and other
wireless device.
Refresh: to update the Pin code.
Rescan: to rescan the WPS-compliant wireless
network around.
Connect: click this button to connect the WPS
wireless network.
Disconnect: to disconnect the connected wireless
network.
11n Wireless Notebook Adapter User Guide
-18-
3.2 AP Mode
3.2.1 AP Mode Topology
The device also can serve as an access point to
transmit wireless signals and create wireless network,
allowing other wireless clients to access the network.
Click the AP Mode icon to enter the AP Mode interface.
11n Wireless Notebook Adapter User Guide
-19-
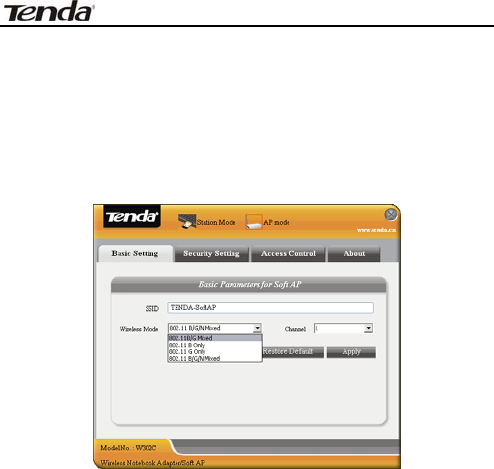
3.2.2 Basic Setting
This window is used to configure the AP’s basic para-
meters, including SSID, Wireless Mode and Channel.
SSID: Wireless network’s ID name scanned by
wireless adapter.
Wireless Mode: 802.11b/802.11g/802.11b/g
mixed.
Channel: 1~11 channels provided.
Restore Default: to restore the set parameters to
default factory default settings.
Apply: to make the changes made take effect.
11n Wireless Notebook Adapter User Guide
-20-
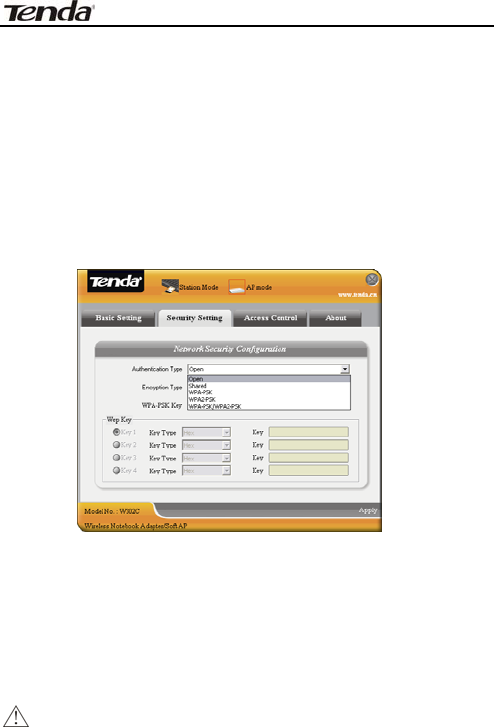
3.2.3 Security Setting
This window is used to configure the wireless
network’s security authentication, providing WEP,
WPA-PSK, WPA2-PSK, and WPA-PSK/WPA2-PSK
encryption methods.
WEP:10/26 bits Hex or 5/13 ASCII support.
WPA-PSK:8~32 bits ASCII support.
WPA2-PSK:8~32 bits ASCII support.
WPA-PSK/WPA2-PSK:8~32 bits ASCII support.
Note:
1. The Hex characters include 0~9 numbers and
11n Wireless Notebook Adapter User Guide
-21-
a~f letters.
2. ASCII characters include any numbers/letters
and characters.
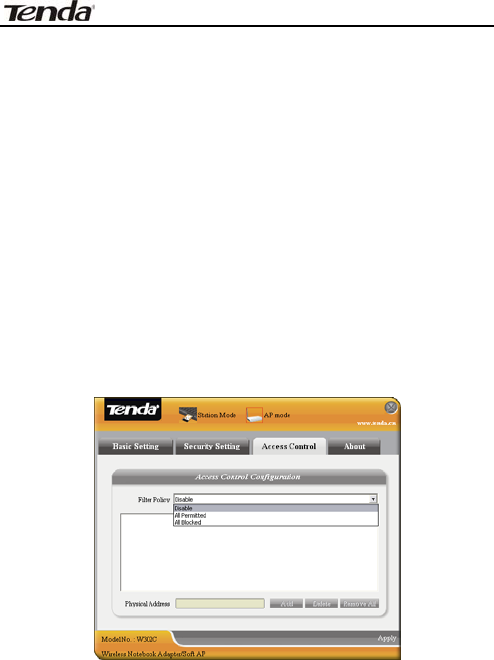
3.2.4 Access Control
Access Control is based on the MAC address to decide
that the specified client connects to the wireless
network, or disables it to access the wireless network.
Filter Policy:
Disabled: to disable the filter function.

11n Wireless Notebook Adapter User Guide
-22-
All Permitted: to permit all clients in the list to
access the wireless network.
All Blocked: to refuse all clients in the list to
access the wireless network.
MAC Address:to input the client’s MAC address to
implement the corresponding filter policy. For
example: b0000a8cd702.
Add: to add the entered MAC address into the list.
Delete: to delete one existing MAC address in the
list.
Remove All: to delete all clients’ MAC address in
the list.
Apply: to make the changes made take effect.
11n Wireless Notebook Adapter User Guide
-23-
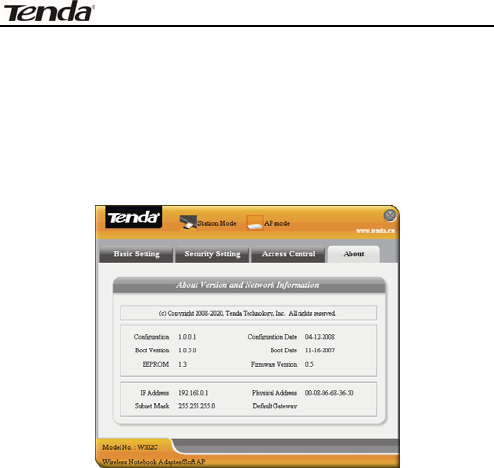
3.2.5 About
This window displays something about software
version and wireless adapter.

11n Wireless Notebook Adapter User Guide
-24-
Appendix One: Acronyms and Terms
WLAN Wireless Local Area Network
802.11 A family of specifications developed by
the IEEE for WLAN technology.
802.11a An extension to 802.11 WLAN standard
that provides up to 54 Mbps transmis-
sion in the 5 GHz UNI radio band.
802.11b An extension to 802.11 WLAN standard
that provides up to 11 Mbps
transmission in the 2.4 GHz ISM radio
band. 802.11b uses DSSS modulation.
802.11g An extension to 802.11 WLAN standard
that provides up to 54 Mbps
transmission in the 2.4 GHz ISM radio
band. 802.11b uses OFDM modulation
and is backwards compatible with
802.11b.
Ad-Hoc A group of computers each with wireless
adapters, connected as an independent
WLAN.
AES Advanced Encryption Standard

11n Wireless Notebook Adapter User Guide
-25-
BSSID Basic Service Set ID
DHCP Dynamic Host Configuration Protocol
DSSS Direct Sequence Spread Spectrum.
DSSS is one of two types of spread
spectrum radio. The other is
frequency-hopping spread spectrum
(FHSS).
QoS Quality of Service
OFDM Orthogonal Frequency Division
Multiplexing
RADIUS Remote Authentication Dial In User
Service
RTS Request to Send
SSID Service Set Identifier. A 32-character
unique identifier attached to the header
of packets sent over a WLAN that acts as
a password when a mobile device tries
to connect to the BSS.
TCP/IP Transmission Control Protocol/Internet
Protocol
TKIP Temporal Key Integrity Protocol
WDS Wireless Distribution System

11n Wireless Notebook Adapter User Guide
-26-
WEP Wired Equivalent Privacy. A security
protocol for
WLANs defined in the IEEE 802.11
standard.
WPA Wi-Fi Protected Access
WPA2 Wi-Fi Protected Access 2. The next
generation of
Wi-Fi security, based on the 802.11i
standard.
WPA2-PSK Wi-Fi Protected Access 2-Pre-shared
Keys
WPA-PSK Wi-Fi Protected Access-Pre-shared Keys
11n Wireless Notebook Adapter User Guide
-27-
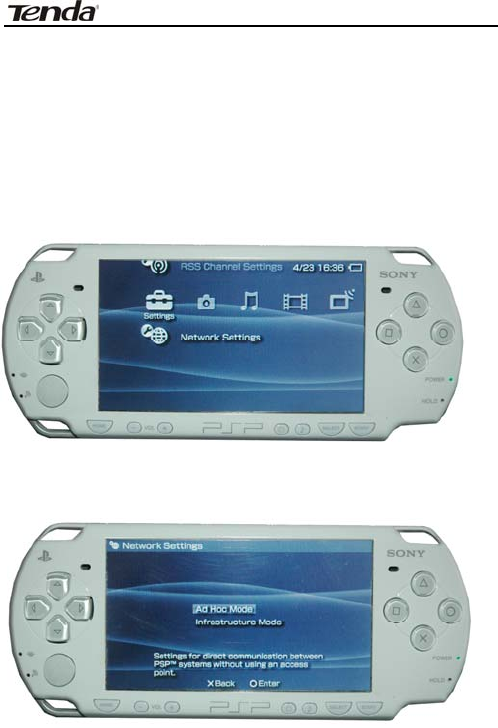
Appendix Two: How to connect with PSP
1. To configure PSP with Ad-Hoc mode
Select Network Settings
Select Ad-Hoc mode
11n Wireless Notebook Adapter User Guide
-28-
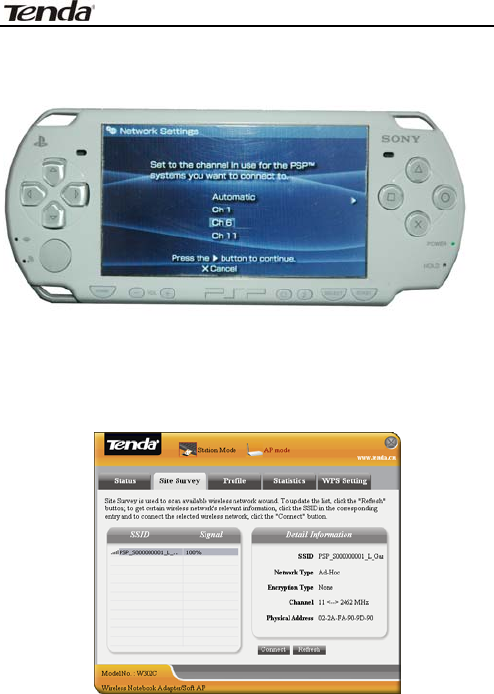
Select Channel
2. In W302C Utility Interface scan PSP and
double-click to connect the wireless
network.
11n Wireless Notebook Adapter User Guide
-29-
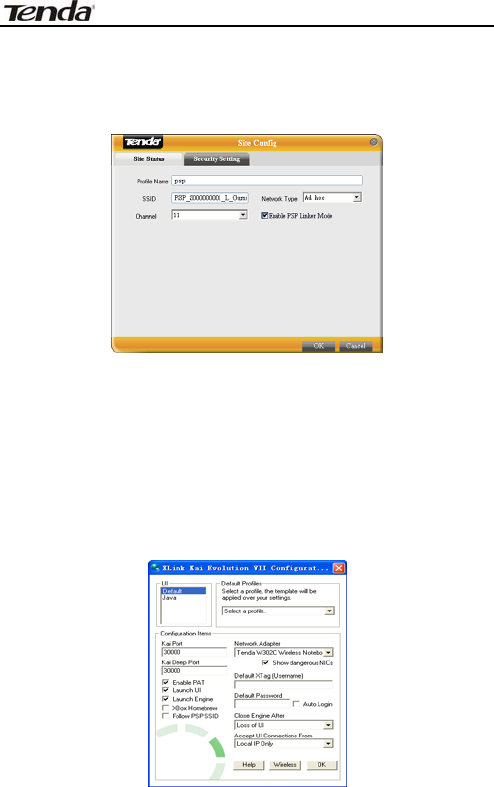
3. In Site Survey check “enable PSP connection
mode” box.
4. To configure Xlink Kai
Select “Start”→ “All programmers” → “Xlink Kai
Evolution VII” → “Start Kai Config” to configure the
user name, password and other parameters as
follows.
11n Wireless Notebook Adapter User Guide
-30-
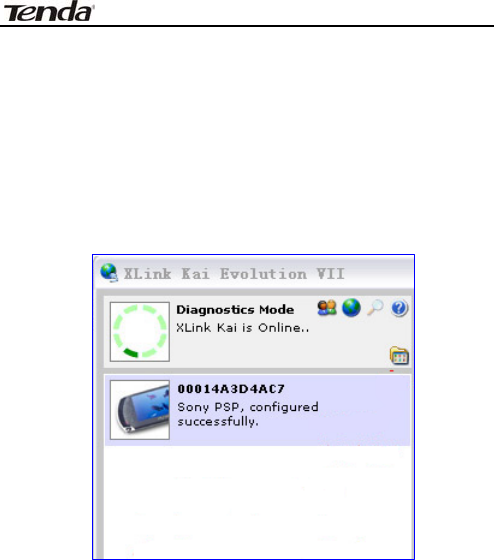
5. Login Xlink Kai
Select “Start”→ “All programmers” → “Xlink Kai
Evolution VII” → “Start Kai”. PSP will connect with
Xlink Kai automatically. The following window will
indicate the connection is established well now.

11n Wireless Notebook Adapter User Guide
-31-
FCC Statement:
Changes or modifications not expressly approved by
the party responsible for compliance could void the
user's authority to operate the equipment.
This device complies with part 15 of the FCC Rules.
Operation is subject to the following two conditions:
(1) This device may not cause harmful interference,
and
(2) this device must accept any interference received,
including interference that may cause undesired
operation
NOTE: This equipment has been tested and found to
comply with the limits for a Class B digital device,
pursuant to Part 15 of the FCC Rules. These limits are
designed to provide reasonable protection against
harmful interference in a residential installation.
This equipment generates, uses and can radiate radio
frequency energy and, if not installed and used in
accordance with the instructions, may cause harmful
interference to radio communications. However,
there is no guarantee that interference will not occur in

11n Wireless Notebook Adapter User Guide
-32-
a particular installation. If this equipment does cause
harmful interference to radio or television reception,
which can be determined by turning the equipment off
and on, the user is encouraged to try to correct the
interference by one or more of the following
measures:
-- Reorient or relocate the receiving antenna.
-- Increase the separation between the equipment
and receiver.
-- Connect the equipment into an outlet on a circuit
different from that to which the receiver is
connected.
-- Consult the dealer or an experienced radio/TV
technician for help.