TENDA TECHNOLOGY W311E Wireless N150 PCI Express Adapter User Manual W900U
SHENZHEN TENDA TECHNOLOGY CO., LTD. Wireless N150 PCI Express Adapter W900U
Users Manual
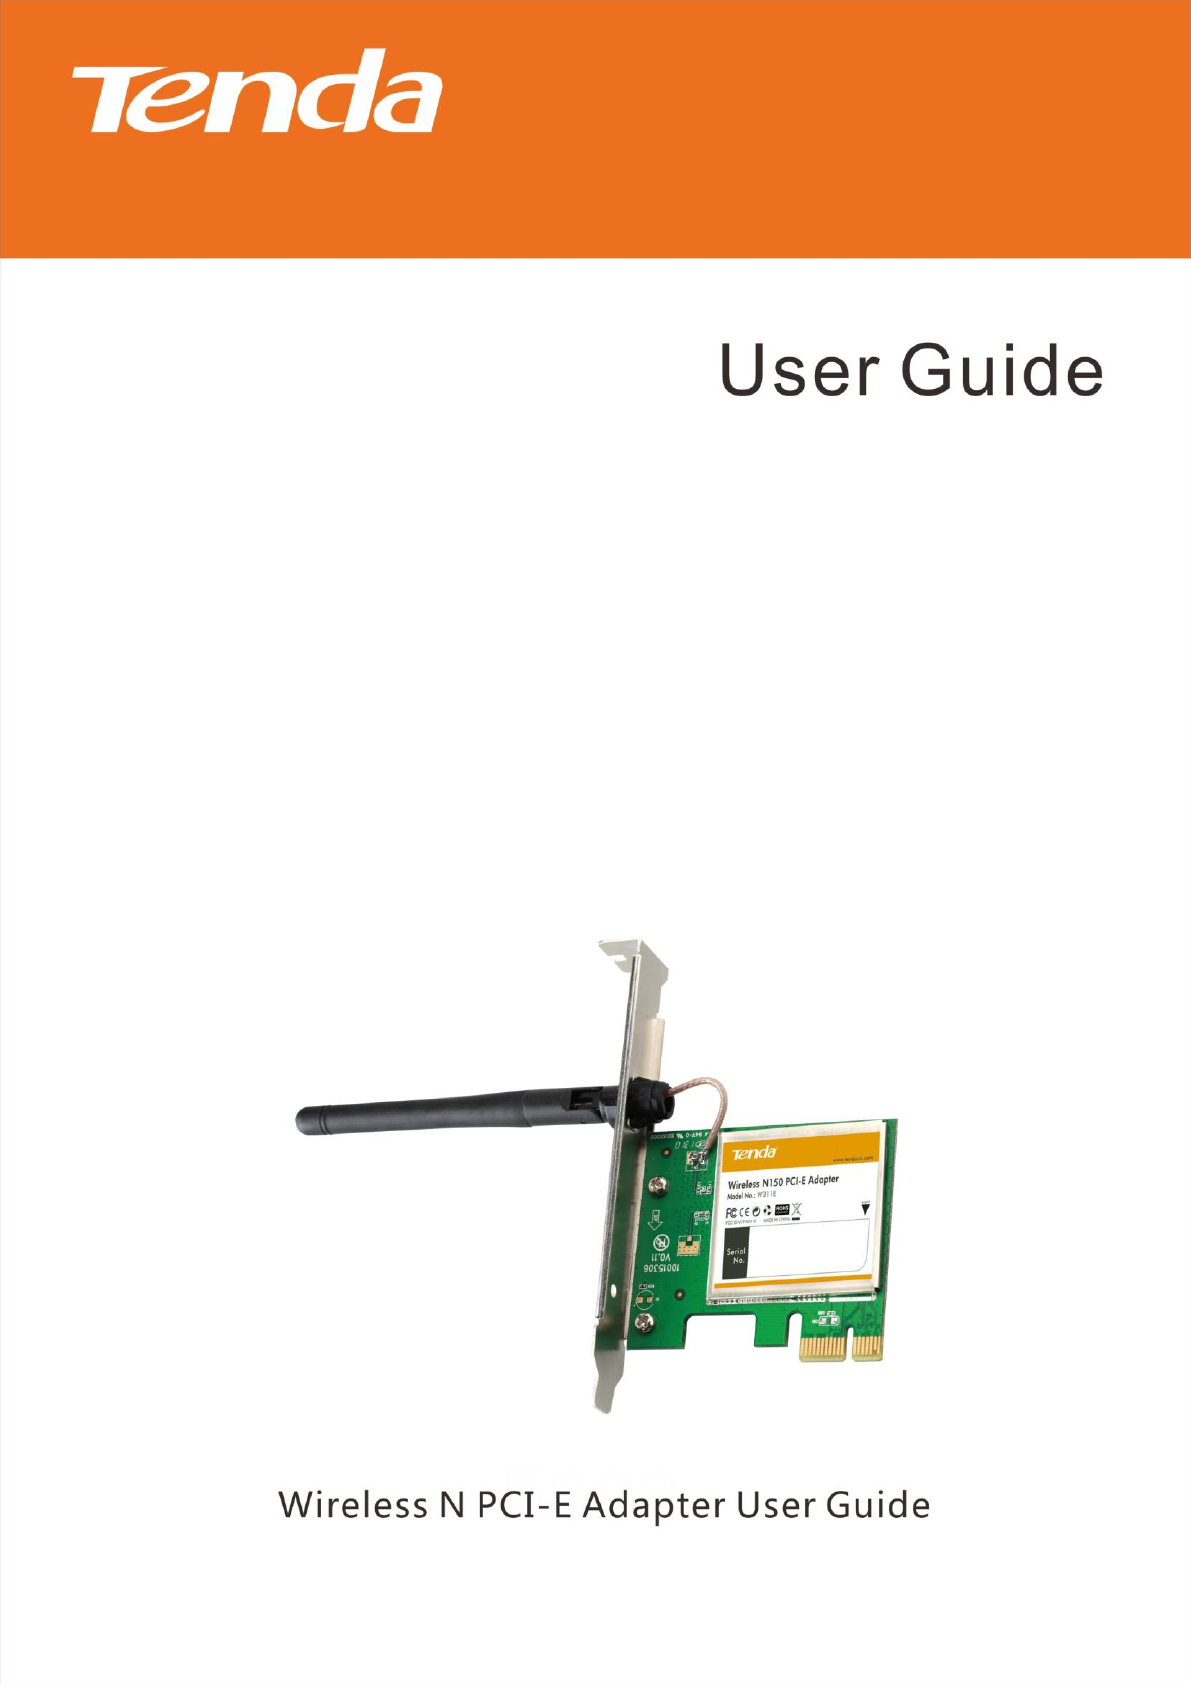
Wireless N PCI-E Adapter User Guide

Wireless N PCI-E Adapter User Guide
Copyright Statement
is the registered trademark of Shenzhen Tenda Technology Co.,
Ltd. All the products and product names mentioned herein are the trademarks
or registered trademarks of their respective holders. Copyright of the whole
product as integration, including its accessories and software, belongs to
Shenzhen Tenda Technology Co., Ltd. No part of this publication can be
reproduced, transmitted, transcribed, stored in a retrieval system, or translated
into any language in any form or by any means without the prior written
permission of Shenzhen Tenda Technology Co., Ltd. If you would like to know
more about our product information, please visit our website at
http://www.tendacn.com.
Disclaimer of Warranties
Pictures, images and product specifications herein are for references only. To
improve internal design, operational function, and/or reliability, Tenda reserves
the right to make changes to the products described in this document without
obligation to notify any person or organization of such revisions or changes.
Tenda does not assume any liability that may occur due to the use or
application of, the product or circuit layout(s) described herein. Every effort has
been made in the preparation of this document to ensure accuracy of the
contents, but all statements, information and recommendations in this
document do not constitute the warranty of any kind, express or implied.
About this User Guide
This user guide applies to W311E (150Mbps) and W322E (300Mbps). The
W311E is used as an example throughout this user guide for illustration.

Wireless N PCI-E Adapter User Guide
Table of Contents
Copyright Statement ..................................................................................................................... 2
Disclaimer of Warranties .............................................................................................................. 2
About this User Guide ................................................................................................................... 2
Table of Contents ............................................................................................................................... 3
Chapter 1 Product Overview .............................................................................................................. 4
1.1 Package Contents (For references only) ........................................................................................... 4
1.2 LED Overview ................................................................................................................................... 5
1.3 Key Features..................................................................................................................................... 5
1.4 Applications ..................................................................................................................................... 5
1.5 Before Getting Started ..................................................................................................................... 5
1.6 Maintenance .................................................................................................................................... 6
Chapter 2 Installation Guide ............................................................................................................... 7
2.1 Hardware Install ............................................................................................................................... 7
2.2 Software Install ................................................................................................................................ 8
Chapter 3 Use System Built-in Wireless Utility ................................................................................. 13
3.1 Join a Wireless Network --Windows® XP ....................................................................................... 13
3.2 Join a Wireless Network --Windows® 7 ......................................................................................... 15
3.3 Join a Wireless Network --Windows® 8 ......................................................................................... 16
Chapter 4 Tenda UI Guide ................................................................................................................ 18
4.1 Frequency Band Setup ................................................................................................................... 18
4.2 Wireless Network .......................................................................................................................... 18
4.3 Connection Status .......................................................................................................................... 20
4.4 Network Profile .............................................................................................................................. 21
4.5 WPS Setup ..................................................................................................................................... 29
PBC Configuration Mode .................................................................................................................. 29
PIN Configuration Mode ................................................................................................................... 34
4.6 Help ............................................................................................................................................... 39
Chapter 5 Appendix ......................................................................................................................... 40
Appendix 1 TCP/IP Settings .................................................................................................................. 40
If you are using Windows XP, do as follows: ..................................................................................... 40
If you are using Windows 7, do as follows: ...................................................................................... 42
Appendix 2 Glossary ............................................................................................................................ 46
Appendix 3 Troubleshooting ................................................................................................................ 48
Appendix 4 Safety and Emission Statement ........................................................................................ 50
Wireless N PCI-E Adapter User Guide
Chapter 1 Product Overview
This Tenda Wireless N PCI-E adapter delivers enhanced wireless performance
over a standard PCI interface for your PCI Express-enabled desktop computer.
Based on wireless n technology, this adapter delivers faster wireless speed
and 3x farther range than wireless G. Plus, it comes with Wi-Fi Protected
Setup™ (WPS) for easy connection to a wireless network. Once connected,
you can share a high-speed Internet connection, photos, files, music, videos,
printers, and storage.
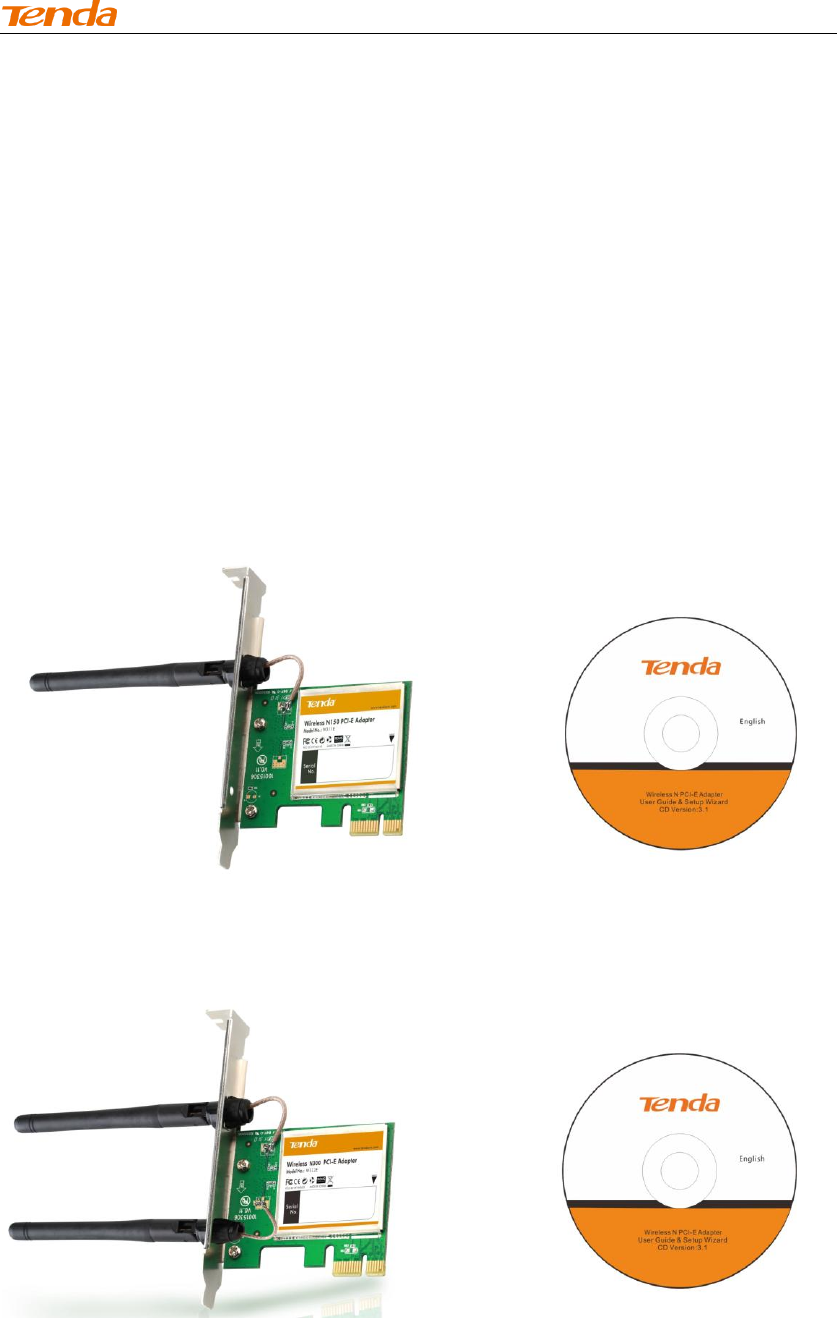
1.1 Package Contents (For references only)
W311E
W322E

Wireless N PCI-E Adapter User Guide
1.2 LED Overview
The adapter comes with a status LED, which displays:
A solid green light while identified and functioning properly;
1.3 Key Features
Automatically sense network and adjust transmission rate;
20/40M bandwidth auto-select;
Up to 150 Mbps(W311E)/300Mbps(W322E) wireless speed over
2.4Ghz;
Comes with 2 operating modes: Infrastructure and Ad-Hoc;
Access secure networks using WEP, WPA or WPA2;
Wi-Fi Protected Setup™ (WPS) for easy connection to a wireless
network;
Compatible with Windows XP, Vista, Windows7, Windows8 and more;
1.4 Applications
The Tenda adapter delivers powerful, fast and reliable wireless access to your
desktop or notebook computer. It is ideal for use by or in:
a). ancient buildings, places rented or for temporary use where wiring is
such a big mess, a huge cost or hard to reach;
b). business or individual always in need of network topology changes;
c). business or individual who wants to have a wireless network established
fast and simple without the mess of wiring.
Note:This PCI-E adapter can only be installed in a PCI-E slot on a desktop.
1.5 Before Getting Started
1. Before installing and using this product, please peruse the entire user
guide.
2. Also, if you have previously installed a different manufacturer's adapter or

Wireless N PCI-E Adapter User Guide
a different model Tenda adapter, make sure the software and driver are
uninstalled before installing the new software. Some utilities may cause a
conflict with the new software.
1.6 Maintenance
Observe the following to ensure the product continuously stays in good
condition.
1. Keep the device in a dry and well ventilated environment
2. DO NOT expose the device to corrosive substances (such as acid and
alkali, etc)
3. DO NOT expose the device to sun shine or other heat sources;
4. If you run into a problem that you cannot solve, go to www.tendacn.com
to find a solution or email your problem to: support@tenda.com.cn or
support02@tenda.com.cn.
Wireless N PCI-E Adapter User Guide
Chapter 2 Installation Guide
The CD that comes in the package includes both driver and software, which
can be installed automatically. This section will walk you through the
installation process.
Software install and operation instructions are illustrated in Windows® XP. If
you have a different operating system, the screenshots on your computer will
look similar to the following examples.
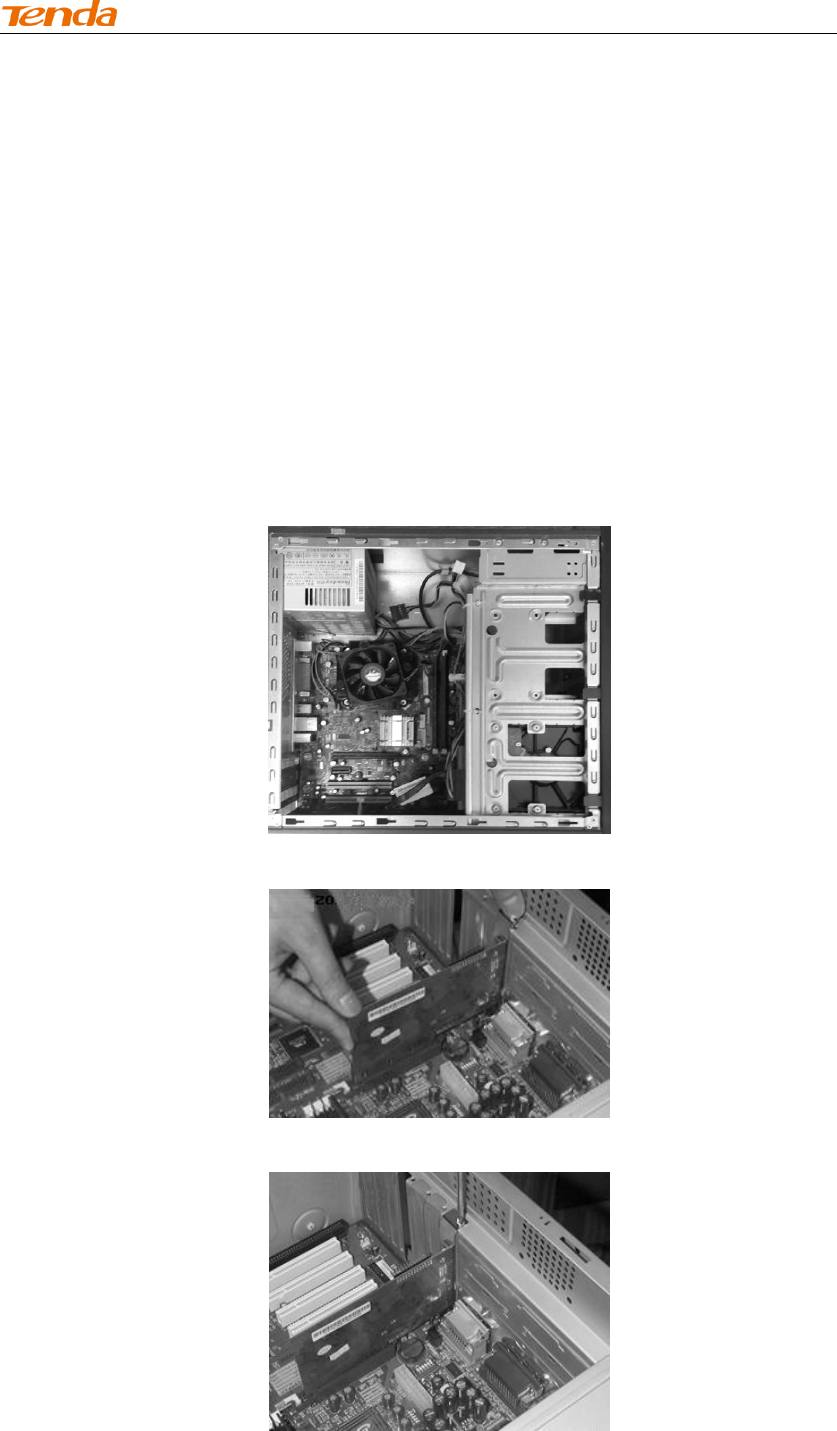
2.1 Hardware Install
1. Turn off your computer and open the case.
2. Insert the NIC into an available PCI-E slot.
3. Fix the NIC with screws and cover the case.
4. Connect the NIC to your existing network using a Cat5 or Cat5e
Ethernet cable.
Wireless N PCI-E Adapter User Guide
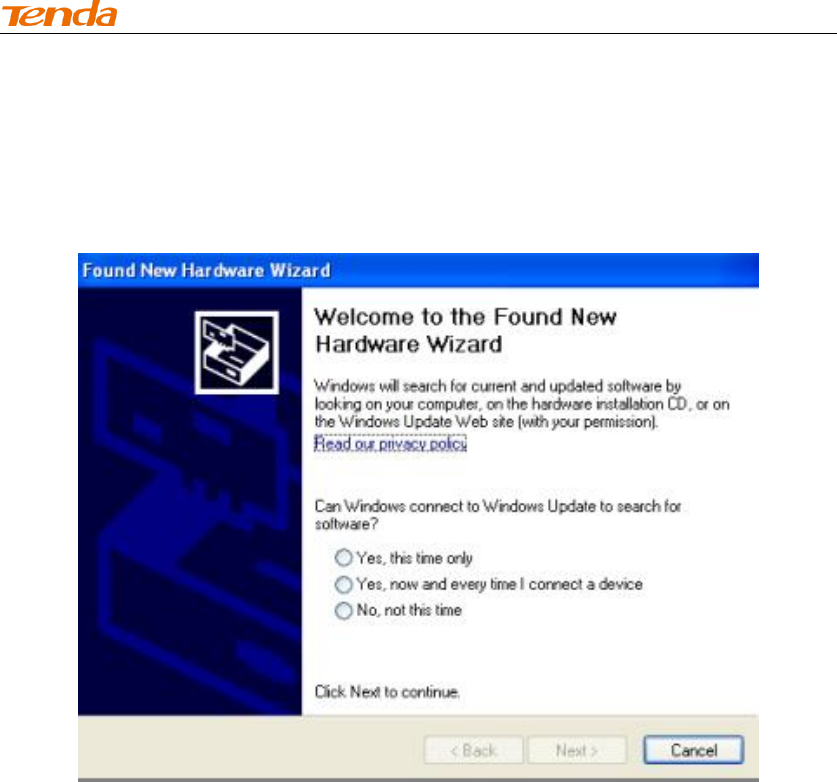
2.2 Software Install
1. If the Found New Hardware Wizard appears, click Cancel and then use the
quick install CD to install the driver and software.
2. Insert the Tenda Driver CD in your PC's CD-ROM drive.If the CD Autorun
function does not automatically start on your computer, double click Tenda.exe.
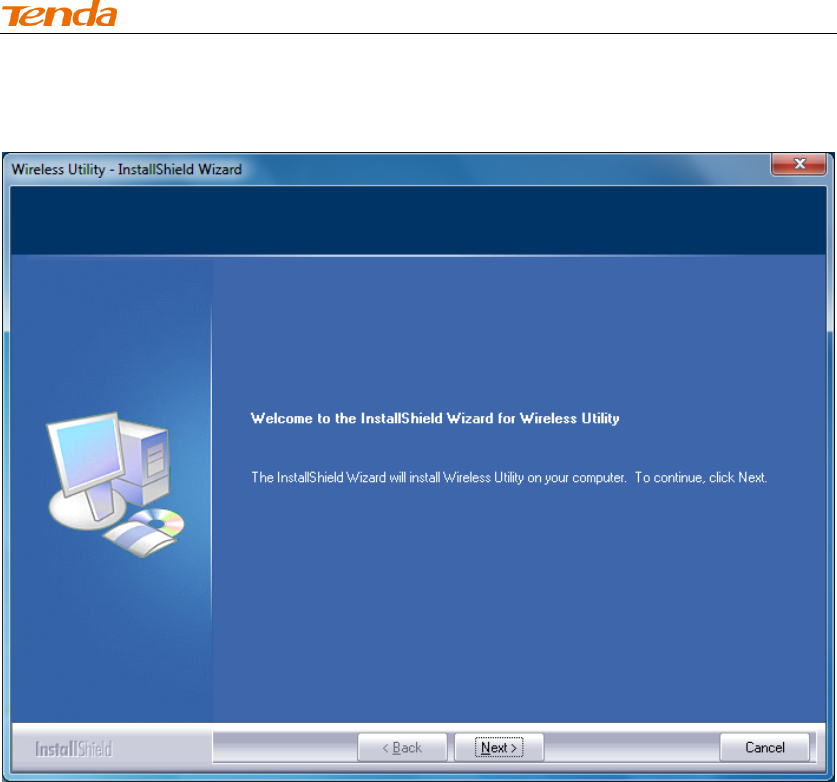
When the autorun screen appears, click Run.
Wireless N PCI-E Adapter User Guide
3. Click Next to continue.
Wireless N PCI-E Adapter User Guide
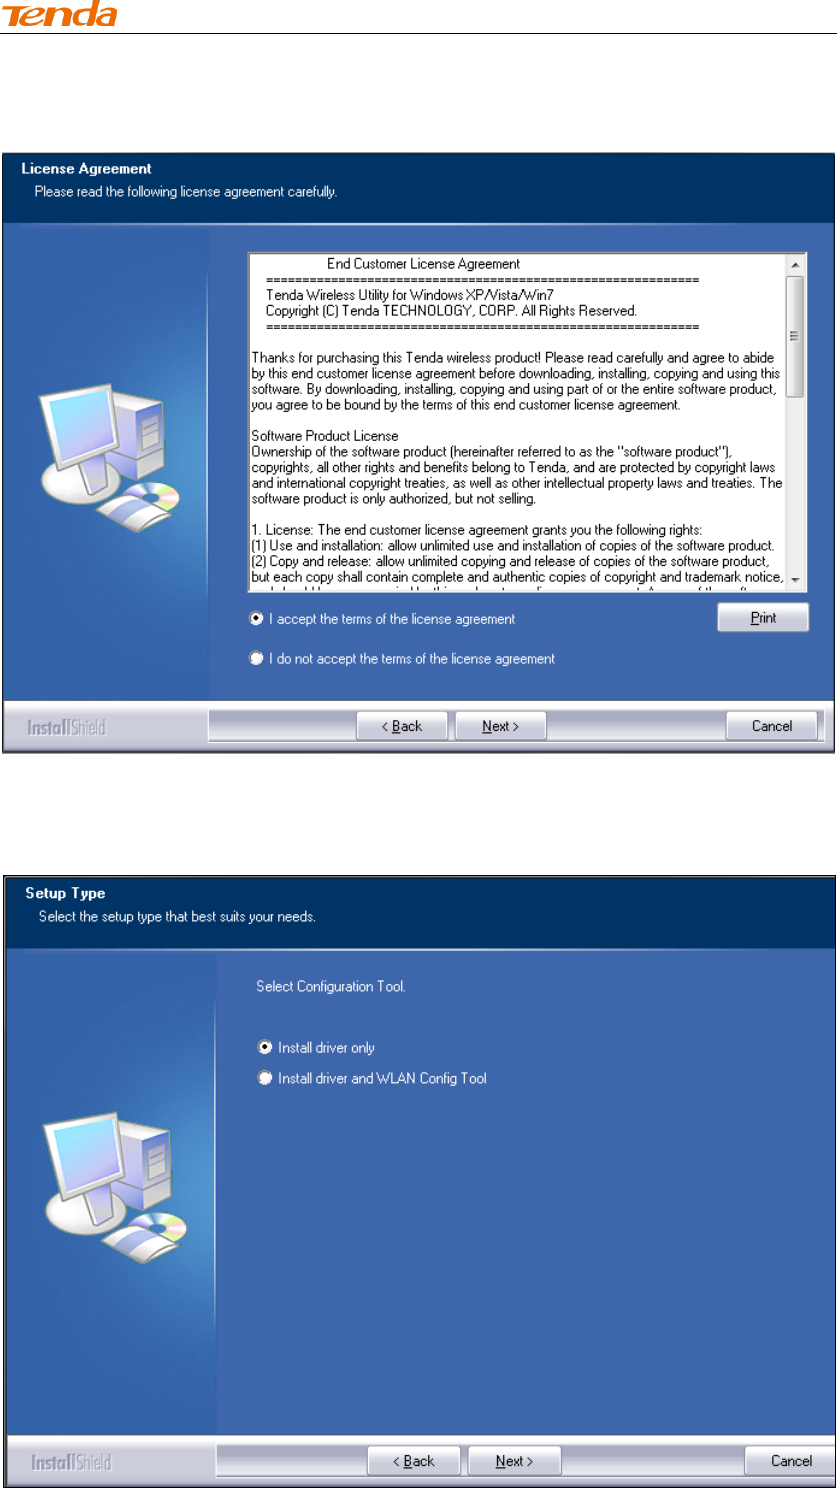
4. Check I accept the terms of the license agreement and then click Next.
5. You can either install the standalone driver without Tenda adapter utility or
install both driver and Tenda adapter utility.
Wireless N PCI-E Adapter User Guide
Note: If you wish to use Windows system built-in wireless utility, you can select
the first installation mode; however, if you want to use advanced features like
WPS, you must also install the Tenda adapter utility.
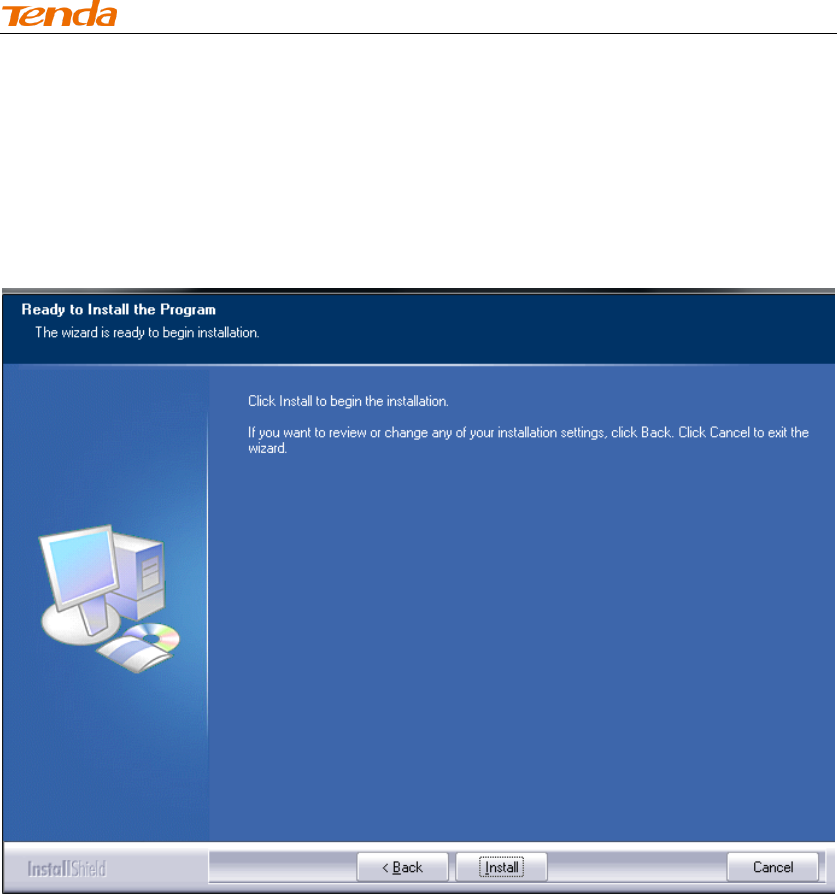
6. Click Install to install the driver.
Wireless N PCI-E Adapter User Guide
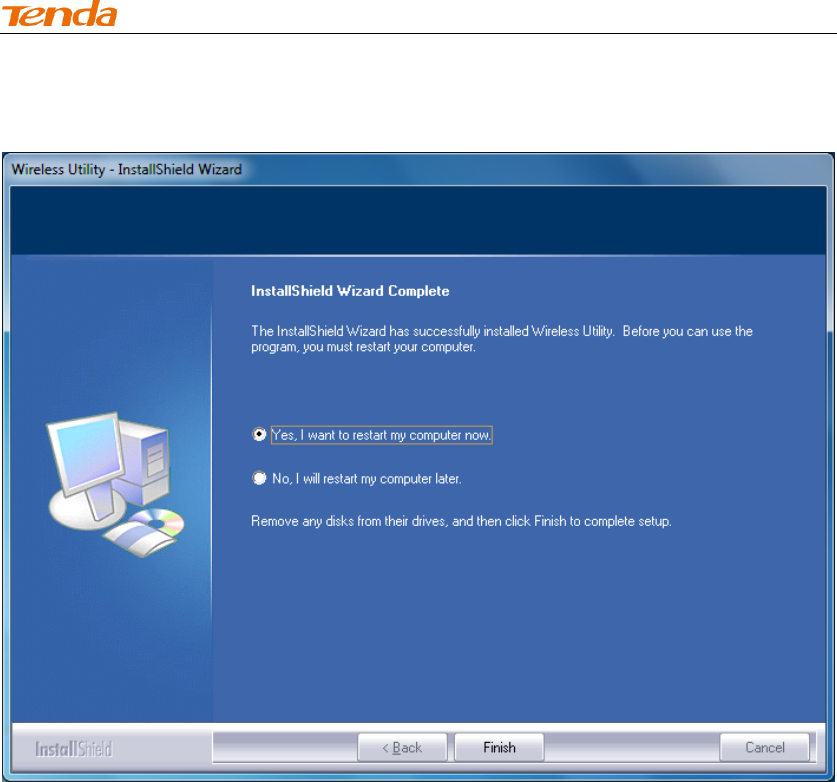
7. Wait till the driver is completely auto-installed and then click Finish to exit.
Wireless N PCI-E Adapter User Guide
Chapter 3 Use System Built-in Wireless Utility
This section will walk you through the configuration process of connecting
to a wireless network using your PC's OS built-in wireless utility.
To use Windows XP built-in wireless utility, you must first enable the
Wireless Zero Configuration service (enabled by default).
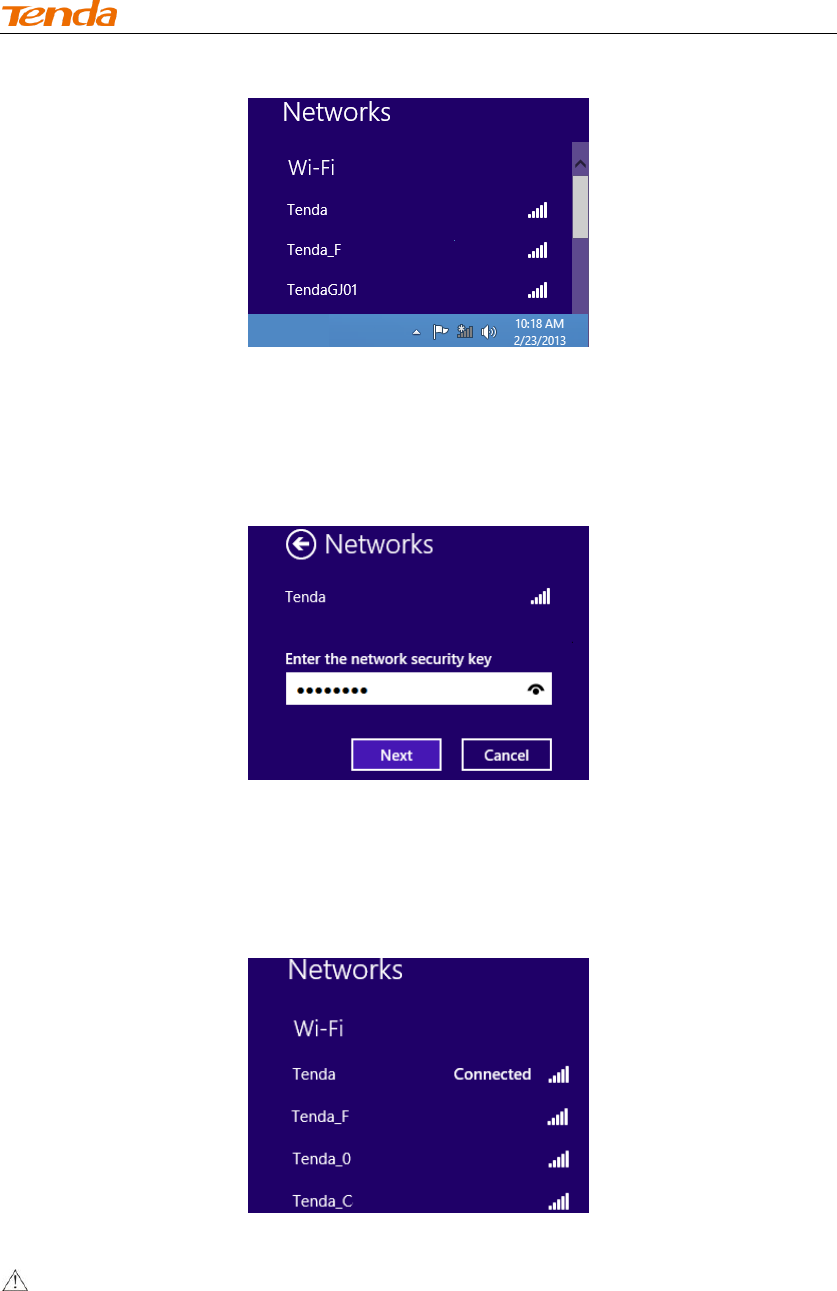
3.1 Join a Wireless Network --Windows® XP
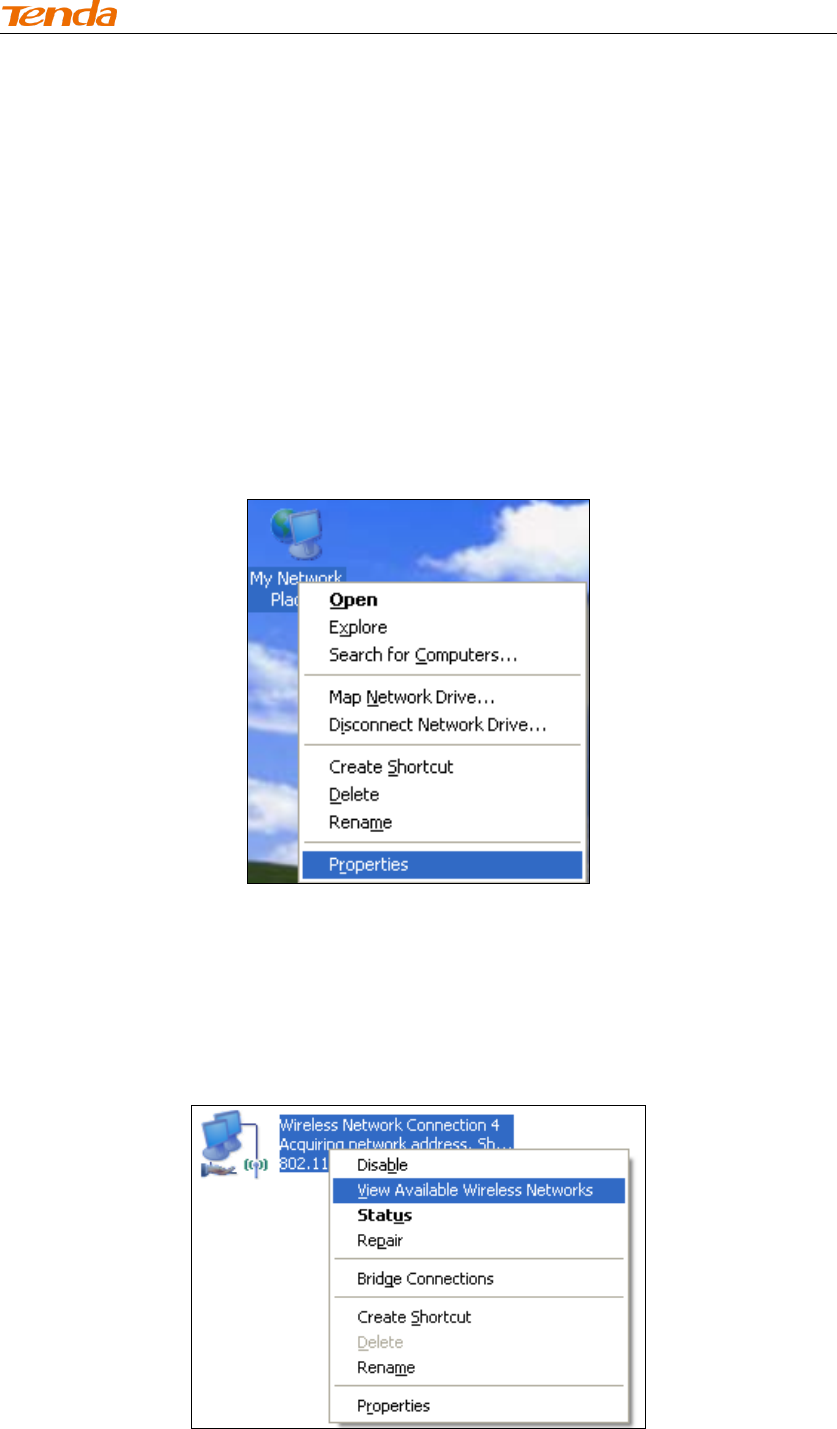
1. Right-click My Network Places from the desktop and select Properties.
2. As seen below, Wireless Network Connection displays Not Connected.
Right click Wireless Network Connection and select View Available
Wireless Networks.
Wireless N PCI-E Adapter User Guide
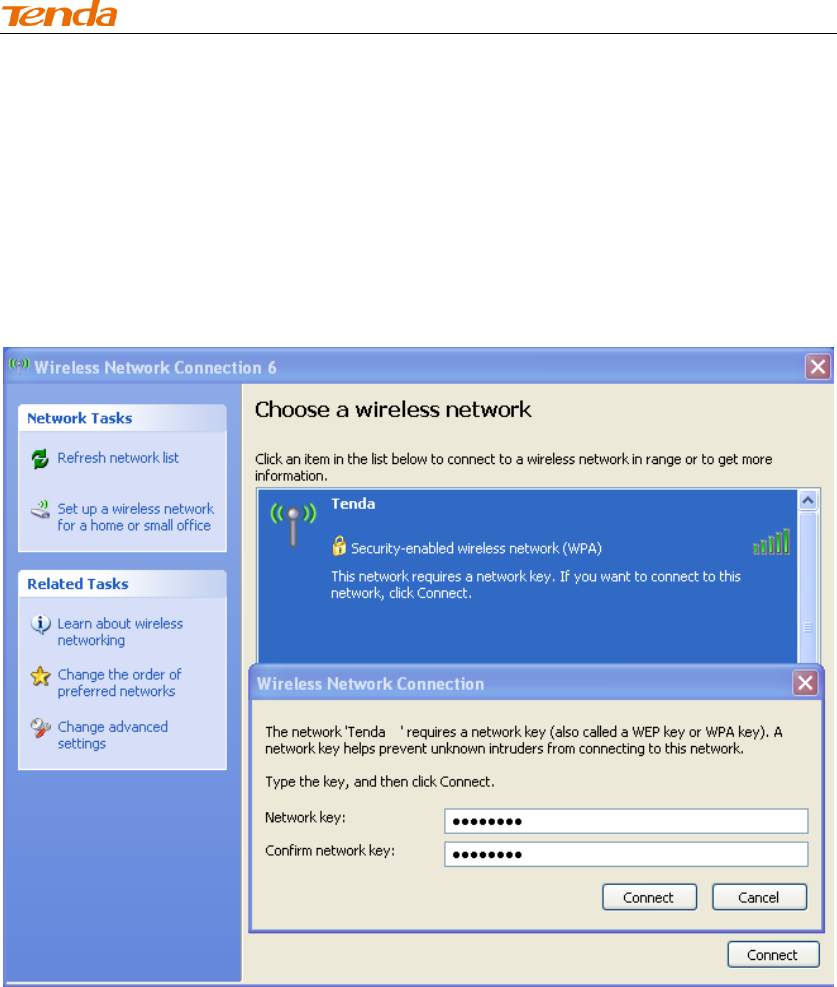
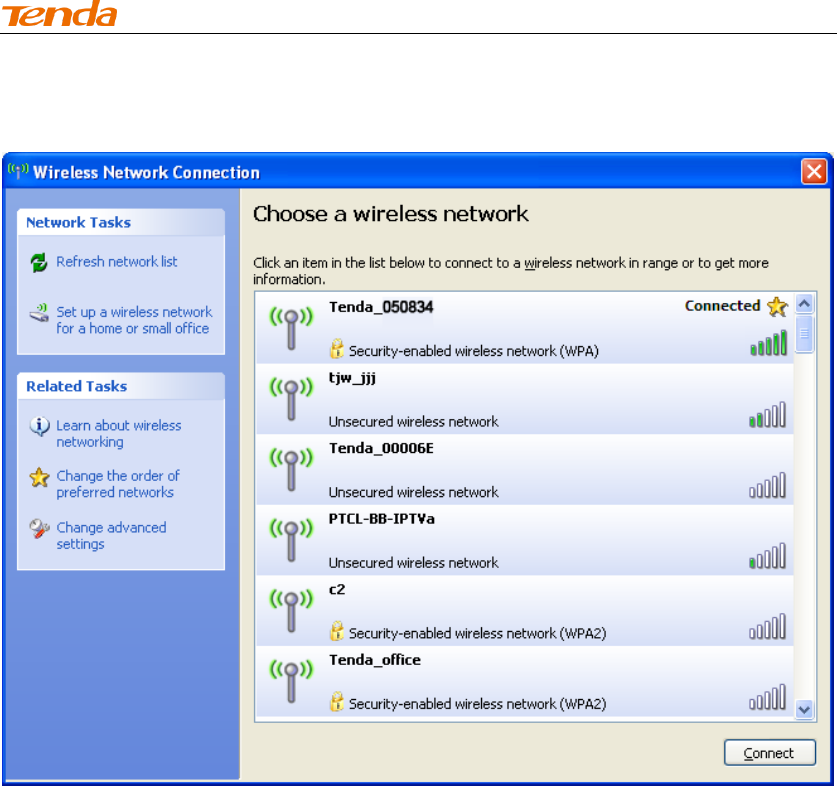
3. The utility will display any available wireless networks in your area. If you
don't see the network you wish to connect to, click the Refresh network list.
Click on the network (SSID) you wish to connect to and click the Connect
button or directly double click it. If you are prompted to provide a security key,
simply enter it (case sensitive) exactly as it is on your wireless router or access
point and then click Connect.
Note: If the network you selected is not encrypted, you will not see this dialog
box requesting a security key.
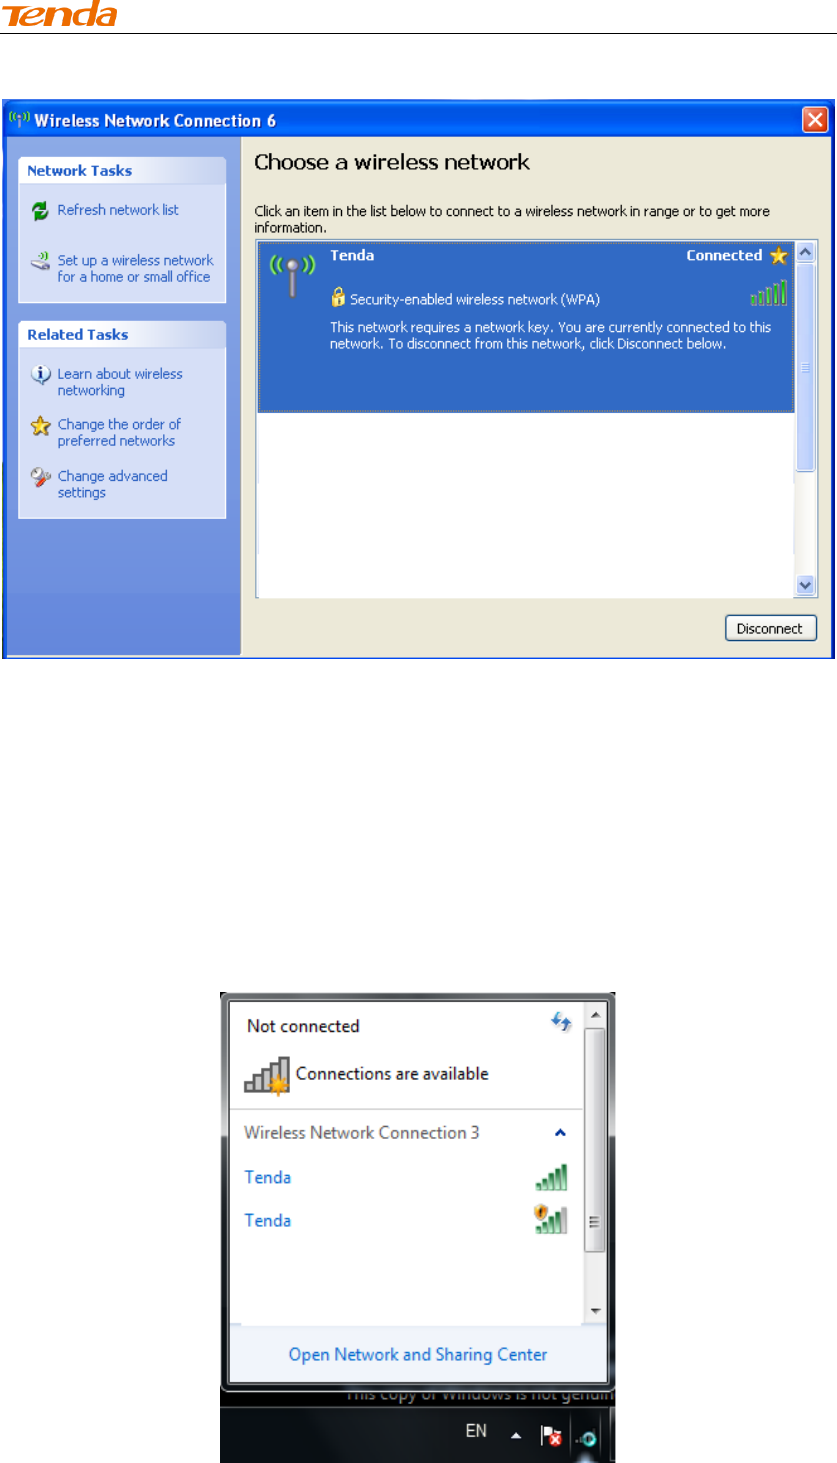
4. When this screen appears, you have successfully connected to your
wireless network and can start surfing Internet.
Wireless N PCI-E Adapter User Guide
3.2 Join a Wireless Network --Windows® 7
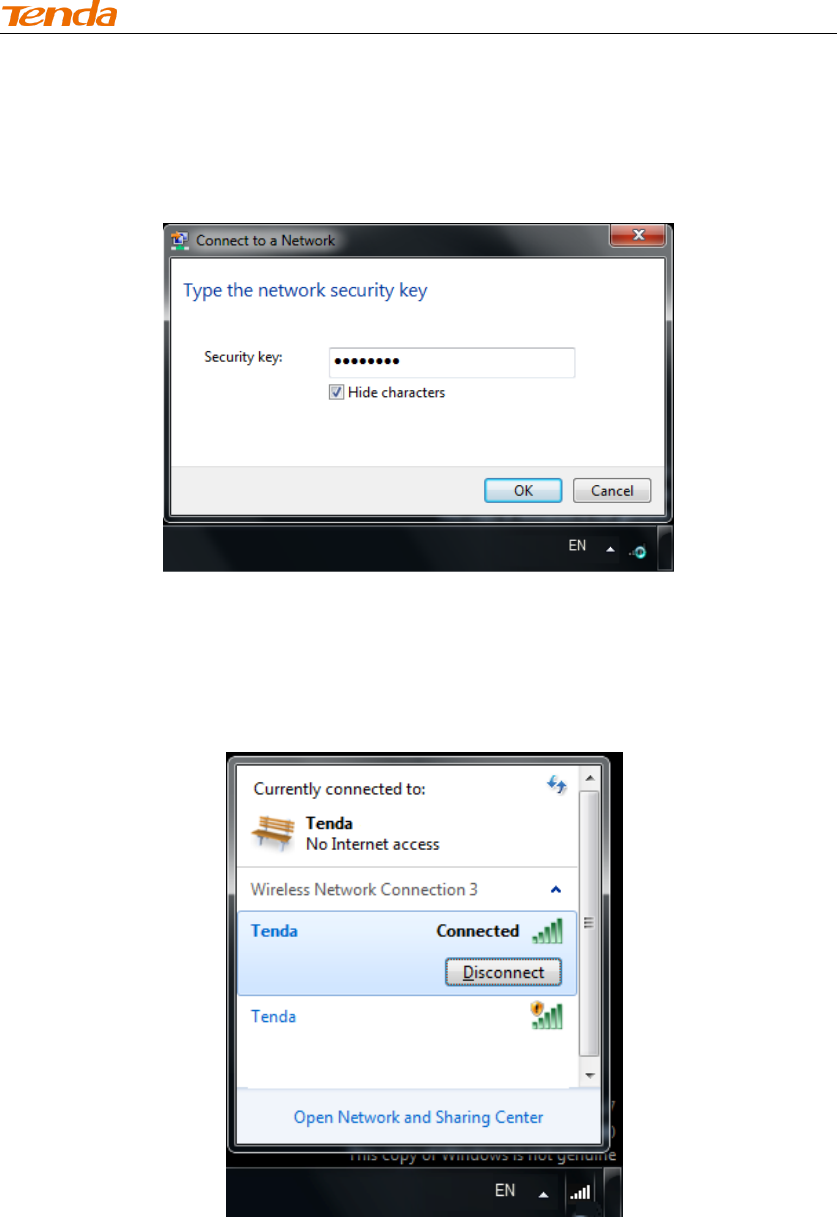
1. Click the wireless icon in your system tray (lower-right corner). The utility will
display any available wireless networks in your area. Click on a network (SSID)
and click the Connect button or directly double-click it. If you don't find the
desired wireless network, click the refresh icon (upper-right corner) to update
the list.
Wireless N PCI-E Adapter User Guide
2. If you are prompted to provide a security key, simply enter it exactly as it is
on your wireless router or access point and then click OK.
3. When Connected appears next to the selected wireless network (SSID),
you have successfully connected to it. To disconnect from it, view status, or
change wireless properties, etc, simply right-click the SSID.
3.3 Join a Wireless Network --Windows® 8
1. Click the wireless icon in your system tray (lower-right corner). The utility will
display any available wireless networks in your area. Click on a network (SSID)
and click the Connect button or directly double-click it.
Wireless N PCI-E Adapter User Guide
2. If you are prompted to provide a security key, simply enter it exactly as it is
on your wireless router or access point and then click Next.
3. When Connected appears next to the selected wireless network (SSID),
you have successfully connected to it.
Note:
If the wireless router or AP you connect to via the wireless adapter does not
have Internet access, then you will get a Restricted status and a yellow
exclamation mark will appear in the wireless icon in your system tray
(lower-right corner).
Wireless N PCI-E Adapter User Guide
Chapter 4 Tenda UI Guide
If you select install both driver and Tenda adapter utility, .then both of them
will be installed on your PC. All features on the adapter can be configured and
implemented through the Tenda adapter utility (abbreviated to UI).
To start the Tenda UI, select Start-> Tenda-> Wireless Utility or directly click
Wireless Utility shortcut from your desktop.
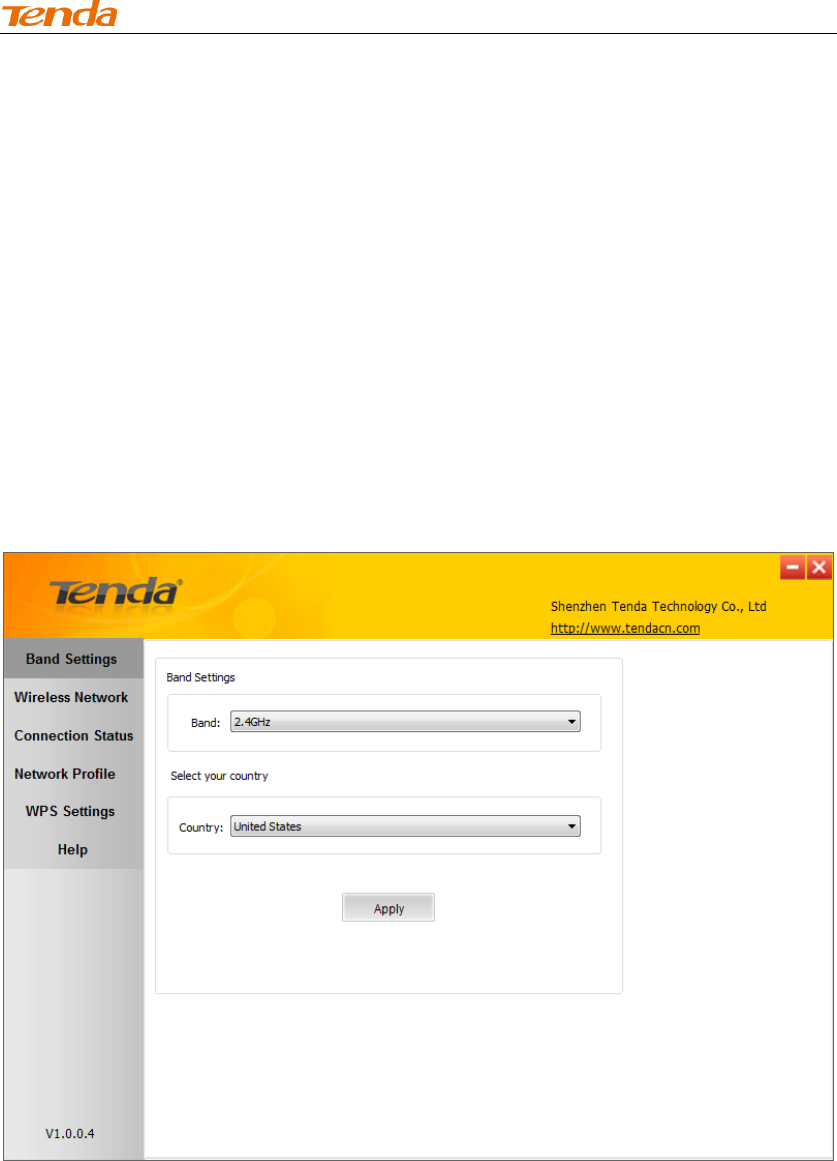
4.1 Frequency Band Setup
This PCI-E wireless adapter operates on 2.4Ghz band only and may need to
operate on different channels depending on your country.
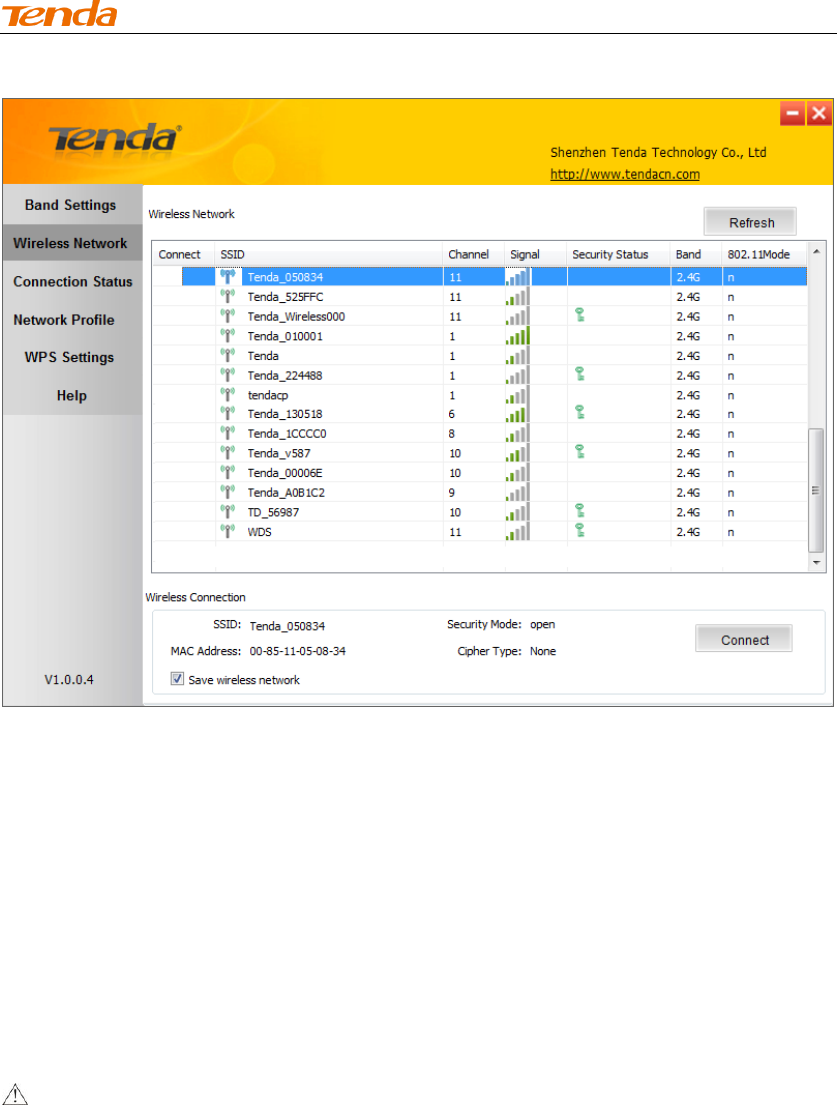
4.2 Wireless Network
Wireless network displays all available wireless networks in the area and lets
you see at a glance MAC address, channel, network mode, signal strength,
authentication mode, encryption mode and/or WPS authentication of each AP.
Also, you can select to connect to the desired wireless network.
Before connecting to a wireless network, click Refresh to update the available
wireless network list, select a desired wireless network and then click
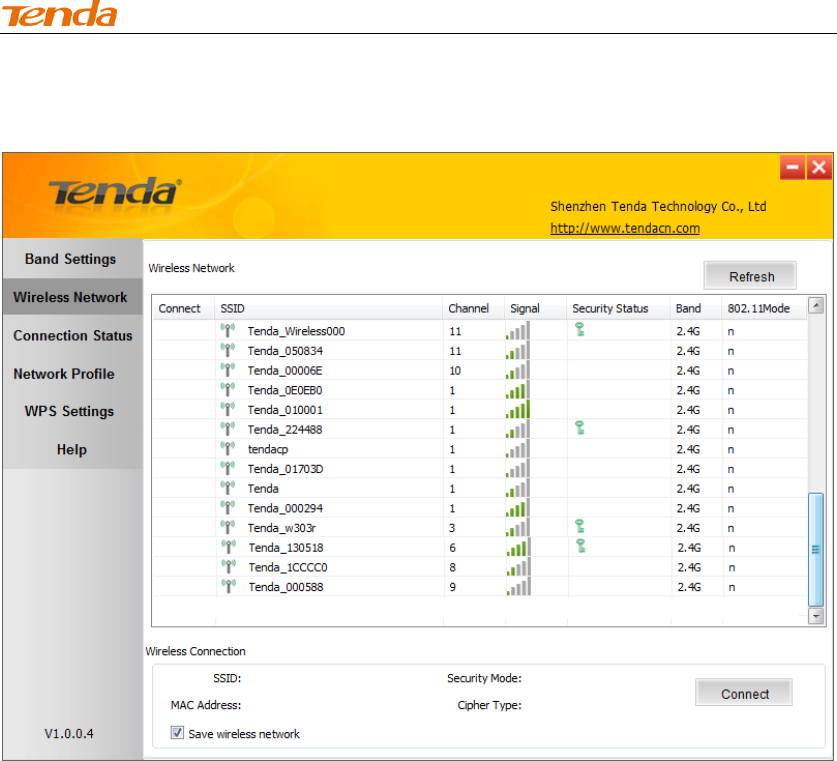
Wireless N PCI-E Adapter User Guide
Connect.
To join an unsecured network, simply click Connect.
When joining a secured network, you will be prompted to provide a security key.
Simply enter it exactly as it is on the wireless router or access point you wish to
join and then click Next.
Wireless N PCI-E Adapter User Guide
Note: If you check “Save wireless network", then, after the adapter connects
to the network, it automatically saves the network connection information to a
profile.
For detailed illustrations of authentication and encryption modes, see below:
WEP: Support 10 or 26 Hex characters; 5 or 13 ASCII characters.
WPA-PSK: Support 8~63ASCII characters; 8~64Hex characters.
WPA2-PSK: Support 8~63 ASCII characters; 8~64 Hex characters.
Note: Hex characters include numbers of 0~9 and letters of a~f.
ASCII characters include any alphanumeric characters.
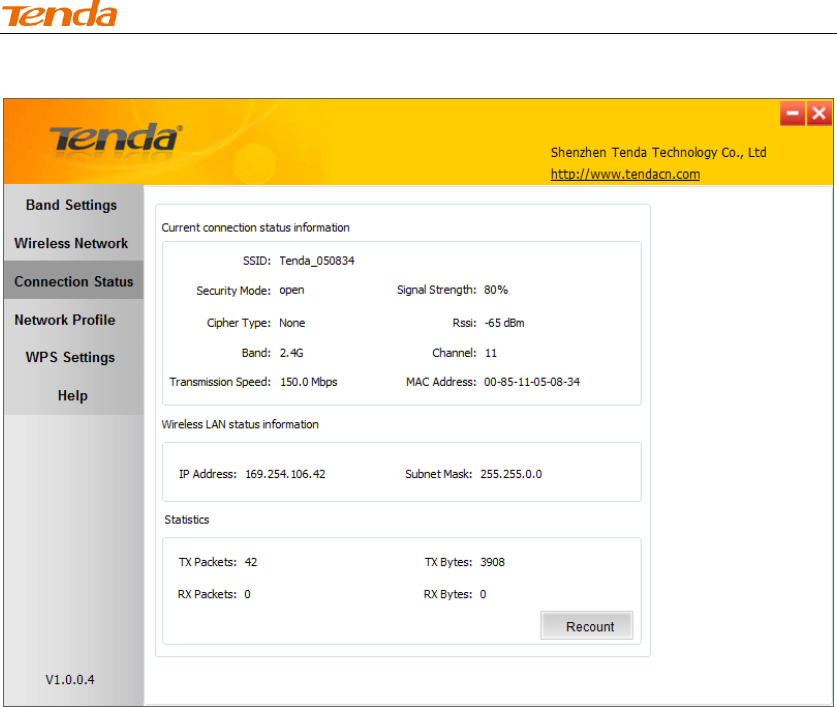
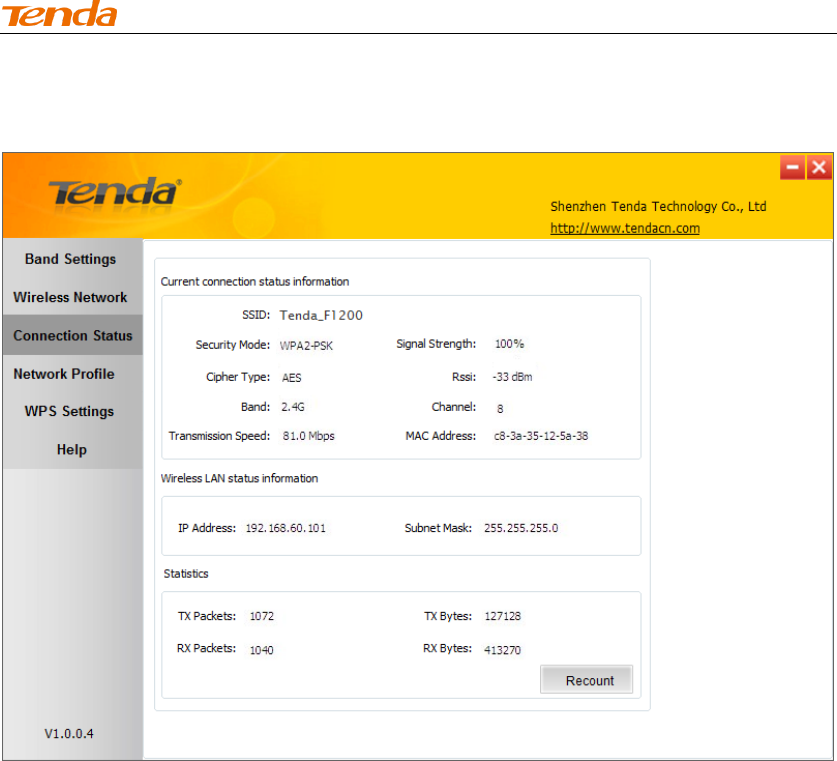
4.3 Connection Status
If you have successfully joined a wireless network, you can view details of the
connection and traffic statistics.
Wireless N PCI-E Adapter User Guide
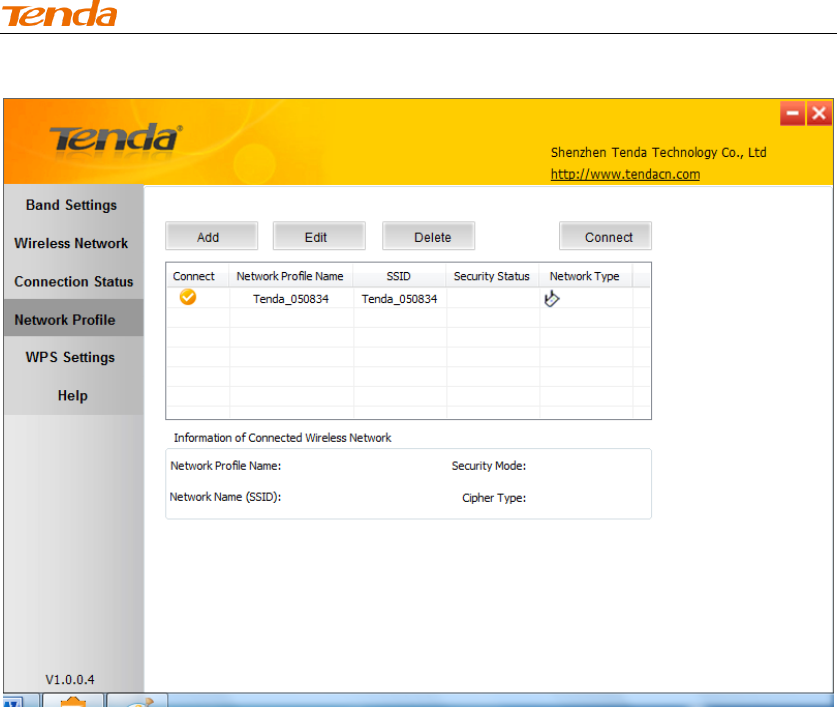
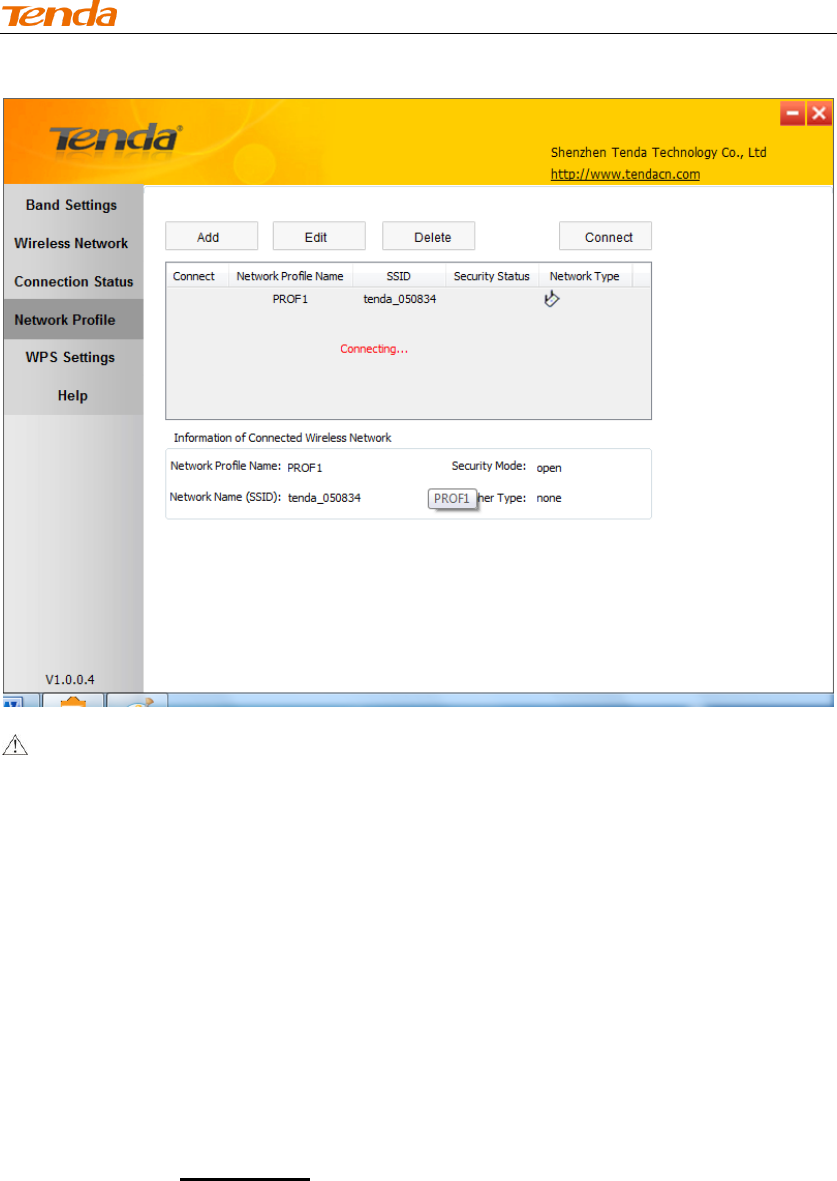
4.4 Network Profile
Also, you can manually add a profile on the Network Profile screen to connect
to a specified wireless network. After the adapter joins the network, it
automatically saves the network connection information to a profile, which can
be used by adapter utility. The next time you launch adapter utility, it will
automatically connect to the network you previously joined if there's no change
in the network information. If you wish to join a hidden network (A hidden
network does not broadcast its SSID), you must add a profile to manually
connect to it.
Wireless N PCI-E Adapter User Guide
Add: Click to create a new wireless network profile;
Delete: Click to remove an existing profile;
Edit: Click to to edit a current profile;
An 802.11 wireless adapter (WNIC) can operate in two modes known as
infrastructure mode and ad hoc mode:
Wireless N PCI-E Adapter User Guide
Infrastructure: In an infrastructure mode network the wireless adapter needs
a wireless access point or a wireless router for communication. All wireless
nodes in an infrastructure mode network connect to an access point or a
wireless router.
Ad-hoc: A wireless ad hoc network does not rely on a preexisting
infrastructure, ,such as routers in wired networks or access points in
managed (infrastructure) wireless networks. It typically refers to any set of
networks where all devices have equal status on a network and are free to
associate with any other ad hoc network device in link range in peer to peer
communication mode.
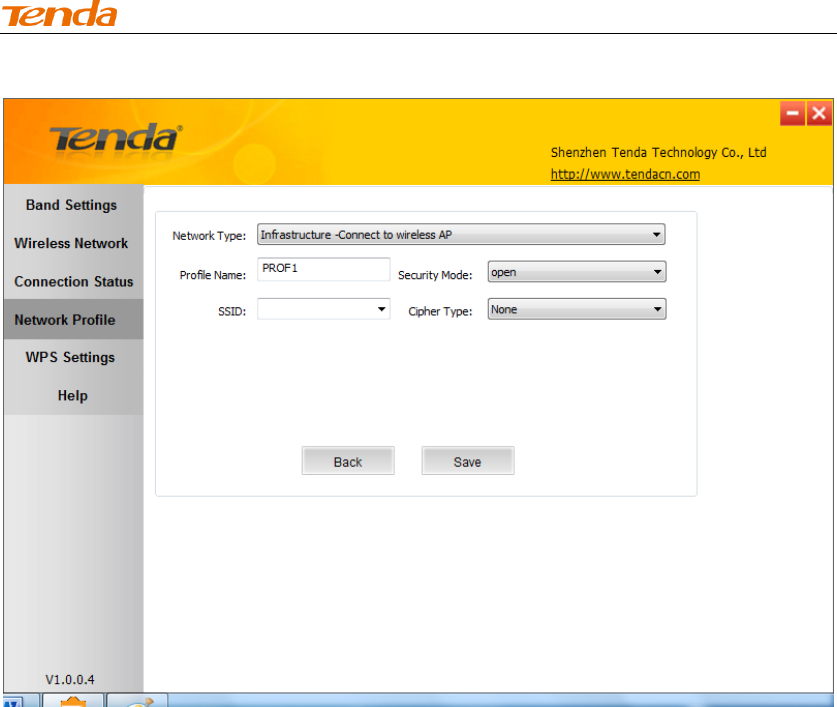
4.4.1 Profile Set Up for Infrastructure Mode
If you plan to connect your wireless adapter to an existing wireless AP or
wireless router, please select the Infrastructure mode. Setting up infrastructure
mode for wireless connectivity is not that hard, all we need is to follow below
instructions.
a). Click Add and select Infrastructure from the appearing dialog box.
Wireless N PCI-E Adapter User Guide
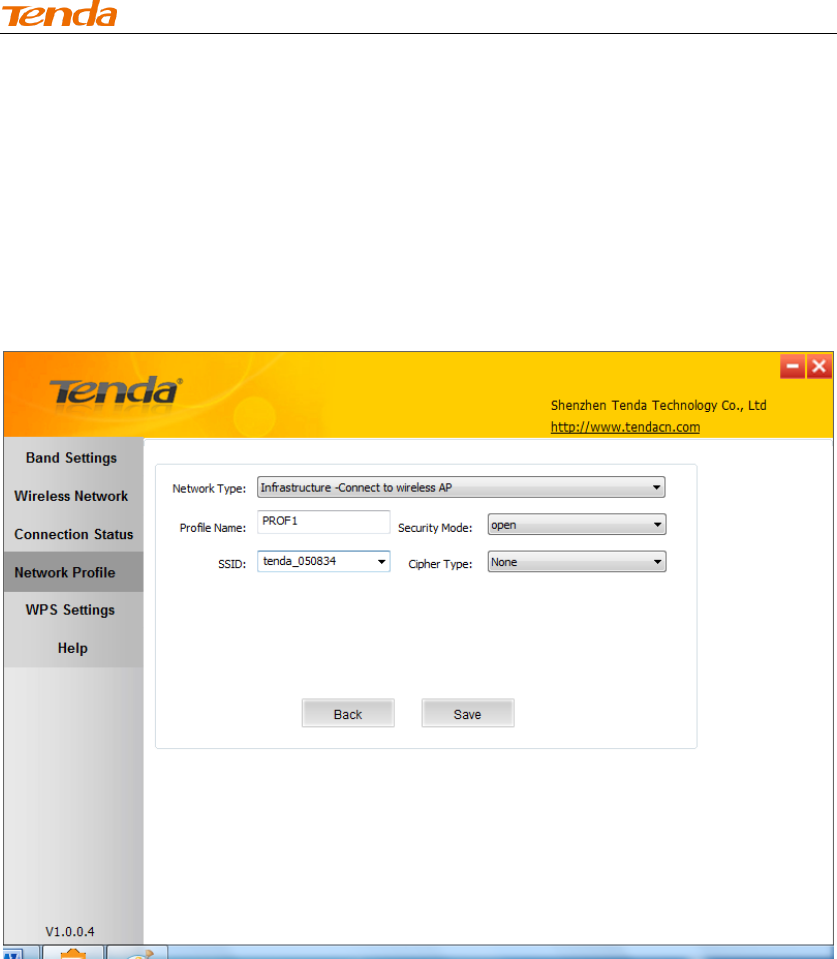
b). Specify a profile name and select the wireless network (SSID) you wish to
join.
c). Specify the authentication mode and encryption mode, say, "WPA-PSK"
and "AES";
d) Enter the security key and click Save.
Now, you may see the added profile in the list. You can edit or delete it. By
clicking Connect, you will soon connect to the wireless network specified in
the profile.
Wireless N PCI-E Adapter User Guide
Note:
If you wish to join a hidden network (wireless AP or wireless router that does
not broadcast its SSID), you must add a profile to manually connect to it.
4.4.2 Profile Set Up for Ad Hoc Mode
By using ad hoc mode for communication, each PC must have a wireless
adapter for sharing resources. Setting up the Ad Hoc is easy. Simply follow
below instructions:
a). Configure a static IP address for each wireless adapter. All PCs on the Ad
Hoc network must be configured with static IP addresses manually. For more
information, see Appendix 1.
e) Enter an unused IP address and subnet mask.
For example: If you set your wireless adapter's IP address as 192.168.0.1,
then you must set other adapters to IP addresses between
192.168.0.2-192.168.0.254.
b. To add Ad Hoc profile:
a). Click Add and specify a SSID (wireless network name), say, "Tenda";
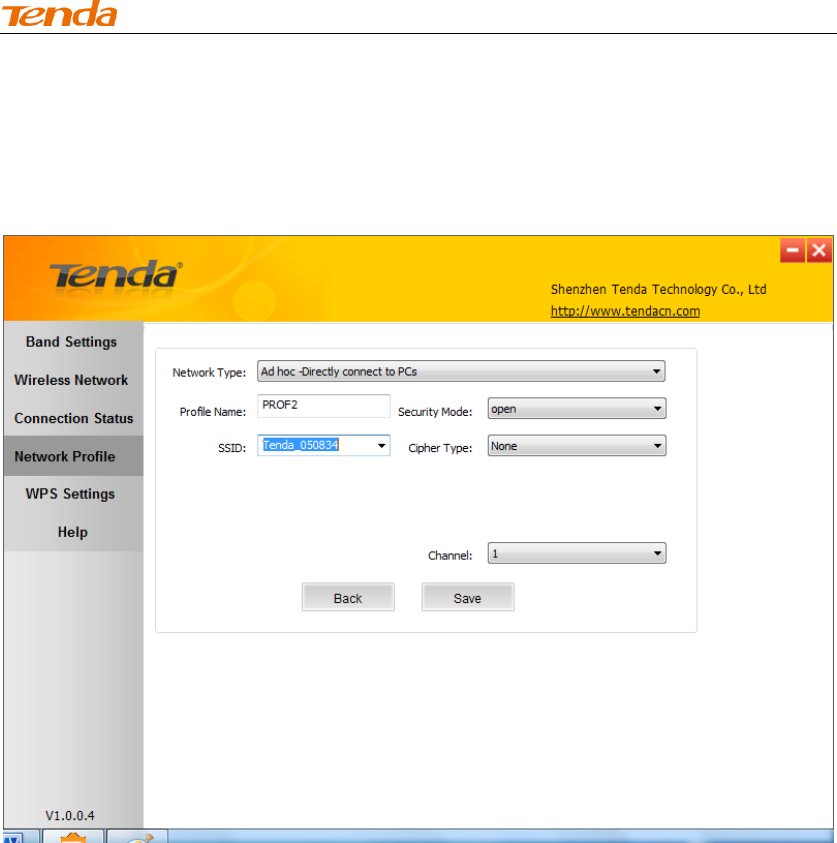
Wireless N PCI-E Adapter User Guide
b). Select Ad Hoc as network type;
c). Select WEP and specify a WEP key or select None.
d). Select a channel.
Click Save and you can see the network profile on the list.
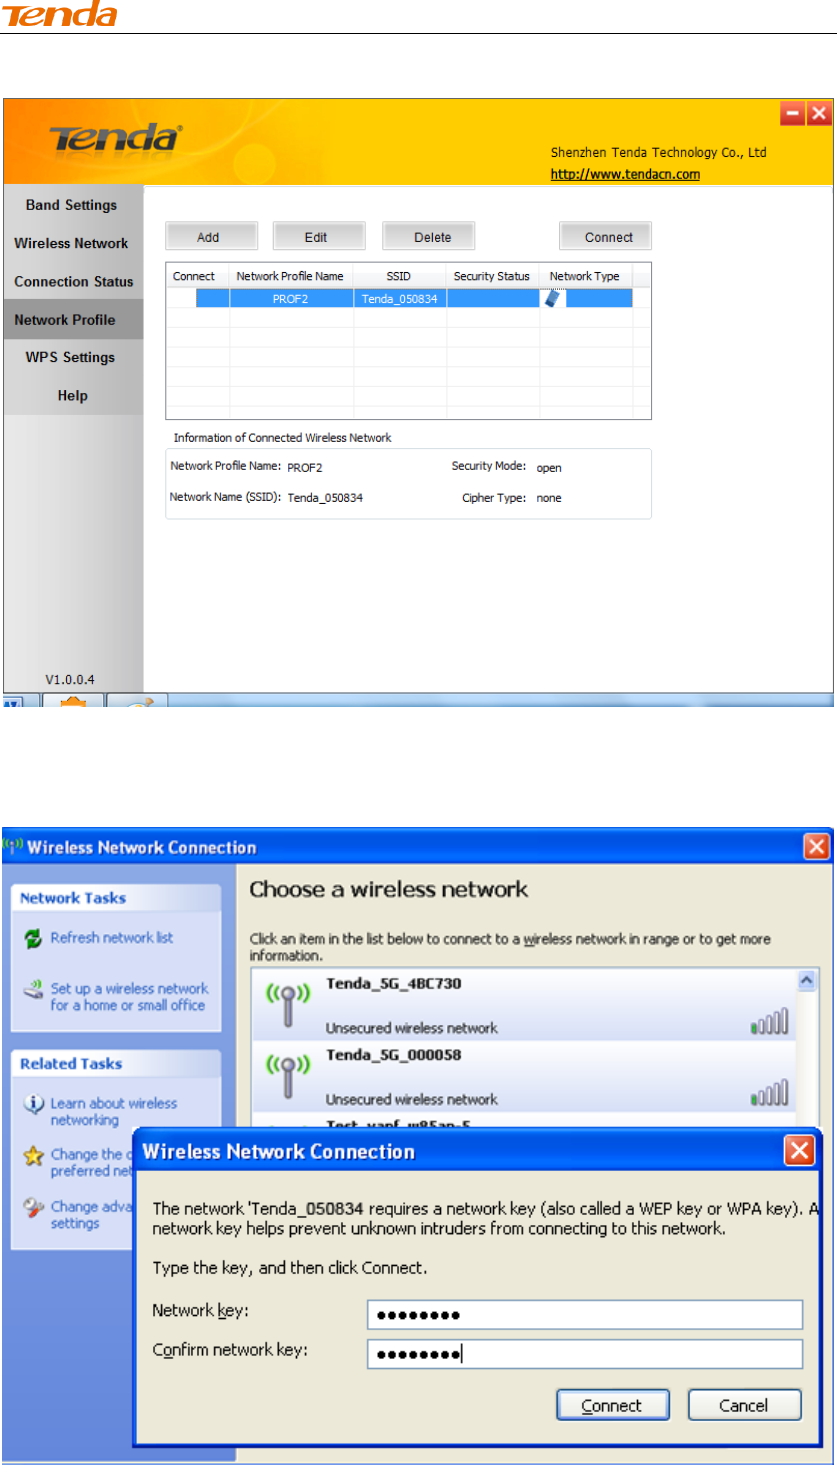
Wireless N PCI-E Adapter User Guide
f) Search for the wireless network from devices on other nodes.
g) Double-click it, enter a security key if required and then click Connect.
Wireless N PCI-E Adapter User Guide
When below screen appears, you have successfully connected to it.
Wireless N PCI-E Adapter User Guide
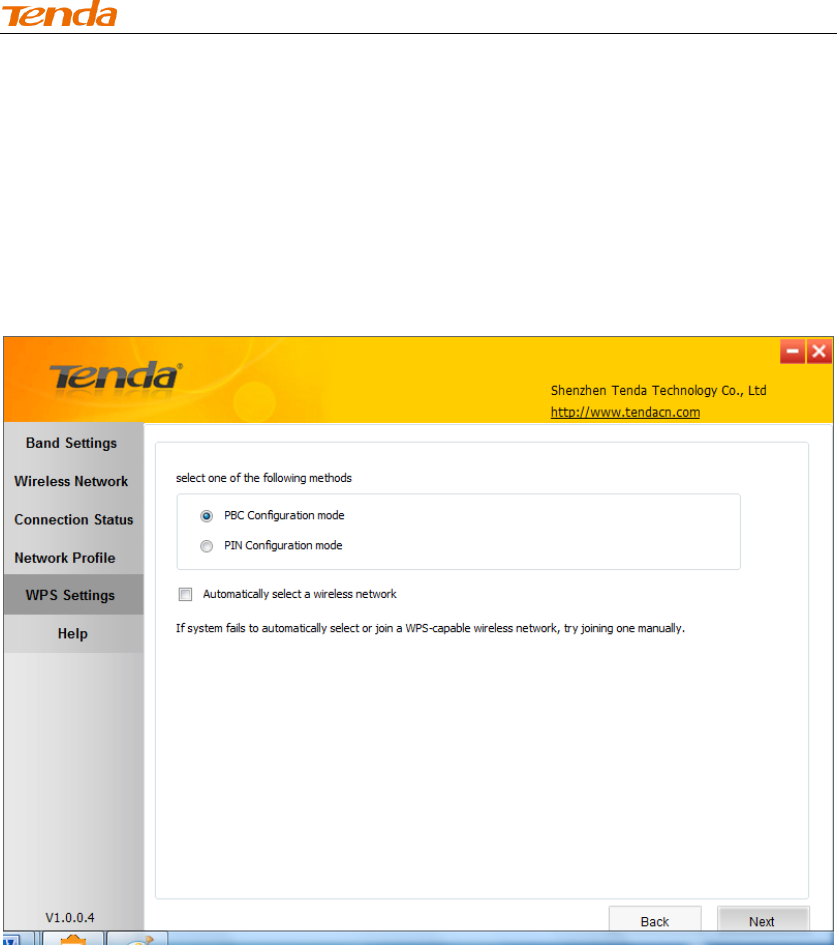
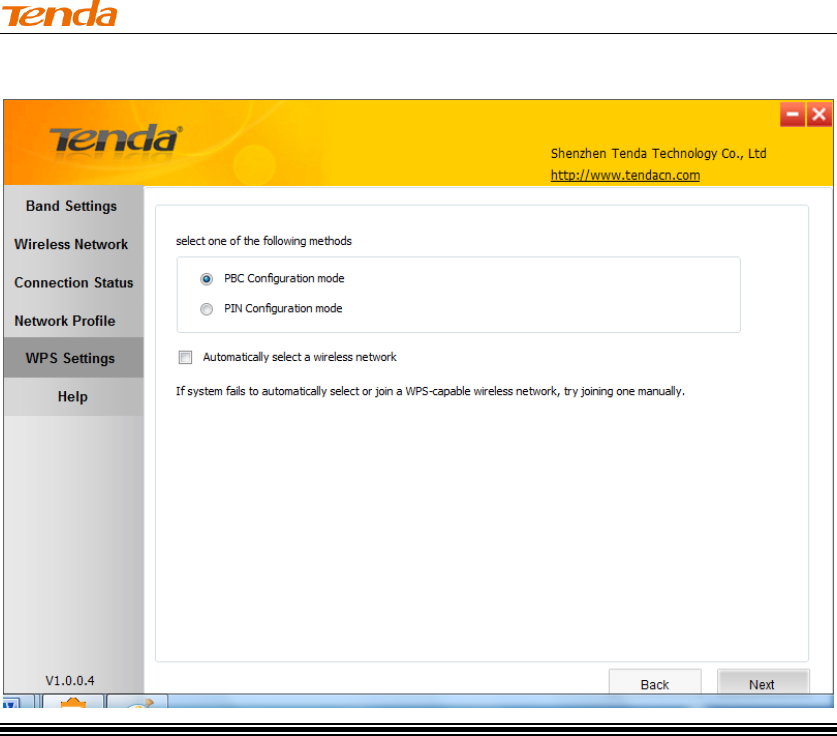
4.5 WPS Setup
If your wireless network supports WPS, you can use WPS to join a wireless
network. WPS can easily and quickly create secure wireless connections.
System automatically adds the network profile upon a successful WPS
connection.
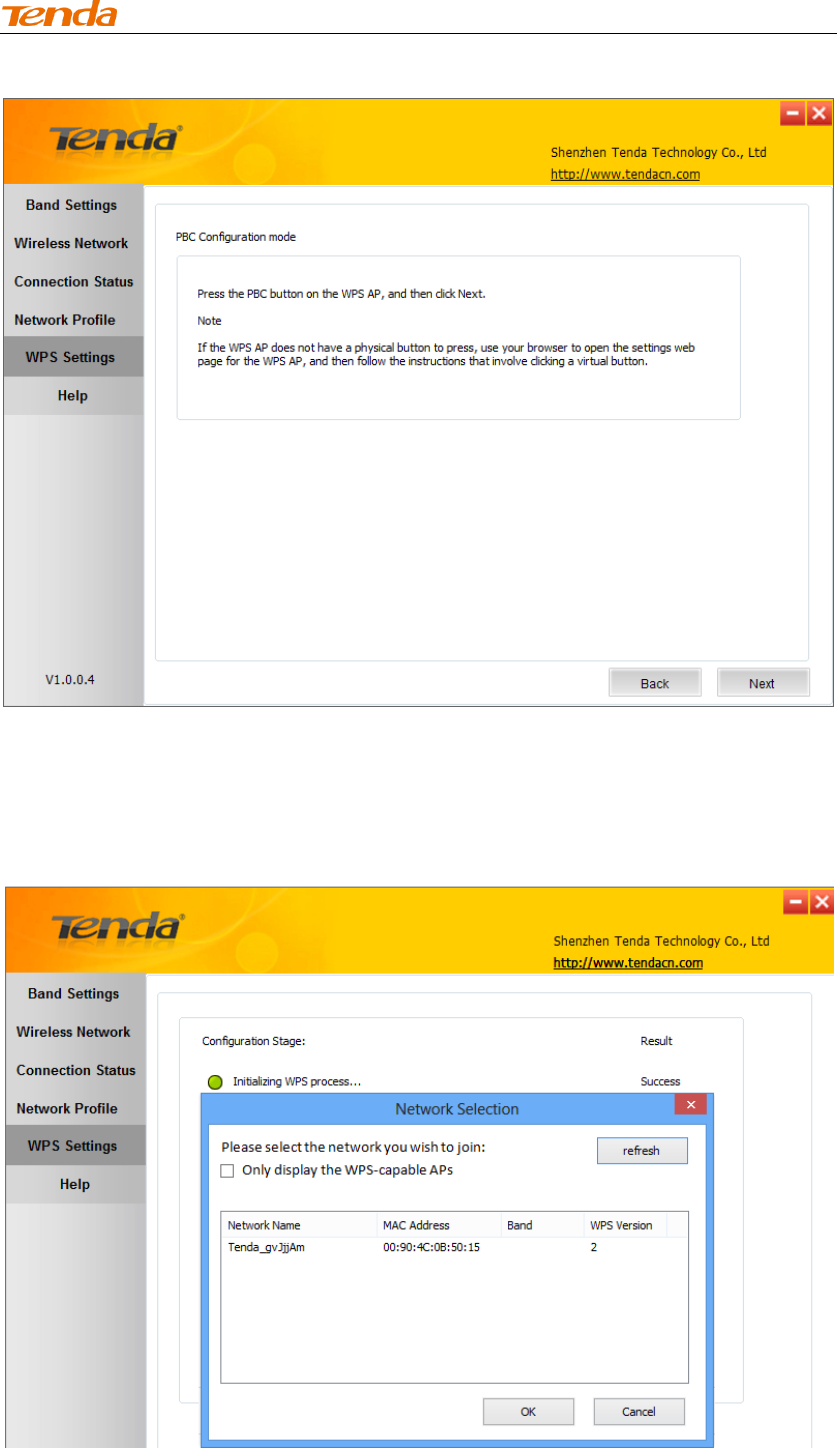
PBC Configuration Mode
To join a wireless network using WPS PBC from Tenda adapter UI:
1. Select WPS Settings-> PBC Configuration Mode.
Wireless N PCI-E Adapter User Guide
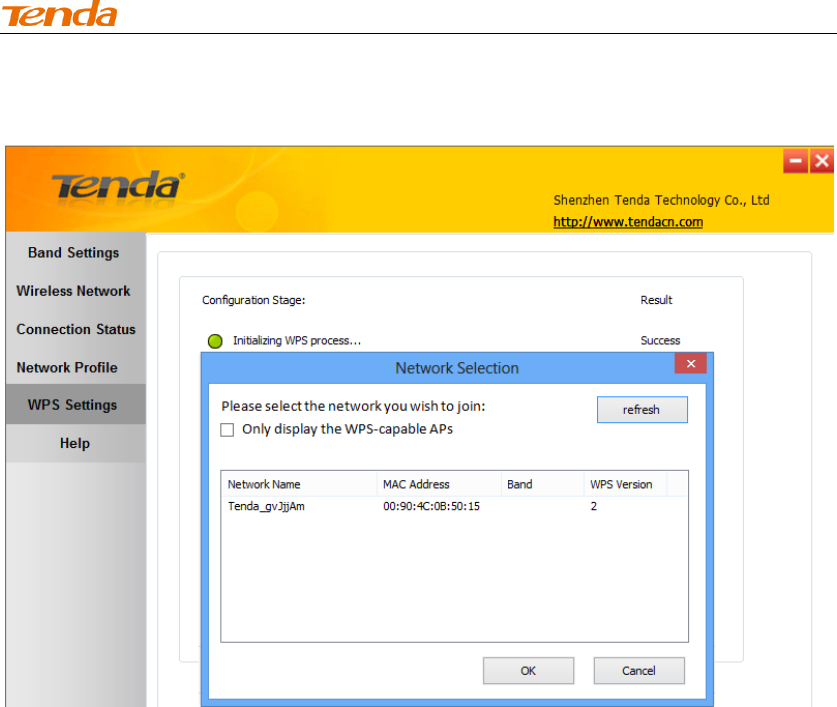
Tip:
a) Automatically select a wireless: Automatically select a WPS-capable
AP from searched results to join. This field is checked by default. If this
field is left unchecked, you must manually select a WPS-capable AP to
connect.
Wireless N PCI-E Adapter User Guide
b) If there are multiple WPS-capable APs, manually select a WPS-capable AP
that you wish to join and leave the Automatically select a wireless network
field unchecked.
2. Click Next and follow onscreen WPS instructions to enable WPS-PBC
on the WPS-capable AP.
Wireless N PCI-E Adapter User Guide
3. Then within 2 minutes, click Next to start WPS negotiation.
Negotiation Process:
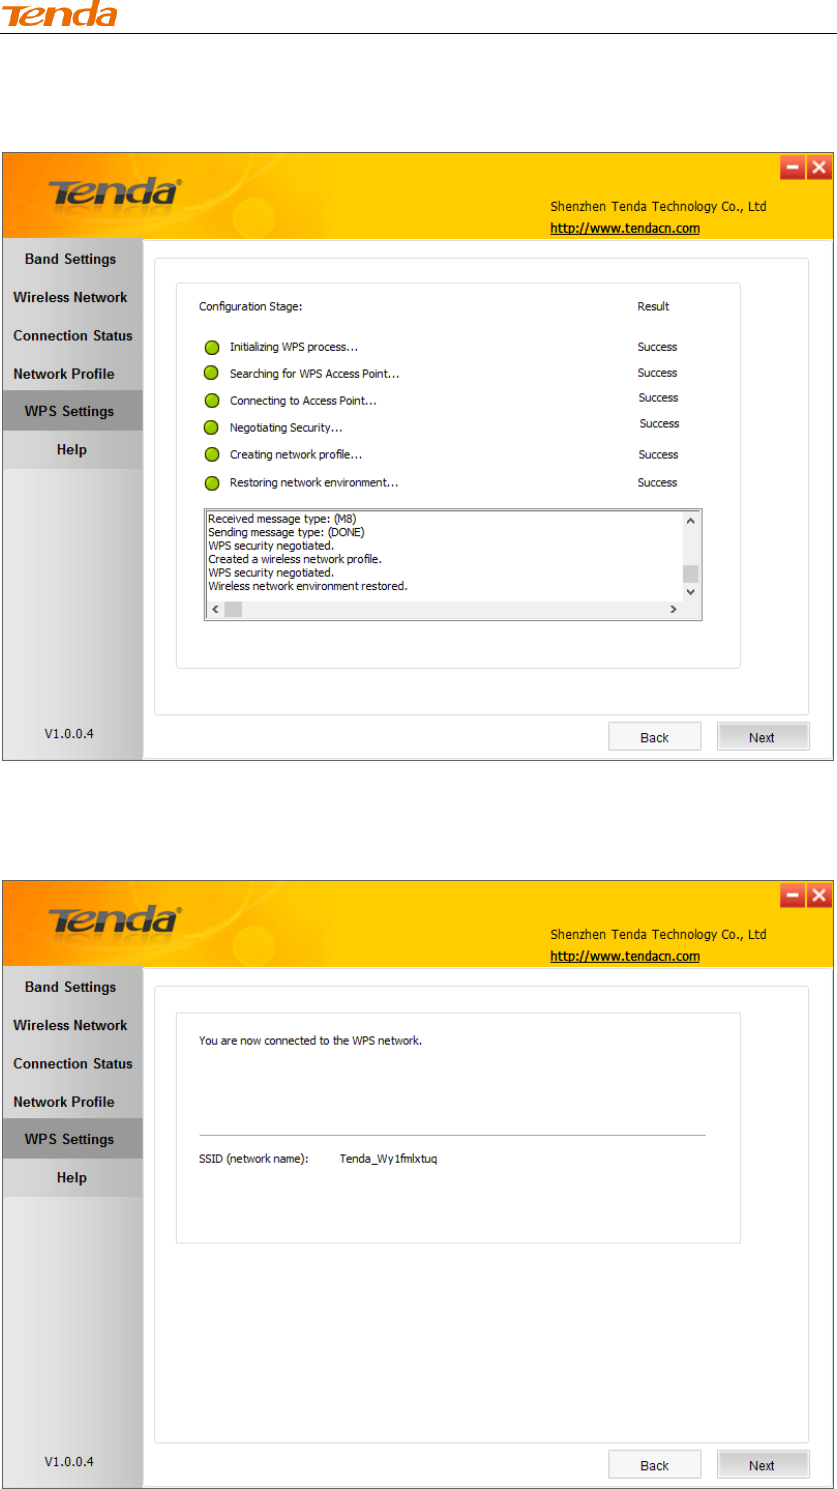
Wireless N PCI-E Adapter User Guide
Negotiation Completed Successfully:
4. Now, simply click Next and you will see the SSID of the wireless
network you joined. The WPS-PBC connection is now completed.
Wireless N PCI-E Adapter User Guide
PIN Configuration Mode
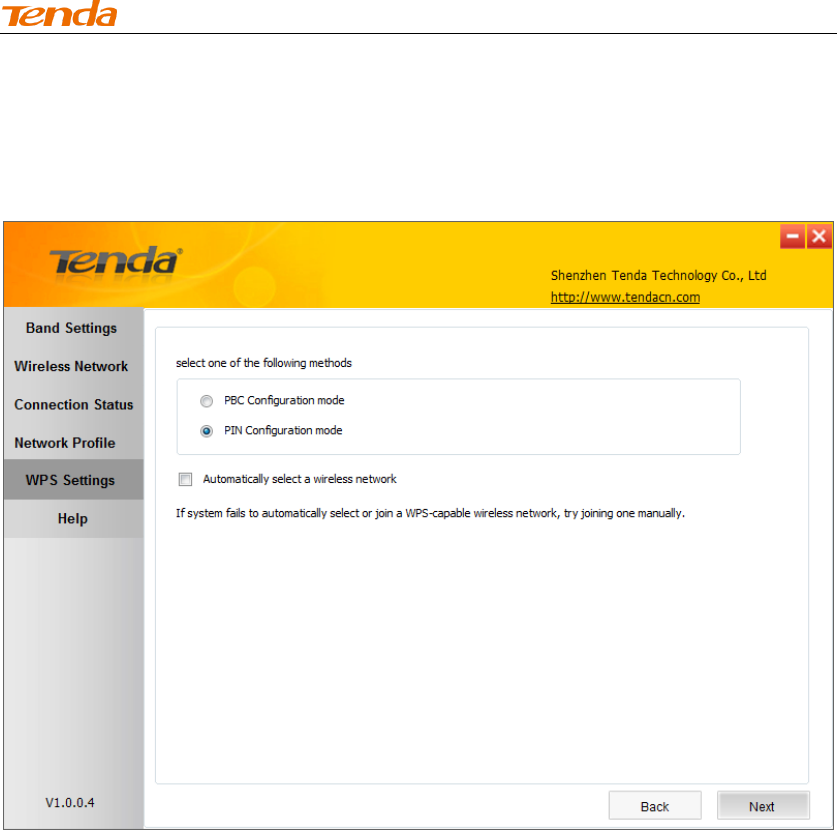
To join a wireless network using WPS PIN from Tenda adapter UI:
1. Click WPS Settings-> PIN Configuration Mode.
2. Click Next and you will find two available WPS-PIN modes:
Enter a PIN into my Access Point or Registrar
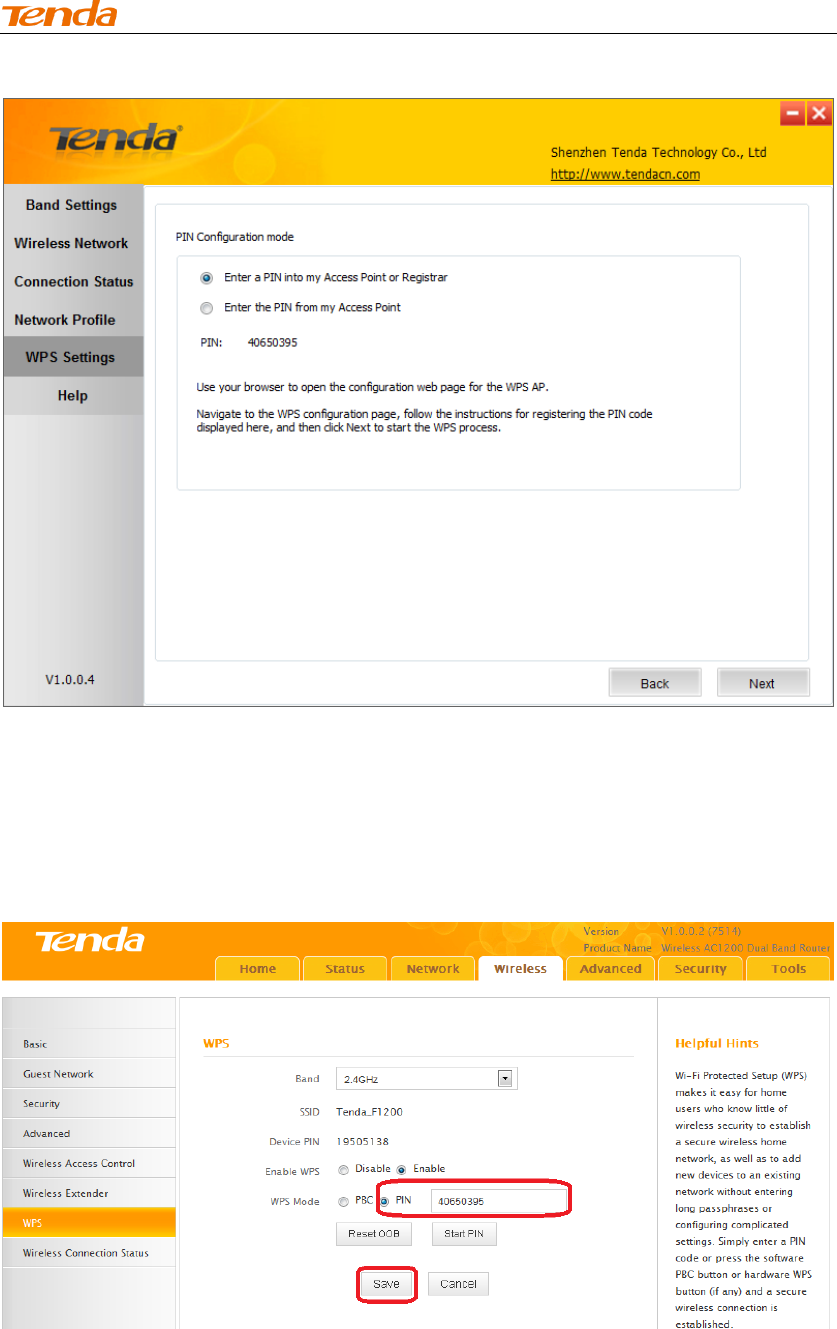
Wireless N PCI-E Adapter User Guide
Follow onscreen instructions to copy NIC's PIN to the wireless AP and enable
WPS-PIN on the wireless AP.
For example: If you wish to connect to Tenda F1200, simply copy the PIN to
Tenda F1200 and enable WPS-PIN on the Tenda F1200.
Enter the PIN from my Access Point
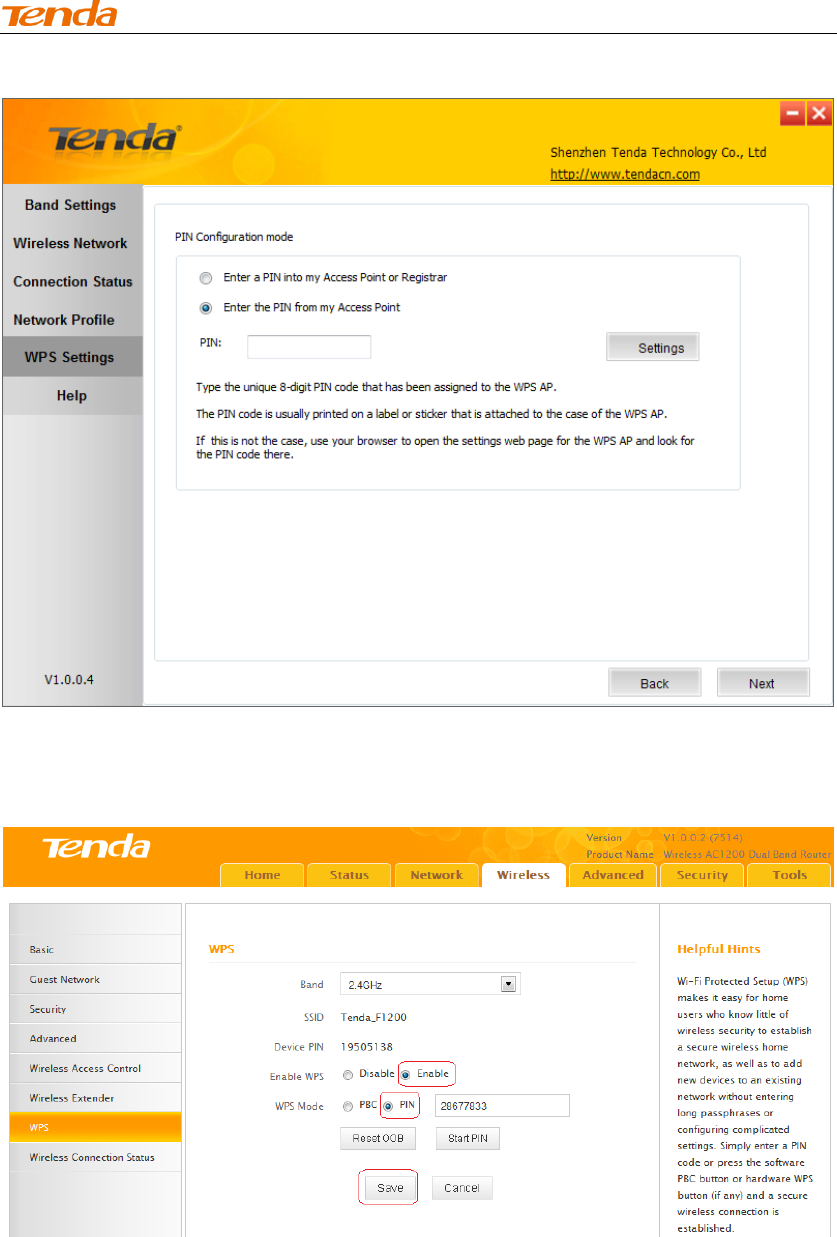
Wireless N PCI-E Adapter User Guide
First, enable the WPS-PIN on the wireless AP you wish to join, say, Tenda
F1200.
Second, enter the wireless AP's PIN.
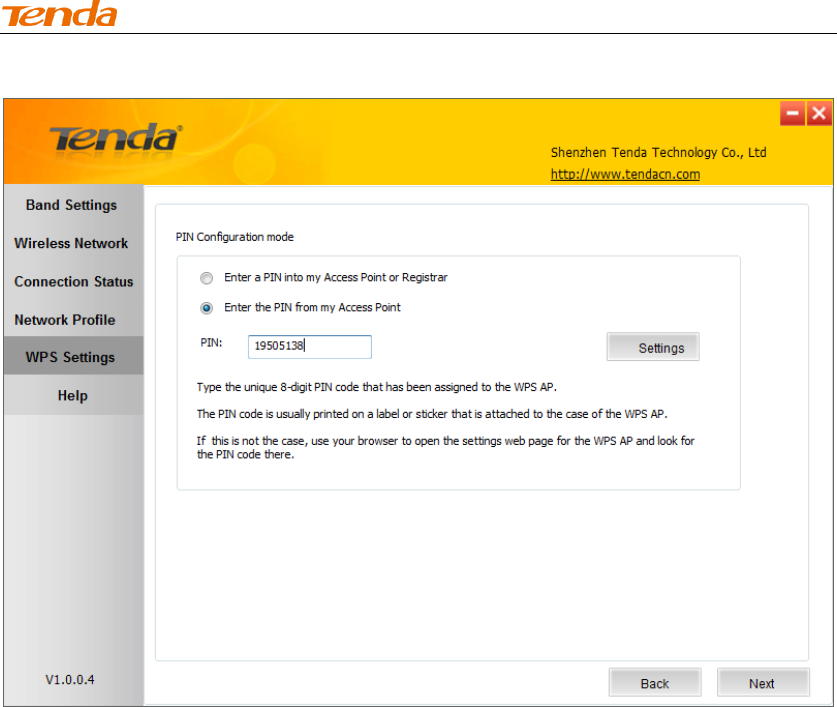
Wireless N PCI-E Adapter User Guide
Also, you can customize the SSID and security settings.
And then click Next to start WPS-PIN negotiation.
Negotiation Completed:
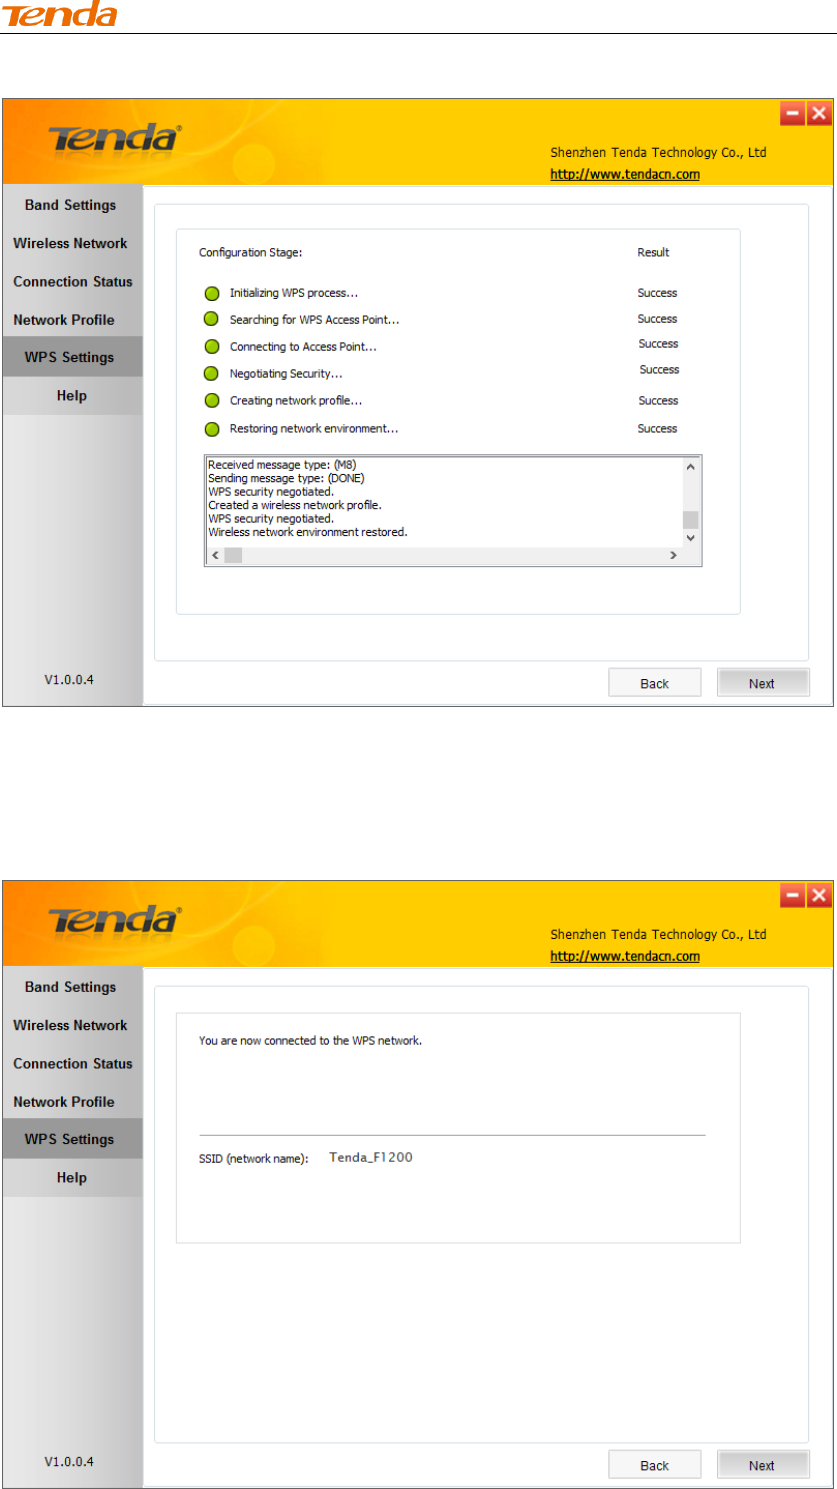
Wireless N PCI-E Adapter User Guide
Now, simply click Next and you will see the SSID of the wireless network you
joined. The WPS-PIN connection is now completed.
Wireless N PCI-E Adapter User Guide
Click Finish and you can view the connection status.
4.6 Help
Click the Help button to display help.
Wireless N PCI-E Adapter User Guide
Chapter 5 Appendix
Appendix 1 TCP/IP Settings
If you are using Windows XP, do as follows:
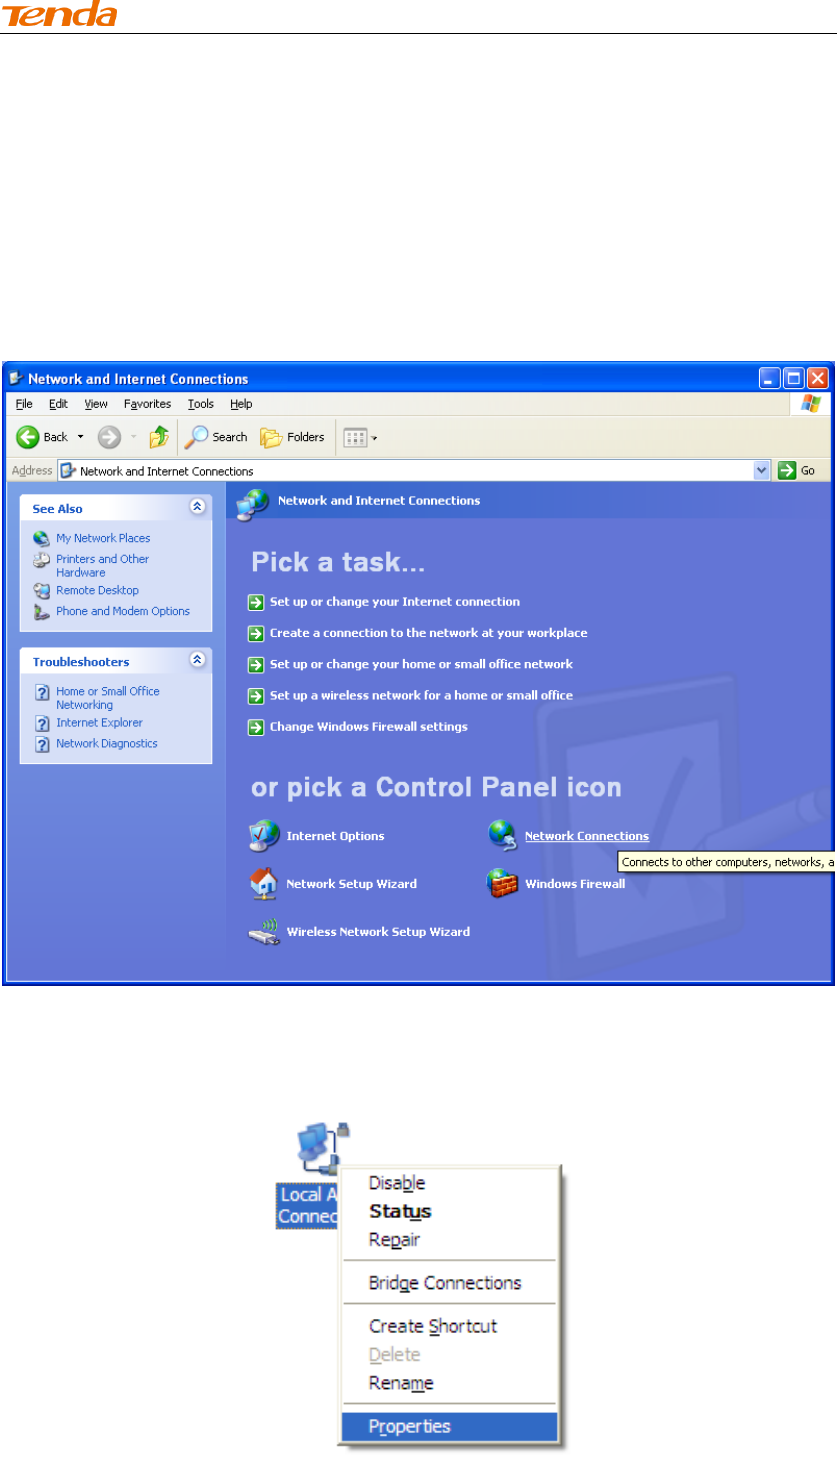
1. Click Start > Control Panel > Network and Internet Connections >
Network Connections.
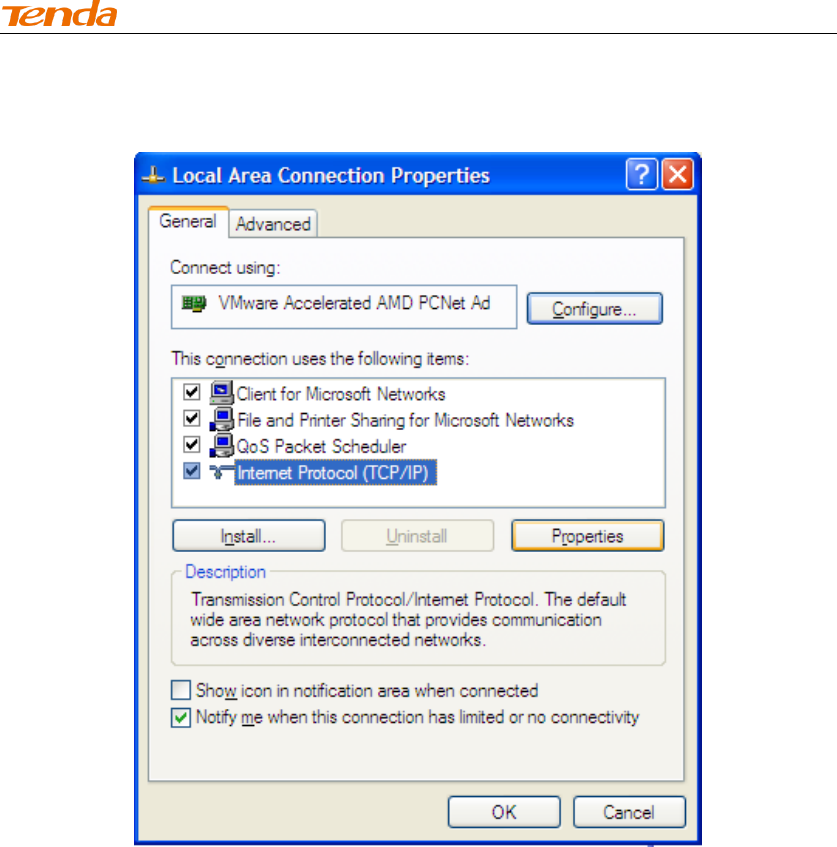
2. Right-click on the Local Area Connection and select Properties.
Wireless N PCI-E Adapter User Guide
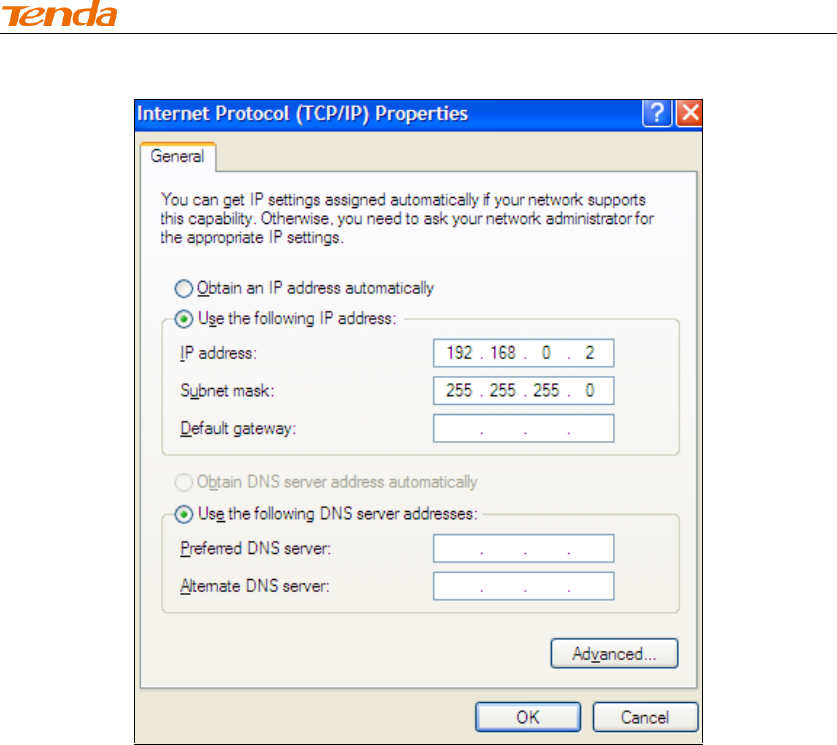
3. Select Internet Protocol (TCP/IP) and click Properties.
4. Select "Use the following IP address".
IP address: Enter 192.168.0.xxx where xxx can be any number between 2 and
253).
Subnet mask: Enter 255.255.255.0
Click OK twice to save your settings.
Wireless N PCI-E Adapter User Guide
If you are using Windows 7, do as follows:
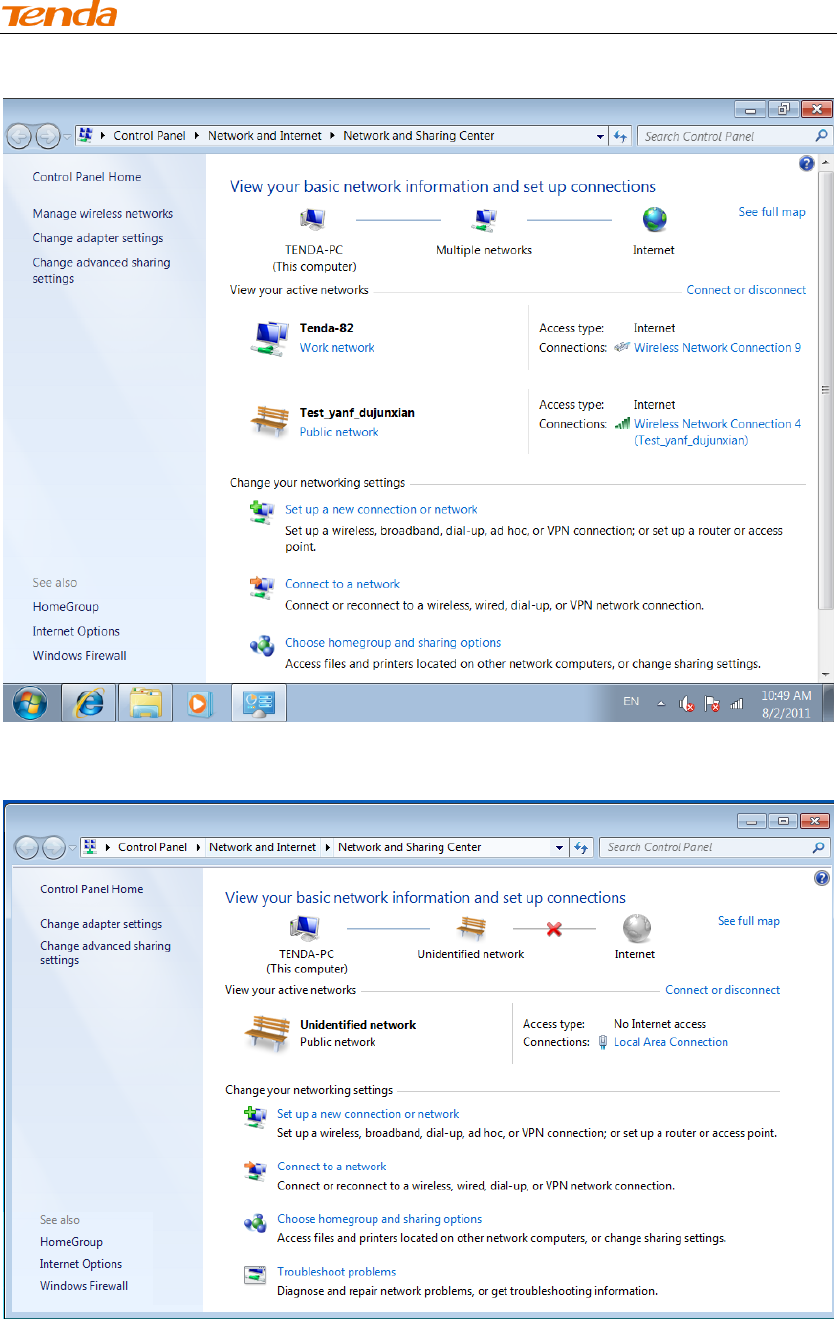
1. Click on Start > Control Panel > Network and Internet > Network and
Sharing Center.
Wireless N PCI-E Adapter User Guide
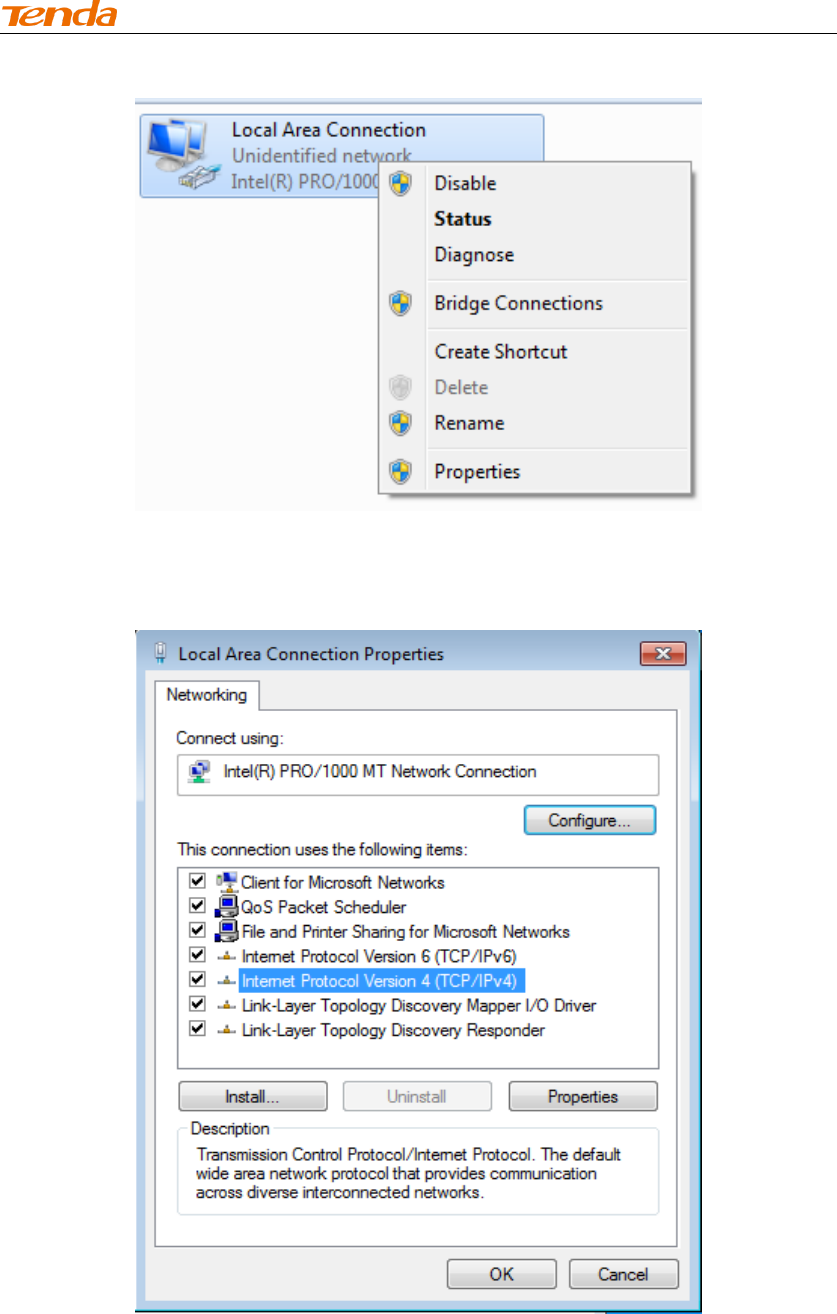
2. Click "Change adapter settings".
3. Right-click on the Local Area Connection and select Properties.
Wireless N PCI-E Adapter User Guide
4. Select Internet Protocol Version 4 (TCP/IPv4) and click Properties or
directly double-click on Internet Protocol Version 4 (TCP/IPv4).

Wireless N PCI-E Adapter User Guide
5. Select Use the following IP address.
IP address: Enter 192.168.0.xxx where xxx can be any number between 2 and
253).
Subnet mask: Enter 255.255.255.0
Click OK twice to save your settings.

Wireless N PCI-E Adapter User Guide
Appendix 2 Glossary
802.11ac: IEEE 802.11ac is a wireless computer networking standard of
802.11, currently under development, providing high-throughput wireless local
area networks on the 5 GHz band. Theoretically, this specification will enable
multi-station WLAN throughput of at least 1 gigabit per second and a maximum
single link throughput of at least 500 megabits per second (500 Mbit/s).
802.11a: 802.11a is an amendment to the IEEE 802.11 specification that
added a higher data rate of up to 54 Mbit/s using the 5 GHz band.
802.11b: 802.11b, is an amendment to the IEEE 802.11 wireless networking
specification that extends throughput up to 11 Mbit/s using the same 2.4 GHz
band.
802.11e: 802.11e is an approved amendment to the IEEE 802.11 standard that
defines a set of Quality of Service enhancements for wireless LAN applications
through modifications to the Media Access Control (MAC) layer. The standard
is considered of critical importance for delay-sensitive applications, such as
Voice over Wireless LAN and streaming multimedia.
802.11g: 802.11g is an amendment to the IEEE 802.11 specification that
extended throughput to up to 54 Mbit/s using the same 2.4 GHz band as
802.11b.
802.11h: 802.11h, refers to the amendment added to the IEEE 802.11
standard for Spectrum and Transmit Power Management Extensions. It solves
problems like interference with satellites and radar using the same 5 GHz
frequency band. It was originally designed to address European regulations
but is now applicable in many other countries.
802.11i: 802.11i, implemented as WPA2, is an amendment to the original IEEE
802.11.
802.11j: 802.11j is an amendment to the IEEE 802.11 standard designed
specially for Japanese market.
802.11n: 802.11n is an amendment to the IEEE 802.11 standard, which
improves network throughput over the two previous standards—802.11a and
802.11g—with a significant increase in the maximum net data rate. 802.11n
standardized support for multiple-input multiple-output and frame aggregation,
and security improvements, among other features.

Wireless N PCI-E Adapter User Guide
IEEE 802.15: IEEE 802.15 is a working group of the IEEE 802 standards
committee which specifies Wireless Personal Area Network (WPAN) standards.
It includes seven task groups. Task group one is based on Bluetooth
technology.
IEEE 802.16: IEEE 802.16 is a series of Wireless Broadband standards
authored by the Institute of Electrical and Electronics Engineers (IEEE).
Although the 802.16 family of standards is officially called Wireless MAN in
IEEE, it has been commercialized under the name “WiMAX” (from "Worldwide
Interoperability for Microwave Access") by the WiMAX Forum industry alliance.
802.16a: 802.16a, also known as WiMAX, extends throughput up to 70Mbit/s
transmission rate within the distance of 30 miles.
802.20: Delivers 1Mbit/s throughput for wireless MAN (Metropolitan area
network).
IEEE 802.1X: IEEE 802.1X is an IEEE Standard for port-based Network
Access Control (PNAC). It is part of the IEEE 802.1 group of networking
protocols. It provides an authentication mechanism to devices wishing to
attach to a LAN or WLAN.IEEE 802.1X defines the encapsulation of the
Extensible Authentication Protocol (EAP) over IEEE 802 which is known as
"EAP over LAN" or EAPOL.
WEP: Wired Equivalent Privacy (WEP) is a security algorithm for IEEE 802.11
wireless networks. Introduced as part of the original 802.11 standard, its
intention was to provide data confidentiality comparable to that of a traditional
wired network.
WPA: Wi-Fi Protected Access (WPA) and Wi-Fi Protected Access II (WPA2)
are two security protocols and security certification programs developed by the
Wi-Fi Alliance to secure wireless computer networks. The Alliance defined
these in response to serious weaknesses researchers had found in the
previous system, WEP (Wired Equivalent Privacy) and intended as an
intermediate solution to WEP insecurities.
RSN: The Wi-Fi Alliance refers to their approved, interoperable implementation
of the full 802.11i as WPA2, also called RSN (Robust Security Network). RSN,
based on 802.1x, is introduced to supersede the security specification, WPA.
Wireless N PCI-E Adapter User Guide
Appendix 3 Troubleshooting
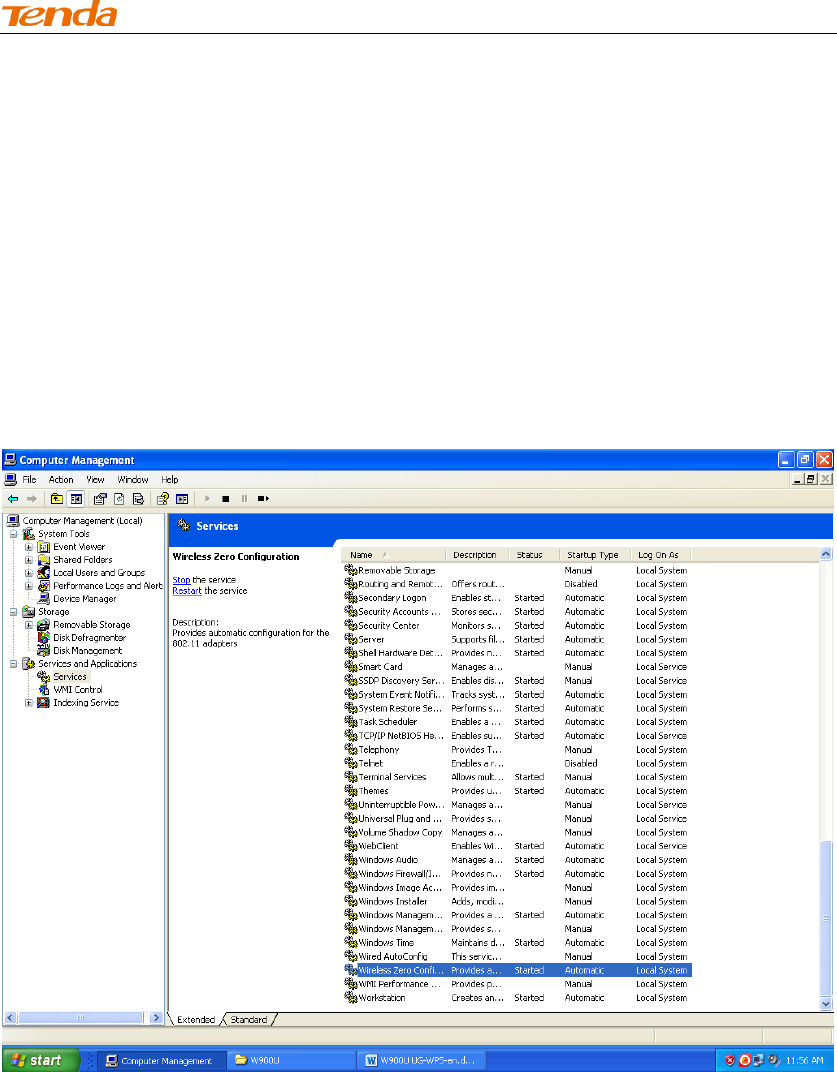
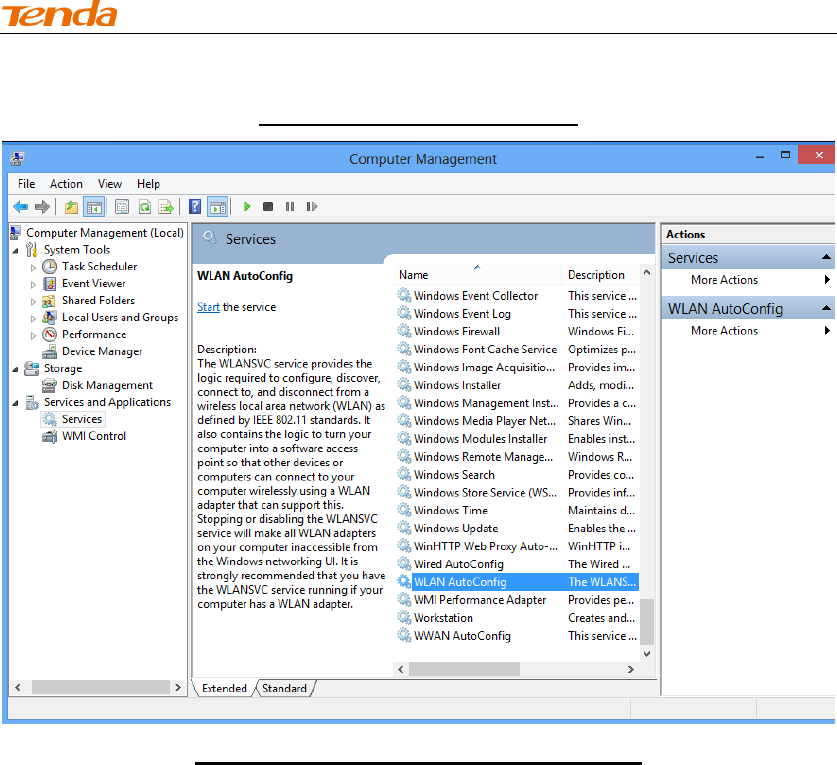
Q1: How do I enable the WZC (Wireless Zero Configuration) service in
Windows XP or enable WAC (WLAN AutoConfig) in Win dows 7/Win dows 8?
Step1. From your desktop, right-click My Computer and select Manage.
Step2. Select Services and Applications -> Services.
Step3. Double-click Wireless Zero Configuration/ WLAN AutoConfig and then
click Start on the appearing window or right click Wireless Zero Configuration/
WLAN AutoConfig and select Start from the pop-up list.
Wireless N PCI-E Adapter User Guide
Enable WZC in Windows XP
Enable WLAN AutoConfig in Windows7
Q2: I followed instructions to install the driver but failed.
This can occur if you have already installed other manufacturer's adapter.
Drivers of other manufacturer might cause a conflict with the new driver.
Please first uninstall it and then check to make sure that oem.inf file is removed
from C:\WINDOWS\inf.

Wireless N PCI-E Adapter User Guide
Appendix 4 Safety and Emission Statement
CE Mark Warning
This is a Class B product In a domestic environment, this product may cause
radio interference, in which case the user may be required to take adequate
measures. This device complies with EU 1999/5/EC.
NOTE:(1)The manufacturer is not responsible for any radio or TV interference
caused by unauthorized modifications to this equipment.(2) To avoid
unnecessary radiation interference, it is recommended to use a shielded RJ45
cable
FCC Statement
This device complies with Part 15 of the FCC Rules. Operation is subject to the
following two conditions: (1) This device may not cause harmful interference,
and (2) this device must accept any interference received, including
interference that may cause undesired operation.
This equipment has been tested and found to comply with the limits for a Class
B digital device, pursuant to Part 15 of the FCC Rules. These limits are
designed to provide reasonable protection against harmful interference in a
residential installation. This equipment generates, uses and can radiate radio
frequency energy and, if not installed and used in accordance with the
instructions, may cause harmful interference to radio communications.
However, there is no guarantee that interference will not occur in a particular
installation. If this equipment does cause harmful interference to radio or
television reception, which can be determined by turning the equipment off and
on, the user is encouraged to try to correct the interference by one of the
following measures:
- Reorient or relocate the receiving antenna.
- Increase the separation between the equipment and receiver.

Wireless N PCI-E Adapter User Guide
- Connect the equipment into an outlet on a circuit different from that
to which the receiver is connected.
- Consult the dealer or an experienced radio/TV technician for help.
FCC Caution: Any changes or modifications not expressly approved by the
party responsible for compliance could void the user's authority to operate this
equipment.
This transmitter must not be co-located or operating in conjunction with any
other antenna or transmitter.
The manufacturer is not responsible for any radio or TV interference caused by
unauthorized modifications to this equipment.
Radiation Exposure Statement
This equipment complies with FCC radiation exposure limits set forth for an
uncontrolled environment. This equipment should be installed and operated
with minimum distance 20cm between the radiator & your body.
NOTE:(1)The manufacturer is not responsible for any radio or TV interference
caused by unauthorized modifications to this equipment.(2) To avoid
unnecessary radiation interference, it is recommended to use a shielded RJ45
cable
NCC Notice
經型式認證合格之低功率射頻電機,非經許可,公司、商號或使用者均不得擅
自變更頻率、加大功率或變更設計之特性及功能。
低功率射頻電機之作用不得影響飛航安全及幹擾合法通信;經發現有幹擾現象
時,應立即停用,並改善至無幹擾時方得繼續使用。前項合法通信,指依電信
規定作業之無線電信。低功率射頻電機須忍受合法通信或工業、科學及醫療用
電波輻射性電機設備之幹擾。