TENDA TECHNOLOGY W311MI 150Mbps Wireless-N Pico USB Adapter User Manual
SHENZHEN TENDA TECHNOLOGY CO., LTD. 150Mbps Wireless-N Pico USB Adapter Users Manual
User Man_V7TW311MI_rev. 1

Wireless Network Adapter Users’ Guide
W311MI

Wireless Network Adapter Users’ Guide
Copyright Statement
is the registered trademark of Shenzhen
Tenda Technology Co., Ltd. All the products and product
names mentioned herein are the trademarks or
registered trademarks of their respective holders.
Copyright of the whole product as integration, including
its accessories and software, belongs to Shenzhen Tenda
Technology Co., Ltd. Without the permission of Shenzhen
Tenda Technology Co., Ltd, any individual or party is not
allowed to copy, plagiarize, reproduce, or translate it into
other languages.
All the photos and product specifications mentioned in
this guide are for references only. Upgrades of software
and hardware may occur, and if there are changes, Tenda
is not responsible for notifying in advance. If you would
like to know more about our product information, please
visit our website at www.tenda.cn.

Wireless Network Adapter Users’ Guide
Contents
Chapter 1 Introduction ...................... 1
1.1 Package Contents ...................................1
1.2 LED Indicator Description .......................1
1.3 Product Features ....................................2
1.4 Product Usage ........................................2
1.5 Before Installation ..................................3
1.6 Disable other manufacturer’s wireless
network adapter ...........................................4
1.7 Product Maintenance ............................5
Chapter 2 Installation Guide .............. 6
Chapter 3 Client Utility Interface ..... 10
3.1.1 NETWORK STATUS .............................. 13
3.1.1 NETWORK STATUS .............................. 13
3.1.2 SITE SURVEY.................................... 13
3.1.3 PROFILE MANAGEMENT......................... 14
3.1.4 STATISTICS...................................... 23
3.1.6 WPS SETTING................................. 24
3.2 AP MODE........................................... 25

Wireless Network Adapter Users’ Guide
3.2.1 BASIC SETTING ................................. 26
3.2.2 SECURITY SETTING ............................. 27
3.2.3 ACCESS CONTROL .............................. 30
3.2.5 ABOUT ........................................... 32
3.2.6 AP MODE UNDER WINDOWS 7................ 32
Chapter 4 Use the System Internal
Wireless Configuration Program ...... 33
4.1 Wireless Network Connection under
Windows XP..................................... 34
4.2 Wireless Network Connection under
Windows 7 ....................................... 39
APPENDIX........................................ 40
Appendix One Acronyms and Terms. 40
Appendix Two: Product Specification42
Appendix Three:How to Set WPS ..... 43
Appendix Four FAQ .......................... 46

Wireless Network Adapter Users’ Guide
-1-
Chapter 1 Introduction
W311MI is a 11N wireless USB network adapter
with up to 150Mbps wireless transmission rate. It
complies with the latest IEEE802.11n standard, and is
compatible with 802.11b/g wireless devices. With mini
and exquisite design, it is easy to carry along. It supports
WPS encryption method to quickly implement wireless
encryption and secure network; supports WMM to better
smooth video and sound; supports Windows 7, Vista,
Windows XP, Windows 2000, MAC OS, Linux operation
systems etc.
In conclusion, W311MI is a high-performance and
cost-effective 11N wireless USB network adapter with
good signal, long transmission range etc.
ͳǤͳ
One Wireless USB network adapter
One Software CD (includes user guide)
ͳǤʹ

Wireless Network Adapter Users’ Guide
-2-
There is one status indicator on the side of this wireless
network adapter. It always remains ON when working
correctly and flashes when transferring data.
ͳǤ͵
¾ Supports 150Mbps receiving and sending rate
¾ Complies with IEEE 802.11n and is compatible with IEEE
802.11b/g standards
¾ Provides USB2.0 port
¾ Supports 20MHz/40MHz frequency width
¾ Detects network and changes the transmission rate
automatically
¾ Provides two work modes: Infrastructure and Ad-Hoc
¾ Supports 64/128-bit WEP encryption, and WPA, WPA2
encryption methods
¾ Provides WPS encryption button to easily implement
wireless encryption and secure network
¾ Compatible with Windows 7, Vista, Windows XP, Windows
2000, MAC OS, Linux systems, etc.
¾ Supports WMM to better smooth your sound and video
ͳǤͶ
W311MI Wireless USB Adapter offers fast, reliable and
cost- effective solution for wireless access. It is best used

Wireless Network Adapter Users’ Guide
-3-
in the following circumstances:
1. Enables staff members who require greater mobility
in the office to have access to wireless networks
anywhere inside their company.
2. Enables wireless communication for companies or
places which are not suitable for wired LAN installation
because of budget or building environment restrictions,
such as historical buildings, rentals, or places for
short-term usage.
3. Suits businesses or individual who often changes
network topology.
4. Suits company or individual who would like to avoid
using expensive cables or renting lines etc.
ͳǤͷ
1. Please peruse this user guide before you install and
use the product.
2. Please close or uninstall the configuration programs of
other manufacturers’ before you install the configuration
programs of W311MI to avoid possible UI collision.
Wireless Network Adapter Users’ Guide
-4-
3.In order to avoid possible network collision between
this Tenda network adapter and those of other
manufactures, we recommend you to first disable the
network of other manufacturer when installaing drive.
ͳǤ ǯ
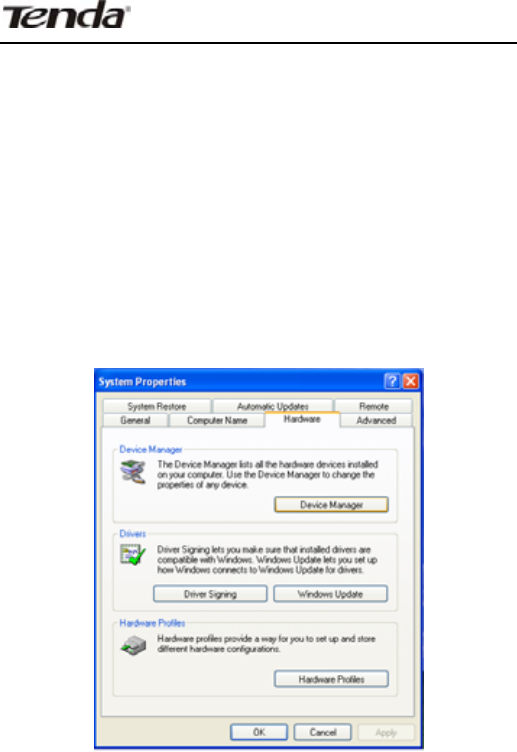
1. Right click “My Computer” and select “Properties. Then
select “Hardware” and click ĀDevice Managerā
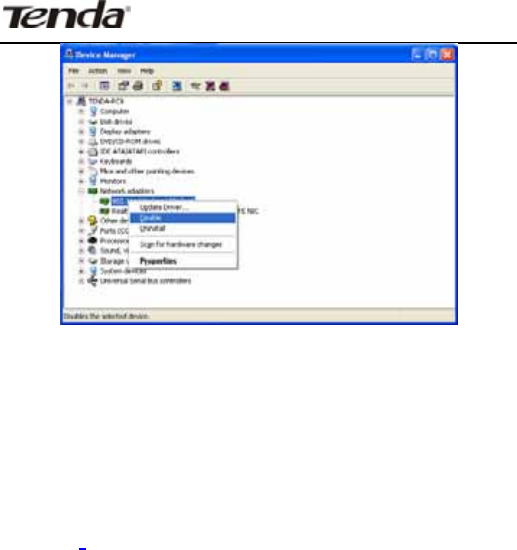
2.Select the wireless network adapter you want to
disable then right click and selectĀDisableā
Wireless Network Adapter Users’ Guide
-5-
ͳǤ
1. Please keep the product away from water and humid
environment to guarantee its normal performance
2. Protect it against other nocuous substances (such as
acid and alkali etc).
3. Please don’t keep the product directly exposed to the
sun or other object emitting great heat.
4. Please contact Tenda customer service if any
problems occur.

Wireless Network Adapter Users’ Guide
-6-
Chapter 2 Installation Guide
This chapter will assist you in installing network adapter
software packet by using the included CD. The software
packet program has integrated driver and configuration
software. So when you are installing driver the
configuration software will be automatically installed as
well.
Windows XP is used as an example to explain the
installation steps. Installation in other operation systems,
please refer to their corresponding prompts.
1. Please insert the Wireless USB Adapter into the USB
port of your computer.
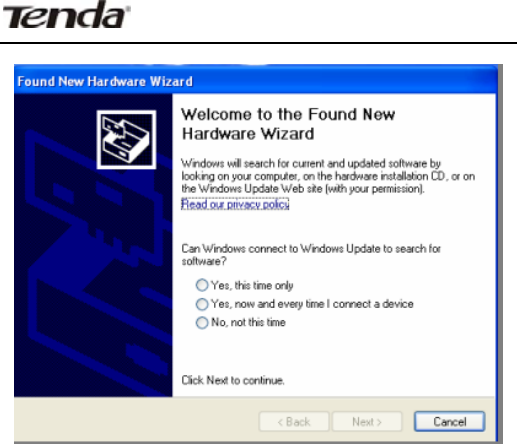
2. System will pop up a “Found New Hardware”dialogue
box. We recommend you to select “Cancel”and use the
attached quick installation CD to easily install driver and
configuration software.
Wireless Network Adapter Users’ Guide
-7-
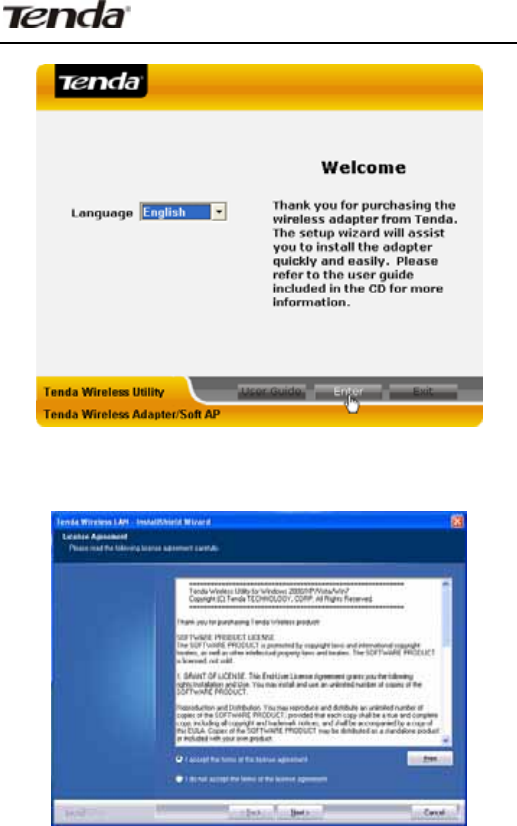
3. Insert the included CD into the CD drive of your
computer to auto-run the program. (If it doesn’t auto-run,
please double click “Tenda.exe”in the CD,). When the
welcome screen appears click ĀRunābutton.
Wireless Network Adapter Users’ Guide
-8-
4. Tick “I accept the terms of the license agreement”
and click “Next”.
Wireless Network Adapter Users’ Guide
-9-
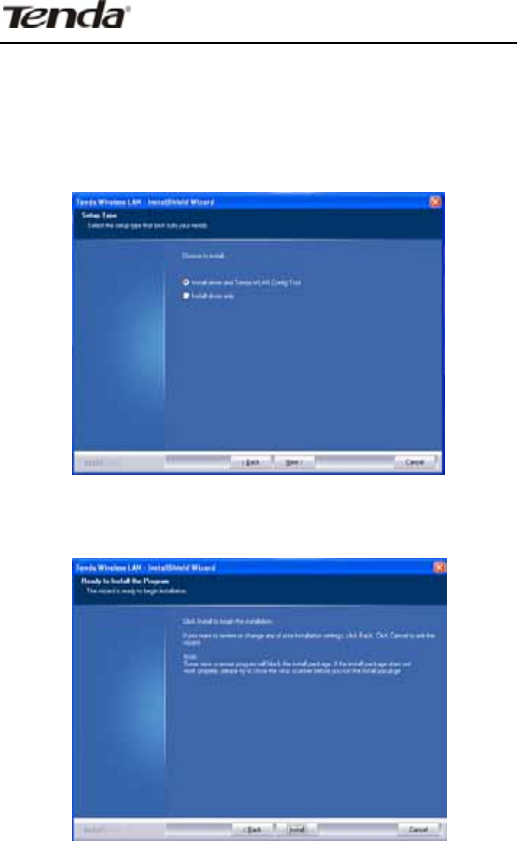
5. There are two installation methods: one is to install
driver and Tenda WLAN Config Tool. The other is to install
driver only . We recommend you to use the default
installation method.
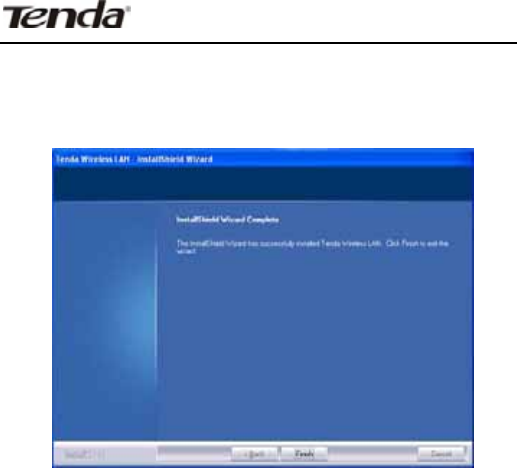
6. Click “Install” to install the driver and configuration
software.
Wireless Network Adapter Users’ Guide
-10-
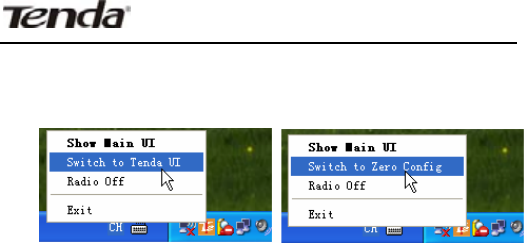
7. Click “Finish” to finish the driver and configuration
software.
Chapter 3 Client Utility Interface
This wireless USB network adapter uses Tenda client
utility interface (In the following text it is abbreviated to
UI). All functions can be configured via this software.
Select “Start”—“All Programs” —“Tenda Wireless”—
Tenda Wireless Utility”, or click the “Tenda Wireless
Utility” shortcut on your PC’s desktop to start UI.
Wireless Network Adapter Users’ Guide
-11-
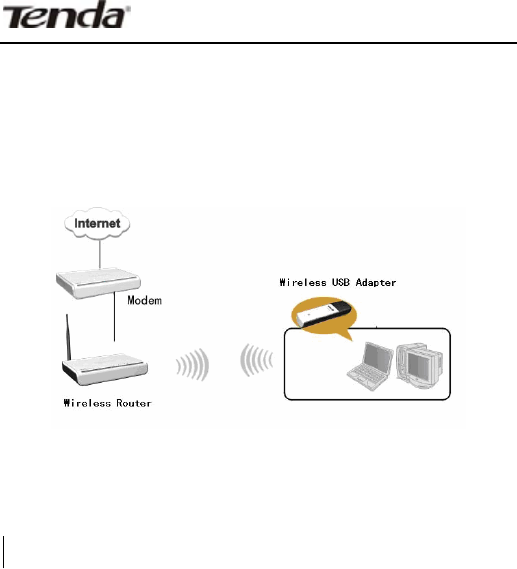
Click Tenda UI on the right-down corner on the desktop to
switch Tenda UI and Zero config, and to exit UI etc.
Note:
1. In Windows 7and VISTA, there is no switch function
between Tenda UI and Zero config.
2. Operation on Tenda UI becomes impossible when
wireless is disabled or it is switched to Zero config.
3 In Windows 2000 system, you need to use Tenda UI to
conduct wireless configuration.
4.In Windows XP or Windows 2003 system, if you want to
use the system internally attached wireless configuration
program to configure the network adapter, please first
disable Tenda UI or switch UI to Zero config.
5. Client application program is “Station Mode” (Client
Mode) by default.
6. Tenda UI users must be managers, some operations
may be inaccessible to other ordinary users due to their
given restricted rights.
Client UI enables configuration of two modes Station
mode (Client Mode) and AP mode (soft AP Mode).
Wireless Network Adapter Users’ Guide
-12-
͵ǤͳȋȌ
Station mode (Client Mode) Overview
This wireless network adapter is a common solution for
client signal reception.
Wireless Network Adapter Users’ Guide
-13-
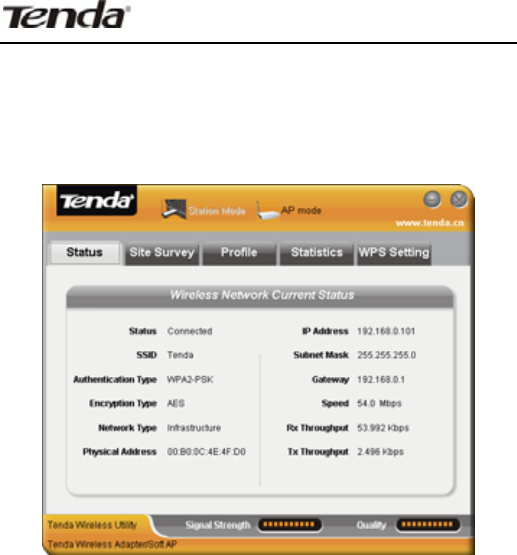
͵ǤͳǤͳ
The Network Status window displays status information
regarding the wireless network as the picture below:
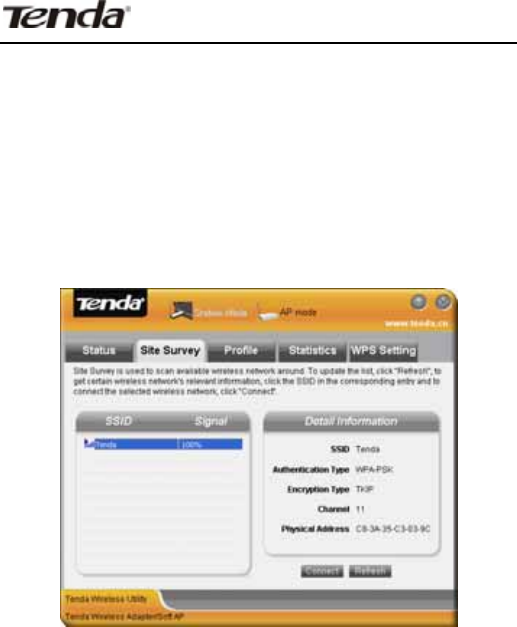
͵ǤͳǤʹ
The Site Survey interface displays the available wireless
networks in the area. When you select a wireless network
name the detailed information of this selected wireless
network will be displayed.
Before you connect wireless network, please click
Wireless Network Adapter Users’ Guide
-14-
“Refresh” to update the wireless network list and select
the one you want to connect, then click “Connect” button.
When connecting wireless network, a dialogue box will
pop up. For the un-encrypted network, directly confirm
instead of changing the configuration, however for the
encrypted wireless network, configuration of key is
needed.
͵ǤͳǤ͵
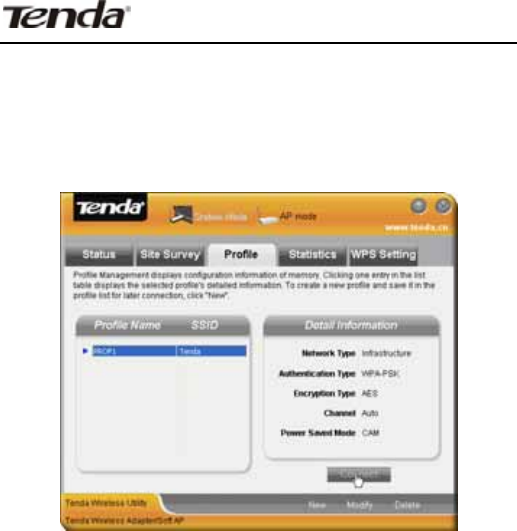
This window saves the general wireless network
parameters and profiles, which helps the wireless
adapter to quickly connect to the wireless network you
Wireless Network Adapter Users’ Guide
-15-
want. Clicking a entry in the list displays the detailed
information of the selected profile. To connect to wireless
network, click “Connect” or double click wireless network
name.
Modify: To modify Site Status and Security Setting of the
existing profiles.
Delete: To delete the existing profiles.
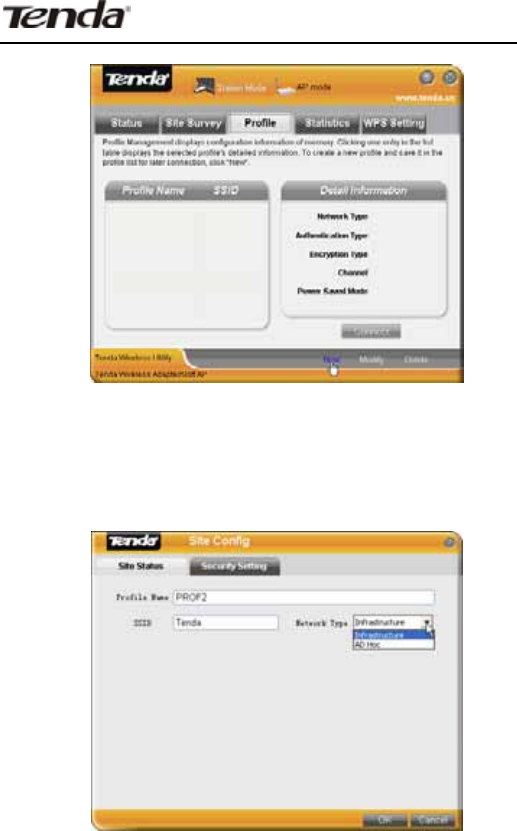
New: To create a new profile and configure the site
status and security setting.
1. Create a new configuration file
1˅Click “New” to create a new file.
Wireless Network Adapter Users’ Guide
-16-
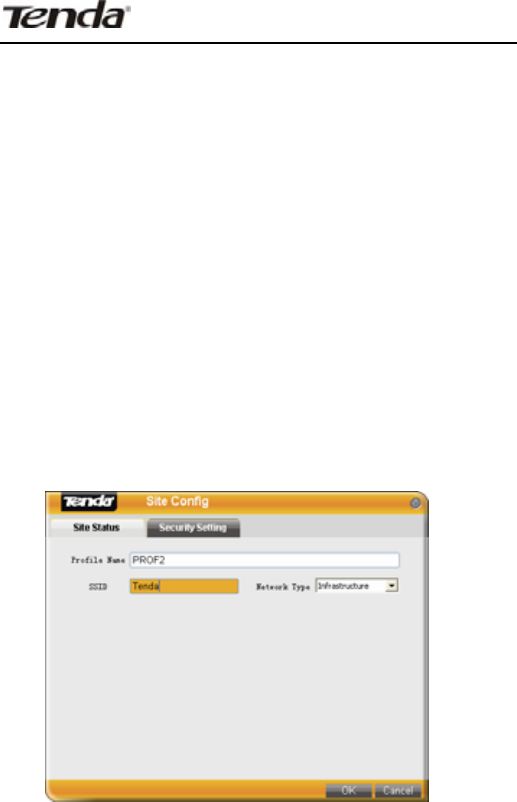
2˅Configure “Site Status” in the appearing dialogue box.
There are Infrastructure and Ad-Hoc two network types
and the default is Infrastructure as the below picture
shows.
Wireless Network Adapter Users’ Guide
-17-
Infrastructure is a application mode which integrates the
wired and wireless LAN architectures. What makes it
different from Ad-Hoc is that the computer installed with
the wireless network adapter has to fulfill wireless
communication via AP or wireless router. It has “wireless
AP + wireless network adapter” mode and “wireless
router + wireless network adapter” mode.
Ad-Hoc is a special wireless mobile network application
mode. All nodes in the network are all equal.
When you are using wireless network adapter to connect
AP or wireless router, please select Infrastructure.
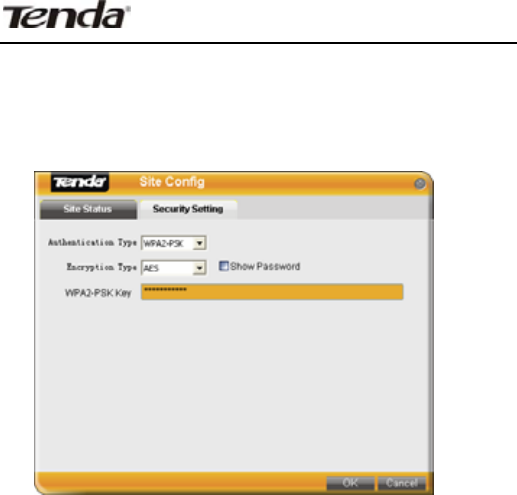
3) Security Setting: enables you to configure
Wireless Network Adapter Users’ Guide
-18-
authentication type, encryption type, and key. The
relevant configurations here must be the same as those
of the connected AP or router.
Note: If the wireless router or AP you want to connect
closes SSID broadcast function, the wireless network
adapter will not be able to scan this wireless network
SSID. However, you can create the corresponding
configuration file to connect.
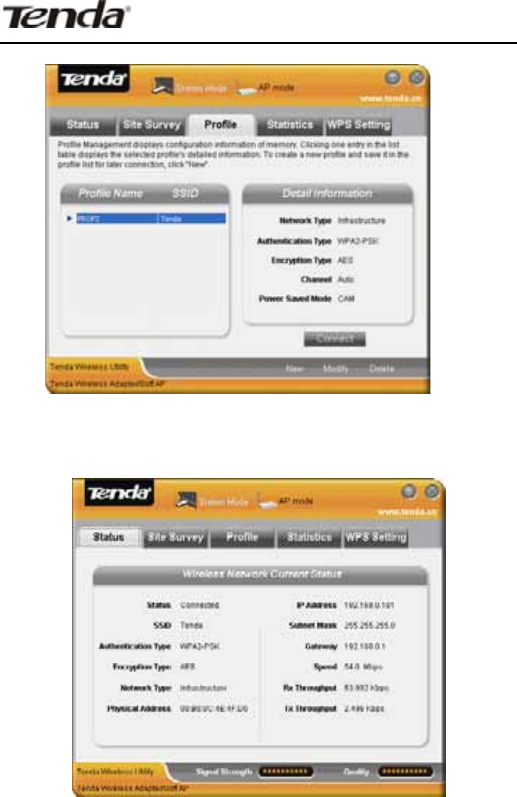
4˅Finish the above, the added wireless network
information will be shown in the profile name list. Select
the profile name and click “Connect” or double click
profile name to connect the wireless network device.
Wireless Network Adapter Users’ Guide
-19-
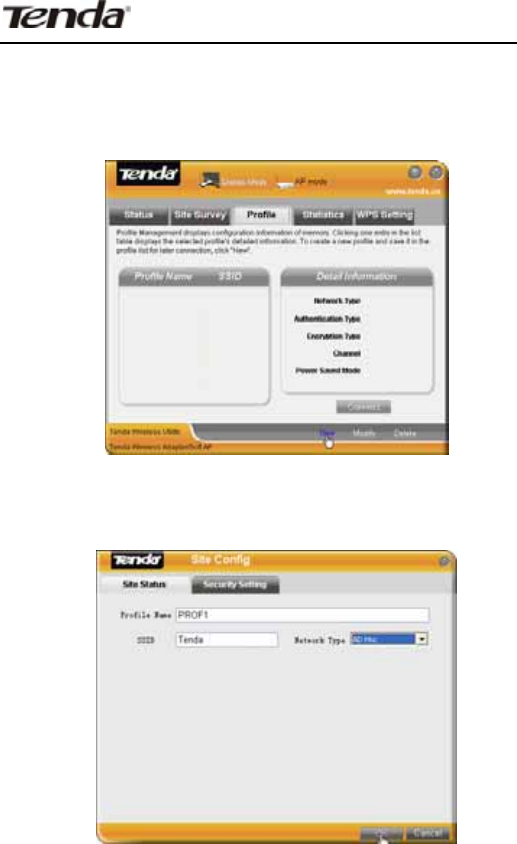
5˅After successful connection, click “Status” to view
the connection status as the picture below.
2. Ad-Hoc connection
Wireless Network Adapter Users’ Guide
-20-
1˅Set the IP address of the wireless network adapter you
want to connect at the same net segment.
2˅Click “New”.
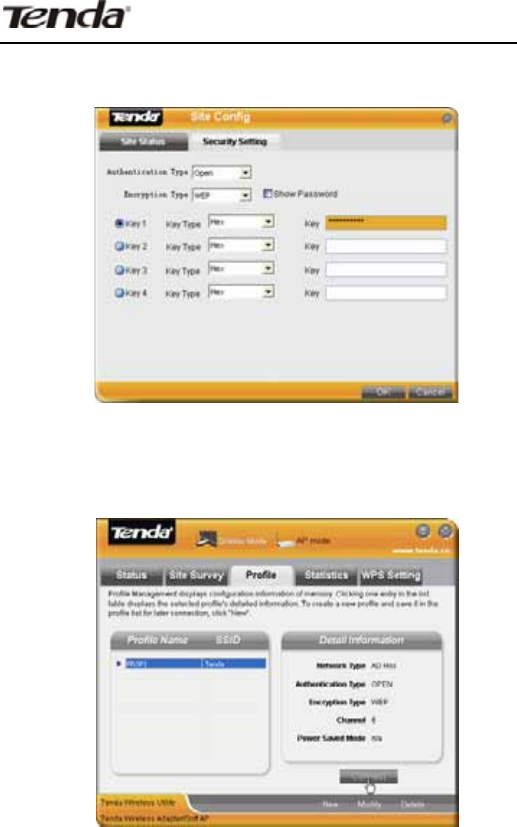
3˅Configure Site Status: Input SSID to identify the
wireless network and select Ad-Hoc for network type.
Wireless Network Adapter Users’ Guide
-21-
4˅Security Setting: Configures authentication,
encryption type and key. Click OK.
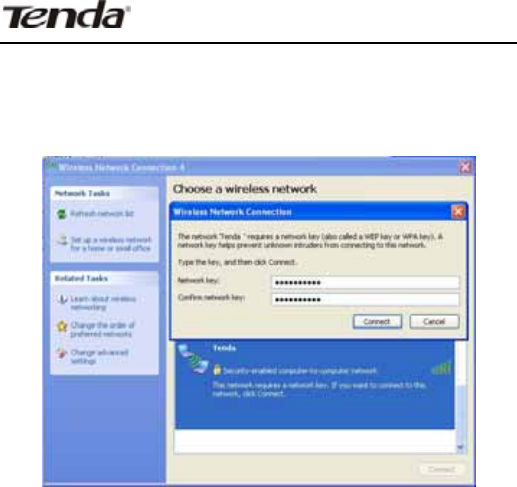
5˅The added wireless network information will be shown
in the profile list. Select the profile name and click
“Connect” or double click the profile name.
Wireless Network Adapter Users’ Guide
-22-
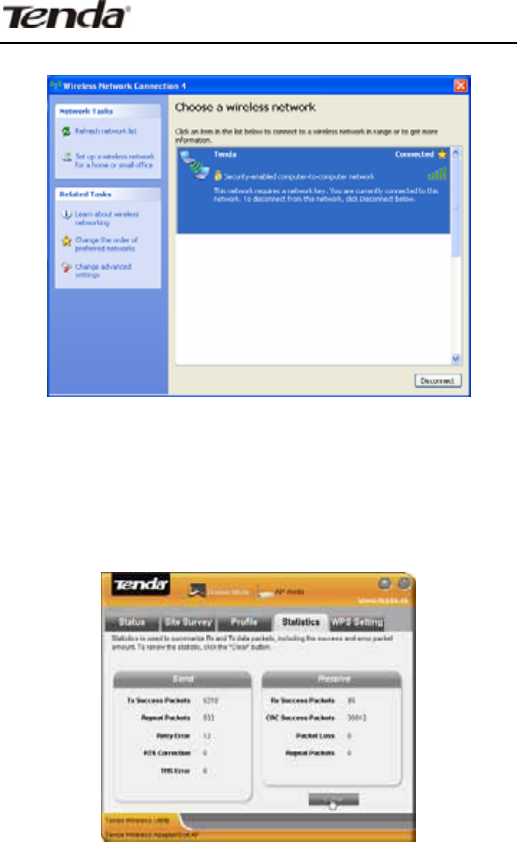
6˅Search wireless network in devices of other nodes.
Double click the wireless network you want to connect
and it will prompt you to input a key. After that, click
“Connect”.
7˅It shows as the picture below after successful
connection.
Wireless Network Adapter Users’ Guide
-23-
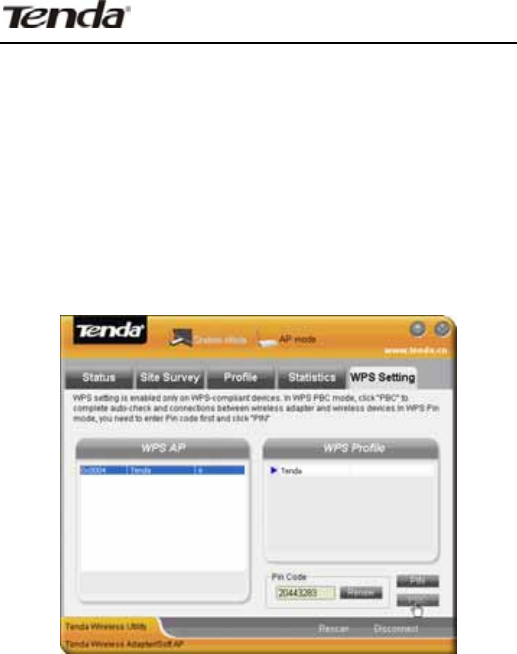
͵ǤͳǤͶ
Statistics is used to calculate the total Rx and Tx data
packets, including the successful and error packet
amount.
Wireless Network Adapter Users’ Guide
-24-
Clear: click this button to delete the existing statistics
and restart new statistics.
͵ǤͳǤ
WPS setting is enabled only on WPS-compliant wireless
devices. It helps you to quickly configure the wireless
network security.
Refresh: To update the Pin code.
Rescan: To rescan the WPS-enabled wireless network in
the area.
Disconnect: To disconnect from a connected wireless
network.

Wireless Network Adapter Users’ Guide
-25-
PIN
˖
Click this button for PIN mode connection.
PBC
澲
Click this button for PBC mode connection.
Please refer to appendix 3 for detailed configuration
steps for PIN and PBC
͵Ǥʹ
AP Mode Overview
Wireless network adapter can also serve as an access
point to transmit wireless signals and create a wireless
network, allowing other wireless clients to access the
network.
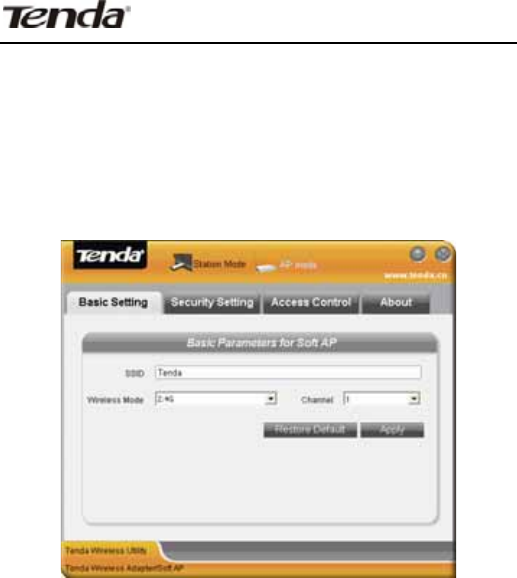
Click the AP Mode on configuration interface to enter the
AP Mode.
Wireless Network Adapter Users’ Guide
-26-
͵ǤʹǤͳ
This window is used to configure the AP’s basic
parameters, including SSID, wireless mode and channel
(SSID is Tenda by default, and channel is 1 by default).
SSID: Wireless network’s ID name scanned by wireless
adapter as a network identifier.
Channel: 1~11 channels provided.
Restore Default: to restore the set parameters to
factory default settings.
Apply: to make the configurations effective.
Wireless Network Adapter Users’ Guide
-27-
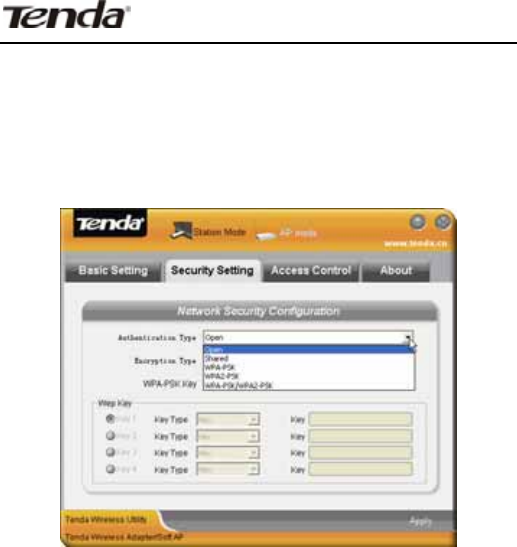
͵ǤʹǤʹ
This window is used to configure the wireless network’s
security authentication information.
WEP
澲
Supports 10/26 bits Hex characters or 5/13 ASCII.
WPA-PSK
澲
Supports 8-63-bit ASCII or 8-64 Hex
characters.
WPA2-PSK ˖Supports 8-63-bit ASCII or 8-64 Hex
characters.
WPA-PSK/WPA2-PSK
˖
Supports 8-63-bit ASCII or
8-64 hex characters.
Wireless Network Adapter Users’ Guide
-28-
Note:
The Hex characters include numbers 0~9 and letters a-f.
ASCII characters include any Arabic digitals/letters and
characters.
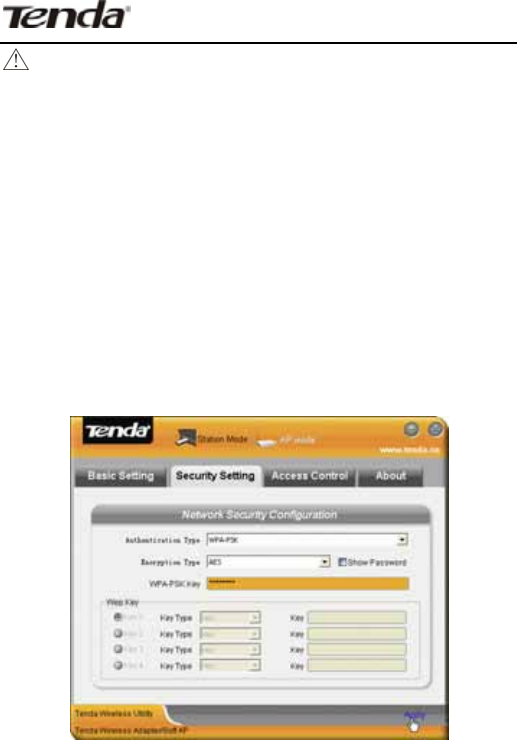
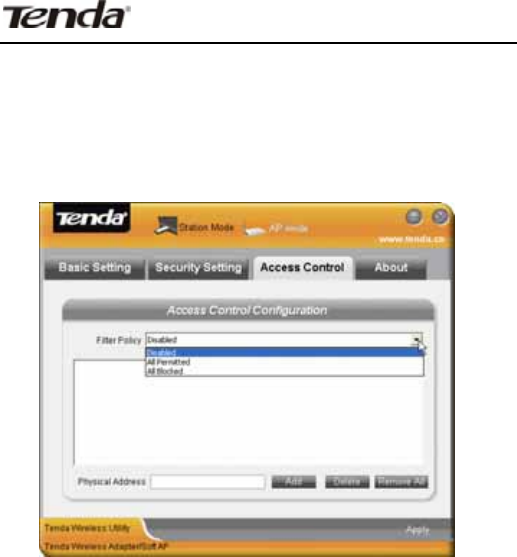
1. Configure AP Mode
1˅First input the SSID which is easy to be identified by
you in the basic settings and keep other information
unchanged.
2˅Select ĀWPA-PSK āin the drop-down menu of
authentication type under security setting. Choose
ĀAESāas encryption type, input a key and click “Apply”.
3˅Other clients can have the following picture after their
scanned usable wireless networks are successfully
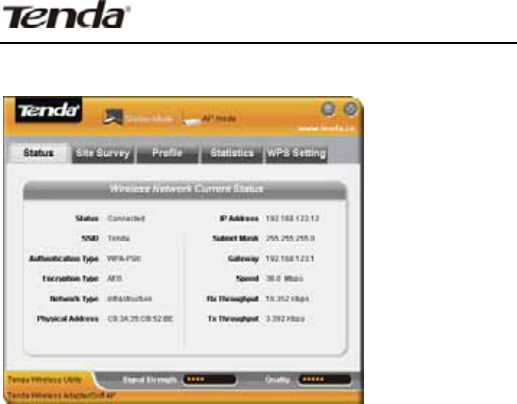
Wireless Network Adapter Users’ Guide
-29-
connected.
Wireless Network Adapter Users’ Guide
-30-
3.2.3AccessControl
Access Control is based on the MAC address to allow or
prohibit a specified client’s access to this wireless
network.
Filter Policy:
Disabled: To disable the filter function.
All Permitted: To permit all hosts whose MAC addresses
are included in the list to access the wireless network,
other hosts whose MAC addresses have not been added
to the list will be prohibited by default.
All Blocked: To prohibit all hosts whose MAC addresses
are included in the list from accessing the wireless
network, other hosts whose MAC addresses have not
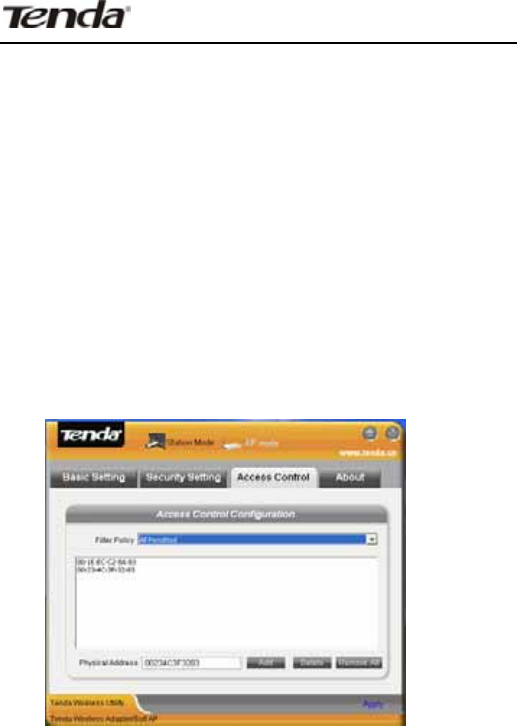
Wireless Network Adapter Users’ Guide
-31-
been added to the list will be permitted by default.
MAC Address
˖
To input the client’s MAC address you
want to filter in the physical address field.
Add: to add the entered client MAC address to the list.
Delete: to delete an existing MAC address in the list.
Remove All: to delete all clients’ MAC address in the list.
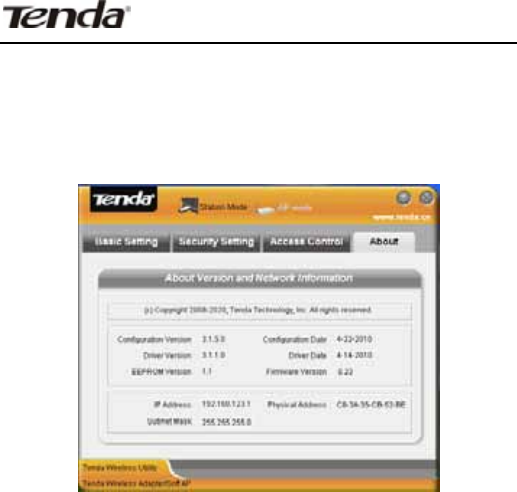
Add the MAC address of the client’s wireless network
adapter to the list and select “All Permitted” in filter policy.
Computers whose MAC addresses are not added to the
list will be refused by default.
2. Select “All Blocked” in filter policy then only host
computers whose MAC address are included in the list
can not be connected to this AP wireless network.
Wireless Network Adapter Users’ Guide
-32-
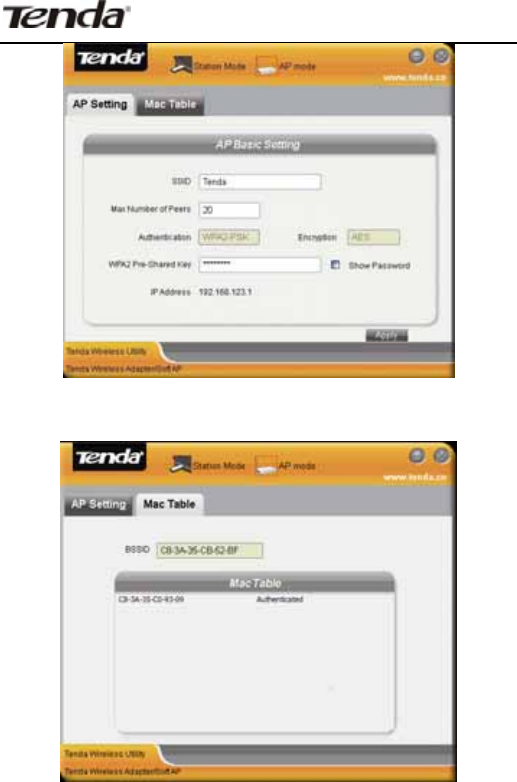
͵ǤʹǤͷ
This interface displays the parameters regarding the
software as the picture below:
͵ǤʹǤ
1. There is only AP setting and MAC table when it is
switched to AP mode under Windows 7 system.
2. You can change SSID in AP setting option and control
the number of the connected clients by modifying the
max number of peers. AP mode only has the defaulted
WPA2-AES encryption method which can not be
modified.
Wireless Network Adapter Users’ Guide
-33-
MAC Table: Displays all the connected clients’ MAC
addresses.
Chapter 4 Use the System
Wireless Network Adapter Users’ Guide
-34-
Internal Wireless Configuration
Program
This chapter explains how to use the system internal
configuration program to connect wireless network for
users who don’t install Tenda configuration program.
You must enable Windows Wireless Zero Configuration (It
is enabled by default) when using the system internal
wireless configuration program.
4.1 Wireless Network
Connection under Windows XP
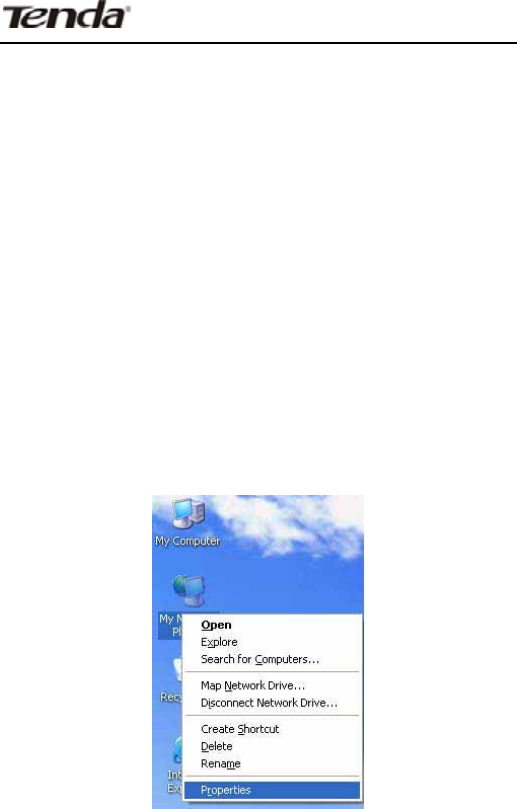
1. Right click “My Network Places” on the desktop and
select “Properties”.
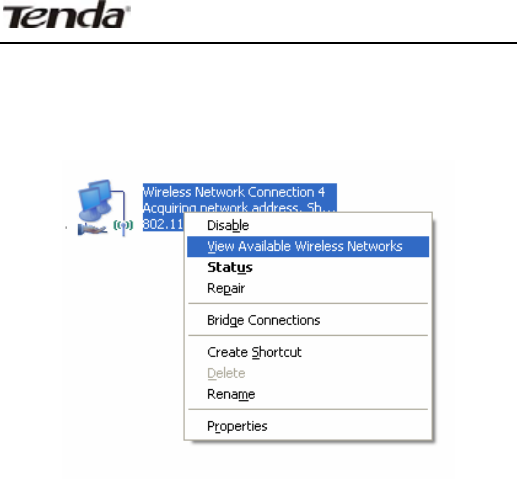
2. Open network connection and you will see “Wireless
Wireless Network Adapter Users’ Guide
-35-
Network Connection Not connected”. Right click “Wireless
Network Connection” and select “View Available Wireless
Networks” as the picture below.
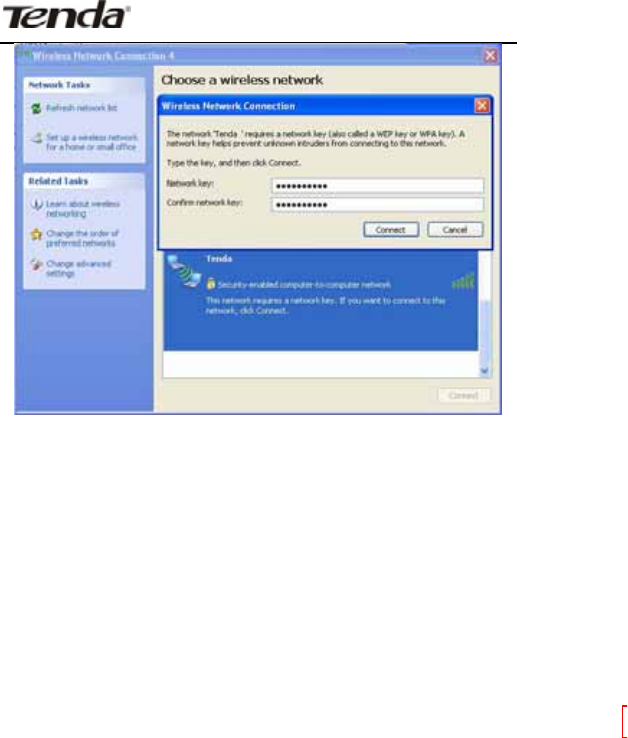
3. On the right of the interface displays the currently
scanned wireless networks. If the one you want to
connect has not been scanned, click “Refresh Network
List” to update the network list.
Select the wireless network you want to connect, and
click “Connect” or double click this wireless network.
Input a key in the key dialogue box (the key input is
case-sensitive) then click “Connect”.
Wireless Network Adapter Users’ Guide
-36-
Note: If the wireless device to connect is not encrypted,
the key dialogue box will not pop up.
4. When it shows “Connected” as the picture below, you
can enjoy wireless access to Internet.

Wireless Network Adapter Users’ Guide
-37-
5. You can change wireless network key by changing
advanced settings
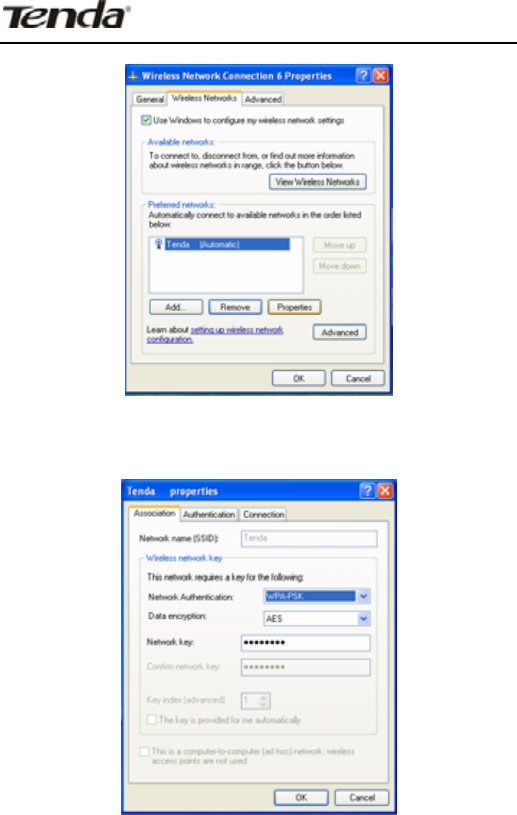
6. Select “Wireless Network” and choose the wireless
network whose configuration you want to change, and
then click “Properties”
Wireless Network Adapter Users’ Guide
-38-
7. Change the key in the appearing dialogue box.
Wireless Network Adapter Users’ Guide
-39-
4.2 Wireless Network
Connection under Windows 7
1. Right click wireless connection on the right-down
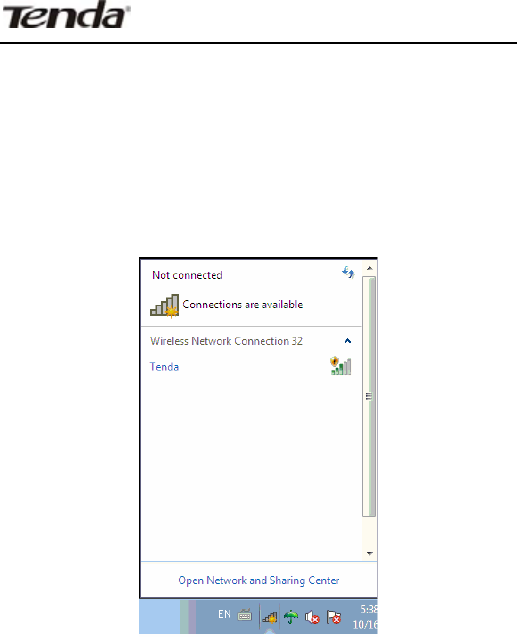
corner on the desktop to view available wireless networks
as the picture below:
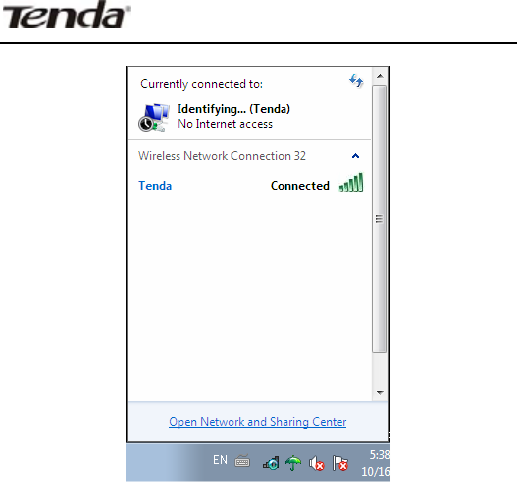
2. Select the wireless network you want to connect and
click “Connect” or double click this wireless network. If
you can not find the specified wireless network, click
refresh icon on the right-up corner to update the list.
Wireless Network Adapter Users’ Guide
-40-
APPENDIX
Appendix One Acronyms and
Terms
WLAN Wireless Local Area Network
802.11 A family of specifications developed by the
IEEE for WLAN technology.

Wireless Network Adapter Users’ Guide
-41-
802.11a An extension to 802.11 WLAN standards
that provides up to 54 Mbps transmission
in the 5 GHz UNI radio band.
802.11b An extension to 802.11 WLAN standard
that provides up to 11 Mbps transmission
in the 2.4 GHz ISM radio band. 802.11b
uses DSSS modulation.
802.11g An extension to 802.11 WLAN standard
that provides up to 54 Mbps transmission
in the 2.4 GHz ISM radio band. 802.11b
uses OFDM modulation and is backwards
compatible with 802.11b.
WEP Wired Equivalent Privacy. A security
protocol for WLANs defined in the IEEE
802.11 standard.
WPA Wireless Protected Access ˈ adopts rotating
keys.
ICS Microsoft Internet Connection Sharing enables
multi-computer to share access to Internet via one PC.

Wireless Network Adapter Users’ Guide
-42-
Appendix Two: Product
Specification
Standard IEEE802.11g, IEEE802.11b,
IEEE802.11n
Port USB2.0
Frequency Range 2.412~2.462GHz
Transmission
Rate 0D[0ESV
Transmission
Power Max 11.6dBm
Modulation
Method OFDM, CCK
Working Temper. 0ć̚45ć
Storage Temper. -40°c̚70Ԩ
Working
Humidity 10ˁ̚RH non-condensing

Wireless Network Adapter Users’ Guide
-43-
Appendix Three:How to Set WPS
WPS setting supports PBC and PIN code modes. The
setting steps of the two modes will be introduced in detail.
The following illustrations take Tenda W311R Wireless
Router for example.
1. Wireless Connection in PBC Mode
There are usually two ways of enabling PBC on Wireless
router (please refer to the user guide of your wireless
router).
1.1 Use WPS button on the router
Keep pressing the WPS button on the Router’s panel for
one second if your wireless router supports WPS (such as
Tenda W311R). The WPS indicator will keep flashing (for
about 2 minutes). It indicates that the WPS function is
enabled on the router. There are 2 ways to use wireless
adapter for PBC connection:
Wireless Network Adapter Users’ Guide
-44-
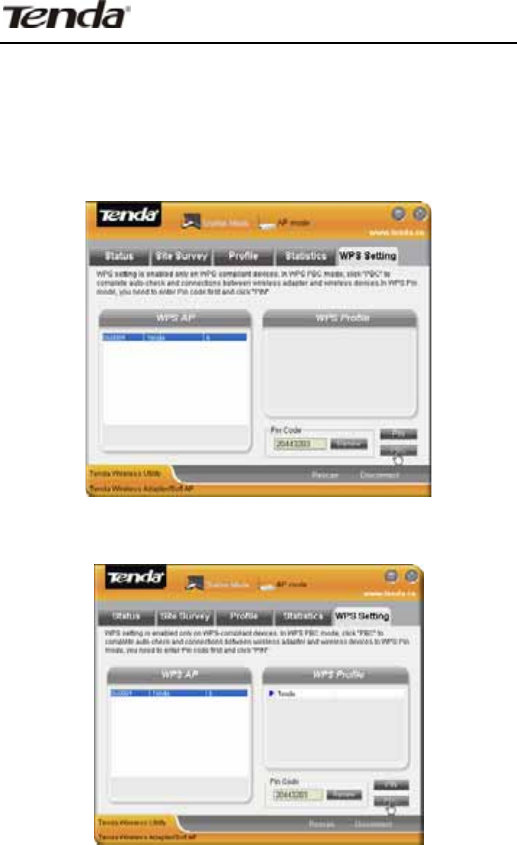
1˅Press in the PBC button on the side of the wireless
adapter after the router has enabled PBC function.
澡
Scan the router SSID in the WPS configuration
interface on the UI of the adapter and click “PBC” button
to connect.
The successful connection is shown as the picture:
Wireless Network Adapter Users’ Guide
-45-
2. Wireless Connections in PIN Mode
2.1 Start Tenda wireless client program to enter the WPS
configuration interface. The PIN code list displays the
existing PIN of the network adapter. Copy or directly
input this Pin Code to the PIN code field of the router
(Please refer to the users’ guide of your wireless router).
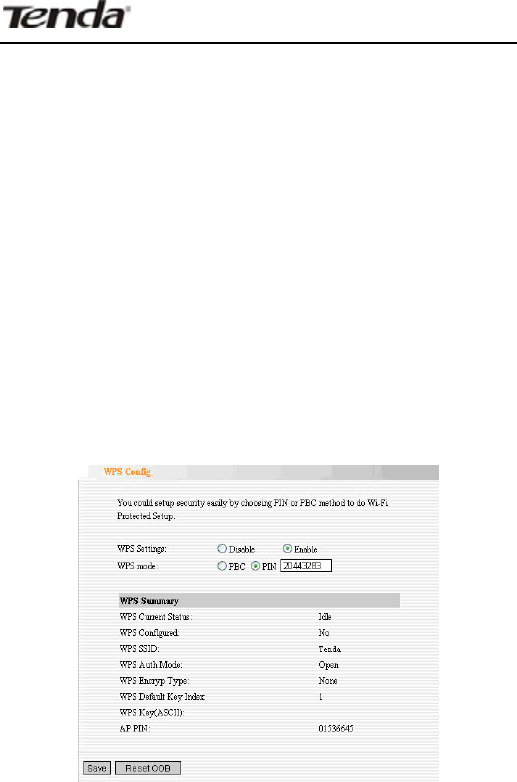
Take Tenda W311R as an example. First enter its WPS
configuration interface. Enable WPS settings and select
PIN for WPS mode then click “Save” button. Now the WPS
indicator of the Router will start flashing. It indicates that
WPS function is enabled.
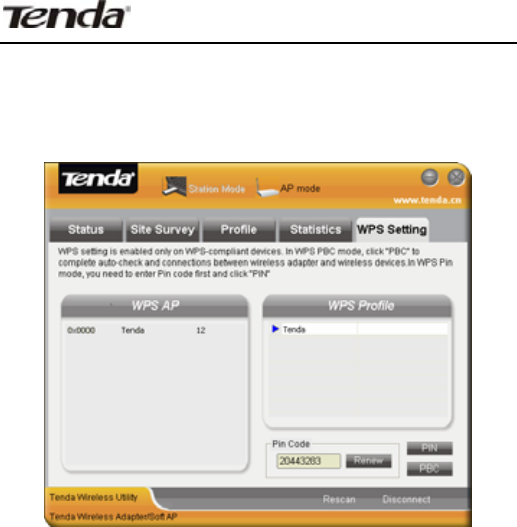
Click the “Rescan” to display the SSID of the connected
devices that have enabled WPS function. Select Tenda
Wireless Network Adapter Users’ Guide
-46-
and click PIN button. When the connection is successfully
established this wireless SSID will be added to
configuration file list as the picture below:
Appendix Four FAQ
Q1: Microsoft ICS service is pending.
A1: If ICS service can not be enabled after a long time,
please re-switch the Station Mode to AP Mode. Restart
the computer if this does not work.
Q2: ICS is already bound by another network device.
A2: Microsoft ICS service can only combine one group of
Wireless Network Adapter Users’ Guide
-47-
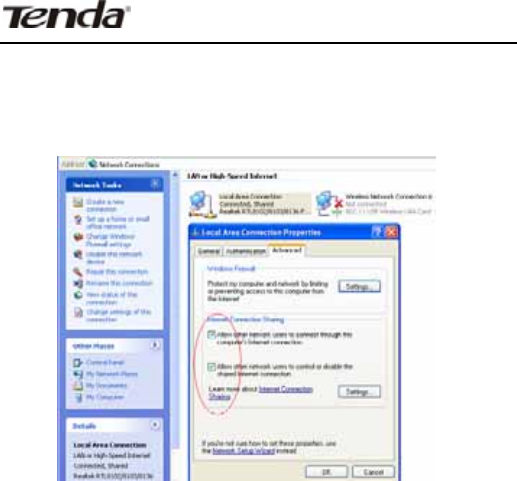
WAN and LAN. This message indicates ICS may have
been enabled by other network adapters.
Please manually cancel ICS and re-switch to AP mode.
Manually enable or cancel ISC
Q3: Failed to enable ICS.
A3: Microsoft ICS service can only combine one group of
WAN and LAN. This message indicates ICS may have
been enabled by other network adapters.
1.Please manually cancel or restart and cancel ICS, then
re-switch to AP mode.
2. This dialogue box appears because virtual wi-fi
miniport adapter can only be used by one wireless
network at a time. Please disable other non- Tenda

Wireless Network Adapter Users’ Guide
-48-
wireless network adapter and re-switch to AP mode.
Q4: Client can not obtain IP when connected to soft AP of
the wireless network adapter.
A4: Manually set a IP address at the same net segment
as that of AP and the gateway at the IP address of AP. And
communication can be achieved.
Q5: Some function buttons on UI become grey and can
not be used.
A5: This is because you have switched to Zero config
mode, please right click the Tenda UI ON the right-down
corner of your desktop. Operations can be done after you
have switched to Tenda UI.
Q6: In Windows 2000 system, IP address can not be
obtained when it is switched to AP Mode.
A6: In Windows 2000 system, you have to manually
configure share and then switch to AP. And an IP address
of 192.168.0.1 will be obtained.
Eu Declaration or Declaration of Conformity
Hereby, SHENZHEN TENDA TECHNOLOGY CO.,LTD,
declares that this Wireless Broadband Router is in
compliance with the essential requirements and other
relevant provisions of Directive 1999/5/EC.

Wireless Network Adapter Users’ Guide
-49-
FCC Statement
This equipment has been tested and found to comply
with the limits for a Class B digital device, pursuant to
Part 15 of the FCC Rules. These limits are designed to
provide reasonable protection against harmful
interference in a residential installation. This equipment
generates, uses and can radiate radio frequency energy
and, if not installed and used in accordance with the
instructions, may cause harmful interference to radio
communications. However, there is no guarantee that
interference will not occur in a particular installation. If
this equipment does cause harmful interference to radio
or television reception, which can be determined by
turning the equipment off and on, the user is encouraged
to try to correct the interference by one of the following
measures:
- Reorient or relocate the receiving antenna.
- Increase the separation between the equipment and
receiver.
- Connect the equipment into an outlet on a circuit
different from that
to which the receiver is connected.
Consult the dealer or an experienced radio/TV technician
for help.
FCC Caution: Any changes or modifications not expressly
approved by the party responsible for compliance could
void the user’s authority to operate this equipment.
This device complies with Part 15 of the FCC Rules.
Operation is subject to the following two conditions: (1)
This device may not cause harmful interference, and (2)
this device must accept any interference received,
including interference that may cause undesired
operation.

Wireless Network Adapter Users’ Guide
-50-
IMPORTANT NOTE :
The product comply with the US/Canada portable RF
exposure limit set forth for an uncontrolled environment
and are safe for intended operation as described in this
manual. The further RF exposure reduction can be achieved
if the product can be kept as far as possible from the user
body or set the device to lower output power if such function
is available
Caution!
The manufacturer is not responsible for any radio or TV
interference caused by unauthorized modifications to this
equipment. Such modifications could void the user
authority to operate the equipment.
If you have any problem, please contact our customer
service or visit our website.
Tenda website : http://www.tenda.cn
TEL: (86)0755-27657180 27653089
Email: support@tenda.com.cn