TENDA TECHNOLOGY W316R 150Mbps Wireless‐N Router User Manual
SHENZHEN TENDA TECHNOLOGY CO., LTD. 150Mbps Wireless‐N Router
Users Manual

11N Wireless Broadband Router User Guide
1
Wireless-N Broadband Router
W316R
Notice:
RF Exposure Statement
To maintain compliance with FCC’s RF Exposure
guidelines, This equipment should be installed and
operated with minimum distance between 20cm the
radiator your body: Use only the supplied antenna.

11N Wireless Broadband Router User Guide
2
Copyright Statement
is the registered tr ademark of Shenzhen
Tenda Technology Co., Ltd. All the products and product
names men tioned herei n are the tr ademarks or
registered t rademarks of thei r respecti ve holders.
Copyright of the whole product as integration, including
its accessories and software, belongs to Shenzhen Tenda
Technology Co., Ltd. Without the permission of Shenzhen
Tenda Technology Co., Ltd, any individual or party is not
allowed to copy, plagiarize, reproduce or translate it into
other languages.
All t he p hotos a nd p roduct s pecifications me ntioned in
this manual are for references only. Upgrades of software
and hardware may occur, and if there are changes, Tenda
is not responsible for notifying in advance. If you would
like to know more about our product information, please
visit our website at www.tenda.cn.

11N Wireless Broadband Router User Guide
3
Contents
CHAPTER 1 PRODUCT INTRODUCTION.........................................1
1.1 PACKAGE CONTENTS.............................................................................2
1.2 LED INDICATORS AND PORT DESCRIPTION ......................................2
CHAPTER 2 PRODUCT INSTALLATION............................................5
CHAPTER 3 HOW TO CONFIGURE TO ACCESS THE
INTERNET...................................................................................................7
3.1 HOW TO SET THE NETWORK CONFIGURATIONS...............................7
3.2 LOG IN TO THE ROUTER......................................................................14
3.3 FAST INTERNET ACCESS ......................................................................16
3.4 FAST ENCRYPTION ...............................................................................18
CHAPTER 4 ADVANCED SETTINGS................................................19
4.1 SYSTEM STATUS.....................................................................................19
4.2 WAN SETTINGS....................................................................................21
4.3 LAN SETTINGS.....................................................................................28
4.4 DNS SETTINGS.....................................................................................29
4.5 BANDWIDTH CONTROL .......................................................................30
4.6 TRAFFIC STATISTICS .............................................................................35
CHAPTER 5 WLAN SETTINGS.............................................................37
5.1 WIRELESS BASIC SETTINGS..................................................................37
5.2 WIRELESS SECURITY SETTINGS...........................................................43
5.2.1 WPS SETTINGS ..................................................................................44
5.3 WIRELESS ACCESS CONTROL ..............................................................48
5.4 CONNECTION STATUS..........................................................................49
CHAPTER 6 DHCP SERVER..................................................................49

11N Wireless Broadband Router User Guide
4
6.1 DHCP SETTINGS..................................................................................49
6.2 DHCP CLIENT LIST.............................................................................50
CHAPTER 7 VIRTUAL SERVER...........................................................52
7.1 PORT RANGE FORWARDING ...............................................................52
7.2 DMZ SETTINGS....................................................................................56
7.3 UPNP SETTINGS ..................................................................................57
CHAPTER 8 SECURITY SETTINGS....................................................58
8.1 CLIENT FILTER SETTINGS....................................................................58
8.2 MAC ADDRESS FILTER........................................................................60
8.3 URL FILTER SETTINGS........................................................................63
8.4 REMOTE WEB MANAGEMENT............................................................65
CHAPTER 9 ROUTING SETTINGS.....................................................68
9.1 ROUTING TABLE...................................................................................68
9.2 STATIC ROUTING..................................................................................68
CHAPTER 10 SYSTEM TOOLS..............................................................70
10.1 TIME SETTINGS...................................................................................70
10.2 DDNS..................................................................................................71
10.3 BACKUP/RESTORE .............................................................................73
10.4 RESTORE TO FACTORY DEFAULT.....................................................77
10.5 UPGRADE.............................................................................................77
10.6 REBOOT THE ROUTER........................................................................78
10.7 PASSWORD CHANGE...........................................................................79
10.8 SYSLOG.................................................................................................81
10.9 LOG OUT..............................................................................................82
APPENDIX 1 GLOSSARY.......................................................................83

11N Wireless Broadband Router User Guide
5
APPENDIX 2 PRODUCT FEATURES.................................................85
APPENDIX 3 FAQ....................................................................................86
APPENDIX 4 CLEAR WIRELESS CONFIGURATION...................90
APPENDIX 5 REGULATORY INFORMATION...............................94

11N Wireless Broadband Router User Guide
1
Chapter 1 Product Introduction
Thank y ou for purchasing the T enda W316R
Wireless Broadband Router!
This easy -to-use router provi des si mple
configuration interface which enables you to configure it
with ease. It i s based on the l atest IEEE802. 11n
standard, and i s backward compatible with devi ces of
IEEE802.11b/g standards.
The W316R,including router, wireless AP, four-port
switch and fi rewall in on e,provides powerful online
monitor function and supports URL filter and MAC filter.
With WDS function, it can repeat an d amplify wireless
signals so as to enlarge network coverage area. It truly
supports UPnP and WMM to make your audio and video
smoother. With QoS function, it can efficiently distribute
the downloading rate for the clients. Additionally, with
super compa tibility, the r outer can break the access
limits i n so me areas so that mul tiple computers can
share the Internet access.

11N Wireless Broadband Router User Guide
2
1.1 Package Contents
Please veri fy the fol lowing i tems afte r you open the
package:
¾ One W316R Wireless Broadband Router
¾ One Quick Installation Guide
¾ One Power Adapter
¾ One Software CD
If any of the l isted i tems are mi ssing or damag ed,
please contact the T enda resel ler for immediate
replacement.
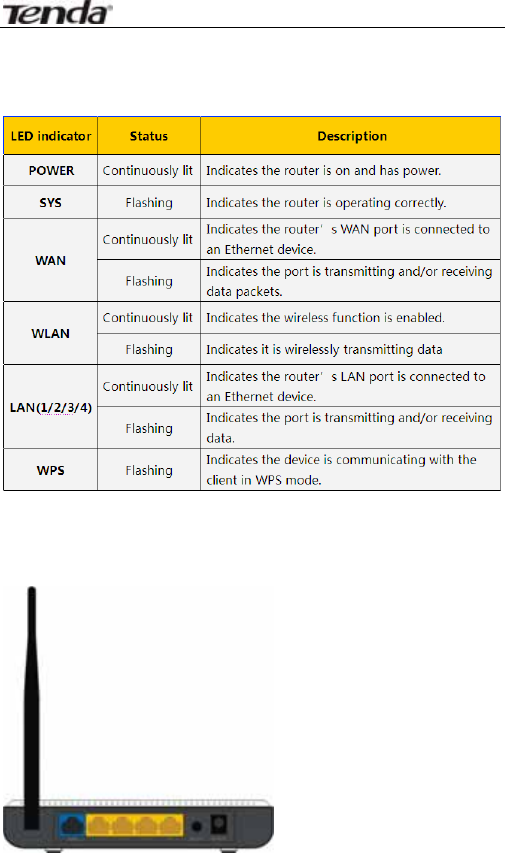
1.2 LED Indicators and Port Description
Panel and LED indicators show:
11N Wireless Broadband Router User Guide
3
LED indicator description on the front panel
Back panel port show
11N Wireless Broadband Router User Guide
4
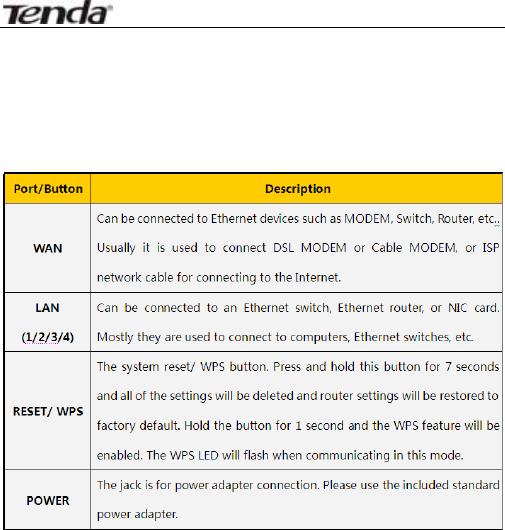
Back panel port description
11N Wireless Broadband Router User Guide
5
Chapter 2 Product Installation
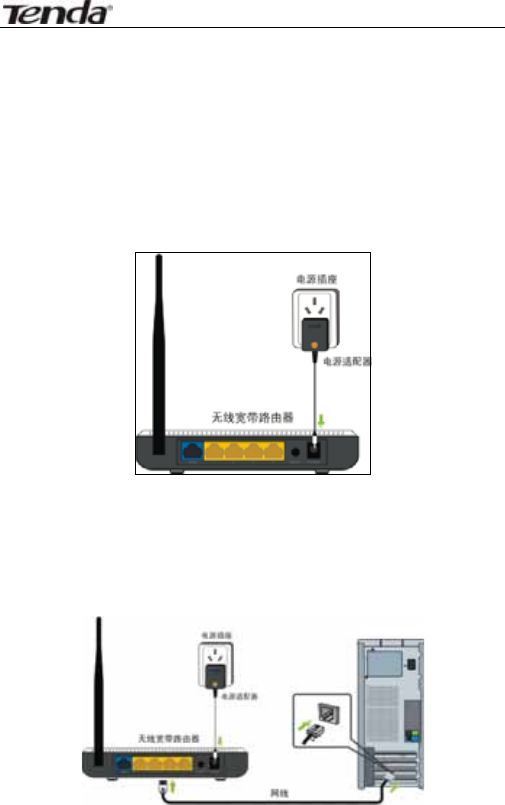
1. Please use only the included power adapter to
power y our r outer. ( NOTE: Use of an unmatched
power adapter could cause damage to this product).
2. Pl ease connect the router ’s LA N port to your
computer with an Ethernet cable as shown below.
11N Wireless Broadband Router User Guide
6
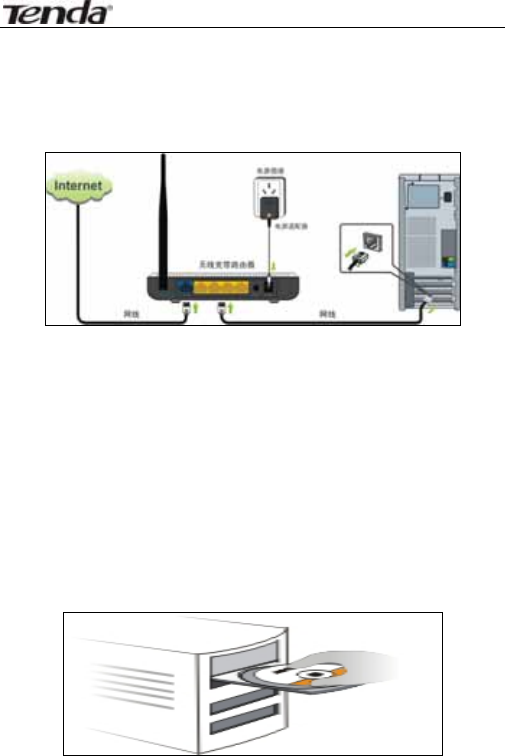
3. Please connect your broadband line provided by your
ISP to the router’s WAN port.
4. Insert the included software CD into the CD drive of
your computer . After t he software automati cally
initiates, double click the “Setup” icon and follow the
instructions to compl ete the i nstallation. You can a lso
enter the router ’s W eb-based Uti lity to compl ete the
configuration.
11N Wireless Broadband Router User Guide
7
Chapter 3 How to configure to access
the Internet
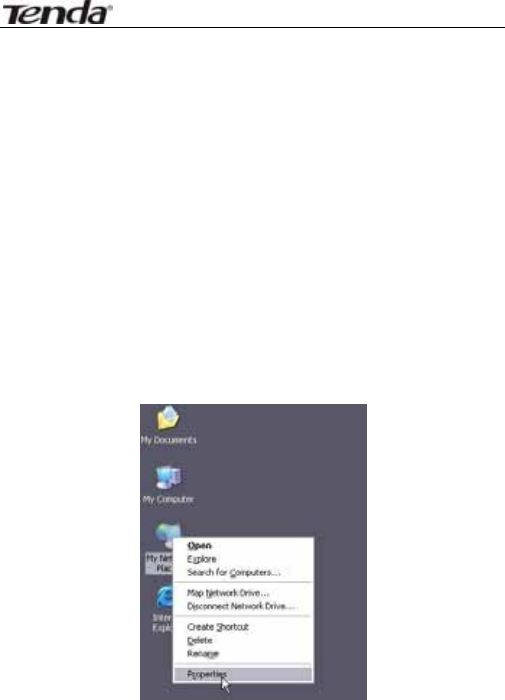
3.1 How to Set the Network Configurations
Network Configurations under windows XP
1. Right click “My Network Places” on your computer
desktop and select “Properties”.
2. Right cli ck “ Local Area Connection ” and sel ect
“Properties”.

11N Wireless Broadband Router User Guide
8
3. S elect “ Internet Pro tocol (TCP/IP) ” and click
“Properties”.
4. Select “Obtain an IP address automatically” and
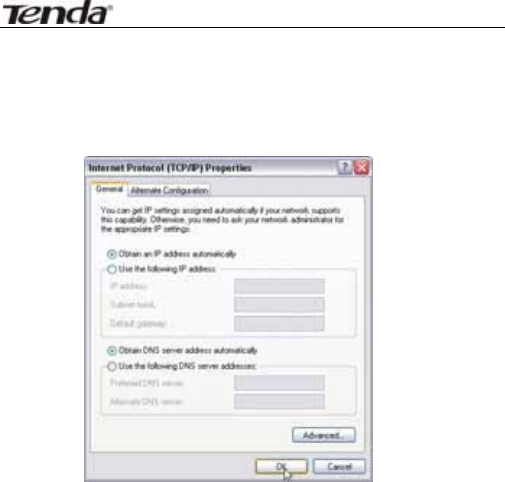
11N Wireless Broadband Router User Guide
9
“Obtain D NS ser ver addr ess automatically ”.
Click “OK” to save the configurations.
Or select “Use the following IP address ” and enter
the IP addr ess, Subnet mask, Defaul t gatewa y a s
follows:
¾ IP Address: 192.168.0.XXX: (XXX i s a number
from 2~254)
¾ Subnet Mask: 255.255.255.0
¾ Gateway: 192.168.0.1
¾ DNS se rver: You s hould in put t he DNS s erver
address provided by your IS P. Otherwise, you can
enter 1 92.168.0.1. Cli ck “OK” to save the
configurations.

11N Wireless Broadband Router User Guide
10
Network Configurations under windows 7
1. Click the network icon on the l ower ri ght corner of
your computer desktop, and then cli ck” Open Network
and Sharing Center”.
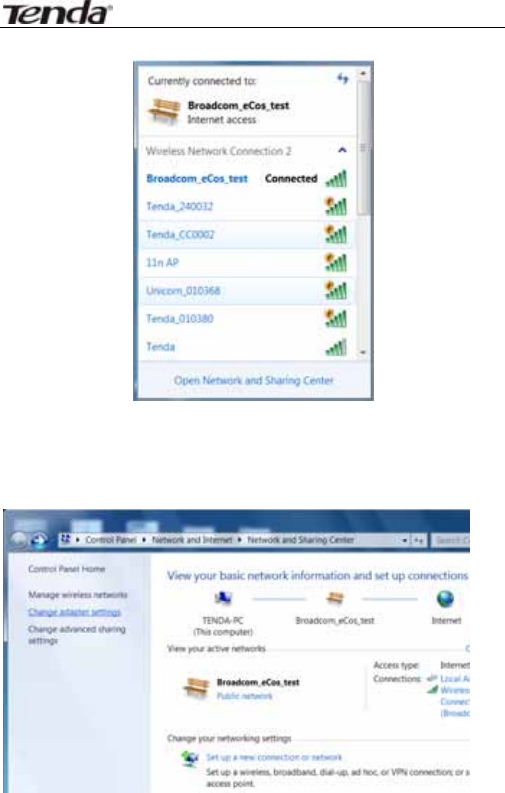
11N Wireless Broadband Router User Guide
11
2. Click “Change adapter settings” on the left side of the
window.
3. Ri ght click “Local Area Connecti on” and sel ect
“Properties”.
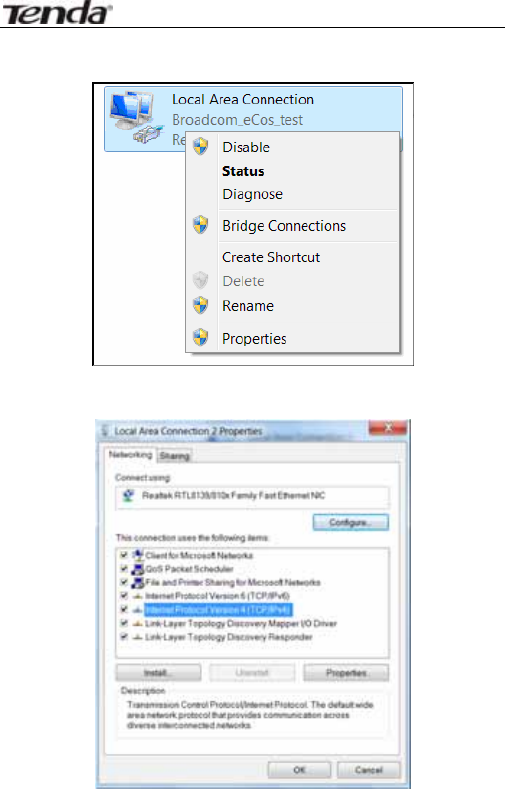
11N Wireless Broadband Router User Guide
12
4. Double click” Internet Protocol Version 4(TCP/IPv4)".

11N Wireless Broadband Router User Guide
13
5. Select “Obtain an IP address automatically” and
“Obtain D NS ser ver addr ess automatically ”.
Click “OK” to save the configurations.
Or select “Use the following IP address ” and enter
the IP addr ess, S ubnet mask, D efault gatewa y as
follows:

11N Wireless Broadband Router User Guide
14
¾ IP Address: 192.168.0.XXX: (XXX i s a number
from 2~254)
¾ Subnet Mask: 255.255.255.0
¾ Gateway: 192.168.0.1
¾ DNS se rver: You s hould in put t he DNS s erver
address provided by your IS P. Otherwise, you can
enter 1 92.168.0.1. Cli ck “OK” to save the
configurations.
3.2 Log in to the Router
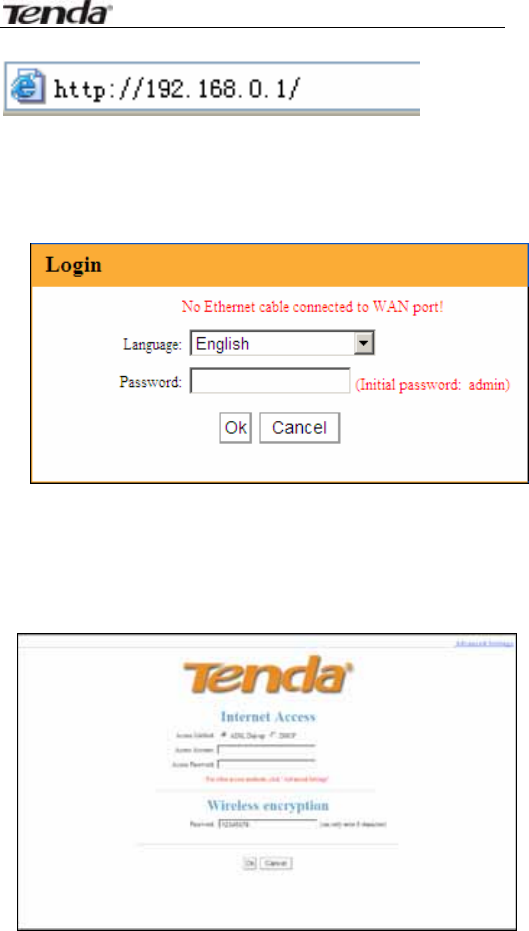
1. To access the R outer’s Web-based Utility, launch a
web browser such as Internet Explorer or Firefox and
enter http://192.168.0.1. Press “Enter”.
11N Wireless Broadband Router User Guide
15
2. Type “admin” in the “Password” field. Click “OK”.
3. If you enter the correc t password, you will come to
the router’s web-based utility as is shown below.
11N Wireless Broadband Router User Guide
16
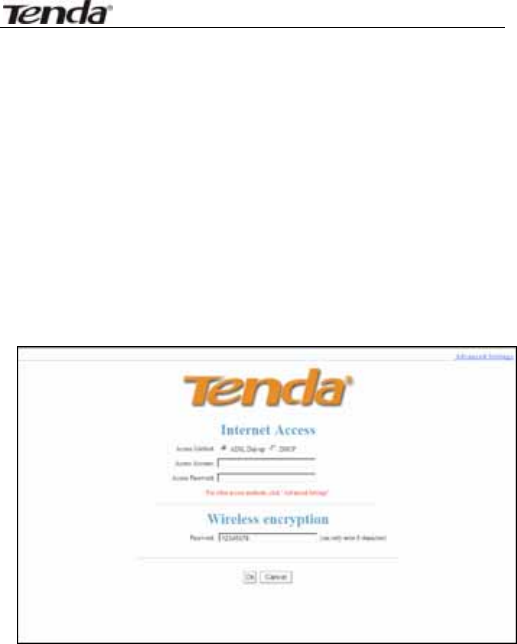
3.3 Fast Internet Access
Two kinds of fast access methods are provided on the
router’s web-based utility: ADSL dial-up and DHCP.
If you select ADSL dial-up, you only need to enter the
access accou nt and access password as we ll as the
wireless password, and then click “Ok” to complete the
settings.
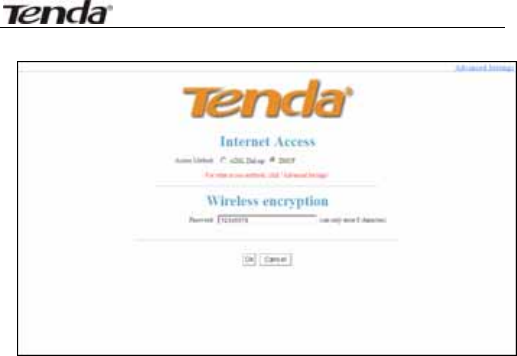
If you select DHCP, you only need to enter the wireless
password and click “Ok” to complete the settings.
11N Wireless Broadband Router User Guide
17
The defaul t access meth od i s A DSL dial-up and the
access account and access password are the same as
the ADSL dial-up account and password, which you can
inquire your broadband ISP. For other access methods,
please refer t o WAN settings in chapter 4.The wi reless
password can only consist of 8 characters, the default is
12345678 and you can modify it when necessary.

11N Wireless Broadband Router User Guide
18
3.4 Fast Encryption
The router provi des two encryption s etting screens,
one i s si mple and easy , the other i s adv anced (For
advanced setting, please refer to chapter 5.2).
Simple and easy screen:
Log on to the router’s web-based utility and you may
set encrypti on for the router. The defaul t adopts
WPA-PSK mode and A ES Al gorithm. The def ault
password is 12345678, as shown below.
NOTE: The wi reless password can onl y be 8
characters in length and t he default is 12345678, you
can modify it when necessary.
11N Wireless Broadband Router User Guide
19
Chapter 4 Advanced Settings
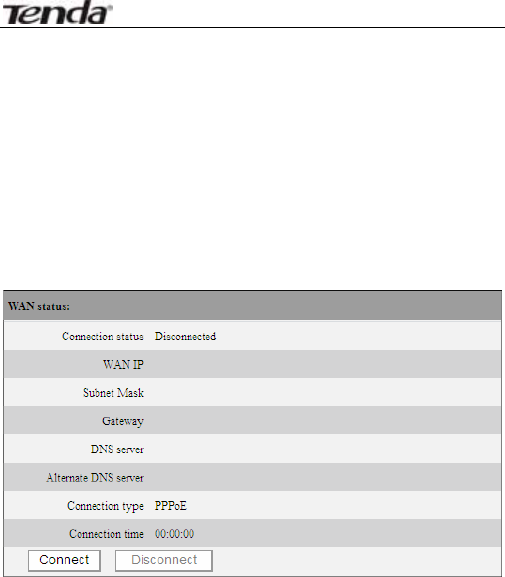
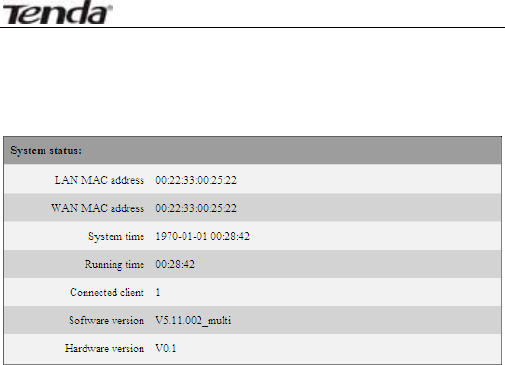
4.1 System Status
System status screen al lows you to view the route r’s
WAN port status and system status.
Connection status: It di splays the router ’s WAN
connection status.
Disconnected: It i ndicates the router ’s W AN por t
hasn’t been connected with the network cable.
Connecting: It i ndicates the router ’s WAN port i s
obtaining IP address.
Connected: It i ndicates the R outer i s well
connected with the ISP.
WAN IP:IP address obtained from ISP.
Subnet mask: Obtained from ISP.
Gateway: Obtained from ISP.
DNS server: Obtained from ISP.
Alternate DNS server: Obtained from ISP.
11N Wireless Broadband Router User Guide
20
Connection type: It displays your current access
method.
LAN MAC address :It displays the R outer’s LAN
MAC address.
WAN MAC address:It displays the Router’s WAN
MAC Address.
System t ime:It di splays the syste m’s updat ed
time
Connected client :It displays the number of the
connected c omputers(normally it displ ays the
number of clients whose IP addresses obtained via
DHCP server)
Software v ersion :It di splays t he R outer’s
software version;
Hardware v ersion:It di splays the R outer’s
hardware version.
11N Wireless Broadband Router User Guide
21
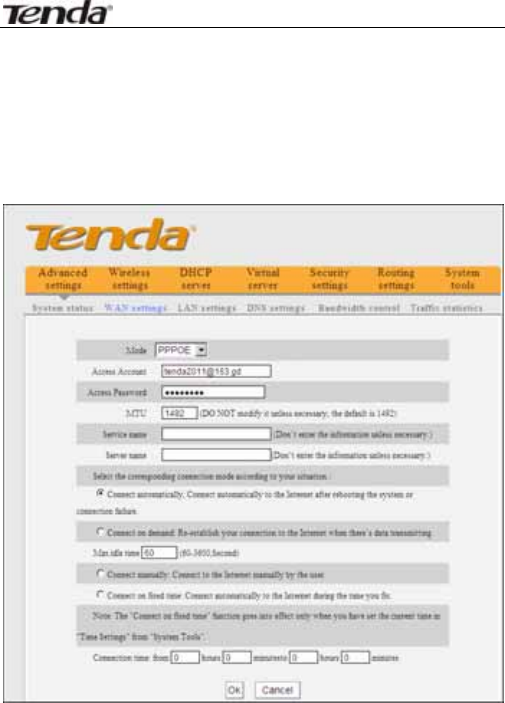
4.2 WAN Settings
Virtual Dial-up (PPPoE)
¾ Mode: Show your current connection mode.
¾ Access Ac count: Enter the account provided by
your ISP.
¾ Access Password: Enter the passwo rd provided
by your ISP.
¾ MTU: Maximum Transmission Unit. It is the size of
the largest data packet that can be sent o ver the

11N Wireless Broadband Router User Guide
22
network. The default value is 1492. Do NOT modify
it unless necessary, but if a specific website or web
application s oftware c annot o pen o r b e e nabled,
you can try to change the MTU value to 1450, 1400,
etc.
¾ Service Name: The connecti on name for current
PPPOE, enter i t if necessary ,otherwise, l eave it
blank.
¾ AC Name: The service name, enter it if necessary,
otherwise, leave it blank.
¾ Connect Automatica lly: Connect automati cally
to the Inter net after rebooti ng the system or
connection failure.
¾ Connect on Deman d: R e-establish your
connection to the Internet after the speci fic time
(Max Idle Time). Zero means you are connected to
the Internet al l ti mes. Otherwi se, enter the
minutes to be elapsed before you are disconnected
from the Internet.
¾ Connect Manually: Connect to the Internet by
users manually.
¾ Connect on Fixed Time: Connect to the Internet
during the time you fix automatically.
NOTE:
The “ Connect on Fixed Time ” goes i nto effect
only when you have set the current time in “Time
11N Wireless Broadband Router User Guide
23
settings” from “System tools”.
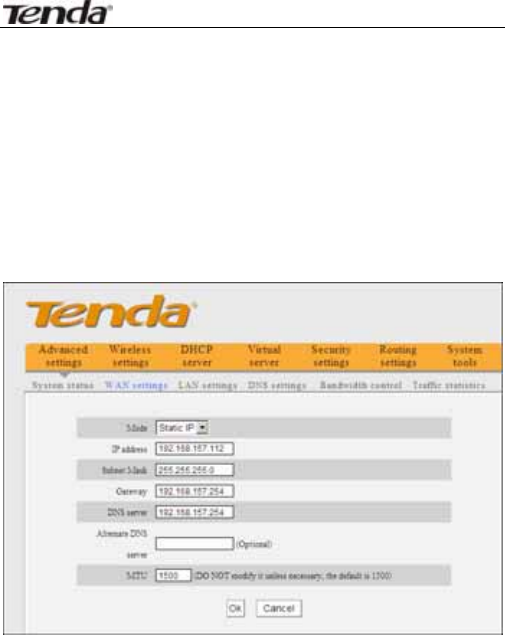
Static IP
If your ISP provides you the stati c IP, pl ease cho ose
static IP, and you need to enter the IP address, subnet
mask, gateway, DNS serv er and al ternate DNS server
provided by your ISP or network administrator。
¾ Mode: Show your current connection mode.
¾ IP address: Enter the WAN IP address provided by
your ISP. If y ou are not c lear, please inquire your
local ISP.
¾ Subnet ma sk: Enter the W AN S ubnet Mask
provided by your ISP. Generally it is 255.255.255.0。
¾ Gateway: Enter the Gateway provided by your ISP.
If you are not clear, please inquire your local ISP.
11N Wireless Broadband Router User Guide
24
¾ DNS serv er: Enter th e necessary DNS server
provided by your ISP.
¾ Alternate DNS serv er: Enter the second DNS
address if your ISP provides, which is optional.
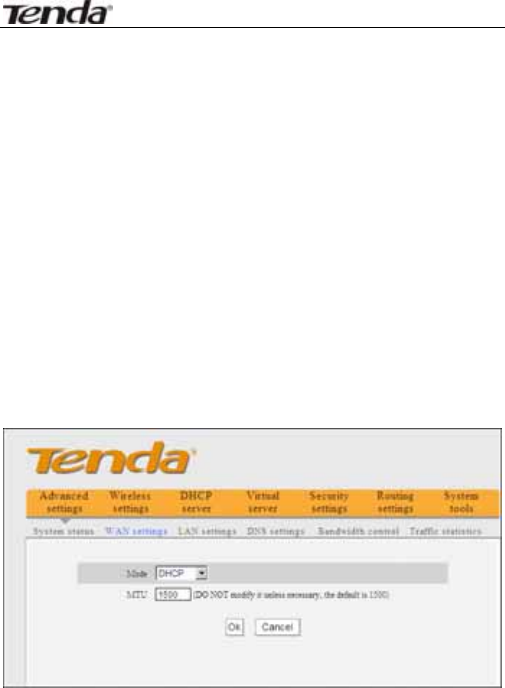
Dynamic IP (Via DHCP)
If your connection mode is Dynamic IP, it means every
time you access the Internet, you will get a different IP.
You don’t need to en ter any parameters in this mode,
just Click “Ok” to finish the settings.
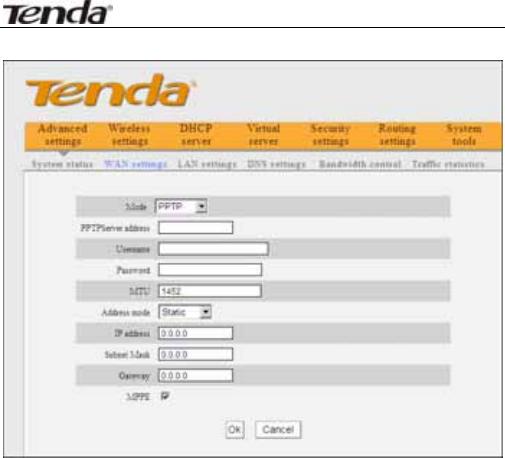
PPTP
11N Wireless Broadband Router User Guide
25
¾ Mode: Show your current connection mode.
¾ PPTP server address: The IP address or domain
name o f t he d estination server a nd it is u sed t o
specify the desti nation addres s whi ch needs fo r
PPTP connection.
¾ Username/Password: Used to v alidate i dentity
when connecting to the PPTP server.
¾ Address mode: Set the router’s IP address mode,
you can select either “Dynamic” or “Static”. If your
ISP doesn’ t provide the IP addre ss, pl ease sel ect
“Dynamic”.
¾ IP address: Please enter the IP address provided
by your ISP, inquire your local ISP if you are not
clear.
11N Wireless Broadband Router User Guide
26
¾ Subnet mask: Pl ease enter the subnet mask
provided by your ISP ,generally its 255.255.255.0
¾ Gateway: Please enter the gateway provided by
your ISP, inquire your local ISP if you are not clear.
All the above parameters are provided by ISP.
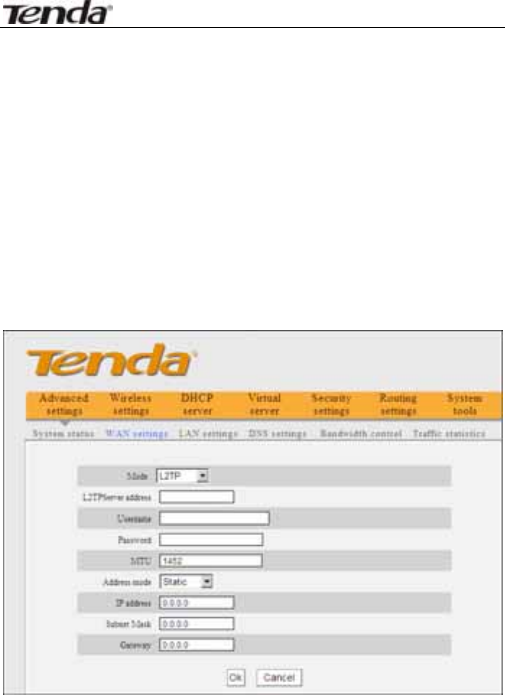
L2TP
¾ Mode: Show your current connection mode.
¾ L2TP server address: The IP address or domain
name o f t he d estination server a nd it is u sed t o
specify the desti nation addres s whi ch needs fo r
L2TP connection.
¾ Username/Password: Used to v alidate i dentity

11N Wireless Broadband Router User Guide
27
when connecting to the L2TP server.
¾ Address mode: Set the router’s IP address mode,
you can select either “Dynamic” or “Static”. If your
ISP doesn’ t provide the IP addre ss, pl ease sel ect
“Dynamic”.
¾ IP address: Please enter the IP address provided
by your ISP, inquire your local ISP if you are not
clear.
¾ Subnet mask: Pl ease enter the subnet mask
provided by your ISP ,generally its 255.255.255.0
¾ Gateway: Please enter the gateway provided by
your ISP, inquire your local ISP if you are not clear.
All the above parameters are provided by ISP.
11N Wireless Broadband Router User Guide
28
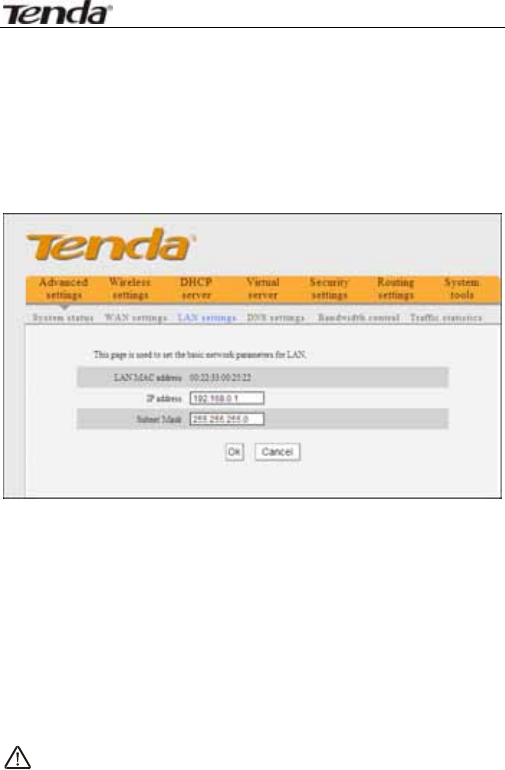
4.3 LAN Settings
Click “ Advanced s ettings” –LAN s ettings to enter the
following screen.
¾ LAN MAC address: The Router’s LAN MAC address,
which is unchangeable.
¾ IP address: The Router’s LAN IP address (not your
PC’s IP address).The default value is 192.168.0.1;
you can change it when necessary.
¾ Subnet mask: The Router’s LAN subnet mask. The
default value is 255.255.255.0
NOTE:
Once you modify the IP address, you need to remember
it for next time you log in to the web-based utility.
11N Wireless Broadband Router User Guide
29
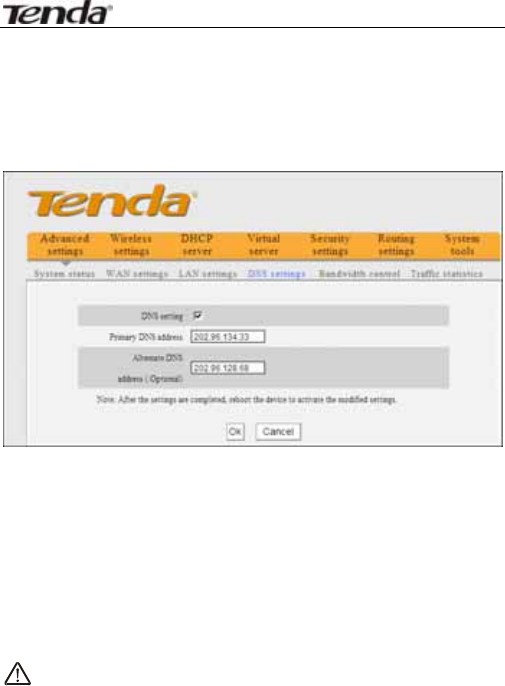
4.4 DNS Settings
DNS stands for Domain Name System (or Service).
¾ DNS setting: Select to enable the DNS server.
¾ Primary DNS address: Enter the necessary
address provided by your ISP.
¾ Alternate DNS address : Enter the s econd DNS
address if your ISP provides, which is optional.
NOTE:
After the settings are completed, reboot the device
to activate the modified settings.

11N Wireless Broadband Router User Guide
30
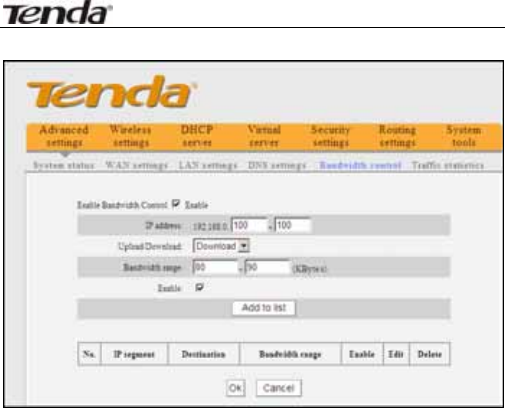
4.5 Bandwidth Control
Bandwidth control is used to limit the communication
traffic of LAN computers when accessing the Internet. It
can simultaneously control maximum of 254 PCs' traffic.
In addi tion, IP addres s r ange configuration i s
supported.
¾ Enable Bandwidth Control: To enable or disable
the i nternal IP bandwi dth control. The defaul t is
disabled.
¾ IP Address: The IP add ress r ange of the hosts
whose traffic has been controlled. It can be a single
IP address or IP address range.
¾ Upload/Download: To specify the traffic heading
way for the sel ected I P addre sses: upl oad or

11N Wireless Broadband Router User Guide
31
download.
¾ Bandwidth Range: The maximum and minimum
upload/download data tr affic of the hosts i n
specified IP range. The unit is KByte/s. The uplink
of upload and downl oad can not exceed the W AN
port bandwidth limitation range.
¾ Enable: To enabl e th e current edited rul e.
Otherwise, the rule will not go into effect.
¾ Add to list: After you edit the rule, click the “add
to list” button to add th e current rul e to the rul e
list.
Here we take 2Mbps b andwidth as an example .
Theoretically, the bi ggest downl oading rate for 2Mb ps
bandwidth is 2Mb ps=256KByte/s, and the bi ggest
uploading rate is 512kbps=64KByte/s
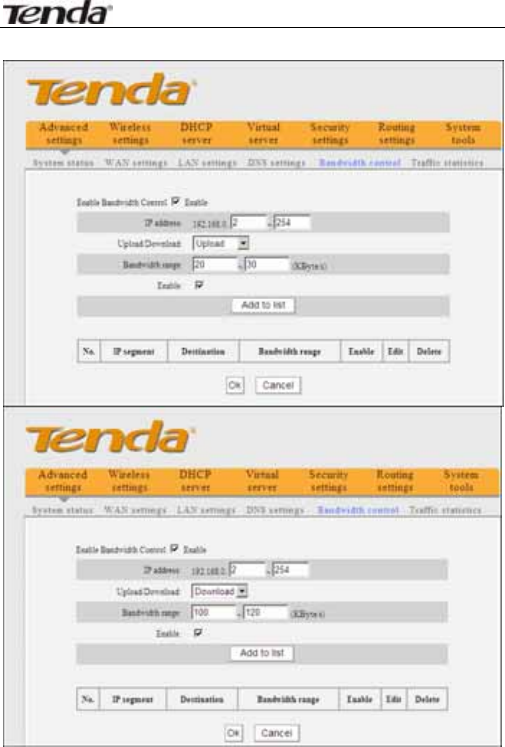
Example 1
If you want to set the download rate of the computer
at the IP ad dress of 192 .168.0.100 a s 80-90KByt e/s,
upload rate as 10-15KByte/s, first add one upload rule
as shown in the picture below:

11N Wireless Broadband Router User Guide
32
1.Enter 192.168.0.100 in the IP address field
2.Select upload in the Upload/Download field.
3.Enter 10-15 in the bandwidth range field
4.Select “Enable”
5.Click “Add to list”
6.Click “Ok” to finish the upload rule settings.
And then add a download rule as shown in the picture
below.
11N Wireless Broadband Router User Guide
33
The setting method is the same as the above.
Example 2 Set the downl oad rate of all computers
within the r ange of 192 .168.0.2--192.168.0.254 as
100-120KByte/s, and the upload rate as 20-30KByte/s,
as shown in the picture below.
11N Wireless Broadband Router User Guide
34
The setting method is the same as Example 1.

11N Wireless Broadband Router User Guide
35
4.6 Traffic Statistics
Traffic statistics is used to display the bandwidth that
LAN PC used.
Enable Traffic statistics: It is used to calculate the
traffic used by the LAN computers. You can enable it to
calculate the tr affic for you. Usua lly, di sable it to
improve the router’s data packet processing ability, and
the default is disabled. When thi s function is enabled,
the webpage will refresh automatical ly e very five
minutes, meanwhile, each computer’s traffic value will
refresh automatically.
¾ IP address: the IP address of the computer whose
traffic is being calculated.
¾ Uplink rate: the data sendi ng speed per second,
the unit is KByte/s.
¾ Downlink rate: the data recei ving spee d p er

11N Wireless Broadband Router User Guide
36
second, the unit is KByte/s.
¾ Sent mess age: the number of the cal culated
computer’s data packets that are sent out through
the router.
¾ Sent Byt es: the vol ume of the cal culated
computer’s statistics that i s sent out through the
router
¾ Received message: the number of the calculated
computer’s t he data pac kets that are recei ved
through the router.
¾ Received B ytes: the vol ume of the cal culated
computer’s s tatistics that i s received through the
router.

11N Wireless Broadband Router User Guide
37
Chapter 5 WLAN Settings
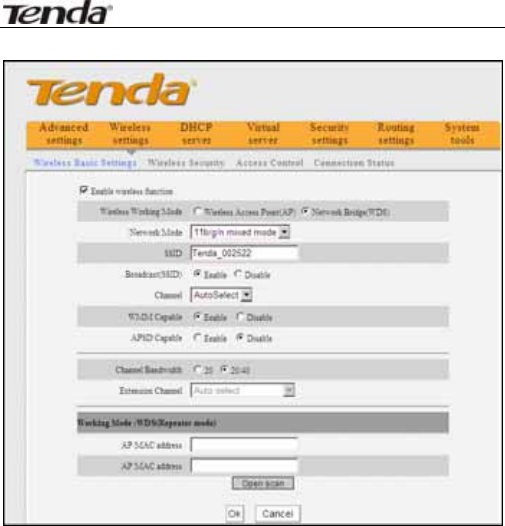
5.1 Wireless Basic Settings
¾ Enable wireless functio n: Select t o enable the
Router’s wi reless features; desel ect to di sable it
and all functions related with wireless are disabled.
¾ Wireless working mode : T his r outer p rovides
two ki nds o f worki ng modes: Wi reless Access
Point(AP) and Network Bridge (WDS)
Wireless Access Point (AP)
¾ Network Mode : Se lect one mode from the

11N Wireless Broadband Router User Guide
38
drop-down list.
11b mode:Select it if you have only Wireless-B clients
in your network.
11g mode:Select it if you have only Wireless-G clients
in your network.
11b/g mixed mode: Select it i f you h ave o nly
Wireless-B and Wireless-G clients in your network.
11b/g/n mixe d mode : Select it if y ou have
Wireless-B, Wireless-G and Wi reless-N cli ents in your
network.
¾ SSID: It is the un ique name of t he wi reless
network and can be mod ified. The S SID must be
entered.
¾ Broadcast (SSID): Select “Enable” to enable the
router’ SSID to be scanna ble by wi reless devices.
The defaul t i s enabl ed. If you di sable i t, the
wireless de vices must know the S SID for
communication.
¾ Channel: The currently used channel by the router.
Select an effective channel (from 1 to 13\Auto) of
the wireless network.
¾ WMM Capable: Enable it to enhance the transfer
performance of the wi relessly tr ansferred
multimedia data ( such a s video o r o nline
playing).We recommend enabling this option if you
are not familiar with WMM.

11N Wireless Broadband Router User Guide
39
¾ APSD Capa ble: It is used for auto power-saved
service. The default is disabled.
¾ Channel b andwidth: Select an appropriate
channel ba ndwidth to enhance the wi reless
performance. Select 20/40M when the network has
11b/g and 11n wi reless clients. Select 20M when
the network has onl y n on-11n wi reless cl ients.
Select 20/40M to promote its throughput when the
wireless network is in 11n mode.
¾ Extension Channel: T o confi rm th e network’ s
frequency range in 11n mode.
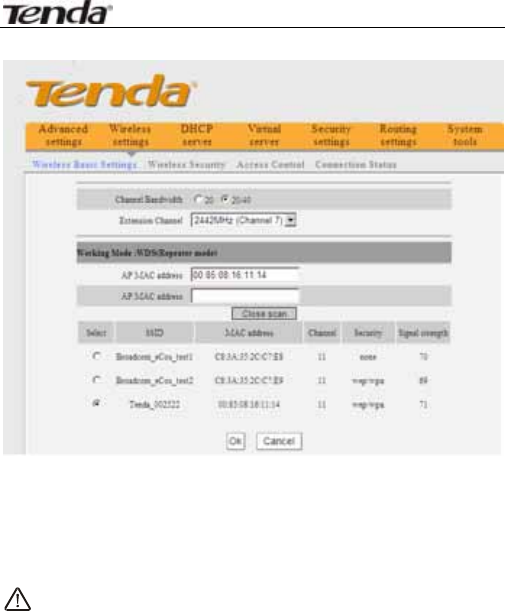
Network Bridge (WDS) Settings
WDS (Wireless Distribution System) is used to expand
wireless coverage area.
11N Wireless Broadband Router User Guide
40
¾ AP MAC ad dress: Input the MA C address of
another (opposi ng) w ireless router y ou w ant to
connect.
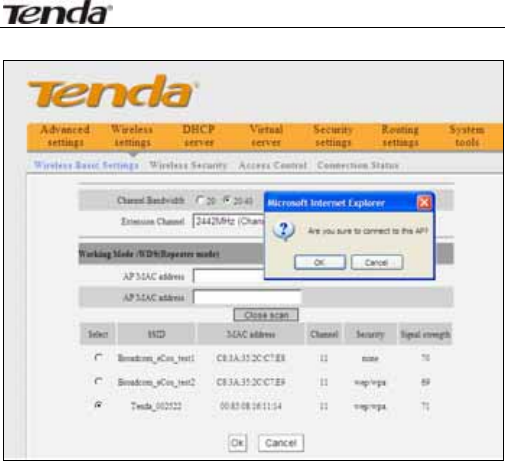
Example: This example is to bridge two 316R routers.
1. If you know the connecti ng router ’s MA C address,
please enter i t into the AP MAC address field and click
“Ok”.

11N Wireless Broadband Router User Guide
41
2. You can also search for the wireless router’s signal by
scanning.
a) Click “Open scan” and cl ick the scanned si gnal and
click the ”O k” button on the di alog bo x and the
corresponding wi reless MA C address will be added to
the AP MAC address field automatically.
11N Wireless Broadband Router User Guide
42
b) Click “Ok” after the MAC address is added.
11N Wireless Broadband Router User Guide
43
After fi nishing the abo ve steps, you need to set the
other W316R router in the same way.
NOTE: WDS feature requi res both routers support
this function and the SSID, channel, encryption method
and password are the same as those of the connecting
router.
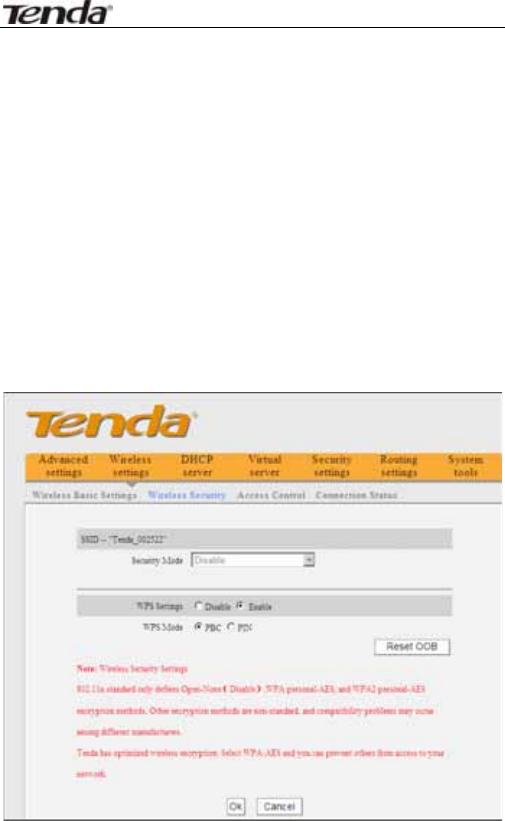
5.2 Wireless Security Settings
With the wi reless securi ty funct ion, y ou can prev ent
others from connecti ng to y our wi reless network and
using the n etwork resources wi thout your cons ent.
Meanwhile, you can al so bl ock ill egal users from
11N Wireless Broadband Router User Guide
44
intercepting or intruding your wireless network.
5.2.1 WPS Settings
WPS (Wi-Fi Protected Setting) makes it quick and easy
to establish a secure con nection between the wi reless
clients and the router . The users onl y need to ente r a
PIN cod e or press W PS b utton on the back panel to
configure it without ma nually s electing a n e ncryption
method or set a key.
¾ WPS settings: To enable or disable WPS function.
The default is “Enable”.

11N Wireless Broadband Router User Guide
45
¾ WPS mode: Provide two ways: PBC (Push-Button
Configuration) and PIN code.
¾ PBC: Select the PBC and cli ck Ok, or press and
hold the WPS button on the back panel of the
device for about one second. The WPS LED
indicator will be fl ashing for 2 mi nutes, whi ch
means t he WPS is e nabled. Du ring t his t ime
(flashing W PS L ED), you can e nable t he wir eless
client to implement the WPS/PBC negoti ation
between the m. When the WPS connecti on is
completed, the LED indicator will be continuously lit.
To add more clients, repeat the above steps.)
¾ PIN: If this option is enabled, you need to enter a
wireless client’s PIN code in the field and keep the
same code in the WPS client.
¾ Reset OOB: Press this button, the WPS client will
be in an idle state, and the WPS indicator will turn
off. AP will not respon d to the W PS cli ent’s
connection request an d will set the securi ty mode
as Open-None (Disable) mode.
NOTE: The use of WPS function requires the wireless
adapter to support this function.
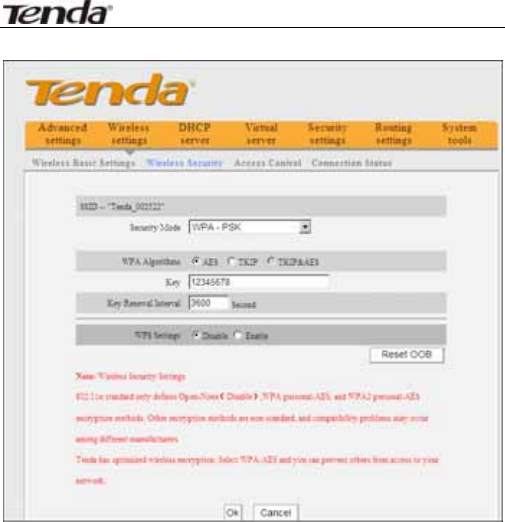
5.2.2 WPA- PSK
WPA guarantees to protec t WLAN users’ data and o nly
the authorized network users can have access to WLAN.
11N Wireless Broadband Router User Guide
46
¾ WPA Algor ithms: Provides TKI P [Temporal K ey
Integrity Pro tocol] or AE S [Adv anced Encrypti on
Standard].
¾ Key: Enter the pass phr ase that consi sts of 8-63
ASCII characters.
¾ Key Renewal Inter val: Set the key’ s renewal
period, which tells the device how often it should
change the dynamic keys.
11N Wireless Broadband Router User Guide
47
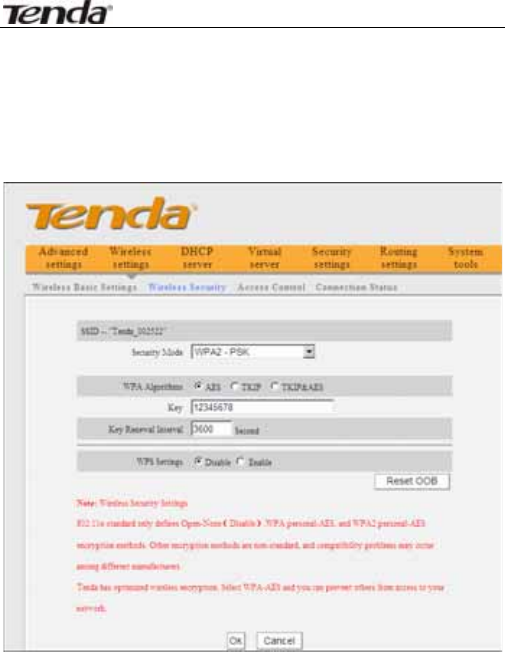
5.2.3 WPA2- PSK
WPA2 (Wi -Fi Protected Access versi on 2) pro vides
higher security than and WPA (Wi-Fi Protected Access).
¾ WPA Algor ithms: Provides TKI P [Temporal K ey
Integrity Pro tocol] or AE S [Adv anced Encrypti on
Standard].
¾ Key: Enter the pass phr ase that consi sts of 8-63
ASCII characters.
¾ Key Renewal Inter val: Set the key’ s renewal
period, which tells the device how often it should
change the dynamic keys.
11N Wireless Broadband Router User Guide
48
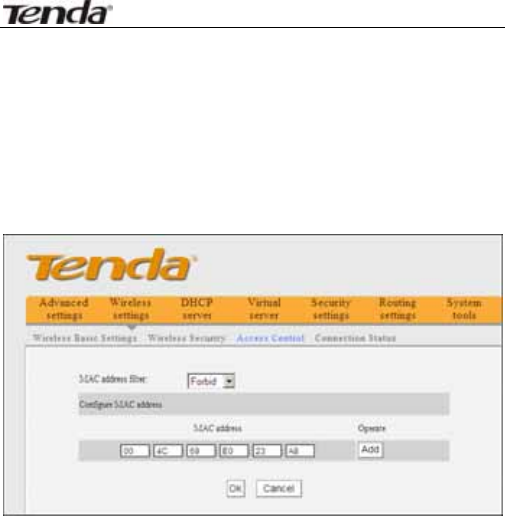
5.3 Wireless Access Control
Wireless access control is actual ly based on the MAC
address to permit or forbid specific clients to access the
wireless network.
¾ MAC address filter: “Permit” indicates to allow
the clients in the list to access the wireless network,
“Forbid” indicates to prevent the clients in the list
from accessing the wireless network.
¾ Configure MAC address: Input the MAC
addresses of the wireless clients to implement the
filter policy . Click “ Add” to fi nish the MAC add
operation.
¾ MAC Address list: S how the added MA C
addresses. You can add or delete them.
11N Wireless Broadband Router User Guide
49
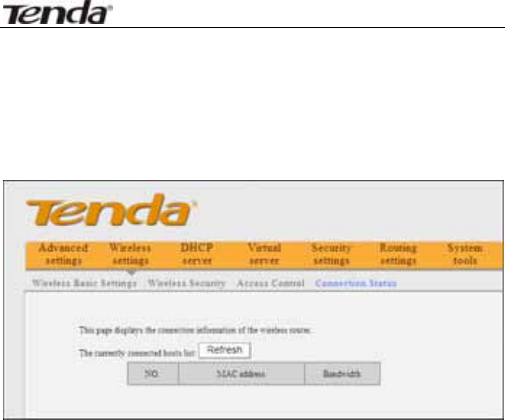
5.4 Connection Status
This screen shows wi reless cl ient’s connecti on status,
including MAC address, Channel bandwidth.
¾ MAC addres s: Shows the MAC addre sses of the
hosts connected to the Router.
¾ Bandwidth: Shows the channel bandwidth of the
current connected hosts (wireless clients).
Chapter 6 DHCP Server
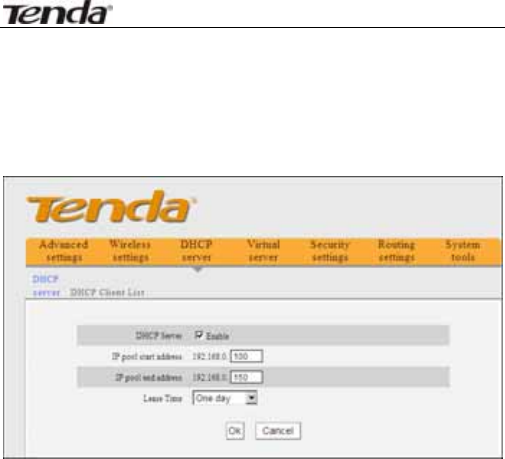
6.1 DHCP Server
DHCP (Dynamic Host Control Protocol) is used to assign
an IP addr ess to the co mputers on the LAN/pri vate
network. When you enable the DHCP Server, the DHCP
Server will allocate automatically an unused IP address
from the IP address pool to the requesting computer in
11N Wireless Broadband Router User Guide
50
premise of acti vating “Obtai n an IP Address
Automatically”. So specifying the start and end address
of the IP Address pool is needed.
¾ DHCP s erver: Check the Enable box to enabl e
DHCP server.
¾ IP pool start/end address: Enter the range of IP
addresses for DHCP server distribution.
¾ Lease time: It i ndicates the v alid t ime of the
dynamic IP address whi ch i s d istributed to the
DHCP c lient’s host com puter by DHCP serv er.
During this time, the serv er will not distribute the
IP address to any other host computer.
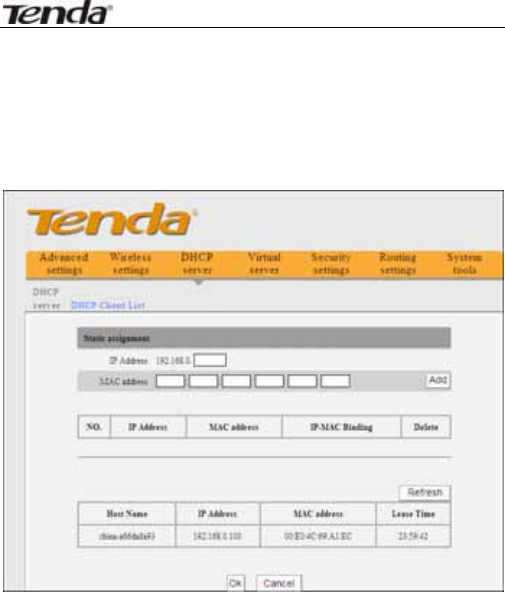
6.2 DHCP Client List
DHCP cli ent list di splays user comput er’ IP a ddress,
MAC address, host name and other i nformation which
11N Wireless Broadband Router User Guide
51
are assi gned by the DHCP server . Y ou can manu ally
enter the IP and MAC address and convert them to static
assignment.
¾ Host name: It displays the name of the computer
whose IP is allocated by the DHCP server.
¾ IP address: Enter the I P add ress w hich needs
static binding.
¾ MAC address: Enter th e MAC address of the
computer you want to bind. Click “Add” to add the
entry in the list.
¾ Lease time: The r emaining t ime length o f t he
corresponding IP address lease.
11N Wireless Broadband Router User Guide
52
Chapter 7 Virtual Server
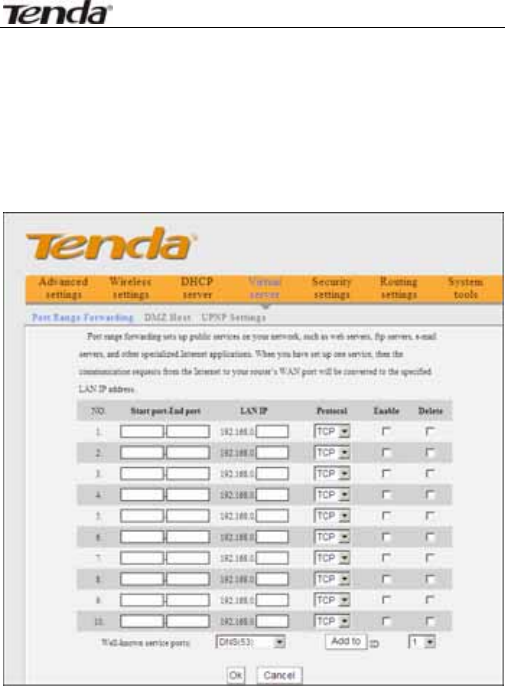
7.1 Port Range Forwarding
¾ Start/End port: Enter the start/end port number
which r anges the Externa l ports used to set th e
server or Internet applications.
¾ LAN IP: Enter the IP address of the PC which you
want to set as the server.
¾ Protocol: Select the prot ocol (TCP/UDP/Both) for
the appl ication. If you a re not cl ear about the

11N Wireless Broadband Router User Guide
53
protocol you are using, you can select “Both”.
¾ Enable: Click the Enable checkbox to bring the set
rule into effect.
¾ Delete: Clear all settings of this item.
¾ Well-known service port: The well -known
protocol ports are listed in the drop-down li st.
Select one and select a sequence number in the ID
drop-down list and then click “Add”, this port will be
added automatically to th e ID l ist. For other wel l
known servi ce ports that are not l isted, y ou can
manually add them to the list.
¾ Add to: Add the sel ected well-known port to the
policy ID.
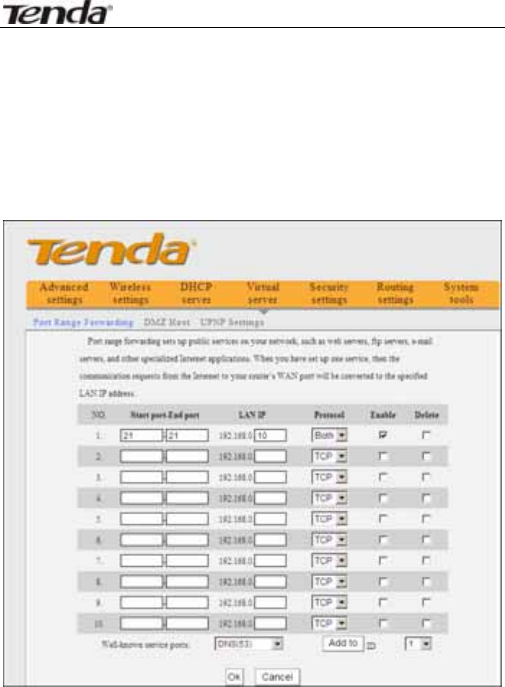
For Example: You want to share some large files with
your friends outside of your local area network, however,
they are too bi g, and it’s not con venient to tr ansfer
them. Then, you can b uild a F TP server on y our
computer and set the router’s port range forwarding to
enable your friends to ac cess to thes e fil es on your
computer. Suppose that your F TP server or your
computer’s static IP addr ess is 192.168.0.10, and you
wish your fr iends can ac cess the s erver through the
default port 21 and adopts TCP protocol.
Please follow the steps below to configure.
1.Enter 21 in both start port and end port fields, or you
can al so sel ect F TP from the wel l-known servi ce port
11N Wireless Broadband Router User Guide
54
and its port 21 will be added to the corresponding field
automatically.
2. Enter 192.168.0.10 in the LAN IP col umn, and then
select “Both” as the protocol and select “Enable”.
3. As the picture shown below.
4. Click the “Ok” button to save the settings.
And now, when your friends want to visit the FTP server,
they only need to enter ftp://xxx.xxx.xxx.xxx:21 in the
address field. Here, xxx.xxx.xxx.xxx means the router’s
WAN IP address. For example, when your router’s WAN
IP address is 172.16.102.89; your friends need to enter

11N Wireless Broadband Router User Guide
55
ftp://172.16.102.89:21 in the address field.
NOTE:
If you set the service port of the virtual server as 80,
you must set the Web management port on Remote
Web Management screen to be any value except 80
such as 8080. Otherwise, there will be a conflict to
disable the virtual server.
11N Wireless Broadband Router User Guide
56
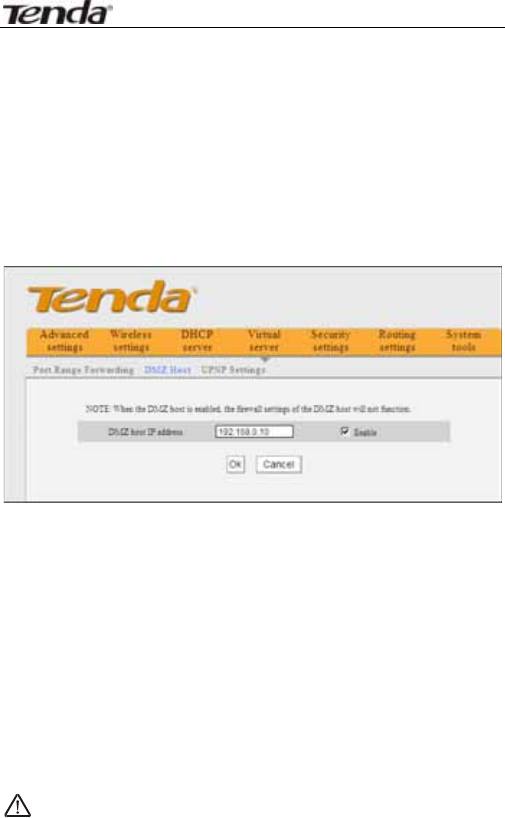
7.2 DMZ Settings
The DMZ Settings screen all ows one local computer to
be exposed to the Internet for use of a special-purpose
service such as Internet gaming or vi deoconferencing.
DMZ hosting forwards all the ports at the same time to
one PC.
¾ DMZ Host IP Address: The IP address of the LAN
computer you want to set as DMZ host.
¾ Enable: Check to enable the DMZ host.
For example:
Set the computer at the IP address of 192.168.0.10 as
DMZ host to connect another host on the Internet for
intercommunication.
NOTE: When the DMZ host i s enabled, the firewall
settings of the DMZ host will not function.
11N Wireless Broadband Router User Guide
57
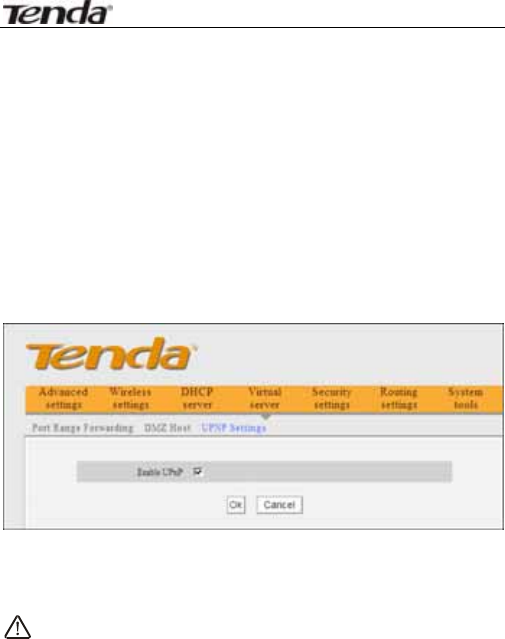
7.3 UPNP Settings
UPnP (Universal Plug and Play).With the UPnP function,
the internal host can request the router to process some
special port switching so as to enable the external host
to visit the resources of the internal host.
¾ Enable UPnP: Cli ck the checkbox to enabl e the
UPnP.
NOTE: This function goes into effect under Windows
XP or Windows ME (NOTE: the system should integrate
or have installed the Directx 9.0) or this function would
go in to e ffect if y ou h ave in stalled s oftware t hat
supports UPnP.
11N Wireless Broadband Router User Guide
58
Chapter 8 Security Settings
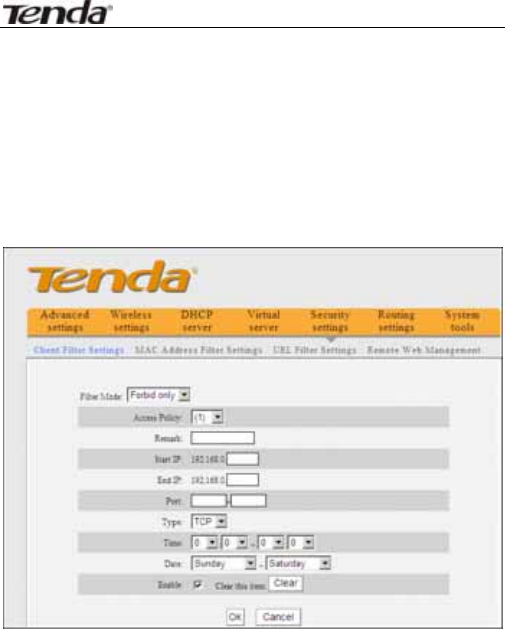
8.1 Client Filter Settings
You can ena ble cli ent f ilter to control LAN computers’
access to some ports of the Internet。
¾ Filter Mode: You can select either “Permit only” or
“Forbid only”.
¾ Access Poli cy: Sel ect one number from the
drop-down list.
¾ Remark: A simple description of the configured file.
You can also leave it blank.
¾ Start/End IP: Enter the start/end IP address.
11N Wireless Broadband Router User Guide
59
¾ Port: Enter the controll ed TCP/UDP protocol port.
You can specify a port or port range.
¾ Type: Sel ect one protoco l (T CP/UDP/Both) from
the drop-down list.
¾ Time: Select the time range of client filter.
¾ Date: Select the day(s) to run the access policy.
¾ Enable: T o e nable/disable t he a ccess p olicy
(forbid/permit the pack ets matched wi th the
access policy to pass through the router.
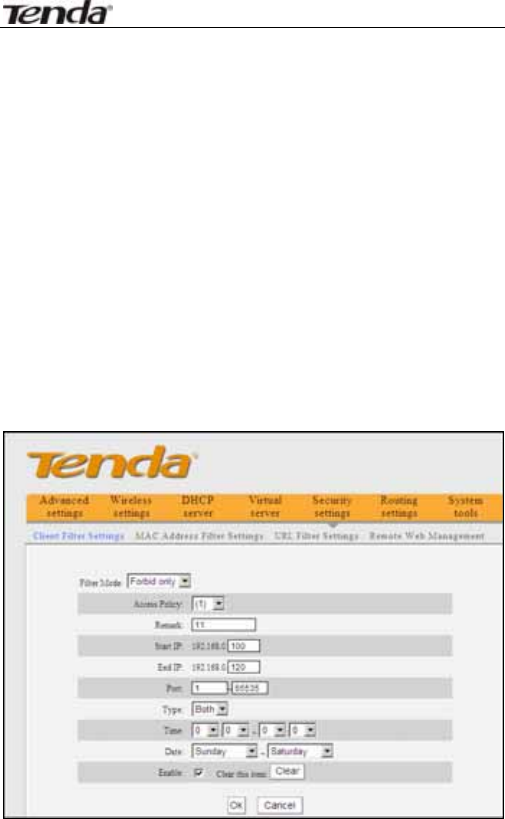
Example1 Forbid LAN computers at the IP addresses of
192.168.0.100--192.168.0.120 to access the Internet.
Example 2 Permit LAN computer with the IP address
of 192. 168.0.145 to ac cess websi tes during 8:00 to
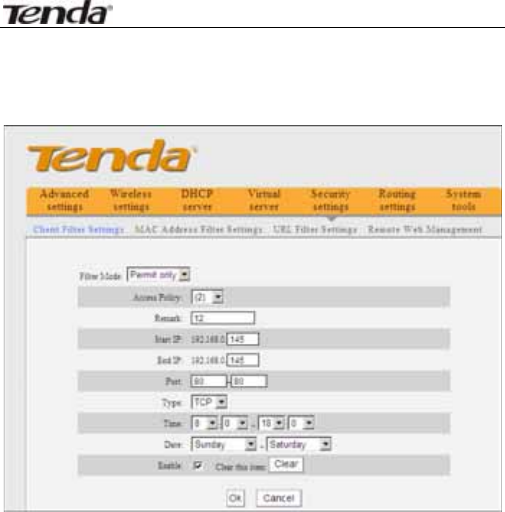
11N Wireless Broadband Router User Guide
60
18:00 from Sunday to Saturday.
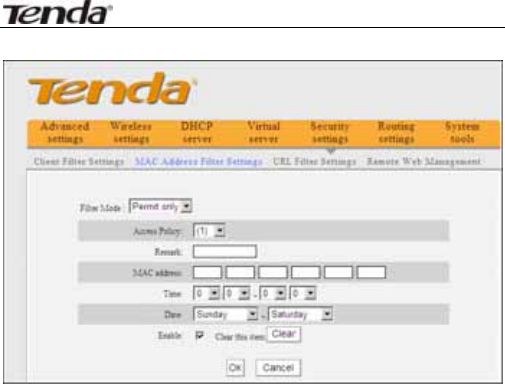
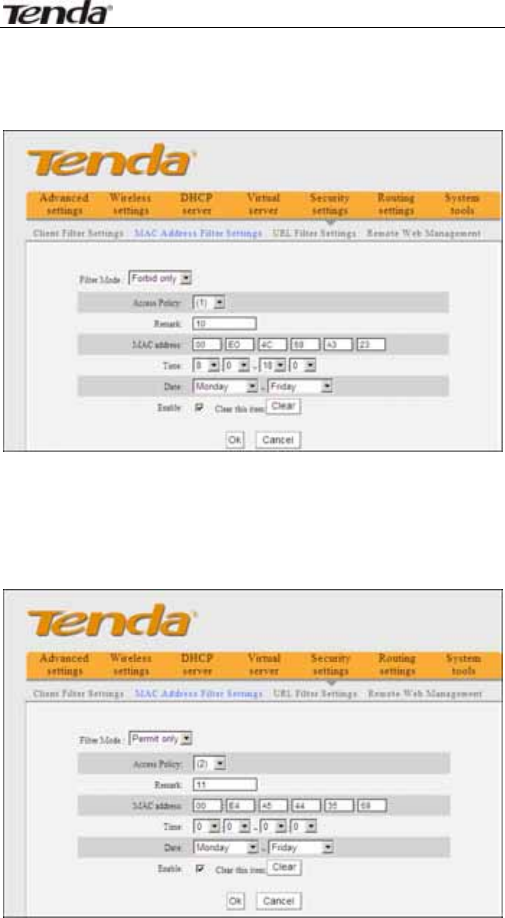
8.2 MAC Address Filter
You can limit the computer’s access to Internet by MAC
Address Filter.
11N Wireless Broadband Router User Guide
61
¾ Filter mode: You can select either “Permit only” or
“Forbid only”.
¾ Access Poli cy: Sel ect one number from the
drop-down list.
¾ Remark: A simple description of the configured file.
You can also leave it blank.
¾ MAC Address: Enter the MAC address you want to
run the access policy.
¾ Time: S elect the ti me r ange of M AC address
filter.
¾ Date: Select the day(s) to run the access policy.
¾ Enable: T o e nable/disable t he a ccess p olicy
(forbid/permit the pack ets matched wi th the
access policy to pass through the router).
Example 1 Forbid the computer with the MAC address
11N Wireless Broadband Router User Guide
62
of 00:E0:4C:69:A3:23 to access Internet during 8:00 to
18:00 from Monday to Friday.
Example 2 Permit the computer with the MAC address
of 00 :E4:A5:44:35:69 to access Internet from
Monday to Friday.
11N Wireless Broadband Router User Guide
63
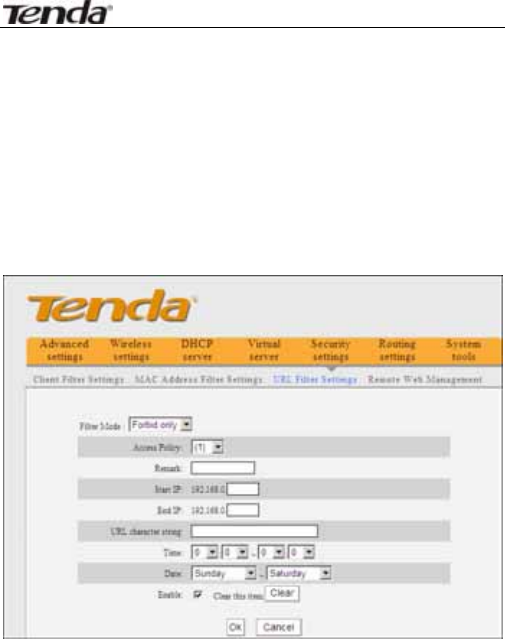
8.3 URL Filter Settings
You can use URL fil tering to forbi d t heir access to
certain websites at a specified time.
¾ Filter Mode: You can select either “Permit only” or
“Forbid only”.
¾ Access Poli cy: Select one number from the
drop-down list.
¾ Remark: A simple description of the configured file.
You can also leave it blank.
¾ Start/End IP: Enter the start/end IP address.
¾ URL character string: Specify the text
strings or keywords needed to be filtered.
11N Wireless Broadband Router User Guide
64
¾ Time: Select the time range of URL filter.
¾ Date: Select the day(s) to run the access policy.
¾ Enable: To enable/disable the access policy (forbid
/permit the packets matched with the access policy
to pass through the router).
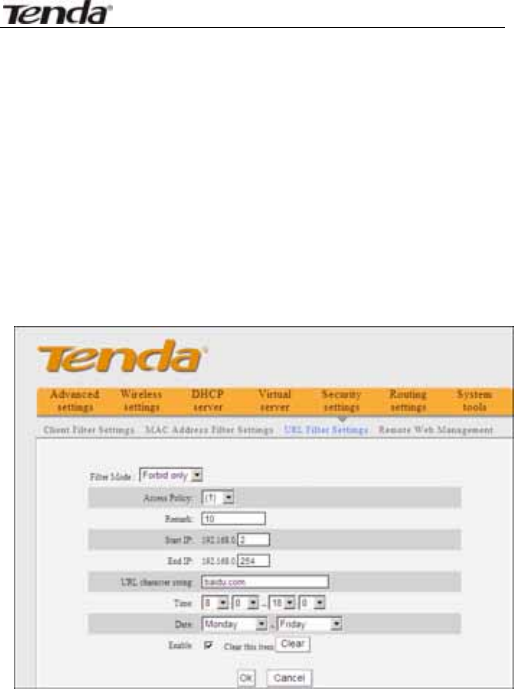
Example1 Forbid all co mputers on LAN to acce ss
baidu.com during 8:00 to 18:00 from Monday to Friday.
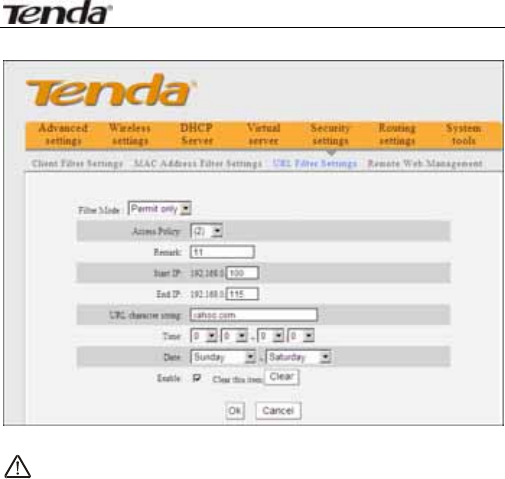
Example2 P ermit LAN computers wi th the IP
addresses of 192. 168.0.100-192.168.0.115 to acc ess
yahoo.com.
11N Wireless Broadband Router User Guide
65
NOTE: Enter only one domain name for each access
policy for one access policy can only filter one domain
name. So, if you want to filter multiple domain names,
you need to set multiple access policies
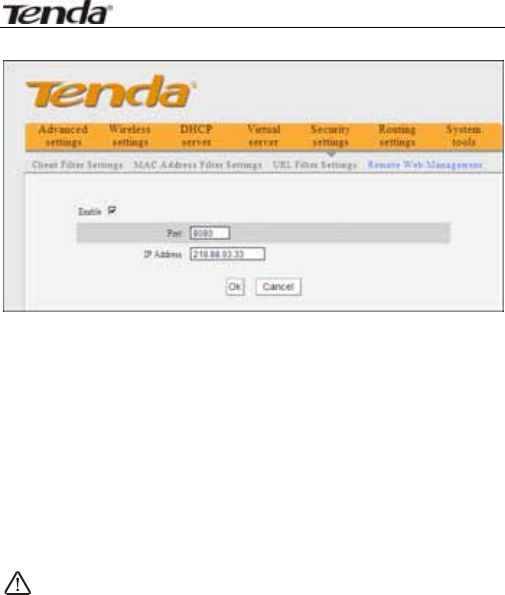
8.4 Remote Web Management
This secti on i nstructs how to al low the network
administrator to manage the R outer r emotely. If y ou
want to acc ess the R outer from outs ide of the local
network, please click the checkbox after “Enable”.
11N Wireless Broadband Router User Guide
66
¾ Enable: Check to enabl e remote web
management.
¾ Port: The management port open to outside
access. The default value is 80.
¾ IP Address: Specify the range of the IP addresses
of the computers on the Internet for remote
management.
NOTE:
1. If you want to l og in the devi ce’s Web-based
Utility via port 8080, you need to use the format of
WAN IP address: port (for exampl e http :
//220.135.211.56:8080) to implement remote login.
2. If your W AN IP addre ss starts and ends wi th
0.0.0.0, i t means al l hosts on the Internet ca n
implement r emote W eb management. If you
change the Internet IP address as
218.88.93.33-218.88.93.35, then onl y the
computers at the IP addresses of 218. 88.93.33,
218.88.93.34 and 218. 88.93.35 can access the

11N Wireless Broadband Router User Guide
67
Router to implement remote web management.
For example:
If you want to configure the computer at the IP address
of 218.88.93.33 to access the router’s web-based utility
via port 8080, please set the parameters as above.
11N Wireless Broadband Router User Guide
68
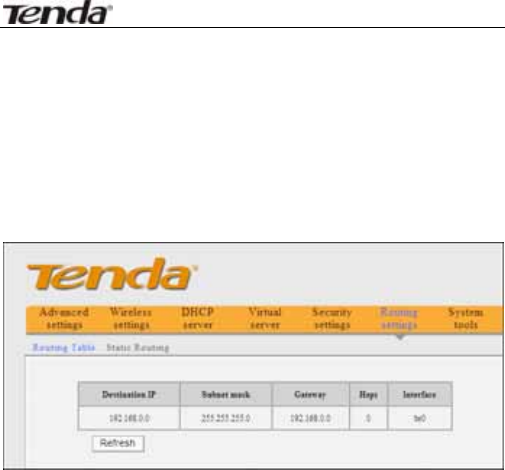
Chapter 9 Routing Settings
9.1 Routing Table
This page shows the router’s core routing table.
The main duty for a router is to look for a best path for
every data p acket, and tr ansfer thi s data packet to a
destination station. In order to fulfill this function, many
transferring paths, i.e. routing table, are saved in the
router, for choosing when needed.
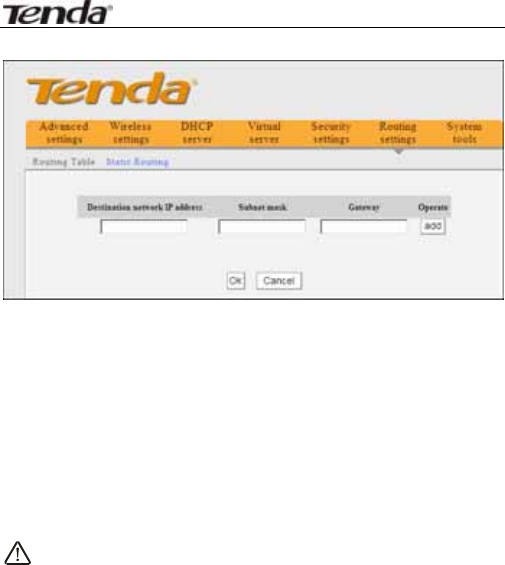
9.2 Static Routing
This screen is used to set the router’s static routing.
A static route is a pre-determined pathway that network
information must t ravel to r each a specific h ost o r
network.
11N Wireless Broadband Router User Guide
69
Destination network IP address : T he destination
host or IP segment you visit.
Subnet mask: Enter the subnet mask, generally it is
255.255.255.0
Gateway: The entry IP address of the next router.
NOTE:
1. The gateway must be at the same net segment with
the router’s LAN IP.
2. If the des tination IP addres s i s one host ’ address,
then the subnet mask must be 255.255.255.255.
3. If the destination IP address is an IP segment, then it
must match with the subnet mask. For example, if the
destination IP is 10.0.0.0 then the subnet mask must be
255.0.0.0

11N Wireless Broadband Router User Guide
70
Chapter 10 System Tools
10.1 Time Settings
This secti on is to confi gure the router ’s system ti me.
You can set it manually or obtain the GMT time from the
Internet.
¾ Time zone: Select the time zone where you are
operating the Router from the drop-down list.
¾ Customized time: Enter the ti me you wi sh to
configure.
NOTE:
When the Router is powered off, the time settings
will be l ost. The router will obtai n the GMT ti me
automatically when you next ti me access the

11N Wireless Broadband Router User Guide
71
Internet. Only when you connect to the Internet
and obtai n the GMT ti me or set the time on thi s
screen, can the ti me set tings in othe r funct ions
(e.g. security settings) take effect.
10.2 DDNS
The DDNS (Dynam ic Domain N ame S ystem) is
supported in this Router. It is used to assign a fixed host
and domai n name to a dynami c Internet IP addr ess.
Every ti me you access the Internet , the dynami c
domain name software installed on your host will tell the
ISP’S host server i ts dyn amic IP address by sendi ng
messages. And the server software i s responsi ble for
providing DNS servi ce and i mplementing dynami c
domain name resolution.

11N Wireless Broadband Router User Guide
72
¾ Main features:
1. Mostly, your ISP provides a dynamic IP address
and the DDNS is used to capture the changeable IP
address and match to the fixed domain. Then users
can ha ve acc ess to the In ternet to c ommunicate
with others outside the network.
2. DDNS can help you to establish a virtual host in
your home or company.
¾ DDNS: Click the radio button to enabl e or disable
the DDNS service.
¾ Service provider: Select one from the drop-down
list and click “Sign up” for registration.
¾ Username: Enter the username that y ou use to
register from the DDNS provider
¾ Password: Enter the password that you use t o
register from the DDNS provider
¾ Domain name: Enter the effecti ve regi stered
domain name
For example:
Establish a Web server i n the l ocal host 192. 168.0.10
and register in 3322.org as follows:
Username T enda
Password 1234 56
Domain Name tenda.3322.org
After mapping the port in the virtual server, and setting
11N Wireless Broadband Router User Guide
73
account i nformation in DDNS serv er, y ou can then
access the web page by entering http://tenda.3322.org
in the address field.
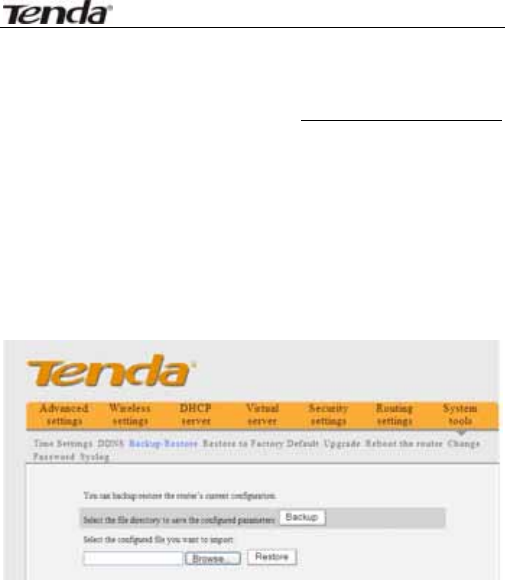
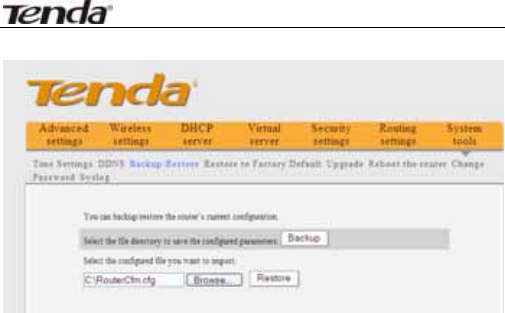
10.3 Backup/Restore
On thi s screen, you can back up the router’s curr ent
settings or restore previous settings.
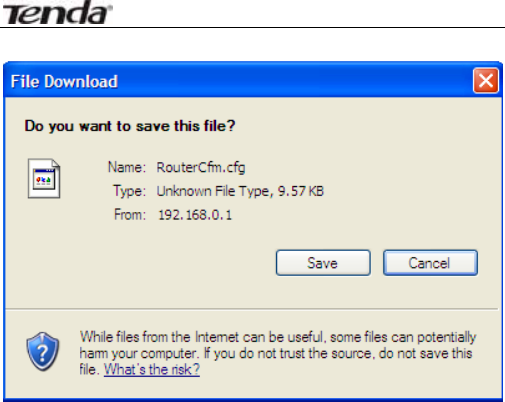
¾ Backup Setting:
Click the Backup button to back up the Router’s
settings and select a path to save them.
11N Wireless Broadband Router User Guide
74
Click the “Save” button to save the c onfiguration
files.
11N Wireless Broadband Router User Guide
75
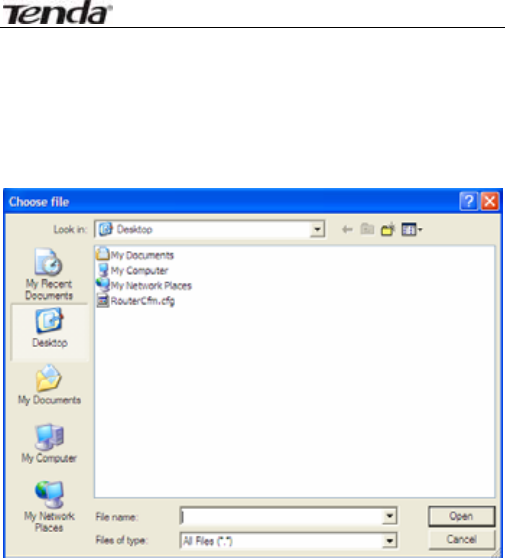
¾ Restore Setting:
Click the “ Browse” button to sel ect the backup
files.
Click the “ Restore” button to restore previ ous
settings.
11N Wireless Broadband Router User Guide
76
11N Wireless Broadband Router User Guide
77
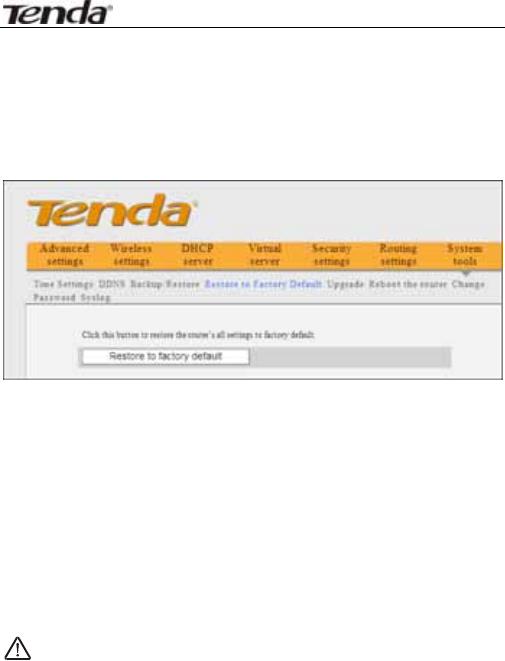
10.4 Restore to Factory Default
This screen allows you t o restore al l setti ngs to the
factory default values.
¾ Restore: Click thi s butto n to restore to defaul t
settings.
¾ Factory default settings:
Password: admin
IP address: 192.168.0.1
Subnet mask: 255.255.255.0
NOTE:
After restoring to defaul t setti ngs, please restar t
the router to make the default settings effective.
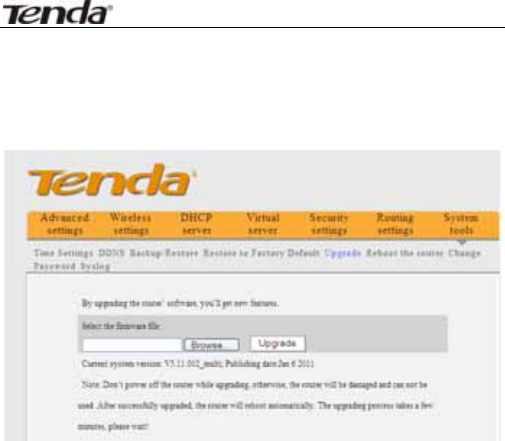
10.5 Upgrade
By upgr ading the rout er’s software, you’ll get be tter
software version and ap preciated ro uting functi on.
Before upgr ading, downl oad the R outer’s softw are
11N Wireless Broadband Router User Guide
78
upgrade file from our website, www.tenda.cn.
¾ Browse: Click thi s button to sel ect t he upgr ade
file.
¾ Upgrade: Click this button to start the upgrading
process. After the upgrade is completed, the router
will reboot automatically.
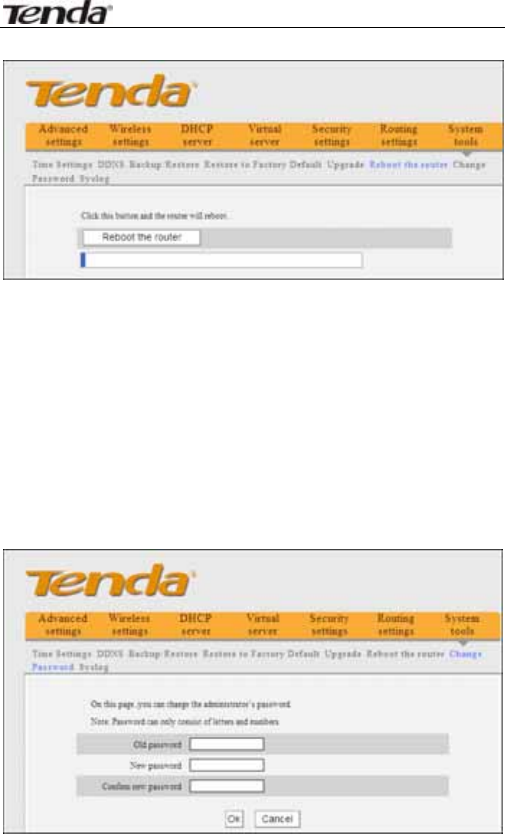
10.6 Reboot the Router
Reboot the router to mak e the conf iguration effective.
The router will cut its WAN connec tion automat ically
after rebooting.
11N Wireless Broadband Router User Guide
79
Reboot the r outer: Click th is butto n to reboot the
router.
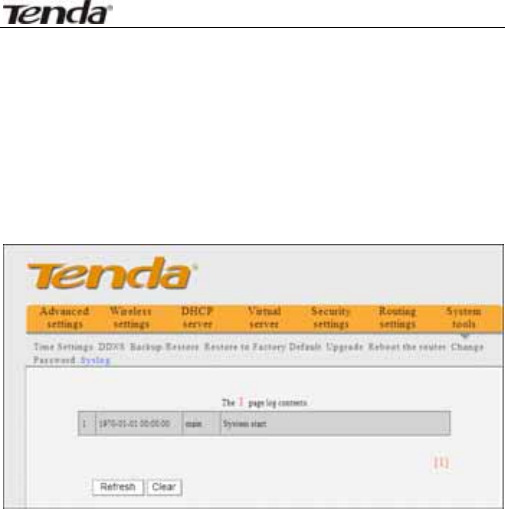
10.7 Password Change
This section is to set a new password to better secu re
your router and network.
¾ Old password: Enter the old password.
¾ New password: Enter a new password.

11N Wireless Broadband Router User Guide
80
¾ Confirm new password: Re-enter to confirm the
new password.
NOTE:
To secure the router and your network, it is highly
recommended t hat y ou c hange t he in itial
password.
11N Wireless Broadband Router User Guide
81
10.8 Syslog
The secti on is to vi ew th e system l og. You can view
various cond itions appearing after system start, an d
also check whether there’ s an attack on the network.
The log can record at most 150 entries.
¾ Refresh: Click this button to update the log.
¾ Clear: Click this button to clear the current shown
log.

11N Wireless Broadband Router User Guide
82
10.9 Log out
After all settings are finished, please click’” Log out” to
exit securely and completely.

11N Wireless Broadband Router User Guide
83
Appendix 1 Glossary
Channel:
An instance of medium use for the pu rpose of pa ssing
protocol data uni ts (P DUs) that may be used
simultaneously, in the same volume of space, with other
instances of medium use(on other channel s) by ot her
instances of the same ph ysical layer (PHY),wi th an
acceptably l ow fr ame error r atio(FER) due to mutua l
interference.
SSID:
SSID (S ervice S et Identi fier) is the network name
shared by all devi ces in a wi reless network. Y our
network’s SSID should be un ique to y our network a nd
identical for all devi ces wi thin the network. It is
case-sensitive and must not exceed 20 characters (use
any of the characters on the keyboard).Make sure this
setting i s th e same for all devi ces in your wireless
network.
WPA/WPA2 Encryption:
A security protocol for wireless networks that builds on
the basic foundations of WEP. It secur es wireless data
transmission by usi ng a key si milar t o WEP, but t he
added str ength of W PA i s that the key changes
dynamically. The changi ng key ma kes i t much mo re
difficult for a hacker to learn the key and gain access to

11N Wireless Broadband Router User Guide
84
the network.WP A2 i s the second gen eration of WP A
security and provides a stronger encryption mechanism
through Advanced Encryption Standard (AES), which is
a requirement for some government users.
802,1x authentication
Static W EP k ey is d ifficult t o ma nage fo r wh en y ou
change the key, you will have to inform all others, and if
the key is disclosed in one of the places, the key can no
longer provide security. Besides, there’s severe security
loophole about static WEP encryption. The WEP key can
be d ecrypted after one person rec eives a speci fic
amount of data vi a wi reless i ntercepting. 802, 1x i s
initially used for wired Ethernet authentication access to
prevent illegal users from accessing the network. Later,
it is found that 802. 1x can better solve the wireless
network securi ty probl em. EA P-TLS of the 80 2.1x
successfully achi eves the two- way authenti cation
between use rs and networks, i.e. can prevent illegal
users from accessing the network and can also prevent
users from accessing the ill egal AP. 802.1x utilizes
dynamic WEP encrypti on to protect th e WEP key fr om
being decryp ted. To sol ve the publ ishing probl em for
digital certification, people make some changes to TLS
authentication and TTLS and EAP come into exist, which
enable you to access the network by usi ng the
traditional way of aut hentication: username and
password.

11N Wireless Broadband Router User Guide
85
Appendix 2 Product Features
z Supports IEEE 802.11n, IEEE 802.11g, IEEE
802.11b, IEEE 802.3 and IEEE 802.3u standards.
z 5dBi hi gh gai n omn i-directional ant enna, wi th
strong signals and long transmission distance.
z Wireless transmission rate up to 150Mbps
z Provides one 10/10 0Mbps auto -negotiation
Ethernet W AN port to co nnect to the Wi de Area
Network
z Provides four 10/100 Mbps auto- negotiation
Ethernet LAN ports to co nnect to the Local Area
Network
z Supports Auto MDI/MDIX
z Supports xDSL/Cable MODEM, static and dynami c
IP in community broadband networking
z Includes router , wi reless access poi nt, fou r-port
switch and firewall all in one
z SupportsWPA-PSK,WPA2-PSK,andWPA-PSK&WPA2
-PSK mixed security modes
z Supports WPS button
z Supports hidden S SID functi on and MA C
address-based access control
z Supports WMM to mak e your audio and vi deo
smoother
z Supports SNTP
z Supports UPnP and DDNS

11N Wireless Broadband Router User Guide
86
z Supports WDS to extend wireless network
z Supports virtual server, DMZ host
z Provides syslog to record the running status of the
router
Appendix 3 FAQ
This s ection provides s ome s olutions t o t he p roblems
which ma y occur duri ng the router ’s i nstallation or
usage. The i nstructions below may help you deal with
the problems. If your problem is not in the list, please
log into our website www.tenda.cn or send an E-mail to
support@tenda.cn, and we wi ll reply to you at the
earliest time.
1. Can not log in to the Web-based Utility of the router
after you enter the IP address in the address field?
Step 1: Check if the router is working correctly, after
the devi ce i s powered on for a few se conds, the SYS
indicator on the front panel should light up. If it is not,
please contact us.
Step 2: Check the net work cabl es are connec ted
correctly and the corresponding LED indicator lights up.
Sometimes, the indicator lights up, but it does not mean
it is functioning.
Step 3: Run “Ping” command and check i f it can ping

11N Wireless Broadband Router User Guide
87
the R outer’s LA N IP addres s 192. 168.0.1 (op en
“Command Prompt ” and type “Pi ng 19 2.168.0.1” a nd
then enter). If it is OK, please make sure your browser
does not access the Internet by proxy server. If the ping
fails, you can press the “RESET” button for 7 seconds to
restore to defaul t setti ngs. And then repeat th e pi ng
operation. If it still does not work, please contact us.
2. Forgot the login password and cannot enter the
Web-based Utility. What can I do?
Press the “RESET” button for 7 seconds to restore t he
Router to default settings.
3. The computer connected with the Router shows
IP address conflict. What can I do?
Check if there are other DHCP servers in the LAN and if
there are then disable them. The default IP address of
the router is 192. 168.0.1 pl ease maker sure the
address is not being used by any other device. If there
are two computers wi th the same IP address, pl ease
change one of them.
4. I cannot use E-mail and access the Intern et.
What can I do?
Sometimes happens wi th ADSL connecti on a nd
Dynamic IP users. You may need to modify the default
MTU value (1492). Please open the “WAN Setting” and
modify the MTU value with the recommended v alue as

11N Wireless Broadband Router User Guide
88
1450 or 1400.
5.How to share my c omputer’s resource w ith
other users in Internet?
If you want Internet users to access the internal server
via the router such as: e-mail server, Web, FTP. You can
configure the “Virtual Server”.
Step 1: create your internal server, make sure the LAN
users can access these servers and know related service
port. For example, Web server’s port i s 80; F TP is 21;
SMTP is 25 and POP3 is 110.
Step 2: In the router’s web click “Virtual Server” and
select “Port Range Forwarding”.
Step 3: Input the servi ce port provi ded by the rout er
(i.e. the external port) for mappi ng the i nternal and
external network, for example, 80-80.
Step 4: input the internal Web service port, for example,
80-80.
Step 5: Input the i nternal server ’s IP address. For
example, if your W eb server ’s IP addres s i s
192.168.0.10, please input it.
Step 6: select the communication protocol used by your
i n t e r n a l h o s t : T C P, U D P, B o t h .
Step 7: click “Ok” to activate the settings.
The following table lists some well-known applications
and their respective service ports:
Server Protocol
Service Port

11N Wireless Broadband Router User Guide
89
WEB Server TCP 80
FTP Server TCP 21
Telnet T CP 23
NetMeeting T CP 1503、1720
MSN
Messenger TCP/UDP
File
Send:6891-6900(TCP)
Voice:1863、6901(TCP)
Voice:1863、5190(UDP)
PPTP VPN TCP 1723
Iphone5.0 T CP 22555
SMTP T CP 25
POP3 T CP 110

11N Wireless Broadband Router User Guide
90
Appendix 4 Clear Wireless
Configuration
Clear Wirel ess configuration file under windo ws
XP
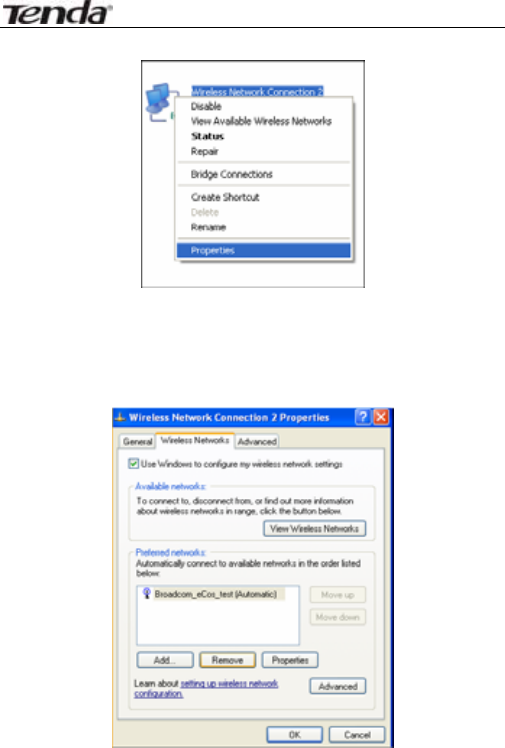
1. Right click “My Network Places” on your computer
desktop and select “Properties”.
2. Ri ght cli ck “W ireless Network Co nnections” a nd
select “Properties”.
11N Wireless Broadband Router User Guide
91
3. Click “Wireless Network Configuration” and clear the
corresponding wi reless configuration fil e as sh own
below.
Clear Wireless configuration file under windows 7
1. Right click “Network” and click “Properties”.
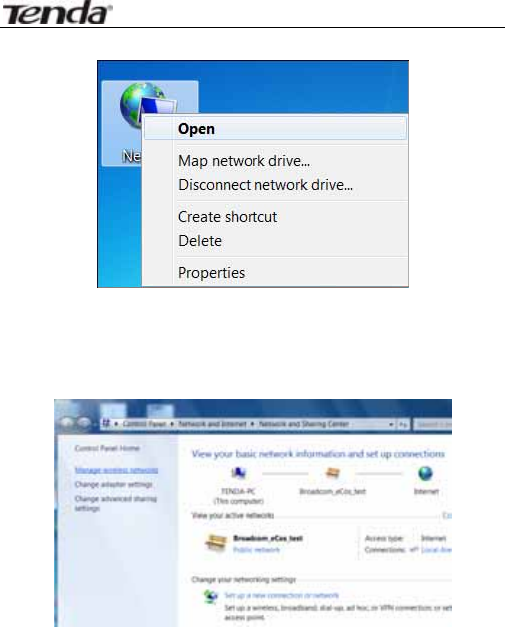
11N Wireless Broadband Router User Guide
92
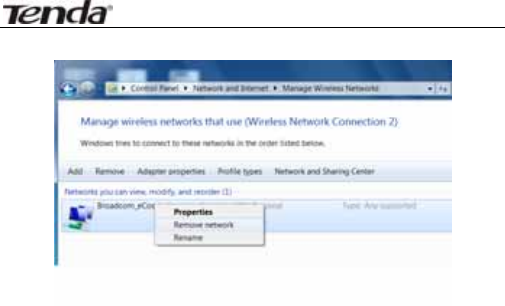
2. Click “Manage wireless networks” on the l eft side of
the window.
3. De lete t he c orresponding c onfigured file in t he
“Manage wireless networks”.
11N Wireless Broadband Router User Guide
93

11N Wireless Broadband Router User Guide
94
Appendix 5 Regulatory Information
EU Declaration or Declaration of Conformity
Hereby, SH ENZHEN T ENDA T ECHNOLOGY C O.,LTD,
declares t hat t his W ireless Br oadband R outer is in
compliance with the essential requirements a nd other
relevant provisions of Directive 1999/5/EC.
FCC Statement
This equi pment has been tested and f ound to comply
with the limits for a Class B digital device, pursuant to
part 15 of th e FCC rul es. These limits are designed to
provide reasonabl e protecti on agai nst harmful
interference in a residential installation. This equipment
generates, uses and can radiate radio frequency energy
and, if not installed and used i n acco rdance wi th the
instructions, ma y c ause ha rmful interference t o r adio
communications. However, there i s no guar antee t hat
interference will not occur in a particular installation. If
this equipment does cause harmful interference
to r adio or tel evision recepti on, wh ich can be
determined by turni ng the equipment off and on, the
user is encouraged to try to correct the interference by
one or more of the following measures:
-Reorient or relocate the receiving antenna.
-Increase th e se paration betwe en th e equi pment and
receiver.

11N Wireless Broadband Router User Guide
95
-Connect the equi pment into an outlet on a ci rcuit
different from that to which the receiver is connected.
-Consult the deal er or an experi enced radio/TV
technician for help.
To assure c ontinued compl iance, a ny changes or
modifications not expres sly approved by the party
responsible for compli ance coul d void the us er’s
authority to operate this equipment. (Example- use only
shielded interface cables when connecting to computer
or peripheral devices).
“The antenna(s) used for this transmitter must not be
co-located or oper ating i n conjuncti on with an y oth er
antenna or transmitter.”
FCC Radiation Exposure Statement
This devi ce complies wi th P art 15 of the FCC Rules.
Operation is subject to the following two conditions: (1)
this device may not cause harmful interference, and (2)
this devi ce must accept an y i nterference rec eived,
including interference t hat may c ause undesi red
operation