TENDA TECHNOLOGY W6US Wireless Access Point User Manual W6 USV1 0 TDE01
SHENZHEN TENDA TECHNOLOGY CO., LTD. Wireless Access Point W6 USV1 0 TDE01
Users Manual
Install Guide
Wireless Access Point
Model: W6_US
Please read this Install Guide carefully before you start.
For information that is not covered here, see the User
Guide at http://www.tendacn.com
Package Contents
1
* If any item is incorrect, missing, or damaged, please keep the original package and contact
your reseller for immediate replacement.
Get to Know Your AP
2
① Detach the AP’s cover plate using a screw-driver as shown in the figure.
System Requirement
Windows XP/7/8 or Linux
Web Browser : IE8 or higher or Google Chrome
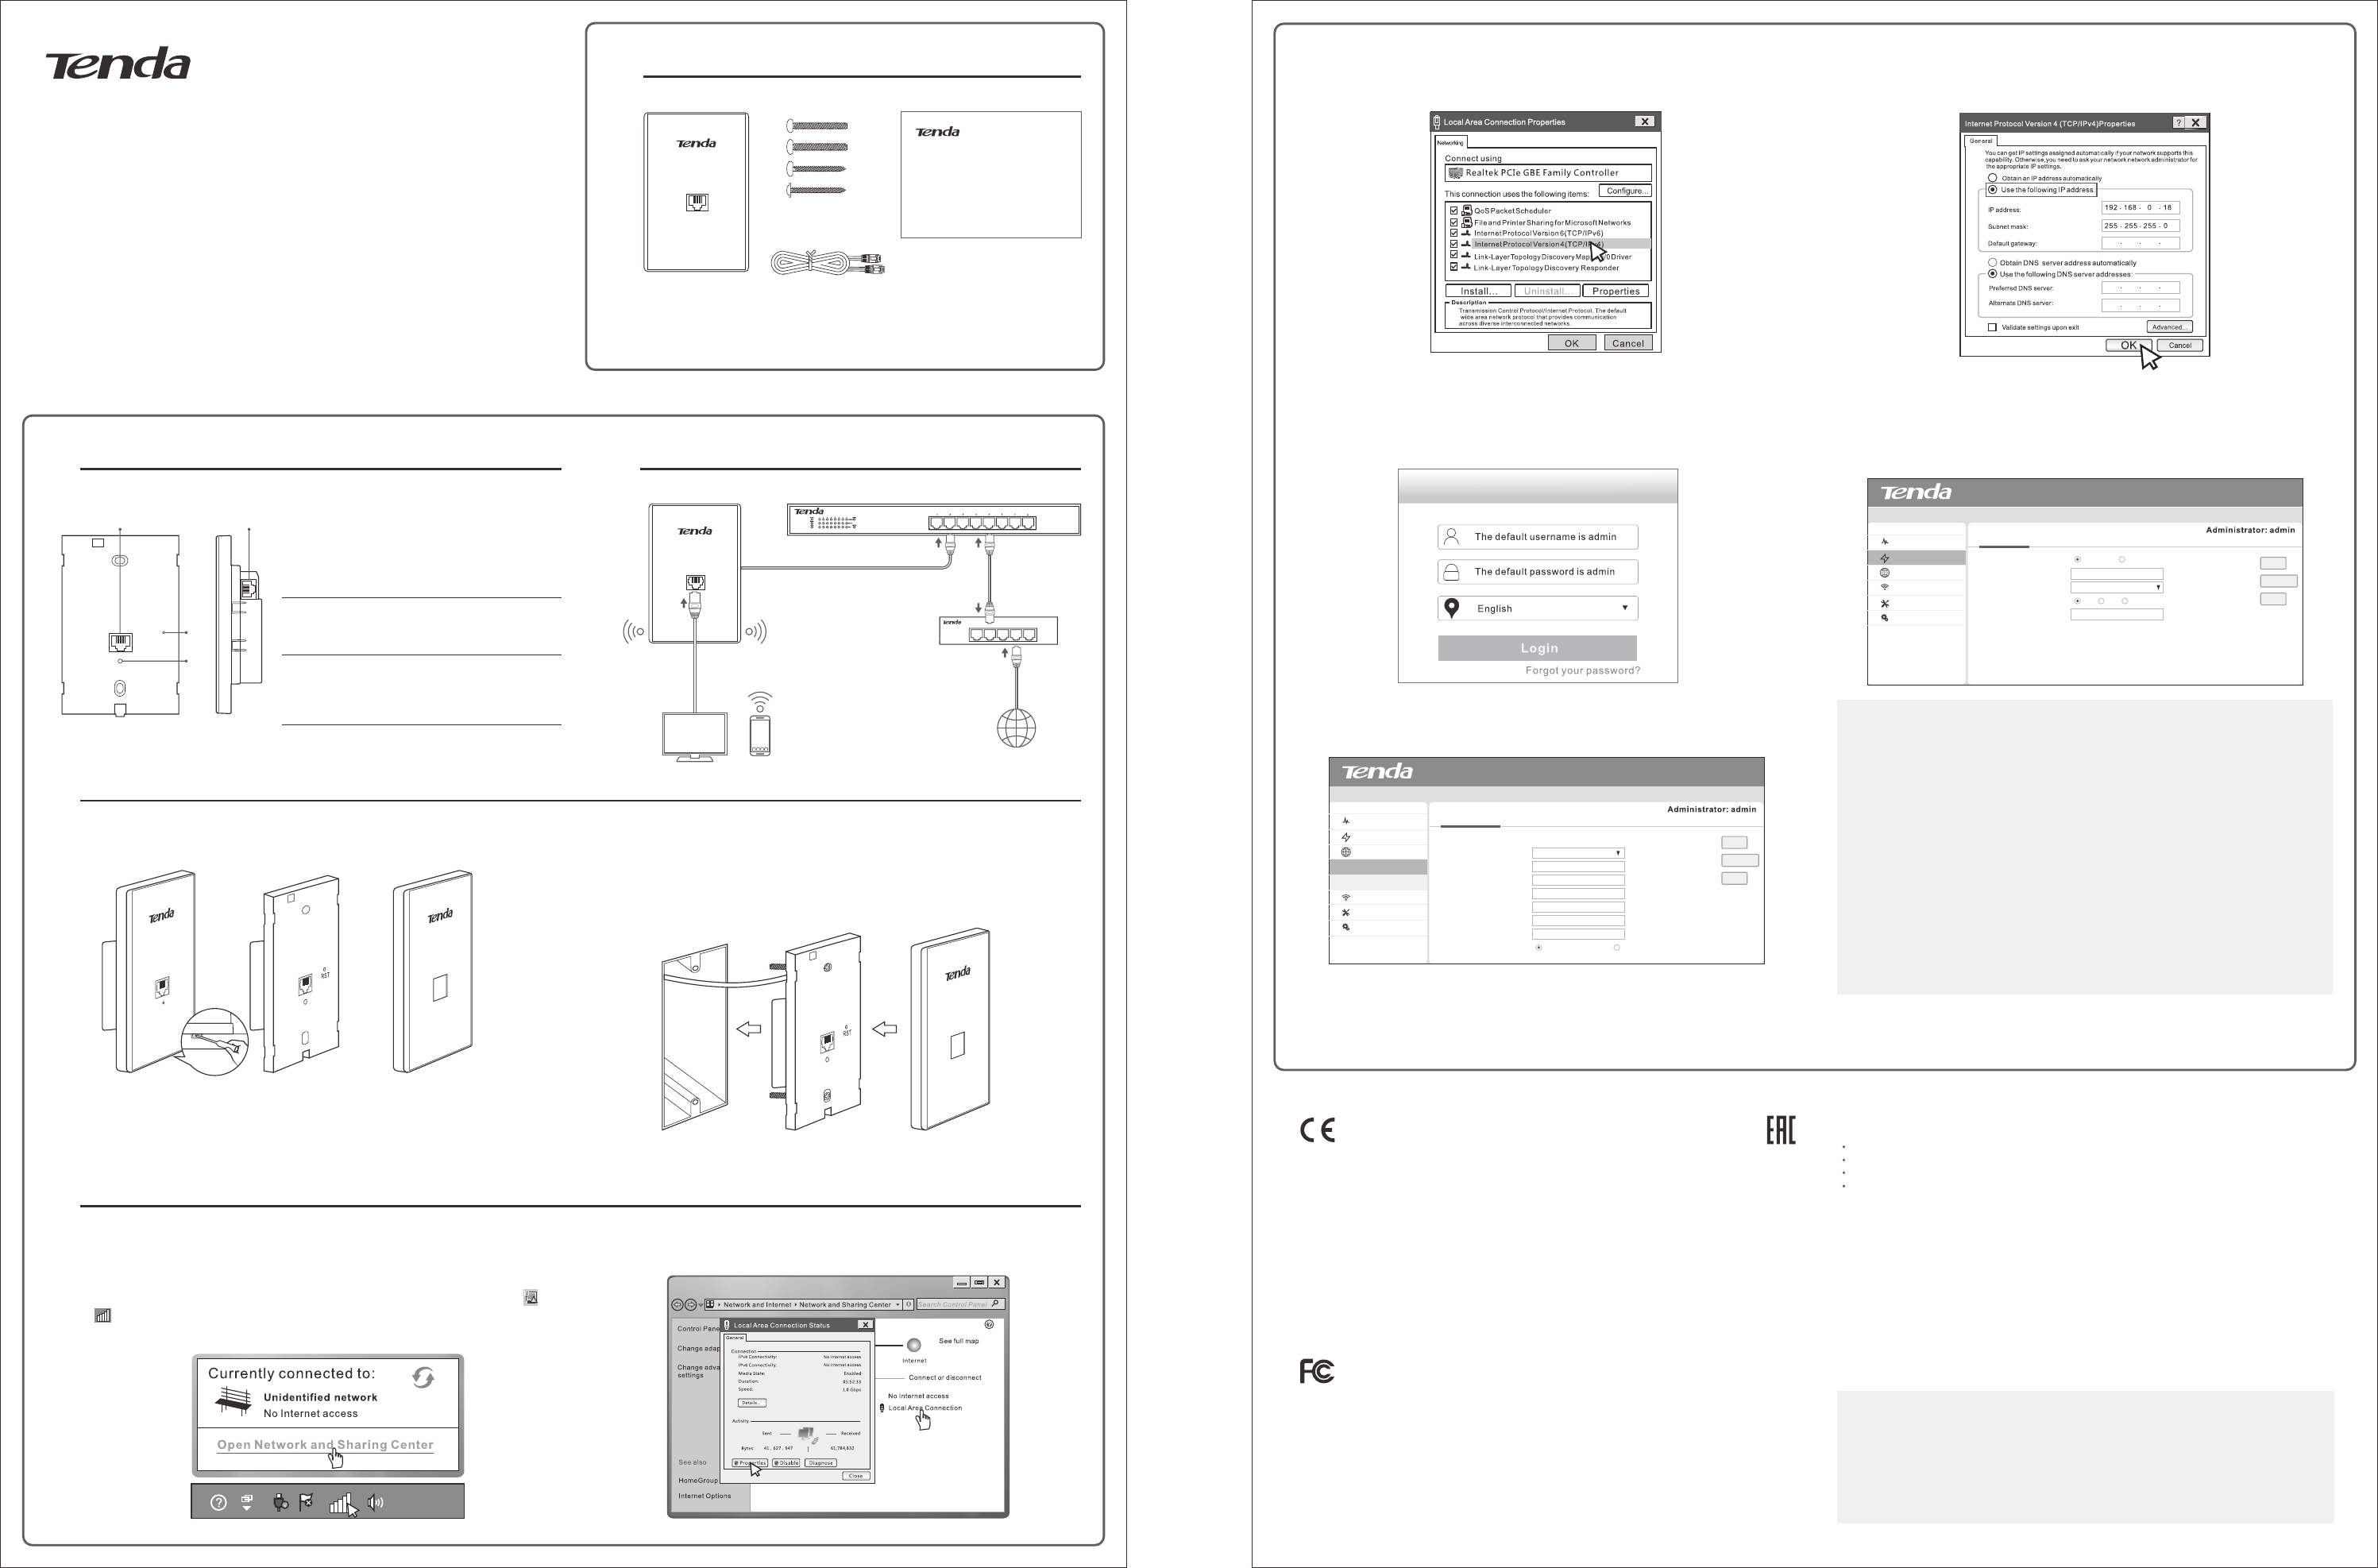
Step 1: Configure the Computer(Take Windows 7 as an example)
① On the computer that connected to the Wireless Access Point, right click the icon
or on the bottom right corner of your desktop, and then click Open Network and
Sharing Center.
An electrical wall box should be pre-installed with an Ethernet cable running from the box.
② Connect the Ethernet cable from the wall box to a PoE switch, and connect the other
end of the Ethernet cable to the LAN port on the back panel of the AP.
③ Install the AP in the wall box. Verify that the Ethernet cable is positioned properly.
④ Fasten the AP with the included screws. Adjust the screws to ensure the AP is flush with the
wall for proper fitting of the cover plate.
⑤ Attach the cover plate to the AP.
② Click Local Area Connection > Properties
Install Your AP
Manage Your AP
4
5
Network Topology
3
Note:
All settings will be restored to factory defaults once you reset the device. You will need to
reconfigure the device for specific purposers.
CE Mark Warning
This is a Class B product. In a domestic environment, this product may cause radio interference, in which case
the user may be required to take adequate measures.
NOTE: (1) The manufacturer is not responsible for any radio or TV interference caused by unauthorized
modifications to this equipment. (2) To avoid unnecessary radiation interference, it is recommended to use a
shielded RJ45 cable.
Declaration of Conformity
Hereby, SHENZHEN TENDA TECHNOLOGY CO. LTD. declares that the radio equipment type W6_US is in
compliance with Directive 2014/53/EU.
The full text of the EU declaration of conformity is available at the following internet address:
http://www.tendacn.com/en/service/page/ce.html
Operate Frequency:2412-2472 MHz EIRP Power(Max.):19.8 dBm Software Version:v1.0.0.2
FCC Statement
This device complies with Part 15 of the FCC Rules. Operation is subject to the following two conditions: (1)
This device may not cause harmful interference, and (2) this device must accept any interference received,
including interference that may cause undesired operation.
This equipment has been tested and found to comply with the limits for a Class B digital device, pursuant to
Part 15 of the FCC Rules. These limits are designed to provide reasonable protection against harmful
interference in a residential installation. This equipment generates, uses and can radiate radio frequency
energy and, if not installed and used in accordance with the instructions, may cause harmful interference to
radio communications. However, there is no guarantee that interference will not occur in a particular
installation. If this equipment does cause harmful interference to radio or television reception, which can be
Step 2: Configure the Wireless Access Point
① Launch a web browser, type 192.168.0.254 in the address bar, and tap Enter on the
keyboard. Type the login Username and Password (Both are “admin” by default) and click
Login.
② Quick Setup: Click Quick Setup, select a mode according to your needs (Here take AP
Mode as an example); customize the SSID (wireless network name), select a security
mode/Cipher Type, customize the Security Key, and click Save.
③ LAN Setup: Click Network > LAN Setup, select a Address Mode, and complete the
releated settings.
Tip
If your computer is set to a static or fixed IP address (such as Step 1: Configure the
Computer), remember to set it back to Obtain an IP address automatically and Obtain
DNS ser ver address automatically after configuration.
③ Double click Internet Protocol Version 4 (TCP/IPv4) ④ Select Use the following IP address, and set up the computer ’s IP address to 192.168.0.X
(X indicates a number between 2 and 253), Subnet mask to 255.255.255.0, and then click OK
to save the settings.
Q1: I cannot access the device’s web UI by using the login IP address 192.168.0.254.
What should I do?
A1: ① Ensure that your computer is connected to the device properly, and the
device is powered on.
② Ensure that your computer ’s IP address is set to 192.168.0.X (X is a number
between 2 and 253).
③ Clear cache of the browser, or launch another web browser.
④ Try configuring the device on a different computer.
⑤ Restore the device to factory defaults (refer to the following question) and retry.
Q2: How to restore the device to factory defaults?
A2: Detach the device’s cover plate, press the RST button with a needle for over 7
seconds until the LED indicator turns to be solid to restore the device to factory
defaults.
FAQs
determined by turning the equipment off and on, the user is encouraged to try to correct the interference by
one of the following measures:
Reorient or relocate the receiving antenna.
Increase the separation between the equipment and receiver.
Connect the equipment into an outlet on a circuit different from that to which the receiver is connected.
Consult the dealer or an experienced radio/TV technician for help.
FCC Caution: Any changes or modifications not expressly approved by the par ty responsible for compliance
could void the user's authority to operate this equipment.
This transmitter must not be co-located or operating in conjunction with any other antenna or transmitter.
The manufacturer is not responsible for any radio or TV interference caused by unauthorized modifications
to this equipment.
Radiation Exposure Statement
This equipment complies with FCC radiation exposure limits set forth for an uncontrolled environment. This
equipment should be installed and operated with minimum distance 20cm between the radiator & your body.
NOTE: (1) The manufacturer is not responsible for any radio or TV interference caused by unauthorized
modifications to this equipment. (2) To avoid unnecessary radiation interference, it is recommended to use a
shielded RJ45 cable.
Install Guide
Wireless Access Point
Model: W6_US
Please read this Install Guide carefully before you start.
For information that is not covered here, see the User
Guide at http://www.tendacn.com
Wireless Access Point 1 Ethernet Cable
Four pairs of screws
Install Guide
Wireless Access Point PoE Switch
Router
Internet
2:30 PM
6/16/2016
Interfaces
PoE Out + Data: 100Mbps LAN Port. Connect it to a
computer, etc. Only support PoE af class 2 or lower power
consumption device.
PoE In + Data: 100Mbps PoE/LAN Port (Supported PoE
power supply). Connect this port to a PoE switch.
Button
RST: Press it for over 7 seconds until the LED indicator
turns to be solid to restore the device to factory defaults.
LED
Blinking: The AP works properly.
Off: The AP is not powered on, malfunctions occur or LED
is disabled manually.
x 2
x 2
x 2
x 2
Detach the cover plate Cover Plate
AP
= +
RST
LED
RST
PoE Out + Data PoE In + Data
Technical Support
Copyright
Address Info:
United States Hotline: 1-800-570-5892 Canada Hotline: 1-888-998-8966
Skype: Tendasz
© 2016 Shenzhen Tenda Technology Co., Ltd. All rights reser ved.
Tenda is a registered trademark legally held by Shenzhen Tenda Technology Co., Ltd. Other brand and product names
mentioned herein are trademarks or registered trademarks of their respective holders. Specifications are subject to
change without notice.
6-8 Floor, Tower E3, NO.1001, Zhongshanyuan Road, Nanshan District, Shenzhen, China. 518052
HongKong Hotline: 00852-81931998
Website: http:// www.tendacn.com E-mail: support@tenda.com.cn
W6_US
Status
Quick Setup
Network
LAN Setup
DHCP Server
Wireless
SNMP
Tools
MAC Address
Address Mode
IP Address
Subnet Mask
Gateway
Primary DNS Ser ver
Secondar y DNS Ser ver
Device Name
Ethernet Mode
LAN Setup
For example:192.168.1.1
For example:255.255.255.0
(optional)
C8:3A:35:16:07:01
Static IP
192.168.0.254
255.255.255.0
W6
192.168.0.1
192.168.0.1
_US
Auto-negotiation 10M half-duplex
Save
Help
Restpre
Status
Quick Setup
Network
Wireless
SNMP
Tools
Mode
SSID
Security Mode
Cipher Type
Security Key
Quick Setup
AP Mode APClient Mode
Tenda_160701
Mixed WPA/WPA2-PSK
AES TKIP TKIP&AES
12345678
Save
Help
Restpre