TERRAILLONS 13357 Bluetooth Kitchen Scale User Manual Notice Nutritab 143x210mm indd
TERRAILLON SAS Bluetooth Kitchen Scale Notice Nutritab 143x210mm indd
Users Manual
PO#1B10382 GKS-1136-B3 说明书
印色:CMYK
材质:200G铜板纸+光胶
尺寸:143*210mm
Par la présente, La société Terraillon SAS déclare que cet appareil est conforme
aux exigences essentielles de santé et de sécurité.
Ce produit répond aux principales exigences et aux autres dispositions applicables
de la Directive R&TTE 1999/5/CE.
Le certificat de conformité complet est disponible sur
http://www.terraillon.com/fr/mentions-legales
EN TERRAILLON CONNECTED KITCHEN SCALE
INSTRUCTION MANUAL .............................................................. 4
FR BALANCE DE CUISINE CONNECTÉE TERRAILLON
NOTICE D’UTILISATION ............................................................... 9
NL TERRAILLON KEUKENWEEGSCHAAL
HANDLEIDING .......................................................................... 14
IT BILANCIA DA CUCINA COLLEGATA TERRAILLON
MANUALE DI ISTRUZIONI .......................................................... 19
ES BALANZA DE COCINA CONECTADA TERRAILLON
MANUAL DE INSTRUCCIONES ................................................. 24
DE VERNETZTE KÜCHENWAAGE TERRAILLON
BEDIENUNGSANLEITUNG ......................................................... 29
PT BALANÇA DE COZINHA TERRAILLON
MANUAL DE INSTRUÇÕES ....................................................... 34
iPhone is registered trademark of Apple Inc.
Android is a trademark of Google Inc.
The Bluetooth® word mark and logos are registered trademarks
owned by Bluetooth SIG, Inc.
Other trademarks and trade names are those of their respective owners.
3

FIND MORE INFORMATION ON
http://www.terraillon.com
Thank you very much for selecting the Terraillon connected Kitchen scale
NUTRITAB.
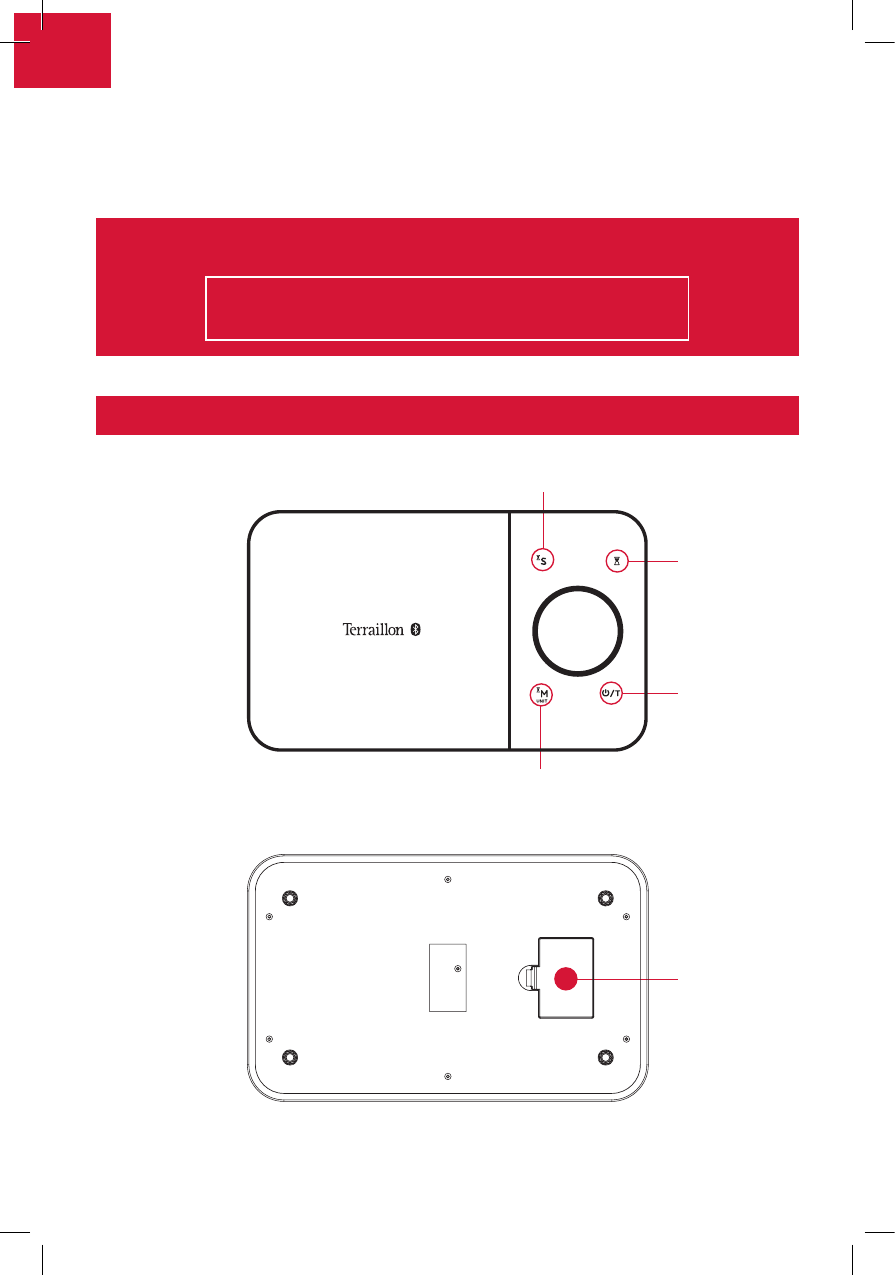
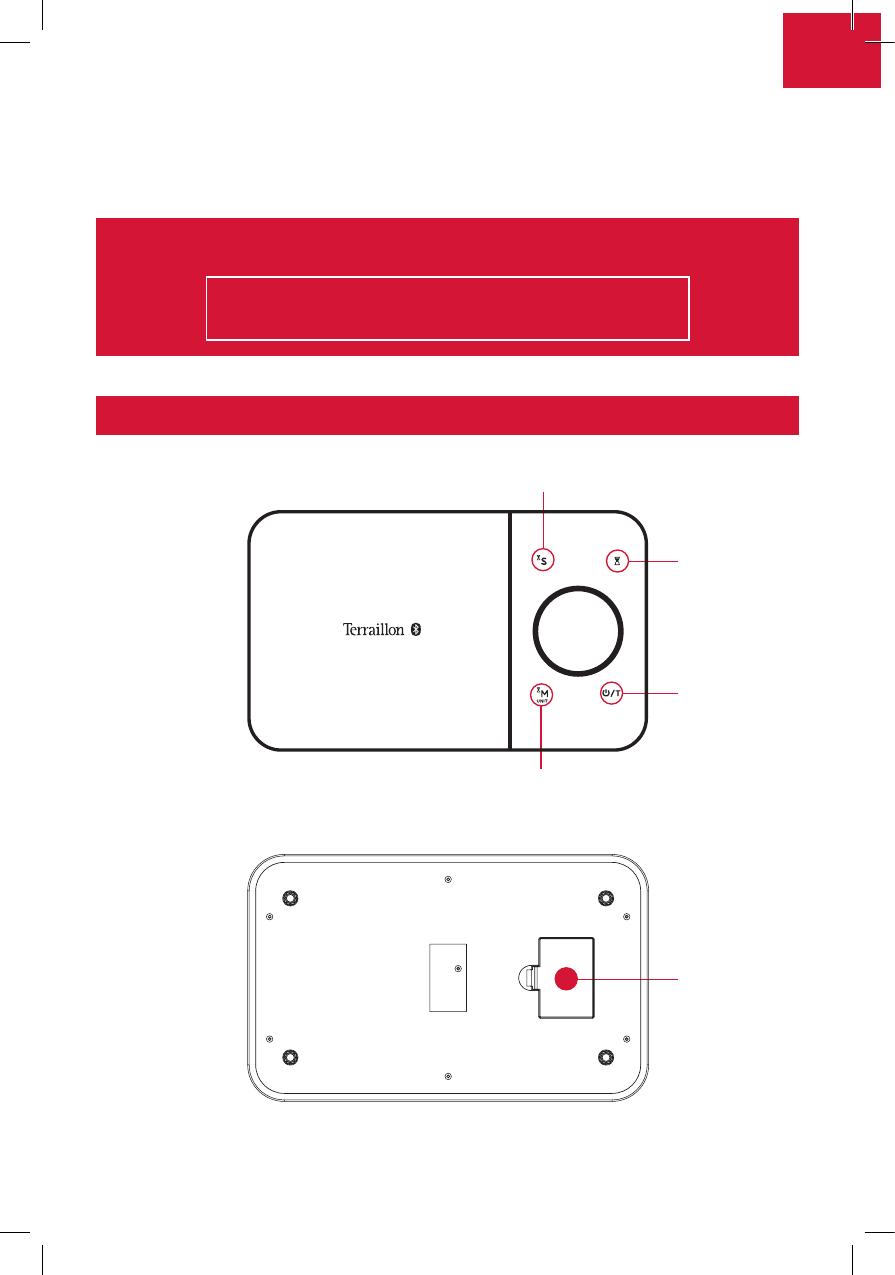
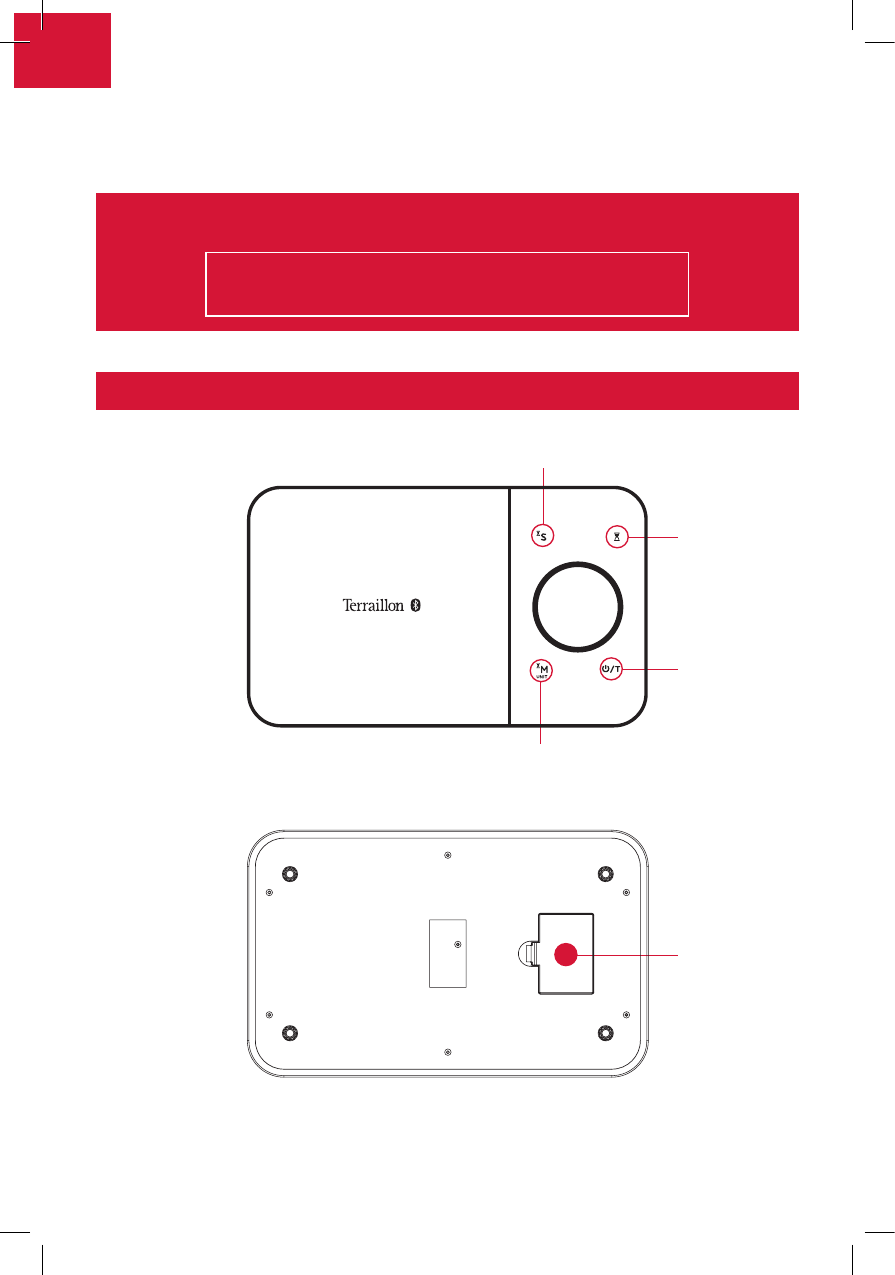
PRODUCT OVERVIEW
TIMER
SECONDS (TIMER)
ON/OFF
and TARE
BATTERY
COMPARTMENT
UNITS & MINUTES (TIMER)
EN
4
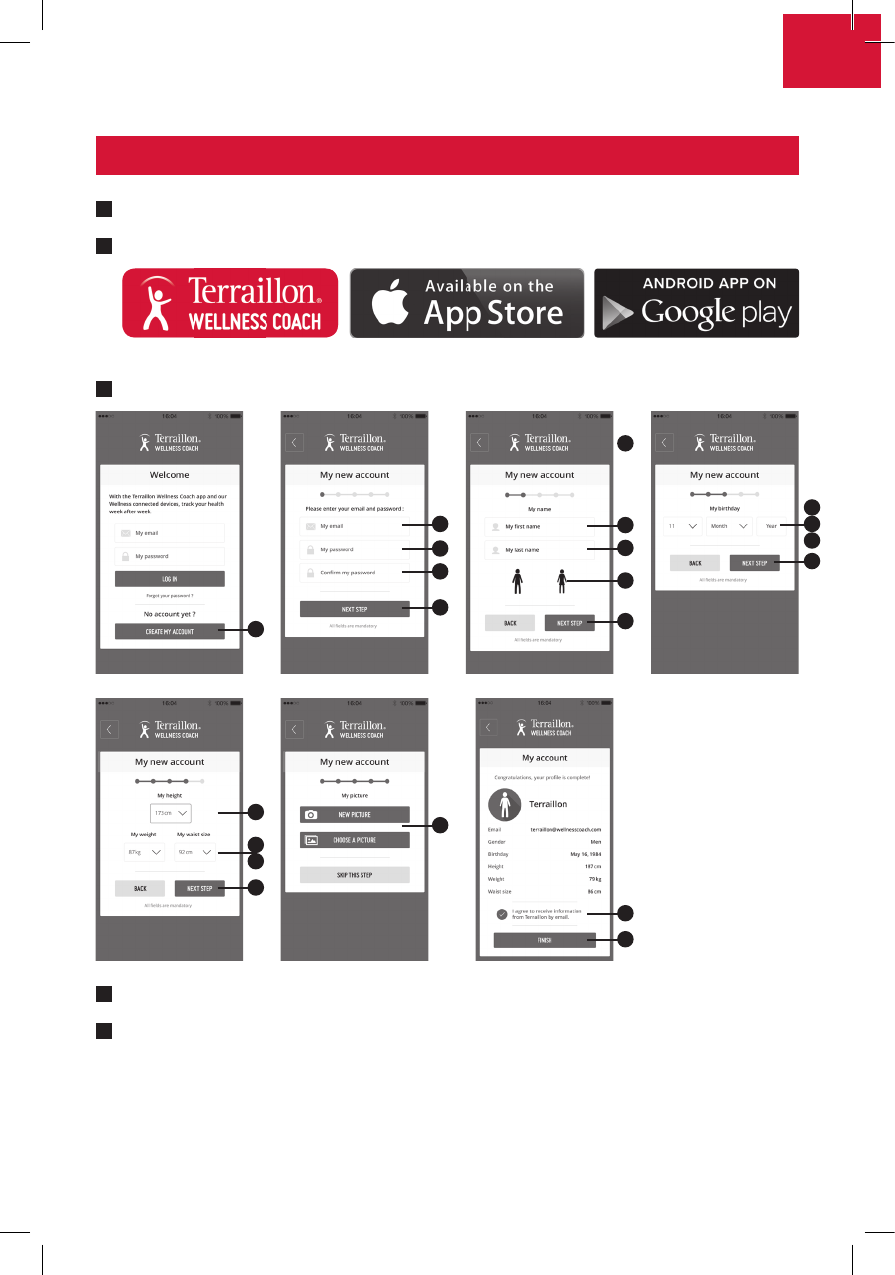
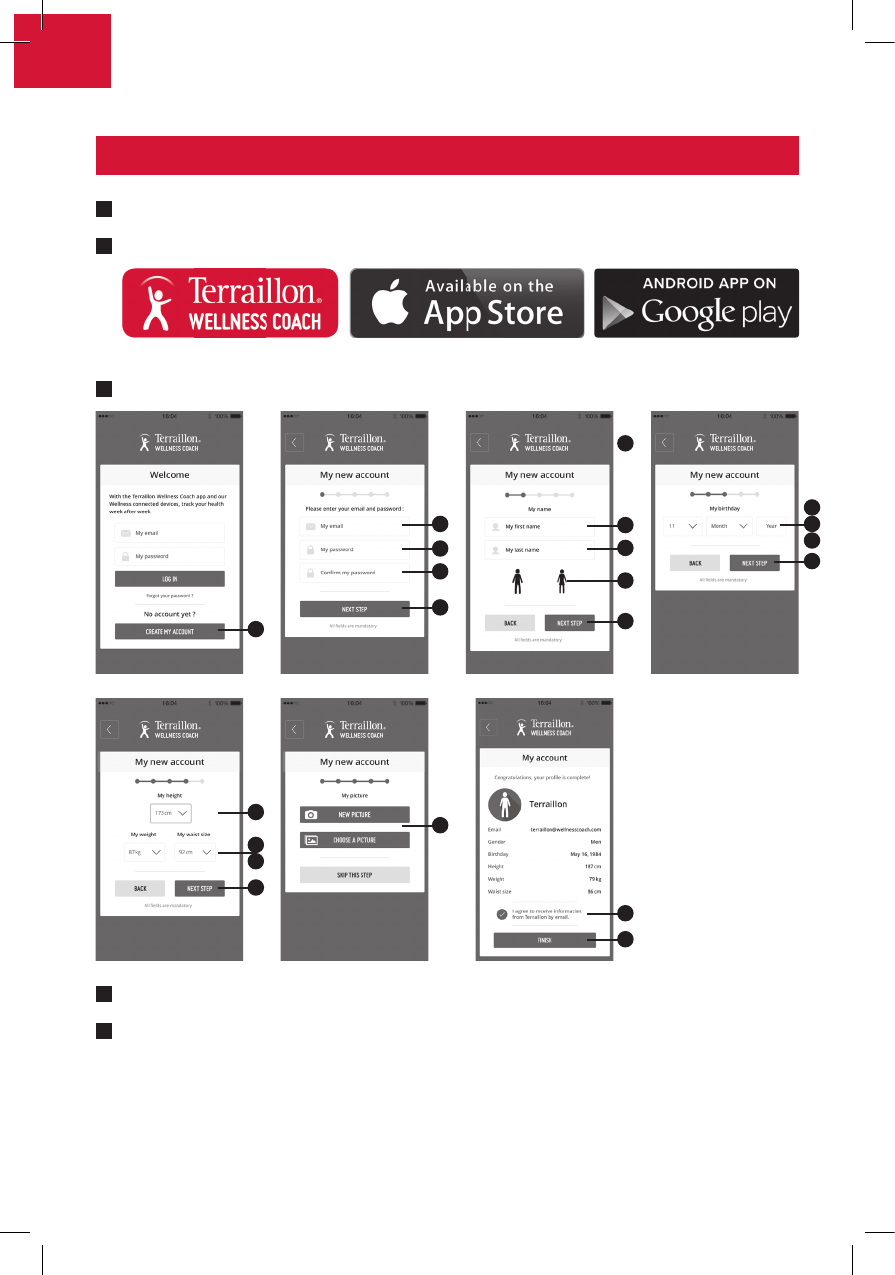
Insert the batteries (3xAAA).
Download the Terraillon Wellness Coach application.
Create your account.
Turn on Bluetooth on your Smartphone (Setting > Bluetooth > ON).
Press the ON/OFF button. NUTRITAB will connect automatically with the
Wellness Coach application.
FIRST USE
A
B
C
D
E
5
1
1
11
2
3
4
2
1
2
3
4
3
2
1
4
4
2
1
3
EN
5
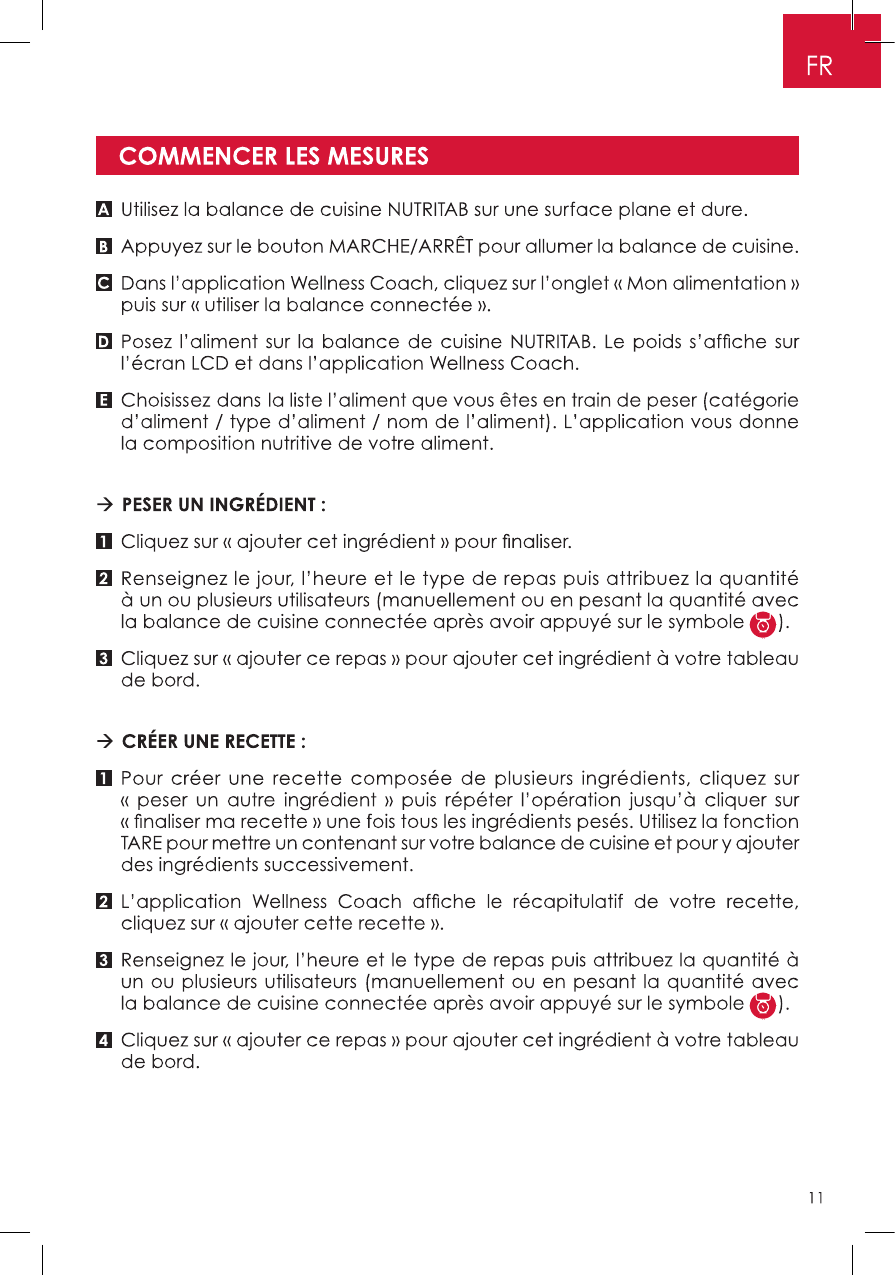
Use the NUTRITAB kitchen scale on a hard, at surface.
Press the ON/OFF button to turn on the kitchen scale.
In the Wellness Coach application, click on the «MY FOOD» tab, and then
on «Use the connected kitchen scale».
Place the food on the NUTRITAB kitchen scale. The weight will be shown on
the LCD screen and in the Wellness Coach application.
Choose the food you are weighing from the list (food category/food type/
food name). The application will give you the food’s nutritional information.
WEIGH AN INGREDIENT:
Click on «Add this ingredient» to complete.
Enter the day, hour, and type of meal, then assign the amount to one or
several users (manually or by weighing the amount on the connected
kitchen scale after having pressed the symbol).
Click on «Add this meal» to add this ingredient to your dashboard.
CREATE A RECIPE:
To create a recipe that is made up of several ingredients, click on «Weigh
another ingredient», repeat the steps, then click on «Complete my recipe»
once all the ingredients have been weighed. Use the TARE function in order
to place a container on the kitchen scale and gradually add ingredients.
The Wellness Coach application shows the summary of your recipes, click
on «Add this recipe».
Enter the day, hour, and type of meal, then assign the amount to one or
several users (manually or by weighing the amount on the connected
kitchen scale after having pressed the symbol).
Click on «Add this meal» to add this ingredient to your dashboard.
START MEASURING
A
1
1
B
2
3
2
C
3
4
D
E
EN
6
OTHER FUNCTIONS OF THE APPLICATION
OTHER FUNCTIONS OF THE KITCHEN SCALE
SCAN A PRODUCT:
In the MY FOOD tab, click on «Scan a product» to use the product’s bar code
to add its energy values to your dashboard. Scan the product’s bar code
with your smartphone camera. If the food is found, click on «Add this dish» to
add the product to your dashboard. If it is not found, use the «Enter manually»
function.
ENTER A PRODUCT MANUALLY:
In the MY FOOD tab, click on «Enter manually» to add a product’s nutritional
information to your dashboard using its nutrition information panel. Move the
various cursors to enter the energy values, then click on «Add this dish» to add
the product to your dashboard.
RECIPE BOOK:
In the MY FOOD tab, click on «Use my recipe book» to add the energy values
of a previously saved recipe to your dashboard. Choose your recipe from the
list, then assign the amount to one or several users (manually or by weighing
the amount on the connected kitchen scale after having pressed the
symbol).
TURN OFF THE KITCHEN SCALE:
Press the ON/OFF button for 3 seconds to turn off the kitchen scale.
LIQUID/UNIT CONVERSION:
Press the M/UNIT button briey to change the units: gmloz.ozg.
AUTOMATIC TARE:
Turn on your kitchen scale. Place your container/food on the kitchen scale,
then press the ON/OFF/TARE button to tare the kitchen scale. You can add
your next ingredient, then repeat the process.
EN
7
This product is guaranteed for 2 years against material and manufacturing
defects. During this period, such defects will be repaired free of charge (proof
of purchase must be presented if the scale is under warranty). This warranty
does not cover damage resulting from accidents, improper use or negligence.
If you have a complaint please contact the store where you purchased the
product rst.
Waste electrical products should not be disposed of with household
waste. Please recycle where facilities exist. Check with your local
authority or retailer for recycling advice.
WARRANTY & ENVIRONMENT PROTECTION
TIMER FUNCTION:
The timer returns to 0 after 199 minutes. Press the ON/OFF button to stop
the timer.
• Press the TIMER button.
• Press the M/UNIT button briey to add 1 minute, and press for 2 seconds
to add 10 minutes.
• Press the S button briey to add 1 second, and press for 2 seconds to add
10 seconds.
• After having set the time, press the TIMER button to start the timer.
• Press TIMER to pause the timer and change the time, then press again
to restart.
MAINTENANCE
Use only a damp cloth. NEVER use detergents or other chemicals.
This product is not suitable for dishwasher or microwave.
EN
8

BESOIN D’INFORMATION ?
http://www.terraillon.com
Nous vous remercions d’avoir choisi la balance de cuisine connectée
Terraillon NUTRITAB.
APERÇU DU PRODUIT
TIMER
SECONDES (TIMER)
ON/OFF
et TARE
COMPARTIMENT
À PILES
UNITÉS & MINUTES (TIMER)
FR
9

Insérez les piles (3xAAA).
Téléchargez l’application Terraillon Wellness Coach.
Créez votre compte sur l’application.
Activez la fonction Bluetooth sur votre Smartphone (Réglages > Bluetooth > ON).
Appuyez sur le bouton MARCHE/ARRÊT. NUTRITAB se connecte automatique
avec l’application Wellness Coach.
PREMIÈRE UTILISATION
A
B
C
D
E
5
1
1
11
2
3
4
2
1
2
3
4
3
2
1
4
4
2
1
3
FR
10

AUTRES FONCTIONS DE L’APPLICATION
AUTRES FONCTIONS DE LA BALANCE
SCANNER UN PRODUIT :
Dans l’onglet MON ALIMENTATION, cliquez sur « scanner un produit » pour
ajouter les valeurs énergétiques d’un produit à votre tableau de bord à partir
de son code-barres. Scannez le code-barres du produit avec l’appareil photo
de votre smartphone. Si l’aliment est référencé, cliquez sur « ajouter ce plat »
pour ajouter ce produit à votre tableau de bord. S’il n’est pas trouvé, utilisez
la fonction « saisir manuellement ».
SAISIR MANUELLEMENT :
Dans l’onglet MON ALIMENTATION, cliquez sur « saisir manuellement » pour
ajouter les valeurs énergétiques d’un produit à votre tableau de bord à partir
de son étiquette énergétique. Déplacez les différents curseurs pour renseigner
les valeurs énergétiques puis cliquez sur « ajouter ce plat » pour ajouter ce
produit à votre tableau de bord.
CARNET DE RECETTES :
Dans l’onglet MON ALIMENTATION, cliquez sur « utiliser mon carnet de recettes »
pour ajouter les valeurs énergétiques d’une recette préalablement enregistrée
à votre tableau de bord. Choisissiez votre recette dans la liste puis attribuez la
quantité à un ou plusieurs utilisateurs (manuellement ou en pesant la quantité
avec la balance de cuisine connectée après avoir appuyé sur le symbole ).
ÉTEINDRE LA BALANCE DE CUISINE :
Appuyez pendant 3 secondes sur le bouton MARCHE/ARRÊT pour éteindre
la balance de cuisine.
CONVERSION DES LIQUIDES/UNITÉS :
Appuyez brièvement sur le bouton M/UNIT pour changer les unités :
gmloz.ozg.
MISE À ZÉRO AUTOMATIQUE :
Allumez votre balance de cuisine. Posez votre contenant/aliment puis
appuyez sur le bouton ON/OFF/TARE pour remettre l’afchage à zéro. Vous
pouvez ajouter votre ingrédient suivant puis répétez l’opération.
FR
12

GARANTIE ET PROTECTION DE L’ENVIRONNEMENT
FONCTION TIMER :
Le Timer revient à 0 après 199 minutes. Appuyez sur le bouton MARCHE/ARRÊT
pour arrêter le réglage ou le délement du TIMER.
• Appuyez sur le bouton TIMER.
• Appuyez brièvement sur le bouton M/UNIT pour ajouter 1 minute, appuyez
dessus 2 secondes pour ajouter 10 minutes.
• Appuyez brièvement sur le bouton S pour ajouter 1 secondes, appuyez
dessus 2 secondes pour ajouter 10 secondes.
• Après avoir réglé le temps, appuyez sur le bouton TIMER pour le démarrer.
• Appuyez sur TIMER pour le mettre en pause et modier le temps puis
appuyer à nouveau pour le relancer.
ENTRETIEN
Utilisez un chiffon humide uniquement. N’utilisez JAMAIS de détergents
ou d’autres produits chimiques.
NE PAS mettre au lave-vaisselle ou au micro-ondes.
Cet appareil est garanti 2 ans contre tout défaut matériel et de fabrication. Au
cours de cette période, ces défauts seront réparés gratuitement (une preuve
d’achat doit être présentée si la balance est sous garantie). Cette garantie ne
couvre pas les dommages provenant d’accidents, d’une mauvaise utilisation
ou de négligence. Si vous avez une réclamation, adressez-vous d’abord au
magasin où vous avez acheté votre produit.
Les déchets de produits électriques ne doivent pas être jetés avec les ordures
ménagères. Les recycler dans les installations prévues à cet effet. Contacter
l’administration locale ou le détaillant pour tout conseil de recyclage.
FR
13
MEER INFORMATIE OVER
http://www.terraillon.com
Bedankt voor uw keuze voor de Terraillon NUTRITAB-keukenweegschaal met
Bluetooth-verbinding.
OVERZICHT
TIMER
SECONDEN (TIMER)
AAN-UITKNOP
en TARRA
BATTERIJVAK
EENHEDEN en MINUTEN (TIMER)
NL
14

Plaats de batterijen in de weegschaal (3xAAA).
Download de Terraillon Wellness Coach-app.
Maak een account aan.
Schakel de Bluetooth-functie van uw smartphone in (Instellingen >
Bluetooth > AAN).
Druk op de AAN-UITKNOP. NUTRITAB maakt automatisch verbinding met de
Wellness Coach-app.
EERSTE INSTALLATIE
A
B
C
D
E
5
1
1
11
2
3
4
2
1
2
3
4
3
2
1
4
4
2
1
3
NL
15
Gebruik de NUTRITAB-keukenweegschaal enkel op een vlakke, harde
ondergrond.
Druk op de AAN-UITKNOP om de keukenweegschaal aan te zetten.
Klik in de Wellness Coach-app op de tab «Mijn voeding» en vervolgens op
«De aangesloten weegschaal gebruiken».
Leg het voedingsmiddel op de NUTRITAB-keukenweegschaal. Het gewicht
wordt weergegeven op het lcd-scherm en in de Wellness Coach-app.
Kies het voedingsmiddel dat u wilt wegen in de lijst (categorie
voedingsmiddel/soort voedingsmiddel/naam van het voedingsmiddel).
De app toont u de voedingswaarde van uw voedingsmiddel.
EEN INGREDIËNT WEGEN:
Klik op «dit ingrediënt toevoegen» om af te ronden.
Vul de dag, het tijdstip en het soort maaltijd in en wijs de hoeveelheid
vervolgens toe aan een of meerdere gebruikers (handmatig of door de
hoeveelheid te wegen met de verbonden keukenweegschaal, nadat u
op het -symbool hebt gedrukt).
Klik op «deze maaltijd toevoegen» om dit ingrediënt aan uw dashboard
toe te voegen.
EEN RECEPT AANMAKEN:
Om een recept aan te maken met meerdere ingrediënten, klikt u op «nog
een ingrediënt wegen» en herhaalt u deze stap. Zodra u alle ingrediënten
hebt gewogen, klikt u op «mijn recept voltooien». Maak gebruik van de
TARRA-functie als u een kom op uw keukenweegschaal wilt plaatsen
waaraan u achtereenvolgens verschillende ingrediënten toevoegt.
De Wellness Coach-app geeft u een overzicht van uw recept. Klik op «dit
recept toevoegen».
Vul de dag, het tijdstip en het soort maaltijd in en wijs de hoeveelheid
vervolgens toe aan een of meerdere gebruikers (handmatig of door de
hoeveelheid te wegen met de verbonden keukenweegschaal, nadat u
op het -symbool hebt gedrukt).
Klik op «deze maaltijd toevoegen» om dit ingrediënt aan uw dashboard
toe te voegen.
BEGINNEN MET METEN
A
1
1
B
2
3
2
C
3
4
D
E
NL
16

ANDERE FUNCTIES VAN DE APP
ANDERE FUNCTIES VAN DE WEEGSCHAAL
EEN PRODUCT SCANNEN:
In de tab MIJN VOEDING kunt u op «een product scannen» klikken om de
energiewaarden van een product aan uw dashboard toe te voegen met
behulp van de streepjescode. Scan de streepjescode van het product met het
fototoestel van uw smartphone. Als het voedingsmiddel verschijnt, klikt u op «dit
gerecht toevoegen» om het product aan uw dashboard toe te voegen. Wordt het
product niet gevonden, dan kunt u de functie «handmatig invoeren» gebruiken.
HANDMATIG INVOEREN:
In de tab MIJN VOEDING klikt u op «handmatig invoeren» om de
energiewaarden van een product aan uw dashboard toe te voegen met
behulp van het etiket. Verplaats de verschillende schuifregelaars om de
energiewaarden in te voeren en klik vervolgens op «dit gerecht toevoegen»
om het product toe te voegen aan uw dashboard.
RECEPTENBOEKJE:
In de tab MIJN VOEDING klikt u op «mijn receptenboekje gebruiken» om
de energiewaarden van een recept dat u eerder hebt bewaard aan uw
dashboard toe te voegen. Kies uw recept uit de lijst en wijs het vervolgens
toe aan een of meerdere gebruikers (handmatig of door de hoeveelheid te
wegen met de verbonden keukenweegschaal, nadat u op het -symbool
hebt gedrukt).
DE KEUKENWEEGSCHAAL UITSCHAKELEN:
Houd de AAN-UITKNOP 3 seconden ingedrukt om de keukenweegschaal uit
te schakelen.
VLOEISTOFFEN/EENHEDEN HERLEIDEN:
Druk kort op de knop M/UNIT om de eenheden te wijzigen: gmloz.ozg.
AUTOMATISCH RESETTEN:
Schakel uw keukenweegschaal in. Plaats uw kom/voedingsmiddel op de
weegschaal en druk vervolgens op ON/OFF/TARRA om de weergave te
resetten. Vervolgens kunt u het volgende ingrediënt toevoegen, en zo verder
tot u klaar bent.
NL
17
GARANTIE & BESCHERMING VAN HET LEEFMILIEU
TIMERFUNCTIE:
De timer wordt na 199 minuten terug op 0 gezet. Druk op de AAN-UITKNOP
om de instelling of het aopen van de TIMER te stoppen.
• Druk op de knop TIMER.
• Druk kort op de knop M/UNIT om de tijd met 1 minuut te verhogen of houd
de knop 2 seconden ingedrukt om met 10 minuten te verhogen.
• Druk kort op de S-knop om de tijd met 1 seconde te verhogen of houd de
knop 2 seconden ingedrukt om met 10 seconden te verhogen.
• Nadat u de tijd hebt ingesteld, klikt u op de knop TIMER om de timer te
starten.
• Druk op TIMER om de timer te pauzeren en de tijd te wijzigen en druk
vervolgens opnieuw op deze knop om de timer te starten.
ONDERHOUD
Gebruik enkel een vochtige doek. Gebruik NOOIT afwasmiddel of andere
chemische producten. Dit product is niet geschikt voor de vaatwasser of
magnetron.
Voor dit toestel geldt een garantie van 2 jaar tegen materiaal- en
fabricagefouten. Gedurende deze periode zullen dergelijke defecten gratis
gerepareerd worden (tijdens de garantieperiode moet een bewijs van aankoop
worden overgelegd). Schade veroorzaakt door ongevallen, onjuist gebruik
of nalatigheid valt niet onder de garantie. Als u klachten hebt, dient u zich in
eerste instantie te wenden tot de winkel waar u de monitor heeft gekocht.
Afgedankte elektrische producten horen niet bij het huishoudelijk afval.
Gelieve te recycleren waar mogelijk. Raadpleeg uw lokale overheid of
verkoper voor recyclingadvies.
NL
18

TROVATE MAGGIORI INFORMAZIONI SUL
http://www.terraillon.com
La ringraziamo per aver scelto Terraillon NUTRITAB, la bilancia da cucina
collegata a un’app.
IN SINTESI
TIMER
SECONDI (TIMER)
ACCENDI/
SPEGNI e TARA
SCOMPARTO
PILE
UNITÀ e MINUTI (TIMER)
IT
19

Inserire le pile (3xAAA).
Scaricare l’app Terraillon Wellness Coach.
Creare un account.
Attivare la funzione Bluetooth sullo Smartphone (Impostazioni > Bluetooth > ON).
Premere il tasto ACCENDI/SPEGNI. NUTRITAB si collega automaticamente
all’app Wellness Coach.
PRIMA INSTALLAZIONE
A
B
C
D
E
5
1
1
11
2
3
4
2
1
2
3
4
3
2
1
4
4
2
1
3
IT
20
AVVIARE LE MISURAZIONI
A
1
1
B
2
3
2
C
3
4
D
E
Posizionare la bilancia da cucina NUTRITAB su una supercie piana e dura.
Premere il tasto ACCENDI/SPEGNI per accendere la bilancia da cucina.
Nell’app Wellness Coach, fare clic sulla scheda «La mia alimentazione» e
poi su «Utilizza la bilancia collegata».
Porre l’alimento sulla bilancia da cucina NUTRITAB. Il peso viene visualizzato
sullo schermo LCD e nell’app Wellness Coach.
Selezionare l’alimento che si vuole pesare tra quelli presenti nella lista
(categoria di alimento/tipo di alimento/nome dell’alimento). L’app
fornisce informazioni sulla composizione nutritiva dell’alimento.
PESARE UN INGREDIENTE:
Fare clic su «Aggiungi l’ingrediente» per calcolare il peso.
Indicare il giorno, l’ora e il tipo di pasto, quindi impostare la quantità
per una o più persone (manualmente o calcolando la quantità con la
bilancia da cucina collegata all’app dopo aver premuto il simbolo ).
Fare clic su «Aggiungi il pasto» per aggiungere l’ingrediente sul pannello
di controllo.
REALIZZARE UNA RICETTA:
Per realizzare una ricetta con diversi ingredienti, fare clic su «Pesa
un altro ingrediente» e ripetere l’operazione per ogni ingrediente da
pesare. Una volta pesati tutti gli ingredienti, fare clic su «Termina la
ricetta». Utilizzare la funzione TARA per mettere un contenitore sulla
bilancia da cucina e aggiungere tutti gli altri ingredienti.
Non appena verrà visualizzata la sintesi della ricetta sull’app Wellness
Coach, fare clic su «Aggiungi questa ricetta».
Indicare il giorno, l’ora e il tipo di pasto, quindi impostare la quantità per
una o più persone (manualmente o calcolando la quantità con la bilancia
da cucina collegata all’app dopo aver premuto il simbolo ).
Fare clic su «Aggiungi il pasto» per aggiungere l’ingrediente sul pannello
di controllo.
IT
21
ALTRE FUNZIONI DELL’APP
ALTRE FUNZIONI DELLA BILANCIA
SCANSIONE DEL PRODOTTO:
Nella scheda LA MIA ALIMENTAZIONE, fare clic su «Scansione del prodotto» per
aggiungere i valori energetici di un prodotto nel pannello di controllo partendo
dal codice a barre. Eseguire la scansione del codice a barre del prodotto
con la fotocamera dello smartphone. Se l’alimento è già presente nell’app,
fare clic su «Aggiungi il piatto» per inserire il prodotto nel pannello di controllo.
Se l’alimento non viene rilevato, utilizzare la funzione «Inserisci manualmente».
INSERIMENTO MANUALE:
Dalla scheda LA MIA ALIMENTAZIONE, fare clic su «Inserimento manuale» per
aggiungere al pannello di controllo i valori nutrizionali di un prodotto a partire
dall’etichetta riportata sulla confezione. Spostare i diversi cursori per inserire i
valori energetici, quindi fare clic su «Aggiungi il piatto» per inserire il prodotto
nel pannello di controllo.
RICETTARIO:
Nella scheda LA MIA ALIMENTAZIONE, fare clic su «Utilizza il mio ricettario»
per aggiungere i valori energetici di una ricetta precedentemente registrata
nel pannello di controllo. Selezionare la ricetta tra quelle presenti nella lista,
quindi impostare la quantità su una o più persone (manualmente o pesando
la quantità con la bilancia da cucina collegata all’app dopo aver premuto
il simbolo ).
SPEGNERE LA BILANCIA DA CUCINA:
Premere il pulsante ACCENDI/SPEGNI per 3 secondi per spegnere la bilancia
da cucina.
CONVERSIONE LIQUIDI/UNITÀ:
Premere brevemente il tasto M/UNIT per modicare le unità di misura:
gmloz.ozg.
AZZERAMENTO AUTOMATICO:
Accendere la bilancia da cucina. Porre il contenitore/l’alimento sulla bilancia,
quindi premere il tasto ON/OFF/TARA per azzerare. Aggiungere l’ingrediente
successivo e ripetere l’operazione.
IT
22
GARANZIA & PROTEZIONE DELL’AMBIENTE
FUNZIONE TIMER:
Il Timer riparte da 0 dopo 199 minuti. Premere il pulsante ACCENDI/SPEGNI per
arrestare il TIMER o interromperne la regolazione.
• Premere il pulsante TIMER.
• Premere brevemente il tasto M/UNIT per aggiungere 1 minuto, tenere
premuto per 2 secondi per aggiungere 10 minuti.
• Premere brevemente il tasto S per aggiungere 1 secondo, tenere premuto
per 2 secondi per aggiungere 10 secondi.
• Una volta impostato il tempo, premere il tasto TIMER per farlo partire.
• Premere TIMER per mettere in pausa e per modicare i minuti, quindi
premere di nuovo il tasto TIMER per farlo ripartire.
MANUTENZIONE
Utilizzare soltanto un panno umido. Non utilizzare MAI detergenti o altri
prodotti chimici.
Questo prodotto non è adatto per lavastoviglie o microonde.
Questo prodotto è garantito per 2 anni contro difetti di materiale e
di fabbricazione. Durante questo periodo, tali difetti saranno riparati
gratuitamente (presentare la prova di acquisto se la bilancia è sotto
garanzia). Questa garanzia non copre i danni derivanti da incidenti, uso
improprio o negligenza. In caso di reclamo contattare il negozio presso cui è
stata acquistata il monitor.
I riuti di apparecchiature elettriche non devono essere smaltiti come riuti
domestici. Riciclare dove esistono strutture atte allo scopo. Consultare le
autorità locali o il rivenditore per indicazioni riguardanti il riciclaggio.
IT
23

ENCONTRAR MÁS INFORMACIÓN SOBRE
http://www.terraillon.com
Le damos las gracias por haber escogido la balanza de cocina conectada
Terraillon NUTRITAB.
DESCRIPCIÓN GENERAL
TEMPORIZADOR
SEGUNDOS (TEMPORIZADOR)
ENCENDER /
APAGAR y TARA
COMPARTIMIENTO
DE LAS PILAS
UNIDADES Y MINUTOS (TEMPORIZADOR)
ES
24

Coloque las pilas (3xAAA).
Descargue la aplicación Terraillon Wellness Coach.
Cree una cuenta.
Active la función Blueetooth en su smartphone (Ajustes > Blueetooth > ACTIVADO).
Pulse el botón ENCENDER / APAGAR. NUTRITAB se conectará automáticamente
con la aplicación Wellness Coach.
INSTALACIÓN INICIAL
COMPARTIMIENTO
DE LAS PILAS
A
B
C
D
E
5
1
1
11
2
3
4
2
1
2
3
4
3
2
1
4
4
2
1
3
ES
25
Utilice la balanza de cocina NUTRITAB sobre una supercie plana y dura.
Pulse el botón ENCENDER / APAGAR para encender la balanza de cocina.
En la aplicación Wellness Coach, haga clic en la pestaña «Mi alimentación»
y, a continuación, en «usar la balanza conectada».
Coloque el alimento en la balanza de cocina NUTRITAB. El peso aparecerá
en la pantalla LCD y en la aplicación Wellness Coach.
Escoja de entre la lista el alimento que está pesando (categoría de
alimento / tipo de alimento / nombre del alimento). La aplicación le
indicará la composición nutricional de su alimento.
PESAR UN INGREDIENTE:
Para terminar, haga clic en «añadir este ingrediente».
Introduzca la fecha, la hora y el tipo de comida y, a continuación, asigne
la cantidad a uno o más usuarios (manualmente o pesando la cantidad con
la balanza de cocina conectada, después de pulsar sobre el símbolo ).
Haga clic en «añadir esta comida» para añadir el ingrediente a su panel
de control.
CREAR UNA RECETA:
Para crear una receta compuesta por varios ingredientes, haga clic en
«pesar otro ingrediente» y repita la misma operación hasta que haya
pesado todos los ingredientes. Una vez hecho, haga clic en «terminar mi
receta». Utilice la función de TARA para colocar un recipiente sobre la
balanza de cocina y añadir en su interior sucesivamente los ingredientes.
La aplicación Wellness Coach muestra el resumen de su receta: haga clic
en «añadir esta receta».
Introduzca la fecha, la hora y el tipo de comida y, a continuación, asigne
la cantidad a uno o más usuarios (manualmente o pesando la cantidad con
la balanza de cocina conectada, después de pulsar sobre el símbolo ).
Haga clic en «añadir esta comida» para añadir el ingrediente a su panel
de control.
COMENZAR A MEDIR
A
1
1
B
2
3
2
C
3
4
D
E
ES
26
OTRAS FUNCIONES DE LA APLICACIÓN
OTRAS FUNCIONES DE LA BALANZA
ESCANEAR UN PRODUCTO:
En la pestaña MI ALIMENTACIÓN, haga clic en «escanear un producto» para
añadir los valores energéticos de un producto a su panel de control utilizando
el código de barras del producto. Escanee el código de barras del producto
con la cámara de su smartphone. Si el alimento aparece catalogado, haga
clic en «añadir este plato» para añadir el producto a su panel de control. Si no
se encuentra el producto, utilice la función «introducir manualmente».
INTRODUCIR MANUALMENTE:
En la pestaña MI ALIMENTACIÓN, haga clic en «introducir manualmente»
para añadir los valores energéticos de un producto a su panel de control
utilizando su etiqueta de valores nutricionales. Sitúe sucesivamente el cursor
en los diferentes campos para introducir los valores energéticos y haga clic
en «añadir este plato» para añadir el producto a su panel de control.
LIBRETA DE RECETAS:
En la pestaña MI ALIMENTACIÓN, haga clic en «usar mi libreta de recetas»
para añadir los valores energéticos de una receta previamente guardada en
su panel de control. Escoja su receta de entre la lista y, una vez hecho, asigne
la cantidad a uno o más usuarios (manualmente o pesando la cantidad con
la balanza de cocina conectada, después de pulsar sobre el símbolo ).
APAGAR LA BALANZA DE COCINA:
Mantenga pulsado durante tres segundos el botón ENCENDER / APAGAR
para apagar la balanza de cocina.
CONVERSIÓN DE MEDIDAS O UNIDADES:
Premere brevemente il tasto M/UNIT per modicare le unità di misura:
gmloz.ozg.
PUESTA A CERO AUTOMÁTICA:
Encienda su balanza de cocina. Coloque su recipiente o alimento y pulse el
botón ENCENDER / APAGAR / TARA para poner el contador a cero. Puede ir
añadiendo ingredientes sucesivamente tras repetir este paso.
ES
27

GARANTÌA & PROTECCIÓN MEDIOAMBIENTAL
FUNCIÓN DE TEMPORIZADOR:
El temporizador se vuelve a poner a cero al llegar a los 199 minutos. Pulse el botón
ENCENDER / APAGAR para concluir el ajuste o el avance del TEMPORIZADOR.
• Pulse el botón TEMPORIZADOR.
• Pulse brevemente el botón M/UNIDAD para añadir un minuto y manténgalo
durante más de dos segundos para añadir 10 minutos.
• Pulse brevemente el botón S para añadir un segundo y manténgalo
pulsado durante más de dos segundos para añadir 10 segundos.
• Una vez ajustado el tiempo, pulse el botón TEMPORIZADOR para iniciarlo.
• Pulse en TEMPORIZADOR para ponerlo en pausa y modicar el tiempo
y vuelva a pulsar de nuevo para reiniciarlo.
MANTENIMIENTO
Utilice solo un paño húmedo. No utilice NUNCA detergentes u otros productos
químicos.
Este producto no es adecuado para el lavavajillas o microondas.
El producto está garantizado por un período de dos años contra todo defecto
de material y de fabricación. Durante dicho período, los problemas de este tipo
se repararán gratuitamente, previa presentación de un justicante de compra.
La garantía no cubre los daños resultantes de accidentes, uso indebido o
negligencia. Si tiene una reclamación, le rogamos se ponga en contacto, en
primer lugar, con la tienda en la que adquirió el producto.
Los productos eléctricos no deben desecharse con la basura doméstica.
Recíclelos en las instalaciones disponibles. Consulte a las autoridades
locales o al comerciante para informase sobre el reciclado.
ES
28
MEHR INFORMATIONEN FINDEN SIE
http://www.terraillon.com
Vielen Dank, dass Sie sich für die vernetzte Küchenwaage Terraillon NUTRITAB
entschieden haben.
FUNKTIONEN
TEMPORIZADOR
SEKUNDEN (TIMER)
EIN/AUS
und TARA
BATTERIEFACH
EINHEITEN & MINUTEN (TIMER)
DE
29
Legen Sie die Batterien ein (3xAAA).
Laden Sie die App Terraillon Wellness Coach herunter.
Legen Sie ein Konto an.
Aktivieren Sie die Bluetooth-Funktion auf Ihrem Smartphone (Einstellungen >
Bluetooth > ON).
Betätigen Sie die Schalt äche EIN/AUS. NUTRITAB loggt sich mit der App
Wellness Coach automatisch ein.
ERSTINSTALLATION
A
B
C
D
E
5
1
1
11
2
3
4
2
1
2
3
4
3
2
1
4
4
2
1
3
DE
30
ERSTE MESSUNGEN
A
1
1
B
2
3
2
C
3
4
D
E
Stellen Sie die Küchenwaage NUTRITAB auf eine feste und ebene Fläche.
Betätigen Sie die Schaltäche EIN/AUS, um die Küchenwaage einzuschalten.
Klicken Sie in der App Wellness Coach auf die Registerkarte „Meine
Ernährung“, dann auf „Vernetzte Waage verwenden“.
Legen Sie das Nahrungsmittel auf die Küchenwaage NUTRITAB. Das Gewicht
wird auf der LCD-Anzeige und in der App Wellness Coach angezeigt.
Wählen Sie das Nahrungsmittel, das Sie gerade gewogen haben, aus der
Liste aus (Kategorie/Typ/Name des Nahrungsmittels). Die App zeigt Ihnen
die Zusammensetzung Ihres Nahrungsmittels an.
ZUTAT ABWIEGEN:
Klicken Sie abschließend auf „Diese Zutat hinzufügen“.
Geben Sie den Tag, die Uhrzeit und die Art der Mahlzeit ein und weisen
Sie die Menge dann einer oder mehreren Personen zu (manuell oder
durch Abwiegen der Menge mit der vernetzten Küchenwaage nach
Betätigen von Symbol ).
Klicken Sie auf „Diese Mahlzeit hinzufügen“, um diese Zutat zu Ihrer
Übersicht hinzuzufügen.
REZEPT ANLEGEN:
Klicken Sie zum Anlegen eines aus mehreren Zutaten bestehenden
Rezepts auf „Weitere Zutat abwiegen“. Wiederholen Sie diesen Schritt
für jede Zutat. Klicken Sie nach Abwiegen aller Zutaten auf „Mein Rezept
abschließen“. Nutzen Sie die Tarafunktion (TARE), wenn Sie ein Gefäß
auf Ihre Küchenwaage stellen und die Zutaten nach und nach in dieses
Gefäß zugeben möchten.
Ihr Rezept wird in der App Wellness Coach zusammenfassend angezeigt.
Klicken Sie dazu auf „Dieses Rezept hinzufügen“.
Geben Sie den Tag, die Uhrzeit und die Art der Mahlzeit ein und weisen Sie
die Menge dann einer oder mehreren Person en zu (manuell oder durch
Abwiegen der Menge mit der vernetzten Küchenwaage nach Betätigen
von Symbol ).
Klicken Sie auf „Diese Mahlzeit hinzufügen“, um diese Zutat zu Ihrer Übersicht
hinzuzufügen.
DE
31
WEITERE FUNKTIONEN DER APP
WEITERE FUNKTIONEN DER WAAGE
PRODUKT SCANNEN:
Klicken Sie in der Registerkarte MEINE ERNÄHRUNG auf „Produkt scannen“, um
die Energiewerte eines Produkts ausgehend von dessen Strichcode zu Ihrer
Übersicht hinzuzufügen. Scannen Sie den Strichcode des Produkts mit dem
Fotoapparat Ihres Smartphones. Ist das Nahrungsmittel gelistet, klicken Sie auf
„Dieses Gericht hinzufügen“, um dieses Produkt Ihrer Übersicht hinzuzufügen. Ist
es nicht gelistet, verwenden Sie die Funktion „Manuell erfassen“.
MANUELL ERFASSEN:
Klicken Sie in der Registerkarte MEINE ERNÄHRUNG auf „Manuell erfassen“, um
die Energiewerte eines Produkts ausgehend von dessen Nährwertangaben
auf dem Etikett zu Ihrer Übersicht hinzuzufügen. Verschieben Sie die diversen
Cursors, um die Energiewerte einzugeben. Klicken Sie dann auf „Dieses
Gericht hinzufügen“, um dieses Produkt Ihrer Übersicht hinzuzufügen.
REZEPTHEFT:
Klicken Sie in der Registerkarte MEINE ERNÄHRUNG auf „Mein Rezeptheft
verwenden“, um die Energiewerte eines zuvor in Ihrer Übersicht registrierten
Rezepts hinzuzufügen. Wählen Sie Ihr Rezept aus der Liste aus. Weisen Sie die
Menge dann einer oder mehreren Personen zu (manuell oder durch Abwiegen
der Menge mit der vernetzten Küchenwaage nach Betätigen von Symbol ).
KÜCHENWAAGE AUSSCHALTEN:
Betätigen Sie zum Ausschalten der Küchenwaage 3 Sekunden lang die
Schaltäche EIN/AUS.
UMRECHNUNG FLÜSSIGKEITEN/EINHEITEN:
Drücken Sie zum Ändern der Einheiten kurz auf die Schaltäche M/UNIT:
gmloz.ozg.
AUTOMATISCHE NULLSTELLUNG:
Schalten Sie Ihre Küchenwaage ein. Stellen Sie Ihr Gefäß bzw. legen Sie Ihr
Nahrungsmittel auf die Waage. Betätigen Sie dann die Schaltäche ON/OFF/
TARE, um die Anzeige auf Null zu setzen. Sie können nun die nächste Zutat
hinzufügen. Wiederholen Sie dann diesen Schritt.
DE
32
GARANTIE & UMWELTSCHUTZSYMBOL
TIMER-FUNKTION:
Der Timer geht nach 199 Minuten auf Null zurück. Betätigen Sie die Schaltäche
EIN/AUS, um die Einstellung oder die Laufzeit des Timers zu stoppen.
• Betätigen Sie die Schaltäche TIMER.
• Drücken Sie kurz auf M/UNIT, um 1 Minute hinzuzufügen und länger als 2
Sekunden, um 10 Minuten hinzuzufügen.
• Drücken Sie kurz auf die Schaltäche S, um 1 Sekunde hinzuzufügen und
länger als 2 Sekunden, um 10 Sekunden hinzuzufügen.
• Betätigen Sie nach Einstellung der Zeit die Schaltäche TIMER, um die
Funktion zu starten.
• Drücken Sie auf TIMER, um eine Pause einzulegen oder die Zeit zu ändern.
Drücken Sie danach erneut, um die Funktion fortzusetzen.
WARTUNG
Benutzen Sie nur ein feuchtes Tuch. Verwenden Sie NIE Reinigungsmittel
oder sonstige chemische Produkte.
Dieses Produkt ist nicht geeignet für die Spülmaschine und Mikrowelle.
Für dieses Produkt besteht eines 2-Jahres-Garantie gegen Material- und
Fabrikationsfehler. Während dieses Zeitraums werden diese Fehler kostenlos
repariert (wenn die Waage unter Garantie steht, muss ein Kaufnachweis vorgelegt
werden). Diese Garantie deckt keine Schäden, die aus Unfällen, unsachgemäßer
Verwendung oder Nachlässigkeit entstehen. Bei Reklamationen wenden Sie sich
bitte an das Geschäft, in dem Sie die Blutdruckmessgerät erworben haben.
Elektrische Geräte getrennt von Hausmüll entsorgen. Bitte nach Möglichkeit
recyceln. Erkundigen Sie sich bei Ihrem Händler oder Ihrer Gemeinde nach
Recyclingmöglichkeiten.
DE
33
OBTENHA MAIS INFORMAÇÕES SOBRE
http://www.terraillon.com
Obrigado por ter escolhido a balança de cozinha Terraillon NUTRITAB.
VISÃO GERAL
TEMPORIZADOR
SEGUNDOS (TEMPORIZADOR)
LIGAR/DESLIGAR
e TARA
COMPARTIMENTO
DAS PILHAS
UNIDADES E MINUTOS (TEMPORIZADOR)
PT
34

Insira as pilhas (3xAAA).
Descarregue a aplicação Terraillon Wellness Coach.
Crie uma conta.
Active a função Bluetooth no Smartphone (De nições > Bluetooth > Ligado).
Prima o botão LIGAR/DESLIGAR; a NUTRITAB liga-se automaticamente com
a aplicação Wellness Coach.
PRIMEIRA INSTALAÇÃO
COMPARTIMENTO
DAS PILHAS
A
B
C
D
E
5
1
1
11
2
3
4
2
1
2
3
4
3
2
1
4
4
2
1
3
PT
35
Utilize a balança de cozinha NUTRITAB sobre uma superfície dura e plana.
Prima o botão LIGAR/DESLIGAR para ligar a balança de cozinha.
Na aplicação Wellness Coach, clique no separador «A minha alimentação»
e, depois, em «utilizar a balança».
Coloque o alimento sobre a balança de cozinha NUTRITAB. O peso é
apresentado no ecrã LCD e na aplicação Wellness Coach.
Na lista, escolha o alimento que está a pesar (categoria / tipo / nome do
alimento). A aplicação apresenta a composição nutritiva do seu alimento.
PESAR UM INGREDIENTE:
Clique em «adicionar este ingrediente» para nalizar.
Indique o dia, a hora e o tipo de refeição e, depois, atribua a quantidade
a um ou vários utilizadores (manualmente ou pesando a quantidade com
a balança de cozinha ligada depois de ter carregado no símbol
o ).
Clique em «adicionar esta refeição» para adicionar este ingrediente ao
seu painel de bordo.
CRIAR UMA RECEITA:
Para criar uma receita composta por vários ingredientes, clique em «pesar
outro ingrediente» e, depois, repita a operação até clicar em «nalizar a
minha receita» quando todos os ingredientes tiverem sido pesados. Utilize
a função TARA para colocar um recipiente sobre a balança de cozinha e
adicionar ingredientes de forma sucessiva ao mesmo.
A aplicação Wellness Coach apresenta uma recapitulação da sua
receita. Clique em «adicionar esta receita».
Indique o dia, a hora e o tipo de refeição e, depois, atribua a quantidade
a um ou vários utilizadores (manualmente ou pesando a quantidade com
a balança de cozinha ligada depois de ter carregado no símbolo ).
Clique em «adicionar esta refeição» para adicionar este ingrediente ao
seu painel de bordo.
COMEÇAR A UTILIZAÇÃO
A
1
1
B
2
3
2
C
3
4
D
E
PT
36
OUTRAS FUNÇÕES DA APLICAÇÃO
OUTRAS FUNÇÕES DA BALANÇA
ANALISAR UM PRODUTO:
No separador «A MINHA ALIMENTAÇÃO», clique em «analisar um produto» para
adicionar os valores energéticos de um produto ao seu painel de bordo a
partir do respectivo código de barras. Digitalize o código de barras do produto
com a câmara fotográca do smartphone. Se o alimento estiver referenciado,
clique em «adicionar este produto» para adicionar este produto ao seu painel
de bordo. Se não for encontrado, utilize a função «inserir manualmente».
INSERIR MANUALMENTE:
No separador «A MINHA ALIMENTAÇÃO», clique em «inserir manualmente»
para adicionar os valores energéticos de um produto ao seu painel de bordo
a partir da respectiva etiqueta de valores energéticos. Desloque os diferentes
cursores para indicar os valores energéticos e, depois, clique em «adicionar
este produto» para adicionar este produto ao seu painel de bordo.
LIVRO DE RECEITAS:
No separador «A MINHA ALIMENTAÇÃO», clique em «utilizar o meu livro de
receitas» para adicionar os valores energéticos de uma receita registada
anteriormente no seu painel de bordo. Escolha a sua receita na lista e,
depois, atribua a quantidade para um ou vários utilizadores (manualmente
ou pesando a quantidade com a balança de cozinha ligada depois de ter
premido o símbolo ).
DESLIGAR A BALANÇA DE COZINHA:
Prima durante 3 segundos o botão LIGAR/DESLIGAR para desligar a balança
de cozinha.
CONVERSÃO DE LÍQUIDOS/UNIDADES:
Prima por breves instantes o botão M/UNIT para alterar as unidades:
gmloz.ozg.
REPOSIÇÃO AUTOMÁTICA A ZERO:
Ligue a balança de cozinha. Coloque o recipiente/alimento e, depois, prima
o botão LIGAR/DESLIGAR/TARA para repor os valores a zero. Pode adicionar
o ingrediente seguinte e, depois, repetir a operação.
PT
37
GARANTIA & PROTEÇÃO AMBIENTAL
FUNÇÃO DE TEMPORIZADOR:
O temporizador regressa a 0 após 199 minutos. Prima o botão LIGAR/DESLIGAR
para interromper a regulação ou a temporização do temporizador.
• Prima o botão do temporizador.
• Prima por breves instantes o botão M/UNIT para adicionar 1 minuto; prima
durante 2 segundos para adicionar 10 minutos.
• Prima por breves instantes o botão S para adicionar 1 segundo; prima
durante 2 segundos para adicionar 10 segundos.
• Após ter regulado o tempo, prima o botão de temporizador para que este inicie.
• Prima o botão de temporizador para pausar e modicar o tempo e,
depois, prima novamente para retomar.
WARTUNG
Utilize apenas um pano húmido. NUNCA utilize detergentes ou outros produtos
químicos.
Este produto não é adequado para a máquina de lavar louça ou microondas.
Este aparelho é garantido 2 anos contra qualquer defeito material e de
fabrico. Durante este período, os defeitos serão reparados gratuitamente
(uma prova de compra deve ser apresentada se a balança estiver abrangida
pela garantia). Esta garantia não cobre os danos resultando de acidentes,
utilização incorrecta ou negligência. Se quiser apresentar uma reclamação,
dirija-se em primeira instância à loja onde comprou o aparelho.
Equipamentos elétricos desativados não devem ser eliminados
juntamente com os resíduos domésticos. Entregue num ponto de
reciclagem existente. Consulte as autoridades locais ou o revendedor
para obter informação sobre a reciclagem.
PT
38

EMC Guidance
1. MEDICAL ELECTRICAL EQUIPMENT needs special precautions regarding EMC and
needs to be installed and put into service according to the EMC information provided in
the ACCOMPANYING DOCUMENTS.
2. Wireless communications equipment such as wireless home network devices, mobile
phones, cordless telephones and their base stations, walkie-talkies can affect this
equipment and should be kept at least a distance d = 3,3 m away from the equipment.
(Note. As indicated in Table 6 of IEC 60601-1-2:2007 for ME EQUIPMENT, a typical cell
phone with a maximum output power of 2 W yields d = 3,3 m at an IMMUNITY LEVEL of
3 V/m)
FCC User Guide Information
Radio Frequency Interface Requirements - FCC
Note: This equipment has been tested and found to comply with the limits for a Class B
digital device, pursuant to Part 15 of the FCC rules. These limits are designed to provide
reasonable protection against harmful interference in a residential installation. This
equipment generates, uses and can radiate radio frequency energy and, if not installed
and used in accordance with the instructions, may cause harmful interference to radio
communications. However there is no guarantee that interference will not occur in a
particular installation. If this equipment does cause harmful interference to radio or
television reception, which can be determined by turning the equipment off and on, the
user is encouraged to try to correct the interference by one or more of the following
measures:
Reorient or relocate the receiving antenna;
Increase the separation between the equipment and receiver;
Connect the equipment into an outlet on a circuit different from that to which the
receiver is connected;
Consult the dealer or an experienced radio / TV technician for help.
FCC Radiation Exposure Statement:
This equipment complies with FCC radiation exposure limits set forth for an uncontrolled
environment.
This transmitter must not be co-located or operating in conjunction with any other
antenna or transmitter.
Radio Transmitters (Part 15)
This device complies with Part 15 of the FCC Rules. Operation is subject to the following
two conditions: (1) this device may not cause harmful interference, and (2) this device
must accept any interference received, including interference that may cause undesired
operation.
CAUTION:The user is cautioned that changes or modifications not expressly
approved by the party responsible for compliance could void the user’s authority to
FCC Regulations
39