Manual

TOTAL STATION
R-2500DNSERIES
R-2501DN,R-2502DN
R-2503DN,R-2505DN
INSTRUCTION MANUAL
Basic Procedures
TI Asahi Co.,Ltd.
International Sales Department
4-3-4 Ueno Iwatsuki-Ku,Saitama-Si
Saitama,339-0073 Japan
Tel, +81-48-793-0118
Fax, +81-48-793-0128
E-mail : international@tiasahi.com
PENTAX
Ⓡ

CONTENTS
General
CONTENTS
Exemption clause
Copyright
PRECAUTIONS REGARDING SAFETY
Warning
Usage Precautions
1
4
4
5
5
8
1. BASIC OPERATION
1.1 Names of parts
1.2 Standard equipment
1.3 Unpacking and packing
1.4 Removing and attaching the Battery
1.5 How to charge the Battery
1.6 Inserting and Removing of various SD cards
1.6.1 Inserting SD card
11
11
12
12
12
13
16
16
16
17
18
18
19
19
19
20
21
22
22
23
1.6.2 Removing SD card
1.6.3 Inserting SD card for camera data
1.6.4 Removing SD card for camera data
1.6.5 Suitability of SD card
1.7 Inserting and Removing of various USB cables
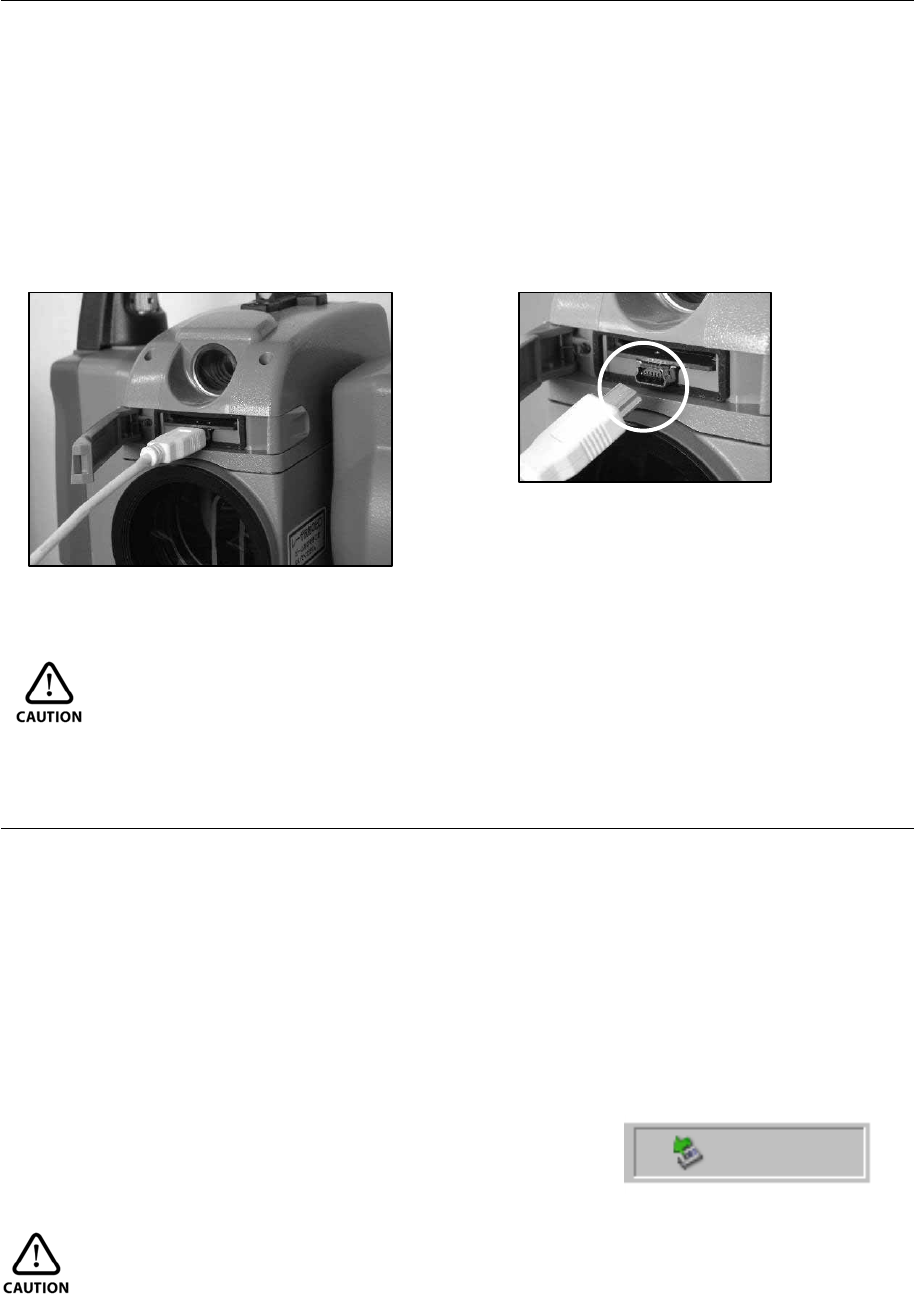
1.7.1 Connecting USB cable
1.7.2 Removing USB cable
1.7.3 Inserting USB cable for camera data
1.7.4 Removing USB cable for camera data
1.8 About recorded data
1.8.1 About measure data
1.8.2 About photography data
2. DISPLAY AND KEYBOARD
2.1 Display and keyboard
2.2 Operation key
2.3 Function Key
2.4 Alphanumeric input
2.5 Laser pointer
25
25
25
26
30
30
3. PREPARATION FOR SURVEYING
3.1 Centring and Levelling of the Instrument
3.2 Laser plummet
3.3 Levelling with circular vial
3.4 Levelling with the plate vial
3.5 Eyepiece adjustment
31
31
31
33
33
33
34
34
3.6 Target sighting
3.7 Attachment and detachment of tribrach
4. TURNING THE POWER ON
4.1 Turning the power on and off
4.2 Adjusting LCD contrast
36
36
36
1

4.3 Adjusting illumination brightness
4.4 Adjusting reticle illumination
37
37
5. ANGLE MEASUREMENT
5.1 Measuring an angle
38
38
38
39
39
40
41
5.2 Resetting the horizontal angle to 0
5.3 Holding the horizontal angle
5.4 Inputting an arbitrary horizontal angle
5.5 Displaying the % slope of the vertical angle
5.6 Changing the horizontal angle from clockwise to counter clockwise
6. DISTANCE MEASUREMENT
6.1 Target setting
6.2 Distance measurement
6.3 Quick Mode
42
42
43
44
7. CORRECTION MODE
45
45
46
47
48
7.1 Changing the target constant
7.2 Changing the temperature
7.3 Changing the atmospheric pressure
7.4 Changing the ppm value
8. INITIAL SETTING
8.1 Overview
49
49
49
49
49
50
50
50
8.2 Entering the mode for initial setting 1
8.3 Entering the mode for initial setting 2
8.4 Entering the mode for initial setting 3
8.5 Entering the mode for initial setting 4
8.6 Entering the mode for initial setting 5
8.7 Entering the mode for setting of data and time
8.8 Example of changing an initial setting content
(selection of atmospheric correction)
8.9 Initial setting 1
8.10 Initial setting 2
8.11 Initial setting 3
8.12 Initial setting 4
8.13 Initial setting 5
51
52
53
55
55
55
56
8.14 Setting of date and time
9. ACCESSING THE FUNCTIONS
9.1 Accessing by help key
9.2 Accessing by 007
57
57
57
10. DIGITAL CAMERA
10.1 Turning the camera On and Off
10.2 Taking pictures
59
59
60
60
61
62
10.2.1 Taking pictures and measuring distance at the same time
10.2.2
10.2.3
Taking pictures without measuring distance
Zooming
2

15. FCC RELATED 100
15.1 FCC Statement 100
15.2 FCC radiation exposure statement 100
10.3 Slide Show
10.4 Playing back images
63
64
64
64
65
66
66
67
67
68
69
75
77
10.4.1
10.4.2
Rotating images
Searching images
10.4.3
Deleting images
10.4.4
10.4.5
10.4.6
Adding PointCode to images
Displaying measured data
Zooming images
10.4.7
Moving images
10.5 Setup
10.6 Adjusting the camera settings
10.7 Adjusting Point Mark position
10.8 Correct Center Mode
11. DATA COLLECTOR
80
12. CHECKS AND ADJUSTMENTS
12.1 Plate level
12.2 Circular vial
80
80
81
82
83
84
84
84
85
86
12.3 Vertical reticle
12.4 Perpendicularity of line of sight to horizontal axis
12.5 Vertical 0 point error
12.6 Optical plummet
12.7 Offset constant
12.8 Beam axis and line of sight
12.9 The EDM beam axis
13. APPENDIX
13.1 Warning and Error Messages
13.2 Atmospheric correction
13.3 hPa and mmHg conversion table
13.4 Error when no atmospheric correction is made
13.5 Atmospheric refraction and earth curvature correction
13.6 Distance range
87
87
88
88
89
90
91
92
13.7 Specifications
14. NOTICE TO THE USER OF THIS PRODUCT
14.1 Specifications of Laser Radiation
96
96
14.2 The following labels are affixed to and must remain
attached to this laser product.
14.3 Caution to maintain the safety in compliance with the standard
14.4 Labelling
96
97
98
3

4
Before using this product, be sure that you have thoroughly read and understood this
instruction manual to ensure proper operation. After reading this manual, be sure to keep in a
convenient place for easy reference.
Exemption clause
1) TI Asahi Co.,Ltd. (TIA) shall not be liable for damage caused by Acts of God, fire, alteration or
servicing by unauthorized parties, accident, negligence, misuse, abnormal operating conditions.
2) TIA shall not be liable for changes or disappearance of data, loss of company profit or
interruption of company operation incurred by the use of this product or malfunction of it.
3) TIA shall not be liable for damage caused by usage not explained in the instruction manual.
4) TIA shall not be liable for damage to this product caused by other equipment connected to this
product.
Copyright © 2013 TI Asahi Co.,Ltd.
All Rights Reserved
TI Asahi Co.,Ltd. is a sole proprietor of the PowerTopoLite software.
The PowerTopoLite software and publication or parts thereof, may not be reproduced in any
form, by any method, for any purpose.
TI Asahi Co.,Ltd. makes no warranty, expressed or implied, including but not limited to any
implied warranties or merchantability or fitness for a particular purpose, regarding these
materials and makes such materials available.

5
PRECAUTIONS REGARDING SAFETYxxxx xxxxxxxxx
Safety precautions (Must be followed)
The following items are intended to prevent possible injury to the user or other people and/or
damage to the instrument before it occurs. These safety precautions are important to the safe
operation of this product and should be observed at all times.
Distinctive displays
The following displays are used to distinguish precautions by the degree of injury or damage
that may result if the precaution is ignored.
WARNING
Items indicated by this sign are precautions which, if ignored, would result in serious injury.
CAUTION
Items indicated by this sign are precautions which if ignored may result in injury or material
damage.
• Here “injury” refers to injuries such as cuts, burns or electric shock the treatment of which
will not likely require hospitalization or long-term attention.
• “Material damage” refers to damage to facilities, buildings, acquired data, etc.
Before using this product, be sure that you have thoroughly read and understood this
instruction manual to ensure proper operation. After reading this manual, be sure to keep it in
a convenient place for easy reference.
This instrument complies with the protection requirement for residential and commercial
areas. If this instrument is used close to industrial areas or transmitters, the equipment can be
influenced by electromagnetic fields.
Quick Reference Guide provided in your carrying case contains the following items:
1. Basic Procedures,
2. Power Topo Lite Operating Procedures
WARNING
Do not stare into the laser beam directly as this may result in damage to your eyes.
R-2500DN is a Class IIIa (3R) Laser product. Do not look into the laser radiation aperture
directly as this may result in damage to your eyes.
Never use the telescope to view intense light such as direct sunlight or sunlight reflected
through a prism as this may result in loss of sight.
Do not disassemble, modify or repair this product as there a risk of laser radiation.

6
Do not aim the laser beam at a person as it is harmful to the eyes and body. Receive the
examination treatment by the doctor when the eyesight or body trouble is doubted by any
chance.
• Electro-Magnetic Compatibility (EMC):
This instrument complies with the protection requirement for residential and commercial
areas. If this instrument is used close to industrial areas or transmitters, the equipment can
be influenced by electromagnetic fields.
• Do not use this product in a coal mine, in a location where there is coal dust, or near
flammable material as there is a risk of explosion.
• Do not disassemble, modify or repair this product as there is a risk of fire, electric shock
and burn injury. If you think the product requires repair, contact the retail outlet where you
purchased it or an authorized repair site.
• Do not charge the BP07 battery with any battery charger other than the BC05 battery
charger as it entails a risk of fire or burn injury from the battery bursting into flames due to
possible differences in voltage or polarity.
• Do not use a damaged electric cord plug or loose electric outlet when charging as there is a
risk of fire or electric shock.
• Do not charge the battery while covered by clothes or similar item as there is a risk of fire
if the clothes ignite.
• Do not use the battery or charger when wet as there is a risk of fire and burn injury due to
short-circuit.
• To prevent making short-circuit when removing the battery and charger from the case and
storing them, apply electrically resistant tape to the poles of the battery. Storing the battery
and charger as it may result in fire or burn injury due to short-circuit.
• Do not throw the battery into fire or expose it to heat as there is a risk of injury if it
explodes.
CAUTION
For your safety, perform the initial and periodical inspection as well as when the
instrument is fixed and adjusted.
When the laser beam enters eyes, an unexpected accident might be caused by blink of eyes.
Do not place the laser product at a height where its laser beam may hit the eyes of car
drivers and pedestrians.
Do not place the laser product at a place where its laser beam may hit a reflecting object
such as a mirror or a glass window. The refection beam of the laser is also harmful to the
human body.
When not performing measurement, cut off the power supply or shade the Objective lens
with Objective cap to prevent the instrument emitting the laser beam.
Keep the laser product in a place where persons who do not have the product knowledge,
such as children, can not touch it by mistake.
• Before disposing of the instrument, destroy its power supply mechanism to prevent it from
emitting the laser beam.
• Do not remove the handgrip without good reason. If it does come off, be sure to attach it
securely to the instrument with screws. If it is not fastened securely, the instrument may
fall when you use the handgrip, leading to possible injury.
• Do not short the poles of the battery or charger as there is a risk of injury or fire.
7
• Do not touch any fluid which may leak from the battery as there is a risk of chemical burn
injury or reaction.
• Do not insert or remove the electric plug with wet hands as there is a risk of electric shock.
• Do not use the case to stand on as it is slippery and unstable and may cause you to fall,
resulting in possible injury.
• Make sure the tripod itself and the instrument on the tripod are both installed securely as
insecure installation may cause the tripod to fall over or the instrument to drop, resulting in
possible injury.
• Do not carry the tripod with the metal shoe pointing toward another person as it may injure
him/her.
• The instrument contains a rechargeable battery and a battery charger.
• It may be illegal to dispose the battery at the end of its useful life.
• Check with your local solid waste officials for details for recycling.

8
Usage precautions xxxx xxxxxxxxx
Surveying instruments are high-precision instruments. In order to assure that the Electronic
Total Station R-2500DN product which you have purchased will provide long-lasting
maximum
performance, the precautions in this manual must be followed. Make sure to follow these
instructions and use this product properly at all times.
[Solar observation]
WARNING
Never view the sun directly using the telescope as this may result in loss of sight.
Never point the objective lens directly at the sun as this may damage internal components.
When using the instrument for solar observation, be sure to attach the specially designed solar
filter (MU64) to the objective lens.
[Laser beam]
Do not stare into the laser beam. R-2500DN is a Class IIIa (3R) Laser product.
[EDM axis]
The R-2500DN EDM is the red visible laser beam and the beam diameter is very small.
The beam is emitted from the objective centre. The EDM axis is designed to coincide with the
telescope sight axis (but both axes may deviate slightly because of intense temperature
changes and a long time lapse).
[Target constant]
Confirm the Target Constant of the instrument before measurement.
If a different constant is to be used, use the correct constant of the target. The constant is
stored in the instrument's memory when turned off.
[Reflectorless and reflector sheet]
• Reflectorless
The measurement range and accuracy of the Reflectorless mode are based on the condition
that laser beam is emitted perpendicular to the white side of a Kodak Gray Card.
The measurement range may be influenced by the shape of the target and its environment.
There is a possibility that the range may vary when the target does not satisfy the
conditions above at survey work.
• There is a possibility that correct distance measurement may not be performed by
dispersion or reduction of laser beam when the laser beam comes into the target from a
diagonal angle.
• There is a possibility that the instrument may not be able to correctly calculate out the
distance when receiving reflected laser beam from forth and back directions in case of
measuring the target on the road.
• There is a possibility that synthesized values are calculated and the distance may become
longer or shorter than the actual one when the operator measures the target of slope or
sphere or rugged shape.
9
• There is a possibility that the instrument may not be able to correctly calculate out the
distance by collecting the reflected laser beam from a man or a car that comes and goes in
front of the target.
• There is a possibility that the distance may not be correctly measured when measuring a
target in the direction where there is a reflecting object (mirror, stainless board and white
wall, etc.) or under too strong sun light.
• In a situation high accuracy may not be expected, perform the measurement by Reflector
sheet or Prism.
• When using reflector sheet, set the reflector sheet to have its surface be approx. vertical to
the aiming line. If it is positioned not to be approx. right angle, there is a possibility that
correct distance measurements may be impossible by dispersion or reduction of laser beam.
In the following environments, the distance might not be able to be measured.
There is a reflection things (mirror, stainless board and white wall, etc.) in the direction of the
target and under too strong sun light
[Battery & charger]
• Do not use any battery or battery charger that is not approved by Pentax as it entails a risk
of damaging the instrument.
• If water should happen to splash on the instrument or the battery, wipe it off immediately
and allow it to dry in a dry location. Do not put the instrument in the case until it is
completely dry as this may result in damage to the instrument.
• Turn off the power when removing the battery from the instrument as removing the battery
while the power is still on may result in damage to the instrument.
• The battery mark displayed on the instrument is only an estimation of remaining battery
power and is not completely accurate. Replace the battery quickly when it is about to run
out of power as the time a battery lasts on one full charge differs depending on conditions
of ambient temperature, and the measurement mode of the instrument.
• Confirm the battery level remaining before operating.
[About Clock Battery (lithium)]
• Clock battery is a backup battery used for calendar clock function.
• The battery can last about five years with regular use, but it is possible to be shorter
depending on usage.
• When the voltage of the clock battery is low or runs out, the date and time display
incorrectly and indication of "Clock-batt. voltage low" will appear.
• Please contact your the dealer which the purchased was mail for any exchange or return of
the clock battery.
[LD POINT, laser pointer]
When you make a correct direction using the “LD POINT”, aim the laser beam at the wall and
mark the centre and then confirm the discrepancy between the reticle centre and the marked
point beforehand.
[Storage and operating environment]
• To prevent making short-circuit when removing the battery and charger from the case and
storing them, apply electrically resistant tape to the poles of the battery. Storing the battery
and charger as it may result in fire or burn injury due to short-circuit.
• Avoid storing the instrument in places subject to extreme high, low or radically fluctuating
temperature. (Ambient temperature range during use: –20° C to +50° C)
10
• Distance measurements may take longer when atmospheric conditions are poor such as
when heat shimmer occurs. When storing the instrument, always put it in its case and avoid
storage in dusty location or location subject to vibration or extreme heat or humidity.
• Whenever there is a sharp temperature difference between the instrument’s storage and
usage environment, allow the instrument to adjust to the environment for an hour or more
before using it. Make sure to protect the instrument from the sun if the location is subject to
intense direct sunlight.
• The battery should be charged approximately once per month if the instrument is to be
stored for an extended period of time. The instrument should also be removed from its case
occasionally and aired out.
• In addition to these precautions, be sure to handle the instrument properly at all times
following the descriptions given in the various sections of this manual to assure safe and
proper measurements.
[Transporting and carrying the instrument]
• Be careful to protect this instrument from shock of impact and excessive vibration which
may result in damage during transportation and shipment.
• When transporting the instrument, always put it in the case and wrap shock absorbing
material around it and be sure it is handled as “FRAGILE”.
[Checks and repairs]
• Always check the instrument before beginning work and check that the instrument is
maintaining the proper level of precision. Pentax bears absolutely no responsibility for
damages due to survey results obtained from surveys conducted without an initial
instrument check.
• Never disassemble the instrument, battery or charger, even if you do detect an abnormality,
as there is a risk of fire or electric shock due to short-circuit. If you think the product
requires repair, contact the retail outlet where you purchased it or an authorized repair site.
11
1. BASIC OPERATION
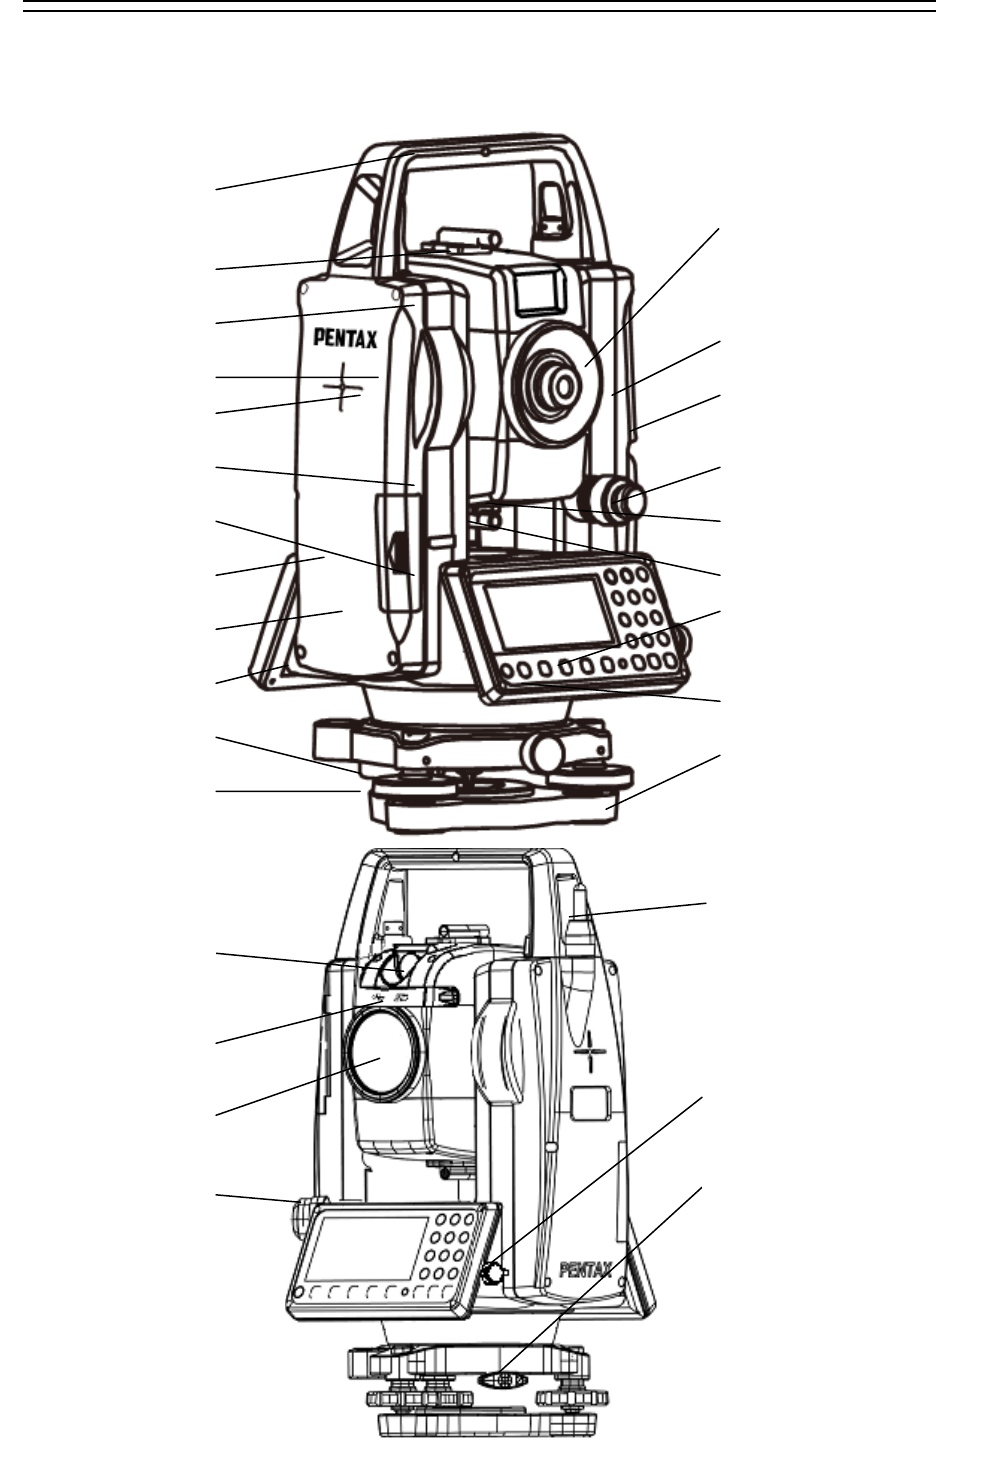
1.1 Names of parts
Top handle
Collimator
camera display
Eyepiece ring
Eyepiece
Laser indicator
Plate vial
SD & USB cover
Display panel
Key board
Detaching knob
Leveling screw
Focus ring
Instrument height mark
Battery latch
Battery pack
Telescope tangent screw
Telescope clamp screw
Clamp screw
Tangent screw
Base plate
DSC objective lens
DSC SD & USB
Objective lens
Laser plummet
Bluetootn antenna
RS-232C connector
Circular vial
Detachable type

12
1.2 Standard equipment
• Instrument
• Carrying case
• BP07 battery
• BC05 battery charger
• AC05 AC adapter
• Power supply cord
• Plumb bob
• Hexagonal wrench
• Adjusting pin
• Screwdriver
• Rain cover
• Quick Reference Guide
• CD-ROM (Basic operation & Special Functions manual)
• USB cable
• SD Card x 2
1.3 Unpacking and packing
[Unpacking the Instrument from the case]
① Set the case down gently with the lid facing upwards.
② Open the latches while pressing down on the lock (safety mechanism)
and open the lid of the case.
③ Remove the instrument from the case.
[Packing the instrument in the case]
① Make sure the telescope is fairly levelled and lightly tighten the telescope clamp screw.
② Line up the housing marks (round yellow marks on the instrument) and tighten the upper
and lower clamp screws.
③ With the housing marks are facing upward, set the instrument gently in the case without
forcing it. Close the lid to the case and secure the latches.
13
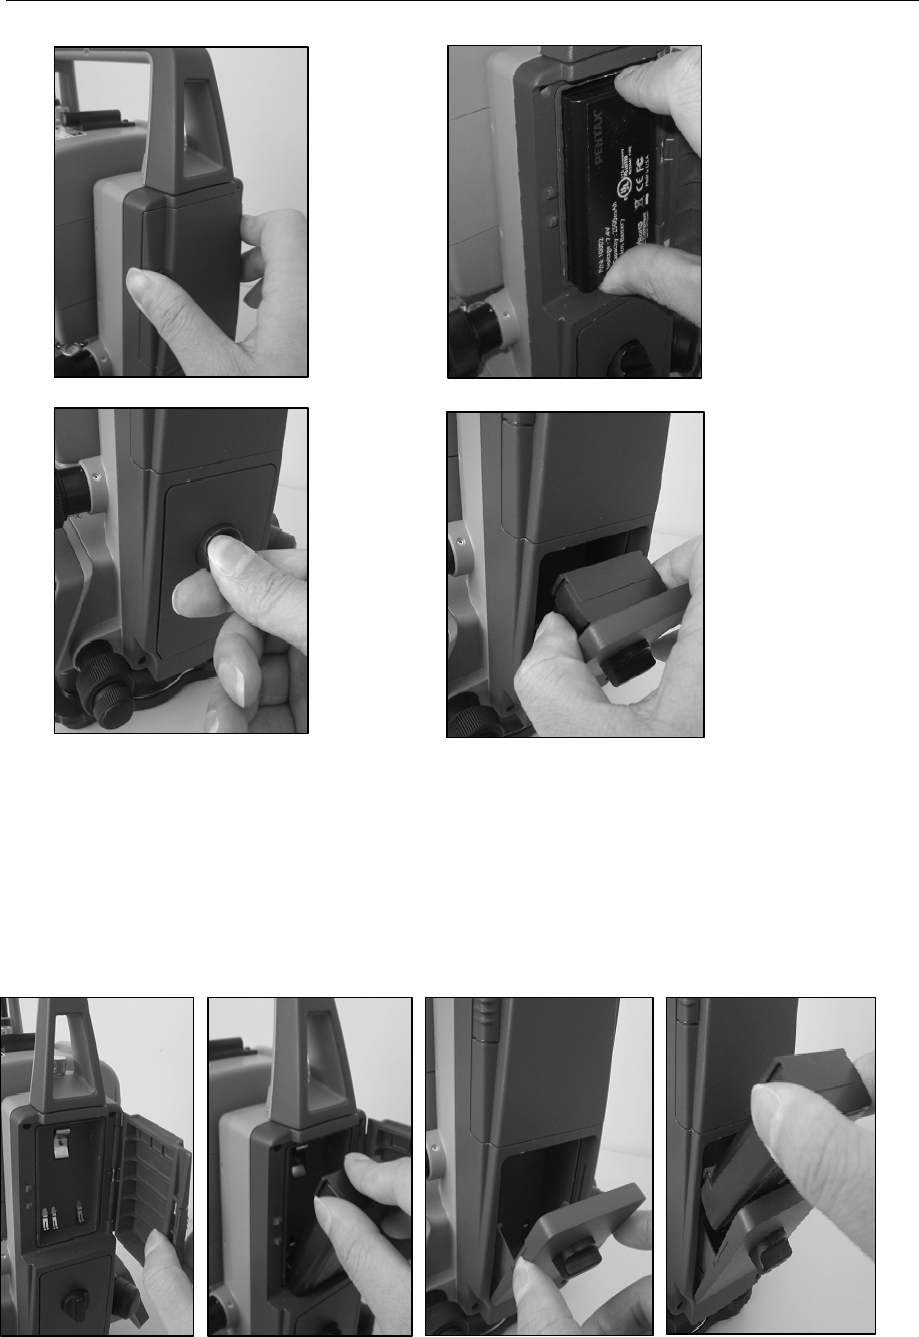
1.4 Removing and attaching the Battery
BatteryA (upside battery)
①The switch of a left-hand side side is made to slide upwards, and a cover is opened.
②It removes shifting a battery upwards.
BatteryB (lower battery)
① Rotate the knob above the battery pack counter clockwise.
② Lift up the battery pack and remove it from the instrument.
[Attaching the Battery]
14
BatteryA (upside battery)
①The switch of a left-hand side side is made to slide upwards, and a cover is opened.
②It attaches putting a battery in slanting down one.
BatteryB (lower battery)
① Place the channel on the bottom of the battery pack.
② Onto the protrusion of the instrument and push the battery pack down into place.
③ Turn the knob clockwise.
1.5 How to charge the Battery
The R-2500DN comes with two lithium-ion rechargeable batteries with a typical operating time
between 8 to 10 hours.
Specifications
Battery Type: Lithium ION
Voltage: +6.2VDC to 8.4VDC
Capacity: 2500mAH
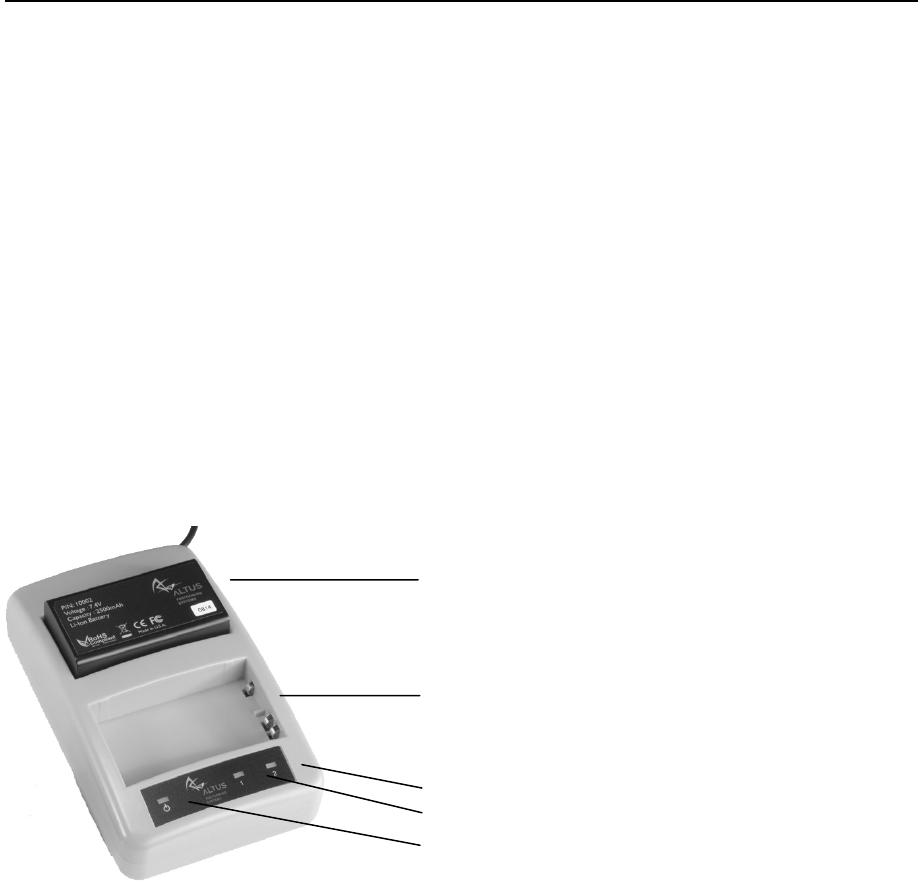
[Battery Charger]
AC Adapter
Input: 100-240VAC ~50/60Hz 1.7A
Output: 19.0VDC @ 3.16A
[Charging the battery]
BatteryChargingDescription
Battery Bay 1
Battery Bay 2
LED Status Indicator:
Battery Bay 2
Battery Bay 1
Power for Battery Charger
• Plug the AC cord to AC Adapter
• Plug in AC Adapter to Battery Charger
• Plug the AC wall battery charger into the wall socket and power LED turns ON
• Place your battery in charger bay correctly
• Wait until battery LED indicator turns GREEN for a full charge
15
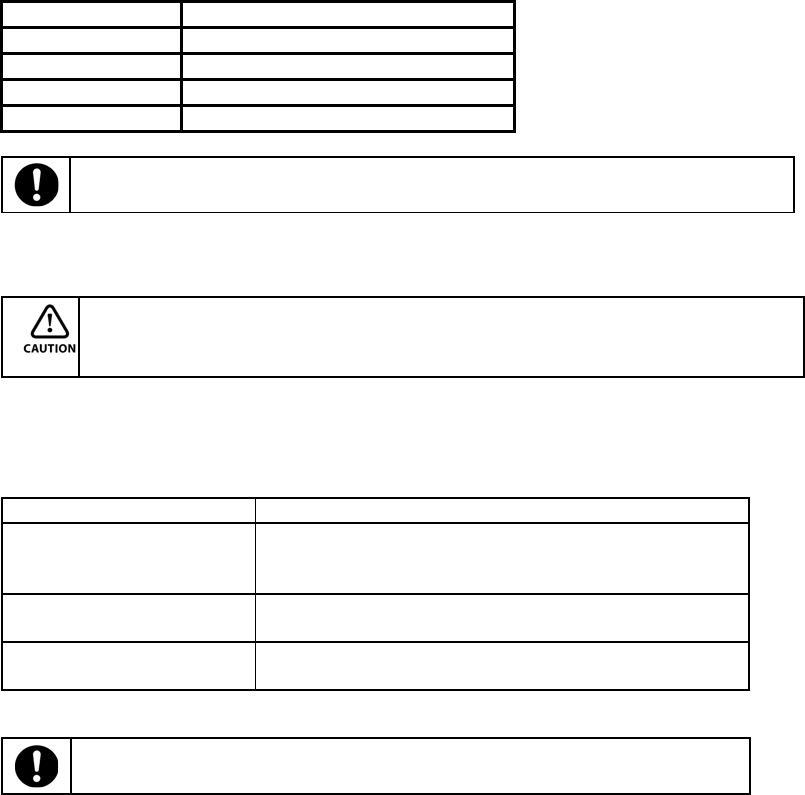
LED Description
NONE Battery is not seated correctly
GREEN Battery is fully charged
RED Battery is being re-charged
Flashing RED Charge error or bad battery
Afullydischargedbatterywilltakeapproximately2hourstofullychargeand
maynotlighttheLEDstatusindicatorwhenfirstmounted.
[Battery Installation and Replacement]
RemovingthebatteryinusewillcausetheR‐2500DNtorestartorturnOFF.Usethe
batterystatusindicatorindatacollectionsoftwaretoconfirmwhichbatteryis“in
use”beforehot‐swappingbatteries.
• Press button to open battery door compartment
• Use the guide to slide the battery into the R-2500DN
• Swivel the battery door compartment up and push from the bottom until it latches completely
What you need to know
Can I remove one of the
batteries while the R-
2500DN is in use?
Before battery removal, use data collection software
to check which battery is in use. Remove the battery
not in use
How long does it take to
charge a battery? It takes 2 hours to fully charge a battery
How do I know if battery
is fully charged? Battery bay LED turns Green when fully charged
ContactaRecyclingCentertoensureproperdisposaloflithium‐ion
Batteries.
16
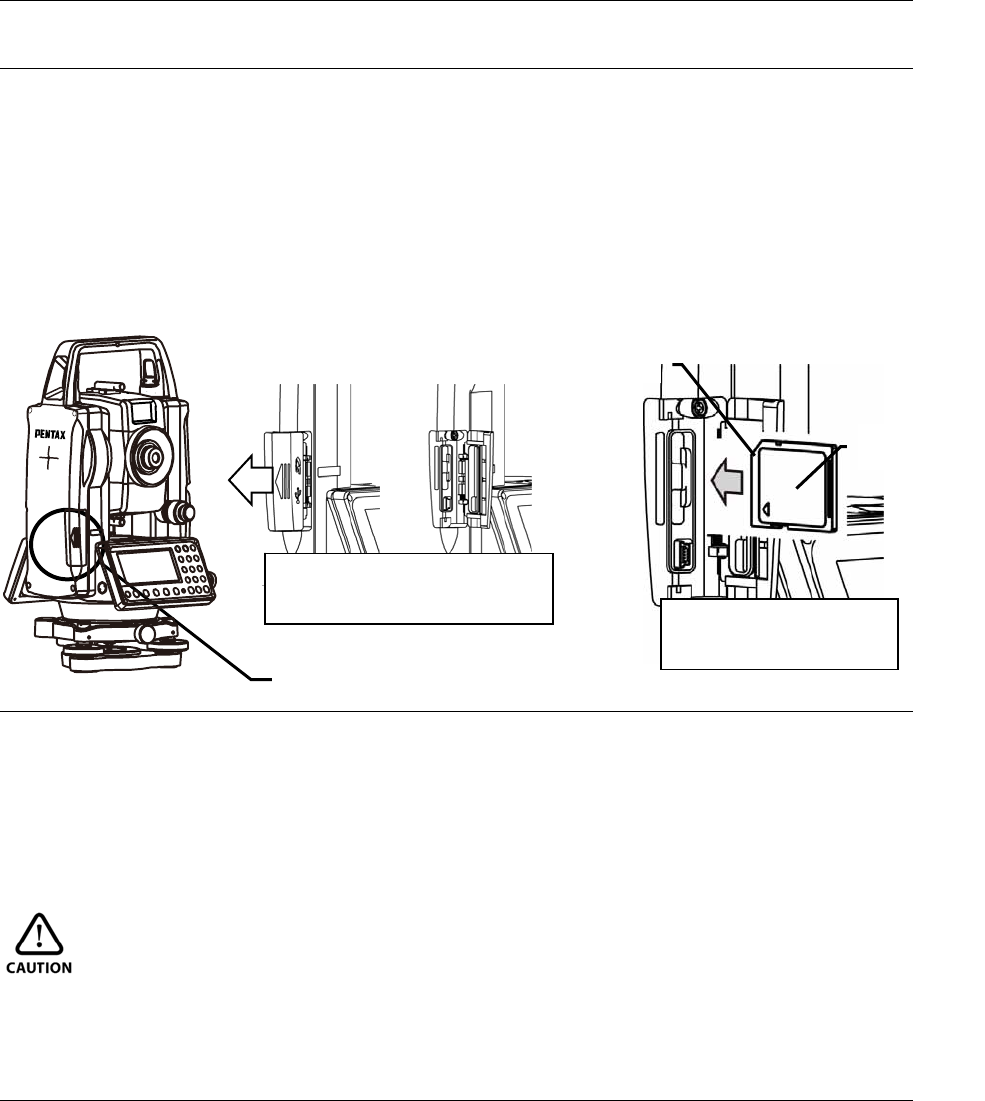
1.6 Inserting and Removing of various SD cards
1.6.1 Inserting SD card
① Open the SD & USB cover.
② Insert the SD card(The side with terminal should face the instrument and the cut-off
corner should be up.)
③ Insert the SD card to the end. Be sure not to press the card too hard.
④ After the SD card is inserted, close the SD & USB cover completely.
1.6.2 Removing SD card
① Open the SD & USB cover.
② Lightly press the SD card slot then release yourself from there.
③ The SD card pops up.
④ After the SD card is removed, close the SD & USB cover completely.
CAUTION
• Be sure to turn the power off before inserting and removing the SD card.
• Be sure to close/open the SD & USB cover and insert/remove the SD card indoors.
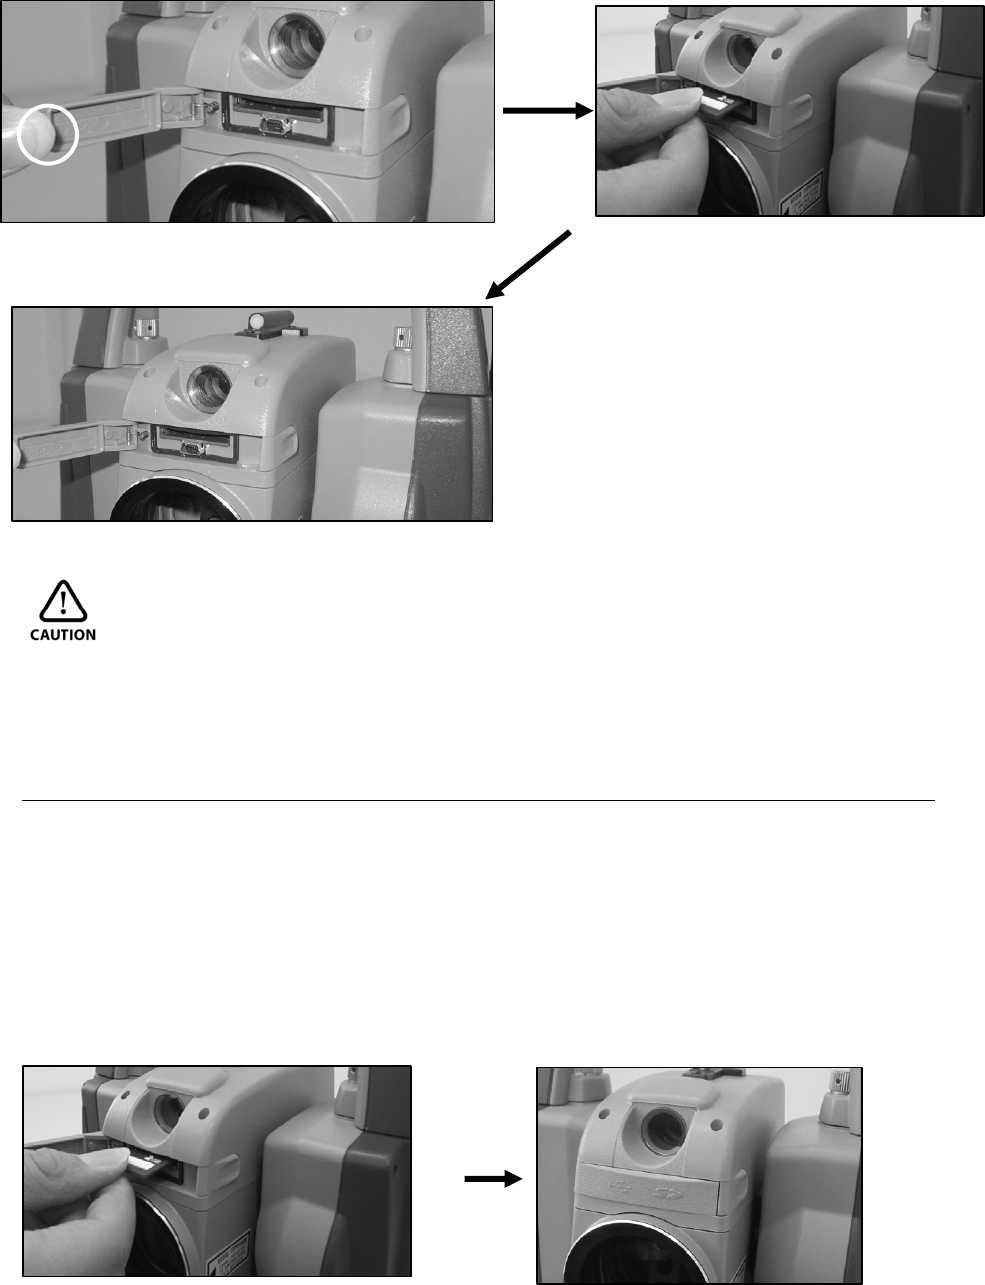
1.6.3 Inserting SD card for camera data
① Please open SD&USB cover. Cover is opened by pressing the white circle part in the
figure. SD&USB plug-in appears.
② Please insert SD card, of which the terminal side is underward, into SD plug-in with SD
notch on the right side.
③ Please push SD card till it stops. In this time, please do not force to push it.
④ After inserting SD card please be sure to close SD&USB plug-in cover.
SD&USB Cover
Direction to insert the
SD card
SD Card
Cut-off corner
Slide the SD & USB cover to
left to open the cover.
17
• Please be sure to do inserting SD card in state of camera OFF.
• Please be sure to start camera in the state that SD card was inserted.
• Before inserting SD card, please confirm that it is in the horizontal and vertical direction
locking state.
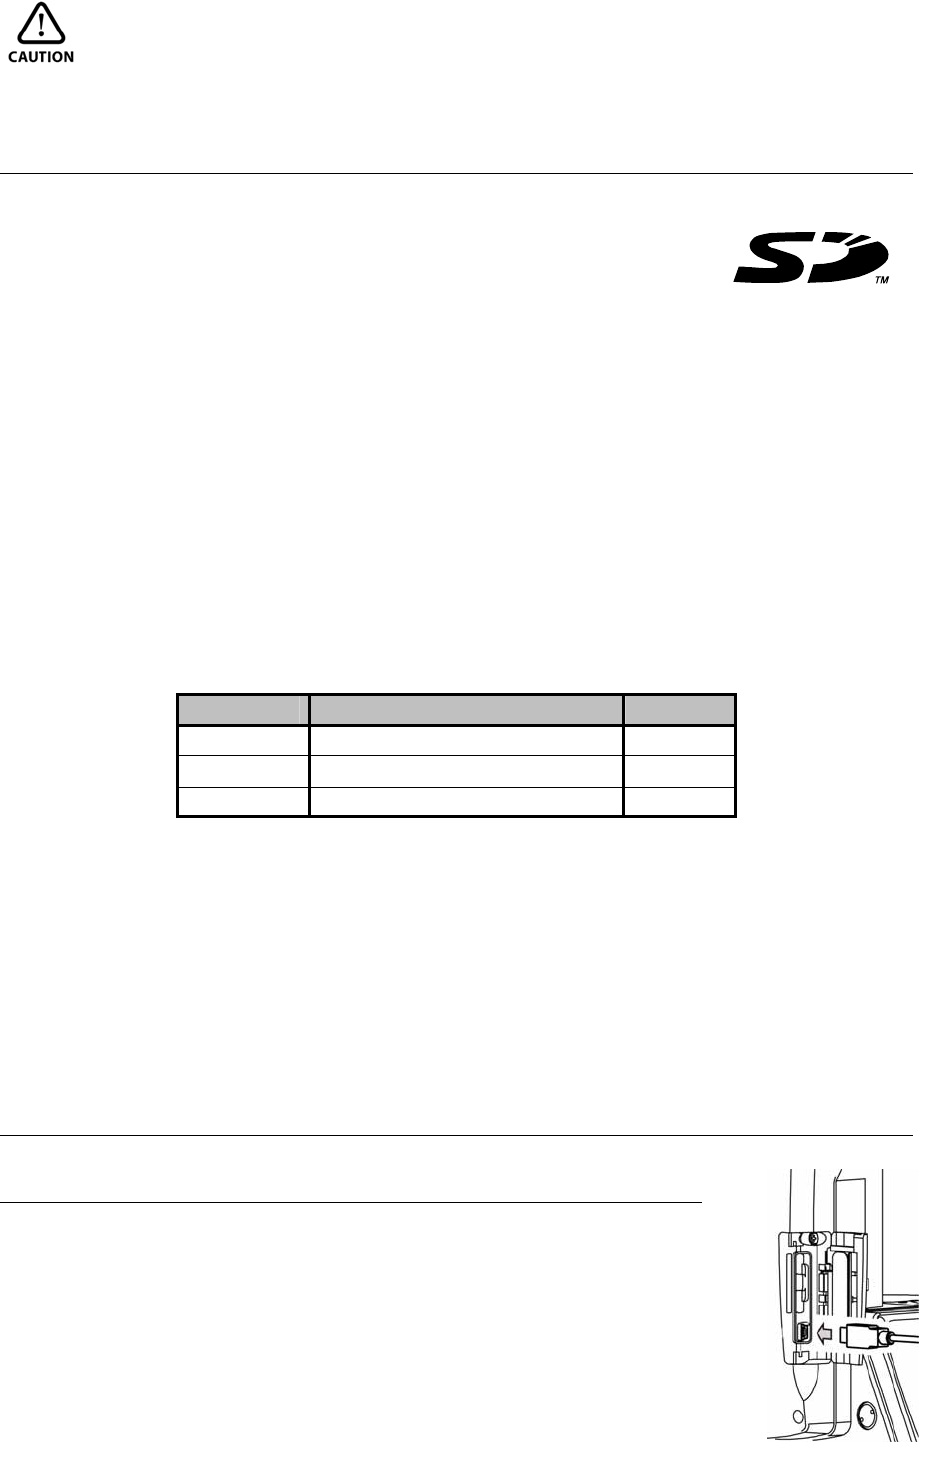
1.6.4 Removing SD card for camera data
① Please open SD&USB cover as same as inserting SD card.
② Please release after pushing the SD card a little in the plug direction.
③ SD card will pop out slightly.
④ After removing SD card, please do close SD&USB plug-in cover when using.
18
• Please do removing SD card in the state of camera OFF.
1.6.5 Suitability of SD card
• SD card and SD logo is registered trademark.
• The SD cards listed in the following table have been tested by us and it has been confirmed
that the SD cards can be used with the R-2500DN series.
This test has been done with only the Pentax R-2500DN series Total Station, but no other
Pentax Total Stations. When using with other Pentax Total Stations, please contact us to
confirm if it works properly.
Also it has been confirmed that the models mentioned in the following table can be used with
the R-2500DN series Total Station, but it has not been confirmed whether other brand SD
cards, not mentioned here, can be used with the R-2500DN series Total Station.
Please note that the test has been done by us and it is not meant that each SD card
manufacturer guarantees that the SD cards can be used with the Pentax R-2500DN series.
SD(micro SD)Card
Maker Model Capacity
Toshiba SD-C01GTR 1GB
Toshiba SD-MD001GA(microSD)1GB
Panasonic RP-SDM01GL1A 1GB
Be sure to use the adaptor when using a microSD.
• Regardless of the information here, be aware that all the SDHC cards can’t be used with
the R-2500DN Total Stations.
• Test item:The following has been done according to our test standard.
① When data is being sent (with connecting USB), it is necessary to be able to refer to
information in the SD card from PC and to operate the file.
② When writing / reading text, it is necessary to be able to read/write text file.
③ Photography should be possible.
④ Photographed image data should be viewed on PC and total station.
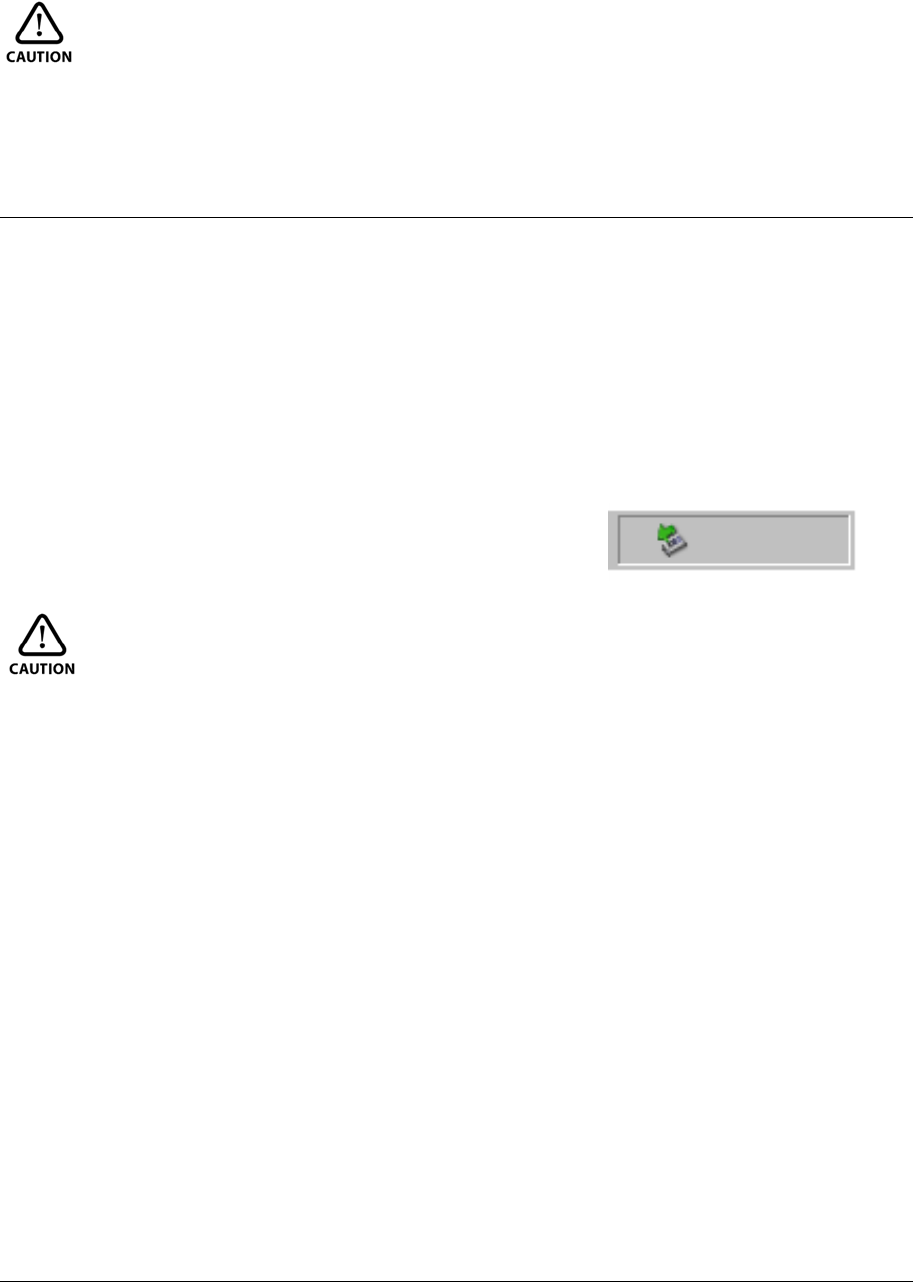
1.7 Inserting and Removing of various USB cables
1.7.1 Connecting USB cable
① Open the SD & USB cover.
② Insert the USB connector into the USB port in the right direction.
19
③ Connect the cable with the computer, power of the station will be on. About the operation
procedure, please refer to “applied function 13-2 data transmission (USB connection)".
CAUTION
• Be sure to turn the power off before inserting/removing the USB cable.
• Be sure to open/close the SD & USB cover and insert/remove the USB cable indoors.
• For clients, the USB port of the station is not functional if the connect target has no host
function. Therefore, the USB memory, printer and card reader cannot be used.
1.7.2 Removing USB cable
① Close the window on the PC screen.
② Please do "safely removing hardware" from icon (the right figure) of the lower right on PC
screen.
③ Finish the connecting.(About the means to finish connecting, please refer to “applied
function 16.2 data transmission”.)
④ Unplug USB cable from the connector.
⑤ After removing USB cable, please do close SD&USB plug-in cover when using.
CAUTION
• About the removing procedure of USB cable, please do follow this order.
• When removable disk does not start even if connection is done by the USB, Please enter
from My Computer and double-click the removable disk.
• If “safely removing hardware” is not done, it is possible to cause data loss. When the file
should have been taken was not taken in by any chance, please do again by the operation
procedure. And, before pressing Finish Key on the image of “USB is in communication” in
this station, please be sure to do “safely removing hardware”.
[Safety Remove Hardware] icon
20
1.7.3 Inserting USB cable for camera data
① As same as inserting SD card, please open SD&USB cover.
② Start camera, please insert USB connector with correct direction. This time, USB camera
screen image is displayed showing that the cable is connected. (About the means to start
camera, please refer to “6-1-1 camera start”.)
③ On the PC screen, image data can be processed. (About details of image data, please refer
to “1-8-2 about Photography data”.)
CAUTION
• About inserting procedure USB cable, please do follow this this order.
1.7.4 Removing USB cable for camera data
① Close the window on the PC screen.
② Please click the removing USB mass storage device. from icon (the right figure) of the
lower right on PC screen.
③ Finish the camera.(About the means to finish camera, please refer to “6-1-2 camera
finish”.)
④ Unplug USB cable from the connector.
⑤ After removing USB cable, please do close SD&USB plug-in cover when using.
CAUTION
• About inserting procedure USB cable, please do follow this this order.
Please insert USB miniB connector so
that the shape of the connector is
confirmed and it should not make a
mi
s
tak
e
in th
e
d
ir
ec
ti
o
n
.
[Safety Remove Hardware] icon
21
1.8 About recorded data
1.8.1 About measure data
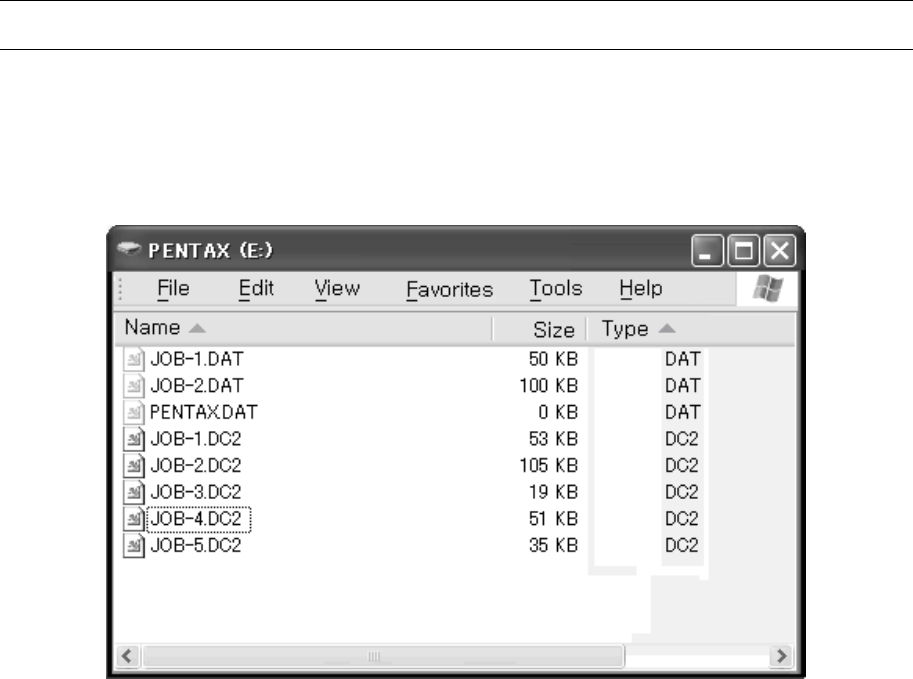
By connecting the instrument and PC with USB cable, you can refer to information in the
internal memory and SD card. You can use this to transfer the file in the internal memory and
SD card to PC or send the file created in the PC to the internal memory or SD card.
CAUTION
• DAT file in the internal memory is identical with the information in the job file stored in
the instrument. For the files with DAT extension, do not copy, paste and delete the file,
and do not change the file name.
NOTE: DAT file has a hidden file. If you take the following procedure in Windows, DAT
file is not displayed.
① Go to Windows Explorer
② Click Folder Options in Tools
③ Click tab of View
④ In Advanced settings, check [Hidden file and No showing hidden file]
⑤ Click OK
• When you finish USB communication, make sure to click [Safely Remove Hardware] icon
shown in the bottom right of the Desktop. If you don’t click this icon, it may cause a loss of
data. In case the file, that should be downloaded, is not included, try this procedure again.
Before pressing the key to finish, make sure to click [Safely Remove Hardware] icon.
22
1.8.2 About photography data
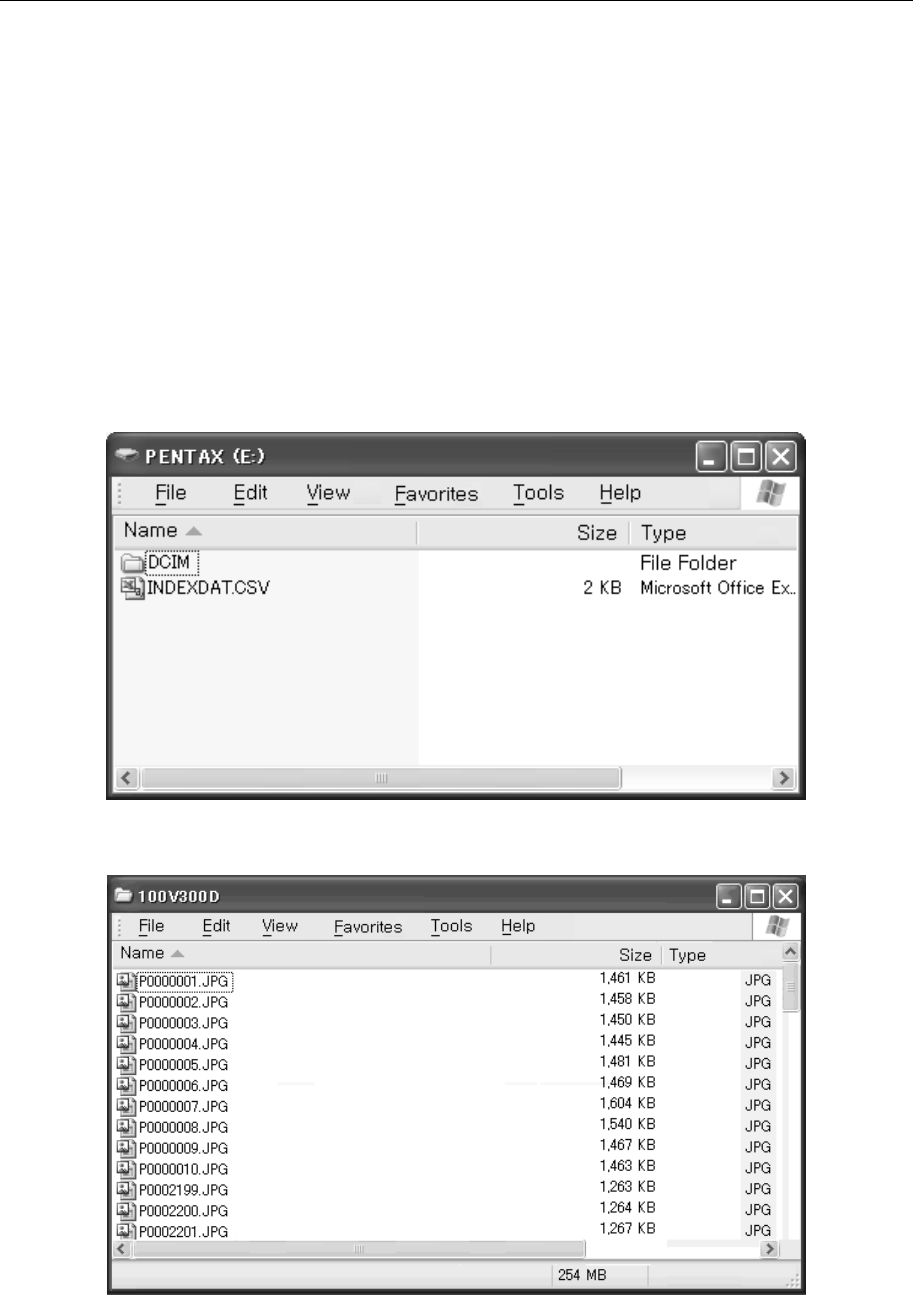
After the SD card is set on your computer or the USB cable is connected, the Explore window
is displayed on your computer as shown in the example. The image data is stored in the
DCIM folder in the form of JPEG. The survey information is stored as a CSV file under the
name of INDEXDAT.CSV.
The numbers to be used for the file of the taken picture are from “P0000001.JPG” to
“P0009999.JPG”
The numbers for the picture taken file are from “P0000001.JPG” to “P0009999.JPG”. A new
folder of “101V300D” is created in the “DCIM” folder if a picture is taken when the number
“P0009999.JPG” has already been reached in the memory. A picture taken file is generated,
starting with the file name of “P0000001.JPG” in that new folder.

23
In the CSV file, the following cells are contained in this order. However, the stored
information differ depending on the camera settings and menu selection when taking a photo.
PhotoNum , Resolution , dXpix , dYpix , PointName ,
X(N) , Y(E) , Z(Z) , PointCode , TH , Tconst , Horizontal Angle ,
Vertical Angle , Slope Distance , Date , Time , STPN ,
Station H. Angle , Station V. Angle , IH , STPC , [CR/LF]
Data list in INDEXDAT.CSV file
Photo Info. PhotoNum Number of photo
Resolution Resolution
dXpix Offset (X direction) of PointMark from the centre of image
(0,0)
dYpix Offset (Y direction) of PointMark from the centre of image
(0,0)
Point info. PointName Point name
X(N) X coordinate (to the North)
Y(E) Y coordinate (to the East)
Z(Z) Z coordinate (Height)
PointCode Point attribute
TH Target height
Tconst Target constant
Hrizontal Angle Horizontal angle
Vertical Angle Vertical angle
Slope Distance Slope distance
Calender Date Date when the photo was taken
Time Time when the photo was taken
Instrument
point info. STPN Instrument point name
Station H. Angle Horizontal angle to the backsight point (orientation angle)
Station V. Angle Vertical angle to the backsight point
IH Instrument height
STPC Attribute of the instrument point
24
2. DISPLAY AND KEYBOARD
2.1 Display and keyboard
2.2 Operation key
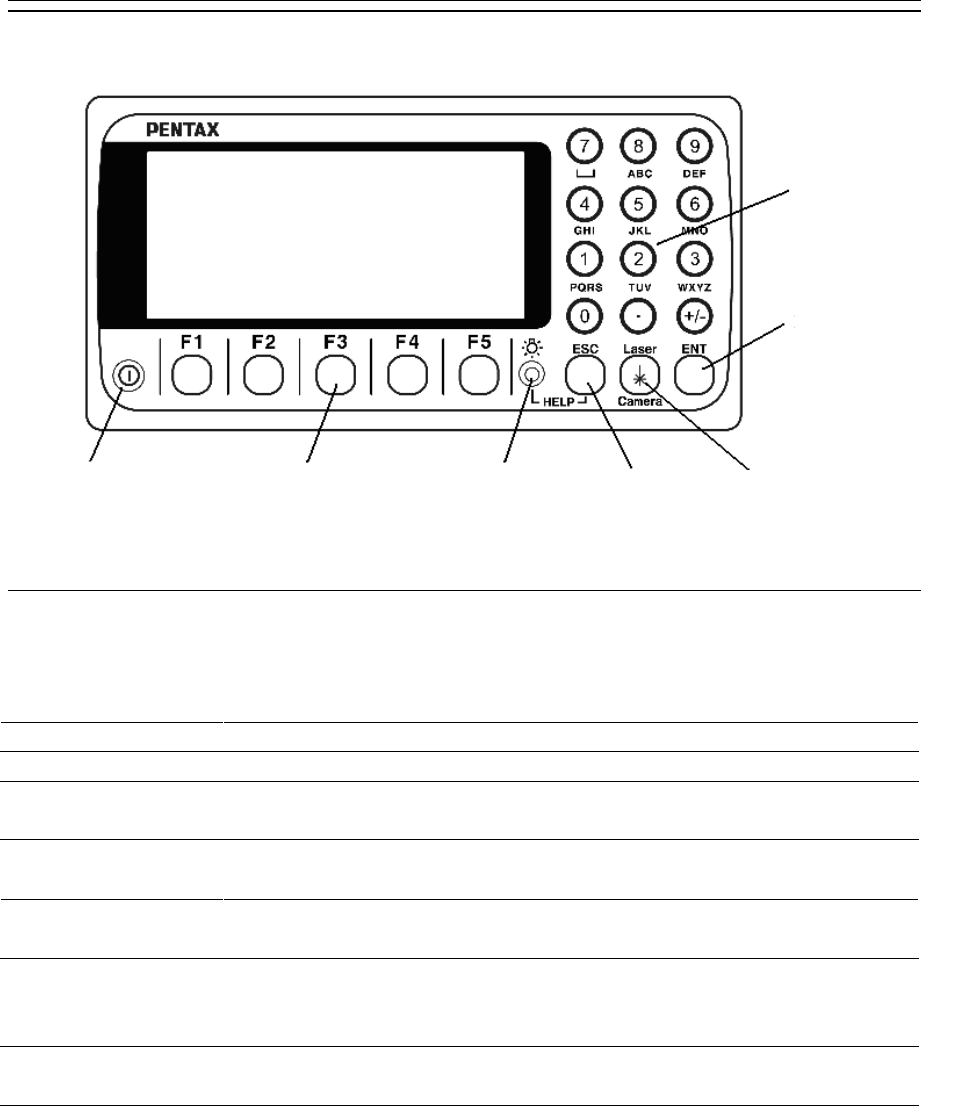
Key Description
[POWER] ON/OFF of power supply
[ESC] Returns to previous screen or cancels an operation.
[ILLU] Turns the illumination of the LCD display and telescope reticle on
and off.
[ENT] Accepts the selected (highlighted) choice or the displayed screen
value.
[LASER/Camera] “RED MARK & CAMERA SETTINGS” appears. It’s able to select
to turn RED MARK or CAMERA on/off.
[Alphanumeric] At the numerical value screen, the numerical value and the sign “.”
displayed are input.The English characters printed right under
numeric of each key are input.
[HELP] Pressing [lLLU]+[ESC] key causes a help menu to appear in
MODE A or MODE B or causes a help message to appear.
Power supply key Function key Illumination key ESC key Laser/Camera key
Enter key
Alphanumeric
and +/- key

25
2.3 Function Key
Display
MODE A
F. Key Description
[MEAS] F1 Pressing this key one time measures the distance in normal
mode another measurement type can be selected by
InitialSetting 2. Pressing this key twice measures the distance
in coarse mode another measurement type can be selected by
Initial Setting 2.
[TARGET] F2 Switches the target.
SHEET / PRISM / REFLECTORLESS
[0 SET] F3 Resets the horizontal angle to 0° 0’ 0” by pressing twice.
[DISP] F4 Switches the display composition in the order
“H.angle/H.dst./V.dst.”, “H.angle/V.angle/S.dst.” and
“H.angle/V.angle/H.dst./S.dst./V.dst.”
[MODE] F5 Switches the screen between MODE A and MODE B.
MODE B
[S.FUNC] F1 PowerTopoLite Special Functions.
[ANG SET] F2 Brings up the angle setting screen for setting angle-related
parameters
(H.ANGLE/%GRADE, H.ANGLE INPUT and
L/R REVERSE).
[HOLD] F3 Pressing this key twice retains (holds) the horizontal angle
shown on the display.
[CORR] F4 Brings up the screen for changing the target constant,
temperature. Pressure setting.
[MODE] F5 Switches the screen between MODE A and MODE B.
26
[Function Key for Camera]
The camara can be operated by using the following function keys, which appear on the screen
when the camera is activated. For more detail, refer to “10. Digital Camera”.
<View mode>
View1/3
[MEAS] F1 Measures the distance. Pictures are automatically taken at the
same time, depending on the camera setting
[TARGET] F2 Switches the target. SHEET/PRISM/REFLECTORLESS
[SNAP] F3 Takes pictures
[CAM OFF] F4 Turns the camera off
[MODE] F5 Switches the screen to View2/3
View2/3
[Zoom IN] F1 The screened image is zoomed in.
[Zoom OUT] F2 The screened image is zoomed out.
[0 SET] F3 Resets the horizontal angle to 0° 0’ 0” by pressing twice.
[CODE] F4 Menu appears for add pointcode to Images.
[MODE] F5 Switches the screen to View3/3
View3/3
[S.FUNC] F1 Activates PowerTopoLite program.
[ANG SET] F2 Displays the angle setting screen for setting angle-related
parameters.
[HOLD] F3 Pressing this key twice holds the horizontal angle shown on the
screen.
[DISP] F4 Switches the screen composition in the order.
“H.angle/H.dst./V.dst.”, “H.angle/V.angle/S.dst.” and
“H.angle/V.angle/H.dst./S.dst./V.dst.”
[MODE] F5 Switches the screen to View 1/3
27
<Review mode>
ReView1/2
[BACK] F1 Switches to the previous image
[NEXT] F2 Switches to the next image
[SEARCH] F3 Searches the images
[DELETE] F4 Deletes the selected image
[MODE] F5 Switches the screen to ReView2/2
ReView2/2
[CODE] F1 Switches the screen to add PointCode to the images
[DataDisp] F2 Activates/de-activates the display of the survey information
[Zoom IN] F3 Zoom the image in
[Zoom OUT] F4 Zoom the image out
[MODE] F5 Switches the screen to MoveImage
Move Image
[ ▽ ] F1 Moves the image to the left
[ ▽ ] F2 Moves the image to the right
[ ▽ ] F3 Moves the image up
[ ▽ ] F4 Moves the image down
[MODE] F5 Switches the screen to ReView1/2
<Slide show mode>
Slide show
[PLAY] F3 Resumes the slide show
[PAUSE] F4 Pauses the slide show.
[ESC] F5 Turns the slide show off
28
[Other functions]
[ ▽ ] F1 Moves the cursor to the left.
[ ▽ ] F2 Moves the cursor to the right.
[ ▽ ] F3 Moves the cursor up.
[ ▽ ] F4 Moves the cursor down.
[ △ ] F1 Goes back five items on the screen.
[ ▽ ] F2 Goes forward five items on the screen.
[RETICLE] F3 Changing the reticle illumination when pressing illumination
key.
[LCD] F4 Changing the LCD constract when pressing illumination key.
[ILLU] F5 Changing the LCD illumination when pressing illumination
key.
[CLEAR] F5 Clear the figure.
[SELECT] F5 Open the selection window.
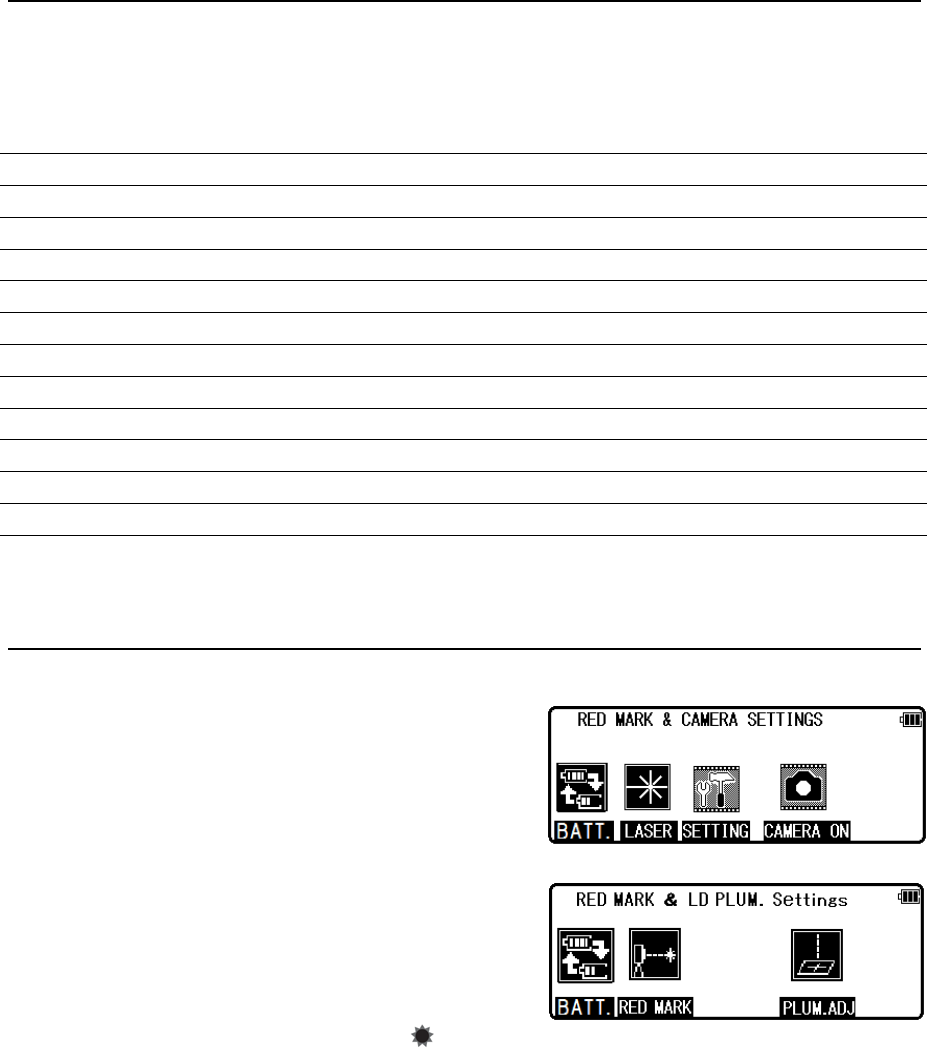
[How to move the menu number]
Example:
The cursor is located at Menu 1.
Press the numeric key 0 and 2 to
move to Menu 2 or press [F4] [ ▽ ].
29
2.4 Alphanumeric input
The point name is inputted by the alphanumeric keys as following.
Key Letter under key Letter & figure order to input
[0] [@][.][_][-][:][/][0]
[1] PQRS [P][Q][R][S][p][q][r][s][1]
[2] TUV [T][U][V][t][u][v][2]
[3] WXYZ [W][X][Y][Z][w][x][y][z][3]
[4] GHI [G][H][I][g][h][i][4]
[5] JKL [J][K][L][j][k][l][5]
[6] MNO [M][N][O][m][n][o][6]
[7] [ ][?][!][_][¯][^][¦][&][7]
[8] ABC [A][B][C][a][b][c][8]
[9] DEF [D][E][F][d][e][f][9]
[.] [.][,][:][;][#][(][)]
[+/-] [+][-][*][/][%][=][<][>]
2.5 Laser pointer
The Laser pointer function turns the laser beam on
continuously to become the aiming point so that
visual confirmation is possible.
Press [Laser/Camera] key to display “RED MARK &
CAMERA SETTINGS” screen.
When push [F1] [RED MARK] key in the screen are
pressed, it will go to "RED MARK & LD PLUM.
settings" screen. Red mark is emitted afterwards
when [F2] [RED MARK] key are pressed.
The Laser indicator is turned on and the “ ” mark
on the left of the screen blinks while the Laser pointer function is operating.
Red marks can be finished in the same way.
• The beam of the sun is strong and visual confirmation is difficult in daytime when out
doors.
• The laser beam is designed not to be able to observe through the telescope.
• Please visually align the laser beam to the target and mark the center.
Confirm the alignment (horizontal and vertical ) before measuring when performing
accurate work like stake out when using the Laser pointer function.
Also refer to 12.8 The EDM beam axis.
• Please do not look at the laser source of beam directly.
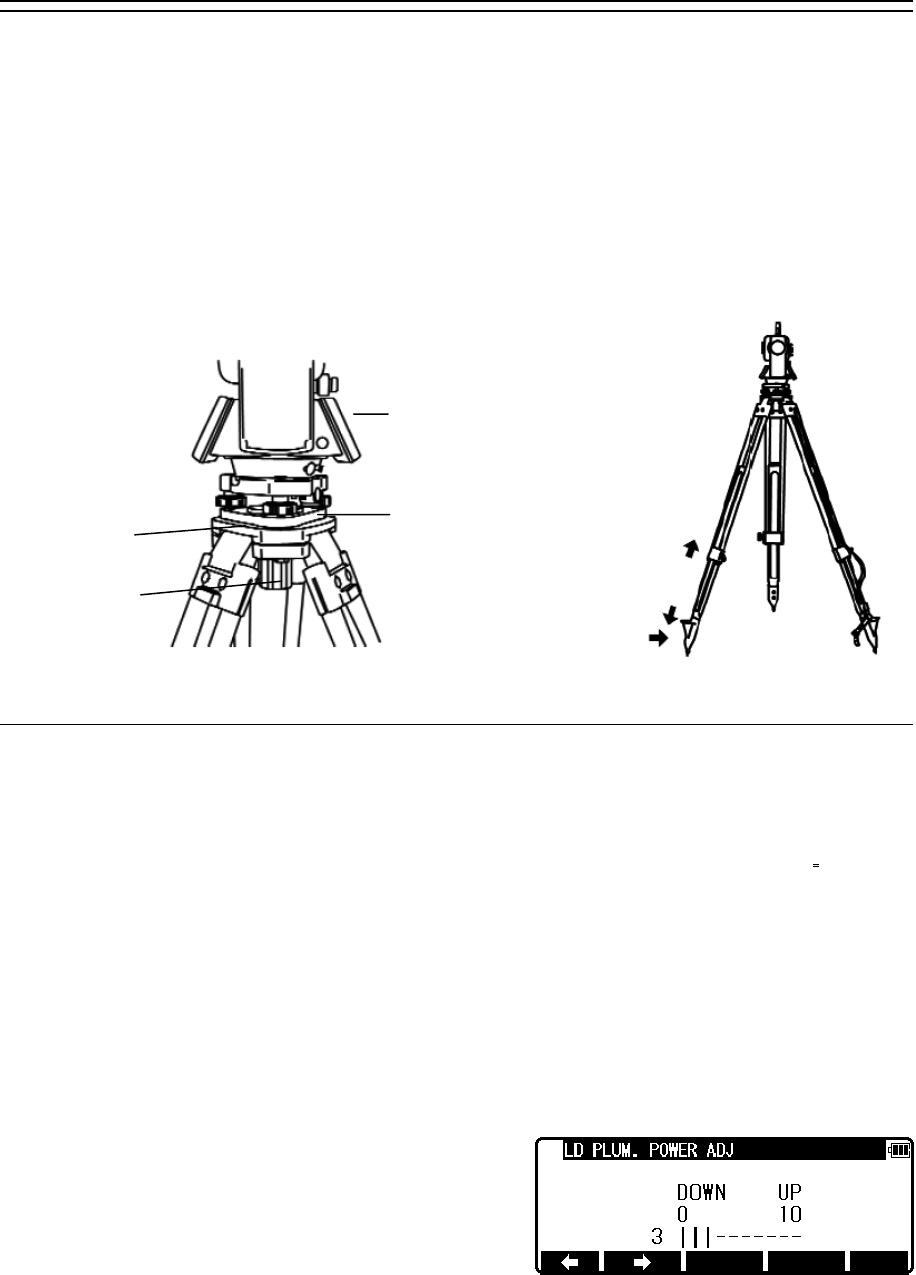
30
3. PREPARATION FOR SURVEYING
3.1 Centring and levelling of the Instrument
[Setting up the instrument and the tripod]
① Adjust the tripod legs so that a height suitable for observation is obtained when the
instrument is set on the tripod.
② Hang the plumb bob on the hook of the tripod, and coarse centre over the station on the
ground. At this time, set the tripod and fix the metal shoes firmly into the ground so that
the tripod head is as levelled as possible.
③ If the tripod head is mis-levelled by the action of fixing the metal shoes into the ground,
correct the level by extending or retracting each leg of the tripod.
3.2 Laser plummet
[Laser plummet model]
The laser plummet is equipped with the R-2500DN series. Pressing [F4] [PLUM. ADJ] on
"RED MARK & LD PLUM Setting" screen will turn on the laser plummet function..
Match the position with the leveling screw so that the laser mark coincides with the
ground mark. The laser plummet is not set to be ON at factory shipping. The laser plummet
operation of power supply ON can be set by command No.520, LD PLUM. For using
Command number, refer to “9.2 Accessing by 007”.
[Brightness adjustment of laser]
Sometimes the state of the surface of the ground mark or a surrounding environmental
does not allow observing the laser spot easily. Please adjust the brightness of the laser if
necessary.
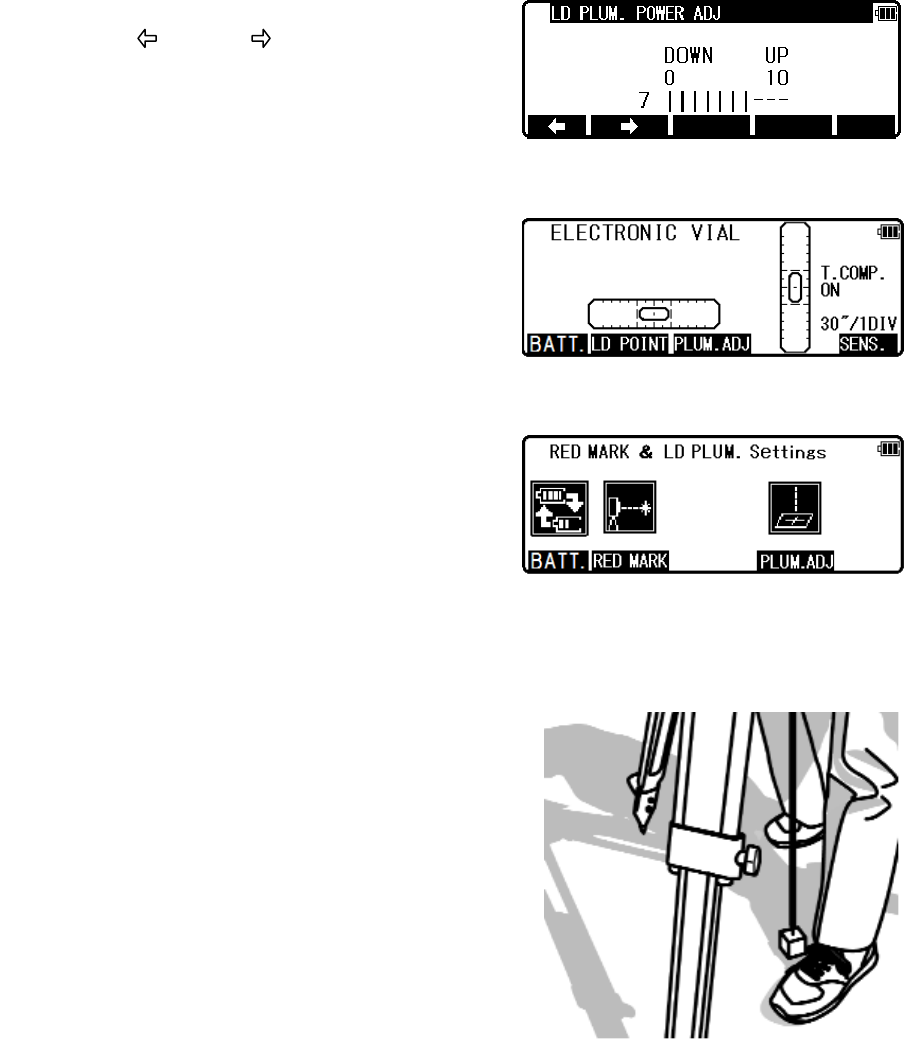
If the laser plummet is turned on with the above
mentioned procedure, the brightness adjustment
screen of the laser plummet device, is displayed.
Contract
Metal shoe
Base plate
Instrument
Tripod head
Center screw
31
The Laser plummet becomes darker or brighter by
pressing [F1] [ ] / [F2] [ ] key.
The adjustment is completed with the [ENT] key and
it returns to electronic vial screen.
The adjustment is completed with the [ENT] key and
it returns to RED MARK & LD PLUM. Settings
screen.
• The brightness adjustment step of the laser is 10 steps.
• The laser plummet spot can become difficult to see in bright sunlight which makes it
difficult to perform the occasional check. In this case, use your foot or the carrying case to
make a shadow over the laser position.
• The laser plummet is adjusted to be within ±0.5mm
at the instrument height of 1.5m at factory shipping.
• Please double check the amount of the gap
(direction of X and Y direction) by laser plummet
with the amount of the gap by plumb bomb etc.
When working accurately you should put out a
perpendicular direction using the laser plummet
function.
• Please do not look at the laser source of beam
directly.
※R-2501DN,R-2502DN
※R-2503DN,R-2505DN
32
3.3 Levelling with circular vial
Tripod is adjusted according to the following points by extending or contracting the legs so
that the bubble of the Circular vial goes to the centre of the circle.
• Shorten the leg at the side of the bubble or extend the leg opposite of the bubble to position
the bubble in the centre of the vial circle.
• All three legs are extended or contracted until the bubble is in the centre.
During this process, the foot is not placed on the tripod leg point and the position of the
tripod points do not change.
3.4 Levelling with the plate vial
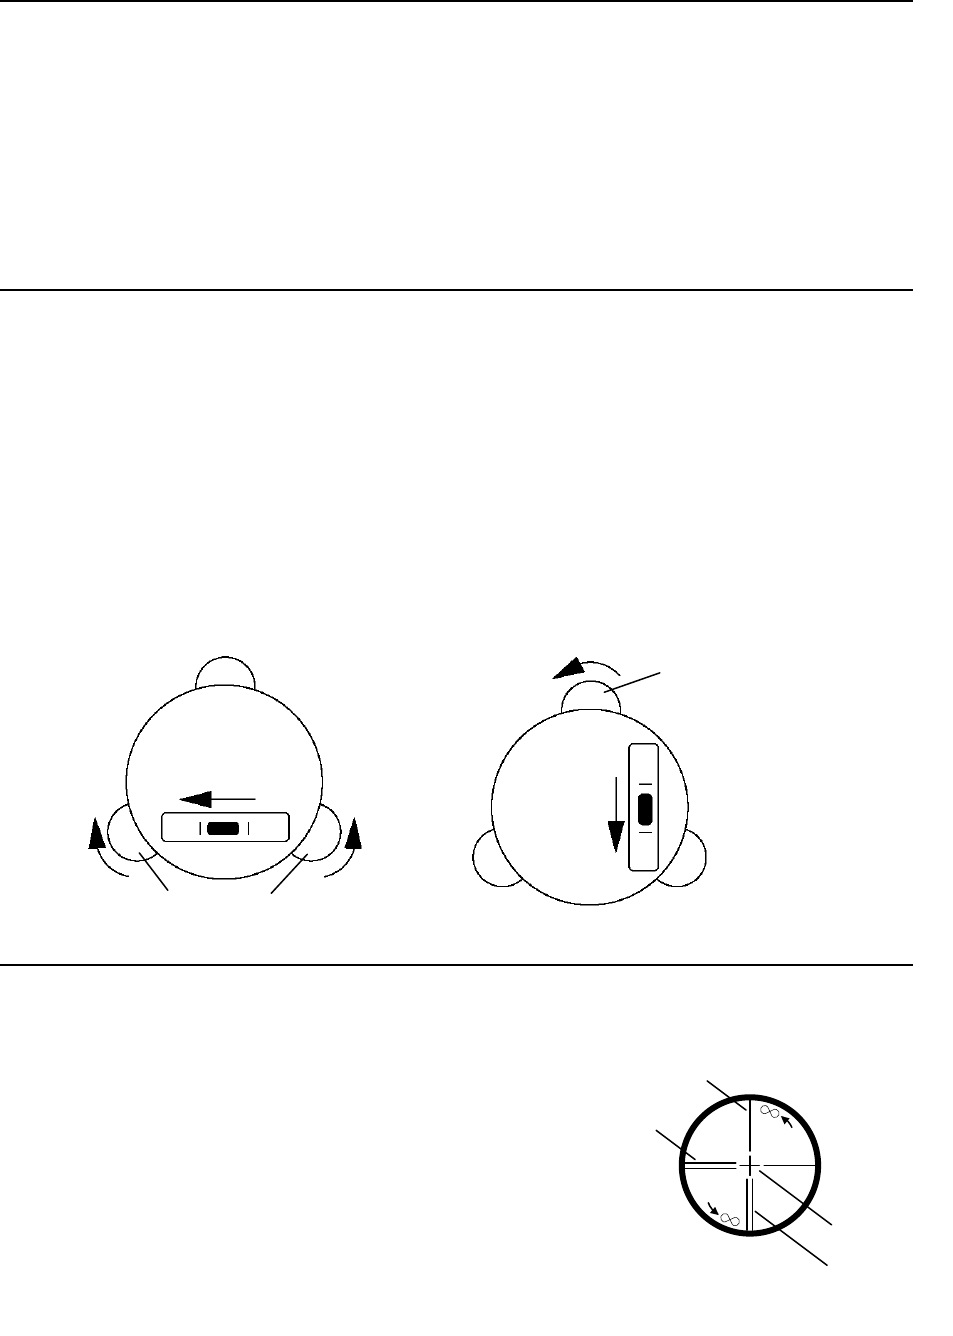
- (A) Align the plate vial in parallel with a line joining any two of the levelling screws.
Then, adjust the two screws to centre the bubble in the plate vial.
- Turn two levelling screws in an opposite direction mutually in a way that the bubble moves
from the side of the plate vial to the centre.
- (B) Rotate the total station 90°.
- Use the remaining screw to centre the bubble in the plate vial.
- Rotate the instrument by 90° and 180° and confirm the position of the bubble in the plate
vial. At this time, it is not necessary to adjust it if the bubble of the plate vial is in the
vicinity of the centre.
3.5 Eyepiece adjustment
[Eyepiece adjustment]
The eyepiece adjustment is performed before target
sighting.
① Remove the telescope lens cap.
② Point the telescope at a bright object, and rotate the
eyepiece ring full counter clockwise.
③ Look through the eyepiece, and rotate the eyepiece
ring clockwise until the reticle appears at its
maximum sharpness.
Leveling screw
Leveling screw
(A) (B)
Vertical lines (double)
Vertical line (single)
Horizontal line
Sight axis
33
• When looking into the eyepiece, avoid an intense look to prevent parallax and eye fatigue.
• When it is hard to see the reticle due to poor brightness, press [ILLU] + [F3] [RETICLE] to
access the RETICLE INTENSITY ADJ. screen. Use the left and right arrow to adjust the
reticle intensity.
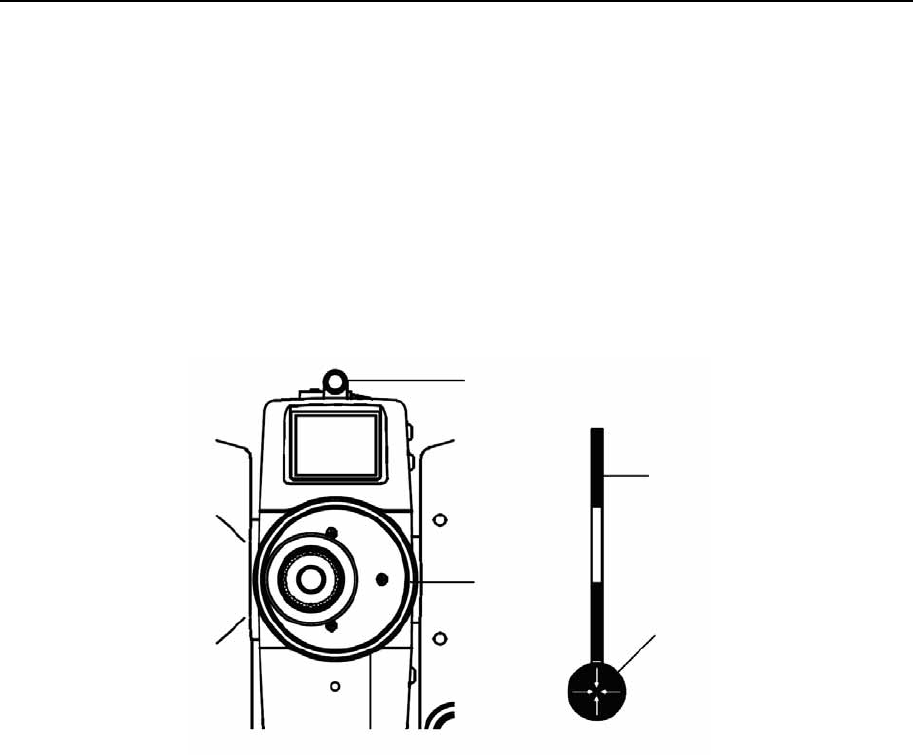
3.6 Target sighting
[Target sighting by Manual focus]
① Loosen the telescope clamp and horizontal clamp screws.
② Point the telescope at the target using a collimator.
③ Tighten the above two screws.
④ Adjust the eyepiece.
⑤ Look through the telescope and then rotate the focusing ring and stop it where the target
can be seen clearly and the target image does not move in relation to reticle even if your
eye is vertically and horizontally moved.
⑥ Align the reticle accurately on the target using telescope and horizontal tangent screws.
• The Focus ring rotation “clockwise” makes it possible to focus on closer objects and
“counter clockwise” will focus on further objects.
Collimator
Target
Collimator
Focus Ring
34
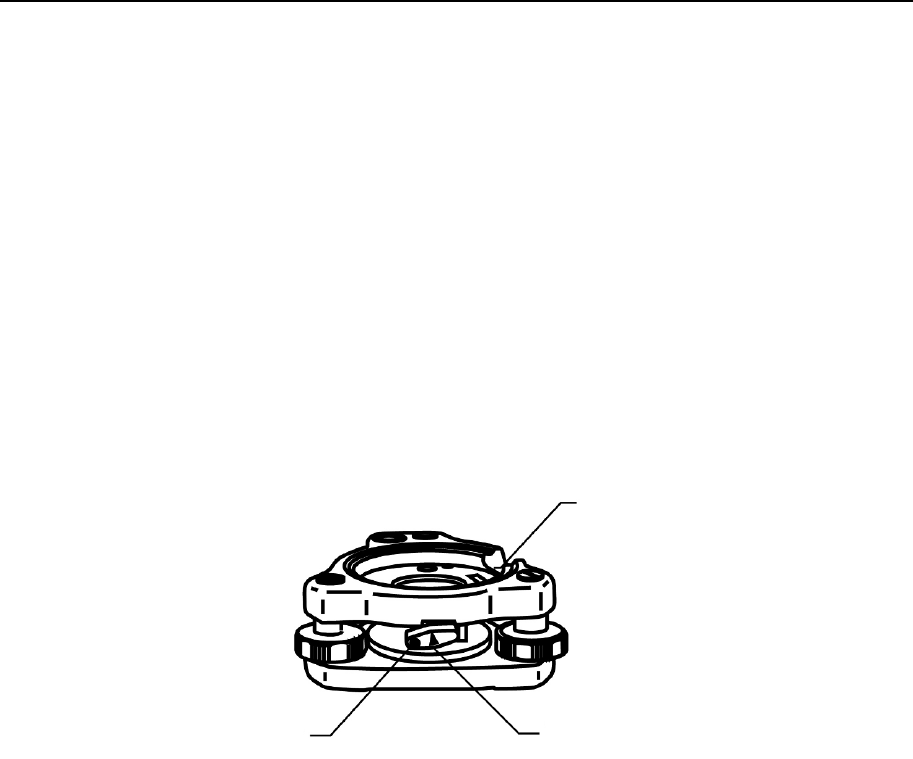
3.7 Attachment and detachment of tribrach
The tribrach of R-2501DN, R-2502DN, R-2503DN, and R-2505DN can be detached from the
instrument, if required when replacing the instrument with a prism for example.
[Detachment]
First loosen the recessed screw with a screwdriver, then rotate the locking knob until the
arrow points upward, and lift the instrument up.
[Attachment]
Mount the instrument on the tribrach with the guide marks coinciding, and rotate the locking
knob until the arrow points downward.
The guide and guide mark must be fitted to attach the instrument.
When the tribrach does not need to be attached or detached or instrument is to be transported,
tighten the recessed screw with a screwdriver to fix the locking knob.
Guide mark
Tribrach locking lever
Recessed screw
35
4. TURNING THE POWER ON
4.1 Turning the power on and off
To set power on: To shut down:
To turn the power supply off, press the I/O key for more than 1 second and then release it.
Power turns OFF.
NOTE: The power is automatically turned off after 10 minutes of inactivity
(Factory default setting).
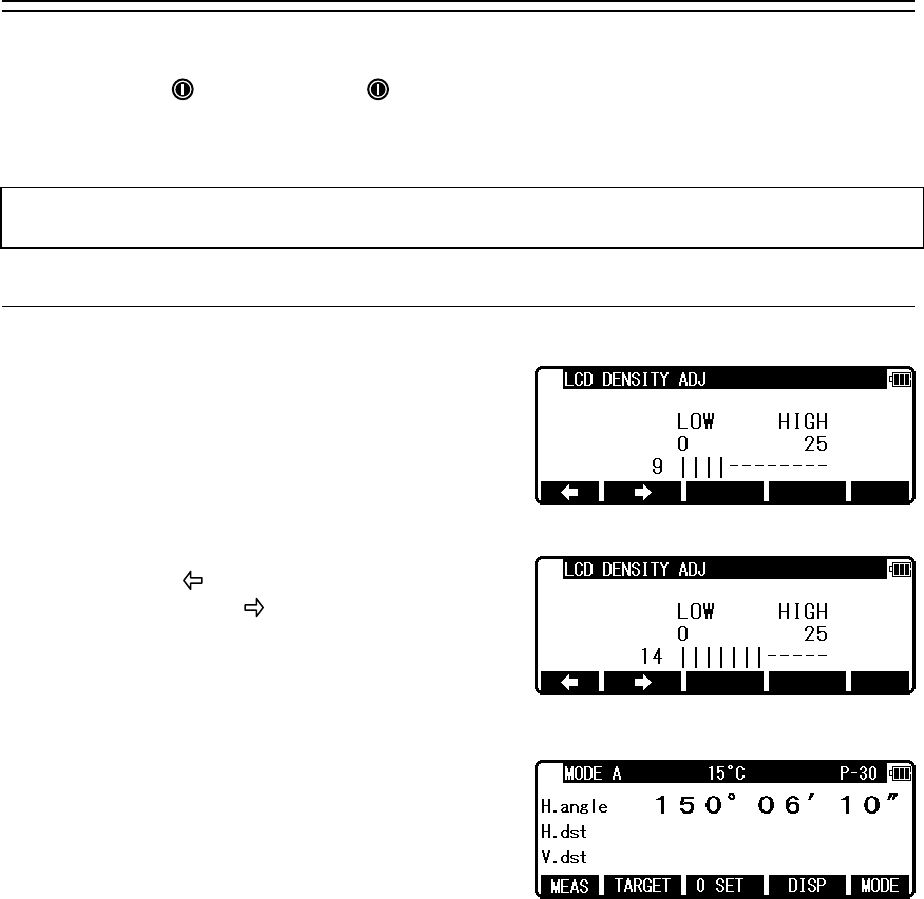
4.2 Adjusting LCD contrast
Press [F4] while holding down the Illumination key
to access the screen for adjusting LCD contrast.
Pressing the [F1] [ ] will lighten the contrast,
while pressing the [F2] [ ] will darken the
contrast.
Press [ENT] to exit adjustment mode and return to
the previous screen.
• Pressing the Illumination key views the [F3] [RETICLE], [F4] [LCD] and [F5] [ILLU].
• LCD contrast may be adjusted as necessary at any time.
• The contrast may be adjusted to any one of 25 levels.
• LCD contrast may be unappealing under certain environmental conditions such as high
temperature. Adjust the LCD contrast as described above in such situations.
36
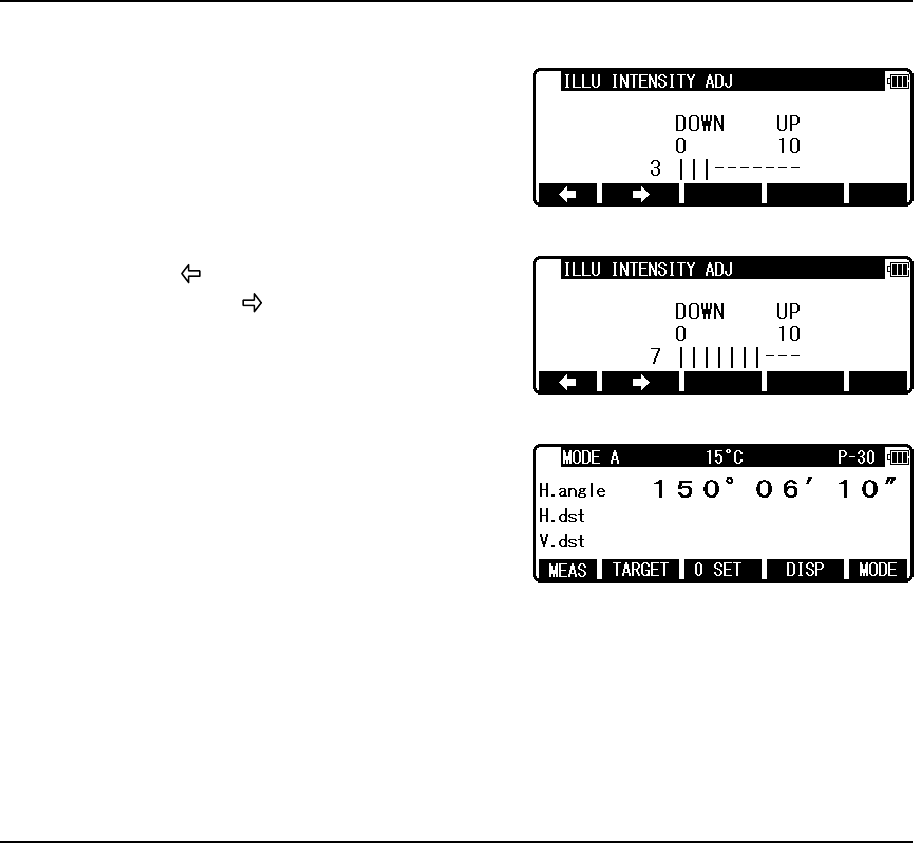
4.3 Adjusting illumination brightness
Press [F5] while holding down the Illumination key
to access the screen for adjusting
illumination brightness.
Pressing the [F1] [ ] will decrease brightness,
while pressing the [F2] [ ] will increase
brightness.
Press [ENT] to exit adjustment mode and return to
the previous screen.
• Pressing the Illumination key views the [F3] [RETICLE], [F4] [LCD] and [F5] [ILLU].
• Illumination brightness of the LCD screen and telescope reticle may be adjusted as
necessary at any time.
• Illumination brightness may be adjusted to any one of 10 levels.
4.4 Adjusting reticle illumination
Press [F3] while holding down the Illumination key to access the screen for adjusting reticle
illumination. The procedure to adjust the reticle illumination is the same way as 4.3.
• Pressing the Illumination key views the [F3] [RETICLE], [F4] [LCD] and [F5] [ILLU].
37
5. ANGLE MEASUREMENT
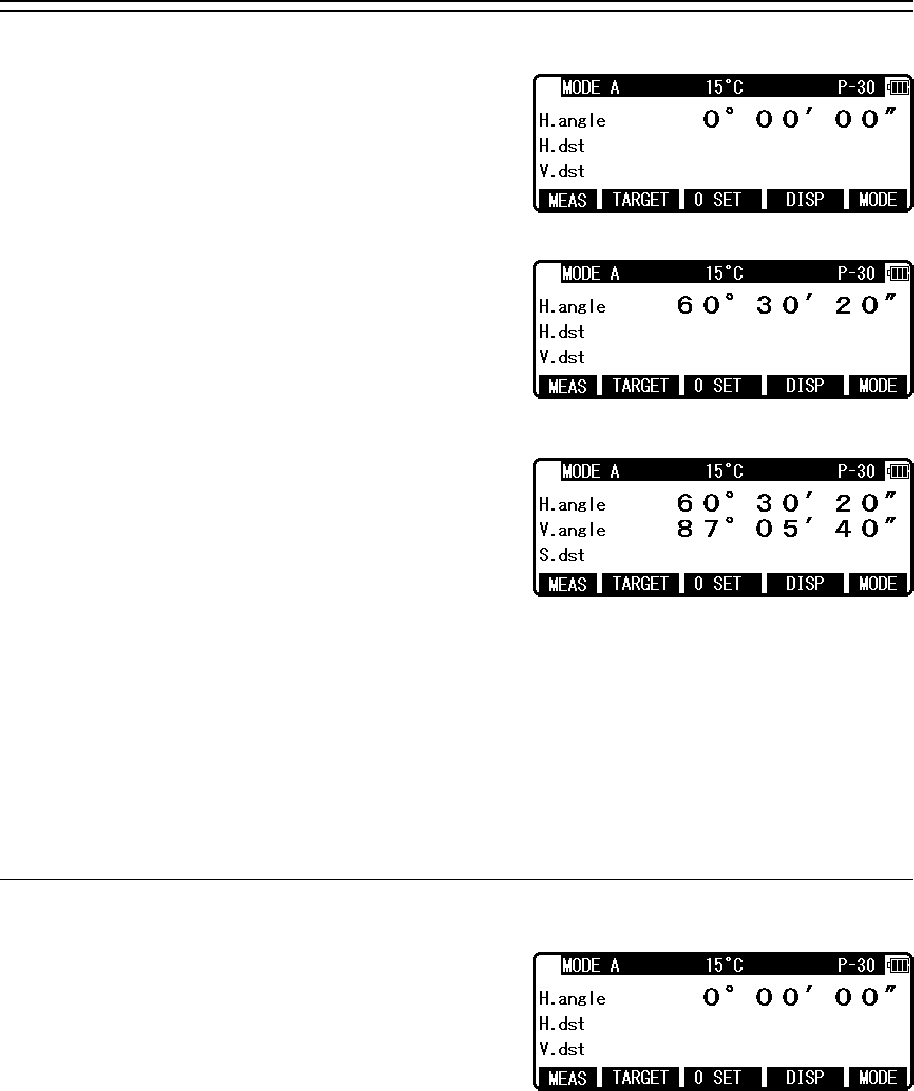
5.1 Measuring an angle
Aim at the first target, then press [F3] [0 SET] twice
in succession to reset the horizontal angle to 0.
Aim at the second target,then read the horizontal
angle.
Pressing [F4] [DISP] displays the vertical angle.
• The [F3] [0 SET] key cannot reset the vertical angle to 0.
• Pressing the [F4] [DISP] key cycles through the sets of display items :
“H.angle/H.dst./V.dst.”, “H.angle/V.angle/S.dst.”, and
“H.angle/V.angle/H.dst./S.dst./V.dst.”.
• Even though you turn the power off during a survey, the horizontal angle displayed last
time is saved, so that it is restored when the power is turned on next time.
• When the restored horizontal angle is not necessary, reset it to 0.
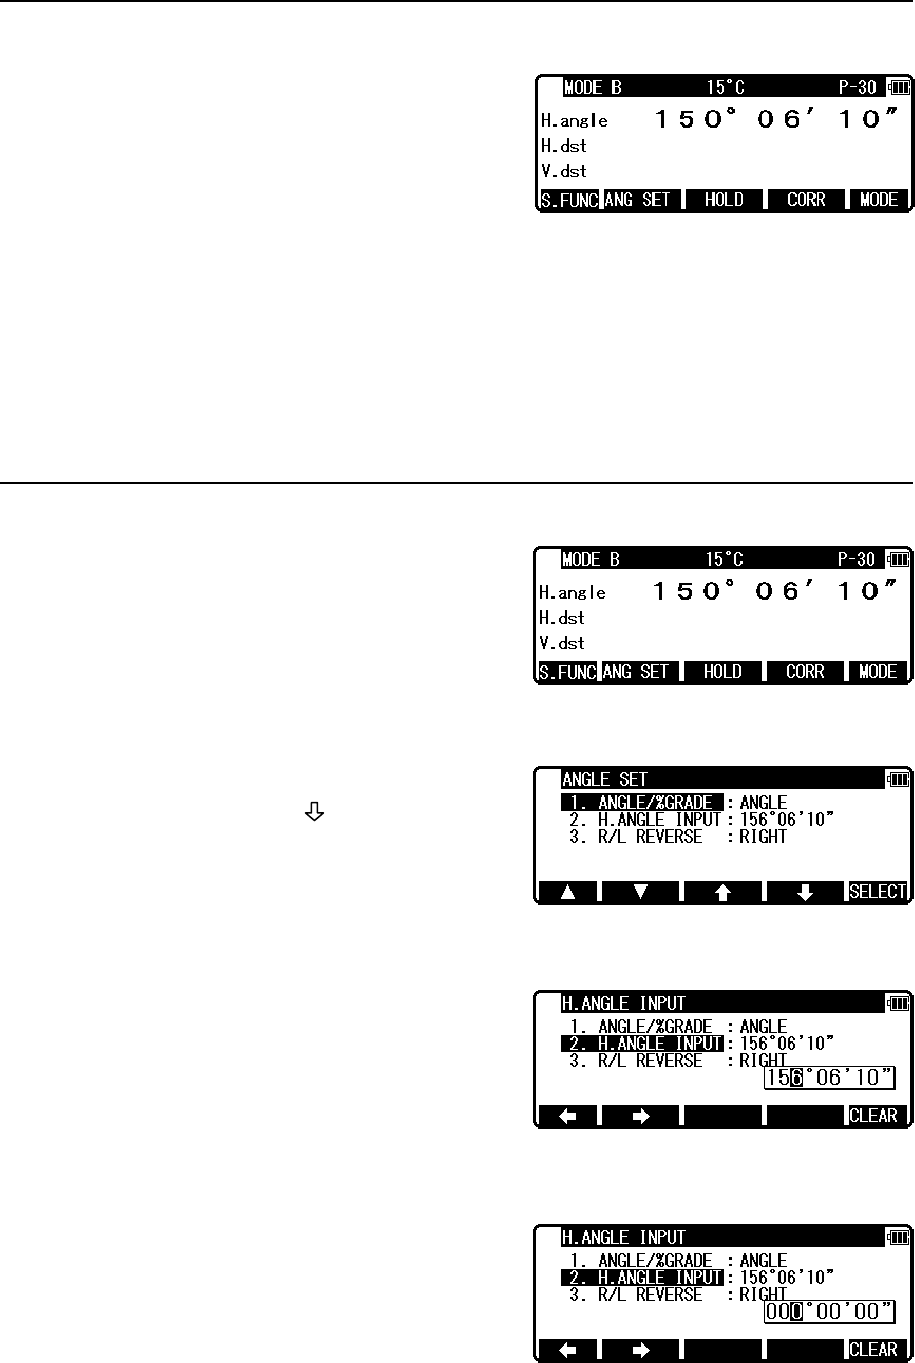
5.2 Resetting the horizontal angle to 0
Pressing [F3] [0 SET] twice in succession resets the
horizontal angle to 0° 0' 0".
• The [F3] [0 SET] cannot reset the vertical angle to 0.
• Pressing the [F3] [0 SET] accidentally during measurement does not reset the horizontal
angle to 0 unless you press it again. Once the buzzer stops sounding, you can go to the next
step.
• You can reset the horizontal angle to 0 any time except when it has been held.
38
5.3 Holding the horizontal angle
To hold the horizontal angle currently being
displayed, press [F3] [HOLD] twice in succession.
The horizontal angle value is displayed in reverse
video when being held.
• lf you want to hold the horizontal angle when you are in MODE A, press [F5] [MODE]
first to switch to MODE B, then press [F3] [HOLD].
• The [F3] [HOLD] cannot hold the vertical angle or distance.
• To release the horizontal angle from being held, press [F3] [HOLD] once.
• Pressing [F3] [HOLD] accidentally during measurement does not hold the horizontal angle
unless you press it again. Once the buzzer stops sounding you can go to the next step.
5.4 Inputting an arbitrary horizontal angle
In case of Horizontal angle 123° 45' 20" input Press
[F5] [MODE] to enter MODE B.
Press [F2] [ANG SET] to display the angle
setting screen, then press [F4] [ ] to
move the cursor to “2. H. ANGLE INPUT”.
Press [F5] [SELECT] to open the horizontal angle
input window.
[F5] [CLEAR] is used to clear the values.
• The former data is called by pressing the
[CLEAR] key again.
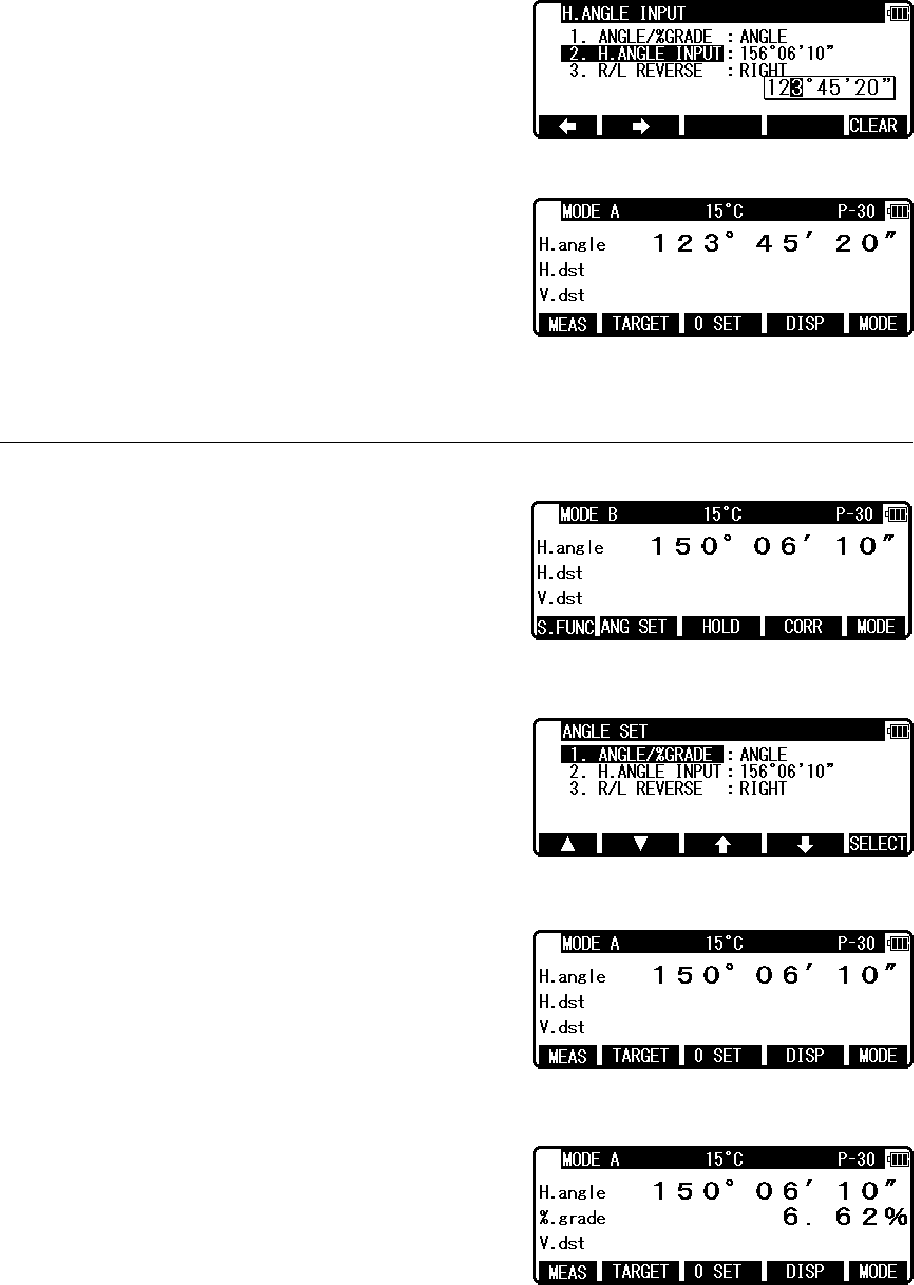
39
Press the numeric key as 123.4520.
Press the [ENT] key to accept the horizontal angle
set to 123° 45' 20" and change the screen to MODE
A.
5.5 Displaying the % slope of the vertical angle
Press [F5] [MODE] to enter MODE B.
Press [F2] [ANG SET] to display the ANGLE SET
screen.
Press the [F5] [SELECT] to change the screen to
display the slope % of Vertical angle.
Press [F4] [DISP] to display the slope value in %.
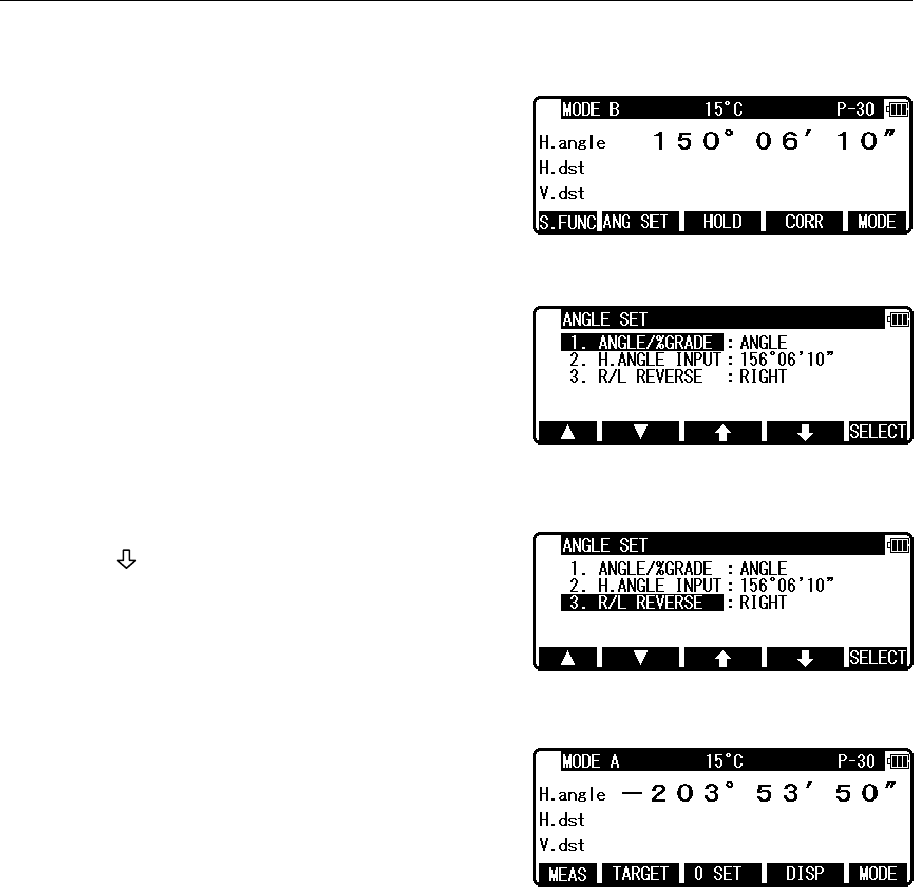
40
• The 0% represents the horizontal 0, and +100% and -100% represent 45° up and down
slopes respectively.
• To return the screen from the slope (%) display to the 360° scale, also take above same
steps by entering MODE B.
• If the slope (%) exceeds [+/-]1000%,“Out of grade range”is displayed,indicating that the
current vertical angle cannot be measured.
• When the telescope returns to a slope within slope [+/-] 1000%, the slope (%) display
returns automatically from the “Out of grade range” message to the numeric value.
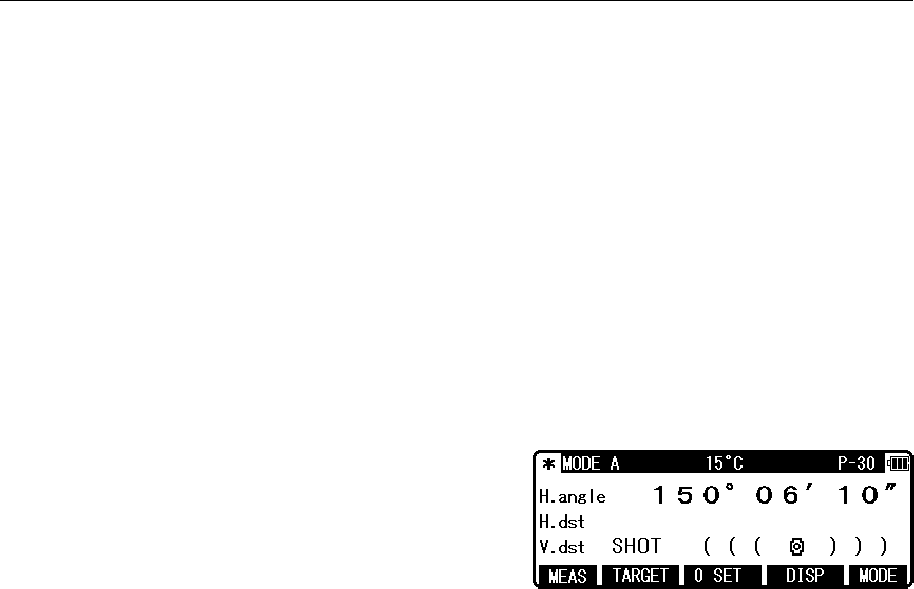
5.6 Changing the horizontal angle from clockwise to counter
clockwise
Press [F5] [MODE] to enter MODE B.
Press [F2] [ANG SET] to display the Angle setting
screen.
Press [F4] [ ] to move the cursor to
“3. R/L REVERSE”.
Press [F5] [SELECT] to add a minus sign (-) to the
horizontal angle value as a counter clockwise angle.
• To return the horizontal angle from counter clockwise to clockwise, also take the above
same procedures, press [F5] [SELECT] to select the clockwise angle.
• When the counter clockwise horizontal angle is selected, the order of aiming at the targets
becomes the reverse (the right one first, then the left one) of the order for the clockwise
angle.

41
6. DISTANCE MEASUREMENT
6.1 Target setting
The target mode and its Constant of current setting
are shown at the left of the battery mark. For
example in case of each Constant 0, Reflectorless
(Non-Prism); N 0, Prism; P 0
Pressing [F2] [TARGET] changes the target mode.
• The target mode is changed sequentially as follows.
Reflector sheet - Prism - Reflectorless
• The selected target mode is stored in the memory even if the power is turned off.
So, next time you can use the same mode after turning on.
• The target Constant differs according to the selected target mode. So, confirm the target
mode and its Constant shown at the top screen after changing the target.
[Distance measurement by reflectorless (Non-Prism) mode]
• The measurement range and accuracy of Reflectorless are based on the condition that laser
beam is emitted perpendicular to the white side of the Kodak Gray Card.The measurement
range may be influenced by the shape of the target and its environment.There is a
possibility that the range may vary when the target does not satisfy the conditions above at
survey work.
• Pay attention to the following in case of distance measurement by Reflectorless.
In case of resulting in low accuracy, perform the distance measurement by Prism.
• The CODE number 521 [LONG RANGE MES.] shows ON/OFF.
• The WARNING (Laser Power) screen is displayed when Message ON is selected, and then
[F1] [MEAS] key is pressed.
• Pressing [F1] [MEAS] one time selects “Second MEAS setting” and twice selects “QUIT”.
①There is a possibility that correct distance measurement may be impossible by dispersion or
reduction of laser beam when the laser beam comes into the target from diagonal angle.
②There is a possibility that the instrument cannot calculate correctly when receiving reflected
laser beam from forth and back directions in case of measuring the target on the road.
③There is a possibility that synthesized values are calculated and the distance may become
longer or shorter than the actual one when the operator measures the target of slope or
sphere or rugged shape.
④There is a possibility that the instrument cannot calculate correctly collecting the reflected
laser beam from a man or a car that comes and goes in front of the target.
[Distance measurement by reflector sheet mode]
Position the Reflector sheet whose reflecting surface faces the aiming line to be approx.
Right angle when the distance is measured by it. If it is positioned not to be approx.
Right angle, there is a possibility that correct distance measurement may be impossible by
dispersion or reduction of laser beam.
42
[Applied measurement range by each target mode]
• When a wrong target mode is selected, a correct distance cannot be measured.
Please select a correct target mode and measure.
• It is sometimes possible to measure without prism under special conditions like in the close
distance, targeting on a wall surface. However, there is a possibility including some errors
in this case, so be sure to select the reflectorless mode.
• The target constant should be correctly selected and confirmed in case that the reflector
sheet is used at the prism mode and the prism is used at the reflector sheet mode.
6.2 Distance measurement
The R-2500DN has two distance measurement modes of primary MEAS and second MEAS.
Pressing the [F1] [MEAS] one time goes to MEAS and twice goes to second MEAS.
You can freely select and allocate your desired measurement mode in primary MEAS and
second MEAS by the Initial Setting 2. The “MEASURE SHOT” is set at primary MEAS and
“TRACK CONT” is set at second MEAS as a Factory default setting.
• MEASURE SHOT means the distance measurement by the shot mode.
• MEASURE CONT means the distance measurement by the continuous mode.
• TRACK SHOT means the fast distance measurement by the shot mode.
• TRACK CONT means the fast distance measurement by the continuous mode.
Confirm the target constant before beginning the distance measurement.
Example: “MEASURE SHOT”at primary MEAS (Factory default setting)
Collimate the telescope at a target and press the [F1]
[MEAS] once to start measuring the distance. Once
distance measurement has been started, the distance
measurement mark remains displayed. Upon
reception of a reflected light from the target, the
instrument beeps and displays the mark to start the
shot measurement automatically.
• If the instrument is in MODE B, press the [F5] [MODE] to switch to MODE A and press
[F1] [MEAS].
• Pressing the [F1] [MEAS] after collimating the telescope at the prism starts shot distance
measurement with the “MEAS” text blinking. Distance measurement is completed and the
“MEAS” text stops blinking the moment the distance measured by shot measurement is
displayed. During continuous measurement, the “MEAS” text keeps on blinking. Pressing
the [F1] [MEAS] again terminates both distance measurement and blinking the “MEAS”
text.
• Pressing [F4] [DISP] cycles through the sets of display items:“H.angle/H.dst./V.dst.”,
“H.angle/V.angle/S.dst.”, and “H.angle/V.angle/H.dst./S.dst./V.dst.”
• Pressing the [ESC] or [F2] [TARGET] or [F5] [MODE] during distance measurement
stops it.
• If the shot count for distance measurement has been set to 2 or more in “Initial Setting 2",
the distance is measured for the specified number of times to display the averaged value.
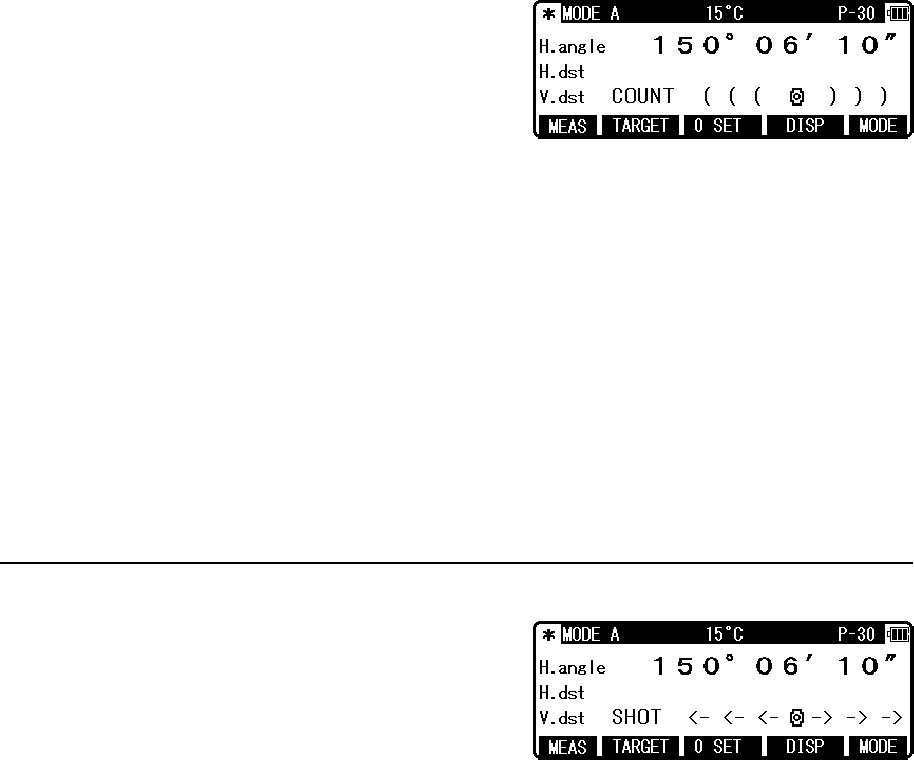
43
Example: “TRACK CONT” at second MEAS (Factory default setting)
Collimate the telescope at a Target and press [F1]
[MEAS] twice to start measuring the distance. Upon
reception of a reflected light from the target, the
instrument beeps and displays the mark to start the
TRACK distance measurement.
• If the instrument is in MODE B, press [F5] [MODE] to switch to MODE A and press [F1]
[MEAS ] twice.
• Pressing [F1] [MEAS] twice after collimating the telescope at the Target starts Continuous
distance measurement at fast speed with the “MEAS” text blinking.
It remains blinking during the measurement. If you press the [F1] [MEAS] again, Distance
measurement is completed and the “MEAS” text stops blinking.
• Pressing [F4] [DISP] cycles through the sets of display items:“H.angle/H.dst./V.dst.”,
“H.angle/V.angle/S.dst.”, and “H.angle/V.angle/H.dst./S.dst./V.dst.”
• Pressing the [ESC] or [F2] [TARGET] or [F5] [MODE] during fast distance measurement
stops it.
6.3 Quick mode
The Quick Mode is to shorten the measuring time
using prism or reflector sheet.
• The Quick Mode is effective to measure the distance up to 500m using prism or reflector
sheet.
• After selecting Quick Mode from the Quick Mode setting screen, the distance measurement
is done in Quick Mode.
• If the Quick Mode is selected, the distance measurement mark, "<-<- ->->", instead of
"((( )))", is displayed
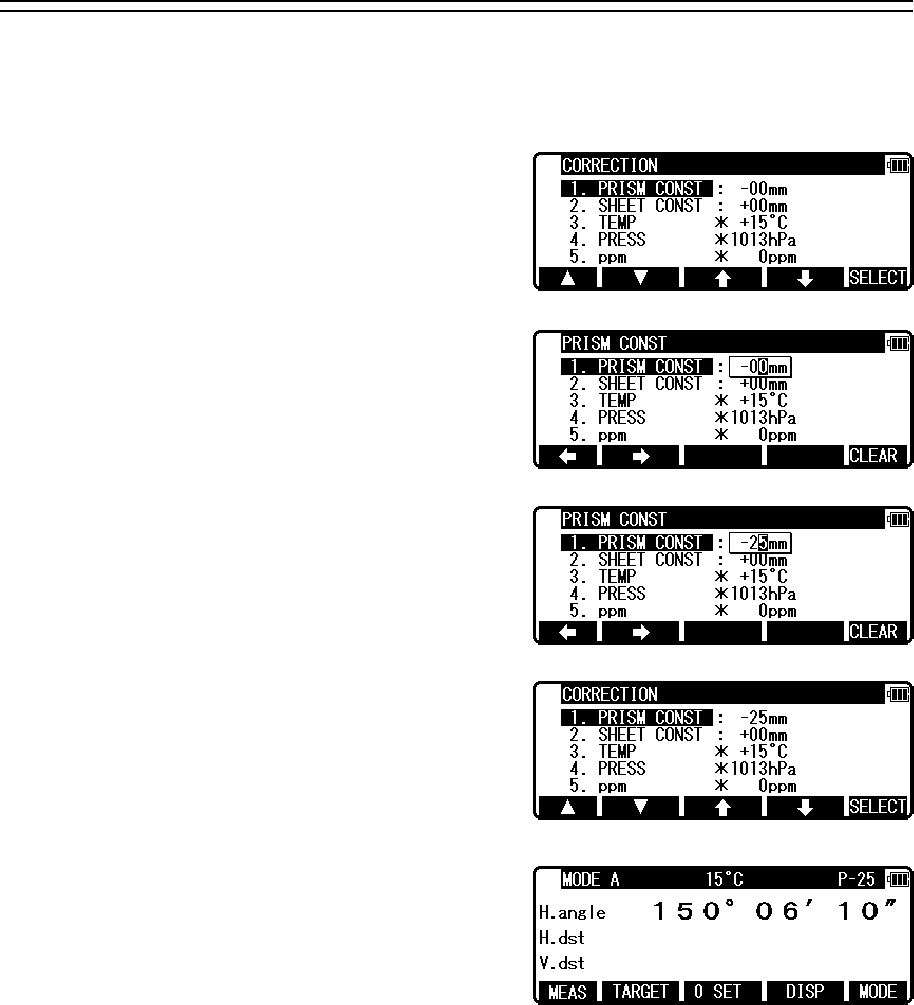
44
7. CORRECTION MODE
7.1 Changing the target constant
Changing the Target Constant can be performed only when the Reflector sheet and Prism
Constant setting are “INPUT” in Initial Setting 1.
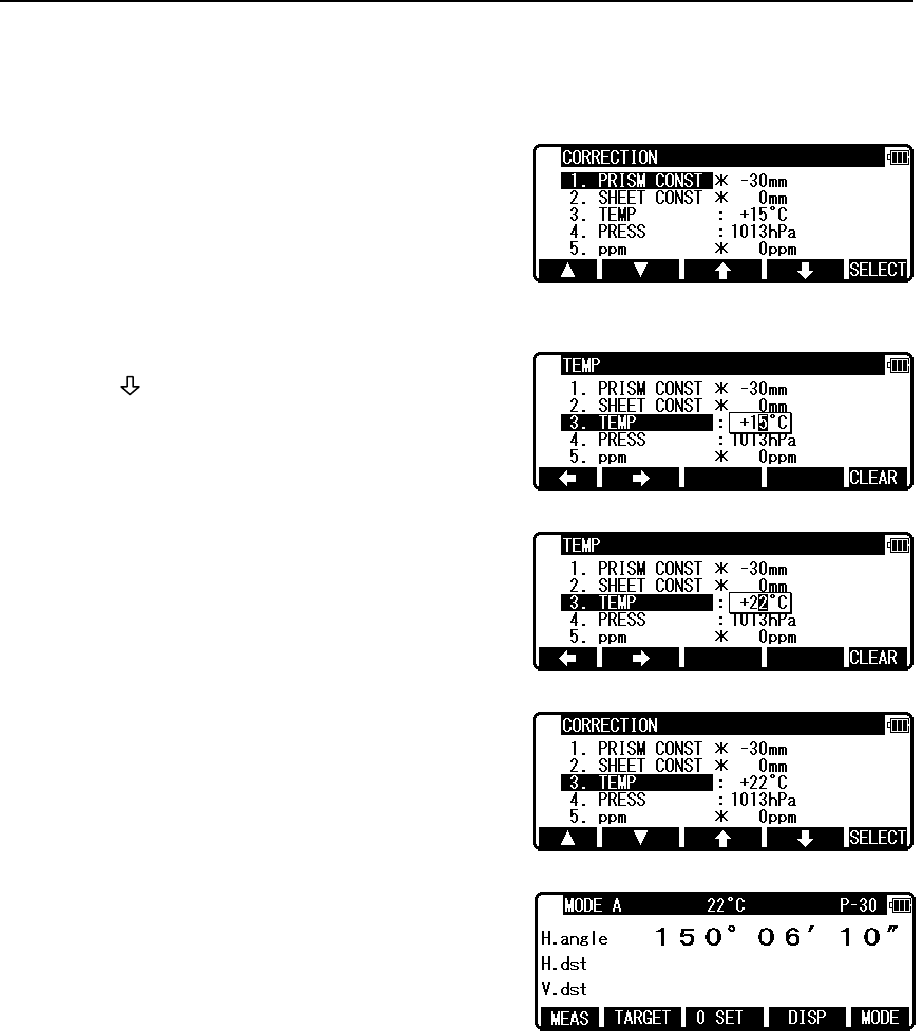
Example: Prism Constant - 25mm setting
Press [F4] [CORR] in MODE B.
(If the instrument is in MODE A,
press [F5] [MODE] to enter MODE B.)
Press the [F5] [SELECT] to enable
the Prism Constant to be changed.
Clear the exiting values by pressing [F5] [CLEAR].
Input -25 by pressing the numeric keys.
Press the [ENT] key to accept the Prism
Constant to -25mm.
Pressing the [ENT] key returns the instrument
to MODE A.
• To set the Reflector sheet constant to “0mm”select “0mm”for “SHEETCONST”in “Initial
Setting 1”
• To set the Prism constant to “0mm”or “-30mm” select “0mm” or “-30mm” for “PRISM
CONST” in “Initial Setting 1”.
• When the “Sheet Constant” has been set to “0mm” in “Initial Setting 1” and “PRISM
CONST” has been set to “0mm” or “-30mm”, “*” is displayed to the left of “0mm” or
“-30mm” on the correction menu screen. When “*” is on the screen, the Constant cannot be
changed (by entering a numeric key).
• Once set, the Reflector sheet Constant and Prism Constant remains on the measurement
screen as “S 0” or “P 0”.
• The factory initial of Reflector sheet Constant and Prism Constant are 0.
• Once set, each Constant remains in memory even after the power is turned off.
45
7.2 Changing the temperature
The temperature setting can be changed only when “ATM CORR” has been set to “ATM
INPUT” in “Initial Setting 1”.
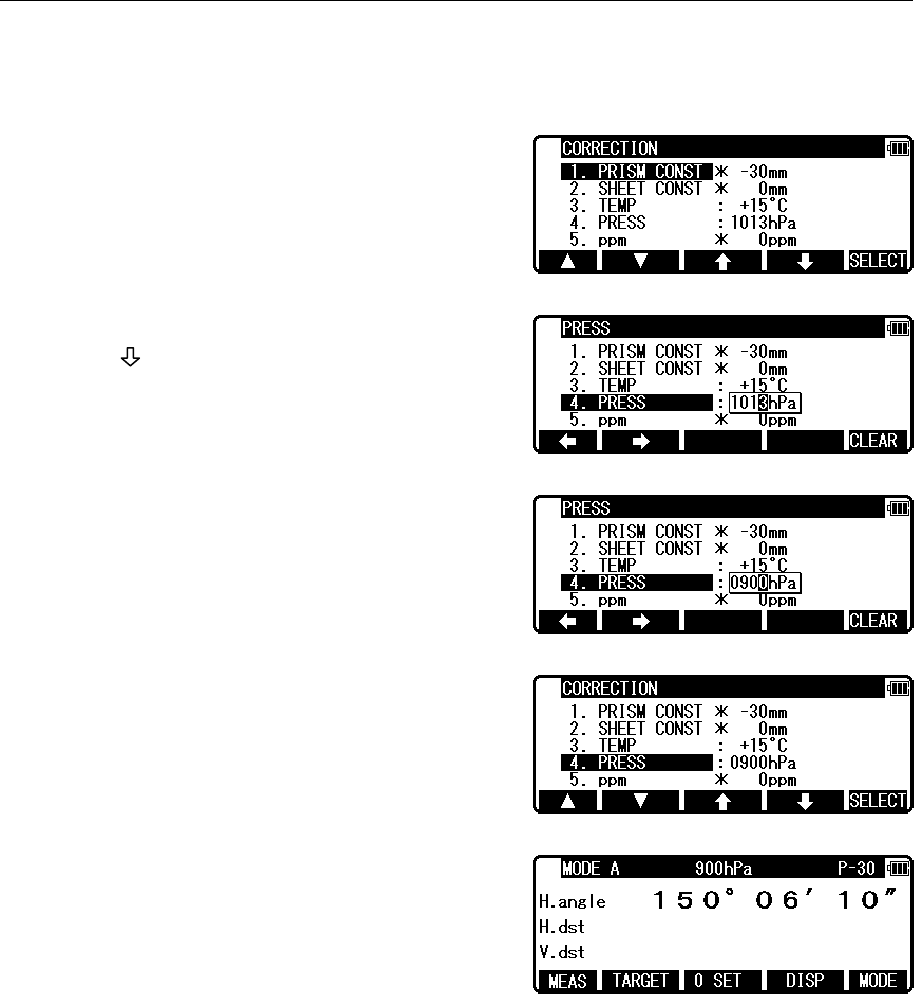
Example: Setting the temperature to +22°C
Press [F4] [CORR] in MODE B.
(If the instrument is in MODE A,
press [F5] [MODE] to enter MODE B.)
Press [F4] [ ] to move the cursor to “3.TEMP”
and press the [F5] [SELECT] to enable the
temperature to be changed.
Clear the exiting values by pressing [F5] [CLEAR].
Input 22 by pressing the numeric keys.
Press the [ENT] key to accept the
temperature to +22°C.
Pressing the [ENT] key returns the instrument to
MODE A.
• The valid range of Temperature input is from -30°C to +60°C.
• When “ATM CORR” in “initial setting 1” has been set to “3. NIL”, “*” is displayed to the
left of the temperature value on the correction menu screen. When “*” is on the screen, the
temperature cannot be changed. If “ATM CORR” in “initial setting 1” has been set to “2.
ppm INPUT”, no temperature is displayed on the correction menu screen.
• Once set, the temperature is displayed at the centre of the top of the measurement screen.
• The factory initial of temperature is “+15°C”.
• Once set, the temperature remains in memory even after the power is turned off.
• Temperature correction is based on 15°C.
If this instrument is used without correcting the temperature, a distance error per 100m is
46
about -0.1mm per +1°C as a temperature difference from 15°C.
A distance error per 100m is about 0.1mm per -1°C as a temperature difference from 15°C.
(For more accurate values, See “13.4 Error when no atmospheric correction is made”.)
7.3 Changing the atmospheric pressure
The atmospheric pressure setting can be changed only when “ATM CORR” has been set to
“ATM INPUT” in “Initial Setting 1”.
Example: Setting the pressure to 900hPa
Press [F4] [CORR] in MODE B.
(If the instrument is in MODE A,
press [F5] [MODE] to enter MODE B.)
Press [F4] [ ] to move the cursor to “4.PRESS”
and press the [F5] [SELECT] to enable
the temperature to be changed.
Clear the exiting values by pressing [CLEAR] key.
Input 900 by pressing the numeric keys.
Press the [ENT] key to accept the
PRESS to 900hPa.
Pressing the [ENT] key returns
the instrument to MODE A.
• The valid range of Pressure input is from 600 to 1120hPa. (420 - 840mmHg)
• When “Atmospheric Correction” in “Initial Setting 1” has been set to “3. NIL”, “*” is
displayed to the left of the pressure value on the correction menu screen.
When “*” is on the screen, the pressure cannot be changed.
If “ATM CORR” in “Initial Setting 1” has been set to “2.ppm INPUT”, no pressure is
displayed on the correction menu screen.
• Once set, the pressure is displayed at the centre of the top of the measurement screen.
• The factory initial of pressure is “1013hPa”.
• Once set, the pressure remains in memory even after the power is turned off.
47
• Pressure correction is based on 1013 hectopascals (hPa).
• If this instrument is used without correcting the pressure, a distance error per 100m is about
-0.3mm per -10hPa as a pressure difference from 1013hPa.
(For more accurate values, see “13.4 Error when no atmospheric correction is made”.)
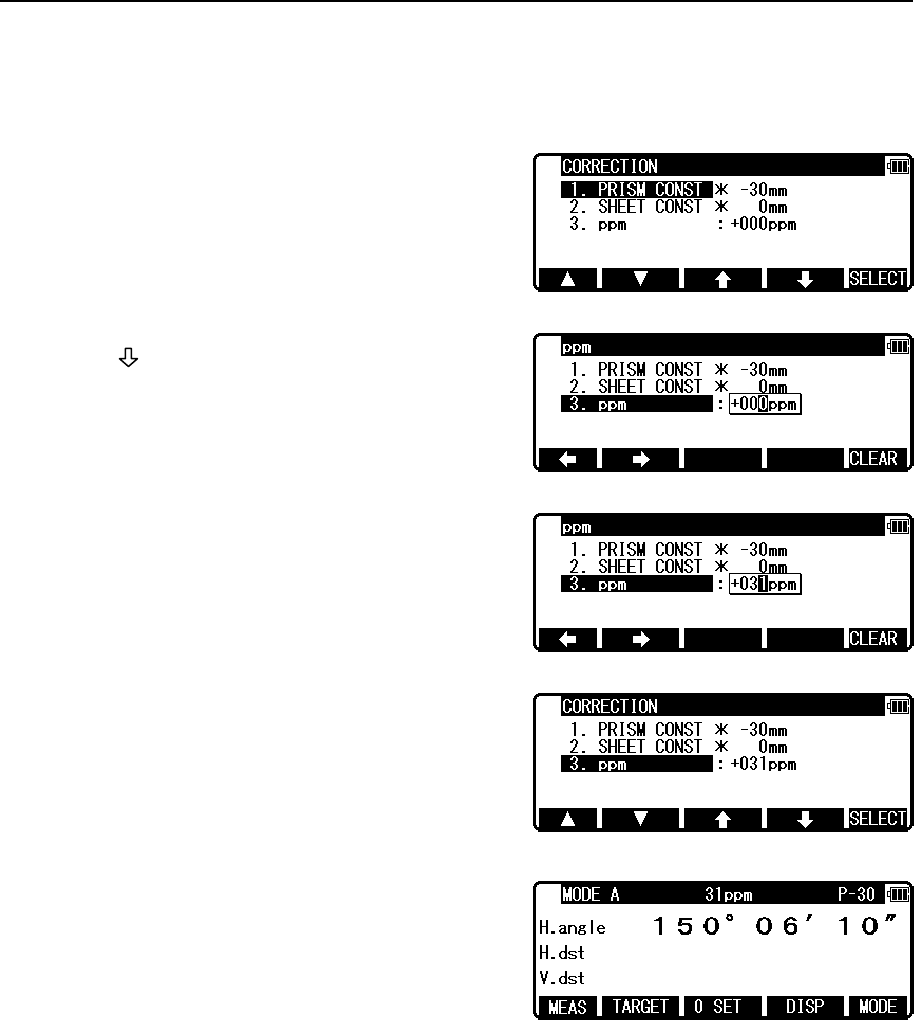
7.4 Changing the ppm value
The ppm value can be changed only when “ATM CORR ” has been set to “ppm INPUT” in
“Initial Setting 1”. “TEMP” and “PRESS” are not displayed.
Example: Setting the ppm value to 31 ppm
Press [F4] [CORR] in MODE B.
Press [F4] [ ] to move the cursor to “3. ppm”
and press the [F5] [SELECT] to enable the
temperature to be changed.
Clear the exiting values by pressing [CLEAR] key.
Input 31 by pressing the numeric keys.
Press the [ENT] key to accept the
PPM to 31ppm.
Pressing the [ESC] key returns
the instrument to MODE A.
• The valid range of ppm values is from -199 to +199.
• Once set, the ppm value is displayed at the centre of the top of the measurement screen.
• The factory initial of ppm value is “0”.
• Once set, the ppm value remains in memory even after the power is turned off.
48
8. INITIAL SETTING
8.1 Overview
For the R-2500DN, you can select and save the desired setting for a variety of prescribed
instrument conditions, called Initial Setting.
The Initial Setting is saved in six modes,“Initial Setting 1”, “Initial Setting 2”,
“Initial Setting 3”, “ initial setting 4”, “Initial Setting 5”, and “Setting of Date and Time ” in
which you can select and save the instrument conditions described below.
The factory default for each of these conditions is marked by .
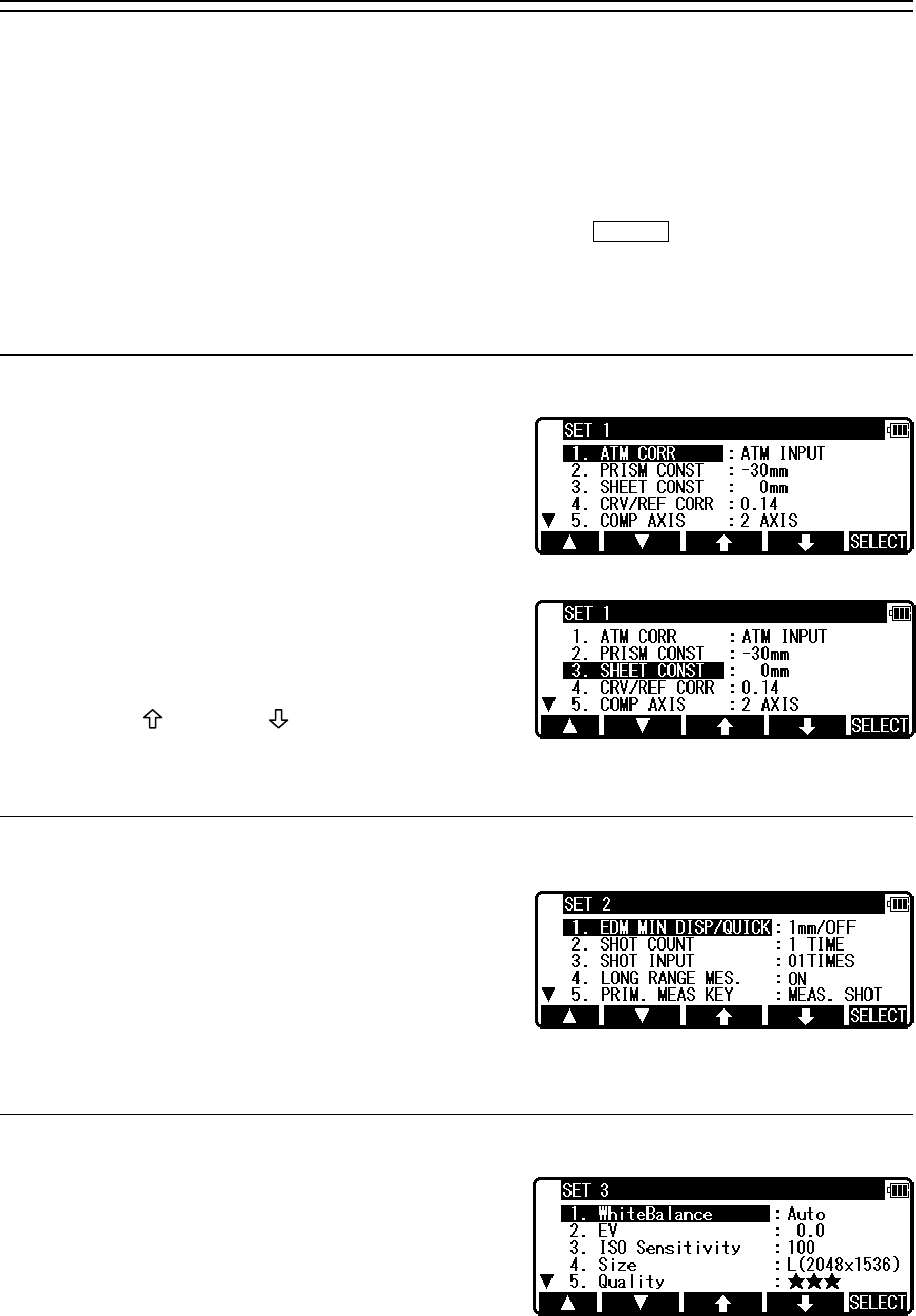
To change initial setting, follow the operating procedures for entering each initial setting
mode in “8.2” and the operating procedures for changing an Initial Setting on “8.2”.
8.2 Entering the mode for initial setting 1
Press the [POWER] key while holding [F1] key
down to access the screen for Initial Setting 1.
• Pressing [F1] [ △ ] scrolls it up fiveitems;
pressing [F2] [ ▽ ] scrolls the screen down five
items.
• Press [F3] [ ] or [F4] [ ] to position the
cursor at the item of interest.
8.3 Entering the mode for initial setting 2
Press the [POWER] key while holding [F2] key
down to access the screen for Initial setting 2.
• Select the item of interest in the same way as
in the mode for Initial setting 2.
8.4 Entering the mode for initial setting 3
Press the [POWER] key while holding [F3] key
down to access the screen for Initial setting 3.
• Select the item of interest in the same way as
in the mode for Initial setting 3.
49
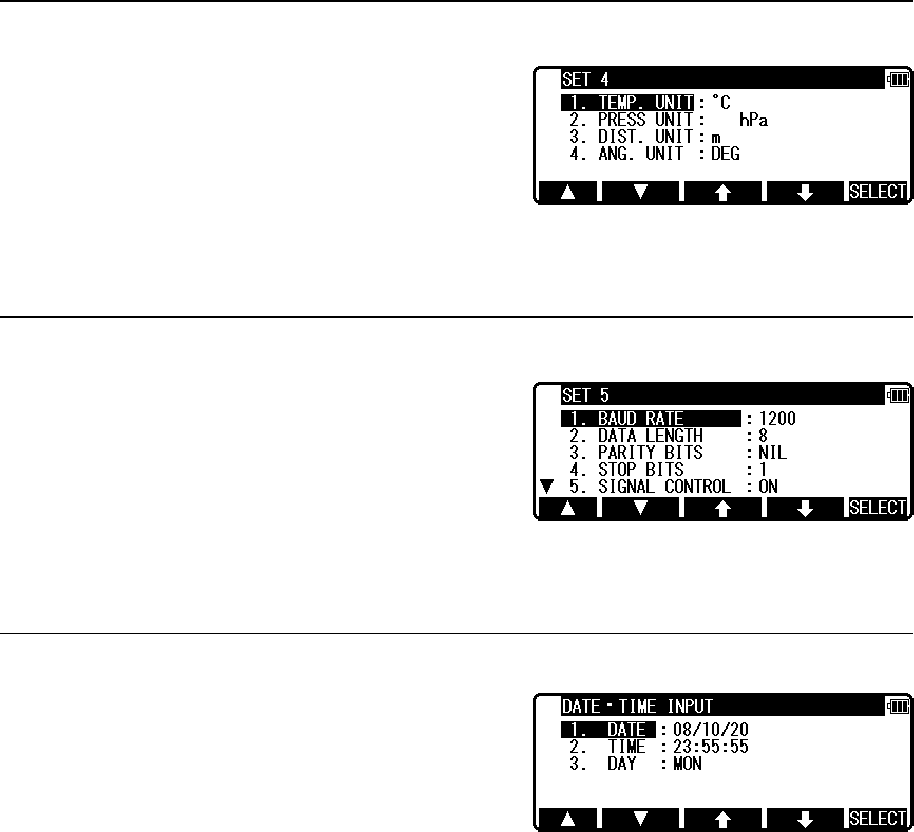
8.5 Entering the mode for initial setting 4
Press the [POWER] key while holding [F4] key
down to access the screen for Initial setting 4.
• Select the item of interest in the same way as in the mode for Initial setting 4.
8.6 Entering the mode for initial setting 5
Press the [POWER] key while holding [F5] key
down to access the screen for Initial setting 5.
• Select the item of interest in the same way as in the mode for Initial setting 5.
8.7 Entering the mode for setting of date and time
Press the [POWER] key while holding [F3]+[F4]
key down to access the screen for Date・Time Input.
50
8.8 Example of changing an initial setting content
(selection of atmospheric correction)
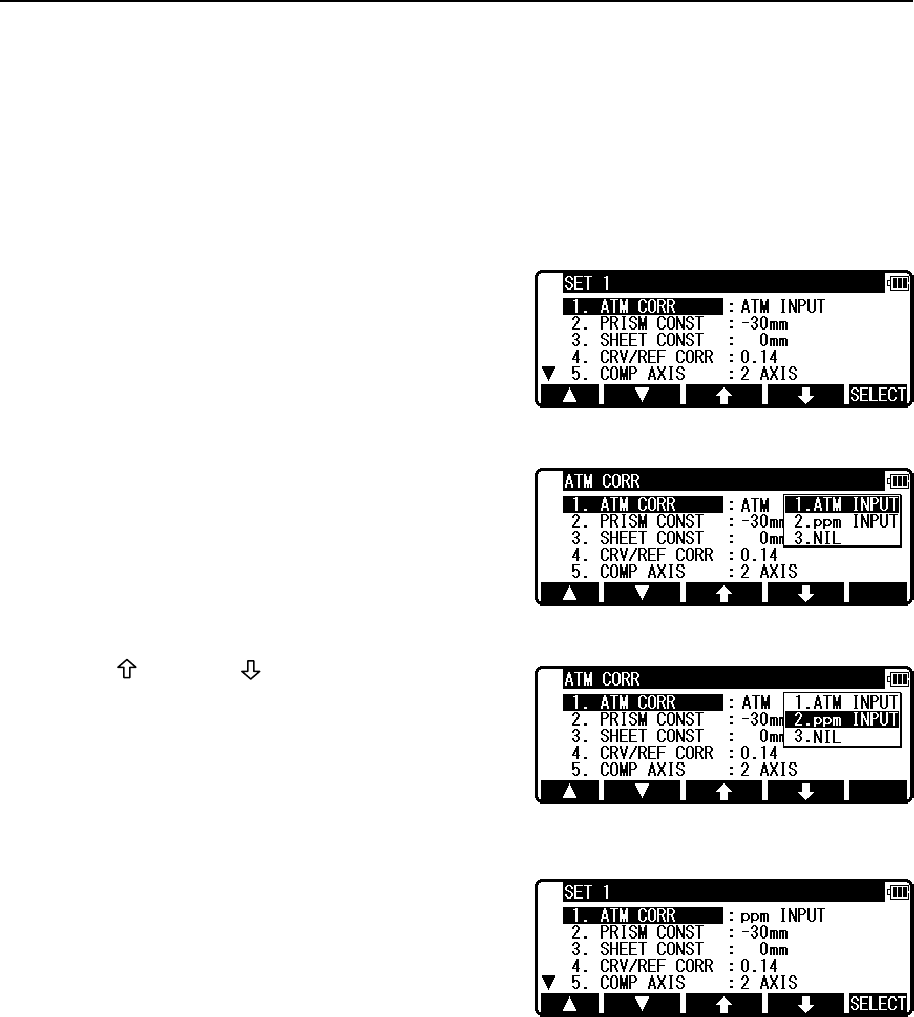
This section describes the operating procedures for selecting “1.ATM CORR” in initial
setting 1 as an example of changing an Initial Setting content. Use this example as a reference
when changing other items because it is also applicable to the operating procedures for
changing them.
Access the screen for Initial Setting 1 by taking
procedures “8.2 Enter the mode for Initial Setting 1”.
Press [F5] [SELECT] to open the screen for selecting
the atmospheric correction.
Press [F3] [ ] or [F4] [ ] to position the cursor
at the desired item, then press [ENT] key to select
that item.
Pressing the [ENT] key settles the change of selected
item. Pressing the [ESC] key invalidates the change
of selected item.
Pressing again the [ESC] key or [ENT] key quits the
initial setting screen and usual start screen appears.
51
8.9 Initial setting 1
1. Selection of Atmospheric Correction: [ATM CORR]
Select whether Atmospheric Correction is to be performed
by entering the atmospheric temperature and pressure,
by entering ppm value, or by fixing the ppm value to 0
(NIL) not to perform Atmospheric Correction.
2. Selection of Prism Constant: [PRISM CONST]
Select whether the Prism Constant to be input is set to
0mm, -30mm or to an arbitrary value to be entered from
the keyboard.
3. Selection for Reflector sheet Constant
: [SHEET CONST]
Select whether the target constant to be input is set to 0mm,
or to an arbitrary value to be entered from the keyboard.
4. Selection for Refraction & Curvature Corrections
: [CRV/REF CORR]
Select whether the correction factor to be input for both
differences (Refraction, Curvature) is set to 0.14, 0.2 or
none (NIL). Selecting “3. NIL” results in no correction of
both values.
5. Selection of Tilt Compensation: [COMP AXIS]
Select whether Tilt Compensation is to be single-axis
(ON) or disabled (OFF)
6. Selection of Atmospheric corrections display: [ATM CORR DISP.]
Select whether to display the atmospheric corrections in the title
bar of the measure screens or not.
• The factory default for each instrument condition is marked by .
X1.-30mmXaXXXXXX
2. 0mm
3.INPUT
X1. 0mmXaXXXXXX
2. INPUT
X1.0.14 XaXXXXXX
2.0.2
3.NIL
X1.ATM INPUTXXXX
2.ppm INPUT
3.NIL
X1.2 AXISXXXXXXX
2.1 AXIS
3.NIL
X1.OFF XaXXXXXX
2.ON
52
8.10 Initial setting 2
1. Selection of the Minimum Distance measurement unit
and Quick Mode : [EDM MIN DISP/QUICK]
More fine angle view is necessary, select 0.1mm,
Besides that, select 1mm/OFF.
When using Quick Mode, select 1mm/ON.
2. Selection of the Shot count: [SHOT COUNT]
Select whether the shot count for Shot distance
measurement is to be 1,3, 5 or an arbitrary count to be
entered.
3. Setting the Shot input: [SHOT INPUT]
Set the shot number for Shot distance measurement.
• The valid range of values for the shot number is from 1 to 99.
• This setting is enabled only when the shot number (Above 2.)
has been set to “4. INPUT”.
4. Selection of Laser plummet : [LD PLUM.]
Laser plumb ON/OFF is selected.
5. Selection of Long range message
: [LONG RANGE MES.]
If you need the long range message.
6. Selection of primary MEAS setting
: [PRIM. MEAS KEY]
Select whether the primary distance measurement is
MEAS SHOT or MEAS CONT or TRACK SHOT or
TRACK CONT.
7. Selection of second MEAS setting : [SEC. MEAS KEY]
Select whether the second distance measurement is
TRACK CONT or TRACK SHOT or MEAS CONT or
MEAS SHOT.
8. Selection of Minimum angle display: [MIN UNIT ANG.]
Select whether to set the minimum angle display mode to
“COARSE (5 seconds)” or “FINE (1 second)”.
01TIMES
X1.1 TIMEXXXXXXX
2.3 TIMES
3.5 TIMES
4.INPUT
X1.1mm/OFFXXXXXX
2.1mm/ON
3.0.1mm
X1.ON XaXXXXXX
2.OFF
X1.MEAS. SHOTXXX
2.MEAS. CONT
3.TRACK SHOT
4.TRACK CONT
X1.TRACK CONTXXX
2.TRACK SHOT
3.MEAS. CONT
4.MEAS. SHOT
1.COARSE
X2.FINEXXXXXXXXX
X1.OFF XaXXXXXX
2.ON

53
9. Selection of Vertical angle style: [V.ANG. STYLE]
Select whether the 0 point for vertical angle is set to be
“Z.0”, “H.0” or “COMPAS”.
10. Selection of Automatic power-off function
: [AUTO OFF]
Select the time interval (10, 20 or 30 minutes) for
activating the automatic power-off function, or select NIL,
disabling the function.
• The automatic power-off function automatically turns the
power supply off after the specified period of time (in
minutes) when no operation for distance measurement or
for key entry has been performed with the angle remaining
unchanged.
11. Selection of Distance measurement automatic power-
off function: [EDM OFF]
Select the time interval (3, 5, or 10 minutes) for activating
the distance measurement automatic power-off function,
or select NIL, disabling the function.
12. Selection of Automatic illumination power-off
function : [ILLU. OFF]
Select the time interval (3, 5, or 10 minutes) for activating
the automatic illumination power-off function, or select
NIL, disabling the function.
13. Selection of Distance measurement buzzer
: [DIST. BUZ]
Select whether to enable or disable the beep when the
prism receives a light during distance measurement or
during repeated distance measurement.
14. Selection for H.angle 90° buzzer: [QUAD. BUZ]
Select whether to enable or disable the beep at every 90°
during angle measurement.
15. Selection of Distance measurement signal
: [MEAS. SIGNAL]
Select whether to display a signal indicator or AIM value
to be displayed from when distance measurement is started
to when measured data is displayed.
X1.Z.0 XXXXX
2.H.0
3.COMPAS
X1.10 MIN XXX
2.20 MIN
3.30 MIN
4.NIL
X1. 3 MIN XXX
2. 5 MIN
3.10 MIN
4.NIL
X1. 3 MIN XXX
2. 5 MIN
3.10 MIN
4.NIL
X1.ON XaXXXXXX
2.OFF
X1.OFF XaXXXXXX
2.ON
X1.MARK XaXXXXXX
2.VALUE
54
16. Selection of Priority Display: [PRIORITY DISP.]
Select the display order of the sets of display items which
pressing the [DISP] key cycles through. The set of display
items selected here appears first after the power is turned
on.
8.11 Initial setting 3
Refer to 10.6 Adjust ing the camera settings.
8.12 Initial setting 4
1. Selection of Temperature unit setting: [TEMP. UNIT]
Select °C or °F as the unit for Temperature.
2. Selection of Pressure unit setting: [PRESS UNIT]
Select hPa (hectopascal), mmHg, inchHg as the unit for
pressure to be input.
3. Selection of Distance unit setting: [DIST. UNIT]
Select m or ft or ft+inch as the unit for Distance.
4. Selection of Angle unit setting: [ANG. UNIT]
Select DEG or DEC or GRD or MIL as the unit for Angle.
8.13 Initial setting 5
Selection of Communication Setting: [COMM.SELECT]
Select RS-232C or Bluetooth.
X1.゚ CXXXXXXXXXX
2.゚ F
X1. hPa XXXXX
2. mmHG
3.inchHG
X1.m XXXXX
2.ft
3.ft+inch
X1.DEG XXX
2.DEC
3.GRD
4.MIL
1.HA VA VD
2.HA VA SD
3.HA VA HD SD VD
X1.RS-232C XXX
2.Bluetooth

55
1. Selection of Transfer rate (baud rate): [BAUD RATE]
Select a baud rate of 1200, 2400, 4800 or 9600.
2. Selection of Data bits: [DATA LENGTH]
Select a data length of 8 bits.
3. Selection of Parity: [PARITY BITS]
Select no (NIL) parity bit, even parity or odd parity.
4. Selection of Stop bit: [STOP BITS]
Select the number of stop bits to be used: 1 or 2.
5. Selection of Control signal: [SIGNAL CONTROL]
Select whether the control signal is effective or not.
6. Selection of XON/XOFF: [XON/XOFF]
Select whether to enable or disable XON/XOFF.
7. Selection of Through command
: [THROUGH COMMAND]
Select whether to disable data output
without receiving any data request command
or enable the “a” to “f” command data output.
X1.1200 XXX
2.2400
3.4800
4.9600
X1.8XXXXXXXXXXXX
X1.NIL XXXXX
2.EVEN
3.ODD
X1.1 XaXXXXXX
2.2
X1.ON XaXXXXXX
2.OFF
X1.ON XaXXXXXX
2.OFF
X1.NILXXXXXXXXXX
2.a
3.b
4.c
5.d
6.e
7.f

56
8.14 Setting of date and time
1. Input of date
Set date using [numeric keys].
Year / month / date
2. Input of time
Set time using [numeric keys].
Time : minute : second
3. Selection of week day
Select week day.
• The date clock is powered by the built-in lithium battery. The lithium battery needs to be
replaced in five years. When the message “Li-batt.voltage s low.” is shown on the display
screen, have the lithium battery replaced by the dealer from whom the instrument was
purchased. The timing of battery replacement varies depending on the frequency of use and
the environment where the instrument is stored while not in use.
1.SUN
2.MON
3.TUE
X4.WEDXXXXXXXXXX
5.THU
6.FRI
7.SAT
08/12/24
00:00:01
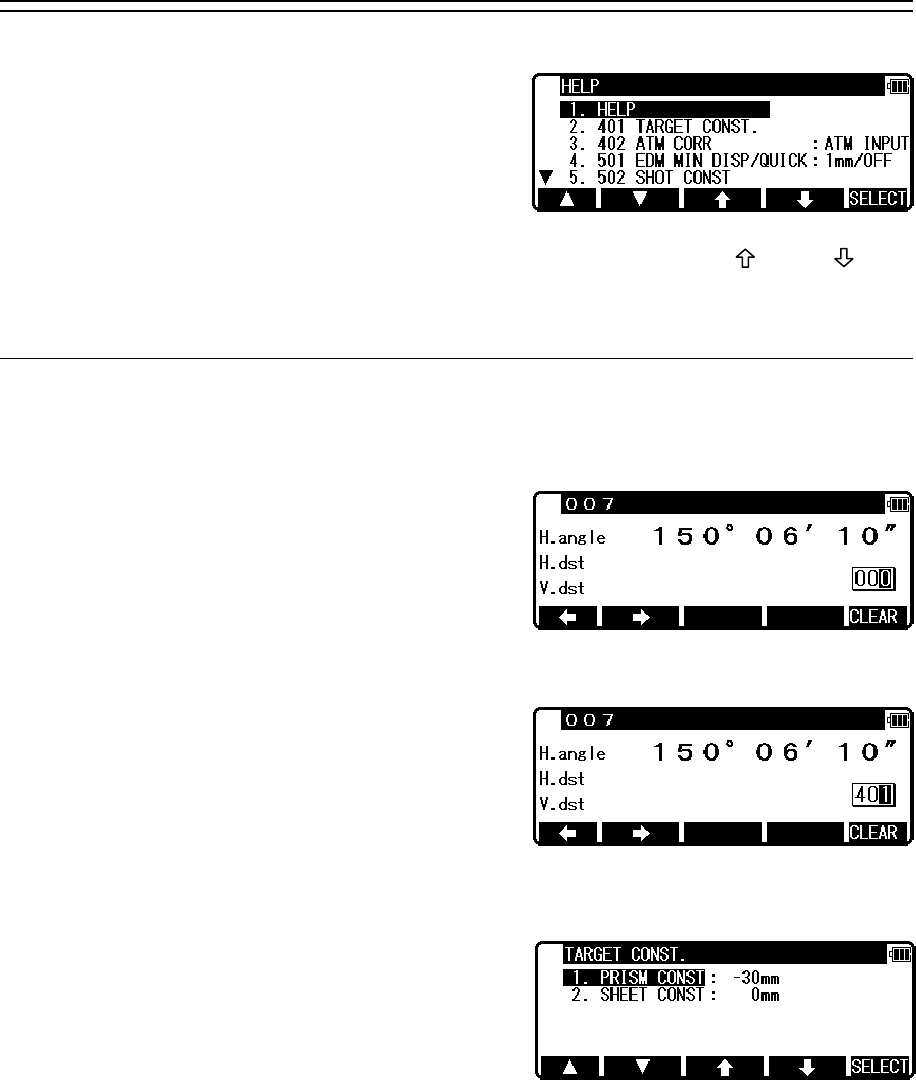
57
9. ACCESSING THE FUNCTIONS
9.1 Accessing by help key
You can use the [HELP] key to display specific
initial setting (such as the prism constant and priority
mode).
Press the [lLLU]+[ESC] key in MODE A or B.
The help menu will then be displayed. Press [F1] [ △ ] [F2] [ ▽ ] or [F3] [ ] [F4] [ ] to
position the cursor to the desired item.
9.2 Accessing by 007
The R-2500DN allows you to enter a special code of 007 with the alphanumeric keys to
display specific initial setting.
Press the numeric keys [0] [0] [7] in MODE A or B.
The screen will then change to the command input
screen.
Press the numeric keys for the desired command
number in the Command No. Table.
(For example, press [4] [0] [1] for TARGET
CONST.)
Press the [ENT] key to access the TARGET
CONST.

58
[Instrument setting items]
007 HELP menu list Default Other options
PRISM CONST -30mm 0mm, INPUT 401 TARGET CONST SHEET CONST 0mm INPUT
402 ATM CORR AUTO
※R-2501DN, R-2502DN
ATM INPUT,
※R-2503DN, R-2505DN
ATM INPUT,
ppm INPUT,
NIL
501 EDM MIN DISP/QUICK 1mm/OFF 1mm/ON, 0.1mm
SHOT COUNT 1TIME 3TIMES, 5TIMES, INPUT502 SHOT COUNT SHOT INPUT 01TIMES (input)
503 CRV/REF CORR. 0.14 0.2, NIL
504 MIN UNIT ANG. FINE COARSE
505 V.ANG. STYLE Z.0 H.0, COMPAS
508 DIST. BUZ. ON OFF
509 QUAD BUZ. OFF ON
510 AUTO OFF 10 MIN 20 MIN, 30 MIN, NIL
511 EDM OFF 3 MIN 5 MIN, 10 MIN, NIL
512 ILL. OFF 3 MIN 5 MIN, 10 MIN, NIL
514 MEAS. SIGNAL MARK VALUE
PRIM. MEAS KEY MEAS. SHOT MEAS. CONT, TRACK
SHOT, TRACK CONT
SEC. MEAS KEY TRACK CONT TRACK SHOT, MEAS.
CONT, MEAS. SHOT
515 PRIORITY SELECT
PRIORITY DISP. HA/HD/VD HA/VA/SD,
HA/VA/HD/SD/VD
517 COMP AXIS 3 AXIS
※R-2501DN, R-2502DN
2 AXIS
※R-2503DN, R-2505DN
2 AXIS
1 AXIS,
NIL
LD PLUM. & E.VIAL LD PLUM. OFF ON
TILT DISP OFF ON
520
TILT DISP UNIT COARSE FINE
521 LONG RANGE MES. ※when target is Refless ON OFF
523 ATM CORR DISP ※ R-2503DN,R-2505DN only OFF ON
TEMP. UNIT ゚ C ゚ F 701 ATM UNIT PRESS UNIT hPa mmHg, inchHg
702 DIST. UNIT m ft, ft+inch
703 ANG. UNIT DEG DEC, GRD, MIL
BAUD RATE 1200 2400, 4800, 9600
DATA LENGTH 8
PARITY BITS NIL EVEN, ODD
STOP BITS 1 2
SIGNAL CONTROL ON OFF
XON / XOFF ON OFF
801 SETUP COM.
THROUGH COMMAND NIL a, b, c, d, e, f
802 COMM.SELECT RS-232C Bluetooth
901 LOGIN PASSWORD OFF ON
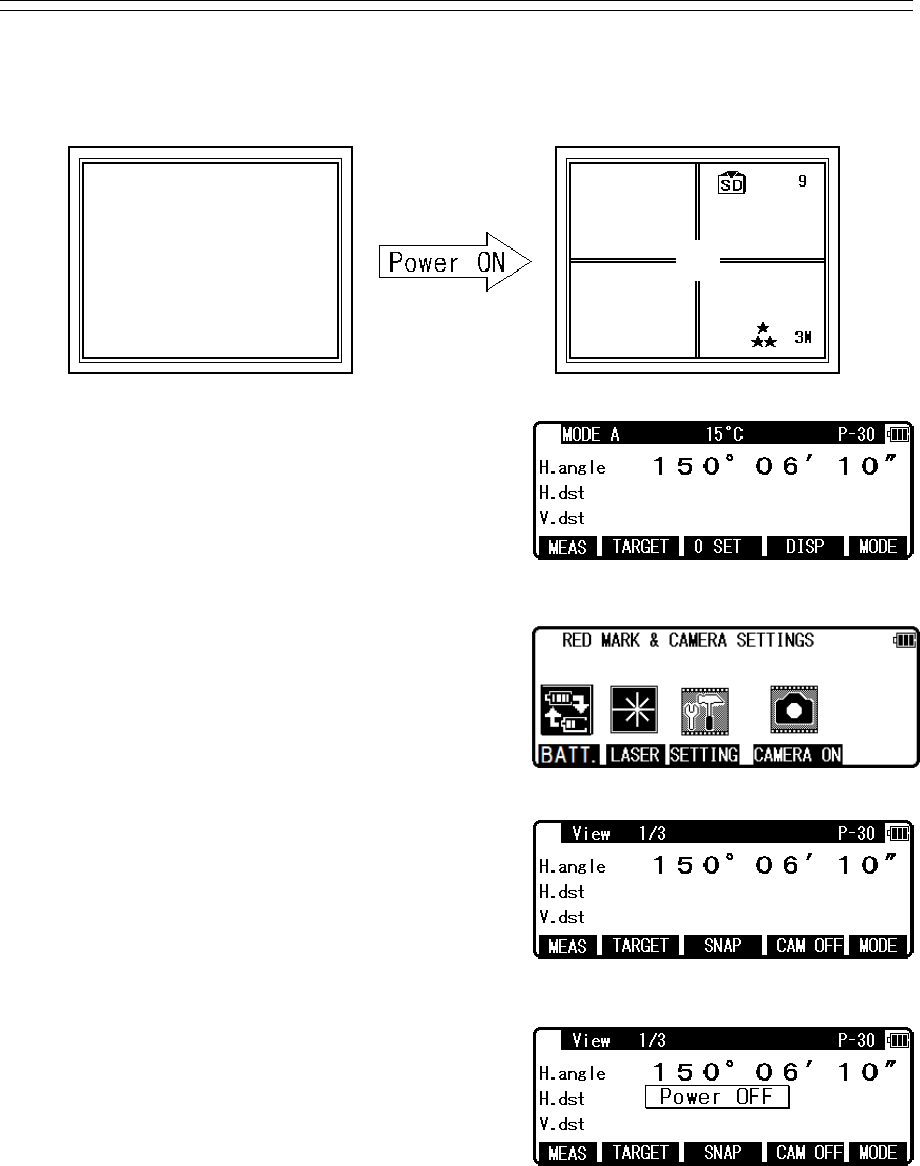
59
10. DIGITAL CAMERA
10.1 Turning the camera On and Off
[Turning the camera On]
Press [Laser/Camera] key to display “RED MARK
& CAMERA SETTINGS” screen.
Press [F4] [CAMERA ON] key to activate the
camera function.
Once the camera is activated, the screen on the title
bar and the function keys are changed to those of the
camera mode. “View 1/3” is displayed on the title
bar for the first screen.
[Turing the camera Off]
Press [F4] [CAM OFF] key in View1/3 screen to
turn the camera function off.
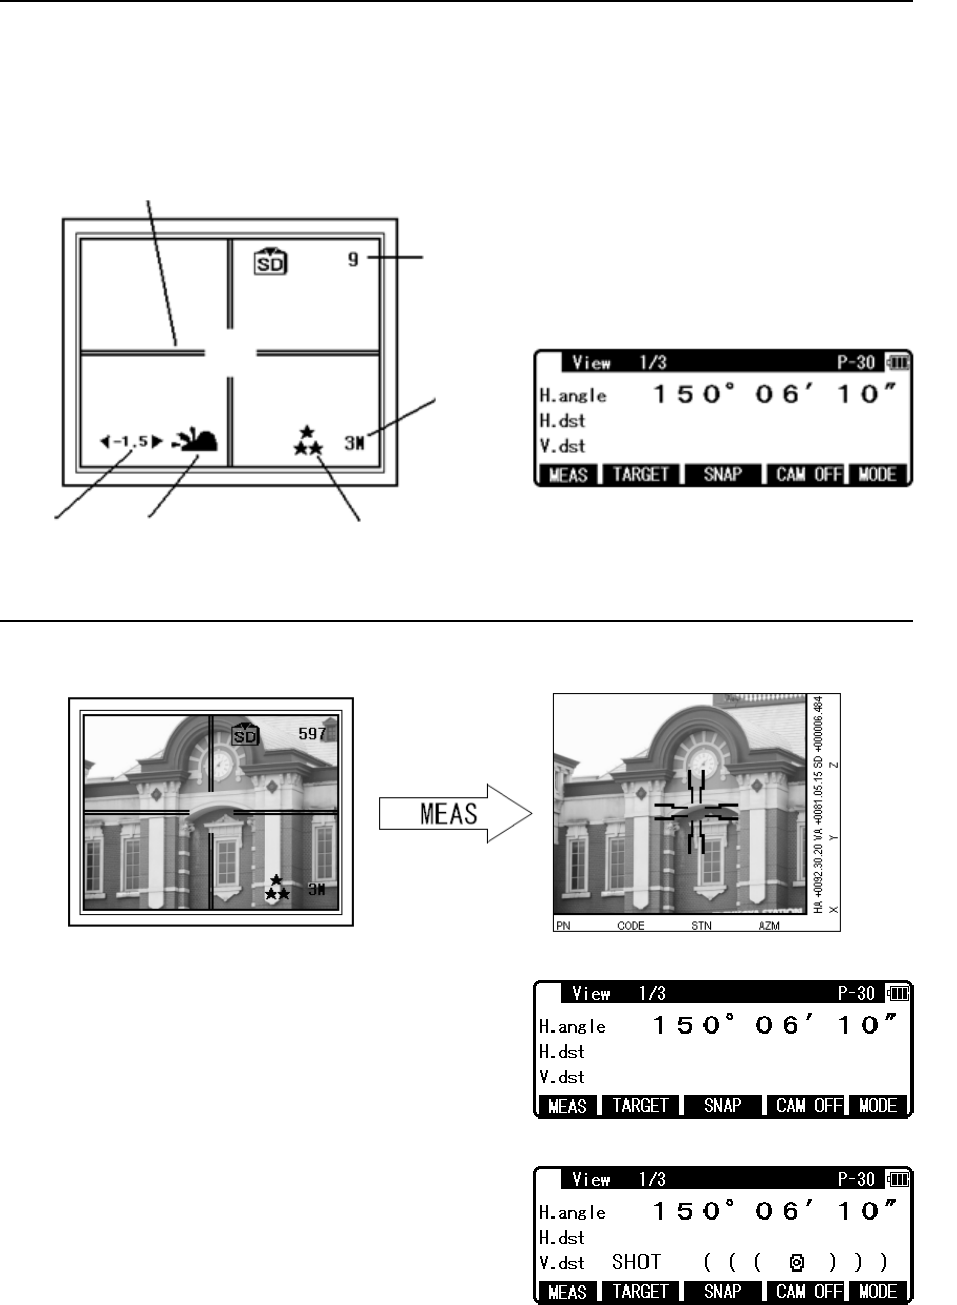
60
Closs Line
The rumber of sheets
you can photograph
Size
Quality White Balance
EV
10.2 Taking pictures
Take a picture in the View mode, which is the first display when the camera is activated.
In the View mode, the function keys are switched to View1/3, View2/3, and View3/3 in that
by every pressing [F5] [MODE] key.
10.2.1 Taking pictures and measuring distance at the same time
Sight the target by the telesope.
Press [F1] [MEAS] key to measure the distance.
Set the line of sight of the telescope onto a target and
press the [F1] [MEAS] once to start measuring the
distance. When distance measurement has been
started, the distance measurement mark remains
displayed. After receiving reflected light from the
target, the instrument beeps and displays the mark to
start the shot measurement automatically.
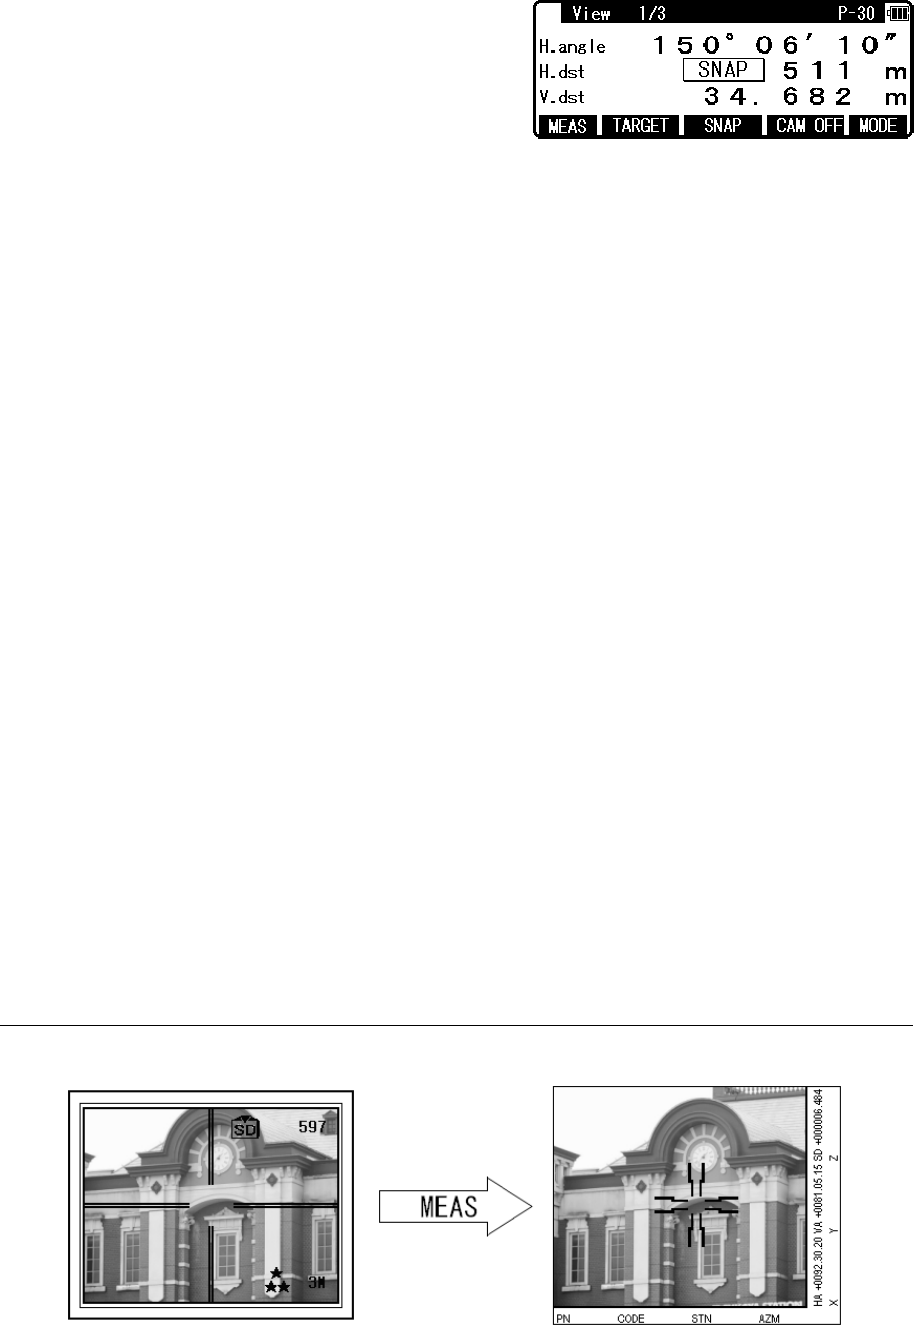
61
The picture is taken and the image is stored in the
memory at that time.
[F1] [MEAS] is allocated as a function in the View1/3 display.
To measure the distance and take pictures simultaneously, “15. Auto Snap” in the camera
setting must be set to ON. Only distance measurement is carried out if [15.Auto Snap] is set
to OFF. (Refer to 10.6 Adjusting the Camera Setting – 15.Auto Snap)
The picture is taken after the end of distance measurement. Therefore, do not move the
telescope until the shot is completed.
You can sight the target approximately while looking at the View Mode screen, but you
cannot sight the target accurately since the telescope and the camare are not on the same
optical axis and both axis are not parallel. The optical axis of the telescope is always
positioned slightly below the centre of View mode screen. Make sure to use the camera
display for sighting the target approximately.
The optical system of the digital camera adopts the fixed focus method that doesn't request
focusing ,so that focusing of telescope doesn't synchronize with focusing the digital camera
on the image.
The type of image to be recorded is defined by selecting out of two types in “16.Save Mode”
of the camera settings. (Refer to 10.6 Adjusting the camera setting – 16. Save Mode)
The images can be checked by [F4] [REVIEW] and [F2] [S.SHOW]. (Refer to 10.3 Slide
Show and 10.4 Playing back images)
The image data is transfered to a computer by recording images to a SD card, or by using a
USB cable.
There is no user of TS because he or she can take a picture of anything. Please note the
copyright.
10.2.2 Taking pictures without measuring distance
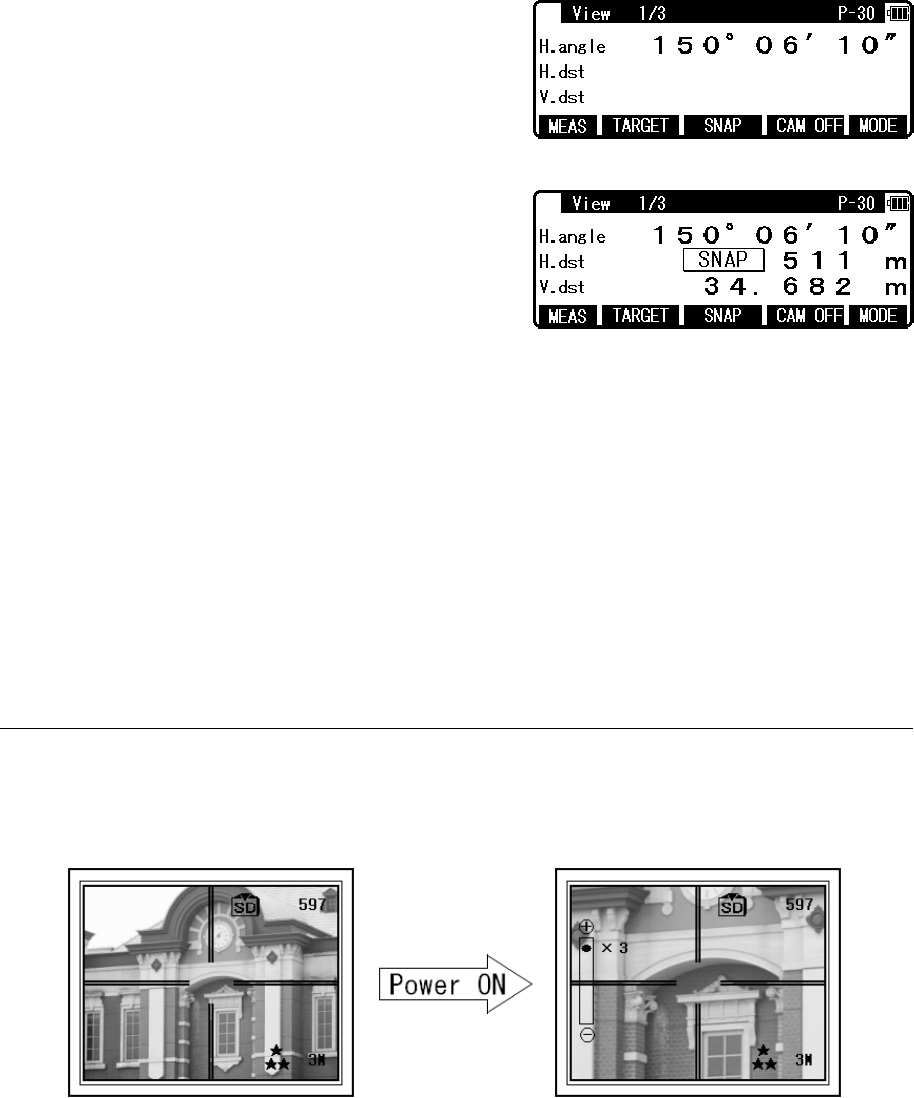
62
Aim the target when using the telescope or the
camera display. Press [F3] [SNAP] key to take a
shot.
[F3] [SNAP] is allocated as a function key in
View1/3 screen.
When “8. Point Mark Disp” and “11. Mark Positiong” are set to ON, Pointmark can be added
even without measuring the distance.
The type of image to be recorded is defined by selecting one of the two types in “16. Save
Mode” for the camera settings. (Refer to 10.6 Adjusting the Camera Setting – 16. Save Mode)
The images can be checked by [REVIEW] and [S.SHOW]. (Refer to 10.3 Slide Show and
10.4 Playing back images)
The image data is transferred to a computer by recording images onto a SD card, or by using a
USB cable.
10.2.3 Zooming
Press [F1] [ZOOM IN] to zoom the image in, and [F2] [ZOOM OUT] to zoom out.
[F1] [ZOOM IN] and [F2] [ZOOM OUT] are provided as a functions in the View2/3 screen.
1-3 times digital zoom is provided.
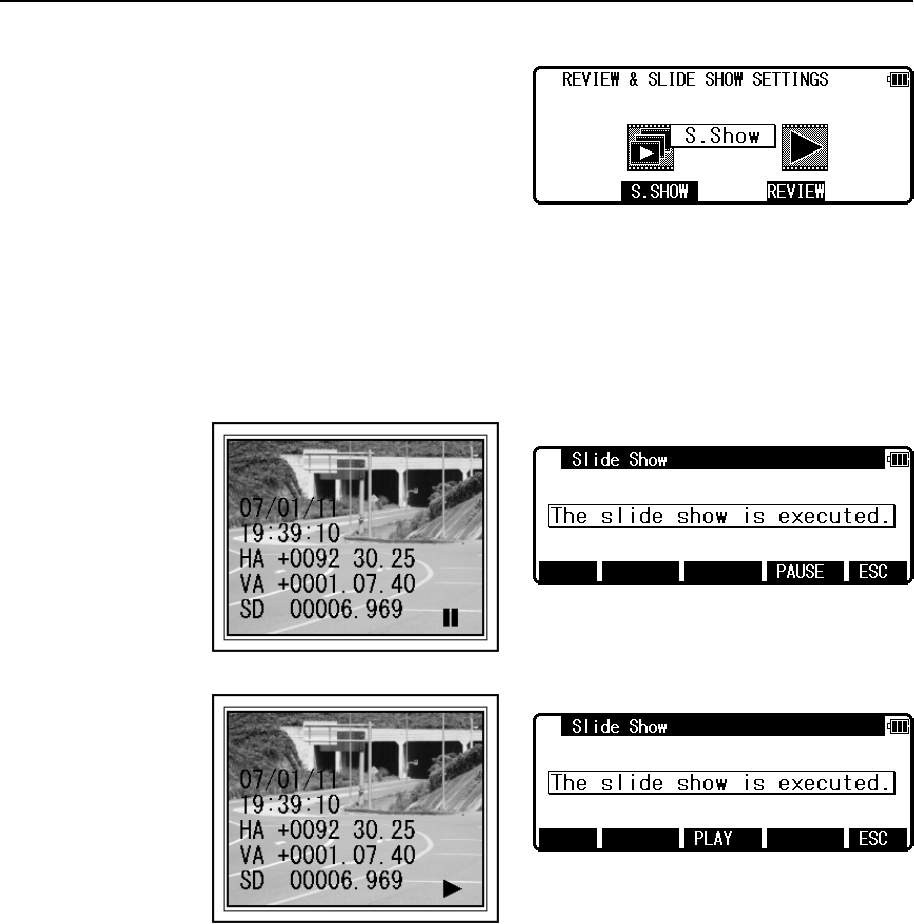
63
10.3 Slide Show
Press [F2] [S.SHOW] in REVIEW & SLIDE SHOW
SETTINGS screen to enter the Slide Show mode.
Play back the recorded images from the top in due
course. Message, “The slide show is executed.”
appears on the screen during Slide Show mode. The
slide show ends automatically when it gets to the last
image. It then returns to REVIEW & SLIDE SHOW
SETTINGS screen.
Press [F4] [PAUSE] to pause the slide show. The slide show will resume when pressing [F3]
[PLAY] is pressed. An icon on the lower right of the camera display will change.
Press [ESC] to end the Slide Show then return to REVIEW & SLIDE SHOW SETTINGS.
PLAY
PAUSE
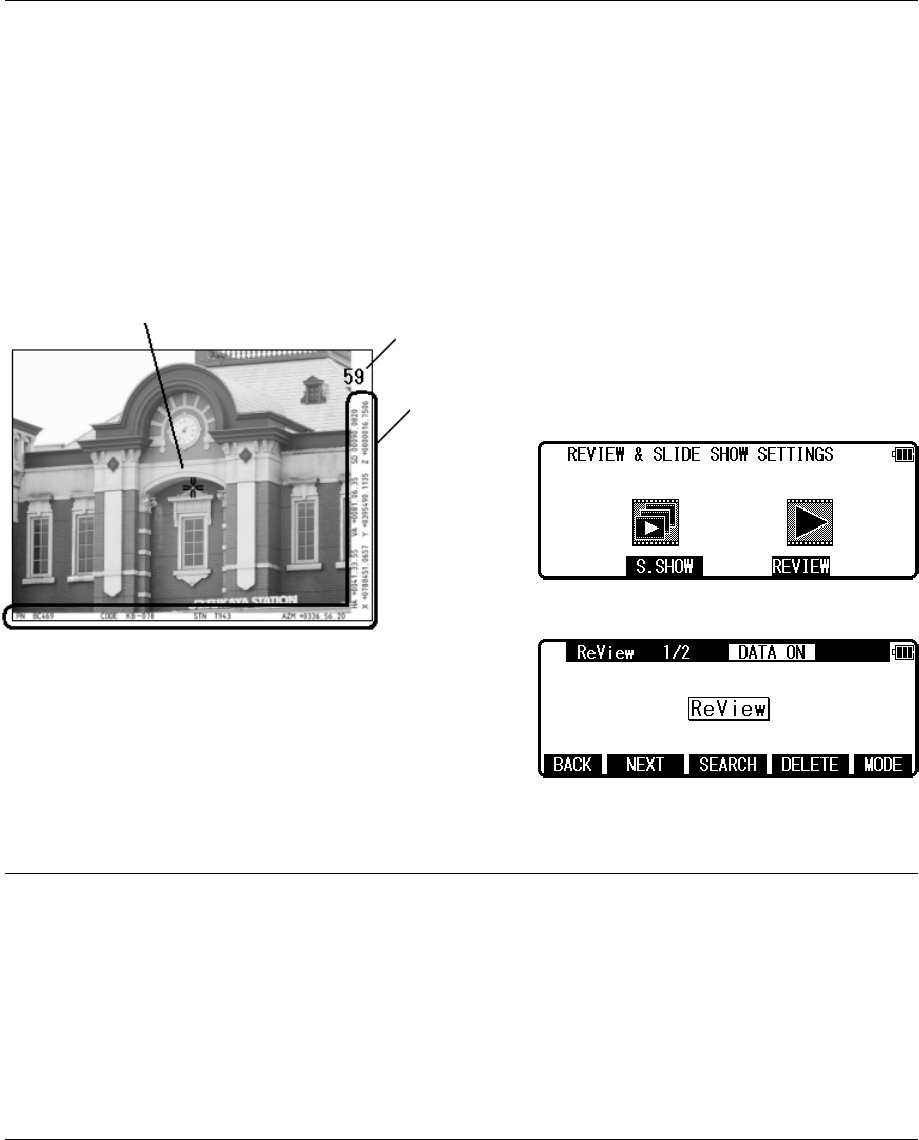
64
10.4 Playing back images
The images can be checked by ReView mode. Press [F4] [REVIEW] on REVIEW & SLIDE
SHOW SETTINGS screen to enter ReView Mode. On ReView mode, the function keys are
switched to ReView1/2, ReView2/2, and Move Image in that order for every press of the [F5]
[MODE] key.
Pressing [ESC] cancels ReView mode and then returns to REVIEW & SLIDE SHOW
SETTINGS screen.
10.4.1 Rotating images
When entering in ReView mode, the picture taken at the last appears on the screen.
Press [F1] [BACK] to switch to one previous screen.
Pressing [F2] [NEXT] to switch to the next screen.
[BACK],[NEXT] are allocated as a function key in Review1/2.
10.4.2 Searching images
Press [F3] [SEARCH] on ReView1/2 to enter the screen to search for images.
The image you choose can be found by the following procedures.
Review mode
Point mark Picture number
Mesurement Data
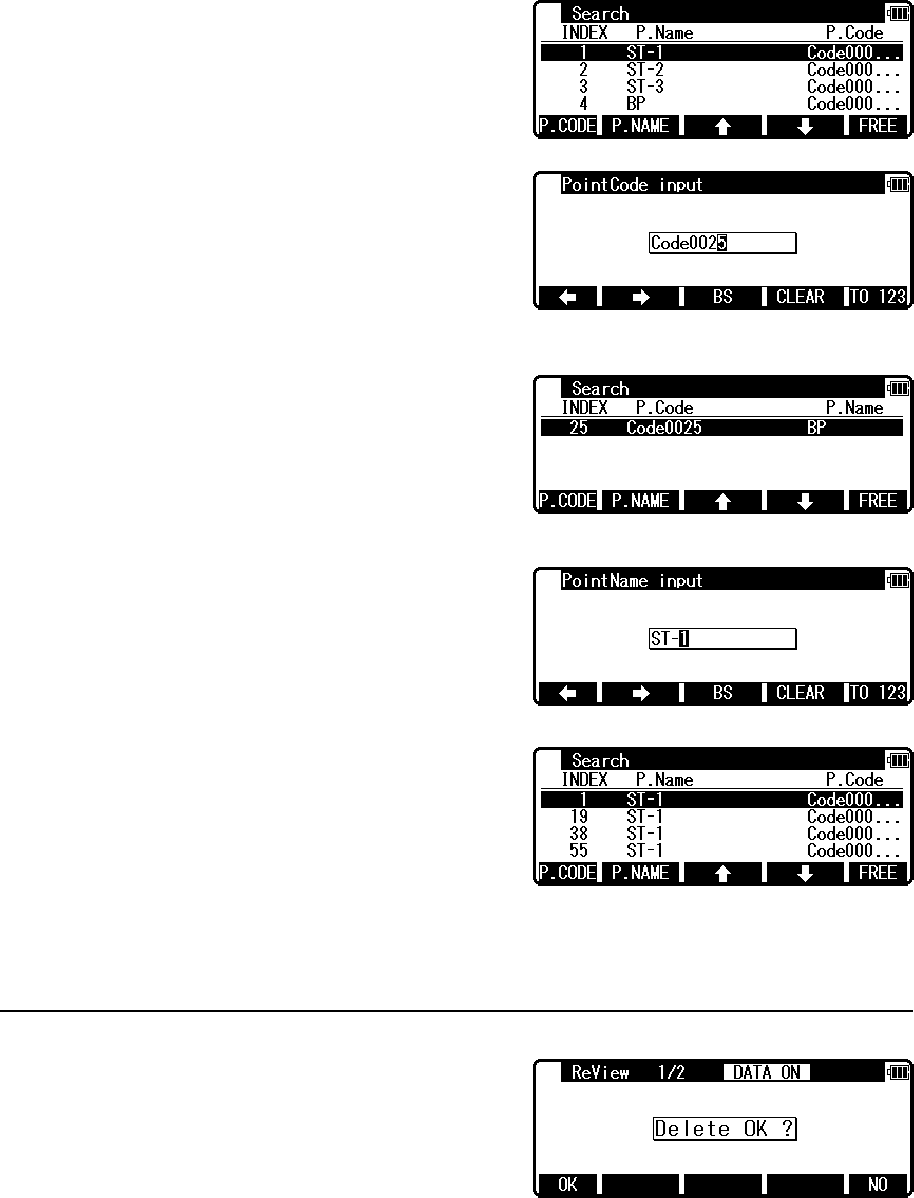
65
[SELECT INDEX]
Select the INDEX by using cursor key and then
press [ENT] to switch to the screen you selected.
[SEARCH POINT Code]
Press [F1] [P.CODE] to enter PointCode input
screen.
Input PointCode and Press [ENT] to start search.
Select one of the search results. Press [ENT] to
switch the screen to the selected one.
[SEARCH PointName]
Press [F2] [P.NAME] to enter PointName input
screen.
Input PointName, then press [ENT] to start search
Select one of the research results and then press
[ENT]. The screen will change to the selected
display.
Press [F5] [FREE] to return to the screen before searching.
[F3] [SEARCH] is allocated as a function key in ReView of 1/2.
10.4.3 Deleting images
Press [F4] [DELETE] when the image you want to
delete appears on the screen and “Delete OK?” is
displayed. Press [F1] [OK] to delete the selected
image. Press [F5] [NO] to cancel.
[F4] [DELETE] is allocated as a function key in ReView1/2.
If you want to delete all the images together, select Format in Setup menu.
Refer to 10.5 Setup–1.FORMAT.
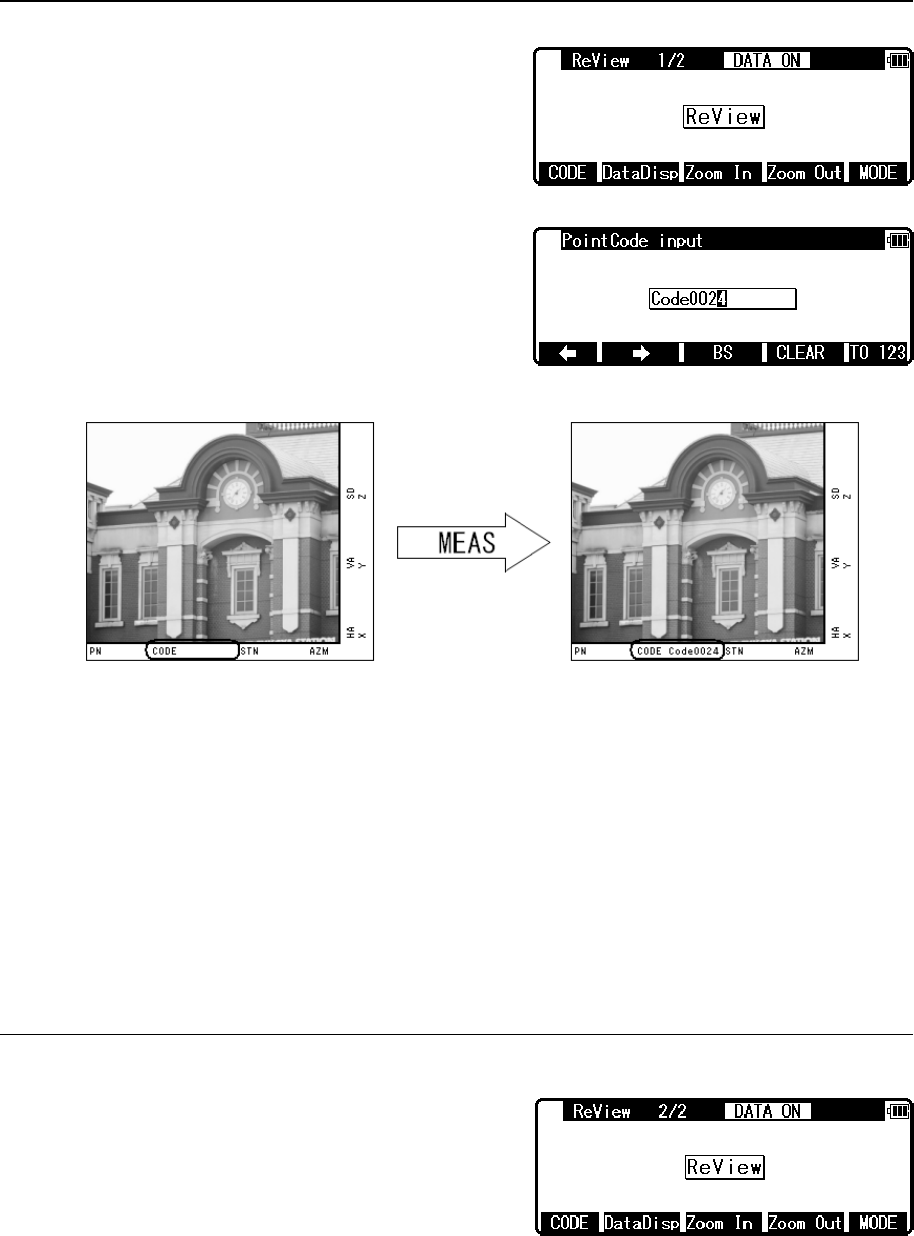
66
10.4.4 Adding PointCode to images
Press [F1] [CODE] in ReView2/2 screen to switch to
PontCode input screen.
Up to 15 characters can be input on the images.
Enter PointCode numbers to add PointCode on the
image.
You can also enter PointCode input screen when pressing [F4] [CODE] on View2/3 and input
PointCode with the same procedure mentioned above.
You can also add PointCode to the image taken when “16. Save Mode” is on “2. Capture
Only” in Setting, which is handled as the same image data as the one taken when “16. Save
Mode” is “1. Capture+Data” on Setting.
The PointCode you input once can be edited again.
10.4.5 Displaying measured data
Press [F2] [DataDisp] in ReView2/2 screen to
display calendar and recorded surveying information.
When [F2] [DataDisp] is on [ON], [DATA ON]
appears on the top of the screen. When [DataDisp] is
on [OFF], it is not diplayed.
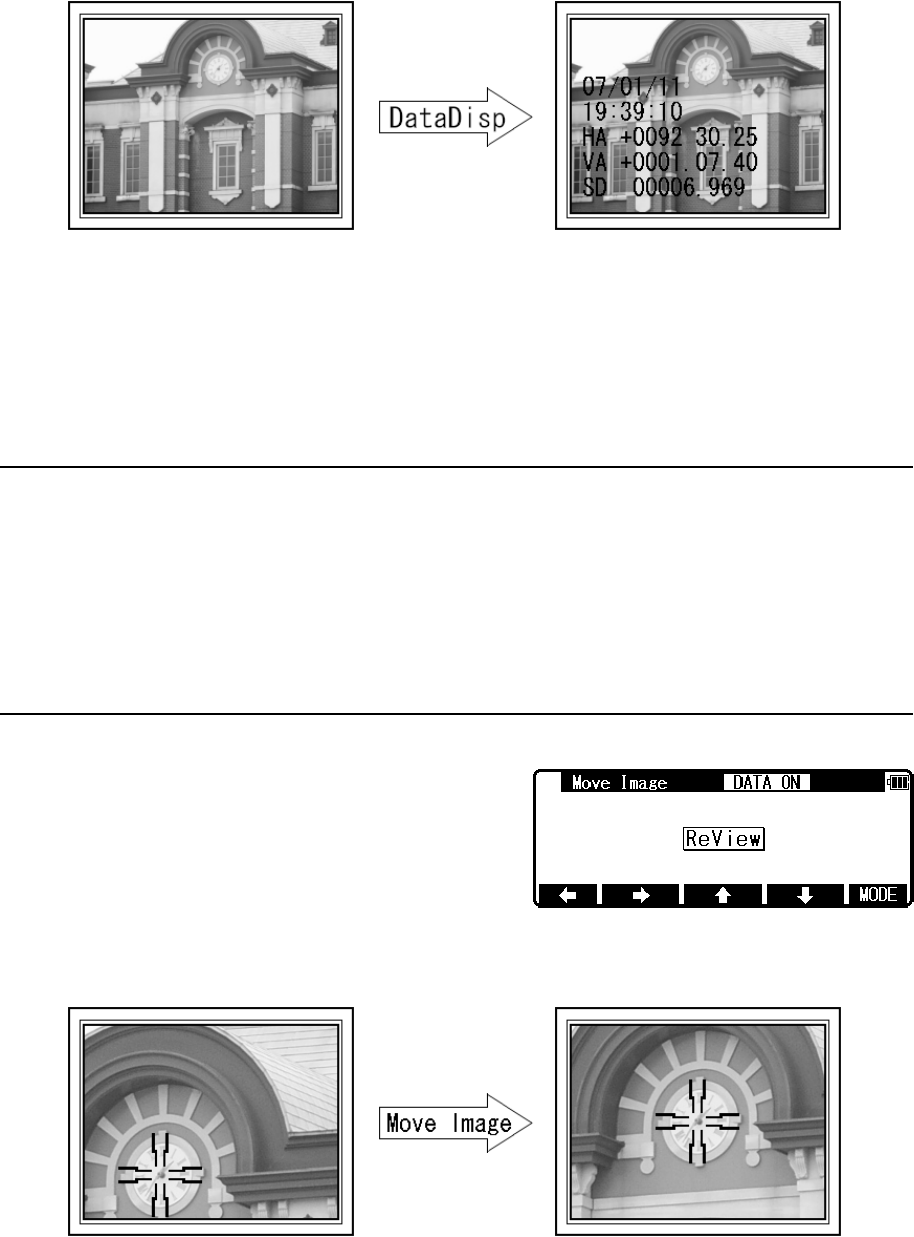
67
Survey data recorded during taking pictures can be displayed on the screen. The image data
taken during special function such as measure can be recorded on coordinated data in addition
to Polar data and these data can be displayed in due course.
[F2] [DataDisp] can be swiched to [ON] and [OFF] in Setting “14. DataDisp”
10.4.6 Zooming images
Press [F3] [ZOOM IN] to magnify the images.
Press [F4] [ZOOM OUT] to reduce the images.
The images can be magnified up to 8 times.
10.4.7 Moving images
Magnified images can be moved to
top/bottom/left/right.
Example: Move double magnified image to the right.
Move Image is allocated as a function key in Review mode. Press ReView1/2 and ReView2/2
to enter Move Image.

68
The screen can be moved only when the images is zoomed more than double.
10.5 Setup
Press [F2] [SETUP] key in RED MARK &
CAMERA SETTINGS screen. The SETUP is a
mode to carry out offsetting an optical axis and
formatting memory.
1.Format
Format the taken pictures in SD card.
See: FORMAT is a function to format an SD card. Make sure to format the SD card before
using with R-2500DN.
Pictures taken and data measured during the special function and the image data which is
taken when the camera is activated in Mode are recorded on the the SD card in the order of
the pictures taken.
When the job name (file) specified by the special function is changed, this data is recorded on
the SD card in the order of the pictures taken.
When using some job names (file) separately, we recommend that you prepare some SD cards
and use a job name (file) and an SD card as one pair.
2.ResetALL
Initialize all the data in Setting.
3.Correct Center
This is a mode for deciding the offset value of top/bottom/left/right of Point Mark which is
displayed in the picture during shooting.
Refer to “10.8 Correct Center Mode”.
4.Ver.disp
Display software information of version.
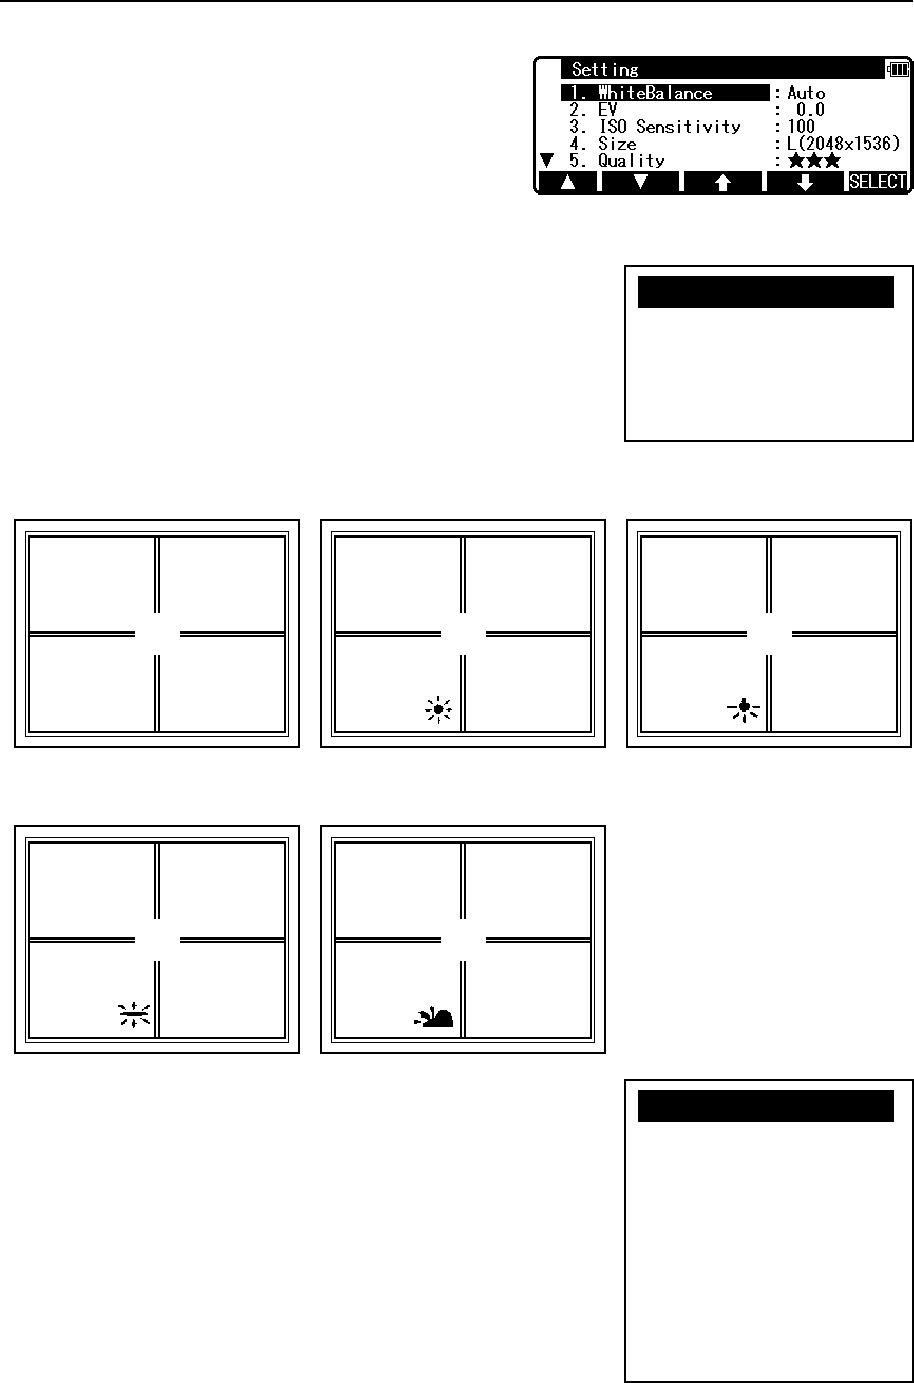
69
10.6 Adjusting the camera settings
Press [F3] [Setting] key in the RED MARK &
CAMERA SETTINGS screen. Snap and photo
conditions are defined in the Setting menu in the
camera settings.
1. White Balance
Color tone correction is defined by selecting one of the
options; [Auto], [Daylight], [Light Bulb], [Fluorescent], and
[Cloudy]. Each time the option setting is changed, the icon
shown at the bottom of the screen is also changed. No icon is
shown for [Auto], which is the default setting.
Example: Icons for Color tone
2. EV
EV (Exposure Value) is specified by selecting from -2.0 to
+2.0 in 0.5 step.
Each time the option setting is changed, the EV shown at the
bottom of the screen is also changed.
No EV is displayed when [0.0] is selected, which is the default
setting.
Cloudy Fluorescent
Light Buib
Daylight
Auto
X1.AutoXXXXXXXXX
2.Daylight
3.Light Buib
4.Fluorescent
5.Cloudy
X1.-2.0XXXXXXXXX
2.-1.5
3.-1.0
4.-0.5
5. 0.0
6.+0.5
7.+1.0
8.+1.5
9.+2.0
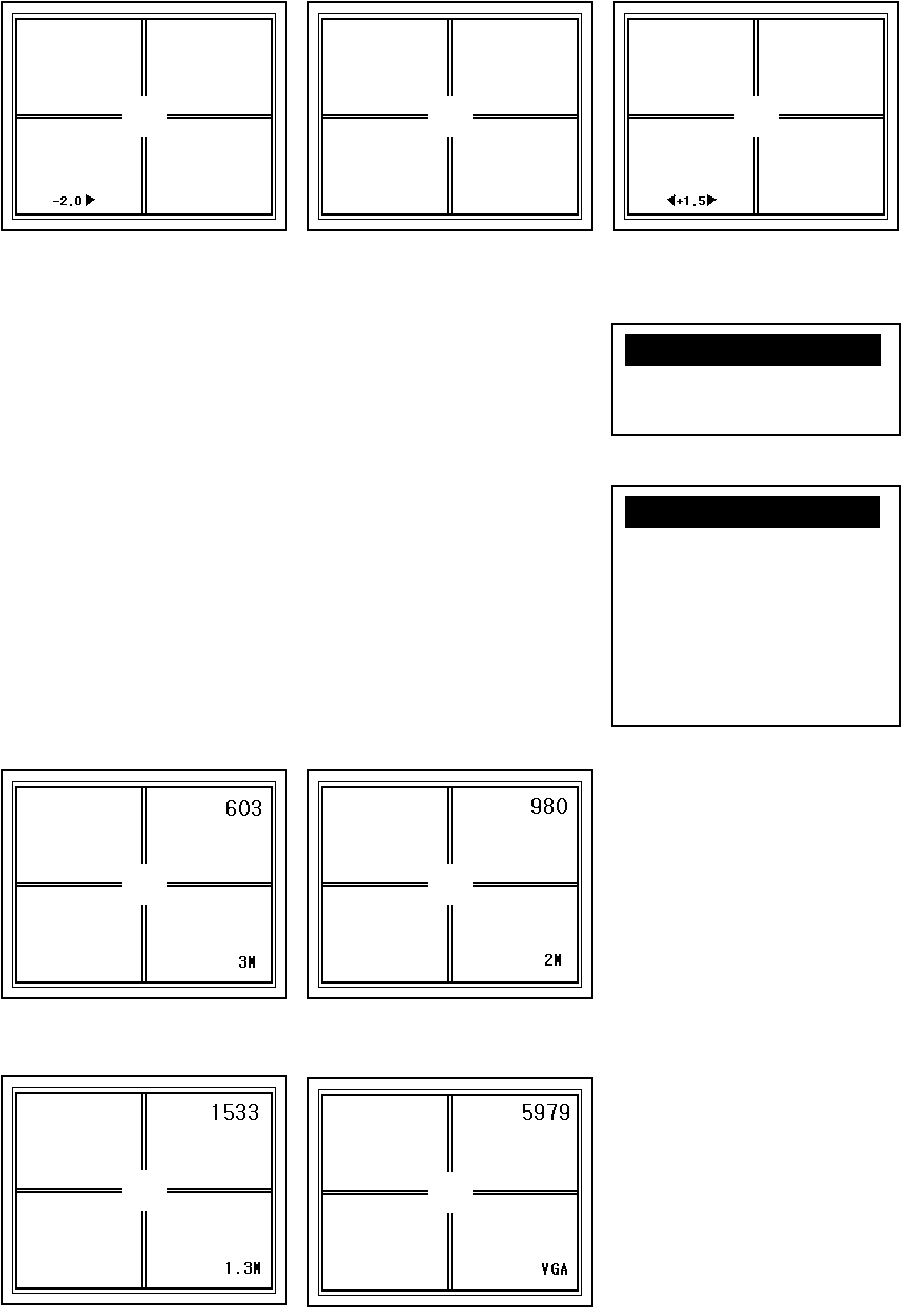
70
Example: EV displayed on camera display
3. ISO Sensitivity
ISO sensitivity is defined by selecting from the options: [100],
[200], and [400]. The default setting is [100].
4. Size
Define the image size by selecting one of the options:
[L(2048x1536)], [M(1600x1200)], [S(1280x960)], [640x480],
[1600x1200(Cut)], [1280x960(Cut), and [640x480(Cut)].
Each time the option setting is changed, the icon shown at the
bottom of camera display is also changed. The default setting
is [L(2048x1536)].
Example: Image size displayed on camera display
EV -2.0 EV 0.0 EV +1.5
S(1280x960)
L(2048x1536) M(1600x1200)
640x480
X1.100 XXXXX
2.200
3.400
X1.L(2048x1536)aa
2.M(1600x1200)
3.S(1280x960)
4.640x480
5.1600x1200(Cut)
6.1280x960(Cut)
7.640x480(Cut)
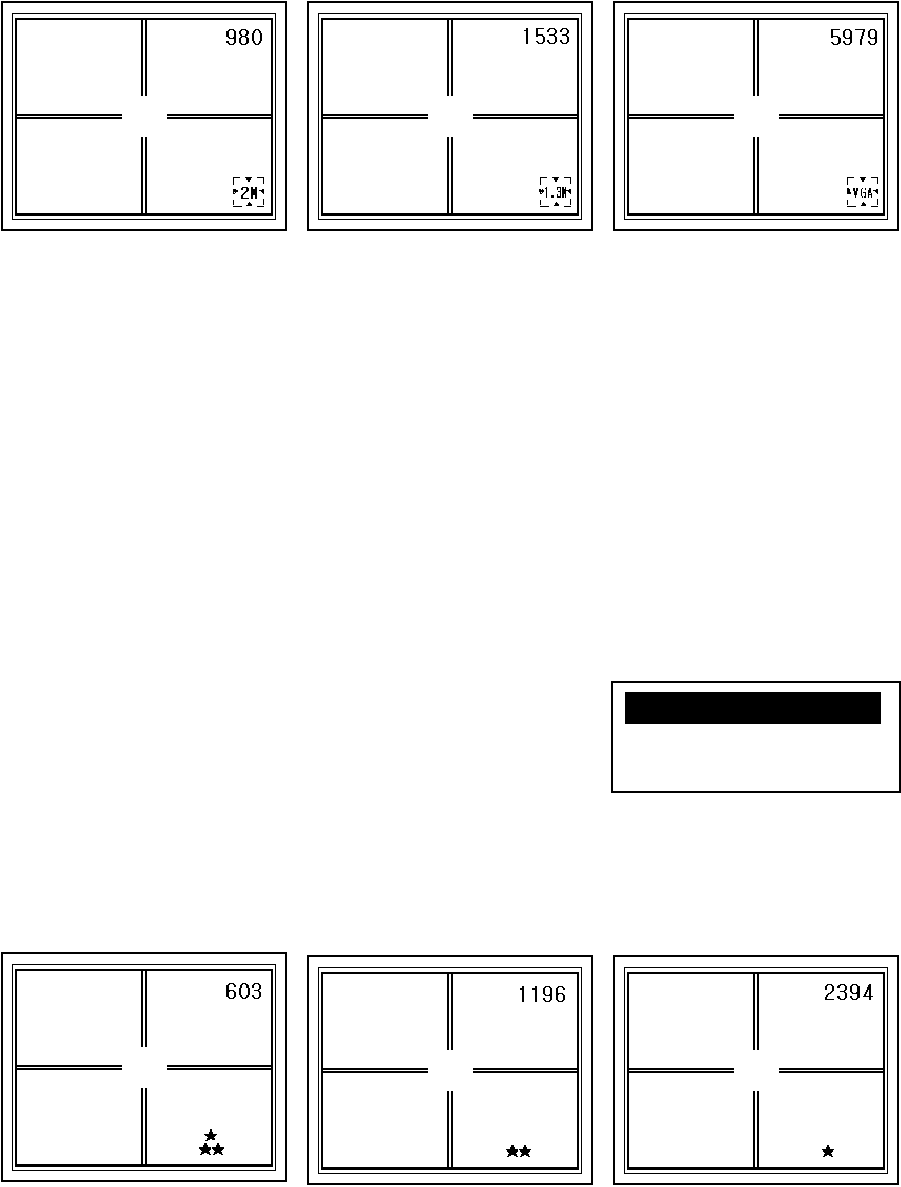
71
Number of images that can be saved as shown in the upper right of the camera display.
Number of images depends on the image size. The smaller the size, the more images can be
shown.
Using the image size with the “(Cut)” attribute, the actual size of the image is stored. Taking
L size (1600 x 1200) for example, [1600x1200(Cut)] saves the image at 1600x1200 pixels.
However, the number of storable photos is the same as that without the Cut attribute.
[640x480] and [640x480(Cut)] are not selectable when [★] is selected in “5.Quality.
5. Quality
Define the image quality by selecting one of the options;
[★★★], [★★],and [★]. When the option setting is changed,
the icon shown at the bottom of camera display is also
changed. The greater the number of stars, the better is the
image quality, but the number that can be stored is reduced.
The default setting is [★★].
Example: Icons for the image quality
[★] cannot be selected when “4.Size” is [640x480] or [640x480(Cut)].
1600x1200(Cut) 640x480(Cut)
1280x960(Cut)
★★★ ★★ ★
X1.★★★ XXXXX
2.★★
3.★
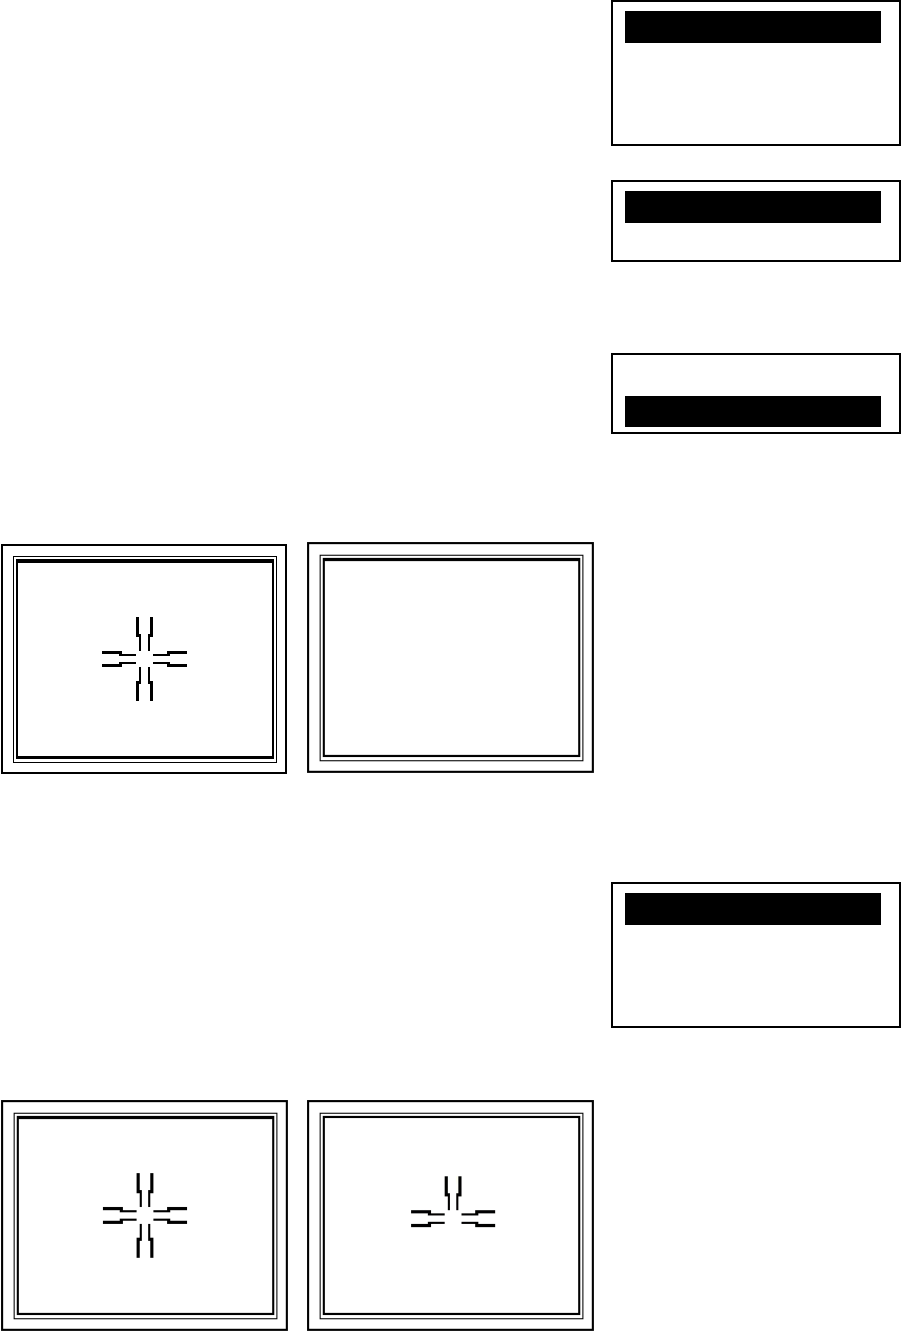
72
6. Rec View
Define the duration of the image display after the shot by
selecting from the following options; [OFF], [1sec], [2sec],
and [3sec]. The default setting is [OFF].
7. Beep
Define the buzzer on / off when shooting a photo. Nothing is
changed on the screen by changing this setting. The default
setting is [ON].
8. Point Mark Disp
Define if the Point Mark is to be superimposed in the photo or
not. Define by selecting ON or OFF. The default setting is
[ON].
Example: Images with / without Point Mark
9. Point Mark Type
Define the type of the Point Mark by selecting from the
options;
[Cross], [Cross border], [Square], and [Bold Cross]. The
defaultsetting is [Cross].
Example: Images with different type of Point Mark
Point Mark ON Point Mark OFF
Cross Cross border
X1.OFF X XX
2.1sec
3.2sec
4.3sec
X1.ON XaXXXXXX
2.OFF
1.OFF
a2.ON a
X1.Cross X XX
2.Cross border
3.Square
4.Bold Cross
73
The Point Mark is not superimposed when “8.Point Mark Disp” is set to [OFF], regardless of
this setting.
10. Point Mark Color
Define the color of the Point Mark by selecting from the
options;
[Black/White] or [Red]. The default setting is [Black/White].
11. Mark positioning
Define if the position of the Point Mark is to be adjusted or
not, each time after the shot: [ON] or [OFF]. The default
setting is [OFF].
The adjustment of the Point Mark position is not activated when “8.Point Mark Disp” is setto
[OFF], regardless of this setting.
Refer to “10.7 Adjusting Point Mark position” for detail.
12. Cross Line Disp
Define if the cross line is to be displayed on the screen, or not:
[ON] or [OFF]. The default setting is [ON].
Example: Screen without / with Cross Line
Bold Cross Square
Cross Line OFF Cross Line ON
X1.Black/WhiteXX
2.Red
X1.OFF XaXXXXXX
2.ON
1.OFF
a2.ON a
74
13. Cross Line Type
Define the type of the cross line: [Cross] or [ Square].
The default setting is [Cross].
Example: Type of Cross Line
14. DataDisp
Define if the calendar information and survey information are
displayed or not when the image is reproduced by Replay or
Slide Show: [ON] or [OFF]. The default setting is [ON].
Example: Image without / with DataDisp
The information shown on the screen is not recorded with the image and is not tranferred to
the external devices: display only.
15. Auto Snap
Define if the shot is automatically carried out, or not: [OFF] or
[ON]. The default setting is [ON].
When entering special function while [Auto Snap] is set to [ON], the camera is automatically
activated and takes pictures at the scene where taking pictures is needed
Set this setting always [ON], when a photo needs to be taken together with the distance
measurement in the View1/2 screen.
Square Cross
DataDisp ON
DataDisp OFF
X1.CrossXXXXX
2.Square
1.OFF
a2.ON a
1.OFF
a2.ON a
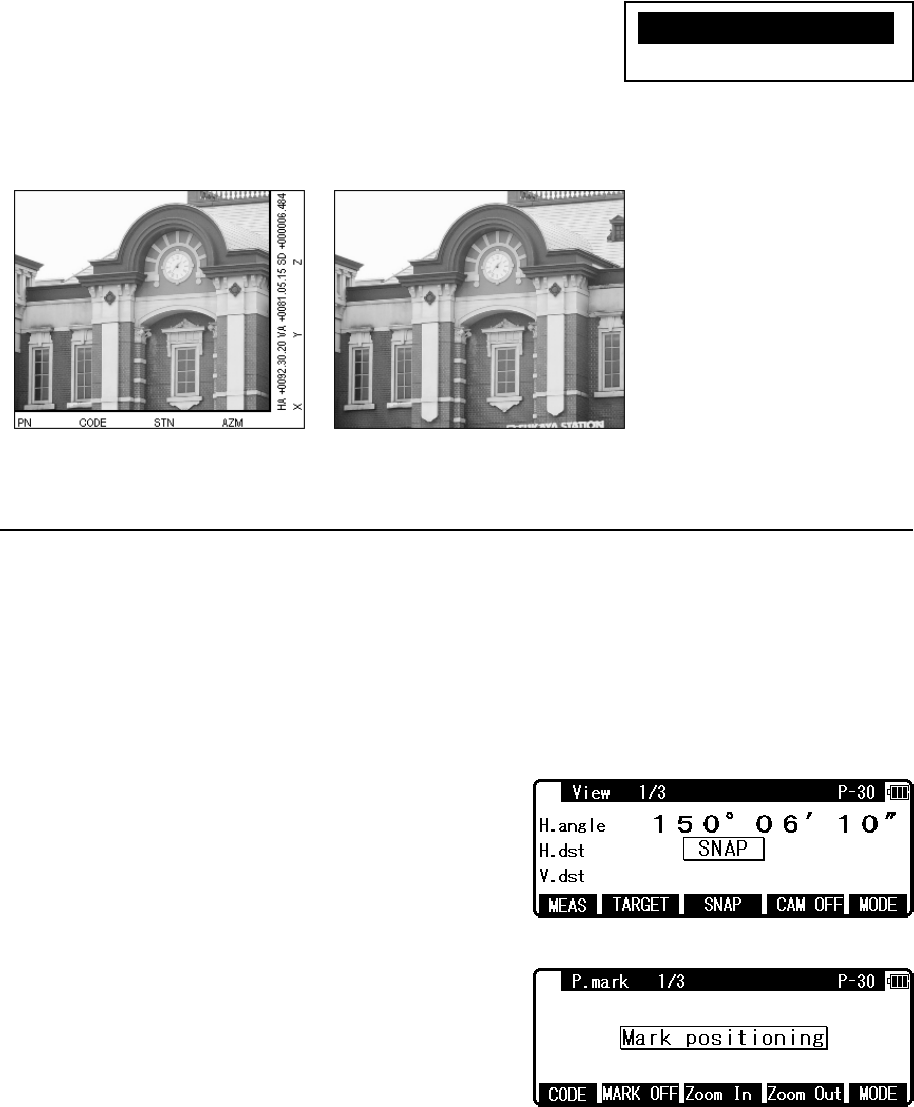
75
16. Save Mode
Define the kind of data to be recorded by selecting one of the
options; [Capture Only], or [Capture+Data]. The default
setting is [Capture+Data].
Example: Kinds of recorded image
10.7 Adjusting Point Mark position
The position of the Point Mark can be adjusted after the photo is taken.
[Adjustment procedure of the Point Mark position]
Both “8. Point Mark Disp” and “11. Mark Positioning” in the camera settings must be set to
ON.
Aim the target using the screen mode View1/3.
Press [F3] [SNAP] key to take a photo.
If the case that the camera setting “15. Auto Snap” is
set to ON, a photo is also taken by pressing [F1]
[MEAS] key.
The display is switched to “P.mark 1/3” a few
seconds after the shot.
[CODE], [P.MARK], [ZOOM IN] and [ZOOM
OUT] functions are available in the P.mark 1/3
screen.
[CODE] : Attribute information of up to 15 characters can be input from the keyboard and
superimposed on the image, with the same function in View mode and ReView mode.
[MARK OFF / ON] : The switch to select whether the Point Mark is superimposed on the
image or not.
Capture + Data Capture Only
X1.Capture+Dataa
2.Capture Only
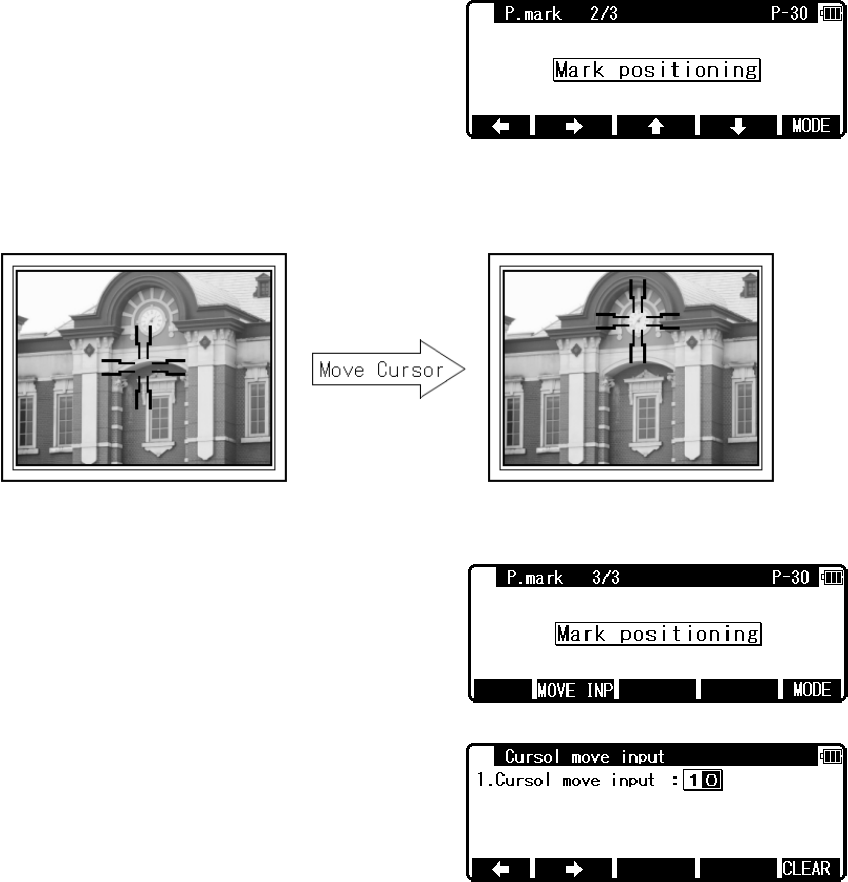
76
[ZOOM IN], [ZOOM OUT] : 1-8 times zoom is available for Point Mark Position
Adjustment, but not for recording images.
Press [F5] [MODE] key to switch the screen to
P.mark 2/3, and adjust the Point Mark position by
using the function keys.
Press [ENT] to save the image with the Point Mark in the adjusted position.
The screen returns to View mode.
Press [F5] [MODE] key to switch the screen to
P.mark 3/3.
Press [F2] [MOVE INP] key in the “P.mark 3/3”
screen to proceed to “Cursol move input” screen.
Input the smallest movement amount of the
PointMark and press [ENT].
In the of P.mark 1/3 and P.mark 2/3 and P.mark 3/3 screens, press [ESC] to return to the
View 1/2 screen. The image without Point Mark is saved in this case.
Using this function, the yellow point mark is recorded to distinguish this from measuring +
SNAP.
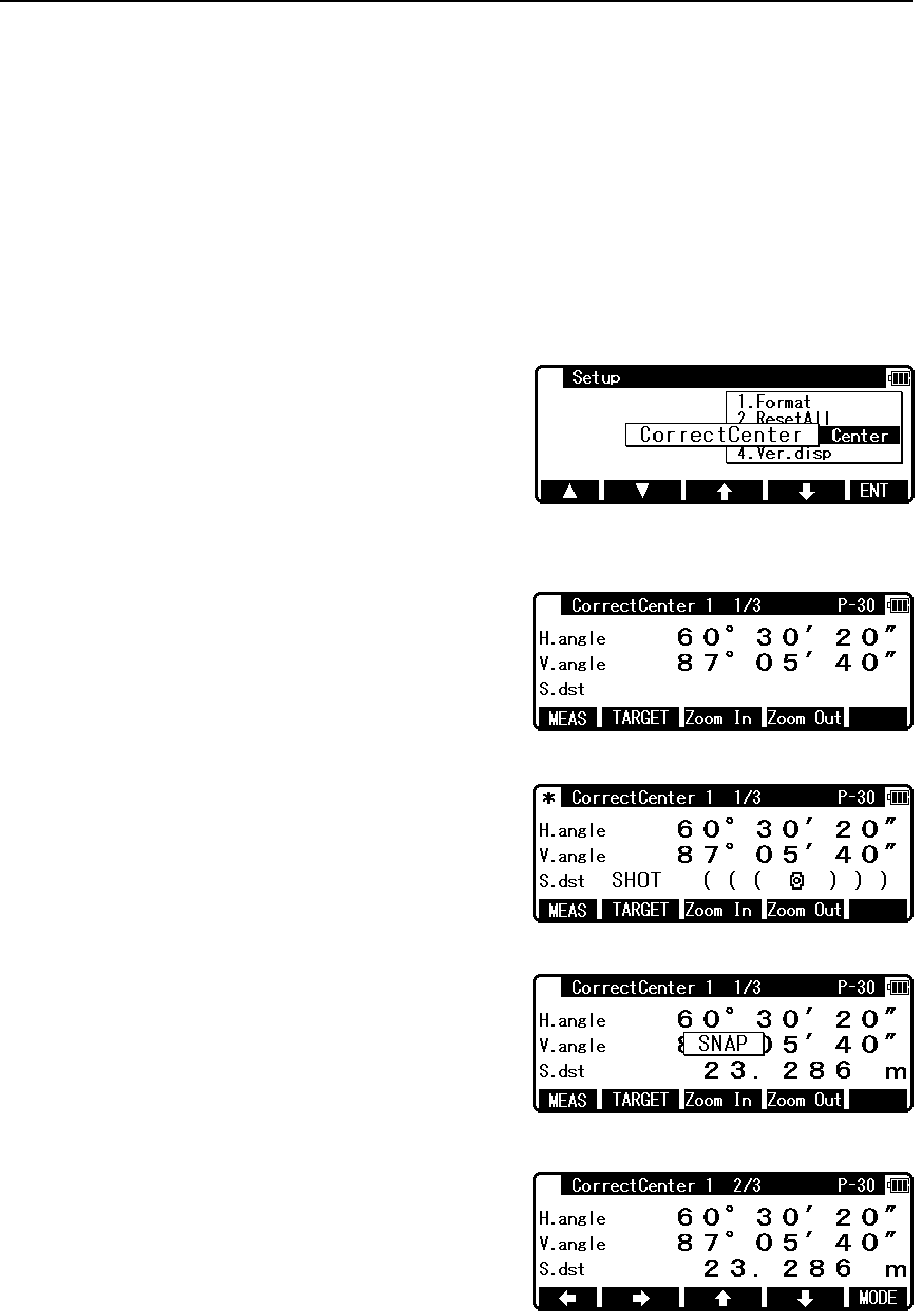
77
10.8 Correct Center Mode
Correct Center Mode is the function to adjust the optical axis of the camera, which can be
changed by aging, temperature change and/or vibration during transportation. In the event that
the aimed point and the Point Mark do not coincide, adjust the camera axis by using Correct
Center Mode.
[Procedure]
Two reference points are used for the adjustment. Distance measurement and Point Mark
Position adjustment are carried out for each reference point. The procedure is as follows;
To enter Correct Center Mode, select “3.Correct
Center” in RED MARK & CAMERA SETTINGS –
SETUP.
<Reference point 1>
Set the reference point 1 at the distance of 20m or
more away from the intsrument.
※Use "CCM TARGET 1" shown in the last page of
this manual as a target.
Aim the target placed at the reference point 1, and
press [MEAS].
When the measured distance is displayed, a photo is
taken, and the screen proceeds to “CorrectCenter 1
2/3”.
Move the PointMark shown on the camera display
by carefully using function keys for accurate
PointMark positioning.
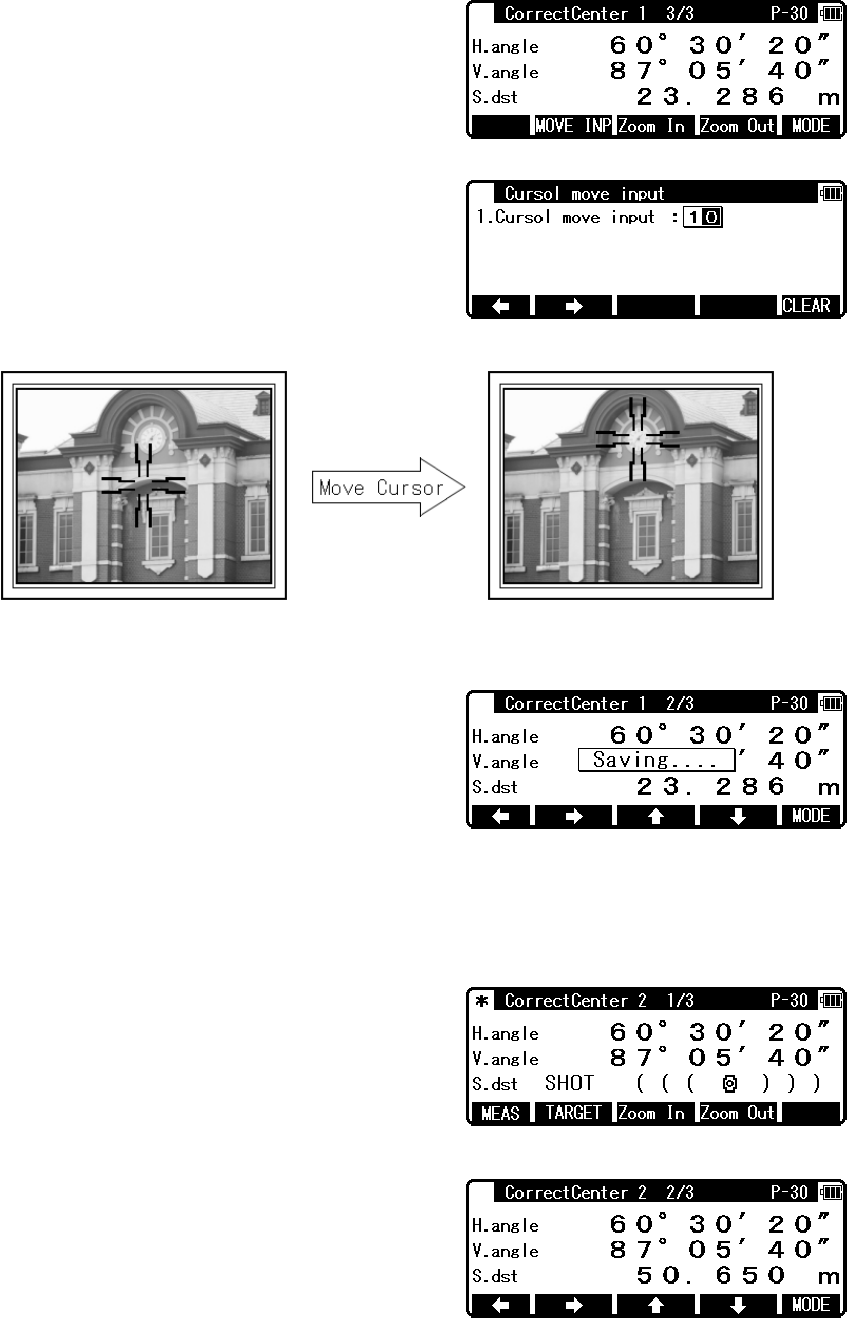
78
Press [F5] [MODE] key to change the screen from
“CorrectCenter 1 2/3” to “CorrectCenter 1 3/3”.
Press [MOVE INP] key in the “CorrectCenter1 3/3”
screen to proceed to “Cursor move input” screen.
Input the smallest movement amount of the
PointMark and press [ENT].
To save the result for the reference point 1, press
[ENT] in the screen “CorrectCenter 1 2/3” or
“CorrectCenter 1 3/3” screen.
The screen proceeds to “CorrectCenter 2 1/3”.
<Reference point 2>
Set the reference point 2 at the distance 20m or more away from reference point 1.
Aim the target placed at the reference point 2, and
press [MEAS].
※Use "CCM TARGET 2" shown in the last page of
this manual as a target.
At the time the measured distance is displayed, a
photo is taken, and the screen proceeds to
“CorrectCenter 2 2/3”.
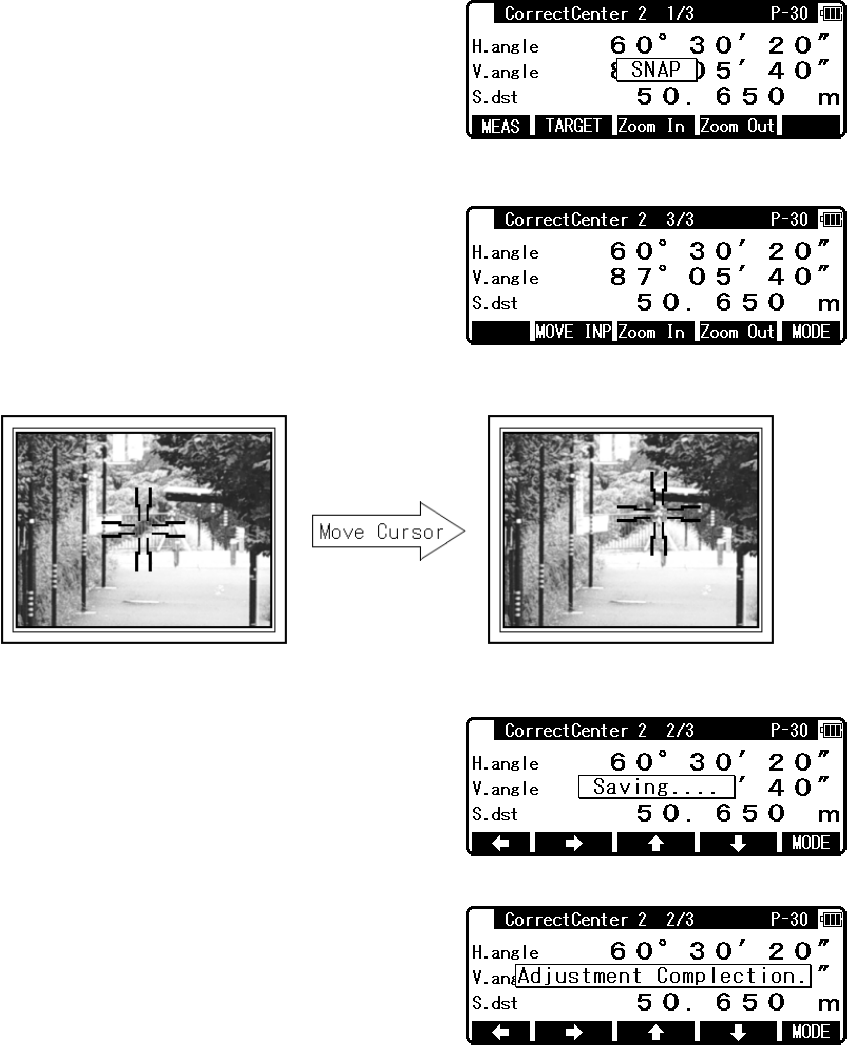
79
Move the PointMark showed on the camera display
by carefully using function keys for accurate
PointMark positioning.
Press [MODE] key to change the screen from
“CorrectCenter 2 2/3” to “CorrectCenter 2 3/3”.
Press [MOVE INP] key in the “CorrectCenter2 3/3”
screen to proceed to “Cursol move input” screen.
To save the result for the reference point 2, press
[ENT] in the screen “CorrectCenter 2 2/3” or
“CorrectCenter 2 3/3”.
After a few seconds, the “Adjustment Completion”
message appears, showing that the compensation
amount of the camera axis deviation is successfully
calculated. The screen returns to View 1/3
automatically.
To quit Correct Center Mode while in process, press [ESC] several times. The screen returns
to “RED MARK & CAMERA SETTINGS”.
Do not move the telescope until a photo is taken right after the distance measurement.
The camera settings cannot be changed during the Correct Center Mode process. Therefore,
we recommend you to check whether clear images for both reference points can be obtained
or not beforehand.

80
11. DATA COLLECTOR
The instrument can communicate directly with a computer through the RS-232c interface. By
use of a data collector you can automate data entry, from the collection of survey data to the
transfer of the data to a computer. This is useful in saving time and protecting data integrity.
For instructions about the connection with a data collector and the handling, please refer to
the “Instruction manual” of the data collector.
12. CHECKS AND ADJUSTMENTS
• Checks and adjustments should be performed before and during measurement.
• The instrument should be checked after long storage and transportation.
• The checks should be performed in the following order.
[Cautions on CHECKS AND ADJUSTMENTS]
• When adjustment is completed, be sure that adjusting screws are completely tightened.
When finishing turning adjusting screws, be sure that screws are turned in a direction for
tightening.
• Repeat check after adjustment, and check if the instrument has been adjusted properly.
• When adjustment is completed, be sure that adjusting screws are completely tightened.
When finishing turning adjusting screws, be sure that screws are turned in a direction for
tightening.
• Repeat check after adjustment, and check if the instrument has been adjusted properly.
12.1 Plate level
[Checks]
① Align the Plate level in parallel with a line joining any two of the levelling screws.
Then, adjust the two screws to centre the bubble in the vial.
② Rotate the instrument 90° and adjust the remaining levelling screw to center the bubble.
③ Loosen the upper clamp screw and rotate the instrument 180° around the vertical axis.
④ No adjustment is needed if the bubble stays in the centre.
Leveling screw to be adjusted.
Plate vial
Leveling screw to be adjusted.
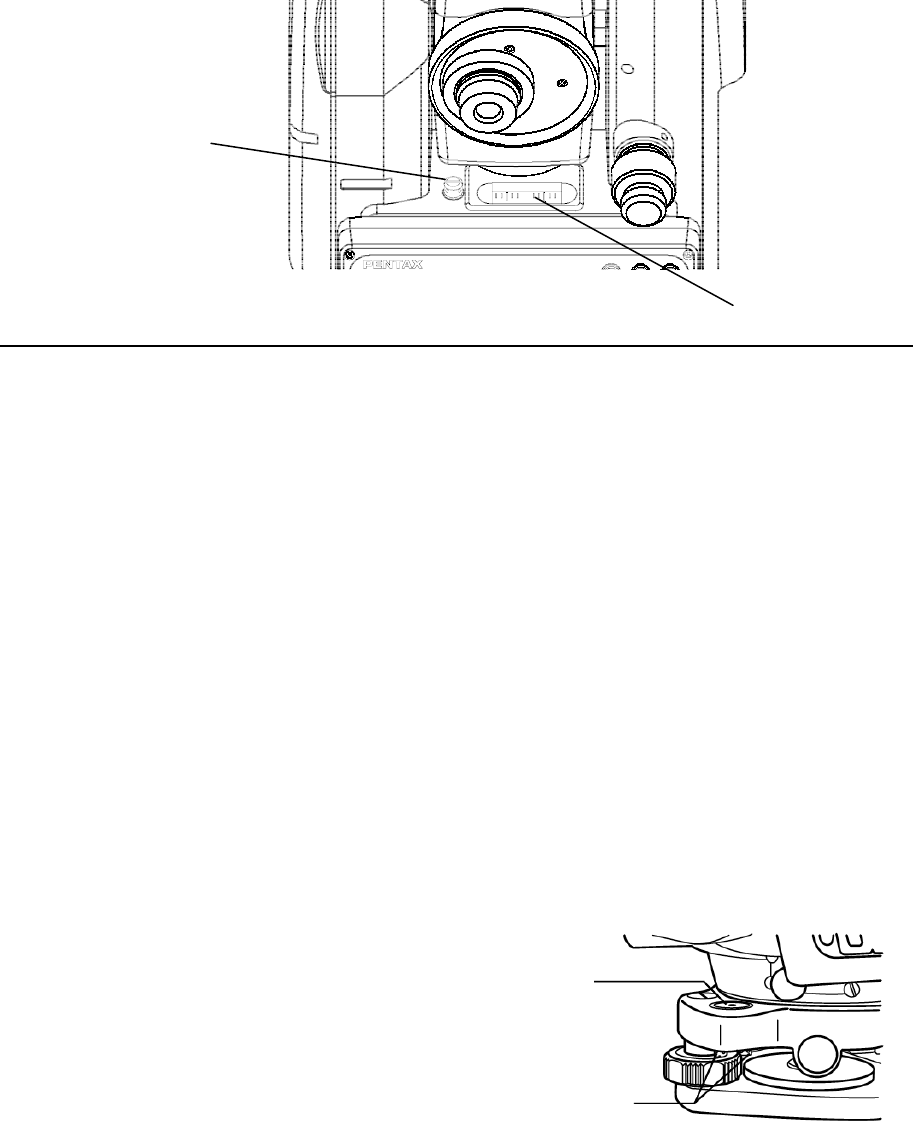
81
Circular vial
Circular vial adj. screw
[Adjustments]
① If the bubble of the plate level moves from the centre, bring it half way back to the centre
by adjusting the levelling screw(s) which is parallel to the plate level.
② Correct the remaining half by adjusting the bubble adjusting nuts with the adjusting pin.
③ Confirm that the bubble does not move from the centre when the instrument is
rotated by 180°.
④ When the bubble moves, repeat from (1) once again.
12.2 Circular vial
[Checks]
① Adjust by the plate level vial beforehand.
② Confirm the position of the bubble of the circular vial.
At this time, it is not necessary to adjust if the bubble is at the centre of the circle.
[Adjustments]
When the bubble of the circular vial comes off from the centre according to check procedure
②,it is necessary to adjust.
Turn the bubble adjustment screws with the reticle adjustment pin and put the bubble in the
centre of the circle.
• Tighten the screws equally after the above adjustment.
[Only the detaching type model]
Turn the bubble adjustment screws with the reticle
adjustment pin and put the bubble in the centre of the circle.
• Tighten the screws equally after the above adjustment.
Plate level
Bubble adjust screw
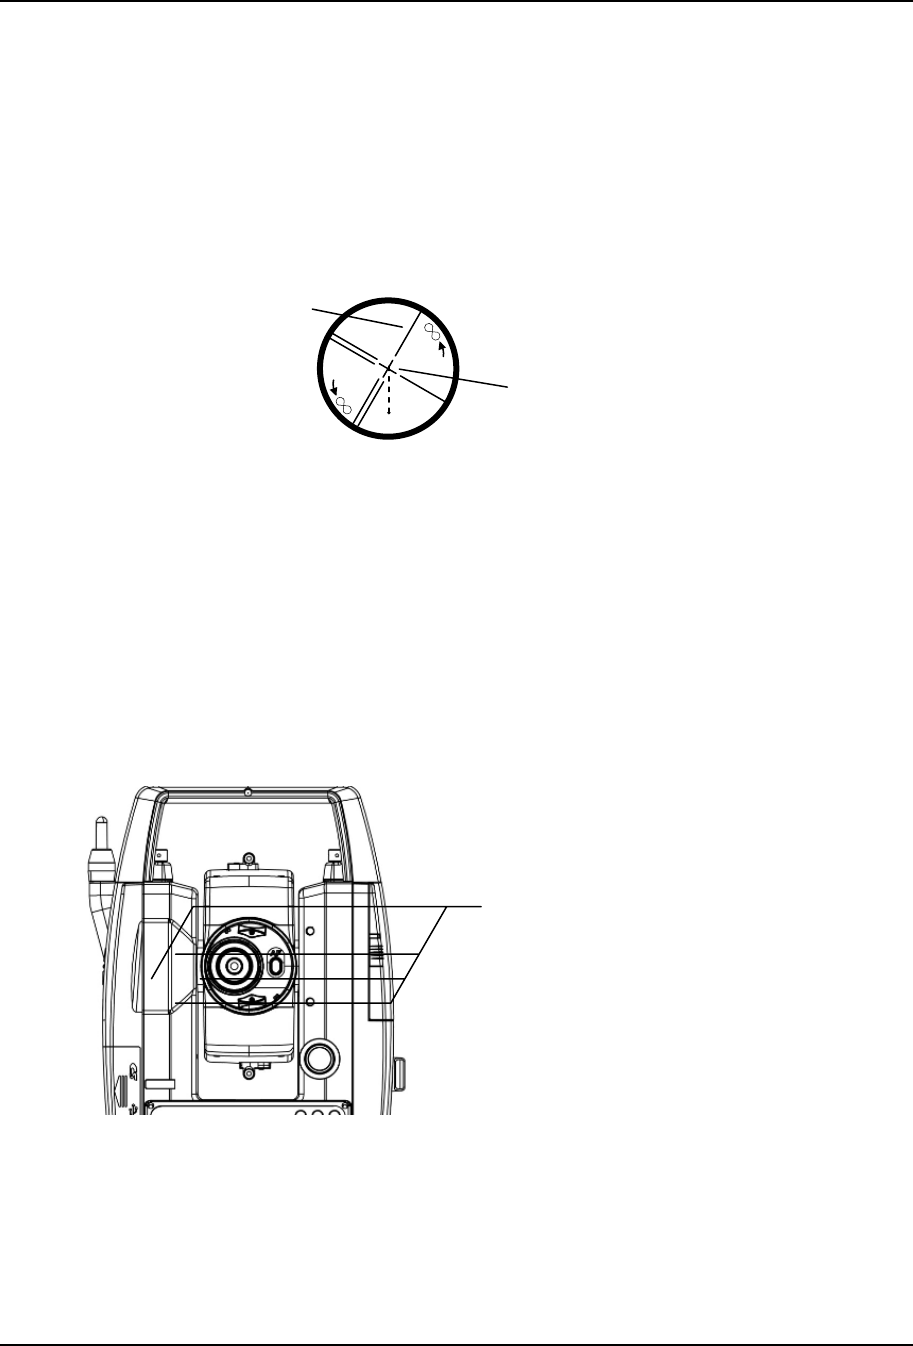
82
12.3 Vertical reticle
[Checks]
① Set the instrument up the tripod and carefully level it.
② Sight the target Point A with telescope.
③ Using the telescope fine adjustment screws, move Point A to the edge of the field of view
by screw (Point A’).
④ No adjustment is necessary if Point A moves along the vertical line of the reticle.
[Adjustments]
① If Point A is off from the vertical line of the reticle, first remove the eyepiece cover.
② Using the adjusting pin, loosen the four reticle adjustment screws slightly by the same
amount, and then rotate the reticle line around the sight axis and align the vertical line of
the sight axis with Point A’.
③ Tighten the reticle adjustment screws again by the same amount, and repeat the check to
make sure the adjustment is correct.
Vertical line
Line of sight axis
A
A'
Reticle adjusting screws
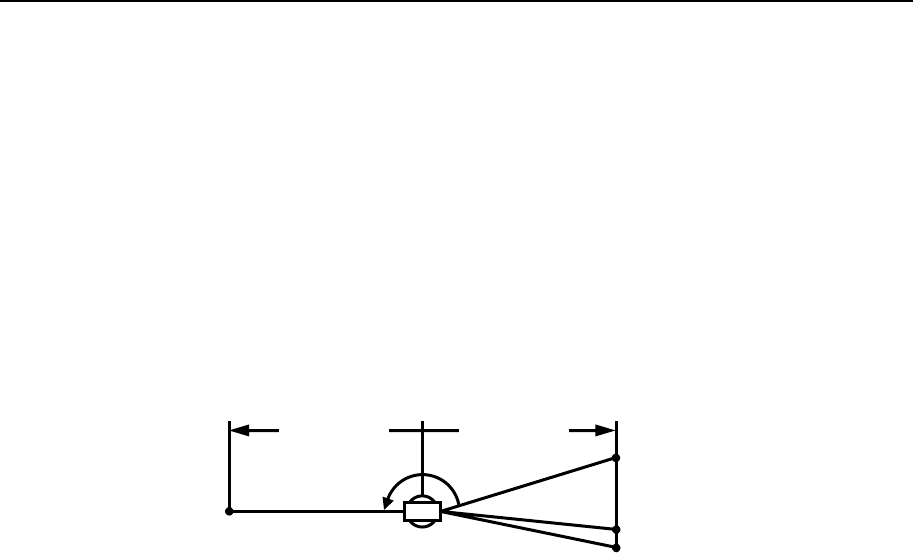
83
12.4 Perpendicularity of line of sight to horizontal axis
[Checks]
① Position a target Point A at a distance 30m - 50m away from the instrument, and sight it
with the telescope.
② Loosen the telescope lock screw and turn the telescope until a point is sighted at a distance
roughly equal to that of Point A. This is Point B.
③ With the telescope still reversed loosen the horizontal lock screw and rotate the instrument
around the vertical axis, and sight Point A again.
④ Loosen the telescope lock screw and turn the telescope until a point is sighted at a distance
equal to that of Point B. This is Point C.
⑤ No adjustment is necessary if Point B and C are aligned.
[Adjustments]
① If Points B and C are not aligned, mark Point D at 1/4 the length of the BC, from Point C
in the direction of Point B.
② Using the adjustment pin, rotate the reticle adjustment screws horizontally opposite each
other (see preceding page), and move the reticle to sight Point D.
③ Repeat the check and make sure the adjustment is correct.
30-50m30-50m
A
B
C
D
①
③
②②
④
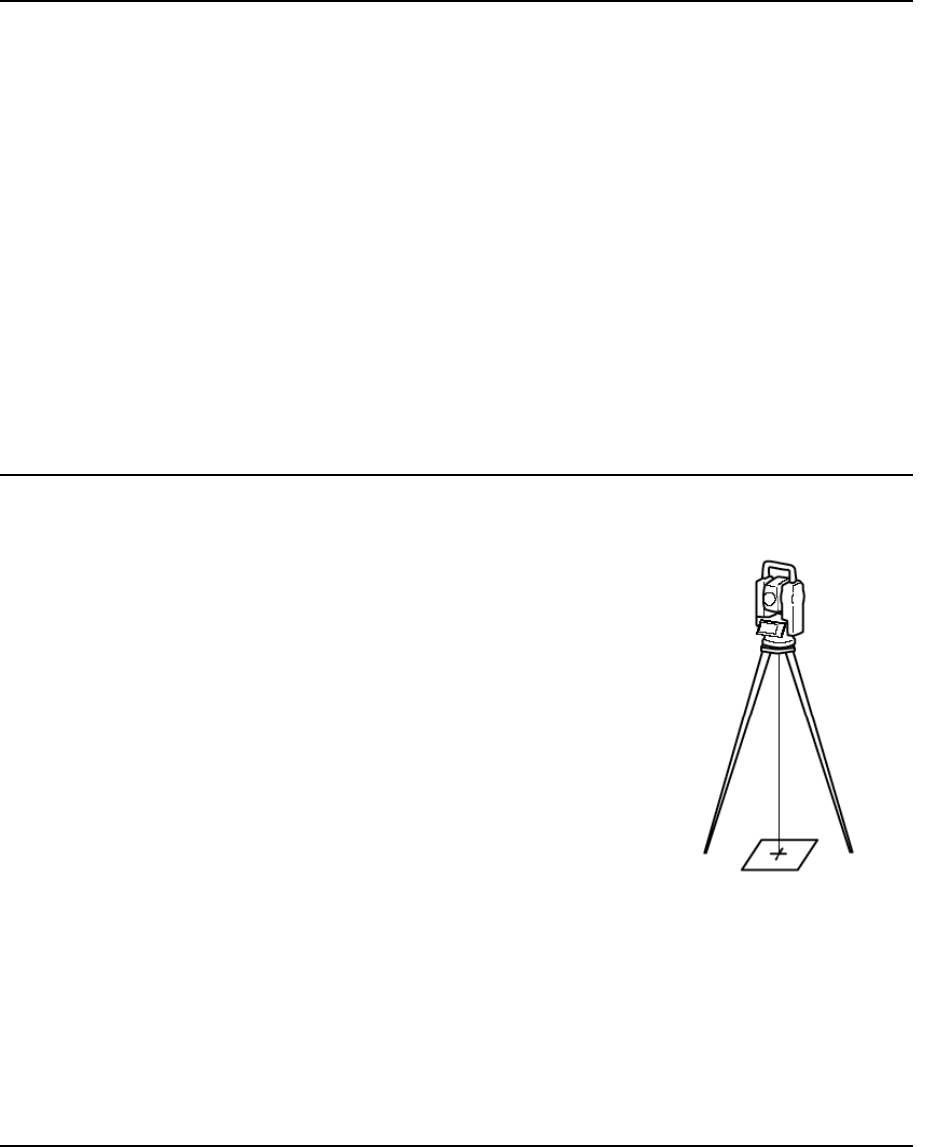
84
12.5 Vertical 0 point error
Make sure to follow check procedures mentioned below after making adjustments on reticle
and perpendicularity of line of sight to horizontal axis.
[Checks]
① Set up the instrument and turn the power on.
② Sight the telescope at any reference target A at Normal state. Read the vertical angle (y).
③ Turn the telescope and rotate the alidade. Sight the same target A again at Back state and
read the vertical angle R.
If y+R = 360°, no further adjustment is necessary.
[Adjustments]
If the deviation d (y+ R - 360° ) is wide, contact your local dealer.
12.6 Laser plummet
[Checks]
① Set the instrument on the tripod, and place a piece of white
paper with a cross drawn on it right under the instrument.
② Press the [LASER/Camera] key and press [F1] [LASER]
key and press [F4] [PLUM.ADJ] key , and move the paper
so that the intersecting point of the cross comes to the
centre of the laser mark.
③ Rotate the instrument around the vertical axis, and observe
the centre mark position against the intersecting point of
the cross at each 90° rotation.
④ If the laser mark always coincides with the intersecting
point, no adjustment is necessary.
[Adjustments]
When a centre part where a cross intersection and the laser mark look the brightest shifts by
0.5mm or more (at the instrument height 1.5m), it is necessary to adjust it.
A repair engineer does this adjustment. Please contact the PENTAX dealer.
12.7 Offset constant
The offset constant rarely changes. It is recommended, however, that check be done once or
twice a year.
The check of the offset constant can be done on a certified base line. It can also be obtained in
a simple way as described below.
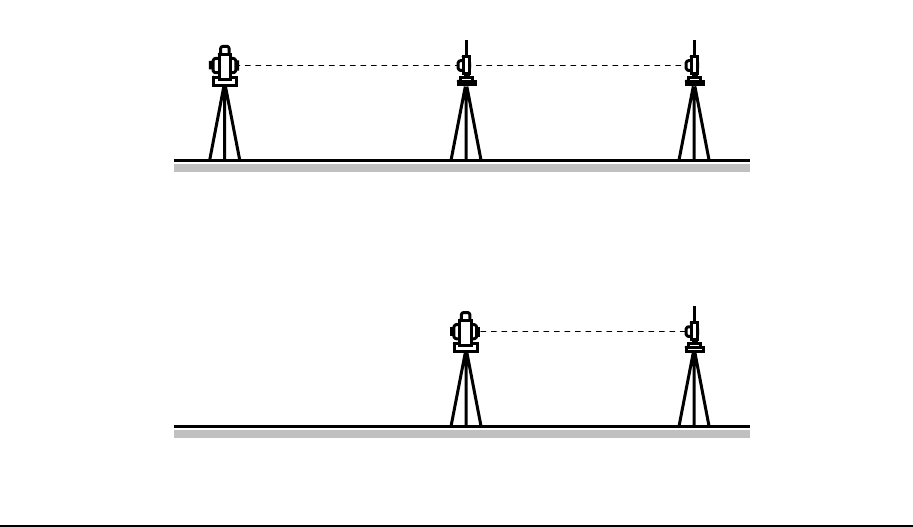
85
[Checks]
① Locate points A, B and C at about 50m intervals on even ground.
② Set up the instrument at point A, and measure the distances between AB and AC.
③ Set up the instrument at point B, and measure the distance BC.
④ Obtain the offset constant (K):
K=AC - (AB+BC)
[Adjustments]
• Contact your local dealer for adjustment of the off-set constant when the K is not nearly 0.
12.8 Beam axis and line of sight
Be sure to check that the beam axis and line of sight are aligned when the adjustments on
reticle and perpendicularity of line of sight to horizontal axis are made.
[Checks]
① Set the prism at a distance greater than 50m.
② Accurately sight the centre of the prism through the telescope.
③ Turn the power on and press (MEAS) to measure.
④ No adjustment is necessary if beam receiving buzzer sounds immediately and
measurement value is displayed in a few seconds.
[Adjustments]
• If instrument function is not as described in ④, contact your local dealer.
• This check should be done under good weather conditions.
A BC
Instrument Prism Prism
A BC
Instrument Prism
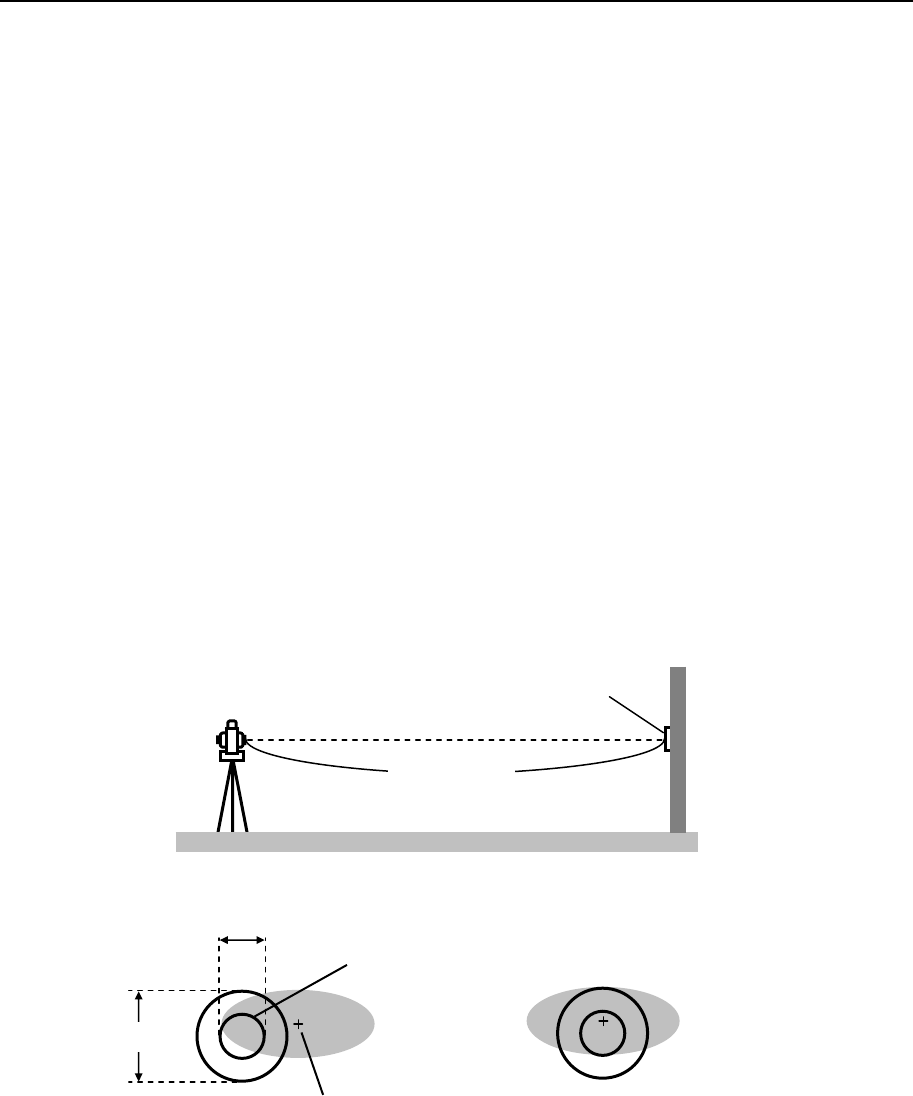
86
12.9 The EDM beam axis
The distance measurement (EDM) beam axis is adjusted to be aligned to the sighting axis of
the telescope, but it can be changed a little in case of rapid temperature change, shock or
aging. Check your instrument by following procedures.
[Checks]
① Install the instrument on the tripod and level it at the distance of approx. 50m from the
wall.
② Displace the target plate attached to the end of this manual. Place the target plate adjusting
its center to the center of telescope cross line and to be about horizontal to the instrument.
③ Turn the power on, and confirm the [TARGET] is set to the reflecting sheet mode (“S”
will be indicated at the top of display, left side of the battery remains sign when it is that.)
When it is not, press [F2] [TARGET] and set to eflecting sheet mode (refere to “6.1 Target
setting”).
④ Press [F1] [MEAS], then the laser spot appears on the target plate. If the “Center” of the
laser spot is within the internal circle (10mm) of the target plate at this moment, the
adjustment is unnecessary.
• The laser spot disappears in approx. 20 seconds after pressing [F1] [MEAS].
Press [MEAS] again, if it is necessary.
[Adjustments]
At the procedure 4. above, if the “Center” of laser spot is not within the internal circle
(10mm) of the target plate, the adjustment is necessary. Please contact your PENTAX
dealer.
Target Plate
approx. 50m
[Example: Adjustment is necessary] [Example: Adjustment is unnecessary]
10mm
20mm
Laser spot centre
Internal circle

87
13. APPENDIX
13.1 Warning and Error Messages
Warning Message Meaning What to do
Out of tilt range Displayed when the instrument is tilted
beyond the vertical compensation range
(±3) in case automatic compensation is
selected.
When it is properly leveled, this message
may be temporarily displayed if the
instrument is turned too fast.
Re-level the
instrument.
Repair is needed if
the message is
displayed when it is
properly levelled.
Excess data The input data exceeds the allowable
range. Press the [ESC] key
and enter the correct
data.
Out of range
(when being lit) This message is displayed if a long
distance which is far beyond measurable
distance of R-2500DN series is measured
with a wrong target mode.
Please select a correct target then
measure.
If a wrong target is selected, a correct
distance cannot be measured.
Select the correct
target mode.
Out of range
(when flashing) The measurement distance is less than
1.5m in Reflector sheet mode.
The measurement distance is less than
5m in Prism mode.
Select a longer point,
or use a tape
measurer.
Unsuitable
Condition Under too strong sunlight.
Unstable light value owing to shimmer or
obstacles.
Reflector sheet, Target and Prism do not
face the instrument.
Reflector sheet, Target and Prism are not
correctly sighted.
Measurement range is over in
Reflectorless mode.
Sufficient signal does not return by
sighting sharp edge etc. at Reflectorless
mode.
Change the object
that has much better
reflectivity or use a
prism, or wait until
the sun activity has
weakened.
Li-batt.voltage is
low. • The Date Clock is powered by the
built-in lithium battery.
• The lithium battery needs to be
replaced in five years.
Have the lithium
battery replaced by
the dealer from whom
the instrument was
purchased.

88
Error Message Meaning What to do
EDM ERROR
04 -05, 34-39, 50-53 Distance measurement
system problem
ETH ERROR 70-76 Angle measurement system problem
MEMORY ERROR 19 Memory problem
ERROR PS DATA of EDM
ERROR P DATA of EDM Problem of the internal EDM
parameters
ERROR ETH DATA Problem of the internal ETH
parameters
Turn the power off,
and then turn on
again
Repair is needed
when the message
appears
consistently.
System unready
Please restart Problem of when activating the
camera
13.2 Atmospheric correction
The speed at which light travels through the air varies depending on the temperature and
atmospheric pressure. The R-2500DN is designed to measure distances at the speed of light in
order to measure accurately, atmospheric correction needs to be used. The instrument is
designed to correct for weather conditions automatically if the temperature and pressure are
input. Correction is then carried out based on the following formula.
K: Atmospheric Correction Constant
P: Atmospheric pressure (hPa)
t: Temperature(°C)
Distance after Atmospheric Correction D = Ds (1+K)
Ds:Measured distance when no Atmospheric Correction is used.
13.3 hPa and mmHg conversion table
[Converting from hPa to mmHg] Unit:mmHg
hPa 0 10 20 30 40 50 60 70 80 90
500 375 383 390 398 405 413 420 428 435 443
600 450 458 465 473 480 488 495 503 510 518
700 525 533 540 548 555 563 570 578 585 593
800 600 608 615 623 630 638 645 653 660 668
900 675 683 690 698 705 713 720 728 735 743
1000 750 758 765 773 780 788 795 803 810 818
1100 825 833 840 848 855 863 870 878 885 893
1200 900 908 915 923 930 938 945 953 960 968
Calculation formula
K= (276.26713 ‒ 273.14941 + t ) X 10-4
78.565271・P
273.14941 + t
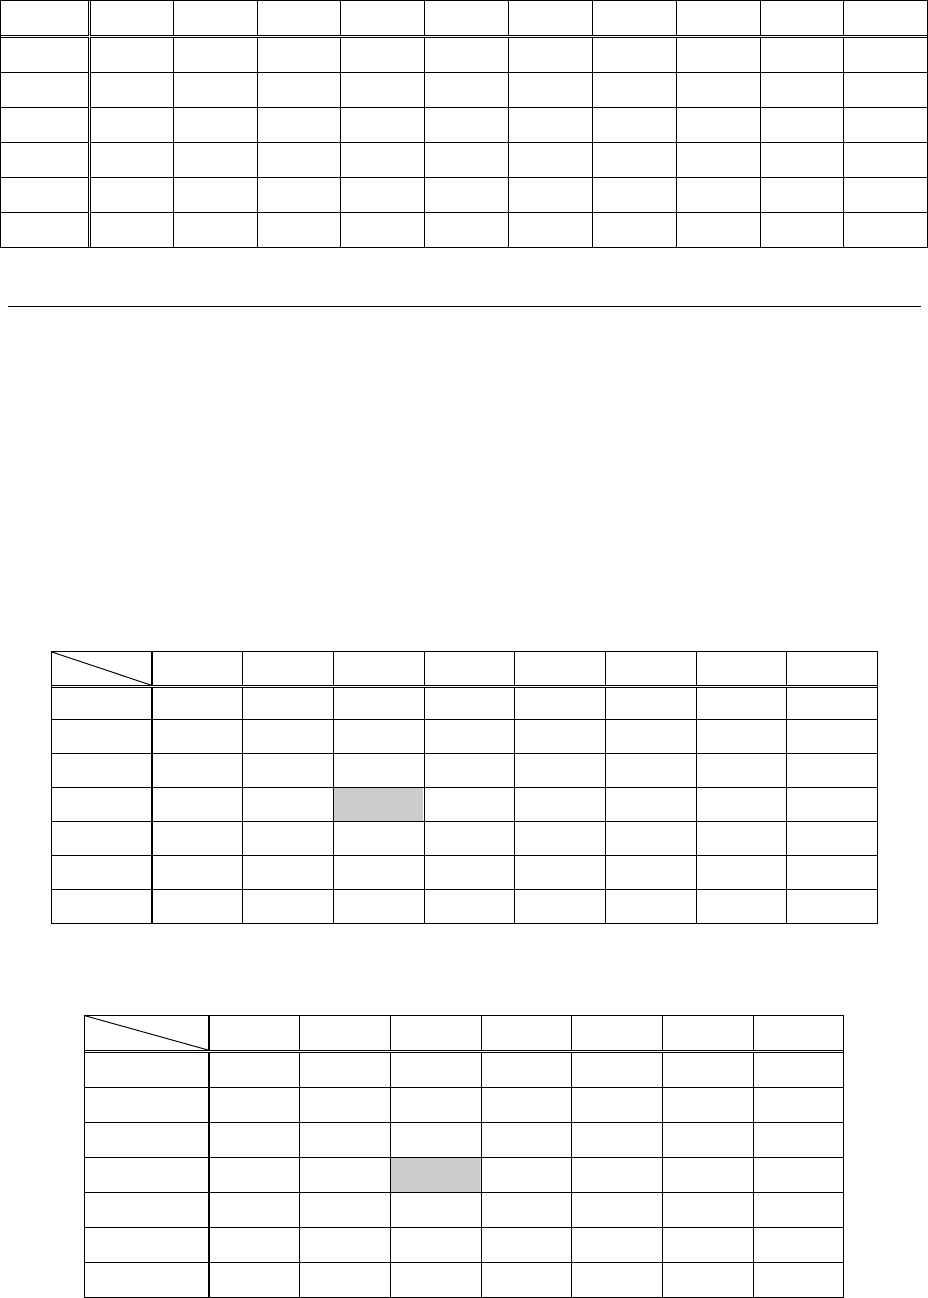
89
[Converting from mmHg to hPa] Unit:hPa
mmHg 0 10 20 30 40 50 60 70 80 90
400 533 547 560 573 587 600 613 627 640 653
500 667 680 693 707 720 733 747 760 773 787
600 800 813 827 840 853 867 880 893 907 920
700 933 947 960 973 987 1000 1013 1027 1040 1053
800 1067 1080 1093 1107 1120 1133 1147 1160 1173 1187
900 1200 1213 1227 1240 1253 1267 1280 1293 1307 1320
13.4 Error when no atmospheric correction is made
When measurement is carried out with no atmospheric correction (with the settings fixed at a
temperature of 15°C and an atmospheric pressure of 1013hPa or 760mmHg), the error per 100
meters in temperature and pressure will be shown in the tables below.
• When the actual pressure is 1013hPa (760mmHg) and the temperature is 25°C, conducting
the measurement with the temperature left at 15°C will result in the measurement being
short by 0.9mm per 100 meters.
[Error table: When hPa (15°C, 1013hPa as standard)] Unit:mm
C° hPa 1200 1100 1013 900 800 700 600 500
45 2.0 -0.5 -2.6 -5.5 -8.0 -10.5 -13.0 -15.5
35 3.0 0.4 -1.8 -4.7 -7.3 -9.9 -12.5 -15.1
25 4.0 1.4 -0.9 -4.0 -6.6 -9.3 -12.0 -14.6
15 5.2 2.4 -0.0 -3.1 -5.9 -8.6 -11.4 -14.2
5 6.3 3.5 1.0 -2.2 -5.1 -8.0 -10.8 -13.7
-5 7.6 4.7 2.1 -1.3 -4.2 -7.2 -10.2 -13.1
-15 9.0 5.9 3.2 -0.2 -3.3 -6.4 -9.5 -12.6
[Error table: With mmHg (15°C, 760mmHg as standard)] Unit:mm
C° mmHg 900 800 760 700 600 500 400
45 2.0 -1.3 -2.6 -4.6 -8.0 -11.3 -14.6
35 3.0 -0.4 -1.8 -3.9 -7.3 -10.8 -14.2
25 4.0 0.5 -0.9 -3.1 -6.6 -10.2 -13.7
15 5.2 1.5 0.0 -2.2 -5.9 -9.6 -13.3
5 6.3 2.5 1.0 -1.3 -5.1 -8.9 -12.7
-5 7.6 3.7 2.1 -0.3 -4.2 -8.2 -12.2
-15 9.0 4.9 3.2 0.8 -3.3 -7.4 -11.5
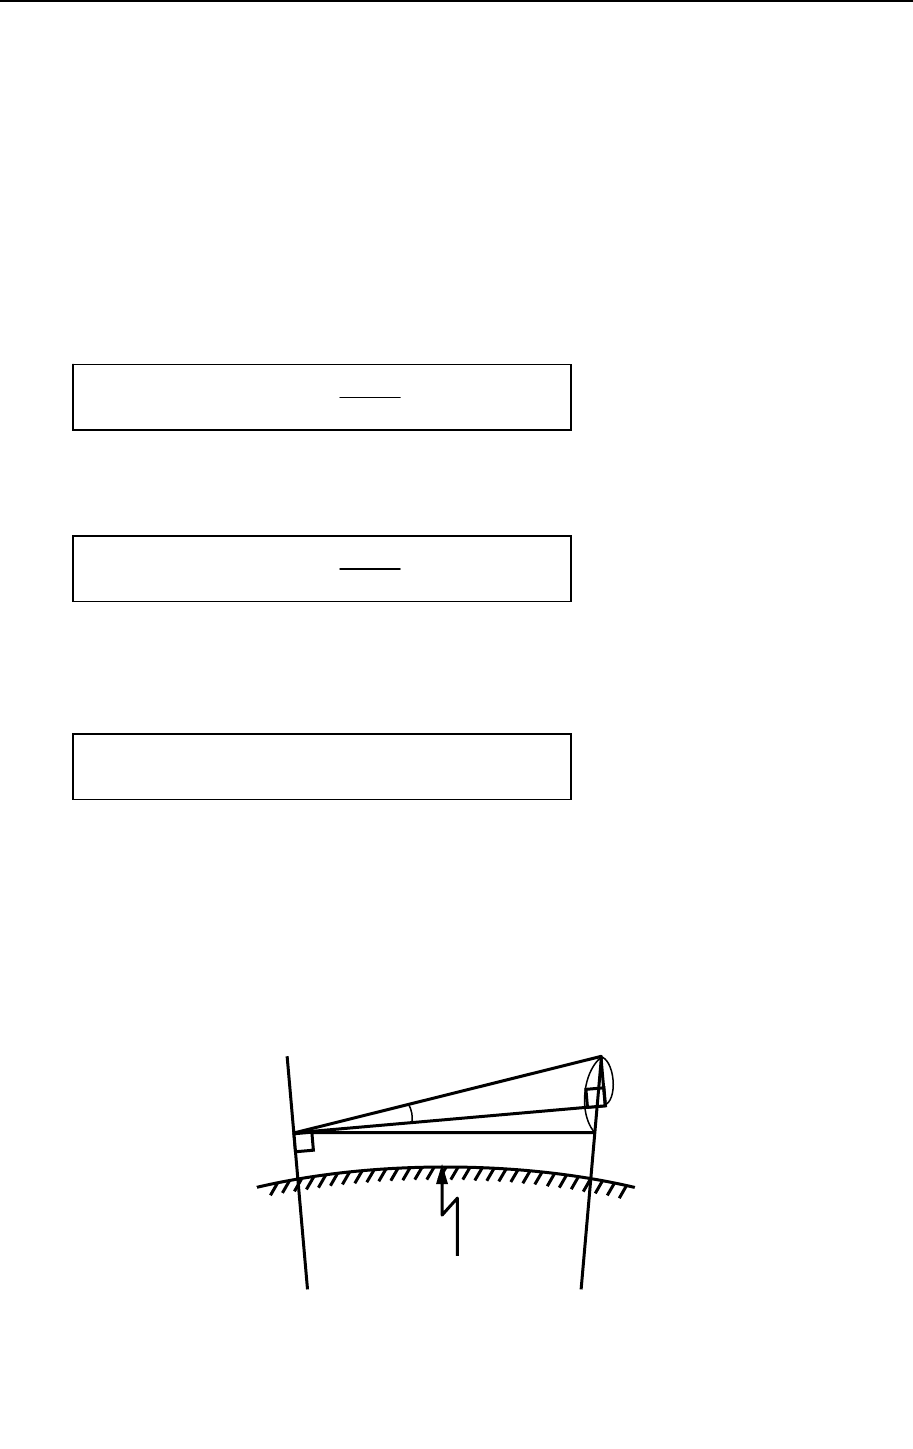
90
α
SH' VV'
H
Re=6378137m
13.5 Atmospheric refraction and earth curvature correction
• Atmospheric refraction and earth curvature correction refers to correcting both the bending
of the light beam caused by atmospheric refraction and the effect on the height differential
and horizontal distance caused by the earth curvature.
• Correction called “atmospheric refraction and earth curvature correction” is initiated to
correct error when the slope distance and vertical angle are caused to determine the
horizontal distance and the height differential, with this instrument, the following formula
is used to correct these factors.
• Calculation formula when atmospheric refraction and earth curvature correction parameter
is set to “ON”:
Corrected horizontal distance (H)
Corrected vertical distance (V)
• Calculation formula when atmospheric refraction and earth curvature correction parameter
is set to “OFF”:
S: Slope distance
α: Vertical angle from horizontal
K: Atmospheric refraction coefficient (0.14 or 0.2)
Re: Diameter of earth (6,370 km)
V = S ( sin α + cos α・ 2Re ・ S ・ cos α )
1-K
2Re
H = S ( cos α + sin α・ 2Re ・ S ・ cos α )
K-2
2Re
Horizontal distance H' = S ・ cos α
Vertical distance V' = S ・ sin α

91
13.6 Distance range
Generally speaking, the maximum range which can be measured varies considerably
depending on the atmospheric conditions. For this reason, the specifications illustrate the
values for both good and normal weather conditions.
It is extremely difficult to judge when weather conditions are “Good” and when they are
“Normal”. With this instrument, the conditions noted below are used to differentiate between
the two situations (good weather conditions for surveying are different from normal weather
conditions, and in surveying situations, cloudy skies are considered more favourable than
sunny skies.) .
Weather conditions for measurement ranges are based on the following standard values:
Normal : Visibility of approximately 20 km, with slight shimmer and moderate wind.
Good : Visibility of approximately 40 km, overcast, with no shimmer and moderate wind.
92
13.7 Specifications
R-2501DN R-2502DN R-2503DN R-2505DN
Telescope
Magnification 30 x
Effective aperture 45mm ( EDM45mm )
Resolving power 3.0"
Field of view 2.6% ( 1°30' )
Minimum focus 1.0m
Focus Manual
Distance measurement
Laser Class Visible Laser : Class IIIa ( Reflectorless ) / Class II ( Prism, sheet )
Measurement range (Good condition) *3
Reflectorless *1 1.5 ∼ 600m
Reflector sheet *2 1.5 ∼ 600m(800m)
Mini prism 1.5 ∼ 2500m(3000m)
1P 1.5 ∼ 7000m(9000m)
3P 1.5 ∼ 9000m(9999m)
Accuracy *4
Prism / Reflector Sheet 1.5m ∼ 10m : ±(3+2ppm x D)mm
10m ∼ : ±(2+2ppm x D)mm
Reflectorless 1.5m ∼ 150m : ±(3+2ppm x D)mm
150m∼ 300m : ±(5+2ppm x D)mm
300m ∼ : ±(7+10ppm x D)mm
At Auto-ATM. Correction
Prism / Reflector sheet 1.5m ∼ 10m: ±(3+10ppmxD)mm
10m ∼ : ±(2+10ppmxD)mm
Reflectorless 1.5m ∼300m:±(5+10ppmxD)mm
300m∼ :±(7+18ppmxD)mm
Minimum count 0.1mm (Fine mode) , 1mm (Normal mode) , 10mm (Track mode)
Measurement time *5
Repeat meas. Normal(1mm) : Prism / Ref.sheet 2.0sec. Ref.less 2.0sec.
Quick(1mm) : Prism / Ref.sheet 1.2sec. *6
Track(10mm) : Prism / Ref.sheet 0.4sec. Ref.less 0.4sec.
Initial meas. Normal(1mm) : Prism / Ref.sheet 2.5sec. Ref.less 2.4sec.
Quick(1mm) : Prism / Ref.sheet 1.7sec. *6
Track(10mm) : Prism / Ref.sheet 2.5sec. Ref.less 2.5sec.

93
R-2501DN R-2502DN R-2503DN R-2505DN
Angle measurement
Measuring method Absolute rotary encoder
Detection method Vertical / Horizontal angle : 2 sides
Minimum count 1" / 5" selectable
Accuracy (ISO17123-3) 1" 2" 3" 5"
Compensator 3 axis *7 2 axis
Tangent Screw 2 Speed 1 Speed
Sensitivity of vials
Plate level (electronic) 20"/1div.
(electronic) 30"/1div.
(electronic) 30"/1div.
Circular level 8'/2mm
Plummet Visible Laser, ±0.5mm (instrument height 1.5m) or Optical(Option)
Base Detachable
Dust and Water Protection IP56 (instrument only)
Ambient temperature -20°C ∼ 50°C / -4°F ∼ 122°F (Working range)
Tripod thread 5/8"x 11
Dimensions/Weight
Dimensions 190(W) x 343(H) x 177(L)mm
Weight (incl. Battery) 5.7kg
Carrying case 373(W) x 286(H) x 465(L)mm / 2.9k
Battery pack BP07
Power source Lithium ION +6.2VDC to 8.4VDC 2500mAH
Operation time Continuous approx. 4.5 hrs (ETH+EDM),
15 hrs (ETH) with approx.
Weight 210g (2)
Battery charger BC05 and AC Adapter AC05
Input voltage (AC05) AC 100 ∼240V
Output voltage (BC05) DC8.4V
Data Process
Data recording method Internal Memory
Coordinates data *8 60000 50000
Special function PowerTopoLite
I/F RS-232C, SD CARD, USB,Bluetooth
Display / Keyboard
Display type Graphic LCD / 20 characters x 8 lines / 240 x 96 pixels
Quantity 2
Keys 22 each(12 numeric / 5 function / 5 special)
Display back light Intensity settings: 10 steps
Laser Pointer Yes
Date clock Yes
94
R-2501DN R-2502DN R-2503DN R-2505DN
Degital Camera(DSC)
Sensor CMOS 3.1 megapixels
Image resolution 2048x1536 / 1600x1200 / 1280x960 / 640x480
LCD 1.5" Color TFT 34mm x 24 mm (502x240 dot.)
EV compensation -2EV~+2EV ( 0.5EV step )
WhiteBlance Auto/Daylight/Light Bulb/Fluorescent/Cloudy
ISO Sensitivity 100/200/400
File format JPEG ( FQ:1/4, NQ:1/8, EQ:1/16 )
File management DCF(Ver1.0) / FAT16
Digital zoom 1x / 2x / 3x
Play back function Yes
External memory SD ( up to 1GB )
Focus length 50mm
Focus range 20m ~ ∞ (fixed focus length)
Field of view 8.8°
Effective Diameter f/5.6
I/F USB 2.0
Power Internal (Supplied from TS battery)
The number of snaps depending on setting & memory size
★★★ 256MB 512MB 1GB
L 156 305 626
M(=Mcut) 253 495 1017
S(=Scut) 396 774 1591
SS(=SScut) 1546 3020 6206
★★ 256MB 512MB 1GB
L 311 604 1241
M(=Mcut) 501 974 2002
S(=Scut) 777 1510 3103
SS(=SScut) 3110 6043 12415
★ 256MB 512MB 1GB
L 622 1208 2483
M(=Mcut) 972 1888 3880
S(=Scut) 1555 3022 6208
SS(=SScut) NO SELECT NO SELECT NO SELECT
The above-mentioned number of sheets showing the maximum of pictures taken is an
approximate value.
The maximum picture you can take depends on the capacity of SD card you will use.
95
NOTE :
*1 The measurement range and accuracy of reflectorless, and time required to measure may
vary by the shape, size of surface area and reflection rate of the target and its environment.
The measurement range of reflectorless is determined by the white side of the Kodak Gray
Card.
*2 Reflector sheet: PENTAX genuine Reflector sheet
*3 The measurement range may vary by conditions of the environment.
Normal conditions: 20km visibility with slight shimmer Good conditions: 40km visibility,
overcast, no heat, no shimmer and moderate wind.
*4 When automatic atmospheric correction is on, the EDM error is 10ppm in prism and
reflector sheet mode.
*5 EDM measuring time is determined in good conditions. It may takes longer than usual to
measure the distance exceeding 4000m in prism mode and 300m in reflectorless mode.
*6 Quick mode, which functions with prism and reflector sheet, is effective only under normal
mode(1mm) and up to 500m.
*7 In addition to dual-axis correction in the (X) and (Y) direction, mechanical error in the
instrument is corrected.
*8 Number of points to be recorded may vary by usage.
Maximum number of point to be recorded per job site : 3000 points
Maximum number of job file to be recorded : 50 job files
Maximum data points to be sent from PC to the instrument: 3000 points
14. NOTICE TO THE USER OF THIS PRODUCT
To assure compliance with the Safety standard 21 CFR, Chapter 1. Subchapter J. The U.S.
Bureau of Radiological Health requires the following information to be provided to user.:
It can be dangerous to look into the beam with optical equipment such as binoculars
and telescopes.
14.1 Specifications of Laser Radiation
A) The EDM module of the R-2500DN produces a visible light beam, which is emitted
from the telescope objective lens and the centre hole of the instrument base plate.
The R-2500DN is designed and built to have a laser diode radiating at 620-690nm.
B) Radiant power
The R-2500DN is designed and built to radiate a maximum average radiant power of
4.75mW from the telescope.The user may be subject to this radiation as the beam
continues operating until such time that the instrument is turned off.

96
14.2 The following labels are affixed to and must remain
attached to this laser product.
WARNING
Do not stare into the laser beam directly as this may result in damage to your eyes.
R-2500DN is a Class IIIa (3R) Laser product.Do not look into the laser radiation aperture
directly as this may result in damage to your eyes.
Never use the telescope to view intense light such as direct sunlight or sunlight reflected
through a prism as this may result in loss of sight.
A) The following Certification label is located near the Plate level: “This laser product is
complied with the provisions of 21 CFR 1040. 10 and 1040.11. For a Class IIIa laser
product.”
B) Caution label is located near the exit aperture: “AVOID EXPOSURE. Laser radiation
is emitted from this aperture.”
C) Warning logotype is located on the surface of the telescope: “CAUTION LASER
RADIATION DO NOT STARE INTO BEAM”
D) Warning label is Located near the exit aperture.
14.3 Caution to maintain the safety in compliance with the
standard
A) To maintain the safety standard, refrain from any operation, maintenance, or
adjustment other than described in this instruction manual.
B) Operation, maintenance or adjustment other than those specified in this instruction
manual may result in hazardous radiation exposure.
C) Maintenance and repair not covered in this manual must be done by an authorized
Pentax dealer.
D) The Laser beam emission by the Distance measurement can be terminated by pressing
[ESC] key.
E) Pressing [Laser/Camera] key and [F1] [LASER] key and [F2] [RED MARK] key can
terminate the laser beam emission by the laser pointer.
F) The laser beam emission by the laser plummet can be terminated by pressing
[Laser/Camera] key and [F1] [LASER] key and [F4] [PLUM.ADJ]key.
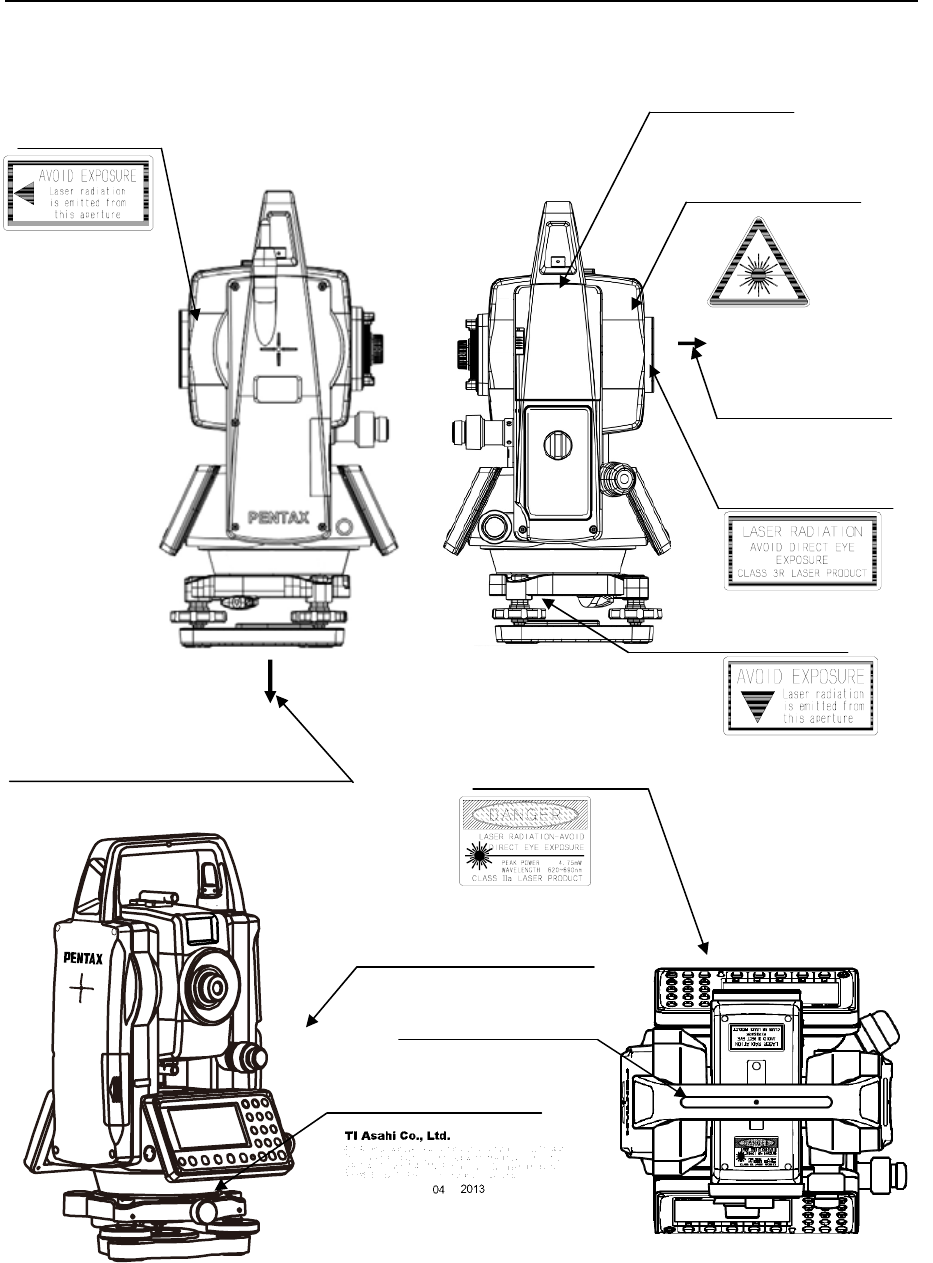
97
14.4 Labelling
Aperture label Identification
Laser beam is
transimitted from
this aperture
Warning logotype
Warning logotype
Warning logotype
Laser beam is transmitted
from this aperture
LED is turned on at
the time of emission
For North America
Certification
Aperture sticker
Laser beam is transmitted from
this aperture
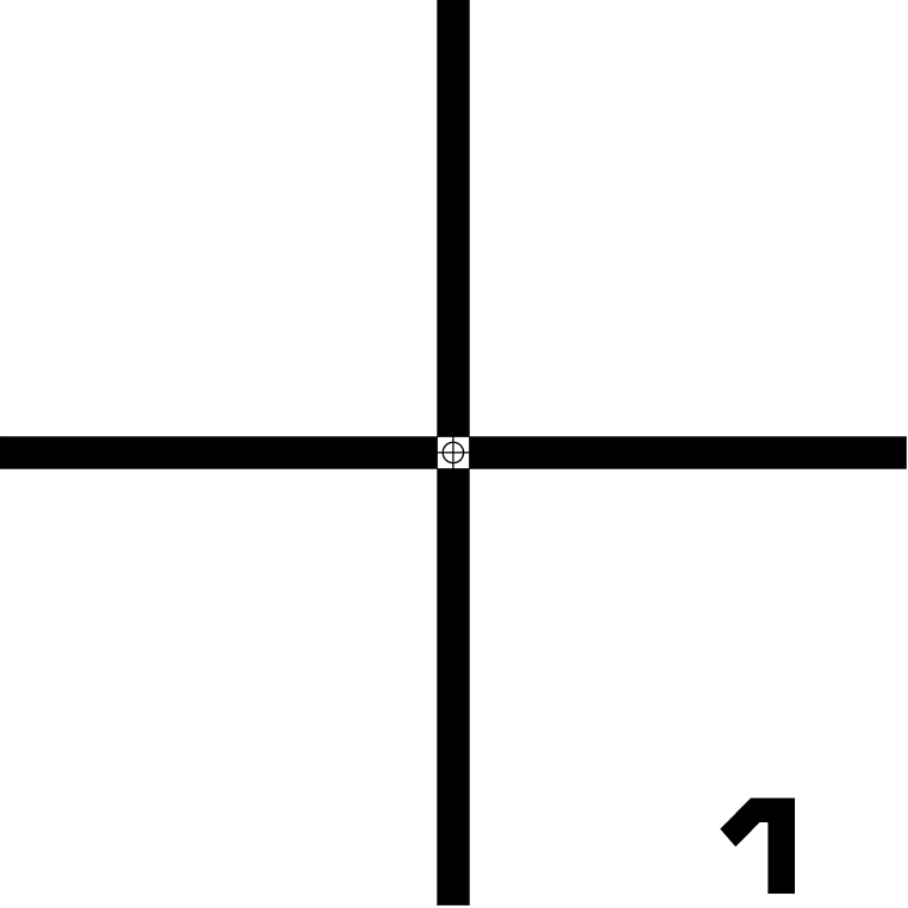
98
[ CCM TARGET 1 ]
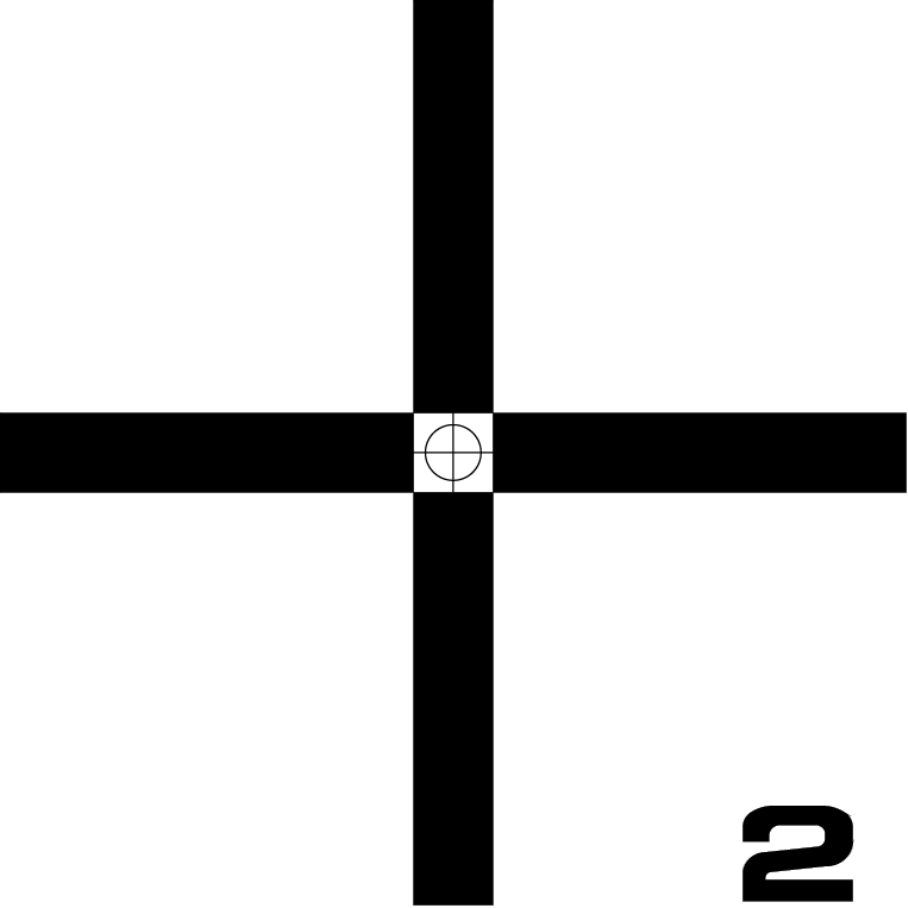
99
[ CCM TARGET 2 ]

15. FCC RELATED
15.1 FCC Statement
1. This device complies with Part 15 of the FCC Rules. Operation is subject to the following two
conditions:
(1) This device may not cause harmful interference.
(2) This device must accept any interference received, including interference that may cause
undesired operation.
2. Changes or modifications not expressly approved by the party responsible for compliance could
void the user's authority to operate the equipment.
NOTE: This equipment has been tested and found to comply with the limits for a Class B digital
device, pursuant to Part 15 of the FCC Rules. These limits are designed to provide reasonable
protection against harmful interference in a residential installation.
This equipment generates ,uses and radiate radio frequency energy and, if not installed and
used in accordance with the instructions, may cause harmful interference to radio communications.
However, there is no guarantee that interference will not occur in a particular installation. If this
equipment does cause harmful interference to radio or television reception, which can be
determined by turning the equipment off and on, the user is encouraged to try to correct the
interference by one or more of the following measures:
Reorient or relocate the receiving antenna.
Increase the separation between the equipment and receiver.
Connect the equipment into an outlet on a circuit different from that to which the receiver is
connected.
Consult the dealer or an experienced radio/TV technician for help.
15.2 FCC Radiation Exposure Statement
This equipment complies with FCC radiation exposure limits set forth for an uncontrolled
environment. This equipment should be installed and operated with minimum distance 20cm
between the radiator & your body
100

101
TI Asahi Co.,Ltd.
International Sales Department
4-3-4 Ueno Iwatsuki-Ku, Saitama-Shi
Saitama,339-0073 Japan
Tel, +81-48-793-0118
Fax, +81-48-793-0128
E-mail: international@tiasahi.com