TJ Media TJ-JI-200M Wireless MIC Receiver User Manual
TJ Media Co., Ltd. Wireless MIC Receiver
TJ Media >
Users Manual
Wireless Microphone Karaoke Player Ji-200
• Thank you for purchasing Ji-200 of TJ media co., Ltd.
• Please read this manual thoroughly before use to enjoy full
performance of Ji-200.
• Please make sure to read Safety Caution for safe use.
• After reading this, please keep this manual within reach so that
you may refer to it any time you need.
T
able of Content
Before use
Verification of included elements·································· 3
Features of wireless Microphone karaoke player········ 4
Safety caution
Warning············································································ 5
Caution············································································· 6
Use / Maintenance / Cleaning····································· 7
Names of parts
Main set·········································································· 8
Microphone······································································ 9
Remote controller························································· 10
Connection
Audio and video connection to TV····························· 11
Separate connection of Audio 1 Amp. ····················· 12
Operation
Power control of main unit········································· 13
Microphone power / Microphone channel··············· 14
Selecting / Playing / Booking(RSRV)·························· 15
Recording······································································· 16
Music control ································································· 17
Tempo / Key(Tune) / Rhythm····································· 18
Manipulation LOCK / Additional song CHIP·············· 19
Others
Checking and troubleshooting····································· 20
Specifications································································· 21
3
Before use -Verification of included elements
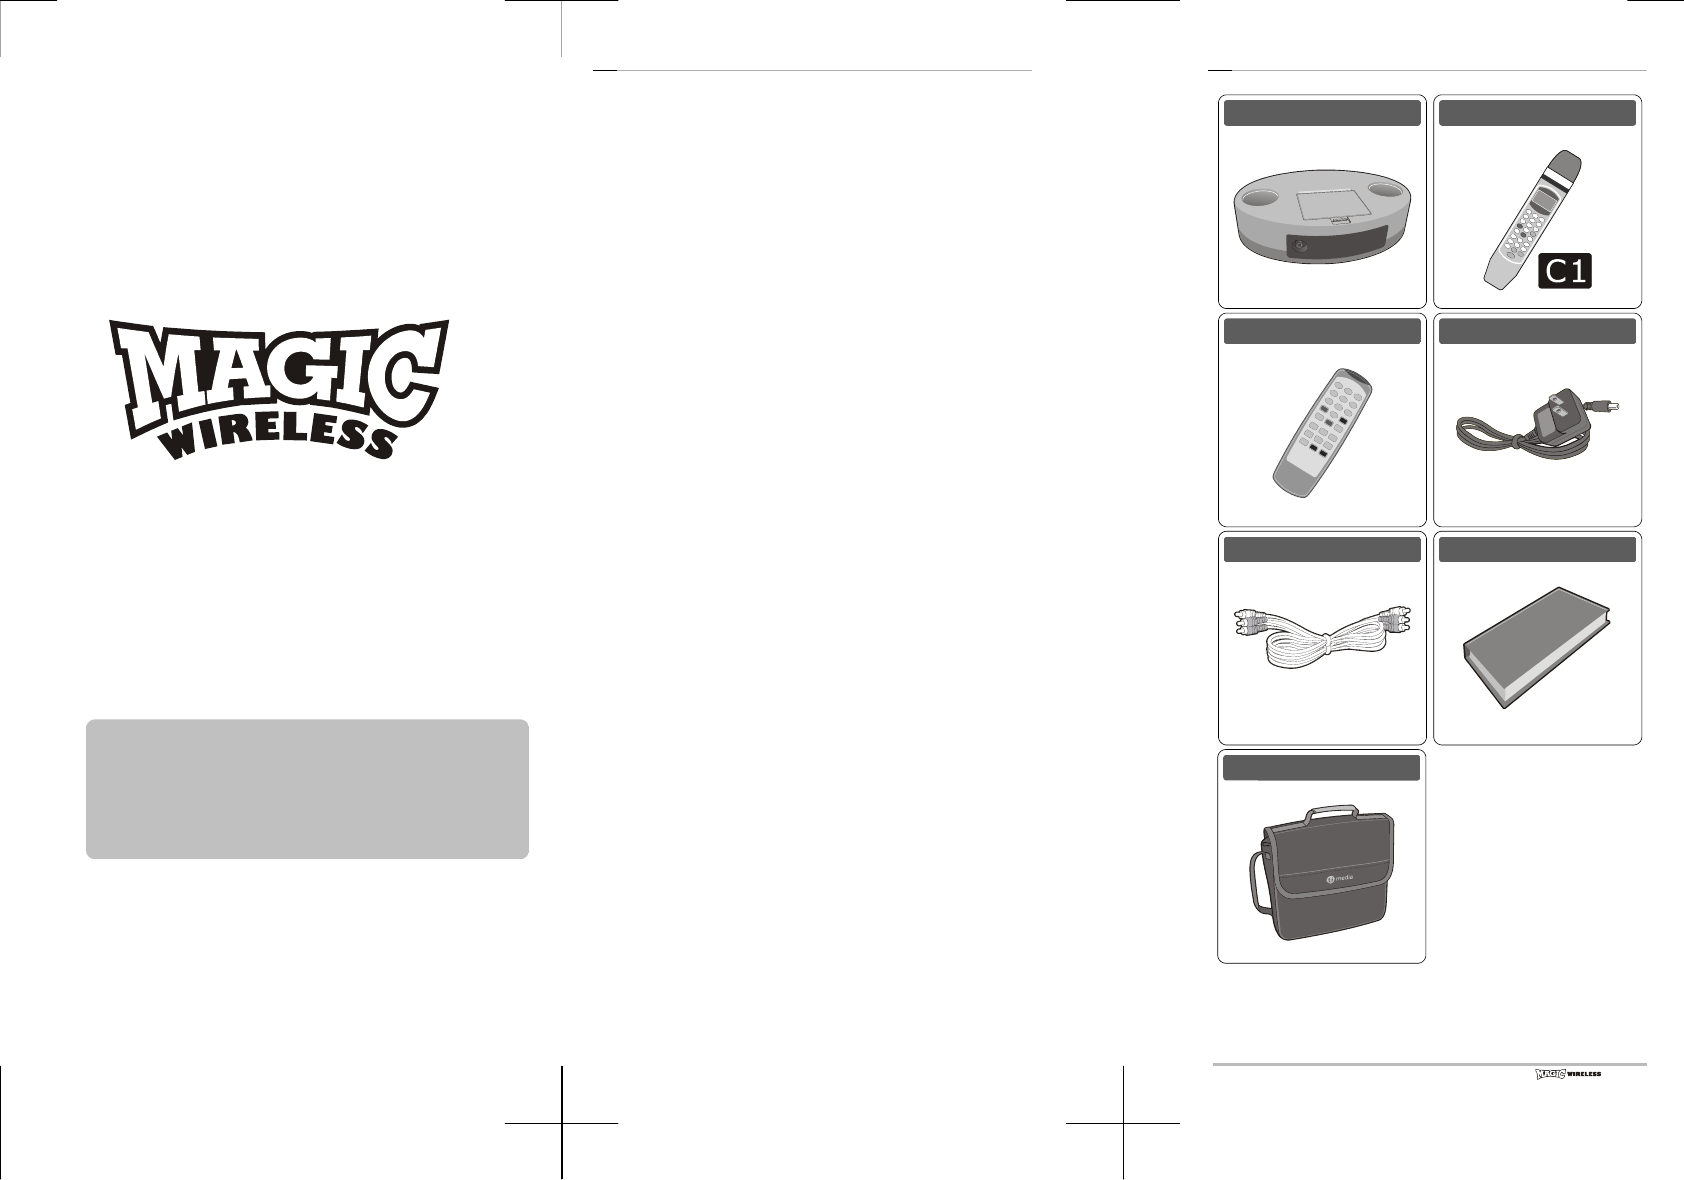
Main set 1EA
Microphone 1EA
Remote controller 1EA
AC adapter 1EA
Video·audio cable 1EA
Song book/manual
Carrying bag
4
Before use -Features of wireless Microphone karaoke player
• This wireless Microphone karaoke player is designed to use
800MHz compatible with the wireless Microphone adapted to a
certain low level of power.
• Wireless, thus very easy to move while singing.
• Its remote control is convenient to manipulate the set such as song
booking while others are singing.
• It produces high quality sound almost like live music.
• Its installation is simple and it is easily portable.
• External image can be connected.
• Booking possible up to 100 songs!
• A song can be recorded up to 5 minutes and the set plays back
the recorded song.
• You can adjust volume, tempo and key(tune) of the melody during
playback.
• Saving Mode - In case of doing not use this product for 30minutes,
automatically power turns off.
FCC INFORMATION
Warning: Modifying, tampering and/or adjusting this or replacement of
any transmitter component (crystal, semiconductor, etc.) in this unit
could result in a violation of the rules. Changes or modifications to this
unit not expressly approved by the party responsible for compliance
could void the user's authority to operate the equipment.
FCC NOTICE
This wireless microphone system complies with Part 90 of FCC Rules.
There are four frequencies available for the system. You must get a
license for each frequency you plan to use before you use the system
(one license can include four frequencies).
Visit http://wireless.fcc.gov/uls/ to access the license online or phone the
nearest FCC offices and contact them to get the necessary application.
Licensing depends on how you will use the system
RF EXPOSURE
This wireless microphone contains a low power transmitter. When the
power is on, it sends out radio frequency (RF) signals. In August 1966,
the Federal Communications Commissions (FCC) adopted RF exposure
guidelines with safety levels for wireless devices.
IMPORTANT NOTE: To adhere to the FCC RF exposure compliance
requirements, no change to the antenna or the unit is permitted. Any
change to the antenna or the unit could result in the system exceeding
the RF exposure requirements.
5
Safety caution -Warning
Current manual and product use different pictures in order to
keep safe insure and to avoid physical or material damage of
user and other people.
Please make sure read following contents carefully and fully
understand the picture.
Safety section is divided into Warning and Caution and their
meanings are as follows.
The signal is to call the attention of operations or matters
that may cause a danger.
Warning: Violating safety instructions can cause serious injury
or death.
Caution: Violating safety instructions can cause slight wound
or damage the appliance.
Warning
■ Unplug power cord as soon as you notice an abnormality or trouble.
In presence of smoke or strange smell / when the set is dropped
or is damaged / when the water or other substance entered
inside of the set
■ Do not place the product on an unstable surface.
■ Do not put any object containing water such as vase, near the microphone.
It can cause fire or electric shock.
■ Do not touch AC adapter during thunder(lighting) to avoid electric shock.
■ Be careful not to damage the cord.
Do not place any heavy objects on the cord or puneture cord with
sharp objects like a needle. If the cord is under a carpet or a rug,
you should be careful not to put anything heavy on the cord.
■ Use the set carefully.
Do not damage the cord's coated cover. Do not cut, bend, twist,
pull or heat the cord. It can cause fire or electric shock.
■ Never open the cabinet of the main set.
It may cause electric shock. Ask your shop for internal control,
adjustment or repair.
■ Do not keep the product near flammable substance, under direct sun's ray or
in a wet and dusty place.
It can cause fire or electric shock.
■ When moving the product, unplug the power cord.
If you move it while it is cord plugged, the cord can be damaged
and cause fire or electric shock.
6
Safety caution -Caution
Caution
■ Do not put anything heavy on the set.
■ Do not expose the product to direct sun's ray or high humidity.
■ When connecting the main set to TV or Audio device, minimize the volume of TV or Amp
before plugging in power cord.
Sudden loud sound may cause hearing trouble to your ears.
■ Unplug AC adapter when cleansing the product.
■ When you will not use the product for a long time during your trip, unplug AC adapter.
It can cause fire.
■ When putting the battery in, check the poles (+/-).
Incorrect installation may cause fire, catastrophe or environmental
pollution due to battery damage or leakage.
■ Do not use unrecommended battery or mix new and old batteries.
It may cause fire, catastrophe or environmental pollution due to battery
damage or leakage.
■ When connecting to TV or Audio device, unplug the AC adapter of main set.
If you connect with the power on, it can cause electric shock or
catastrophe.
■ Do not use the product with the song broken.
It may heat the speaker causing fire.
■ Plug AC adapter in correctly.
Otherwise, its heating or dust may cause fire.
The contact with a knife or other sharp object may cause electric shock.
If AC adapter cannot be plugged in tightly, request the outlet change to
your shop or electric company without plugging the AC adapter into the
outlet.
■ Do not unplug AC adapter with your hands wet.
It may cause electric shock. Do not modify or damage power cord.
7
Safety caution -Use / Maintenance / Cleaning
About the place of installation and usage
■ Do not keep the product near an object producing strong
electric wave such as mobile phone or transformer. Due to the
electric wave, the product may not work.
■ If you keep the product near the TV, this may give bad effect
to the quality of its image or sound. In this case, keep a
certain distance from the TV.
■ Long and constant absence of use may deteriorate the product's
function. Turn it on and make it work from time to time.
Use of microphone
■ Grasp the middle of wireless microphone for use.
■ This Microphone has its transmitting antenna in the lower part.
If you cover this part with your hand, you may interfere with the
electric waves.
■ Set the volume to a level with clean sound and avoid using it
in front of the speaker.
■ Do not put Microphone on Microphone stand in case of power
on because of noise.
Maintenance and cleaning of the device
■ Do not clean the plastic part with alcohol/benzene/thinner for it
may damage paints.
■ When cleaning the product, use a soft cloth. If it is very dirty,
use the cloth soaked in the water with diluted neutral detergent
before using dry cloth.
■ When using the cloth with chemical substance, follow the
instructions carefully.
■ Do not put flammable substances such as insecticide. If you
use the set giving it a long contact with rubber or vinyl product,
it may damage paints.
■ When cleaning the set, unplug the AC adapter.
8
Names of parts -Main set
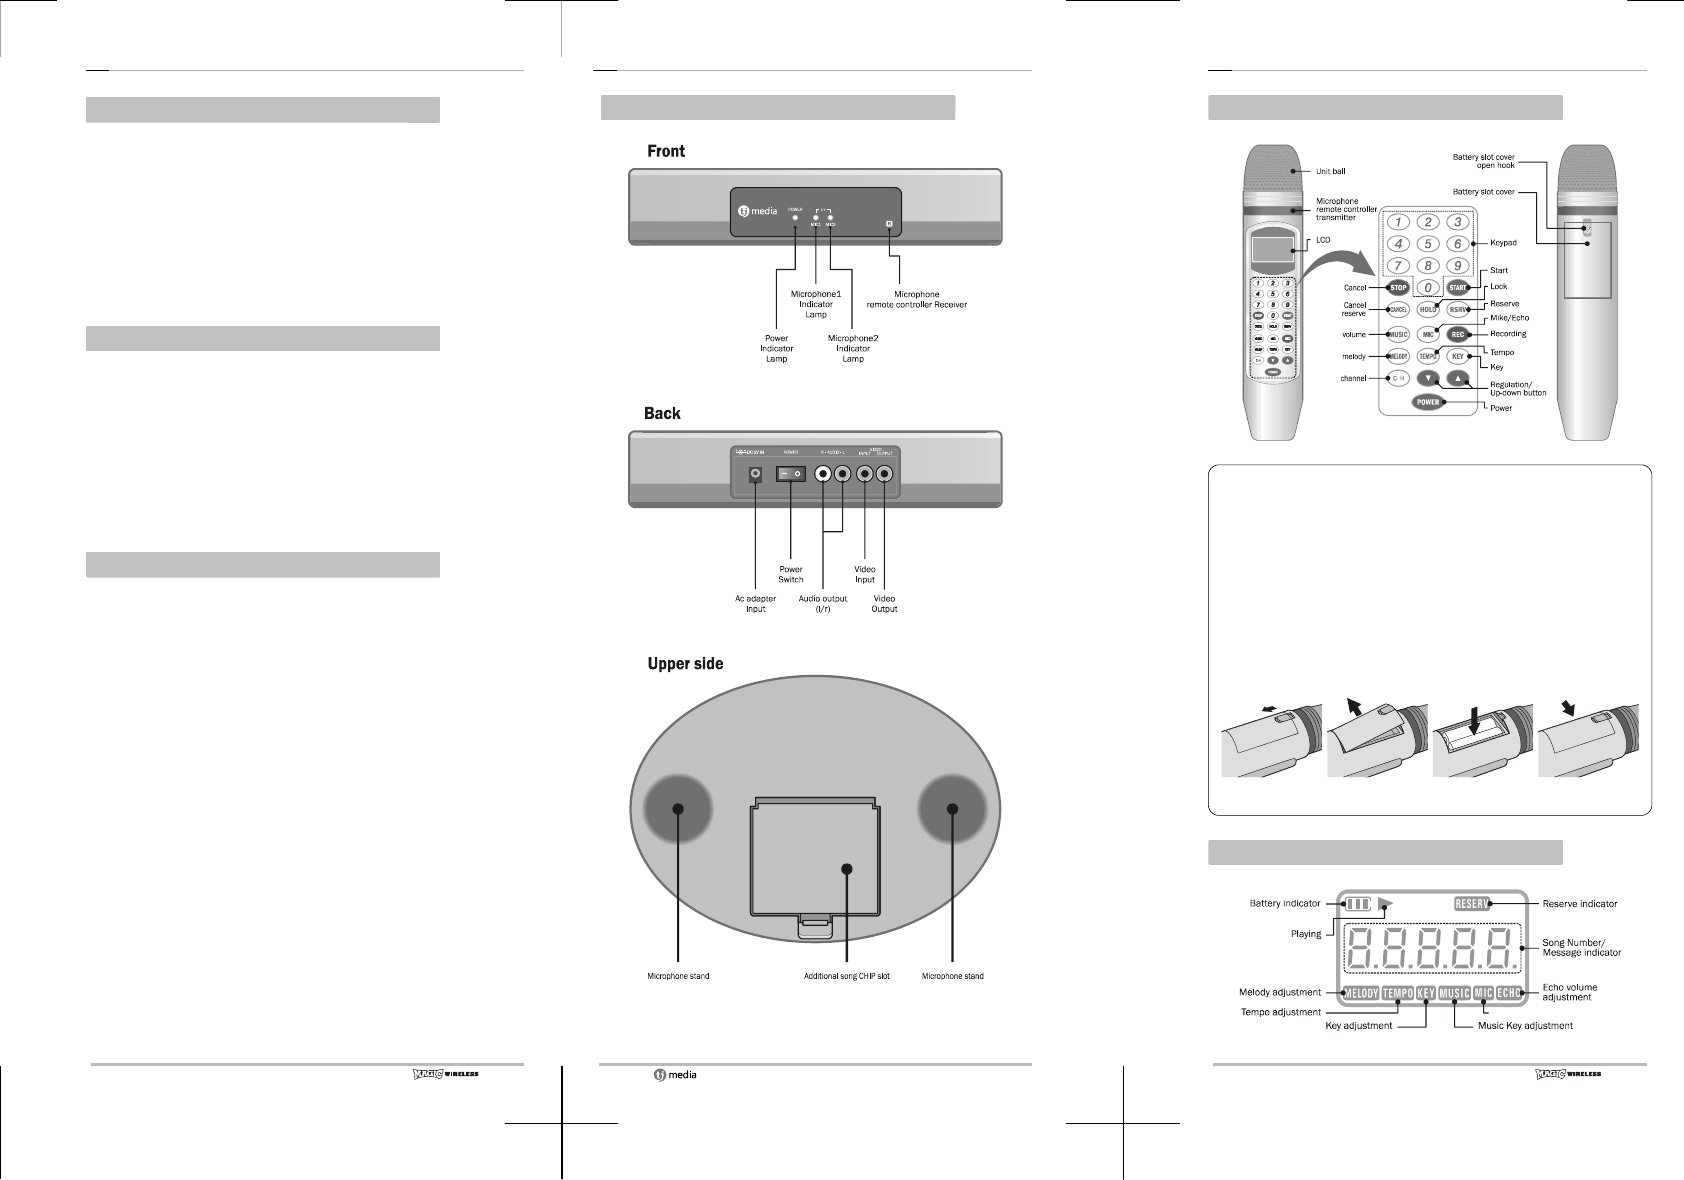
Main set
9
Names of parts -Microphone
Microphone main unit
Keep following instructions to avoid electric discharge or
damage of battery.
■ When inputting the battery in the Microphone. check its poles (+/-).
■ Make sure to use the battery of (AA) size.
■ When changing the batteries, make sure to change both of them.
■ When you don't use the Microphone for a long time, keep the
battery out of Microphone.
When to change the battery
■ If the microphone does not work even within short distance from the
set, the battery is going dead. You should change the batteries.
How to change the battery
① Pull down the
hook.
② Pull up the
cover.
③ Insert battery
in correctly.
④ Close the
cover.
Microphone display indication
10
Names of parts -Remote controller
Remote controller
Keep following instructions to avoid electric discharge or
damage of battery.
■ When inputting the battery in the Microphone. check its poles (+/-).
■ Make sure to use the batteries for remote controller of (AAA) size.
■ When changing the batteries, make sure to change both of them.
■ When you don't use the Microphone for a long time, keep the
battery out of Microphone.
When to change the battery
■ If the Microphone work in a shorter distance from the set, the
battery is going dead. You should change the batteries.
How to change the battery
① Pressing the groove,
pull up the cover.
② Insert the battery
correctly.
③ Close the cover.
Option
Additional Chip Microphone C2
11
Connection -Audio and video connection to TV
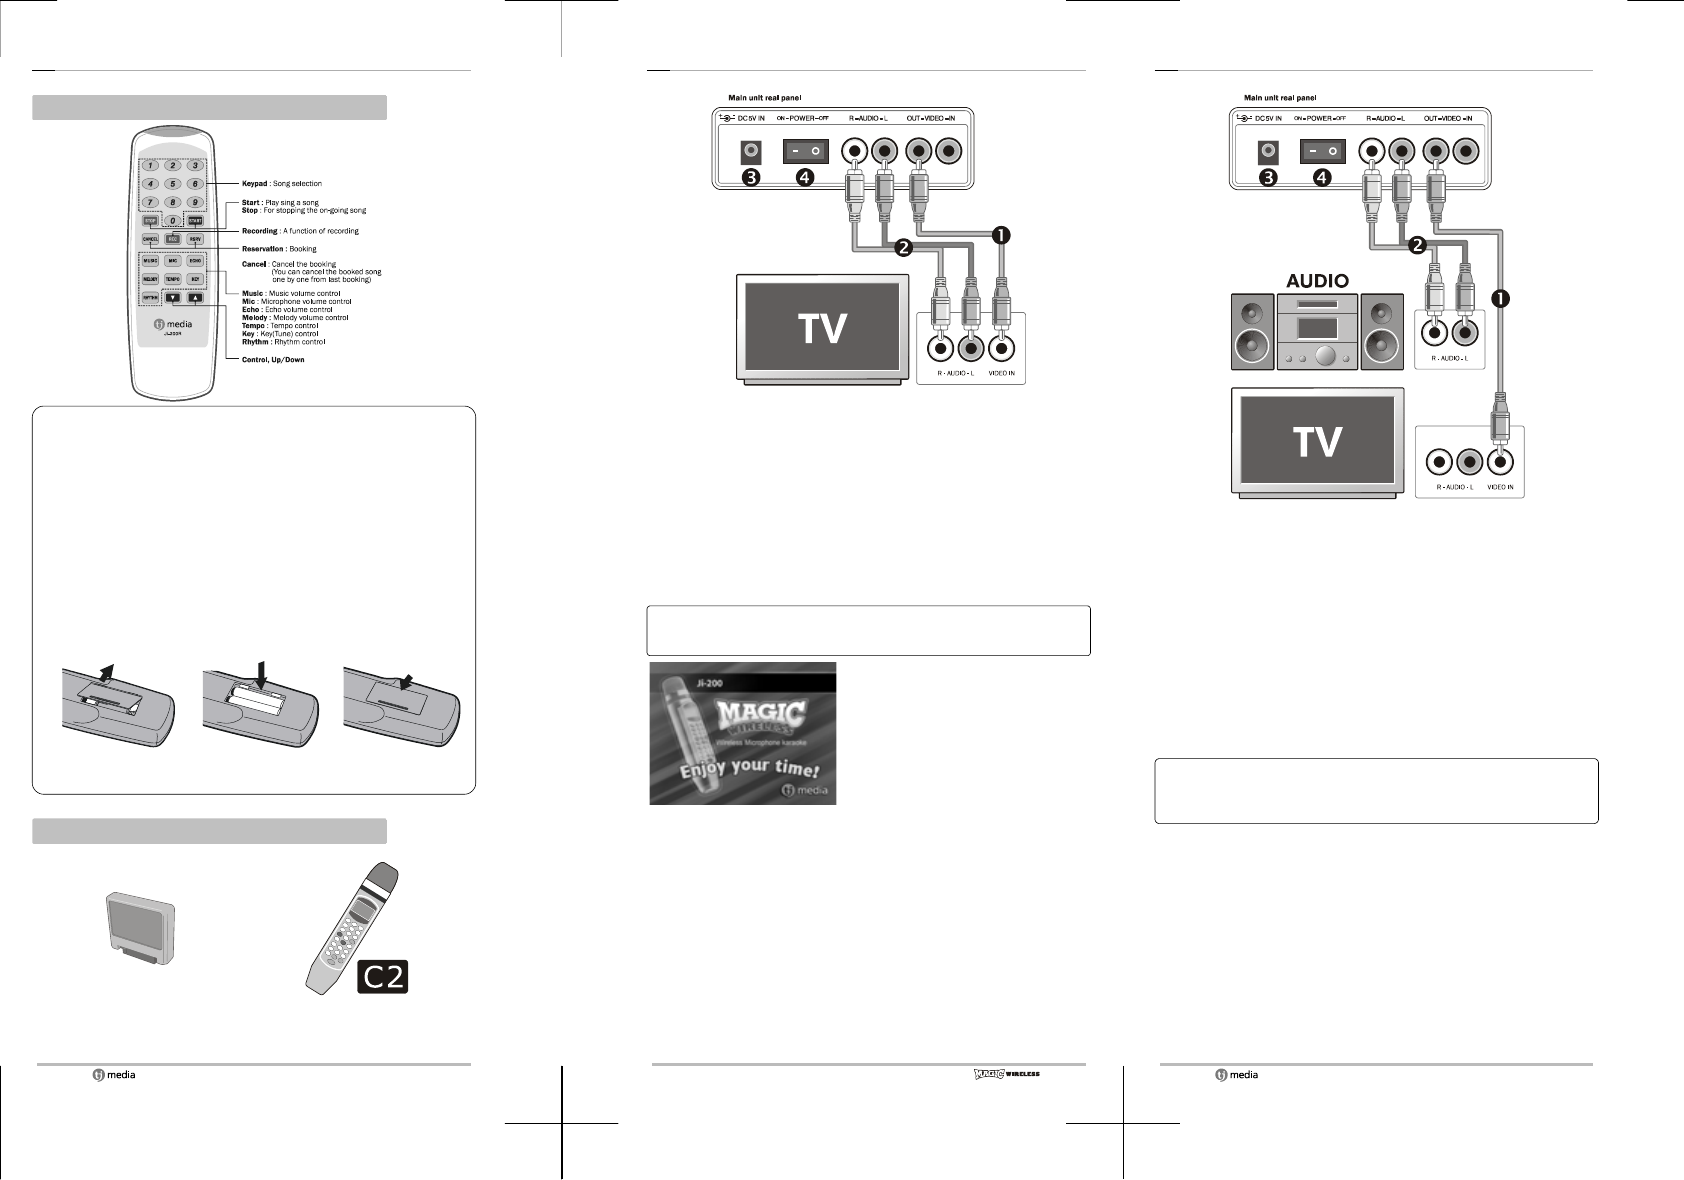
❶ Connect video output(yellow) of Ji-200 main unit and video input
(yellow) of TV with yellow cable among video audio cables.
❷ Connect audio output(left-white/right-red) of Ji-200 main unit and
audio input(left-white/right-red) of TV with white/red audio cable.
❸ Connect AC adapter jack to adapter connection terminal of rear
panel of main unit and plug AC adapter in.
❹ Turn on the switch of rear panel of main unit. Check the red
lamp of front panel is ON.
❺ Change the TV input mode into the mode of connected video
input terminal.
Refer to the TV user's manual for the detailed explanation on
TV input mode and external device connection.
❻ Select a song after you get
Ji-200 initial image in TV
screen. You will see letters
appearing.
12
Connection -Separate connection of Audio·Amp.
❶ Connect video output(yellow) of Ji-200 main unit and video input
(yellow) of TV with yellow cable among video audio cables.
❷ Connect audio output(left-white/right-red) of Ji-200 main unit and
audio input(left-white/right-red) of audio or amp. with white/red
audio cable.
❸ Connect AC adapter jack to adapter connection terminal of rear
panel of main unit and plug AC adapter in.
❹ Turn on the switch of rear panel of main unit. Check the red
lamp of front panel is ON.
❺ Change TV input mode into the mode of connected video input
terminal, and change audio or amp. input mode into external
input(or AUX).
Refer to the TV user's manual for the detailed explanation on
TV, audio and amp. input mode and external device
connection.
13
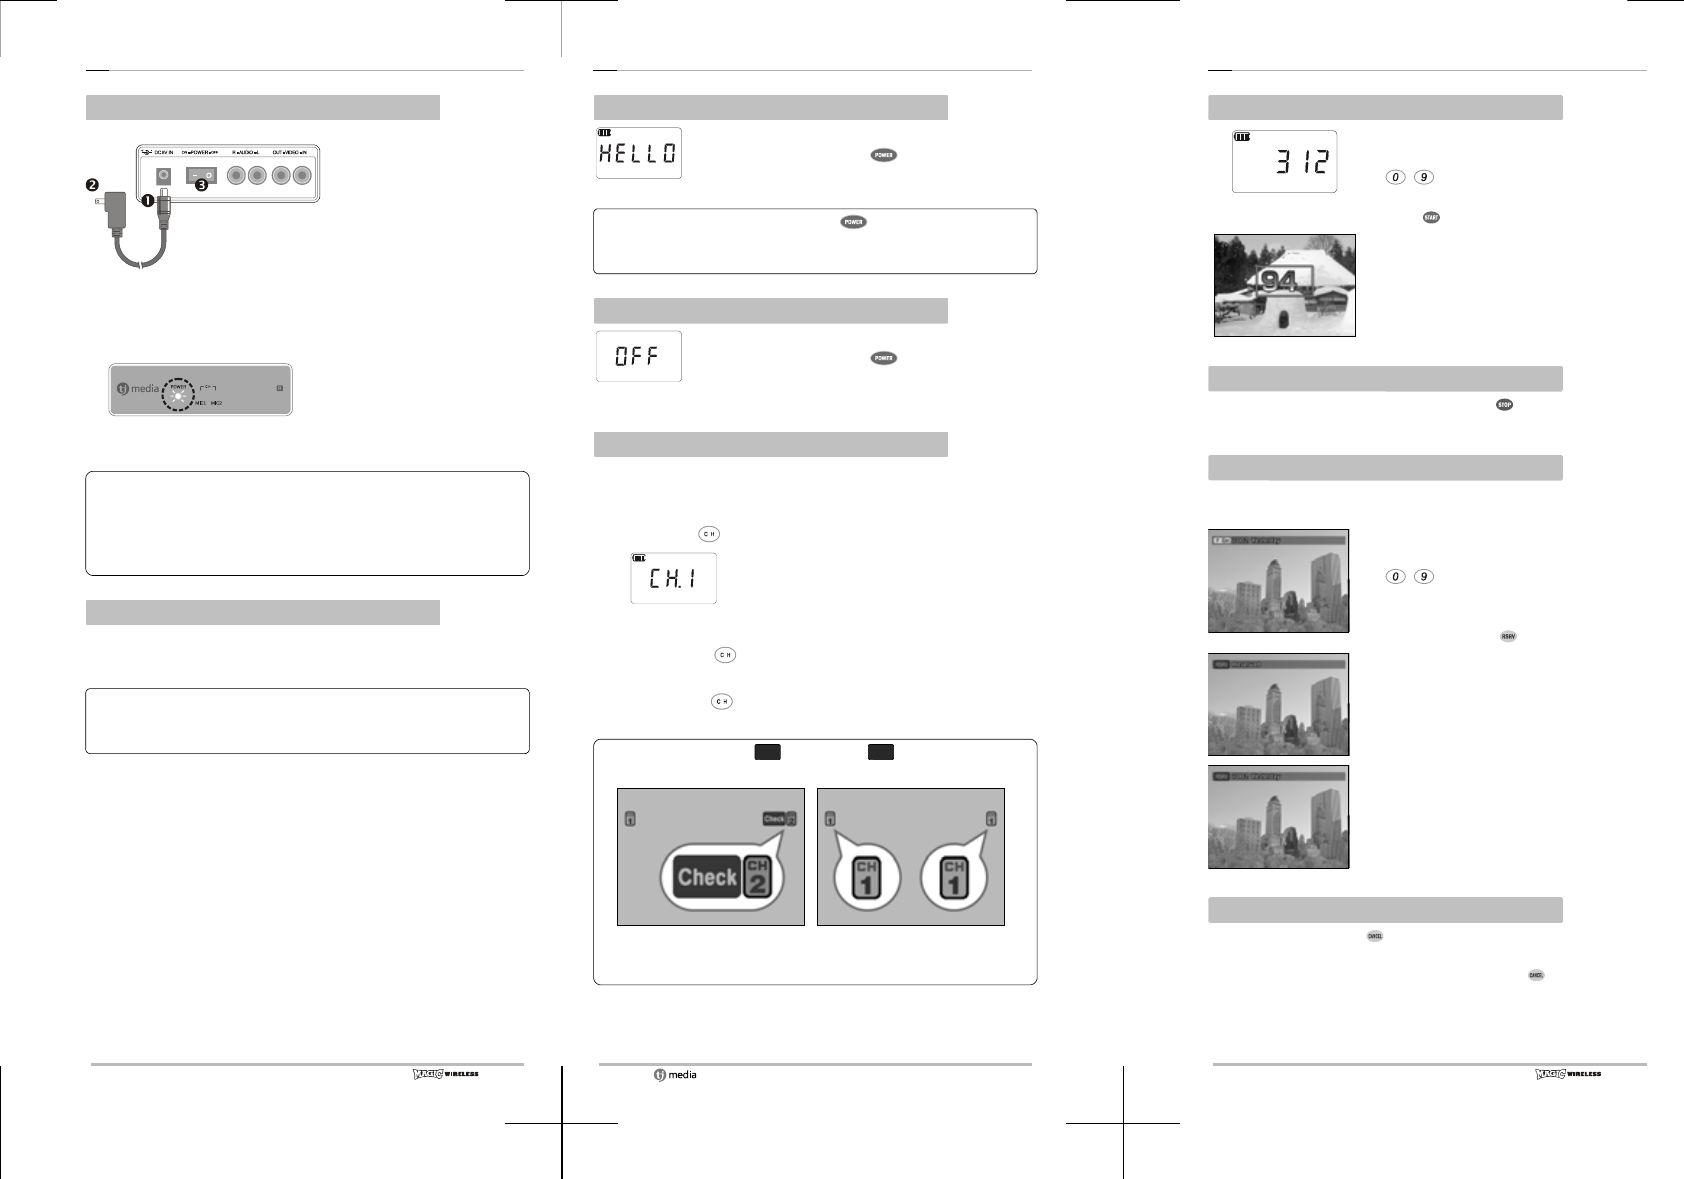
Operation - Power control of main unit
Turn on the main unit
❶ To turn on the main unit, connect AC adapter jack to AC
adapter connection terminal on the rear panel of main unit.
❷ Plug in the AC adapter.
❸ Press the power switch on the rear panel.
❹Check if the lamp on the front
panel is ON in red.
❺Check the product's initial image
comes out on TV screen.
• If you don't get image or sound, check the connection of TV,
amp. or audio.
• Check if the external input mode of TV, amp. or audio is
correctly set and refer to the user's manual for setting
external input.
Turn off the main unit
❶ Switch off the button on the rear panel of main unit.
❷ Unplug AC adapter.
❸ Disconnect the AC adapter jack.
• Before turning off the main unit, switch off the Microphone
first.
(To refer to the 14 page, Turn off the Microphone)
14
Operation - Microphone power / Microphone channel
Turn on the microphone
Take the Microphone toward the receiver of main
unit and press Microphone button. Microphone
is ON with HELLO message on the Microphone
LCD window.
Do not press Microphone 1 and 2 button same time !
Because main unit or Microphone may not work due to
frequency.
Turn off the microphone
Take the Microphone toward to receiver of main
unit and press Microphone button for 3
seconds. Microphone turns off with OFF message
on LCD window.
Microphone channel set
Ji-200 Microphone has a total of 4 channels. If you don't get clean
sound, you can change the channel to optimize the sound.
❶Press the button on the Microphone.
❷
Microphone LCD
indication
Relevant channel is indicated on the
Microphone LCD window and screen.
❸If you press button again and again, you can get
CH1~CH4 one by one.
❹By pressing button, choose a channel with best sound.
When using Microphone C
1
, Microphone C2 both, set them
in the same channel.
Microphone channel is incorrect.
(Gray channel image and check
ima
g
e comes u
p
.
)
Microphone channel is correct.
(
Green channel ima
g
e comes u
p
.
)
15
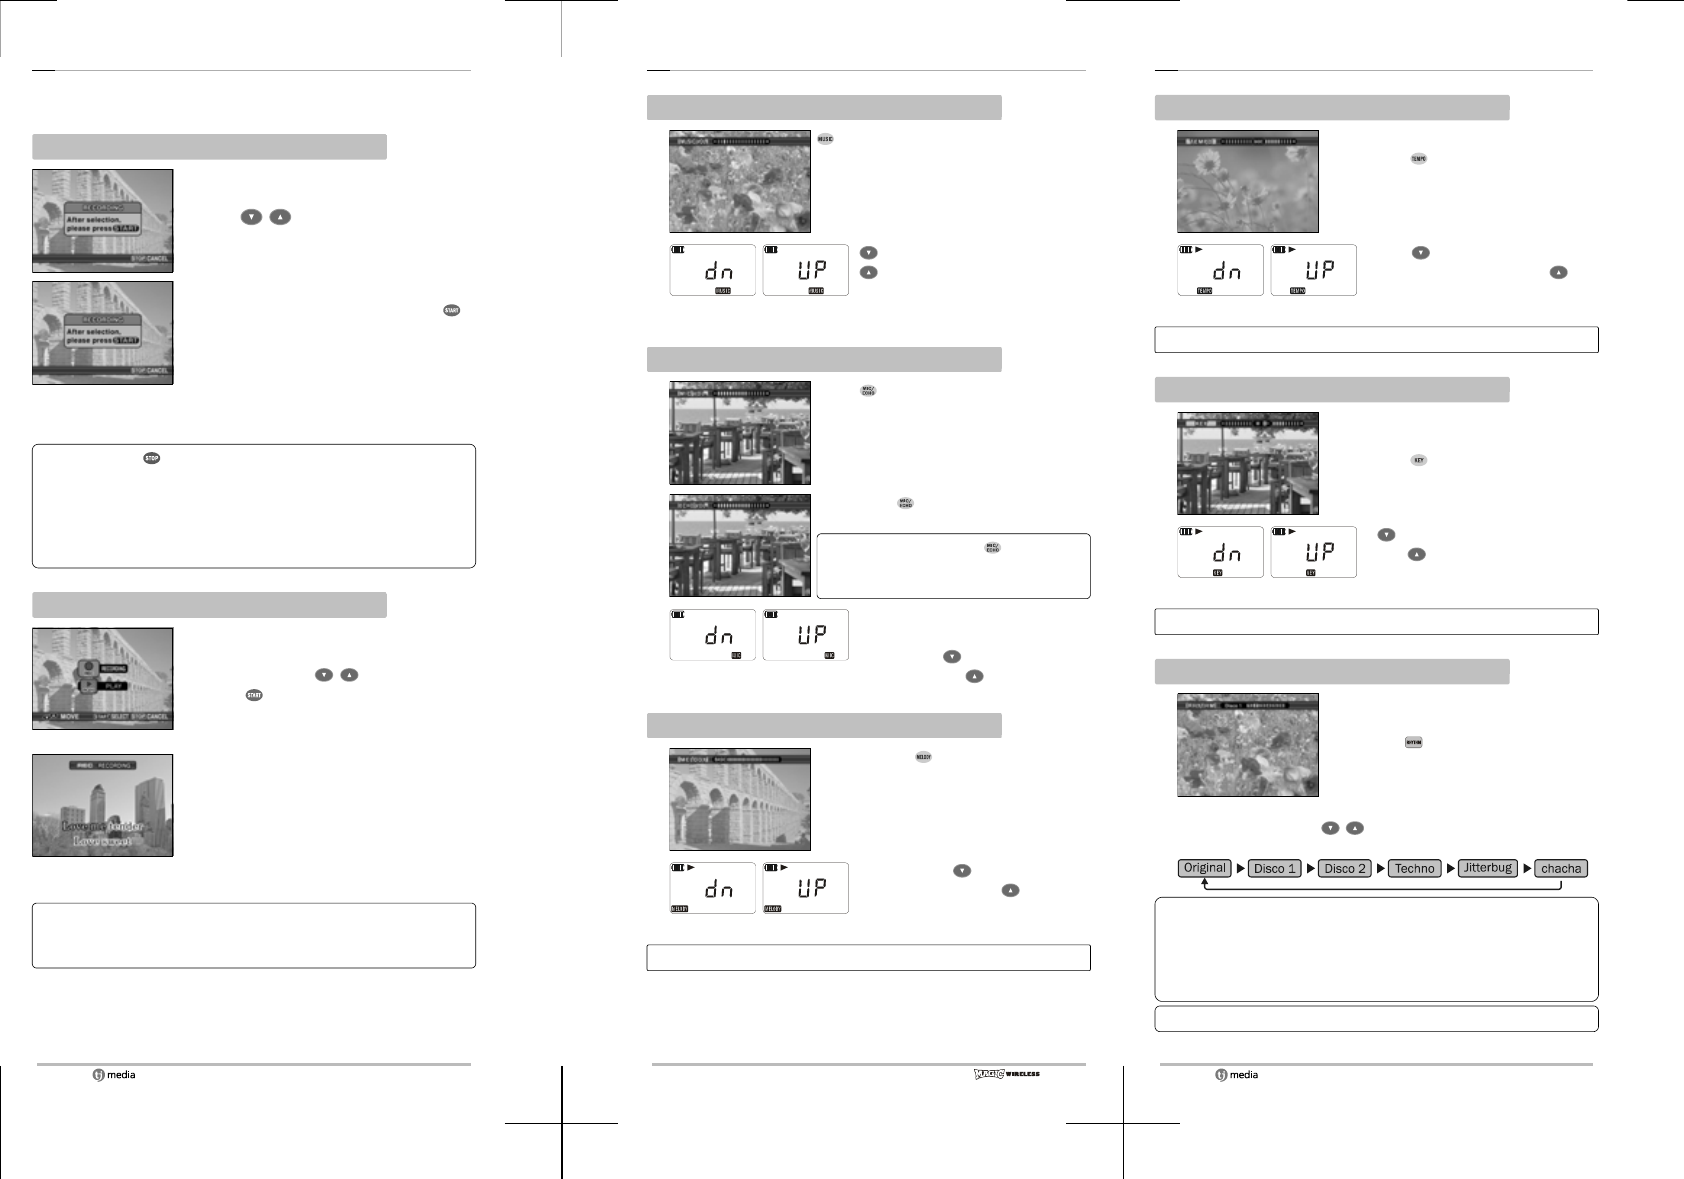
Operation - Selecting / Playing / Booking
Basic play
Microphone LCD
indication
❶ Find the number of the song to sing
and insert it with number button
(~) of Microphone or remote
controller.
❷ Press button and sing.
❸ Once you finish singing, you will get
your score.
Stop during playback
❶ When stopping the on-going song, press button.
❷ The song stops and you will see the score of the song done.
Booking
Before singing or during playback, you can book you song to sing
up to 100 songs.
❶ Find the number of the song to book
and insert it with number button
(~) of Microphone or remote
controller.
❷ Check the title on the top of the
screen and press button.
❸ You will see the message Booking is
Done on the screen.
❹ Your booked song is seen in the
waiting list and if two or more songs
are booked, you will see their numbers.
Cancel the booking(RSRV)
❶ Whenever you press button, you can cancel the booked
songs one by one from the last booking.
❷ If you insert booked song number and press button, you
can cancel the song.
16
Operation - Recording
Ji-200 has a function of recording and you can listen to the song
you recorded.
Recording
❶ You can have recording menu screen by
pressing Record button.
❷ With buttons, select Record.
❸ When recording preparation screen
comes up, select a song and press
button.
❹ Recording starts with playback and Rec
message appears on the screen.
❺ Recording stops automatically when the
song is over and you will have recording
main screen again.
• If you press button during recording, recording and
playback stops and the recoding already done is saved.
• If you record something you were recording just before, the
one before is removed.
• If you turn off the main unit, the recorded song is removed.
• Available recording time for 5 minutes.
Playing the recording
Recordin
g
main screen
❶ By pressing Record button, you will have
recording menu screen.
❷ Select Play with buttons and
press button.
Playback of recording
❸ Recorded song is played with sound.
If you select Playback when you don't have any recording, you
will get a message of Could not find a recorded sing and
playback doesn't work.
17
Operation - Volume control
Background music volume control
❶ button gives you background music
volume indication comes up on the
screen.
❷
button diminishes volume and
button increases it.
Microphone LCD indication
Microphone / Echo volume control
❶With button, you will have
Microphone volume indication comes up.
❷By pressing button once more, echo
volume indication comes up.
At each time you press button,
Microphone volume and echo volume
comes up in turns.
❸
After selecting the one to modify
in the screen, you can reduce the
volume with button and
increase it with button.
Melody volume control
❶By pressing button, you will have
melody volume indication on the
screen.
❷
If you press button, volume
decreases and with button, it
increases.
Microphone LCD indication
You can adjust melody volume only during the playback.
18
Operation - Tempo / Key(Tune) / Rhythm
Tempo control
❶You can adjust the speed of the song.
By pressing , you can have tempo
indication on the screen.
❷
With button, you can slow
down the music and with
button, tempo becomes faster.
Microphone LCD indication
Tempo control works only during the playback.
Key(Tune) control
❶You can adjust the key according to
t
he
singer's tune.
By pressing button, key indication
appears in the screen.
❷
button slows down the
t
empo
and button makes the music
faster.
Microphone LCD indication
Key control works only during the playback.
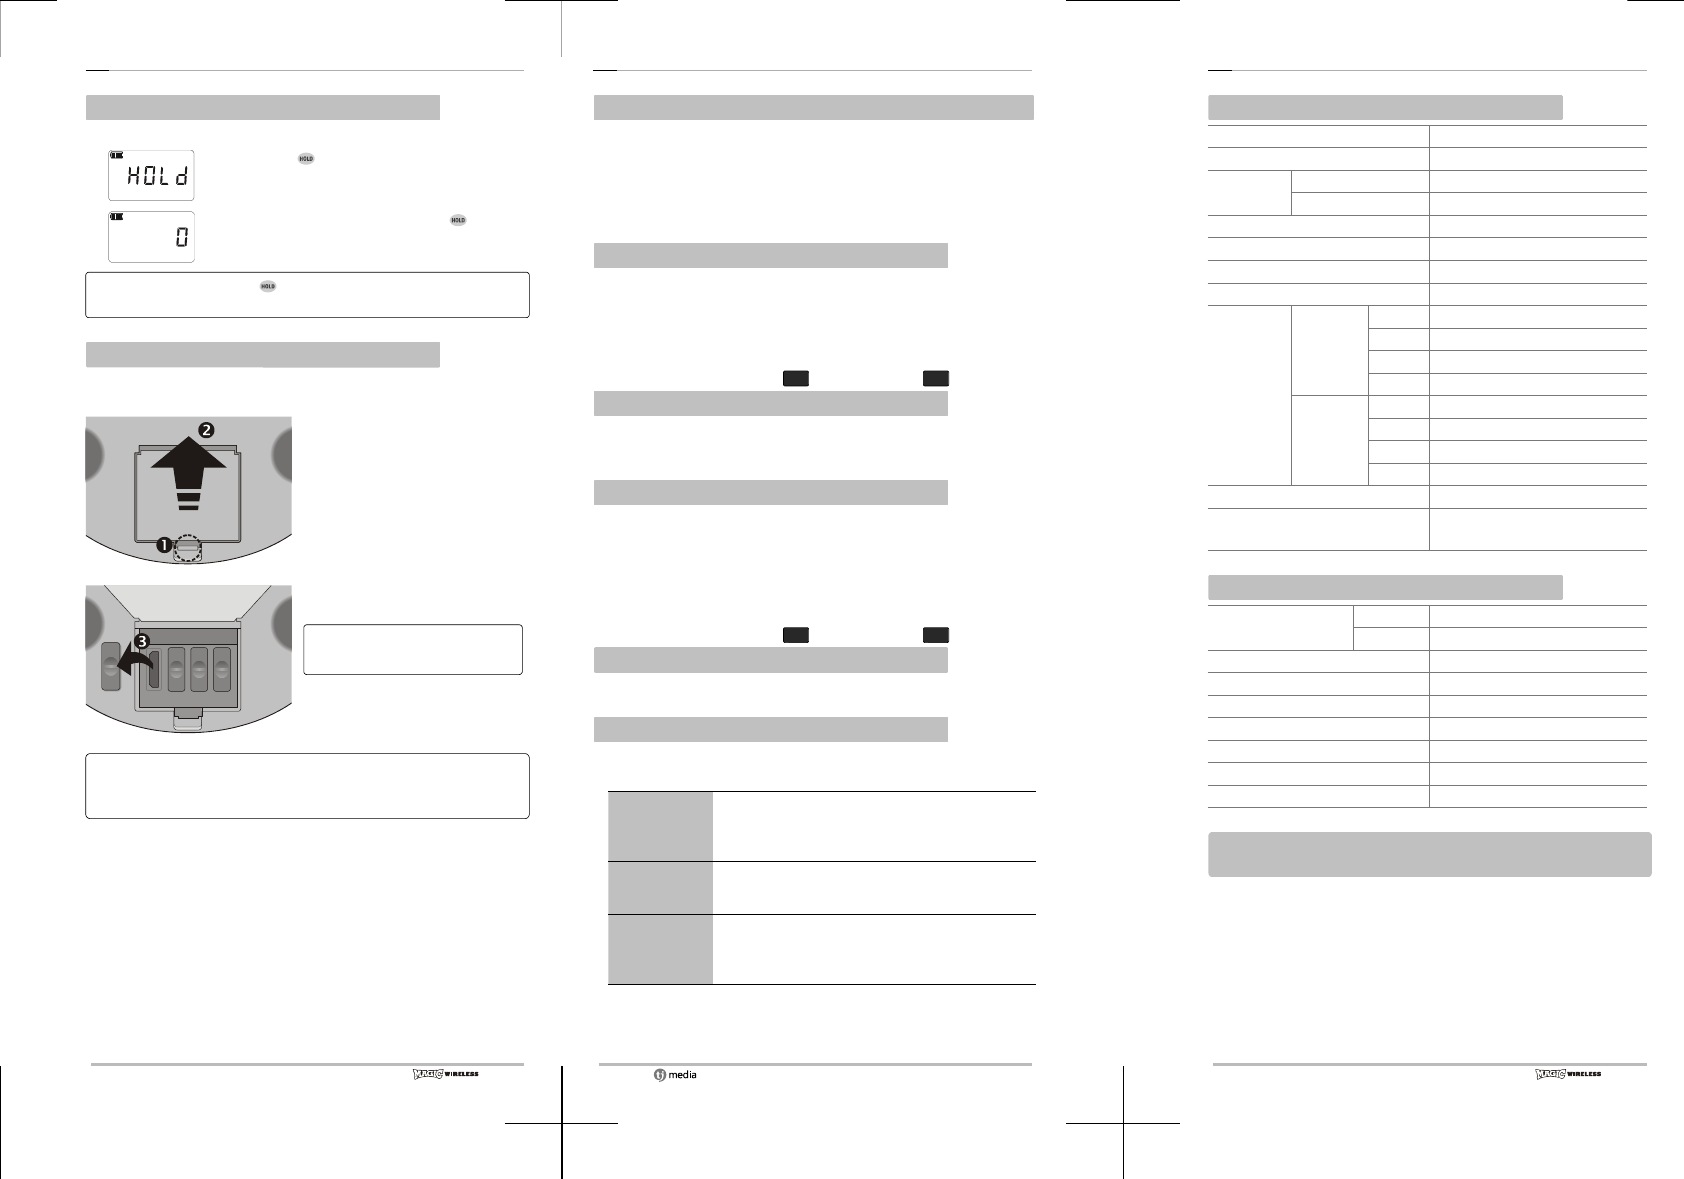
Rhythm change on the remote controller
❶It changes the background music in
different styles of rhythms.
By pressing button on the remote
controller given at the moment of
purchase, rhythm change indication
appears in the screen.
❷
At each time you press buttons, rhythm changes in the
following order.
• Rhythm change works only during the playback and once the
on-going song is over, next song will be in its original
rhythm.
• Rhythm change can be done by the remote controller
included.
In case of POP song, it is only available!
19
Operation - Manipulation LOCK / Additional song CHIP
Manipulation LOCK
This function locks the Microphone buttons.
❶If you press button for 1 second,
Microphone buttons are locked.
❷ When they are locked, if you press button
for 1 second, this function is released.
At each time you press button for 1 second, lock and
unlock states take turns.
Additional song CHIP installation
Additional songs besides the included songs in the Microphone are
offered through additional song CHIP.
❶ After turning off the main unit,
push forward the fixing device
of the slot cover of additional
song CHIP.
❷ Open the additional song CHIP
slot cover.
❸ Take out the rubber covers as
many as the chips to insert.
You can insert the chips in any
empty hole regardless of the order.
❹ Insert the additional song chip
in correct way in the empty
slot.
■ If you take the chip in wrong direction, it cannot be inserted.
■ Make sure to turn off the main unit before inserting the chip.
■ For the chip purchase information, contact your purchase shop.
20
Others -Checking and troubleshooting
You can neither turn on the product nor have image and sound.
▸Check if TV, Ji-200 main unit and Microphone are on.
▸Check if TV video input conversion button is set according to the
connected input terminal.
▸Is AC adapter is connected correctly to the outlet and the main
unit?
▸Aren't batteries inserted incorrectly or dead?
You have the image but not the sound.
▸Check if a headphone is not connected to the TV or audio. If so,
take off the headphone jack.
▸Try to increase the volume of TV and Microphone.
▸If you don't get the sound from other equipment such as audio
device, check the audio connection.
▸Check whether microphone C1 and Microphone C2 are equal.
You don't see the image.
▸Check the TV' s video input terminal connection.
▸Check if the TV video input is set according to the input terminal
connected to the TV.
Microphone volume is low.
▸Press the volume button and adjust it with ▼▲ buttons.
▸Press the Microphone button once and adjust Microphone volume
with ▼▲ buttons.
▸During Microphone volume adjustment, press Microphone button
once more to set echo control and adjust echo with ▼▲
buttons.
▸Check whether microphone C1 and Microphone C2 are equal.
Booking·Selecting songs doesn't work.
▸Didn't you book more than 100 songs?
▸Check the song number and try again.
The sound is not smooth and cut.
▸Its reason may be one of the followings. Refer to the below
instructions in case of trouble during installation·use.
Wireless
Microphone
① Bad battery : Change the battery into new ones.
② Trouble in Microphone : If you don't have HELLO
message in the LCD window when turning it on,
contact service center or nearby shop.
Main unit
(Base)
① Trouble in main unit : If POWER LED is not on
after you plug adapter in, contact service center or
nearby shop.
Entanglement
① Entanglement can happen due to the bothering of
nearby channel frequency. In this case, change the
channel into the one without entanglement. (With CH
button, you can change it between CH1and CH4.)
21
Others -Specifications
Microphone specifications
Power DC +3V
Operating temperature range(℃)0℃~50℃
Battery Standard Standard 2 AA type
Durability 10 hours (based on Alkaline)
Weight (g) 148 (Without Battery)
Dimension(W×D×H, mm) 44×44×210
Microphone type DYNAMIC Microphone type
Electric wave type F3E
Transmitting
frequency
Mic1
CH1 802.875MHz
CH2 803.125MHz
CH3 803.375MHz
CH4 803.625MHz
Mic2
CH1 804.875MHz
CH2 805.125MHz
CH3 805.375MHz
CH4 805.625MHz
Antenna power 50Ω Electricity under 10mW
Valid range of wireless operation
More than 10M in an open space
Main SET specifications
Power : AC Adapter Input AC100~240V, 50~60Hz
output DC +5V, 1A
Power consumption (mW) 500
Weight (g) 468
Dimension (W×D×H, mm) 236×170×51
Audio output level 2.54 Vrms
Audio Frequency output range 20Hz ~ 20KHz
Video input 75Ω, 1 Vp-p
Video output 75Ω, 1 Vp-p
These specifications and product exterior form may be changes
without notice for quality improvement.