TOA WM-5270 Wireless Microphone User Manual wm5270 e
TOA Corporation Wireless Microphone wm5270 e
UserManual.wiki
>
TOA
>
WM-5270 User Manual
>
Manual
Contents
1.
Users Manual
2.
Manual
Manual
Navigation menu
Upload a User Manual
Namespaces
Wiki Guide
HTML
PDF
Info
Views
User Manual
Discussion / Help
Navigation

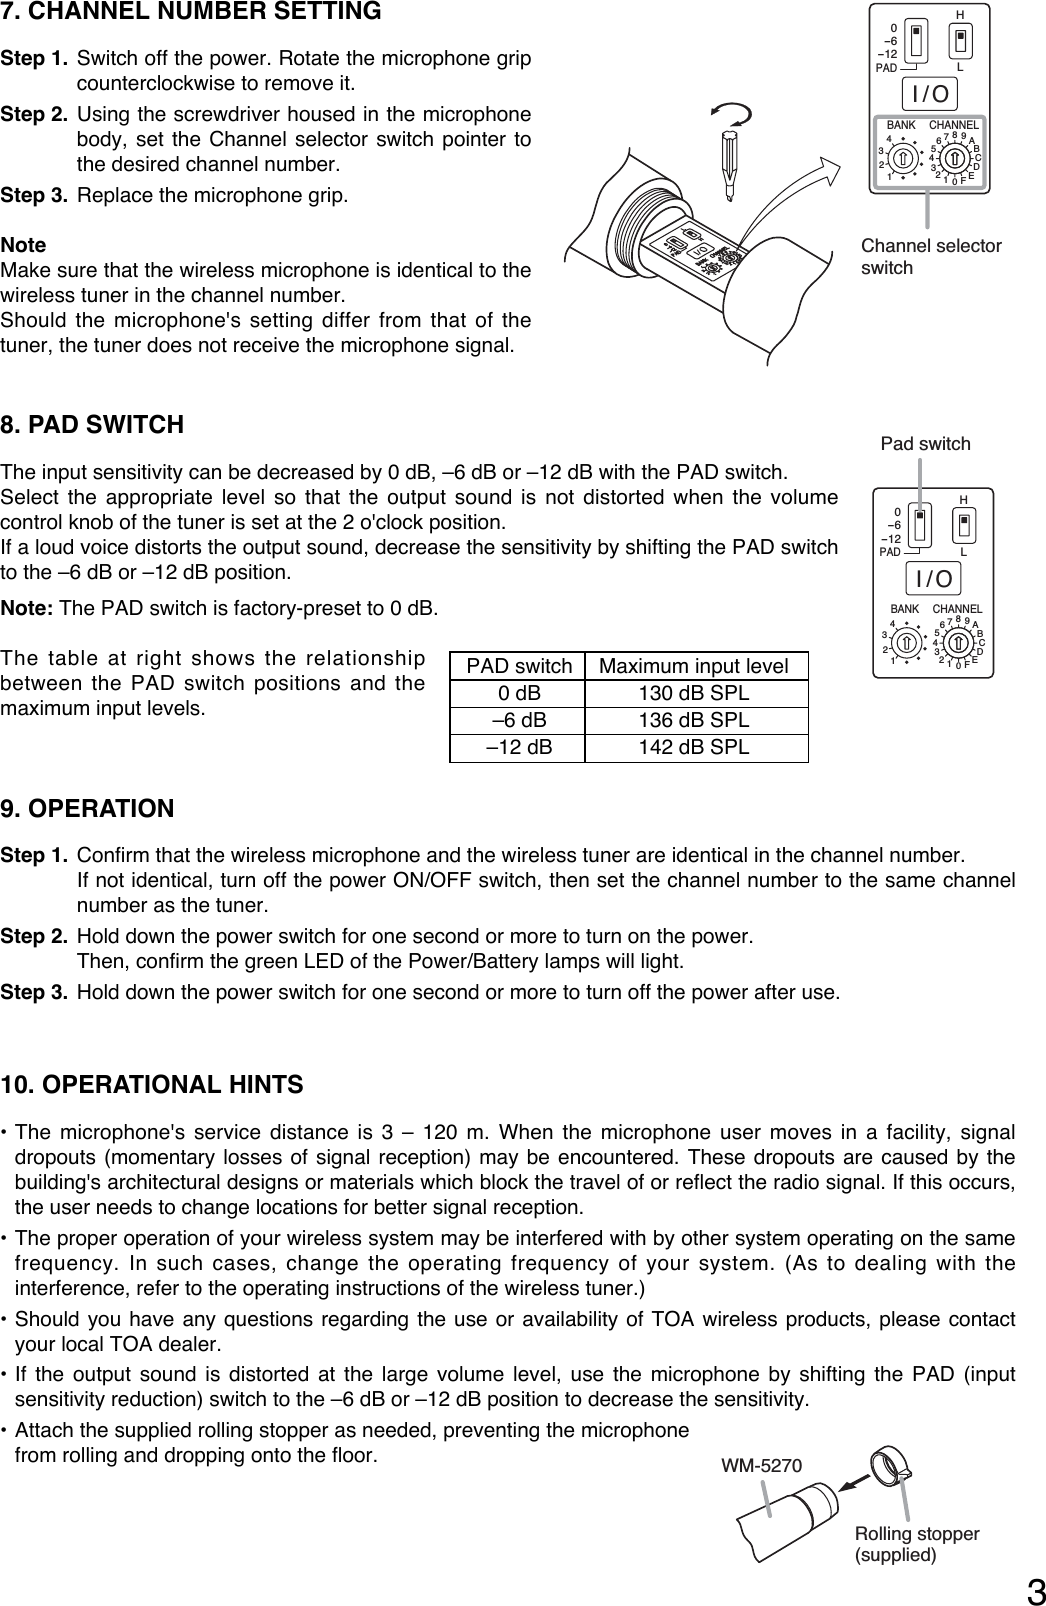
![6. REPLACING THE BATTERYStep 1. Hold down the power switch for one second or more to turn off thepower.Step 2. Hold the microphone body and rotate the microphone gripcounterclockwise to remove it. Step 3. Insert an AA battery according to (+) and (–) indications on thebattery compartment.Step 4. Replace the microphone grip by sliding and rotating it clockwise.Battery replacement• A brand-new AA alkaline battery will continuously operate the unit forabout 10 hours.• When the battery capacity becomes low, the green LED of thePower/Battery lamps starts to dim, while the red LED to light. When onlythe red LED lights, replace the battery with a new one. In this condition,the unit transmits the remaining battery capacity information to the tuner,causing the tuner's BATT indicator to light.24. HANDLING PRECAUTIONS • Do not expose the unit to rain or an environment where it may be splashed by water or other liquids, asdoing so may result in unit failure. • Never open nor remove the unit case to modify the unit. Refer all servicing to your nearest TOA dealer.• Take care not to drop the unit onto the floor nor bump it against a hard object as the unit could fail.• Do not place the unit in locations of high temperature (ex. in a car parked in summer) or high humidity as theunit could fail.• Do not use the unit in locations where it is exposed to seawater.• To clean, use a dry cloth. When the unit gets very dirty, wipe lightly with a cloth damped in a dilute neutralcleanser, then wipe with a dry cloth. Never use benzine, thinner, or chemically-treated cleaning towel.• Avoid using a mobile telephone near the wireless microphone in use. Noise could be picked up.• When using two or more wireless microphones, keep them at least 50 cm away from each other to avoidmalfunctions or noise. • Keep the wireless microphone at least 3 m away from the receiving antenna. Using the microphone in closeproximity to the antenna could result in malfunctions or noise. 5. NOMENCLATURE POWERHBANK CHANNELLI/O0-6-12PAD4321456789ABCDEF0321HBANK CHANNELLI/O0-6-12PAD4321456789ABCDEF0321Power/Battery lampsPower ON/OFF switchPressing this switch for more than one second turns the power on or off.••Channel selector switchNew Emphasis circuit ON/OFF switchPad switchThis switch is used for microphone sensitivity adjustment.The sensitivity can be decreased by 0, –6, or –12 dB.H: ON* L: OFF* Enables further noise suppression (Valid only for WT-5800 series Wireless Tuners)A green LED lights as long as the battery capacity is sufficient. When the battery capacity becomes low, the green LED starts to dim, while the red LED to light.The microphone does not transmit the signal if the channel selector switch is set to the idle channel. In this case, the red LED and green LED flash alternately.32POWER[Bottom]Green LEDPower ON/OFF switch1Red LED](https://usermanual.wiki/TOA/WM-5270.Manual/User-Guide-777978-Page-2.png)
![133-07-241-5A12. SPECIFICATIONSMicrophone Element Dynamic microphone unit, cardioid patternModulation Frequency modulationFrequency Range 692 – 865 MHz (692 – 806 MHz for USA/Canada) Selectable Channel 64 frequencies (the number of channels may differ from country to country.)RF Carrier Power Less than 50 mW Tone Frequency 32.768 kHzOscillator PLL synthesizedMaximum Input Level 142 dB SPL Maximum Deviation ±40 kHz Audio Frequency Response 80 – 15,000 Hz Dynamic Range (AF Circuit) More than 95 dB (with WT-5800)Battery LR6 (AA)Battery Life More than 10 hours (alkaline)Indicator Power/Battery lamps Antenna Built-in typeOperating Temperature –10 to +50°CFinish Dark grayDimensions ø48 x 244 mmWeight 340 g (with battery)Note: The design and specifications are subject to change without notice for improvement. • AccessoriesMicrophone holder (with stand adapter) ............... 1Screwdriver for setting (housed in the body) ........ 1Storage case ........................................................ 1Rolling stopper ..................................................... 1License requirementOperation is subject to the following two conditions:(1) This device may not cause harmful interference, and (2) this device must accept any interference received,including interference that may cause undesired operation.11. NEW EMPHASIS CIRCUIT ON/OFF SWITCHThe WM-5270 incorporates an improved new Emphasis circuit that further suppresses noise.The Emphasis circuit can be switched to the new circuit (pre-compressor Emphasis) by setting the NewEmphasis circuit ON/OFF switch to ON (H position), and to the conventional circuit (post-compressorEmphasis) by setting the switch to OFF (L position).When using the WM-5270 with the switch set to ON, also reset the WT-5800 series tuner to a new circuit bymeans of the optional RW-4800 ROM Writer. So, further noise suppressed and clearer sound can be assured.The WM-5270 is compatible with the WT-4800 series turners when shipped from the factory (New Emphasiscircuit ON/OFF switch: OFF). Once the switch is set to ON, however, no more compatibility is ensured. The table below shows the compatibility between the Wireless Microphones and Tuners.WM-5270New Emphasis circuit ON/OFF switch: ON (H)WT-5800 seriesWT-4800 seriesPre-compressor (New Emphasis circuit)Post-compressor (Conventional Emphasis circuit)New Emphasis circuit ON/OFF switch: OFF (L): CompatibleWireless TunersWireless Microphones[Compatibility table]HLHL](https://usermanual.wiki/TOA/WM-5270.Manual/User-Guide-777978-Page-4.png)