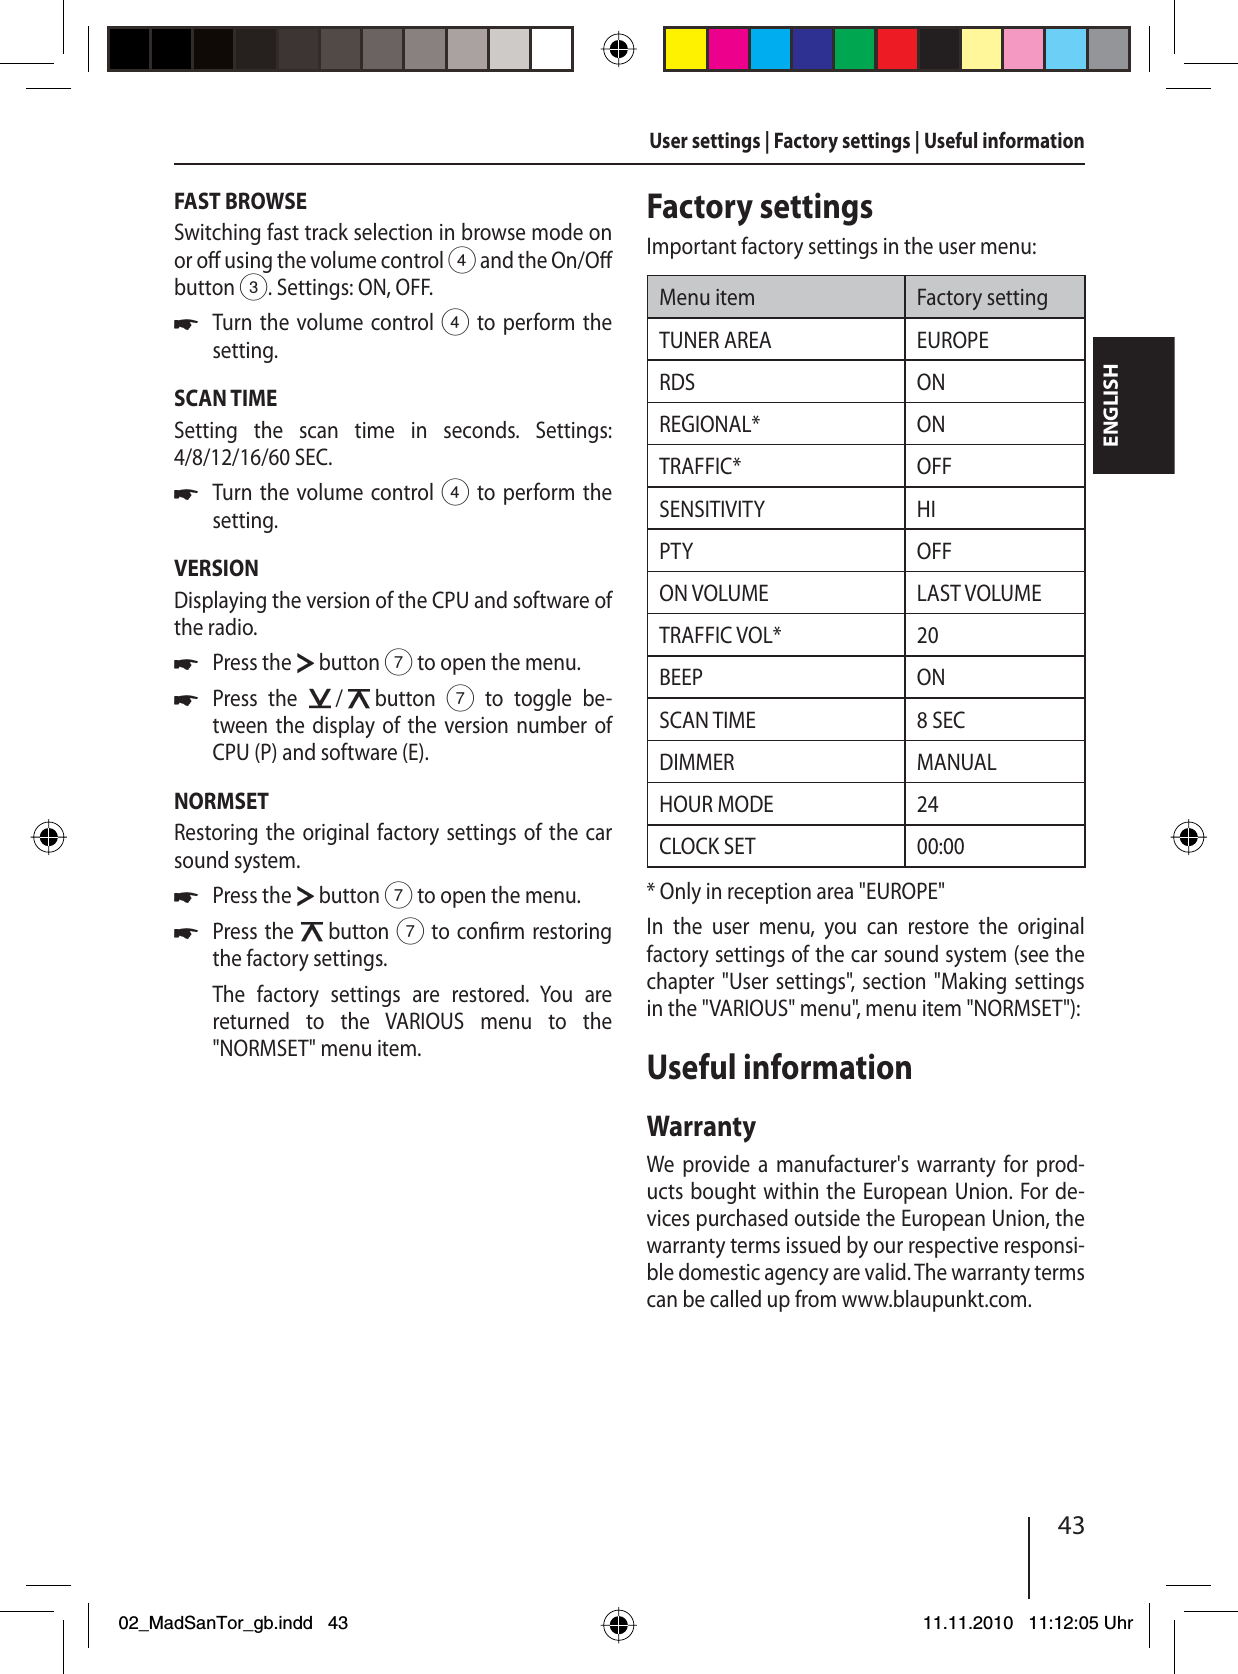
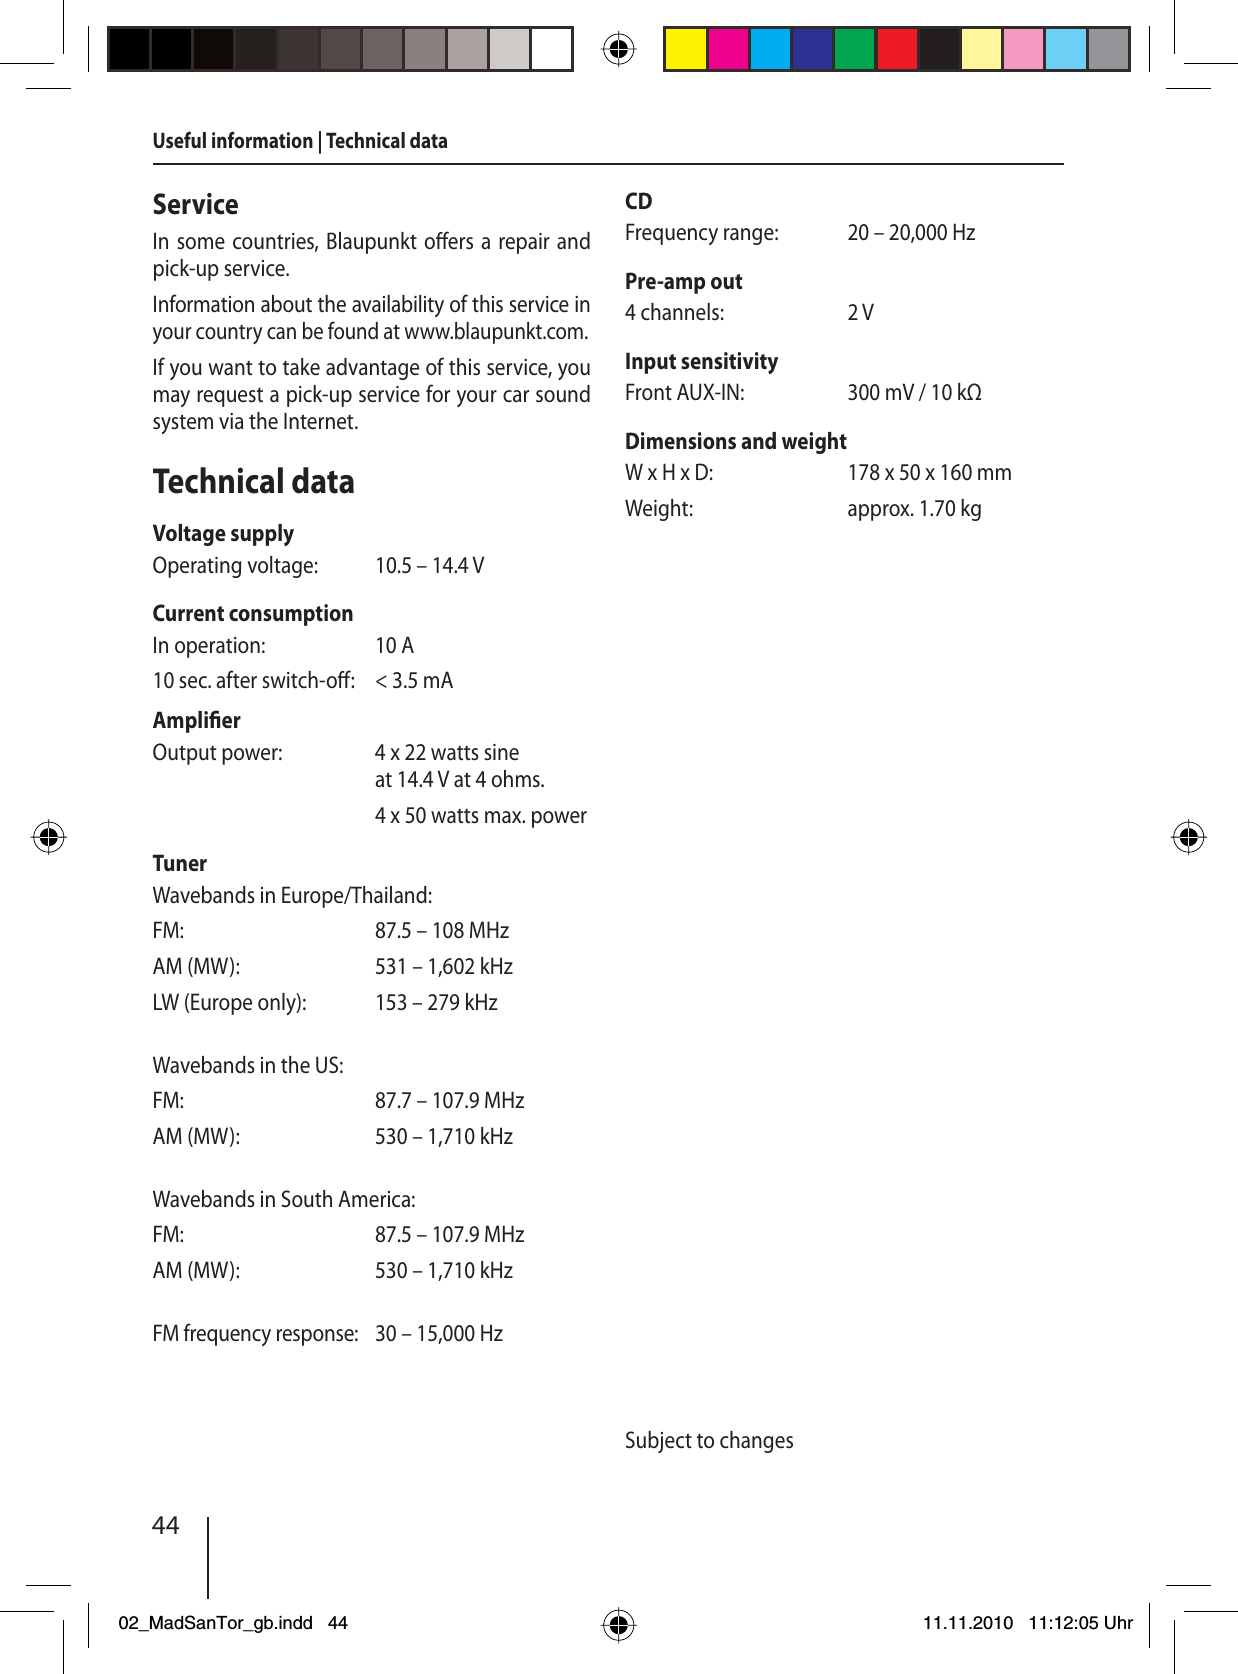
TOKWA PRECISION TECHNOLOGY TORONTO410 CAR CD RADIO PLAYER WITH BT User Manual 01 MadSanTor de indd

SHENZHEN TOKWA PRECISION TECHNOLOGY CO., LTD. CAR CD RADIO PLAYER WITH BT 01 MadSanTor de indd

Users Manual

Bedienungs- und Einbauanleitung Operating and installation instructionsMode d’emploi et de montageIstruzioni d’uso e di installazioneGebruiksaanwijzing en inbouwhandleidingBruks- och monteringsanvisning Instrucciones de manejo e instalaciónInstruções de serviço e de montagemBetjenings- og monteringsvejledningKäyttö- ja asennusohjeΟδηγίες τοποθέτησης και χρήσης Instrukcja obsługi i montażowaKezelési és beszerelési útmutatóInstrucţiuni de operare şi montajРъководство за експлоатация и монтажMadrid 210 7 649 068 510 / 7 649 069 510San Francisco 310 7 649 073 510 / 7 649 074 510Toronto 410 BT 7 640 000 510 / 7 640 001 510www.blaupunkt.comRadio | CD | USB | MP3 | WMAwww.blaupunkt.com01_MadSanTor_de.indd 101_MadSanTor_de.indd   111.11.2010 11:11:05 Uhr11.11.2010   11:11:05 Uhr
241   button Unlock the detachable control panel2 MENU button Short press: Call up/close menuLong press: Start scan function3 On/O  button Short press: Switch on car sound systemIn operation: Mute car sound system (Mute)Long press: Switch o  car sound system4 Volume controlIn the menu: Change settings5 CD tray6 Display7   /   buttonIn the menu: Select menu itemRadio mode: Start seek tuningMP3/WMA/iPod mode: Change to next/previous folder  /   buttonIn the menu: Change menu levelRadio mode: Adjust the stationsOther operating modes: Track selection8   button (Eject) Eject a CD9 USB socket:  Front AUX-IN socket;  button (only Toronto 410 BT)Ending/rejecting a phone call<  button (only Toronto 410 BT)Short press: Answering a call, speed dialLong press: Open the phone book of the cell phone or activate voice dialing= Keys 1 - 5> SRC button Select memory bank or audio source? DISP button Short press: Switch displayLong press: Switch display brightness@  SD card slot (only San Francisco 310 and  Toronto  410  BT) Access only with detached control panel16Controls3745 6281101112 91415 1302_MadSanTor_gb.indd 2402_MadSanTor_gb.indd   2411.11.2010 11:12:01 Uhr11.11.2010   11:12:01 Uhr
25ENGLISHContentsSafety notes .................................................... 26Symbols used ............................................................26Road safety ................................................................26General safety notes ...............................................26Declaration of conformity ....................................27Cleaning notes ................................................ 27Disposal notes................................................. 27Scope of delivery ............................................ 27Optional equipment (not part of the scope of delivery) .....................27Placing the device in operation ..................... 27Attaching/detaching the control panel ..........27Display language (only Toronto 410 BT) .........28Setting the reception area ...................................28Switching on/o  ......................................................28Volume ........................................................................28Display brightness ...................................................29Switching demo mode on/o  .............................29Bluetooth® functions (only Toronto 410 BT) .............................................29Tra  c information .......................................... 29Radio mode ..................................................... 29RDS................................................................................29Changing to radio mode or selecting a memory bank ............................................................30Tuning into a station ..............................................30Storing stations or calling stored stations ......31Scanning stations ....................................................31Storing stations automatically ( Travelstore) ............................................................... 31PTY ................................................................................31Con guring the display .........................................32CD/MP3/WMA/iPod mode .............................. 32Basic information .....................................................32Changing to CD/MP3/WMA/iPod mode .........33Inserting/ejecting a CD .........................................33Connecting/removing a USB data carrier .......34Inserting/removing an SD/MMC card (not for Madrid 210)................................................34Selecting tracks ........................................................34Selecting a folder (only in MP3/WMA/iPod mode) .........................34Fast searching ...........................................................35Interrupting playback ............................................35Scanning all tracks ..................................................35Playing tracks in random order ..........................35Repeatedly playing individual tracks or directories ..................................................................35Con guring the display .........................................35Browse mode ............................................................36External audio sources ................................... 37Front AUX-IN socket ................................................37Sound settings ................................................ 37Calling and exiting the "AUDIO" menu ............37Making settings in the "AUDIO" menu .............38Setting the 3-band equaliser ...............................38User settings ................................................... 39Calling the user menu and selecting a menu .........................................................................39Making settings in the "TUNER" menu ............40Making settings in the "DISPLAY" menu .........41Making settings in the "VOLUME" menu ........41Making settings in the "CLOCK" menu ............41Making settings in the "VARIOUS" menu ........42Factory settings .............................................. 43Useful information ......................................... 43Warranty .....................................................................43Service .........................................................................44Technical data ................................................. 44Installation instructions  .............................. 33002_MadSanTor_gb.indd 2502_MadSanTor_gb.indd   2511.11.2010 11:12:01 Uhr11.11.2010   11:12:01 Uhr
26Safety notesThe car sound system was manufactured accord-ing to the state of the art and established safety guidelines. Even so, dangers may occur if you do not observe the safety notes in these instructions.These instructions contain important informa-tion to easily and safely install and operate the car sound system.Read these instructions carefully and com-pletely before using the car sound system.Keep the instructions at a location so that they are always accessible to all users.Always pass on the car sound system to third parties together with these instructions.In addition, observe the instructions of the devices used in conjunction with this car sound system.Symbols usedThese instructions employ the following symbols:DANGER!Warns about injuriesCAUTION!Warns about damaging the CD driveDANGER!Warns about high volumeThe CE mark con rms the compliance with EU directives.Identi es a sequencing stepIdenti es a listing•••u•Road safetyObserve the following notes about road safety:Use your device in such a way that you can always safely control your vehicle. In case of doubt, stop at a suitable location and operate your device while the vehicle is standing.Remove or attach the control panel only while the vehicle is standing.Always listen at a moderate volume to pro-tect your hearing and to be able to hear acous-tic warning signals (e. g. police sirens). During mute phases (e. g. when changing the audio source), changing the volume is not audible. Do not increase the volume during this mute phase.General safety notesObserve the following notes to protect yourself against injuries:Do not modify or open the device. The device contains a Class 1 laser that can cause injuries to your eyes.Do not increase the volume during mute phases, e. g. when changing the audio source. Changing the volume is not audible during a mute phase.Do not increase the volume during mute phases, e. g. when changing the audio source.Use as directedThis car sound system is intended for installation and operation in a vehicle with 12 V vehicle sys-tem voltage and must be installed in a DIN slot. Observe the performance limits in the technical data. Repairs and installation, if necessary, should be performed by a specialist.Installation instructionsYou may only install the car sound system your-self if you are experienced in installing car sound systems and are very familiar with the electrical system of the vehicle. For this purpose, observe the installation instructions at the end of these instructions.•••••Safety notes02_MadSanTor_gb.indd 2602_MadSanTor_gb.indd   2611.11.2010 11:12:02 Uhr11.11.2010   11:12:02 Uhr
27ENGLISHSafety notes | Cleaning notes | Disposal notes | Scope of delivery | Placing the device in operationDeclaration of conformityThe Blaupunkt AudioVision GmbH & Co. KG de-clares that the car sound systems Madrid 210 and San Francisco 310 comply with the basic require-ments and the other relevant regulations of the directive 89/336/EEC and the car sound system Toronto 410 BT complies with the basic require-ments and the other relevant regulations of the directive 1999/5/EC.The declaration of conformity can be found on the Internet under www.blaupunkt.com.Cleaning notesSolvents, cleaning and scouring agents as well as dashboard spray and plastics care product may contain ingredients that will damage the surface of the car sound system.Use only a dry or slightly moistened cloth for cleaning the car sound system.If necessary, clean the contacts of the control panel regularly using a soft cloth moistened with cleaning alcohol.Disposal notesDo not dispose of your old unit in the house-hold trash!Use the return and collection systems available to dispose of the old device.Scope of deliveryThe scope of delivery includes:1  Car sound system1 Operating/installation instructions1  Case for the control panel1 Support frame1  Antenna connection adapter1  Set of small partsExtended scope of delivery (only for 7 649 069 510/… 074 510, 7 640 001 510):1  Handheld remote control (incl. batteries)••1  Connecting cable chamber A1  Connecting cable chamber BOptional equipment (not part of the scope of delivery)Use only accessories approved by Blaupunkt. Information is available from your Blaupunkt specialised dealer or on the Internet under www.blaupunkt.com.Placing the device in operationAttentionTransport securing screwsBefore the startup of the car sound system, ensure that the transport securing screws are removed (see the chapter "Installation instructions").Attaching/detaching the control panelThe car sound system is equipped with a detach-able control panel (release panel) to protect your equipment against theft. In the delivery state, the control panel is in the supplied case. To start  operating the radio after installation, you must  rst  attach the control panel (see the section  "Attaching the control panel" in this chapter).Always take the control panel with you when leav-ing the vehicle. The car sound system is worthless to a thief without this control panel.CautionDamage to the control panelNever drop the control panel.Transport the control panel so that it is protected against impacts and the contacts cannot become dirty.Do not expose the control panel to direct sunlight or another heat source.Avoid direct skin contact with the control panel’s electrical contacts. 02_MadSanTor_gb.indd 2702_MadSanTor_gb.indd   2711.11.2010 11:12:02 Uhr11.11.2010   11:12:02 Uhr
28Placing the device in operationAttaching the control panelPush the control panel into the bracket at the right edge of the device. Push the control panel carefully into the left bracket until it clicks into place.Removing the control panelPress the   button 1 to unlock the control panel.The left side of the control panel detaches from the device and is secured by the bracket against falling out.Move the control panel slightly to the left  until it disengages from the right bracket.Carefully remove the control panel from the left bracket.Note:The car sound system automatically switches o  as soon as the control panel is removed.Display language (only Toronto 410 BT)For the Toronto 410 BT, you can de ne whether the language for messages on the display is Eng-lish or German. The setting is performed in the user menu (see the chapter "User settings", section "Making settings in the "DISPLAY" menu", menu item "LANGUAGE" ).Setting the reception areaThis car sound system is designed for opera-tion in di erent regions with di erent frequency ranges and station technologies. The factory de-fault of the reception area is "EUROPE". In addi-tion, the reception areas "USA", "THAILAND" and "SOUTH AMERICA" are available.Note:If you operate the car sound system outside of Europe, you may  rst have to set a suit-able reception area in the user menu (see the chapter "User settings", section "Making settings in the "TUNER" menu", menu item "TUNER AREA").uuuuuSwitching on/o Switching on/o  with the On/O  buttonFor switch-on, press the On/O  button 3.The car sound system switches on.To switch o  the device, press and hold down the On/O  button 3 for longer than 2 sec-onds.The car sound system switches o .Note:If you switch on the car sound system while the vehicle ignition is switched o , it auto-matically switches o  after 1 hour to preserve the vehicle battery.Switching on/o  via vehicle ignitionThe car sound system will switch o /on simulta-neously with the ignition if the device is correctly connected to the vehicle’s ignition as shown in the installation instructions and you did not switch the device o  by pressing the On/O  button 3.VolumeAdjusting the volumeYou can adjust the volume in steps from 0 (o ) to 50 (maximum).Turn the volume control 4 to change the volume.Note:If a telephone or navigation system is con-nected with the car sound system as de-scribed in the installation instructions, the car sound system is muted in case of a telephone call or navigation announcement so that you can hear the playback of the telephone or navigation system undisturbed. While it is muted, the display shows "TELEPHONE".Muting the car sound system (Mute)Brie y press the On/O  button 3 to mute the car sound system or to reactivate the pre-vious volume.While it is switched low, the display shows "MUTE".uuuu02_MadSanTor_gb.indd 2802_MadSanTor_gb.indd   2811.11.2010 11:12:02 Uhr11.11.2010   11:12:02 Uhr
29ENGLISHPlacing the device in operation | Tra  c information | Radio modeDisplay brightnessYou can manually switch the display brightness between daytime mode and night-time mode or switch automatically with the driving lights of the vehicle.Note:The manual or automatic switching of the display brightness is selected in the user menu (see the chapter "User settings", sec-tion  "Making settings in the "DISPLAY" menu", menu item "DIMMER").Press the DISP button ? for approx. 2 sec-onds to manually switch the display bright-ness.Switching demo mode on/o The demo mode shows the functions of the car sound system as scrolling text on the display. By pressing any button, the demo mode is interrupt-ed and you can operate the device. The demo mode can be switched on and o  in the user menu (see the chapter "User settings", section "Making settings in the "VARIOUS" menu", menu item "DEMO MODE").Bluetooth® functions (only Toronto 410 BT)The Toronto 410 BT can be connected with suit-able cell phones and MP3 players via Bluetooth®. This enables it to perform hands-free calling with the connected telephone (via the loudspeakers and the integrated microphone of the car sound system) and audio playback of MP3  les stored on the Bluetooth® device.Note:You can also connect an external microphone for hands-free calling (see the chapter "Instal-lation instructions").For the Bluetooth® functions of the Toronto 410 BT, please read the enclosed "Bluetooth® instructions for Toronto 410 BT".uTra  c informationIn the reception area "EUROPE", an FM station can identify tra  c reports by means of an RDS signal. If priority for tra  c reports is switched on, a traf- c report is automatically switched through, even if the car sound system is currently not in radio mode.If priority is switched on, the display shows the  tra  c jam symbol ( ). "TRAFFIC" is displayed during a switched-through tra  c announcement.The priority is activated and deactivated in the user menu (see the chapter "User settings", sec-tion "Making settings in the "TUNER" menu", menu item "TRAFFIC").Notes:The volume is increased for the duration of the switched-through tra  c announce-ment. You can adjust the minimum volume for tra  c announcements (see the chapter "User settings", section "Making settings in the "VOLUME" menu", menu item "TRAFFIC VOL").To cancel a switched-through tra  c  an-nouncement, press the SRC button >.Radio modeRDSMany FM stations broadcast an RDS (Radio Data System) signal in addition to their programme in the reception area "EUROPE" that allows the  following additional functions:The station name is shown on the display.The car sound system recognises tra  c  an-nouncements and news broadcasts and can automatically switch them through in other operating modes (e. g. in CD mode).Alternate frequency: If RDS is activated, the car sound system automatically selects the best receivable frequency for the station that is cur-rently set.•••••02_MadSanTor_gb.indd 2902_MadSanTor_gb.indd   2911.11.2010 11:12:02 Uhr11.11.2010   11:12:02 Uhr
30Radio modeRegional: At certain times, some radio sta-tions divide their programme into regional programmes providing di erent content. If the REGIONAL function is activated, the car sound system changes only to those alternate frequencies on which the same regional pro-gramme is being broadcast.The functions RDS and REGIONAL are activated and deactivated in the user menu (see the chap-ter "User settings", section "Making settings in the "TUNER" menu", menu items "RDS" and  "REGIONAL").Note:If you adjust a di erent reception area than "EUROPE", RDS is automatically switched o . If you want to use radio stations with RDS features in your region, switch on RDS in the user menu.Changing to radio mode or selecting a memory bankThe following memory banks are available in the di erent reception areas:Region Memory banksEUROPE FM1, FM2, FMT, MW, LWUSA FM1, FM2, FMT, AM, AMTTHAILAND FM1, FM2, FMT, AMSOUTH AMERICA FM1, FM2, FMT, AM, AMTPress the SRC button > repeatedly until the desired memory bank is displayed.Note:Up to 5 stations can be stored in each  memory bank.•uTuning into a stationThere are various ways of tuning into a station:Tuning into stations manuallyBrie y  press  the   /   button 7 once or several times to incrementally change the frequency.Note:For the reception area "EUROPE": In the FM waveband, the next station of the broadcast-ing network is automatically tuned into if the RDS function is switched on. Starting station seek tuning Press the   /   button 7 for approx. 2 sec-onds to start station seek tuning.The radio tunes into the next receivable  station.Notes:For the reception area "EUROPE": In the FM waveband, only tra  c information stations are tuned into if the priority for tra  c infor-mation ( ) is switched on. The sensitivity of seek tuning can be ad-justed (see the chapter "User settings", section "Making settings in the "TUNER" menu", menu item "SENSITIVITY").If PTY and RDS are switched o , you can also start station seek tuning by pressing the   /   button 7.Changing to the next station of the broadcasting networkNote:This function requires that RDS is switched on and PTY is switched o  (see the chapter "User settings", section "Making settings in the "TUNER" menu", menu items "RDS" and "PTY").Press the   /   button 7.uu•••u02_MadSanTor_gb.indd 3002_MadSanTor_gb.indd   3011.11.2010 11:12:02 Uhr11.11.2010   11:12:02 Uhr
31ENGLISHRadio modeStoring stations or calling stored stationsSelect the desired memory bank.If necessary, set the desired station.Press the station button 1 - 5 = for approx. 2 seconds to store the current station under the button.- or -Brie y press the station button 1 - 5 = to call up the stored station.Scanning stationsThe scan function allows scanning all receivable stations of the current waveband or all stations stored in the current waveband.Note:You can adjust the scan time for each sta-tion (see the chapter "User settings", section  "Making settings in the "VARIOUS" menu", menu item "SCAN TIME").Scanning all receivable stationsPress the MENU button 2 for approx. 2 sec-onds to start scanning.During the scan, the display alternately dis-plays "SCAN" and the current frequency as well as memory bank or station name. Brie y press the   /   button 7 to continue listening to the station that is currently being received.Scanning all stored stationsPress the   /   button 7 for approx. 2 sec-onds to start scanning.During the scan, the display alternately dis-plays "SCAN" and the current frequency as well as memory bank or station name. Brie y press the   /   button 7 to continue listening to the station that is currently being received.uuuuuuuuStoring stations automatically (Travelstore)With Travelstore, you can automatically search for and store the 5 FM stations o ering the strongest reception in the region in one memory bank, Any previously stored stations in this memory bank are deleted in the process.In the reception areas "EUROPE" and "THAILAND", you can store 5 FM stations in the FMT memory bank with Travelstore. In the reception areas "USA" and "SOUTH AMERICA", you can also store 5 AM stations in the AMT memory bank.Select a memory bank of the desired wave-band, e. g. FM1 or AM.Press the SRC button > for approx. 2 sec-onds.The tuner starts the automatic station seek tuning; the display shows "FM TSTORE" or "AM TSTORE". After the storing is completed, the radio plays the station at memory location 1 of the FMT or AMT level.Notes:For the reception area "EUROPE": If the priority for tra  c information is switched on ( ), only tra  c information stations are stored.If the FMT memory bank is deactivated (see the chapter "User settings", section "Making settings in the "TUNER" menu", menu item "BAND"), it is automatically reactivated if you initiate the Travelstore function.PTYIn the reception areas "EUROPE" and "USA", an FM station can transmit its current programme type, e. g. CULTURE, POP, JAZZ, ROCK, SPORT or SCI-ENCE. Hence, the PTY function allows a targeted search for broadcasts of a certain programme type, e. g. for rock or sports broadcasts. Note that PTY is not supported by all stations.uu••02_MadSanTor_gb.indd 3102_MadSanTor_gb.indd   3111.11.2010 11:12:03 Uhr11.11.2010   11:12:03 Uhr
32Note:The PTY function is only available if it has been activated (see the chapter "User settings", sec-tion "Making settings in the "TUNER" menu", menu item "PTY"). Selecting a programme typeTo select a programme type. read the section "Making settings in the "TUNER" menu", menu item "PTY TYPES" in the chapter "User settings".Note:In the reception area "EUROPE", you can adjust the language in which the programme types are displayed (see the chapter "User settings", section "Making settings in the "TUNER" menu", menu item "PTY LANGUAGE").Searching for stationsPress the   /   button 7.During the seek tuning, the currently selected programme type is shown on the display.As soon as a station with the desired pro-gramme type is found, it remains being tuned into.Notes:If no station with the selected programme type is found, "PTY NONE" is brie y  dis-played and 5 beeps can be heard. The  radio will then retune to the station that it played last.If the tuned radio station or another sta-tion on the broadcasting network broad-casts your selected programme type at a later point in time, the car sound system will automatically switch from the cur-rently tuned station or from the current audio source (e. g. CD) to the station whose programme type matches the one you se-lected. Note that this function is not sup-ported by all stations.u••Con guring the displayPress the DISP button ? to toggle between these two displays:Display MeaningABCDEF Station nameFM1 102.90 Memory bank/frequencyCD/MP3/WMA/iPod modeNote:The playback of MP3/WMA  les stored on an SD card as well as iPod mode are supported only by the models San Francisco 310 and Toronto 410 BT.Basic informationCD/MP3/WMA modeThis car sound system can be used to play audio CDs (CDDA) and CD-R/RWs with audio, MP3 or WMA  les as well as MP3 or WMA  les on USB data carriers and SD/MMC cards.Notes:To ensure proper functioning, use only CDs with the Compact-Disc logo.Blaupunkt cannot guarantee the  awless function of copy-protected CDs and all CD blanks, USB data carriers and SD cards available on the market.Note the following information when preparing an MP3/WMA data carrier:Naming of tracks and directories:Max. 32 characters without the  le exten-sion ".mp3" or ".wma" (the use of more characters reduces the number of tracks and folders that the car sound system can recognise)No umlauts or special charactersCD formats: audio CD (CDDA), CD-R/RW, Ø: 12 cmCD data formats: ISO 9669 Level 1 and 2, JolietCD burn speed: Max. 16x (recommended)u•••––•••Radio mode | CD/MP3/WMA/iPod mode02_MadSanTor_gb.indd 3202_MadSanTor_gb.indd   3211.11.2010 11:12:03 Uhr11.11.2010   11:12:03 Uhr
33ENGLISHUSB format/ le system: Mass storage device/ FAT16/32SD card  le system: FAT16/32File extension of audio  les:.MP3 for MP3  les.WMA for WMA  lesWMA  les only without Digital Rights Manage-ment (DRM) and created with Windows Media Player version 8 or laterMP3 ID3 tags: Version 1 and 2Bitrate for creating audio  les:MP3: 32 to 320 kbpsWMA: 32 to 192 kbpsMaximum number of  les and directories: USB medium: Up to 20,000 entries depend-ing on the data structureSD cards: Up to 1,500  les (directories and tracks) per directoryiPod mode (not for Madrid 210)You can connect numerous iPod and iPhone  models to the car sound system via the USB port and control the audio playback from the car sound system.Note:Blaupunkt cannot guarantee the  awless function of all iPod and iPhone models.Use a suitable adapter cable to connect your iPod or iPhone with the USB port of the car sound  system.Changing to CD/MP3/WMA/iPod modePress the SRC button > repeatedly until the desired audio source is displayed:"CD": Inserted CD."SD": Inserted SD card"USB": Connected USB data carrier."IPOD": Connected iPod"AUX": Connected external audio source.•••––•••––•––u•••••Notes:The respective audio source can be select-ed only if a corresponding CD is inserted or a corresponding device is connected.A connected iPod is initially selected un-der "USB" and as soon as the iPod has been  recognised under "IPOD".If the car sound system  rst has to read the data of a connected device or data car-rier before the playback, the display shows "READING". The duration of the reading  depends on the data volume and design of the device or data carrier. If the device or data carrier is defective or the transferred data cannot be played back, a correspond-ing message appears on the display (e. g. "CD ERROR").Inserting/ejecting a CDInserting a CDRisk of severe damage to the CD drive! Noncircular contoured CDs (shape CDs) and CDs with a diameter of 8 cm (mini CDs) must not be used.We accept no responsibility for any damage to the CD drive that may occur as a result of the use of unsuitable CDs.Note:You must not hinder or assist the drive as it automatically draws in the CD.Insert the CD with its printed side up into the CD tray 5 until you feel a slight resistance.The drive automatically draws in the CD and checks its data. Afterwards, the playback starts in CD or MP3 mode. Note:If the inserted CD cannot be played back, "CD ERROR" is brie y displayed and the CD is auto-matically ejected after approx. 2 seconds.•••uCD/MP3/WMA/iPod mode02_MadSanTor_gb.indd 3302_MadSanTor_gb.indd   3311.11.2010 11:12:03 Uhr11.11.2010   11:12:03 Uhr
34Ejecting a CDNote:You must not hinder or assist the drive as it ejects the CD.Press the   button 8 to eject an inserted CD.Notes:If a CD is ejected and not removed, the drive will automatically draw it back in again after approx. 10 seconds.You can also eject CDs while the car sound system is switched o  or whilst another audio source is activated. Connecting/removing a USB data carrierConnecting a USB data carrierSwitch of the car sound system so that the data carrier will be correctly registered.Pull the protective cap of the USB socket 9 to the front until it moves out of the socket and fold it to the right.Connect the USB data carrier.Turn on the car sound system.If the USB data carrier is initially selected as audio source, the data are read  rst.Notes:If the connected USB data carrier cannot be seen, "USB ERROR" is brie y displayed.The time required for reading in the data depends on the design and size of the USB data carrier.Removing a USB data carrierSwitch of the car sound system so that the data carrier will be correctly unregistered.Disconnect the USB data carrier.Close the protective cap of the USB socket 9.u••uuuu••uuuInserting/removing an SD/MMC card (not for Madrid 210)Inserting an SD/MMC cardDetach the control panel.Insert the SD/MMC card with its labelled side up and its contacts  rst into the card slot @ until it clicks into place.Attach the control panel.After switch-on, the device automatically  selects the inserted SD card as audio source. The data of the SD card are read. Afterwards, the playback starts in MP3 mode.Notes:If the inserted SD card cannot be played, "SD ERROR" is brie y displayed.The time required for reading in the data depends on the design and size of the SD card.Removing the SD/MMC cardDetach the control panel.push on the SD/MMC card until it disengag-es. Pull the SD/MMC card out of the card slot @.Attach the control panel.Selecting tracksPress the   /   button 7 brie y to change to the previous/next track.Note:If the current track plays longer than 3 sec-onds, pressing   7 once restarts the track.Selecting a folder (only in MP3/WMA/iPod mode)Press the   /   button 7 brie y to change to the previous/next folder.Note:In iPod mode, this allows you to change to the previous/next folder of the current category, e. g. to the next genre, if you previously se-uuu••uuuuuuCD/MP3/WMA/iPod mode02_MadSanTor_gb.indd 3402_MadSanTor_gb.indd   3411.11.2010 11:12:03 Uhr11.11.2010   11:12:03 Uhr
35ENGLISHlected a track on the iPod via the correspond-ing genre.Fast searchingPress and hold down the button   /   7 until the desired position has been reached.Interrupting playbackPress the 3   = button to interrupt the playback ("PAUSE") or to continue it.Scanning all tracksThe scan function scans all available tracks.Press the MENU button 2 for approx. 2 sec-onds to start the scan, or brie y to continue playing the currently scanned track.During the scan, the display alternately dis-plays "SCAN" and the current track number or  le name. Note:The scan time can be adjusted (see the chap-ter "User settings", section "Making settings in the "VARIOUS" menu", menu item "SCAN TIME"). Playing tracks in random orderPress the 5 MIX button = to change among the playback modes:Opera-tionDisplay MeaningCD MIX ALL Mixing tracksMP3/WMA/iPodMIX FOLDER Mixing tracks of the current folderMIX ALL Mixing tracks of the data carrierGen. MIX OFF Regular playbackIf the MIX function is switched on, the icon MIX (mix all tracks) or MIX   (mix tracks of current folder) is shown on the display.uuuuRepeatedly playing individual tracks or directoriesPress the 4 RPT button = to change among the playback modes:Opera-tionDisplay MeaningCD REPEAT TRACK Repeating tracksMP3/WMA/iPodREPEAT TRACK  Repeating tracksREPEAT FOLDER Repeating foldersGen. REPEAT OFF  Regular playbackIf the REPEAT function is switched on, the icon  (repeat tracks) or   (repeat folders) is shown on the display.Con guring the displayPress the DISP button ? once or several times to switch among these displays:Opera-tionDisplay / icon MeaningCD TRACK 01  0:15Track number and playing timeTRACK 01  3:37Track number and durationMP3/WMA/iPodSONG-INFO /  Track name FILE-INFO /  File namePLAYTIME  0:15 Playing timeTOTAL TIME  3:37 Track dura-tionARTIST-INFO /  Artist ALBUM-INFO /  Album name   Track name, artist and album name must be stored as ID3 tag to be able to display them.uuCD/MP3/WMA/iPod mode02_MadSanTor_gb.indd 3502_MadSanTor_gb.indd   3511.11.2010 11:12:03 Uhr11.11.2010   11:12:03 Uhr
36CD/MP3/WMA/iPod modeBrowse modeIn Browse mode, you can directly search for and select a certain track on the MP3/WMA data  carrier or iPod without interrupting the current playback.Browse mode in MP3/WMA modeIn MP3/WMA mode, you can select and play a track from a directory of the data carrier.Press the 1 LIST button = to call up the browse mode in the MP3/WMA mode.The display shows the   icon. The  rst or current folder on the data carrier is  being  displayed.Notes:The  rst folder is displayed only if the browse mode has been called for the  rst time after inserting or connecting the data carrier. Afterwards, the current folder is displayed whenever the browse mode is called.You can exit the browse mode at any time by pressing the 1 LIST button =.Press the   /   button 7 once or several times to select a di erent folder.Press the   button 7 to display the tracks of the selected folder.The  rst track of the folder is shown on the display.Note:Pressing the   button 7 returns you to the folder list.Press the   /   button 7 once or several times to select a di erent track.Press the   button 7 to play the track.The playback starts. You are exiting the browse mode.Browse mode in iPod modeIn iPod mode, you can select and play a track using the categories "Artists", "Albums" or "Genre" stored in the ID3 tags.u••uuuuPress the 2 ID3 button = to call up the Browse mode in the iPod mode.The display shows the   icon. The  rst category, "ARTISTS", is displayed.Note:You can exit the browse mode at any time by pressing the 2 ID3 button =.Press the   /   button 7 once or several times to select a di erent category.Press the   button 7 to display the available entries of the category.The  rst entry of the selected category is shown on the display (e. g. "Jazz" in the  "Genre"  category).Note:Pressing the   button 7 returns you to the list of categories.Press the   /   button 7 once or several times to select a di erent entry.Press the   button 7 to display the available tracks of the entry.The  rst track of the entry is shown on the display.Note:Pressing the   button 7 returns you to the list of entries.Press the   /   button 7 once or several times to select a di erent track.Press the   button 7 to play the track.The playback starts. You are exiting the browse mode.uuuuuuu02_MadSanTor_gb.indd 3602_MadSanTor_gb.indd   3611.11.2010 11:12:04 Uhr11.11.2010   11:12:04 Uhr
37ENGLISHCD/MP3/WMA/iPod mode | External audio sources | Sound settingsFast browsingFast browsing enables faster access to tracks. In-stead of the arrow keys 7, you use the volume control 4 and the On/O  button 3 to select and con rm list entries:Function Browse modeFast browse modeSelecting entries in lists  /   7Volume control 4Con rming entries  7On/o button 3Return to the higher level  7 7Fast browsing is switched on or o  in the user menu (see the chapter "User settings", section "Making settings in the "VARIOUS" menu", menu item "FAST BROWSE").Note:With activated fast browsing, you cannot change the volume in browse mode or mute the car sound system. To do so,  rst  exit the browse mode by pressing the button 1 LIST = or 2 ID3 = or starting the track playback.External audio sourcesFront AUX-IN socketDanger! Increased risk of injury from connector.In case of an accident, the protruding connector in the front AUX-IN socket may cause injuries. The use of straight plugs or adapters leads to an increased risk of injury.For this reason, we recommend using angled jack plugs, e. g. the Blaupunkt accessories cable (7 607 001 535).As soon as an external audio source, such as a portable CD/MiniDisc or MP3 player is connected to the front AUX-IN socket :, it can be selected with the SRC button >. "AUX" then appears on the display.Notes:You can enter an individual name for the AUX source that is shown on the display in AUX mode (see the chapter "User settings", section "Making settings in the "VARIOUS" menu", menu item "AUX EDIT").You can play back an AUX source at the same time with one of the internal audio sources of the car sound system. Hence, you can play back the announcements of a navigation device connected to the front AUX-IN socket : via the loudspeakers of the car sound system while listening to the radio or a CD at the same time. In ad-dition, you can adjust the volume levels of both audio sources to each other. For more details, please read the section "Making settings in the "VARIOUS" menu", menu items "AUX MIX" and "AUX MIX GAIN" in the chapter "User settings".Sound settingsThe following sound settings can be changed in the "AUDIO" menu:Adjusting bass and trebleSetting the left/right volume distribution  (Balance) or front/rear (Fader)Adjusting the increase of bass at low volume (Loudness)Selecting a sound pro le (Sound Preset)Setting level and frequency of the preampli er output (Sub-Out)Setting the 3-band equaliserCalling and exiting the "AUDIO" menuBrie y press the MENU 2 button to open the user menu.••••••••u02_MadSanTor_gb.indd 3702_MadSanTor_gb.indd   3711.11.2010 11:12:04 Uhr11.11.2010   11:12:04 Uhr
38Press the   /   button 7 repeatedly until the "AUDIO" menu item is selected.Press the   button 7 to open the "AUDIO" menu.Press the   /   button 7 repeatedly until the desired menu item is selected.Perform the setting (see the next section).Brie y press the MENU button 2 to exit the menu.Notes:The menu is automatically exited approx. 15 seconds after the last button activation and you are returned to the display of the current audio source.In the menu, you can press the button  7 in each case to return to the higher menu level.Making settings in the "AUDIO" menuBASSBass level. Settings: –7 to +7.Turn the volume control 4 to perform the setting.TREBLETreble. Settings: –7 to +7.Turn the volume control 4 to perform the setting.BALANCELeft/right volume distribution. Settings: L9 (left) to R9 (right).Turn the volume control 4 to perform the setting.FADERFront/rear volume distribution. Settings: R9 (rear) to F9 (front).Turn the volume control 4 to perform the setting.uuuuu••uuuuLOUDNESSIncrease of bass at low volume. Settings: ON, OFF.Turn the volume control 4 to perform the setting.SOUND PRESETSSelecting equalizer presettings. Settings: POP, ROCK, CLASSIC, PRESET EQ OFF.Press the   button 7 to open the menu.Turn the volume control 4 to perform the setting.SUB-OUTSetting the level and frequency of the preampli- er output. Settings: GAIN 0 to +7, FREQUENCY 80/120/160 Hz.Press the   button 7 to open the menu.Press the   /   button 7 to toggle between the menu items "GAIN" and "FREQUENCY".Turn the volume control 4 in each case to perform the setting.Setting the 3-band equaliserThe radio features a 3-band equaliser. For each of the three treble, middle and bass bands, you can select a frequency as well as adjust the level. In  addition, you can adjust the quality factor for bass and middle. The equaliser also provides an adjustable increase of the bass at low volume (X-bass).Opening the "EQUALIZER" menuIn the "AUDIO" menu, select the "EQUALIZER" menu item.Press the   button 7 to open the menu.Press the   /   button 7 to change among the following menu items:EQUALIZEREQ TREBLEEQ MIDDLEEQ BASSEQ X-BASSuuuuuuuuu–––––Sound settings02_MadSanTor_gb.indd 3802_MadSanTor_gb.indd   3811.11.2010 11:12:04 Uhr11.11.2010   11:12:04 Uhr
39ENGLISHEQUALIZERSwitching the equalizer on or o .  Settings: ON, OFF.Turn the volume control 4 to perform the setting.EQ TREBLEAdjusting treble frequency and level of the equal-izer.Press the   button 7 to open the menu.Press the   /   button 7 to change among the following menu items:FREQUENCY (settings: 10/12.5/15/17.5 kHz)GAIN (settings: –7 to +7)Turn the volume control 4 in each case to perform the setting.EQ MIDDLEAdjusting centre frequency and level of the equal-izer.Press the   button 7 to open the menu.Press the   /   button 7 to change among the following menu items:FREQUENCY (settings: 0.5/1.0/1.5/2.5 kHz)GAIN (settings: –7 to +7)Q-FACTOR(settings: 0.5/0.75/1.0/1.25)Turn the volume control 4 in each case to perform the setting.EQ BASSAdjusting bass frequency and level of the equal-izer.Press the   button 7 to open the menu.Press the   /   button 7 to change among the following menu items:FREQUENCY (settings: 60/80/100/200 Hz)GAIN(settings: –7 to +7)uuu––uuu–––uuu––Q-FACTOR(settings: 1.0/1.25/1.5/2.0)Turn the volume control 4 in each case to perform the setting.EQ X-BASSAdjusting the frequency and level for the increase of bass at low volume.Press the   button 7 to open the menu.Press the   /   button 7 to change among the following menu items:FREQUENCY (settings: 60/80/100 Hz)GAIN(settings: 0 to +3)Turn the volume control 4 in each case to perform the setting.User settingsCalling the user menu and selecting a menuBrie y press the MENU 2 button to open the user menu.In the user menu, the user settings can be found in the following menus:TUNERAUDIO (see chapter "Sound settings")DISPLAYVOLUMECLOCKVARIOUSBLUETOOTH (only for Toronto 410 BT, see the accompanying "Bluetooth® instructions for  Toronto  410  BT")Press the   /   button 7 repeatedly until the desired menu is selected.Press the   button 7 to open the selected menu.Press the   /   button 7 repeatedly until the desired menu item is selected.Perform the setting (see the following sec-tions).–uuu––uu•••••••uuuuSound settings | User settings02_MadSanTor_gb.indd 3902_MadSanTor_gb.indd   3911.11.2010 11:12:04 Uhr11.11.2010   11:12:04 Uhr
40Brie y press the MENU button 2 to exit the menu.Notes:The menu is automatically exited approx. 15 seconds after the last button activation and you are returned to the display of the current audio source.In the menu, you can press the   button 7 in each case to return to the higher menu level.Making settings in the "TUNER" menuTRAFFIC (tra  c information)(only for reception area EUROPE)Only possible in FM radio mode: Switching prior-ity for tra  c announcements on or o . Settings: ON, OFF.Turn the volume control 4 to change among the settings.If priority is switched on for tra  c information, the display shows the icon  .BAND (band selection)Activating or deactivating memory banks. Memory banks that can be deactivated: FM2, FMT, MW and LW (only for reception area EUROPE), AM and AMT (only for reception area USA and SOUTH AMERICA).Settings in each case: ON, OFF.Press the   button 7 to open the menu.Press the   /   button 7 repeatedly until the desired memory bank is displayed.Turn the volume control 4 to toggle be-tween the settings ON (activate memory bank) and OFF (deactivate memory bank).Deactivated memory banks are skipped during the source selection with the SRC button >.Note:If a memory bank is deactivated, the stations stored in this memory bank are retained.u••uuuuREGIONAL(only for reception area EUROPE)Only possible in FM radio mode: Switching  REGIONAL function on or o . Settings: ON, OFF.Turn the volume control 4 to change be-tween the settings.SENSITIVITYSetting the sensitivity of station seek tuning. Settings: LO (–; low), HI (+; high).Turn the volume control 4 to change be-tween the settings.RDSSwitching the RDS function on or o . Settings: ON, OFF.Turn the volume control 4 to change be-tween the settings.PTYSwitching the PTY function on or o . Settings: ON, OFF.Turn the volume control 4 to change be-tween the settings.PTY TYPESOnly possible with activated PTY function: Select a programme type.Turn the volume control 4 to select a pro-gramme type.PTY LANGUAGESelect the language for the display of the pro-gramme types. Settings: ENGLISH, FRANCAIS (French), DEUTSCH (German).Press the   button 7 to open the menu.Turn the volume control 4 to select a lan-guage.TUNER AREA (reception area)Select the reception area for the radio reception. Settings: EUROPE, USA, SOUTH AMERICA, THAI-LAND.uuuuuuuUser settings02_MadSanTor_gb.indd 4002_MadSanTor_gb.indd   4011.11.2010 11:12:05 Uhr11.11.2010   11:12:05 Uhr
41ENGLISHPress the   button 7 to open the menu.Press the   /   button 7 to select a recep-tion area.Press the   button 7 to set the reception area.Press the   button 7 to con rm the select-ed reception area.Making settings in the "DISPLAY" menuDIMMERSelect automatic or manual switching of the dis-play brightness for day or night. Settings: AUTO (display brightness is automatically switched by switching the driving lights on or o ), MANUAL (display brightness can be switched manually).Turn the volume control 4 to perform the setting.Automatic switching of the display brightness is possible only If your car sound system is installed as described in the installation instructions and your vehicle features the corresponding connec-tion. SCROLLINGSelect the display of scrolling text (e. g. when  displaying  MP3   le names) either as single display or continued display. Settings: 1X (single display), ON (continued display).Turn the volume control 4 to change be-tween the settings.LANGUAGE(only for Toronto 410 BT)Select the language for the display. Settings:  ENGLISH, DEUTSCH (German).Press the   button 7 to open the menu.Turn the volume control 4 to select a lan-guage.uuuuuuuuMaking settings in the "VOLUME" menuON VOLUMESetting the power-on volume. Settings: ON VOL (power-on volume; 1 – 50) or LAST VOL (volume set last before switching o  the car sound sys-tem).Danger! High volume.The power-on volume can be unex-pectedly high if the LAST VOL setting is selected and a high volume was set the last time the radio was switched o .Always set the device to a moderate volume.Press the   button 7 to open the menu.Press the   /   button 7 to toggle be-tween the settings LAST VOL and ON VOL.If necessary, turn the volume control 4 to adjust the desired volume for the ON VOL setting.TRAFFIC VOL(only for reception area EUROPE)Setting the minimum volume for tra  c announce-ments. Settings: 1 – 50.Turn the volume control 4 to perform the setting.BEEPSwitching the con rmation beep on or o . Set-tings: ON, OFF.Turn the volume control 4 to perform the setting.Making settings in the "CLOCK" menuSETSetting the time. Turn the volume control 4 clockwise to set the hours.uuuuuuUser settings02_MadSanTor_gb.indd 4102_MadSanTor_gb.indd   4111.11.2010 11:12:05 Uhr11.11.2010   11:12:05 Uhr
42Turn the volume control 4 counterclockwise to set the minutes.Press the   button 7 to con rm the time entered and to return to the user menu.- or -Brie y press the MENU button 2 to con rm the time entered and to exit the user menu.Note:When you set the time in 12-hour mode (HOUR MODE 12), an "AM" is displayed before the time for the time before noon or a "PM" for the time after noon.HOUR MODESelecting the 12 or 24-hour time. Settings: 12, 24.Turn the volume control 4 to perform the setting.PERM CLOCKSwitch the permanent display of the time on or o . Settings: ON, OFF.Turn the volume control 4 to perform the setting.If the permanent display of the time is switched on, the time is shown on the display. The display of the respective audio source is shown only after pressing a button. Approximately 15 seconds  after the button is pressed last, the time is displayed again.Making settings in the "VARIOUS" menuDEMO MODESwitching the demo mode on or o .  Settings: ON, OFF.Turn the volume control 4 to perform the setting.In demo mode, the features of the radio are shown as scrolling text on the display.uuuuuuMIX AUXSwitching the combined playback of the AUX source with another audio source on or o . Set-tings: ON, OFF.Turn the volume control 4 to perform the setting.With the AUX MIX ON setting, an audio source connected to the front AUX-IN socket : is played back simultaneously with the respective active in-ternal audio source of the car sound system (e. g. radio or CD).AUX MIX GAIN (AUX MIX Level)Adjusting the level of the AUX source with com-bined playback of the AUX source and another audio source (AUX MIX ON). Settings: –5 to +5.Turn the volume control 4 to perform the setting.This setting allows raising or lowering the level of the AUX source to adjust it to the level of the other active audio source.AUX EDITEntry of an individual 15-digit name for the AUX source. Possible characters: space, 0 – 9, A – Z.Press the   button 7 to open the entry menu.Turn the volume control 4 to select a char-acter for the respective position.Press the   or   button 7 to reach the next or previous position.Press the   or   button 7 repeatedly until you reach past the  rst or last position in order to con rm the name entered and to return to the "VARIOUS" menu.- or -Brie y press the MENU button 2 to con rm the name entered and to exit the user menu.The name entered is shown on the display as soon as you select the AUX source.uuuuuuuUser settings02_MadSanTor_gb.indd 4202_MadSanTor_gb.indd   4211.11.2010 11:12:05 Uhr11.11.2010   11:12:05 Uhr
43ENGLISHFAST BROWSESwitching fast track selection in browse mode on or o  using the volume control 4 and the On/O  button 3. Settings: ON, OFF.Turn the volume control 4 to perform the setting.SCAN TIMESetting the scan time in seconds. Settings: 4/8/12/16/60 SEC.Turn the volume control 4 to perform the setting.VERSIONDisplaying the version of the CPU and software of the radio.Press the   button 7 to open the menu.Press the   /   button 7 to toggle be-tween the display of the version number of CPU (P) and software (E).NORMSETRestoring the original factory settings of the car sound system.Press the   button 7 to open the menu.Press the   button 7 to con rm restoring the factory settings.The factory settings are restored. You are returned to the VARIOUS menu to the "NORMSET" menu item. uuuuuuFactory settingsImportant factory settings in the user menu:Menu item Factory settingTUNER AREA EUROPERDS ONREGIONAL* ONTRAFFIC* OFFSENSITIVITY HIPTY OFFON VOLUME LAST VOLUMETRAFFIC VOL* 20BEEP ONSCAN TIME 8 SECDIMMER MANUALHOUR MODE 24CLOCK SET 00:00* Only in reception area "EUROPE"In the user menu, you can restore the original factory settings of the car sound system (see the chapter "User settings", section "Making settings in the "VARIOUS" menu", menu item "NORMSET"):Useful informationWarrantyWe provide a manufacturer's warranty for prod-ucts bought within the European Union. For de-vices purchased outside the European Union, the warranty terms issued by our respective responsi-ble domestic agency are valid. The warranty terms can be called up from www.blaupunkt.com. User settings | Factory settings | Useful information02_MadSanTor_gb.indd 4302_MadSanTor_gb.indd   4311.11.2010 11:12:05 Uhr11.11.2010   11:12:05 Uhr
44ServiceIn some countries, Blaupunkt o ers a repair and pick-up service.Information about the availability of this service in your country can be found at www.blaupunkt.com.If you want to take advantage of this service, you may request a pick-up service for your car sound system via the Internet.Technical dataVoltage supplyOperating voltage:  10.5 – 14.4 VCurrent consumptionIn operation:  10 A10 sec. after switch-o :  < 3.5 mAAmpli er Output power:  4 x 22 watts sine at 14.4 V at 4 ohms.  4 x 50 watts max. powerTunerWavebands in Europe/Thailand:FM:  87.5 – 108 MHzAM (MW):  531 – 1,602 kHzLW (Europe only):  153 – 279 kHzWavebands in the US:FM:  87.7 – 107.9 MHzAM (MW):  530 – 1,710 kHzWavebands in South America:FM:  87.5 – 107.9 MHzAM (MW):  530 – 1,710 kHzFM frequency response:  30 – 15,000 HzCDFrequency range:  20 – 20,000 HzPre-amp out4 channels:  2 VInput sensitivityFront AUX-IN:  300 mV / 10 kΩDimensions and weightW x H x D:  178 x 50 x 160 mmWeight:  approx. 1.70 kgSubject to changesUseful information | Technical data02_MadSanTor_gb.indd 4402_MadSanTor_gb.indd   4411.11.2010 11:12:05 Uhr11.11.2010   11:12:05 Uhr
FCC WARNING This device complies with Part 15 of the FCC Rules. Operation is subject to the following two conditions: (1) this device may not cause harmful interference, and (2) this device must accept any interference received, including interference that may cause undesired operation. NOTE 1: Any changes or modifications not expressly approved by the manufacturer could void the user’s authority to operate the equipment. NOTE 2: The manufacturer is not responsible for any radio or TV interference caused by unauthorized modifications to this equipment. Such modifications could void the user’s authority to operate the equipment.

Navigation menu