TOSHIBA Direct View Digital 27 To 40 TV Manual L0701370
User Manual: TOSHIBA TOSHIBA Direct View Digital 27 to 40 TV Manual TOSHIBA Direct View Digital 27 to 40 TV Owner's Manual, TOSHIBA Direct View Digital 27 to 40 TV installation guides
Open the PDF directly: View PDF ![]() .
.
Page Count: 72
l
TOSHIBA
STAR
_SIGHT®
Color Television
IIIIIII I IIIIII I III
OWNER'S MANUAL
CN35FgO/CN35F95
@TOSHIBA CORPORATION, 1996
Dear Customer
Congratulations! You have purchased one of the
finest Color TV's on the market!
This manual will help you use the many exciting and
useful features to make your TV viewing more enjoy-
able than ever before.
Before operating your TV set, please read all these
safety and operating instructions completely and
then retain for future reference.
* This manual applies to models CN35F90 and
CN35F95. The common illustrations used in the
following texts represent model CN35Fg0.
Customer's Record
You will find the model number and serial number on
the back of your "IV set.
Record these numbers in the spaces provided below.
Refer to them whenever you call upon your TOSHIBA
dealer regarding this product.
Model Number
Serial Number
Safety Precautions
WARNING:
TO REDUCE THE RISK OF FIRE OR ELECTRIC
SHOCK, DO NOT EXPOSE THIS APPLIANCE TO
RAIN OR MOISTURE.
WARNING
AVIS: RISQUE DE CHOC
ELECTRIQUE-NE PAS OUVRIR
WARNING: TO REDUCE THE RISK OF
ELECTRIC SHOCK, DO NOT REMOVE
COVER (OR BACK). NO USER-
SERVICEABLE PARTS INSIDE. REFER
SERVICING TO QUALIFIED SERVICE PER-
SONNEL.
The lightning symbol in the triangle tells
you that the voltage inside this product may
be strong enough to cause an electric shock.
DO NOT TRY TO SERVICE THIS PRODUCT
YOURSELF.
The exclamation point in the triangle tells
you that important operating and mainte-
nance instructions follow this symbol.
CAUTIONS:
TO PREVENT ELECTRIC SHOCK, DO NOT USE THIS
POLARIZED PLUG WITH AN EXTENSION CORD
RECEPTACLE OR OTHER OUTLET UNLESS THE
PRONGS CAN BE FULLY INSERTED INTO THE
OUTLET TO PREVENT ANY EXPOSURE OF THE
PRONGS ON THE POLARIZED PLUG.
ATTENTION:
POUR PRI_VENIR LES CHOCS I_LECTRIQUES, NE
PAS UTILISER CETTE FICHE POLARISI_E AVEC UN
PROLONGATEUR, UNE PRISE DE COURANT OU
UNE AUTRE SORTIE DE COURANT, SAUF SI LES
LAMES PEUVENT I_TRE INSI_RI_S _. FOND SANS
EN LAISSER AUCUNE PARTIE )k DI_COUVERT.
NOTE TO CATV SYSTEM INSTALLER IN THE USA:
This reminder is provided to call the CATV system
installer's attention to Article 820-40 of the NEC that
provides guidelines for proper grounding and, in
particular, specifies that the cable ground shall be
connected to the grounding system of the building,
as close to the point of cable entry as practical.
Only for CN35F90:
This -rv set may be used only with TOSHIBA stand
model ST3504. Use with other stands may result in
instability causing possible injury.
2
Table of Contents
Preparation
Installing Your TV Set ...................................... 4
Antenna/Cable TV General Information .......... 5
Antenna/Cable TV Connections ....................... 6
Setting Up StarSight ...................................... 10
Activating StarSight ....................................... 18
Location of Controls (TV Set) ........................ 22
Location of Controls (Remote Control) ......... 26
Before Using the Remote Control ................. 27
Using the Remote Control with VCR
or Cable Box ................................................ 28
Programming the Remote Control ................ 29
Menu Function (General Instructions) .......... 34
Selecting the Antenna Input .......................... 36
Programming Channel Memory ................... 37
Basic Operation
Watching TV Programs .................................. 39
Convenient Remote Functions ...................... 40
Adjusting the Picture ...................................... 41
Adjusting the Sound ...................................... 43
Selecting Stereo/SAP Broadcasts ................. 44
Advanced Operation
Enhancing the Surround Sound Effect ......... 45
Operating the Sub-Woofer System
"CYCLONE _" .............................................. 48
Setting the Off-Timer/Clock ......................... 49
Watching Picture-in-Picture ........................... 50
Locking Channels ........................................... 52
Labeling Channels .......................................... 54
Programming Your Favorite Channels ......... 56
Using Closed-Captioned Function ................. 58
Activating Flesh Tone /Noise Reduction
Functions ..................................................... 60
Changing On-Screen Display Language ....... 61
Equipment Connections
Connecting aStandard VCR .......................... 62
Connecting a VCR with an S-Video Jack ...... 63
Connecting a Video Camera .......................... 64
Dubbing/Editing Video Tapes with 2 VCR's.. 65
Connecting an Audio Amplifier ..................... 66
Connecting External Speakers ...................... 67
Reference Section
Cleaning and Care .......................................... 68
Specifications ................................................. 69
Before Calling Service Personnel .................. 70
Limited United States Warranty .................... 71
3
Installing Your TV Set
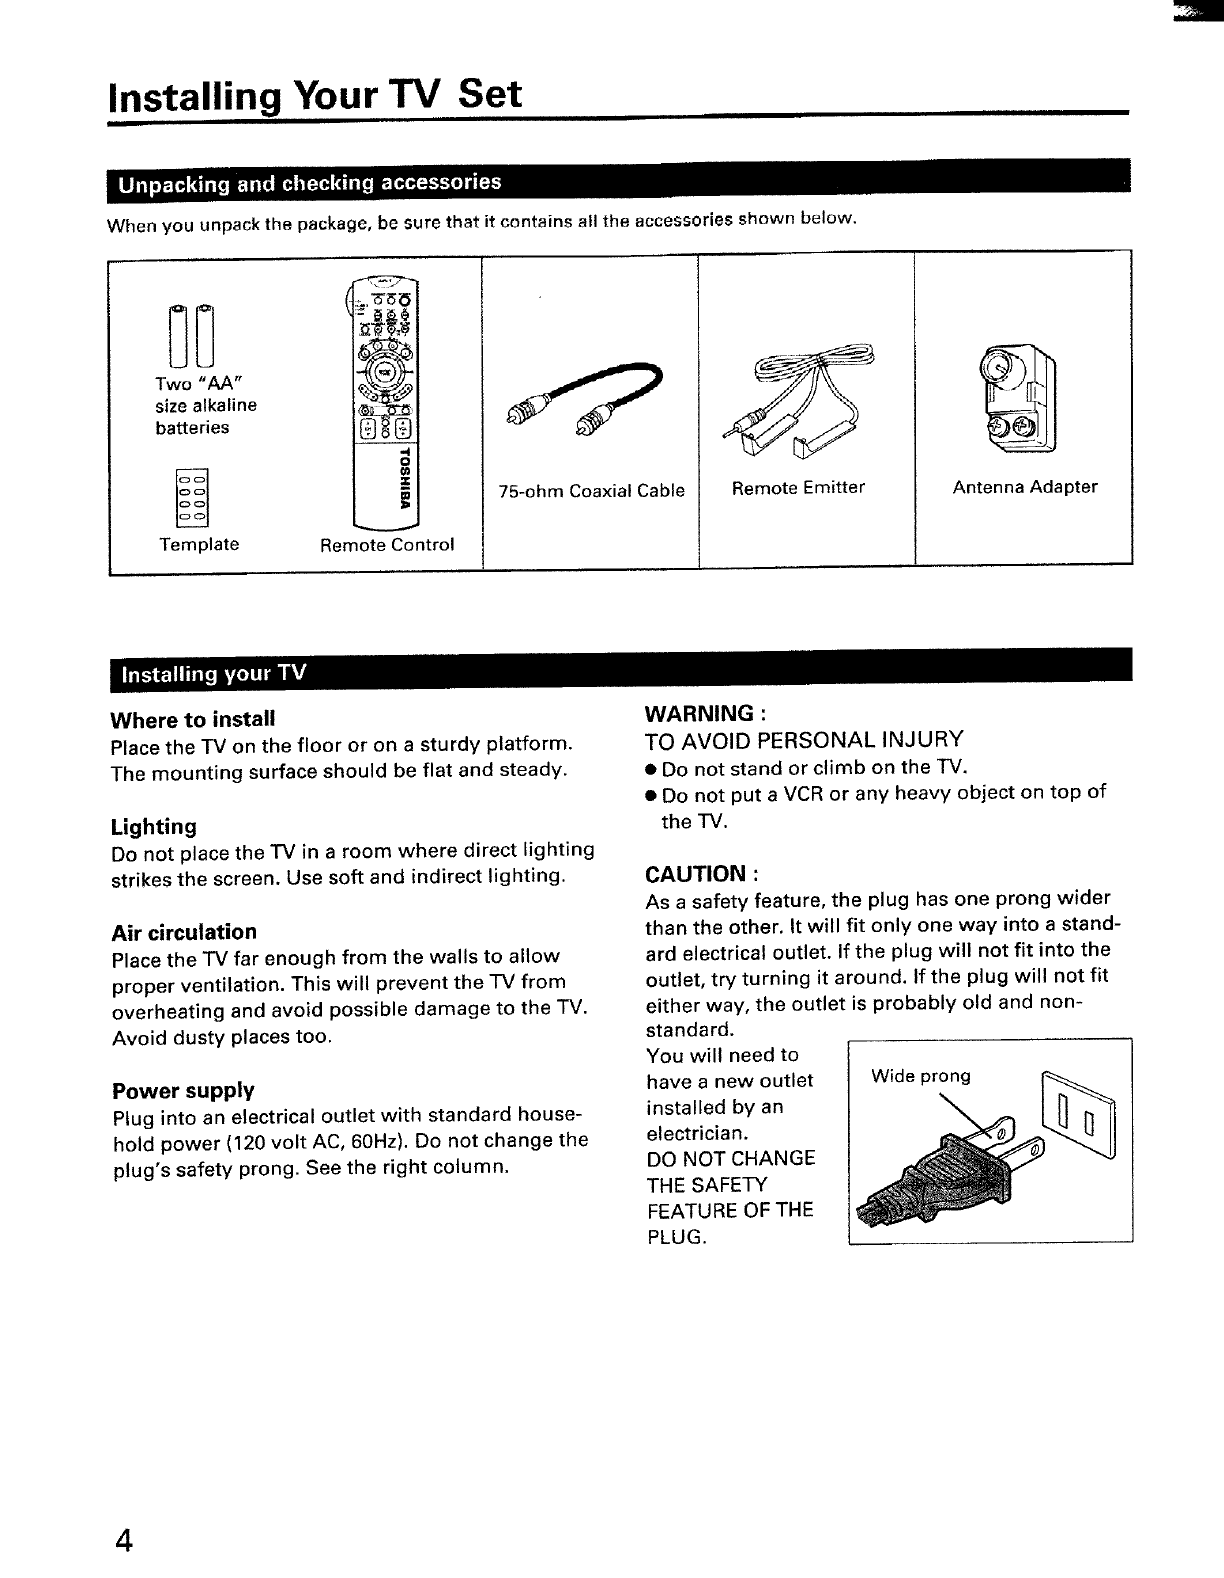
When you unpack the package, be sure that it contains all the accessories shown below.
Two "AA"
size alkaline
batteries
Template
il
Remote Control
75-ohm Coaxial Cable Remote Emitter Antenna Adapter
Where to install
P_acethe "IV on the floor or on a sturdy platform.
The mounting surface should be flat and steady.
Lighting
Do not place the "IV in aroom where direct lighting
strikes the screen. Use soft and indirect lighting.
Air circulation
Place the "IV far enough from the walls to allow
proper ventilation. This will prevent the TV from
overheating and avoid possible damage to the TV.
Avoid dusty places too.
Power supply
Plug into an electrical outlet with standard house-
hold power (120 volt AC, 60Hz). Do not change the
plug's safety prong. See the right column.
WARNING :
TO AVOID PERSONAL INJURY
•Do not stand or climb on the TV.
• Do not put aVCR or any heavy object on top of
the TV.
CAUTION :
As asafety feature, the plug has one prong wider
than the other. It will fit only one way into a stand-
ard electrical outlet, If the plug will not fit into the
outlet, try turning it around. If the plug will not fit
either way, the outlet is probably old and non-
standard.
You will need to
have a new outlet Wide prong
installed by an
electrician.
DO NOT CHANGE
THE SAFETY
FEATURE OF THE
PLUG.
4
Antenna/Cable TV General Information
You can use either an indoor or outdoor antenna to receive VHF and/or UHF channels.
Channels 2 -13 are VHF channels, and channels 14 - 69 are UHF channels.
We recommend using an outdoor antenna for better picture quality.
You can receive Cable TV by connecting your local cable company.
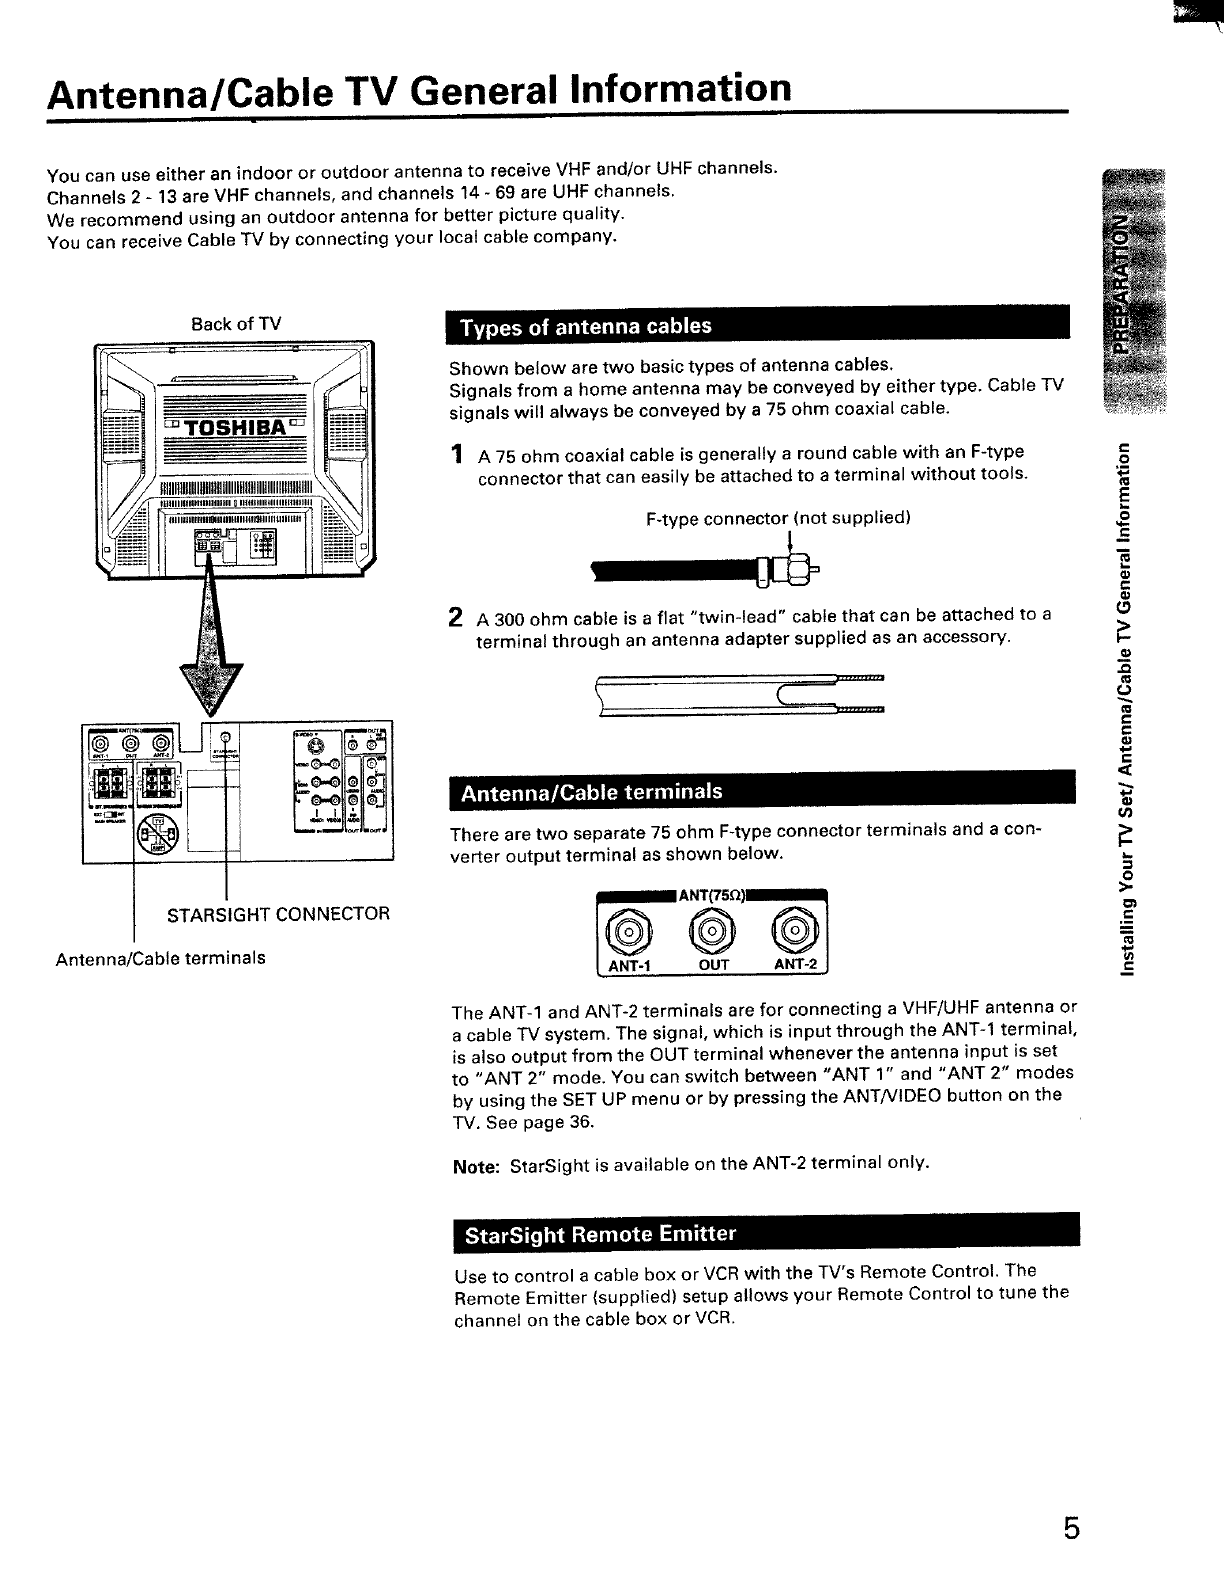
STARSIGHT CONNECTOR
Antenna/Cable terminals
Shown below are two basic types of antenna cables.
Signals from a home antenna may be conveyed by either type. Cable TV
signals will always be conveyed by a 75 ohm coaxial cable.
1A 75 ohm coaxial cable is generally a round cable with an F-type
connector that can easily be attached to aterminal without tools.
F-type connector (not supplied)
2A 300 ohm cable is a flat "twin-lead" cable that can be attached to a
terminal through an antenna adapter supplied as an accessory.
There are two separate 75 ohm F-type connector terminals and a con-
verter output termina! as shown below.
®OUT ANT-2
The ANT-1 and ANT-2 terminals are for connecting a VHF/UHF antenna or
a cable TV system. The signal, which is input through the ANT-1 terminal,
is also output from the OUT terminal whenever the antenna input is set
to "ANT 2" mode. You can switch between "ANT 1" and "ANT 2" modes
by using the SET UP menu or by pressing the ANT/VIDEO button on the
"IV. See page 36.
Note: StarSight is available on the ANT-2 terminal only.
,2
,90
_=
e,
(3
.O
(J
e-
qJ
€/)
o
>.
=
_=
Use to control a cable box or VCR with the TV's Remote Control. The
Remote Emitter (supplied) setup allows your Remote Control to tune the
channel on the cable box or VCR.
5
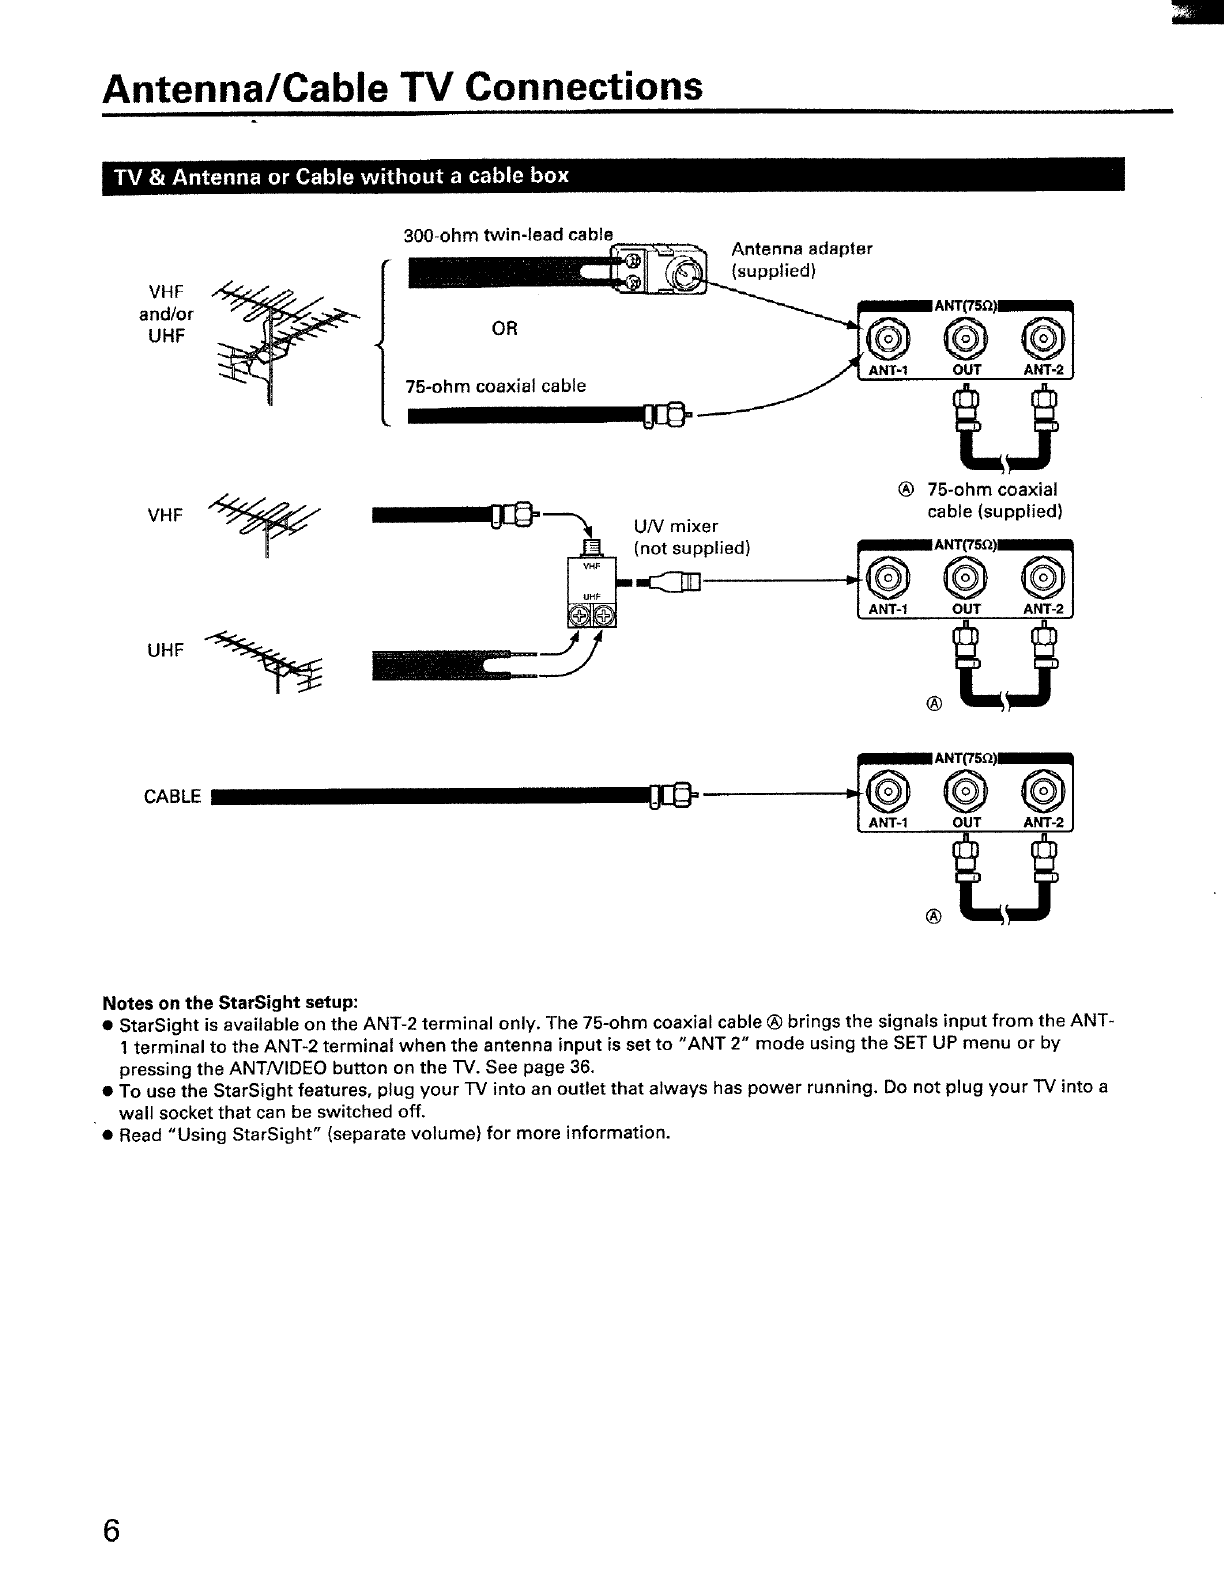
Antenna/Cable TV Connections
and/or
UHF
VHF
UHF
300-ohm twin-lead cable Antenna adapter
........ _l ANT-I OUT ANT-2 j
75-o.mcoaxialcaD_e __
UN mixer
(_plied)
®75-ohm coaxial
cable (supplied)
®
CABLE [_
Notes on the StarSight setup:
•StarSight is available on the ANT-2 terminal only. The 75-ohm coaxial cable ® brings the signals input from the ANT-
1terminal to the ANT-2 terminal when the antenna input is set to "ANT 2" mode using the SET UP menu or by
pressing the ANTNIDEO button on the IV. See page 36.
• To use the StarSight features, plug your -IV into an outlet that always has power running. Do not plug your "IV into a
wall socket that can be switched off,
•Read "Using StarSight" (separate volume) for more information.
6
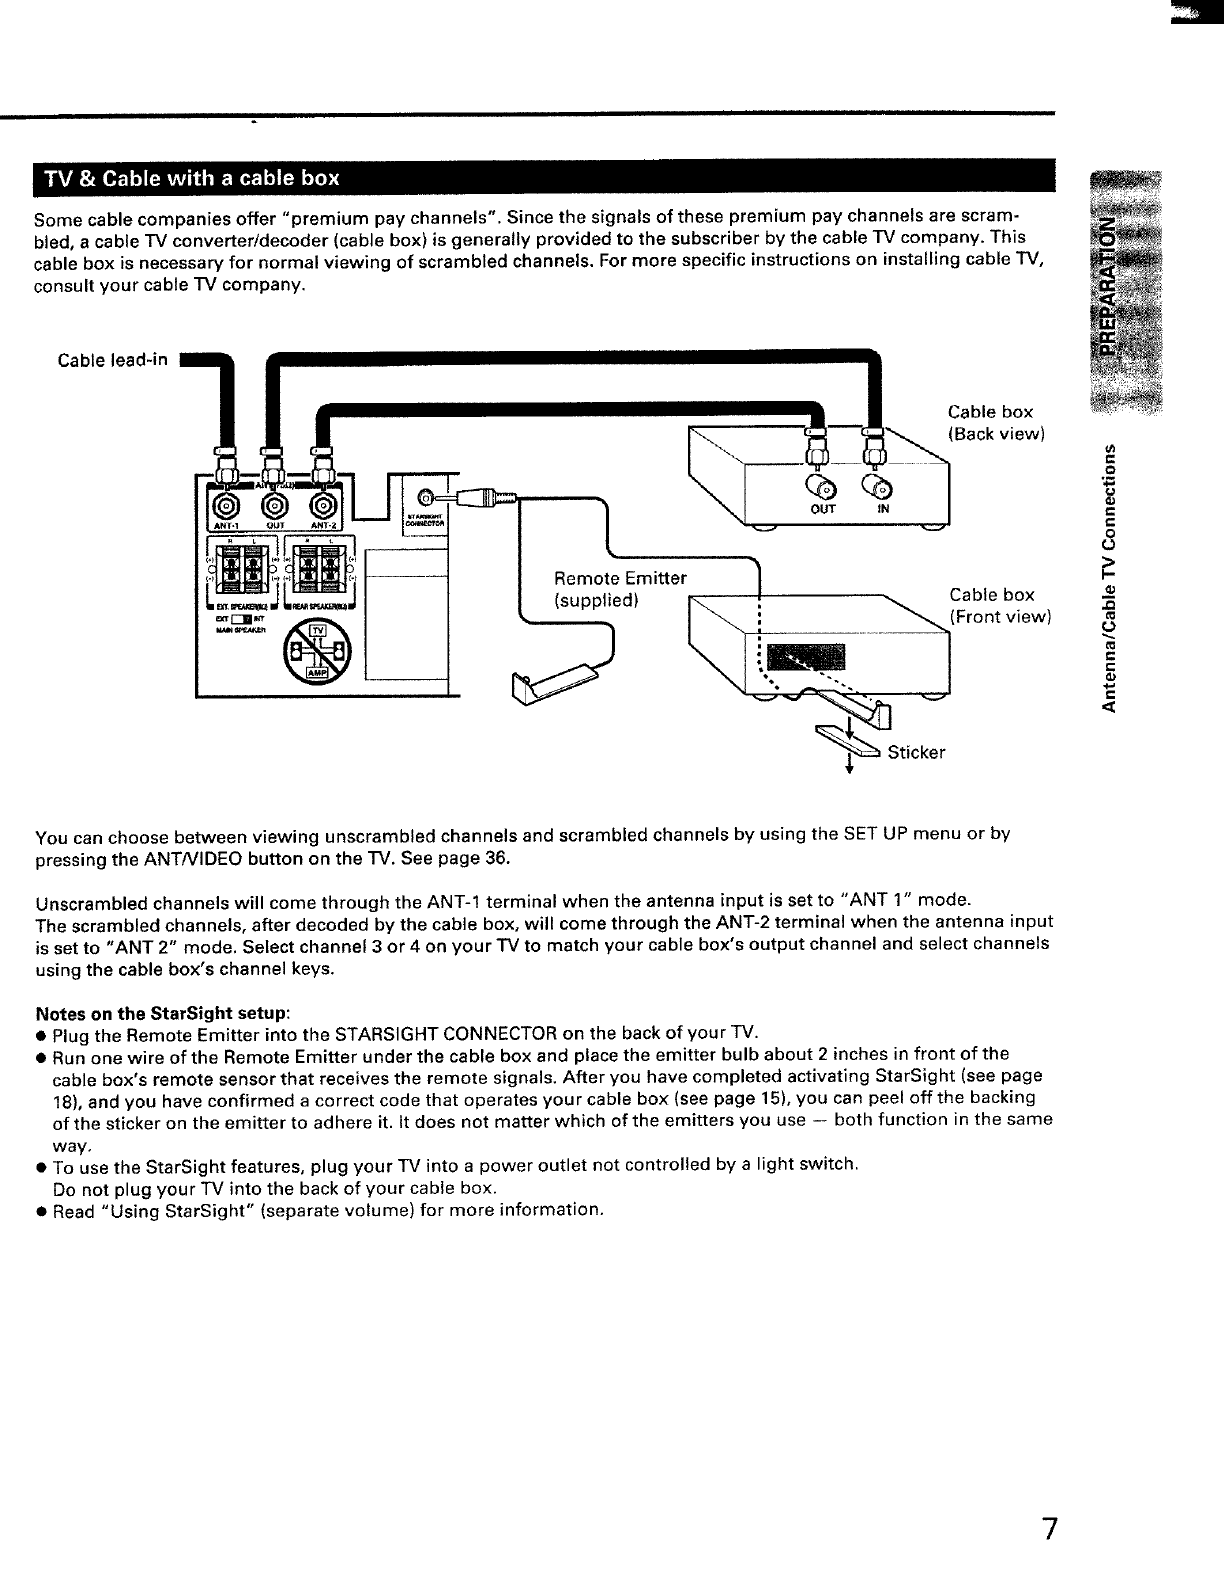
Some cable companies offer "premium pay channels". Since the signals of these premium pay channels are scram-
bled, a cable TV converter/decoder (cable box) is generally provided to the subscriber by the cable TV company. This
cable box is necessary for normal viewing of scrambled channels. For more specific instructions on installing cable TV,
consult your cable TV company.
Cable lead-in
OUT IN
Cable box
(Back view)
(supplied)
U
Remote Emitter
. _ Cab e box
-' _(Front view)
]
_ Sticker
ffl
0
o
>
l-
ID
C
i-
,<
You can choose between viewing unscrambled channels and scrambled channels by using the SET UP menu or by
pressing the ANTNIDEO button on the IV. See page 36.
Unscrambled channels will come through the ANT-1 terminal when the antenna input is set to "ANT 1" mode.
The scrambled channels, after decoded by the cable box, will come through the ANT-2 terminal when the antenna input
is set to "ANT 2" mode. Select channel 3 or 4 on your TV to match your cable box's output channel and select channels
using the cable box's channel keys.
Notes on the StarSight setup:
•Plug the Remote Emitter into the STARSIGHT CONNECTOR on the back of your "IV.
•Run one wire of the Remote Emitter under the cable box and place the emitter bulb about 2 inches in front of the
cable box's remote sensor that receives the remote signals. After you have completed activating StarSight (see page
18), and you have confirmed a correct code that operates your cable box (see page 15), you can peel off the backing
of the sticker on the emitter to adhere it. it does not matter which of the emitters you use -- both function in the same
way.
•To use the StarSight features, plug your TV into a power outlet not controlled by a light switch.
Do not plug your "IV into the back of your cable box.
•Read "Using StarSight" (separate volume) for more information.
7
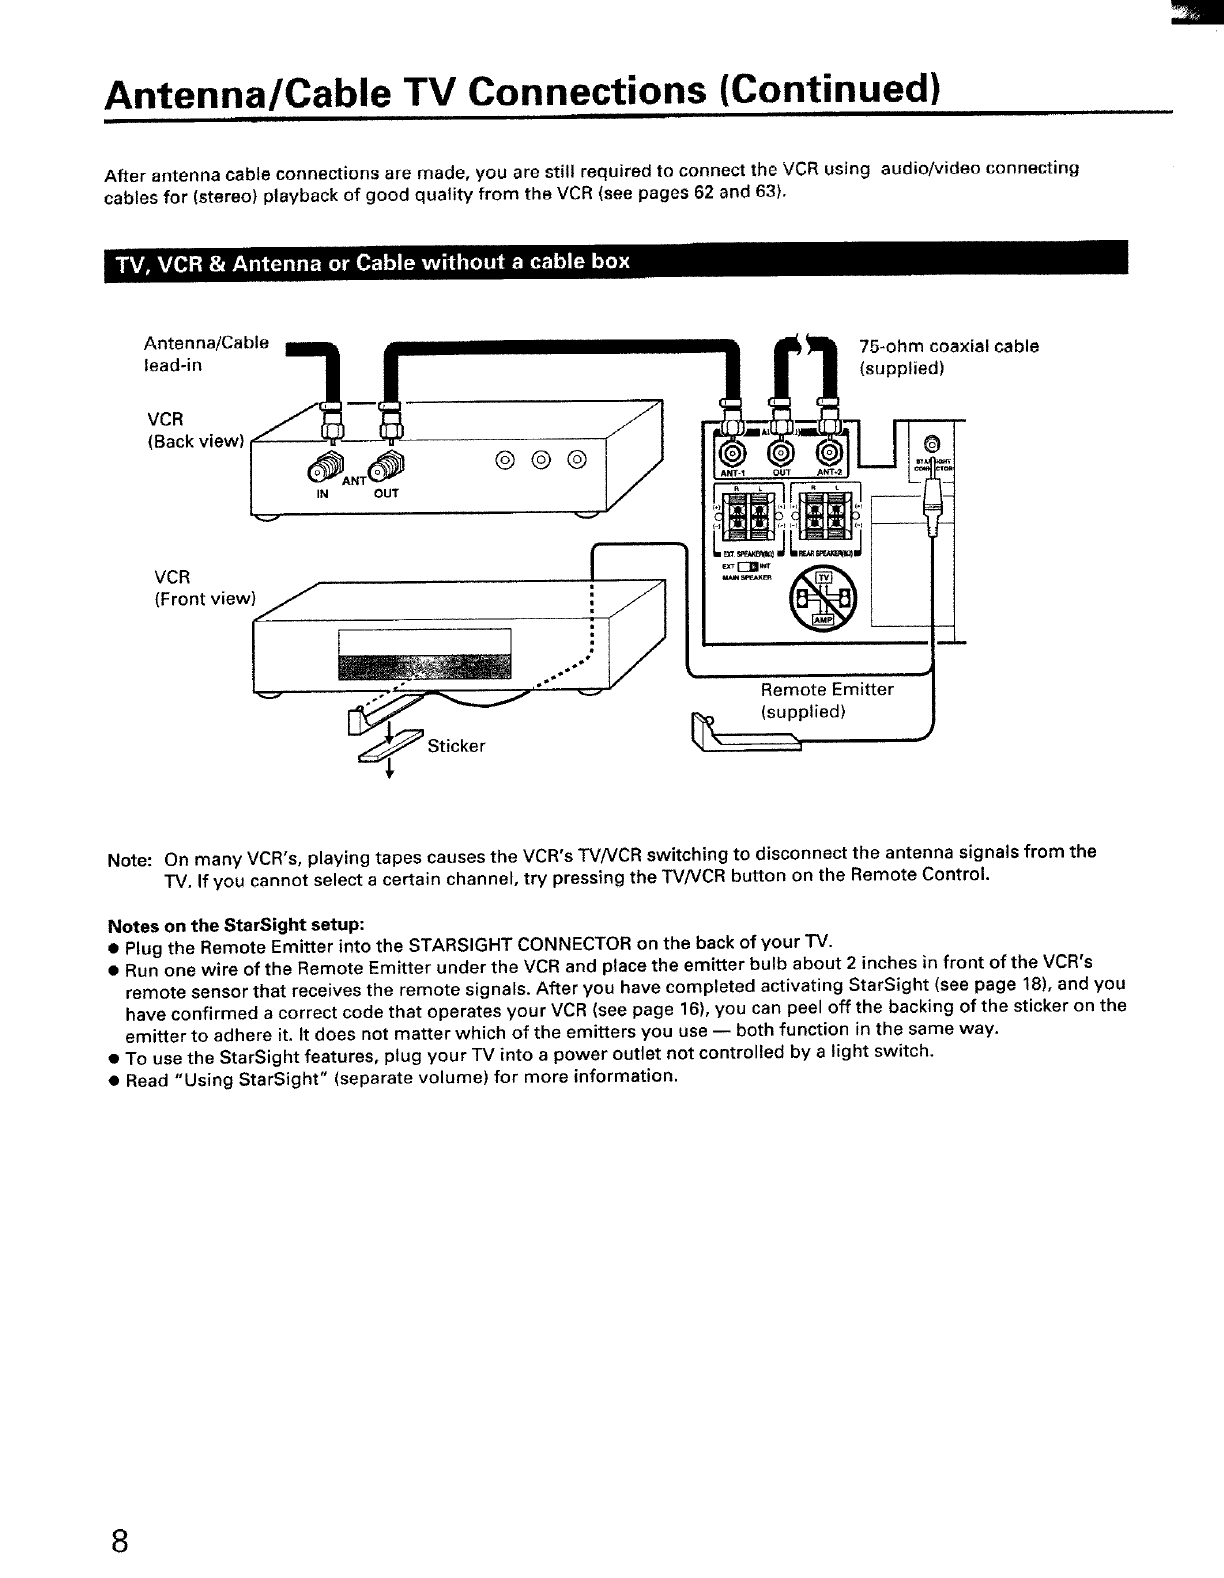
Antenna/Cable TV Connections (Continued)
After antenna cable connections are made, you are still required to connect the VCR using audio/video connecting
cables for (stereo) playback of good quality from the VCR (see pages 62 and 63).
Antenna/Cable
lead-in
vc.
(Back view) I (_AIN NT (_OUT (_ @ (_
VCR
(Front view_
75-ohm coaxial cable
(supplied)
Remote Emitter
Note: On many VCR's, playing tapes causes the VCR's TVNCR switching to disconnect the antenna signals from the
TV. If you cannot select a certain channel, try pressing the TV/VCR button on the Remote Control.
Notes on the StarSight setup:
•Plug the Remote Emitter into the STARSIGHT CONNECTOR on the back of your TV.
•Run one wire of the Remote Emitter under the VCR and place the emitter bulb about 2 inches in front of the VCR's
remote sensor that receives the remote signals. After you have completed activating StarSight (see page 18), and you
have confirmed a correct code that operates your VCR (see page 16), you can peel off the backing of the sticker on the
emitter to adhere it. It does not matter which of the emitters you use -- both function in the same way.
•To use the StarSight features, plug your rv into a power outlet not controlled by a light switch.
•Read "Using StarSight" (separate volume) for more information.
8
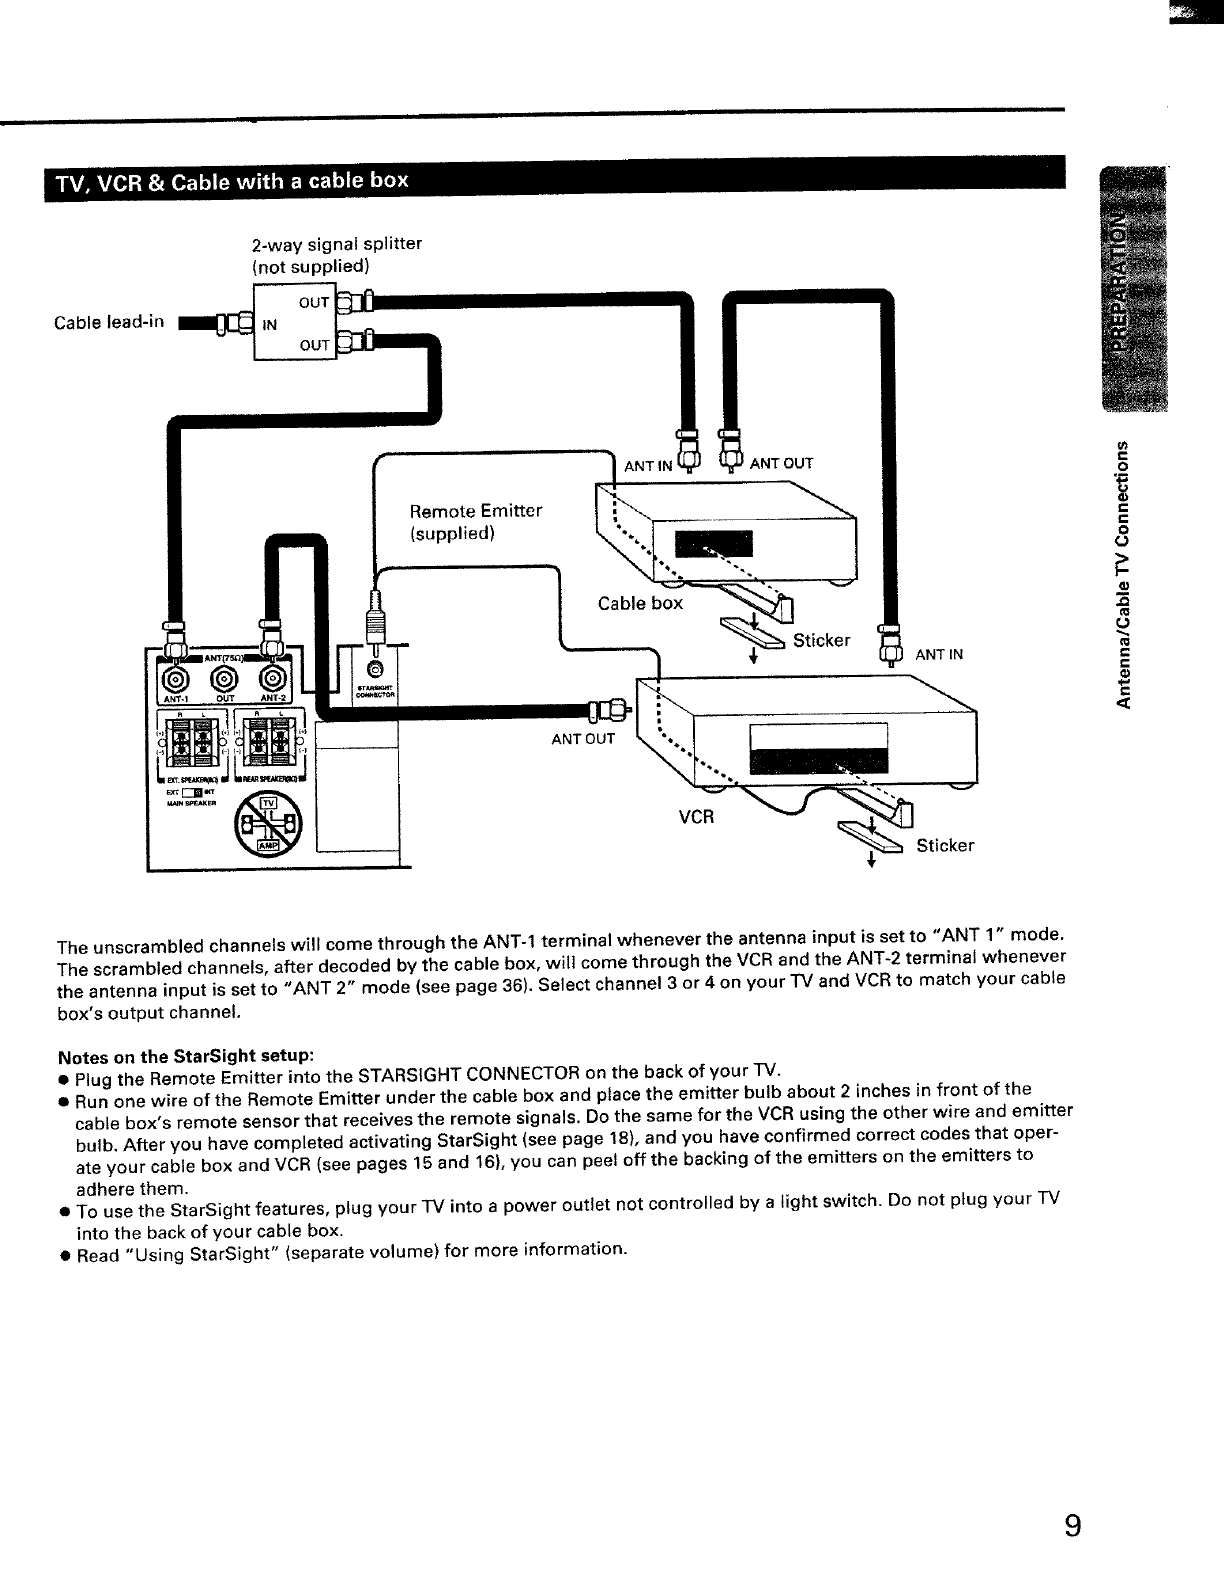
Cable lead-in
2-way signal splitter
(not supplied)
OUT!
IN
@
Remote Emitter
(supplied)
Cable box
_ANT OUT
Sticker ANTIN
IANT OUT
VCR
Sticker
€
o
f-
r-
e-
f-
The unscrambled channels will come through the ANT-1 terminal whenever the antenna input is set to "ANT 1" mode,
The scrambled channels, after decoded by the cable box, will come through the VCR and the ANT-2 terminal whenever
the antenna input is set to "ANT 2" mode (see page 36). Select channel 3 or 4 on your -rv and VCR to match your cable
box's output channel.
Notes on the StarSight setup:
•Plug the Remote Emitter into the STARSIGHT CONNECTOR on the back of your "IV.
•Run one wire of the Remote Emitter under the cable box and place the emitter bulb about 2 inches in front of the
cable box's remote sensor that receives the remote signals. Do the same for the VCR using the other wire and emitter
bulb. After you have completed activating StarSight (see page 18), and you have confirmed correct codes that oper-
ate your cable box and VCR (see pages 15 and 16), you can peel offthe backing of the emitters on the emitters to
adhere them.
• To use the StarSight features, plug your "IV into a power outlet not controlled by a light switch. Do not plug your IV
into the back of your cable box.
•Read "Using StarSight" (separate volume) for more information.
9
Setting Up StarSight
i llliiiiiiiiu l iii
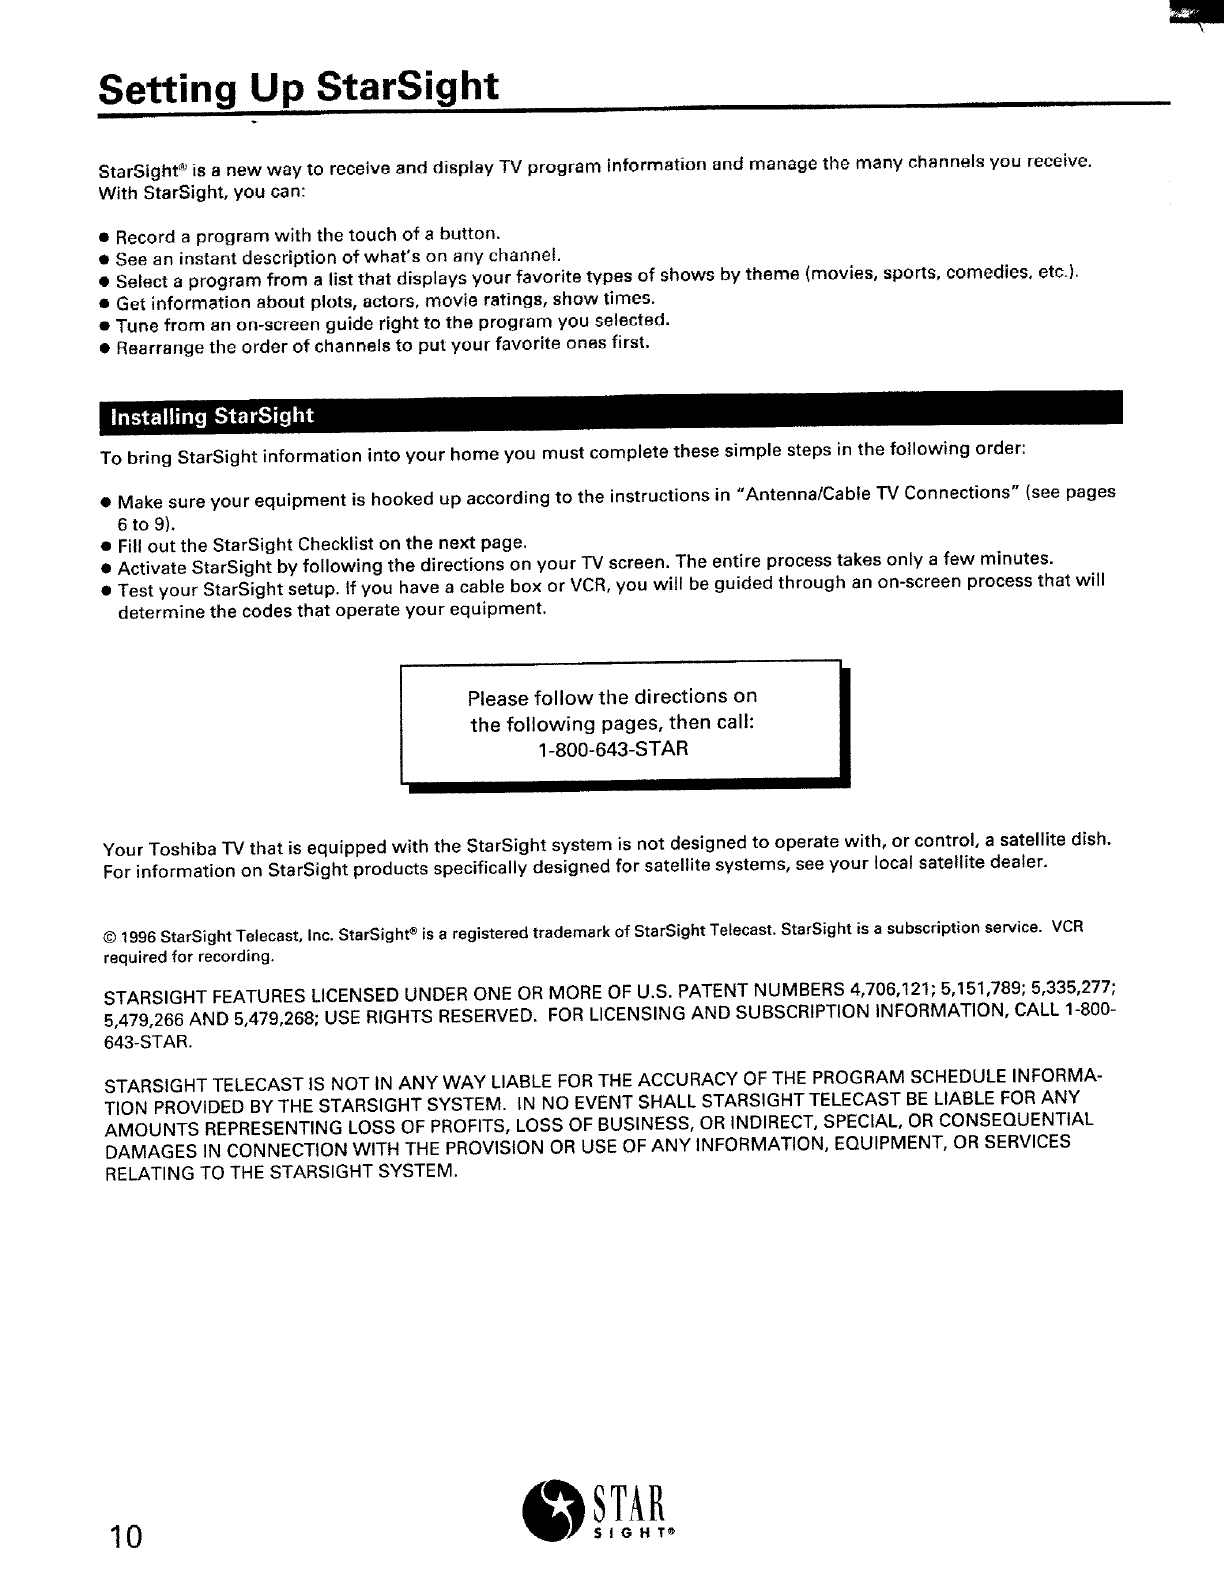
StarSight _ is a new way to receive and display TV program information and manage the many channels you receive.
With StarSigbt, you can:
• Record a program with the touch of abutton.
• See an instant description of what's on any channel.
• Select a program from a list that displays your favorite types of Shows by theme (movies, sports, comedies, etc.).
• Get information about plots, actors, movie ratings, show times.
• Tune from an on-screen guide right to the program you selected.
• Rearrange the order of channels to put your favorite ones first.
To bring StarSight information into your home you must complete these simple steps in the following order:
• Make sure your equipment is hooked up according to the instructions in "Antenna/Cable TV Connections" (see pages
6 to 9).
• Fill out the StarSight Checklist on the next page.
• Activate StarSight by following the directions on your TV screen. The entire process takes only a few minutes.
• Test your StarSight setup. If you have acable box or VCR, you will be guided through an on-screen process that will
determine the codes that operate your equipment.
"11111111111111111
Please follow the directions on
the following pages, then call:
1-800-643-STAR i
Your Toshiba TV that is equipped with the StarSight system is not designed to operate with, or control, a satellite dish.
For information on StarSight products specifically designed for satellite systems, see your local satellite dealer.
©1996 StarSight Telecast, Inc. StarSight _ is a registered trademark of StarSight TelecasL StarSight is a subscription service. VCR
required for recording.
STARSIGHT FEATURES LICENSED UNDER ONE OR MORE OF U.S. PATENT NUMBERS 4,706,121; 5,151,789; 5,335,277;
5,479,266 AND 5,479,268; USE RIGHTS RESERVED. FOR LICENSING AND SUBSCRIPTION INFORMATION, CALL 1-800-
643-STAR.
STARSIGHT TELECAST IS NOT IN ANY WAY LIABLE FOR THE ACCURACY OF THE PROGRAM SCHEDULE INFORMA-
TION PROVIDED BY THE STARSIGHT SYSTEM. IN NO EVENT SHALL STARSIGHT TELECAST BE LIABLE FOR ANY
AMOUNTS REPRESENTING LOSS OF PROFITS, LOSS OF BUSINESS, OR INDIRECT, SPECIAL, OR CONSEQUENTIAL
DAMAGES IN CONNECTION WITH THE PROVISION OR USE OF ANY INFORMATION, EQUIPMENT, OR SERVICES
RELATING TO THE STARSIGHT SYSTEM.
lo STAR
SIGHT ®

Fill in the blanks below. Keep this Checklist close at hand when you activate StarSight. You will find the information
you need to complete this Checklist in the PBS Stations, Cable Box Codes and VCR Codes lists on pages 12 to 16.
A, PBS Stations:
From the PBS Stations section on the next page, find the PBS Station closest to your city. (if you have a choice of two
or more PBS Stations, select the one with the clearest picture.) Write the PBS Station letters and channel number
below.
PBS Station Letters:
PBS Station Channel Number:
For Cable Users Only:
Check your cable company's channel line-up or your local newspaper's TV listing to see if the PBS Station in your area
has a different channel number than the one you wrote down above.
If so, enter your PBS Station's cable channel number here: __
(You will tune to this channel number during the activation process.)
For the Canadian Customers Only:
From the PBS Station for Canadian Customers section on page 15, find the PBS Station that you receive. (if you have a
choice of two or more PBS Stations, select the one with the clearest picture.) Write the PBS Station letters and channel
number in the spaces provided above.
e-
{6
e_
ol
C
u_
B,Code Numbers:
From the Cable Box Codes section, find the code numbers that apply to your brand of cable box and enter them below:
Code 1: Code 2:__ Code 3:__ Code 4:__ Code 5:__
From the VCR Codes section, find the code numbers that apply to your brand of VCR and enter them below:
Code 1:__ Code 2:__ Code 3:__ Code 4:__ Code 5:__
• IF YOUR BRAND IS NOT LISTED, USE A CODE OF "999".
C, Activating StarSight:
Now go to "Activating StarSight" on pages 18 to 21. During activation, StarSight will display your STAR number and ID
number on your TV screen. When these numbers appear, write them below:
STAR #:
ID #:
STAR 11
SIGHT ®
Setting Up StarSight (Continued)
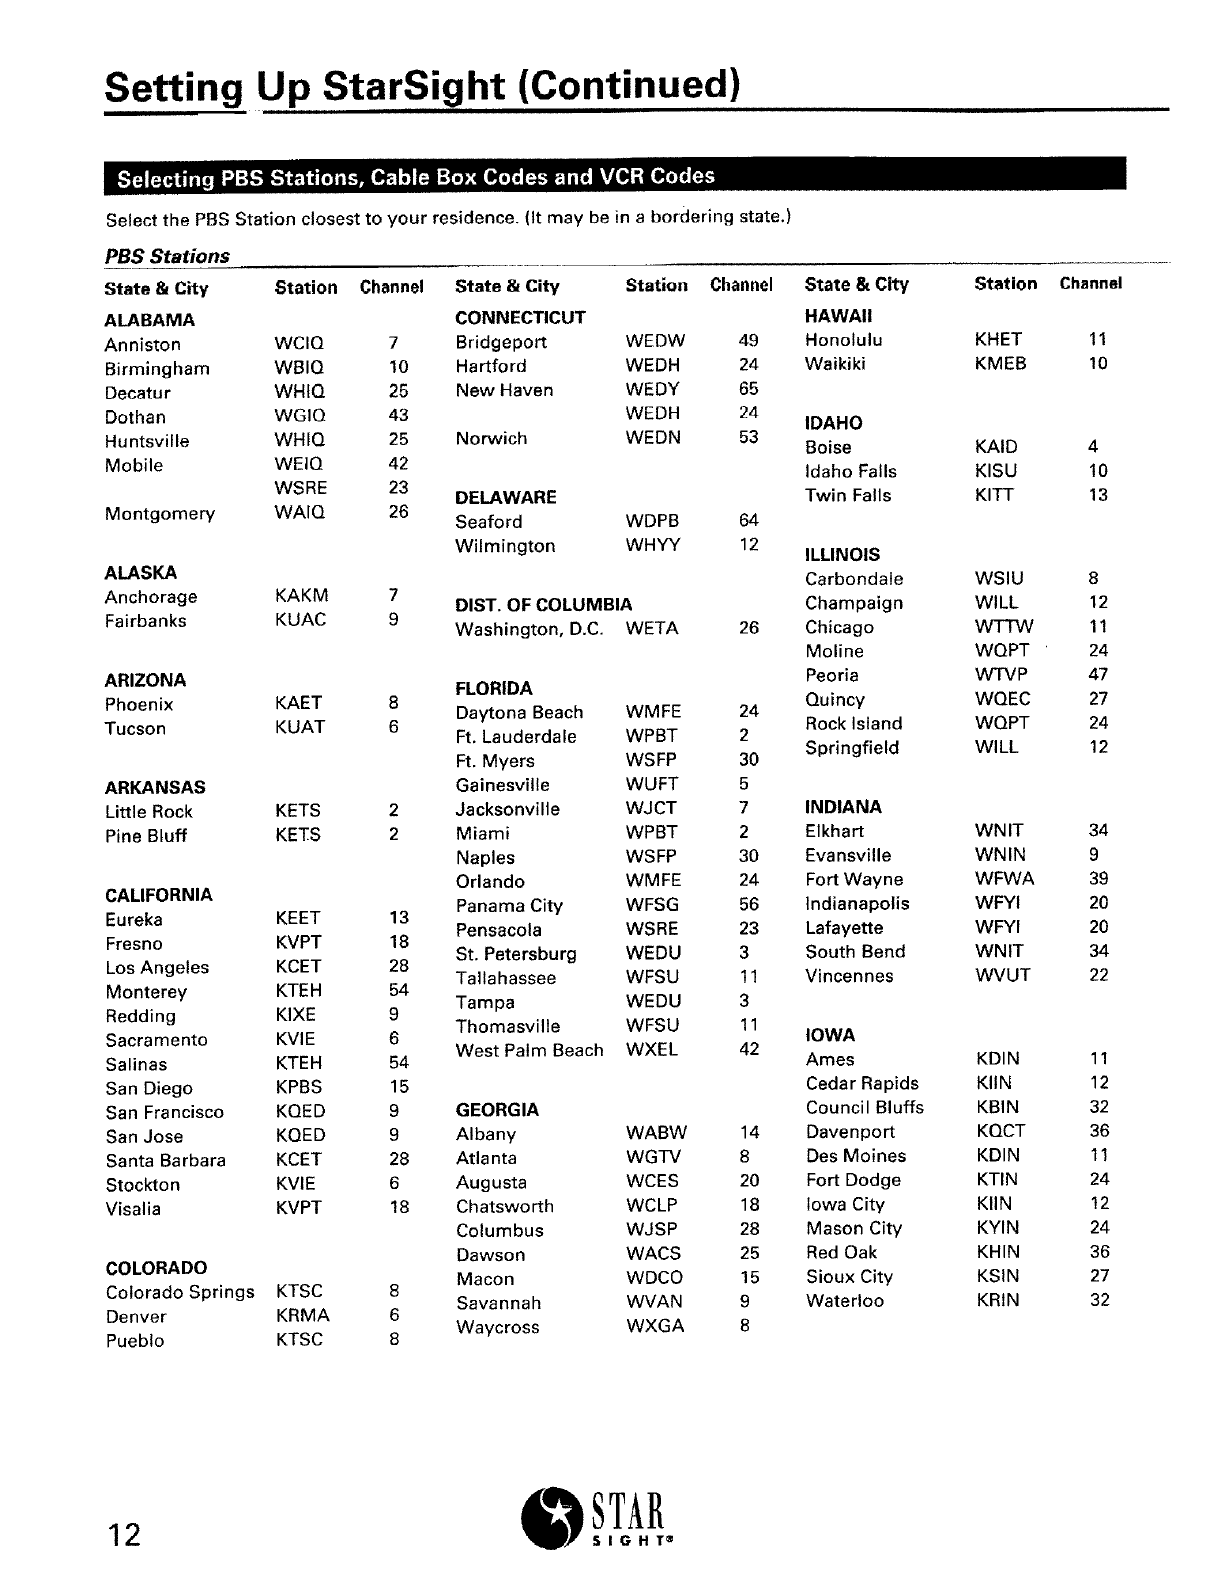
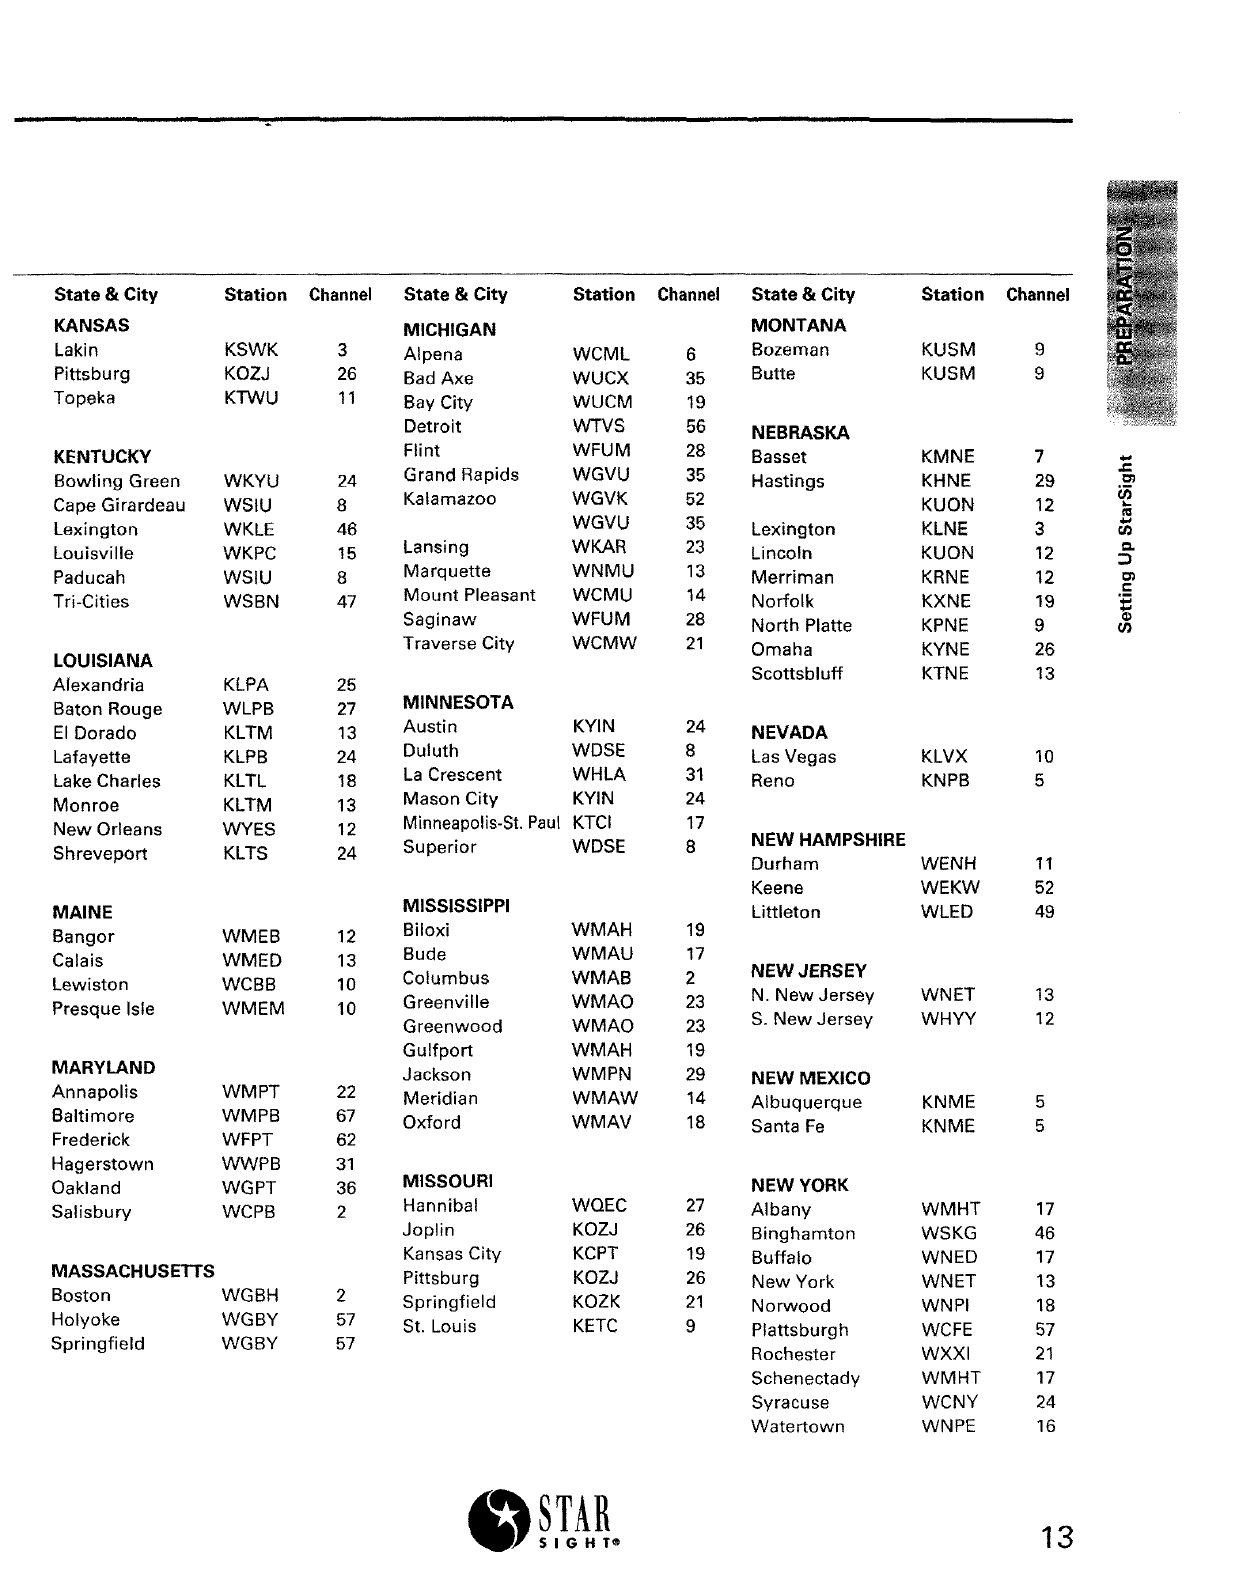
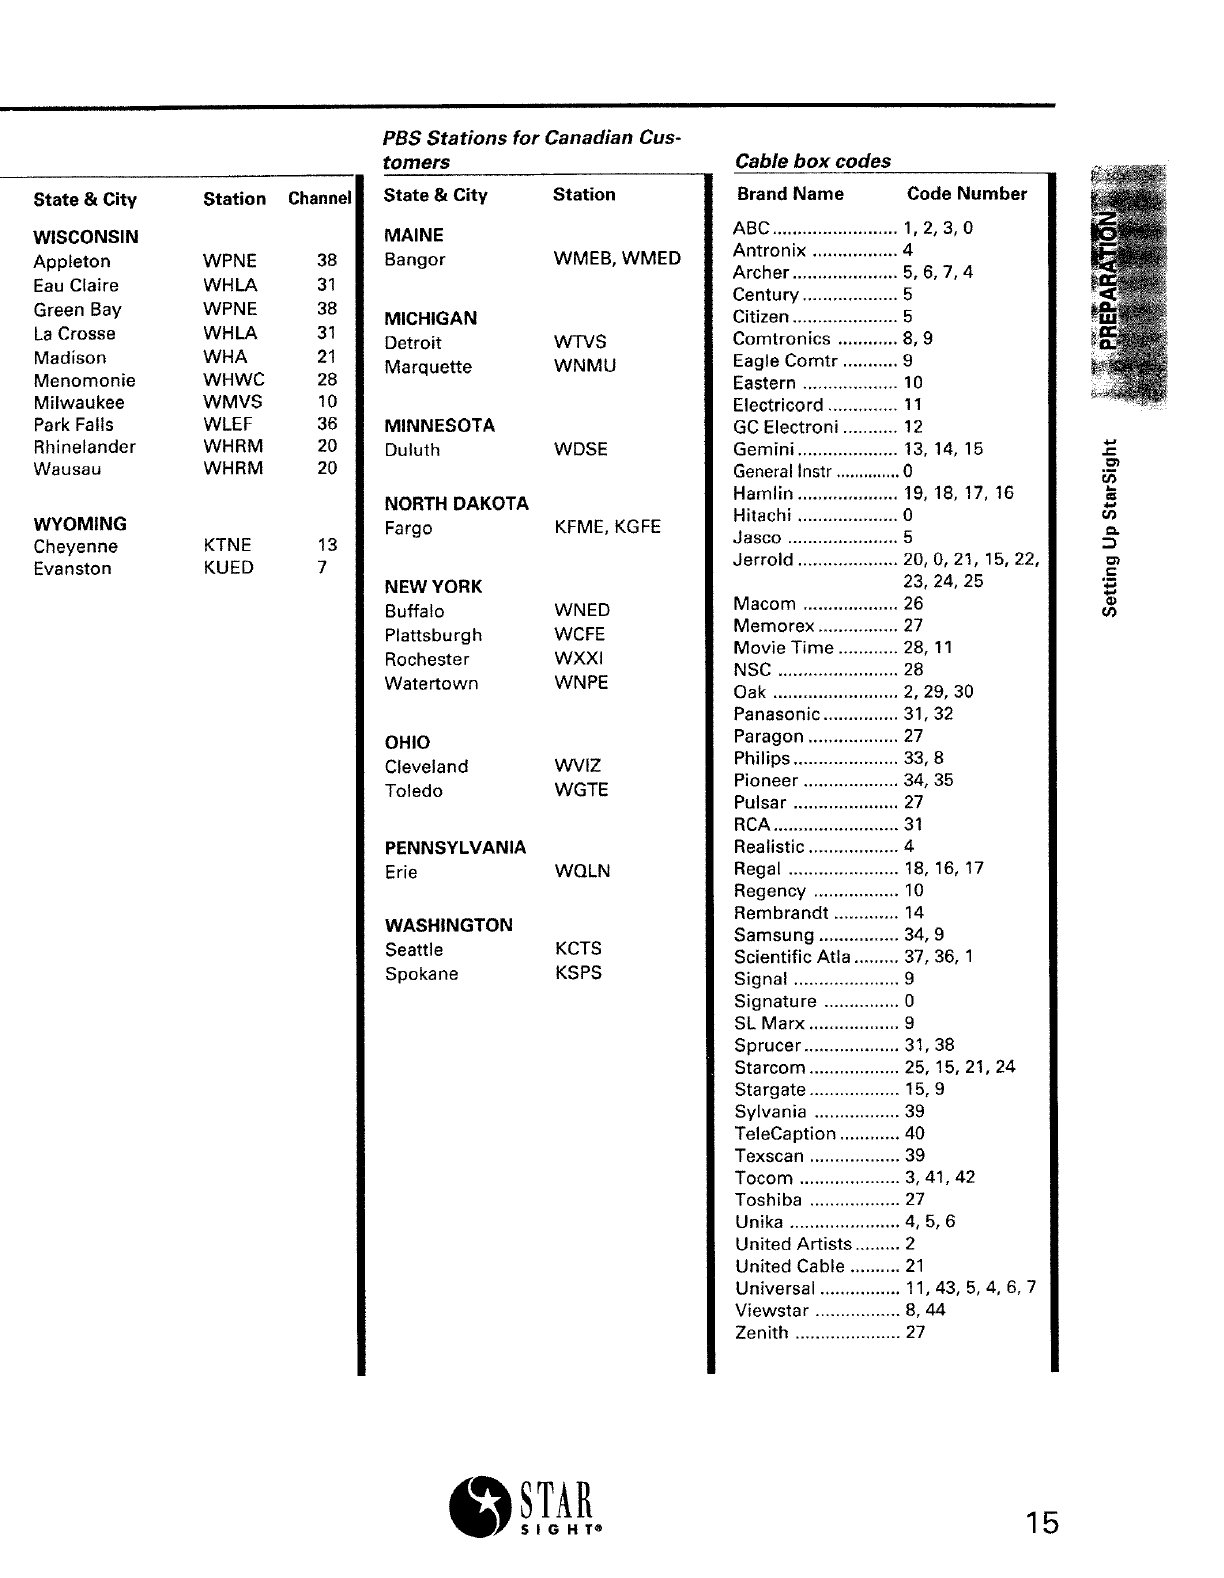
Select the PBS Station closest to your residence. (It may be in abordering state.)
PBS Stations
State & City Station Channel
ALABAMA
Anniston WCIQ 7
Birmingham WBIQ 10
Decatur WHIQ 25
Dothan WGIO 43
Huntsville WHIQ 25
Mobile WEIQ 42
WSRE 23
Montgomery WAIQ 26
ALASKA
Anchorage KAKM
Fairbanks KUAC
ARIZONA
Phoenix KAET
Tucson KUAT
ARKANSAS
Little Rock KETS
Pine Bluff KETS
7
9
8
6
2
2
CALIFORNIA
Eureka KEET 13
Fresno KVPT 18
Los Angeles KCET 28
Monterey KTEH 54
Redding KIXE 9
Sacramento KVIE 6
Salinas KTEH 54
San Diego KPBS 15
San Francisco KQED 9
San Jose KQED 9
Santa Barbara KCET 28
Stockton KVIE 6
Visalia KVPT 18
COLORADO
Colorado Springs KTSC
Denver KRMA
Pueblo KTSC
8
6
8
State & City
CONNECTICUT
Bridgeport
Hartford
New Haven
Norwich
Station Channel
WEDW 49
WEDH 24
WEDY 65
WEDH 24
WEDN 53
DELAWARE
Seaford
Wilmington
WDPB 64
WHYY 12
DIST. OF COLUMBIA
Washington, D.C. WETA 26
FLORIDA
Daytona Beach WMFE 24
Ft. Lauderdale WPBT 2
Ft. Myers WSFP 30
Gainesville WUFT 5
Jacksonville WJCT 7
Miami WPBT 2
Naples WSFP 30
Orlando WMFE 24
Panama City WFSG 56
Pensacola WSRE 23
St. Petersburg WEDU 3
Tallahassee WFSU 11
Tampa WEDU 3
ThomasvilIe WFSU 11
West Palm Beach WXEL 42
GEORGIA
Albany WABW 14
Atlanta WGTV 8
Augusta WCES 20
Chatsworth WCLP 18
Columbus WJSP 28
Dawson WACS 25
Macon WDCO 15
Savannah WVAN 9
Waycross WXGA 8
State & City
HAWAII
Honolulu
Waikiki
IDAHO
Boise
Idaho Falls
Twin Falls
ILLINOIS
CarbondaIe
Champaign
Chicago
Moline
Peoria
Quincy
Rock Island
Springfield
INDIANA
Elkhart
Evansville
Fort Wayne
Indianapolis
Lafayette
South Bend
Vincennes
IOWA
Ames
Cedar Rapids
Council Bluffs
Davenport
Des Moines
Fort Dodge
Iowa City
Mason City
Red Oak
Sioux City
Waterloo
Station
KHET
KMEB
KAID
KISU
KITT
WSIU
WILL
WTTW
WQPT
WTVP
WQEC
WQPT
WILL
WN IT
WNIN
WFWA
WFYI
WFYI
WN IT
WVUT
KDIN
KIlN
KBIN
KQCT
KDIN
KTI N
KIlN
KYIN
KHIN
KSIN
KRIN
Channel
11
10
4
10
13
8
12
11
24
47
27
24
12
34
9
39
20
20
34
22
11
12
32
36
11
24
12
24
36
27
32
12 STAR
SIGHT ®
State & City Station Channel
KANSAS
Lakin KSWK 3
Pittsburg KOZJ 26
Topeka KTWU 11
KENTUCKY
Bowling Green WKYU 24
Cape Girardeau WSIU 8
Lexington WKLE 46
Louisville WKPC 15
Paducah WSIU 8
Tri-Cities WSBN 47
LOUISIANA
Alexandria KLPA 25
Baton Rouge WLPB 27
El Dorado KLTM 13
Lafayette KLPB 24
Lake Charles KLTL 18
Monroe KLTM 13
New Orleans WYES 12
Shreveport KLTS 24
MAINE
Bangor WMEB 12
Calais WMED 13
Lewiston WCBB 10
Presque Isle WMEM 10
MARYLAND
Annapolis WMPT 22
Baltimore WMPB 67
Frederick WFPT 62
Hagerstown WWPB 31
Oakland WGPT 36
Salisbury WCPB 2
MASSACHUSETTS
Boston WGBH 2
Holyoke WGBY 57
Springfield WGBY 57
State & City
MICHIGAN
Alpena
Bad Axe
Bay City
Detroit
Flint
Grand Rapids
Kalamazoo
Lansing
Marquette
Mount Pleasant
Saginaw
Traverse City
Station
WCML
WUCX
WUCM
WTVS
WFU M
WGVU
WGVK
WGVU
WKAR
WNMU
WCMU
WFUM
WCMW
MINNESOTA
Austin KYIN
Duluth WDSE
La Crescent WHLA
Mason City KYIN
Minneapolis-St. Paul KTCl
Superior WDSE
Channel
6
35
19
56
28
35
52
35
23
13
14
28
21
24
8
31
24
17
8
MISSISSIPPI
Biloxi WMAH 19
Bude WMAU 17
Columbus WMAB 2
Greenville WMAO 23
Greenwood WMAO 23
Gulfport WMAH 19
Jackson WMPN 29
Meridian WMAW 14
Oxford WMAV 18
MISSOURI
Hannibal WQEC 27
Joplin KOZJ 26
Kansas City KCPT 19
Pittsburg KOZJ 26
Springfield KOZK 21
St. Louis KETC 9
State & City Station
MONTANA
Bozeman KUSM
Butte KUSM
Channel
9
9
NEBRASKA
Basset KMNE 7
Hastings KHNE 29
KUON 12
Lexington KLNE 3
Lincoln KUON 12
Merriman KRNE 12 =
f-
Norfolk KXNE 19 "_
North Platte KPNE 9
Omaha KYNE 26
Scottsbluff KTNE 13
NEVADA
Las Vegas KLVX
Reno KNPB
10
5
NEW HAMPSHIRE
Durham WENH 11
Keene WEKW 52
Littleton WLED 49
NEW JERSEY
N. New Jersey WNET
S. New Jersey WHYY
NEW MEXICO
Albuquerque KNME
Santa Fe KNME
13
12
5
5
NEW YORK
Albany WMHT 17
Binghamton WSKG 46
Buffalo WNED 17
New York WNET 13
Norwood WNPI 18
Plattsburgh WCFE 57
Rochester WXXI 21
Schenectady WMHT 17
Syracuse WCNY 24
Watertown WNPE 16
STAR
_SIGHT® 13

Setting Up StarSight (Continued)
PBS Stations (continued)
State & City Station Channel State & City Station Channel State & City Station Channel
NORTH CAROLINA PENNSYLVANIA TEXAS
Asheville WUNF 33 AItoona WPSX 3 Amarillo KACV 2
Charlotte WUNG 58 Erie WQLN 54 Austin KLRU 18
Columbia WUND 2 Harrisburg WITF 33 Corpus Christi KEDT 16
Greensboro WUNL 26 Johnstown WPSX 3 Dallas KERA 13
Greenville WUNK 25 Lancaster WlTF 33 El Paso KCOS 13
Jacksonville WUNM 19 Philadelphia WHYY 12 Ft, Worth KERA 13
Linville WUNE 17 Pittsburgh WQED 13 Harlingen KMBH 60
Raleigh-Durham WUNC 4 Scranton WVIA 44 Houston KUHT 8
Roanoke Rapids WUNP 36 Wilkes-Barre WVIA 44 Lubbock KTXT 5
Wilmington WUNJ 39 Odessa Midland KOCV 36
San Antonio KLRN 9
RHODE ISLAND
NORTH DAKOTA New Bedford WSBE 36 Temple KNCT 46
Bismarck KBME 3 Providence WSBE 36 Waco KNCT 46
Drakinson KDSE 9
Ellendale KJRE 19 UTAH
Fargo KFME 13 SOUTH CAROLINA Salt Lake City KUED 7
Grand Forks KGFE 2 Allendale WEBA 14
Minot KBME 3 Beaufort WJWJ 16
Wiltiston KWSE 4 Charleston WlTV 7 VERMONT
Columbia WRLK 35 Burlington WCFE 57
Conway WHMC 23
OHIO Florence WJPM 33
Akron WEAO 49 VIRGINIA
Greenville WNTV 29
WVIZ 25 Greenwood WNEH 38 Arlington WETA 26
Athens WOUB 20 Charlottesville WHTJ 41
Huntington WPBY 33 Harrisonburg WVPT 51
Cleveland WVIZ 25 Rock Hill WNSC 30
Cincinnati WCET 48 Lynchburg WBRA 15
Columbus WOSU 34 Spartanburg WRET 49 Norfolk WHRO 15
Sumter WRJA 27
Dayton WPTD 16 Norton WSBN 47
Lima WBGU 27 Petersburg WCVE 23
Portsmouth WPBO 42 SOUTH DAKOTA Portsmouth WHRO 15
Steubenville WOUC 44 Aberdeen KDSD 16 Richmond WCVE 15
Toledo WGTE 30 Brookings KESD 8 Roanoke WBRA 15
Youngstown WNEO 45 Eagle Butte KPSD 13
Lowry KQSD 11 WASHINGTON
Martin KZSD 8
OKLAHOMA Seattle KCTS 9
Pierre KTSD 10
Cheyenne KWET 12 Rapid City KBHE 9 Spokane KSPS 7
Eufaula KOET 3 Tacoma KCTS 9
Vermillion KUSD 2
Oklahoma City KETA 13 Yakima KYVE 47
Tulsa KOED 11
TENNESSEE WEST VIRGINIA
OREGON Chattanooga WTCI 45 Beckley WSWP 9
Jackson WLJT 11
Bend KOAB 3 Bluefield WSWP 9
Corvallis KOAC 7 Johnson City WSJK 2Charleston WPBY 33
Knoxville WKOP 15
Eugene KEPB 28 Memphis WKNO 10 Clarksburg WNPB 24
Klamath Falls KFTS 22 Huntington WPBY 33
Nashville WDCN 8
Medford KSYS 8 Parkersburg WOUB 20
Sneedville WSJK 2
Portland KOPB 10 Weston WNPB 24
Wheeling WOUC 44
STAR
State&City
WISCONSIN
Appleton
Eau Claire
Green Bay
La Crosse
Madison
Menomonie
Milwaukee
Park Falls
Rhinelander
Wausau
WYOMING
Cheyenne
Evanston
Station
WPNE
WHLA
WPNE
WHLA
WHA
WHWC
WMVS
WLEF
WHRM
WHRM
KTNE
KUED
Channel
38
31
38
31
21
28
10
36
20
20
13
7
PBS Stations for Canadian Cus-
tomers
State & City Station
MAINE
Bangor WMEB, WMED
MICHIGAN
Detroit WTVS
Marquette WNMU
MINNESOTA
Duluth WDSE
NORTH DAKOTA
Fargo KFME, KGFE
NEW YORK
Buffalo WNED
Plattsburgh WCFE
Rochester WXXI
Watertown WNPE
OHIO
Cleveland WVIZ
Toledo WGTE
PENNSYLVANIA
Erie WQLN
WASHINGTON
Seattle KCTS
Spokane KSPS
Cable box codes
Brand Name Code Number
ABC ......................... 1, 2, 3, 0
Antronix ................. 4
Archer ..................... 5, 6, 7, 4
Century ................... 5
Citizen ..................... 5
Comtronics ............ 8, 9
Eagle Comtr ........... 9
Eastern ................... 10
Electricord .............. 11
GC Electroni ........... 12
Gemini .................... 13, 14, 15
General Instr .............. 0
Hamlln .................... 19, 18, 17, 16
Hitachi .................... 0
Jasco ...................... 5
Jerrold .................... 20, 0, 21, 15, 22,
23, 24, 25
Macom ................... 26
Memorex ................ 27
Movie Time ............ 28, 11
NSC ........................ 28
Oak ......................... 2, 29, 30
Panasonic ............... 31, 32
Paragon .................. 27
Philips ..................... 33, 8
Pioneer ................... 34, 35
Pulsar ..................... 27
RCA ......................... 31
Realistic .................. 4
Regal ...................... 18, 16, 17
Regency ................. 10
Rembrandt ............. 14
Samsung ................ 34, 9
Scientific Atla ......... 37, 36, 1
Signal ..................... 9
Signature ............... 0
SL Marx .................. 9
Sprucer ................... 31, 38
Starcom .................. 25, 15, 21, 24
Stargate .................. 15, 9
Sylvania ................. 39
TeleCaption ............ 40
Texscan .................. 39
Tocom .................... 3, 41, 42
Toshiba .................. 27
Unika ...................... 4, 5, 6
United Artists ......... 2
United Cable .......... 21
Universal ................ 11, 43, 5, 4, 6, 7
Viewstar ................. 8, 44
Zenith ..................... 27
,,€
O}
o}
€
u_
STAR
_SIGHT ® 15
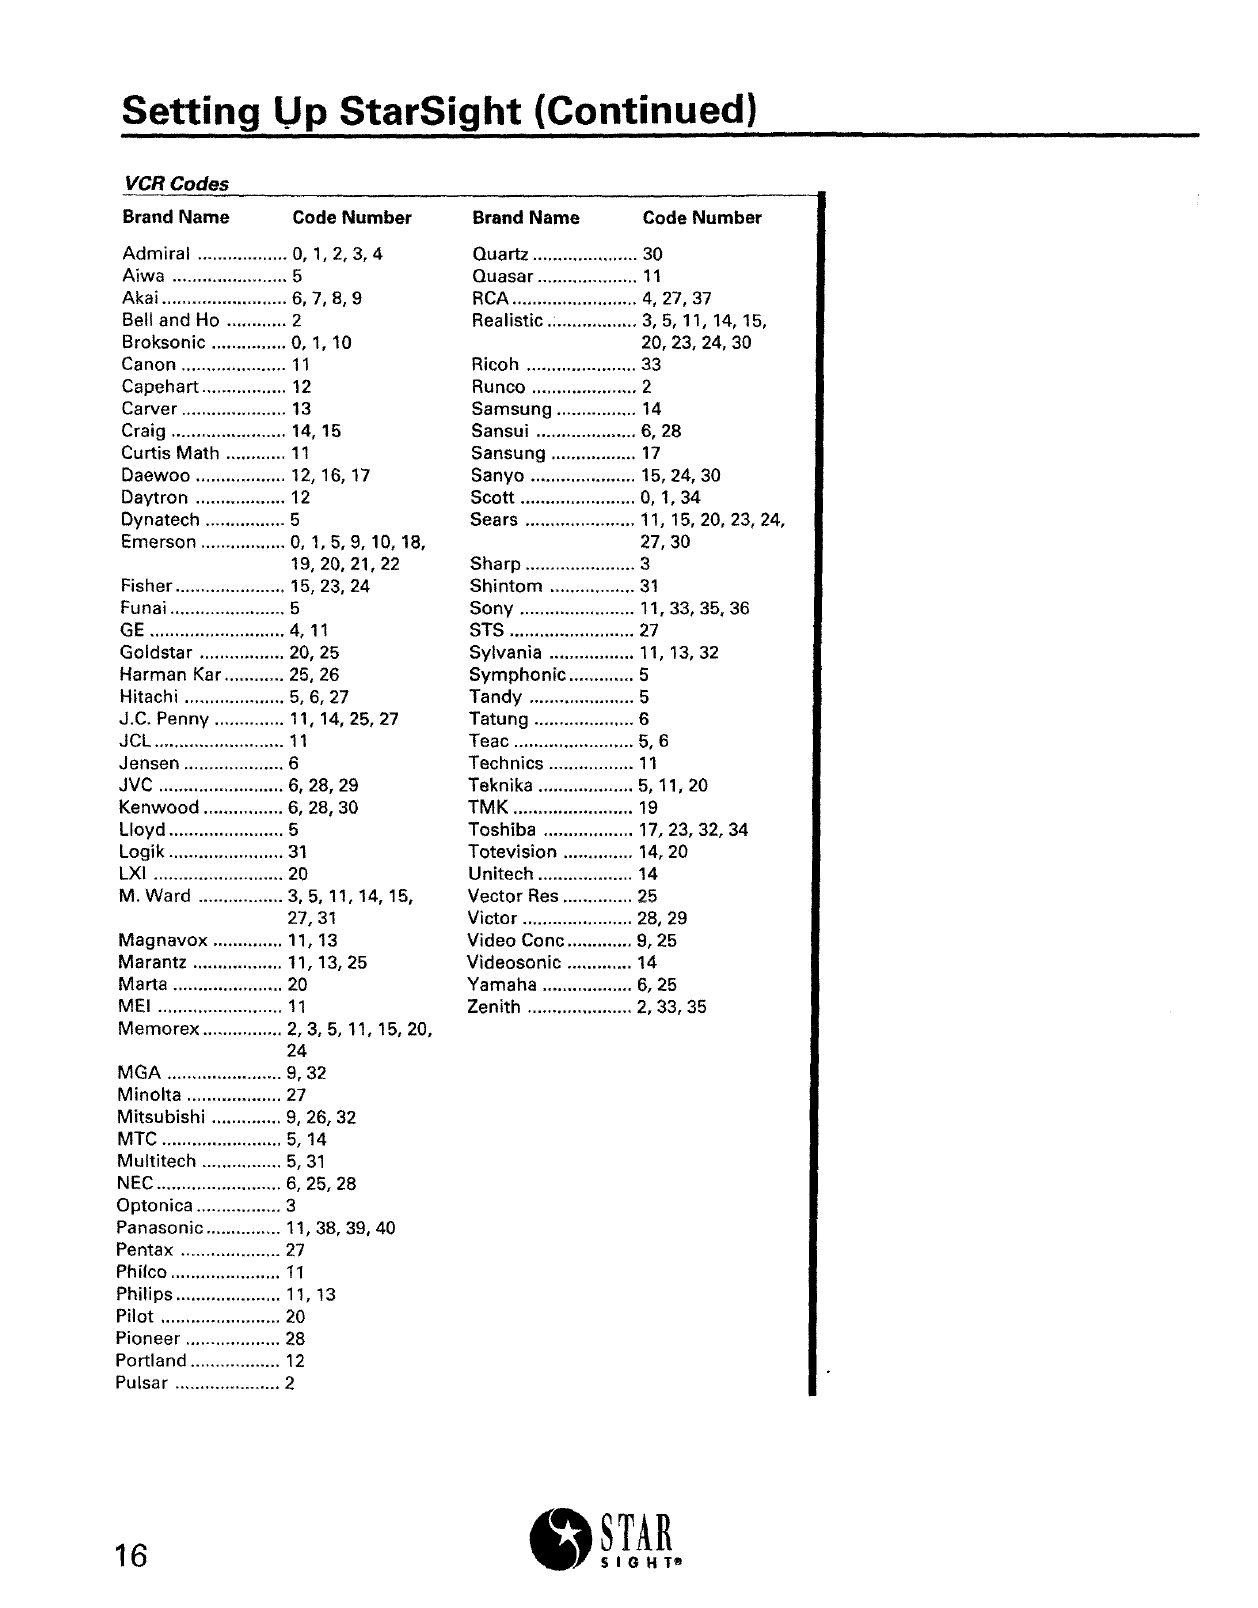
Setting,,,,,UP StarS,,ight,,,,(Continued) .......
VCR Codes
Brand Name Code Number
Admiral .................. 0, 1, 2, 3, 4
Aiwa ....................... 5
Akai ......................... 6, 7, 8, 9
Bell and Ho ............ 2
Broksonic ............... 0, 1, 10
Canon ..................... 11
Capehart ................. 12
Carver ..................... 13
Craig ....................... 14, 15
Curtis Math ............ 11
Daewoo .................. 12, 16, 17
Daytron .................. 12
Dynatech ................ 5
Emerson ................. 0, 1, 5, 9, 10, 18,
19, 20, 21, 22
Fisher ...................... 15, 23, 24
Funai ....................... 5
GE ........................... 4,11
Goldstar ................. 20, 25
Harman Kar ............ 25, 26
Hitachi .................... 5, 6, 27
J.C. Penny .............. 11, 14, 25, 27
JCL .......................... 11
Jensen .................... 6
JVC ......................... 6, 28, 29
Kenwood ................ 6, 28, 30
Lloyd ....................... 5
Logik ....................... 31
LXI .......................... 20
M. Ward ................. 3, 5, 11, 14, 15,
27, 31
Magnavox .............. 11, 13
Marantz .................. 11, 13, 25
Marta ...................... 20
MEI ......................... 11
Memorex ................ 2, 3, 5, 11, 15, 20,
24
MGA ....................... 9, 32
Minolta ................... 27
Mitsubishi .............. 9, 26, 32
MTC ........................ 5, 14
Multitech ................ 5, 31
NEC ......................... 6, 25, 28
Optonica ................. 3
Panasonic ............... 11, 38, 39, 40
Pentax .................... 27
Philco ...................... 11
Philips ..................... 11, 13
Pilot ........................ 20
Pioneer ................... 28
Portland .................. 12
Pulsar ..................... 2
Brand Name Code Number
Quartz ..................... 30
Quasar .................... 11
RCA ......................... 4, 27, 37
Realistic.: ................ 3, 5, 11, 14, 15,
20, 23, 24, 30
Ricoh ...................... 33
Runco ..................... 2
Samsung ................ 14
Sansui .................... 6, 28
Sansung ................. 17
Sanyo ..................... 15, 24, 30
Scott ....................... 0, 1, 34
Sears ...................... 11, 15, 20, 23, 24,
27, 30
Sharp ...................... 3
Shintom ................. 31
Sony ....................... 11, 33, 35, 36
STS ......................... 27
Sylvania ................. 11, 13, 32
Symphonic ............. 5
Tandy ..................... 5
Tatung .................... 6
Teac ........................ 5, 6
Technics ................. 11
Teknika ................... 5, 11, 20
TMK ........................ 19
Toshiba .................. 17, 23, 32, 34
Totevision .............. 14, 20
Unitech ................... 14
Vector Res .............. 25
Victor ...................... 28, 29
Video Conc ............. 9, 25
Videosonic ............. 14
Yamaha .................. 6, 25
Zenith ..................... 2, 33, 35
16 STAR
SIGHT®
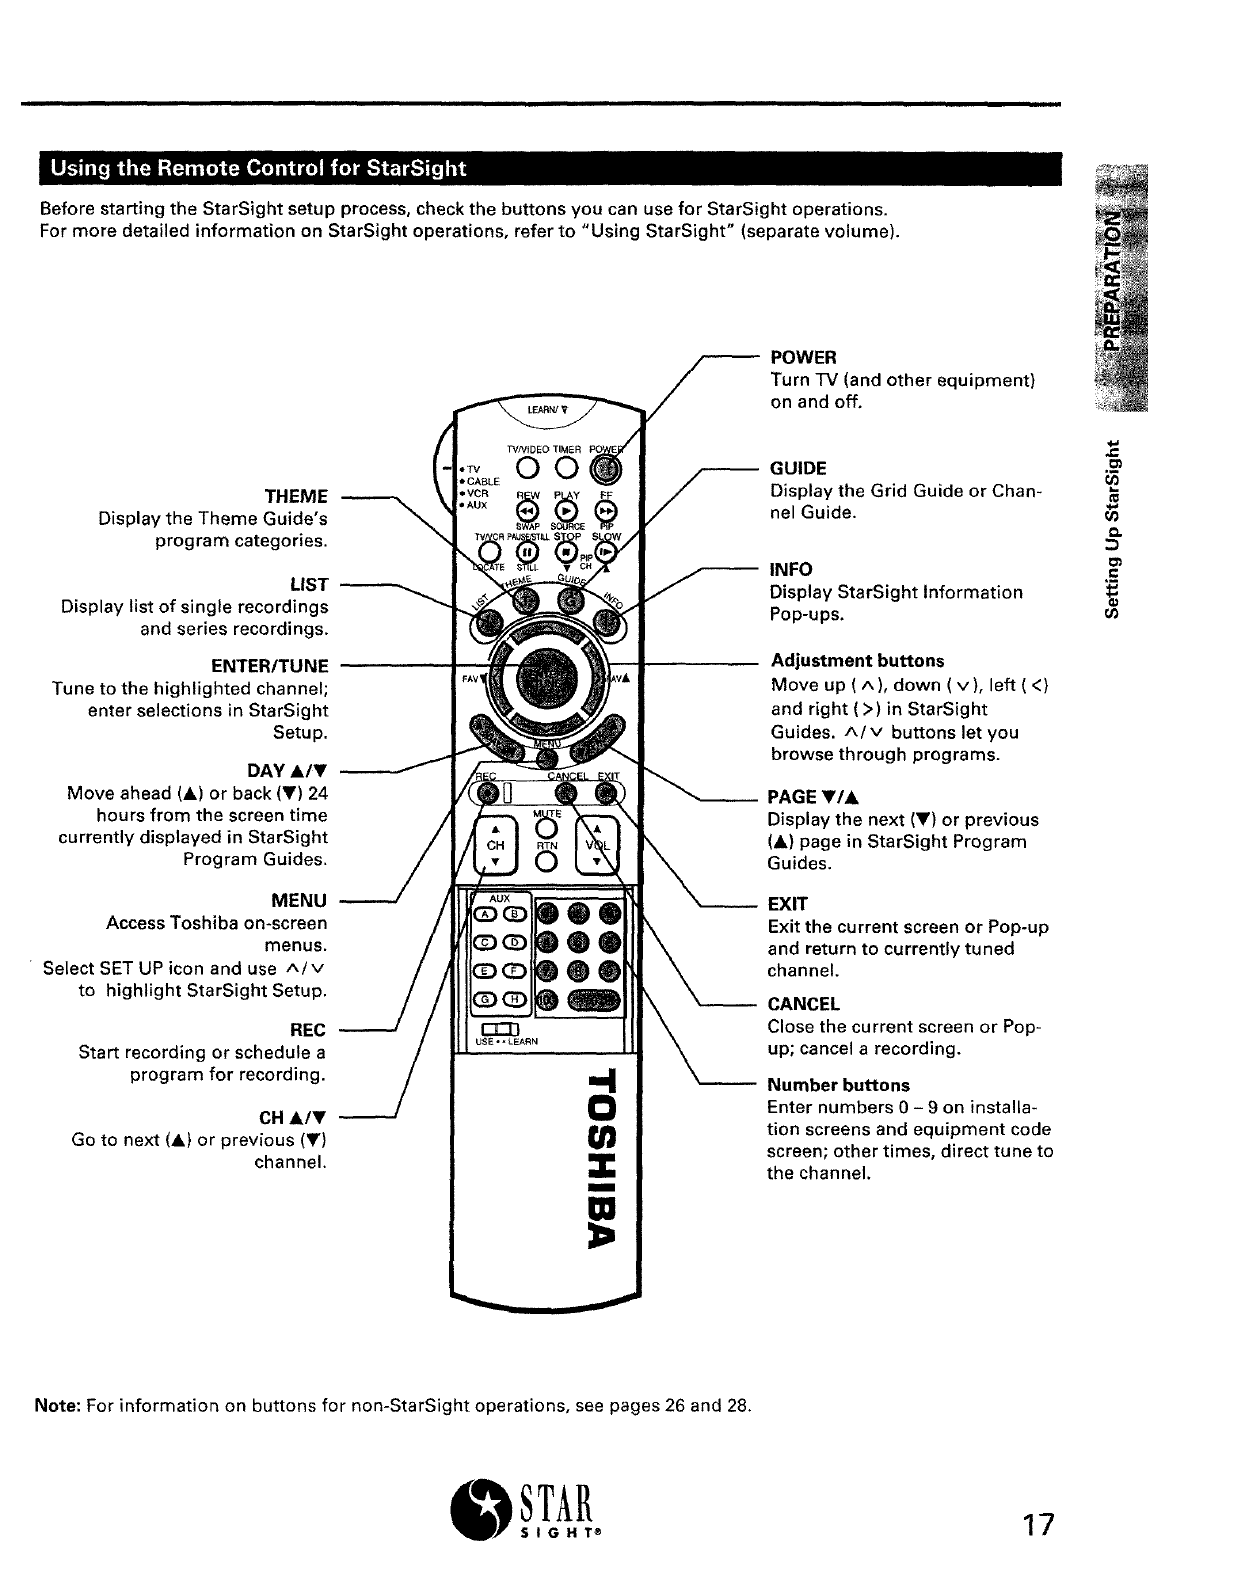
Before starting the StarSight setup process, check the buttons you can use for StarSight operations.
For more detailed information on StarSight operations, refer to "Using StarSight" (separate volume).
THEME
Display the Theme Guide's
program categories.
LIST
Display list of single recordings
and series recordings.
ENTER/TUNE
Tune to the highlighted channel;
enter selections in StarSight
Setup.
DAY A/_'
Move ahead (A) or back (V) 24
hours from the screen time
currently displayed in StarSight
Program Guides.
MENU
Access Toshiba on-screen
menus.
Select SET UP icon and use A/V
to highlight StarSight Setup.
REC
Start recording or schedule a
program for recording.
CH A/T
Go to next (A) or previous (Y)
channel.
USE "* LEARN
W
i
POWER
Turn -IV (and other equipment)
on and off.
GUIDE
Display the Grid Guide or Chan-
nel Guide.
INFO
Display StarSight Information
Pop-ups.
Adjustment buttons
Move up (^), down (v), left (<)
and right (>) in StarSight
Guides. ^/v buttons let you
browse through programs.
PAGE VIA
Display the next (Y) or previous
(A) page in StarSight Program
Guides.
EXIT
Exit the current screen or Pop-up
and return to currently tuned
channel.
CANCEL
Close the current screen or Pop-
up; cancel a recording.
Number buttons
Enter numbers 0 - 9 on installa-
tion screens and equipment code
screen; other times, direct tune to
the channel.
e-
._=
D.
O1
,E
Note: For information on buttons for non-StarSight operations, see pages 26 and 28.
STAR
_SIGHT® 17
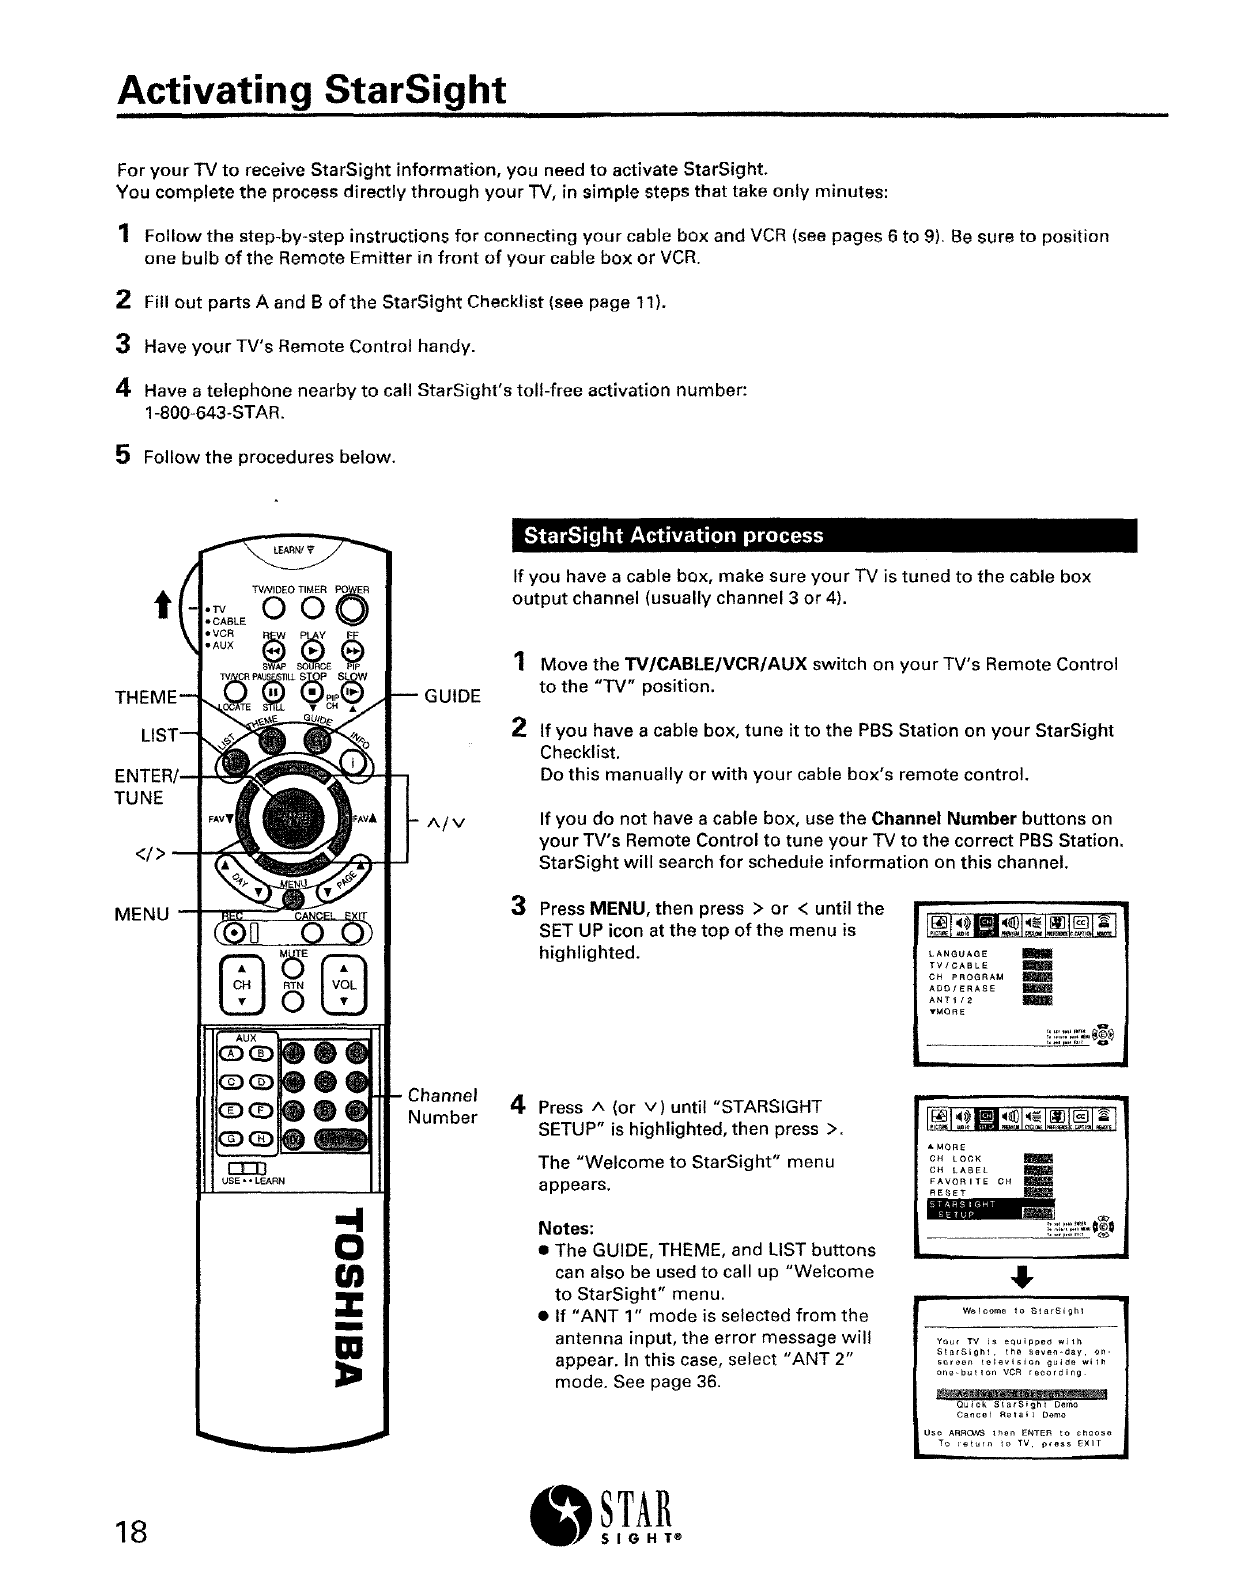
Activating StarSight
For your TV to receive StarSight information, you need to activate StarSight.
You complete the process directly through your TV, in simple steps that take only minutes:
1 Follow the step-by-step instructions for connecting your cable box and VCR (see pages 6 to 9). Be sure to position
one bulb of the Remote Emitter in front of your cable box or VCR.
2Fill out parts A and B of the StarSight Checklist (see page 11).
3 Have your TV's Remote Control handy.
4Have a telephone nearby to call StarSight's toll-free activation number:
1-800-643-STAR.
5 Follow the procedures below.
THEME-
TUNE
</>
MENU
18
TVNIDEO TIMER
•OO
,CABLE
eAUX
£
®e
® •
m
USE ••LEARN
".4
0
a)
I
W
==
GUIDE
A/V
-Channel
Number
If you have a cable box, make sure your TV is tuned to the cable box
output channel (usually channel 3 or 4).
1
2
3
Move the TV/CABLE/VCR/AUX switch on your TV's Remote Control
to the "TV" position.
If you have a cable box, tune it to the PBS Station on your StarSight
Checklist.
Do this manually or with your cable box's remote control.
If you do not have a cable box, use the Channel Number buttons on
your TV's Remote Control to tune your TV to the correct PBS Station.
StarSight will search for schedule information on this channel.
Press MENU, then press > or < until the
SET UP icon at the top of the menu is
highlighted. LANGUAGE
TV/CABLE
CH PROGRAM
ADO/ERASE
ANT1/2
TMORE
4Press ^ (or v) until "STARSIGHT
SETUP" is highlighted, then press >.
The "Welcome to StarSight" menu
appears.
Notes:
•The GUIDE, THEME, and LIST buttons
can also be used to call up "Welcome
to StarSight" menu.
• If "ANT 1" mode is selected from the
antenna input, the error message will
appear. In this case, select "ANT 2"
mode. See page 36.
STAR
SIGHT ®
&MORE
CH _OCK
OH LABEL
FAVORITE OH
RESET
|
!!.
Welcome to StarSighl
Y_u_ TV is equipped with
StarSight, the seven-day, on-
s_reen _e_ev_sion guide with
one_bu_on VCR re_or_Jng
Qu_ck 8ta_S_h_ Demo
Cancel Rs_a_ Domo
'Uso ARROWS _en ENTE_ to ch_se
To _tutn _o TV, p_ess _×IT iii
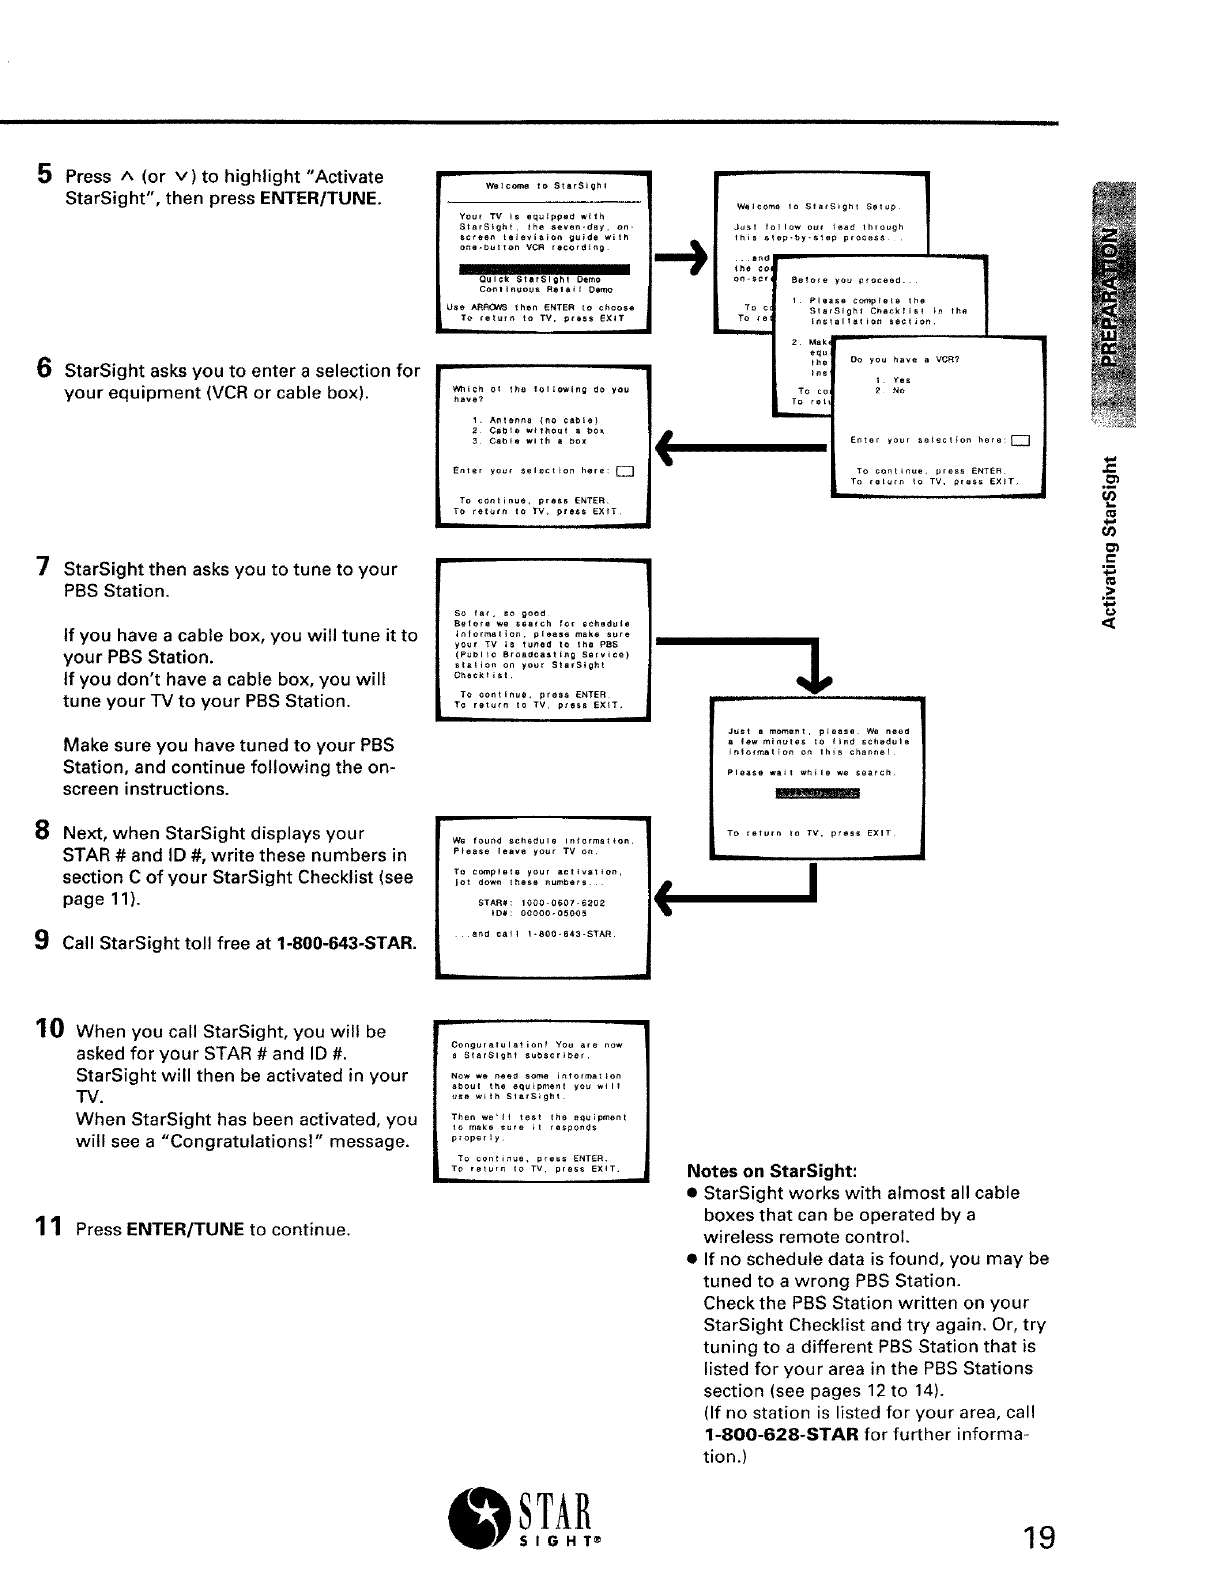
5 Press ^ (or v)to highlight "Activate
StarSight", then press ENTER/TUNE.
6 StarSight asks you to enter a selection for
your equipment (VCR or cable box).
7 StarSight then asks you to tune to your
PBS Station.
If you have a cable box, you will tune it to
your PBS Station.
If you don't have a cable box, you will
tune your TV to your PBS Station.
Make sure you have tuned to your PBS
Station, and continue following the on-
screen instructions.
8 Next, when StarSight displays your
STAR # and ID #, write these numbers in
section C of your StarSight Checklist (see
page 11).
9Call StarSight toll free at 1-800-643-STAR.
Which of the following do you
have?
s_ far, so good
Before we search _0r scheduIe
informa_$on, pleale make sure
your TV _s tuned to the PBS
(Public Broadcasting Service)
sta_io_ on your $tarS_ght
Checkt ist
TO ¢0ntlnu_, press ENTER
To return to TV, pre_s EXIT,
III
Do you have a VCR?
1Yes
_ Nn
Just a moment, p_ease Wa need
a_w minutes _o find schedule
Please w_t w_le we search
e,,
t-
._>
10 When you call StarSight, you will be
asked for your STAR # and ID #.
StarSight will then be activated in your
TV.
When StarSight has been activated, you
will see a "Congratulations!" message.
1 1 Press ENTER/TUNE to continue.
Conguratulslion! YOU are now
a SlarSight subscriber
NOw we need some information
a_out the equipment yo_ w_l_
use w_th SlarS_gh_
Then we'll test the e_uipment
_o m_ke sure i_ _esponds
p_oper_y
To continue, press ENTER¸
T_ retur_ to TV press EXiT
STAR
_SIGHT ®
Notes on StarSight:
iiii •StarSight works with almost all cable
boxes that can be operated by a
wireless remote control.
• If no schedule data is found, you may be
tuned to a wrong PBS Station.
Check the PBS Station written on your
StarSight Checklist and try again. Or, try
tuning to a different PBS Station that is
listed for your area in the PBS Stations
section (see pages 12 to 14).
(If no station is listed for your area, call
1-800-628-STAR for further informa=
tion.)
19
Activating StarSight (Continued)
Now that you have subscribed, the final step is to test your equipment
setup. Here's how:
1Press ENTER/TUNE on the TV's Remote Control when you see the
"Congratulations!" message on the screen.
2
StarSight will now guide you through a series of on-screen displays.
Follow the instructions carefully. All you have to do is respond to the
on-screen prompts.
Find the cable box and VCR Codes on your StarSight Checklist (see
page 11).
3
If you have listed more than one code for a given brand of cable box
and VCR, StarSight lets you test each code until the correct one has
been entered.
Make sure the Remote Emitter you have placed previously is posi-
tioned according to the instructions.
With your equipment setup and StarSight activation complete, you
will begin to collect StarSight program information. Your s_/stem will
be automatically updated with the latest program information when-
ever your TV is turned off or is tuned to your PBS Station (the channel
you used for activating StarSight.) Initially, it will take between 4and
12 hours to collect program information. Do not be alarmed if your
StarSight guide is not full right away; it has seven days of program
information to collect. In a day or so, your data will be complete and
will continue to be updated daily.
That's it! Your TV is now all set up and ready to collect program informa-
tion. To learn how to use StarSight, refer to "Using StarSight" (separate
volume).
Notes on StarSight:
•To maintain StarSight program informa-
tion, always leave your TV power cord
plugged in and your cable box on (if you
have one).
• It is important that you leave your VCR
off when it is not being used. If you
forget to turn off your VCR, ascheduled
recording cannot be done.
20 STAR
_SIGHT ®
When you use StarSight, make sure of the following:
• Leave the cable box on at all times.
• Leave the VCR off whenever you are not watching a video tape.
• Plug the TV into an outlet that is not controlled by a light switch. (Do not plug it into the back of the cable box.)
Problem Try this...
Cable box and VCR are not controlled by StarSight
VCR turns off and on, but will not change channels
• Make sure the Remote Emitter is plugged into the
STARSIGHT CONNECTOR on the back of the TV.
• Check the placement of the Remote Emitter -- the bulbs
should be facing and a few inches in front of the remote
sensor of the cable box and VCR.
• Make sure you have tried all codes for your brand of equip-
ment. (See page 11 .)
• If you have a cable box, your VCR does not need to char_ge
channels. (The cable box will change the channels)
• Your VCR must be capable of direct tuning, i.e. your VCR's
remote control must have a 10 digit number pad.
No picture-- "snow" • Check the connections between TV, VCR and cable box.
TV is turned off during cable box testing. • Make sure the TV is not plugged into the back of cable box
or into an outlet that is controlled by a light switch.
Leave the cable box on at all times.
.r=
_tj
._>
For questions regarding StarSight operations, call the StarSight Help Desk at 1-800-628-STAR.
TAR
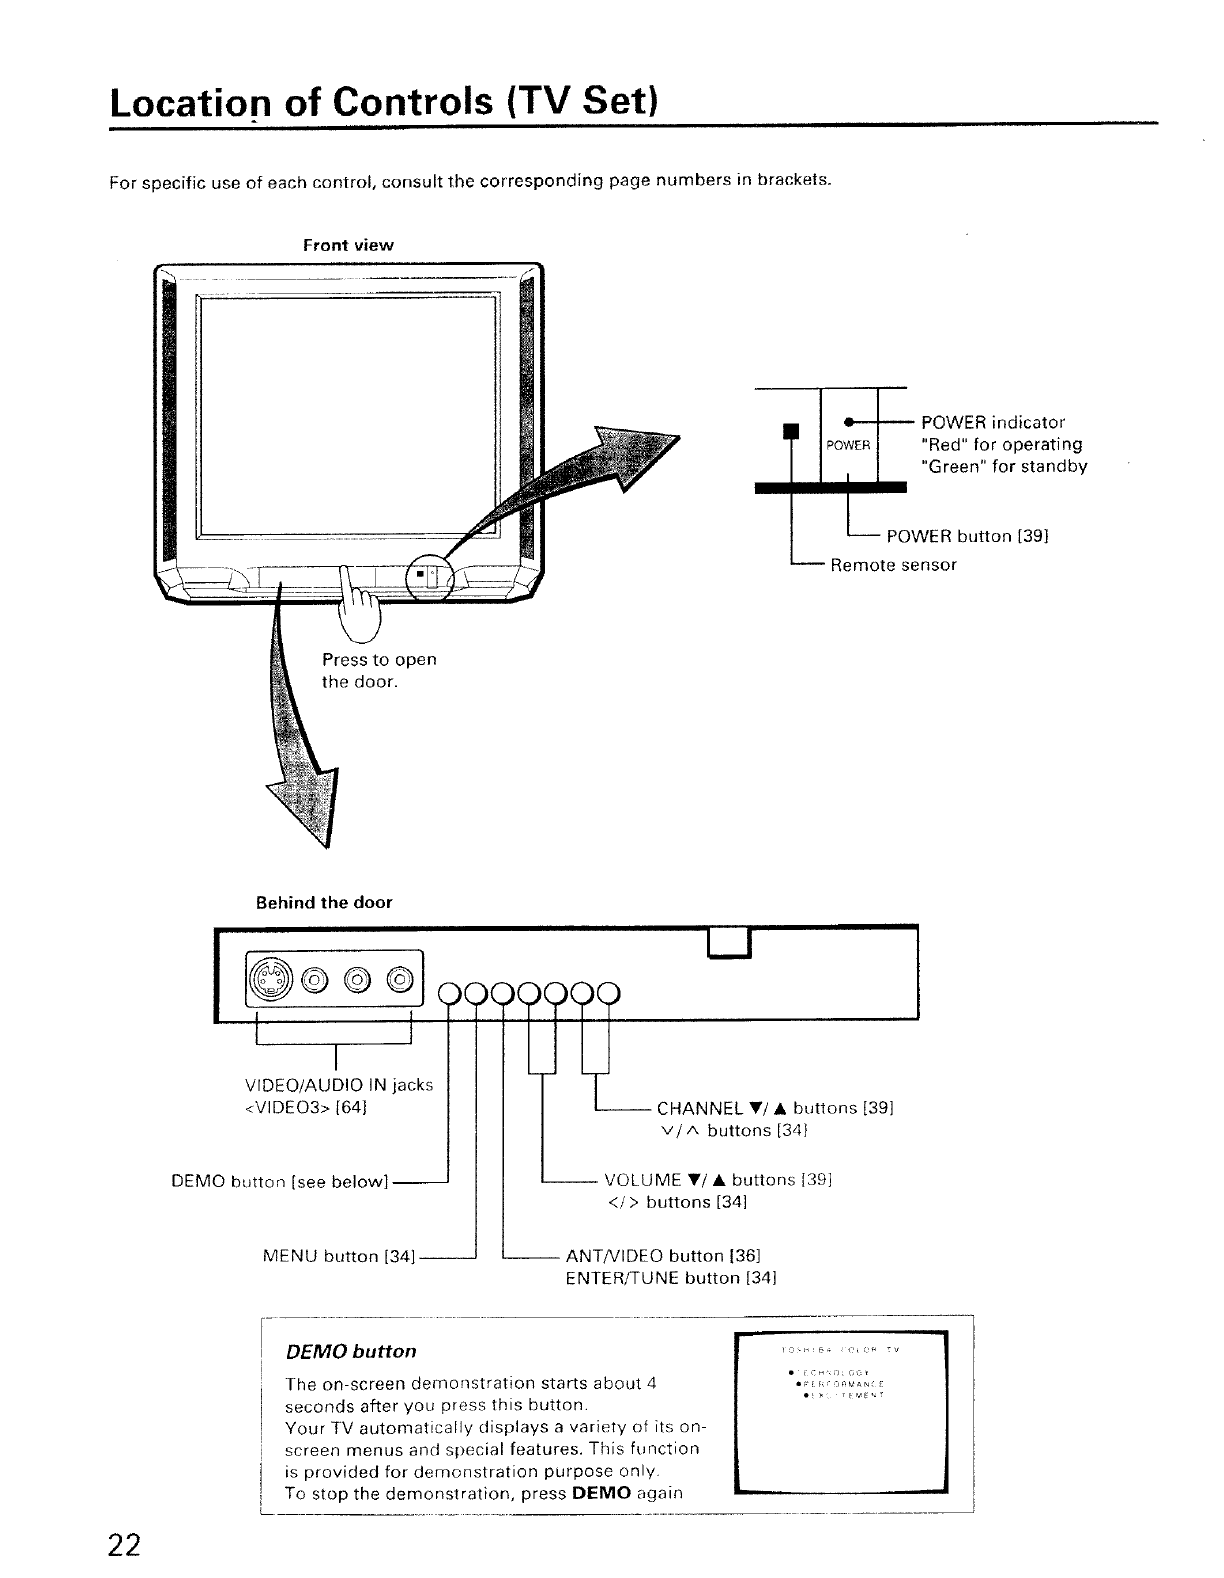
Location of Controls (TV Set)
For specific use of each control, consult the corresponding page numbers in brackets.
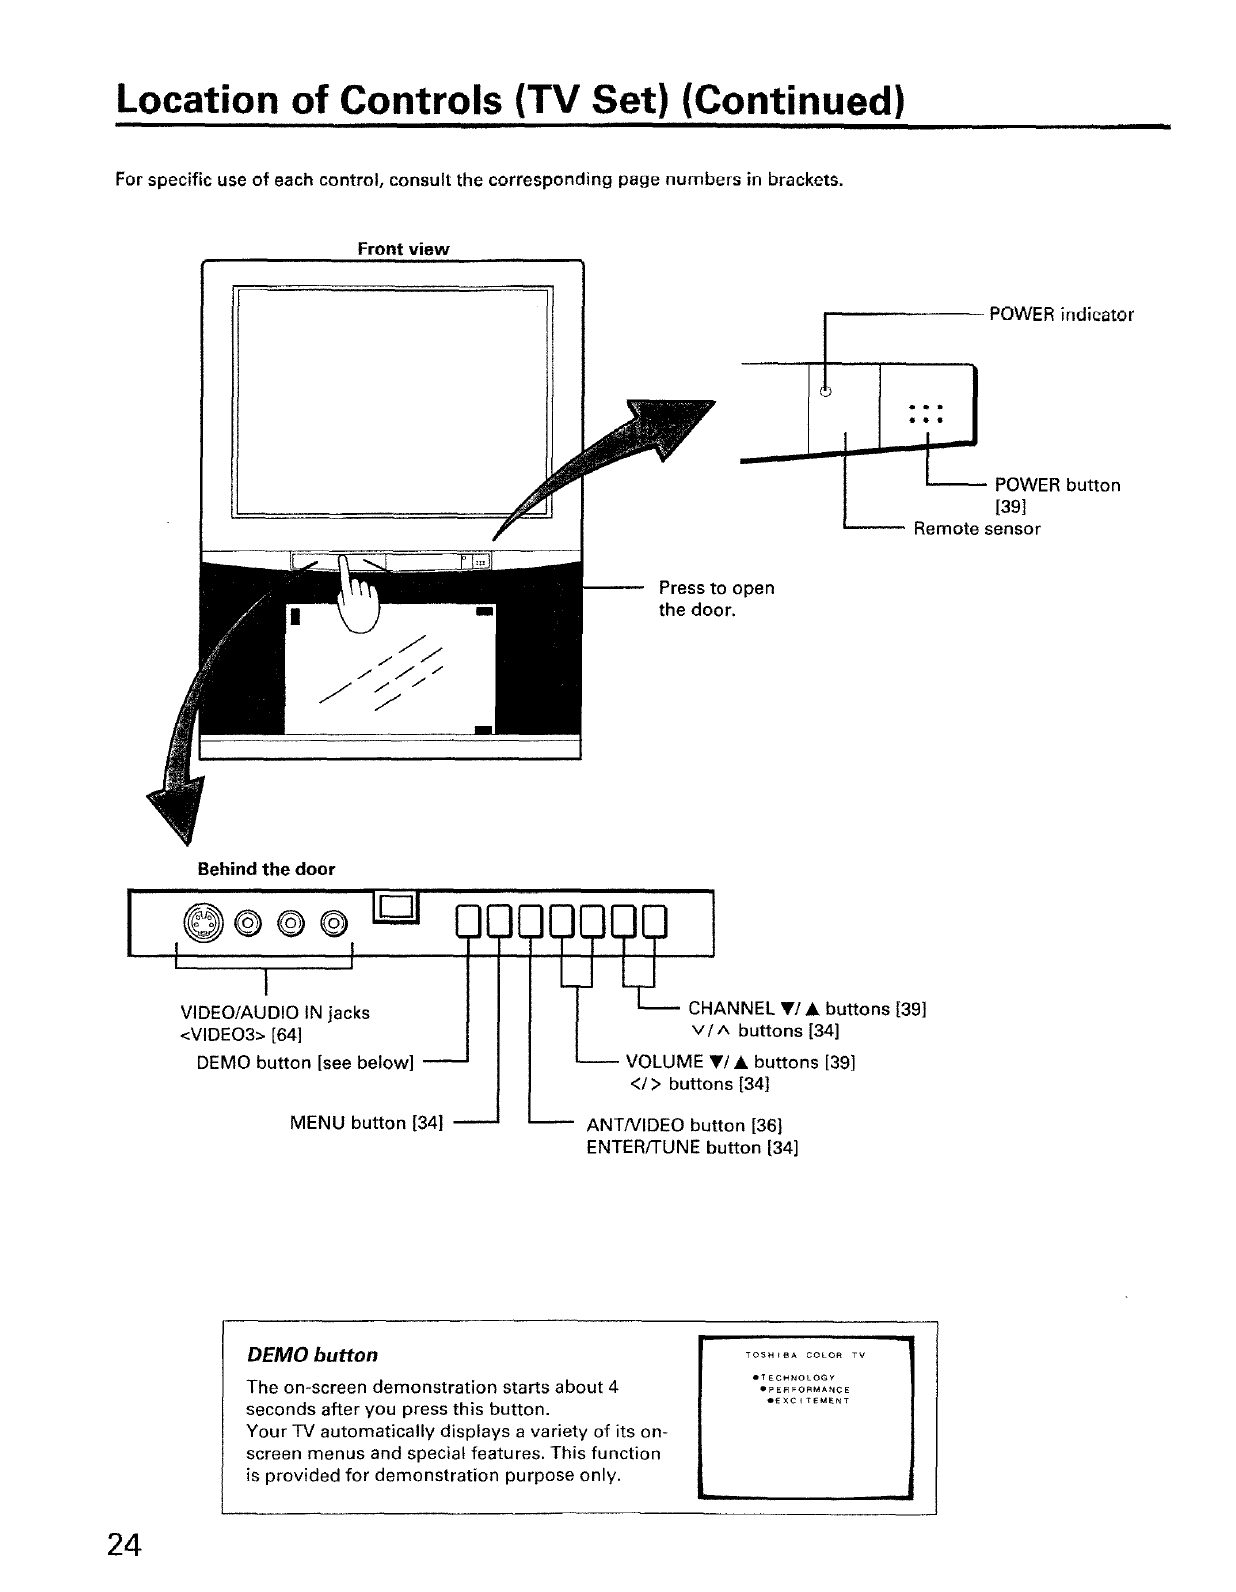
Front view
T _ POWER indicator
I Po'VERI "Red" for operating
I / "Green" for standby
POWER button [391
Remote sensor
Press to open
the door.
Behind the door
I
VIDEO/AUDIO IN jacks
<VIDEO3> 164]
DEMO button [see below]--
MENU button [34]
)()(
L.J
-- CHANNEL _'/• buttons [39]
V/A buttons [34}
-- VOLUME T/• buttons 139]
</> buttons [34]
-- ANT/VIDEO button 136]
ENTER/TUNE button [34]
I
22
8_ _r ,r_MAN, _ _
DEMO button
The on-screen demonstration starts about 4
seconds after you press this button.
Your TV automatically displays a variety of its on-
screen menus and special features. This function
is provided for demonstration purpose only.
To stop the demons[ration, press DEMO again
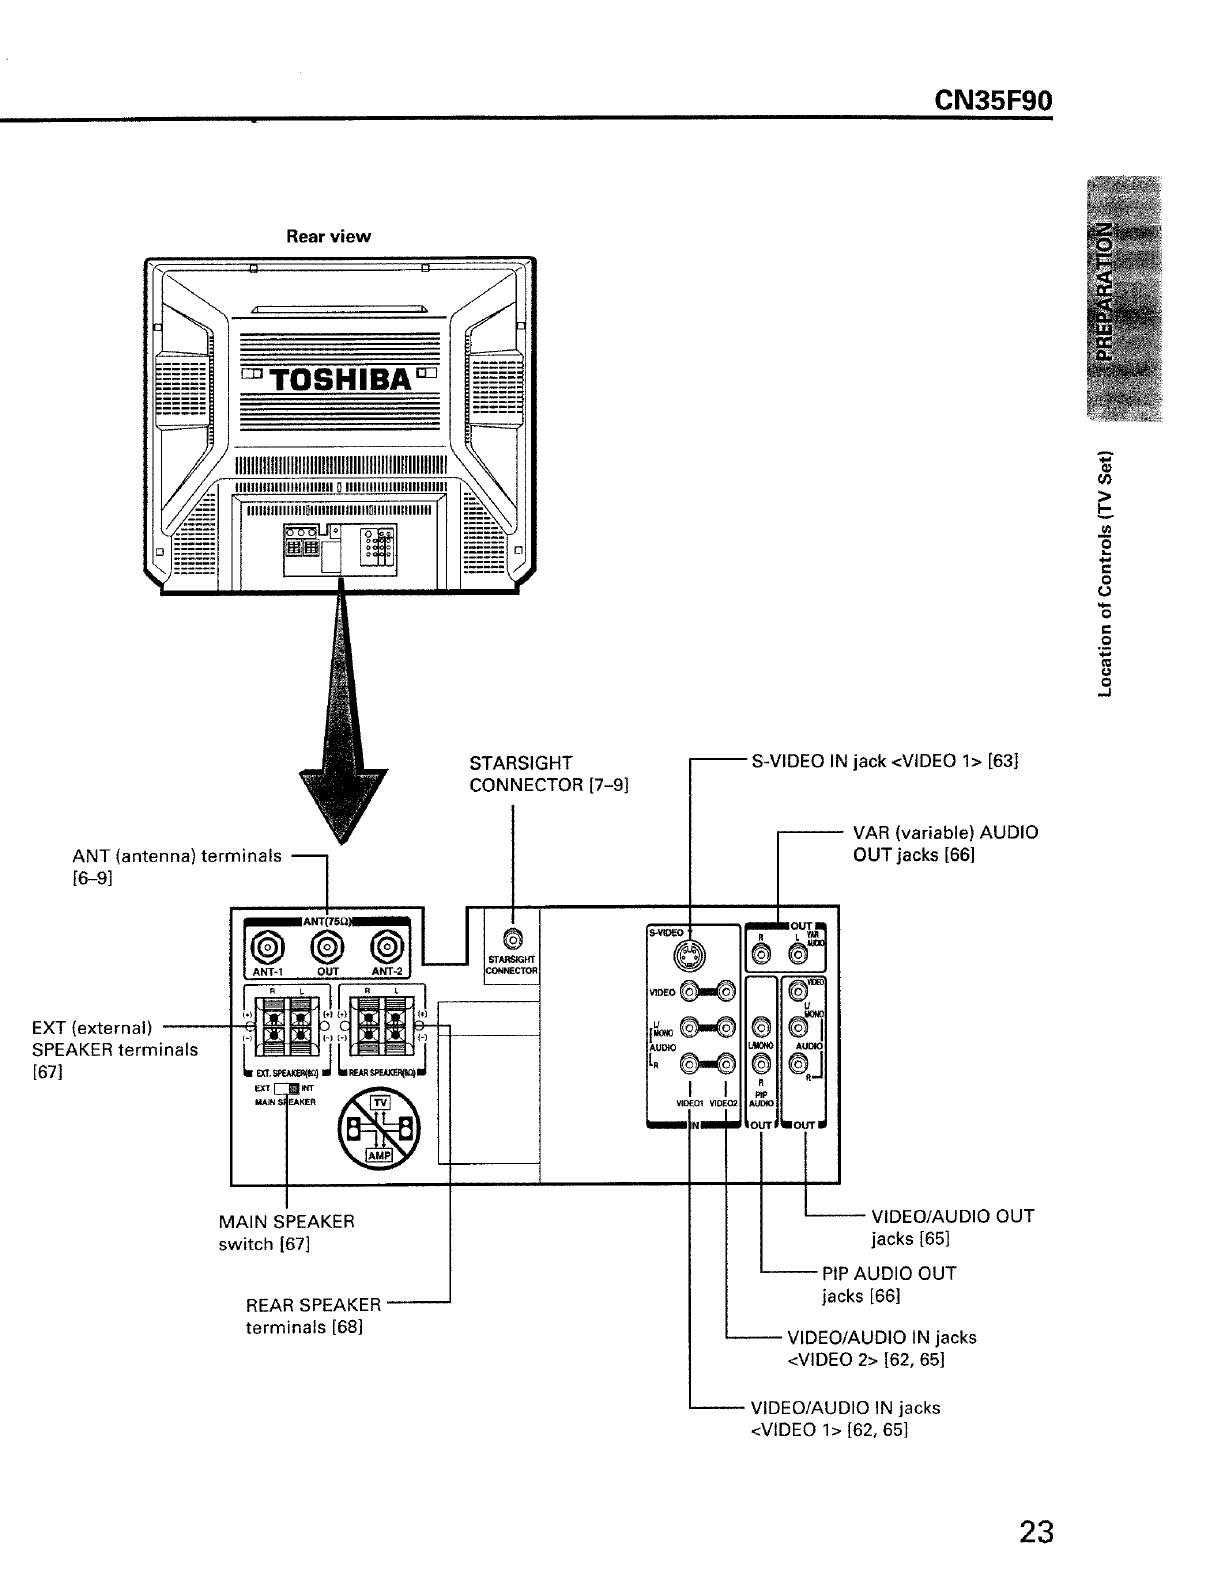
CN35F90
Rear view
[3 [3
_TOSHIBA _
IIIIIIIIIIIIIIIIIIIIIIIII11!11111111111111111111111111
IIIIIIIIIIIIIIIOIIIIIIIIIIIIIIIDIIIIIIIIIIIIIII
ANT (antenna) terminals --
[6-9]
EXT (external)
SPEAKER terminals
[67]
STARSIGHT
CONNECTOR [7-9]
@
MAIN ;PEAKER
switch [67]
s-v_o
@
VIDE01 VIDEO;'
iiiim Nlll
REAR SPEAKER --
terminals [68]
-- S-VIDEO IN jack <VIDEO 1> [63]
AU#_
o./
IIOUT I
ll-
-- VAR (variable) AUDIO
OUT jacks [66]
VIDEO/AUDIO OUT
jacks [65]
-- PIP AUDIO OUT
jacks [66]
VIDEO/AUDIO IN jacks
<VIDEO 2> [62, 65]
-- VIDEO/AUDIO IN jacks
<VIDEO 1> [62, 65]
O3
£
o
t.-
.2
o
--I
23
Location of Controls (TV Set) (Continued)
For specific use of each control, consult the corresponding page numbers in brackets.
Front view
Press to open
the door.
POWER indicator
iro o o j
!oi
[POWER button
[39]
Remote sensor
IBehind the door
.............. i
I
VIDEO/AUD!O IN jacks
<VIDEO3> [64]
DEMO button [see below]
MENU button [34]
CHANNEL Y/• buttons [39]
V/A buttons [34]
-- VOLUME V/• buttons [39]
</> buttons [34]
ANT/VIDEO button [36]
ENTER/TUNE button [34]
r
DEMO button |..............
L
ITECHNOLOGY
The on-screen demonstration starts about 4 ,PE_O,M*,CE
seconds after you press this button. ,E×C,_E_NT
Your TV automatically displays a variety of its on-
screen menus and special features. This function
is provided for demonstration purpose only.
24
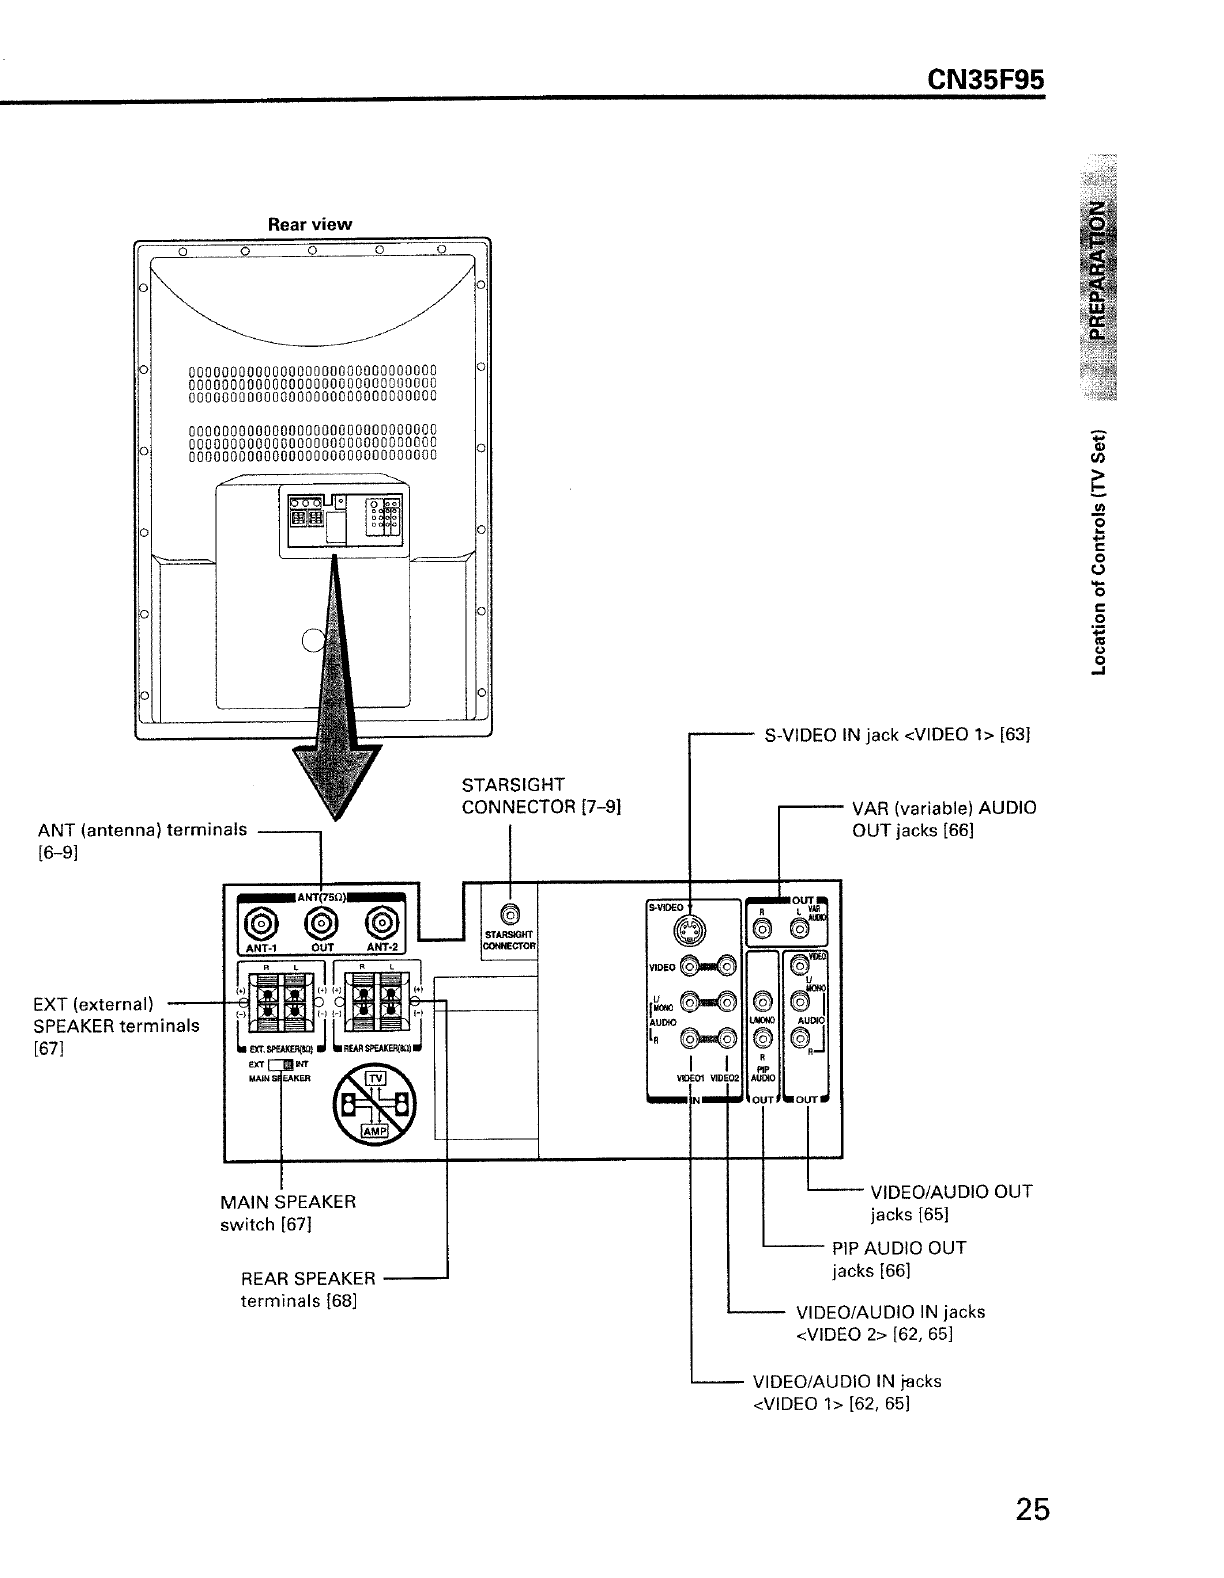
CN35F95
Rear view
0 0 0 0 0
000000000000000000000000000000 o
000000000000000000000000000000
000000000000000000000000000000
000000000000000000000000000000
000000000000000000000000000000
000000000000000000000000000000o._[_ !
C
_ STARSIGHT
CONNECTOR [7-9]
_k6N_T](antenna)terminals_ OUTA_"_T'=@A_)a @U--
EXT (external)
SPEAKER terminals
[67] @
MAIN SPEAKER
switch [67]
REAR SPEAKER
terminals [68]
VIOE Ol _DE02
_1mlllllll
S-VIDEO IN jack <VIDEO 1> [63]
i@,J
LEOUT II
LI
L
VAR (variable) AUDIO
OUT jacks [66]
L-----VIDEO/AUDIO OUT
jacks [65]
PIP AUDIO OUT
jacks [66]
-- VIDEO/AUDIO IN jacks
<VIDEO 2> [62, 65]
-- VIDEO/AUDIO IN jacks
<VIDEO 1> [62, 65]
8
,,,.I
25
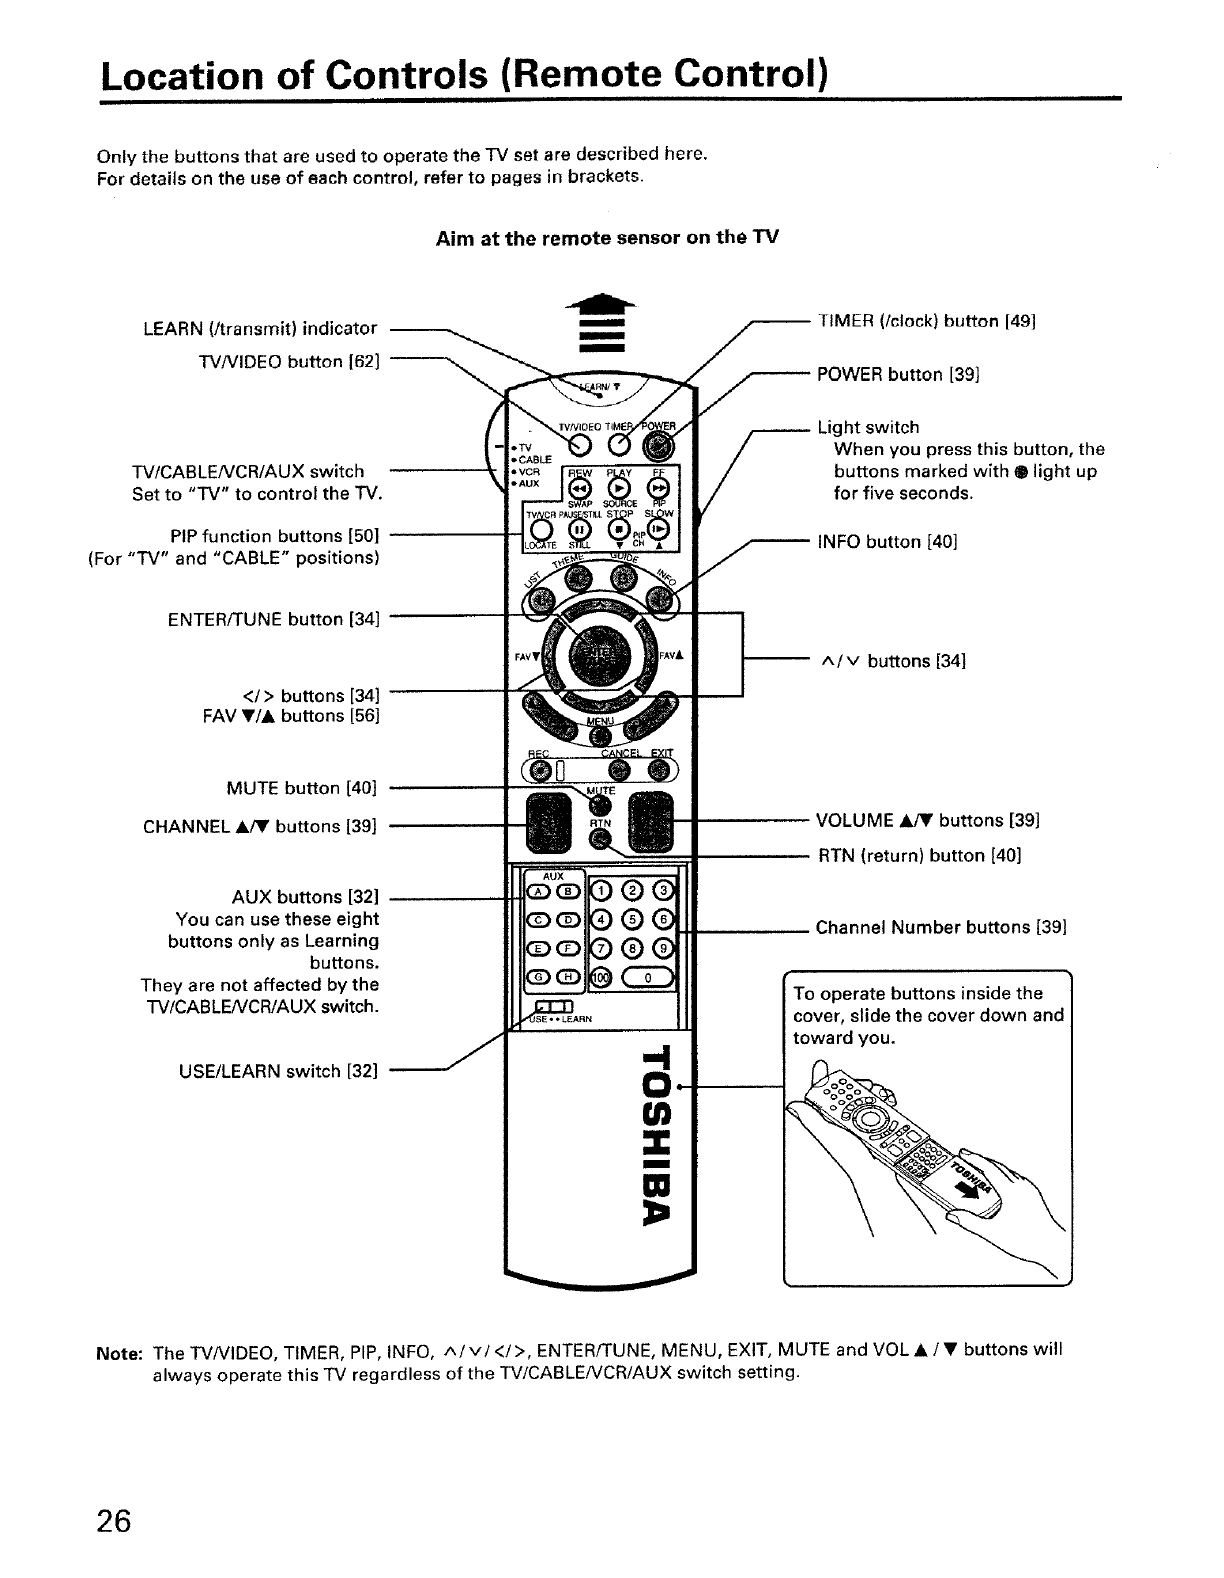
Location of Controls (Remote Control)
Only the buttons that are used to operate the TV set are described here.
For details on the use of each control, refer to pages in brackets.
Aim at the remote sensor on the TV
LEARN (/transmit) indicator
TVNIDEO button [62]
TV/CABLENCR/AUX switch
Set to "TV" to control the "IV.
PIP function buttons [50]
(For "TV" and "CABLE" positions)
ENTER/TUNE button [34]
</> buttons [34]
FAV •/A buttons [56]
MUTE button [40]
CHANNEL A/• buttons [39]
AUX buttons [32]
You can use these eight
buttons only as Learning
buttons.
They are not affected by the
I-V/CABLENCR/AUX switch.
USE/LEARN switch [32]
Q®
Q®
Q®
(ZD
-4
O_
U)
m
M
TIMER (/clock) button [49]
POWER button [39]
Light switch
When you press this button, the
buttons marked with ® light up
for five seconds.
INFO button [40]
-- ^/v buttons [34]
VOLUME A/V buttons [39]
RTN (return) button [40]
Channel Number buttons [39]
buttons inside the
cover, slide the cover down and
toward you.
Note: The TV/VIDEO, TIMER, PIP, INFO, ^/v/</>, ENTER/TUNE, MENU, EXIT, MUTE and VOL • /• buttons will
always operate this TV regardless of the TV/CABLENCR/AUX switch setting.
26
Before Using the Remote Control
With this Remote Control, you can operate your TV and
most models of remote-controlled VCR's and cable
boxes even if they are different brands.
However, this Remote Control must be programmed to
control other brands of VCR's and/or cable boxes. See
page 29. If you will be using your TV set with a Toshiba
VCR, your Remote Control has already been prepro-
grammed for you.
Further, this Remote Control is capable of learning
operating codes from most infrared remote control
transmitters. See page 32.
• Before attempting to operate your Remote Control,
install the batteries according to "Installing and
replacing batteries" (see below).
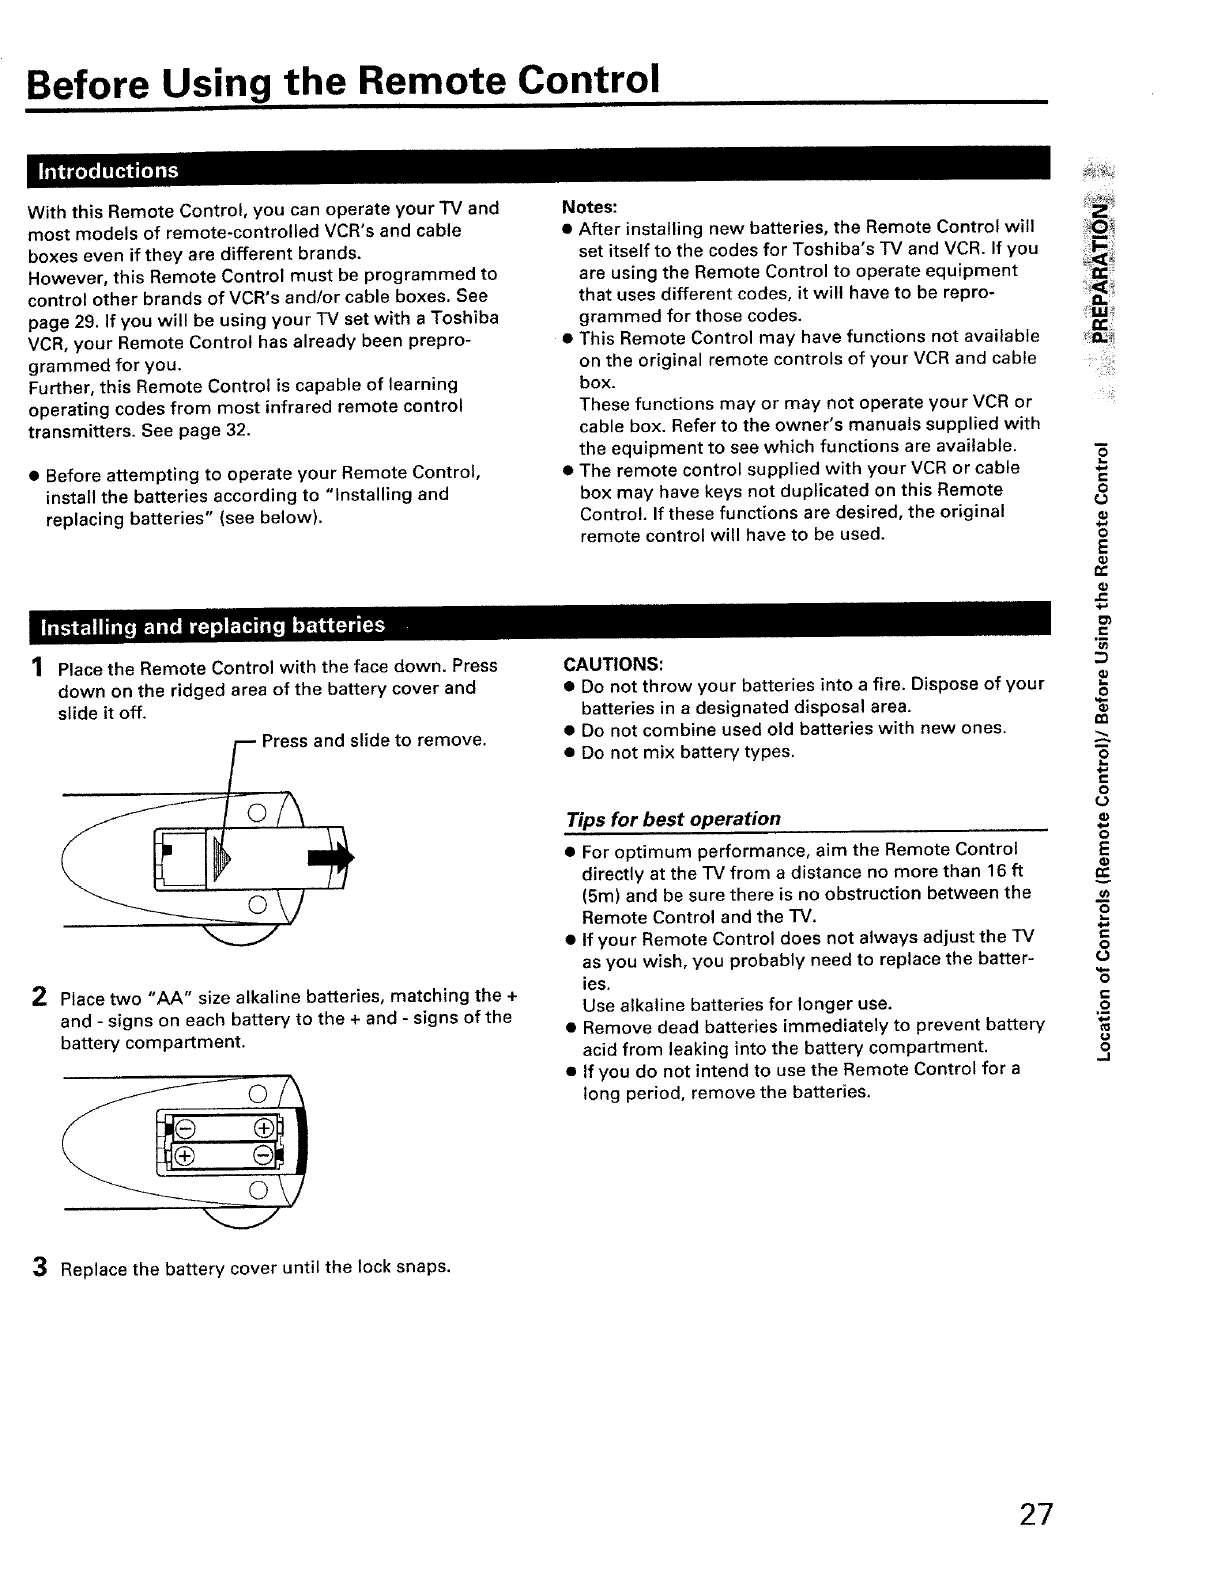
Place the Remote Control with the face down. Press
down on the ridged area of the battery cover and
slide it off.
_ Press and slide to remove.
Place two "AA" size alkaline batteries, matching the +
and - signs on each battery to the + and - signs of the
battery compartment.
3Replace the battery cover until the lock snaps.
Notes:
• After installing new batteries, the Remote Control will _O_
set itself to the codes for Toshiba's IV and VCR. If you
are using the Remote Control to operate equipment
that uses different codes, it will have to be repro-
grammed for those codes, uJ_+
Iz::
• This Remote Control may have functions not available _n_,_
on the original remote controls of your VCR and cable ....
box.
These functions may or may not operate your VCR or
cable box. Refer to the owner's manuals supplied with
the equipment to see which functions are available.
• The remote control supplied with your VCR or cable
box may have keys not duplicated on this Remote
Control, If these functions are desired, the original
remote control will have to be used.
CAUTIONS:
• Do not throw your batteries into a fire. Dispose of your
batteries in a designated disposal area.
• Do not combine used old batteries with new ones.
• Do not mix battery types.
Tips for best operation
• For optimum performance, aim the Remote Control
directly at the TV from a distance no more than 16 ft
(5m) and be sure there is no obstruction between the
Remote Control and the TV.
• If your Remote Control does not always adjust the TV
as you wish, you probably need to replace the batter-
ies.
Use alkaline batteries for longer use.
• Remove dead batteries immediately to prevent battery
acid from leaking into the battery compartment.
• If you do not intend to use the Remote Control for a
long period, remove the batteries.
4_
€
o
O
E
4-J
cn
P
o
-$
rn
.o
+-
O
O
E
hr.
o
c-
o
c-
o
o
27
Using the Remote Control with VCR or Cable Box
• To control a Toshiba VCR, first set the TV/CABLENCR/AUX switch to the "VCR" position. The buttons shown below
will then control the VCR. The rest of the buttons operate the "IV as usual.
If you have another brand of VCR, you can probably program your Remote Control to control it.
Details are on page 29.
•To control acable box, this Remote Control must be programmed to recognize the brand of your cable box.
See page 29.
Set the TV/CABLENCR/AUX switch to the "CABLE" position whenever you control the cable box.
Aim at the VCR or cable box
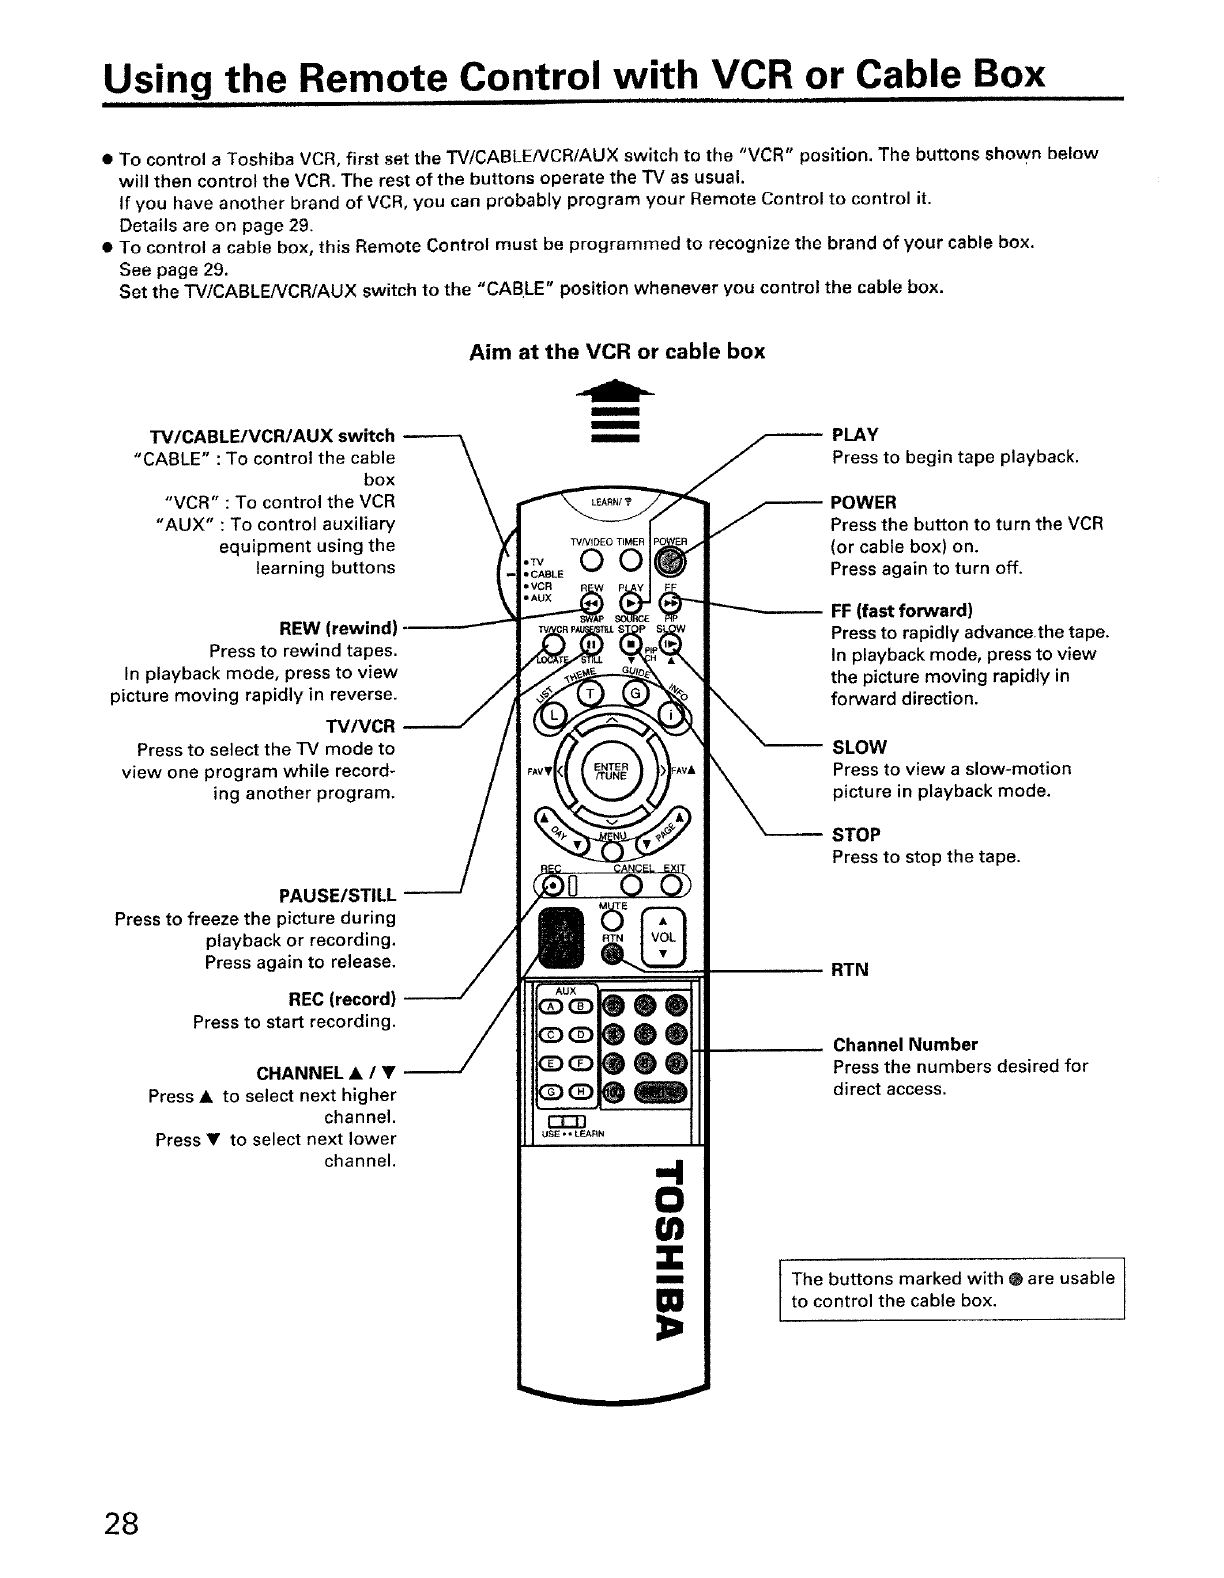
TV/CABLEIVCRIAUX switch
"CABLE" : To control the cable
,, ,, box
VCR : To control the VCR
"AUX" : To control auxiliary
equipment using the
learning buttons
REW (rewind)
Press to rewind tapes.
In playback mode, press to view
picture moving rapidly in reverse.
TV/VCR
Press to select the "IV mode to
view one program while record-
ing another program.
PAUSE/STILL
Press to freeze the picture during
playback or recording.
Press again to release.
REC (record)
Press to start recording.
CHANNEL •/V
Press •to select next higher
channel.
Press • to select next lower
channel.
Illllllllll
IIIIIIII
®®
®0
00
O
CO
IIIIII
PLAY
Press to begin tape playback.
POWER
Press the button to turn the VCR
(or cable box) on.
Press again to turn off.
FF (fast forward)
Press to rapidly advancethe tape.
In playback mode, press to view
the picture moving rapidly in
forward direction.
SLOW
Press to view a slow-motion
picture in playback mode.
STOP
Pressto stop the tape.
RTN
Channel Number
Press the numbers desired for
direct access.
The buttons marked with • are usable
to control the cable box.
28
Programming the Remote Control
• This Remote Control is preprogrammed to operate Toshiba VCR's.
• To use VCR's other than Toshiba models (or cable box), perform the following procedures before operating.
Z
!TVNIDEO TIMER
•AUX
E
W CRP SN S_W
L • CH •
REC CANCEL EXIT
®®
r-r-n
USE *" LEARN
-4
0
m
W
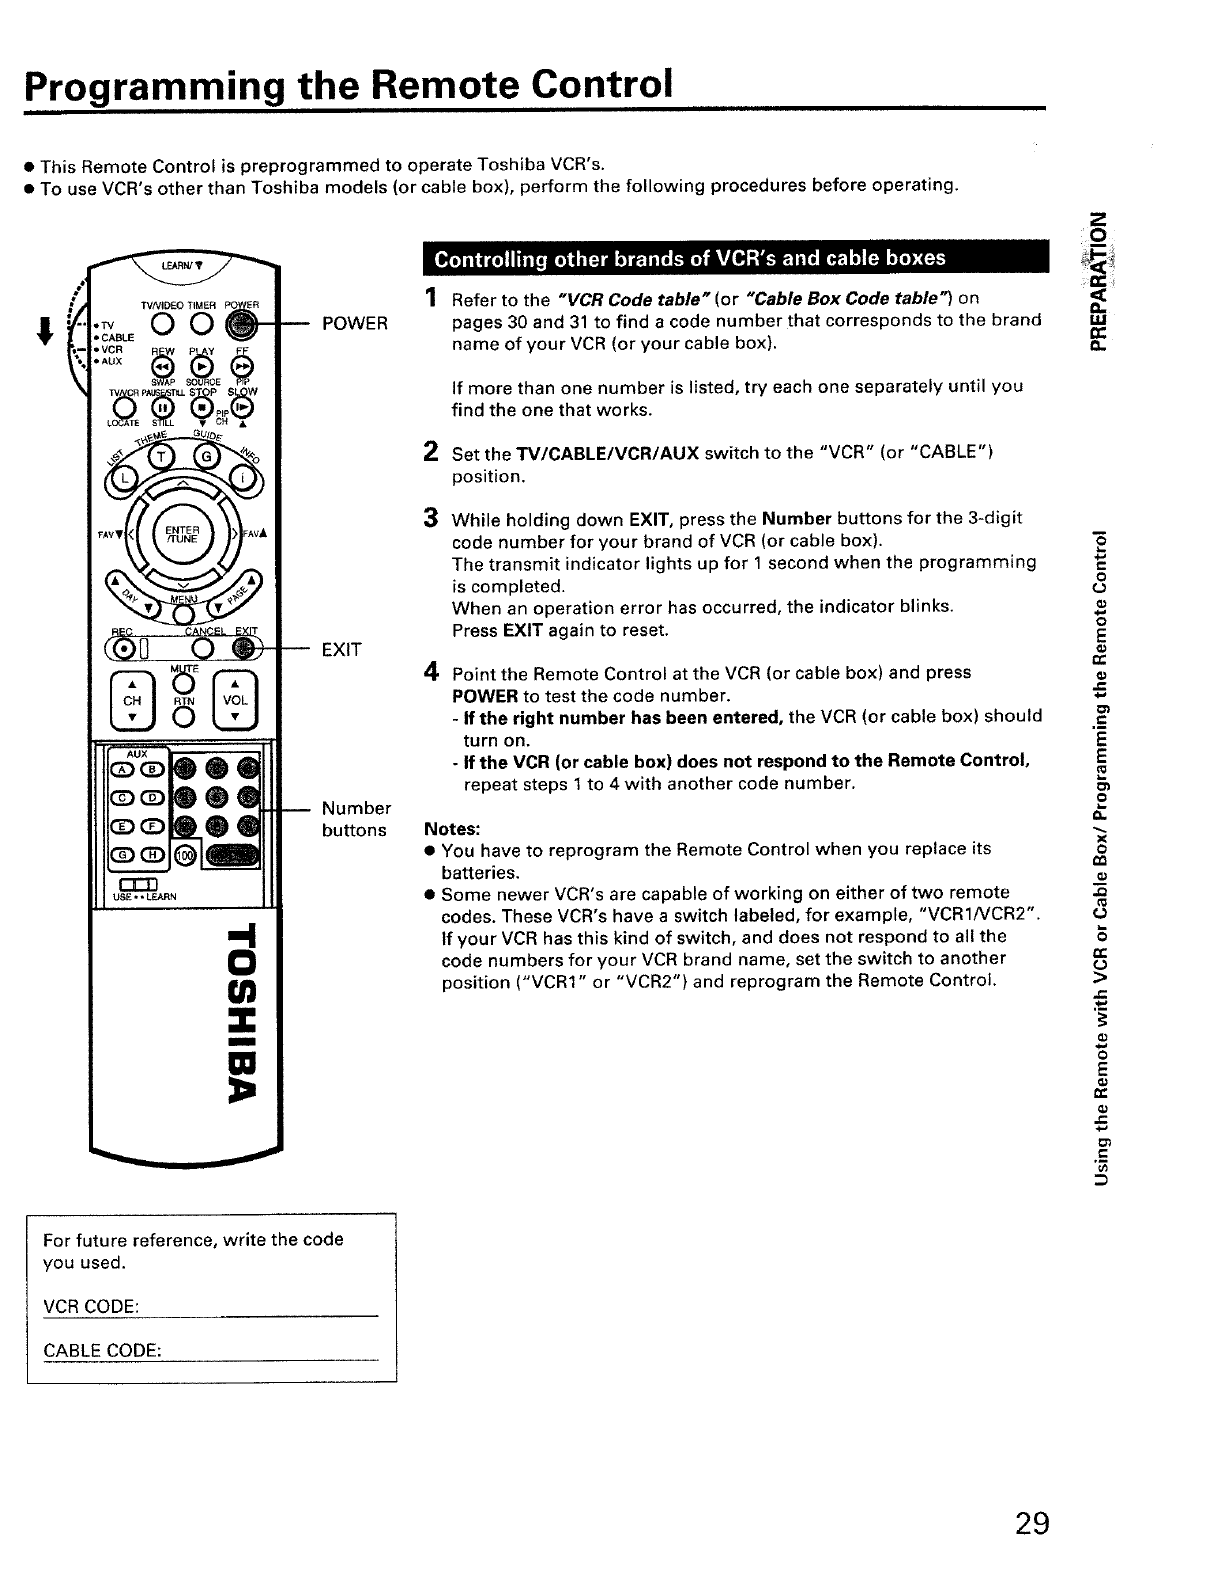
POWER
-- EXIT
-- Number
buttons
2
3
4
Refer to the "VCR Code table" (or "Cable Box Code table") on
pages 30 and 31 to finda code number thatcorresponds to the brand
name ofyour VCR (oryour cablebox),
If more than one number is listed, try each one separately until you
find the one that works.
Set the TM/CABLE/VCR/AUX switch to the "VCR" (or "CABLE"
position.
While holding down EXIT, press the Number buttons for the 3-digit
code number for your brand of VCR (or cable box).
The transmit indicator lights up for 1 second when the programming
is completed.
When an operation error has occurred, the indicator blinks.
Press EXIT again to reset.
Point the Remote Control at the VCR (or cable box) and press
POWER to test the code number.
-If the right number has been entered, the VCR (or cable box) should
turn on.
-If the VCR (or cable box) does not respond to the Remote Control,
repeat steps 1to 4 with another code number.
Notes:
• You have to reprogram the Remote Control when you replace its
batteries.
•Some newer VCR's are capable of working on either of two remote
codes. These VCR's have a switch labeled, for example, "VCR1NCR2".
If your VCR has this kind of switch, and does not respond to all the
code numbers for your VCR brand name, set the switch to another
position ('VCR1" or "VCR2") and reprogram the Remote Control.
I.M
n-
m
o
Q;
.Id
O
E
n-
Q;
.=_
E
E
x
o
>
o
E
'N
For future reference, write the code
you used.
VCR CODE:
CABLE CODE:
29
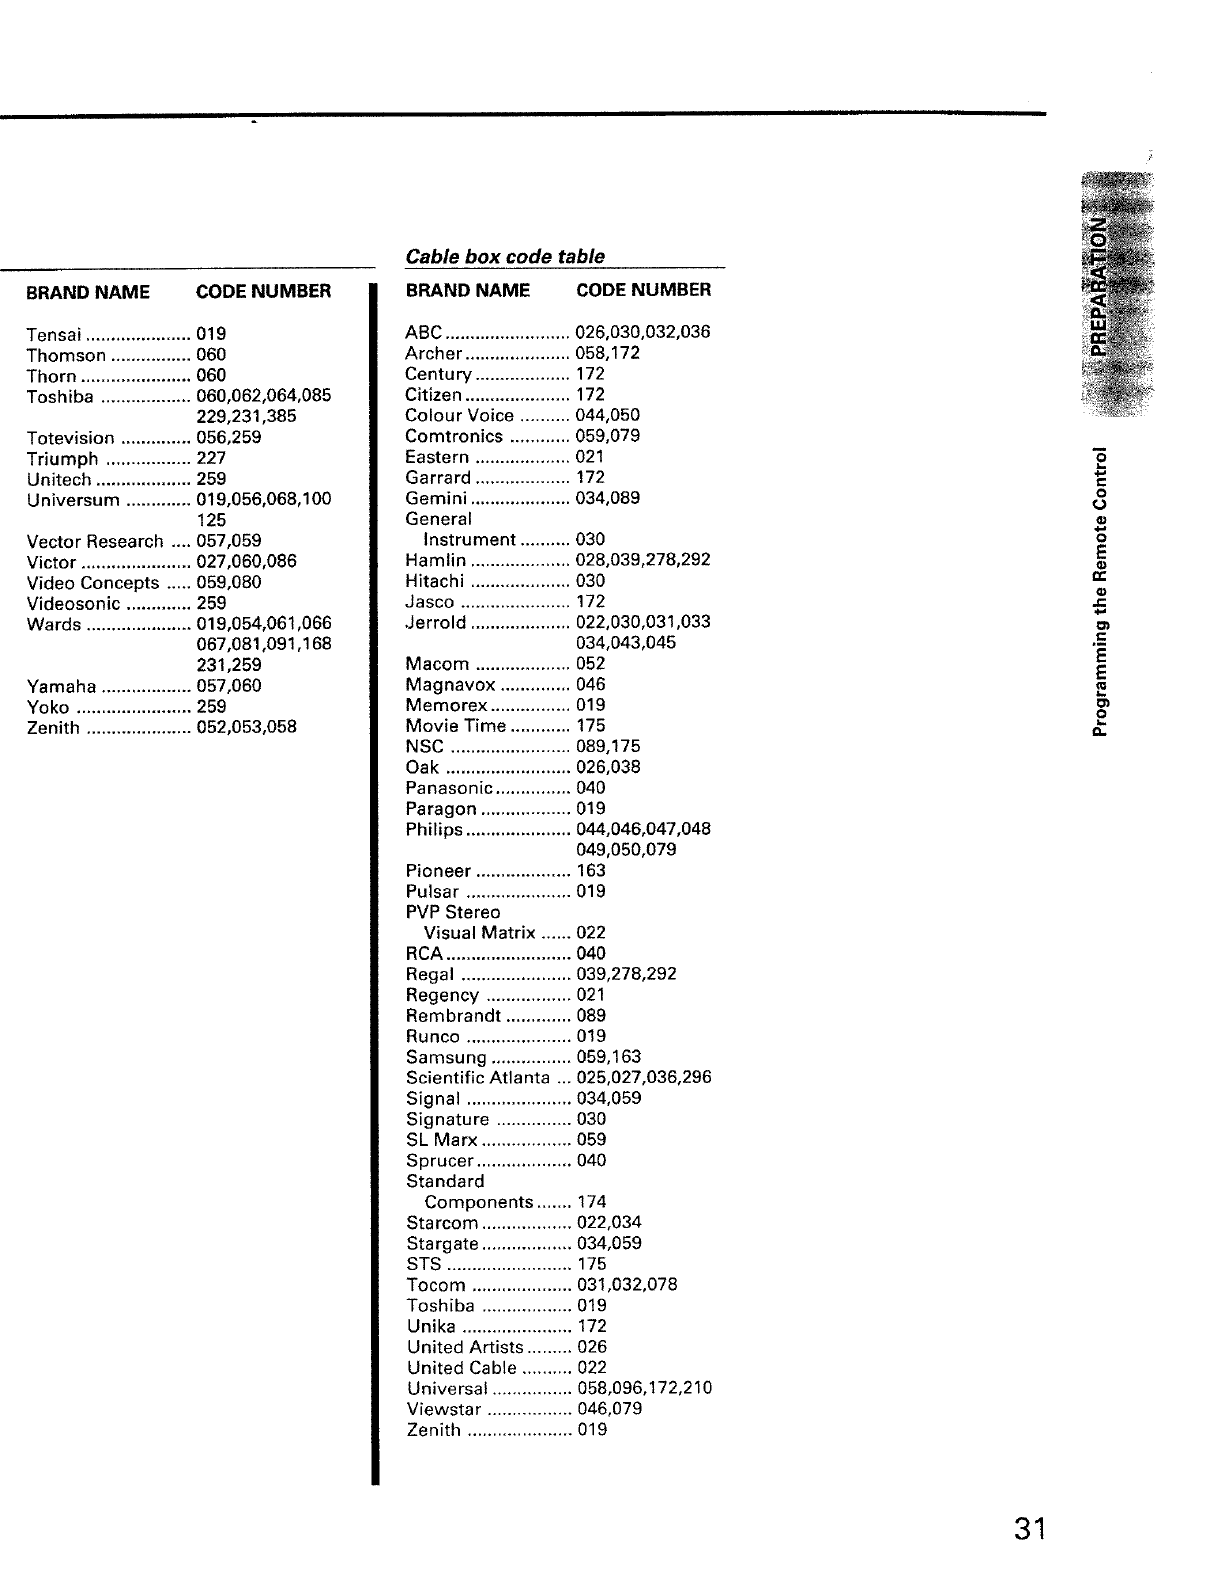
Programming the Remote Control (Continued)
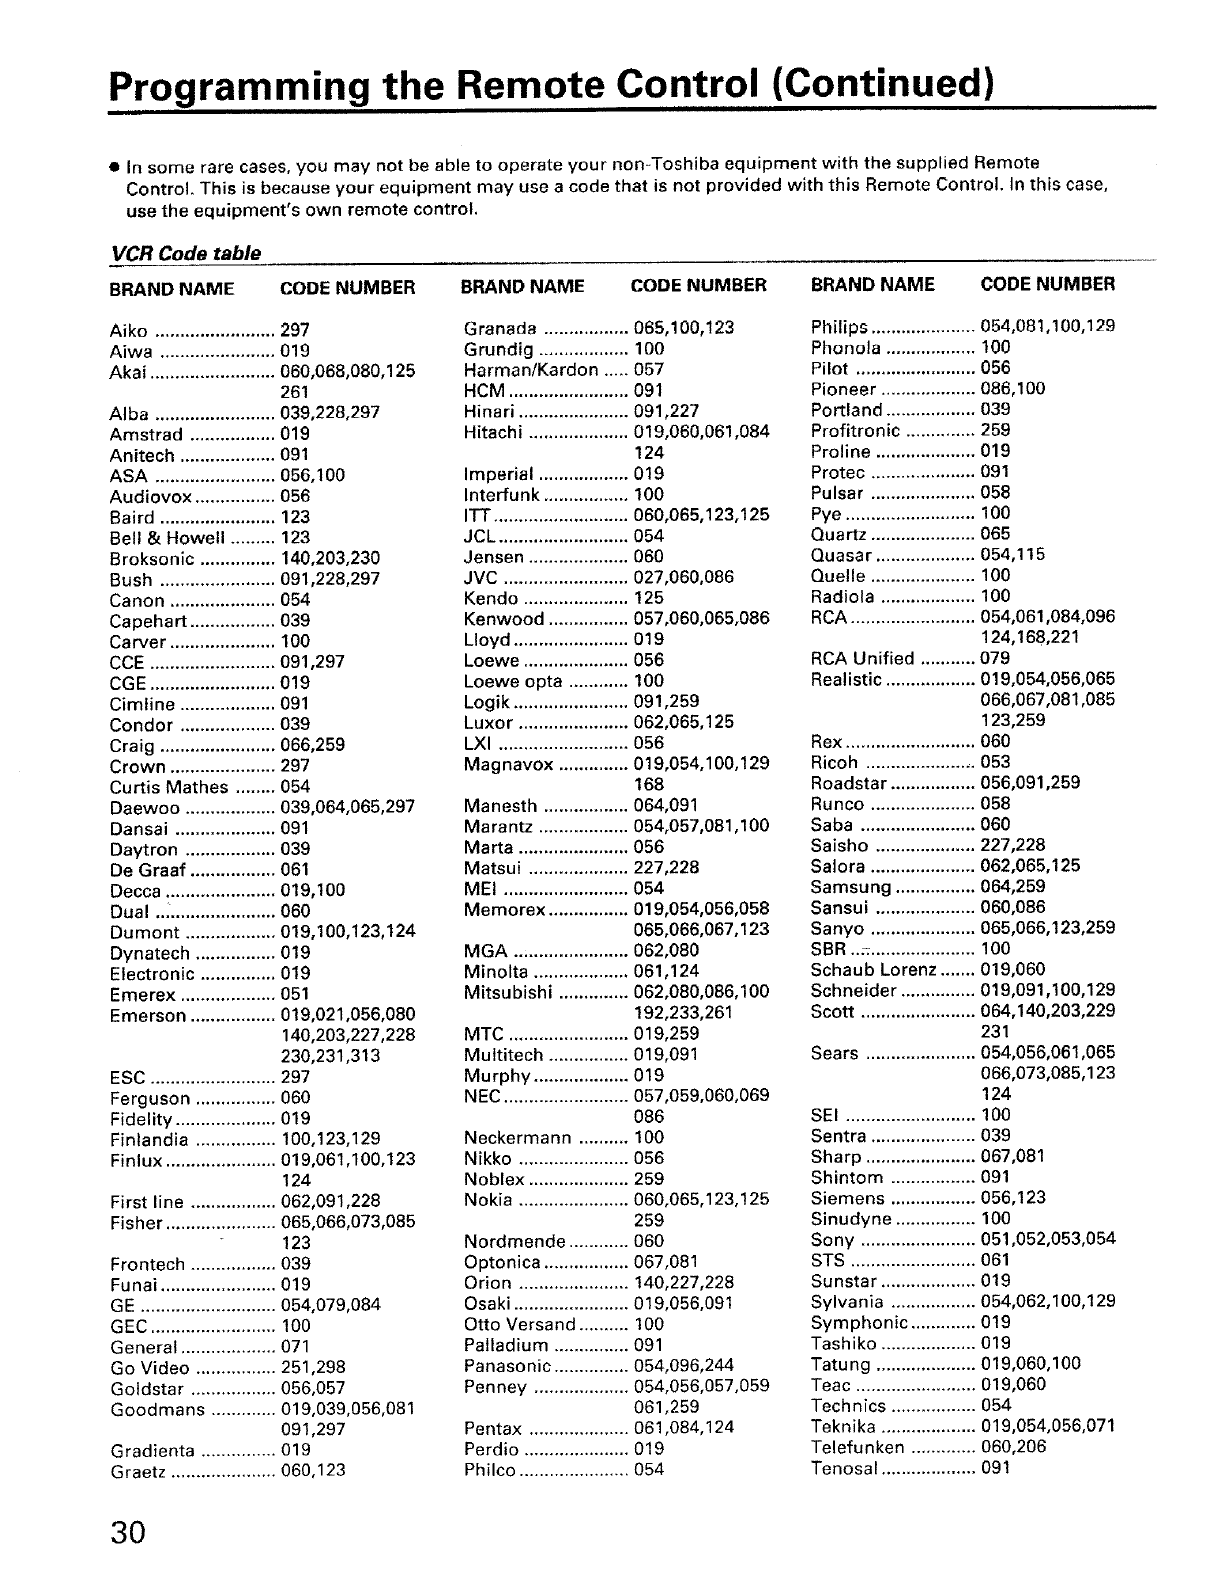
• In some rare cases, you may not be able to operate your non-Toshiba equipment with the supplied Remote
Control. This is because your equipment may use acode that is not provided with this Remote Control. In this case,
use the equipment's own remote control.
VCR Code table
BRAND NAME CODE NUMBER BRAND NAME CODE NUMBER BRAND NAME CODE NUMBER
Aiko ........................ 297
Aiwa ....................... 019
Akai ......................... 060,068,080,125
261
Alba ........................ 039,228,297
Amstrad ................. 019
Anitech ................... 091
ASA ........................ 056,100
Audiovox ................ 056
Baird ....................... 123
Bell & Howell ......... 123
Broksonic ............... 140,203,230
Bush ....................... 091,228,297
Canon ..................... 054
Capehart ................. 039
Carver ..................... 100
CCE ......................... 091,297
CGE ......................... 019
Cimline ................... 091
Condor ................... 039
Craig ....................... 066,259
Crown ..................... 297
Curtis Mathes ........ 054
Daewoo .................. 039,064,065,297
Dansai .................... 091
Daytron .................. 039
De Graaf ................. 061
Decca ...................... 019,100
Dual .._..................... 060
Dumont .................. 019,100,123,124
Dynatech ................ 019
Electronic ............... 019
Emerex ................... 051
Emerson ................. 019,021,056,080
140,203,227,228
230,231,313
ESC ......................... 297
Ferguson ................ 060
Fidelity .................... 019
Finlandia ................ 100,123,129
Finlux ...................... 019,061,100,123
124
First line ................. 062,091,228
Fisher ...................... 065,066,073,085
123
Frontech ................. 039
Funai ....................... 019
GE ........................... 054,079,084
GEC ......................... 100
General ................... 071
Go Video ................ 251,298
Goldstar ................. 056,057
Goodmans ............. 019,039,056,081
091,297
Gradienta ............... 019
Graetz ..................... 060,123
Granada ................. 065,100,123
Grundig .................. 100
Harman/Kardon ..... 057
HCM ........................ 091
Hinari ...................... 091,227
Hitachi .................... 019,060,061,084
124
Imperial .................. 019
Interfunk ................. 100
ITT ........................... 060,065,123,125
JCL .......................... 054
Jensen .................... 060
JVC ......................... 027,060,086
Kendo ..................... 125
Kenwood ................ 057,060,065,086
Lloyd ....................... 019
Loewe ..................... 056
Loewe opta ............ 100
Logik ....................... 091,259
Luxor ...................... 062,065,125
LXI .......................... 056
Magnavox .............. 019,054,100,129
168
Manesth ................. 064,091
Marantz .................. 054,057,081,100
Marta ...................... 056
Matsui .................... 227,228
MEI ......................... 054
Memorex ................ 019,054,056,058
065,066,067,123
MGA ....................... 062,080
Minolta ................... 061,124
Mitsubishi .............. 062,080,086,100
192,233,261
MTC ........................ 019,259
Multitech ................ 019,091
Murphy ................... 019
NEC ......................... 057,059,060,069
086
Neckermann .......... 100
Nikko ...................... 056
Noblex .................... 259
Nokia ...................... 060,065,123,125
259
Nordmende ............ 060
Optonica ................. 067,081
Orion ...................... 140,227,228
Osaki ....................... 019,056,091
Otto Versand .......... 100
Palladium ............... 091
Panasonic ............... 054,096,244
Penney ................... 054,056,057,059
061,259
Pentax .................... 061,084,124
Perdio ..................... 019
Philco ...................... 054
Philips ..................... 054,081,100,129
Phonola .................. 100
Pilot ........................ 056
Pioneer ................... 086,100
Portland .................. 039
Profitronic .............. 259
Proline .................... 019
Protec ..................... 091
Pulsar ..................... 058
Pye .......................... 100
Quartz ..................... 065
Quasar .................... 054,115
Quelle ..................... 100
Radiola ................... 100
RCA ......................... 054,061,084,096
124,168,221
RCA Unified ........... 079
Realistic .................. 019,054,056,065
066,067,081,085
123,259
Rex .......................... 060
Ricoh ...................... 053
Roadstar ................. 056,091,259
Runco ..................... 058
Saba ....................... 060
Saisho .................... 227,228
Salora ..................... 062,065,125
Samsung ................ 064,259
Sansui .................... 060,086
Sanyo ..................... 065,066,123,259
SBR .._:..................... 100
Schaub Lorenz ....... 019,060
Schneider ............... 019,091,100,129
Scott ....................... 064,140,203,229
231
Sears ...................... 054,056,061,065
066,073,085,123
124
SEI .......................... 100
Sentra ..................... 039
Sharp ...................... 067,081
Shintom ................. 091
Siemens ................. 056,123
Sinudyne ................ 100
Sony ....................... 051,052,053,054
STS ......................... 061
Sunstar ................... 019
Sylvania ................. 054,062,100,129
Symphonic ............. 019
Tashiko ................... 019
Tatung .................... 019,060,100
Teac ........................ 019,060
Technics ................. 054
Teknika ................... 019,054,056,071
Telefunken ............. 060,206
Tenosal ................... 091
3O
BRAND NAME CODE NUMBER
Tensai ..................... 019
Thomson ................ 060
Thorn ...................... 060
Toshiba .................. 060,062,064,085
229,231,385
Totevision .............. 056,259
Triumph ................. 227
Unitech ................... 259
Universum ............. 019,056,068,100
125
Vector Research .... 057,059
Victor ...................... 027,060,086
Video Concepts ..... 059,080
Videosonic ............. 259
Wards ..................... 019,054,061,066
067,081,091,168
231,259
Yamaha .................. 057,060
Yoko ....................... 259
Zenith ..................... 052,053,058
Cable box code table
BRAND NAME CODENUMBER
ABC ......................... 026,030,032,036
Archer ..................... 058,172
Century ................... 172
Citizen ..................... 172
Colour Voice .......... 044,050
Comtronics ............ 059,079
Eastern ................... 021
Garrard ................... 172
Gemini .................... 034,089
General
Instrument .......... 030
Hamlin .................... 028,039,278,292
Hitachi .................... 030
Jasco ...................... 172
Jerrold .................... 022,030,031,033
O34,O43,045
Macom ................... 052
Magnavox .............. 046
Memorex ................ 019
Movie Time ............ 175
NSC ........................ 089,175
Oak ......................... 026,038
Panasonic ............... 040
Paragon .................. 019
Philips ..................... 044,046,047,048
049,050,079
Pioneer ................... 163
Pulsar ..................... 019
PVP Stereo
Visual Matrix ...... 022
RCA ......................... 040
Regal ...................... 039,278,292
Regency ................. 021
Rembrandt ............. 089
Runco ..................... 019
Samsung ................ 059,163
Scientific Atlanta ... 025,027,036,296
Signal ..................... 034,059
Signature ............... 030
SL Marx .................. 059
Sprucer ................... 040
Standard
Components ....... 174
Starcom .................. 022,034
Stargate .................. 034,059
STS ......................... 175
Tocom .................... 031,032,078
Toshiba .................. 019
Unika ...................... 172
United Artists ......... 026
United Cable .......... 022
Universal ................ 058,096,172,210
Viewstar ................. 046,079
Zenith ..................... 019
t-
O
O
E
0_
¢¢
.E
E
E
2
o.
31
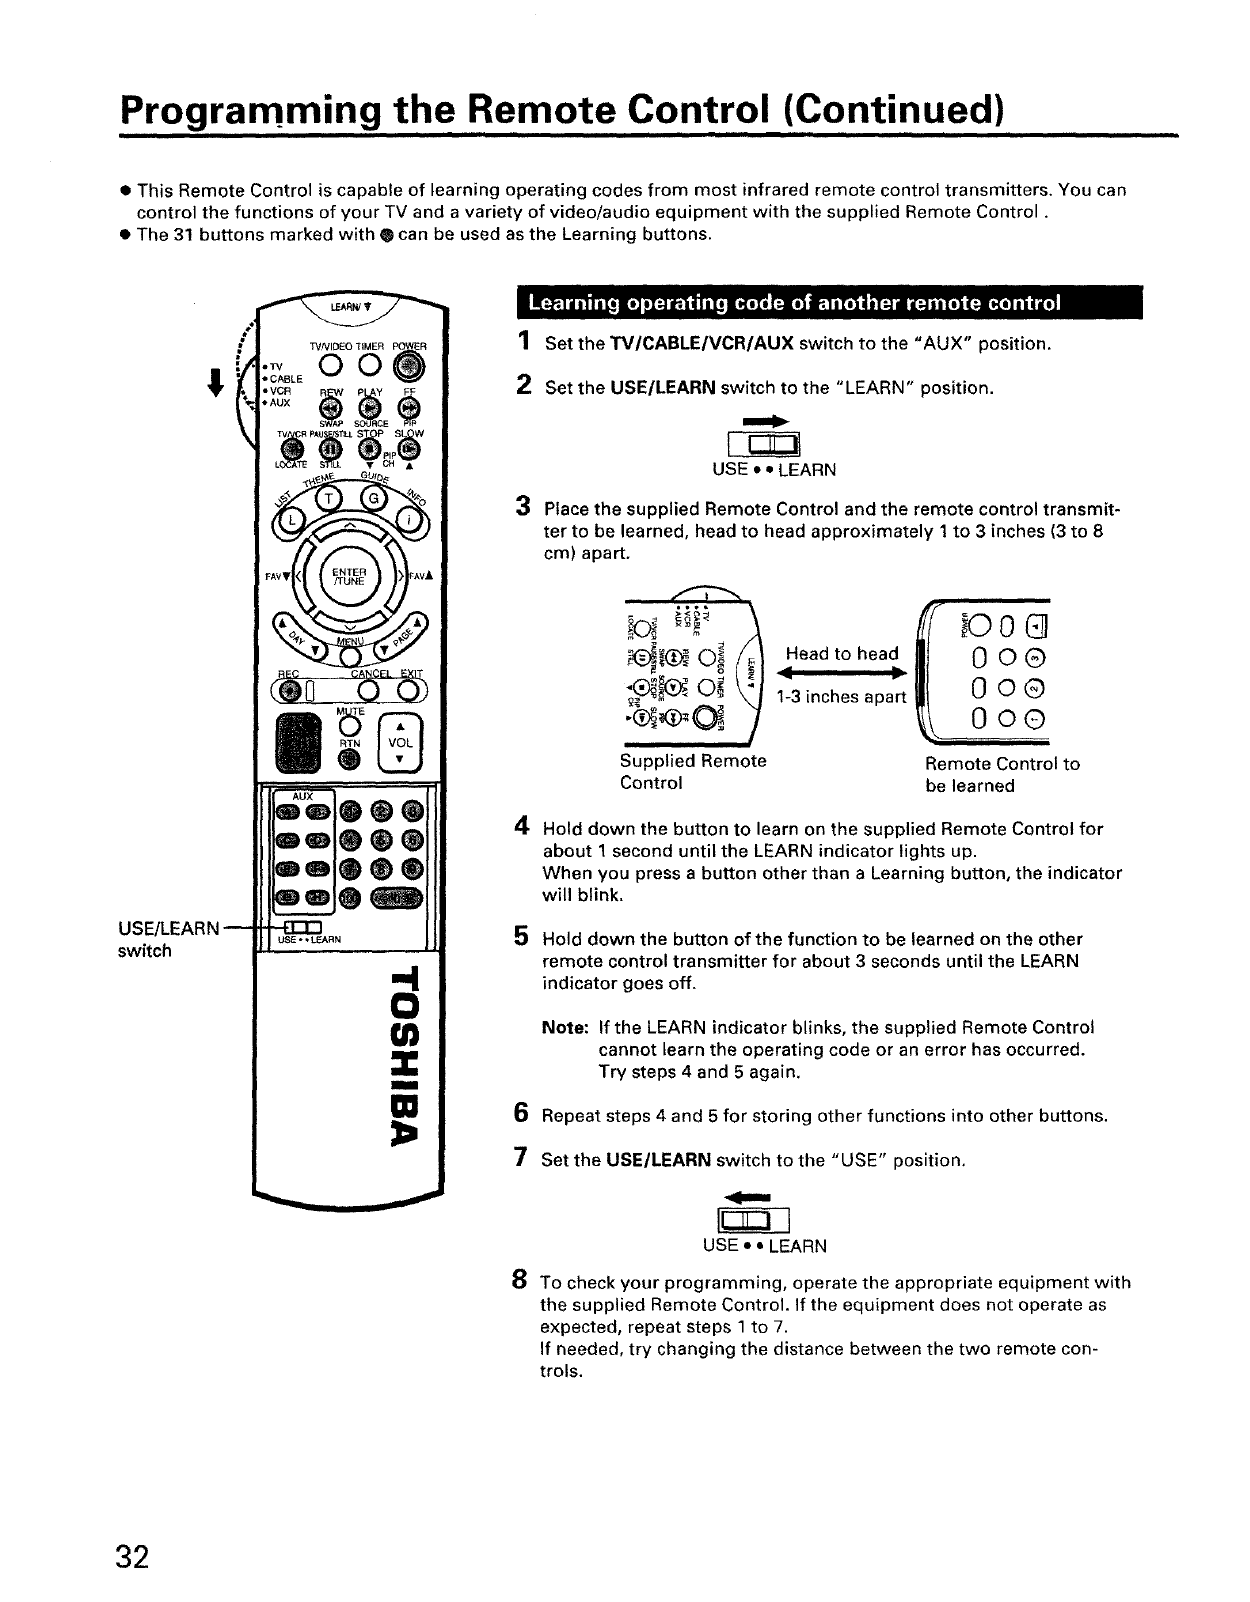
Programming the Remote €o,,ntrol (Continued) ..........
•This Remote Control is capable of learning operating codes from most infrared remote control transmitters. You can
control the functions of your TV and a variety of video/audio equipment with the supplied Remote Control.
• The 31 buttons marked with • can be used as the Learning buttons.
USE
switch
eTV
•CABLE
• VCR
• AUX
TVNIDEO TIMER
OO 1 Set the TMICABLEIVCRIAUX switch to the "AUX" position.
2Set the USE/LEARN switch to the "LEARN" position.
4
5
USE • • LEARN
Place the supplied Remote Control and the remote control transmit-
ter to be learned, head to head approximately 1 to 3 inches (3 to 8
cm) apart.
(
Supplied Remote
Control
Head to head
1-3 inches apart
fL)O
0o®
0o®
0o®
Remote Control to
be learned
Hold down the button to learn on the supplied Remote Control for
about 1 second until the LEARN indicator lights up.
When you press a button other than a Learning button, the indicator
will blink.
Hold down the button of the function to be learned on the other
remote control transmitter for about 3 seconds until the LEARN
indicator goes off.
Note: If the LEARN indicator blinks, the supplied Remote Control
cannot learn the operating code or an error has occurred.
Try steps 4 and 5 again.
6 Repeat steps 4 and 5 for storing other functions into other buttons.
7 Set the USE/LEARN switch to the "USE" position,
USE • • LEARN
8 To check your programming, operate the appropriate equipment with
the supplied Remote Control. If the equipment does not operate as
expected, repeat steps 1 to 7.
If needed, try changing the distance between the two remote con-
trols.
32
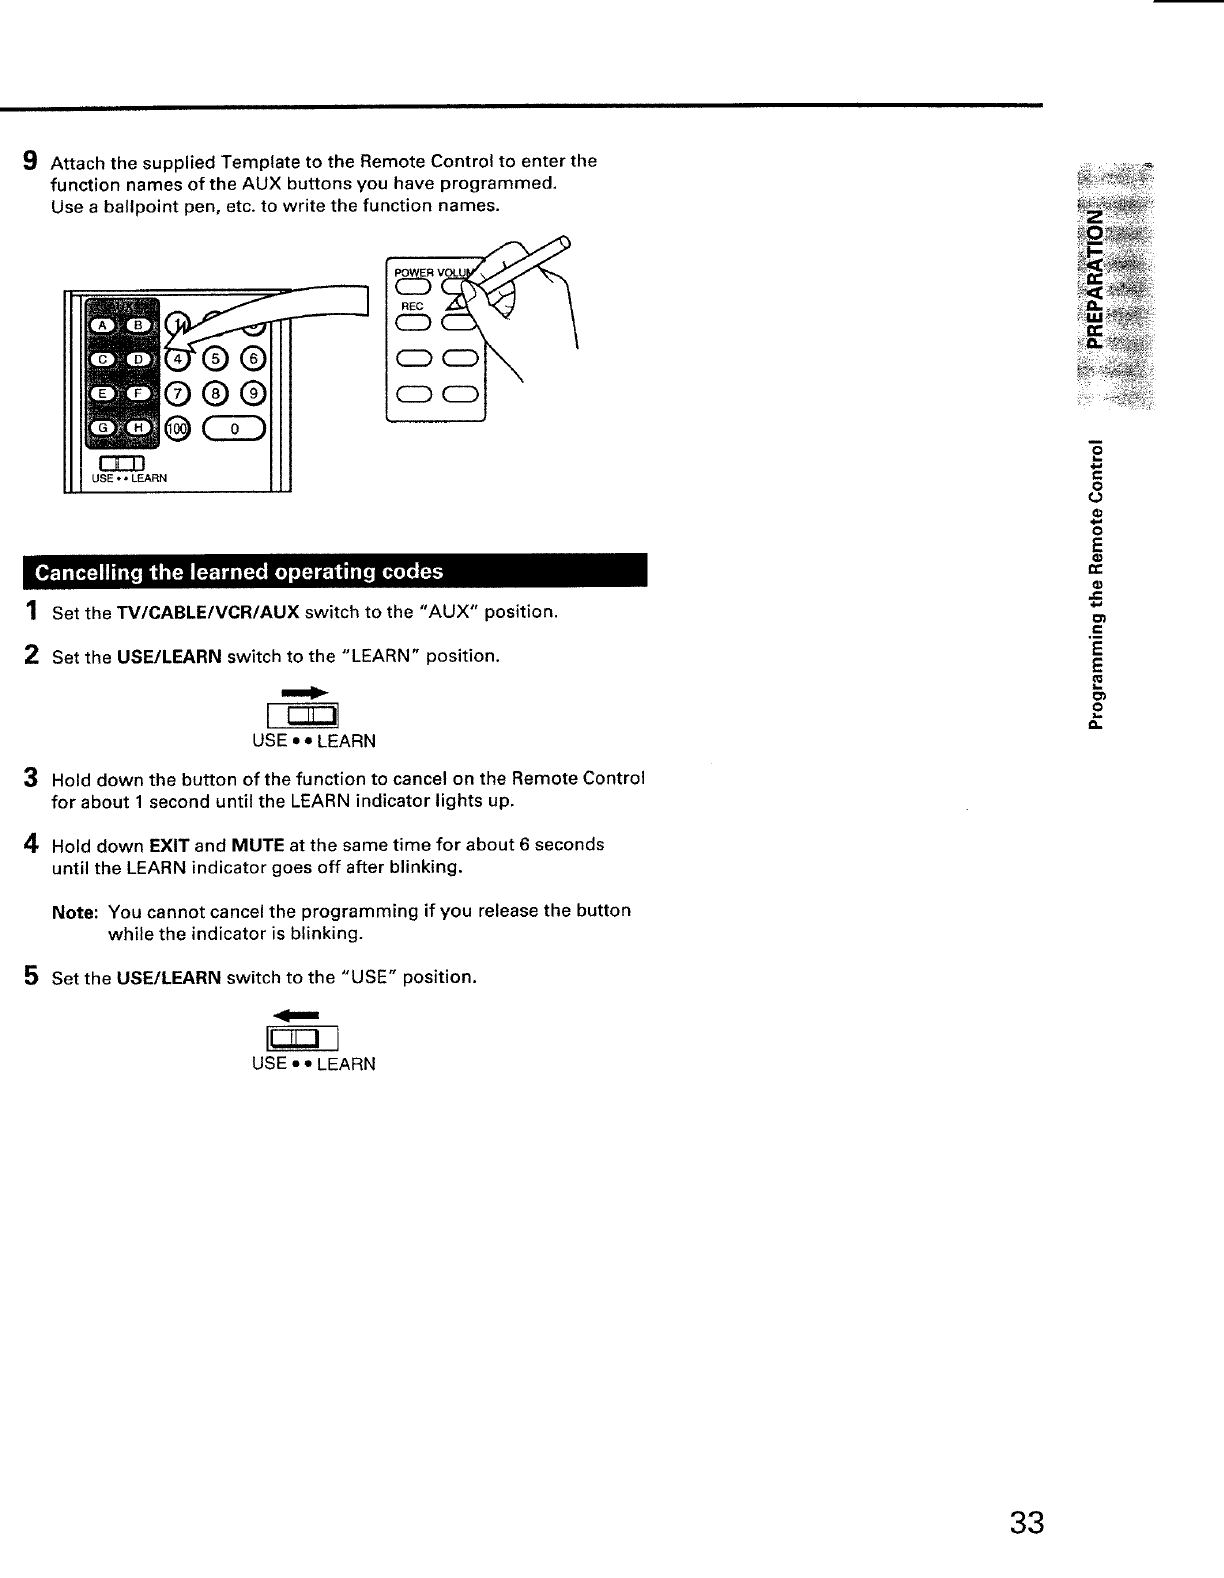
9 Attach the supplied Template to the Remote Control to enter the
function names of the AUX buttons you have programmed.
Use a ballpoint pen, etc. to write the function names.
1 Set the TVlCABLEIVCR/AUX switch to the "AUX" position.
2Set the USE/LEARN switch to the "LEARN" position.
USE • * LEARN
3 Hold down the button of the function to cancel on the Remote Control
for about 1 second until the LEARN indicator lights up.
4 Hold down EXIT and MUTE at the same time for about 6 seconds
until the LEARN indicator goes off after blinking.
Note: You cannot cancel the programming if you release the button
while the indicator is blinking.
5Set the USE/LEARN switch to the "USE" position.
USE •• LEARN
O
o
E
O_
,iE
E
o
o.
33
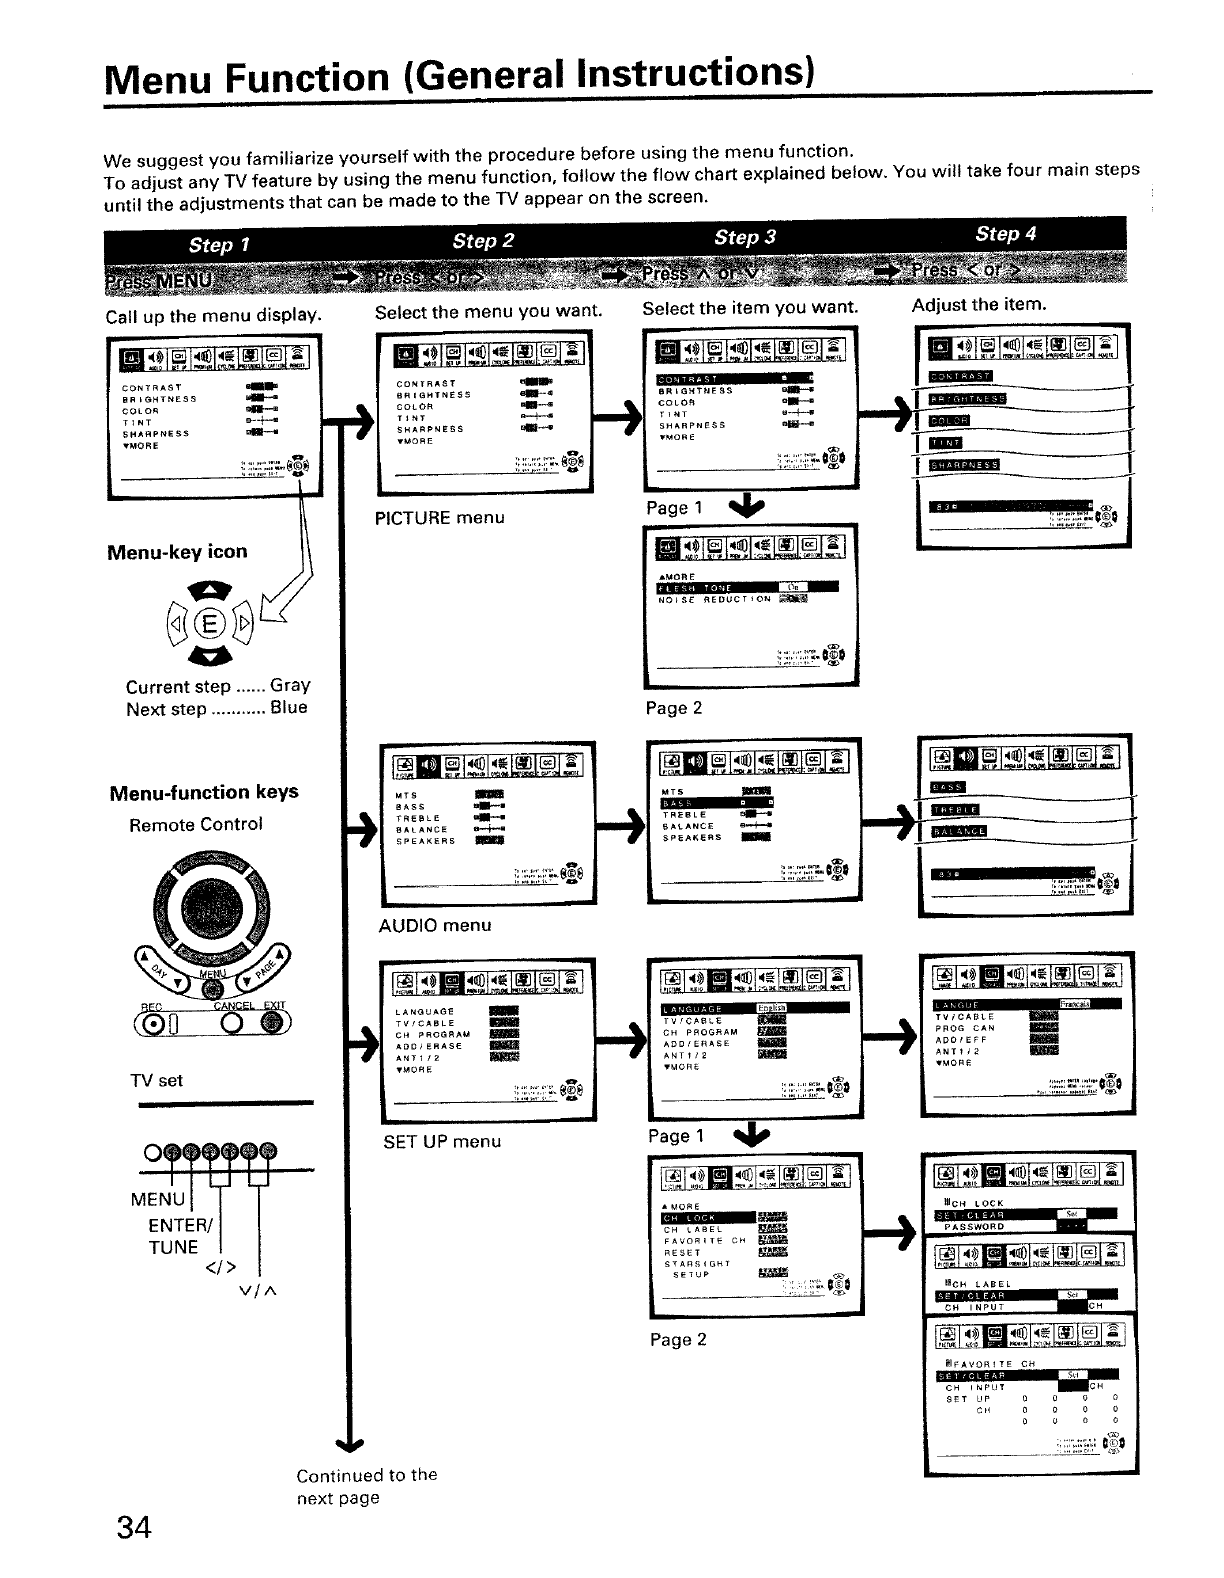
Menu Function (General Instructions)
We suggest you familiarize yourself with the procedure before using the menu function.
To adjust any TV feature by using the menu function, follow the flow chart explained below. You will take four main steps
until the adjustments that can be made to the TV appear on the screen,
Call up the menu display.
CONTRAST _#IIIIP
BRIGHTNESS a,_
COLOR I_1_
SHARPNESS af[_
VMORE
Menu-key icon
Current step ...... Gray
Next step ........... Blue
Menu-function keys
Remote Control
'0 CANCEL EXIT
TV set
MEaly
ENTER/_ I
TUNE I |
</> /
v/^
34
Select the menu you want.
-)
CONTRAST
8RtGHYNE$S _1_-_
COLOR =1_
TINT
SHARPNESS BI_,_
TMORE
..... !i!ii'i!:ii;'_4_
PICTURE menu
Select the item you want.
mm,
i '
BRLG_tTNESS _
COLOR
i_ r_Nr
SHARpNesS alN_
VMORE
-- i
Page 1 91_
AMORE
I'll (*)e
NOISE REDUCTION
i
Page 2
AUDIO menu
€LANGUAGE
TVICABLE
CH PROGRAM
ADDJERASE
ANTll2
VMORE
i ii
SET UP menu
-.) TVfCABLE
CH PROGRAM
A_D/ERASE
ANT1/2
VMORE
I
Page 1
FAVORITE OH
_SET
STARBIG_
i
Page 2
I
E
Continued to the
next page
Adjust the item.
_,__ _0 _ _] _
TV/CABLE
pROG CAN
ADD/EFF
ANTfl2
_CH LOCK
PASSWORD
I_CH LABEL
_IFAVOR € TE CH
SET UP 0 0 O 0
C H 00e 0
0_00
J
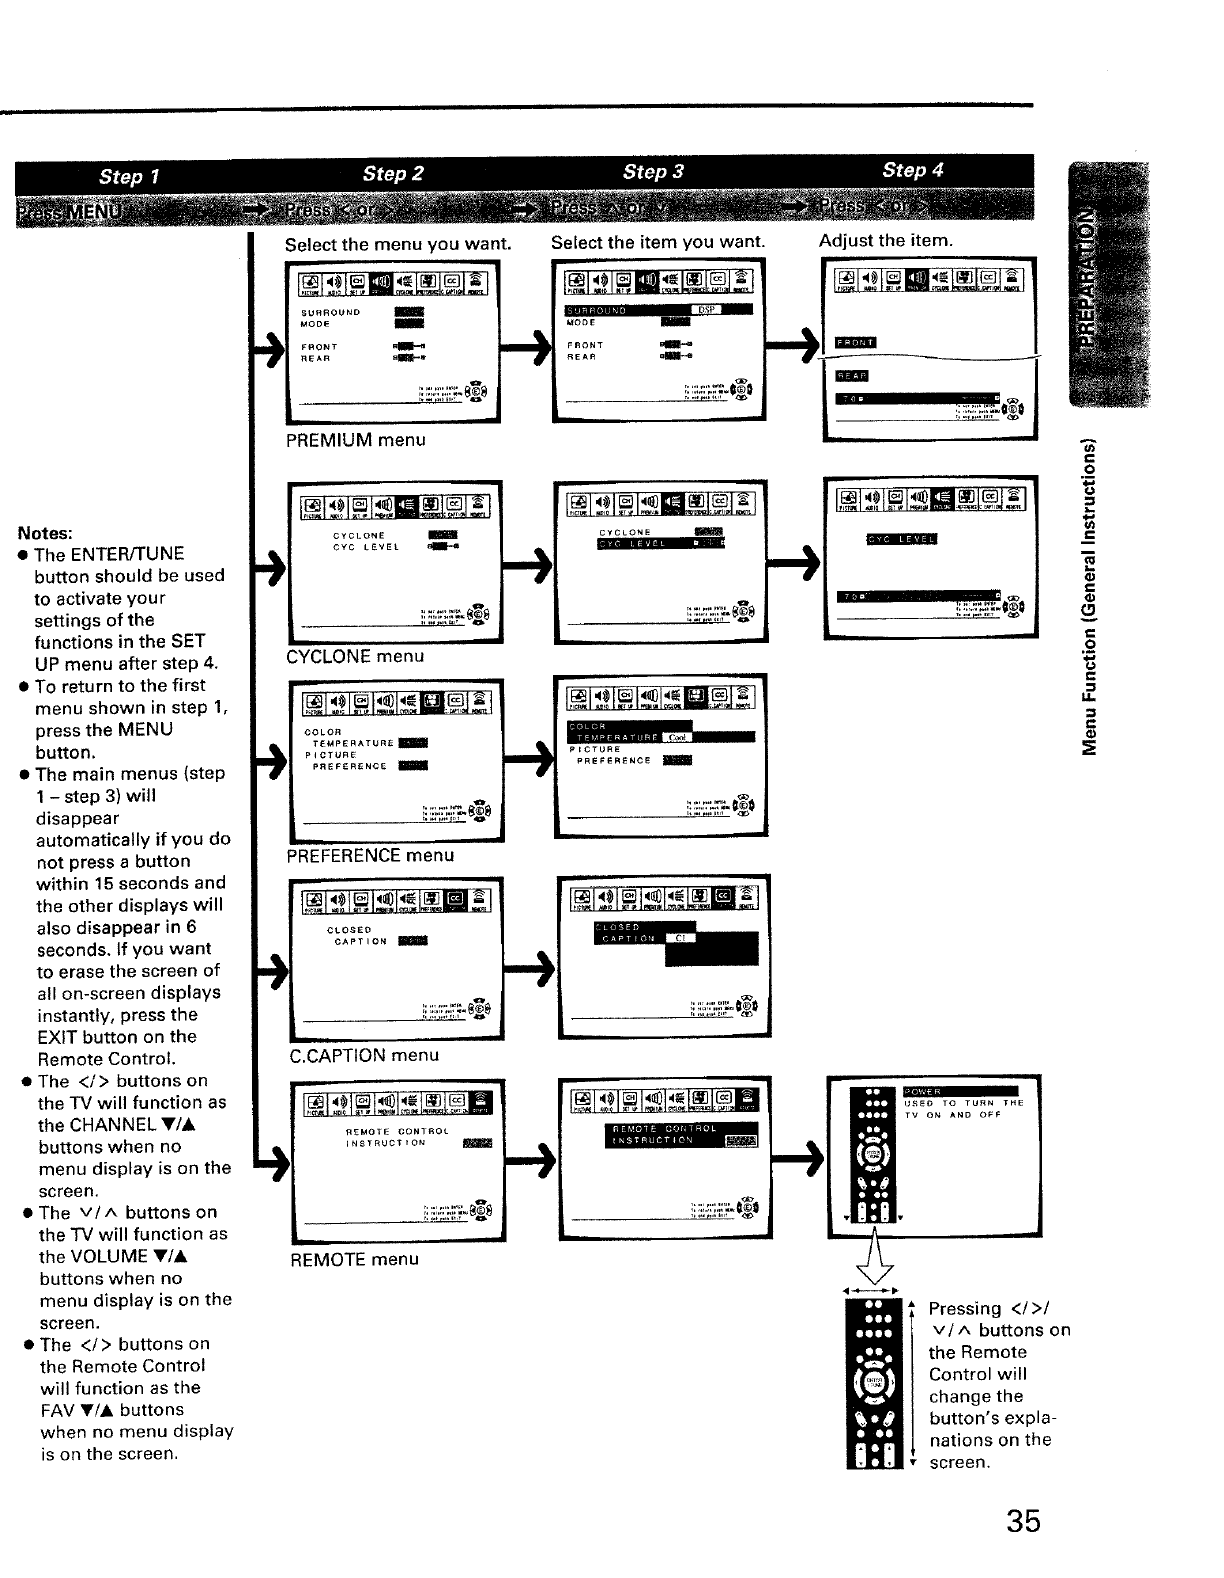
Notes:
•The ENTER/TUNE
button should be used
to activate you r
settings of the
functions in the SET
UP menu after step 4.
• To return to the first
menu shown in step 1,
press the MENU
button.
•The main menus (step
1 - step 3) will
disappear
automatically if you do
not press a button
within 15 seconds and
the other displays will
also disappear in 6
seconds. If you want
to erase the screen of
all on-screen displays
instantly, press the
EXIT button on the
Remote Control.
• The </> buttons on
the TV will function as
the CHANNEL Y/&
buttons when no
menu display is on the
screen.
• The v/^ buttons on
the TV will function as
the VOLUME V/A
buttons when no
menu display is on the
screen.
• The </> buttons on
the Remote Control
will function as the
FAV y/L buttons
when no menu display
is on the screen.
Select the menu you want.
PREMIUM menu
CYCLONE menu
PREFERENCE menu
C.CAPTION menu
REMOTE menu
Select the item you want. Adjust the item.
Press'r'g 1 '
v/A buttons on
the Remote
Control will
change the
button's expla-
nations on the
screen,
t-
o
2
r-
€
.2
M.
C
35
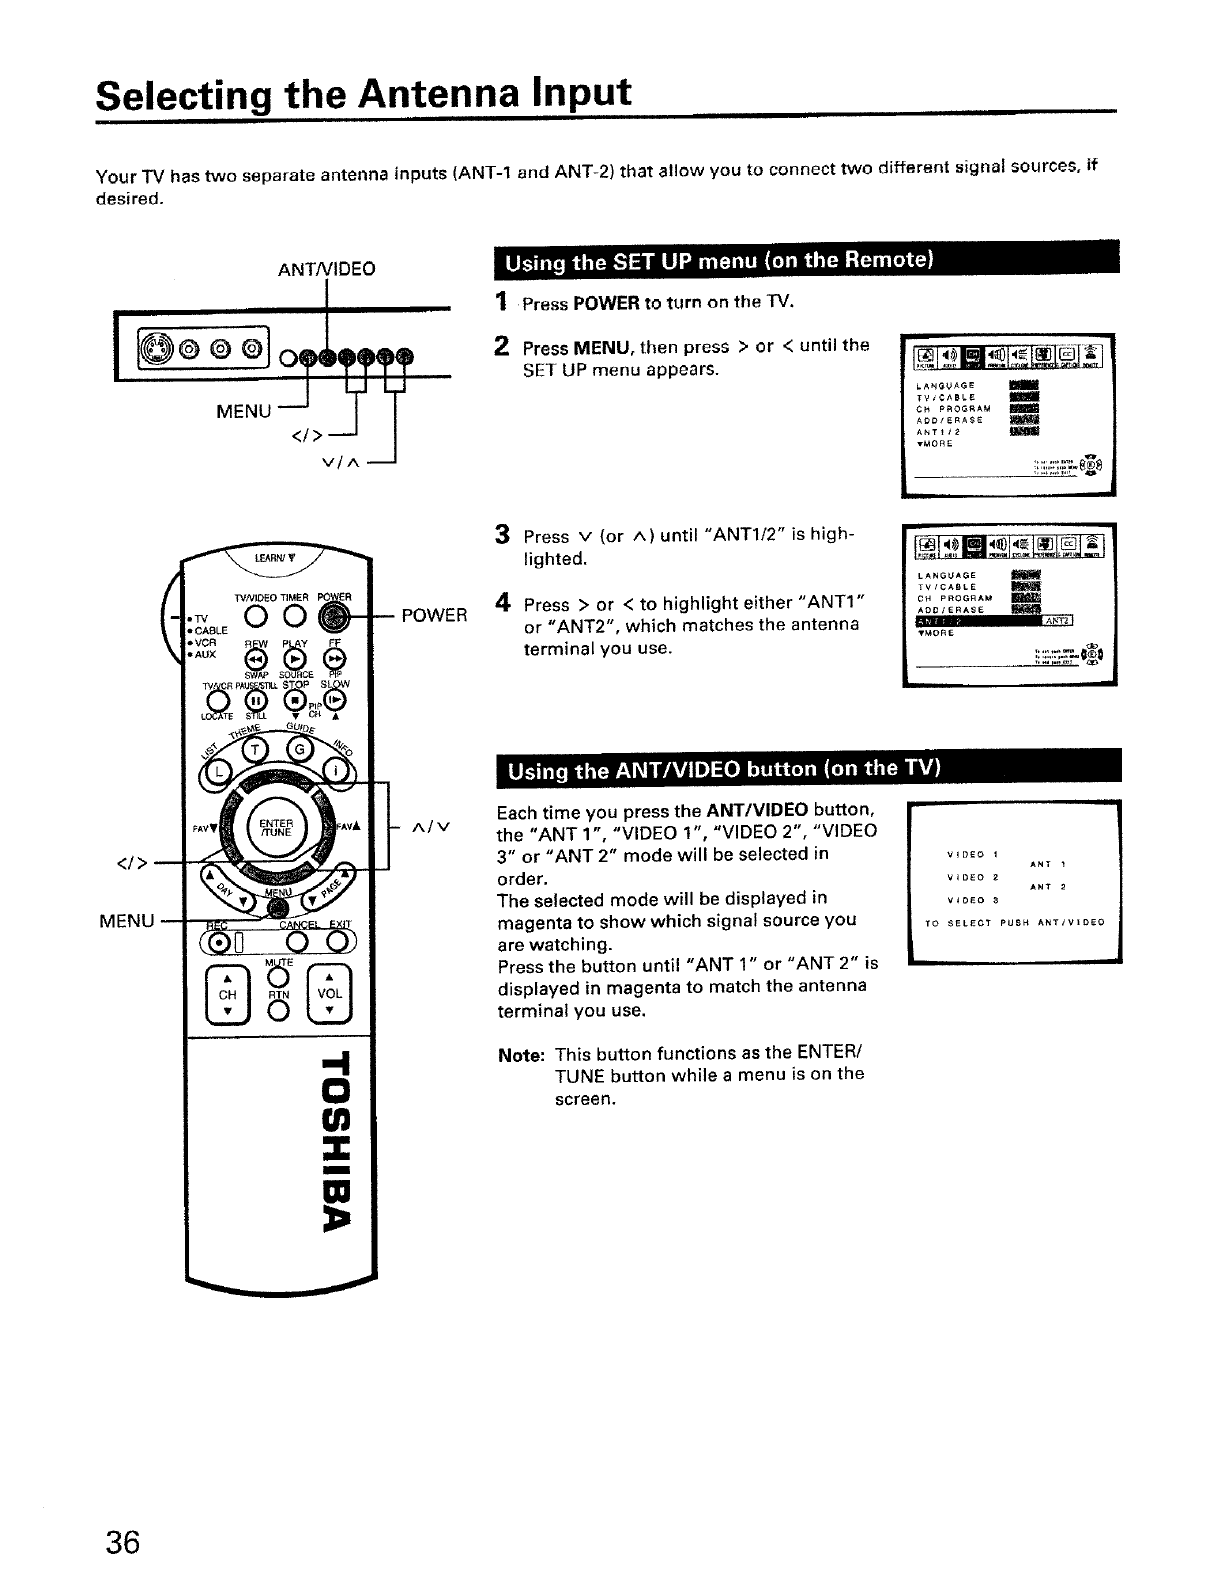
Selecting the Antenna Input
Your TV has two separate antenna inputs (ANT-1 and ANT-2) that allow you to connect two different signal sources, if
desired.
ANTNIDEO
MENU
1Press POWER to turn on the TV.
2Press MENU, then press > or < until the
SET UP menu appears.
iiii
LANGUAGE
TViCABLE
CH PROGRAM
AOD/ERASE
vMORE
MENU
-4
0
(n
i
no
>
POWER
^/v
3Press v(or ^) until "ANT1/2" is high-
lighted.
4Press > or < to highlight either "ANT1"
or "ANT2", which matches the antenna
terminal you use.
Each time you press the ANT/VIDEO button,
the "ANT 1", "VIDEO 1", "VIDEO 2", "VIDEO
3" or "ANT 2" mode will be selected in
order.
The selected mode will be displayed in
magenta to show which signal source you
are watching.
Press the button until "ANT 1" or "ANT 2" is
displayed in magenta to match the antenna
terminal you use.
Note: This button functions as the ENTER/
TUNE button while a menu is on the
screen.
LANGUAGE
TV/CABLE
CH PROGRAM
IADD I_RASE _ &N*T_ I
V(DEO 1
ANT 1
VIDEO 2
ANT 2
V_DEO 3
TO SELECT P@_H ANT/V_DEO
36
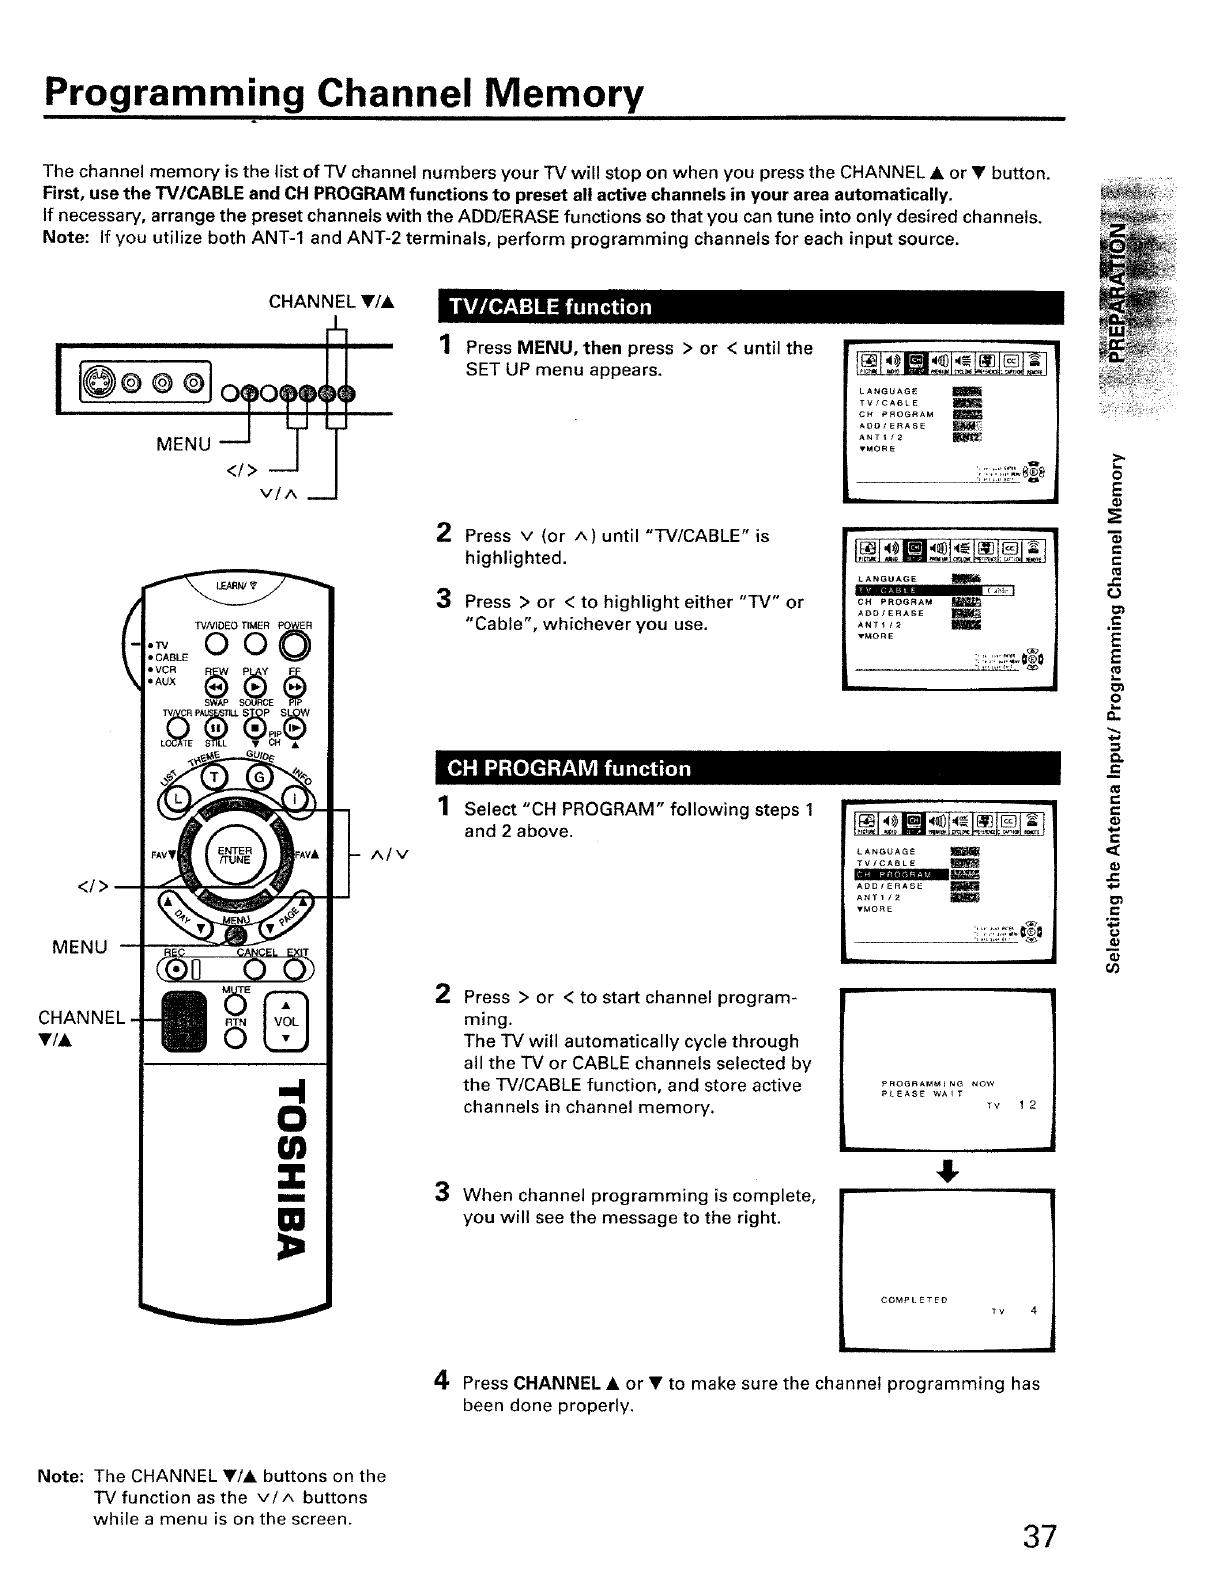
Programming Channel Memory
The channel memory is the list of TV channel numbers your TV will stop on when you press the CHANNEL • or • button.
First, use the TV/CABLE and CH PROGRAM functions to preset all active channels in your area automatically.
If necessary, arrange the preset channels with the ADD/ERASE functions so that you can tune into only desired channels,
Note: If you utilize both ANT-1 and ANT-2 terminals, perform programming channels for each input source.
CHANNEL •/A
I@@ ® O] o <
MENU _ _
VIA
</>
MENU
CHANNEL
•/A
0
U'I
i
1Press MENU, then press > or <until the
SET UP menu appears.
2
3
Press v (or ^) until "TV/CABLE" is
highlighted.
Press > or < to highlight either "TV" or
"Cable", whichever you use.
1 Select "CH PROGRAM" following steps 1
and 2above.
A/V
2Press > or < to start channel program-
ming.
The TV will automatically cycle through
all the TV or CABLE channels selected by
the TV/CABLE function, and store active
channels in channel memory.
3 When channel programming is complete,
you will see the message to the right.
LANGUAGE
TV/CABLE
CH PROGRAM
ADD/ERASE _
ANTII2
VMORE
PROGRAMMING NO_
PLEASE WAiT
TV 12
COMPLETEO
Tv 4
4Press CHANNEL • or • to make sure the channel programming has
been done properly.
Note: The CHANNEL •/• buttons on the
TV function as the v/^ buttons
while a menu is on the screen. 37
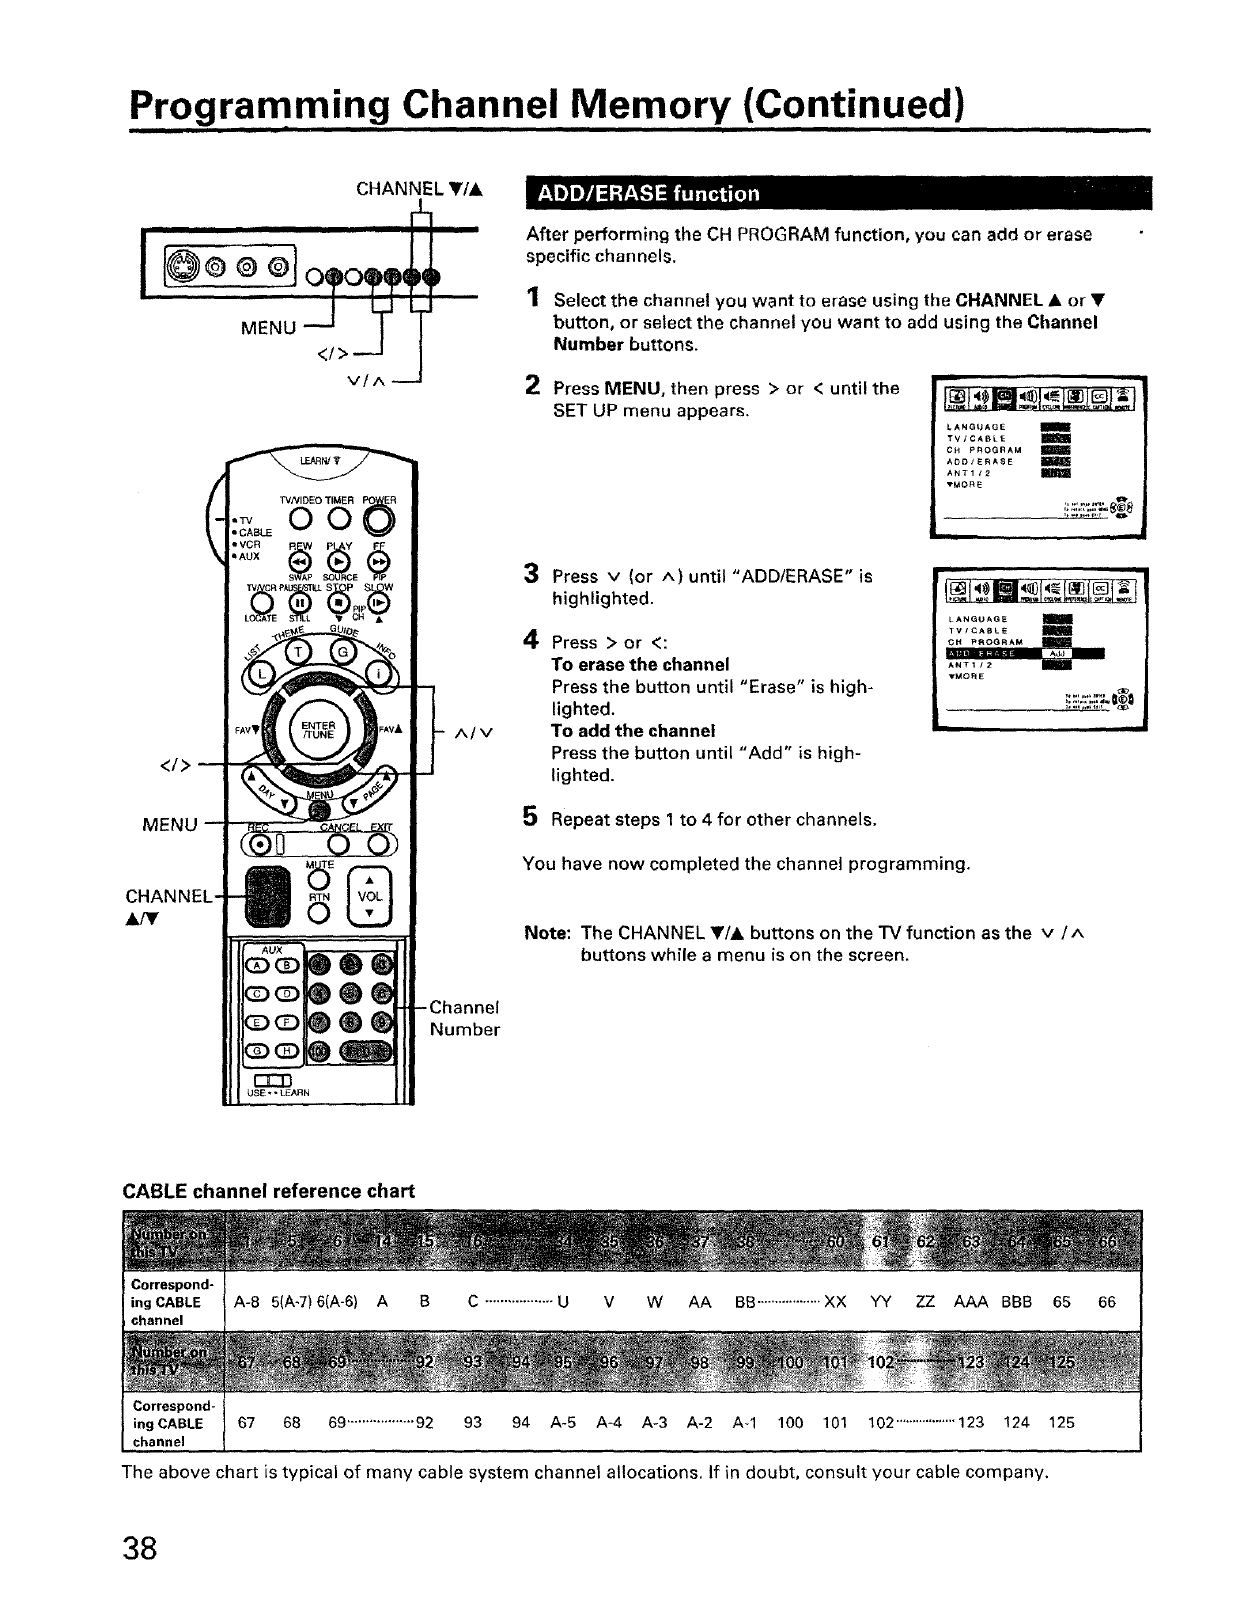
programming Channel Memory (Continued)
I iii
CHANNEL Y/&
i
,®ooJ ,
</>--J
V/A -----
MENU
CHANNEL-
A/V
-Channel
Number
After performing the CH PROGRAM function, you can add or erase
specific channels.
1Select the channel you want to erase using the CHANNEL • or V
button, or select the channel you want to add using the Channel
Number buttons.
2Press MENU, then press > or < until the
SET UP menu appears.
LANGUAGE I
TV/CABLE
CH PROGRAM
A_OJERASE
ANTIf2
VMORE
3
4
Press v (or A) until "ADDtERASE" is
highlighted.
Press > or <:
To erase the channel
Press the button until "Erase" is high-
lighted.
To add the channel
Press the button until "Add" is high-
lighted.
5Repeat steps 1 to 4 for other channels.
i
LANGUAGE
TV/CABLE
CH PROGRAM
i"II Ad_
ANT_/_ I
TMORE
You have now completed the channel programming.
Note: The CHANNEL Y/A buttons on the TV function as the v/A
buttons while a menu is on the screen,
CABLE channel reference chart
A-8 5(A-7)6(A-6) A B C ..................UV W AA BB..................XX YY ZZ AAA BBB 65 66
Correspond-
ingCABLE
channel
Correspond-
ing CABLE
channel
The above chart is typical of many cable system channel allocations. If in doubt, consult your cable company,
67 6B 69 ..................92 93 94 A-5 A-4 A-3 A-2 A_I 100 101 102 ..................123 124 125
38
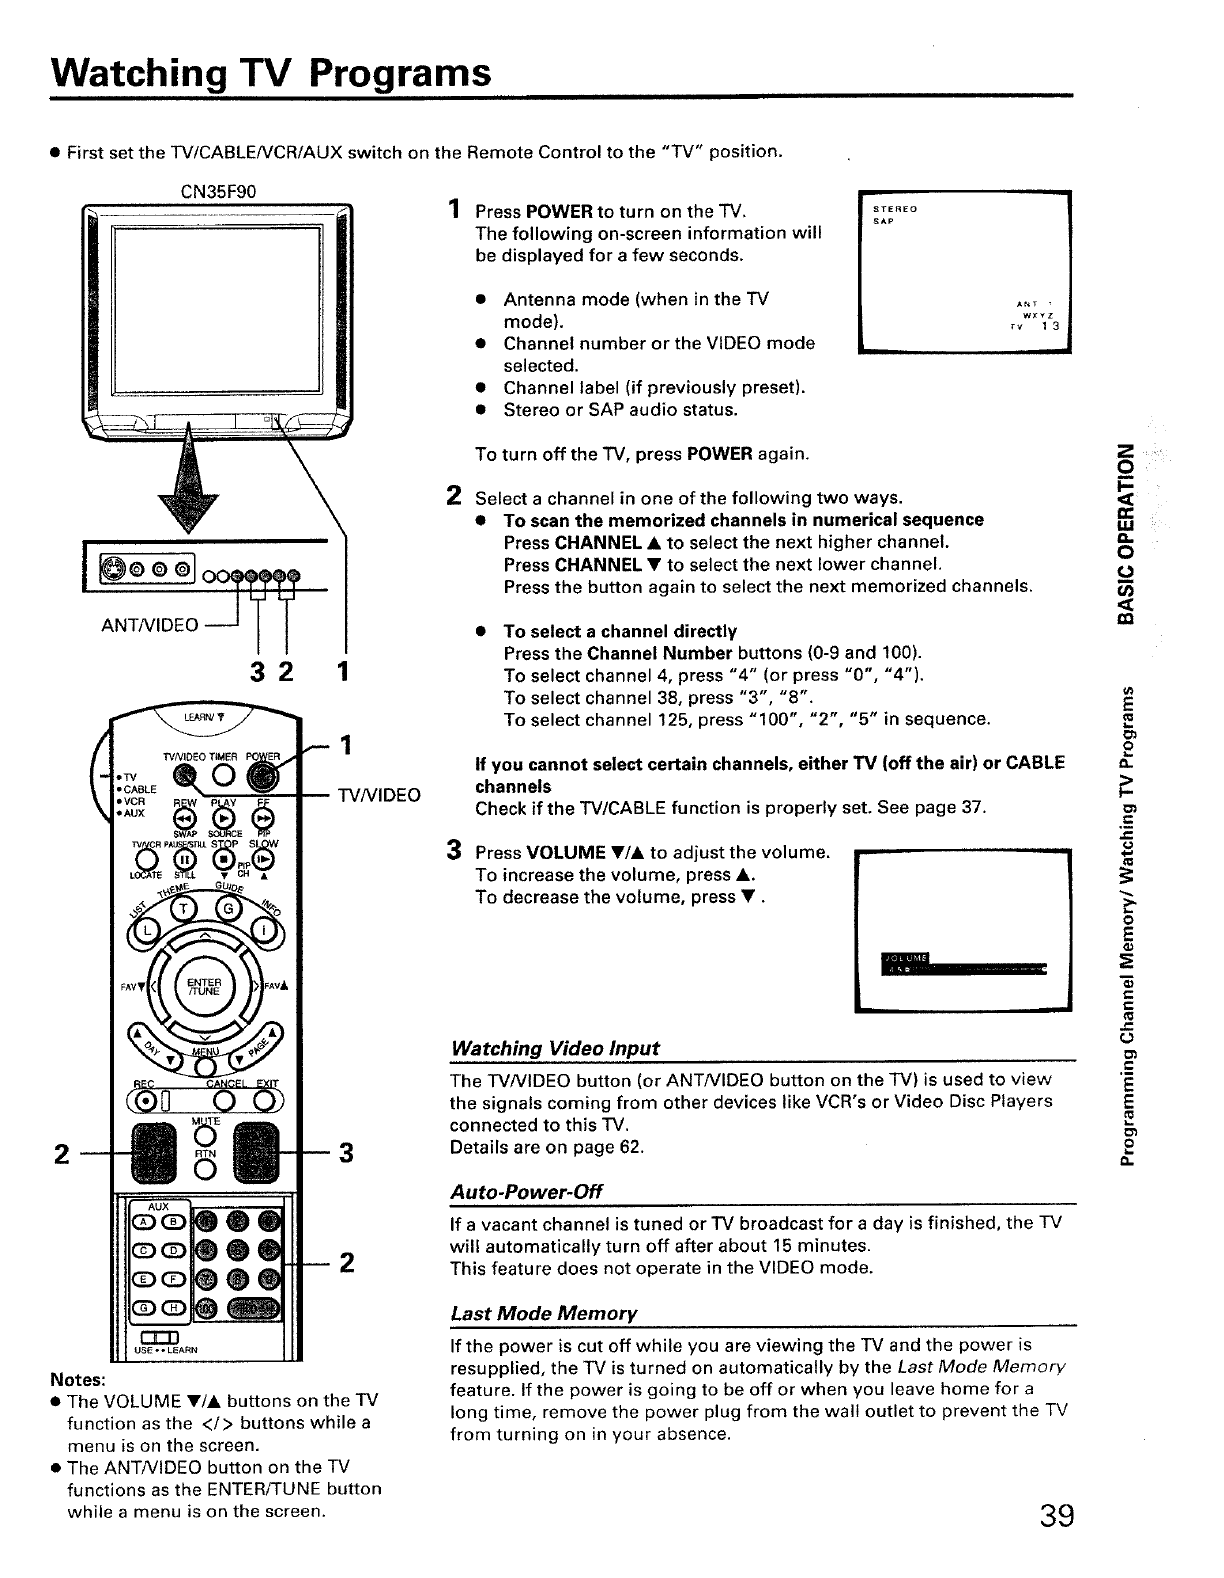
Watching TV Programs
• First set the TV/CABLENCR/AUX switch on the Remote Control to the "TV" position.
CN35F90 Press POWER to turn on the TV.
The following on-screen information will
be displayed for a few seconds.
• Antenna mode (when in the TV
mode).
• Channel number or the VIDEO mode
selected.
• Channel label (if previously preset).
• Stereo or SAP audio status.
STEREO
SAP
WXYZ
TV 13
32
TVNIDEO TIMER
e,O
• CABLE
•
eAUX
E
"P4 CRP S P S
L(_-,ATE SllLL • •
cgEL55
Ti®l
rr-n
US[ •* LEARN
Notes:
•The VOLUME •/A buttons on the "IV
function as the </> buttons while a
menu is on the screen.
• The ANT!VIDEO button on the TV
functions as the ENTER/TUNE button
while a menu is on the screen.
1
TVNIDEO
2
To turn off the TV, press POWER again.
Select a channel in one of the following two ways.
•To scan the memorized channels in numerical sequence
Press CHANNEL •to select the next higher channel.
Press CHANNEL •to select the next lower channel.
Press the button again to select the next memorized channels.
3
To select a channel directly
Press the Channel Number buttons (0-9 and 100).
To select channel 4, press "4" (or press "0", "4").
To select channel 38, press "3", "8".
To select channel 125, press "100", "2", "5" in sequence.
If you cannot select certain channels, either TV (off the air) or CABLE
channels
Check if the TV/CABLE function is properly set. See page 37.
Press VOLUME •/• to adjust the volume.
To increase the volume, press A.
To decrease the volume, press •.
/
Watching Video Input
The TV/VIDEO button (or ANT/VIDEO button on the TV) is used to view
the signals coming from other devices like VCR's or Video Disc Players
connected to this TV.
Details are on page 62.
Auto-Power-Off
If avacant channel is tuned or TV broadcast for a day is finished, the TV
will automatically turn off after about 15 minutes.
This feature does not operate in the VIDEO mode.
Last Mode Memory
If the power is cut off while you are viewing the TV and the power is
resupplied, the TV is turned on automatically by the Last Mode Memory
feature. If the power is going to be off or when you leave home for a
long time, remove the power plug from the wall outlet to prevent the TV
from turning on in your absence.
39
I-
<11:
a.
O
u_
<_
Pt_
u_
E
o
a.
._=
J::
{=
o
E
€
(J
o_
P-
E
=o
Q.
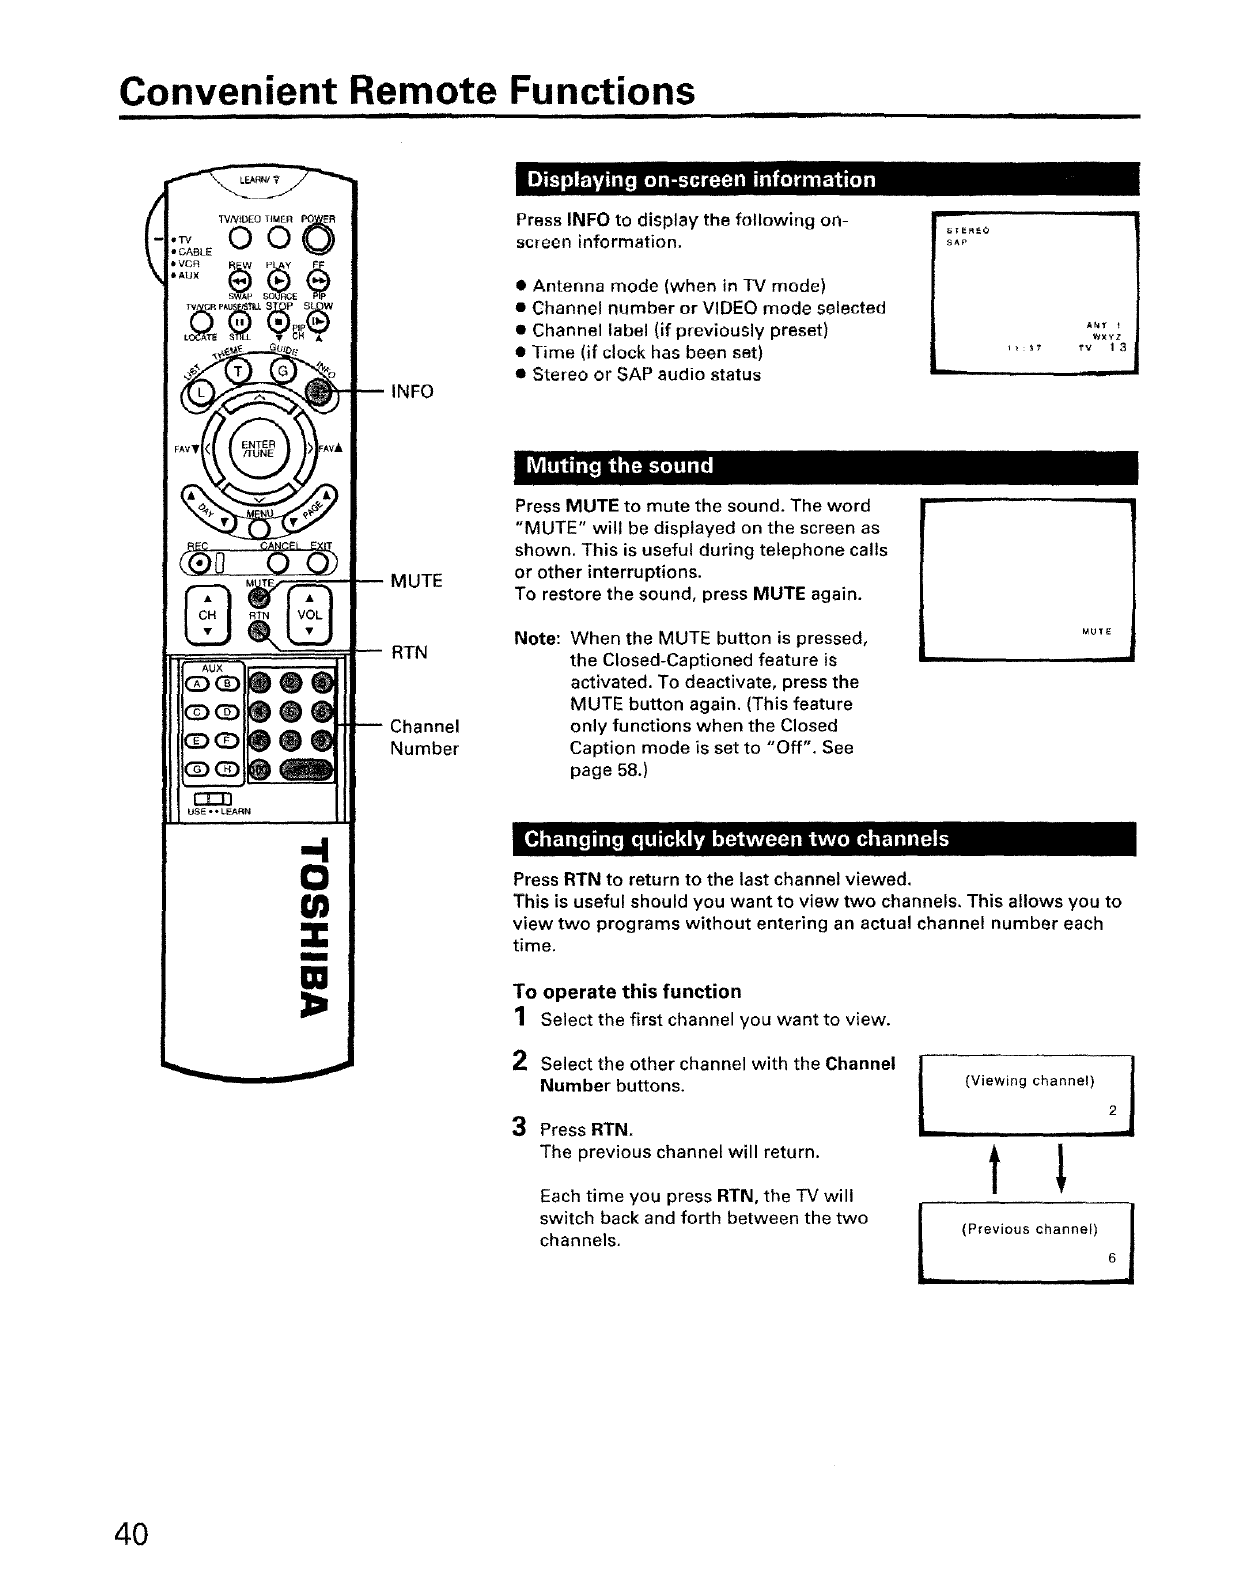
Convenient Remote Functions
(TVNIDEO ]iMER
OO
• GABLE
•AUX
E
TV G .... _;,pS_W
AU×
_o®®®
_®®®
_o®®®
USE • • LF_e_RN
=4
0
I
m INFO
MUTE
RTN
-- Channel
Number
Press INFO to display the following on-
screen information.
•Antenna mode (when in TV mode)
• Channel number or VIDEO mode selected
• Channel label (if previously preset)
• Time (if clock has been set)
• Stereo or SAP audio status
_AP
ANT
wxyz
I_:S7 _v i3
Press MUTE to mute the sound. The word
"MUTE" wilI be displayed on the screen as
shown. This is useful during telephone calls
or other interruptions.
To restore the sound, press MUTE again.
Note: When the MUTE button is pressed,
the Closed-Captioned feature is
activated. To deactivate, press the
MUTE button again. (This feature
only functions when the Closed
Caption mode is set to "Off". See
page 58.)
MUTE
Press RTN to return to the last channel viewed.
This is useful should you want to view two channels. This allows you to
view two programs without entering an actual channel number each
time.
To operate this function
1Select the first channel you want to view.
2Select the other channel with the Channel
Number buttons.
3 Press RTN.
The previous channel will return.
Each time you press RTN, the TV will
switch back and forth between the two
channels.
L(Viewing channel) J2
tI
I (Previous channel) 6 ,I
40
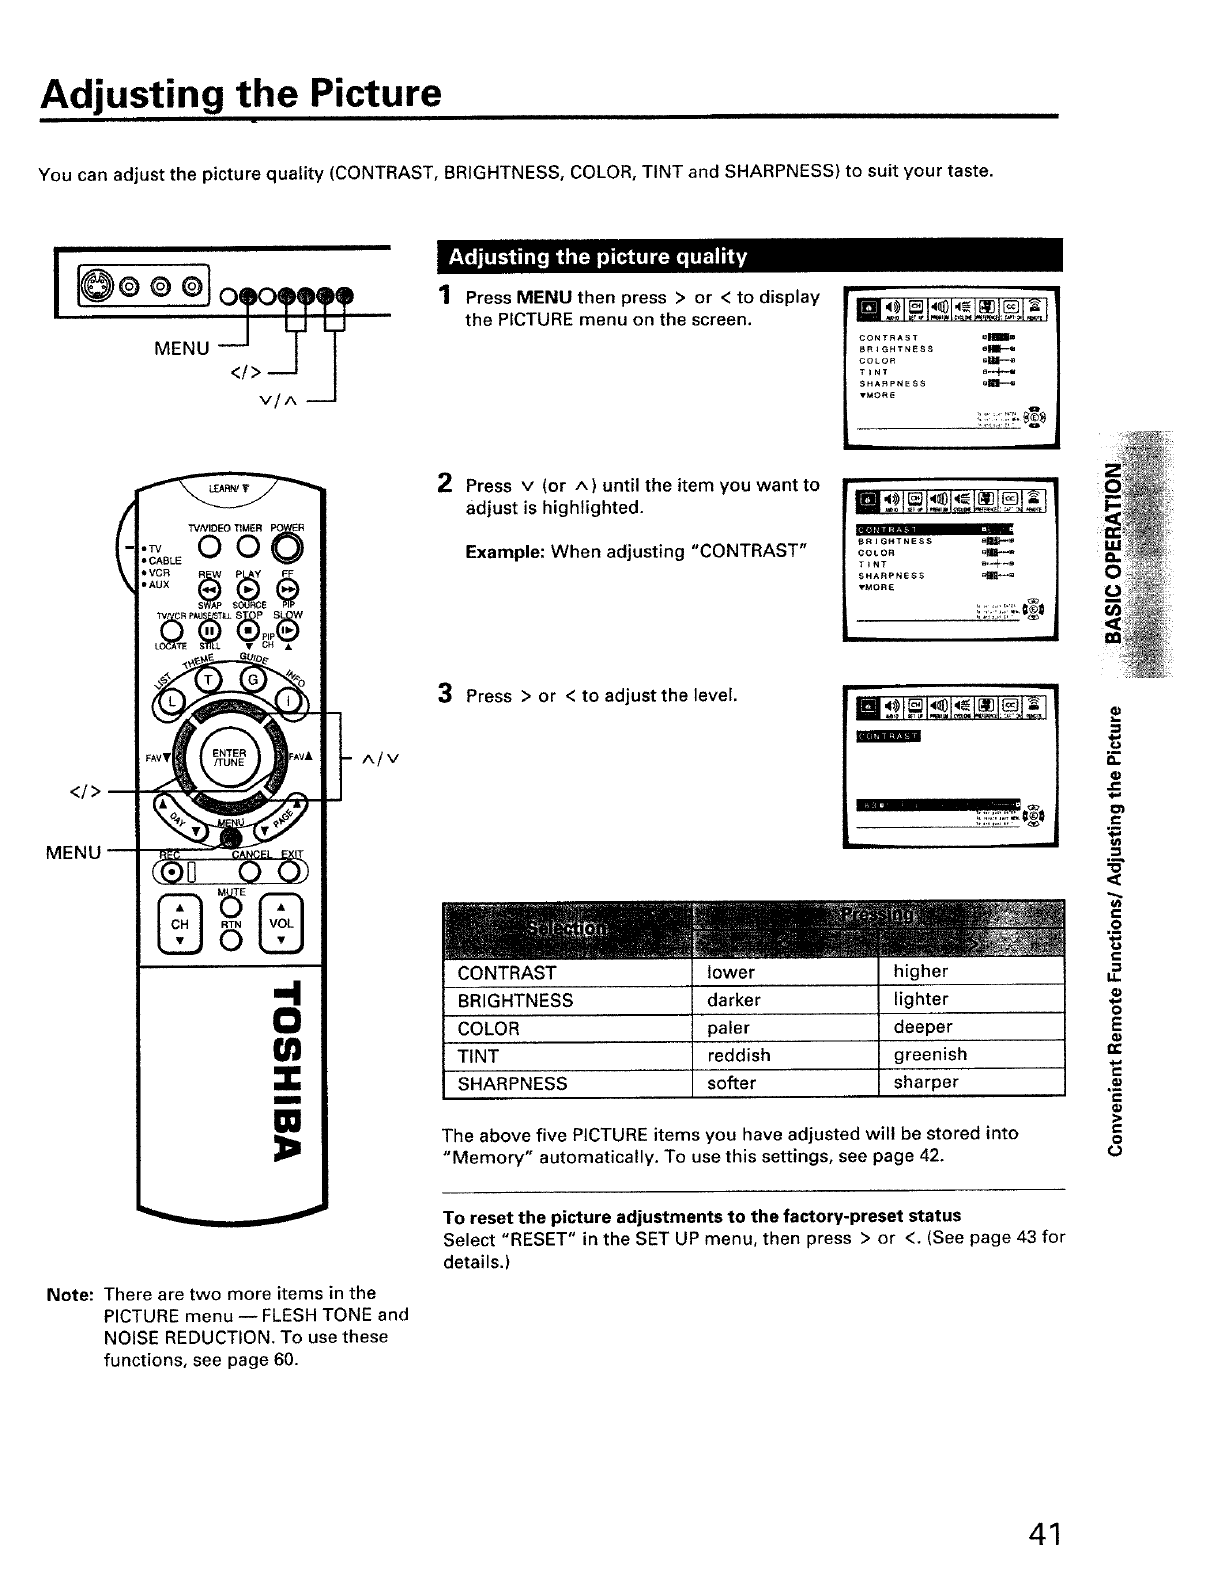
Adjusting the Picture
You can adjust the picture quality (CONTRAST, BRIGHTNESS, COLOR, TINT and SHARPNESS) to suit your taste.
I
</>
MENU
I_© @ ®1 o
MENU O</_>v/_ T
0
w
m
>
AIv
1Press MENU then press > or < to display
the PICTURE menu on the screen.
2Press v (or A) until the item you want to
adjust is highlighted.
Example: When adjusting "CONTRAST"
CONTRAST s_B
BRIGHTNESS eM_--e
COLOR _ml--=
TINT _
SHARPNESS gml--a
VMORE
BRIGHTNESS _*--=
COLOR
T_NT m-_-_
SHARPNESS m_f_*m
.MORE
ii_i!:il)T_-
3Press > or <to adjust the level.
m
CONTRAST lower higher
BRIGHTNESS darker lighter
COLOR deeper
TINT reddish greenish
SHARPNESS softer sharper
The above five PICTURE items you have adjusted will be stored into
"Memory" automatically. To use this settings, see page 42.
.=
,,C
e-
<
r=
.2
€
o
E
rr,
"F=
>
O
o
Note: There are two more items in the
PICTURE menu -- FLESH TONE and
NOISE REDUCTION. To use these
functions, see page 60.
To reset the picture adjustments to the factory-preset status
Select "RESET" in the SET UP menu, then press > or <. (See page 43 for
details,)
41
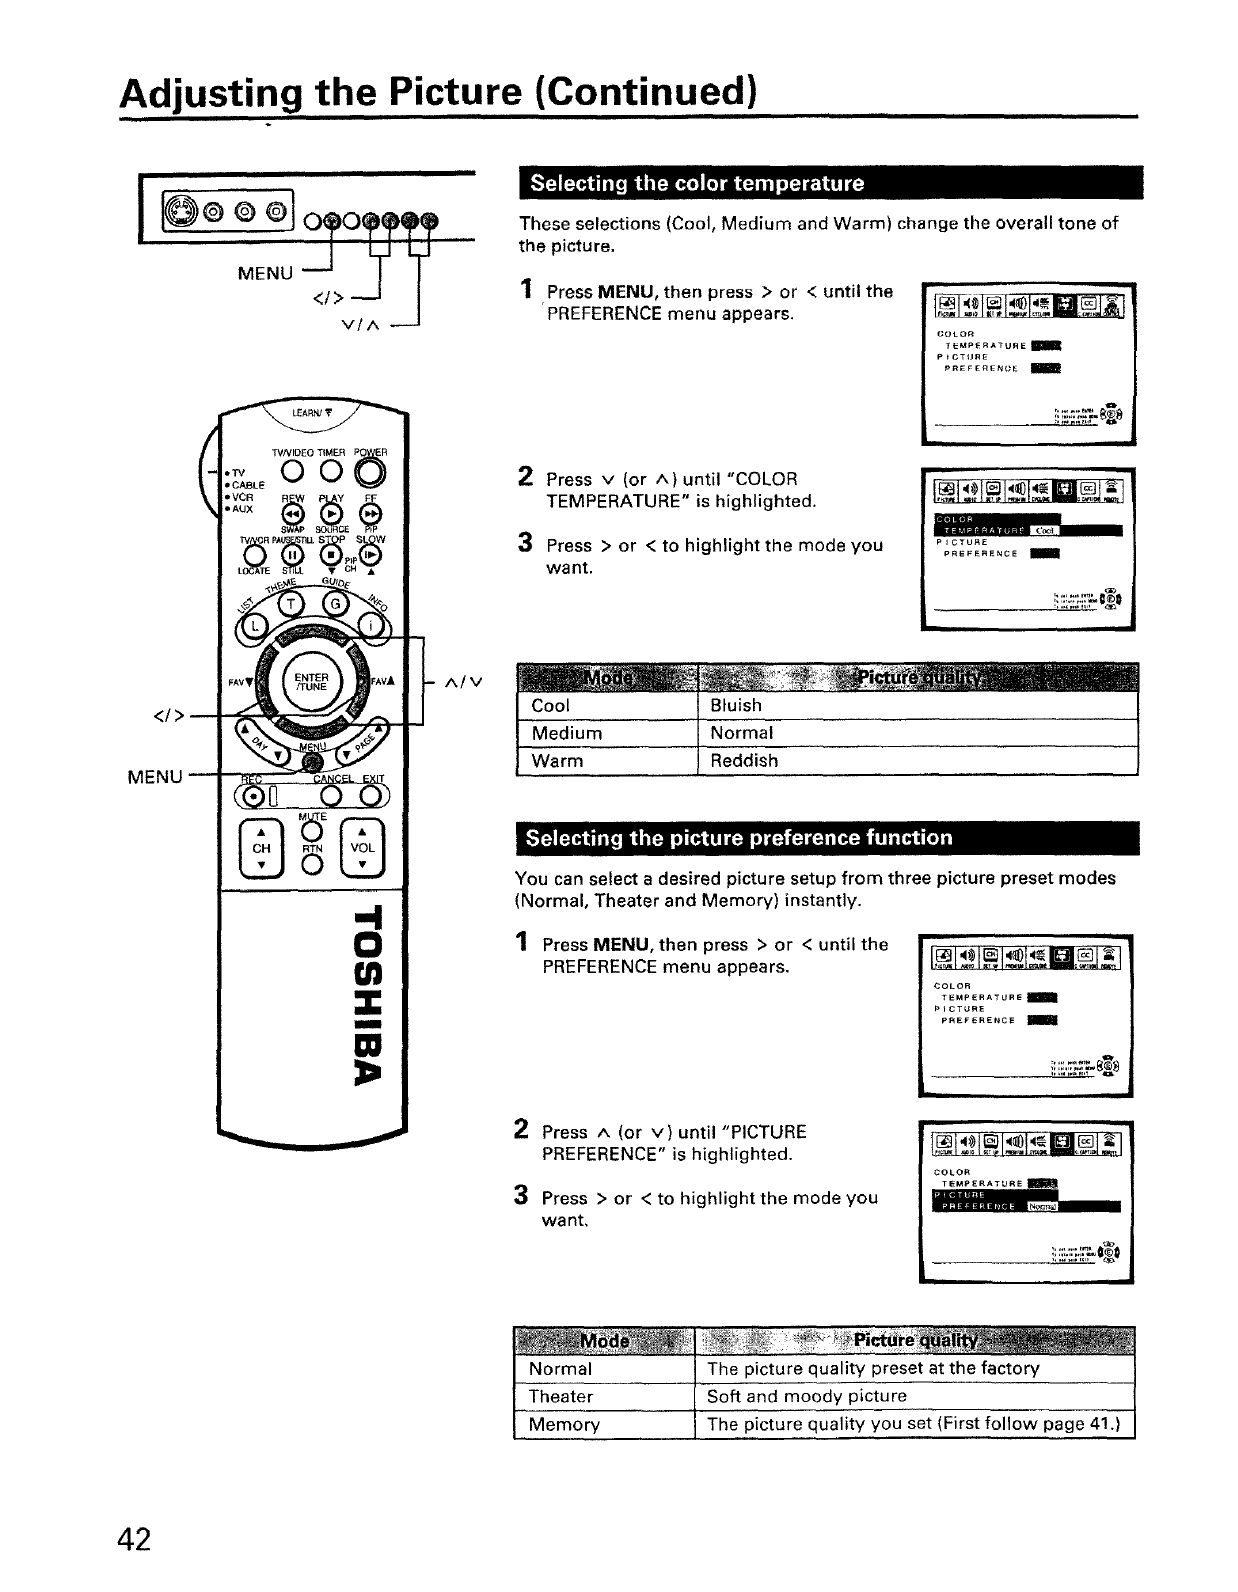
Adjusting,,,,the Picture (Continued)
Ii
MENU
</>
w
Z
m
M
3=
AIM
These selections (Cool, Medium and Warm) change the overall tone of
the picture.
1Press MENU, then press > or < until the
PREFERENCE menu appears.
_OLOR
TEMPERATURE
PfCTtJRE
PREFERENCE
L_
2Press v (or ^)until "COLOR
TEMPERATURE" is highlighted.
3 Press > or < to highlight the mode you
want.
P_CTURE
pREFERENCE I_
'_ , iii
Cool
Medium
Warm
Bluish
Normal
Reddish
You can select a desired picture setup from three picture preset modes
(Normal, Theater and Memory) instantly.
1 Press MENU, then press >or < until the
PREFERENCE menu appears.
COLOR
TEMpERATURE_IIII_
PICTURE
pREFERENCE
_ i
2Press A (or v) until "PICTURE
PREFERENCE" is highlighted.
3 Press > or < to highlight the mode you
want,
COLOR
TEMPERATURE_
III
Normal
Theater
Memory
Soft and moody picture
The picture quality you set (First follow page 41.)
42
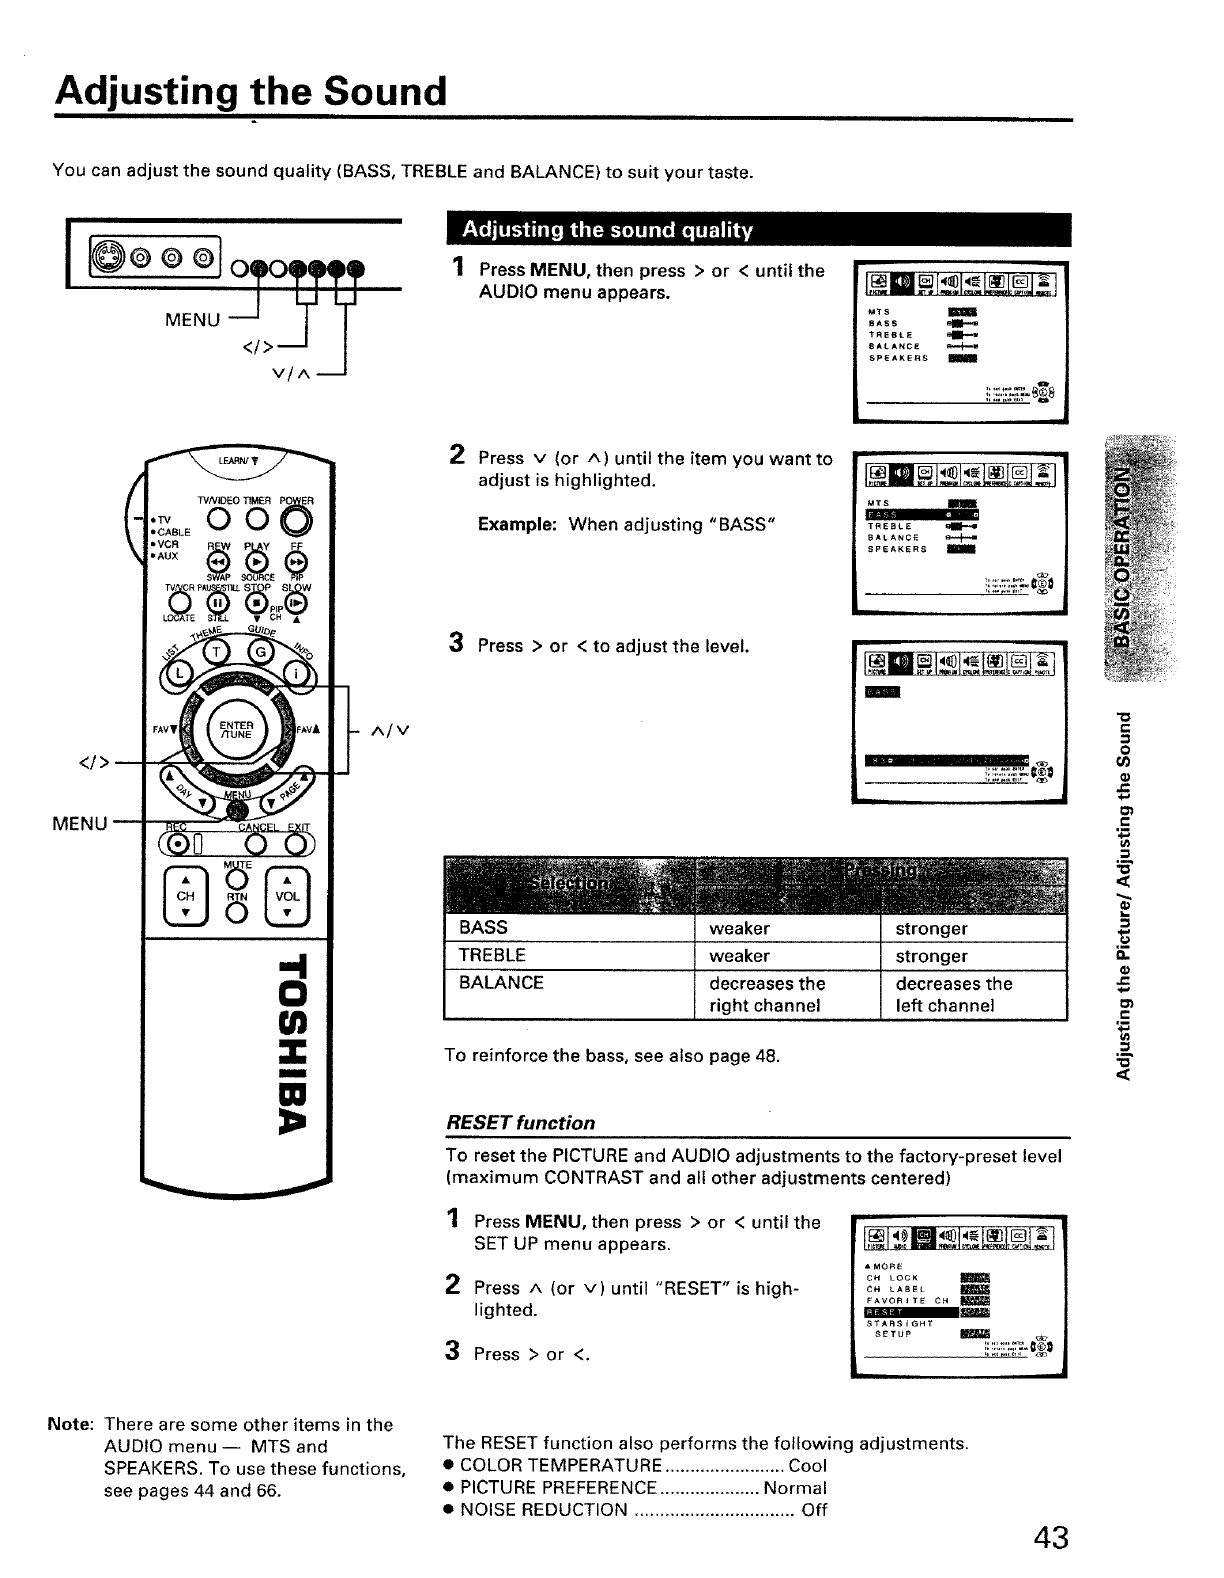
Adjusting the Sound
You can adjust the sound quality (BASS, TREBLE and BALANCE) to suit your taste.
I
MENU
MENU <1>_ I
V/A
(WNIDEO TIMER
OO
DCABLE
I,AUX
E
-4
0
U)
m
W
AIM
1Press MENU, then press > or < until the
AUDIO menu appears.
2Press v (or A) until the item you want to
adjust is highlighted.
Example: When adjusting "BASS"
3 Press > or < to adjust the level.
MT$
BASS
TREBLE L=_l_-w
BALANCE lai,4--=
SPEAKERS
L
MTS
TREBLE
BALANCE
SPEAKERS
ii
|
BASS weaker stronger
TREBLE weaker stronger
BALANCE decreases the decreases the
right channel left channel
To reinforce the bass, see also page 48.
RESET function
To reset the PICTURE and AUDIO adjustments to the factory-preset level
(maximum CONTRAST and all other adjustments centered)
1 Press MENU, then press > or < until the
SET UP menu appears.
2Press A(or V) until "RESET" is high-
lighted.
3 Press > or <.
&MORE
CH LOCK
CH LABEL
FAVORITE CH
STARSIGHT
SETUP I_
"o
o
O1
t-
_E
<1
E
o.
e-
{31
e-
,m
(#)
_E
Note: There are some other items in the
AUDIO menu-- MTS and
SPEAKERS. To use these functions,
see pages 44 and 66.
The RESET function also performs the following adjustments.
•COLOR TEMPERATURE ........................ Cool
• PICTURE PREFERENCE .................... Normal
• NOISE REDUCTION ................................ Off 43
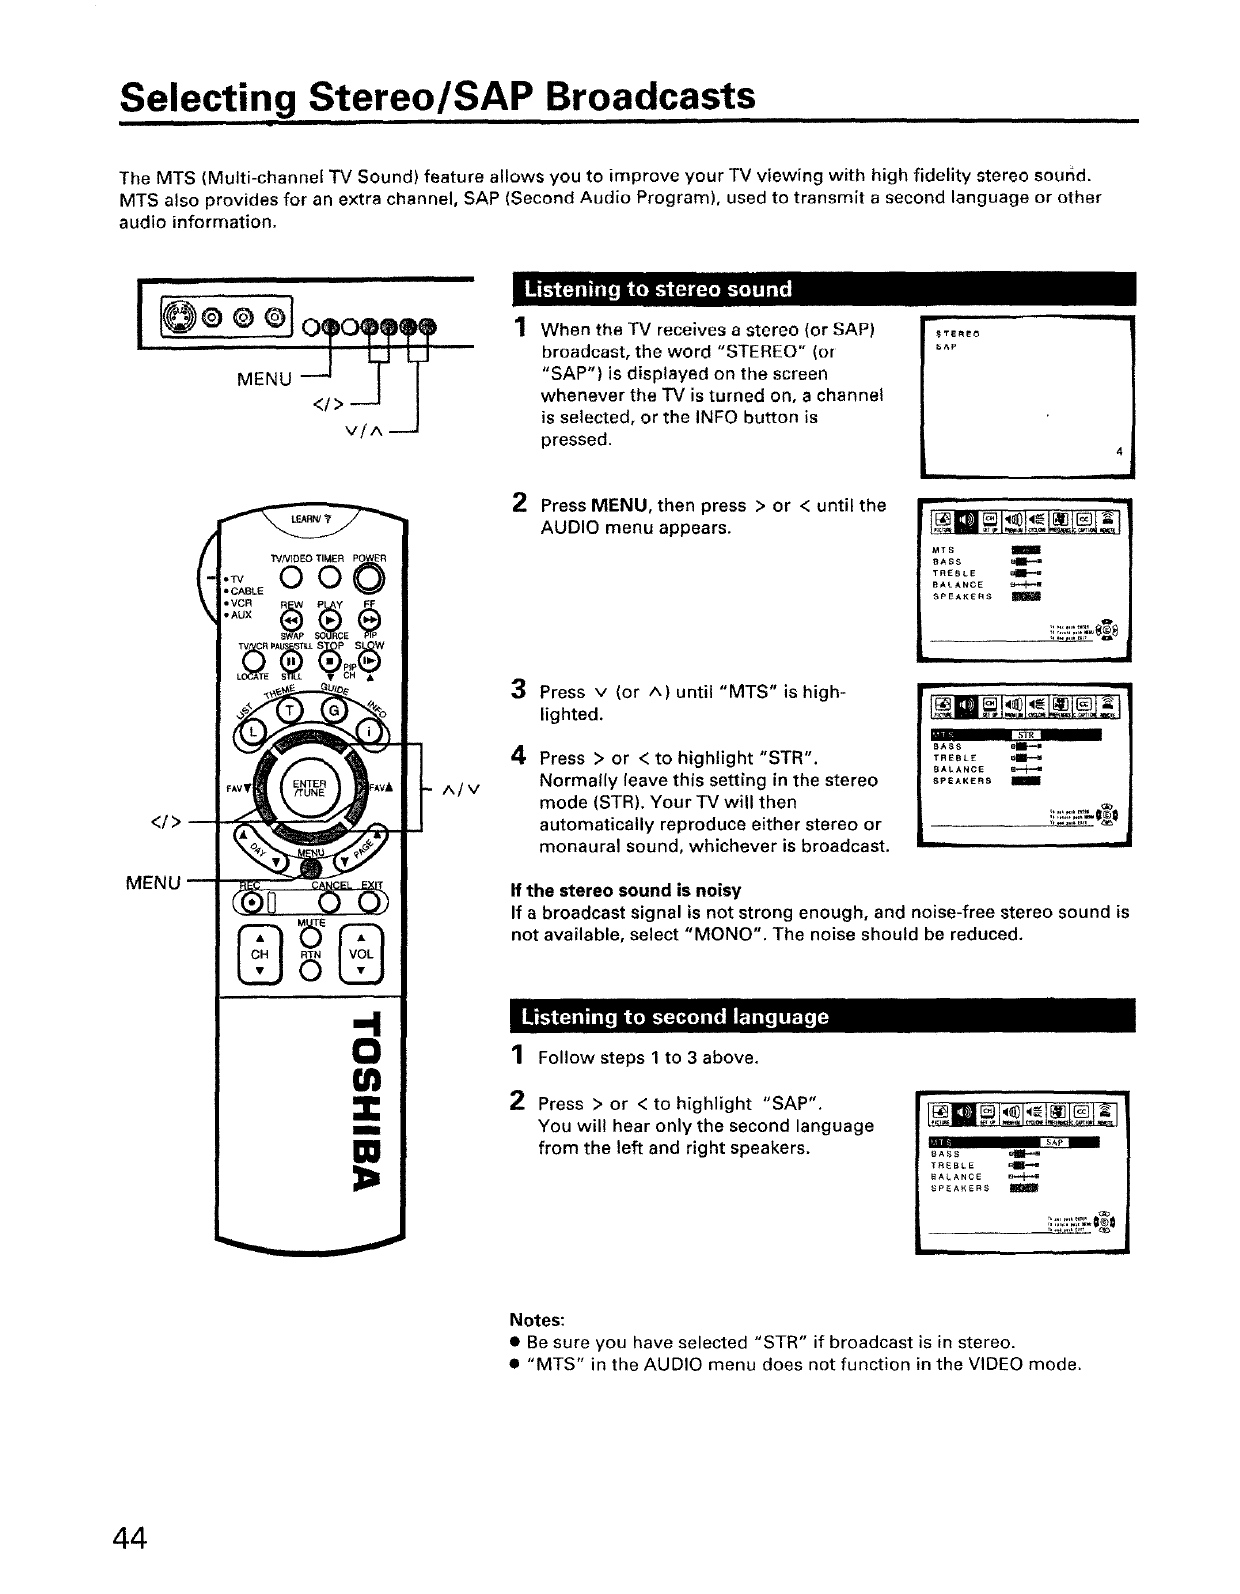
Selecting Stereo/SAP Broadcasts
The MTS (Multi-channel TV Sound) feature allows you to improve your TV viewing with high fidelity stereo soured.
MTS also provides for an extra channel, SAP (Second Audio Program), used to transmit a second language or other
audio information.
I_0@@ I
MENU O<_/>Ov/_A7
When the TV receives astereo (or SAP)
broadcast, the word "STEREO" (or
"SAP") is displayed on the screen
whenever the TV is turned on, a channel
is selected, or the INFO button is
pressed.
(TVNIDEO TIMER
•OO
•CABLE
. co
-AUX
E
TV CR,, _Pp,pS(_W
-4
0
(n
W
3=
Atv
2Press MENU, then press > or < until the
AUDIO menu appears.
3 Press v (or A) until "MTS" is high-
lighted.
4Press > or < to highlight "STR'.
Normally leave this setting in the stereo
mode (STR). Your TV will then
automatically reproduce either stereo or
monaural sound, whichever is broadcast.
M_s tim
BASS a_=
TREBLE
BALANCE
SPEAKERS
L
BASS o1_=
TREBLE _U_.-=
BALANCE e,-,_,_
SPEAKERS
__ i!=jS:_:,,="a_O
If the stereo sound is noisy
If a broadcast signal is not strong enough, and noise-free stereo sound is
not available, select "MONO'. The noise should be reduced.
1 Follow steps 1 to 3 above.
2Press > or < to highlight "SAP".
You will hear only the second language
from the left and right speakers. II1' _
8ASS
TREBLE
BALANCE
_PEAKERS
Notes:
• Be sure you have selected "STR" if broadcast is in stereo.
•"MTS" in the AUDIO menu does not function in the VIDEO mode.
44
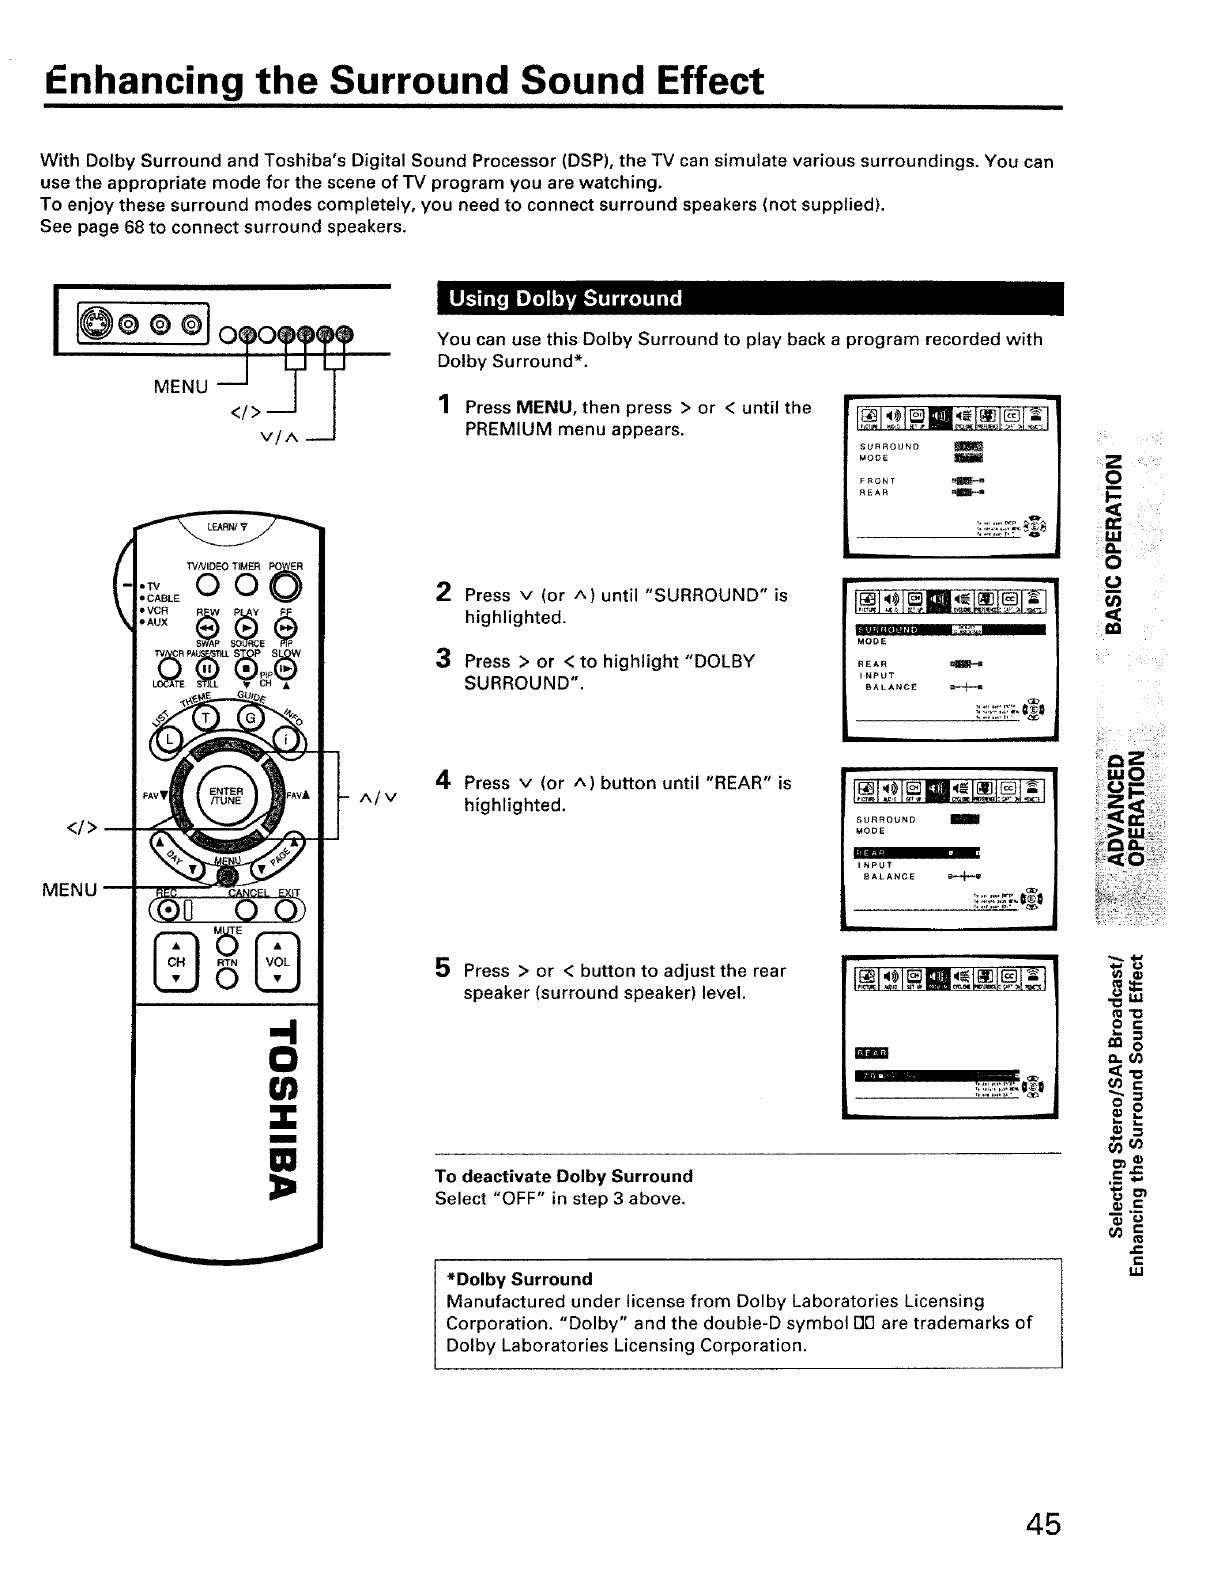
Enhancing the Surround Sound Effect
With Dolby Surround and Toshiba°s Digital Sound Processor (DSP), the TV can simulate various surroundings. You can
use the appropriate mode for the scene of TV program you are watching.
To enjoy these surround modes completely, you need to connect surround speakers (not supplied).
See page 68 to connect surround speakers.
I
</>
MENU
(TVNIDEO TIMER
-_ DO
•CABLE
oAUX
E
TV CR PAU SPS W
LOCATE STILL •CH •
-4
0
U)
IIIIIII
W
A/V
You can use this Dolby Surround to play back a program recorded with
Dolby Surround*.
Press MENU, then press > or < until the
PREMIUM menu appears.
SURROUND
MODE
FRONT
REAR _IR_-_
2Press v (or A) until "SURROUND" is
highlighted.
3 Press > or < to highlight "DOLBY
SURROUND".
MODE
REAR
INPUT
BALANCE _
4Press v (or A) button until "REAR" is
highlighted.
5 Press > or < button to adjust the rear
speaker (surround speaker) level.
_ _ r_ _ [] []
SURROUND J
MODE
INPUT
BALANCE s--_*-=
|
!i!i!:,!'.E;"€_
To deactivate Dolby Surround
Select "OFF" in step 3above.
*Dolby Surround
Manufactured under license from Dolby Laboratories Licensing
Corporation. "Dolby" and the doubte-D symbol F1[]are trademarks of
Dolby Laboratories Licensing Corporation.
O
;_UJ
•O
tO
u}
o=
mo
._=_
45

Enhancing the Surround Sound Effect (Continued)
I
<!>
6
Surround speakers
mmm iiiiii iiiiiiim
_//VID EO T_MER
._ OO
• CABLE
oAUX
TV RP_US _S P SW
LOCATE STILL •CH •
Z
I
M
}=
A/V
If direct speech is heard from the connected surround speakers while
playing back a Dolby Surround program, adjust "INPUT BALANCE" to
cancel it.
1Set the MAIN SPEAKER switch on the TV
rear panel to the "EXT" position to
disconnect the main speakers. EXT _INT
MAINSPEAKER
Note: If you are using the external speak-
ers, disconnect both (L and R)
positive leads temporarily.
See page 67 for details.
2Press MENU, then press > or < until the
PREMIUM menu appears.
3Press v (or A) until "SURROUND" is
highlighted.
4 Press > or < to highlight "DOLBY
SURROUND".
SURROUND
MODE
FRONT _ji_--=
REAR allle*-m
MODE
_EAR _UJJ'-=
INPUT
5Press v (or ^) until "INPUT BALANCE"
is highlighted.
SURRQUND
MODE
6Press > or < to adjust the input balance.
Minimize the dialogue sound from the
surround speakers.
,iI
46
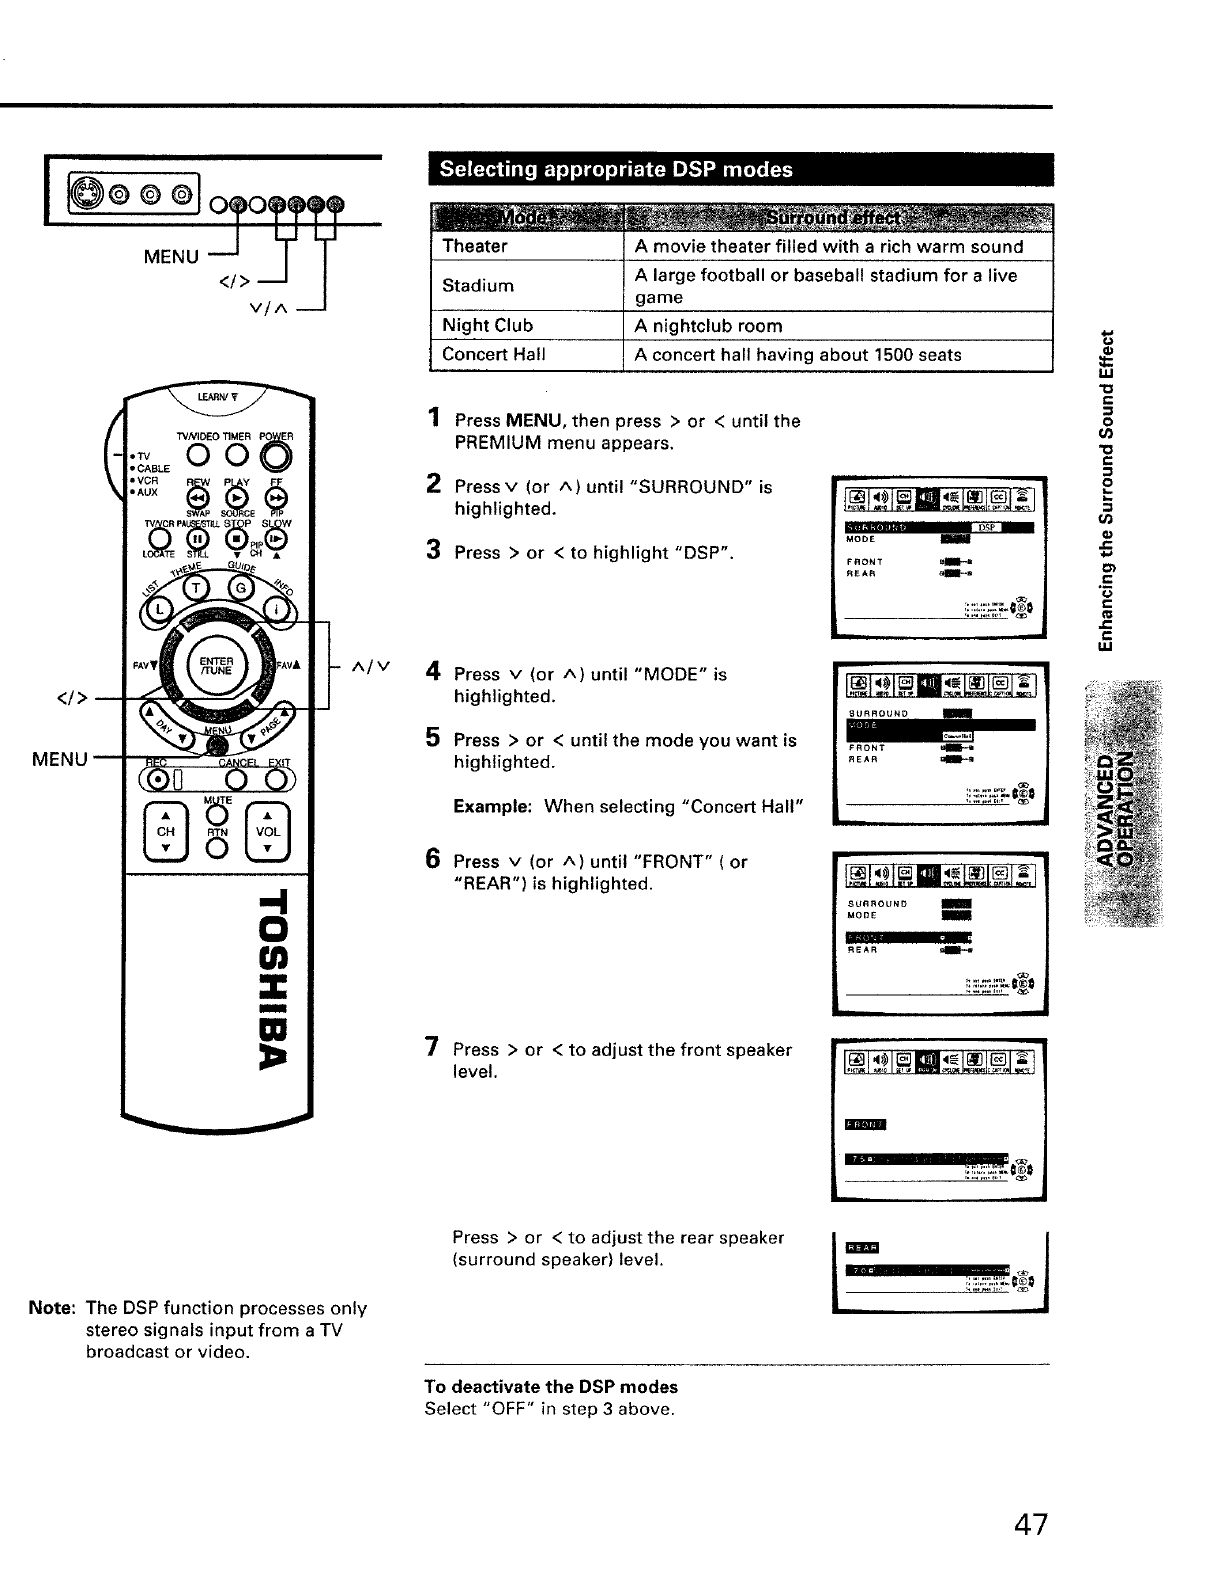
I
</>
MENU
0
w
m
W
A/V
Note: The DSP function processes only
stereo signals input from a TV
broadcast or video.
Theater A movie theater filled with a rich warm sound
Stadium A large football or baseball stadium for a live
game
Night Club A nightclub room
Concert Hall A concert hall having about 1500 seats
1Press MENU, then press > or < until the
PREMIUM menu appears.
2Pressv (or ^) until "SURROUND" is
highlighted.
3 Press > or < to highlight "DSP".
4Press v (or ^) until "MODE" is
highlighted.
5 Press > or < until the mode you want is
highlighted.
Example: When selecting "Concert Hall"
6Press v (or ^) until "FRONT" ( or
"REAR") is highlighted.
7Press > or < to adjust the front speaker
level.
Press > or < to adjust the rear speaker
(surround speaker) level.
DSP
MODE
FRONT =n_,.-s
REAR _B
FRONT
REAR
!II:_.'.:_R.=0
II
SURROUND m
MODE
REAR
m
To deactivate the DSP modes
Select "OFF" in step 3 above.
I,U
?=
o
03
e-
uJ
47
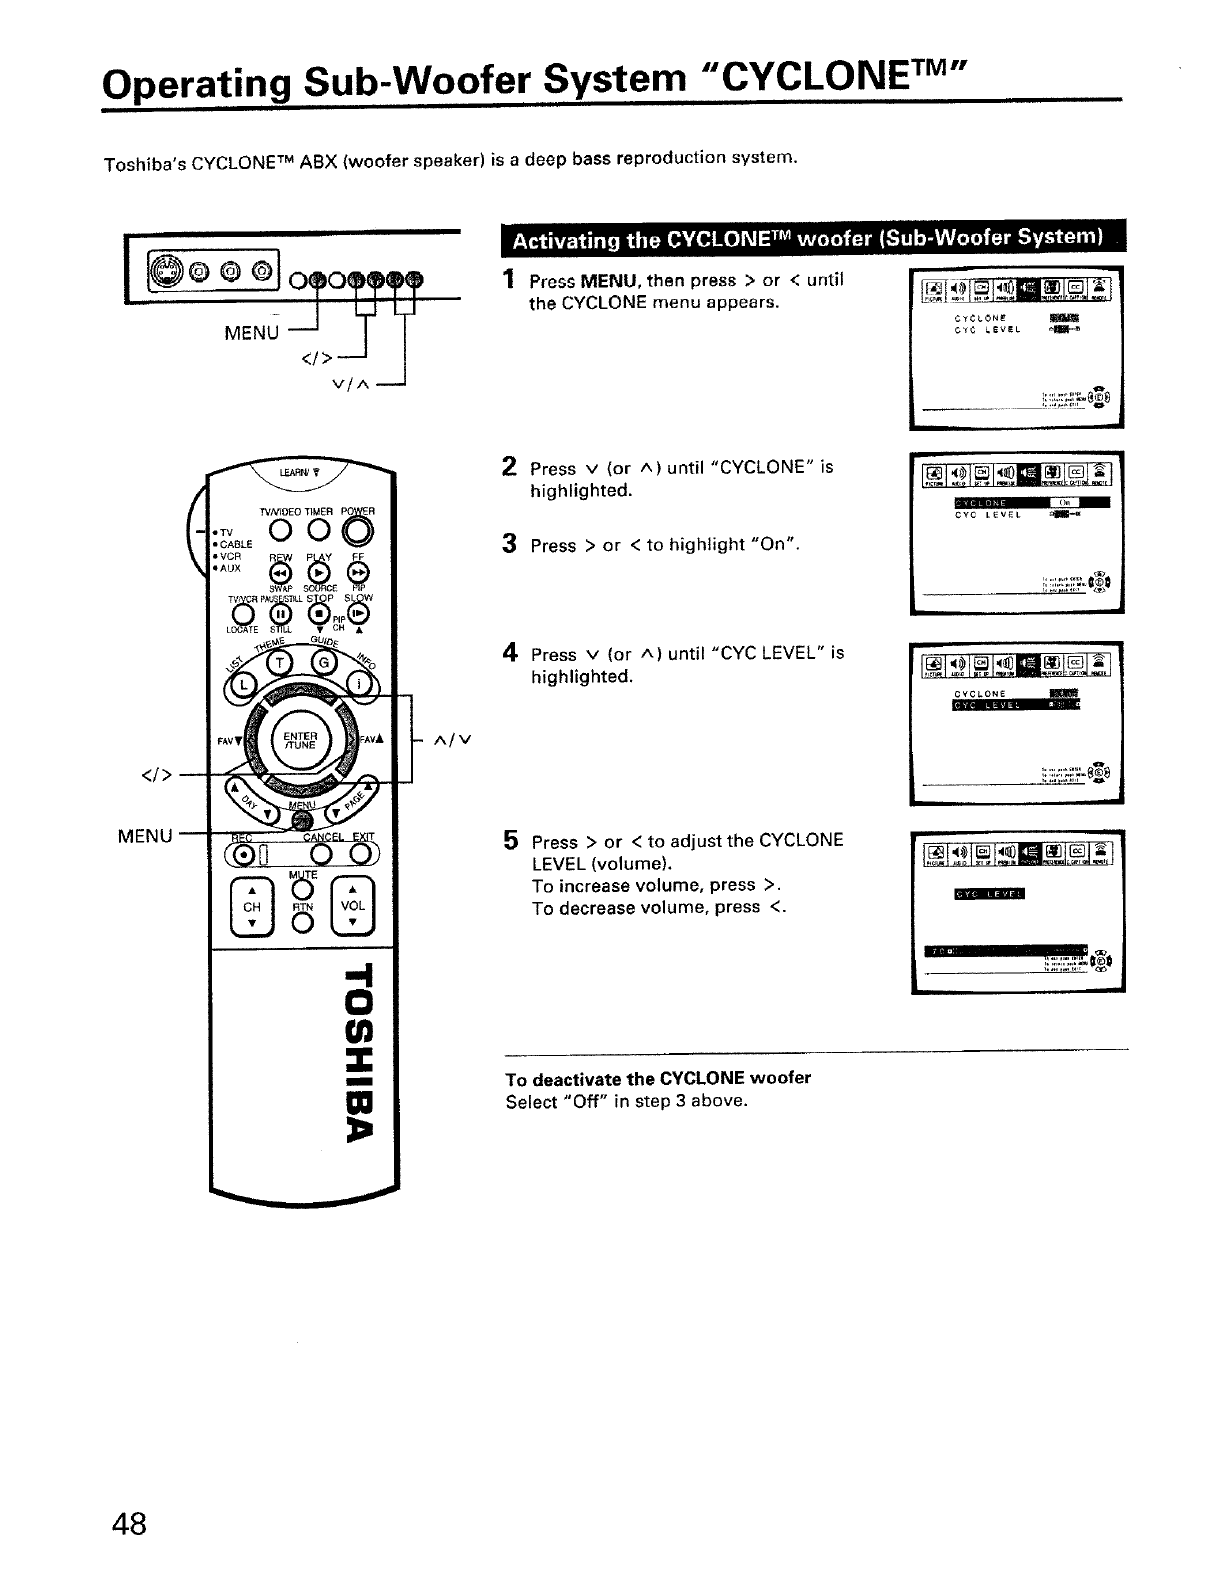
Operating Sub-Woofer System "CYCLONE TM"
Toshiba's CYCLONE TM ABX (woofer speaker) is a deep bass reproduction system.
I[@ooO.loo
MENU
I
A/V
1Press MENU, then press > or <until
the CYCLONE menu appears.
2Press v (or A) until "CYCLONE" is
highlighted.
3 Press > or < to highlight "On".
4Press v (or ^) until "CYC LEVEL" is
highlighted.
5 Press > or < to adjust the CYCLONE
LEVEL (volume).
To increase volume, press >.
To decrease volume, press <.
CYCLONE
On
CYC LEVEL _lli_--a
J
CYCLONE
To deactivate the CYCLONE woofer
Select "Off" in step 3 above.
48
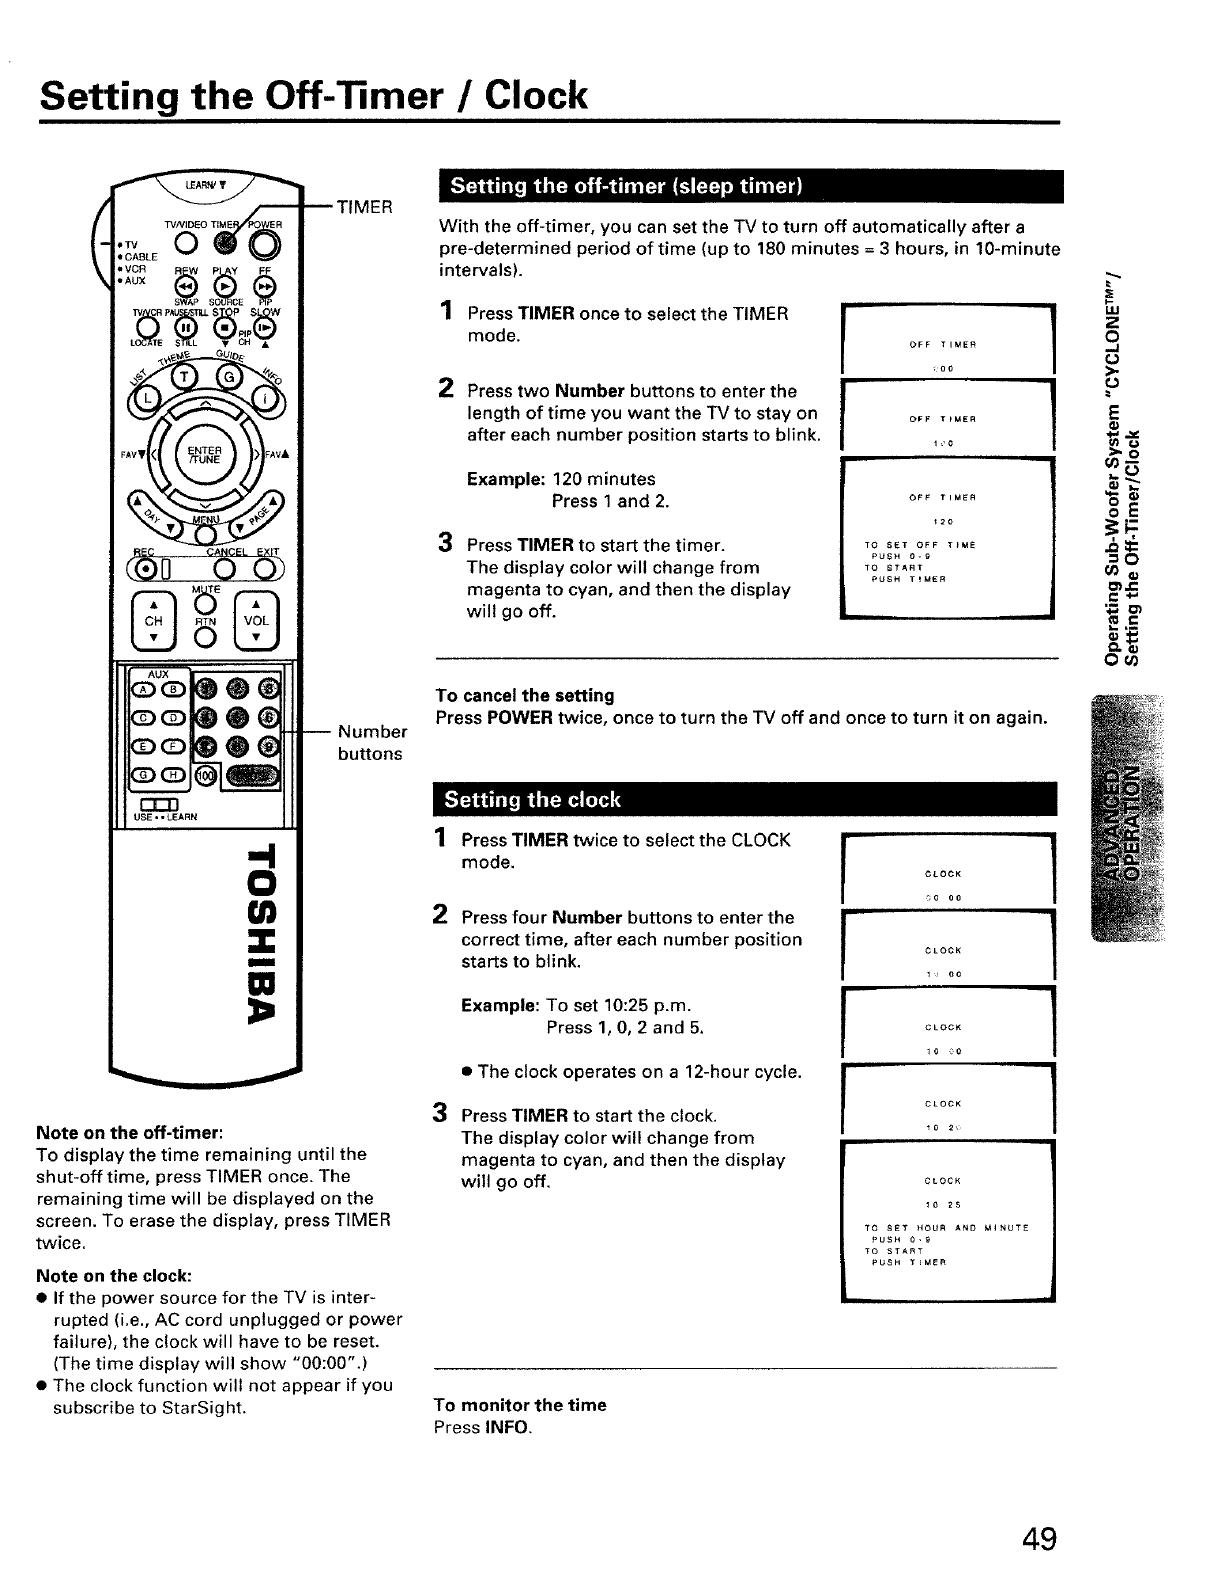
Setting the Off-Timer /Clock
(• CABLEeTV TV/VIDEOO _TIME ER
oAUX
E
6G
r-r-n
USE • • LEARN
-4
0
U)
m
--TIMER
-- Number
buttons
Note on the off-timer:
To display the time remaining until the
shut-off time, press TIMER once. The
remaining time will be displayed on the
screen. To erase the display, press TIMER
twice.
Note on the clock:
• If the power source for the TV is inter-
rupted (i.e., AC cord unplugged or power
failure), the clock will have to be reset.
(The time display will show "00:00".)
• The clock function will not appear if you
subscribe to StarSight.
With the oft-timer, you can set the TV to turn off automatically after a
pre-determined period of time (up to 180 minutes = 3 hours, in 10-minute
intervals).
2
Press TIMER once to select the TIMER
mode.
Press two Number buttons to enter the
length of time you want the TV to stay on
after each number position starts to blink.
OFF TIMER
OFF T_MER
OFF TIM_
Example: 120 minutes
Press 1 and 2.
Press TIMER to start the timer.
The display color will change from
magenta to cyan, and then the display
will go off.
TO SET OFF T_ME
pUSH 0-g
TO START
pUSH TtMER
To cancel the setting
Press POWER twice, once to turn the TV off and once to turn it on again.
2
3
Press TIMER twice to select the CLOCK
mode.
Press four Number buttons to enter the
correct time, after each number position
starts to blink.
Example: To set 10:25 p.m.
Press 1, 0, 2 and 5.
• The clock operates on a 12-hour cycle.
Press TIMER to start the clock.
The display color will change from
magenta to cyan, and then the display
will go off.
CLOCK
_0 O0
CLOCK
I_ oo
CLOCK
10 _0
CLOCK
_0 2,
CLOCK
I0 25
TO SET HOUR ANO M_NUTE
PUSH O-9
TO START
PUSH TIMER
I
1
To monitor the time
Press INFO.
gJ
z
o
-J
C3
>-
E
0J
=O
03¢
O_e-
ou)
49
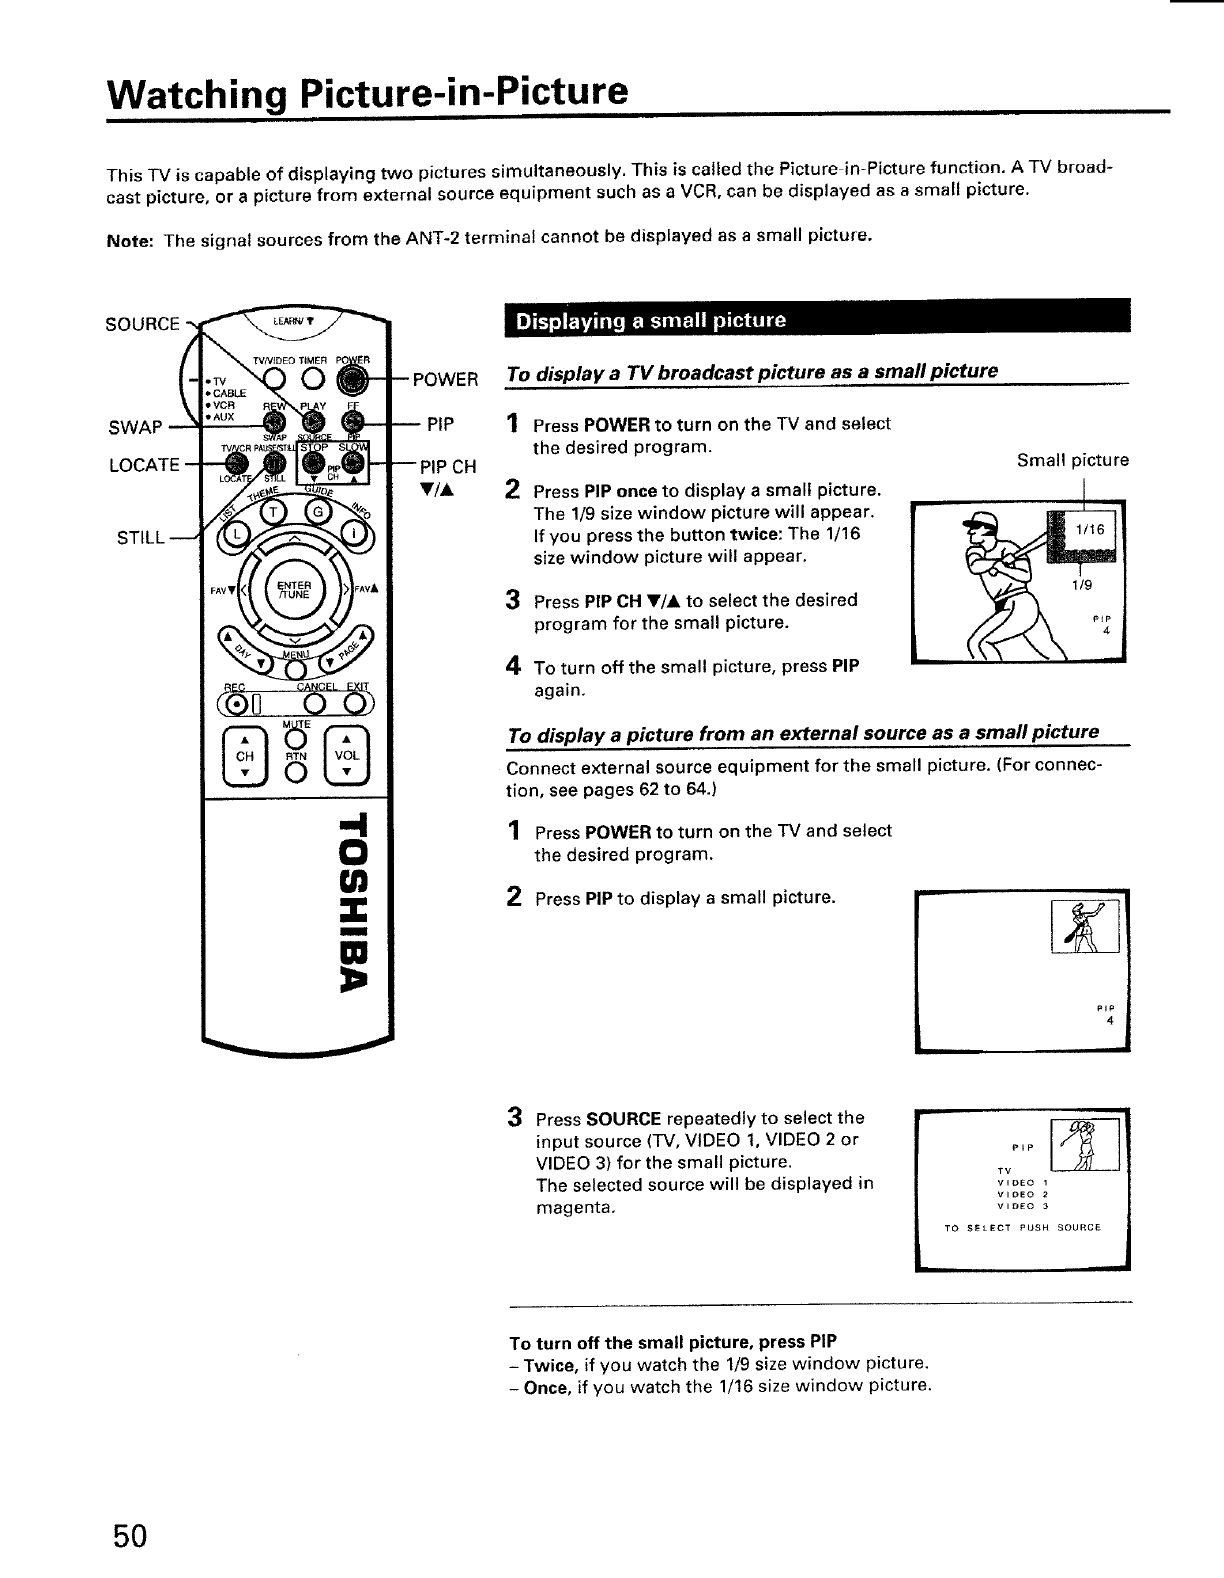
Watching Picture-in-Picture
This TV is capable of displaying two pictures simultaneously. This is called the Picture in-Picture function. A TV broad-
cast picture, or apicture from external source equipment such asaVCR, can be displayed as a small picture.
Note: [he signal sources from the ANT-2 terminal cannot be displayed as a small picture.
SOURCE
REC CANCEL EXIT
(®0 0
0
W
l
M
1
CH
v/A 2
To display a TV broadcast picture as a small picture
3
4
Press POWER to turn on the TV and select
the desired program.
Press PIP once to display a small picture.
The 1/9 size window picture will appear.
If you press the button twice: The 1/16
size window picture will appear.
Press PIP CH T/A to select the desired
program for the small picture.
To turn off the small picture, press PIP
again.
Small picture
To display a picture from an external source as a small picture
Connect external source equipment for the small picture, (For connec-
tion, see pages 62 to 64.)
1 Press POWER to turn on the TV and select
the desired program.
2Press PIP to display a small picture.
PIP
4
3Press SOURCE repeatedly to select the
input source (TV, VIDEO 1, VIDEO 2 or
VIDEO 3) for the small picture,
The selected source will be displayed in
magenta,
PIP
TV
VIDEO 1
VIDEO 2
VIDEO 3
TO SELECT PUSH SOURCE
To turn off the small picture, press PIP
-Twice, if you watch the 1/9 size window picture.
- Once, if you watch the 1/16 size window picture.
50

To change the position of the small picture
Press LOCATE repeatedly when a small picture is displayed. The display
position of the small picture will change in order.
t
To switch the main and small picture
Press SWAP when a small picture is displayed.
The main and small pictures wilt switch.
To switch them again, press SWAP again.
Ij , ,
/I_IL i:i i_¸¸
To freeze the small picture
Press STILL when a small picture is displayed.
The small picture will become a still picture.
To return to a moving picture, press STILL again.
Still picture
51
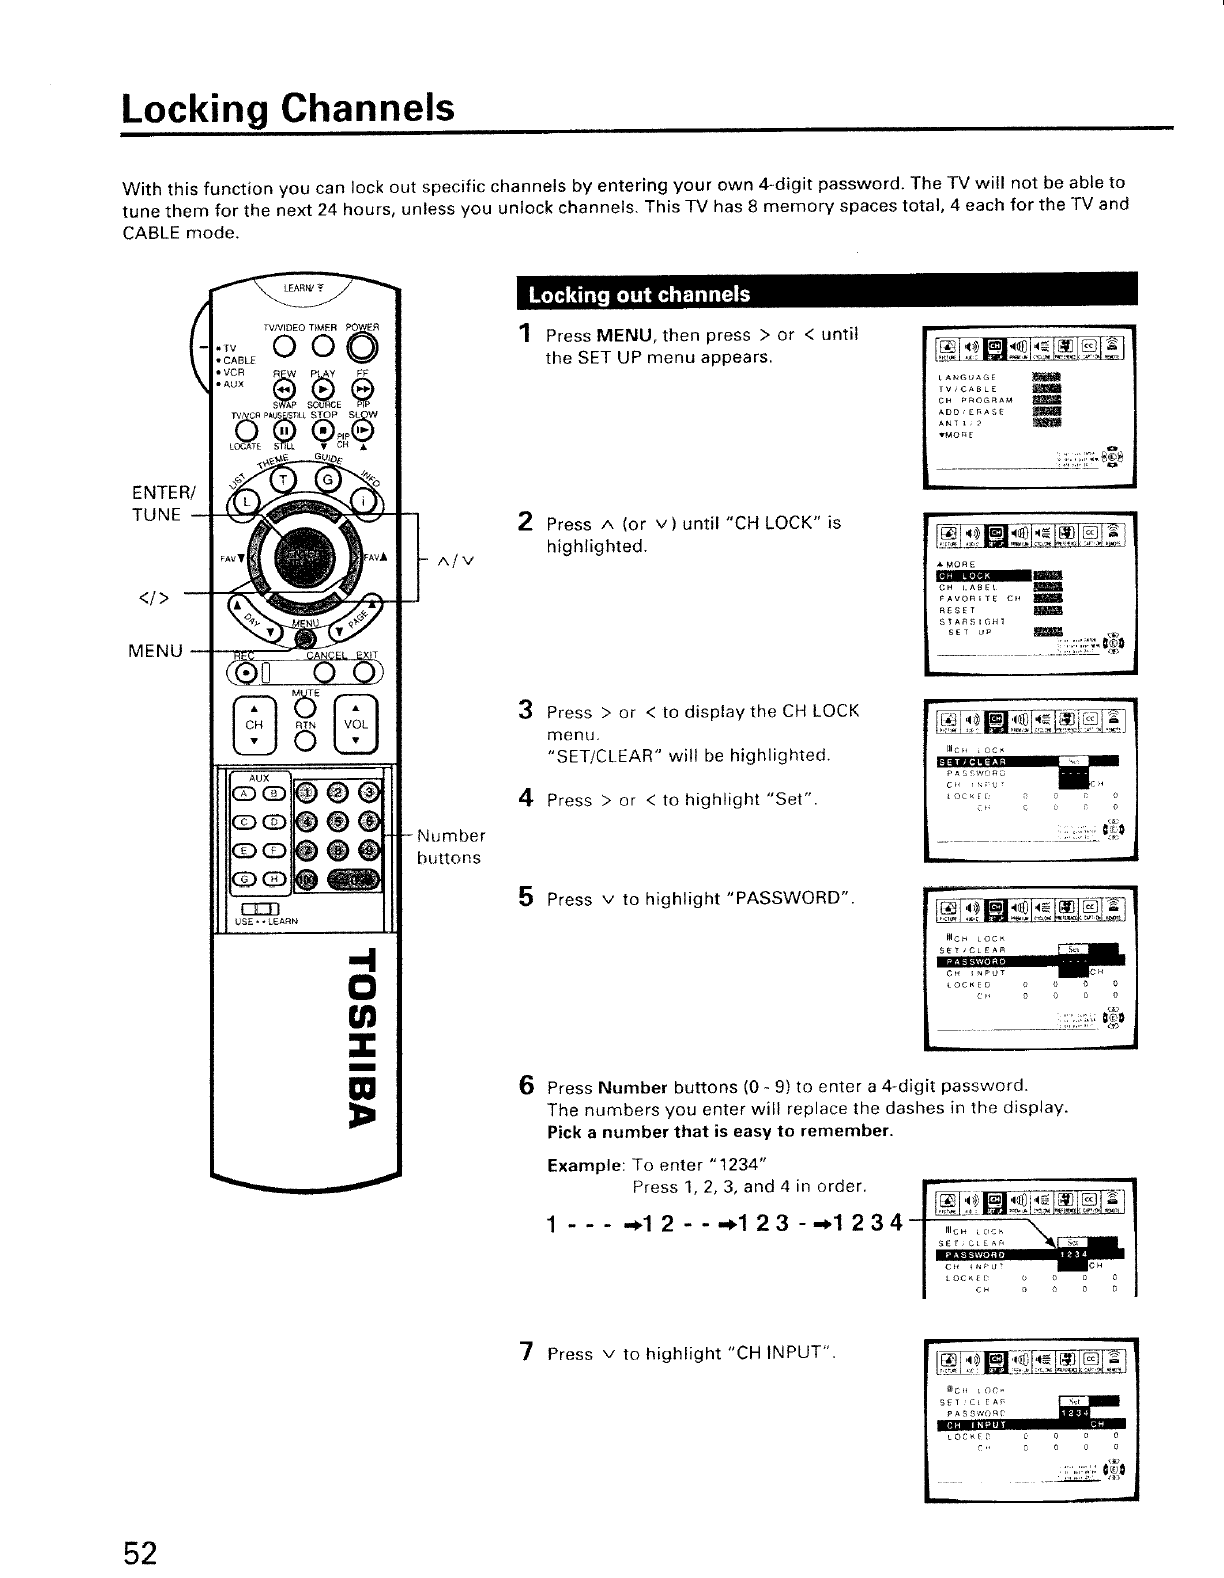
Locking Channels
With this function you can lock out specific channels by entering your own 4-digit password. The -IV will not be able to
tune them for the next 24 hours, unless you unlock channels. ThisTV has 8 memory spaces total, 4 each for the TV and
CABLE mode.
ENTER/
TUNE
<t>
MENU
®@
®@
®@
AIv
Number
buttons
1Press MENU, then press > or < until
the SET UP menu appears.
2 Press A (or v) until "CH LOCK" is
highlighted.
3Press >or <to display the CH LOCK
menu.
"SET/CLEAR" will be highlighted.
4Press >or <to highlight "Set".
5 Press v to highlight "PASSWORD".
r
LANGUAGE I
TV#CABLE
OH PROGRAM I
ADO,£RASE
ANTI,2
TMORE
I
AMORE
|
CH _ABEL
FAVOP_TE CH
RESET m
STARSlC, H_
SET UP I
ii
_OC_Eb _ 0
0_0
6Press Number buttons (0 - 9) to enter a 4-digit password.
The numbers you enter will replace the dashes in the display.
Pick a number that is easy to remember.
Example: To enter "1234"
Press 1, 2, 3, and 4 in order.
1 --- -_12 - -._123 -.,.1234
7 Press v to highlight "CH INPUT".
_CH _OC_
LOCkeD C 0 0 O
C" 0 0 0 0
52
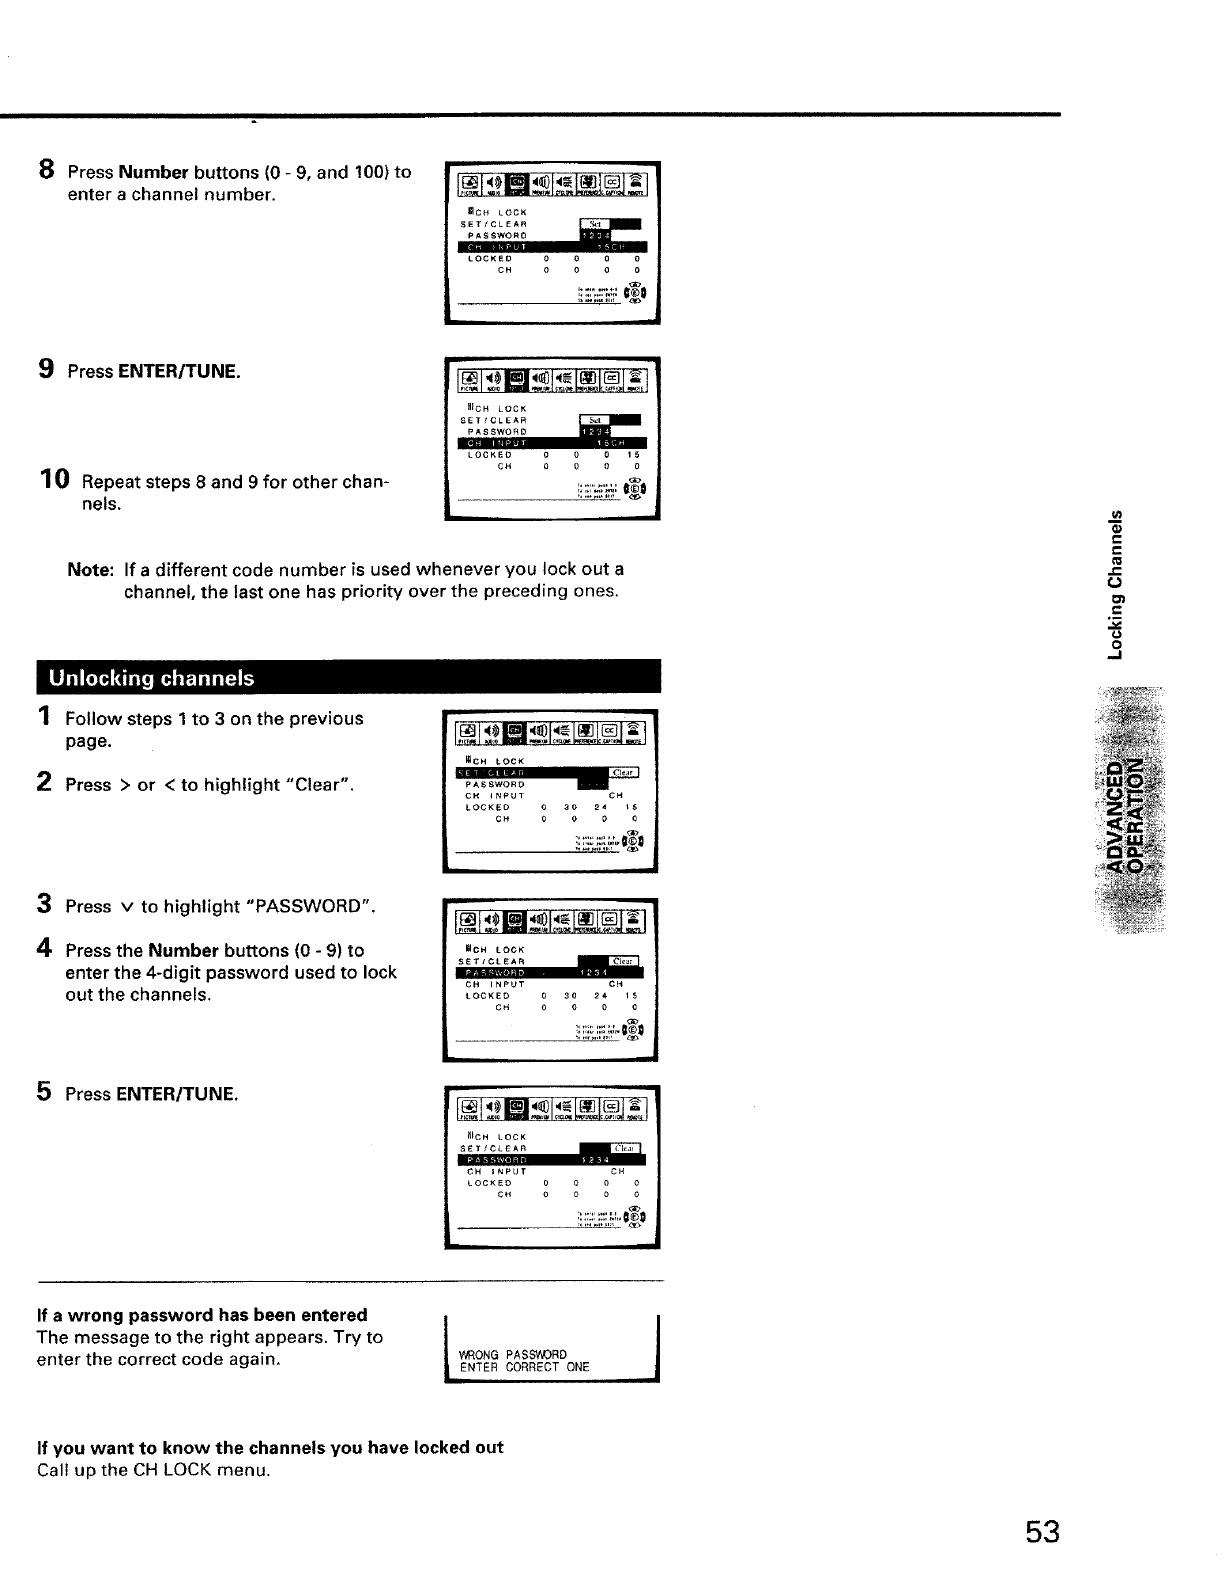
8Press Number buttons (0 - 9, and 100) to
enter a channel number.
_CH LOCK
LOCKEO 0 0 0 0
CH 0 0 0 0
9Press ENTER/TUNE.
10 Repeat steps 8 and 9for other chan-
nels.
men LOCK
LOCKED 00 0 15
CH 00 0 0
%,
Note: If a different code number is used whenever you lock out a
channel, the last one has priority over the preceding ones,
1Follow steps 1 to 3 on the previous
page.
2Press > or < to highlight "Clear".
3 Press v to highlight "PASSWORD".
4Press the Number buttons (0 - 9) to
enter the 4-digit password used to lock
out the channels.
5Press ENTER/TUNE.
mCH LOCK
PASSWORD i
CM INPUT CP_
LOCREO G 30 24 15
CH 000 0
_CH LOCK
LOCKED o30 24 I5
OH 00oo
i!:!i:i.!i_,_,:"€_=
L __
JtlCH LOCK
CH INPUT CR
LOCKEO 0 0 0 0
CH 000 0
_j
e.
fo
,J_
O_
e.
o
.,J
If a wrong password has been entered
The message to the right appears. Try to
enter the correct code again. WRONG PASSWORD
NTER CORRECT ONE
If you want to know the channels you have locked out
Call up the CH LOCK menu.
53
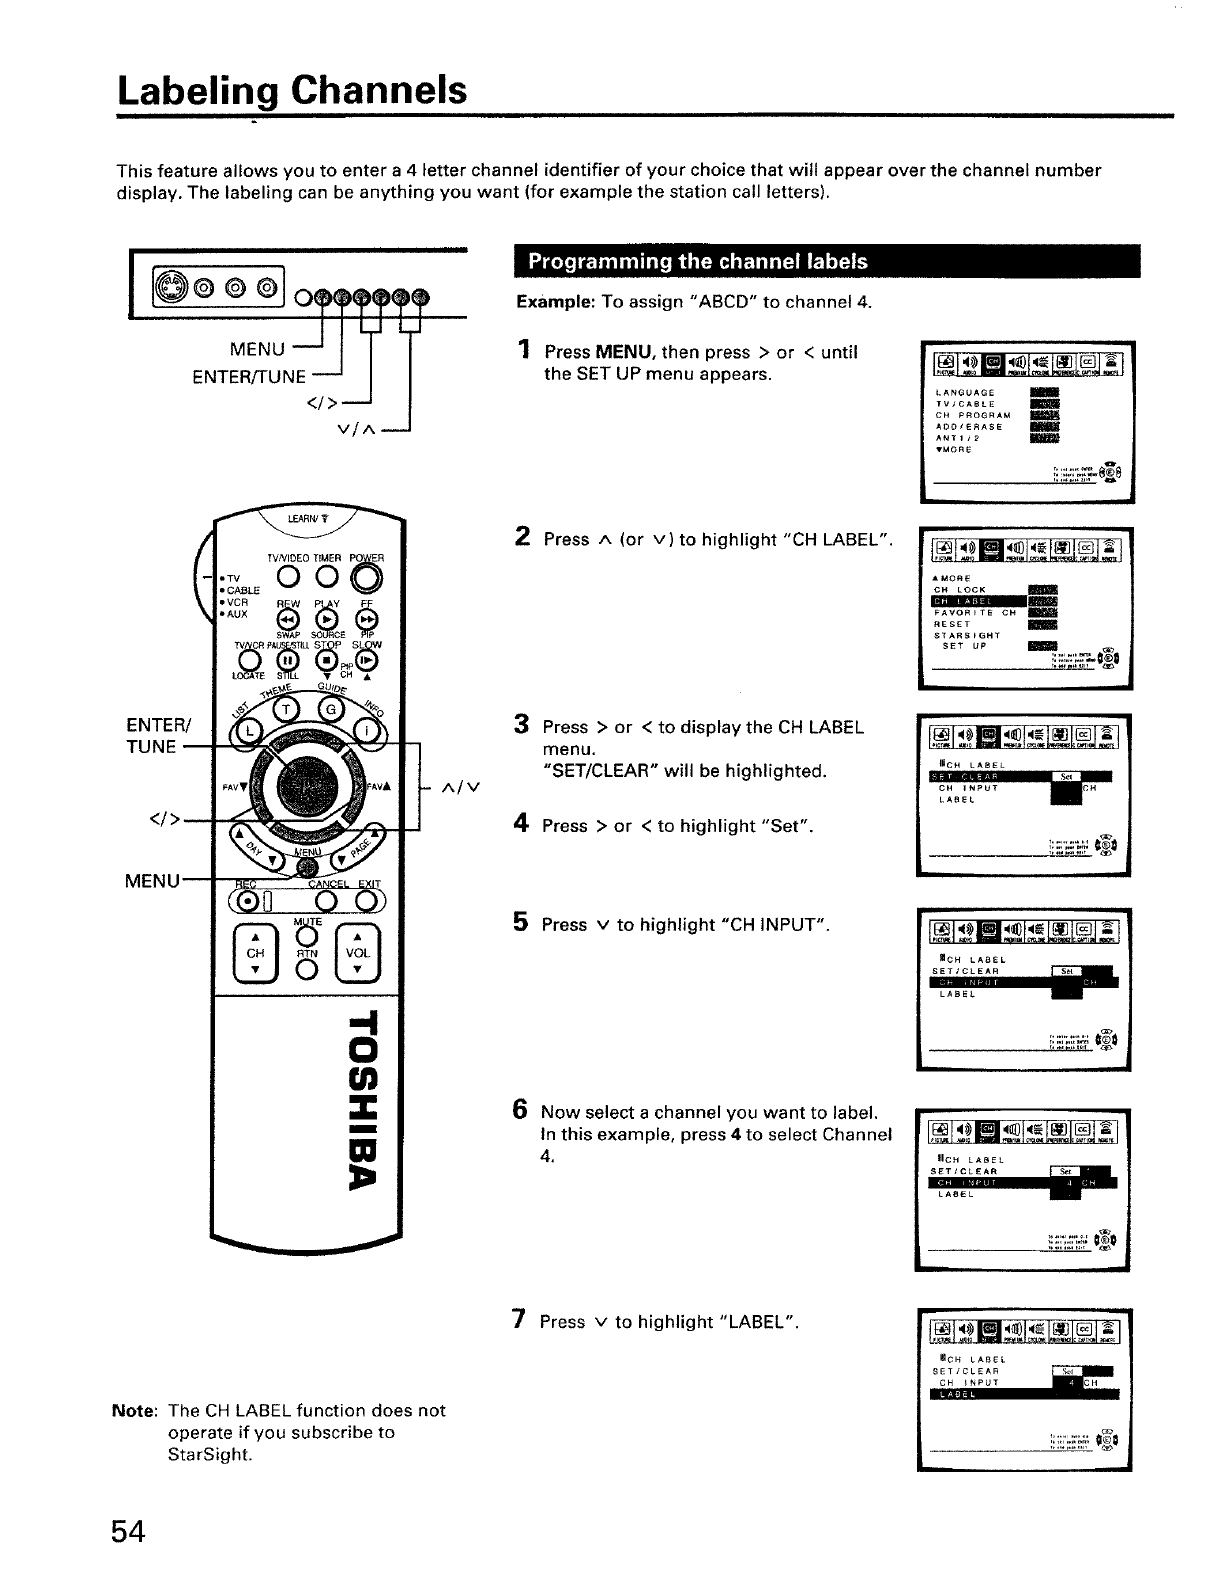
Labeling Channels
This feature allows you to enter a4 letter channel identifier of your choice that will appear over the channel number
display. The labeling can be anything you want (for example the station call letters).
I
</>VIA-'-'J J
(
ENTER/
TUNE
MENI
_NIOE0 T_MER
•_ OO
• CABLE
•AUX
E
"rV P,R P_ 'SNI,
P_P
L • CH •
W
I
W
1=,
A/V
Note: The CH LABEL function does not
operate if you subscribe to
StarSight.
Example: To assign "ABCD" to channel 4.
1Press MENU, then press > or < until
the SET UP menu appears.
2Press A (or v) to highlight "CH LABEL".
3 Press > or < to display the CH LABEL
menu.
"SET/CLEAR" will be highlighted.
4Press > or < to highlight "Set".
5Press v to highlight "CH INPUT".
6 Now select a channel you want to label.
In this example, press 4 to select Channel
4.
7Press v to highlight "LABEL".
LANGUAGE
TV/CABLE
OH PROGRAM I_
AOO/ERASE
ANTI/2
TMORE
AMORE
CH LOCK
FAVORITE OH
RESET m
STARS_GHT
SET UP m
iiiiii iiii
-- j
_CH LAB£L
54
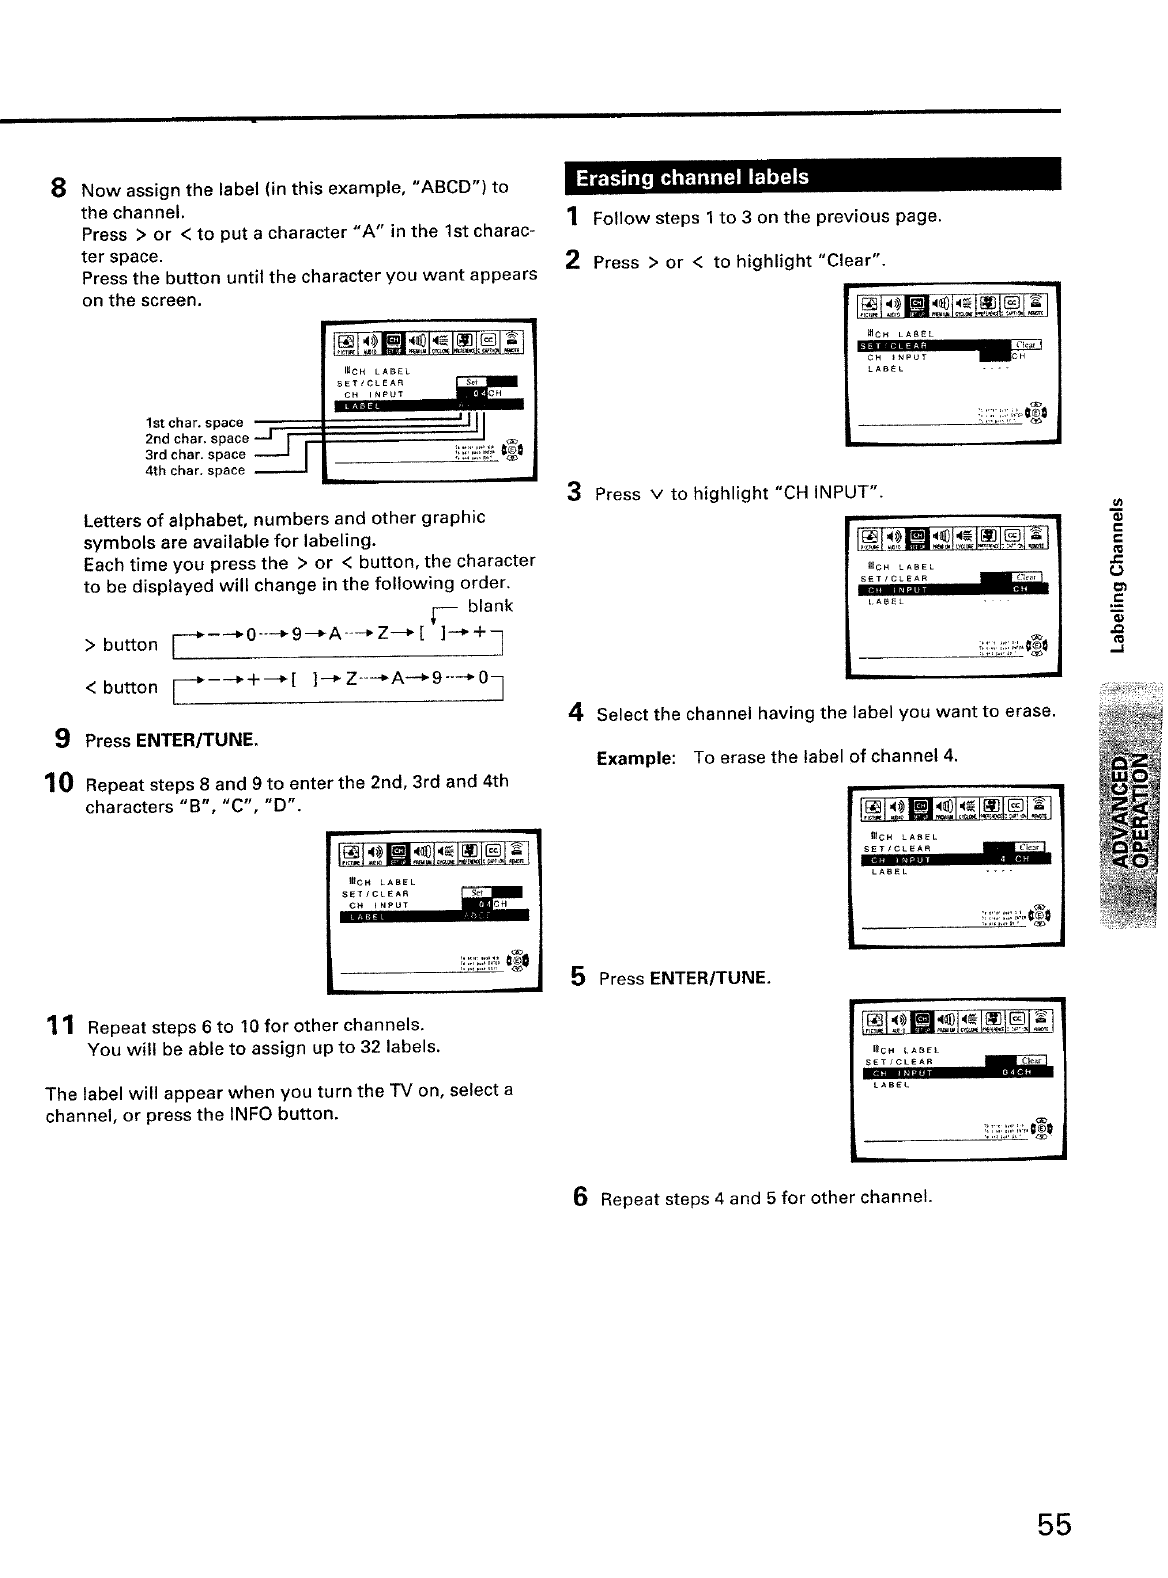
8Now assign the label (in this example, "ABCD") to
the channel.
Press > or < to put a character "A" in the 1st charac-
ter space.
Press the button until the character you want appears
on the screen.
1st char. apace
2nd char. space -J { r--
3rd char. apace ----J I
4th char. space
IHCH LABEL
SET/C
'llI
,+., ,.++_+,
Letters of alphabet, numbers and other graphic
symbols are available for labeling.
Each time you press the > or < button, the character
to be displayed will change in the following order.
_-- blank
> button ["-_--'*o''''*9-_A----*Z-_[ ]-'_+q
< button _-*--++--*[ ]--_Z+---_A--_9-+O_
9 Press ENTER/TUNE.
10Repeat steps 8 and 9 to enter the 2nd, 3rd and 4th
characters "B', "C", "D'.
_#CH LABEL
+*,, ,.++_.,t_
J
11 Repeat steps 6 to 10 for other channels.
You will be able to assign up to 32 labels.
The label will appear when you turn the TV on, select a
channel, or press the INFO button.
1 Follow steps 1 to 3 on the previous page.
2Press > or < to highlight "Clear".
_c_ LA_Et
OH _NPUT iCH
LABEL ---
3Press v to highlight "CH INPUT".
}I[GH LABEL
4Select the channel having the label you want to erase.
Example: To erase the label of channel 4.
ilICN LA_EL
LABEL ....
Press ENTER/TUNE.
I{}CH LABEL
LAB£L
h
6 Repeat steps 4 and 5 for other channel.
!!ii:ii'.i:i_,.0_0
P
r-
L}
=
55
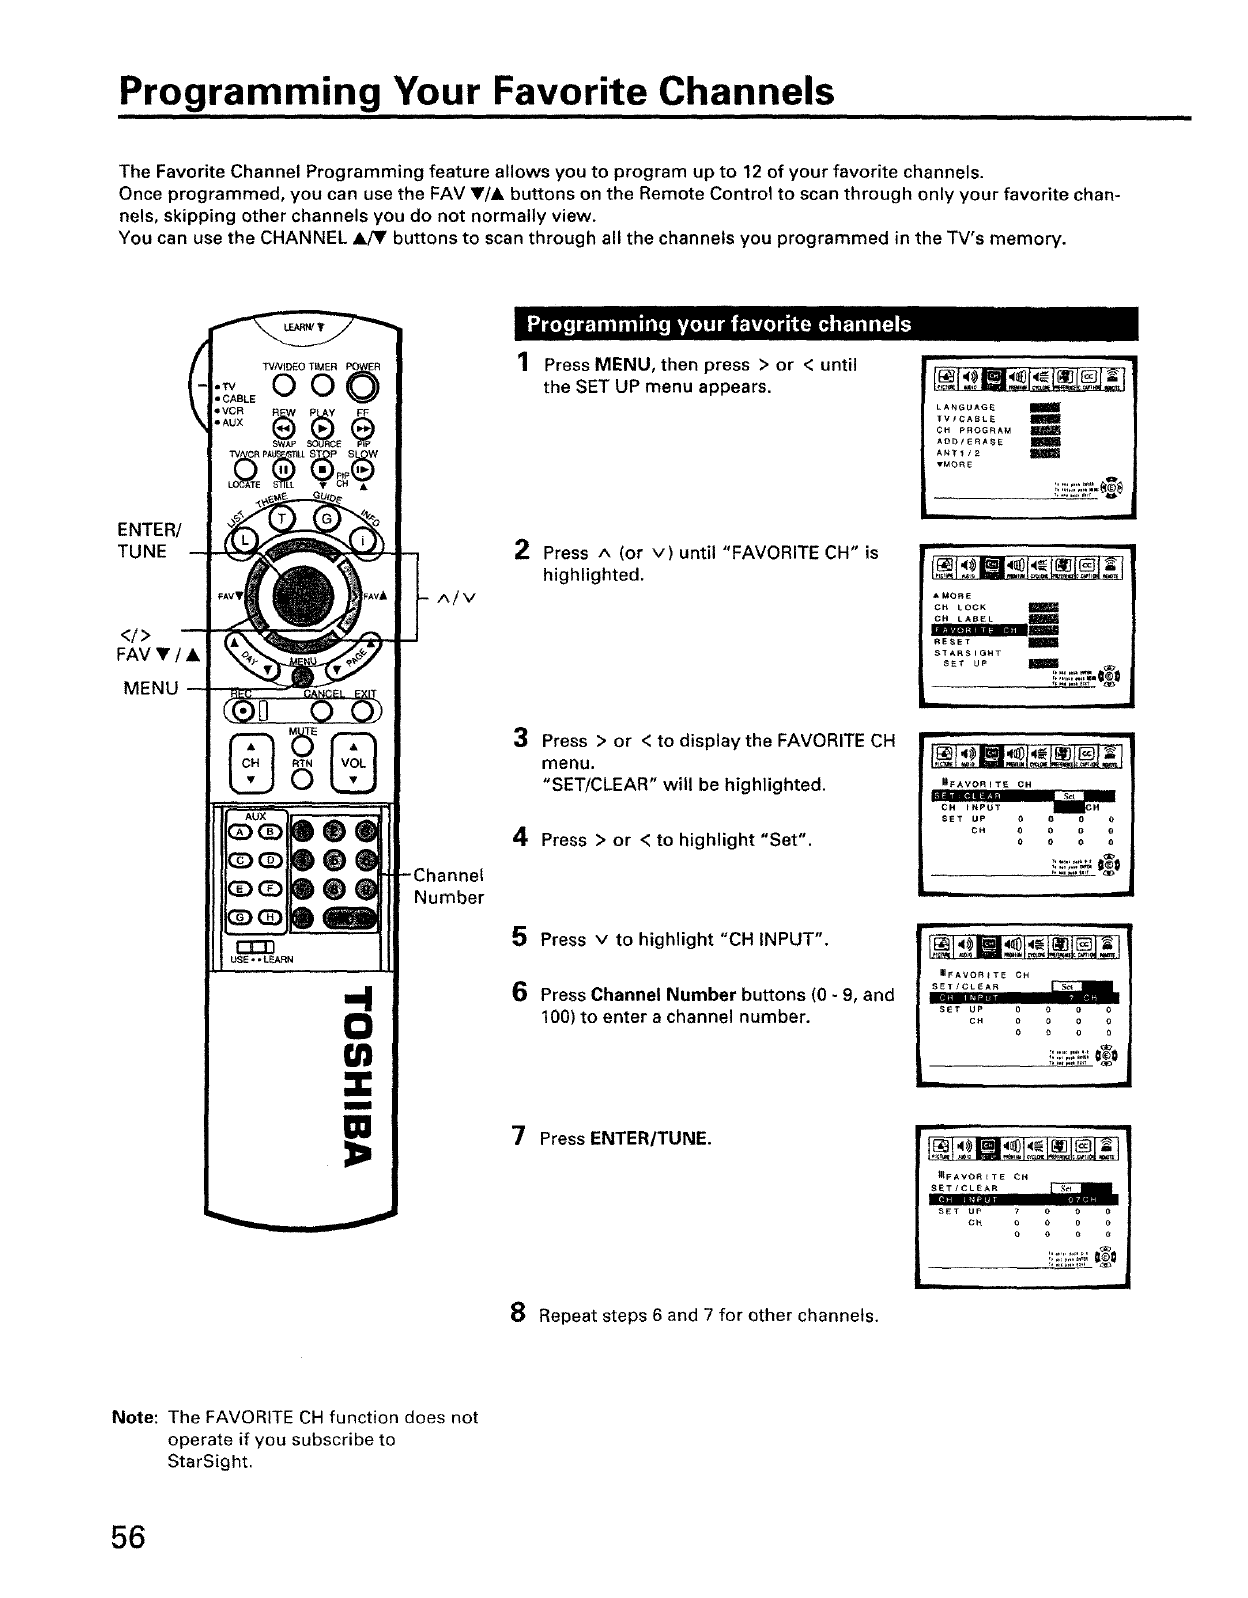
Programming Your Favorite Channels
The Favorite Channel Programming feature allows you to program up to 12 of your favorite channels.
Once programmed, you can use the FAV Y/& buttons on the Remote Control to scan through only your favorite chan-
nels, skipping other channels you do not normally view.
You can use the CHANNEL &_' buttons to scan through all the channels you programmed in the TV's memory.
(
ENTER/
TUNE
<I>
FAV V /•
MENU
TVNIDEO TIMER
,_ OO
i CABLE
•
•AUX
SWAP E
TV CRPAU _Pp,pS_W
USE " "LEARN
-4
0
U)
m
m
^Iv
-Channel
Number
1Press MENU, then press > or < until
the SET UP menu appears.
2Press ^ (or v) until "FAVORITE CH" is
highlighted.
3Press > or < to display the FAVORITE CH
menu.
"SET/CLEAR" will be highlighted.
4Press > or < to highlight "Set".
5Press v to highlight "CH INPUT".
6Press Channel Number buttons (O - 9, and
100) to enter achannel number.
7Press ENTER/TUNE.
8Repeat steps 6 and 7for other channels.
LANGUAGE i
TVtCASL_
¢H pROGrAM
AOb/ERASE
AN_I/2
TM_RE
• MO_E
CI4 LOCK
CH LABEL
RESET _
STARLIGHT
SET up _
__ =
i,,i
mgAVOR I TE OH
CH 0 0 0 O
oooo
LLJJ_!
BFAVOR_TE CH
CH0000
000_
_IIFAVOFt _ TE CH
SETUPTO00
OH0000
000e
Note: The FAVORITE CH function does not
operate if you subscribe to
StarSight.
56
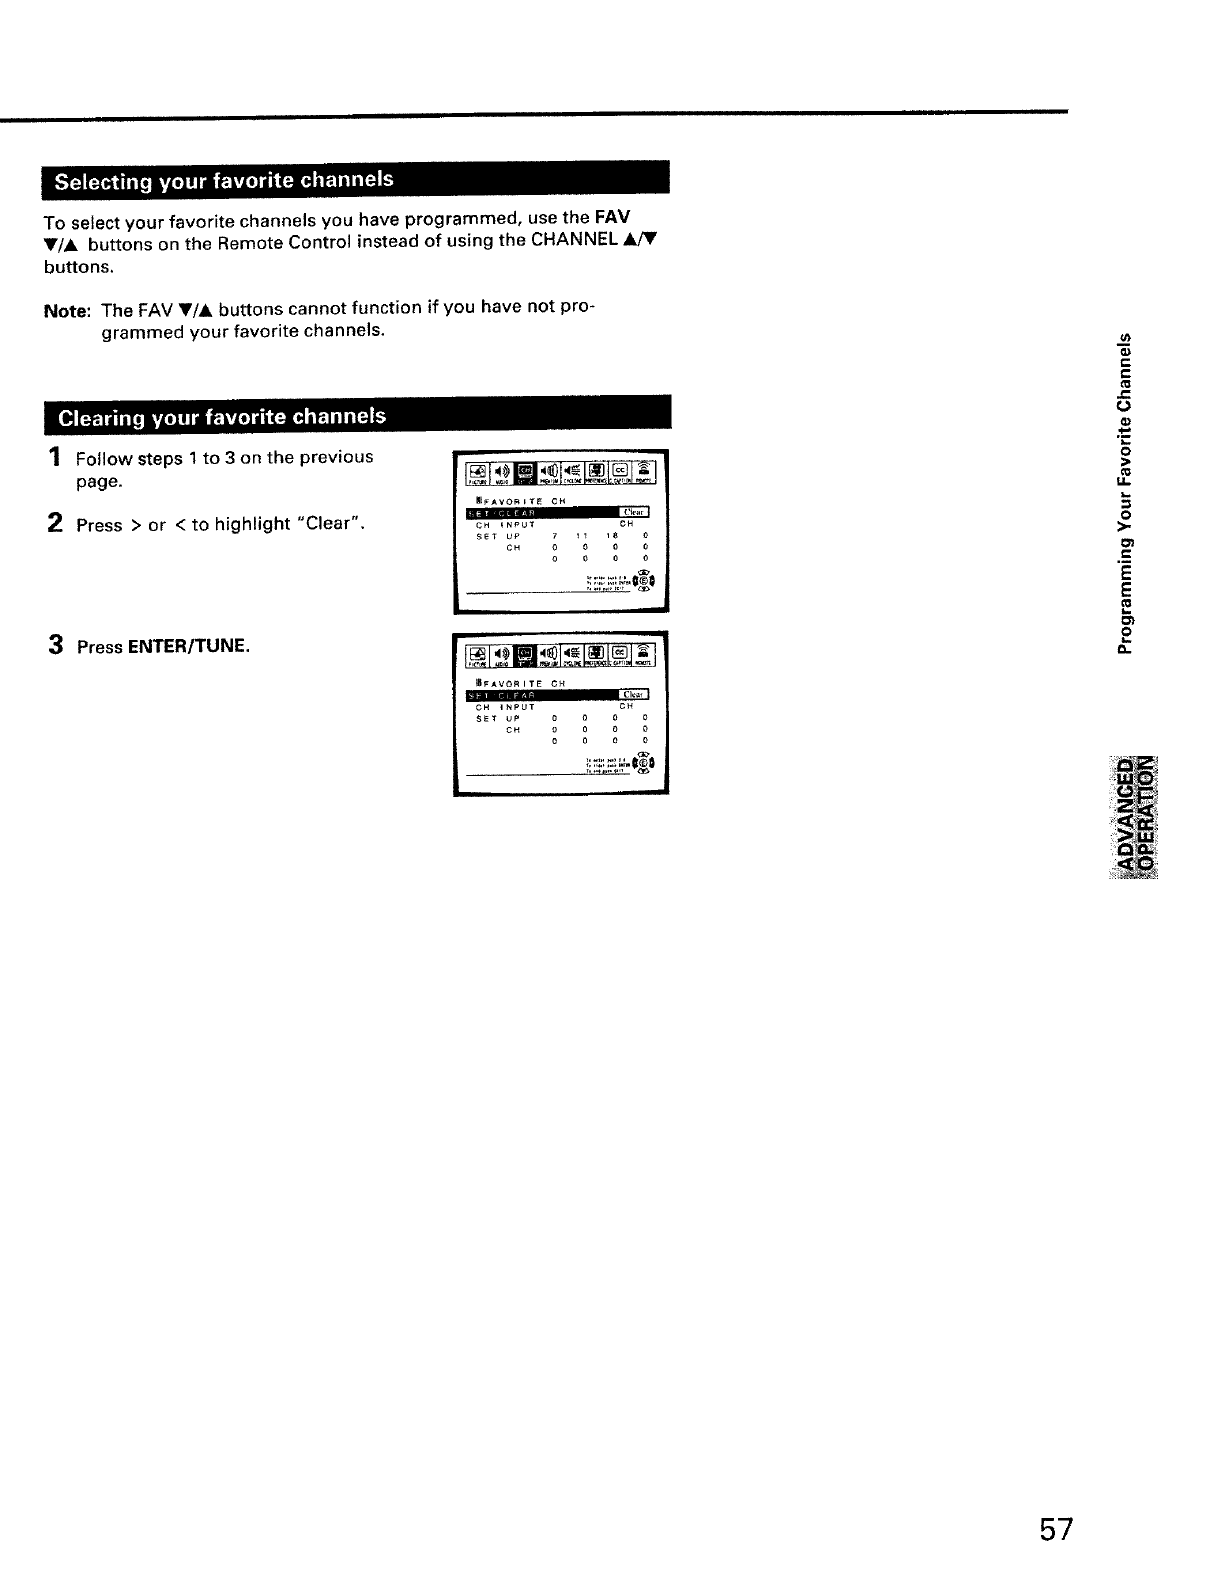
To select your favorite channels you have programmed, use the FAV
Y/A buttons on the Remote Control instead of using the CHANNEL
buttons.
Note: The FAV Y/& buttons cannot function if you have not pro-
grammed your favorite channels.
1 Follow steps 1 to 3 on the previous
page.
2Press > or < to highlight "Clear".
3Press ENTER/TUNE.
i
#IFAVOR I TE CH
(te.r t
CH INPUT OH
SET UP ?_1 18 o
oOH 0 0 0
oooo
_FAVOR I TE CH
ci
CH INPUT CH
SET UP 0 0 00
CH 0 0 0 0
0 0 0 0
a,I
C
t_
o
>
Ill
ii
O
e,
F=
E
E
57
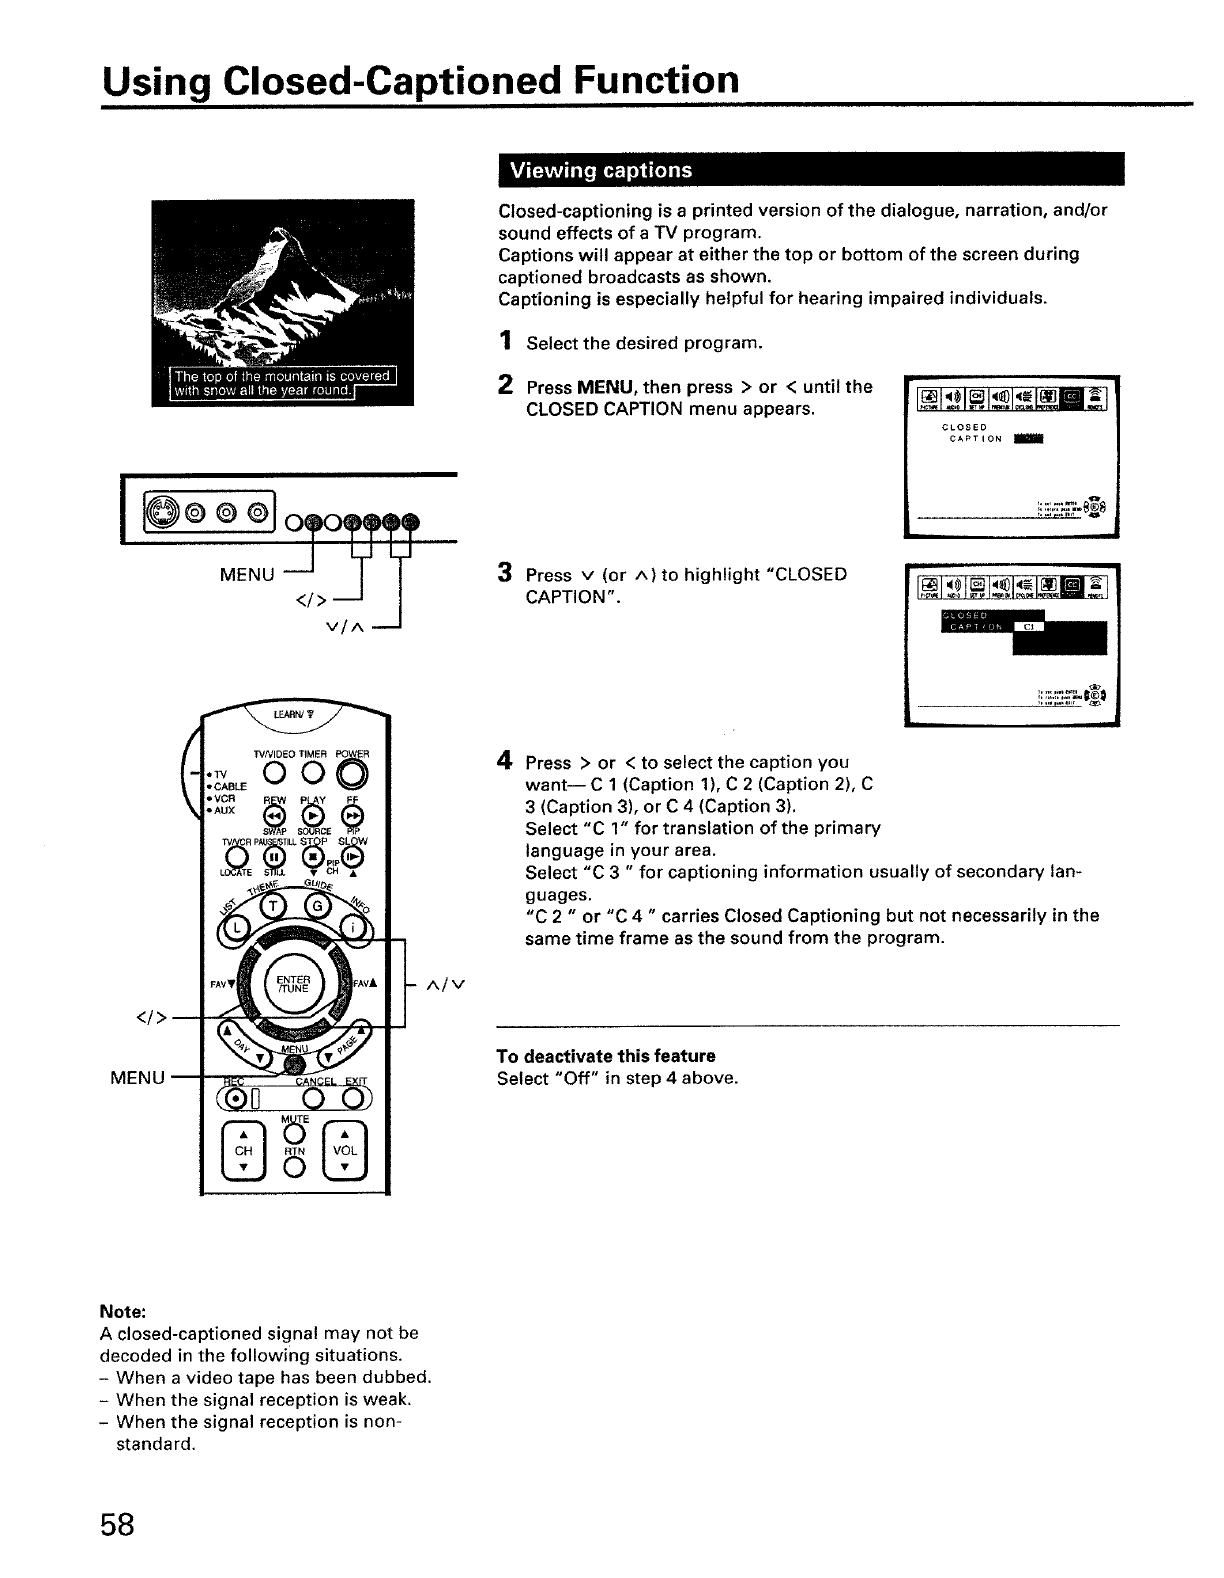
Using Closed-Captioned Function
I
</>
MENU
TI/NIDEO TIMER
OO
,CABLE
,AUX
E
^fv
Closed-captioning is a printed version of the dialogue, narration, and/or
sound effects of a TV program.
Captions will appear at either the top or bottom of the screen during
captioned broadcasts as shown.
Captioning is especially helpful for hearing impaired individuals.
1 Select the desired program.
2Press MENU, then press > or < until the
CLOSED CAPTION menu appears.
3Press v (or A)tO highlight "CLOSED
CAPTION".
4
CLOSED
CAPTION
L
J
Press >or <to select the caption you
want-- C 1 (Caption 1), C2(Caption 2), C
3 (Caption 3), or C 4 (Caption 3).
Select "C 1" for translation of the primary
language in your area.
Select "C 3"for captioning information usually of secondary lan-
guages.
"C 2"or "C 4" carries Closed Captioning but not necessarily in the
same time frame as the sound from the program.
To deactivate this feature
Select "Off" in step 4 above.
Note:
A closed-captioned signal may not be
decoded in the following situations.
- When a video tape has been dubbed.
- When the signal reception is weak.
- When the signal reception is non-
standard.
58
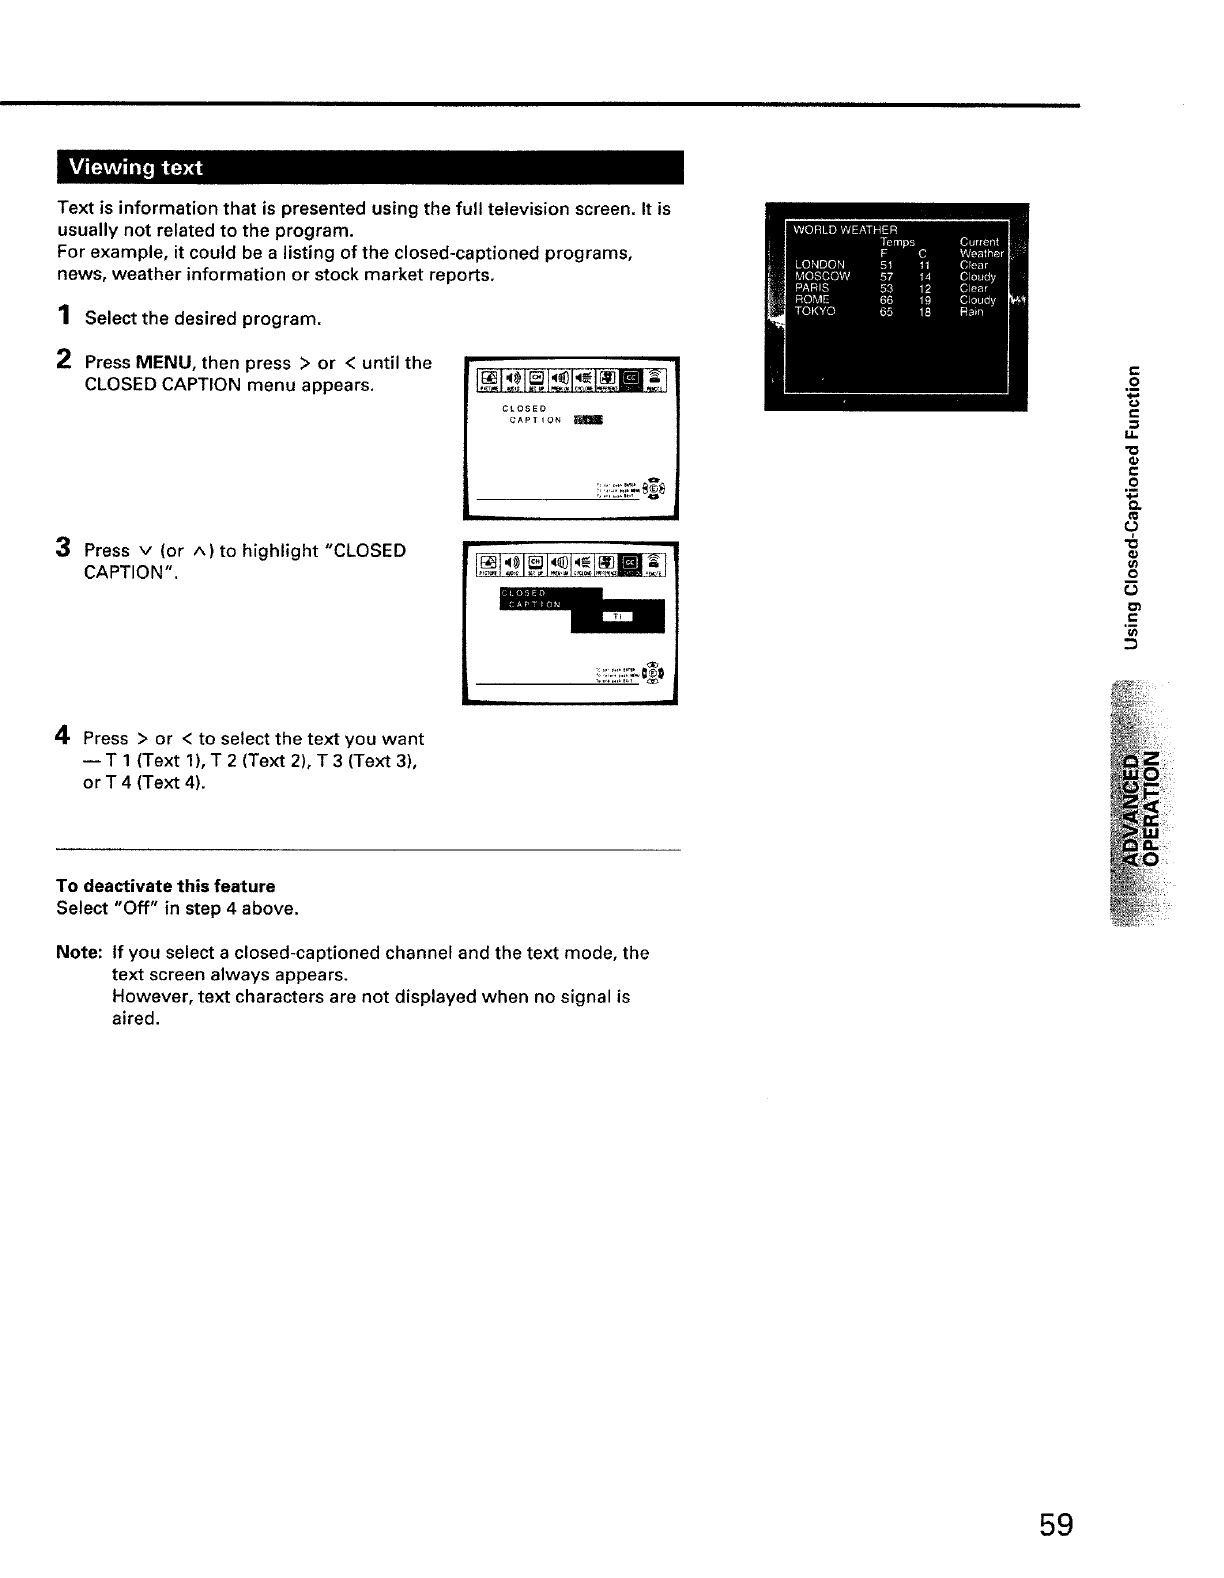
Text is information that is presented using the full television screen. It is
usually not related to the program.
For example, it could be a listing of the closed-captioned programs,
news, weather information or stock market reports.
1Select the desired program.
2Press MENU, then press > or < until the
CLOSED CAPTION menu appears.
3 Press v (or A)to highlight "CLOSED
CAPTION".
4 Press > or < to select the text you want
--T 1 (Text 1), T 2 (Text 2)° T 3 (Text 3),
or T 4 (Text 4).
CLOSEO
CAPTION I
i!!ii.!!ii.i_*
, J
C
o
e-
ll.
"ID
r"
o
(/1
0
ID}
C
To deactivate this feature
Select "Off" in step 4above.
Note: If you select a closed-captioned channel and the text mode, the
text screen always appears.
However, text characters are not displayed when no signal is
aired.
59
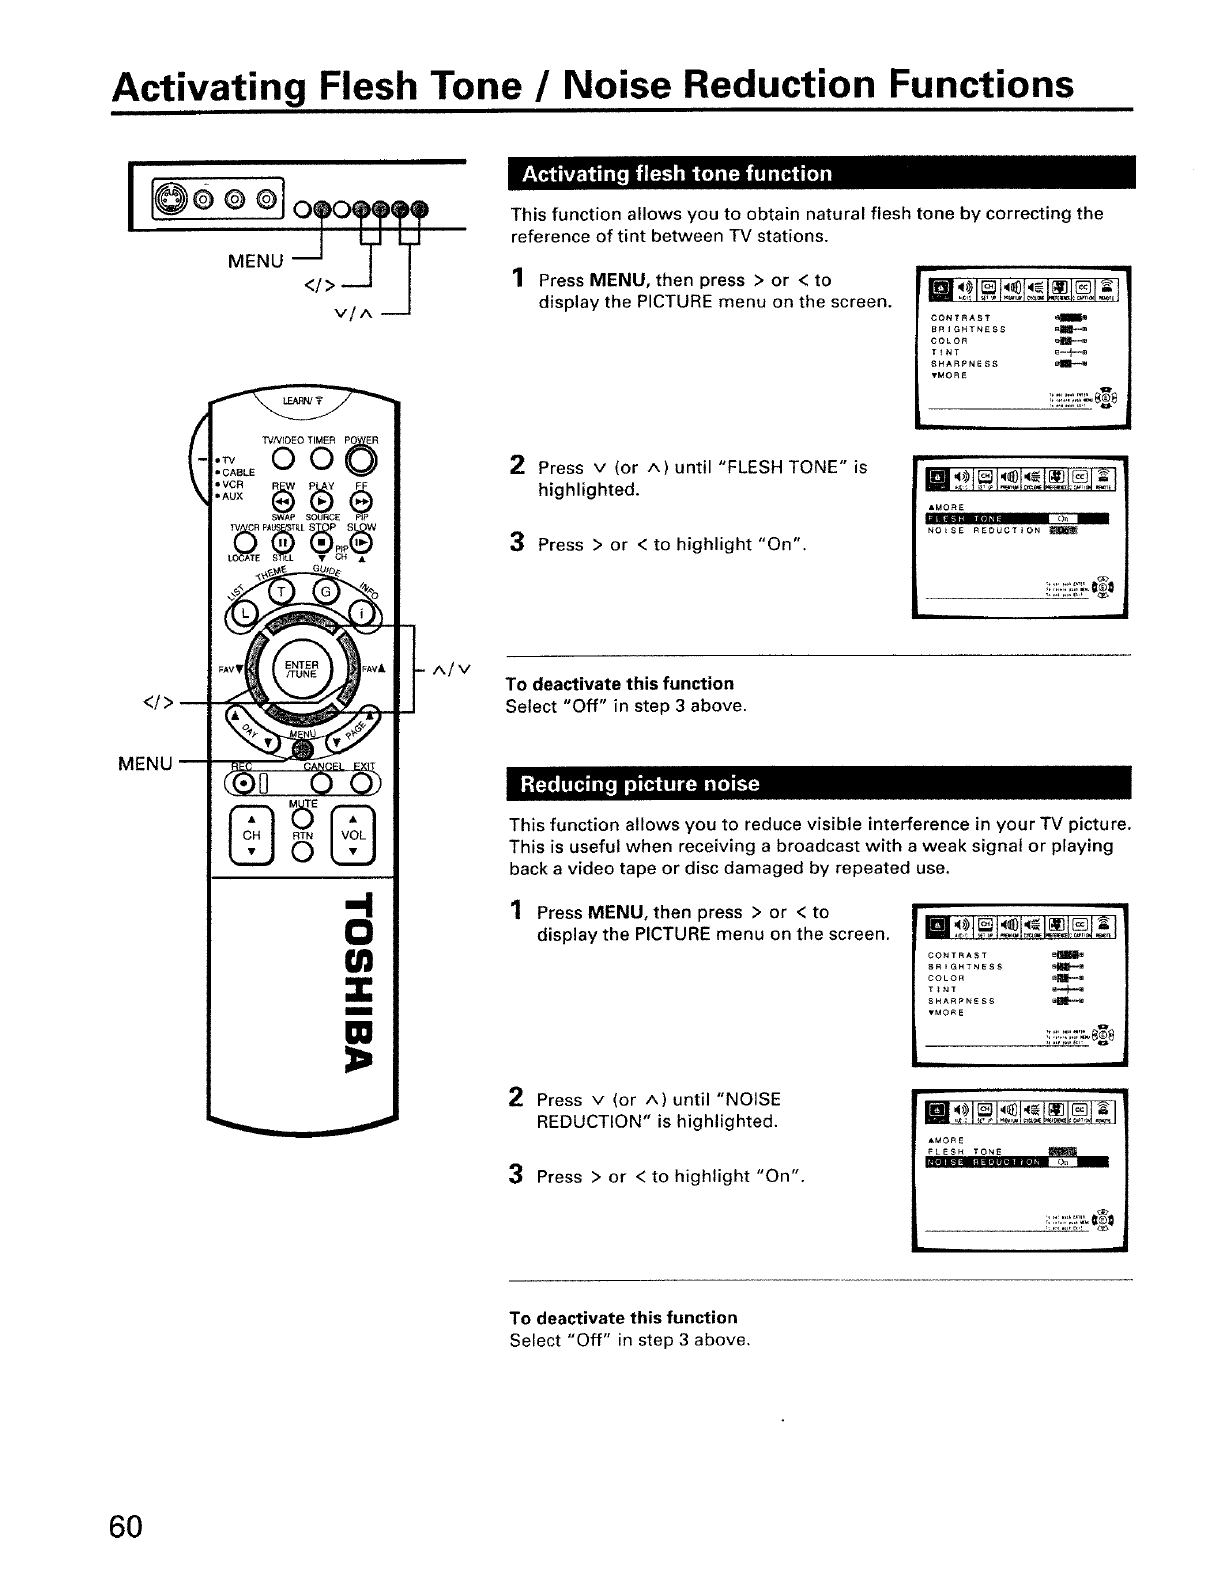
Activating Flesh Tone /Noise Reduction Functions
I
-4
0
(n
m
W
This function allows you to obtain natural flesh tone by correcting the
reference of tint between TV stations.
1Press MENU, then press > or <to
display the PICTURE menu on the screen,
2Press v (or ^) until "FLESH TONE" is
highlighted.
3Press > or <to highlight "On".
CONTRAST _m
BRIGHTNESS _-m
COLOR _-m
TiNT B--JC-_B
SHARPNESB _r-e
VMORE
AMORE
NO_$E REDUCTION
To deactivate this function
Select "Off" in step 3 above.
This function allows you to reduce visible interference in your TV picture.
This is useful when receiving a broadcast with a weak signal or playing
back a video tape or disc damaged by repeated use.
Press MENU, then press > or < to
display the PICTURE menu on the screen.
CONTRAST B_m
BRIGHTNESS B_m
COLOR B_--m
TINT a--J_
SHARPNESS a_--_
TMO_E
2Press v (or ^) until "NOISE
REDUCTION" is highlighted.
3Press > or < to highlight "On".
•.M0 r_E
FLESH TO_E
m_ ..... 0=_
iili,'.!i;,)ii_-a_O
To deactivate this function
Select "Off" in step 3 above.
60
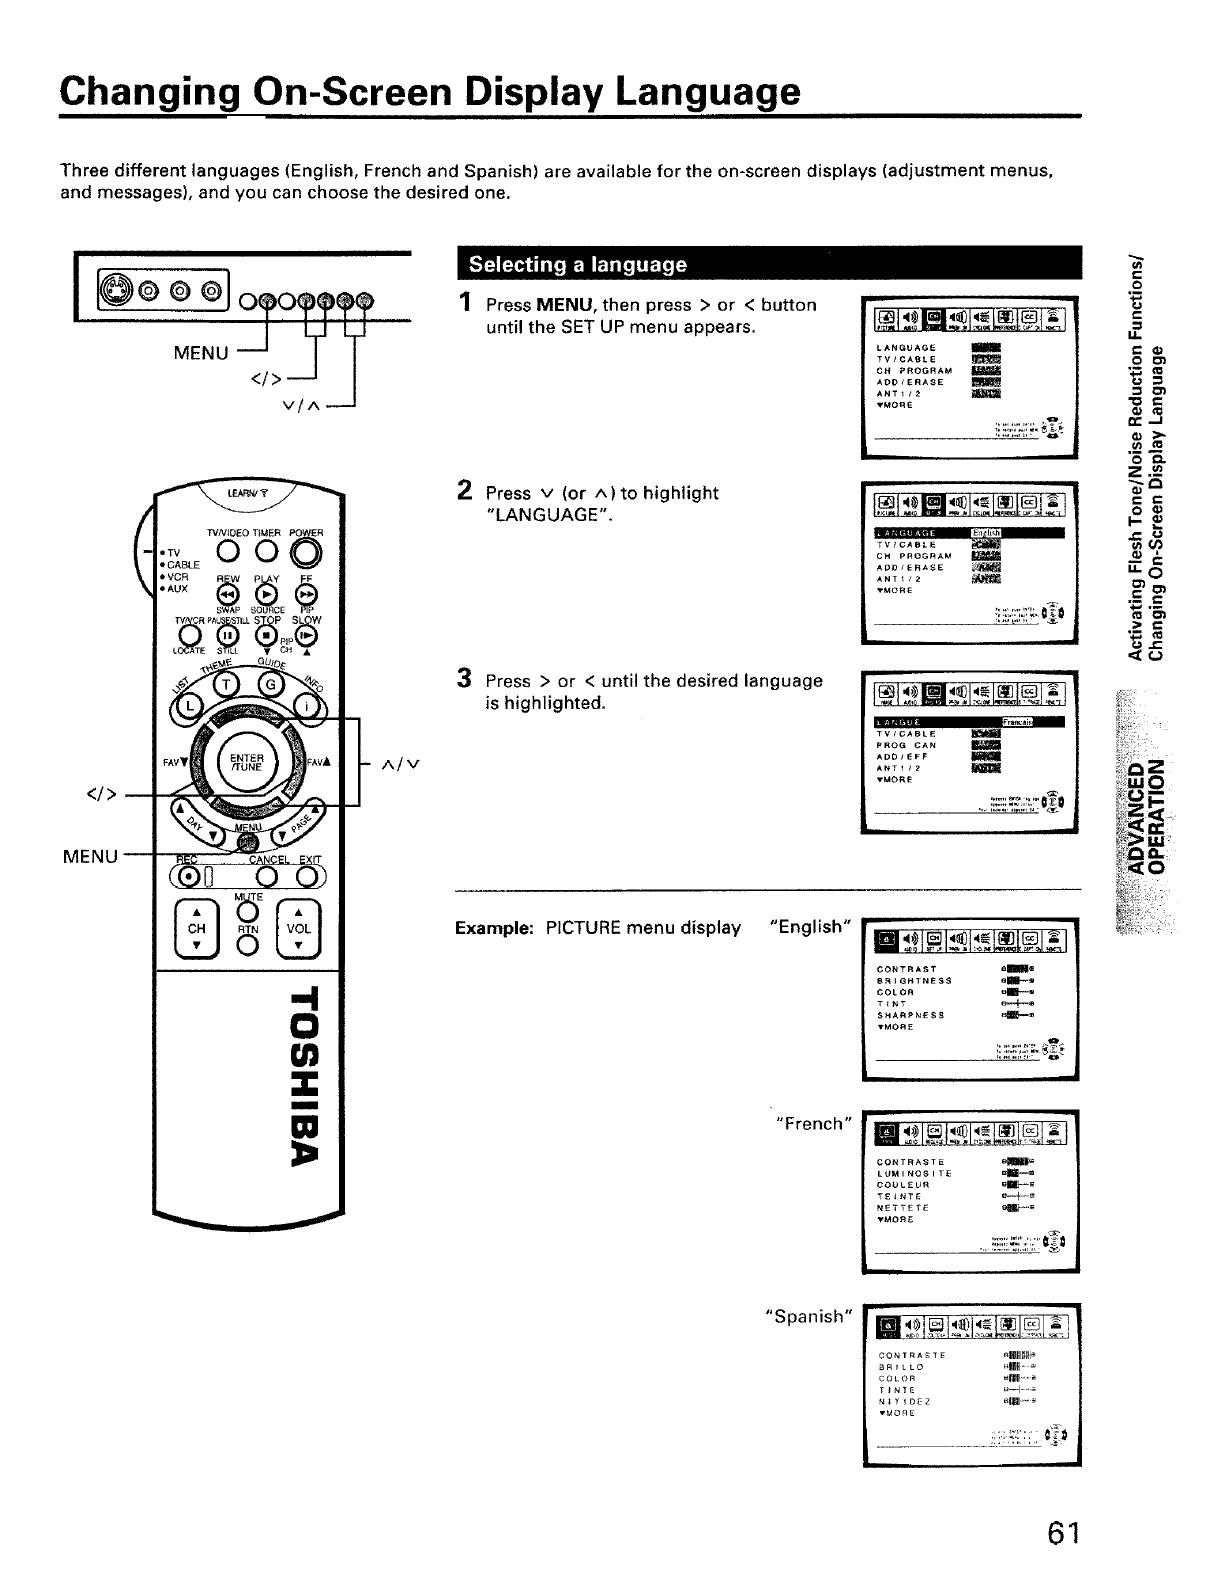
Changing On-Screen Display Language
Three different languages (English, French and Spanish) are available for the on-screen displays (adjustment menus,
and messages), and you can choose the desired one.
</>
,,,,i
t,ll
m
A/V
1 Press MENU, then press > or < button
until the SET UP menu appears.
2Press v (or A)tO highlight
"LANGUAGE".
3Press > or < until the desired language
is highlighted.
LANGUAGE m
TVICABLE
OH PROGRAM I
AOOYERASE
ANTI/2
TMORE
r-- ........ E_I_
TV/CABLE
GH PROGRAM t
ADDIERASE _
ANTl/Z
T_ORE
- ........j
TV/CABLE
PROG CAN
AOD/EFF I_
ANTI/2 I
Example: PICTURE menu display "English"
"French"
"Spanish"
-- (
CONTRAST al_m_m
BR(GHTNESS ell_m
COLOR ml_--s
_MOR_
IIIIII1
CO_TRAST_ _|_
LUMINO_IT_ B_
COUL£UR mR_--m
NETTETE _.--,m
_MO_E
CONTO_O oil_
COLOR _|1-_
YINT_
N(T(O_Z a(II " _
U.
O
e_.J
._
_'N
61
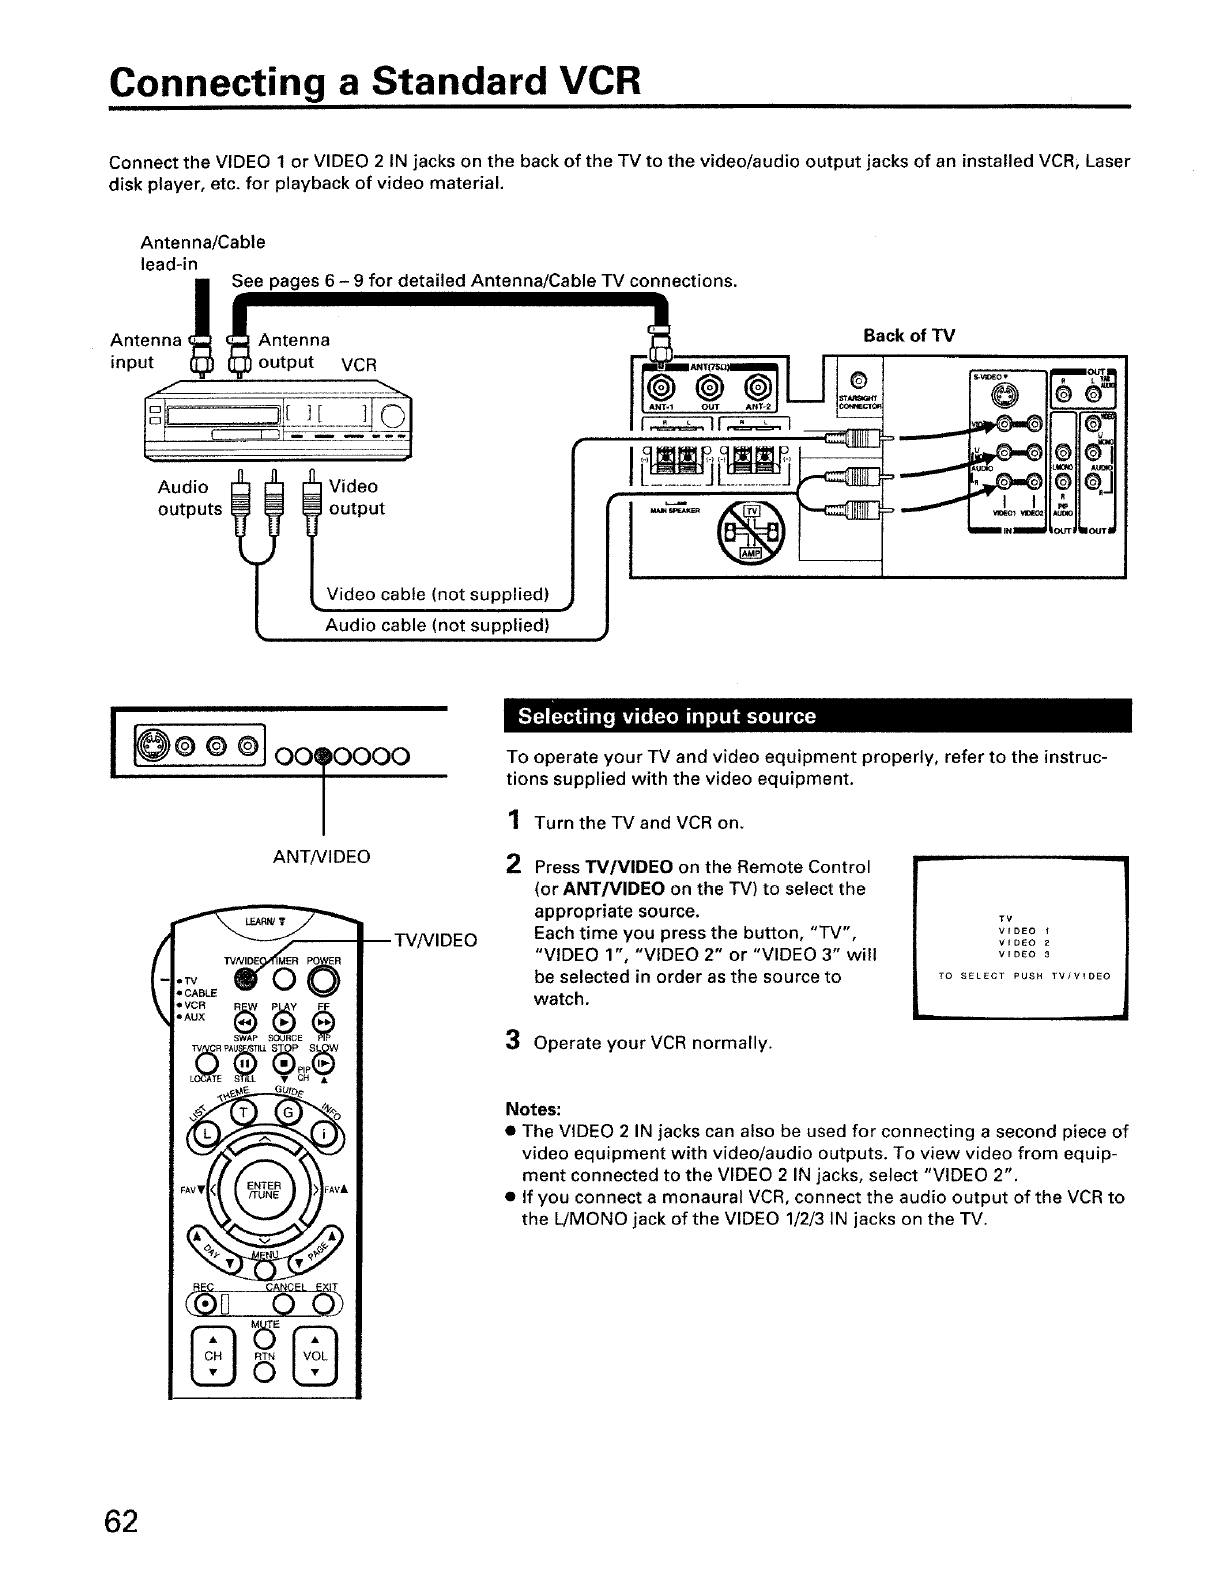
Connecting a Standard VCR
Connect the VIDEO 1 or VIDEO 2 IN jacks on the back of the TV to the video/audio output jacks of an installed VCR, Laser
disk player, etc. for playback of video material.
Antenna/Cable
lead-in
See pages 6 - 9 for detailed Antenna/Cable TV connections.
Antenna,
input
/"
Audio
outputs
Antenna Back of "IV
output VCR
l Video
output
Video cable (not supplied)
Audio cable (not supplied)
@ ee °
_,_ _mt_ ''-'1 I''_
_ _ 0110"_
mmmm INN Fo_lr JI O_fTI
i
I ooo,oomoooo
ANTNIDEO
• CABLE
.vo.
•AUX
SWAP SOURCE
TV/VIDEO
To operate your TV and video equipment properly, refer to the instruc-
tions supplied with the video equipment.
1 Turn the TV and VCR on.
2Press TM/VIDEO on the Remote Control
(or ANT/VIDEO on the TV) to select the
appropriate source.
Each time you press the button, "TV',
"VIDEO 1", "VIDEO 2" or "VIDEO 3" will
be selected in order as the source to
watch.
3Operate your VCR normally.
TV
VIDEO
VIDEO 2
VIDEO 3
TO SELECT PUSH TV/V_DEO
L_
Notes:
•The VIDEO 2 IN jacks can also be used for connecting a second piece of
video equipment with video/audio outputs. To view video from equip-
ment connected to the VIDEO 2 IN jacks, select "VIDEO 2".
• If you connect a monaural VCR, connect the audio output of the VCR to
the L/MONO jack of the VIDEO 1/2/3 IN jacks on the TV.
62
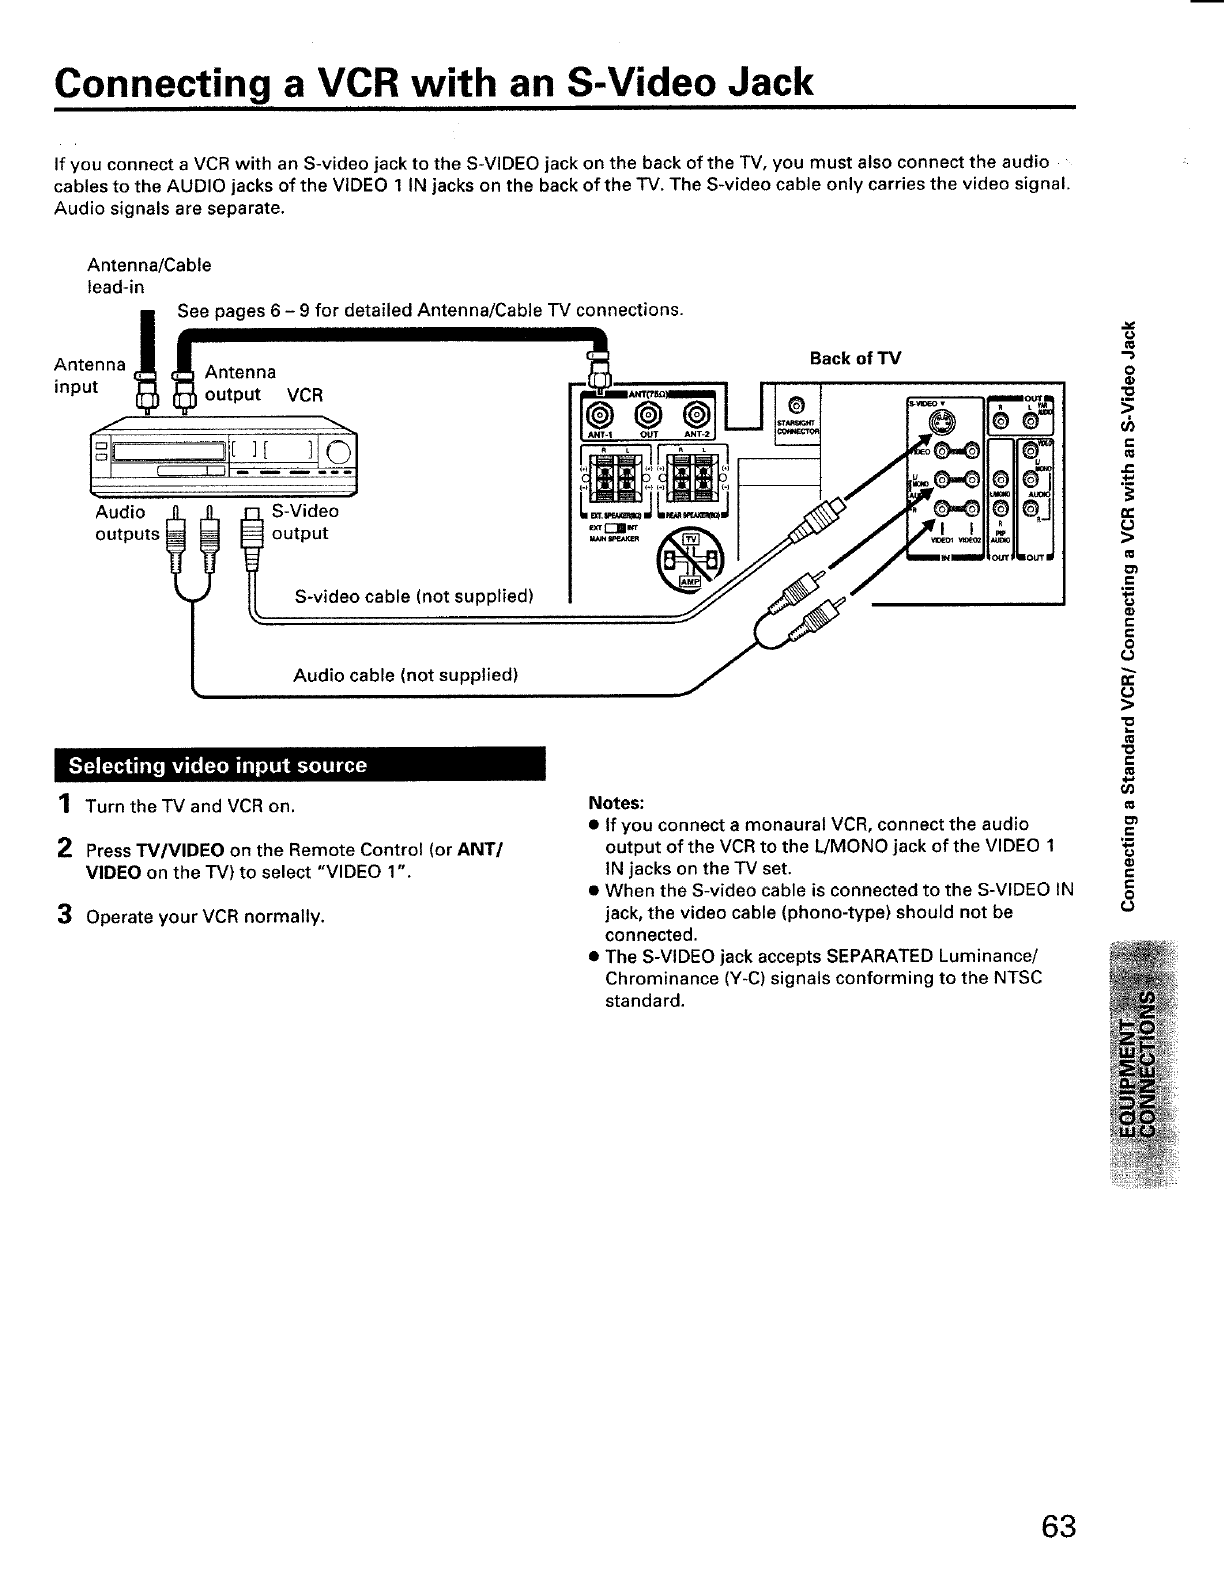
Connecting a VCR with an S-Video Jack
If you connect a VCR with an S-video jack to the S-VIDEO jack on the back of the TV, you must also connect the audio
cables to the AUDIO jacks of the VIDEO 1 IN jacks on the back of the TV, The S-video cable only carries the video signal.
Audio signals are separate.
Antenna _ _ Antenna
input output
o u:,sllI
Antenna/Cable
lead-in
See pages 6 -9 for detailed Antenna/Cable TV connections.
VCR
S-Video
output
S-video cable (not supplied)
Audio cable (not supplied)
1 Turn the TV and VCR on.
Back of TV
ii i:,:i ii ,_._ Oil
I I .......
2Press TV/VIDEO on the Remote Control (or ANT/
VIDEO on the "I'V)to select "VIDEO 1".
3 Operate your VCR normally.
Notes:
• if you connect a monaural VCR, connect the audio
output of the VCR to the L!MONO jack of the VIDEO 1
IN jacks on the "IV set,
• When the S-video cable is connected to the S-VIDEO IN
jack, the video cable (phono-type) should not be
connected.
• The S-VIDEO jack accepts SEPARATED Luminance/
Chrominance (Y-C) signals conforming to the NTSC
standard.
11
o
ql
>
t-
€I
J=
1¢
>
II
._=
i-
o
cJ
>
"o
p,
11
d-*
¢q
11
f-
ro
f-
c-
o
63
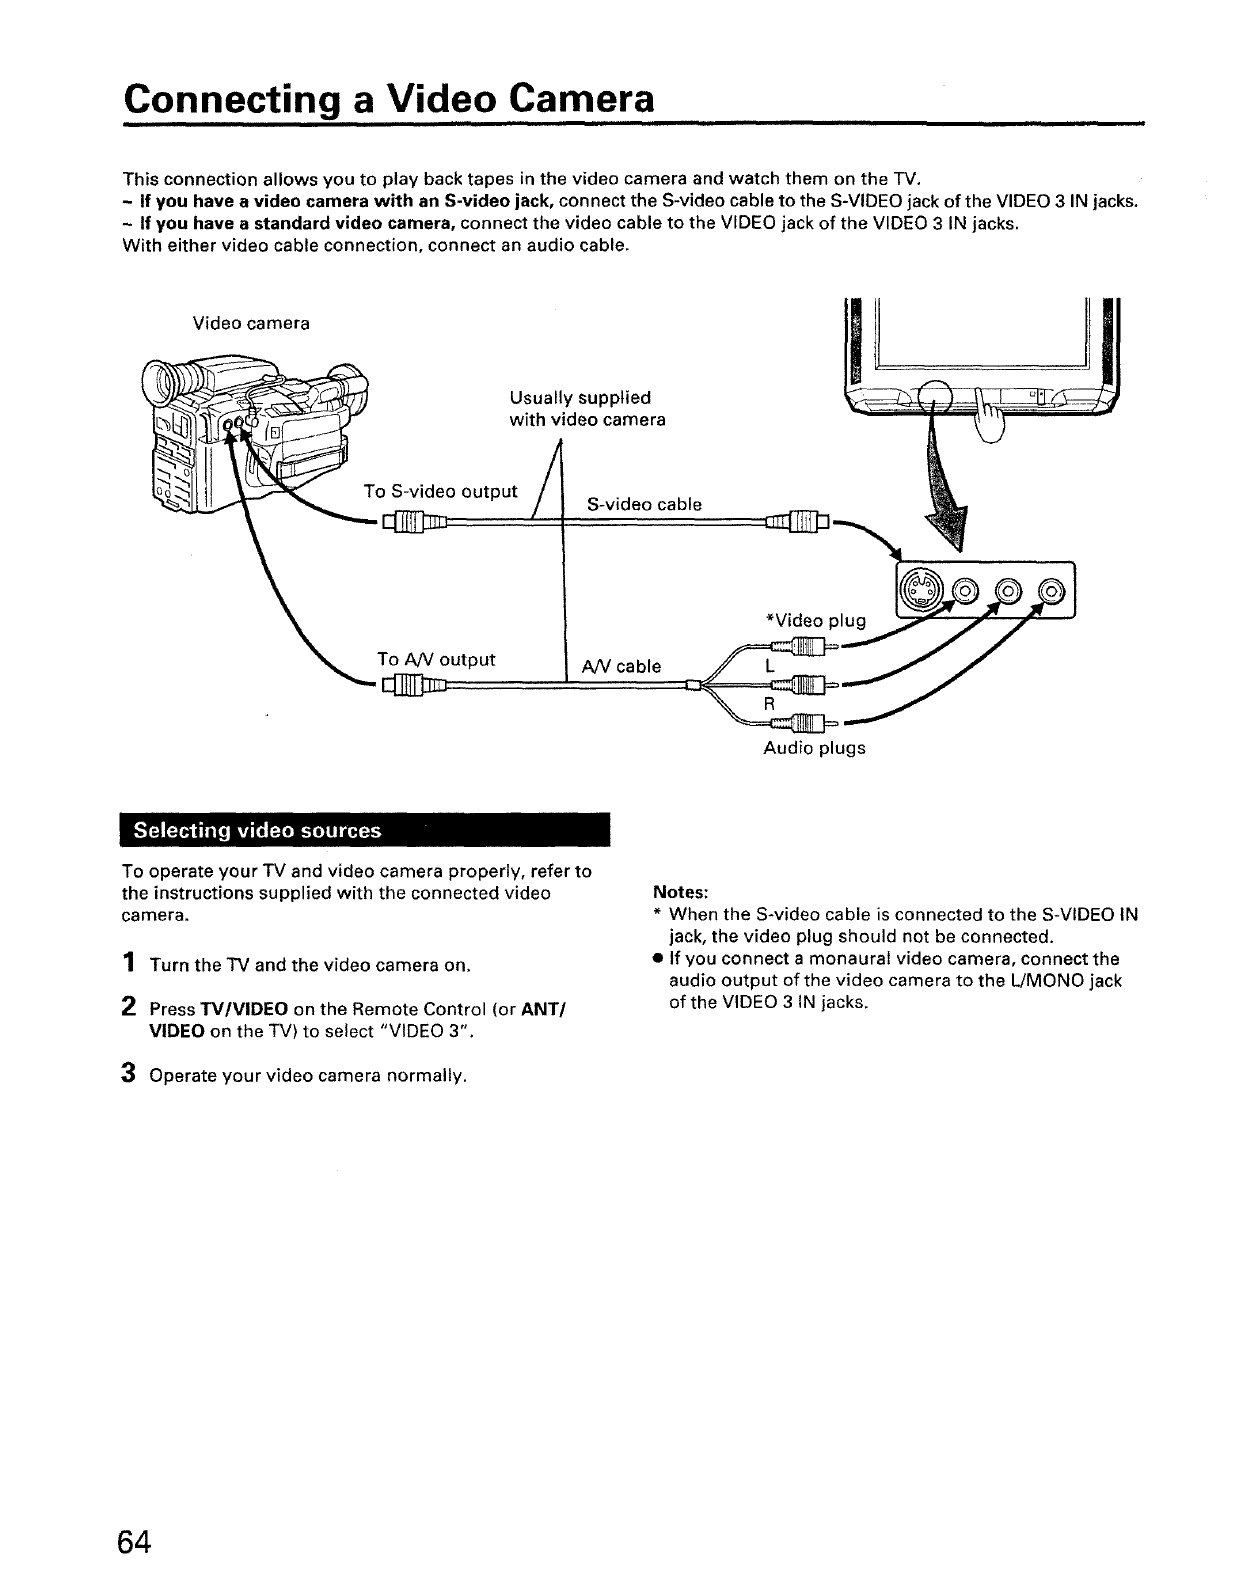
Connecting a Video Camera
This connection allows you to play back tapes in the video camera and watch them on the TV.
- If you have a video camera with an S-video jack, connect the S-video cable to the S-VIDEO jack of the VIDEO 3 IN jacks.
~ If you have a standard video camera, connect the video cable to the VIDEO jack of the VIDEO 3 IN jacks.
With either video cable connection, connect an audio cable.
Video camera
Usually supplied
with video camera
/
To S-video output
_To AN output
i A/V cable
S-video cable
*Video plug
Audio plugs
To operate your TV and video camera properly, refer to
the instructions supplied with the connected video
camera.
1 Turn the TV and the video camera on.
2Press TV/VIDEO on the Remote Control (or ANT/
VIDEO on the TV) to select "VIDEO 3".
3 Operate your video camera normally.
Notes:
* When the S-video cable is connected to the S-VIDEO IN
jack, the video plug should not be connected.
• If you connect a monaural video camera, connect the
audio output of the video camera to the L/MONO jack
of the VIDEO 3 IN jacks.
64
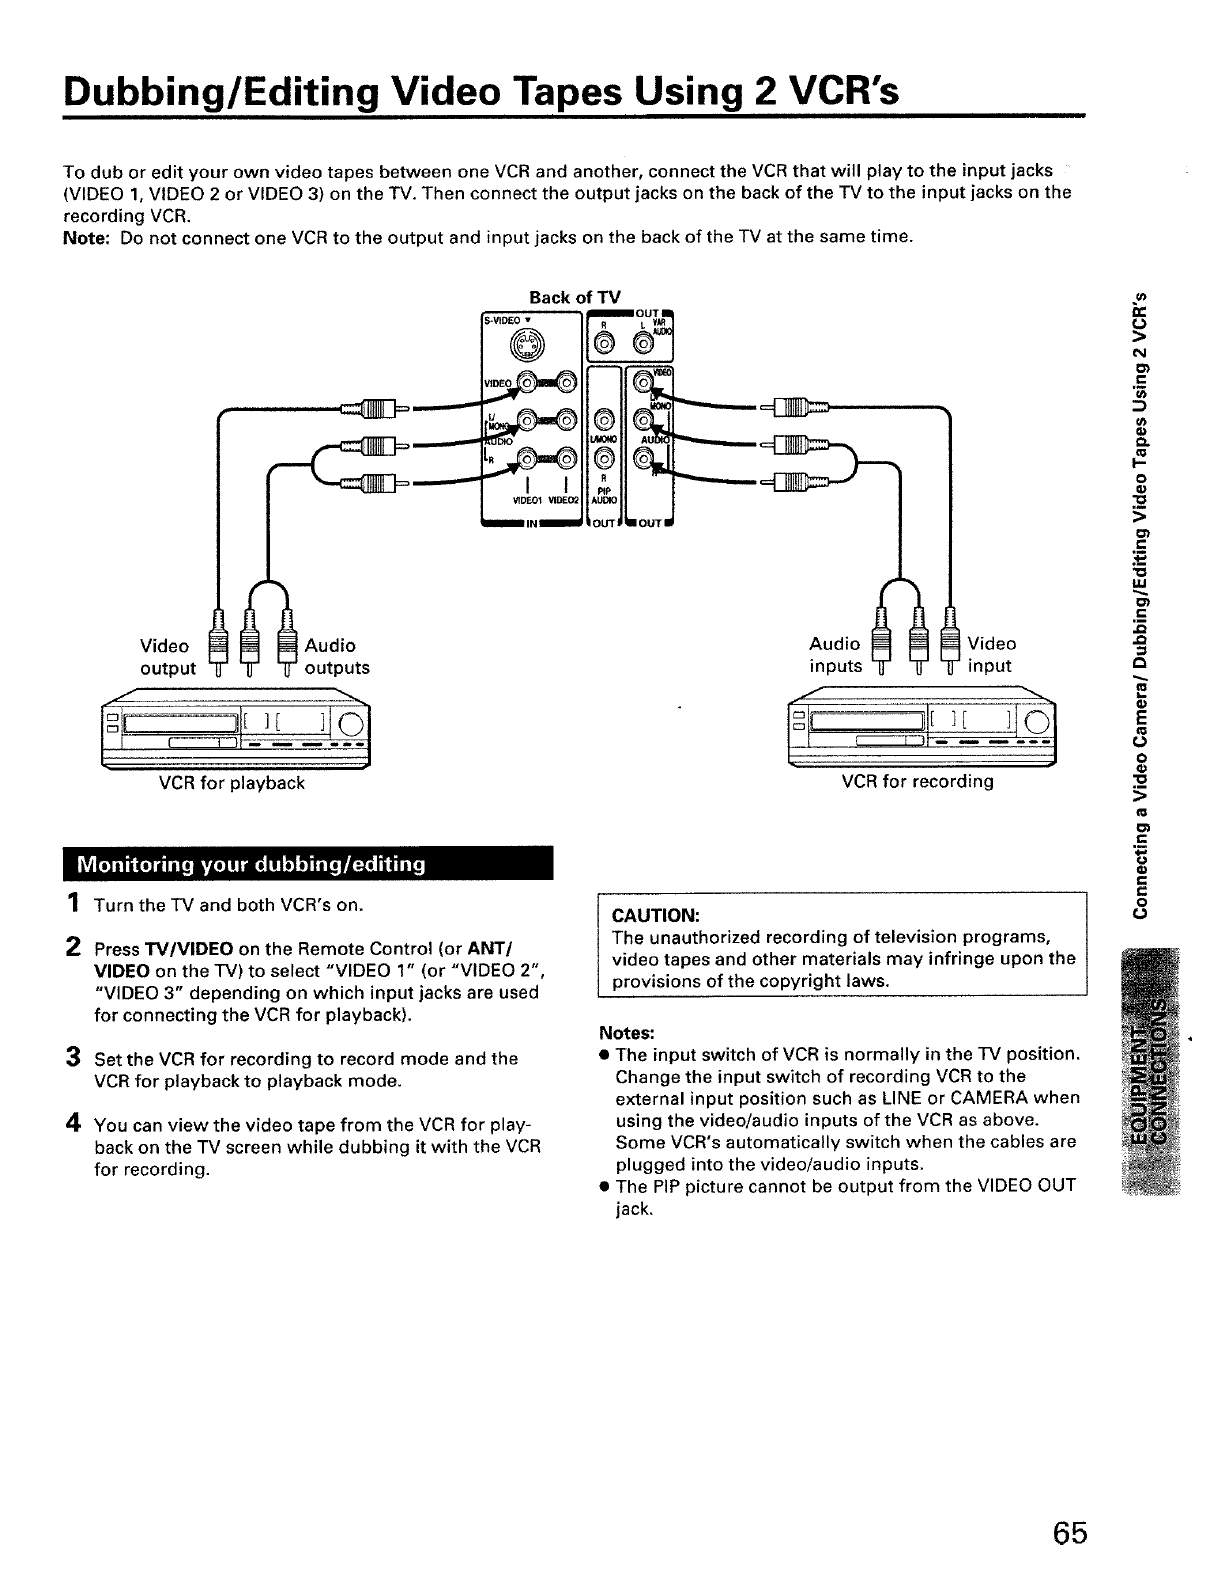
Dubbing/Editing Video Tapes Using 2 VCR's
To dub or edit your own video tapes between one VCR and another, connect the VCR that will play to the input jacks
(VIDEO 1, VIDEO 2 or VIDEO 3) on the TV. Then connect the output jacks on the back of the TV to the input jacks on the
recording VCR.
Note: Do not connect one VCR to the output and input jacks on the back of the TV at the same time.
Video
output
Back of TV
S-VIDE0 v
@ 6
Jo,
IIIIIIIIIIIIIII1_IN mnllm
N N Audio
-g "g" outputs
J
VCR for playback
1 Turn the TV and both VCR's on.
®
@
R
FtP
AUDIO
OUT
OUT
/IOUTI
Audio N N Video
inputs y y -0- input
VCR for recording
2Press TV/VIDEO on the Remote Control (or ANTI
VIDEO on the TV) to select "VIDEO 1" (or "VIDEO 2",
"VIDEO 3" depending on which input jacks are used
for connecting the VCR for playback).
3 Set the VCR for recording to record mode and the
VCR for playback to playback mode.
4You can view the video tape from the VCR for play-
back on the TV screen while dubbing it with the VCR
for recording.
CAUTION:
The unauthorized recording of television programs,
video tapes and other materials may infringe upon the
provisions of the copyright laws.
Notes:
• The input switch of VCR is normally in the TV position.
Change the input switch of recording VCR to the
external input position such as LINE or CAMERA when
using the video!audio inputs of the VCR as above.
Some VCR's automatically switch when the cables are
plugged into the video/audio inputs.
• The PIP picture cannot be output from the VIDEO OUT
jack.
(J
>
CN
.=_
u}
I-
O
e-
IJJ
O1
€
.m
,J=
G)
E
o
I-
C
O
cJ
65
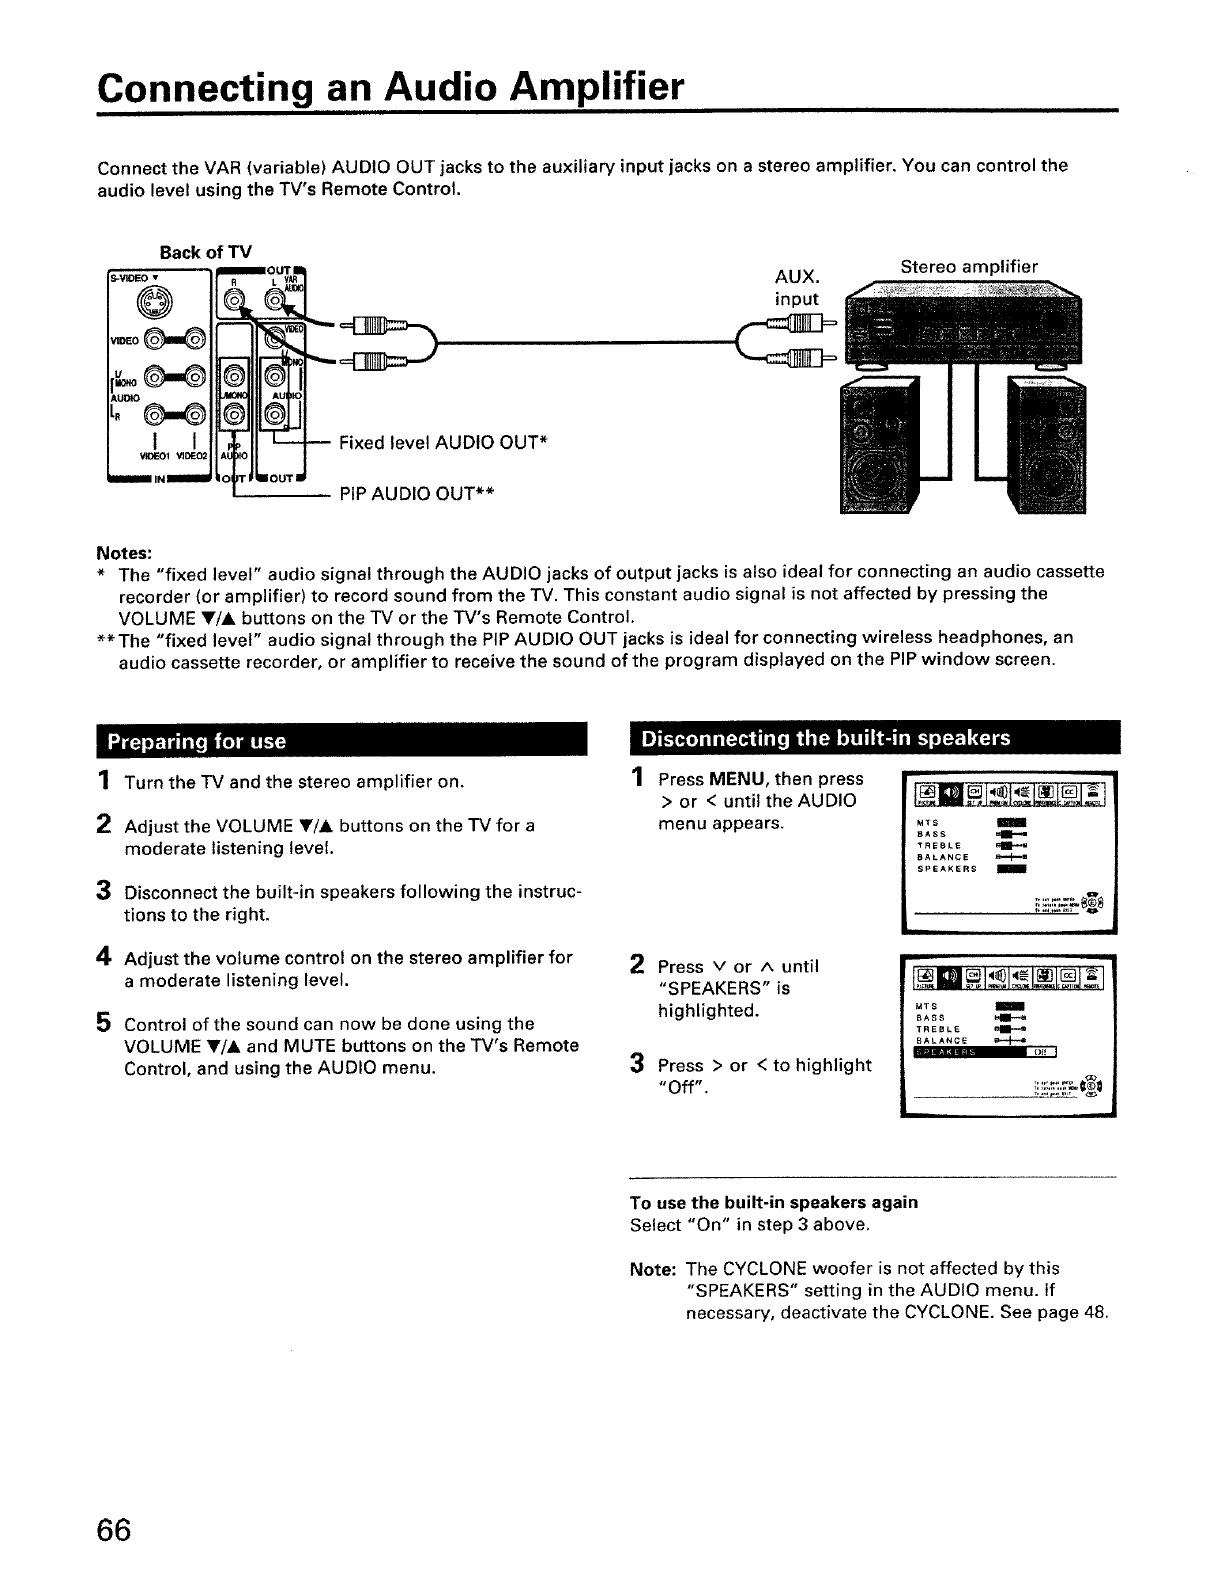
Connecting an Audio Amplifier
Connect the VAR (variable) AUDIO OUT jacks to the auxiliary input jacks on a stereo amplifier, You can control the
audio level using the TV's Remote Control.
Fixed level AUDIO OUT*
PIP AUDIO OUT**
AUX.
input
Stereo amplifier
Notes:
* The "fixed level" audio signal through the AUDIO jacks of output jacks is also ideal for connecting an audio cassette
recorder (or amplifier) to record sound from the TV. This constant audio signal is not affected by pressing the
VOLUME T/A buttons on the TV or the TV's Remote Control.
**The "fixed level" audio signal through the PIP AUDIO OUT jacks is ideal for connecting wireless headphones, an
audio cassette recorder, or amplifier to receive the sound of the program displayed on the PIP window screen.
1Turn the TV and the stereo amplifier on,
2Adjust the VOLUME Y/A buttons on the TV for a
moderate listening level.
3Disconnect the built-in speakers following the instruc-
tions to the right.
4Adjust the volume control on the stereo amplifier for
a moderate listening level.
5Control of the sound can now be done using the
VOLUME Y/A and MUTE buttons on the TV's Remote
Control, and using the AUDIO menu,
1Press MENU, then press
>or < until the AUDIO
menu appears.
2Press v or ^ until
"SPEAKERS" is
highlighted.
3 Press > or < to highlight
"Off".
MTS
BASS
TREBLE
BALANCE 8*,-p-=
SPEAKERS
MTS
BASS _1_
TREBLE ml_-_
BALANCE
Ot_ J
To use the built-in speakers again
Select "On" in step 3 above.
Note: The CYCLONE woofer is not affected by this
"SPEAKERS" setting in the AUDIO menu. If
necessary, deactivate the CYCLONE. See page 48,
66
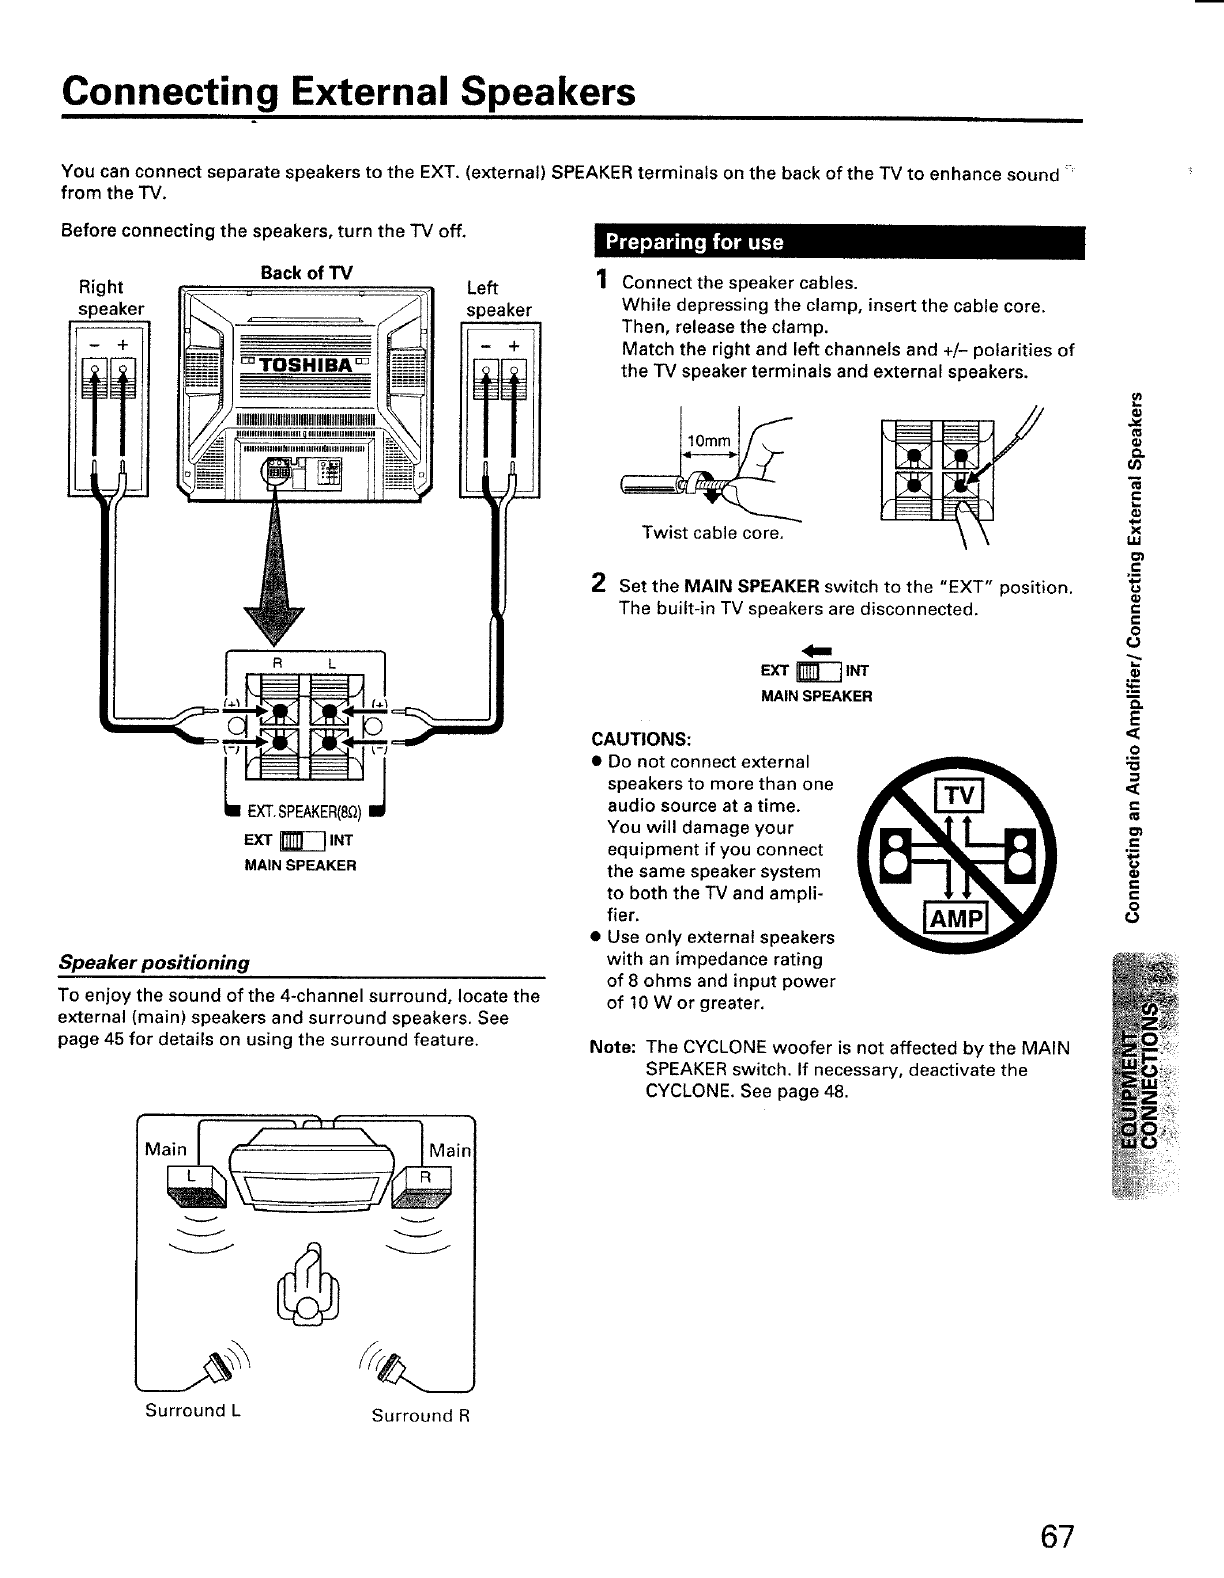
Connecting External Speakers
You can connect separate speakers to the EXT. (external) SPEAKER terminals on the back of the TV to enhance sound _
from the TV.
Before connecting the speakers, turn the TV off.
Right
s._peaker
I
i
jt
Back of TV
===-=__TOSHIBA[= :=_=:
==_*.==:
lllllllllllllllllllllllllfllllllllHlllllllfllllllllll
Left
speaker
I R L J
L .SpEAKER 'O 'J
EXT _INT
MAIN SPEAKER
Speaker positioning
To enjoy the sound of the 4-channel surround, locate the
external (main) speakers and surround speakers, See
page 45 for details on using the surround feature.
v
Surround L Surround R
Connect the speaker cables.
While depressing the clamp, insert the cable core.
Then, release the clamp.
Match the right and left channels and +/- polarities of
the TV speaker terminals and external speakers.
Twist cable core.
2Set the MAIN SPEAKER switch to the "EXT" position.
The built-in TV speakers are disconnected.
EXT _INT
MAIN SPEAKER
CAUTIONS:
• Do not connect external
speakers to more than one
audio source at a time.
You will damage your
equipment if you connect
the same speaker system
to both the TV and ampli-
fier.
•Use only external speakers
with an impedance rating
of 8 ohms and input power
of 10 W or greater,
Note: The CYCLONE woofer is not affected by the MAIN
SPEAKER switch. If necessary, deactivate the
CYCLONE. See page 48.
,=
u)
E
X
LM
C
e-
e=
o
e_
E
.9
e-
e-
¢D
=
c
o
67
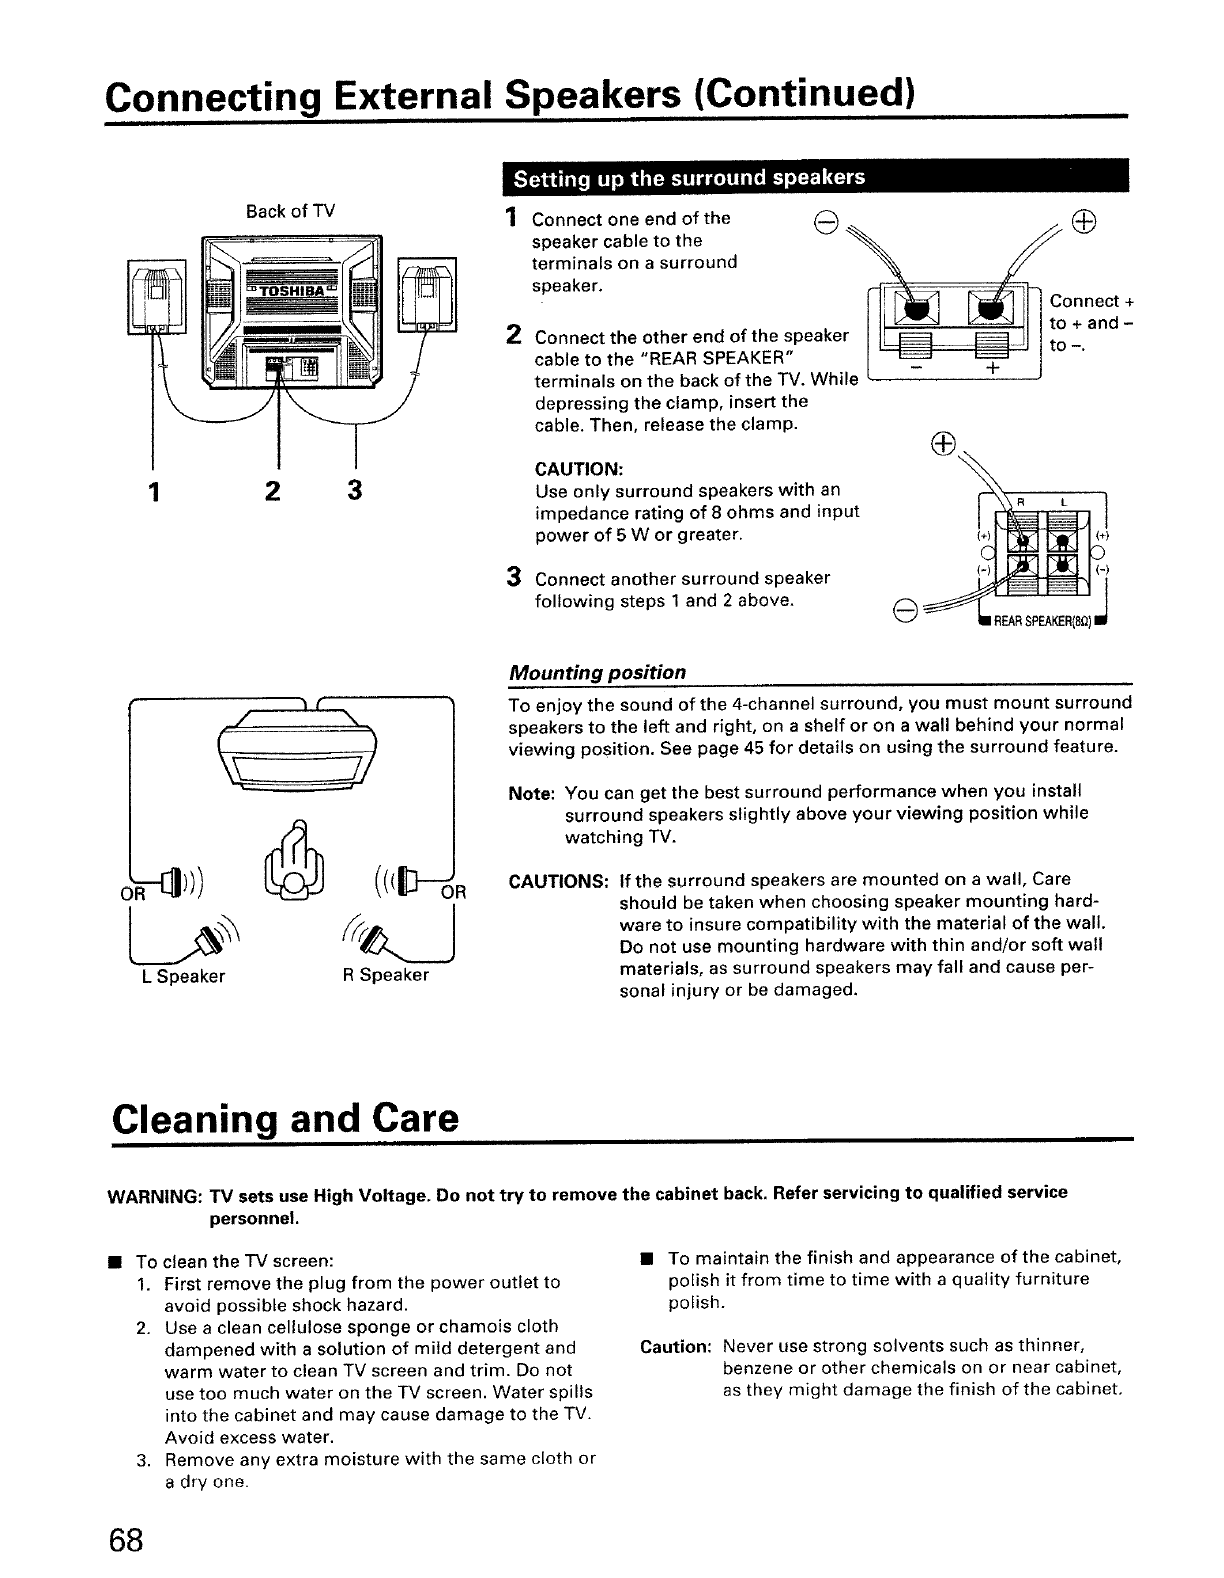
Connecting External Speakers (Continued)
Back of TV
1 2 3
L Speaker R Speaker
1Connect one end of the _
speaker cable to the _/J
terminals on a surround _ _/
speaker. _r--_=_
J If I_iiiii_i I_il_(! il JConnect +
III _ _ II Jto+and-
2Connect theotherendofthespeaker J J[ _ E_] jJ jio
cable to the "REAR SPEAKER" [_ I -"
term nas on the back of the TV. Whale L• J
depressing the clamp, insert the
cable. Then, release the clamp.
CAUTION:
Use only surround speakers with an
impedance rating of 8 ohms and input
power of 5 W or greater.
3Connect another surround speaker
following steps 1 and 2 above.
L]
(+) (+)
Mounting position
To enjoy the sound of the 4-channel surround, you must mount surround
speakers to the left and right, on a shelf or on a wall behind your normal
viewing position. See page 45 for details on using the surround feature.
Note: You can get the best surround performance when you install
surround speakers slightly above your viewing position while
watching TV.
CAUTIONS: If the surround speakers are mounted on a wall, Care
should be taken when choosing speaker mounting hard-
ware to insure compatibility with the material of the wall.
Do not use mounting hardware with thin and/or soft wall
materials, as surround speakers may fall and cause per-
sonal injury or be damaged.
Cleaning and Care
WARNING: TV sets use High Voltage. Do not try to remove the cabinet back. Refer servicing to qualified service
personnel.
• To
1.
clean the TV screen:
First remove the plug from the power outlet to
avoid possible shock hazard.
2. Use a clean cellulose sponge or chamois cloth
dampened with a solution of mild detergent and
warm water to clean TV screen and trim. Do not
use too much water on the TV screen, Water spills
into the cabinet and may cause damage to the TV.
Avoid excess water.
3. Remove any extra moisture with the same cloth or
a dry one.
• To maintain the finish and appearance of the cabinet,
polish it from time to time with a quality furniture
polish.
Caution: Never use strong solvents such as thinner,
benzene or other chemicals on or near cabinet,
as they might damage the finish of the cabinet.
68
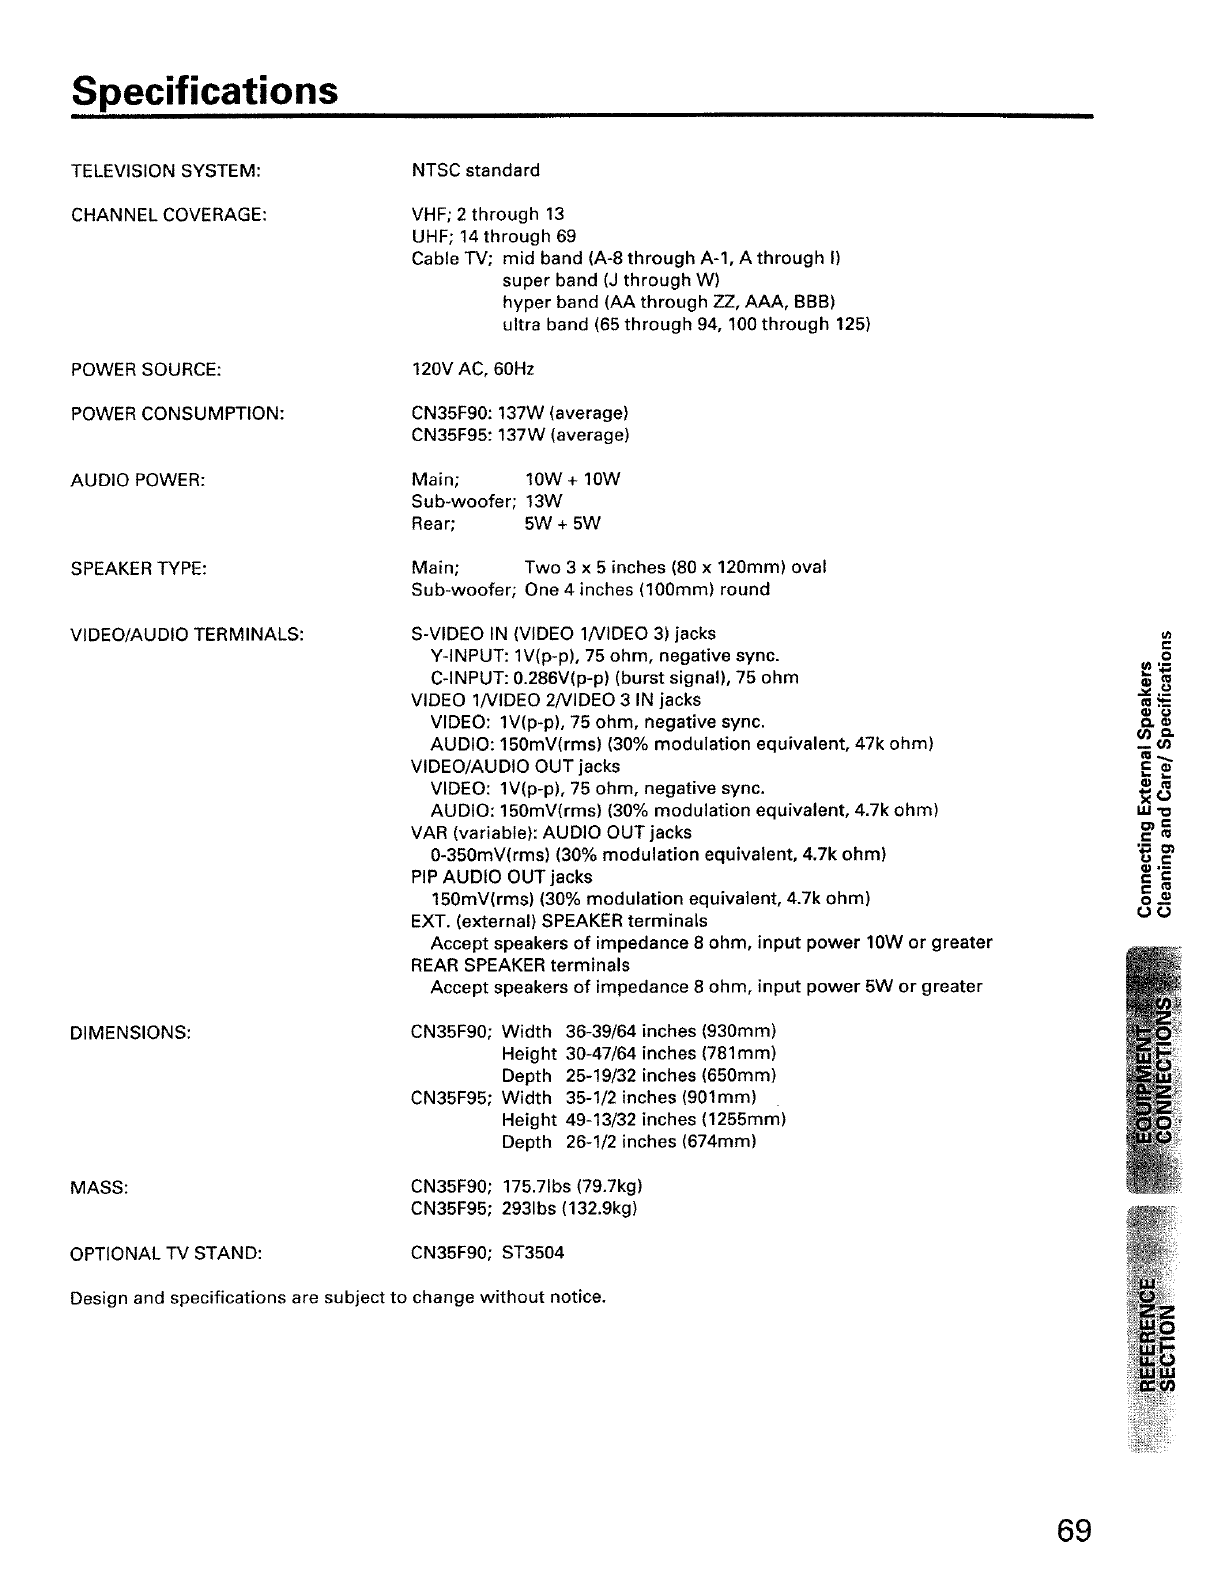
Specifications
TELEVISION SYSTEM: NTSC standard
CHANNEL COVERAGE: VHF; 2 through 13
UHF; 14 through 69
Cable TV; mid band (A-8 through A-l, A through I)
super band (J through W)
hyper band (AA through ZZ, AAA, BBB)
ultra band (65 through 94, 100 through 125)
POWER SOURCE: 120V AC, 60Hz
POWER CONSUMPTION: CN35F90: 137W (average)
CN35F95: 137W (average)
AUDIO POWER: Main; 10W + 10W
Sub-woofer; 13W
Rear; 5W + 5W
SPEAKER TYPE: Main; Two 3 x 5 inches (80 x 120mm) oval
Sub-woofer; One 4 inches (100mm) round
VIDEO/AUDIO TERMINALS: S-VIDEO IN (VIDEO 1NIDEO 3) jacks
Y-INPUT: 1V(p-p), 75 ohm, negative sync.
C-INPUT: 0.286V(p-p) (burst signal), 75 ohm
VIDEO 1NIDEO 2NIDEO 3 IN jacks
VIDEO: 1V(p-p), 75 ohm, negative sync.
AUDIO: 150mV(rms) (30% modulation equivalent, 47k ohm)
VIDEO/AUDIO OUT jacks
VIDEO: 1V(p-p), 75 ohm, negative sync.
AUDIO: 150mV(rms) (30% modulation equivalent, 4.7k ohm)
VAR (variable): AUDIO OUT jacks
0-350mV(rms) (30% modulation equivalent, 4.7k ohm)
PIP AUDIO OUT jacks
150mV(rms) (30% modulation equivalent, 4.7k ohm)
EXT. (external) SPEAKER terminals
Accept speakers of impedance 8 ohm, input power 10W or greater
REAR SPEAKER terminals
Accept speakers of impedance 8 ohm, input power 5W or greater
DIMENSIONS: CN35F90;
CN35F95;
Width 36-39/64 inches (930mm)
Height 30-47/64 inches (781mm)
Depth 25-19/32 inches (650mm)
Width 35-1/2 inches (901mm)
Height 49-13/32 inches (1255mm)
Depth 26-1/2 inches (674mm)
MASS: CN35F90; 175.71bs (79.7kg)
CN35F95; 2931bs (132.9kg)
OPTIONAL TV STAND: CN35F90; ST3504
Design and specifications are subject to change without notice.
t-
O
C
Ce-
o_e
69
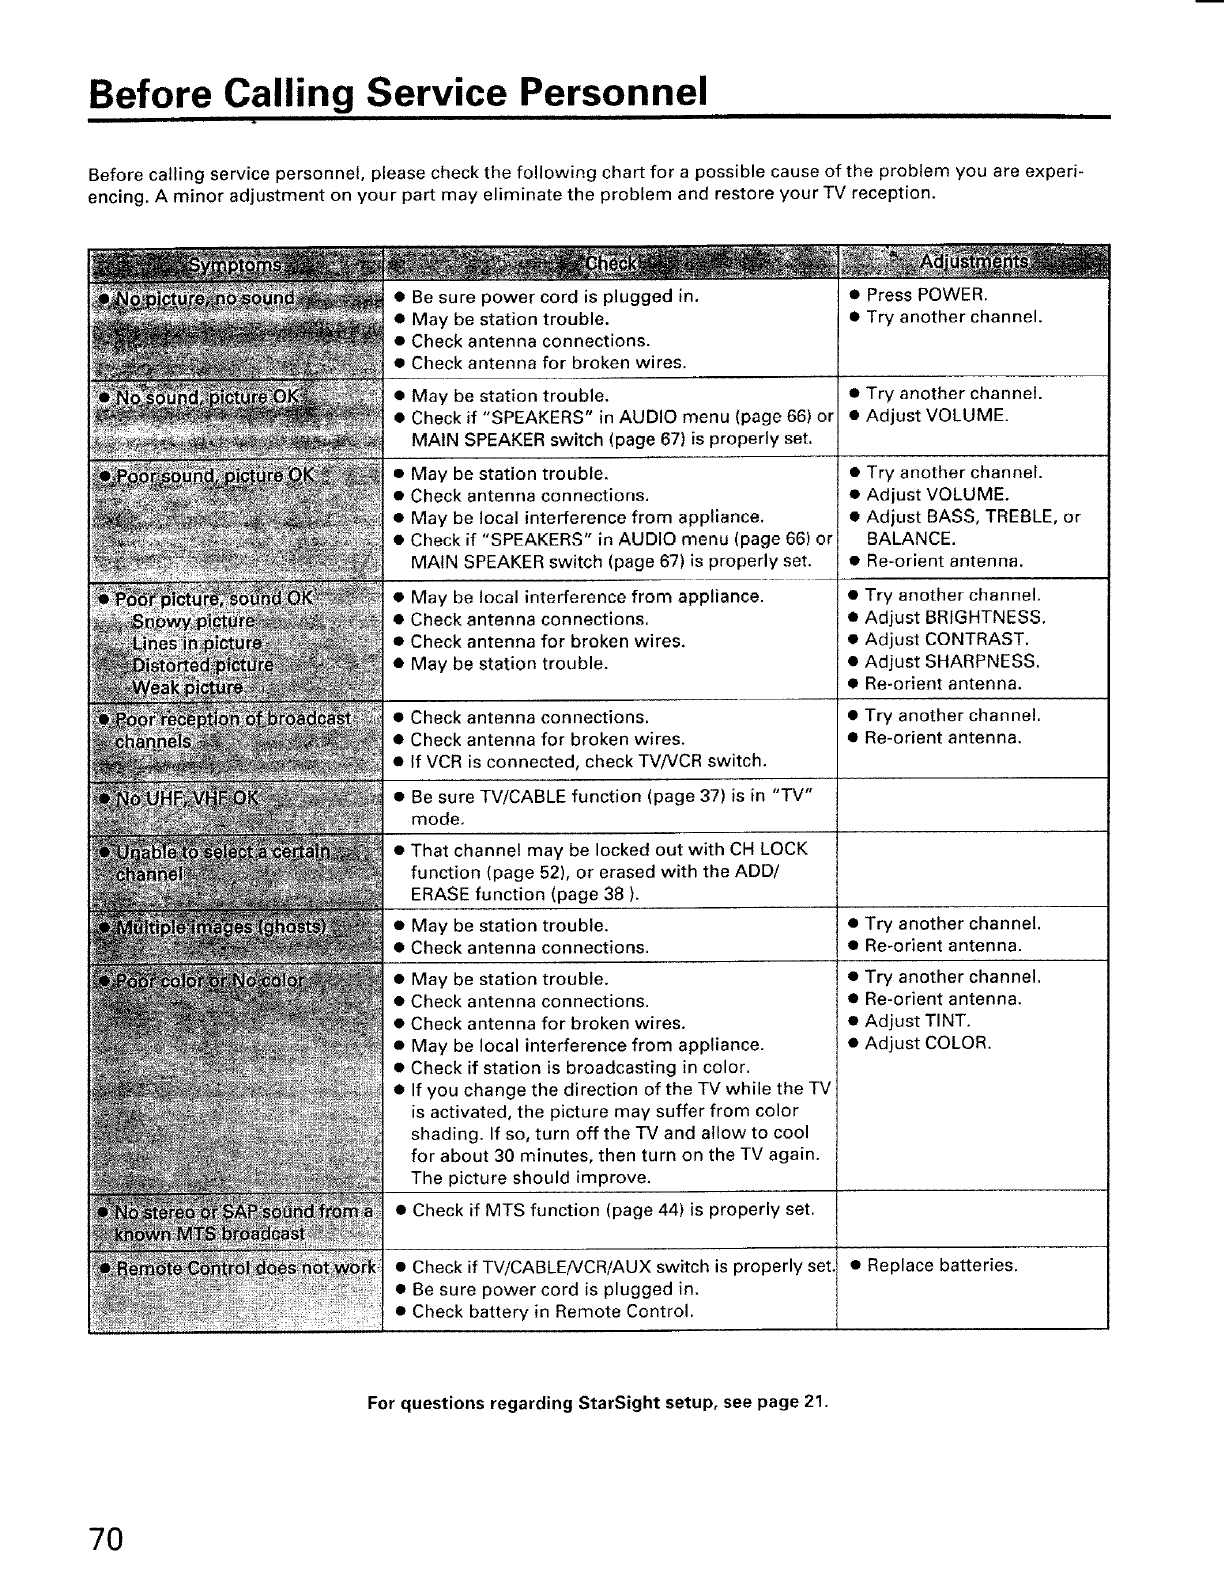
Before Calling Service Personnel
Before calling service personnel, please check the following chart for a possible cause of the problem you are experi-
encing. A minor adjustment on your part may eliminate the problem and restore your TV reception.
• Be sure power cord is plugged in. • Press POWER.
• May be station trouble. • Try another channel.
• Check antenna connections.
• Check antenna for broken wires.
•May be station trouble.
• Check if "SPEAKERS" in AUDIO menu (page 66) or
MAIN SPEAKER switch (page 67) is properly set.
•May be station trouble,
• Check antenna connections.
• May be local interference from appliance.
• Check if "SPEAKERS" in AUDIO menu (page 66) or
MAIN SPEAKER switch (page 67) is properly set.
• May be local interference from appliance.
• Check antenna connections.
• Check antenna for broken wires.
• May be station trouble.
• Try another channel.
• Adjust VOLUME.
• Try another channel.
• Adjust VOLUME.
• Adjust BASS, TREBLE, or
BALANCE.
• Re-orient antenna.
• Try another channel.
• Adjust BRIGHTNESS.
• Adjust CONTRAST.
• Adjust SHARPNESS.
• Re-orient antenna.
• Check antenna connections.
• Check antenna for broken wires.
• If VCR is connected, check TV/VCR switch.
• Be sure TV/CABLE function (page 37) is in "TV"
mode,
• That channel may be locked out with CH LOCK
function (page 52), or erased with the ADD/
ERASE function (page 38 ).
• May be station trouble.
• Check antenna connections.
• May be station trouble.
• Check antenna connections.
• Check antenna for broken wires.
• May be local interference from appliance.
• Check if station is broadcasting in color.
• If you change the direction of the TV while the TV
is activated, the picture may suffer from color
shading. If so, turn off the TV and allow to cool
for about 30 minutes, then turn on the TV again.
The picture should improve.
• Check if MTS function (page 44) is properly set.
• Try another channel.
• Re-orient antenna.
• Try another channel.
• Re-orient antenna.
• Try another channel.
• Re-orient antenna.
• Adjust TINT.
• Adjust COLOR.
• Check if TV/CABLENCR/AUX switch is properly set. • Replace batteries.
• Be sure power cord is plugged in.
• Check battery in Remote Control.
For questions regarding StarSight setup, see page 21.
70

Limited United States Warranty
Toshiba America Consumer Products, Inc. ('TACP') and Toshiba Hawaii Inc. ("THI") make the following limited warranties. These limited
warranties extend to the original consumer purchaser or any person receiving this set as a gift from the original consumer purchaser _nd
to no other purchaser or transferee.
Limited One (1) Year Warranty
TACP and THI warrant this product and its parts against defects in
materials or workmanship for a period of one (1) year after the date
of original retail purchase. During this period, TACP and THI will
repair a defective product or part, without charge to you. "Author-
ized TACP/THI service station personnel will come to your home
when warranty service is required. Depending on the type of repair
required, the service will either be performed in your home or the
set will be taken to the authorized TACP/THI service station for
repair and returned to your home at no cost to you."
Limited Two (2) Year Warranty of Picture Tube
TACP and THI further warrant the picture tube in this product
against defects in materials or workmanship for a period of two (2)
years after the date of original retail purchase. During this period,
TACP and THI will replace a defective picture tube without charge
to you, except that if a defective picture tube is replaced after one
(1) year from the date of the original retail purchase, you pay labor
charges involved in the replacement.
Owner's Manual and Registration Card
You should read this owner's manual thoroughly before operating
this product. You should also insure that your name and address
are on file as owner of a TACP/THI product by completing and
mailing the enclosed registration card within ten days after you, or
the person who has given you this product as agift, purchased this
product. This is one way to enable TACPFFHI to provide you with
better customer service and improved products. Failure to return
the card will not affect your rights under this warranty so long as
you retain other proof of purchase such as a bill of sale.
Your Responsibility
The above warranties are subject to the following conditions:
(1) You must retain your bill of sale or provide other proof of
purchase.
(2) All warranty servicing of this product must be made by an
Authorized TACP/THI Service Station.
(3) These warranties are effective only ifthe product is purchased
and operated in the U.S.A.
(4) Labor service charges for set installation, set up, adjustment of
customer controls and installation or repair of antenna sys-
tems are not covered by this warranty. Reception problems
caused by inadequate antenna systems are your responsibil-
ity.
(5) Warranties extend only to defects in materials or workmanship
as limited above and do not extend to any product or parts
which have been lost or discarded by you or to damage to
products or parts caused by misuse, accident, damage caused
by Acts of God, such as lightning or fluctuations in electric
power, improper installation, improper maintenance or use in
violation of instructions furnished by us; orto units which have
been altered or modified without authorization of TACP/THI or
to damage to products or parts thereof which have had the
serial number removed, altered, defaced or rendered illegible.
Step-By-Step Procedures - How to Obtain Warranty Service
If, after following all of the operating instructions in this manual and checking the section "BEFORE CALLING SERVICE PERSONNEL",
you find that service is needed;
(1) ContactoneoftheTACP/rHIServiceCenterslisted belowforwarrantyserviceorcallthe IN THE CONTINENTAL UNITED STATES
TACP toll free number 800-631-3811 within thirty (30) days after you find a defective Should your unit require service, Call
product or part to find the nearest TOSHIBA Authorized Service Station or any
authorized TOSHIBA dealer.
(2) Please present your bill of sale or other proof to the Authorized Service Station.
"Authorized TACP/THI service station personnel will cometoyour home when warranty
service is required. Depending on the type of repair required, the service will either be
performed in your home or the set will be taken to the authorized TACP/THI service
station for repair and returned to your home at no cost to you."
(3) If you have any question about service, please contact one of the following TACPiTHI
Service Centers:
NORTHEAST MIDWEST WEST SOUTHWEST SOUTHEAST HAWAII
82 Totowa Road, 1010 Johnson Drive, 5490 E. Francis St., 1421 Champion Drive 6115 Jimmy Carter 327 Kamakee Street,
Wayne, Buffalo Grove, Ontario, Suite 304, Carrollton, Blvd., Honolulu,
New Jersey 07470 I1160089-6900 California 91761 Texas 75006 Suite C2, Norcross, Hawaii 96814
Georgia 30071-4607
All warranties implied by state law, including the implied warranties of merchantability and fitness for aparticular purpose, are expressly
limited to the duration of the limited warranties set forth above. With the exception of any warranties implied by state law as hereby limited,
the foregoing warranty is exclusive and in lieu of all other warranties, guarantees, agreements and similar obligations of man ufacturer or
seller with respect to the repair or replacement of any product or parts. In no event shall TACP orTHI be liable for consequential or incidental
damages.
No person, agent, distributor, dealer or company is authorized to change, modify or extend the terms of these warranties in any manner
whatsoever. The time within which action must be commenced to enforce any obligation ofTACP orTHI arising under this warranty or under
any statute, or law of the United States or any state thereof, is hereby limited to 90 days from the date you discover or should have
discovered, the defect. This limitation does not apply to implied warranties arising under state law.
This warranty gives you specific legal rights and you may also have other rights which may vary from state to state, Some states do not
allow limitation on how long an implied warranty lasts, when an action may be brought, or the exclusion or limitation of incidental or
consequential damages, so the above provisions may not apply to you.
lr_\ ATTENTION CANADIAN CONSUMERS:
Canadian consumers are requested to complete the special Canadian "Warranty Registration Form" enclosed, and forward
this completed form with a copy of bill of sale to TOSHIBA OF CANADA to "Register and Validate" their warranty.
C
2
}.
G}
OJ
C
"o
.E
.-I
€
C
t-
O
P
a.
.£
._q
o
I11
71

TOSHIBA AMERICA CONSUMER PROOUCTS,
HEAD OFFICE/82 TOTOWA ROAD, WAYNE, NEW JERSEY 07470
FACTORY SERVICE CENTERS/NORTHEAST: 82 TOTOWA ROAD, WAYNE, NEW JERSEY 07470
MIDWEST: 1010 JOHNSON DRIVE, BUFFALO GROVE, ILLINOIS 60089-6900
WEST: 5490 E. FRANCIS ST., ONTARIO, CA 91761
SOUTHWEST: 1421 CHAMPION DRIVE, SUITE 304 CARROLLTON, TEXAS 75006
SOUTHEAST: 6115 JIMMY CARTER BLVD., SUITE C2, NORCROSS, GA 30071-4607
INC.
TOSHIBA HAWAII, INC.
HEAD OFFICE/327 KAMAKEE STREET, HONOLULU, HAWAII 96814, U.S.A.
TOSHIBA OF CANAOA LTO.
HEAD OFFICE/191 MCNABB STREET, MARKHAM, ONTARIO, L3R 8H2, CANADA TEL: (905) 470-5400
SERVICE CENTERS/TORONTO: 191MCNABB STREET, MARKHAM, ONTARIO, L3R 8H2, CANADA TEL: (905) 470-5400
MONTREAL: 1643, NORTH SERVICE RD., TRANS-CANADA HIGHWAY, DORVAL QUEBEC, H9P 1J1, CANADA
TEL: (514) 332-6860
VANCOUVER: 3870 JACOMBS ROAD, RICHMOND, B.C, V6V 1Y6, CANADA TEL: (604) 270-8481
MANUFACTURED BY
TOSHIBA AMERICA CONSUMER PROOUCTS, INC. TOSHIBA
PRINTED IN USA
(96-03) 23562646L
