TOYO ELECTRIC MFG TY-S-2400 SATELLITE CONTROLLER User Manual users manual
TOYO ELECTRIC MFG. CO., LTD. SATELLITE CONTROLLER users manual
users manual
User Instructions for Model TY-R-2400, TY-T4 and TY-S-2400
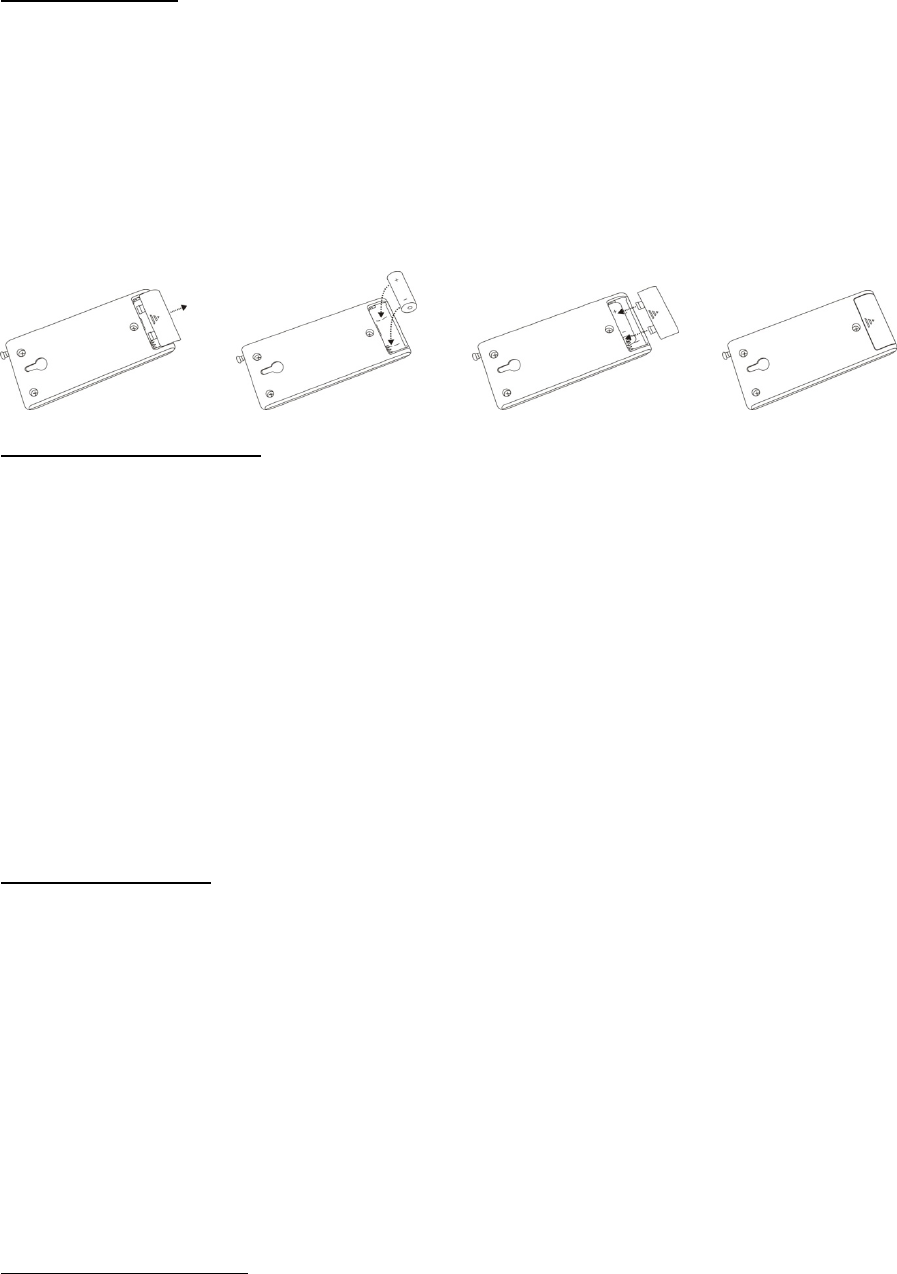
Battery Installation
1. Remove the remote control and battery from the poly bag.
2. Open the battery cover on the back of the remote by sliding the cover towards the bottom of the
remote
3. Clean the battery contacts and also those of the device prior to battery installation.
4. Use only 12V Alkaline battery type 23A for replacement, use of other batteries may damage remote.
5. Insert negative (-) end of the battery (see marking on battery) into the spring side of the battery
holder and insert positive (+) end of the battery into other side.
6. Close battery cover by sliding back into place.
Remote Control Operation:
The remote has three buttons on the front side to operate the controller with 2422MHz receiver and
conneced light set:
a. ON/OFF – this is the upper button. Press to turn the set OFF. Press again to turn the set ON.
Note: even when the lights are off, the set still has power to all lamps, to disconnect power,
you must unplug the set.
b. FUNCTION – this is the second button. Press to change the light pattern to the next function
mode. After reaching last function, the set can be returned to Function 1 by pressing the
function button again. For best results, pause for a few seconds before pushing the
“FUNCTION” button again for the next function.
c. DIMMER – this is the third button. Press to change the brighteness of a certain lighting pattern.
d. SENSOR – this is a lowest button. Press to change the controller working under “ Sensor
“ Mode.
Controller Installation:
FOR WALL MOUNTING
Fasten the screws(pre-attached in the upper section of enclosure) and hook the unit to a wall ; Make
sure the unit fits securely against the wall.
FOR GROUND STAKIING
Slide the ground stake into the slot on the base of the unit.Carefully press the stake into the ground.
Plug your Christmas light strings or decorative lighting outfits into the outlets of main controllers TY-T4 and
satellite
controller TY-S-2400 (MAX 420 Watts total).
Plug the main power cord into a power outlet (recommended to plug into a receptacle or extended
receptacle protected by GFCI).
Features:
Remote Control Functions
a) Regular mode
16 Pre-programmed Settings ( Note: The sequence of Settings may be veried) , the default setting when
powered is steady on;
1. Combination Light Show (Cycles through functions)
2. Fast Chasing right to left from one light set to the other
+
-
3. Fast Chasing left to right from one light set to another
4. Slow to fast chasing right to left from one light set to another.
5. Slow to fast chasing left to right from one light set to another.
6. Flashing/Chasing combination
7. Alternating flashing
8. Bi-Directional Pulsing
9. Bi-directional Chasing
10. Strobing
11. Random Flashing
12. Bi-directional chasing with flashing
13. Pulsing to Strobing feature.
14. Bi-Directional Strobing
15. Fade in / Fade out
16. Steady on
(b) Sensor mode
As music plays through the speaker with blue tooth feather or memory card, the lights will dance and
flash to the rhythm of the music.
Press the button “ Sensor “ on the panel of remote controller.
Insert the Memory card to the slot, Power on the speaker and the light indicator on the panel is red, the
controller can work under SD card Mode;
pressing the button “ Mode” and the light indicator is blue, the controller cand work under “ blue tooth”
Mode, the speaker can play music sent from your mobile phone or ipod.
Press the “volume” control bar to adjust the volume level as you desire.
Change the songs just press the backward or forward button.
NOTES:
1. Light set must be plugged into working outlet for remote control to function.
2. The remote control unit is the only way to change the function setting of this product.
3. When using the remote to turn your set ON, there may be a slight delay before the light pattern starts
working.
4. To change the light pattern, it is recommended to wait a few seconds after each time you press the
“FUNCTION” button until you reach the desired pattern/function.
5. If the lights do not change function or the set does not turn on or off with the remote, see the trouble
shooting section.
6. If there is a power interruption, including if used on a switched outlet, on a timer, or power failure, the
system’s memory will retain the last light pattern displayed.
7. The operating distance of the remote is up to 100 feet ( 30meters). Distance may vary due to other
radio transmitters in the area (cell phones, Wi-Fi signals, wireless phones, intercoms, baby monitor,
etc.), microwave ovens, computers, materials used in the construction of your home, trees, hills,
bushes and other items that may attenuate the radio signal.
8. The battery in the remote will drain and become depleted very quickly if the remote is place where
one (or both) of the buttons on the remote are continually pushed (such as placing an item on top
of them, or storing the remote upside down).
NOTES:
A. When multiple light sets are lighted, pressing the FUNCTION button will change all sets to the next
pattern. If the set are preprogrammed, then they should all change to the same next pattern.
B. These are Radio Frequency controlled devices. All sets within the effective range will be affected
and controlled using any one remote.
C. If used with a mechanical / digital timer, only one timer must control all sets. In this case, do not turn
sets off using the remote or the sets will not turn on with the timer.

D. Due to component tolerances, there will be cycle time differences between sets.
WARNING:
• Do not expose the remote control to moisture.
• Remove battery when not used for extended period of time, or when depleted.
• Dispose of batteries properly by following directions on batteries.
• Use only 12V Alkaline battery type 23A for replacement, use of other batteries may damage remote.
Troubleshooting Instructions:
• If lights do not change function or turn off or on when a button is pushed:
1. Check that the light on the remote is illuminating and not dim:
a. Check that battery is inserted properly (+ and -) and making contact (typically LED would
not be illuminating in this condition), see page 1 for battery installation details.
b. Clean battery and remote terminals.
c. Replace battery, see page 1 for battery replacement details.
2. Make sure antenna is up and fully extended.
3. Move away from other items that may cause interference, such as cell phones, 2-way radios,
microwave ovens, computers, Wi-Fi access points, etc.
4. Make sure you are close enough to the light set control box.
5. Make sure light string has power:
a. Make sure power is on at the outlet (try a different product on the outlet to ensure power
is on)
b. Make sure outlet is not powered by a dimmer (move to a different outlet)
c. Make sure outlet is not on a timer (more to a different outlet)
d. Reset Ground Fault Circuit Interrupter (GFCI) in case it accidentally tripped.
6. Unplug light string plug for 1 minute and plug back into powered outlet and retry.
7. If used on a timer controlled circuit, make sure the timer is rated for use with Compact
Fluorescent bulbs (CFL) as some timers will not work properly with electronics.
• If the remote only works at a very short distance (for example, right next to the light set), follow steps 1 –
3 above.
• If sets do not turn on when power is turned on to the set (when plugged in, timer turns on, or switch
controlling the outlet is turned on), try pushing the “On/Off” button as it may have been turned off via
the remote the last time it was used (remember, this product will remember the last function it was
turned off at, including if the remote was used to turn the set off).
• If the battery in the remote drains and becomes depleted very quickly, then the remote is being placed
where one (or both) of the buttons on the remote are being continually pushed (such as placing an
item on top of the buttons, or storing the remote upside down, etc.). Place the remote such that the
buttons are not pushed.
FCC Statement
NOTE: This equipment has been tested and found to comply with the limits for a Class B digital device,
pursuant to Part 15 of the FCC Rules. These limits are designed to provide reasonable protection against
harmful interference in a residential installation. This equipment generates, uses, and can radiate radio
frequency energy, and if not installed and used in accordance with the instructions, may cause harmful
interference to radio communications. However, there is no guarantee that interference will not occur in a
particular installation. If this equipment does cause harmful interference to radio or television reception,
which can be determined by turning the equipment off and on, the user is encouraged to try to correct the
interference by one or more of the following measures:
• Reorient or relocate the receiving antenna.
• Increase the separation between the equipment and receiver.
• Connect the equipment into an outlet on a circuit different from that to which the receiver is
connected.
• Consult the dealer or an experienced radio/TV technician for help.
This device complies with Part 15 of the FCC Rules. Operation is subject to the following two conditions: (1)
this device may not cause harmful interference; and (2) this device must accept any interference received,
including interference that may cause undesired operation.
Note:“Changes or modifications to this unit not expressly approved by the party responsible for
compliance could void the user’s authority to operate the equipment.”