TP Link Technologies HS105V3 Smart Wi-Fi Plug Mini User Manual 14 Users Manual rev 1
TP-Link Technologies Co., Ltd. Smart Wi-Fi Plug Mini 14 Users Manual rev 1
14. Users Manual rev 1
1910012216 REV 2.0.1
Smart Wi-Fi Plug Mini
User’s Manual
HS105/HS105 V3
Copyright & Trademarks
Specifications are subject to change without notice. TP-Link is a registered trademark of TP-Link Technologies Co., Ltd. Other
brands and product names are trademarks or registered trademarks of their respective holders.
No part of the specifications may be reproduced in any form or by any means or used to make any derivative such as translation,
transformation, or adaptation without permission from TP-Link Technologies Co., Ltd.
© 2017 TP-Link. All rights reserved.
www.tp-link.com

Contents
4 Introduction
4 Features
4 Product Requirements
4 Smart Wi-Fi Plug Mini
5 Smart Wi-Fi Plug Mini Installation
6 Using Kasa with Smart Wi-Fi Plug Mini
6 Kasa Account
6 Kasa Settings
7 Customizing Smart Wi-Fi Plug Mini
7 Timer
8 Scheduling
9 Creating Scenes
10 Away Mode
11 Runtime Summary
12 Maintaining the Smart Wi-Fi Plug Mini
12 Firmware Update
12 Resetting
14 Troubleshooting
14 Frequently Asked Questions
14 Usage Tips
14 Support
www.tp-link.com
User’s Manual Smart Wi-Fi Plug Mini
4
Introduction
TP-Link’s Smart Wi-Fi Plug Mini is a compact home device that turns your typical electrical wall outlet
into a controllable, customizable and multi-functional outlet, enabling you to easily control your lights
and household electronic devices via TP-Link’s Kasa for Mobile app on your iOS or Android devices, no
matter where you nd yourself.
Features
• Control the plugged-in devices whenever you are connected to the internet using the Kasa app on
your smartphones and tablets.
• Automate your lights and small household appliances with Schedule and Timer.
• Discourage potential intruders with Away Mode that automatically turns the plugged-in devices on
and off at different times.
• Compatible with Amazon Echo (sold separately) that lets you interact with the Smart Wi-Fi Plug Mini
using your voice.
Product Requirements
• A smartphone or tablet running iOS 9 or higher; Android 4.1x or higher.
• A Wi-Fi connection (supports 802.11n standard).
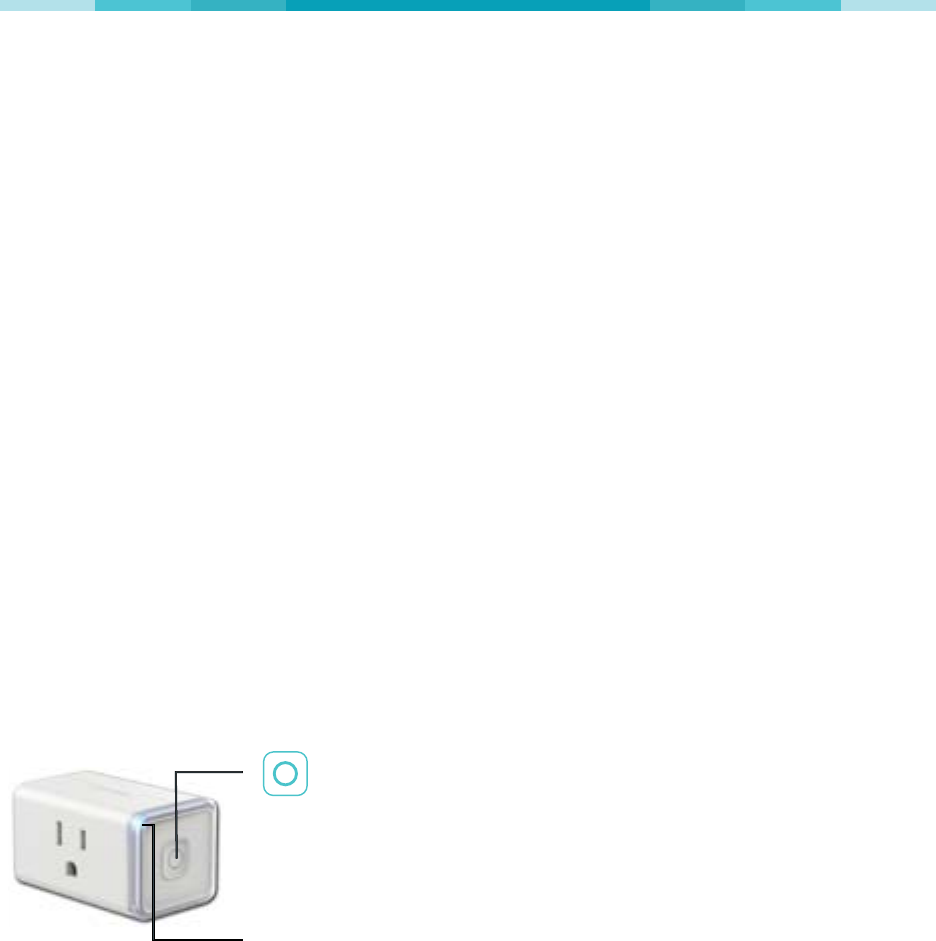
Smart Wi-Fi Plug Mini
Press to turn the socket ON or OFF.
Press and hold (for 5 seconds) until the LED flashes amber and
blue alternately to initiate the app conguring process (SoftAP).
Press and hold (for 10 seconds) until the LED flashes amber rapidly
to factory reset the Smart Plug Mini.
LED Flashing amber and blue: App conguring process (SoftAP)
initiated.
Flashing blue rapidly: Connecting to the network.
Solid blue: Connected to the network.
Flashing amber rapidly: Factory reset.
Solid amber: Initializing, rebooting, or no network connection.
Off: The Smart Plug Mini is switched OFF.
* Image may differ from actual product due to different regional power specications. We use the U.S.
version as an example.
www.tp-link.com
User’s Manual Smart Wi-Fi Plug Mini
5
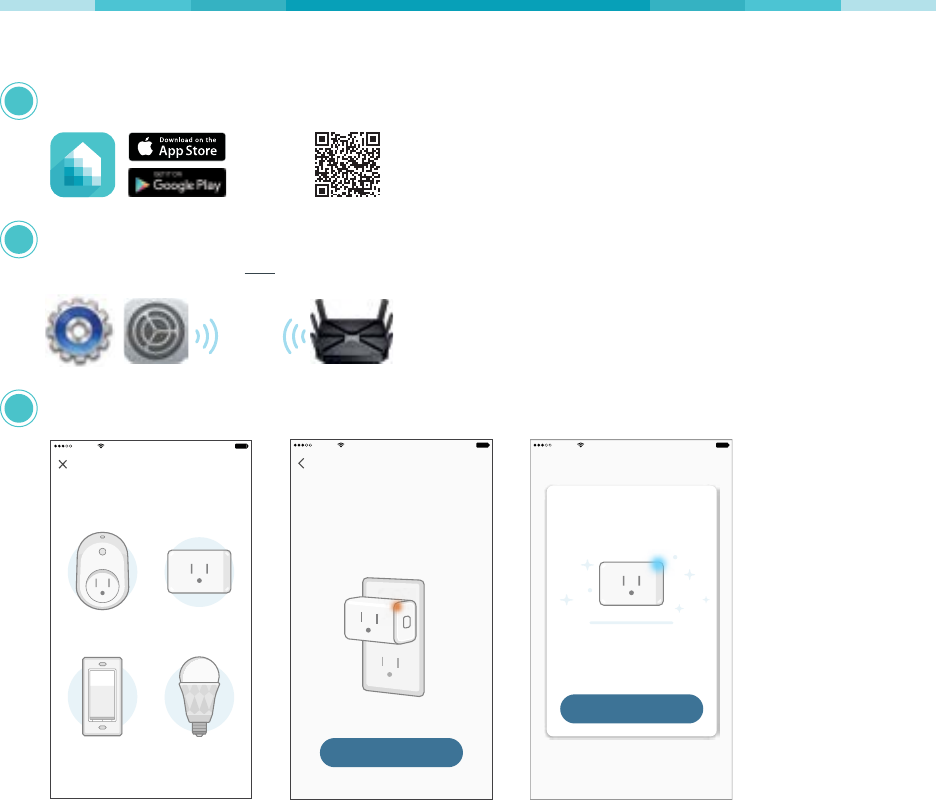
Smart Wi-Fi Plug Mini Installation
Download Kasa for Mobile from the App Store or Google Play.
OR
scan QR
code
Connect your mobile device to a 2.4GHz Wi-Fi network.
Note: The Smart Plug Mini only supports the 2.4GHz networks.
Launch Kasa and follow the in-app instructions to connect the Smart Plug Mini to your network.
Add Device
Sketch9:41 AM 100%
Smart Plug Smart Plug Mini
Smart Bulb
Smart Switch
Sketch 9:41 AM 100%
Power up your Smart Plug Mini
NEXT
Plug in your Smart Plug Mini. If you
don’t see the LED light, press the
power button once.
Sketch9:41 AM 100%
DONE
Great!
Your Smart Plug Mini is all set up.
It is now saved in your Device List.
Note: The U.S. plug version is used throughout the Kasa app.
1
2
3

www.tp-link.com
User’s Manual Smart Wi-Fi Plug Mini
6
Using Kasa with Smart Wi-Fi Plug Mini
Kasa Account
While you don’t have to have a Kasa account to use your devices, signing up for an account provides
added functionality such as:
• Synchronization of settings and congurations to all your mobile devices.
• Ability to control and congure the devices from outside your home.
• Ability to customize your TP-Link Smart Home devices with “Scenes” for a truly automated
experience.
• Use of third-party services and products such as Amazon Echo.
Devices can only be associated with one Kasa account. To remove the association, turn off Remote
Control in the Kasa’s settings, or factory reset the device.
After creating your Kasa account, you will need to verify the email associated with your account by
clicking a link in an email that Kasa sends you. Until you verify the email, much of the above functionality
will not work.
Kasa Settings
Kasa’s Settings allows you to set your global preferences such as:
• Remote Control to control your Smart Home devices outside of your home. You need to sign in to
your Kasa account rst to turn on this function.
• Location and Time to set the location and time of where the Smart Home devices are located so
that the Away Mode and Schedules can run on time. You can set your device’s location using your
smartphone’s GPS function, or manually enter the latitude and longitude coordinates.
• Firmware Update to update your Smart Home devices when there is an update available. Refer to
Firmware Update for instructions.
www.tp-link.com
User’s Manual Smart Wi-Fi Plug Mini
7
Customizing Smart Wi-Fi Plug Mini
You can personalize your Smart Wi-Fi Plug Mini with a descriptive name and a custom icon that
represents the connected device or household appliance from the Smart Wi-Fi Plug Mini’s details
screen.
1. On the Devices screen, tap on the row of the Smart Wi-Fi Plug Mini to go to its controls.
2. Tap the (Settings) icon at the top-right corner.
3. On the Device Settings screen, tap the icon for each of the settings you want to personalize.
• Device Name – Enter a unique name for your Smart Wi-Fi Plug Mini.
• Device Icon – Choose one of the available icons or use your own custom icon.
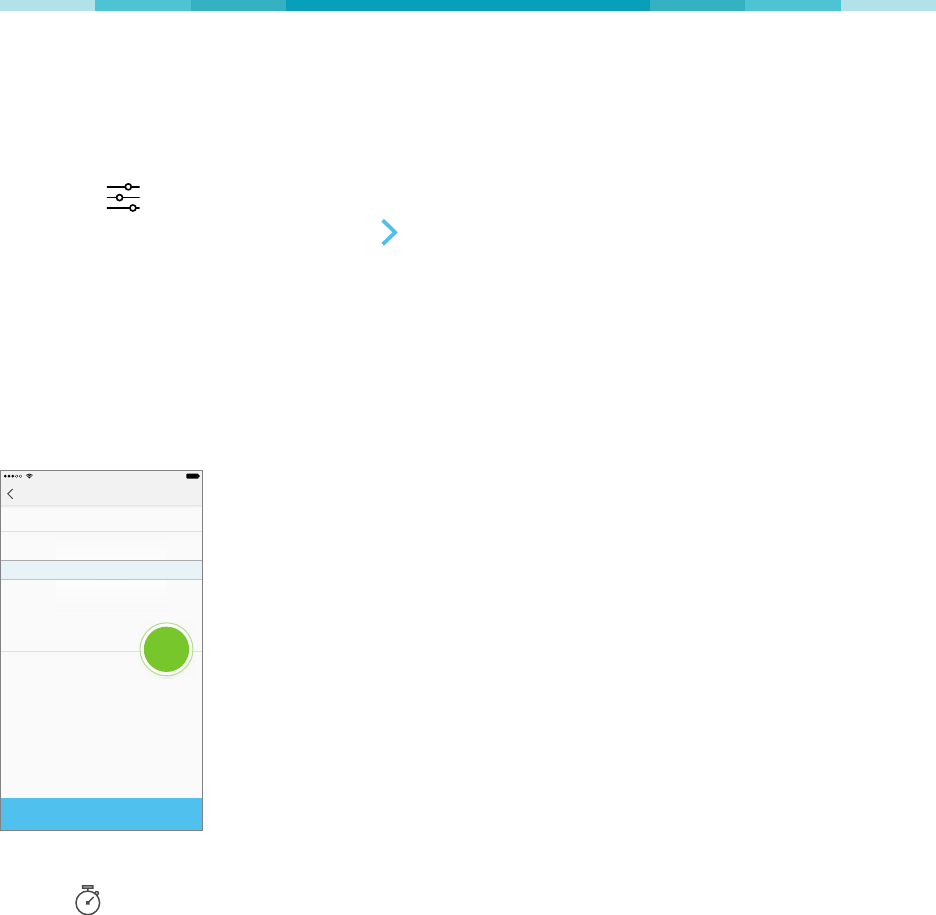
Timer
Timer can be set to automatically turn the lights or household appliances plugged into the Smart Wi-Fi
Plug Mini on or off after the countdown time has elapsed.
Timer
9:41 PM 100%
AfterAfter
Turn my Smart PlugTurn my Smart Plug
7 0 1
8 0 2
5 5 9
4 5 8
66 00 00 minmin
ON
START
hrshrs
1. On the Devices screen, tap on the row of the Smart Wi-Fi Plug Mini to go to its controls.
2. Tap (Timer) to open the Timer screen.
3. Set the timer duration in Hours and Minutes.
4. Set your preferred state (ON or OFF) to be triggered once the countdown timer is complete.
5. Tap Start.
Note that if a timer overlaps an existing scheduled Event, that schedule will not run. If it overlaps Away
Mode, the device will resume away behavior after the timer expires. However, timer will be canceled
when power is lost or interrupted, or at any time you turn on/off the device manually using Kasa or the
physical ON/OFF switch. You may need to set a new timer if desired.
www.tp-link.com
User’s Manual Smart Wi-Fi Plug Mini
8
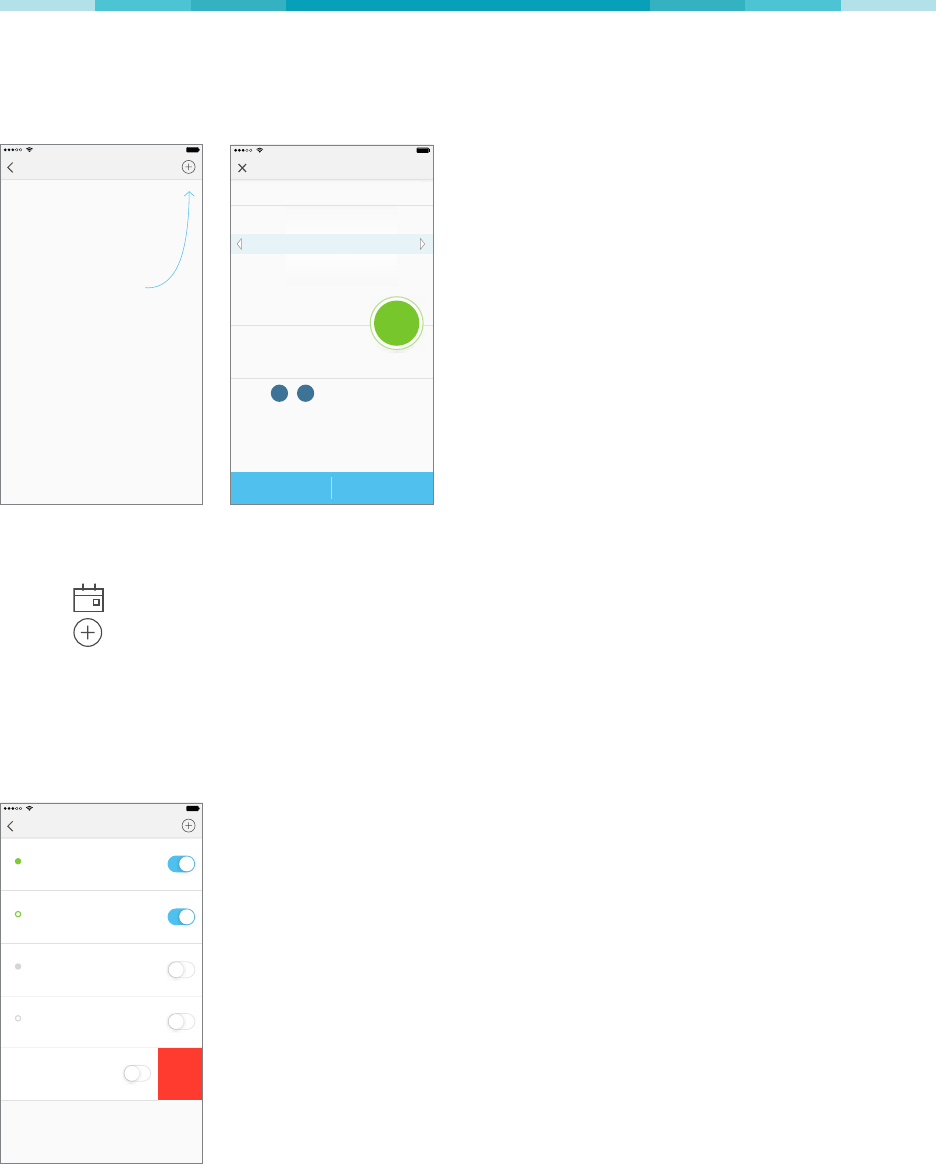
Scheduling
You can create ON/OFF schedules to automate your plugged-in devices to work around your home and
work schedules, such as setting the lights to come on at dusk and turn off at sunrise.
Your Schedule lives here
Build a Schedule by creating Events,
using this button on the top right.
Schedule
9:41 PM 100%
SAVECANCEL
Create Event
9:41 PM 100%
At
Turn my Smart Plug
Repeating every
7 0 1
8 0 2
am
5 5 9
4 5 8
6 0 0
pm
:
SM T W T F S
ON
1. On the Devices screen, tap on the row of the Smart Wi-Fi Plug Mini that you want to create a
schedule for.
2. Tap (Schedule) to open the Schedule screen.
3. Tap to create an event.
4. Within the Create Event screen, set the time, your preferred state (ON or OFF) for the connected
device, and repeating frequency.
5. Tap Save.
You can create as many events as you like and edit them at anytime from the Schedule screen.
Schedule
9:41 PM 100%
SMT
WTFS
7
0 0
:pm
SMTWTFSSMTWTFS
7 0 0
:pmpm
SMTWTFS
715
:pm
One time only
OFFOFF
OFFOFF
900
:amam
SMTWTFS
ONON
ONON
60 0
:amam
Delete
www.tp-link.com
User’s Manual Smart Wi-Fi Plug Mini
9
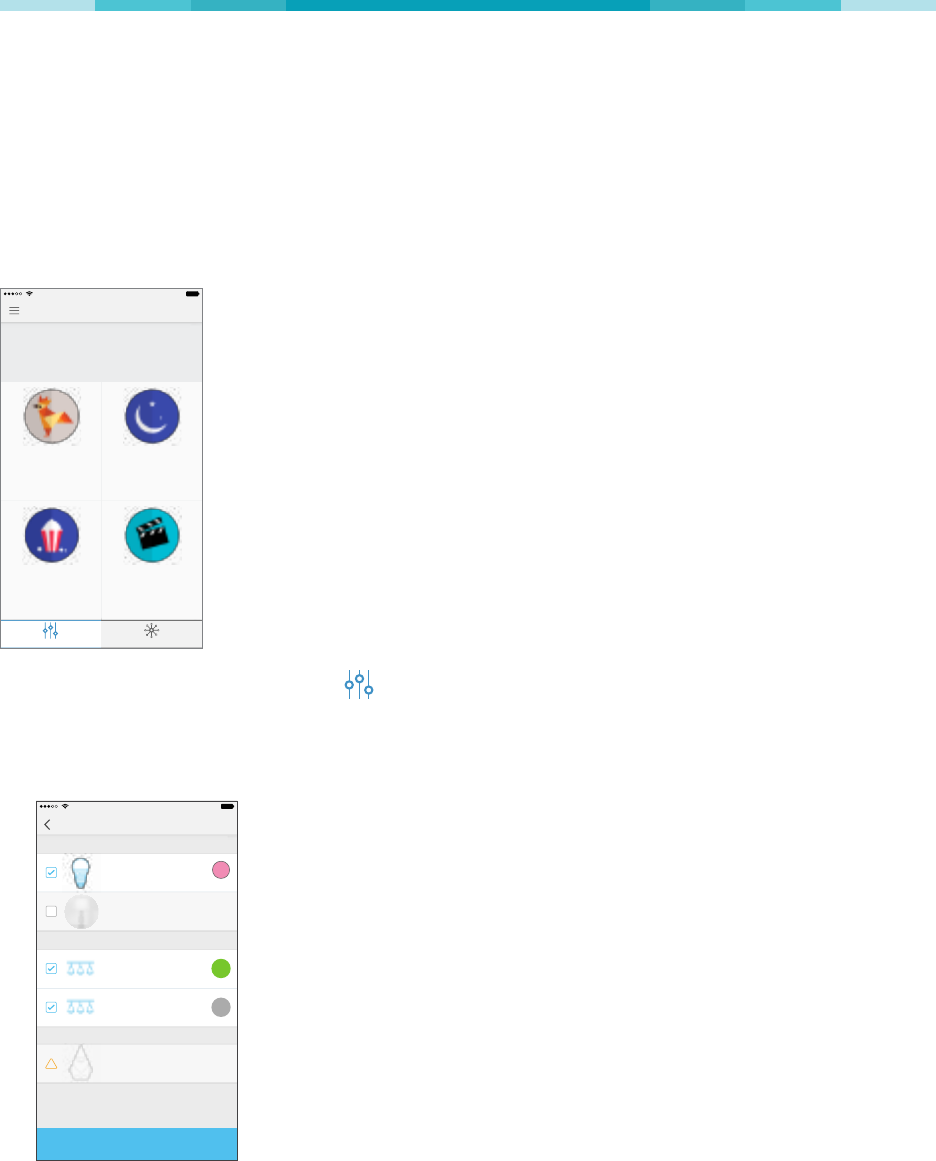
Creating Scenes
Take full advantage of your TP-Link Smart Home devices in your home with “Scenes”. A scene is a
preset group of Smart Devices (such as Smart Wi-Fi Plugs Mini and Smart Wi-Fi Switches) that can
be customized and controlled simultaneously at the touch of a button from your smartphone or tablet
to easily set your mood or t any special occasion. For example, set a customized “Movie Time” to
turn on the home theater system plugged into a Smart Wi-Fi Plug Mini and dim down the lights in your
Entertainment Room to 10% at the same time.
Please keep in mind that SCENES can only be set and controlled once you’re signed in to your Kasa
account.
Devices
Scenes
Scenes let you set the mood of your
home in one tap.
Good Morning
Get ready for the day by
turning on your devices
Movie Night
Dim the lights for
showtime
Good Night
Turn everything off
before bedtime
Custom
Create your own scene
9:41 PM 100%
Scenes
1. On the main Home screen, tap the (Scenes) tab to switch to the Scenes view.
2. Choose one of the preset scenes to start, or choose Custom to set up your own scene that is
personalized to suit individual preferences and needs. To set a scene, you will need to select one or
more devices to be controlled, and then dene their actions and/or states.
Bedroom Lamp
BULBS
PREVIEW
Main Kitchen Lights
Side Kitchen Lights
Christmas Gnome
SWITCHES
PLUGS
60%
Party Bulb
ON
OFF
Next
9:41 PM 100%
Set Scene
!
Note that you must have at least one Smart Device in order to create a scene.
www.tp-link.com
User’s Manual Smart Wi-Fi Plug Mini
10
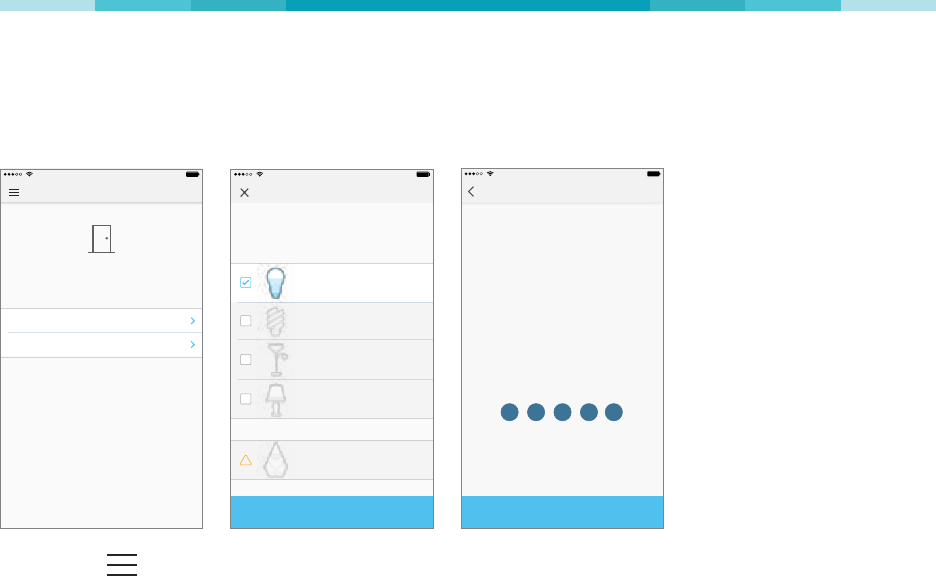
Away Mode
Away Mode allows you to automate your Smart Wi-Fi Plug Mini in combination with other Smart Home
products to respond to your specic schedules. For example, turn on and off Smart Devices at certain
intervals to simulate occupancy when you’re away from home.
Away Mode
9:41 PM 100%
Schedules
Devices
2
3
When you’re Away, your devices will turn
on and off to simulate that someone is
home.
Select Devices
9:41 PM 100%
How about picking one light from each
room?
Christmas Gnome
Garage Light
Party Bulb
Living Room
Bedroom Lamp
!
PLUGS
BULBS
SAVE
600
:pm
10 00
:pm
MM TT WW TT FF
STOP
Away Mode
9:41 PM 100%
Away Mode is activeAway Mode is active
Your device will be randomly turned on
and off during this time.
START TIME
END TIME
REPEATING EVERY
SS SS
1. Tap the (navigation drawer) and then Away Mode.
2. Tap Select Devices to select your Smart Home devices, and then tap Save.
3. If you want to set a schedule to automate Away Mode so you don’t have to manually activate it, tap
Set Schedule.
Note: Multiple schedules can be set to repeat weekly on the day(s) of your choice.
4. Within the Create Event screen, set your preferred mode (Away or Home), time, and day(s).
5. Tap Save.
You can always toggle Away Mode on and off in the sidebar by tapping on the translucent button under
the Kasa logo.

www.tp-link.com
User’s Manual Smart Wi-Fi Plug Mini
11
Runtime Summary
The Runtime summary provides a statistical information about how long the Smart Wi-Fi Plug Mini has
been running. To view the Runtime summary, tap on the Runtime section in the device’s details screen.
Current Runtime
2.80
hrs
Total Runtime
3.10
hrs
Daily Average
5.00
hrs
Total Runtime
35.0
hrs
Runtime
9:41 PM 100%
TODAY
PAST 7 DAYS
Daily Average
4.00
hrs
Total Runtime
120
hrs
PAST 30 DAYS

www.tp-link.com
User’s Manual Smart Wi-Fi Plug Mini
12
Maintaining the Smart Wi-Fi Plug Mini
Firmware Update
To keep the Smart Wi-Fi Plug Mini happy and up-to-date with all the latest improvement and xes, we
recommend that you update the rmware when updates are available.
Firmware Update
9:41 PM 100%
New Updates Available
Smart Plugs
Latest Version: 1.2.0
UPDATE
We found available rmware updates for your
reachable devices.
4 Available Updates
Smart Bulb HS100
Latest Version: 1.2.0
UPDATE
2 Available Updates
Smart Bulb HS120
Latest Version: 1.2.0
0 Available Updates
9:41 PM 100%
Updating rmware
Please do not unplug your devices during
the update.
25%
This process may take a few minutes.
1. Launch Kasa.
2. Tap the (navigation drawer) and then Settings.
3. Tap Firmware Update.
4. Within the Firmware Update screen, tap Update.
Remember: Only the Smart Wi-Fi Plug Mini that is currently reachable and has an available update
will be shown in the Firmware Update screen.
It is important to leave the Kasa app running while it nishes updating the Smart Wi-Fi Plug Mini. Try not
to minimize the app, close the app, or interrupt the update to prevent problems.
Resetting
Resetting the Smart Wi-Fi Plug Mini can help you troubleshoot any issues that you may have. Please
keep in mind that factory resetting a device will erase all of your custom settings and restore them to
factory default settings.
ON/OFF Button
The ON/OFF button located on the right side of the Smart Wi-Fi Plug Mini has two functions:
• Press and hold (about 5 seconds) until the LED blinks amber and blue alternately to only reset the
network settings without losing your current conguration and initiate the app conguring (SoftAP)
process.

www.tp-link.com
User’s Manual Smart Wi-Fi Plug Mini
13
• Press and hold (about 10 seconds) until the LED blinks amber rapidly to reset the Smart Wi-Fi Plug
Mini to its factory defaults. Note that factory resetting the Smart Wi-Fi Plug Mini will erase all of your
custom settings, and you’ll have to set it up again.

www.tp-link.com
User’s Manual Smart Wi-Fi Plug Mini
14
Troubleshooting
Frequently Asked Questions
1. What devices can I control with the Smart Wi-Fi Plug Mini?
You can control lights, fans, humidiers, portable heaters, and any small appliances in accordance
with the Smart Wi-Fi Plug Mini’s specications.
2. What should I do when I can’t turn the plugged-in devices on or off using Kasa?
• Make sure the device plugged into the Smart Wi-Fi Plug Mini is switched to ON.
• Make sure the Remote Control feature in the app is enabled to control your devices from outside
of your home.
3. What should I do when the LED is lit a solid amber?
A solid amber light indicates no network connection. You can troubleshoot the following:
• Check your network connectivity.
• Avoid placing the Smart Wi-Fi Plug Mini near potential sources of radio signal interference such
as microwave ovens, cordless phones, baby monitors, and motor-driven appliances.
• Repeat the app conguring process.
• Factory reset the Smart Wi-Fi Plug Mini and try to add it to your network again.
4. How do I pair the Smart Wi-Fi Plug Mini with Amazon Alexa?
Visit www.tp-link.com/en/faq-944.html or within the Kasa Help section for pairing instructions, then
you can interact with your plugged-in devices using voice recognition. For example, to command
Alexa to turn on the Smart Wi-Fi Plug Mini named “Bedroom Lights”, simply say, “Alexa, turn on
Bedroom Lights.”
Usage Tips
• Place your Smart Wi-Fi Plug Mini within the range of your Wi-Fi router or access point
(approximately 100 feet).
• Avoid physical obstructions and radio interference in the surrounding area.
Support
• Specications can be found on the product page at http://www.tp-link.com.
• If you encounter any issues with the Smart Wi-Fi Plug Mini or conguration, please visit
www.tp-link.com/support for web support and troubleshooting information.

User’s Manual Smart Wi-Fi Plug Mini
FCC Statement
This equipment has been tested and found to comply with the limits for a Class B digital device, pursuant to part 15 of the FCC
Rules. These limits are designed to provide reasonable protection against harmful interference in a residential installation.
This equipment generates, uses and can radiate radio frequency energy and, if not installed and used in accordance with the
instructions, may cause harmful interference to radio communications. However, there is no guarantee that interference will not
occur in a particular installation. If this equipment does cause harmful interference to radio or television reception, which can be
determined by turning the equipment off and on, the user is encouraged to try to correct the interference by one or more of the
following measures:
• Reorient or relocate the receiving antenna.
• Increase the separation between the equipment and receiver.
• Connect the equipment into an outlet on a circuit different from that to which the receiver is connected.
• Consult the dealer or an experienced radio / TV technician for help.
This device complies with part 15 of the FCC Rules. Operation is subject to the following two conditions:
1) This device may not cause harmful interference.
2) This device must accept any interference received, including interference that may cause undesired operation.
Any changes or modications not expressly approved by the party responsible for compliance could void the user’s authority to
operate the equipment.
Note: The manufacturer is not responsible for any radio or TV interference caused by unauthorized modications to this
equipment. Such modications could void the user’s authority to operate the equipment.
FCC RF Radiation Exposure Statement
This equipment complies with FCC RF radiation exposure limits set forth for an uncontrolled environment. This device and its
antenna must not be co-located or operating in conjunction with any other antenna or transmitter.
“To comply with FCC RF exposure compliance requirements, this grant is applicable to only Mobile Congurations. The antennas
used for this transmitter must be installed to provide a separation distance of at least 20 cm from all persons and must not be
co-located or operating in conjunction with any other antenna or transmitter.”
Canadian Compliance Statement
This device complies with Industry Canada license-exempt RSSs. Operation is subject to the following two conditions:
1) This device may not cause interference, and
2) This device must accept any interference, including interference that may cause undesired operation of the device.
Le présent appareil est conforme aux CNR d’Industrie Canada applicables aux appareils radio exempts de licence. L’exploitation
est autorisée aux deux conditions suivantes :
1) l’appareil ne doit pas produire de brouillage;
2) l’utilisateur de l’appareil doit accepter tout brouillage radioélectrique subi, meme si le brouillage est susceptible d’en
compromettre le fonctionnement.
Radiation Exposure Statement
This equipment complies with IC radiation exposure limits set forth for an uncontrolled environment. This equipment should be
installed and operated with minimum distance 20cm between the radiator and your body.
Déclaration d’exposition aux radiations
Cet équipement est conforme aux limites d’exposition aux rayonnements IC établies pour un environnement non contrôlé. Cet
équipement doit être installé et utilisé avec un minimum de 20 cm de distance entre la source de rayonnement et votre corps.
Industry Canada Statement
CAN ICES-3 (B)/NMB-3(B)
NCC Notice
User’s Manual Smart Wi-Fi Plug Mini
BSMI Notice
Pb
Cd
Hg
CrVI
PBB
PBDE
PCB
—
Safety Information
• The automatic operation feature is Type 1.B action according to UL 60730-1.
• The product is Pollution Degree 2, which is intended to be used in a household environment or similar.
• Keep the device away from water, re, humidity or hot environments.
• Do not attempt to disassemble, repair, or modify the device.
• Do not use damaged charger or USB cable to charge the device.
• Do not use any other chargers than those recommended.
• Do not use the device where wireless devices are not allowed.
• The socket-outlet shall be installed near the equipment and shall be easily accessible.
• For passthrough devices, plug the power strips into the integrated electrical sockets of the devices, but devices of the same or
another type not be stacked in normal use.
Please read and follow the above safety information when operating the device. We cannot guarantee that no accidents or
damage will occur due to improper use of the device. Please use this product with care and operate at your own risk.
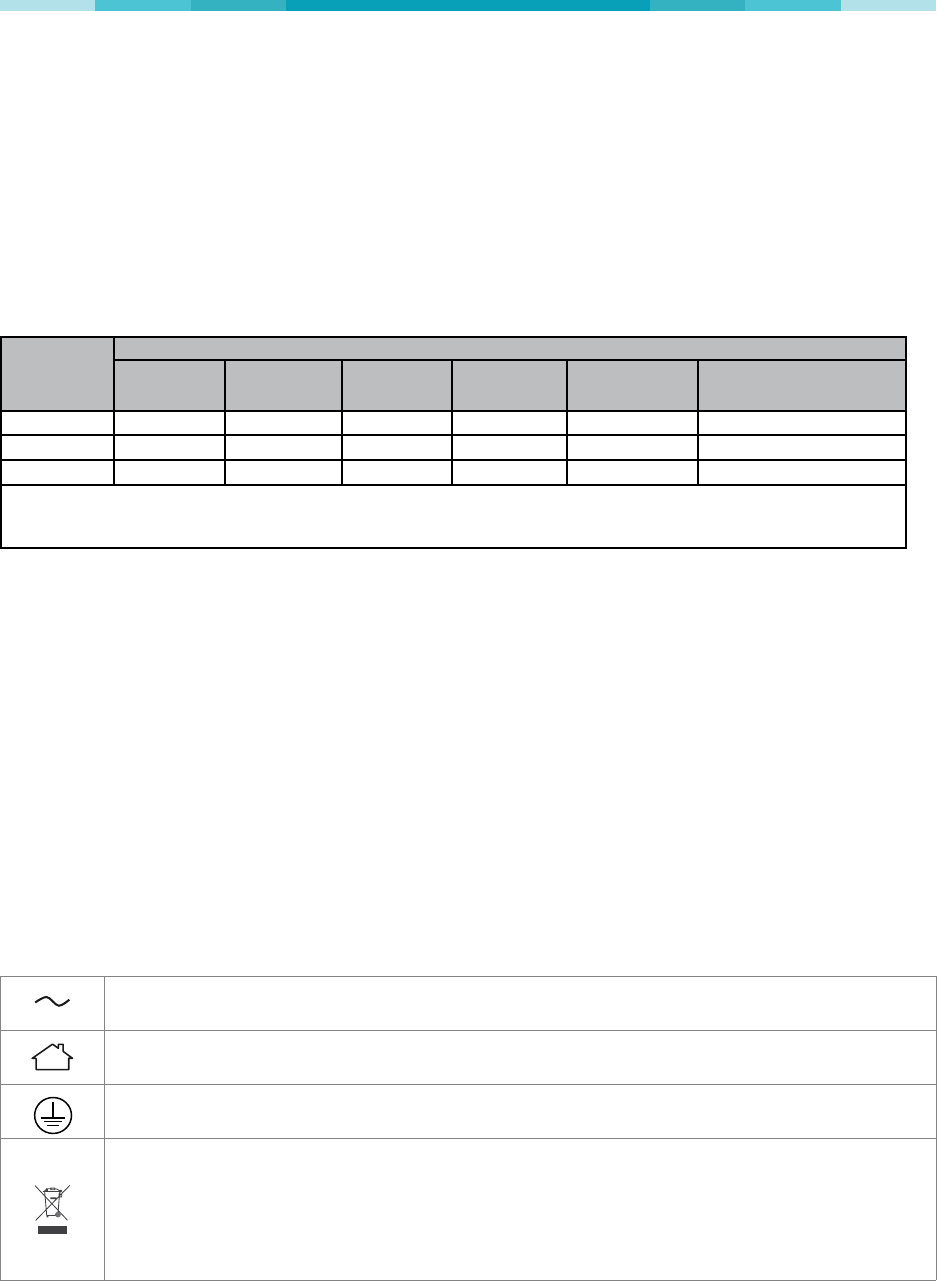
Explanation of the symbols on the product label
AC voltage
Indoor use only
Protection earth
RECYCLING
This product bears the selective sorting symbol for Waste electrical and electronic equipment (WEEE). This
means that this product must be handled pursuant to European directive 2012/19/EU in order to be recycled or
dismantled to minimize its impact on the environment.
User has the choice to give his product to a competent recycling organization or to the retailer when he buys a
new electrical or electronic equipment.