TP Link Technologies TCW7960 300Mbps Wireless N DOCSIS 3.0 Cable Modem Router User Manual TE7TSCW7960 Rev1
TP-Link Technologies Co., Ltd. 300Mbps Wireless N DOCSIS 3.0 Cable Modem Router TE7TSCW7960 Rev1
TE7TSCW7960_User Manual_Rev1
TC-W7960
300Mbps Wireless N DOCSIS 3.0 Cable Modem Router
REV1.0.0
1910011384

COPYRIGHT & TRADEMARKS
Specifications are subject to change without notice. is a registered trademark
of TP-LINK TECHNOLOGIES CO., LTD. Other brands and product names are trademarks or
registered trademarks of their respective holders.
No part of the specifications may be reproduced in any form or by any means or used to make any
derivative such as translation, transformation, or adaptation without permission from TP-LINK
TECHNOLOGIES CO., LTD. Copyright © 2016 TP-LINK TECHNOLOGIES CO., LTD. All rights
reserved.
http://www.tp-link.com

FCC STATEMENT
This equipment has been tested and found to comply with the limits for a Class B digital device,
pursuant to part 15 of the FCC Rules. These limits are designed to provide reasonable protection
against harmful interference in a residential installation. This equipment generates, uses and can
radiate radio frequency energy and, if not installed and used in accordance with the instructions,
may cause harmful interference to radio communications. However, there is no guarantee that
interference will not occur in a particular installation. If this equipment does cause harmful
interference to radio or television reception, which can be determined by turning the equipment off
and on, the user is encouraged to try to correct the interference by one or more of the following
measures:
Reorient or relocate the receiving antenna.
Increase the separation between the equipment and receiver.
Connect the equipment into an outlet on a circuit different from that to which the receiver is
connected.
Consult the dealer or an experienced radio/ TV technician for help..
This device complies with part 15 of the FCC Rules. Operation is subject to the following two
conditions:
1) This device may not cause harmful interference.
2) This device must accept any interference received, including interference that may cause
undesired operation.
Any changes or modifications not expressly approved by the party responsible for compliance
could void the user’s authority to operate the equipment.
Note: The manufacturer is not responsible for any radio or TV interference caused by
unauthorized modifications to this equipment. Such modifications could void the user’s authority to
operate the equipment.
FCC RF Radiation Exposure Statement:
This equipment complies with FCC RF radiation exposure limits set forth for an uncontrolled
environment. This device and its antenna must not be co-located or operating in conjunction with
any other antenna or transmitter.
“To comply with FCC RF exposure compliance requirements, this grant is applicable to only
Mobile Configurations. The antennas used for this transmitter must be installed to provide a
separation distance of at least 20 cm from all persons and must not be co-located or operating in
conjunction with any other antenna or transmitter.”
Canadian Compliance Statement
This device complies with Industry Canada license-exempt RSSs. Operation is subject to the
following two conditions:
1) This device may not cause interference, and
2) This device must accept any interference, including interference that may cause undesired
operation of the device.
Le présent appareil est conforme aux CNR d’Industrie Canada applicables aux appareils radio
exempts de licence. L’exploitation est autorisée aux deux conditions suivantes :
3) l’appareil ne doit pas produire de brouillage;
l’utilisateur de l’appareil doit accepter tout brouillage radioélectrique subi, meme si le brouillage est
susceptible d’en compromettre le fonctionnement.
Radiation Exposure Statement:
This equipment complies with IC radiation exposure limits set forth for an uncontrolled
environment. This equipment should be installed and operated with minimum distance 20cm
between the radiator & your body.
Déclaration d'exposition aux radiations:
Cet équipement est conforme aux limites d'exposition aux rayonnements IC établies pour un
environnement non contrôlé. Cet équipement doit être installé et utilisé avec un minimum de 20
cm de distance entre la source de rayonnement et votre corps.
Industry Canada Statement
CAN ICES-3 (B)/NMB-3(B)
Safety Information
When product has power button, the power button is one of the way to shut off the product;
when there is no power button, the only way to completely shut off power is to disconnect the
product or the power adapter from the power source.
Don’t disassemble the product, or make repairs yourself. You run the risk of electric shock
and voiding the limited warranty. If you need service, please contact us.
Avoid water and wet locations.
Adapter shall be installed near the equipment and shall be easily accessible.
The plug considered as disconnect device of adapter.
Explanation of the symbols on the product label
Symbol Explanation
DC voltage
RECYCLING
This product bears the selective sorting symbol for Waste electrical and electronic
equipment (WEEE). This means that this product must be handled pursuant to
European directive 2012/19/EU in order to be recycled or dismantled to minimize
its impact on the environment.
User has the choice to give his product to a competent recycling organization or to
the retailer when he buys a new electrical or electronic equipment.
CONTENTS
Package Contents ....................................................................................................1
Chapter 1.Product Overview...................................................................................2
1.1Overview of the Modem Router ...................................................................................... 2
1.2Main Features................................................................................................................. 2
1.3Panel Layout................................................................................................................... 3
1.3.1The Front Panel ................................................................................................................... 3
1.3.2The Back Panel.................................................................................................................... 5
Chapter 2.Connecting to the Network....................................................................6
2.1System Requirements .................................................................................................... 6
2.2Installation Environment Requirements .......................................................................... 6
2.3Connecting the Hardware ............................................................................................... 6
2.4Activating the Modem Router ......................................................................................... 7
Chapter 3.Log into the Modem Router...................................................................9
Chapter 4.Basic Configuration .............................................................................10
4.1Network Map................................................................................................................. 10
4.2Internet.......................................................................................................................... 10
4.3Wireless ........................................................................................................................ 13
4.4Guest Network .............................................................................................................. 14
4.5USB Settings ................................................................................................................ 15
4.5.1Folder Sharing.................................................................................................................... 15
4.5.2Print Server ........................................................................................................................ 17
4.6Parental Control............................................................................................................ 18
Chapter 5.Advanced Configuration......................................................................24
5.1Status............................................................................................................................ 24
5.2Operation Mode ............................................................................................................ 24
5.3Network......................................................................................................................... 25
5.3.1WAN................................................................................................................................... 25
5.3.2LAN Settings ...................................................................................................................... 30
5.3.3IPv6 LAN Settings.............................................................................................................. 32
5.3.4Dynamic DNS..................................................................................................................... 34
5.3.5Advanced Routing.............................................................................................................. 35
5.4Wireless 2.4G ............................................................................................................... 36
5.4.1Basic Settings .................................................................................................................... 36
5.4.2Primary Network................................................................................................................. 37
5.4.3Guest Network ................................................................................................................... 42
5.4.4MAC Filtering ..................................................................................................................... 43
5.4.5Wireless Bridging ............................................................................................................... 46
5.4.6Wireless Advanced ............................................................................................................ 47
5.5NAT Forwarding............................................................................................................ 48
5.5.1IP Filtering .......................................................................................................................... 48
5.5.2MAC Filtering ..................................................................................................................... 50
5.5.3Port Filtering....................................................................................................................... 50
5.5.4Port Forwarding.................................................................................................................. 52
5.5.5Port Triggers ...................................................................................................................... 53
5.5.6DMZ ................................................................................................................................... 56
5.5.7Options............................................................................................................................... 56
5.6USB Settings ................................................................................................................ 58
5.6.1Disk Settings ...................................................................................................................... 58
5.6.2Folder Sharing.................................................................................................................... 59
5.6.3Print Server ........................................................................................................................ 63
5.7Parental Control............................................................................................................ 64
5.8Firewall ......................................................................................................................... 66
5.8.1Basic .................................................................................................................................. 67
5.8.2Local Log............................................................................................................................ 67
5.8.3Remote Log........................................................................................................................ 68
5.9System Tools ................................................................................................................ 70
5.9.1System Information ............................................................................................................ 70
5.9.2Device Information ............................................................................................................. 71
5.9.3Connection Status.............................................................................................................. 71
5.9.4Diagnostic .......................................................................................................................... 73
5.9.5Time Settings ..................................................................................................................... 74
5.9.6Backup & Restore .............................................................................................................. 76
5.9.7Administrator ...................................................................................................................... 77
5.9.8Event Log ........................................................................................................................... 78
Appendix A: Specifications ...................................................................................79

TC-W7960 300Mbps Wireless N DOCSIS 3.0 Cable Modem Router User Guide
Package Contents
The following contents should be found in your package:
One TC-W7960 300Mbps Wireless N DOCSIS 3.0 Cable Modem Router
One Power Adapter for TC-W7960 300Mbps Wireless N DOCSIS 3.0 Cable Modem Router
Quick Installation Guide
One RJ45 cable
Note:
Make sure that the package contains the above items. If any of the listed items are damaged or
missing, please contact your distributor.
1

TC-W7960 300Mbps Wireless N DOCSIS 3.0 Cable Modem Router User Guide
Chapter 1. Product Overview
Thank you for choosing the TC-W7960 300Mbps Wireless N DOCSIS 3.0 Cable Modem Router.
1.1 Overview of the Modem Router
The TC-W7960 300Mbps Wireless N DOCSIS 3.0 Cable Modem Router integrates DOCSIS 3.0
modem, NAT router, 4-port switch and wireless access point in one device provides a one-stop
networking solution.
The modem router provides up to 300Mbps (2.4GHz) wireless connection with other wireless clients.
The incredible speed makes it ideal for handling multiple data streams at the same time, which
ensures your network stable and smooth. It is compatible with all IEEE 802.11a, IEEE 802.11b, IEEE
802.11g and IEEE 802.11n products.
With multiple protection measures, including SSID broadcast control and wireless LAN 64/128
WEP encryption, Wi-Fi protected Access (WPA2-PSK, WPA-PSK), as well as advanced Firewall
protections, the TC-W7960 300Mbps Wireless N DOCSIS 3.0 Cable Modem Router provides
complete data privacy.
The modem router provides flexible access control, so that parents or network administrators can
establish restricted access policies for children or staffs. It also supports Virtual Server and DMZ
host for Port Triggering, and then the network administrators can manage and monitor the network
in real time with the remote management function.
Since the modem router is compatible with virtually all the major operating systems, it is very easy
to manage. Detailed instructions are provided step by step in this user guide. Before installing the
modem router, please look through this guide to know all the modem router’s functions.
1.2 Main Features
DOCSIS 3.0, Compatible with DOCSIS 2.0/1.1/1.0
8 Downstream Channel bonding, Up to 343.072 Mbps Downstream for DOCSIS
4 Upstream Channel bonding, Up to 143.36 Mbps Upstream
Full Band Capture windows - Utilize any channels in the downstream spectrum.
Dual-core processor – for wonderful performance with Internet, Wi-Fi, Ethernet and USB
devices
2 internal antennas provide Omni-directional wireless coverage and reliability
Full gigabit ports ensure ultra fast data transfer speeds
USB Port - easily share printers, files or media with your friends or family locally or over the
Internet
Guest Network Access provides secure Wi-Fi access for guests sharing your home or office
network
IPv6 supported, meeting the demands for the next generation of Internet
Wi-Fi On/Off Button allows users to turn their wireless radio on or off
Easy one-touch WPA wireless security encryption with the WPS button
2
TC-W7960 300Mbps Wireless N DOCSIS 3.0 Cable Modem Router User Guide
WPA-PSK/WPA2-PSK encryptions provide user networks with active defense against
security threats
Parental Controls allow parents or administrators to establish restricted access policies for
children or staff
1.3 Panel Layout
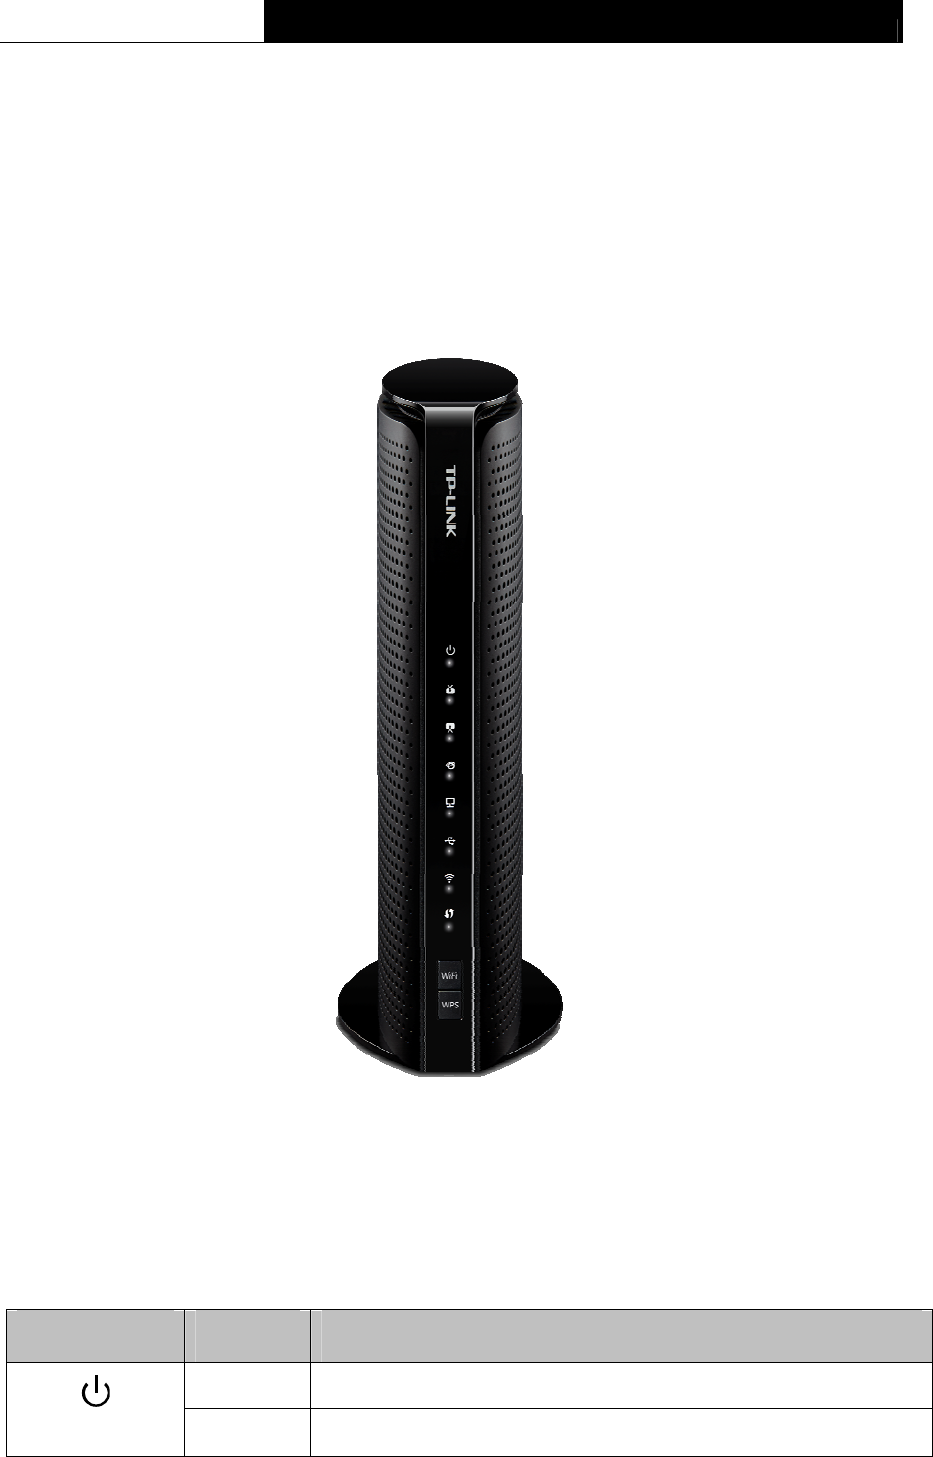
1.3.1 The Front Panel
Figure 1-1
The modem router’s LEDs are located on the side panel (View from top to bottom). They indicate
the device’s working status. For details, please refer to LED Explanation.
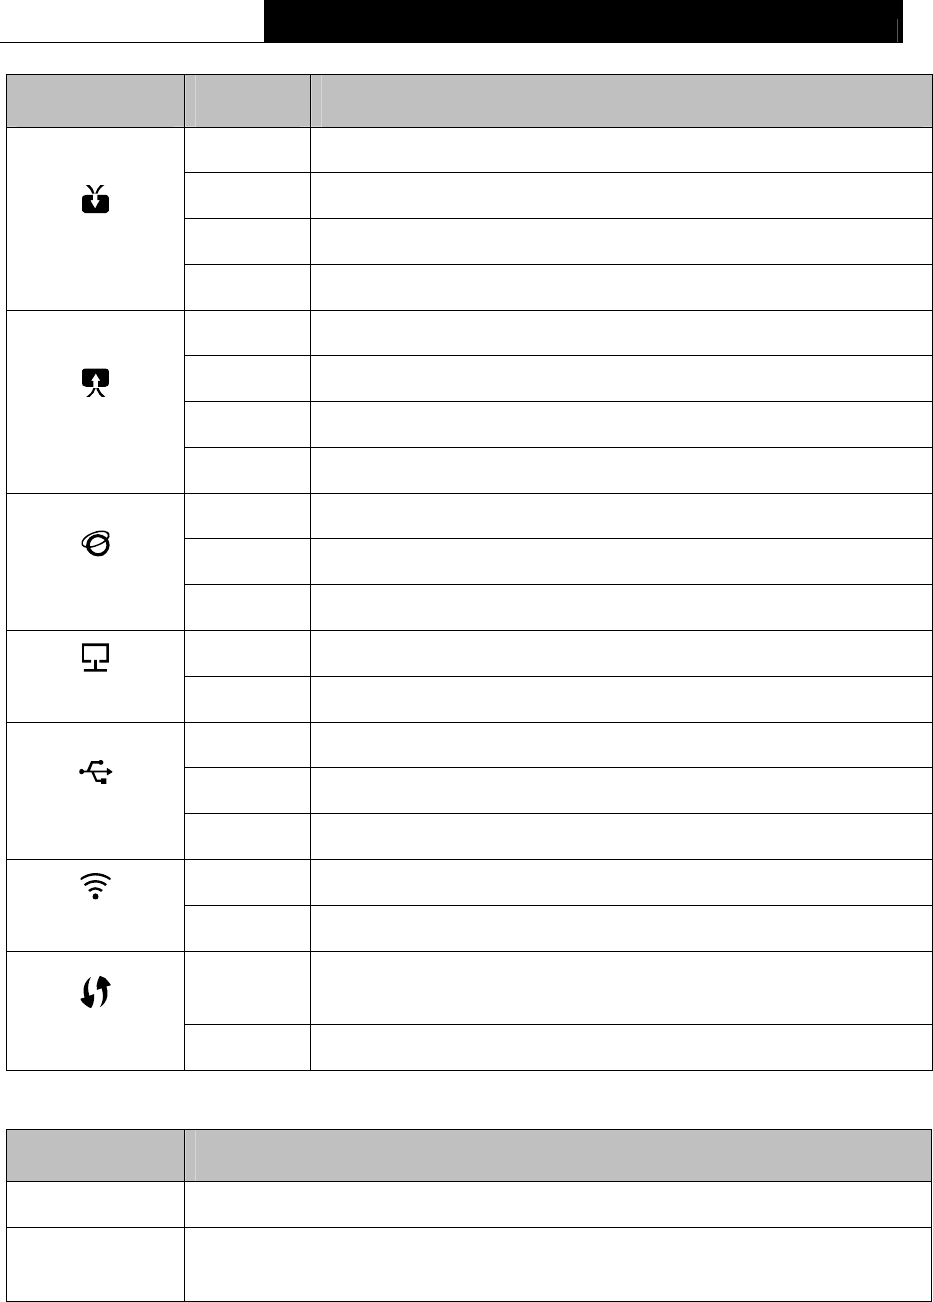
LED Explanation:
Name Status Indication
On Power is on.
(Power) Off Power is off.
3
TC-W7960 300Mbps Wireless N DOCSIS 3.0 Cable Modem Router User Guide
Name Status Indication
Green The modem router is synchronized with more than one channel.
White The modem router is synchronized with one channel.
Flashing The modem router is scanning for downstream channels.
(Downstream)
Off The initialization is not started, or has failed.
Green The modem router is synchronized with more than one channel.
White The modem router is synchronized with one channel.
Flashing The modem router is synchronizing with upstream channels.
(Upstream)
Off The initialization is not started, or has failed.
On Internet service is available.
Off Internet service is not available.
(Internet)
Flashing The modem router is initializing.
On At least one LAN port is connected.
(LAN) Off No LAN port is connected.
Off No USB device is plugged in to the USB port.
On The USB device is detected and ready to use.
(USB)
Flashing The USB device is being detected.
On The wireless network is enabled.
(Wireless) Off The wireless network is disabled.
On/Off The LED stays on for 5 minutes when a WPS connection is
established before turns off.
(WPS) Flashing WPS connection is in progress. This may take up to 2 minutes.
Buttons:
Name Indication
WiFi The switch for the WiFi function. Press it to enable/disable the WiFi function.
WPS The switch for the WPS function. Press it for 2 seconds to enable the WPS
function.
4
TC-W7960 300Mbps Wireless N DOCSIS 3.0 Cable Modem Router User Guide
1.3.2 The Back Panel
Figure 1-2
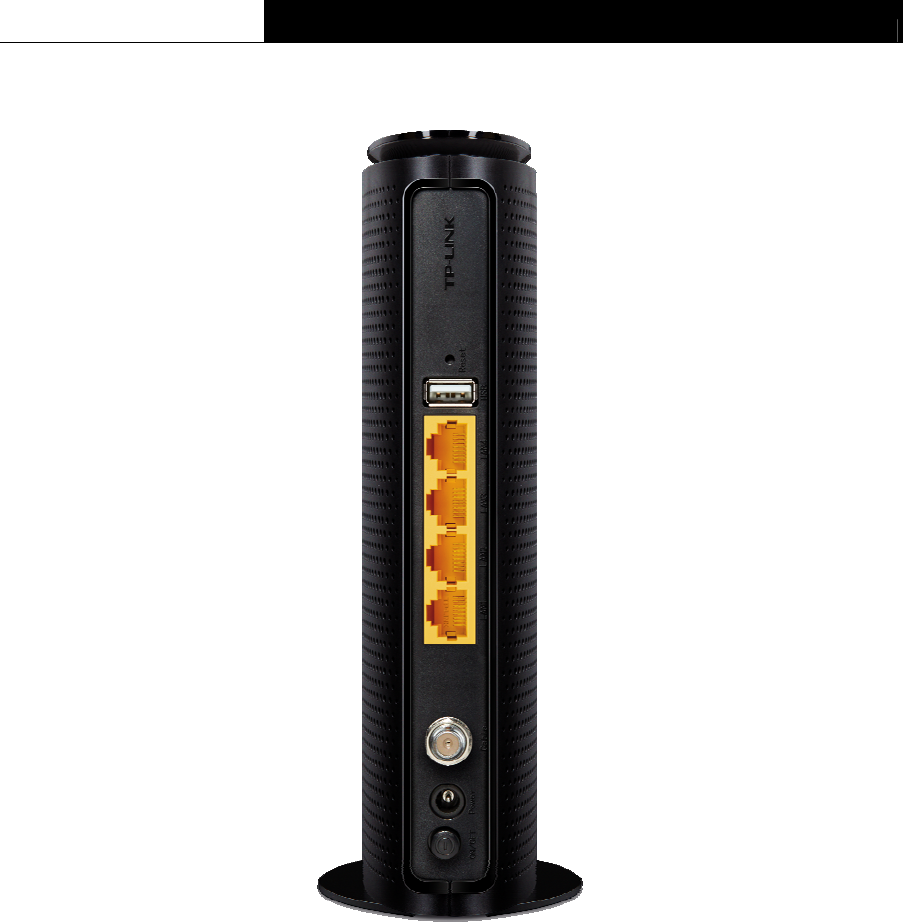
Reset: There are two ways to reset the modem router's factory defaults.
Method one: With the modem router powered on, press and hold the Reset button for
approximately 8 seconds until all LEDs turn back on, then release the button.
Method two: Log in to the web management page of the modem router. Go to Advanced >
System tools > Backup & Restore and click Reset. The modem router will restore and
reboot automatically.
USB: The USB port connects to a USB storage device or a USB printer.
LAN4, LAN3, LAN2, LAN1: Through these ports, you can connect the modem router to your
PC or other Ethernet network devices.
Cable: Through this port, you can connect the modem router to coaxial cable.
Power: The power plug where you will connect the power adapter.
ON/OFF: The switch for the power.
5
TC-W7960 300Mbps Wireless N DOCSIS 3.0 Cable Modem Router User Guide
Chapter 2. Connecting to the Network
2.1 System Requirements
Broadband Internet Access Service (Cable).
PCs with a working Ethernet Adapter and an Ethernet cable with RJ45 connectors.
TCP/IP protocol on each PC.
Web browser, such as Microsoft Internet Explorer, Mozilla Firefox or Apple Safari.
2.2 Installation Environment Requirements
The product should not be located where it will be exposed to moisture or excessive heat.
Place the Router in a location where it can be connected to the various devices as well as to a
power source.
Make sure the cables and power cord are safely placed out of the way so they do not create a
tripping hazard.
The Router can be placed on a shelf or desktop.
Keep away from the strong electromagnetic radiation and the device of electromagnetic
sensitive.
2.3 Connecting the Hardware
Before installing the device, please make sure your broadband cable service provided by your ISP
is available. If there is any problem, please contact your ISP. Before cable connection, cut off the
power supply and keep your hands dry, then follow the steps below to install it.
LAN1CableDC
Power
ON/OFF LAN2 LAN3 LAN4 USB
Reset
Internet
Coaxial cablePower adapter
Figure 2-1
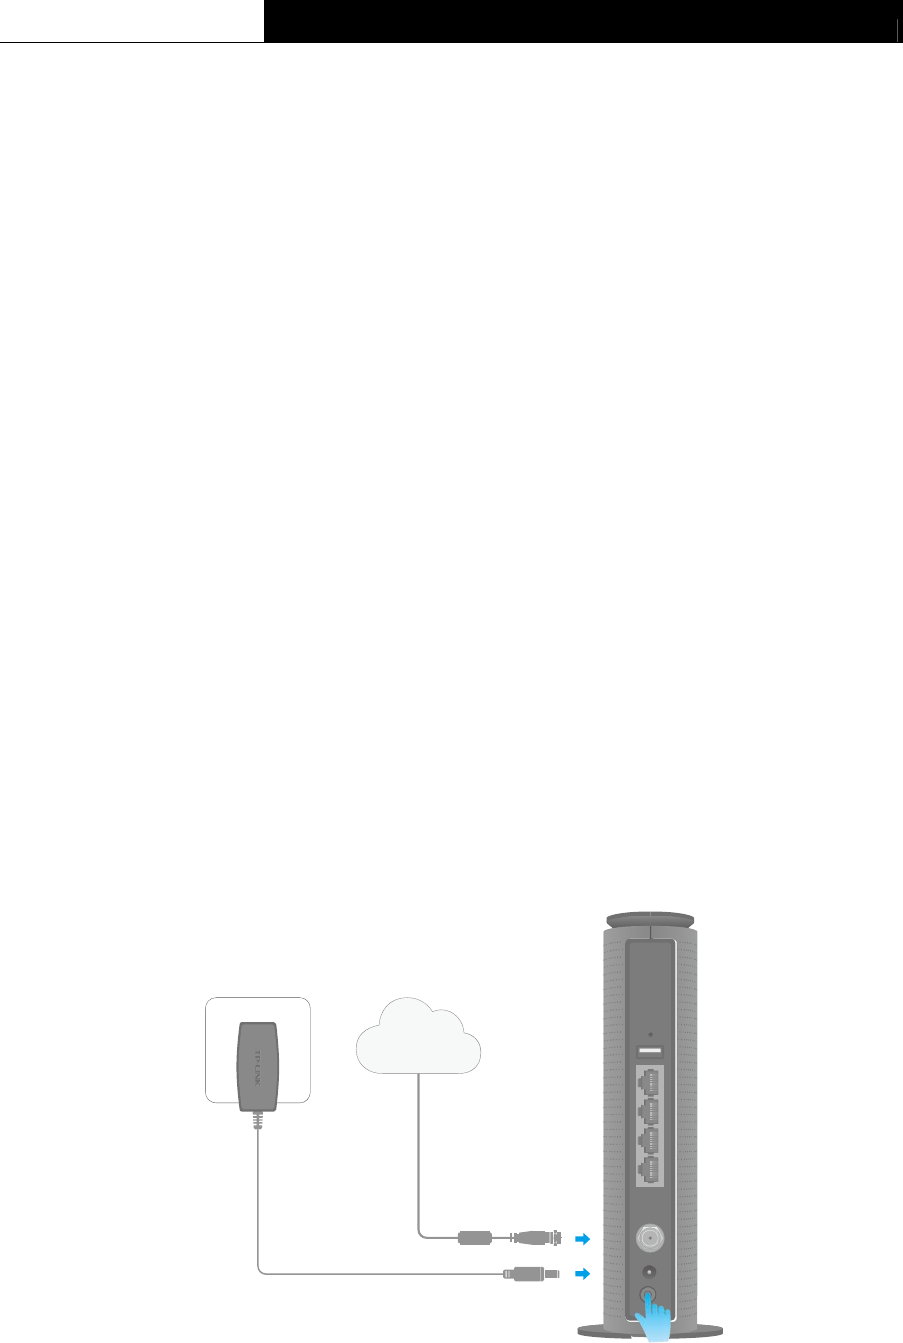
Step 1: Connect the coaxial cable and power adapter to the modem router, then power on your
modem router.
6
TC-W7960 300Mbps Wireless N DOCSIS 3.0 Cable Modem Router User Guide
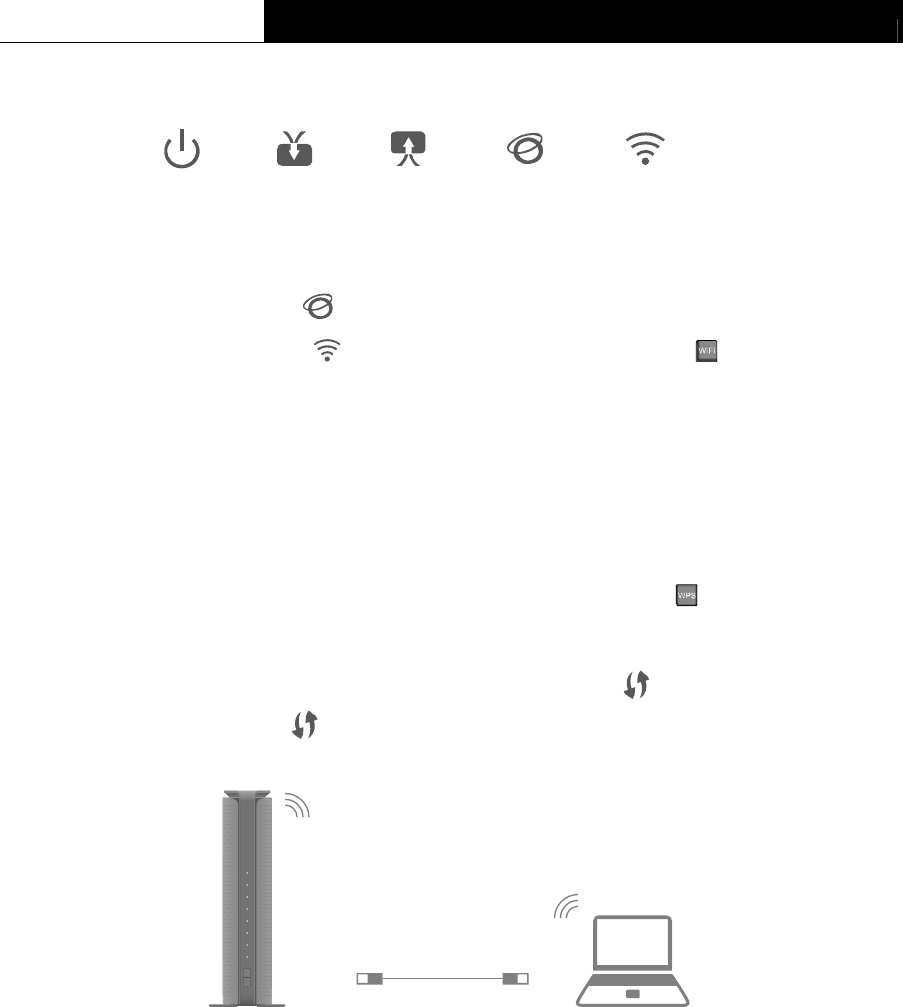
Step 2: Wait for about 1 minute until the following LEDs are solid on.
Note:
1. Keep the power on at all times during this process.
2. If the Internet LED is blinking or off, please call your ISP’s customer service.
3. If the wireless LED is off, please press the WiFi button on the front panel,
then check the LEDs again.
Step 3: Connect your computer to the modem router via a wired or wireless connection.
Wired: Connect the computer to the modem router’s LAN port via an Ethernet cable.
Wireless: On your computer, select and connect to the modem router’s wireless network.
The default wireless network name (SSID) and password are on the provided
Information Card.
Or you can set up a connection via the WPS button , which is on the front
panel of the modem router. If your computer use an adapter that supports
WPS, press the WPS button on the adapter. Within 2 minutes, press the WPS
button on the modem router until the WPS LED starts to flash quickly. The
WPS LED will stay on for 5 minutes when a WPS connection is
established, then turns off.
Figure 2-2
2.4 Activating the Modem Router
Step 1. Get your Internet service account information and the modem router’s Information Card
ready for activating your modem router. To access the Internet, the modem router needs
to be activated.
Step 2. If your computer is configured with a fixed IP, change it to “obtain an IP address
dynamically”.
Launch a web browser, and visit any website. You will be automatically redirected to your
service provider’s self-activation page.
Follow the on-screen self-activation instructions to activate the modem router. If the
self-activation page does not show up, please call your service provider’s customer
service to activate the modem router.
7

TC-W7960 300Mbps Wireless N DOCSIS 3.0 Cable Modem Router User Guide
Tips:
For Comcast and Time Warner Cable (TWC):
Comcast Xfinity www.comcast.com 1-800-934-6489
Time Warner Cable www.timewarnercable.com 1-855-704-4503
The contact information listed might change. You can also find the contact number in your monthly
Internet service billing statement.
After activating your modem router successfully, wait for about 10 minutes till these LEDs
become solid on, then you can enjoy the Internet.
Note:
If the Internet is not accessible, contact your ISP and make sure that the modem router is
activated.
For additional configuration, log into the web-based management at http://tplinkmodem.net or
192.168.1.1, and enter admin (all lowercase) for both username and password.
Safety Information
The product should be connected to cable distribution system that grounded (earthed) in
accordance with ANSI/NFPA 70, the National Electrical Code (NEC), in particular Section 820.93 -
Grounding of Outer Conductive Shield of a Coaxial Cable.
8
TC-W7960 300Mbps Wireless N DOCSIS 3.0 Cable Modem Router User Guide
Chapter 3. Log into the Modem Router
With a Web-based management page, it is easy to configure and manage the TC-W7960
300Mbps Wireless N DOCSIS 3.0 Cable Modem Router. The Web-based management page can
be used on any Windows, Macintosh or UNIX OS with a Web browser, such as Microsoft Internet
Explorer, Mozilla Firefox or Apple Safari.
Set up the TCP/IP Protocol in "Obtain an IP address automatically" mode on your PC. If you
need instructions as to how to do this, please refer to Appendix B: Trouble shooting.
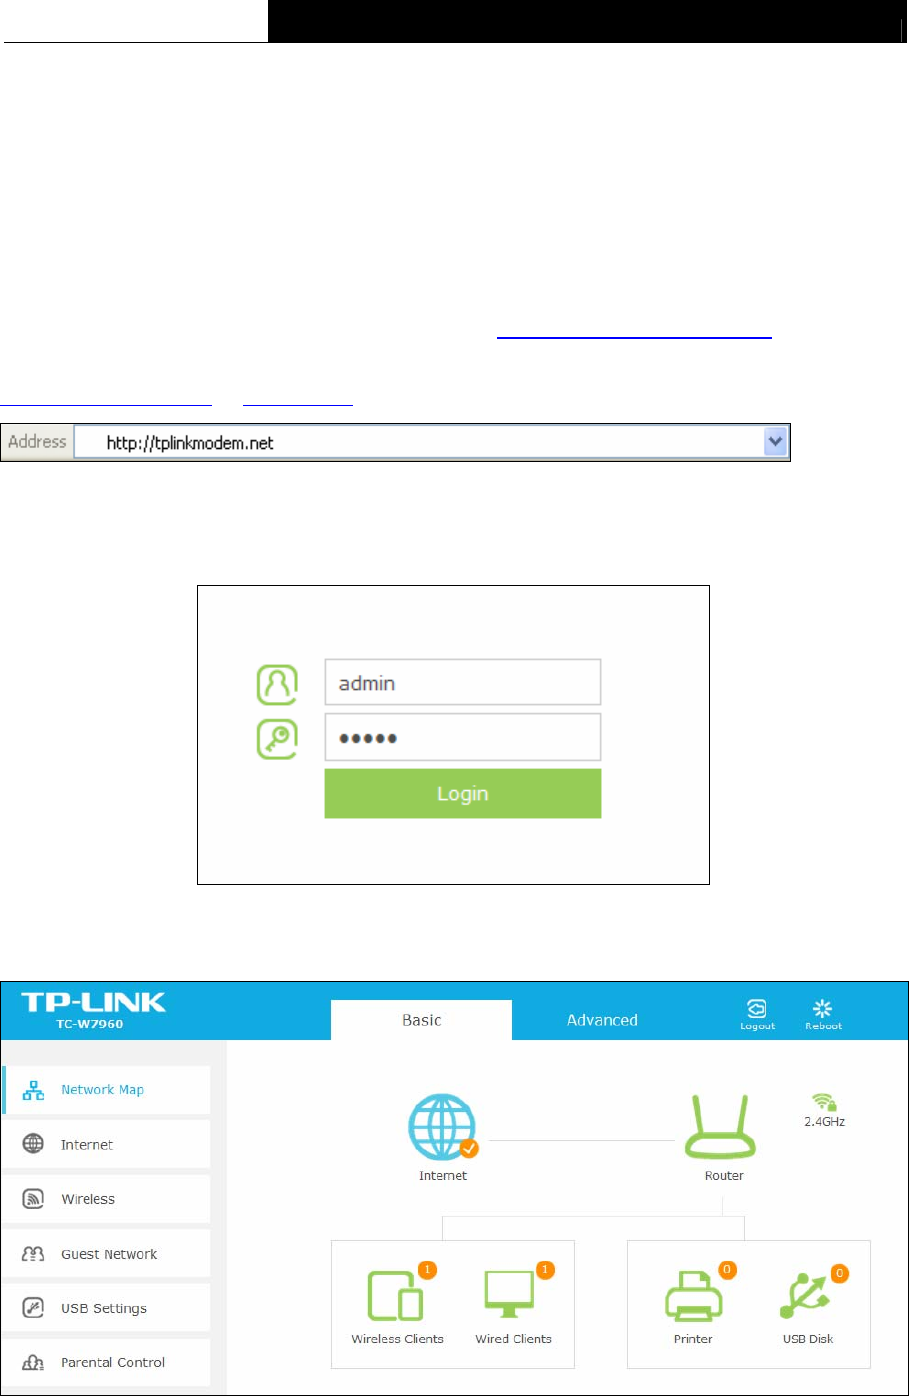
To access the configuration utility, open a web-browser and type the default address
http://tplinkmodem.net/ or 192.168.1.1 in the address field of the browser.
Figure 3-1
After a moment, a login window will appear. Enter admin for the Username and Password, both in
lower case letters. Then click the Login button or press the Enter key.
Figure 3-2
After your successful login, you will see the screen as shown below.
Figure 3-3
9
TC-W7960 300Mbps Wireless N DOCSIS 3.0 Cable Modem Router User Guide
Chapter 4. Basic Configuration
4.1 Network Map
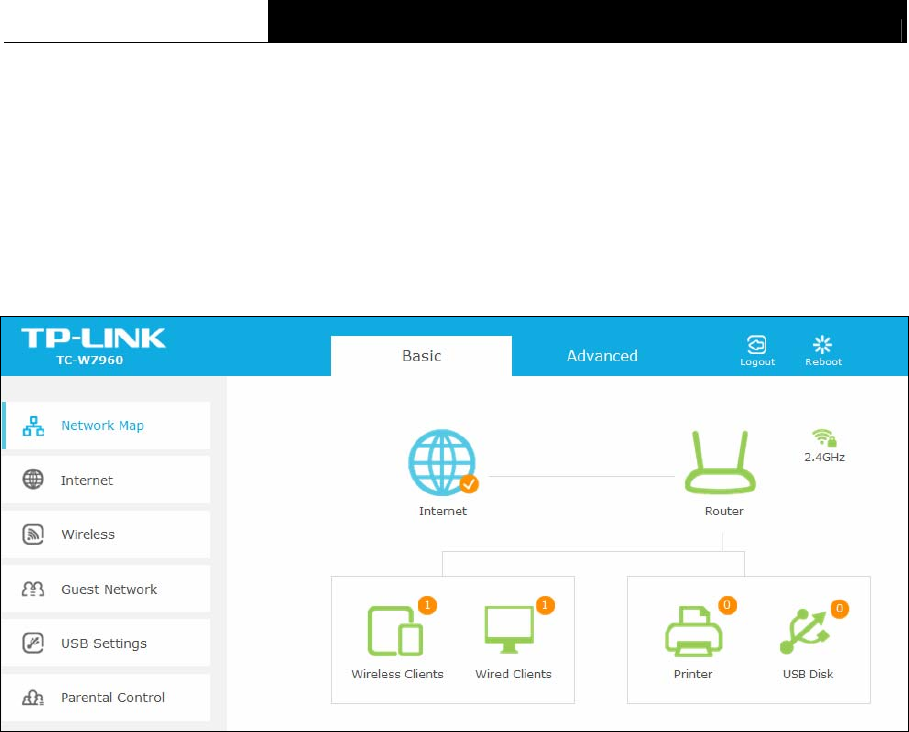
Network Map provides a dashboard that lets you see the status of your Internet connection
and network at a glance. You can click any of the six sections of the dashboard to view the
detailed information. All the information is read-only.
Figure 4-1
Internet – Click the Internet icon to view the ISP settings of your modem router.
Router - Click the Router icon to view the Wireless and Guest Network settings.
Wireless Clients - Click the Wireless Clients icon to view the wireless devices connected to
your network.
Wired Clients - Click the Wired Clients icon to view the wired devices connected to your
network.
Printer - Click the Printer icon to view the information of the printer connected to your
network.
USB Disk - Click the USB Disk icon to view the information of the USB storage device
connected to your network.
4.2 Internet
Choose “Basic Internet”, and you can configure the basic settings of the ISP Configuration and
the Internet on this page.
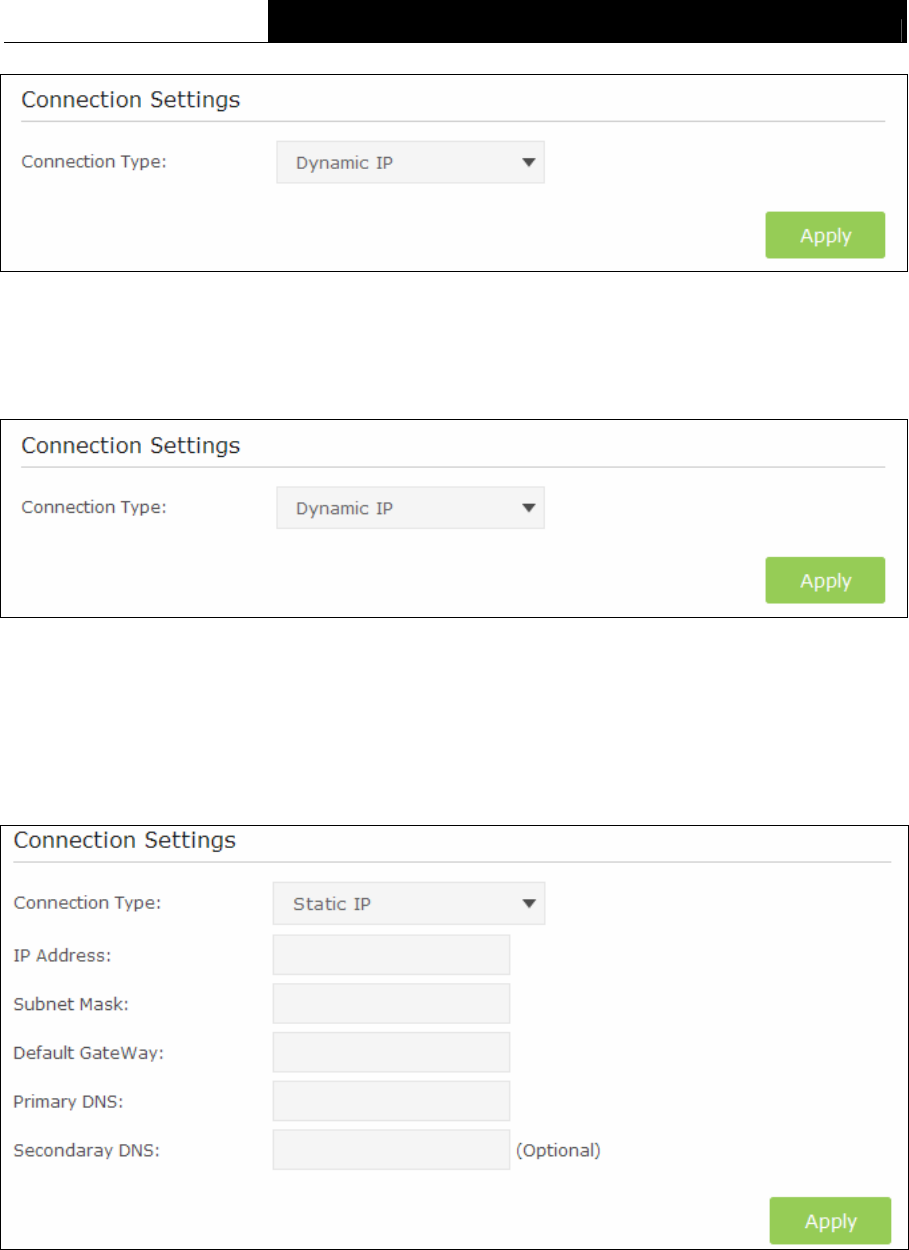
There are four different connection types, Dynamic IP, Static IP, L2TP(Dynamic IP) and
L2TP(Static). You can select the corresponding type according to your needs.
10
TC-W7960 300Mbps Wireless N DOCSIS 3.0 Cable Modem Router User Guide
Figure 4-2
1) Dynamic IP
Choose Dynamic IP in the drop-down list, the modem router will be able to obtain IP network
information dynamically from a DHCP server provided by your ISP.
Figure 4-3
Click the Apply button to save the settings.
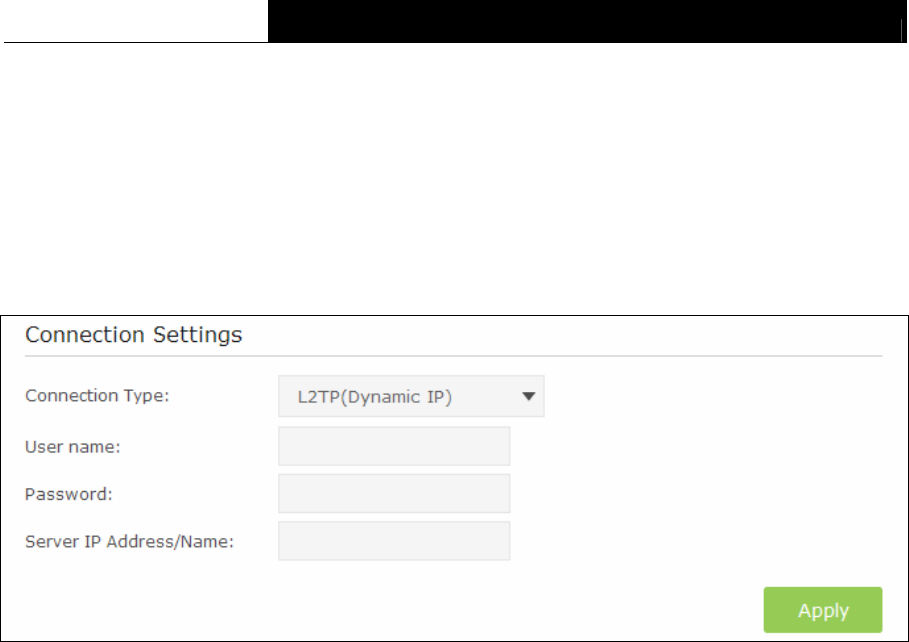
2) Static IP
Choose Static IP in the drop-down list if your ISP provides static IP information to you. You should
set static IP address, Subnet mask, and gateway address in the screen below.
Figure 4-4
IP Address - Enter the IP address in dotted-decimal notation provided by your ISP.
Subnet Mask - Enter the subnet Mask in dotted-decimal notation provided by your ISP,
usually is 255.255.255.0.
Default Gateway - Enter the gateway IP address in dotted-decimal notation provided by your
ISP.
11
TC-W7960 300Mbps Wireless N DOCSIS 3.0 Cable Modem Router User Guide
Primary DNS/ Secondary DNS - Here you can set DNS Server (at least one) manually. The
Router will use this DNS Server for priority.
Click the Apply button to save the settings.
3) L2TP(Dynamic IP)
Choose L2TP(Dynamic IP) in the drop-down list if your ISP provides L2TP(Dynamic IP)
information to you. You should set User name, Password and Server IP Address/Name in the
screen below.
Figure 4-5
Username/Password - Enter the Username and Password provided by your ISP. These
fields are case-sensitive. If you have difficulty with this process, please contact your ISP.
Server IP Address/Name - Enter the server IP address or domain name provided by your
ISP. If you have difficulty with this process, please contact your ISP.
Click the Apply button to save the settings.
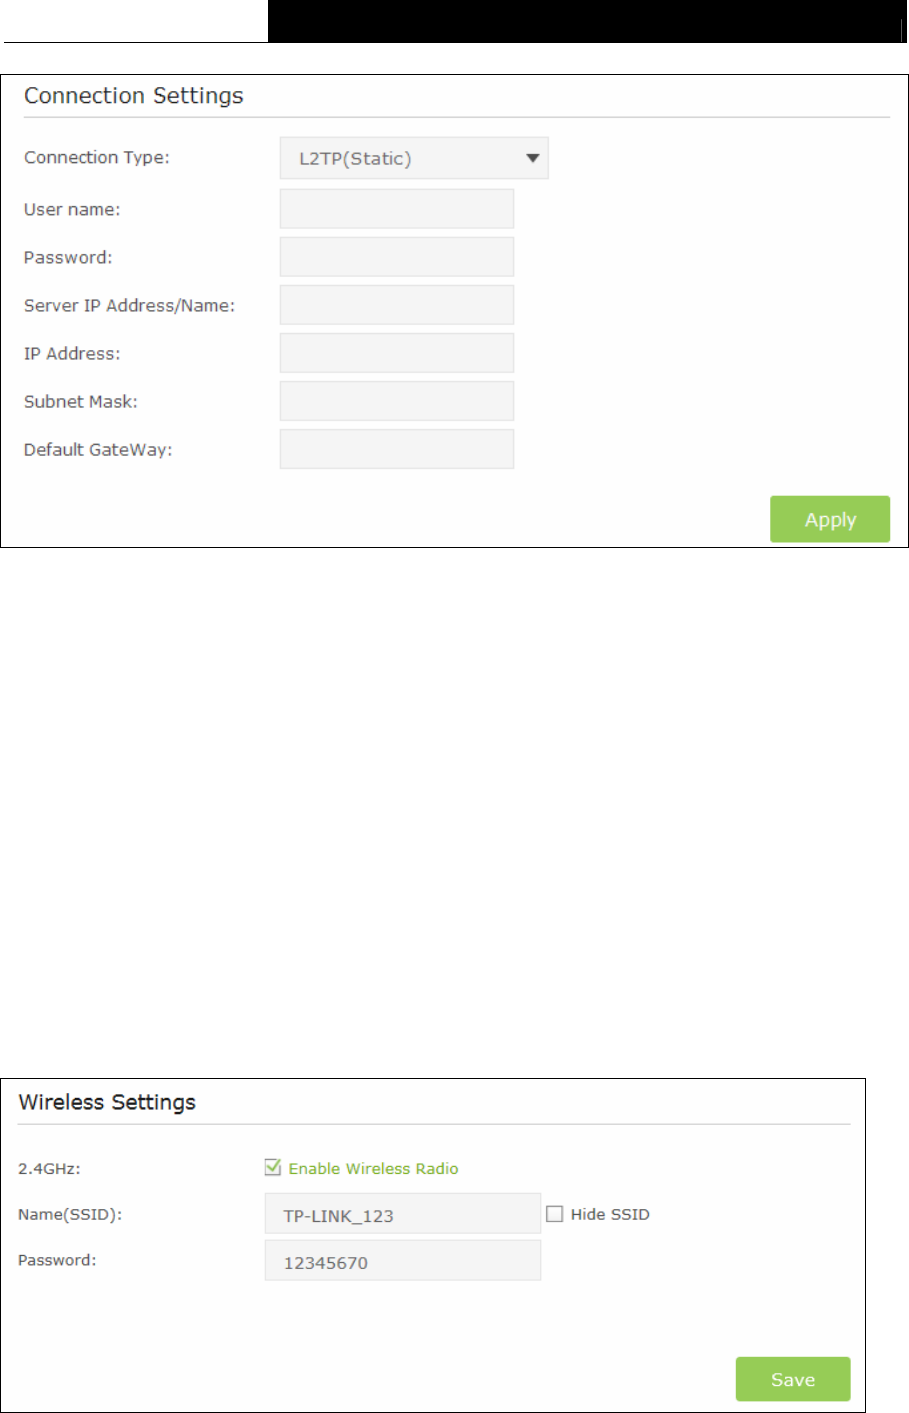
4) L2TP(Static)
Choose L2TP(Static) in the drop-down list if your ISP provides L2TP(Static) information to you.
You should set User name, Password, Server IP Address/Name, IP Address, Subnet Mask and
Default Gateway in the screen below.
12
TC-W7960 300Mbps Wireless N DOCSIS 3.0 Cable Modem Router User Guide
Figure 4-6
Username/Password - Enter the Username and Password provided by your ISP. These
fields are case-sensitive. If you have difficulty with this process, please contact your ISP.
Server IP Address/Name - Enter the server IP address or domain name provided by your
ISP. If you have difficulty with this process, please contact your ISP.
IP Address - Enter the IP address in dotted-decimal notation provided by your ISP.
Subnet Mask - Enter the subnet Mask in dotted-decimal notation provided by your ISP,
usually is 255.255.255.0.
Default Gateway - Enter the gateway IP address in dotted-decimal notation provided by your
ISP.
Click the Apply button to save the settings.
4.3 Wireless
Choose menu “Basic” → “Wireless”, you can configure the basic settings for the wireless
networks on this page.
Figure 4-7
13
TC-W7960 300Mbps Wireless N DOCSIS 3.0 Cable Modem Router User Guide
Enable Wireless Radio – Check the box to enable the Wireless Radio.
Name(SSID) –Enter a desired wireless network name which is case-sensitive and must not
exceed 32 characters. The default SSID is TP-LINK_XXXX (XXXX is the last four numbers of
modem router’s MAC address).
Hide SSID – If you want to hide the SSID of your wireless network from the Wi-Fi network,
you should check the box.
Password –You can enter ASCII characters between 8 and 63 characters or 8 to 64
Hexadecimal characters. The default password is the same with the default PIN code, which
is labeled on the bottom of the modem router.
Click the Save button to save the settings.
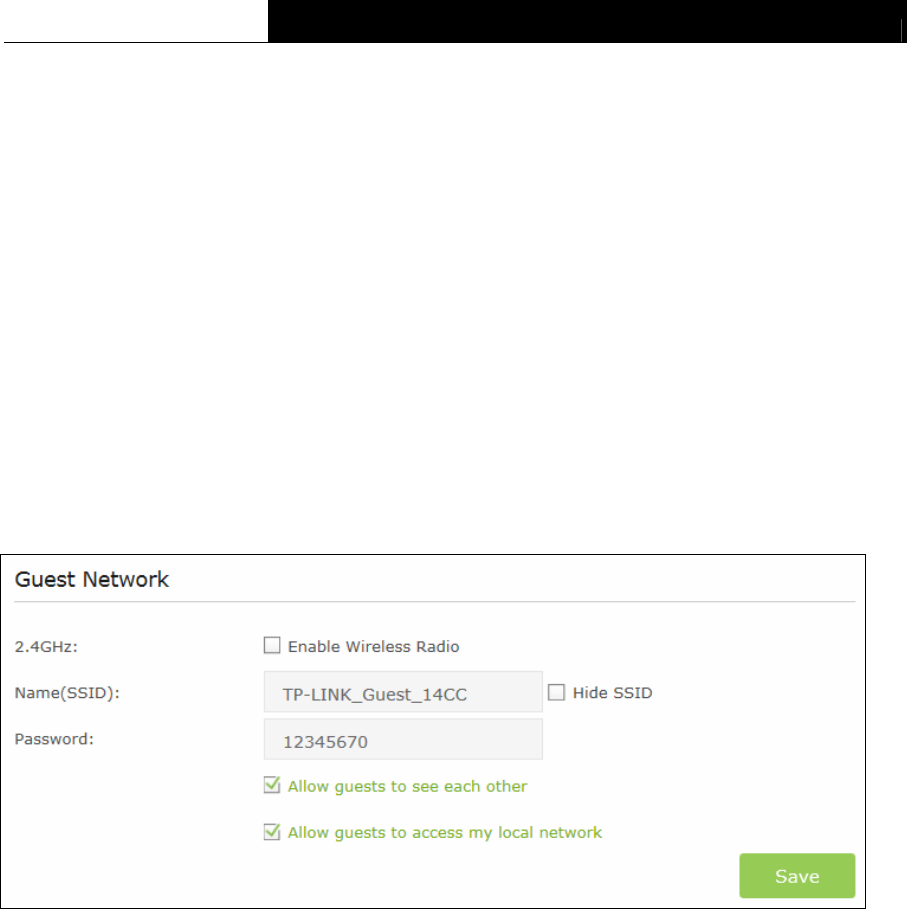
4.4 Guest Network
Choose menu “Basic → Guest Network”, and you will see the screen as shown below. This
feature allows you to create a separate network for your guests without allowing them to access
your main network and computers connected to it.
Figure 4-8
Enable Wireless Radio – Check the box to enable the Wireless Radio.
Name(SSID) - Create a name for the guest network. When setting up a Guest network, it is
strongly recommended to use a name that easily distinguishes it from your primary network. If
you want to hide the guest network from the Wi-Fi network, check the Hide SSID.
Password - Create a password for the guest network. The password must have a minimum
of 8 characters in length.
Allow guests to see each other - If Allow guests to see each other is selected, anyone
who connects to the guest network can access each other.
Allow guests to access my local network - If Allow guests to access my local network is
selected, anyone who connects to the guest network has access to your local network, not
just Internet access.
Click the Save button to save the settings.
14
TC-W7960 300Mbps Wireless N DOCSIS 3.0 Cable Modem Router User Guide
4.5 USB Settings
There are two submenus under the USB Settings menu, Folder Sharing and Print Server. Click
any of them, and you will be able to configure the corresponding function.
4.5.1 Folder Sharing
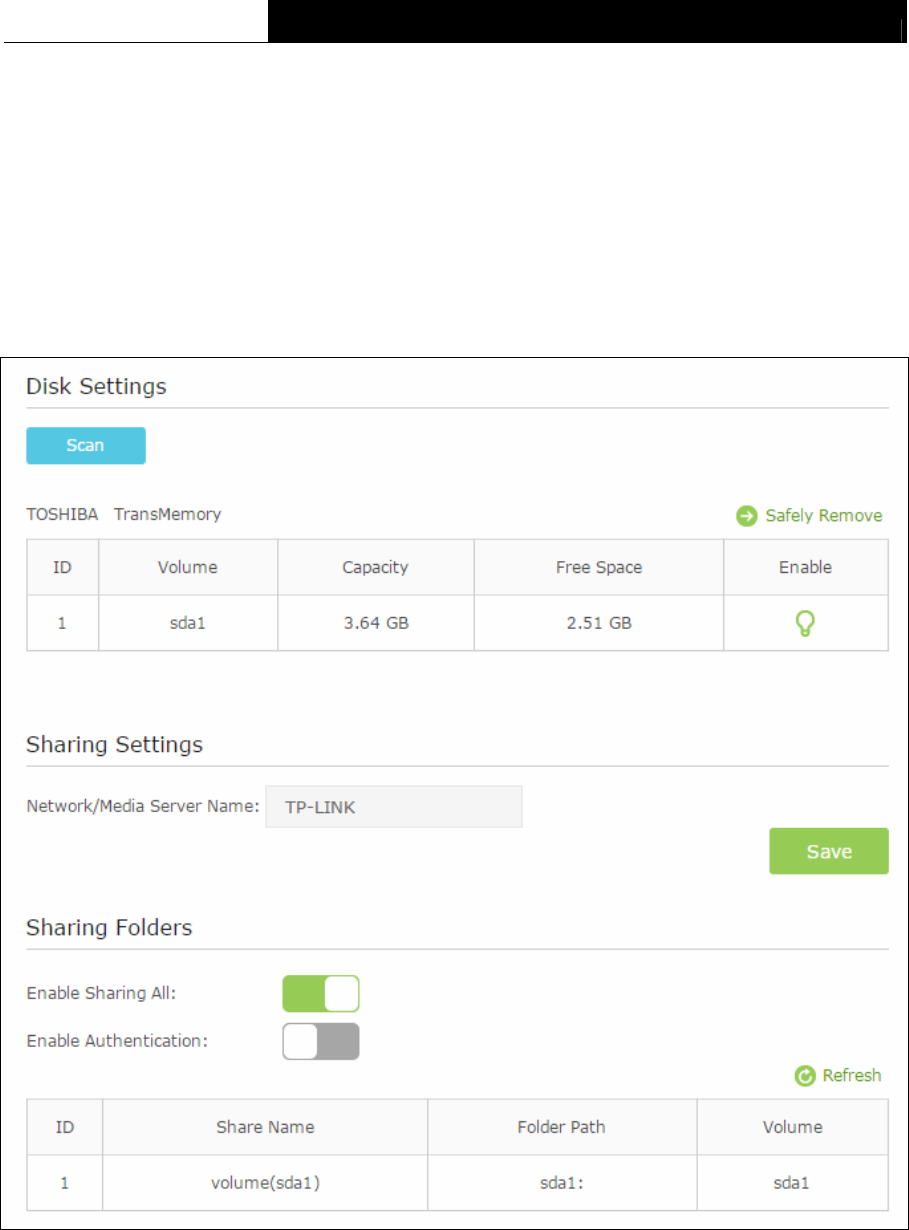
Choose menu “Basic → USB Settings → Folder Sharing”, you can view the basic information
about the connected USB mass storage, and configure Sharing Folders (Media files, Document
files, Compress files and so on.)
Figure 4-9
Disk Settings:
Scan - Click the button to display the information of the USB storage device connected to the
modem router.
Volume - The volume name of the USB driver the users have access to.
Capacity - The storage capacity of the USB driver.
15
TC-W7960 300Mbps Wireless N DOCSIS 3.0 Cable Modem Router User Guide
Free Space - The available capacity of the USB driver.
Enable - When the volume is shared, you can click the icon to stop sharing the volume;
when volume is non-shared, you can click the icon to share the volume.
Click Safely Remove button to remove the USB storage device that is connected to USB port.
Note:
Before removing the USB storage device, you should click “ Safely Remove” to make sure that
all your data have been saved completely. Removing device directly may cause your USB storage
device crashed.
Sharing Settings:
Network/Media Server Name - Show the name of the network/media server. This is the
name used to access the USB device connected to the modem router.
Sharing Folders:
Enable Sharing All - The switch for sharing all the folders. If you turn on the switch, the field
will become green and all the folders in the USB drive will be shared.
Enable Authentication - If you turn on this switch, the folder sharing needs authentication.
The default setting is off.
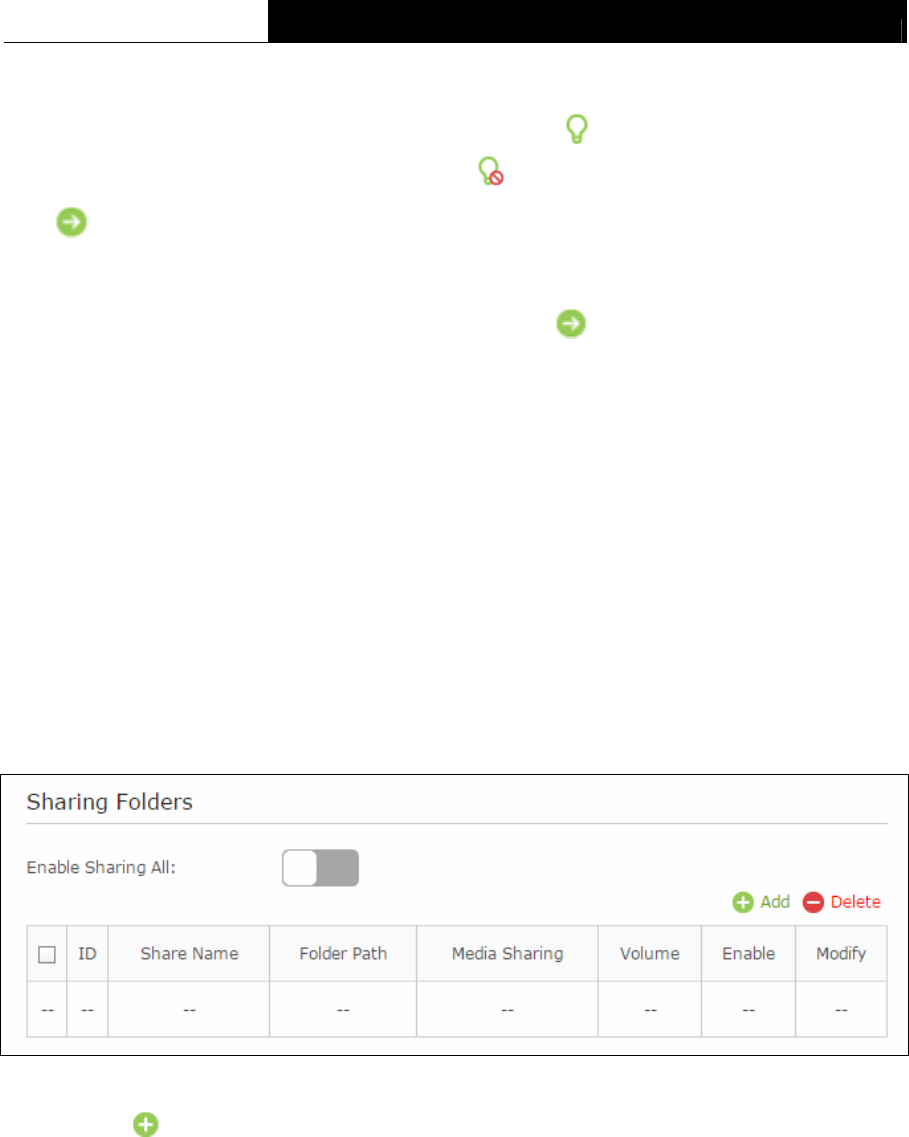
To share the folders you specified, please follow the steps below.
1. Turn off the Enable Sharing All switch and the next screen will pop-up as shown below.
Figure 4-10
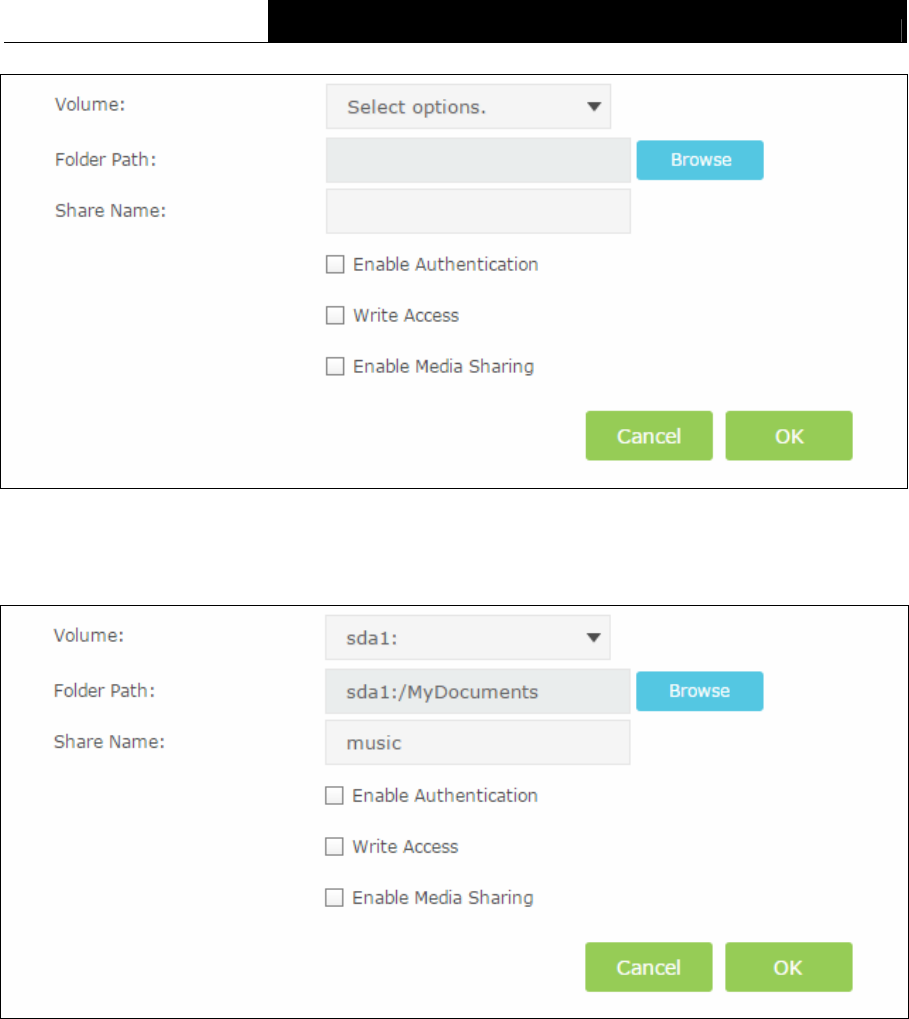
2. Click the Add button and the next screen will pop-up as shown in Figure 4-11.
16
TC-W7960 300Mbps Wireless N DOCSIS 3.0 Cable Modem Router User Guide
Figure 4-11
3. Select the volume desired to share from the Volume drop-down list. Then click the Browse
button to select the folder path. You can create a share name, e.g. music.
Figure 4-12
4. Select the checkboxes in Figure 4-12.according to your needs.
Enable Authentication - If this checkbox is selected, then the folder sharing needs
authentication.
Write Access - If this checkbox is selected, then the sharing folder is allowed for writing
access.
Enable Media Sharing - Select this checkbox to enable media sharing.
Click OK to complete the settings.
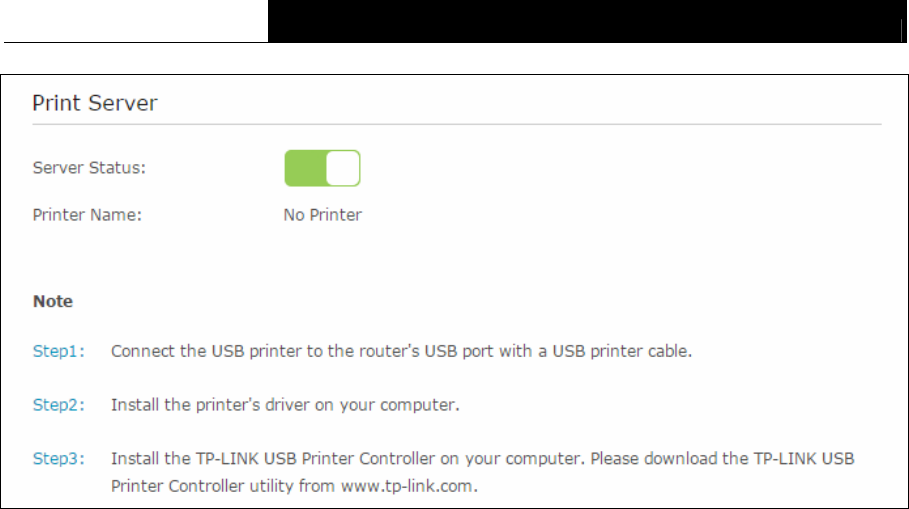
4.5.2 Print Server
Choose menu “Basic→USB Settings→Print Server”, you can enable or disable the print
server.Then follow the on-screen steps to share the USB printer among computers on your
network.
17
TC-W7960 300Mbps Wireless N DOCSIS 3.0 Cable Modem Router User Guide
Figure 4-13
4.6 Parental Control
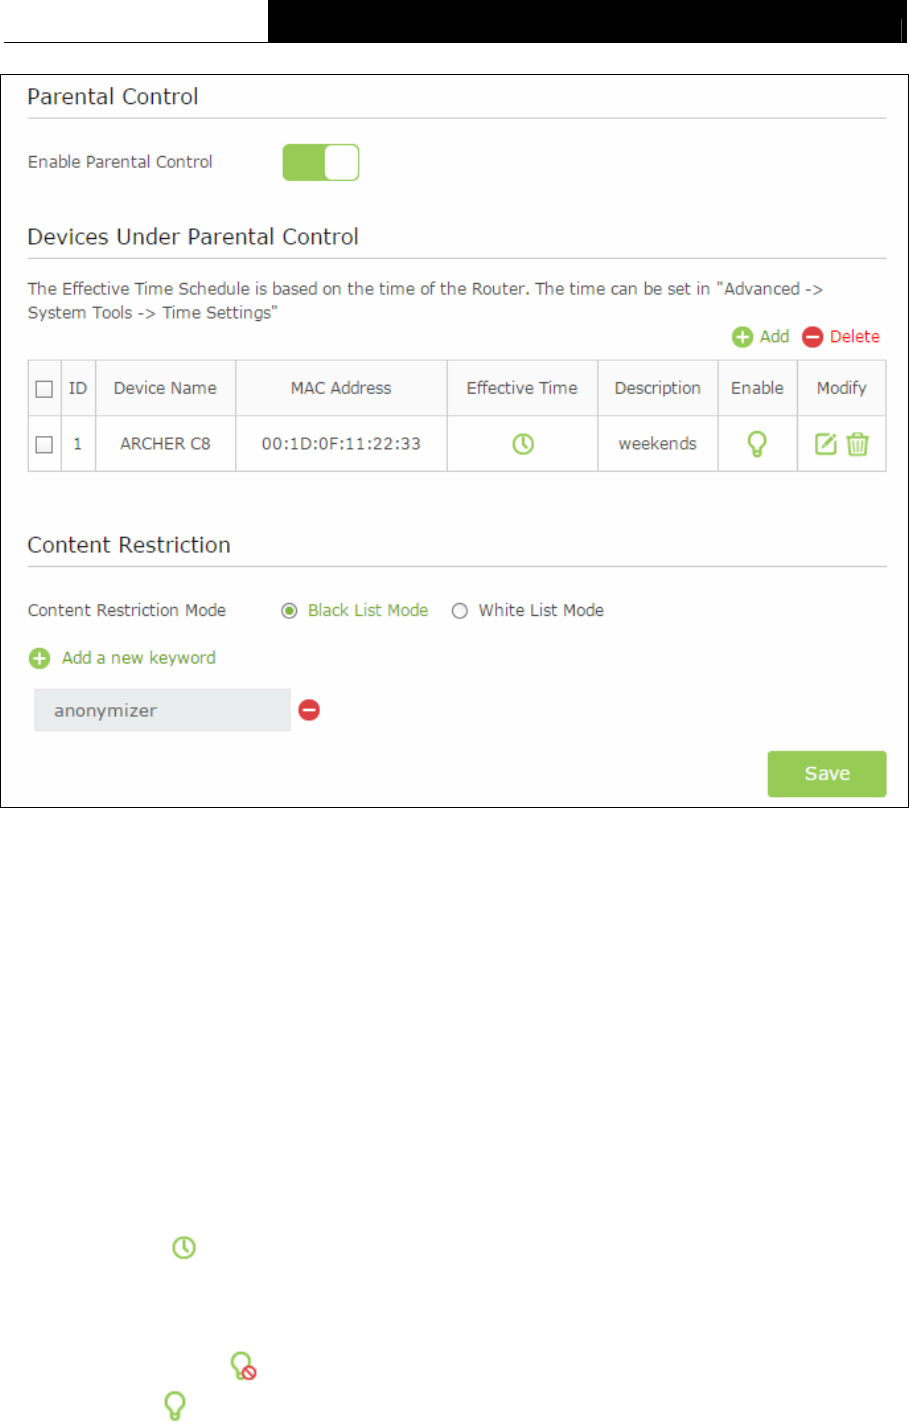
Choose menu “Basic→Parental Control”, and then you can configure the parental control. The
Parental Control function can be used to control the internet activities of the child, limit the child to
accessing certain websites and restrict the time of surfing.
18
TC-W7960 300Mbps Wireless N DOCSIS 3.0 Cable Modem Router User Guide
Figure 4-14
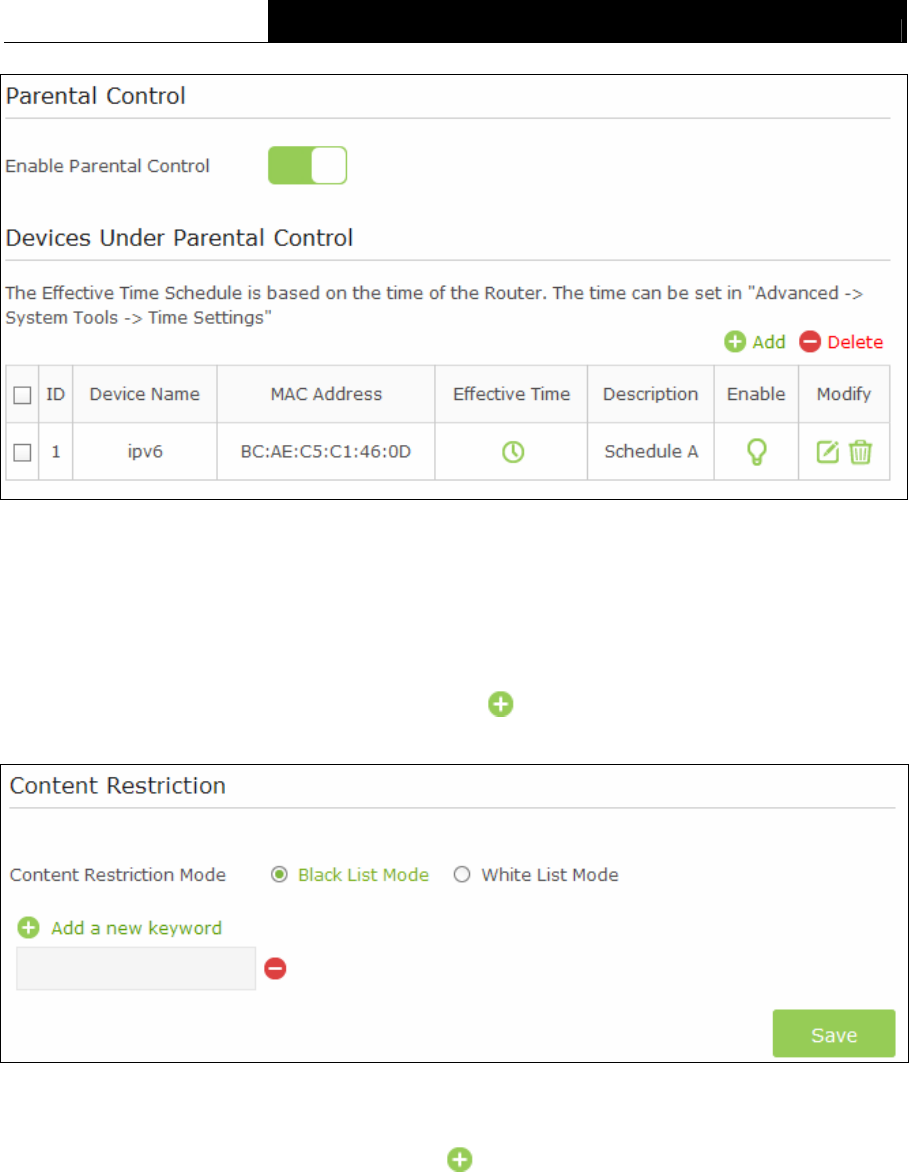
Parental Control:
Enable Parental Control - The switch for the parental control. If you turn on the switch, the
field will become green.
Devices Under Parental Control:
Add - You can click the button to add a new device for the parental control.
Delete - You can click the button to delete the selected entries.
Device Name -The name used for identifying a device.
MAC Address - This field displays the MAC address of the PC that is managing this modem
router.
Effective Time - The time period allowed for the PC controlled to access the Internet. You
can click the icon to configure the time period.
Description - Here displays the description about the parental control and this description is
unique.
Enable – Click the icon to enable the function. If this function has taken effect, the icon
will become .
19
TC-W7960 300Mbps Wireless N DOCSIS 3.0 Cable Modem Router User Guide
Modify – Click the icon to edit the corresponding entry. If you want to delete this entry,
you can click the icon.
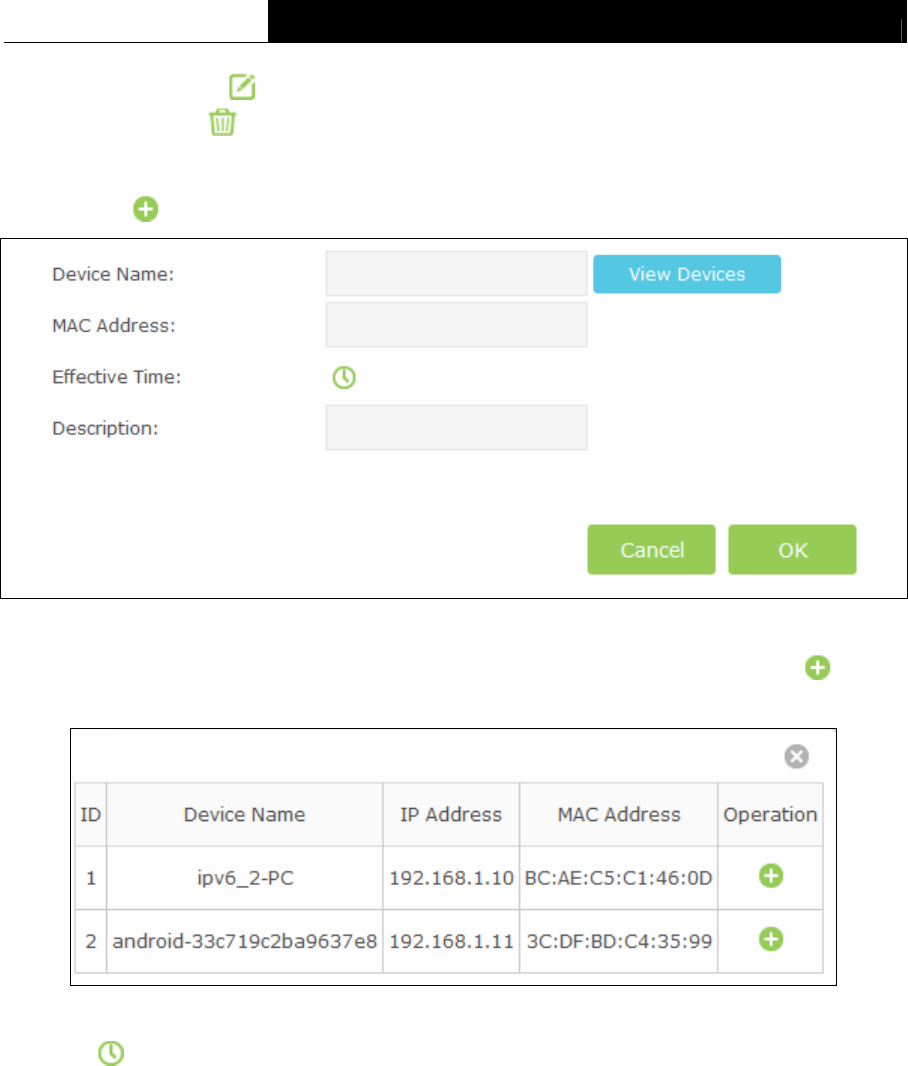
To add a new entry, please follow the steps below.
1. Click the Add button and the screen below will pop-up.
Figure 4-15
2. Click View Device button and the screen below will pop-up. You can click the icon to
select a device.
Figure 4-16
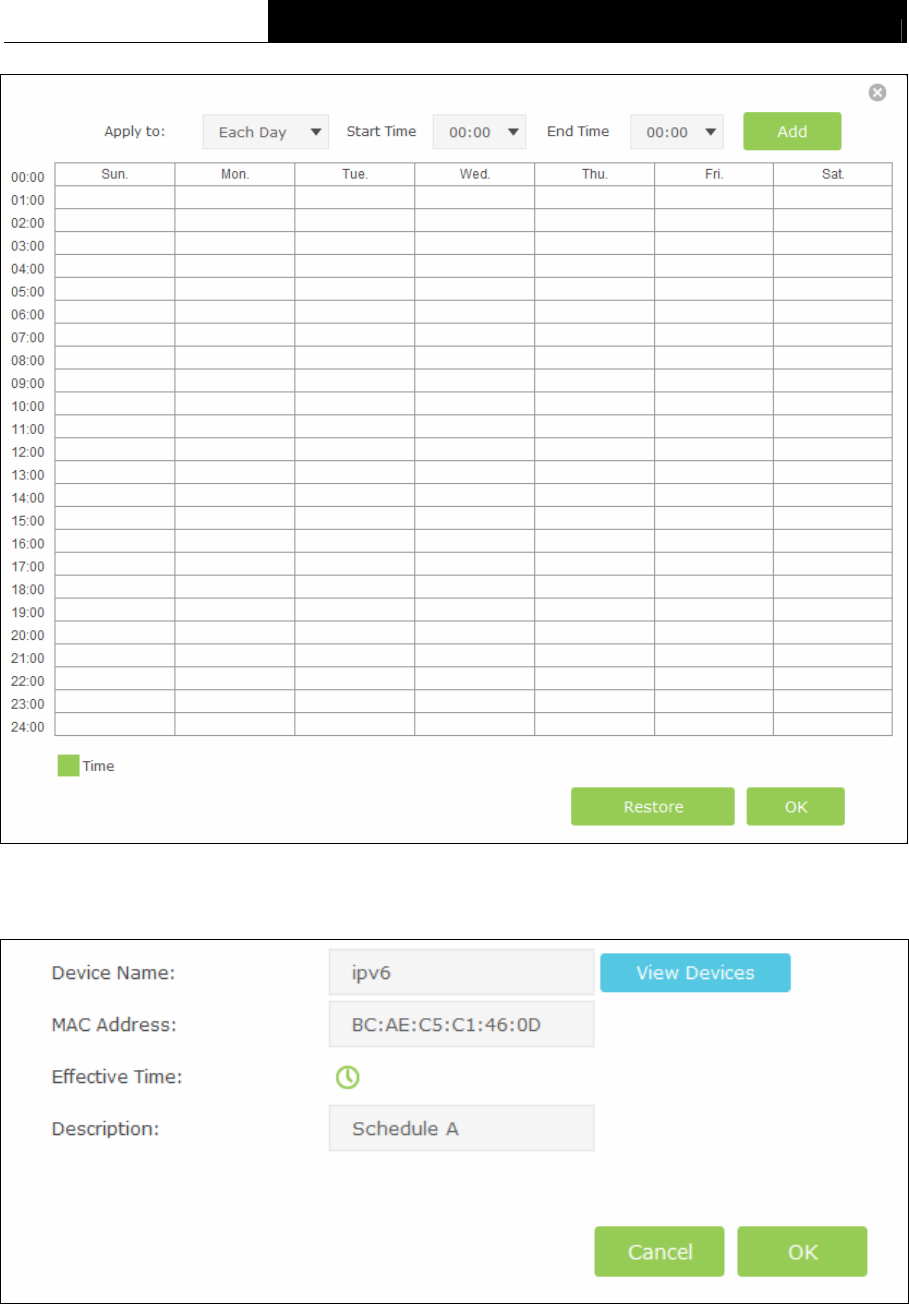
3. Click to create a new schedule.
20
TC-W7960 300Mbps Wireless N DOCSIS 3.0 Cable Modem Router User Guide
Figure 4-17
4. Give a name (e.g. Schedule A) for the entry in the Description field.
Figure 4-18
5. Click OK to complete the settings. Then the information of the new entry will be displayed on
the screen as shown below.
21
TC-W7960 300Mbps Wireless N DOCSIS 3.0 Cable Modem Router User Guide
Figure 4-19
Content Restriction:
Content Restriction Mode – Select the Black List Mode or White List Mode for this
account.
Black List Mode - All webs entered within the Black List will be denied to access. Check the
box to enable this mode. You’d like to click Add a new keyword button and input
websites that the child is denied to access.
Figure 4-20
White List Mode - Only the websites entered within the White List will be allowed. Check the
box to enable this mode. You can click Add a new keyword button and input the
websites that the child is allowed to access.
22

TC-W7960 300Mbps Wireless N DOCSIS 3.0 Cable Modem Router User Guide
Figure 4-21
Click Save to complete the settings.
23
TC-W7960 300Mbps Wireless N DOCSIS 3.0 Cable Modem Router User Guide
Chapter 5. Advanced Configuration
5.1 Status
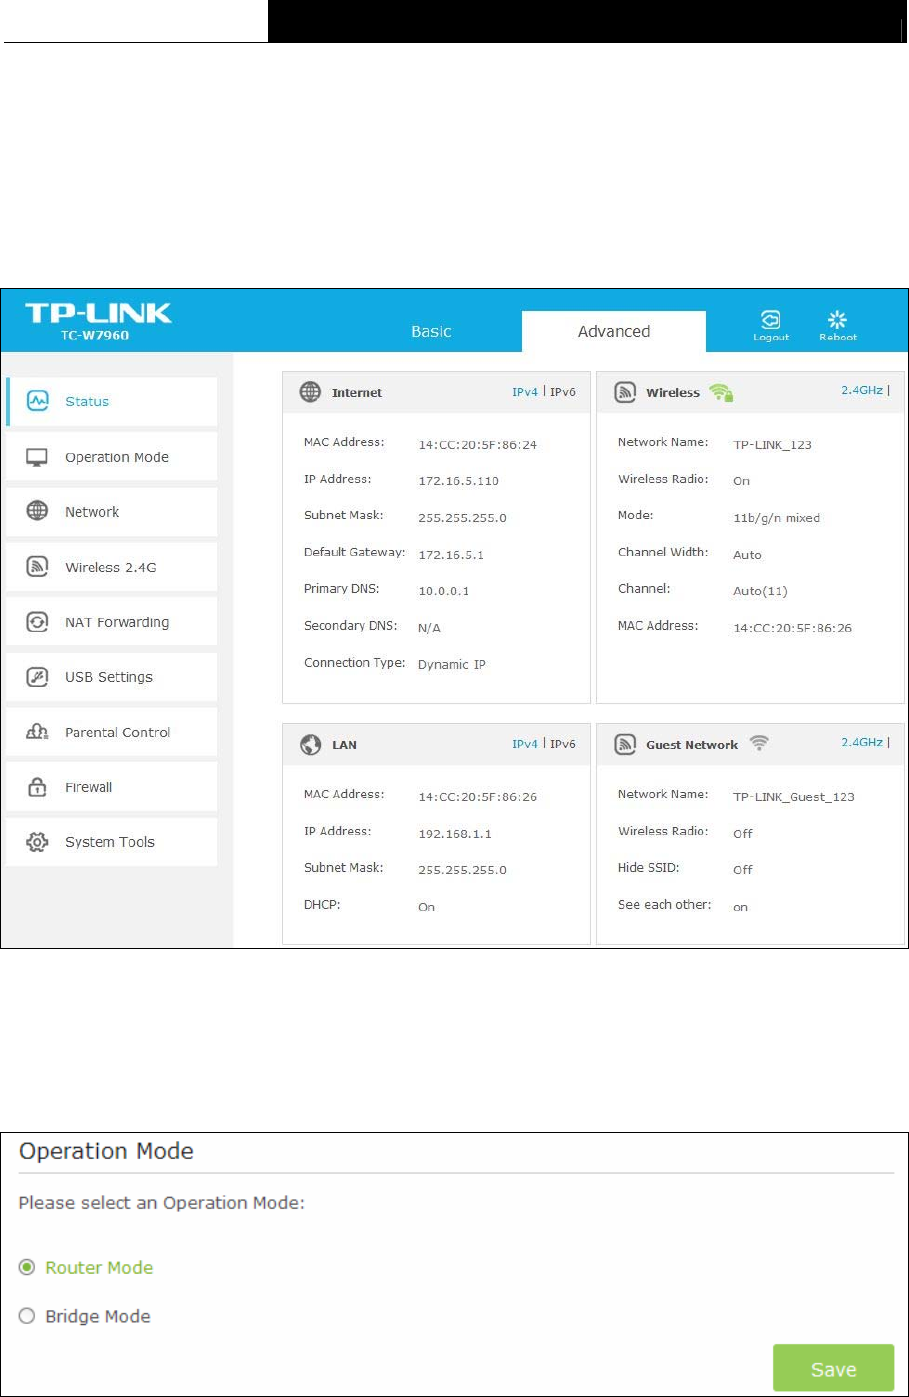
Choose menu “Advanced→Status”, you can see the current status information about the modem
router.
Figure 5-1
5.2 Operation Mode
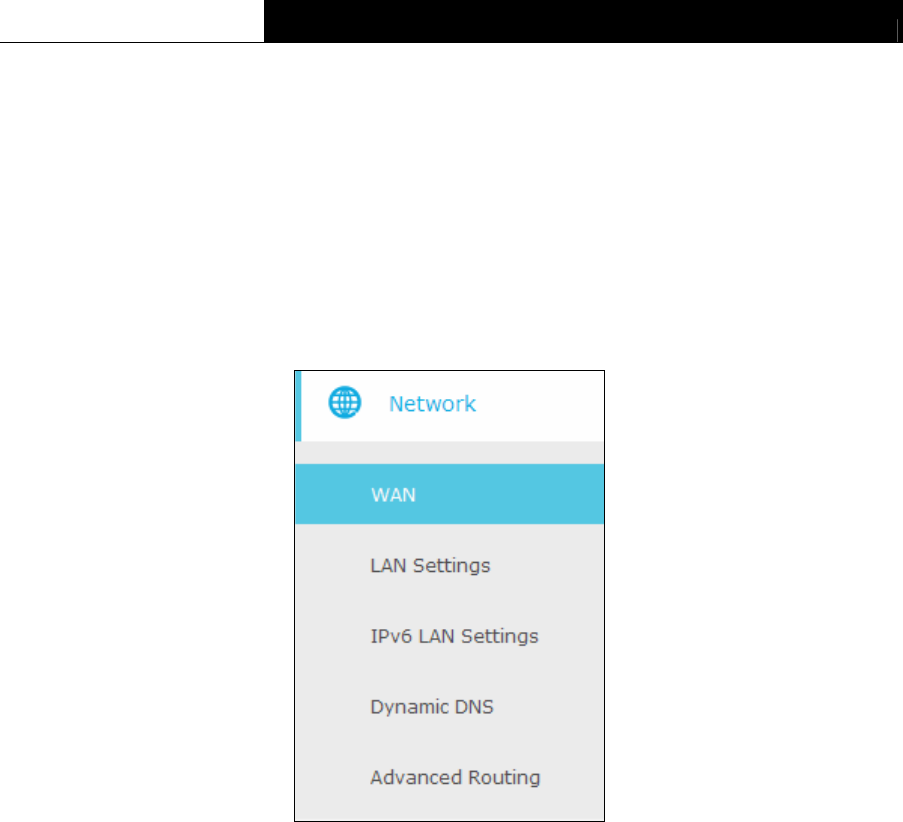
Choose menu “Advanced→Operation Mode”, and you will see the screen as shown in Figure 5-2.
Select your desired mode and then click Save.
Figure 5-2
24
TC-W7960 300Mbps Wireless N DOCSIS 3.0 Cable Modem Router User Guide
Router Mode - The device enables multi-users to share Internet via cable using its Cable port
and share it wirelessly at 300Mbps wireless speeds.
Bridge Mode – In this mode, the modem router can be configured to act as a bridging device
between your LAN and your ISP. Bridges are devices that enable two or more networks to
communicate as if they are in two segments of the same physical LAN. If you were in Bridge
Mode, you could log in the web-based management at 192.168.100.1, and then change the
setting to obtain an IP address automatically.
After you click the Save button, the modem router will reboot. Please wait.
5.3 Network
Figure 5-3
There are five submenus under the Network menu: WAN, LAN Settings, IPv6 LAN Settings,
Dynamic DNS and Advanced Routing. Click any of them, and you will be able to configure the
corresponding function.
5.3.1 WAN
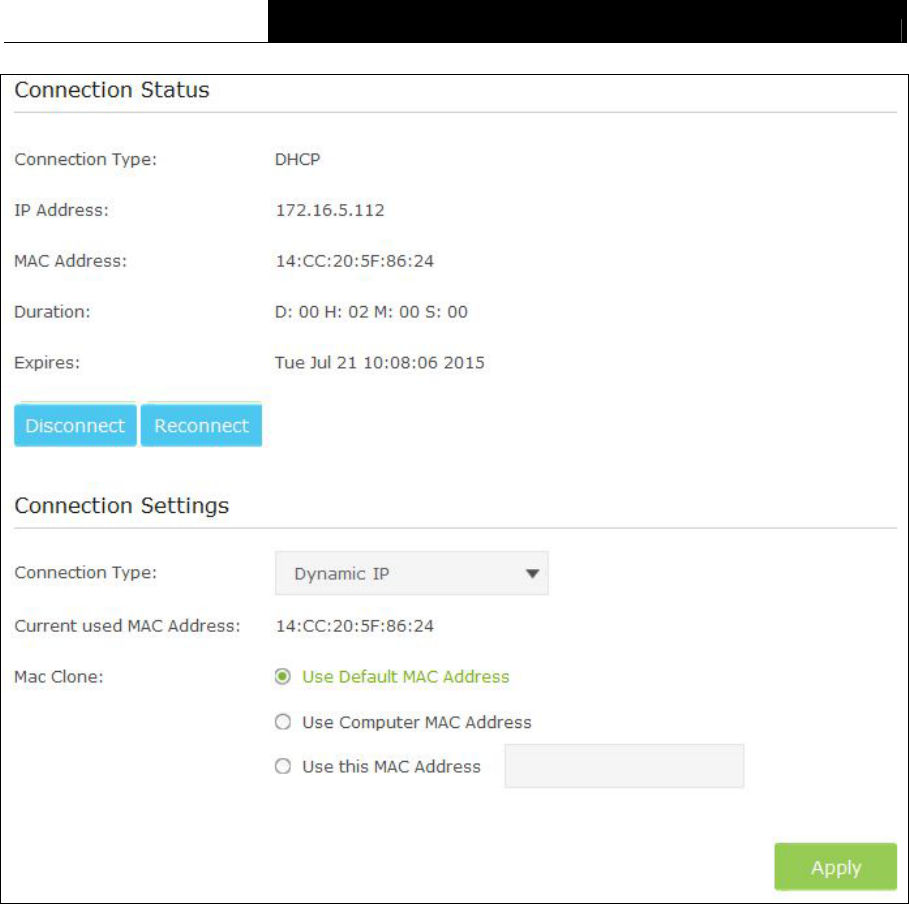
Choose “Advanced Network WAN”, you can configure the IP parameters of the WAN as
shown in the figure below.
25
TC-W7960 300Mbps Wireless N DOCSIS 3.0 Cable Modem Router User Guide
Figure 5-4
Connection Status:
Connection Type – Display the connection type for WAN.
IP/MAC Address - This field displays the current IP/MAC address of the Internet port.
Duration – Display the total connection time.
Expires – Display the expiration time of the DHCP servers leases an IP address to a new
device.
Disconnect - Click the Disconnect button to release WAN lease.
Reconnect –Click the Reconnect button to renew WAN lease.
Connection settings:
There are four different connection types, Dynamic IP, Static IP, L2TP(Dynamic IP) and
L2TP(Static). You can select the corresponding type according to your needs.
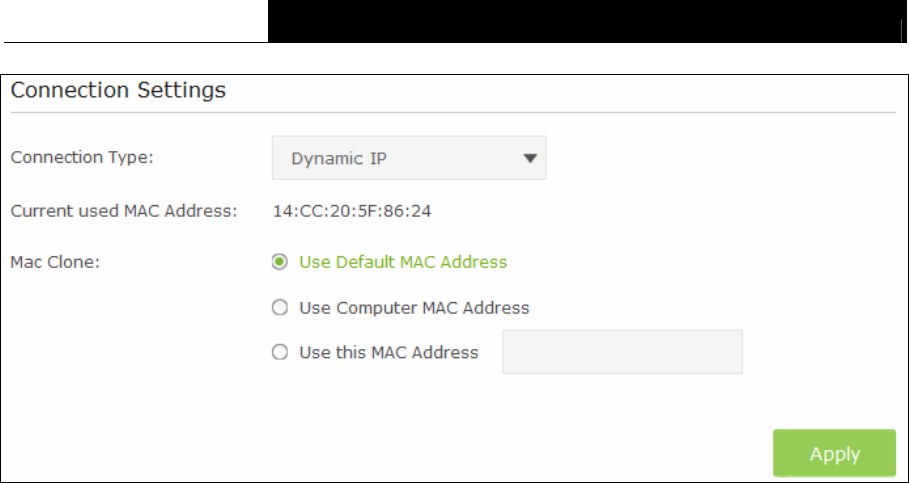
1) Dynamic IP
Choose Dynamic IP in the drop-down list, the modem router will be able to obtain IP network
information dynamically from a DHCP server provided by your ISP.
26
TC-W7960 300Mbps Wireless N DOCSIS 3.0 Cable Modem Router User Guide
Figure 5-5
Current used MAC Address - This field displays the current MAC address of the Internet
port.
MAC Clone - You can select one of below methods to change MAC address for this WAN
Interface depend on your needs. If you select Use this MAC Address, you can enter the
MAC Address you want to change.
Click the Apply button to save the settings.
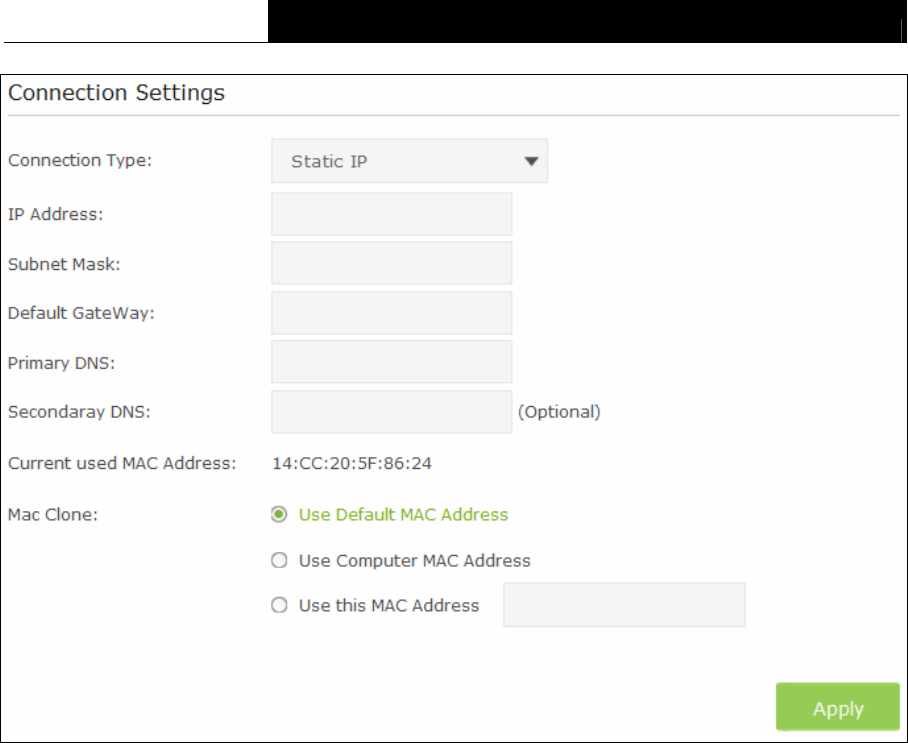
2) Static IP
Choose Static IP in the drop-down list if your ISP provides static IP information to you. You should
set static IP address, Subnet mask, and gateway address in the screen below.
27
TC-W7960 300Mbps Wireless N DOCSIS 3.0 Cable Modem Router User Guide
Figure 5-6
IP Address - Enter the IP address in dotted-decimal notation provided by your ISP.
Subnet Mask - Enter the subnet Mask in dotted-decimal notation provided by your ISP,
usually is 255.255.255.0.
Default Gateway - Enter the gateway IP address in dotted-decimal notation provided by your
ISP.
Primary DNS/ Secondary DNS - Here you can set DNS Server (at least one) manually. The
Router will use this DNS Server for priority.
Current used MAC Address - This field displays the current MAC address of the Internet
port.
MAC Clone - You can select one of below methods to change MAC address for this WAN
Interface depend on your needs. If you select Use this MAC Address, you can enter the
MAC Address you want to change.
Click the Apply button to save the settings.
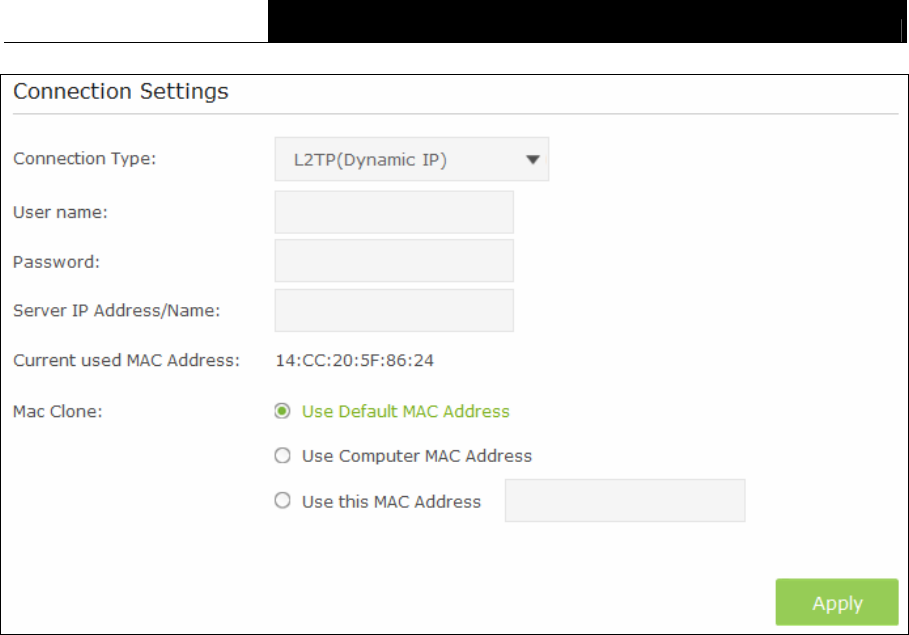
3) L2TP(Dynamic IP)
Choose L2TP(Dynamic IP) in the drop-down list if your ISP provides L2TP(Dynamic IP)
information to you. You should set User name, Password and Server IP Address/Name in the
screen below.
28
TC-W7960 300Mbps Wireless N DOCSIS 3.0 Cable Modem Router User Guide
Figure 5-7
User name/Password - Enter the Username and Password provided by your ISP. These
fields are case-sensitive. If you have difficulty with this process, please contact your ISP.
Server IP Address/Name - Enter the server IP address or domain name provided by your
ISP. If you have difficulty with this process, please contact your ISP.
Current used MAC Address - This field displays the current MAC address of the Internet
port.
MAC Clone - You can select one of below methods to change MAC address for this WAN
Interface depend on your needs. If you select Use this MAC Address, you can enter the MAC
Address you want to change.
Click the Apply button to save the settings.
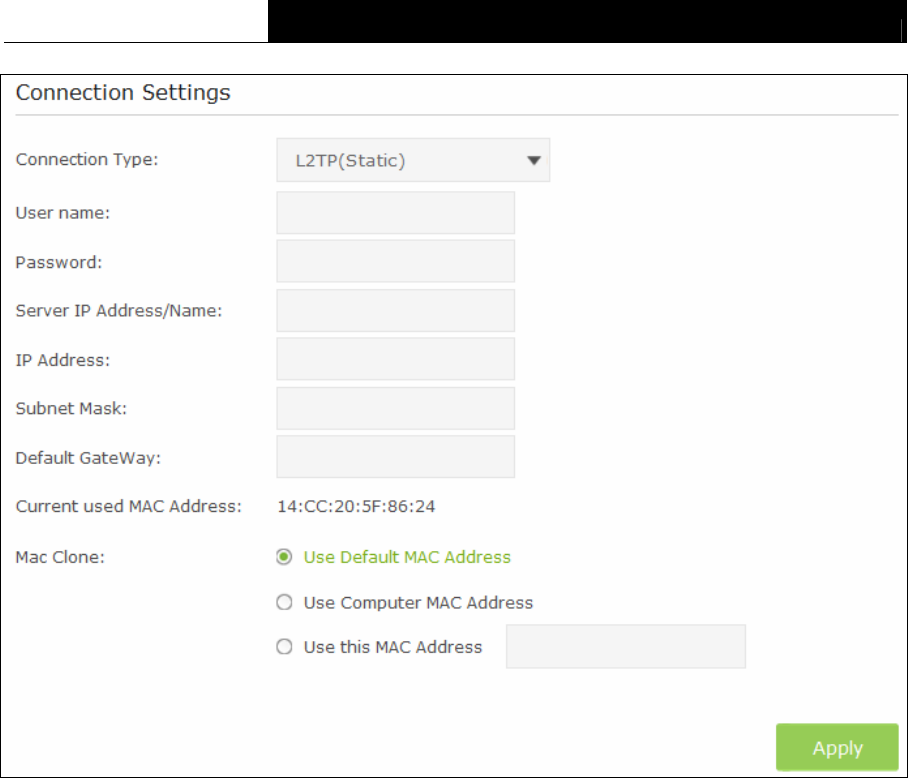
4) L2TP(Static)
Choose L2TP(Static) in the drop-down list if your ISP provides L2TP(Static IP) information to you.
You should set User name, Password, Server IP Address/Name, IP Address, Subnet Mask and
Default Gateway in the screen below.
29
TC-W7960 300Mbps Wireless N DOCSIS 3.0 Cable Modem Router User Guide
Figure 5-8
User name/Password - Enter the Username and Password provided by your ISP. These
fields are case-sensitive. If you have difficulty with this process, please contact your ISP.
Server IP Address/Name - Enter the server IP address or domain name provided by your
ISP. If you have difficulty with this process, please contact your ISP.
IP Address - Enter the IP address in dotted-decimal notation provided by your ISP.
Subnet Mask - Enter the subnet Mask in dotted-decimal notation provided by your ISP,
usually is 255.255.255.0.
Default Gateway - Enter the gateway IP address in dotted-decimal notation provided by your
ISP.
Current used MAC Address - This field displays the current MAC address of the Internet
port.
MAC Clone - You can select one of below methods to change MAC address for this WAN
Interface depend on your needs. If you select Use this MAC Address, you can enter the
MAC Address you want to change.
Click the Apply button to save the settings.
5.3.2 LAN Settings
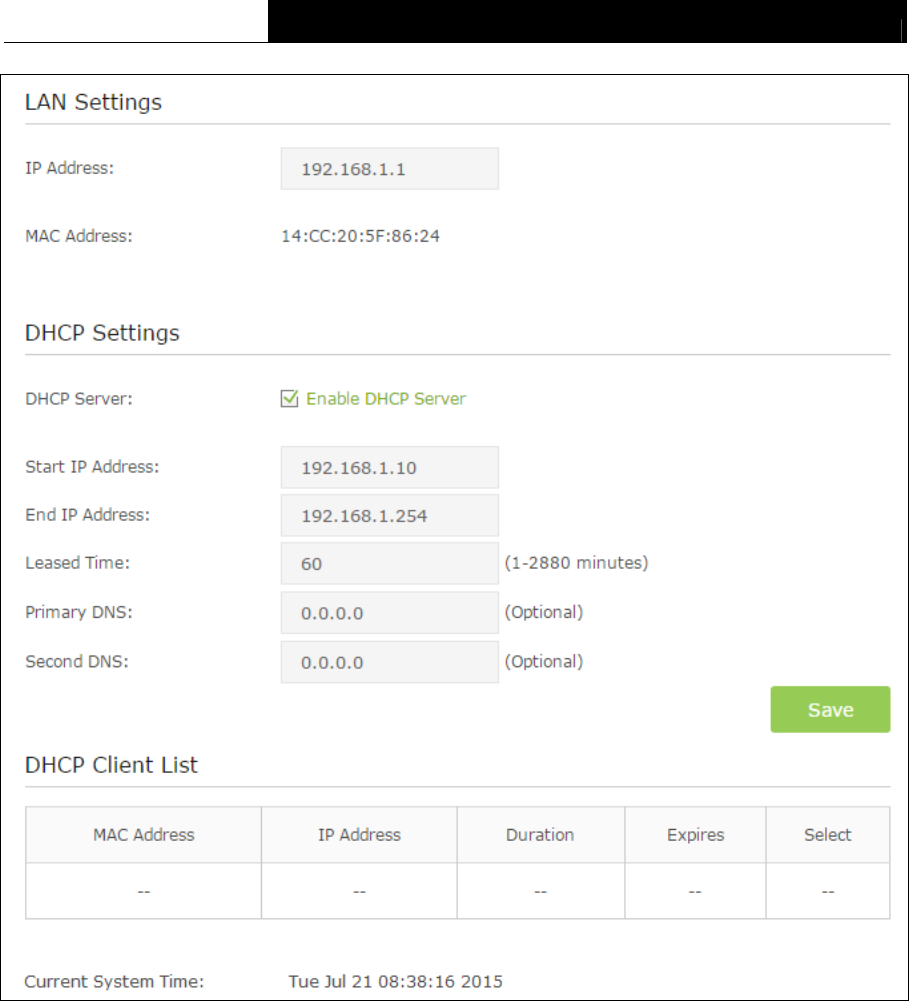
Choose “AdvancedNetworkLAN Settings” menu, and you will see the LAN screen shown
below. Please configure the parameters for LAN ports according to the descriptions below.
30
TC-W7960 300Mbps Wireless N DOCSIS 3.0 Cable Modem Router User Guide
Figure 5-9
LAN Settings:
IP Address - Enter the modem router’s local IP Address, then you can access to the
Web-based management page via the IP Address, the default value is 192.168.1.1.
MAC Address - The physical address of the modem router, as seen from the LAN. The
value can't be changed.
DHCP Settings:
DHCP Sever – Check the box to enable this function. If DHCP Server is enabled, the modem
router will work as a DHCP server, which provides the TCP/IP configuration for all the PC(s)
that are connected to it on the LAN.
Start IP Address - Enter a value for the DHCP server to start with when issuing IP
addresses.
End IP Address - Enter a value for the DHCP server to end with when issuing IP addresses.
31

TC-W7960 300Mbps Wireless N DOCSIS 3.0 Cable Modem Router User Guide
Leased Time - The Leased Time is the amount of time in which a network user will be
allowed for connection to the modem router with their current dynamic IP address. Enter the
amount of time, then the user will be “leased” this dynamic IP address. After the dynamic IP
address has expired, the user will be automatically assigned to a new dynamic IP address.
The default is 60 minutes.
Primary DNS/Second DNS – The LAN Settings allows you set DNS Server manually. The
router will use the DNS Server for priority (Optional).
Click the Save button to save the settings.
DHCP Client List:
MAC Address - The MAC address of the DHCP client
IP Address - The IP address that the modem router has allocated to the DHCP client
Duration - Display the total connection time.
Expires- Display the expiration time of the DHCP client leased.
Select – Click the icon to delete this entry.
5.3.3 IPv6 LAN Settings
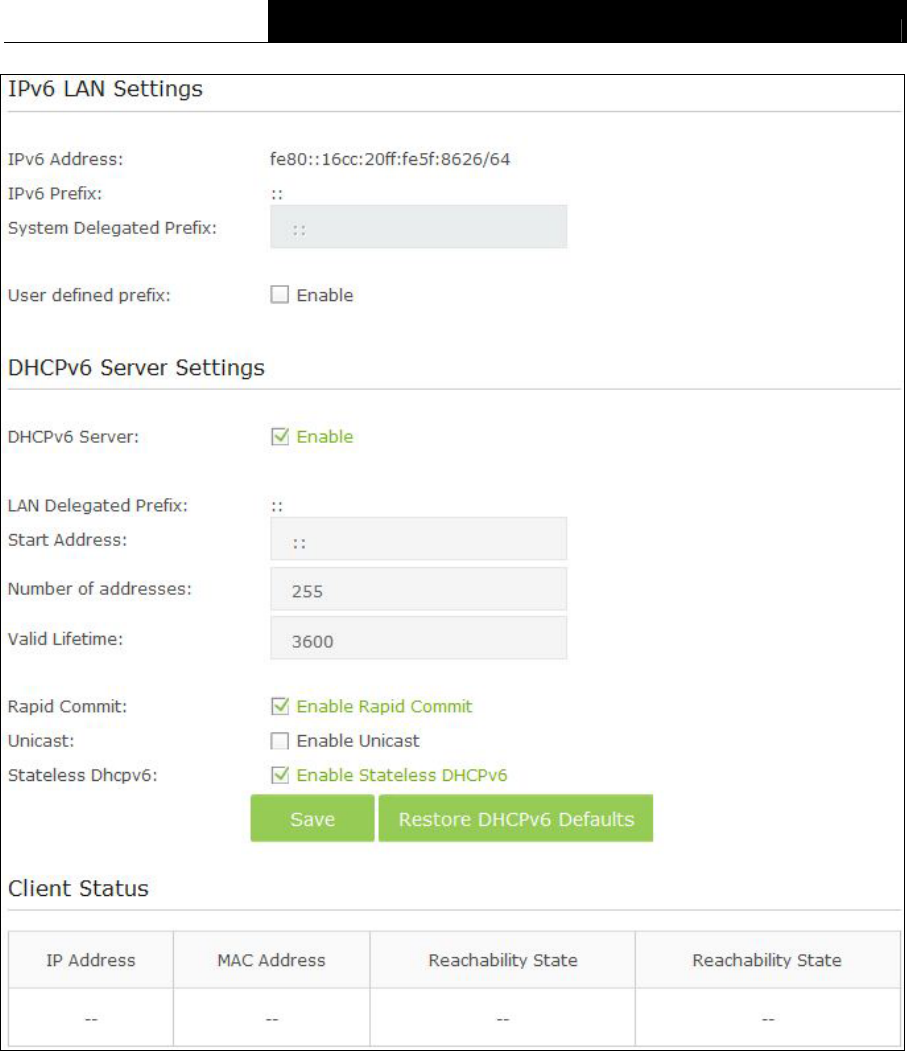
Choose “AdvancedNetworkIPv6 LAN Settings” menu, and you will see the IPv6 LAN
screen. Please configure the parameters for IPv6 LAN ports according to the descriptions below.
32
TC-W7960 300Mbps Wireless N DOCSIS 3.0 Cable Modem Router User Guide
Figure 5-10
IPv6 LAN Settings:
IPv6 Address - Display the modem router’s local IPv6 Address.
IPv6 Prefix – Display the IPv6 prefix address.
System Delegated Prefix – You can also enter the prefix address used for the tunnel after
select the User Defined prefix checkbox.
User defined prefix – Select the checkbox to define a new IPv6 prefix address.
DHCPv6 Server Settings:
DHCPv6 Server – Check the box to enable DHCPv6 server.
LAN Delegated Prefix – Display the LAN prefix address.
33
TC-W7960 300Mbps Wireless N DOCSIS 3.0 Cable Modem Router User Guide
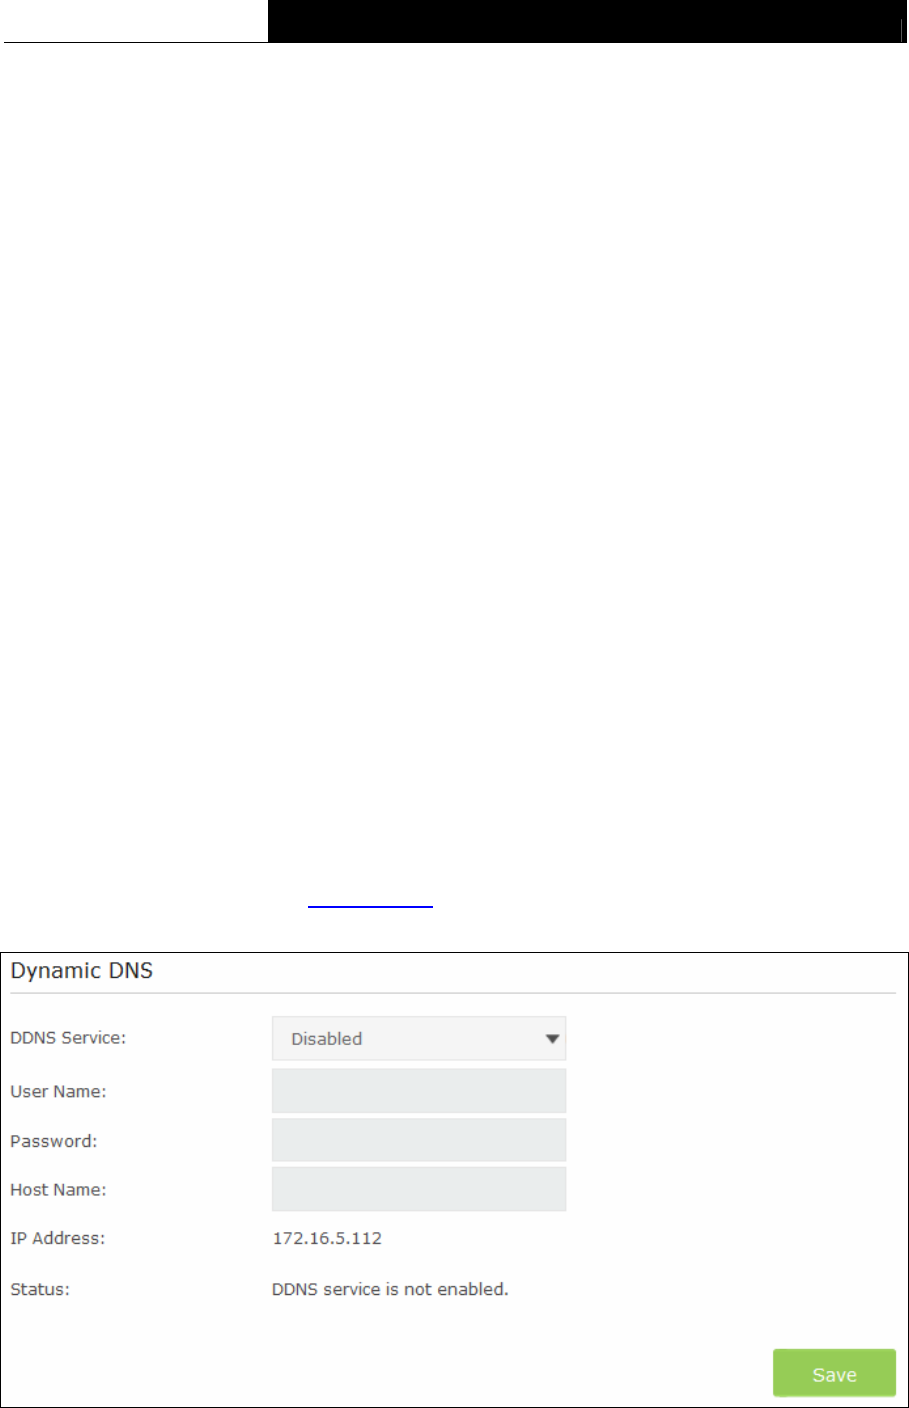
Start Address - Enter a value for the DHCPv6 server to start with when issuing IP addresses.
Number of addresses – Enter a value between 0-255 for DHCPv6 server preference. The
default value is 255.
Valid Lifetime - The Valid Lifetime is the amount of time in which a network user will be
allowed connection to the modem router with their current dynamic IP address. Enter the
amount of time, then the user will be “leased” this dynamic IP address. After the dynamic IP
address has expired, the user will be automatically assigned a new dynamic IP address. The
default is 3600 seconds.
Rapid Commit – Check the box to enable prefix fast distribution function.
Unicast – Select the checkbox to enable unicast function. The default setting is disabled.
Stateless Dhcpv6 - Stateless DHCPv6 is a combination of “stateless Address
Auto-configuration” and “Dynamic Host Configuration Protocol for IPv6” and is specified by
RFC3736. Check the box to enable this function.
Client Status:
IP Address - The IP address of the DHCP client
MAC Address - The MAC address of the DHCP client
Reachability State – Display the reachability of network.
5.3.4 Dynamic DNS
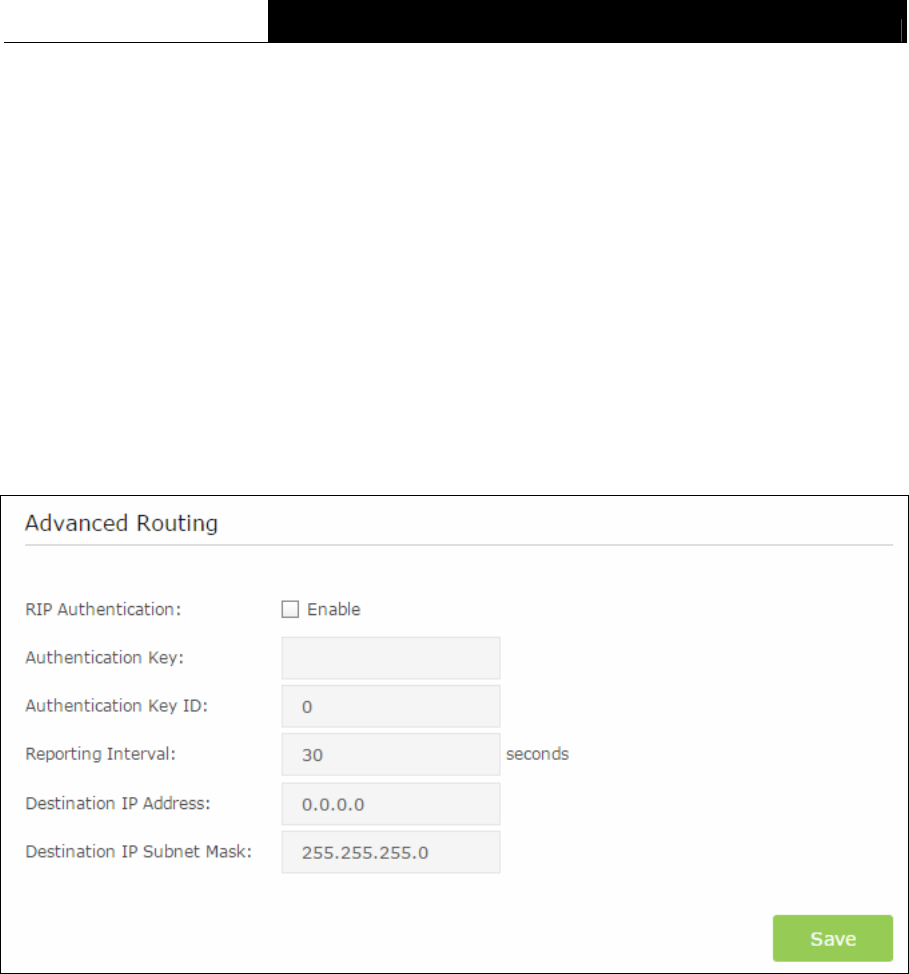
Choose menu “Advanced Network Dynamic DNS”, and you can configure the Dynamic
DNS function.
The modem router offers the DDNS (Dynamic Domain Name System) feature, which allows the
hosting of a website, FTP server, or e-mail server with a fixed domain name (named by yourself)
and a dynamic IP address, and then your friends can connect to your server by entering your
domain name no matter what your IP address is. Before using this feature, you need to sign up for
DDNS service providers such as dyn.com/dns/. The Dynamic DNS client service provider will give
you a password or key.
Figure 5-11
34
TC-W7960 300Mbps Wireless N DOCSIS 3.0 Cable Modem Router User Guide
DDNS Service - The service provider of DDNS. In this field you could select Disabled,
dyn.com or www.noip.com. If you have selected dyn.com or www.noip.com , you need to
sign up for DDNS service providers.
User Name & Password – Type in the “User Name” and “Password” for your DDNS account.
Host Name - Enter the Domain name you want to set.
IP Address – Display the WAN IP address.
Status – Display the status of the DDNS service.
Click the Save button to save your settings.
5.3.5 Advanced Routing
Choose “Advanced Network Advanced Routing”, you can view all the current groups on
this page.
Figure 5-12
RIP Authentication – Check the box to enable the RIP Authentication function.
Authentication Key – Create a key(up to 16 characters)for the RIP authentication.
Authentication Key ID - Create a ID(up to 3 characters) for identitying a authentication key.
Reporting Interval – Refer to the update interval for routing information.
Destination IP Address –The Destination IP Address is the address of the network or host
that you want to assign to a static route.
Destination IP Subnet Mask –The Destination IP Subnet Mask determines which portion
of an IP Address is the network portion, and which portion is the host portion.
Click Save button to save the settings.
35
TC-W7960 300Mbps Wireless N DOCSIS 3.0 Cable Modem Router User Guide
5.4 Wireless 2.4G
Figure 5-13
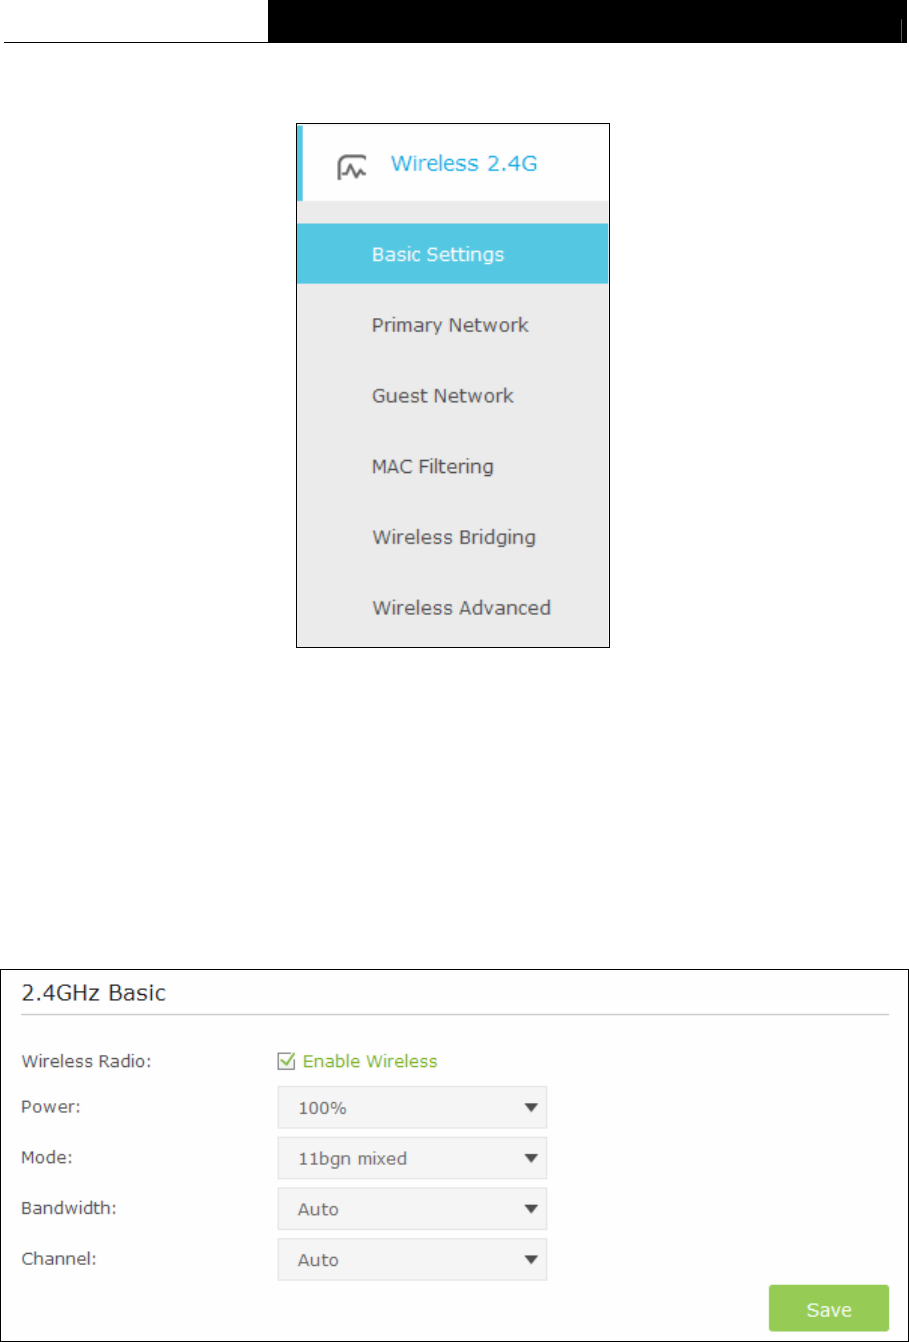
Choose menu “Advanced→Wireless 2.4G”, you will see six submenus under the Wireless menu:
Basic Settings, Primary Network, Guest Network, MAC Filtering, Wireless Bridging and
Wireless Advanced. Click any of them, and you will be able to configure the corresponding
function.
5.4.1 Basic Settings
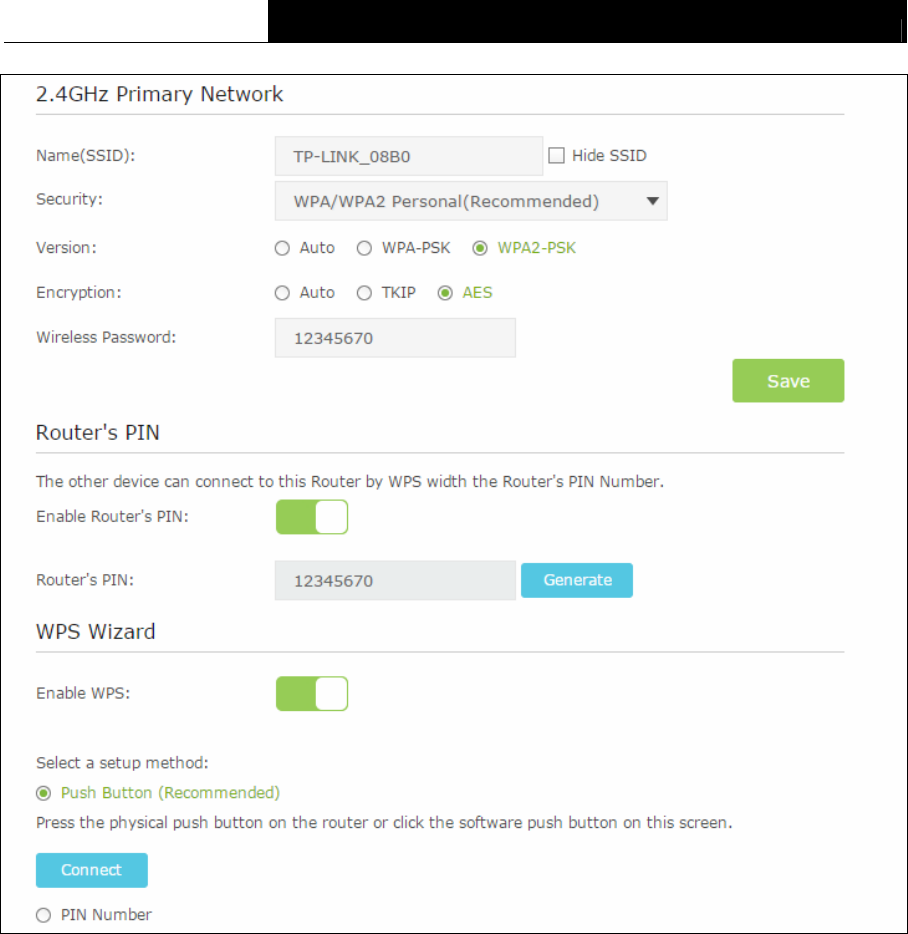
Choose menu “Advanced → Wireless 2.4G → Basic Settings”, you can configure the
advanced wireless settings for the wireless 2.4G network.
Figure 5-14
Wireless Radio – Check the box to enable the Wireless Radio.
36

TC-W7960 300Mbps Wireless N DOCSIS 3.0 Cable Modem Router User Guide
Power – Here you can specify the transmit power of the modem router. You can select 25%,
50%, 75% and 100% which you would like. 100% is the default setting and is recommended.
Mode – Select the desired mode.
11bgn mixed: Select if you are using a mix of 802.11b, 11g, and 11n wireless clients.
11gn mixed: Select if you are using both 802.11g and 802.11n wireless clients.
11n only: Select if you are using 802.11n wireless clients only.
Select the desired wireless mode. It is strongly recommended that you set the Mode to 11bgn
mixed, and all of 802.11b, 802.11g, and 802.11n wireless stations can connect to the modem
router.
Bandwidth - Select the channel width from the drop-down list. The default setting is Auto,
which can adjust the channel width for your clients automatically.
Channel - Select the channel you want to use from the drop-down list of Channel. This field
determines which operating frequency will be used. It is not necessary to change the wireless
channel unless you notice interference problems with another nearby access point.
Click the Save button to save the settings.
5.4.2 Primary Network
Choose menu “Advanced → Wireless 2.4G → Primary Network”, You can configure the
wireless 2.4G primary network.
37
TC-W7960 300Mbps Wireless N DOCSIS 3.0 Cable Modem Router User Guide
Figure 5-15
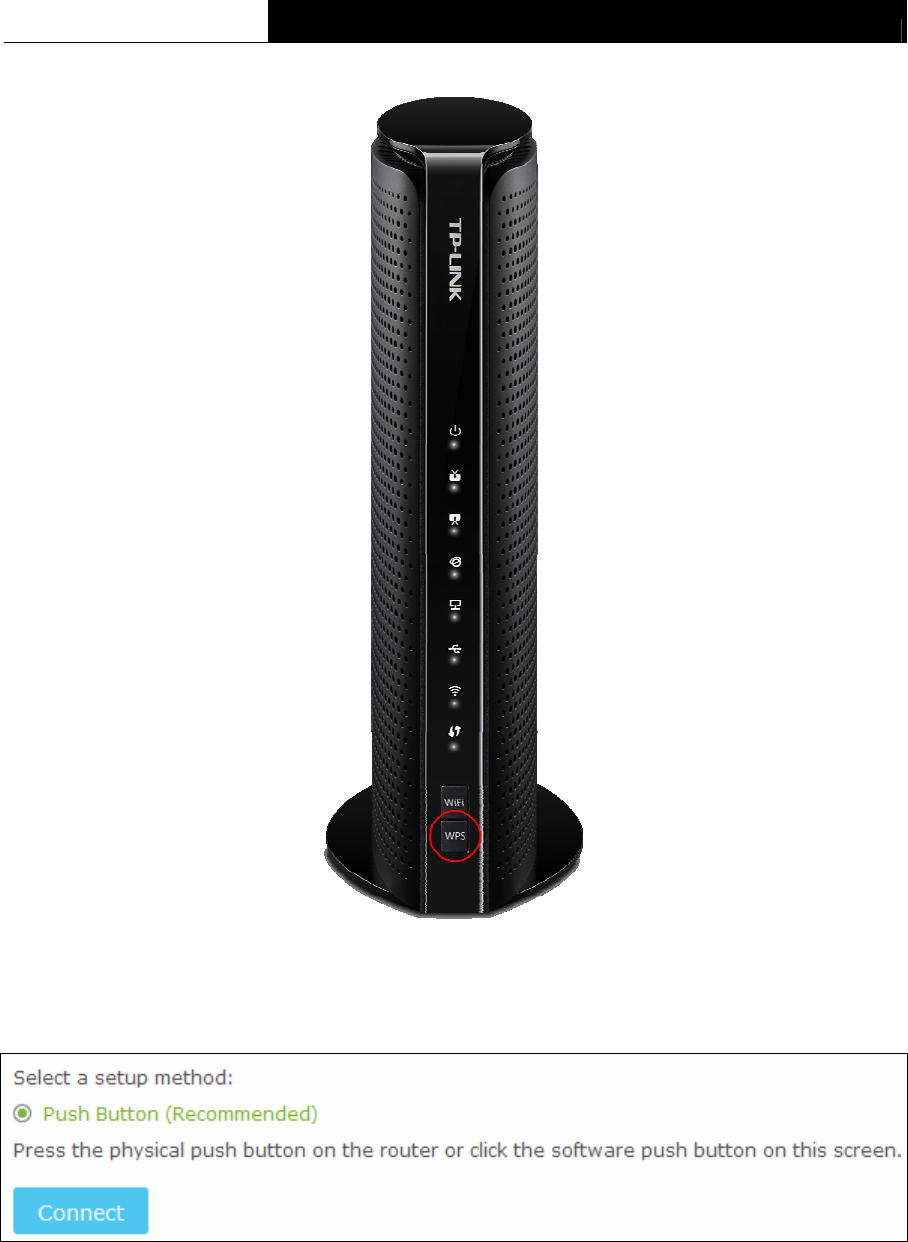
2.4GHz Primary Network:
Name(SSID) – Create a name (up to 32 characters) for your 2.4GHz wireless network. The
default SSID is set to be TP-LINK_XXXX.
Hide SSID – If you want to hide the SSID of your wireless network from the Wi-Fi network,
you should check the box.
Security – There are four wireless security modes supported by the modem router: No
Security, WPA/WPA2 Personal (Recommended), WPA/WPA2 Enterprise, WEP. You can
choose one of them from the drop-down list.
1) No Security: If you do not want to use wireless security, choose No Security. But it’s
recommended to use wireless security.
2) WPA-PSK/WPA2-PSK Personal(Recommended):
Version –You can choose the version of the WPA-PSK/WPA2-PSK security by selecting
Auto, WPA-PSK or WPA2-PSK. The default setting is WPA2-PSK.
38

TC-W7960 300Mbps Wireless N DOCSIS 3.0 Cable Modem Router User Guide
Encryption – You can choose the encryption by selecting Auto, TKIP or AES. The default
setting is AES.
Wireless Password – You can enter ASCII characters between 8 and 63 characters or 8 to
64 Hexadecimal characters. The default password is the same with the default PIN code,
which is labeled on the bottom of the modem router.
3) WPA/WPA2 Enterprise:
Version –You can choose the version of the WPA/WPA2 Enterprise security by selecting
Auto, WPA or WPA2. The default setting is WPA2.
Encryption – You can select Auto, TKIP or AES as Encryption. The default setting is AES.
RADIUS Server IP: Enter the IP address of the Radius Server.
RADIUS Port: Enter the port that radius service used.
RADIUS Password: Enter the password for the Radius Server.
4) WEP:
Key Selected – Select one of the four keys from the drop-down list.
Key Type –You can select the WEP key length (64-bit, or 128-bit.) for encryption.
64-bit: You can enter 10 hexadecimal digits (any combination of 0-9, a-f, A-F, zero key is not
promoted) or 5 ASCII characters.
128-bit: You can enter 26 hexadecimal digits (any combination of 0-9, a-f, A-F, zero key is not
promoted) or 13 ASCII characters.
Key Format – ASCII and Hexadecimal formats are provided here. ASCII format stands for
any combination of keyboard characters in the specified length. Hexadecimal format stands
for any combination of hexadecimal digits (0-9, a-f, A-F) in the specified length.
Key Value - Enter the WEP key that you create. Make sure these values are identical on all
wireless stations in your network.
Note:
If you do not set the key, the wireless security function is still disabled even if you have selected
Shared Key.
Router’s PIN:
Enable Router’s PIN - The switch for the Router’s PIN. If you turn on this button, the field will
become green and other device can connect to this Router by WPS with the Router's PIN
Number.
Router’s PIN - The current value of the modem router's PIN is displayed here. The default
PIN of the modem router can be found in the label.
Generate - Click this button, and then you can get a new random value for the modem
router's PIN. You can ensure the network security by generating a new PIN.
Note:
You cannot connect other device to this modem router by entering the router’s PIN on your client
device if you haven’t switch on Enable Router’s PIN.
39

TC-W7960 300Mbps Wireless N DOCSIS 3.0 Cable Modem Router User Guide
WPS Wizard:
Enable WPS - The switch for the WPS. If you turn on this button, the field will become green
and you can add a new wireless device to an existing network quickly by WPS (also called
QSS) function.
Select a setup method – You can select either of Push Button (Recommended) or PIN
Number as the WPS setup method.
Push Button (Recommended) – When you select this method, you can add a new device by
pressing the physical button on the router or by clicking the software push Connect button on
this screen.
PIN Number - When you select this method, you can add a new device by entering the
client’s PIN in the field and then click Connect button.
To add a new device:
If the wireless adapter supports Wi-Fi Protected Setup (WPS), you can establish a wireless
connection between wireless adapter and modem router using either Push Button method or PIN
Number method.
Note:
To build a successful connection by WPS, you should also do the corresponding configuration of
the new device for WPS function meanwhile.
I. Use the WPS Button
Use this method if your client device has a Wi-Fi Protected Setup (WPS) button.
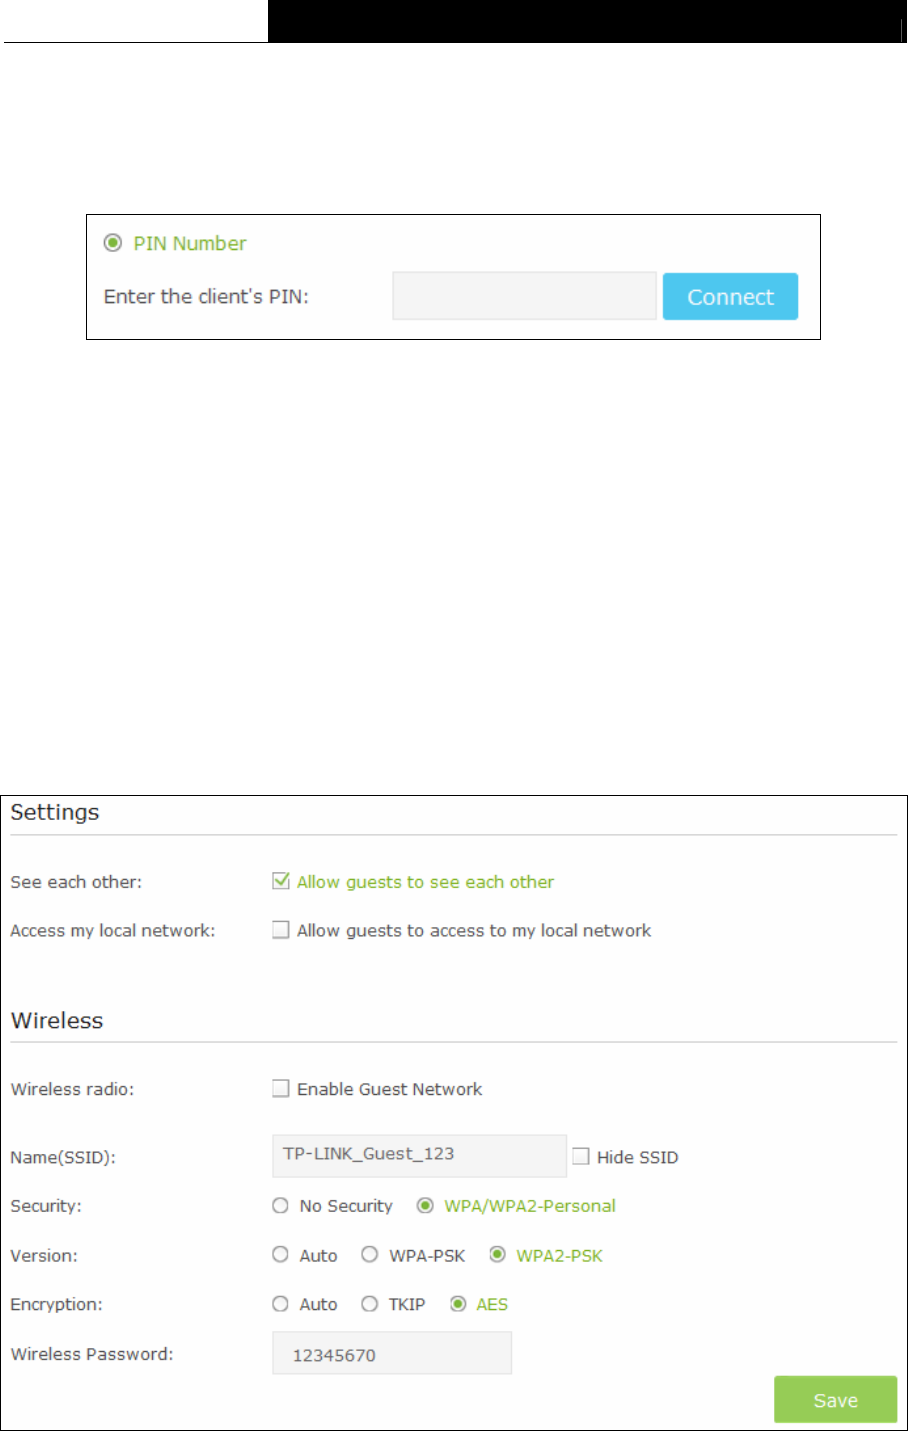
Step 1: Press the WPS button on the router or select the Push Button (Recommended) on the
screen as shown in Figure 5-17, then click Connect.
40
TC-W7960 300Mbps Wireless N DOCSIS 3.0 Cable Modem Router User Guide
Figure 5-16
Figure 5-17
Step 2: Press and hold the WPS button of the client device directly.
Step 3: The WPS LED flashes for two minutes during the Wi-Fi Protected Setup process.
Step 4: When the WPS LED is on, the client device has successfully connected to the modem
router.
Refer back to your client device or its documentation for further instructions.
41
TC-W7960 300Mbps Wireless N DOCSIS 3.0 Cable Modem Router User Guide
II. Enter the client device’s PIN on the modem router
Use this method if your client device has a Wi-Fi Protected Setup PIN number.
Step 1: Enter the PIN number from the client device in the field, as shown in the following figure.
Then click Connect button.
Figure 5-18
Step 2: “Device has been added successfully!” will appear on the screen, which means the
client device has successfully connected to the modem router.
Note:
1. The WPS LED on the modem router will light green for five minutes if the device has been
successfully added to the network.
2. The WPS function cannot be configured if the Enable Router’s PIN switch is off. Please
make sure the Enable Router’s PIN switch is on before configuring the WPS.
5.4.3 Guest Network
Choose menu “Advanced → Wireless 2.4G → Guest Network”, you can configure the
advanced settings of your guest network.
Figure 5-19
42

TC-W7960 300Mbps Wireless N DOCSIS 3.0 Cable Modem Router User Guide
Settings:
See each other - If Allow guests to see each other is selected, anyone who connects to the
guest network can access each other.
Access my local network - If Allow guests to access my local network is selected,
anyone who connects to the guest network has access to your local network, not just Internet
access.
Wireless:
Wireless radio – Check the box to enable this function. The guest network function is
disabled by default.
Name (SSID) - Create a name for the guest network. When setting up a Guest network, it is
strongly recommended to use a name that easily distinguishes it from your primary network.
The default name is TP-LINK_Guest_2.4GHz. If you want to hide the guest network from the
Wi-Fi network, check the Hide SSID.
Security - It’s strongly recommended to select WPA/WPA2 Personal. If you do not want to
use wireless security, choose No Security.
Version -You can choose the version of the WPA-PSK/WPA2-PSK security by selecting
Auto, WPA-PSK or WPA2-PSK. The default setting is WPA2-PSK.
Encryption - You can choose the encryption by selecting Auto, TKIP or AES.
Wireless Password - Create a password for the guest network. The password must have a
minimum of 8 characters in length.
Click Save button to save the settings.
5.4.4 MAC Filtering
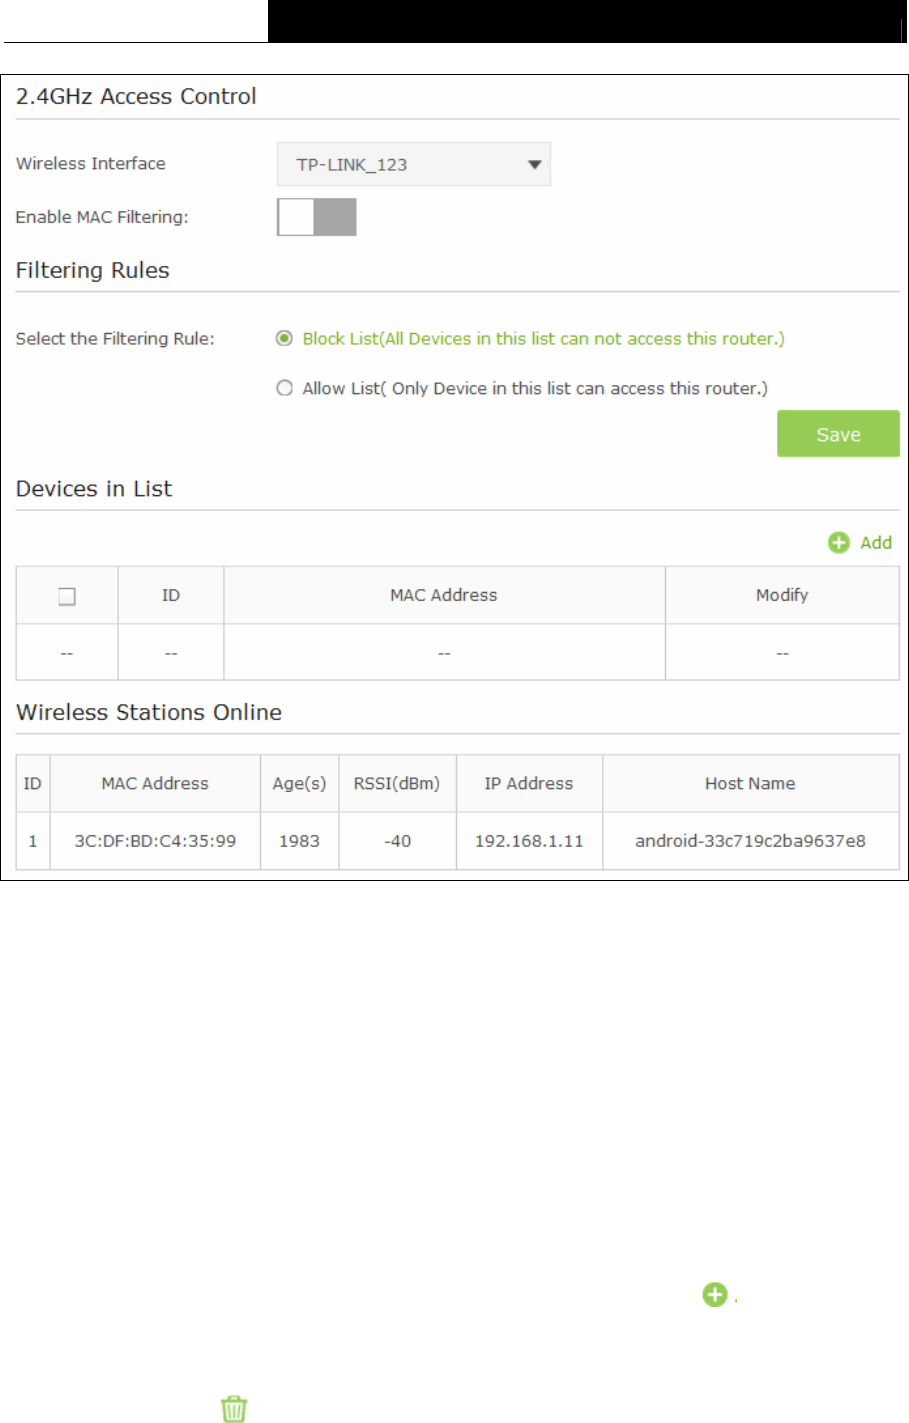
Choose menu “Advanced → Wireless 2.4GHz → MAC Filtering”, you can control the wireless
access by configuring the MAC Filtering function.
43
TC-W7960 300Mbps Wireless N DOCSIS 3.0 Cable Modem Router User Guide
Figure 5-20
2.4GHz Access Control:
Wireless Interface - Select an available wireless interface from the drop-down list.
Enable MAC Filtering- The switch for the MAC Filtering. If you turn on this button, the field
will become green and you can filter wireless users by MAC Address.
Filtering Rules:
Select the Filtering Rule - You can select either of Block List or Allow List as the MAC
filtering rule.
Click the Save button to save the settings.
Devices in List:
Add - You can add a new device for the MAC Filtering rule by clicking Add button.
MAC Address - This field displays the MAC address of the wireless station that cannot
access this router/can access this router.
Modify - Click the icon to delete this entry.
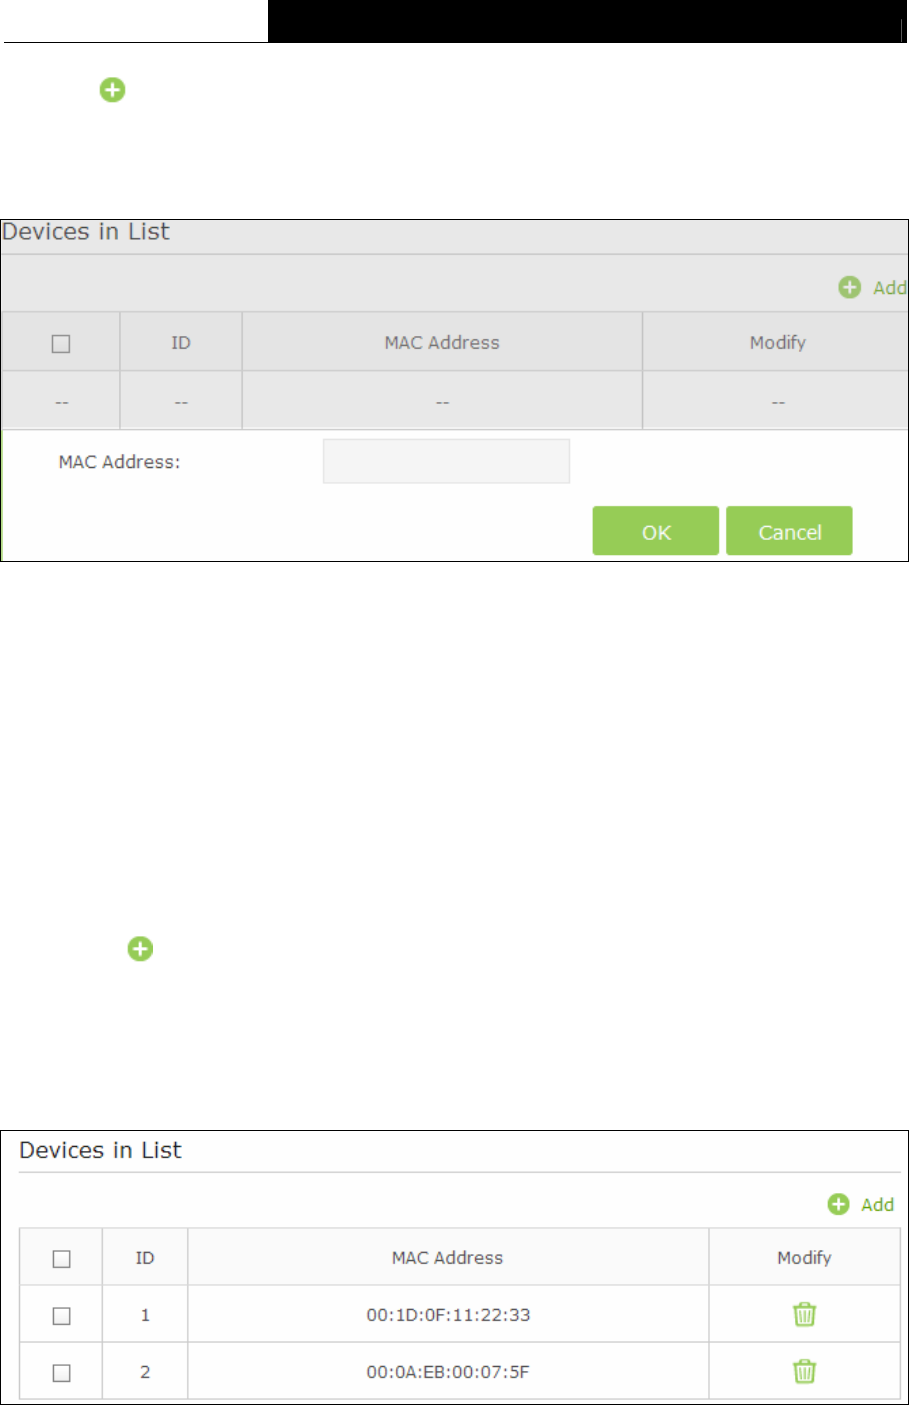
To add a MAC Address Filtering entry:
44
TC-W7960 300Mbps Wireless N DOCSIS 3.0 Cable Modem Router User Guide
1. Click Add button, then you will see a setting page.
2. Enter the appropriate MAC Address into the MAC Address field. The format of the MAC
Address is XX-XX-XX-XX-XX-XX (X is any hexadecimal digit). For example:
00-1D-0F-11-22-33.
Figure 5-21
3. Click the OK button to save this entry. If you do not want to save this entry, click the Cancel
button.
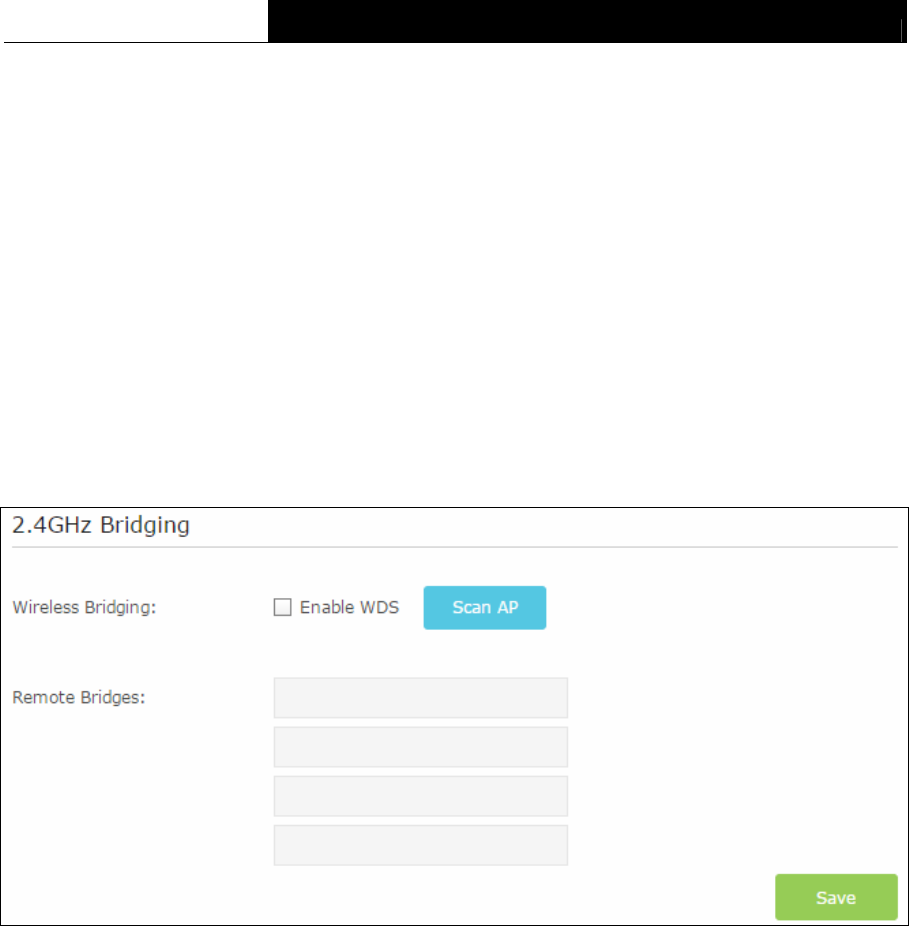
For example: If you desire that the wireless station A with MAC address 00-1D-0F-11-22-33 and
the wireless station B with MAC address 00-0A-EB-00-07-5F are able to access the modem router,
but all the other wireless stations cannot access the modem router, you can configure the MAC
Filtering settings by following these steps:
1. Switch on the Enable MAC Filtering button to enable this function.
2. Select the White List for Filtering Rules.
3. Delete all or disable all entries if there are any entries already.
4. Click the
Add
button.
1) Enter the MAC address
00-1D-0F-11-22-33
/
00-0A-EB-00-07-5F
in the MAC Address
field.
2) Click the OK button.
The filtering rules that configured should be similar to the following figure:
Figure 5-22
45
TC-W7960 300Mbps Wireless N DOCSIS 3.0 Cable Modem Router User Guide
Wireless Stations Online:
MAC Address - The MAC address of the wireless station online.
Age(s) – Display the duration time of wireless station online.
RSSI(dBm) – Refers to the Received Signal Strength Indication.
IP Address- The IP address of the wireless station online.
Host Name – Display the host name of the wireless station.
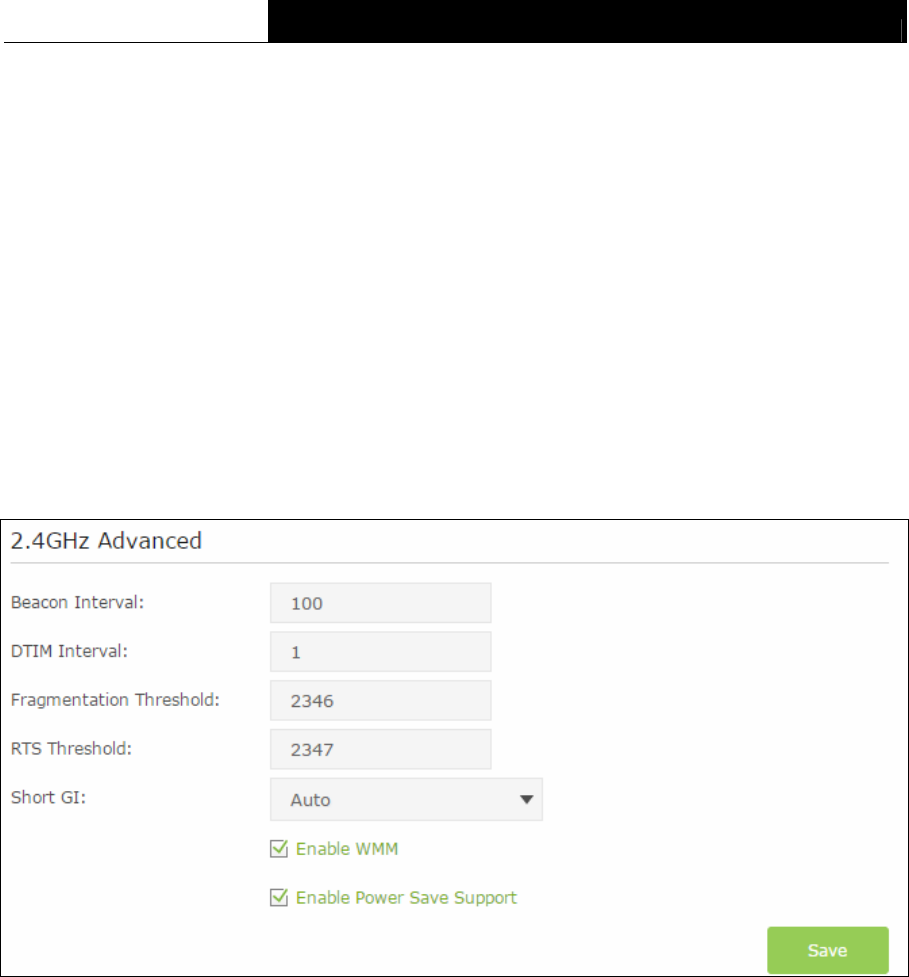
5.4.5 Wireless Bridging
Choose menu “Advanced → Wireless 2.4G → Wireless Bridging”. With this function, the
modem router can bridge more WLANs. To configure this function, you must know the MAC
addresses of the access point that need to be bridged. Often, the MAC address is on the product
label.
Figure 5-23
WDS Bridging - With this function, the modem router can bridge more WLANs. If you check
the Enable WDS, you can click the Scan AP button to scan the nearby wireless access
points.
Remote Bridges – Enter the MAC address of the access point that you choose to be bridged.
Click the Save button to save the settings.
To set up a wireless network with WDS:
Before you set up a wireless network with WDS, both access points must meet the following
conditions:
Use the same wireless channel and encryption mode.
Be on the same local network and have different LAN IP. For example, the TC-W7960’s LAN
IP is 192.168.1.1, and the other access point’s LAN IP is 192.168.1.2.
First, set up the TC-W7960, then set up the access point to be bridged.
To set up the TC-W7960:
46
TC-W7960 300Mbps Wireless N DOCSIS 3.0 Cable Modem Router User Guide
1. In
the Wireless Bridging screen, click the Scan AP button to get nearby wireless access
points information, then click the Back button.
2. Enter the BSSID (wireless MAC address) of the access point that you choose to be bridged.
3. Click the Save button to save the settings.
To set up the access point to be bridged:
1. Log into the web management page of the access point.
2. Go to the WDS settings screen of the access point.
3. Enter the wireless MAC address of the TC-W7960, and then save the settings.
5.4.6 Wireless Advanced
Choose menu “Advanced → Wireless 2.4G → Wireless Advanced”, you can configure the
advanced settings of your wireless network.
Figure 5-24
2.4GHz Advanced:
Beacon Interval - Enter a value between 25-1000 milliseconds for Beacon Interval here.
The beacons are the packets sent by the modem router to synchronize a wireless network.
Beacon Interval value determines the time interval of the beacons. The default value is 100.
DTIM Interval - This value determines the interval of the Delivery Traffic Indication Message
(DTIM). A DTIM field is a countdown field informing clients of the next window for listening to
broadcast and multicast messages. When the modem router has buffered broadcast or
multicast messages for associated clients, it sends the next DTIM with a DTIM Interval value.
You can specify the value between 1-255 Beacon Intervals. The default value is 1, which
indicates the DTIM Interval is the same as Beacon Interval.
Fragmentation Threshold - This value is the maximum size determining whether packets
will be fragmented. Setting the Fragmentation Threshold too low may result in poor network
performance because of excessive packets. 2346 is the default setting and is recommended.
47
TC-W7960 300Mbps Wireless N DOCSIS 3.0 Cable Modem Router User Guide
RTS Threshold - Here you can specify the RTS (Request to Send) Threshold. If the packet
is larger than the specified RTS Threshold size, the modem router will send RTS frames to a
particular receiving station and negotiate the sending of a data frame. The default value is
2347.
Short GI - This function is recommended for it will increase the data capacity by reducing the
guard interval time. Short GI is enabled by default.
Enable WMM – Check the box to enable this function. WMM function can guarantee the
packets with high-priority messages being transmitted preferentially, which is strongly
recommended. It is enabled by default.
Enable Power Save Support - Check the box to enable this function. This function can
make the wireless client has only antenna is in working condition, and the remaining
antennas are dormant, so as to achieve the purpose of saving power.
Click the Save button to save the settings.
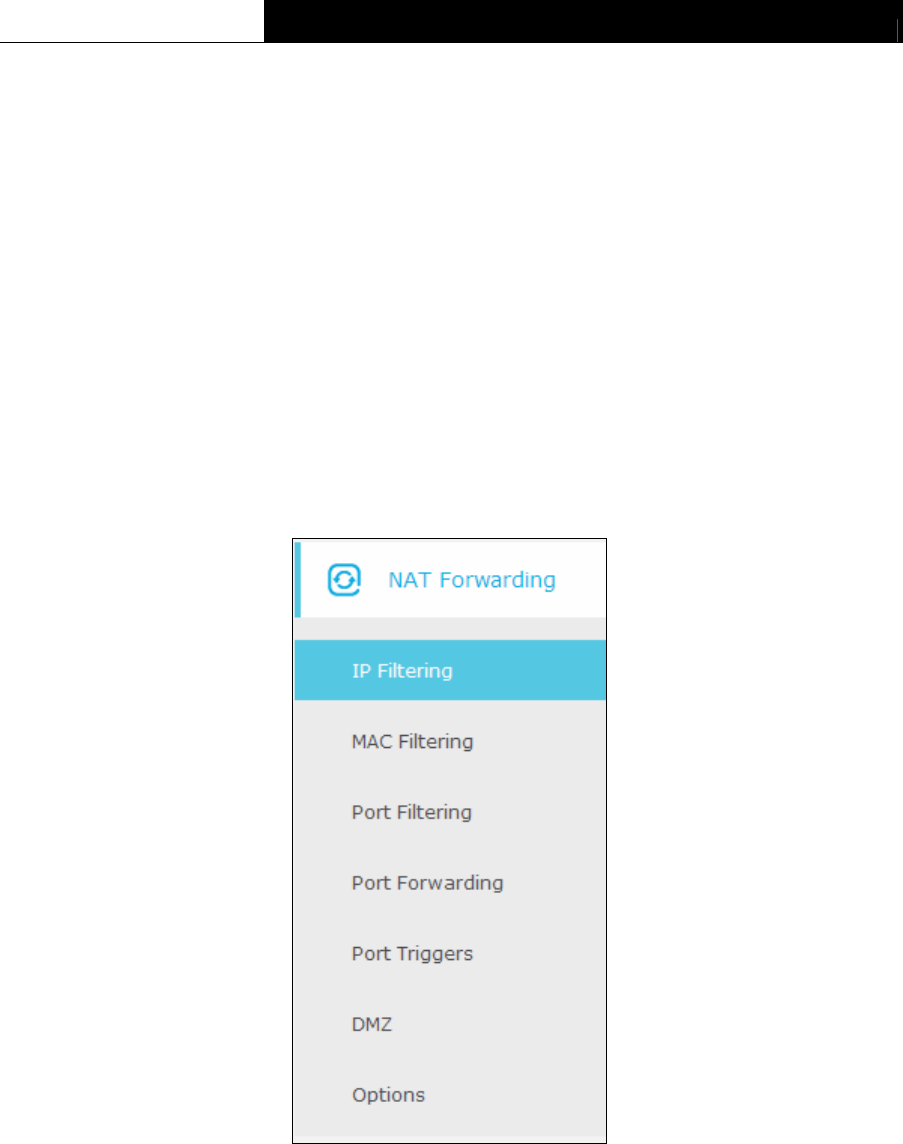
5.5 NAT Forwarding
Figure 5-25 The Forwarding menu
There are seven submenus under the Forwarding menu: IP Filtering, MAC Filtering, Port
Filtering, Port Forwarding, Port Triggers, DMZ and Options. Click any of them, and you will be
able to configure the corresponding function.
5.5.1 IP Filtering
Choose menu “Advanced NAT Forwarding IP Filtering”, and then you can control the
client’s access by configuring the IP Filtering function.
48
TC-W7960 300Mbps Wireless N DOCSIS 3.0 Cable Modem Router User Guide
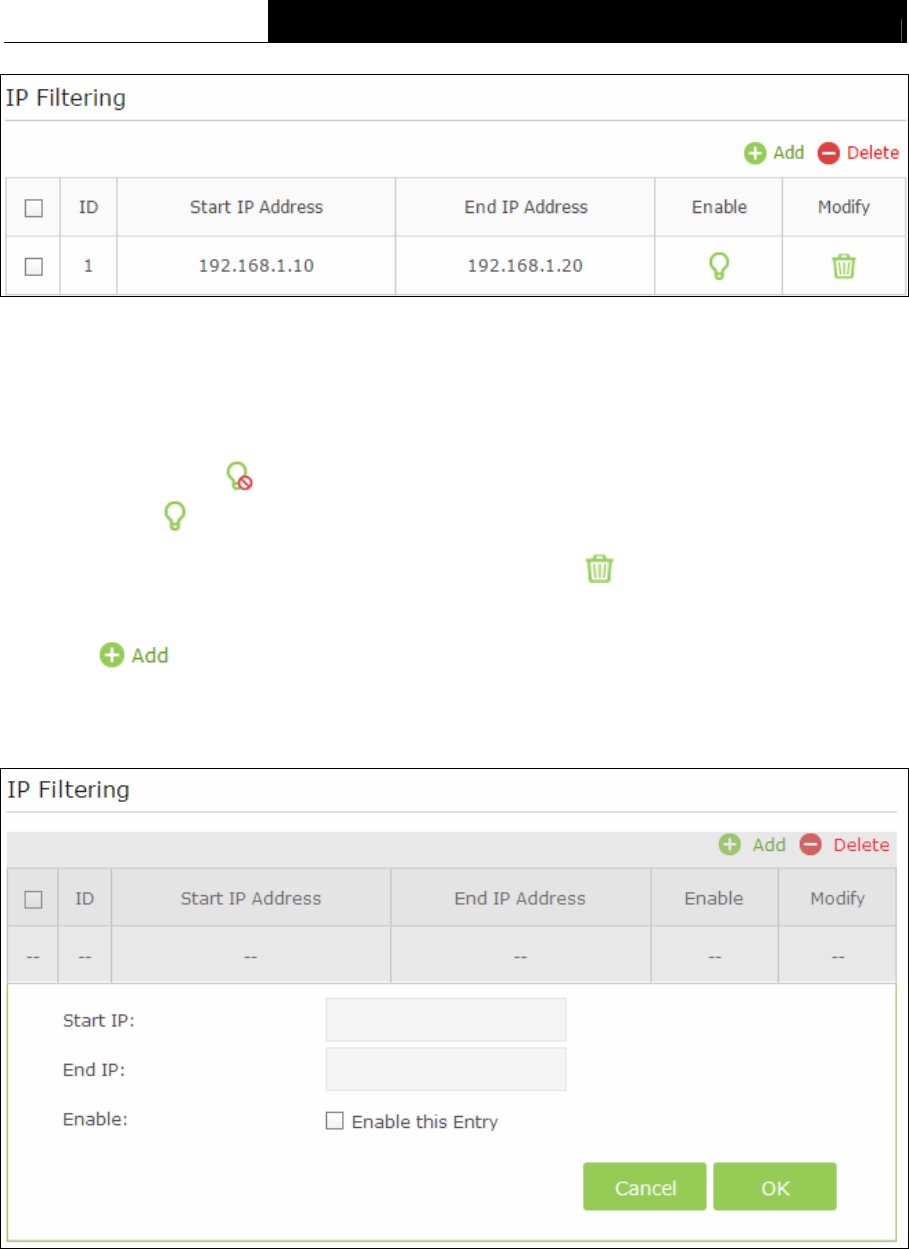
Figure 5-26
IP Filtering:
Start/End IP Address –Display the start IP Address/end IP Address of the client that cannot
access this router.
Enable - Click the icon to enable the function. If this function has taken effect, the icon
will become .
Modify - If you want to delete this entry, you can click the icon.
To add a IP Address Filtering entry:
1. Click button, then you will see a setting page, as shown in the following figure.
2. Enter the Start IP Address and the End IP Address.
3. Check Enable this Entry for this entry.
Figure 5-27
4. Click the OK button to save this entry. If you do not want to save this entry, click the Cancel
button.
49
TC-W7960 300Mbps Wireless N DOCSIS 3.0 Cable Modem Router User Guide
5.5.2 MAC Filtering
Choose menu “Advanced NAT Forwarding MAC Filtering”, and then you can control the
client’s access by configuring the MAC Filtering function.
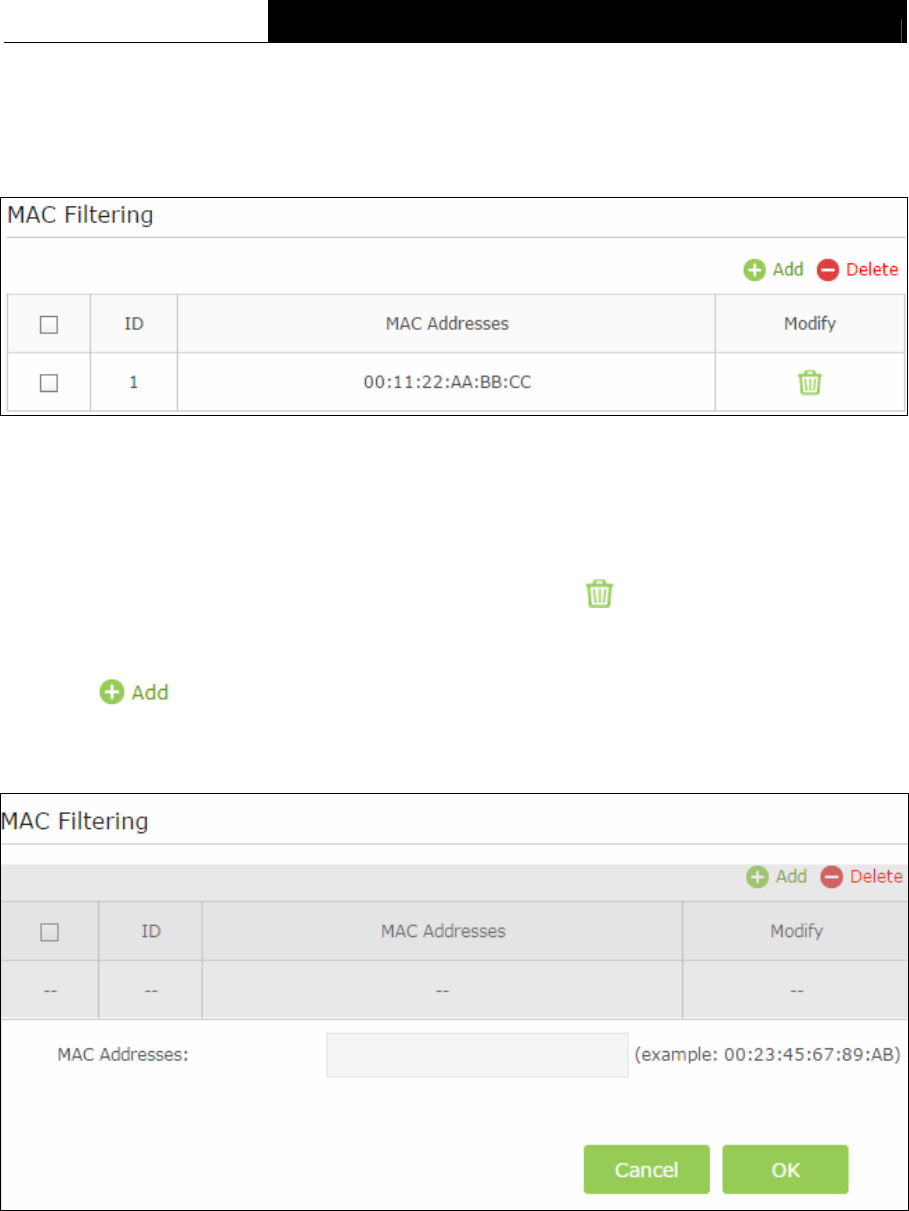
Figure 5-28
MAC Filtering:
MAC Address - This field displays the MAC address of the station that cannot access this
router.
Modify - If you want to delete this entry, you can click the icon.
To add a MAC Address Filtering entry:
1. Click button, then you will see a setting page.
2. Enter the appropriate MAC Address into the MAC Address field. The format of the MAC
Address is XX:XX:XX:XX:XX:XX (X is any hexadecimal digit).
Figure 5-29
3. Click the Add button to save this entry. If you do not want to save this entry, click the Cancel
button.
5.5.3 Port Filtering
Choose menu “Advanced NAT Forwarding Port Filtering”, and then you can control the
client’s access by configuring the Port Filtering function.
50
TC-W7960 300Mbps Wireless N DOCSIS 3.0 Cable Modem Router User Guide
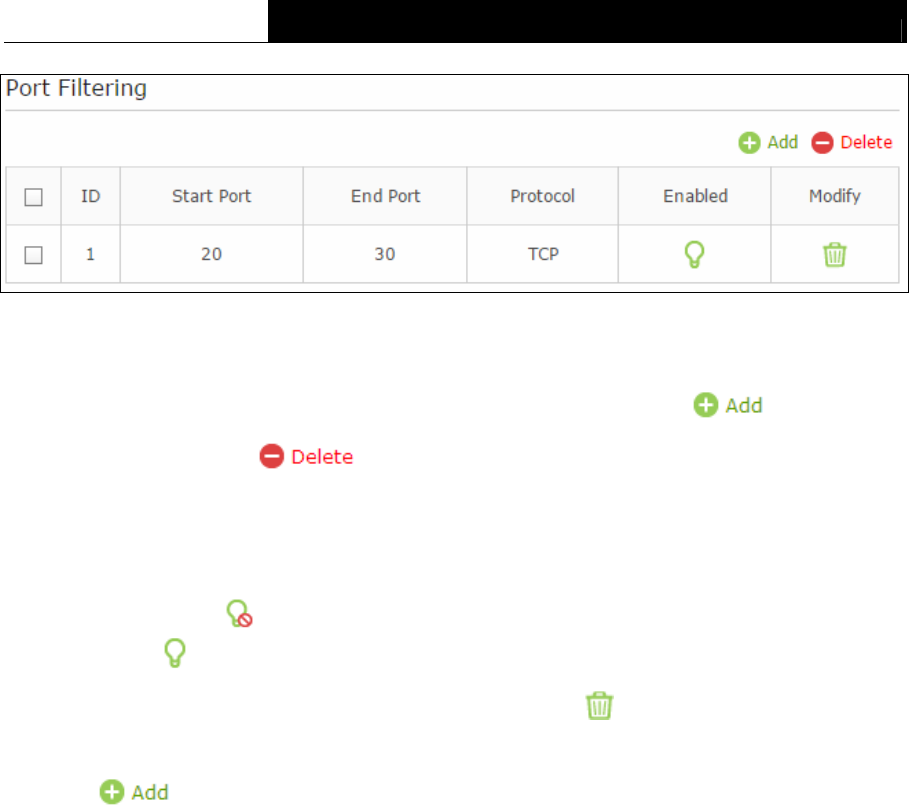
Figure 5-30
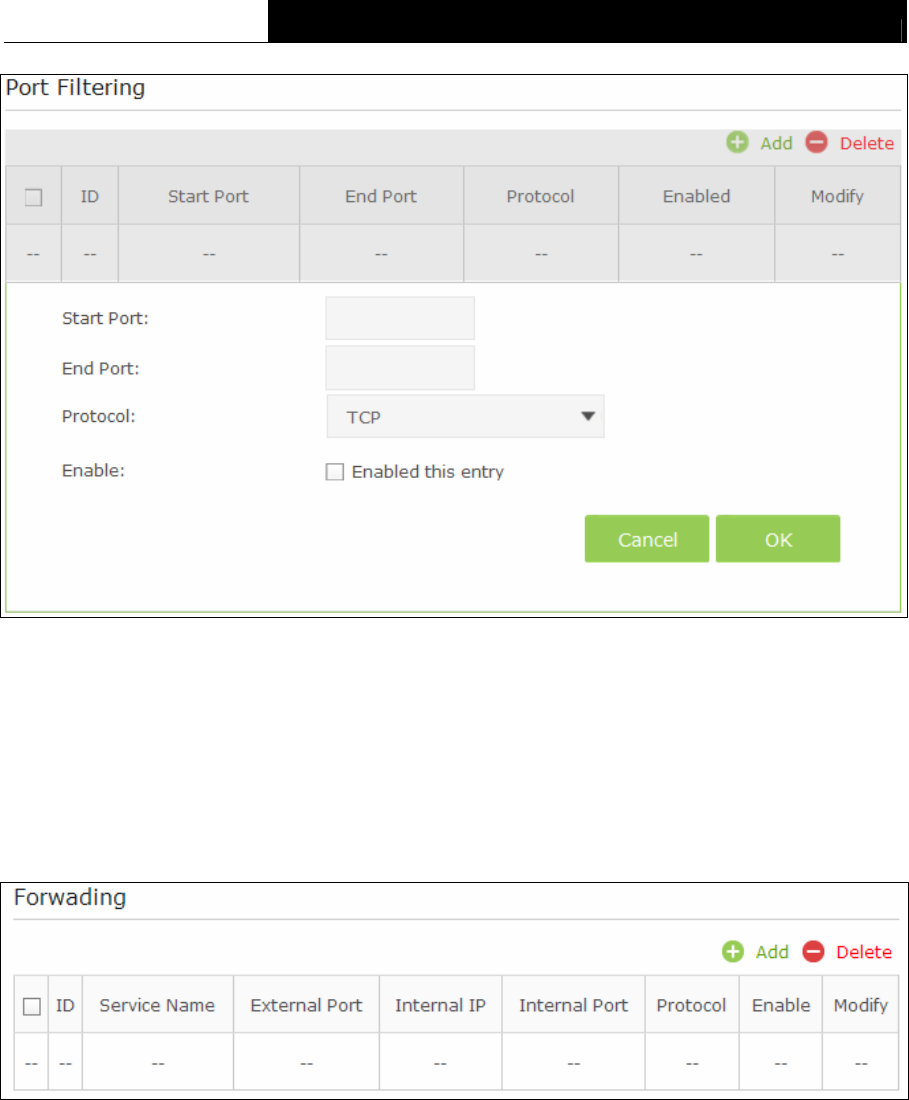
Port Filtering:
Add - You can add a new device for the Port Filtering rule by clicking button.
Delete - You can click button to delete the selected entries.
Start/End Port - Display the start port/end port that cannot access this router.
Protocol - The protocol used for this application, either TCP, UDP, or BOTH (all protocols
supported by the modem router).
Enable - Click the icon to enable the function. If this function has taken effect, the icon
will become .
Modify - If you want to delete this entry, you can click the icon.
To add an IP Address Filtering entry:
1. Click button, then you will see a setting page.
2. Enter the Start Port and the End Port.
3. Select the Protocol which you want.
4. Check Enable this Entry for this entry, as shown in the following figure.
51
TC-W7960 300Mbps Wireless N DOCSIS 3.0 Cable Modem Router User Guide
Figure 5-31
5. Click the OK button to save this entry. If you do not want to save this entry, click the Cancel
button.
5.5.4 Port Forwarding
Choose menu “Advanced NAT Forwarding Port Forwarding”, and then you will see the
screen as shown below.
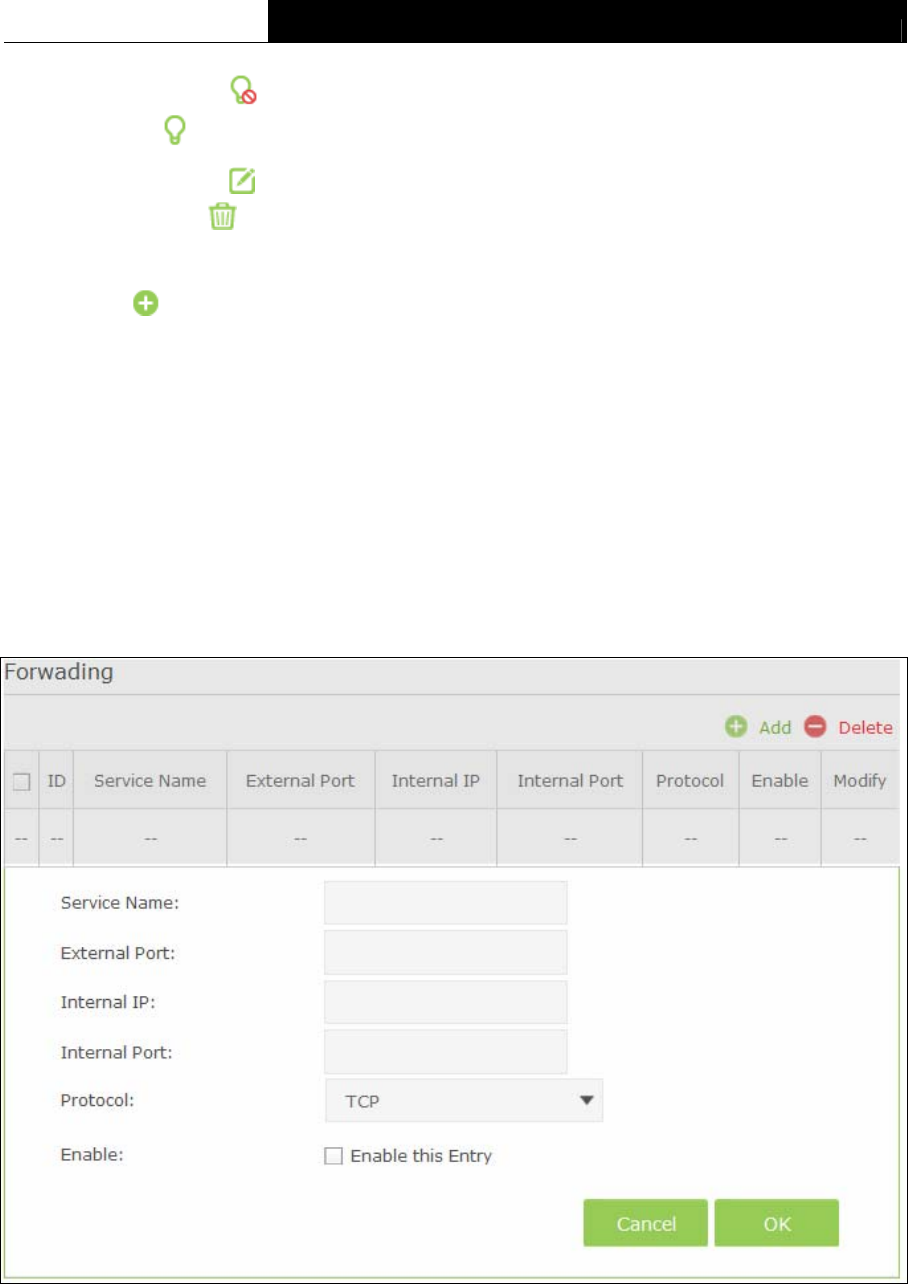
Figure 5-32
Service Name - The port forwarding you want to use.
External Port - The numbers of External Service Ports. You can enter a service port (the
value between 1-65535).
Internal IP - The IP address of the PC running the service application (which is in the same
subnet with LAN IP).
Internal Port - The Internal Service Port number of the PC running the service application.
You can enter a service port (the value between 1-65535).
Protocol - The protocol used for this application, either TCP, UDP, or BOTH (all protocols
supported by the modem router).
52
TC-W7960 300Mbps Wireless N DOCSIS 3.0 Cable Modem Router User Guide
Enable – Click the icon to enable the function. If this function has taken effect, the icon
will become .
Modify – Click the icon to edit the corresponding entry. If you want to delete this entry,
you can click the icon.
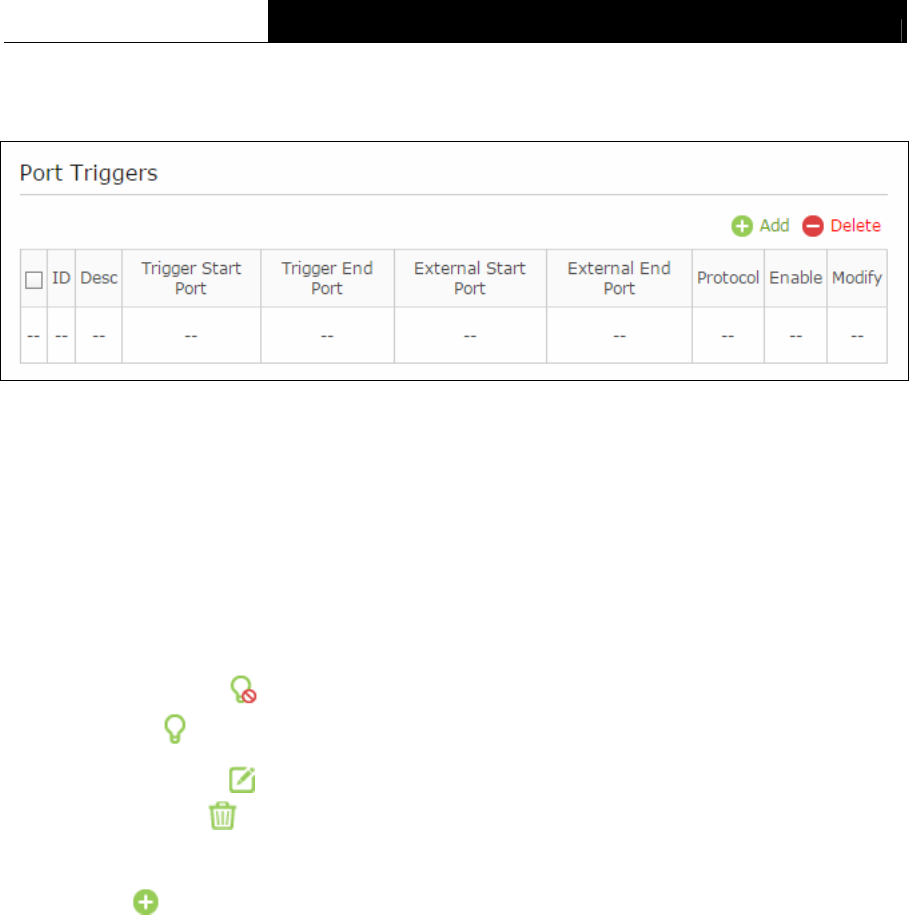
To setup a port forwarding entry:
1. Click the Add button.
2. Enter the Service Name.
3. Enter the external port of the computer running the service application in the External Port
field.
4. Enter the IP address of the computer running the service application in the Internal IP field.
5. Enter the internal port of the computer running the service application in the Internal Port
field.
6. Select the protocol used for this application in the Protocol drop-down list, either TCP, UDP,
or BOTH.
7. Enable the Enable this entry checkbox.
8. Click the OK button.
Figure 5-33
5.5.5 Port Triggers
Choose menu “Advanced→ NAT Forwarding→Port Triggering”, you can view and add port
triggering in the next screen shown below. Some applications require multiple connections, like
53
TC-W7960 300Mbps Wireless N DOCSIS 3.0 Cable Modem Router User Guide
Internet games, video conferencing, Internet telephoning and so on. Port Triggering is used for
some of these applications that cannot work with a pure NAT modem router.
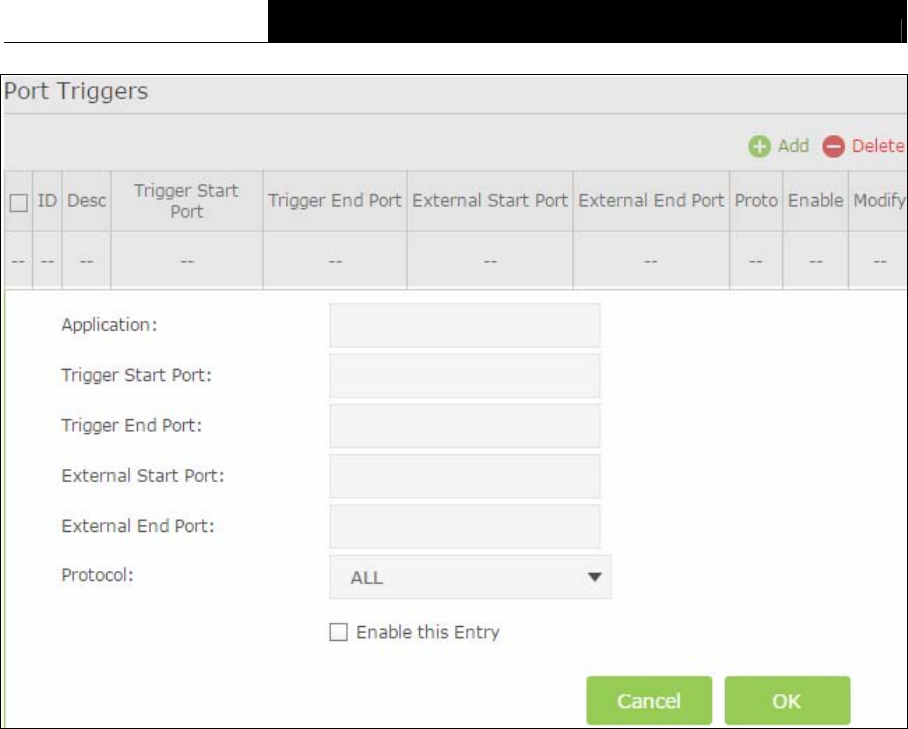
Figure 5-34
Triggering Start/End Port - The start port/end port for outgoing traffic. An outgoing
connection using this port will trigger this rule.
External Start/End Port - The port used by the remote system when it responds to the
outgoing request. A response using one of these ports will be forwarded to the PC which
triggered this rule.
Protocol - The protocol used for External Port, either TCP, UDP, or ALL (all protocols
supported by the router).
Enable – Click the icon to enable the function. If this function has taken effect, the icon
will become .
Modify – Click the icon to edit the corresponding entry. If you want to delete this entry,
you can click the icon.
To add a new rule, follow the steps below.
1. Click the Add button.
2. Enter the number of the Triggering Start/End and External Start/End Port.
3. Select the protocol used for this application in the Protocol drop-down list, either TCP, UDP,
or Both.
4. Enable the Enable this entry checkbox.
5. Click the OK button.
54
TC-W7960 300Mbps Wireless N DOCSIS 3.0 Cable Modem Router User Guide
Figure 5-35
Note:
1. When the trigger connection is released, the corresponding opened ports will be closed.
2. Each rule can only be used by one host on the LAN at a time. The trigger connection of other
hosts on the LAN will be refused.
3. External Port ranges cannot overlap each other.
55
TC-W7960 300Mbps Wireless N DOCSIS 3.0 Cable Modem Router User Guide
5.5.6 DMZ
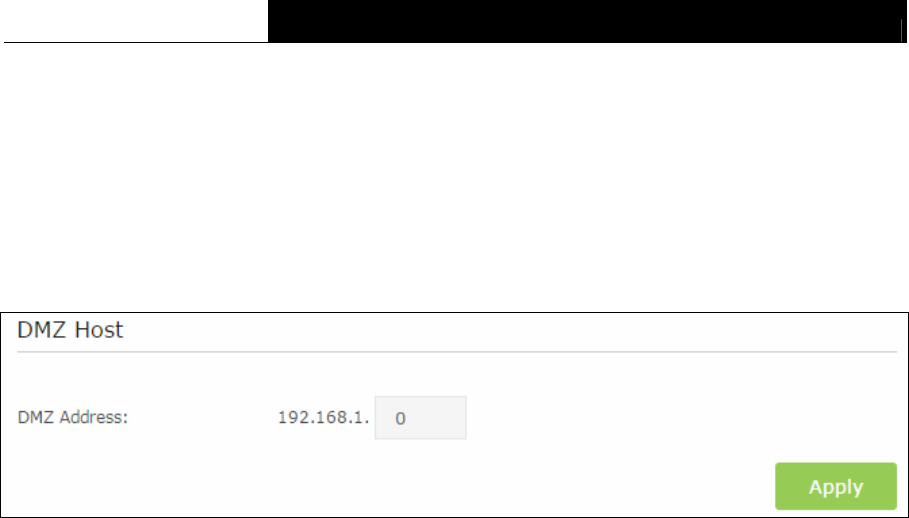
Choose menu “Advanced → NAT Forwarding → DMZ”, and then you can view and configure
DMZ host in the screen shown below. The DMZ host feature allows one local host to be exposed
to the Internet for a special-purpose service such as Internet gaming or videoconferencing. The
router forwards packets of all services to the DMZ host. Any PC whose port is being forwarded
must have its DHCP client function disabled and should have a new static IP Address assigned to
it because its IP Address may be changed when using the DHCP function.
Figure 5-36
To assign a computer or server to be a DMZ server:
1. Enter the IP address of a local PC that is set to be DMZ host in the DMZ Host IP Address
field.
2. Click the Apply button.
5.5.7 Options
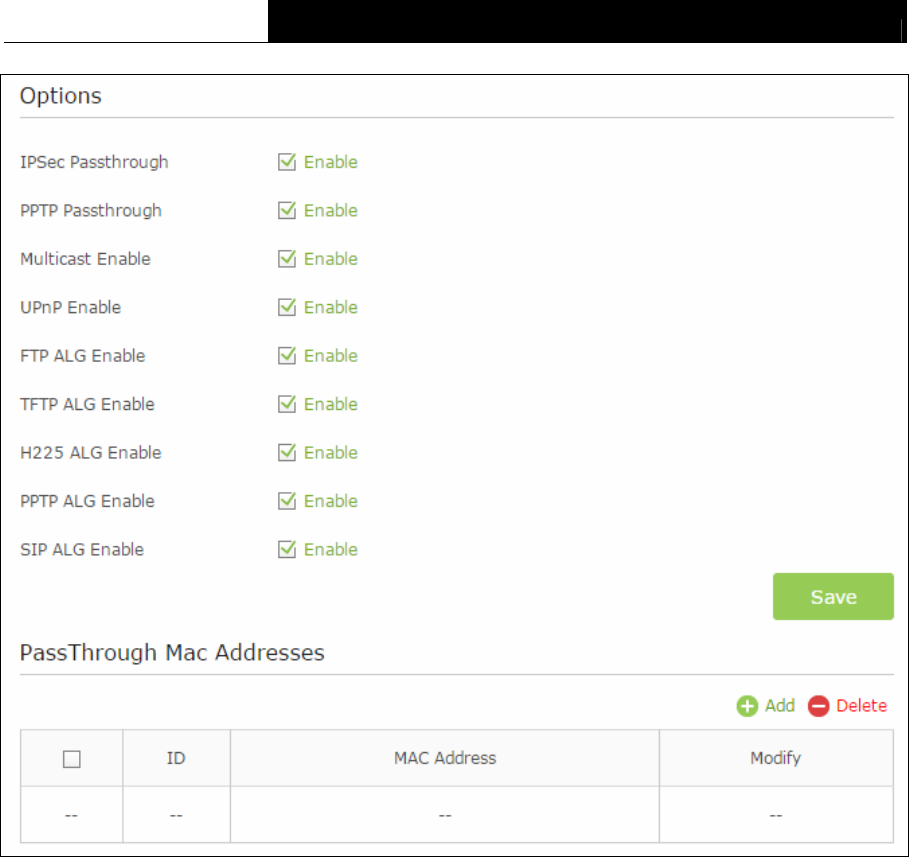
Choose menu “Advanced → NAT Forwarding → Options”, and then you can view the
information in the screen shown below.
56
TC-W7960 300Mbps Wireless N DOCSIS 3.0 Cable Modem Router User Guide
Figure 5-37
IPSec Passthrough - Internet Protocol security (IPSec) is a suite of protocols for ensuring
private, secure communications over Internet Protocol (IP) networks, through the use of
cryptographic security services. To allow IPSec tunnels to pass through the modem router,
turn on the switch.
PPTP Passthrough - Point-to-Point Tunneling Protocol (PPTP) allows the Point-to-Point
Protocol (PPP) to be tunneled through an IP network. To allow PPTP tunnels to pass through
the modem router, turn on the switch.
Multicast Enable - Multicasting allows a single transmission to simultaneously reach specific
within your local network. Check the box to enable multicasting.
UPnP Enable – Check the box to enable UPnP. This feature is enabled by default.
FTP ALG Enable - To allow FTP clients and servers to transfer data across NAT, turn on the
switch.
TFTP ALG Enable - To allow TFTP clients and servers to transfer data across NAT, turn on
the switch.
H225 ALG Enable - To allow H225 clients and servers to transfer data across NAT, turn on
the switch.
PPTP ALG Enable - To allow PPTP clients and servers to transfer data across NAT, turn on
the switch.
57
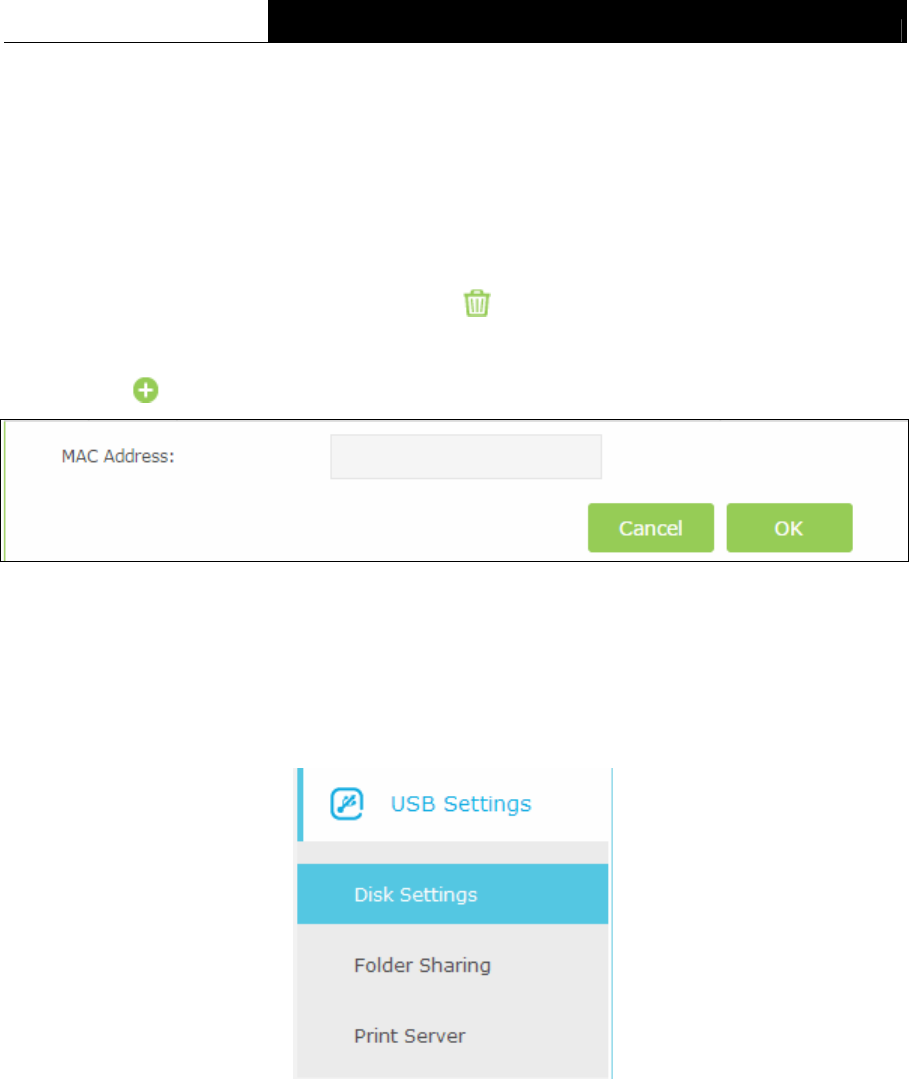
TC-W7960 300Mbps Wireless N DOCSIS 3.0 Cable Modem Router User Guide
SIP ALG Enable- To allow SIP clients and servers to transfer data across NAT, turn on the
switch.
Click Save button to save these settings.
PassThrough MAC Address
MAC Address –This field displays the MAC address which is allowed to pass through the
modem router
Modify – Delete this entry, you can click the icon.
To add a new entry, please follow the steps below.
1. Click the Add button and the next screen will pop-up as shown below.
Figure 5-38
2. Enter the MAC Address.
3. Click OK button to save these settings.
5.6 USB Settings
Figure 5-39
There are three submenus under the USB Settings menu: Disk Settings, Folder Sharing and
Print Server. Click any of them, and you will be able to configure the corresponding functions.
5.6.1 Disk Settings
Choose menu “Advanced→USB Settings→Disk Settings”, you can configure the USB disk
drive attached to the modem router and view the information.
58
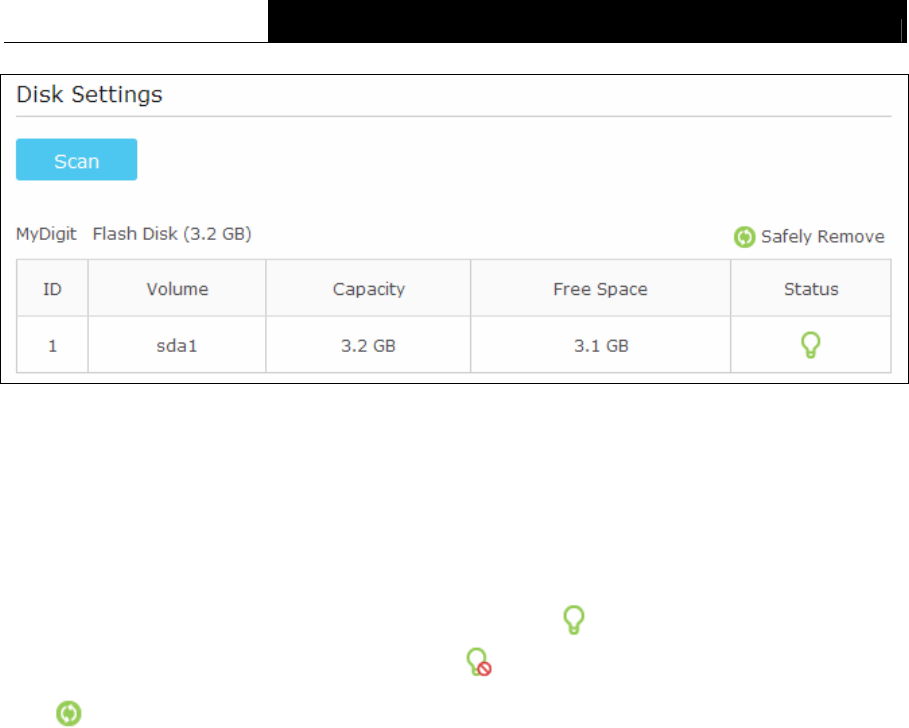
TC-W7960 300Mbps Wireless N DOCSIS 3.0 Cable Modem Router User Guide
Figure 5-40
Click the Scan button to scan the USB drive connected to the router.
Volume - The volume name of the USB drive the users have access to.
Capacity - The storage capacity of the USB driver.
Free Space- The available space of the USB driver.
Status: When the volume is shared, you can click the icon to stop sharing the volume;
when volume is non-shared, you can click to icon share the volume.
Click Safely Remove button to remove the USB storage device that is connected to USB port.
5.6.2 Folder Sharing
Choose menu “Advanced→USB Settings→Folder Sharing”, you can configure the sharing
account and sharing settings.
59
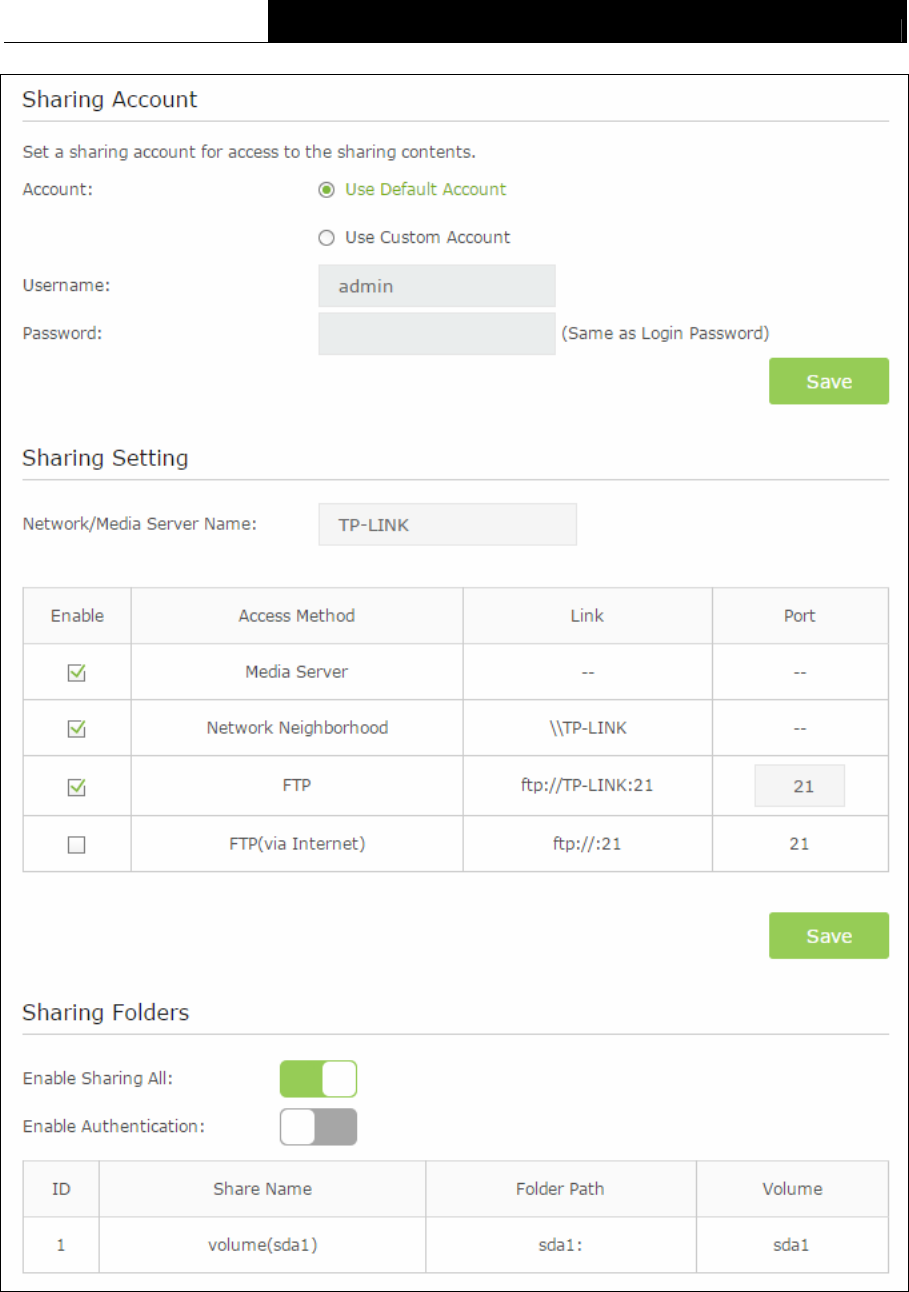
TC-W7960 300Mbps Wireless N DOCSIS 3.0 Cable Modem Router User Guide
Figure 5-41
Sharing Account
Account – You can select Use Default Account or Use Custom Account to log in sharing
Folders.
60

TC-W7960 300Mbps Wireless N DOCSIS 3.0 Cable Modem Router User Guide
Use Default Account - Select this radio button, and the sharing account username is
admin, and password is the same as Login Password.
Use Custom Account - Select this radio button, then you have to specify the new
username and password in the Username and Password fields for sharing account.
Click Save button to save these settings.
Sharing Settings
Network/Media Server Name - Show the name of the network/media server. This is the
name used to access the USB device connected to the router.
Access Method - Select the check boxes for the access methods that you want. The
methods for Windows users and Mac OS X users are different.
For Windows:
1) Network Neighborhood: This method is enabled by default.
i. Select Start > Run.
ii. Enter the server address, such as \\TP-LINK in the dialog box and click the OK
button.
2) FTP: This method is enabled by default. If you select this check box and click the Save
button, the LAN users can access the USB drive through FTP.
i. Select Start > Run.
ii. Enter ftp://<domain name>:<port number> (such as ftp://TP-LINK:21) in the dialog
box and click the OK button.
3) FTP (via Internet): This method is disabled by default. If you select this check box,
remote users can access the USB drive through FTP over the Internet. This feature
supports both downloading and uploading of files.
i. Select Start > Run.
ii. Enter ftp://<WAN IP address of the router>:<port number> (such as
ftp://59.40.2.243:21) in the dialog box and click the OK button.
Note:
If the port for FTP is changed, the port for FTP (via Internet) will be changed to the same port.
For Mac OS X:
1) Network Neighborhood: This method is enabled by default.
i. Select Go > Connect to Server.
ii. Enter the server address, such as smb://TP-LINK in the dialog box and click the
Connect button.
2) FTP: This method is enabled by default. If you select this check box and click the Save
button, the LAN users can access the USB drive through FTP.
i. Open a web browser.
ii. Type the server address in the address bar:
Type in ftp://<domain name>:<port number> (such as ftp://TP-LINK:21) in the
dialog box and click the OK button.
61
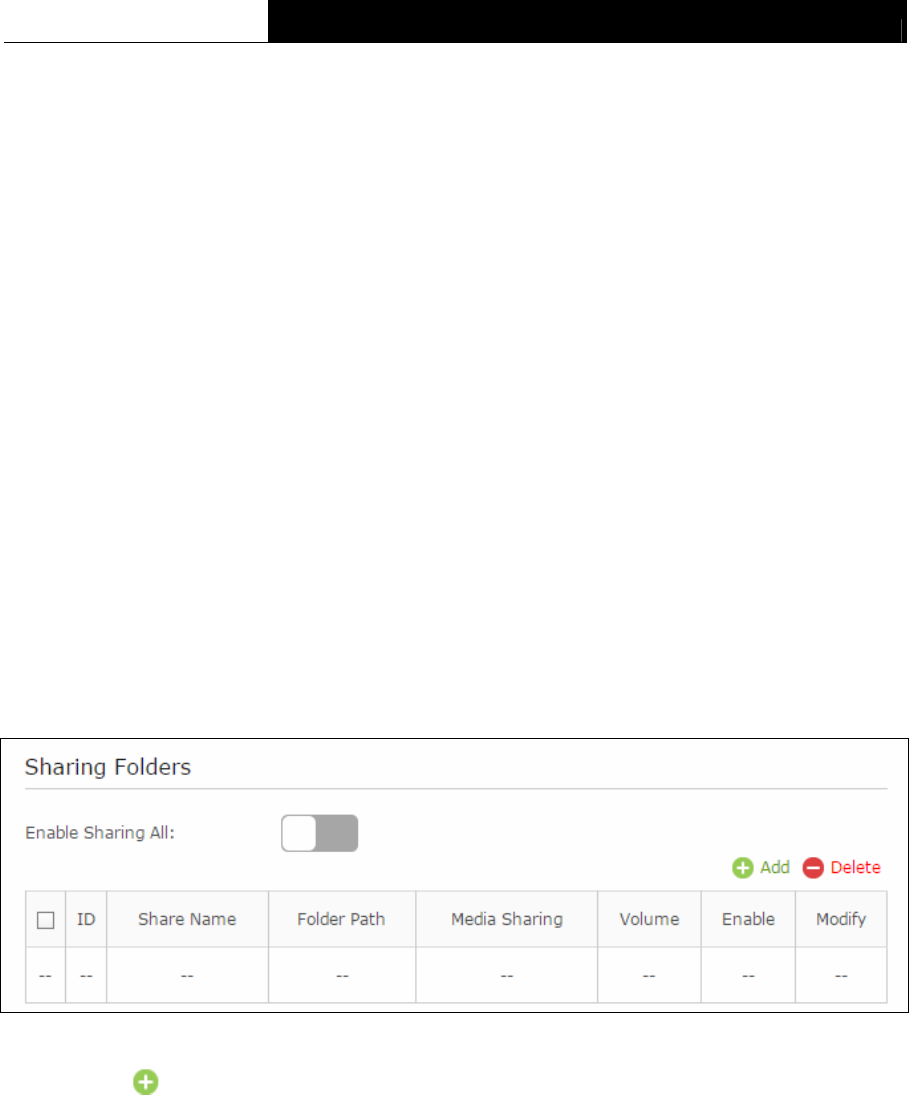
TC-W7960 300Mbps Wireless N DOCSIS 3.0 Cable Modem Router User Guide
3) FTP (via Internet): This method is disabled by default. If you select this check box,
remote users can access the USB drive through FTP over the Internet.
i. Open a web browser.
ii. Type the server address in the address bar:
iii. Type in ftp://<WAN IP address of the router>:<port number> (such as
ftp://59.40.2.243:21) in the dialog box and click the OK button.
Note:
1. If the port for FTP is changed, the port for FTP (via Internet) will be changed to the same
port.
2. You can also access the USB disk via a third-party app for network files management,
which can resume broken file transfers.
Sharing Folders
Enable Sharing All - The switch for sharing all the folders. If you turn on the switch, the field
will become green and all the folders in the USB drive will be shared.
Enable Authentication - If you turn on this switch, the folder sharing needs authentication.
The default setting is off.
To share the folders you specified, please follow the steps below.
1. Turn off the Enable Sharing All switch and the next screen will pop-up as shown in Figure
5-42.
Figure 5-42
2. Click the Add button and the next screen will pop-up as shown below.
62
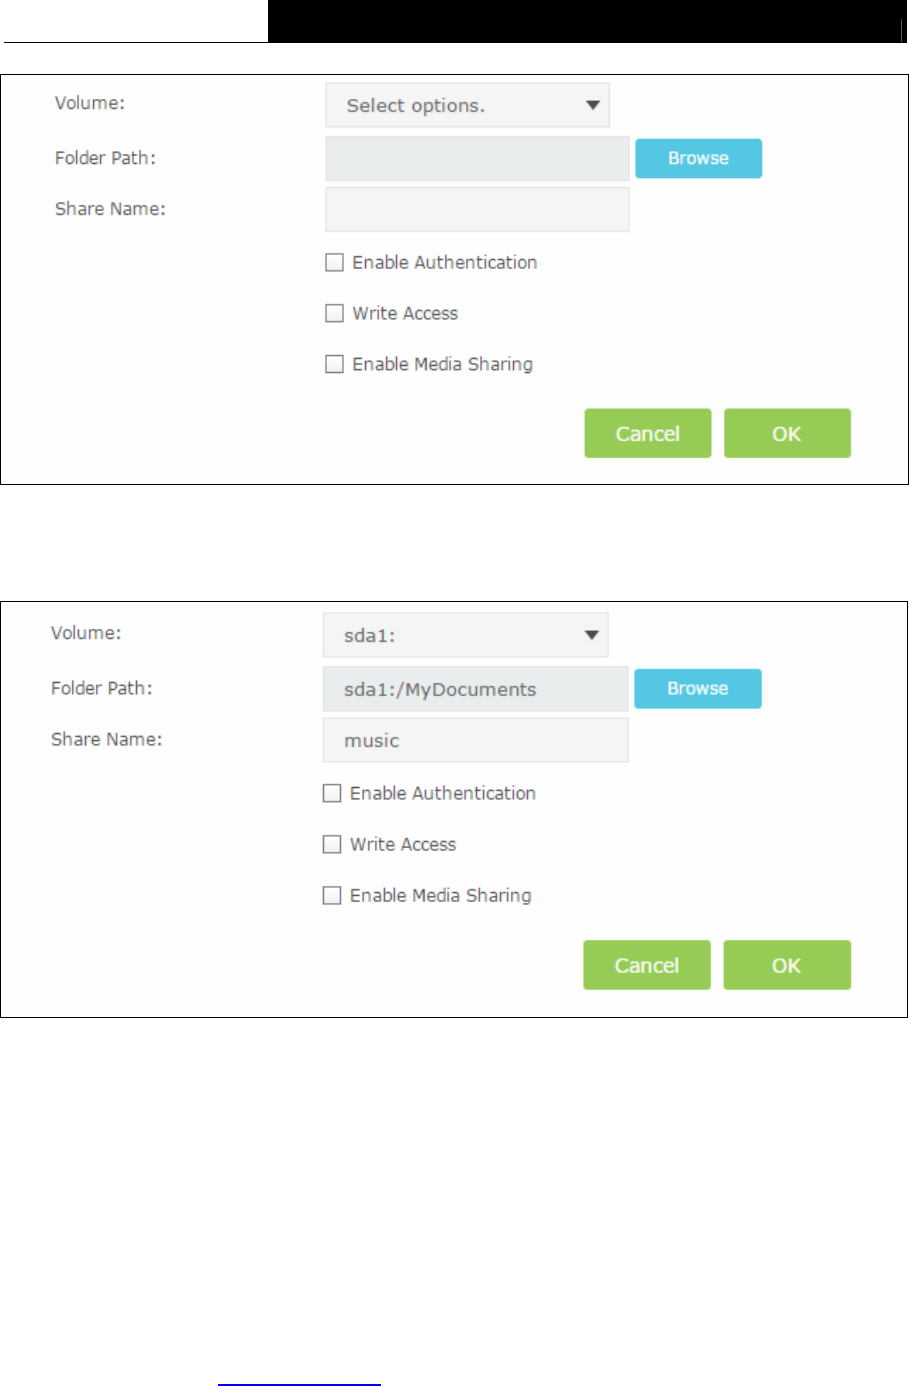
TC-W7960 300Mbps Wireless N DOCSIS 3.0 Cable Modem Router User Guide
Figure 5-43
3. Select the volume desired to share from the Volume drop-down list. Then click the Browse
button to select the folder path. You can create a share name, e.g. music.
Figure 5-44
4. Select the checkboxes in Figure 5-44.according to your needs.
Enable Authentication - If this checkbox is selected, then the folder sharing needs
authentication.
Write Access - If this checkbox is selected, then the sharing folder is allowed write access.
Enable Media Sharing - Select this checkbox to enable media sharing.
5. Click OK to complete the settings.
5.6.3 Print Server
Please refer to Section 4.5.2 Print Server.
63
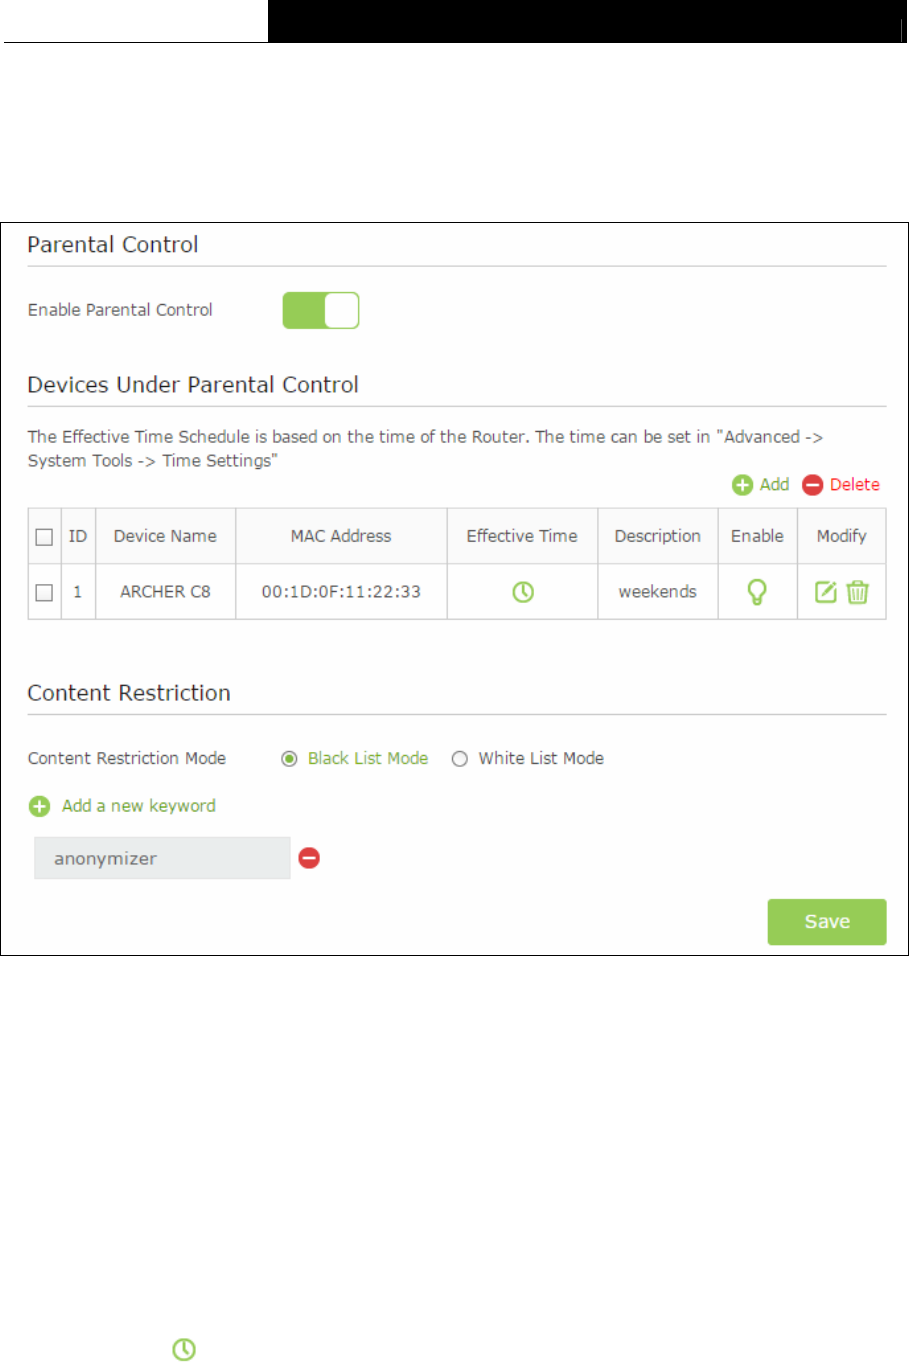
TC-W7960 300Mbps Wireless N DOCSIS 3.0 Cable Modem Router User Guide
5.7 Parental Control
Choose menu “Advanced→Parental Control”, and then you can configure the parental control in
the screen as shown below. The Parental Control function can be used to control the internet
activities of the child, limit the child to access certain websites and restrict the time of surfing.
Figure 5-45
Enable Parental Control - The switch for the parental control. If you turn on the switch, the
field will become green
Devices Under Parental Control:
Add - You can add a new device for the parental control by clicking this button.
Delete - You can click the button to delete the selected entries.
Device Name -The name used for identifying a device.
MAC Address - This field displays the MAC address of the PC that is managing this modem
router.
Effective Time - The time period allowed for the PC controlled to access the Internet. You
can click the icon to configure the time period.
Description - Here displays the description about the parental control and this description is
unique.
64
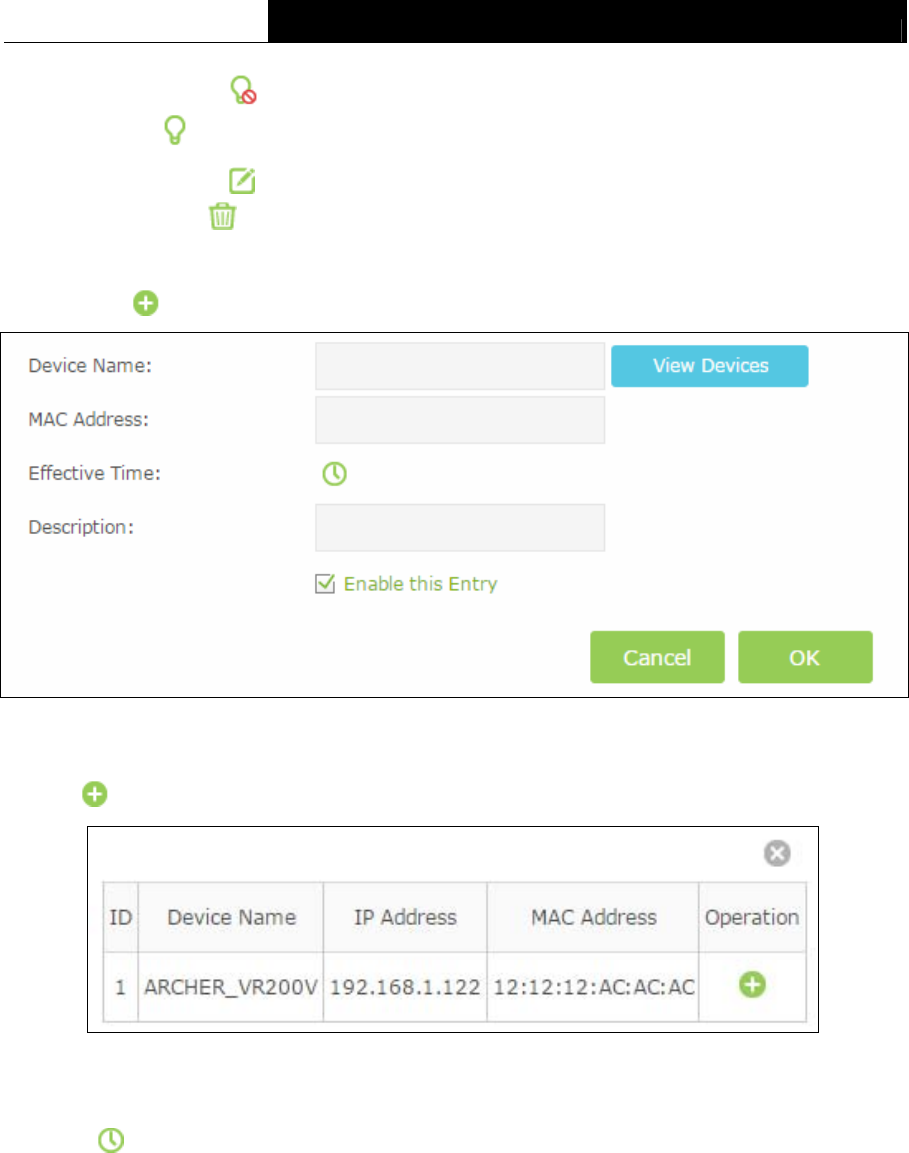
TC-W7960 300Mbps Wireless N DOCSIS 3.0 Cable Modem Router User Guide
Enable – Click the icon to enable the function. If this function has taken effect, the icon
will become .
Modify – Click the icon to edit the corresponding entry. If you want to delete this entry,
you can click the icon.
To add a new entry, please follow the steps below.
4. Click the Add button and the next screen will pop-up as shown below.
Figure 5-46
5. Click View Device button and the next screen will pop-up as shown below. You’d like to click
the icon to select a device.
Figure 5-47
6. Enter the Device Name in Figure 5-46.
7. Click to create a new schedule. You’d like to click the Schedule in green below to go to
the Advance Schedule Settings page and create the schedule you need. Then enter the
Description.
8. Check the box Enable this Entry to enable this function.
9. Click OK to complete the settings.
Content Restriction:
Content Restriction Mode – Select the Black List Mode or White List Mode for this
account.
65
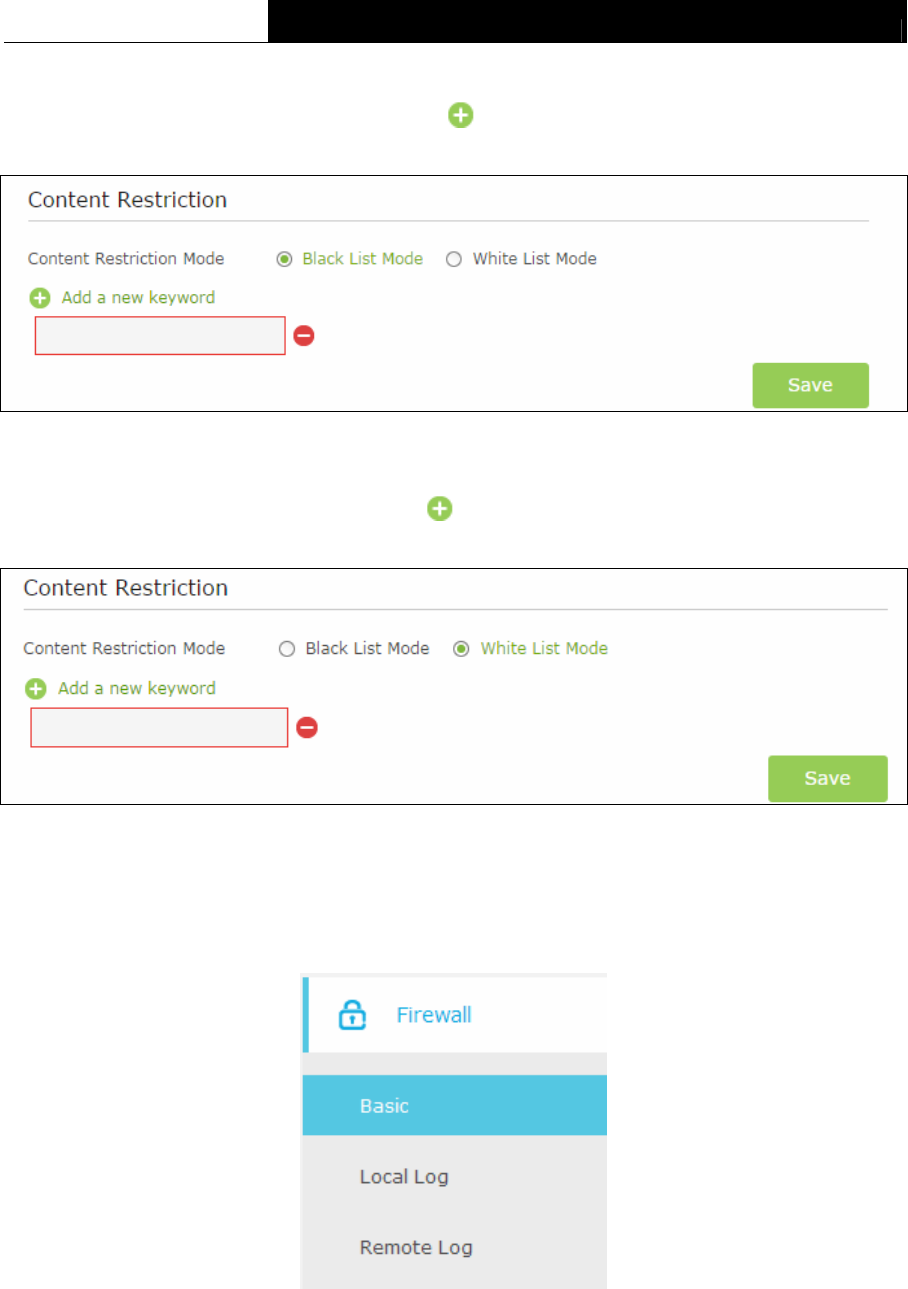
TC-W7960 300Mbps Wireless N DOCSIS 3.0 Cable Modem Router User Guide
Black List Mode - All webs entered within the Black List will be denied to access. Check the
box to enable this mode. You’d like to click Add a new keyword button and input the net
addresses which the child is denied to access.
Figure 5-48
White List Mode - Only the web entered within the White List will be allowed. Check the box
to enable this mode. You’d like to click Add a new keyword button and input the net
addresses which the child is allowed to access.
Figure 5-49
Click Save to complete the settings.
5.8 Firewall
Figure 5-50
There are three submenus under the Security menu: Basic, Local Log, and Remote Log. Click
any of them, and you will be able to configure the corresponding functions.
66
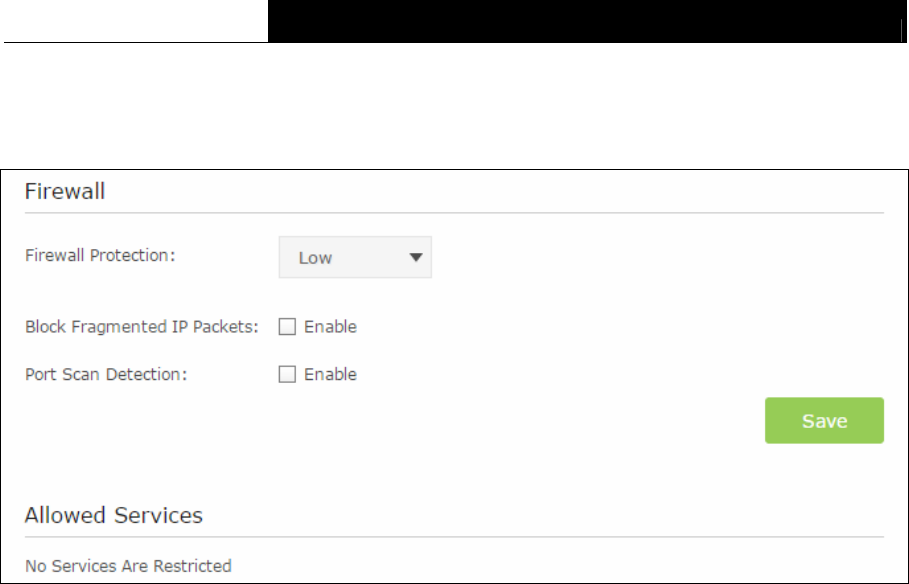
TC-W7960 300Mbps Wireless N DOCSIS 3.0 Cable Modem Router User Guide
5.8.1 Basic
Choose menu “Advanced Firewall Basic”, and you can configure the basic firewall function.
Figure 5-51
Firewall:
Firewall Protection - You can select OFF, Low, Medium or High which you would like.
Block Fragmented IP Packets - This feature helps protect your private local network from
Internet based denial of service attacks. Check the box to enable this function.
Port Scan Detection - This feature can detect the port scan attack. Check the box to enable
this function.
Click the Save button to save your settings.
5.8.2 Local Log
Choose menu “Advanced→ Firewall Local Log”, and then you can configure the function in
the screen as shown below.
67
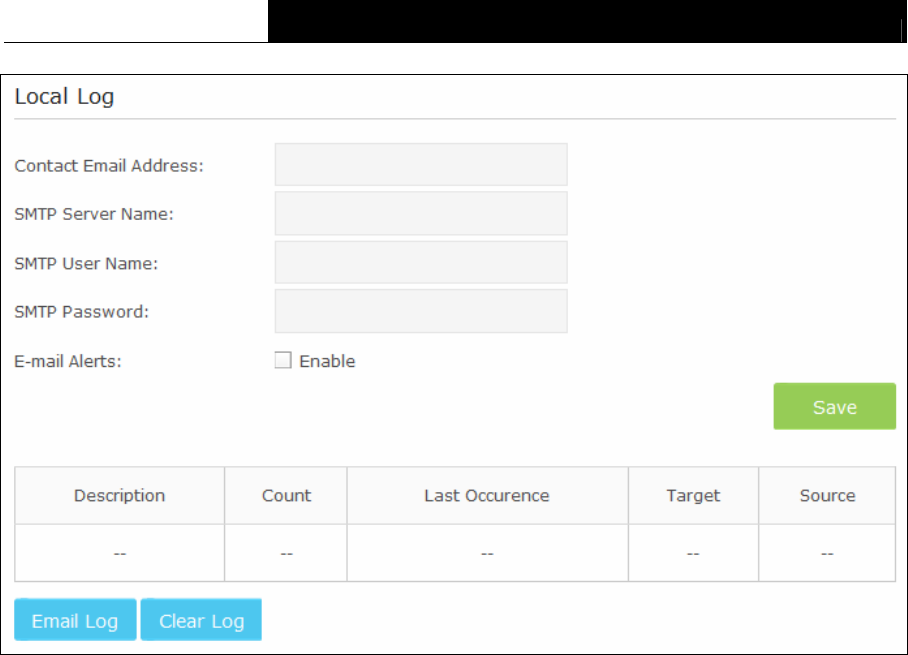
TC-W7960 300Mbps Wireless N DOCSIS 3.0 Cable Modem Router User Guide
Figure 5-52
Contact Email Address – The modem router can email you its logs. Enter your email
address here.
SMTP Server Name - Enter the name of your SMTP sever.
SMTP User Name/Password – The default User Name/Password is admin/admin. You can
also specify the new username/password.
E-mail Alerts – Check the box to enable this function. This feature can send alerts when
someone attempts to visit a blocked site.
Click the Save button to save your settings.
Email Log – Click to email the log immediately.
Clear Log – Click to delete all the logs.
5.8.3 Remote Log
Choose menu “Advanced→ Firewall Remote Log”, and then you can configure the function
in the screen as shown below.
68
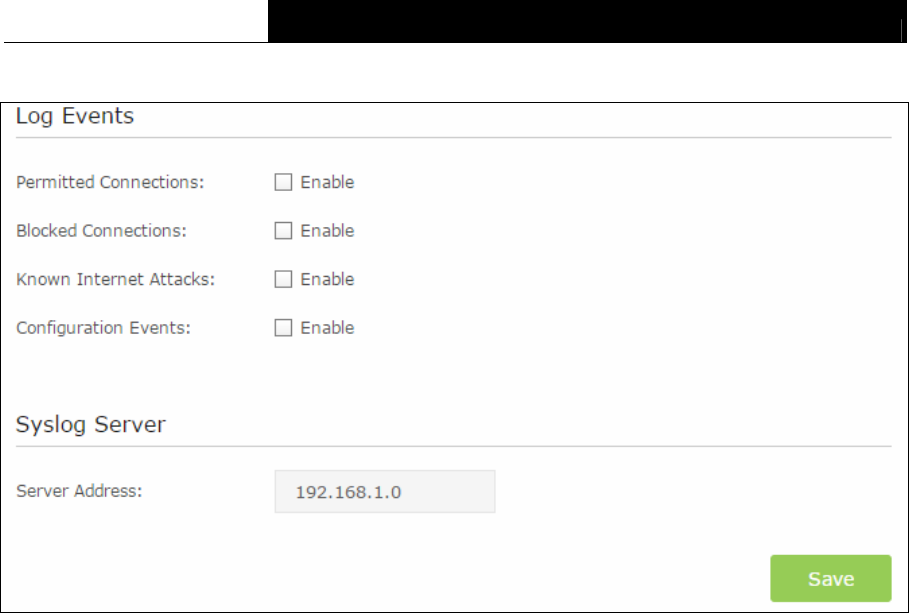
TC-W7960 300Mbps Wireless N DOCSIS 3.0 Cable Modem Router User Guide
Figure 5-53
Select the Log checkbox to view the corresponding events.
Server Address - The specified IP address of the remote system log server.
Click Save button to save these settings.
69
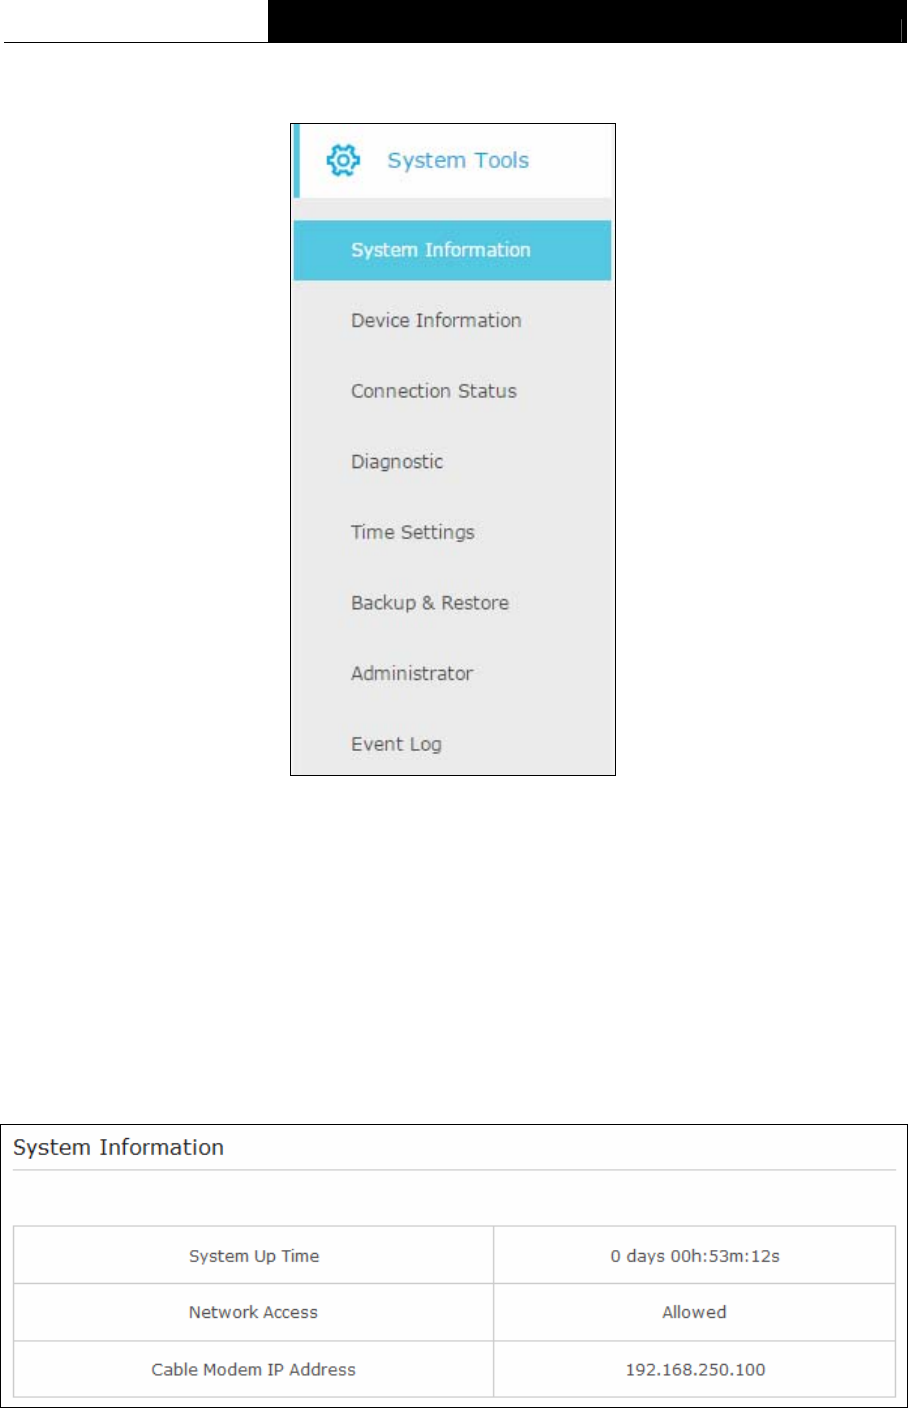
TC-W7960 300Mbps Wireless N DOCSIS 3.0 Cable Modem Router User Guide
5.9 System Tools
Figure 5-54
Choose menu “Advanced→System Tools”, you will see eight submenus under the System Tools
menu: System Information, Device Information, Connection Status, Diagnostic, Time
Settings, Backup & Restore, Administrator and Event Log. Click any of them, and you will be
able to configure the corresponding function. The detailed explanations for each submenu are
provided below.
5.9.1 System Information
Choose menu “Advanced→System Tools→System Information”, you can see the current
status information about the modem router.
Figure 5-55
70
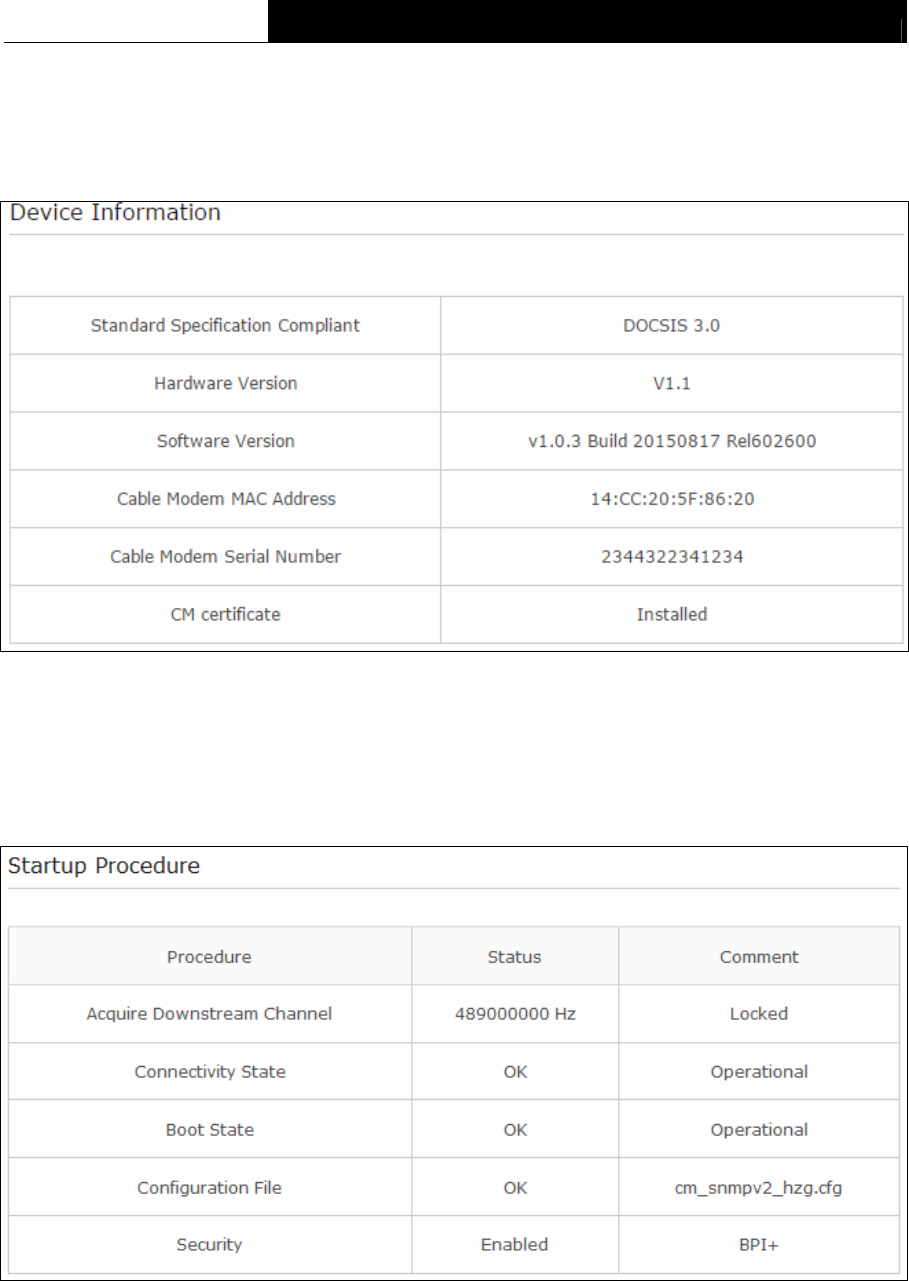
TC-W7960 300Mbps Wireless N DOCSIS 3.0 Cable Modem Router User Guide
5.9.2 Device Information
Choose menu “Advanced→System Tools→Device Information”, you can see the current
information about the modem router.
Figure 5-56
5.9.3 Connection Status
Choose menu “Advanced→System Tools→Connection Status”, you can see the current
connection status about the modem router.
71
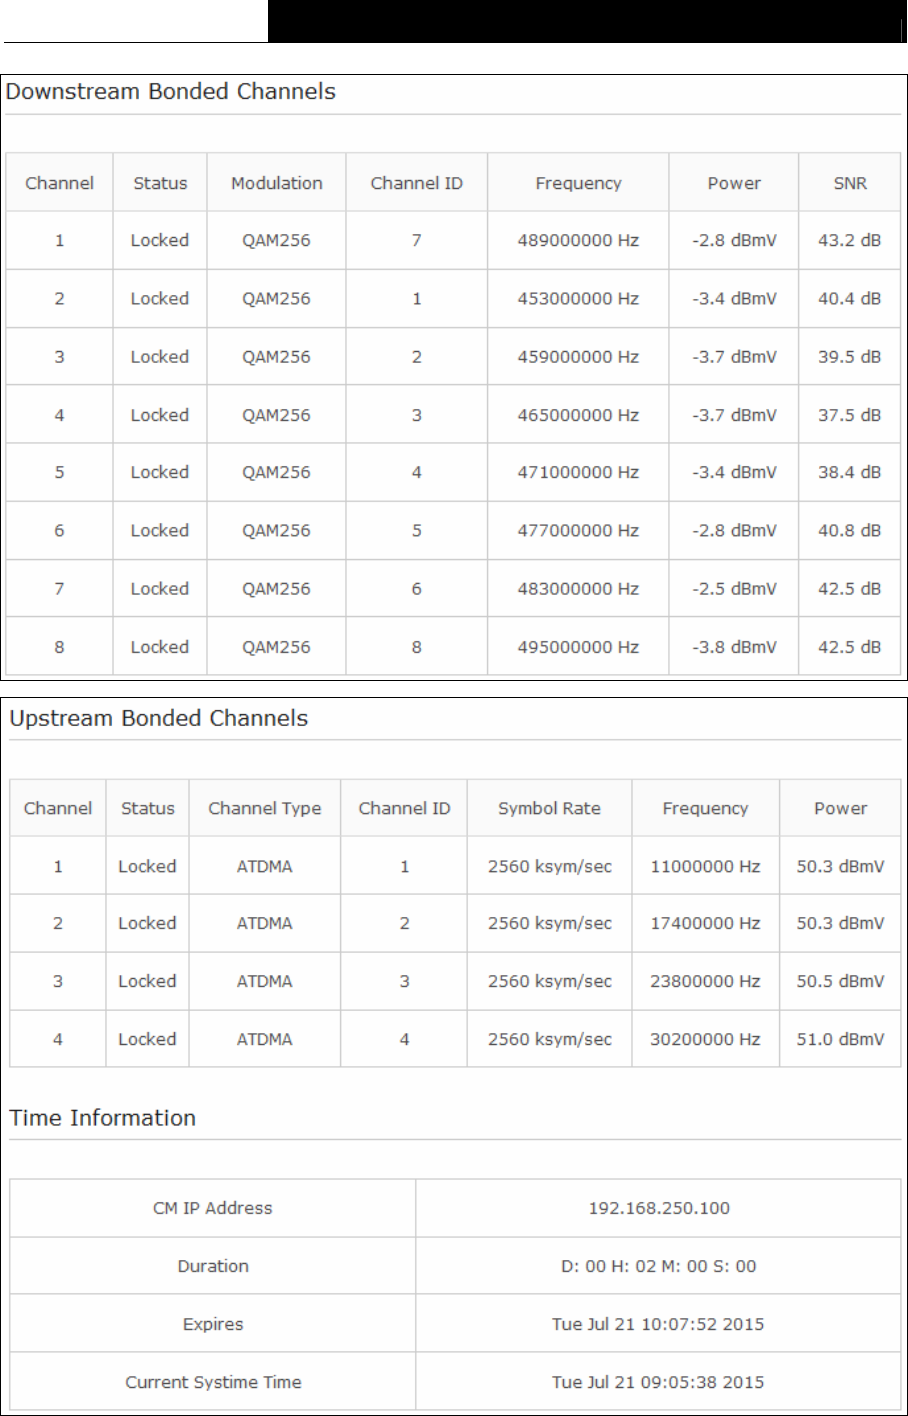
TC-W7960 300Mbps Wireless N DOCSIS 3.0 Cable Modem Router User Guide
Figure 5-57
72
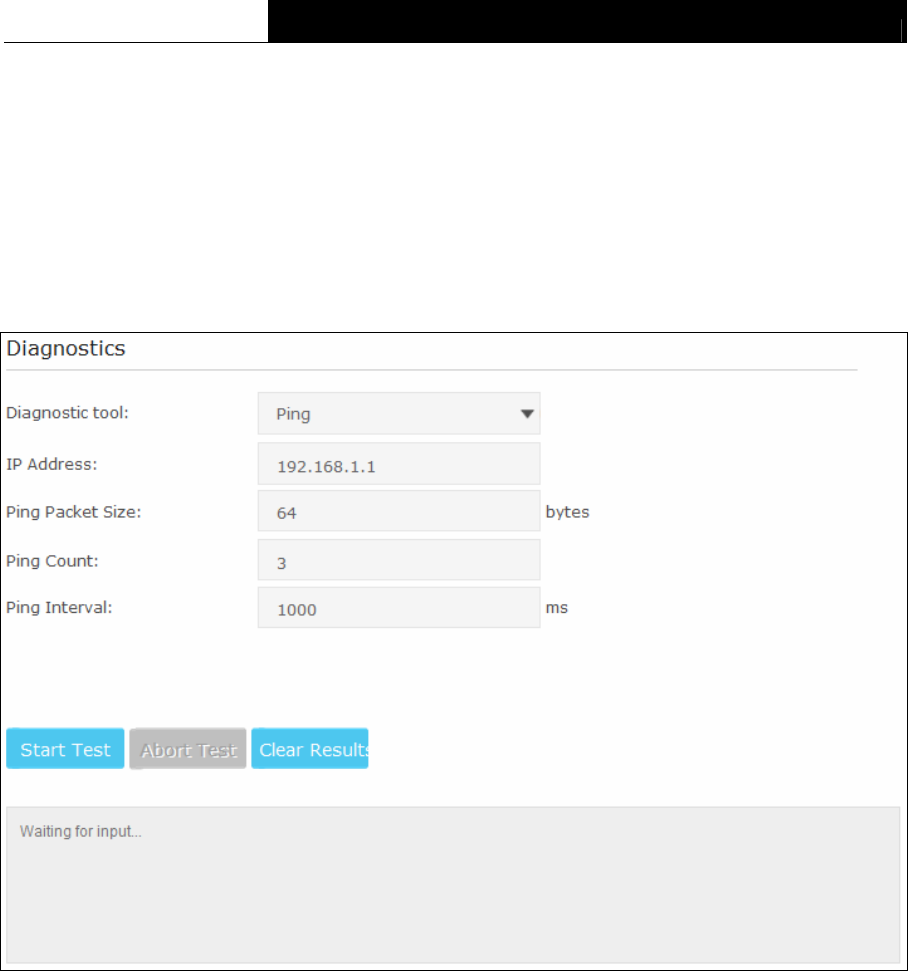
TC-W7960 300Mbps Wireless N DOCSIS 3.0 Cable Modem Router User Guide
Startup Procedure - Display the initialization progress.
Downstream/Upstream Bonded Channels - Display the status of each channel.
Time Information –The time information will display when the modem router is initialized.
5.9.4 Diagnostic
Choose menu “Advanced→System Tools→Diagnostic”, you can test the connectivity of the
Internet on the following screen.
Figure 5-58
Diagnostic tool - There are two tools to diagnose, which is PING and Traceroute. You can
select the corresponding type according to your needs.
1) PING: If you select this option, you could check the status of the Internet connection.
IP Address – Enter the IP address that you want to PING.
PING Packet Size – Enter the size of the PING packet you want to use.
PING Count – Enter the number of times you want to ping the target device.
PING Interval – Enter the time period between each ping.
Click Start Test to check the connectivity of the Internet. The page will display the result
of diagnosis.
Click Abort Test to end the connectivity of the Internet.
Click Clear Results to delete the logs.
2) Traceroute: If you select this option, all the anonymous calls would be blocked.
73
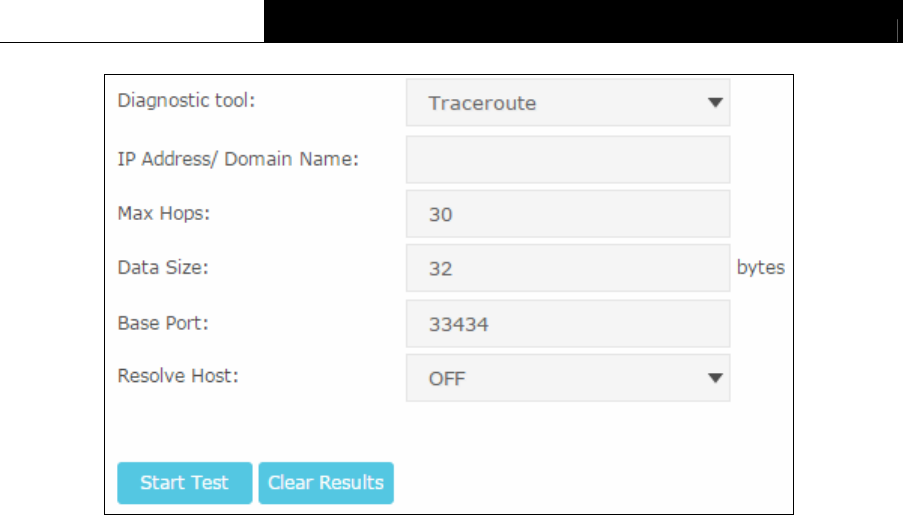
TC-W7960 300Mbps Wireless N DOCSIS 3.0 Cable Modem Router User Guide
Figure 5-59
IP Address/ Domain Name – Enter the IP Address or Domain Name you want to
trace.
Max Hops – Enter the max number of hops.
Data Size – Enter the size of data you want to use.
Base Port – Enter the port number to send packets.
Resolve Host – To resolve the host name to the IP address you can select ON from
the drop-down list. The default status is OFF.
Click Start Test to check the connectivity of the Internet. The page will display the result
of diagnosis.
Click Clear Results to delete the logs.
Note:
Only one user can use the diagnostic tools at one time.
5.9.5 Time Settings
Choose menu “Advanced→System Tools→Time Settings”, you can configure the time settings
on the following screen.
74
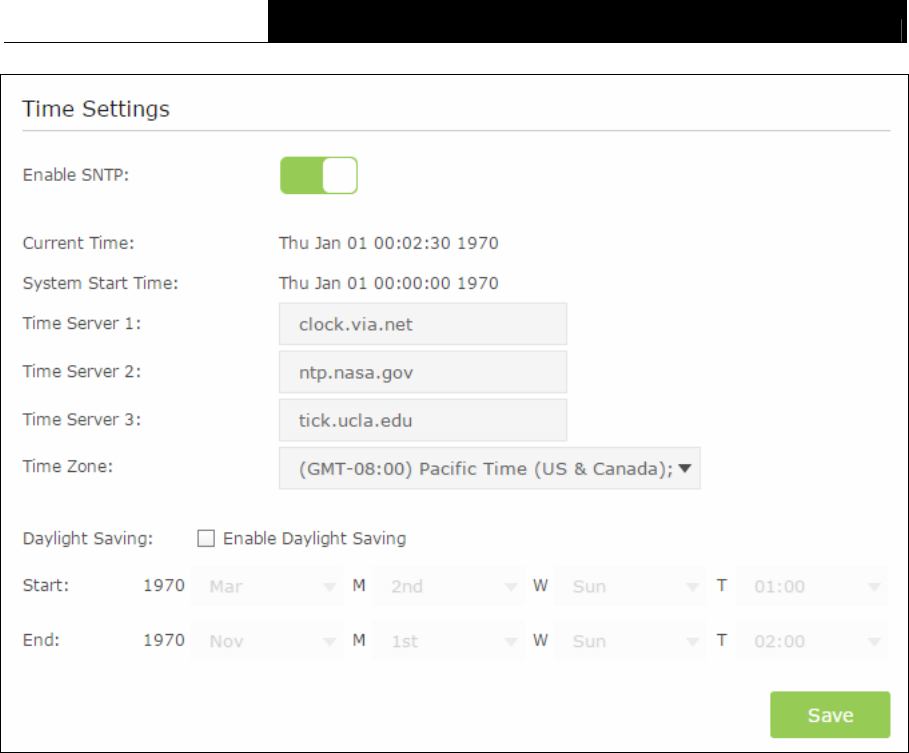
TC-W7960 300Mbps Wireless N DOCSIS 3.0 Cable Modem Router User Guide
Figure 5-60
Time Settings:
Enable SNTP - The switch for SNTP function. If you turn on the switch, the field will become
green.
Current Time – Display the current time.
System Start Time – Display the system start time.
Time Server 1 / Time Server 2 / Time Server 3- Enter the address or domain of the Server 1
or Server 2, and then the modem router will get the time from the Server preferentially. In
addition, the modem router built-in some common Servers, so it can get time automatically
once it connects the Internet.
Time Zone - Select your local time zone from the pull down list.
Daylight Saving - You can set Daylight Saving time according to your needs. Tick the
checkbox to enable Daylight Saving, set the start and end time and then click Save to make
the settings effective.
Click Save button to save these settings.
Note:
1. This setting will be used for some time-based functions such as parental control and firewall.
You must specify your time zone once you login to the router successfully; otherwise, these
functions will not take effect.
2. The time will be lost if the router is turned off.
75
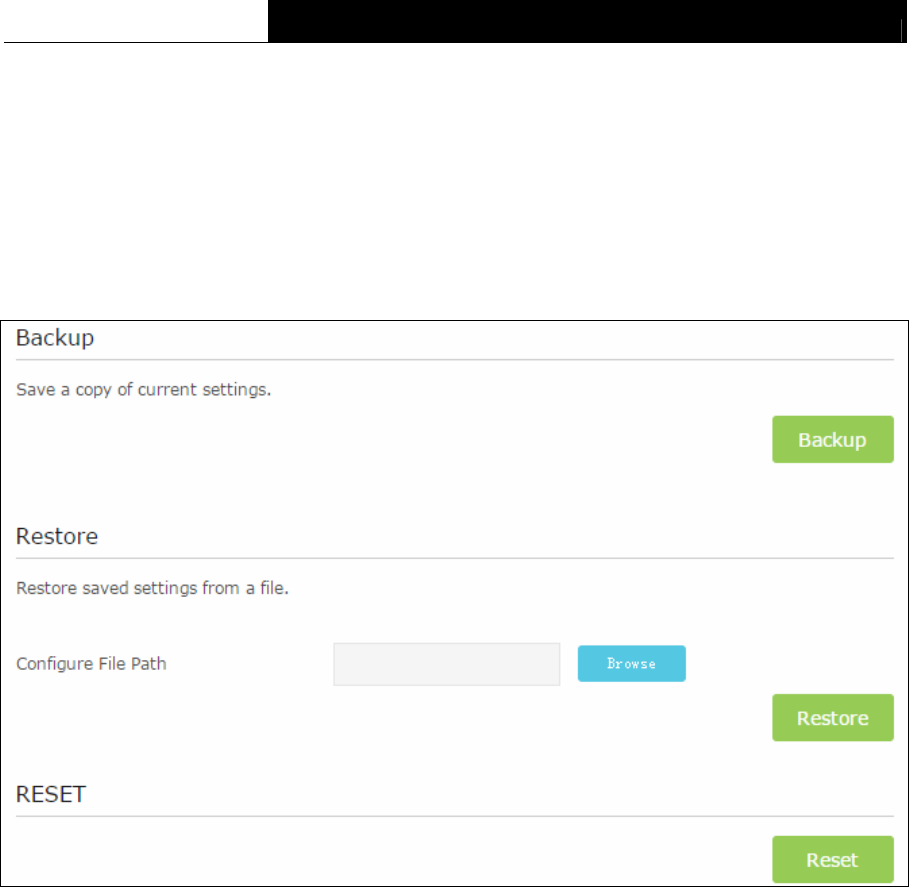
TC-W7960 300Mbps Wireless N DOCSIS 3.0 Cable Modem Router User Guide
3. The router will automatically obtain GMT from the Internet if it is configured accordingly.
4. The Daylight Saving will take effect one minute after the configurations are completed.
5.9.6 Backup & Restore
Choose menu “Advanced→System Tools→Backup & Restore”, and then you can save the
current configuration of the modem router as a backup file and restore the configuration via a
backup file as shown in the following figure.
Figure 5-61
Backup:
Click the Backup button to save all configuration settings as a backup file in your local computer.
Restore:
To restore the modem router's configuration, follow these instructions.
Click the Browse button to find the configuration file which you want to restore.
Click the Restore button to restore the configuration with the file whose path is the one
you have input or selected in the blank.
Reset:
Click the Reset button to reset all configuration settings to their default values.
Note:
1. The current configuration will be covered with the uploading configuration file. Wrong process
will lead the device unmanaged. The restoring process lasts for 20 seconds and the modem
router will restart automatically then. Keep the power of the modem router on during the
process, in case of any damage.
76
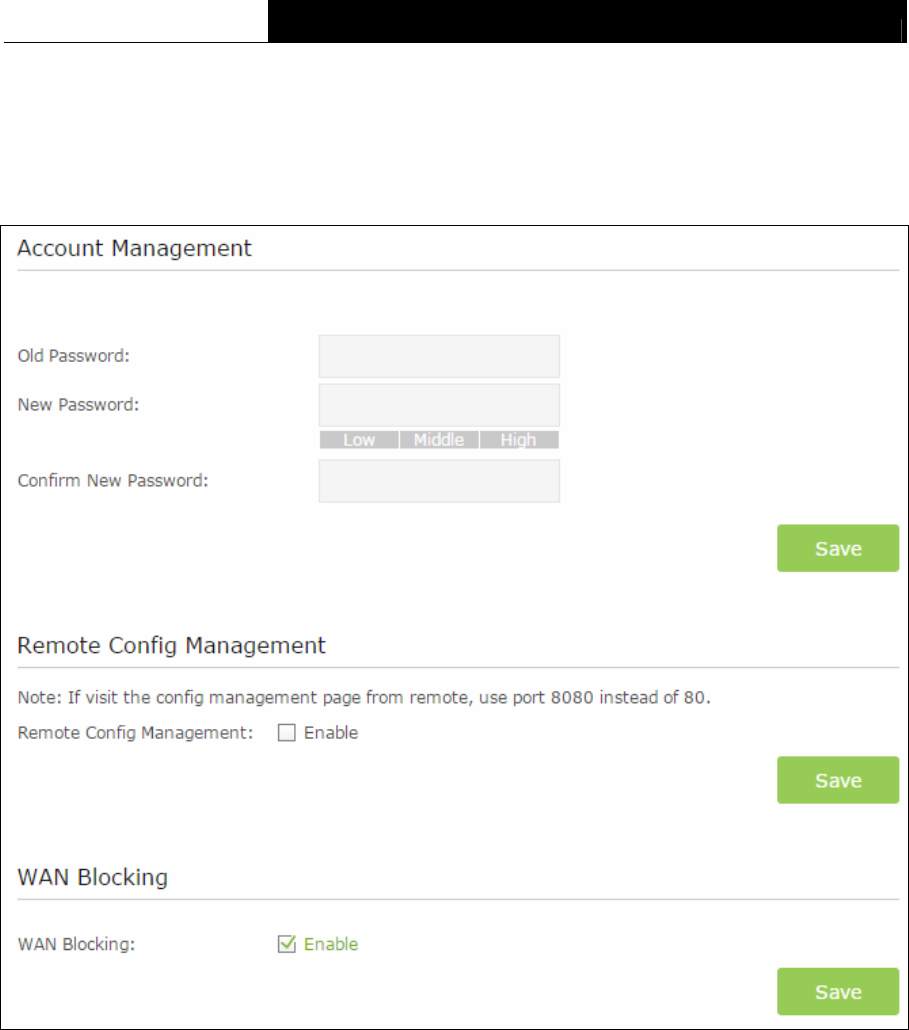
TC-W7960 300Mbps Wireless N DOCSIS 3.0 Cable Modem Router User Guide
2. All changed settings will be lost when defaults are restored.
5.9.7 Administrator
Choose menu “Advanced→System Tools→Administration”, you will see the following screen.
Figure 5-62
Account Management:
Here you can set the account user information about Old Password, New Password and
Confirm Password.
It is strongly recommended that you should change the factory default user name and password of
the router, because all users who try to access the router's Web-based utility or Quick Setup will
be prompted for the router's default user name and password.
Note:
Enter the new Password twice to confirm it. The level of the new password’s security will be shown
on the screen as Low, Middle or High.
Click the Save button save the settings.
77
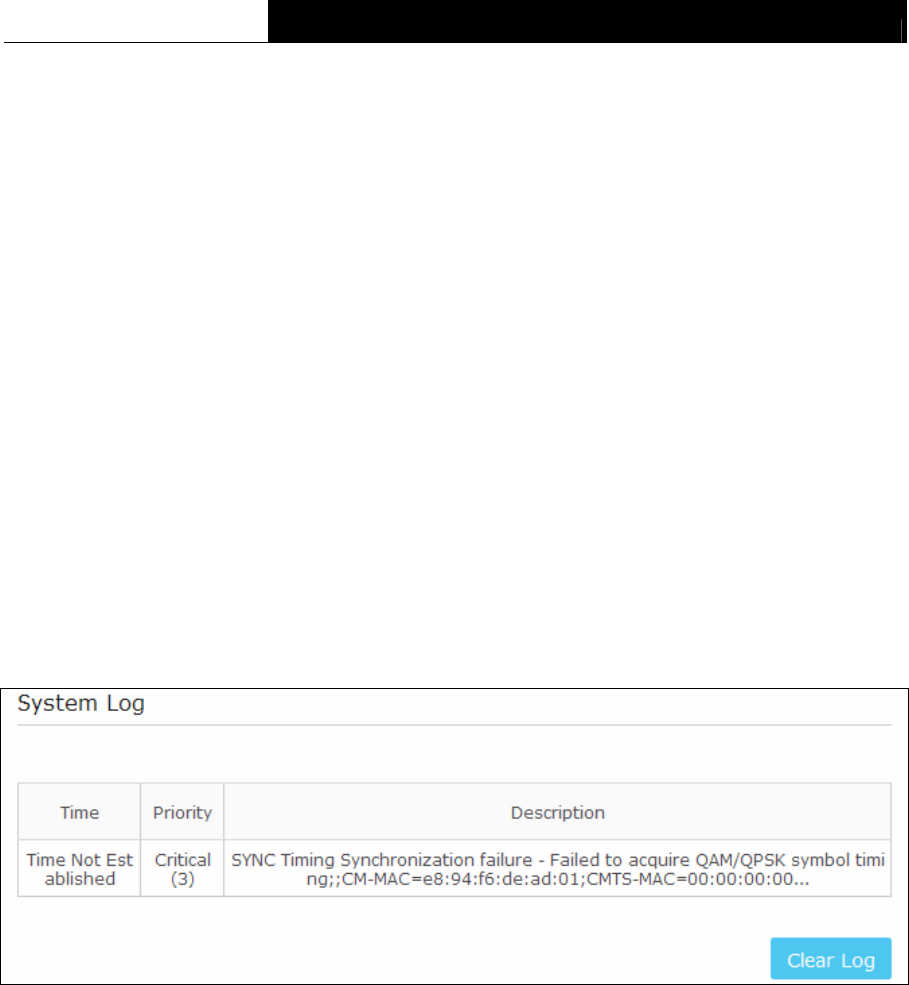
TC-W7960 300Mbps Wireless N DOCSIS 3.0 Cable Modem Router User Guide
Remote Config Management:
Remote Config Management – Check the Enable to enable the remote management.
Click the Save button save the settings.
Note:
To access the router, you should type your router's WAN IP address into your browser's address
(in IE) or Location (in Navigator) box, followed by a colon and the custom port number. For
example, if your router's WAN address is 202.96.12.8, and the port number used is 8080, please
enter http://202.96.12.8:8080 in your browser. Later, you may be asked for the router's password.
After successfully entering the username and password, you will be able to access the router's
web-based utility.
WAN Blocking:
WAN Blocking – Check the Enable to block anonymous Internet requests.
Click the Save button save the settings.
5.9.8 Event Log
Choose menu “Advanced→System Tools→Event Log”, and then you can view and clear the
logs of the modem router.
Figure 5-63
Clear Log – Click to delete all the logs.
78

TC-W7960 300Mbps Wireless N DOCSIS 3.0 Cable Modem Router User Guide
Appendix A: Specifications
HARDWARE FEATURES
Interface
1 F-Connector, female 75 Ω
4 10/100/1000Mbps RJ45 LAN Ports
1 USB 2.0 Ports
Button
1 Power On/Off Button
1 Wi-Fi On/Off Button
1 WPS Button
1 Reset Button
External Power Supply 12VDC/1.5A
IEEE Standards
IEEE 802.1p, IEEE 802.1q, IEEE 802.1x, IEEE 802.1d, IEEE 802.1w,
IEEE 802.3, IEEE 802.3u, IEEE 802.3ab, IEEE 802.x,
IEEE 802.11e, IEEE 802.11b, IEEE 802.11g, IEEE 802.11n
DOCSIS Standards DOCSIS 3.0
Dimensions ( W x D x H ) 2.5× 7.7× 9.7 in. (62.5× 195× 246 mm)
Antenna Type Omni directional, Internal
Antenna Gain 2dBi for 2.4GHz
DOWNSTREAM
Channel Binding Up to 8
Modulation 64 or 256 QAM
Maximum PHY Rate DOCSIS Up to 343.072 Mbps
Bandwidth DOCSIS 48 MHz(8 channels) / 6MHz (single channel)
Frequency Range 108 to 1002 MHz (edge to edge)
Frequency Plan DOCSIS Annex B
79

TC-W7960 300Mbps Wireless N DOCSIS 3.0 Cable Modem Router User Guide
HARDWARE FEATURES
Symbol Rate DOCSIS 64 QAM 5.057 Msym/s; 256 QAM 5.361 Msym/s
Operating Level Range –15 to 15 dBmV (DOCSIS)
Security DOCSIS 3.0 Security (BPI+, EAE, SSD)
UPSTREAM
Channel Binding Up to 4
Modulation QPSK and 8, 16, 32, 64, 128, optional 256 QAM
Maximum PHY Rate Up to 143.36 Mbps (4 channels) and 35.84 Mbps (single channel)
Channel Bandwidth 200 kHz, 400 kHz, 800 kHz, 1.6 MHz,3.2 MHz, 6.4 MHz
Frequency Range DOCSIS 5-42 MHz (edge to edge),
Symbol Rate 160, 320, 640, 1280, 2560, 5120 ksym/s
TDMA
Pmin to +57 dBmV (32 QAM, 64 QAM)
Pmin to +58 dBmV (8 QAM, 16 QAM)
Pmin to +61 dBmV (QPSK)
Note: TDMA max output power reduced 3dB when transmitting two
channels and 6dB when transmitting 3 or 4 channels
S-CDMA
Pmin to +56 dBmV (all modulations)
Pmin = +17 dBmV, 1280 kHz modulation rate
Pmin = +20 dBmV, 2560 kHz modulation rate
Pmin = +23 dBmV, 5120 kHz modulation rate
Level range
Note: S-CDMA max output reduced 3dB when transmitting 2 or more
channels
WIRELESS FEATURES
Wireless Standards IEEE 802.11b/g/n 2.4GHz
80

TC-W7960 300Mbps Wireless N DOCSIS 3.0 Cable Modem Router User Guide
WIRELESS FEATURES
Wireless Speeds 2.4GHz: Up to 300Mbps
Frequency 2.4GHz
EIRP <30dBm(EIRP)
Wireless Functions Enable/Disable Wireless Radio, WDS Bridge, WMM, Wireless Statistics
Wireless Security 64/128-bit WEP,WPA / WPA2,WPA-PSK/ WPA2-PSK encryption,
Wireless MAC Filtering
Guest Network 2.4GHz guest network × 1
WPS Support PIN and Push button
SOFTWARE FEATURES
WAN Connection Type Dynamic IP、Static IP、L2TP(Dynamic)、L2TP(Static)
DHCP Server, Client, DHCP Client List,
Port Forwarding Virtual Server, Port Triggering, DMZ, ALGs
USB Sharing Support Samba(Storage)/FTP Server/Media Server/Printer Server
Dynamic DNS DynDns, NO-IP
IPv6 IPv6 and IPv4 dual stack
Security
NAT Firewall, SPI Firewall, Access Control, Denial of Service(DoS), SYN
Flooding, Ping of Death
MAC / IP / Port/ URL Filtering,
Baseline Encryption (BPI)/ BPI+/ EAE/ SSD
Management
Web Based Configuration(HTTP), Command Line Interface;
Remote management, SNMP v1/v2c/v3;
Diagnostic Tools
Advanced Features Parental Control, Network Address Translation (NAT);
RIP v1/v2(optional);
81
TC-W7960 300Mbps Wireless N DOCSIS 3.0 Cable Modem Router User Guide
SOFTWARE FEATURES
DNS, DNS Proxy, IGMP V1/V2/V3, UPnP
OTHERS
Certification FCC, RoHS, CableLabs, UL
Package Contents
TC-W7960
RJ-45 Ethernet Cable
Quick Installation Guide
Power Adapter
Environment
Operating Temperature: 0Ԩ~40Ԩ (32Ԭ~104Ԭ)
Storage Temperature: -40Ԩ~70Ԩ (-40Ԭ~158Ԭ)
Operating Humidity: 10%~90% non-condensing
Storage Humidity: 5%~90% non-condensing
82

TC-W7960 300Mbps Wireless N DOCSIS 3.0 Cable Modem Router User Guide
Appendix B: Troubleshooting
T1. What can I do if I cannot access the Internet?
1) Make sure the coaxial cable, Ethernet cable and power adapter are plugged in correctly.
2) Contact your ISP to make sure the modem router is activated.
3) Contact our Technical Support if the problem persists.
T2. What can I do if the login page does not appear?
1) If the computer is set to a static or fixed IP address, change the setting to obtain an IP
address automatically.
2) Make sure http://tplinkmodem.net or http://192.168.1.1 is correctly entered in the web
browser.
3) Use another web browser and try again.
4) Reboot your modem router and try again.
5) Disable then re-enable the network adapter being used.
T3. How do I restore the modem router to its factory default settings?
1) With the modem router powered on, press and hold the Reset button on the rear panel of the
modem router for approximately 8 seconds until all LEDs turn back on, then release the button.
2) Log in to the web management page of the modem router. Go to Advanced > System tools >
Backup & Restore and click Reset. The modem router will restore and reboot automatically.
Note:
Once the modem router is reset, the current configuration settings will be lost and you will need to
re-configure the router.
T4. What can I do if I forgot my password?
For the web management page password:
Restore the modem router to its factory default settings and use the default admin (all lowercase)
for both username and password to log in.
For the default wireless password:
1) The default Wireless Password/PIN is printed on the product label of the modem router.
2) If the default wireless password has been changed, log in to the web management page and go
to Basic > Wireless to retrieve or reset your password.
For the Guest Network password:
Log into the web management page and go to Basic > Guest Network to retrieve or reset the
password.
T5. What can I do if I cannot access the web-based management page?
83

TC-W7960 300Mbps Wireless N DOCSIS 3.0 Cable Modem Router User Guide
1) If the computer is set to a static or fixed IP address, change the setting to obtain an IP
address automatically.
For Mac OS X
Click the Apple icon on the upper left corner of the screen.
Go to “System Preferences -> Network”.
Select Airport on the left menu bar, and then click Advanced for wireless configuration; or
select Ethernet for wired configuration.
In the Con-figure IPv4 box under TCP/IP, select Using DHCP.
Click Apply to save the settings.
For Windows 7
Click “Start -> Control Panel -> Network and Internet -> View network status -> Change
adapter settings”.
Right-click Wireless Network Connection (or Local Area Connection), and then click
Properties.
Select Internet Protocol Version 4 (TCP/IPv4), and then click Properties.
Select Obtain an IP address automatically and Obtain DNS server address automatically.
Then click OK.
For Windows XP
Click “Start -> Control Panel -> Network and Internet Connections -> Network
Connections”.
Right-click Wireless Network Connection (or Local Area Connection), and then click
Properties.
Select Internet Protocol (TCP/IP), and then click Properties.
Select Obtain an IP address automatically and Obtain DNS server address automatically.
Then click OK.
For Windows 8
Move your mouse to the lower right corner and you will see Search icon in the Popups. Go
to “ -> Apps”. Type Control Panel in the search box and press Enter, then you will go to
Control Panel.
Click “View network status and tasks > Change adapter settings”.
Right-click “Ethernet” and then select Properties.
Double-click Internet Protocol Version 4 (TCP/IPv4). Select Obtain an IP address
automatically, choose Obtain DNS server address automatically and then click OK.
2) Configure your IE browser
84
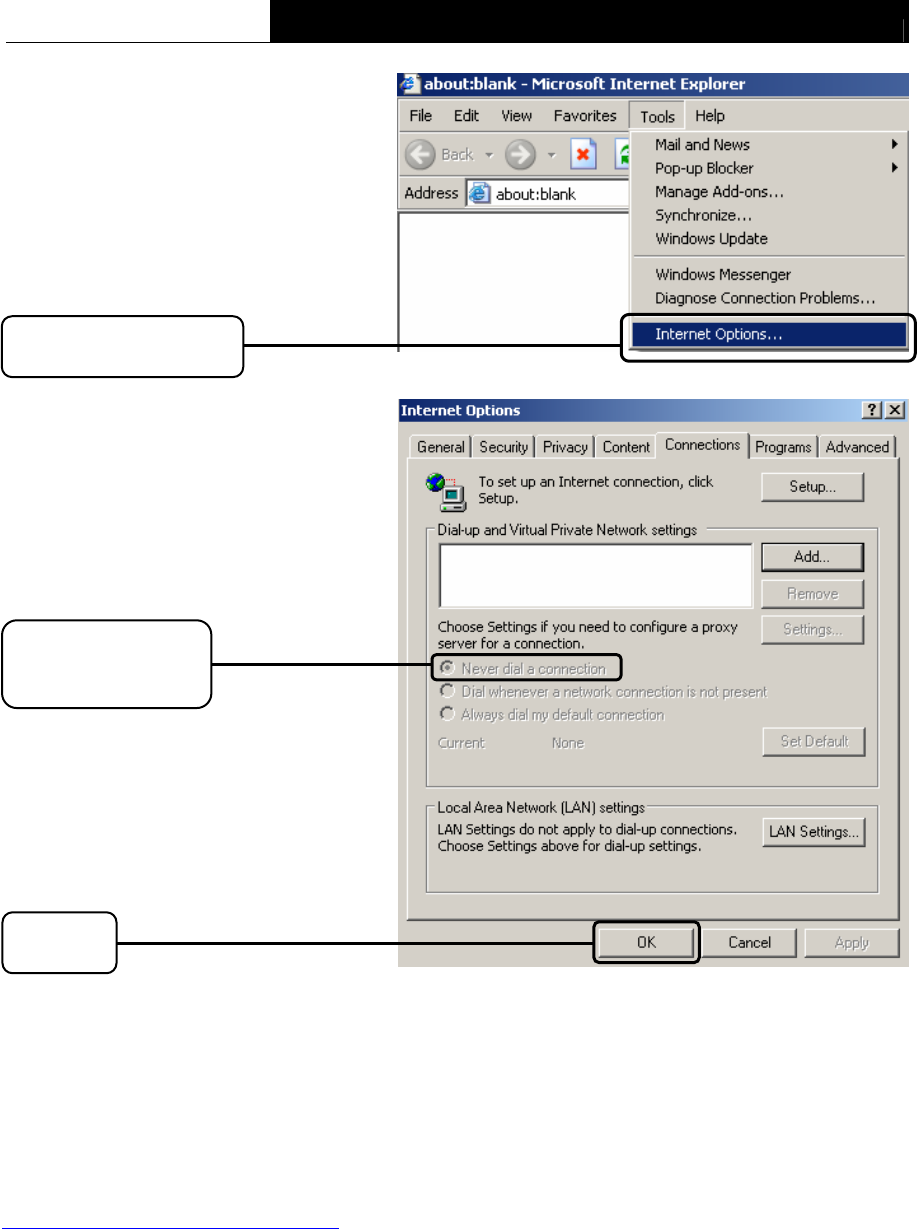
TC-W7960 300Mbps Wireless N DOCSIS 3.0 Cable Modem Router User Guide
85
Open your IE browser, click
Tools tab and you will see the
following screen.
Click Internet Options
Click OK
Select Never dial a
connection
Now, try to log into the web-based management page again after the above settings have been
configured. If you still cannot access the configuration page, please restore your modem router’s
factory default settings and try to log into the web-based management page again. Please feel
free to contact our Technical Support if the problem still exists.
Note:
For further assistance, contact Technical Support at 1-866-225-8139 or visit
http://www.tp-link.us/support/contact.