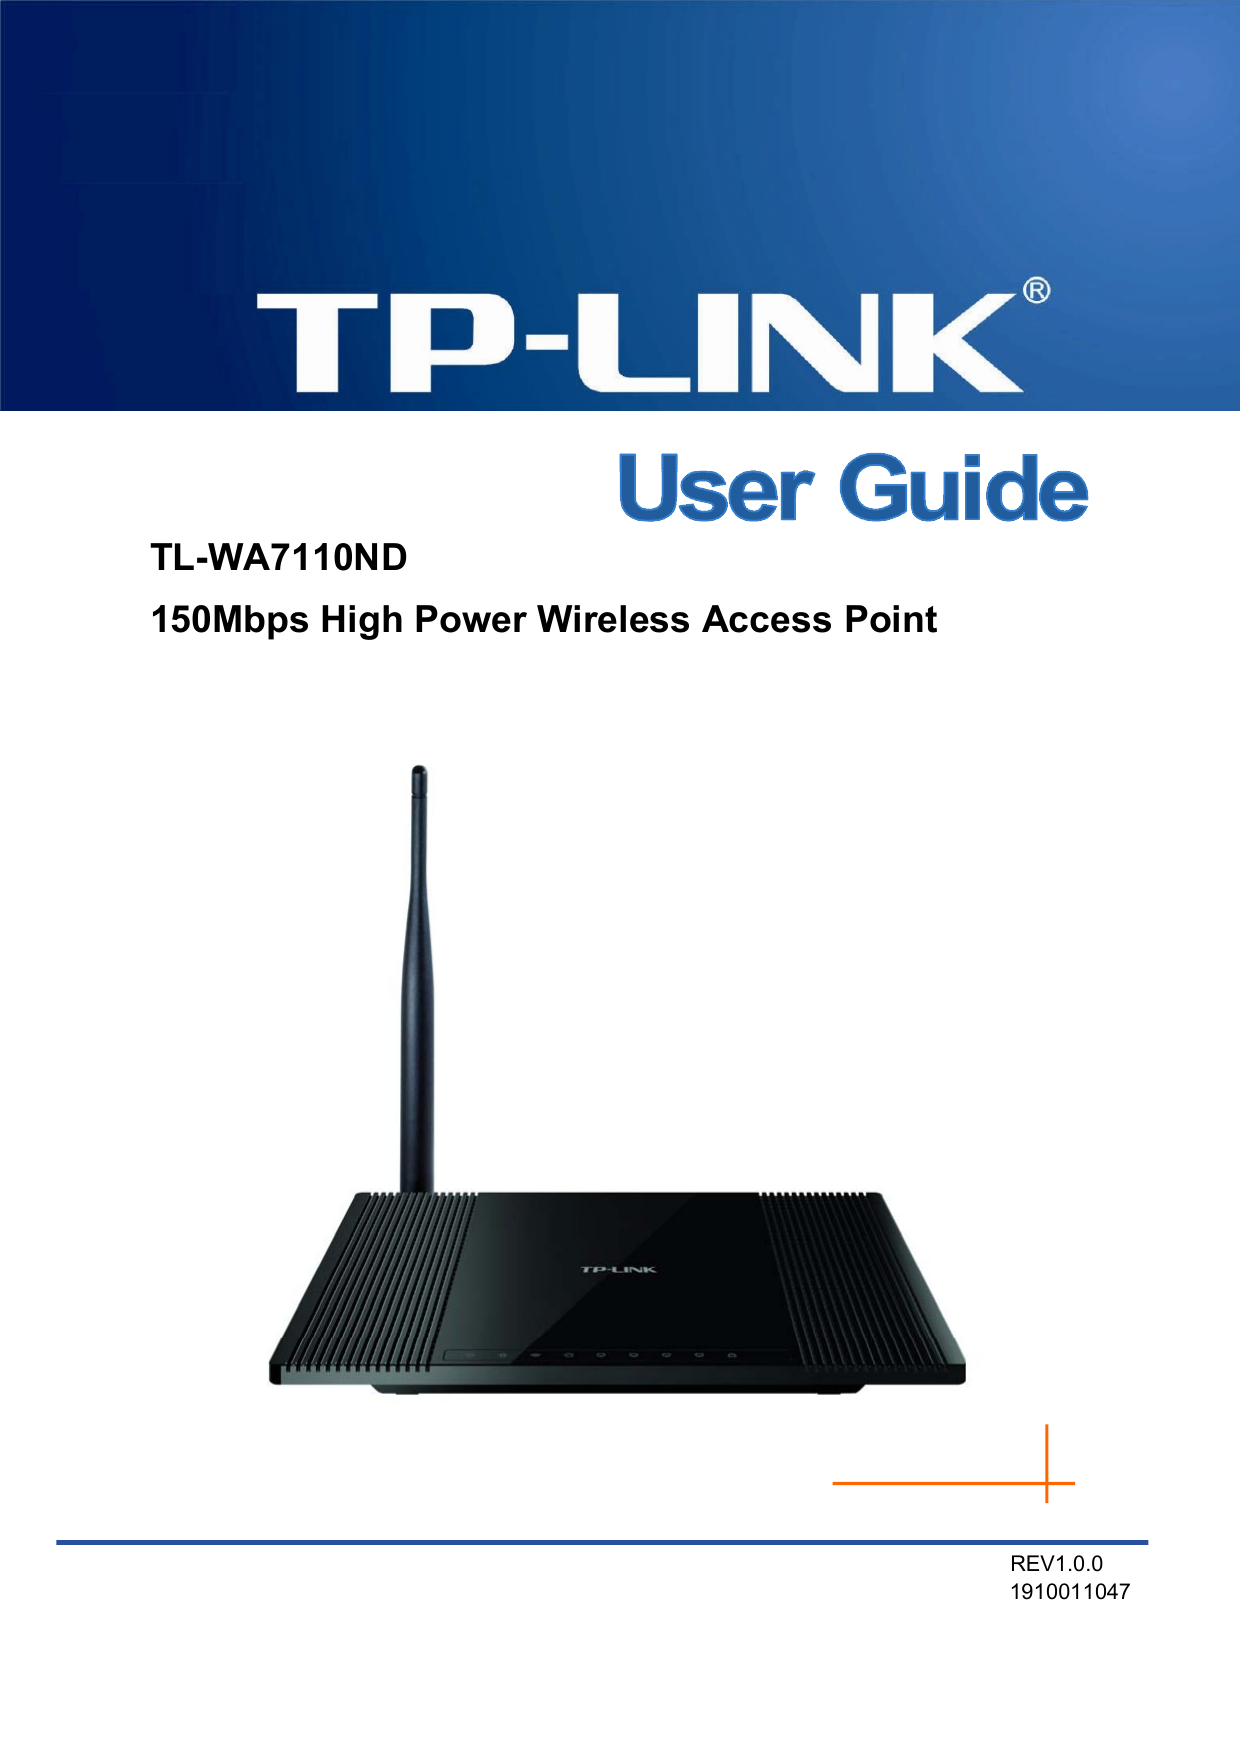
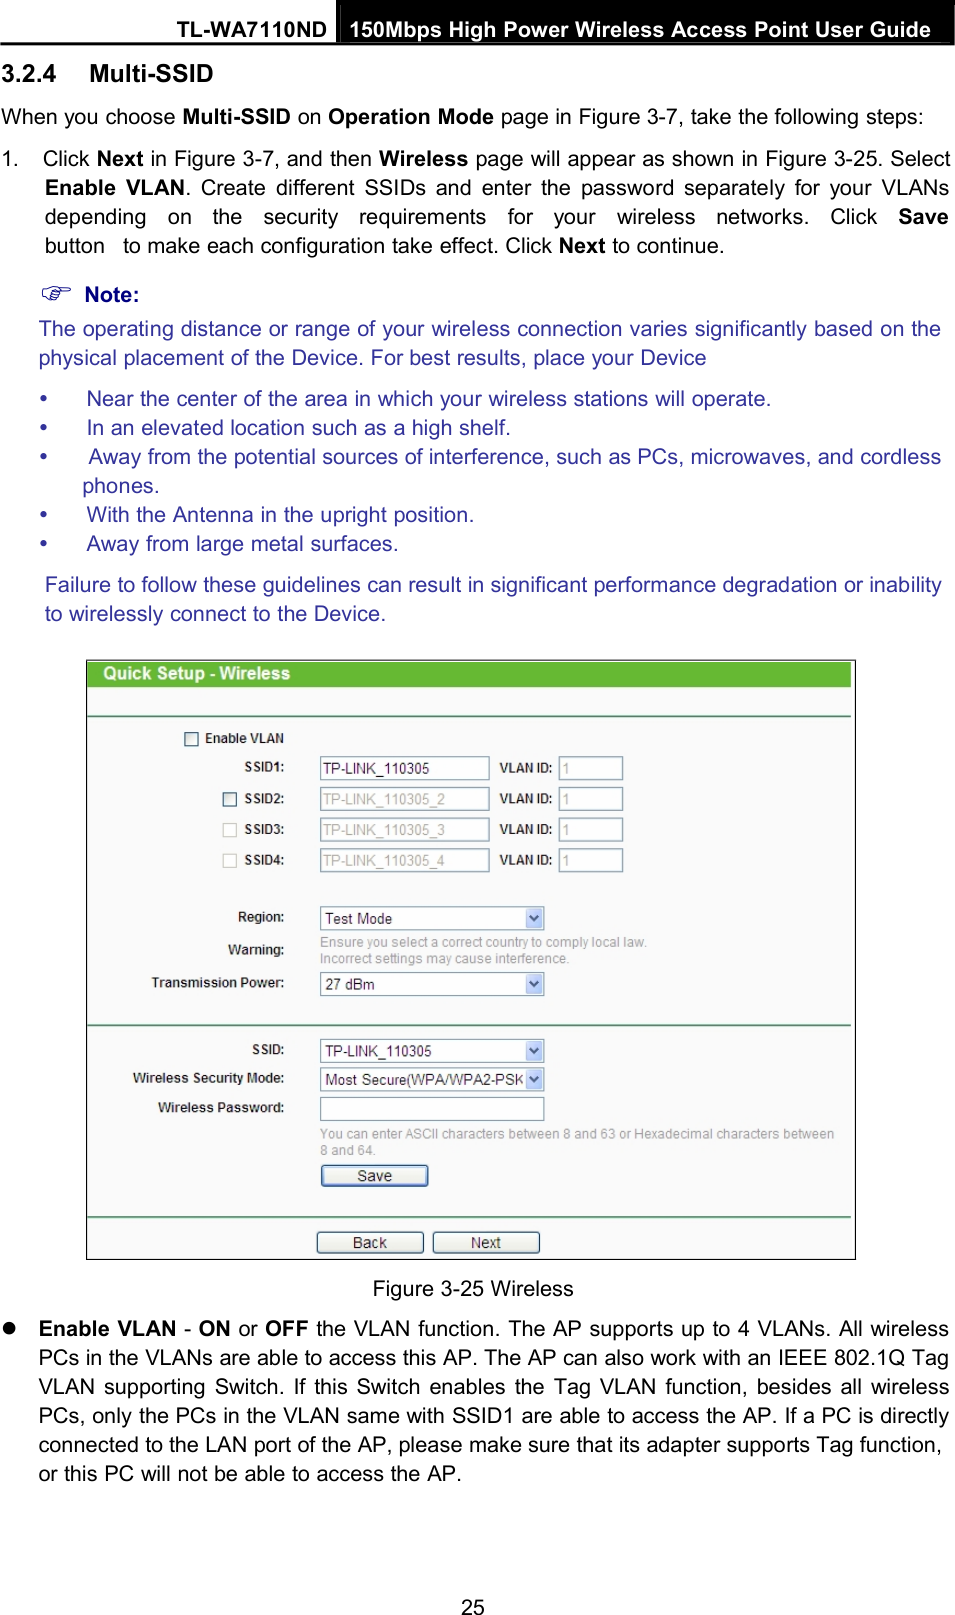
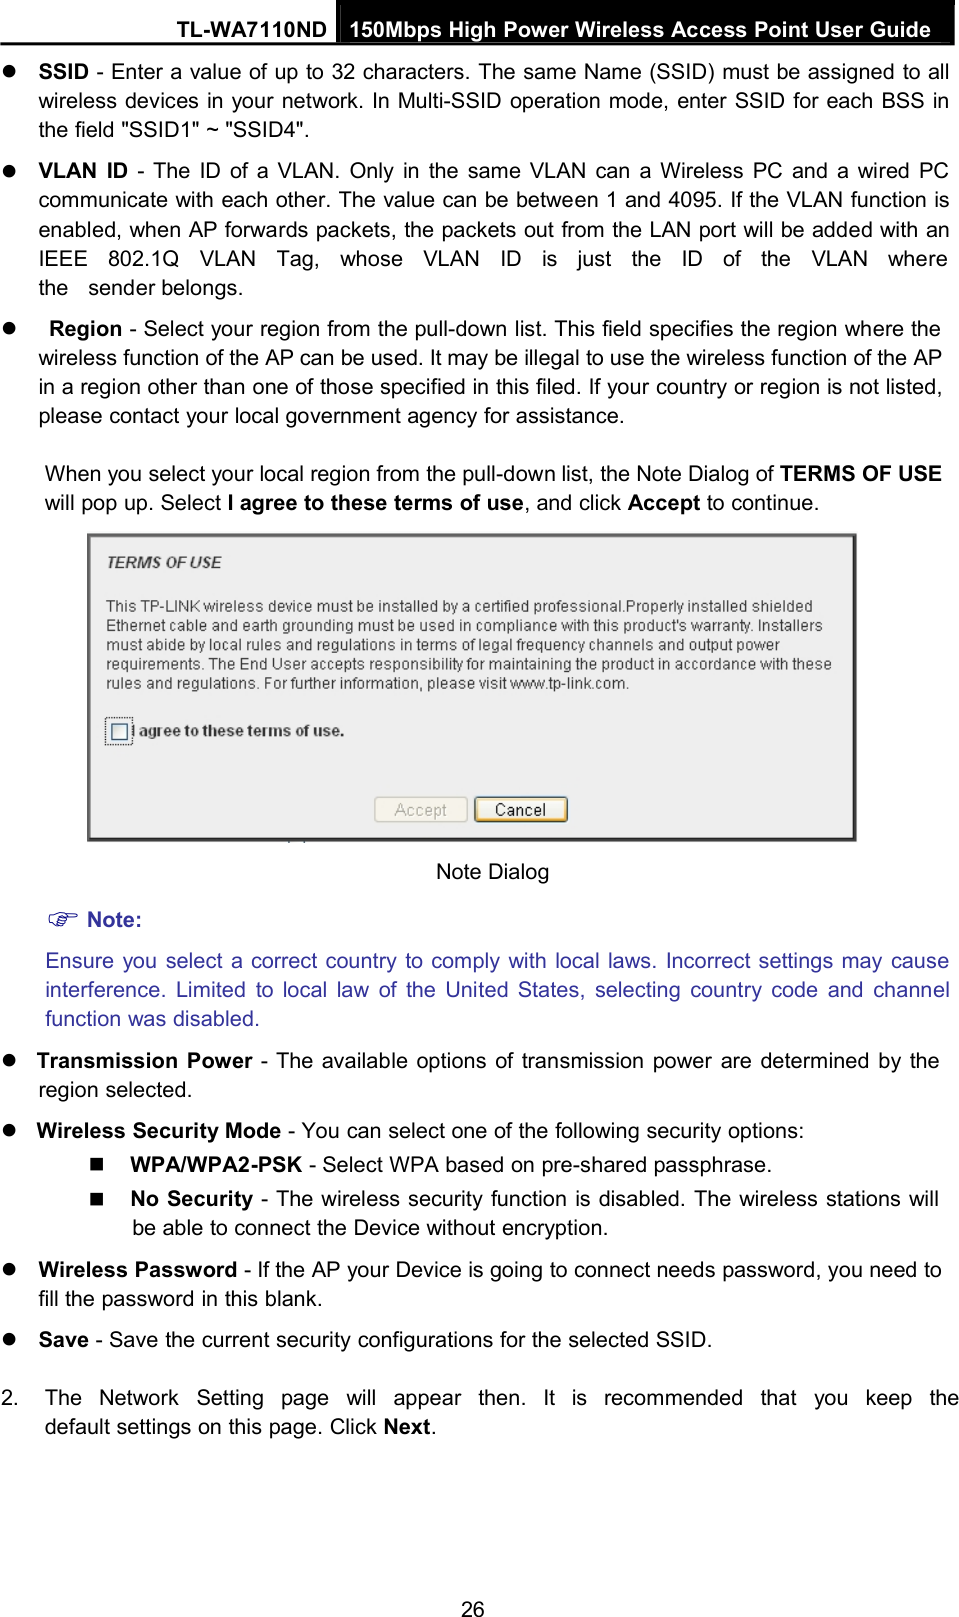
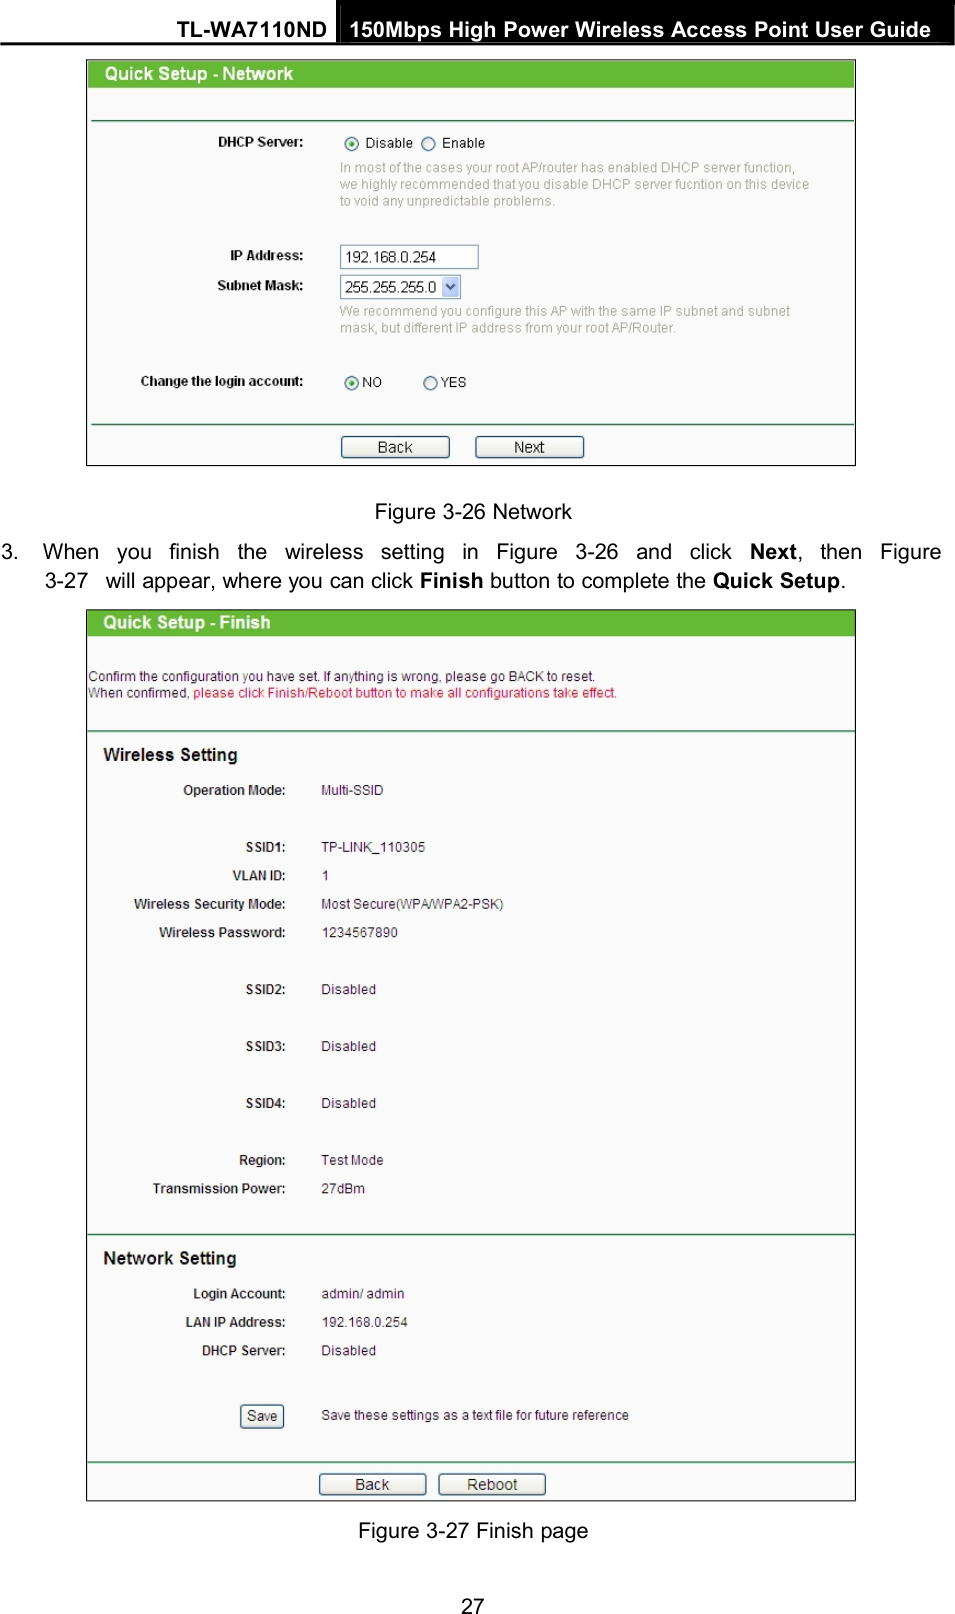
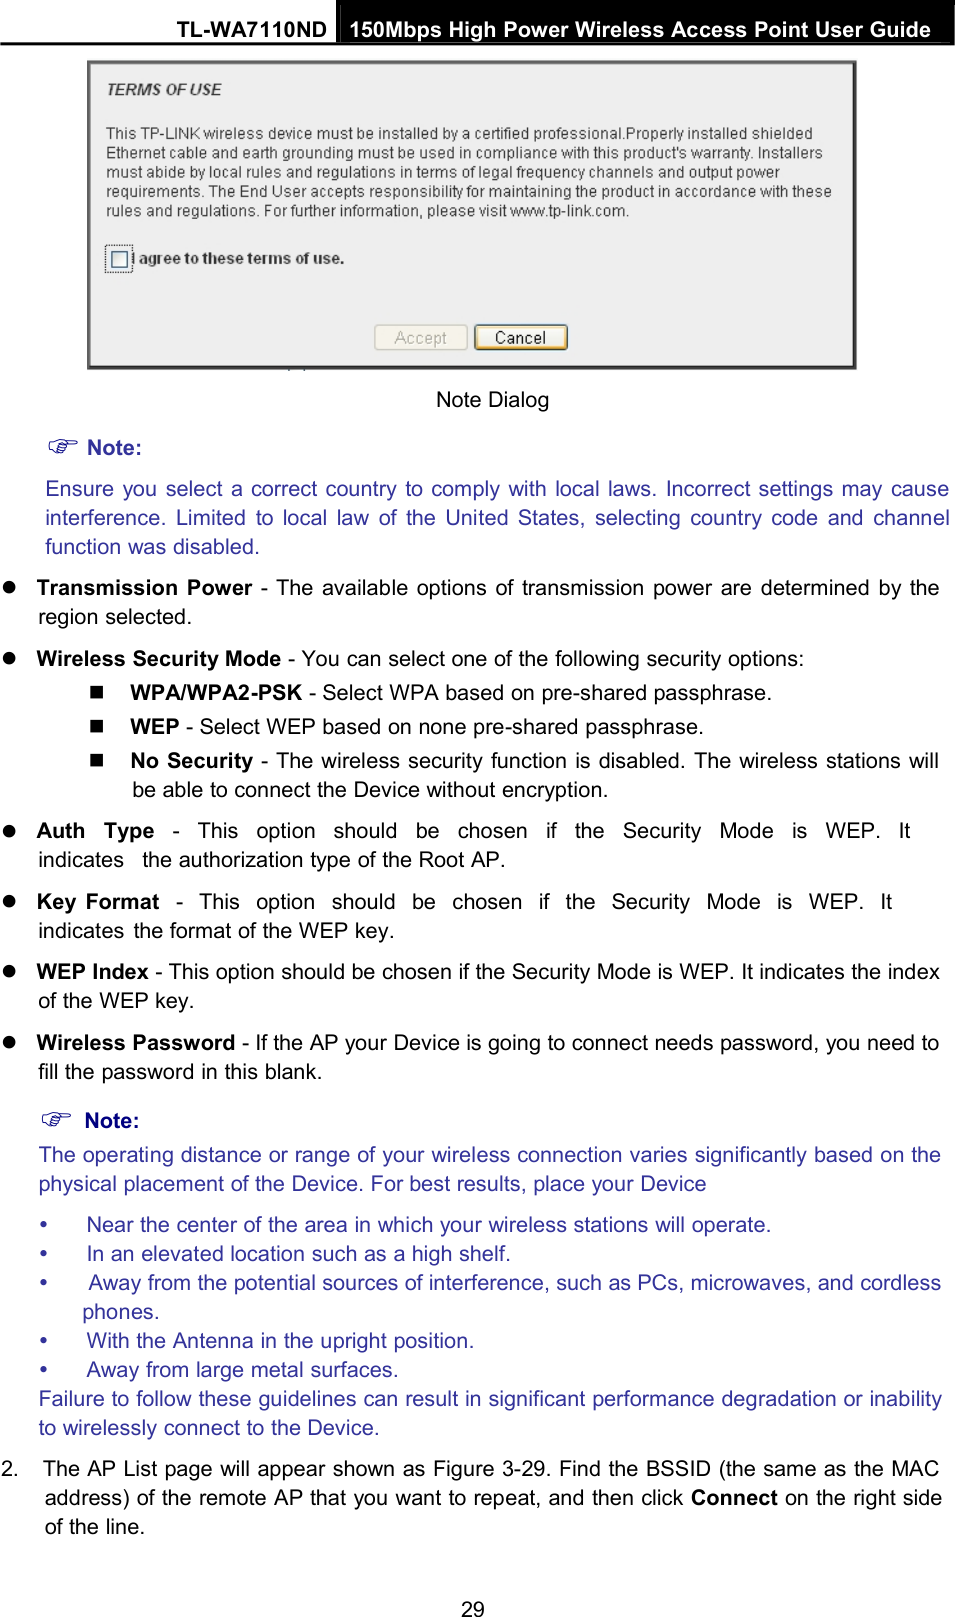
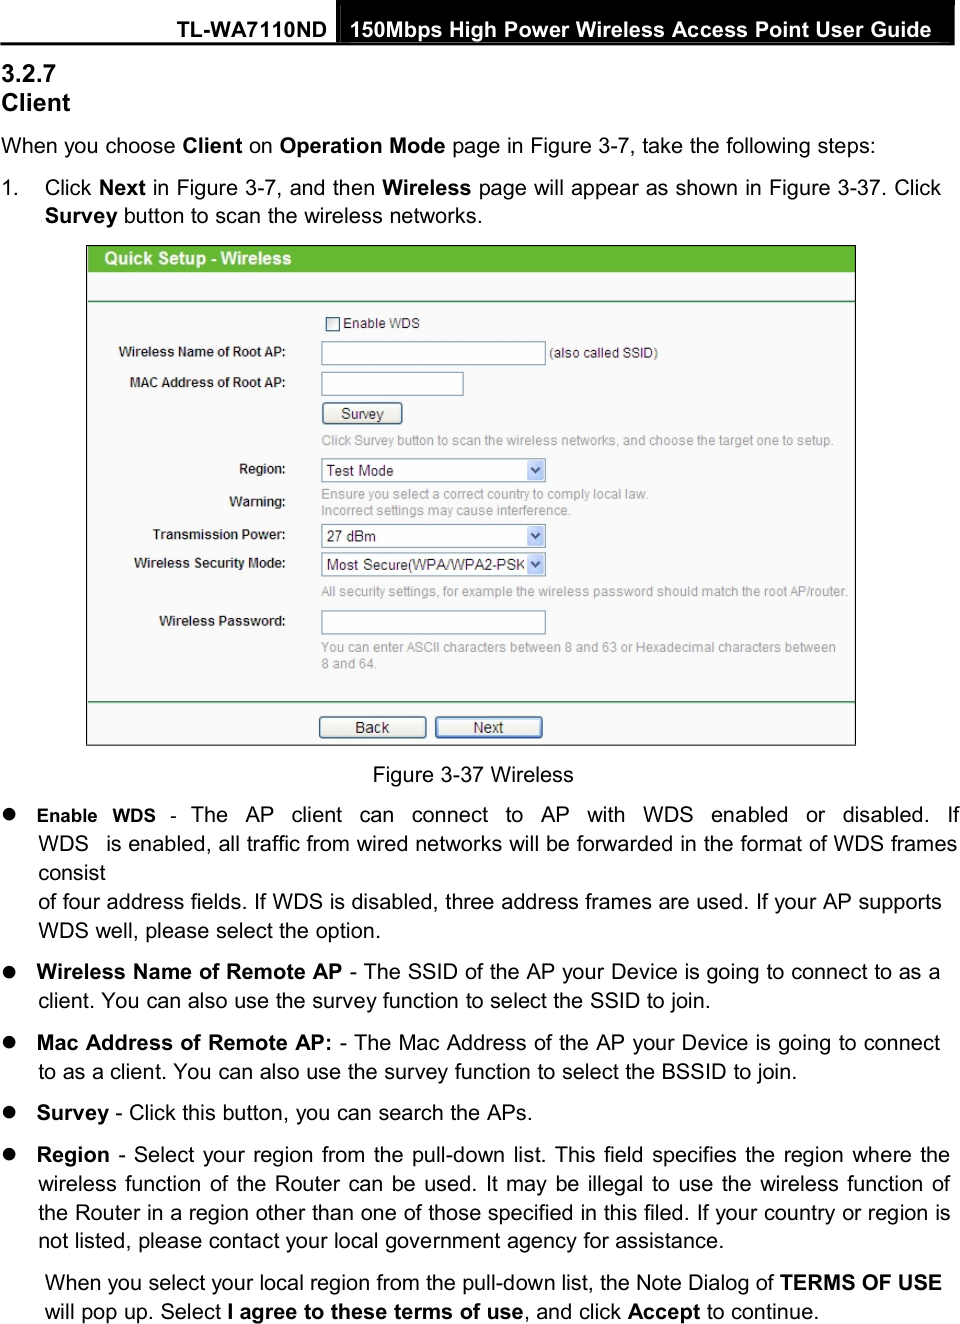
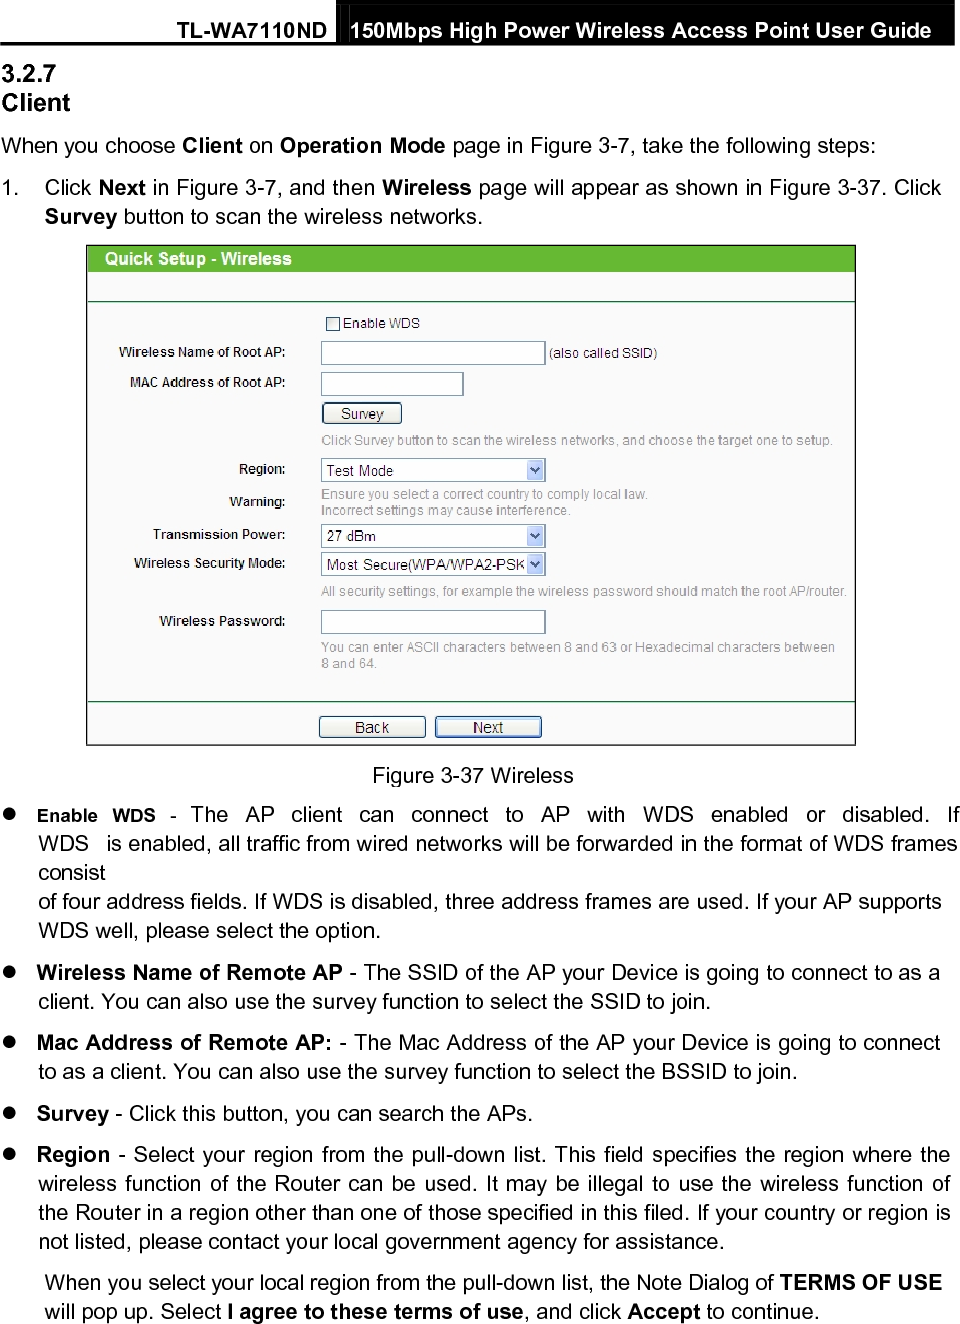
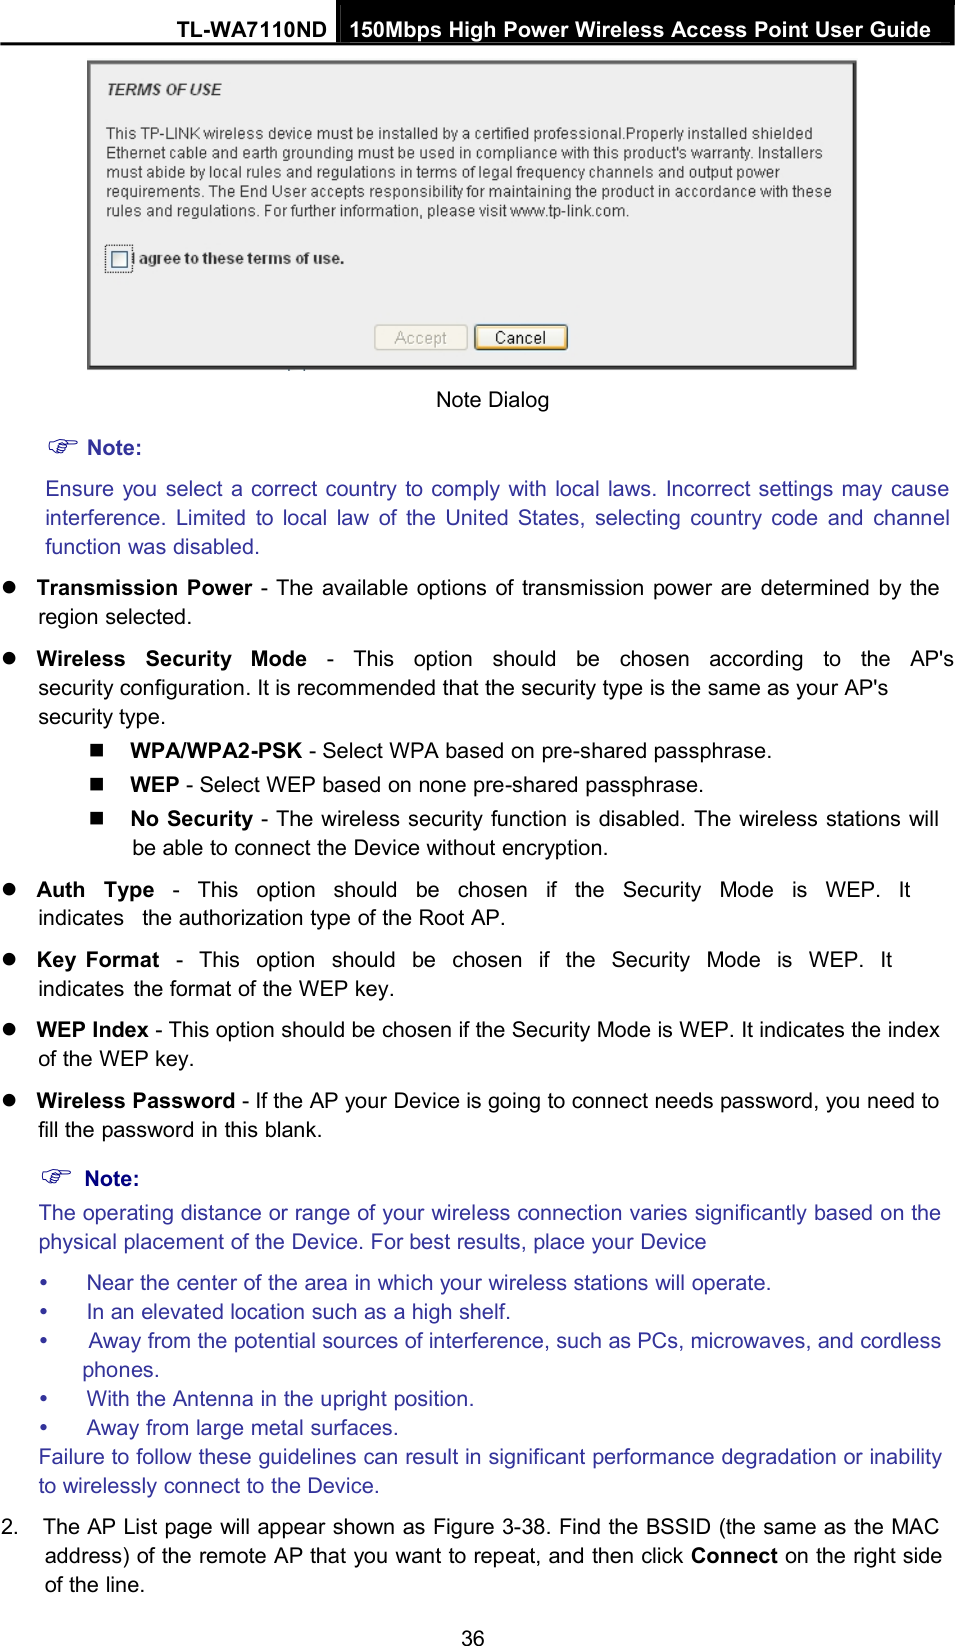
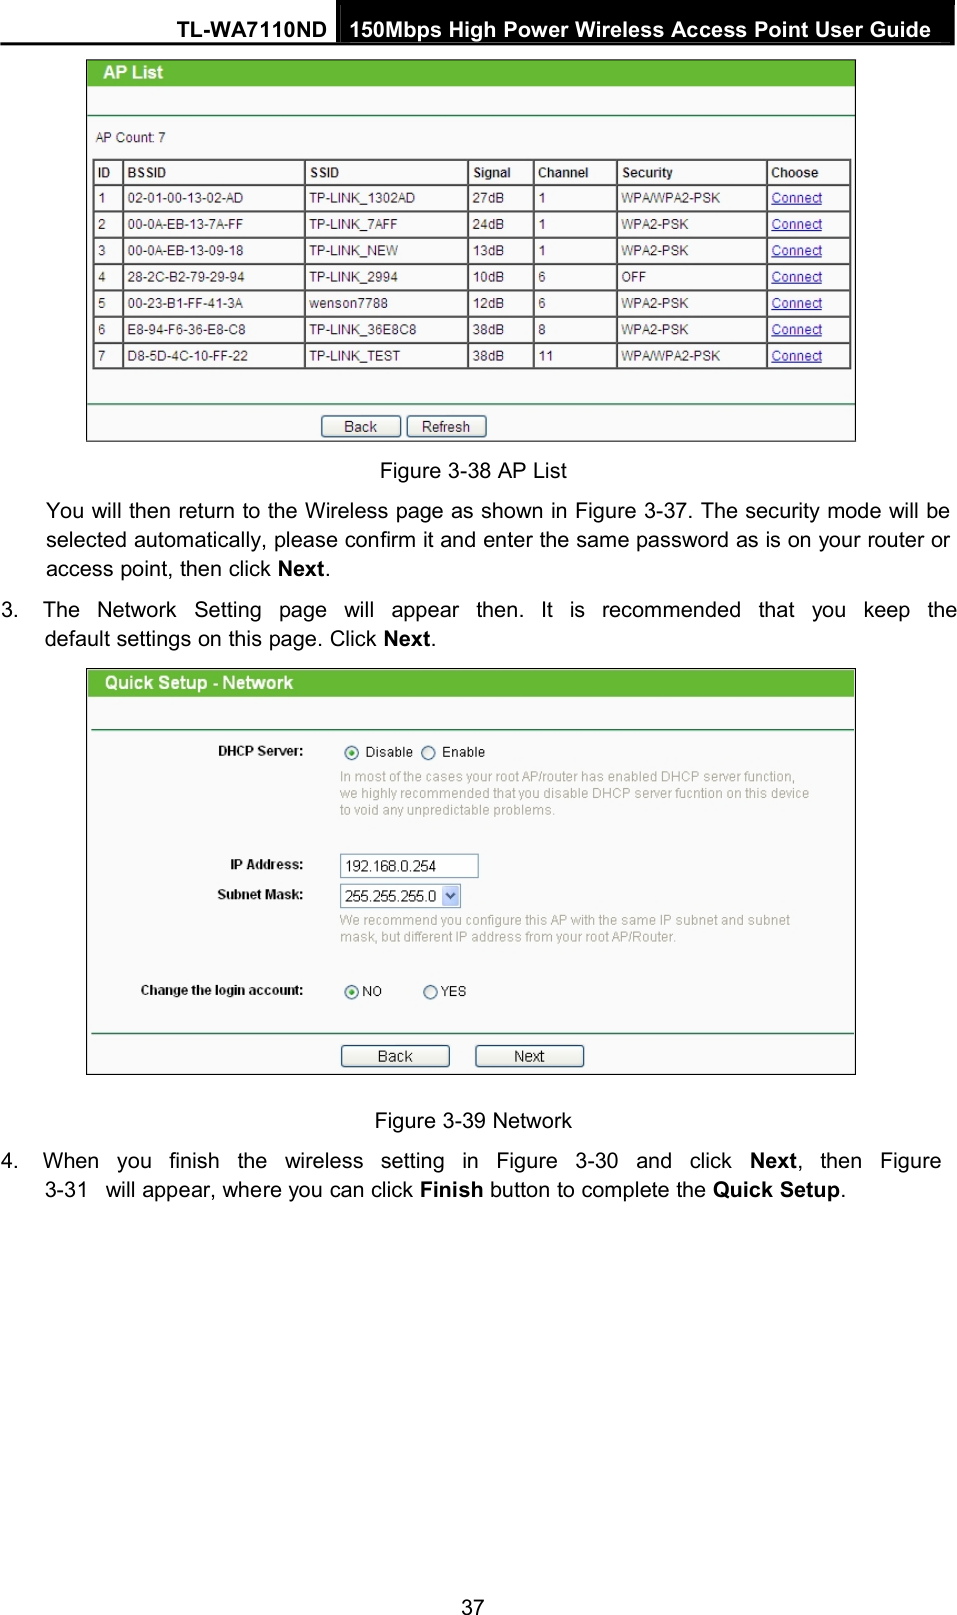
TP Link Technologies WA7110ND 2.4GHz 150Mbps High Power Wireless Access Point User Manual TL WA7110ND Part1

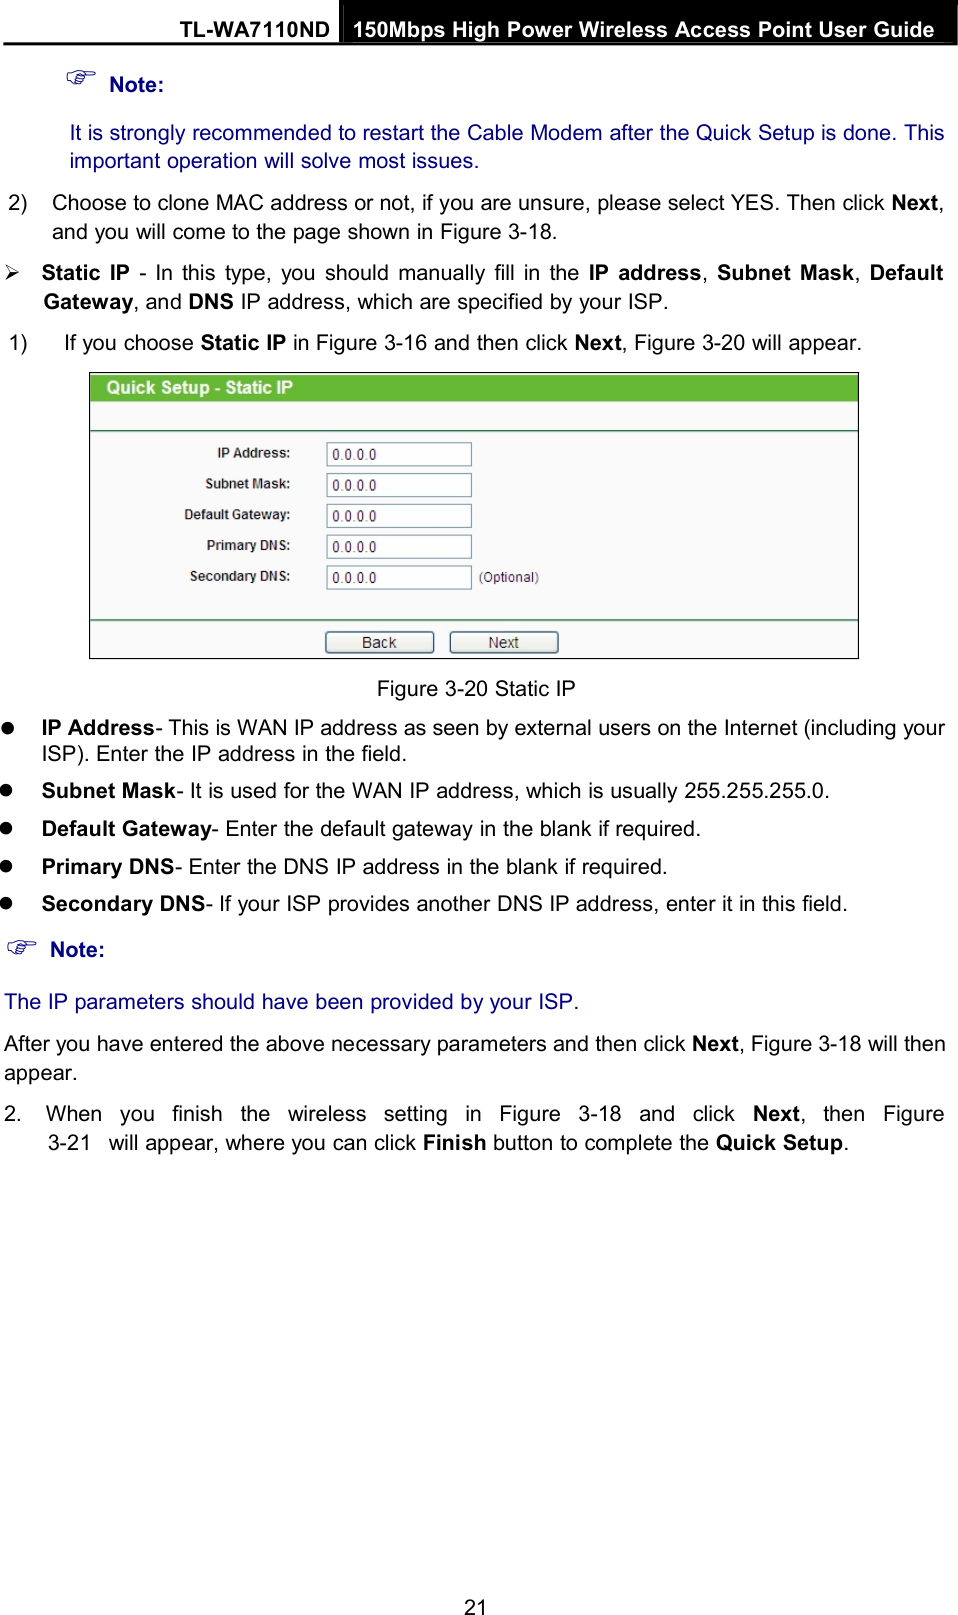
TP-Link Technologies Co., Ltd. 2.4GHz 150Mbps High Power Wireless Access Point TL WA7110ND Part1

Contents

TL-WA7110ND_User Manual-Part1

TL-WA7110ND150Mbps High Power Wireless Access PointREV1.0.01910011047
COPYRIGHT & TRADEMARKSSpecifications are subject to change without notice. is a registered trademarkof TP-LINK TECHNOLOGIES CO., LTD. Other brands and product names aretrademarks or registered trademarks of their respective holders.No part of the specifications may be reproduced in any form or by any means or used to make anyderivative such as translation, transformation, or adaptation without permission fromTP-LINK TECHNOLOGIES CO., LTD. Copyright © 2014 TP-LINK TECHNOLOGIES CO., LTD.All rights reserved.http://www.tp-link.com
FCC STATEMENTThis equipment has been tested and found to comply with the limits for a Class B digital device,pursuant to part 15 of the FCC Rules. These limits are designed to provide reasonable protectionagainst harmful interference in a residential installation. This equipment generates, uses and canradiate radio frequency energy and, if not installed and used in accordance with the instructions,may cause harmful interference to radio communications. However, there is no guarantee thatinterference will not occur in a particular installation. If this equipment doescause harmful interference to radio or television reception, which can be determined by turningthe equipment off and on, the user is encouraged to try to correct the interference by one ormore of the following measures:Reorient or relocate the receiving antenna.Increase the separation between the equipment and receiver.Connect the equipment into an outlet on a circuit different from that to which the receiveris connected.Consult the dealer or an experienced radio/ TV technician for help.This device complies with part 15 of the FCC Rules. Operation is subject to the following twoconditions:1)This device may not cause harmful interference.2)This device must accept any interference received, including interference that maycause undesired operation.Any changes or modifications not expressly approved by the party responsible forcompliance could void the user’s authority to operate the equipment.Note: The manufacturer is not responsible for any radio or TV interferencecaused by unauthorized modifications to this equipment. Such modifications could void theuser’s authorityto operate the equipment.FCC RF Radiation Exposure Statement:This equipment complies with FCC RF radiation exposure limits set forth for anuncontrolled environment. This device and its antenna must not be co-located or operating inconjunction with any other antenna or transmitter.“To comply with FCC RF exposure compliance requirements, this grant isapplicable to only Mobile Configurations. The antennas used for this transmittermust be installed to provide a separation distance of at least 20 cm from all persons andmust not be co-located or operating in conjunction with any other antenna or transmitter.”CE Mark WarningThis is a class B product. In a domestic environment, this product may cause radio interference, inwhich case the user may be required to take adequate measures.
Canadian Compliance StatementThis device complies with Industry Canada license-exempt RSS standard(s). Operation is subjectto the following two conditions:(1)This device may not cause interference, and(2)This device must accept any interference, including interference that may causeundesired operation of the device.Cet appareil est conforme aux norms CNR exemptes de licence d’IndustrieCanada. Le fonctionnement est soumis aux deux conditions suivantes:(1)cet appareil ne doit pas provoquer d’interférences et(2)cet appareil doit accepter toute interférence, y compris celles susceptibles de provoquer unfonctionnement non souhaité de l’appareil.This device has been designed to operate with the antennas listed below, and having a maximumgain of 5 dBi. Antennas not included in this list or having a gain greater than 5 dBi are strictlyprohibited for use with this device. The required antenna impedance is 50 ohms.To reduce potential radio interference to other users, the antenna type and its gain should be sochosen that the equivalent isotropically radiated power (e.i.r.p.) is not more than that permitted forsuccessful communication.Industry Canada StatementComplies with the Canadian ICES-003 Class B specifications.Cet appareil numérique de la classe B est conforme à la norme NMB-003 du Canada.This device complies with RSS 210 of Industry Canada. This Class B devicemeets all the requirements of the Canadian interference-causing equipment regulations.Cet appareil numérique de la Classe B respecte toutes les exigences duRèglement sur le matériel brouilleur du Canada.Korea Warning Statements당해 무선설비는 운용중 전파혼신 가능성이 있음.NCC Notice & BSMI Notice注意!依據 低功率電波輻射性電機管理辦法第十二條經型式認證合格之低功率射頻電機,非經許可,公司、商號或使用者均不得擅自變更頻率、加大功率或變更原設計之特性或功能。第十四條 低功率射頻電機之使用不得影響飛航安全及干擾合法通行;經發現有干擾現象時,應立即停用, 並改善至無干擾時方得繼續使用。前項合法通信,指依電信規定作業之無線電信。低功率射頻電 機需忍受合法通信或工業、科學以及醫療用電波輻射性電機設備之干擾。 減少電磁波影響,請妥適使用。
安全諮詢及注意事項●請使用原裝電源供應器或只能按照本產品注明的電源類型使用本產品。●清潔本產品之前請先拔掉電源線。請勿使用液體、噴霧清潔劑或濕布進行清潔。●注意防潮,請勿將水或其他液體潑灑到本產品上。●插槽與開口供通風使用,以確保本產品的操作可靠並防止過熱,請勿堵塞或覆蓋開口。●請勿將本產品置放於靠近熱源的地方。除非有正常的通風,否則不可放在密閉位置中。●請不要私自打開機殼,不要嘗試自行維修本產品,請由授權的專業人士進行此項工作。Продукт сертифіковано згідно с правилами системи УкрСЕПРО на відповідність вимогамнормативних документів та вимогам, що передбачені чинними законодавчими актамиУкраїни.Safety InformationWhen product has power button, the power button is one of the way to shut off the product;when there is no power button, the only way to completely shut off power is to disconnect theproduct or the power adapter from the power source.Don’t disassemble the product, or make repairs yourself. You run the risk of electric shockand voiding the limited warranty. If you need service, please contact us.Avoid water and wet locations.This product can be used in the following countries:ATBGBYCACZDEDKEEESFIFRGBGRHUIEITLTLVMTNLNOPLPTRORUSESKTRUAUS
TP-LINK TECHNOLOGIES CO., LTDDECLARATIONOFCONFORMITYFor the following equipment:Product Description: 150Mbps High Power Wireless Access PointModel No.: TL-WA7110NDTrademark: TP-LINKWe declare under our own responsibility that the above products satisfy allthe technical regulations applicable to the product within the scope of Council Directives:Directives 1999/5/EC, Directives 2004/108/EC, Directives 2006/95/EC, Directives 1999/519/EC,Directives 2011/65/EUThe above product is in conformity with the following standards or other normative documentsEN 300 328 V1.7.1: 2006EN 301 489-1 V1.9.2:2011& EN 301 489-17 V2.2.1:2012EN 55022:2010+AC:2011EN 55024:2010EN 61000-3-2:2006+A1:2009+A2:2009EN 61000-3-3:2008EN 60950-1:2006+A11:2009+A1:2010+A12:2011EN 62311:2008The product carries the CE Mark:Person responsible for marking this declaration:Yang HongliangProduct Manager of International BusinessDate of issue: 2014TP-LINK TECHNOLOGIES CO., LTD.Building 24 (floors 1, 3, 4, 5), and 28 (floors 1-4) Central Science and Technology Park, ShennanRd, Nanshan, Shenzhen, China
CONTENTSPackage Contents ................................................................................................................................. 1Chapter 1. Introduction ....................................................................................................................21.1 Overview of the Product...........................................................................................................21.2 Features ................................................................................................................................... 21.3 Conventions ............................................................................................................................. 41.4 Panel Layout ............................................................................................................................ 41.4.1 The Front Panel................................................................................................................ 41.4.2 The Rear Panel ................................................................................................................ 5Chapter 2. Connecting the Device................................................................................................... 62.1 System Requirements.............................................................................................................. 62.2 Installation Environment Requirements ................................................................................... 62.3 Connecting the Device............................................................................................................. 62.3.1 AP Client Router............................................................................................................... 62.3.2 AP Router.........................................................................................................................72.3.3 Access Point.....................................................................................................................72.3.4 Multi-SSID ........................................................................................................................82.3.5 Repeater and Universal Repeater.................................................................................... 82.3.6 Bridge with AP..................................................................................................................82.3.7 Client ................................................................................................................................ 9Chapter 3. Quick Installation Guide .............................................................................................. 103.1 Configure the Device .............................................................................................................103.2 Quick Setup ...........................................................................................................................113.2.1 AP Client Router............................................................................................................. 143.2.2 AP Router.......................................................................................................................183.2.3 Access Point...................................................................................................................223.2.4 Multi-SSID ......................................................................................................................253.2.5 Repeater (Range Extender) ........................................................................................... 283.2.6 Bridge with AP................................................................................................................ 313.2.7 Client ..............................................................................................................................35Chapter 4. AP & Multi-SSID & Repeater (Range Extender) & Bridge with AP& ClientOperation Mode................................................................................................................................... 394.1 Login ...................................................................................................................................... 394.2 Status ..................................................................................................................................... 394.3 Quick Setup ...........................................................................................................................404.4 Operation Mode ..................................................................................................................... 404.5 WPS ....................................................................................................................................... 41
4.6 Network ..................................................................................................................................424.6.1 LAN.................................................................................................................................424.7 Wireless .................................................................................................................................434.7.1 Wireless Settings............................................................................................................ 444.7.2 Wireless Security............................................................................................................ 454.7.3 Wireless MAC Filtering...................................................................................................484.7.4 Wireless Advanced......................................................................................................... 504.7.5 Distance Setting ............................................................................................................. 514.7.6 Throughput Monitor ........................................................................................................ 524.7.7 Wireless Statistics ..........................................................................................................534.8 DHCP .....................................................................................................................................534.8.1 DHCP Settings ............................................................................................................... 534.8.2 DHCP Clients List........................................................................................................... 544.8.3 Address Reservation ...................................................................................................... 554.9 System Tools ......................................................................................................................... 564.9.1 SNMP .............................................................................................................................574.9.2 Time Settings ................................................................................................................. 584.9.3 Diagnostic.......................................................................................................................594.9.4 Ping Watch Dog ............................................................................................................. 614.9.5 Speed Test .....................................................................................................................614.9.6 Firmware Upgrade.......................................................................................................... 624.9.7 Factory Defaults ............................................................................................................. 634.9.8 Backup & Restore .......................................................................................................... 634.9.9 Reboot............................................................................................................................644.9.10 Password........................................................................................................................644.9.11 System log......................................................................................................................654.9.12 Statistics .........................................................................................................................66Chapter 5. AP Client Router & AP Router Operation Mode........................................................685.1 Login ...................................................................................................................................... 685.2 Status ..................................................................................................................................... 685.3 Quick Setup ...........................................................................................................................705.4 Operation Mode ..................................................................................................................... 705.5 WPS ....................................................................................................................................... 715.6 Network ..................................................................................................................................725.6.1 WAN ...............................................................................................................................725.6.2 MAC Clone ..................................................................................................................... 805.6.3 LAN.................................................................................................................................815.7 Wireless .................................................................................................................................81II
5.7.1 Wireless Settings............................................................................................................ 825.7.2 Wireless Security............................................................................................................ 865.7.3 MAC Filtering..................................................................................................................885.7.4 Wireless Advanced......................................................................................................... 905.7.5 Distance Setting ............................................................................................................. 915.7.6 Throughput Monitor ........................................................................................................ 925.7.7 Wireless Statistics ..........................................................................................................935.8 DHCP .....................................................................................................................................935.8.1 DHCP Settings ............................................................................................................... 935.8.2 DHCP Clients List........................................................................................................... 945.8.3 Address Reservation ...................................................................................................... 955.9 Forwarding .............................................................................................................................965.9.1 Virtual Servers................................................................................................................ 975.9.2 Port Triggering................................................................................................................ 985.9.3 DMZ..............................................................................................................................1005.9.4 UPnP ............................................................................................................................1005.10 Security ................................................................................................................................1015.10.1 Basic Security............................................................................................................... 1015.10.2 Advanced Security ....................................................................................................... 1035.10.3 Local Management.......................................................................................................1045.10.4 Remote Management................................................................................................... 1055.11 Parental Control ...................................................................................................................1055.12 Access Control.....................................................................................................................1075.12.1 Rule ..............................................................................................................................1075.12.2 Host ..............................................................................................................................1095.12.3 Target ...........................................................................................................................1105.12.4 Schedule ......................................................................................................................1115.13 Advanced Routing................................................................................................................1125.13.1 Static Routing List ........................................................................................................1125.13.2 System Routing Table .................................................................................................. 1135.14 Bandwidth Control................................................................................................................1145.14.1 Control Settings............................................................................................................1145.14.2 Rules List......................................................................................................................1145.15 IP & MAC Binding ................................................................................................................1155.15.1 Binding Setting ............................................................................................................. 1155.15.2 ARP List........................................................................................................................1165.16 Dynamic DNS ......................................................................................................................1175.17 System Tools .......................................................................................................................120III
5.17.1 Time Settings ............................................................................................................... 1215.17.2 Diagnostic.....................................................................................................................1225.17.3 Firmware Upgrade........................................................................................................1235.17.4 Factory Defaults ...........................................................................................................1245.17.5 Backup & Restore ........................................................................................................1245.17.6 Reboot ..........................................................................................................................1255.17.7 Password...................................................................................................................... 1255.17.8 System log....................................................................................................................1265.17.9 Statistics .......................................................................................................................128Appendix A: FAQ ..............................................................................................................................130Appendix B: Configuring the PC .....................................................................................................134Appendix C: Specifications..............................................................................................................138Appendix D: Glossary....................................................................................................................... 139IV
TL-WA7110ND 150Mbps High Power Wireless Access Point User GuidePackage ContentsThe following items should be found in your package:One TL-WA7110ND 150Mbps High Power Wireless Access PointOne power Adapter for TL-WA7110ND 150Mbps High Power Wireless Access PointOne Power InjectorMounting KitsQuick Installation GuideOne Resource CD for TL-WA7110ND 150Mbps High Power WirelessAccess Point, including:This User GuideOther helpful informationNote:Make sure that the package contains the above items. If any of the listed items are damaged ormissing, please contact your distributor.1
TL-WA7110ND 150Mbps High Power Wireless Access Point User GuideChapter 1. Introduction1.1 Overview of the ProductThe TL-WA7110ND 150Mbps High Power Wireless Access Point will allow you to connect yournetwork with other wireless devices wirelessly, sharing Internet Access, files and fun, easily andsecurely. The high power design will also help you build a more stable link or cover more areaindoors.The TL-WA7110ND 150Mbps High Power Wireless Access Point provides 7 operation modes formulti-user to access the Internet: AP Client Router, AP Router, Access Point,Multi-SSID, Repeater (Range Extender), Bridge with AP and Client. In AP Client Router mode,it works as a WISP CPE and can access the Internet wirelessly via your WISP. In APRouter mode, it can access the Internet via an ADSL/Cable Modem, while sharing datawirelessly.With the most attentive wireless security, the TL-WA7110ND 150Mbps High PowerWireless Access Point provides multiple protection measures. It can be set to turn offwireless network name (SSID) broadcast so that only stations that have the SSIDcan be connected. The AP provides wireless LAN 64/128/152-bit WEPencryption security, and WPA/WPA2 and WPA-PSK/WPA2-PSK authentication, aswell as TKIP/AES encryption security. It also supports VPN pass-through for sensitive datasecure transmission.The TL-WA7110ND 150Mbps High Power Wireless Access Point complies with the IEEE 802.11n,IEEE 802.11g and IEEE 802.11b standards so that the data transmission rate is up to 150Mbps.The wireless transmission range can extend up to tens of kilometers.1.2 FeaturesComplies with IEEE 802.11n, IEEE 802.11g, IEEE 802.11b, IEEE 802.3,IEEE 802.3u standards.Wireless Data transfer rates up to 150Mbps.Supports AP Client Router, AP Router, Access Point, Multi-SSID, Repeater (Range Extender),Bridge with AP and Client mode.High output transmit power and receive sensitivity optimized.Supports Client Router Mode for WISP CPE.Supports passive power over Ethernet.Supports Wireless Distribution System (WDS).ACK timeout adjustment for long range transmission, up to 50km.Provides throughput monitor indicating the current wireless throughput.Supports Layer 2 User Isolation.Supports Ping Watch Dog.Supports link speed test.Output transmit power adjustable.Supports PPPoE, Dynamic IP, Static IP Internet Access.Built-in NAT and DHCP server supporting static IP address distributing.Provides WLAN ACL (Access Control List).
TL-WA7110ND 150Mbps High Power Wireless Access Point User GuideSupports configuration backup/restore and firmware upgrade.Supports Web management.Supports Remote Management.Supports UPnP, Dynamic DNS, Static Routing, VPN Pass-through.Supports Virtual Server, Special Application and DMZ host.Built-in firewall supporting IP address filtering, Domain Name filtering, and MACaddress filtering.3
TL-WA7110ND 150Mbps High Power Wireless Access Point User Guide1.3 ConventionsThe AP or TL-WA7110ND, or device mentioned in this User guide stands for TL-WA7110ND150Mbps High Power Wireless Access Point without any explanations.Parameters provided in the pictures are just references for setting up the product,which may differ from the actual situation.You can set the parameters according to your demand.1.4 Panel Layout1.4.1 The Front PanelTL-WA7110ND consists of several LED indicators, which is designed to indicate connections andwireless signal.LED ExplanationFigure 1-1 Front Panel sketchNameStatusIndicationOffNo PowerOnPower onOffThe device has a system errorOnThe device is initialisingFlashingThe device is working properlyOffThere is no device linked to the corresponding portOnThere is a device linked to the corresponding port but no activityFlashingThere is an active device linked to the corresponding portOffThe Wireless function is disabledFlashingThe Wireless function is enabledSlow FlashA wireless device is connecting to the network by function.This process will last in the first 2 minutes.OnA wireless device has been successfully added to thenetwork by function.Quick FlashA wireless device failed to be added to the network by function.Table 2-14
TL-WA7110ND 150Mbps High Power Wireless Access Point User Guide1.4.2 The Rear PanelFigure 1-2 Rear Panel sketchViewed from left to right, the following parts are located on the rear panel of TL-WA7110ND.POWER: The power port connects to the power adapter provided with the TL-WA7110ND.MAIN (PoE): One LAN 10/100Mbps RJ45 port connects to a network device, such as a switch ora router, and is capable of 12V Power over Ethernet output.SECONDARY: This port is used as a secondary Ethernet port to connect to a network device,such as a switch or a router.WPS/RESET: This button is used for both WPS and Reset function. To use the WPS function,press it for less than five seconds; to use the RESET function, press it for more than five seconds.Used as RESET button:There are two ways to reset to the Router's factory defaults:1) Use the Factory Defaults function on System Tools -> Factory Defaults page in theRouter's Web-based Utility.2) Use the WPS/RESET button: With the Router powered on, pressand hold the WPS/RESET button (more than 5 seconds) until the SYS LEDbecomes quick-flash from slow-flash. Then release the button and wait the AccessPoint to reboot to its factory default settings.Used as WPS button:If you have client devices, such as wireless adapters, that support Wi-Fi Protected Setup,then you can press this button to quickly establish a connection between the Access Pointand client devices and automatically configure wireless security for your wireless network.Wireless antenna: The external antenna is used to transmit and receive wireless data.5
TL-WA7110ND 150Mbps High Power Wireless Access Point User GuideChapter 2. Connecting the Device2.1 System RequirementsEach PC in the LAN needs a working Ethernet Adapter and an Ethernet cable with RJ45connectors.TCP/IP protocol must be installed on each PC.Web browser, such as Microsoft Internet Explorer 5.0 or later, Netscape Navigator6.0 or later.If the device is configured to AP Client Router mode, you also need:Wireless Internet Service Provider (WISP).If the device is configured to AP Router mode, you also need:Broadband Internet Access Service (DSL/Cable/Ethernet).One DSL/Cable Modem that has an RJ45 connector (you do not need it if you connect therouter to the Ethernet.).2.2 Installation Environment RequirementsOperating temperature: -30℃~70℃Operating Humidity: 10%~90% RH, Non-condensing2.3 Connecting the DeviceTo connect the AP, please follow the steps below:1. Power off your PC, Cable/DSL Modem, and the AP.2. Locate an optimum location for the AP. The best place is usually at thecenter of your wireless network. The place must accord with the Installation EnvironmentRequirements.3. Adjust the direction of the antenna. Normally, upright is a good direction.After finishing the steps above, please choose the operation mode you need and carry out thecorresponding steps. There are seven operation mode supported by this AP: AP Client Router,AP Router,Access Point,Multi-SSID,Repeater (Range Extender),Bridge withAP and Client.2.3.1 AP Client RouterFigure 2-1 Hardware Installation of the TL-WA7110ND in AP Client Router mode6
TL-WA7110ND 150Mbps High Power Wireless Access Point User Guide1. Connect the MAIN (PoE) port of TL-WA7110N to the POE port of the Power Injector with anEthernet cable.2. Connect the PC to the LAN port of the Power Injector with an Ethernet cable.3. Plug one end of the Power Adapter into the DC jack on the Power Injector, and the other endin electrical wall socket.4. Power on the PC(s) and notebook(s).2.3.2 AP RouterFigure 2-2 Hardware Installation of the TL-WA7110ND in AP Router mode1. Connect the MAIN (PoE) port of TL-WA7110N to the POE port of the Power Injector with anEthernet cable.2. Connect the DSL/Cable Modem to the LAN port of the Power Injector with an Ethernet cable.3. Plug one end of the Power Adapter into the DC jack on the Power Injector, and the other endin electrical wall socket.4. Power on the PC(s) and other connected devices (such as the ADSL modem).Note:In this mode, the LAN port of the Power Injector (connected to the LAN port of the Device) worksas the WAN port.2.3.3 Access PointThis operation mode allows wireless stations to access.Figure 2-3 Hardware Installation of the TL-WA7110ND in Access Point mode1. Connect the MAIN (PoE) port of TL-WA7110N to the POE port of the Power Injector with anEthernet cable.2. Connect the LAN port of the Power Injector to the wired network port with an Ethernet cable.3. Plug one end of the Power Adapter into the DC jack on the Power Injector, and the other endin the electrical wall socket.4. Power on the notebook(s) and other connected devices (such as the Wired Router).7
TL-WA7110ND 150Mbps High Power Wireless Access Point User Guide2.3.4 Multi-SSIDIn this mode, AP can support up to 4 SSID.Figure 2-4 Hardware Installation of the TL-WA7110ND in Multi-SSID mode1. Connect the MAIN (PoE) port of TL-WA7110N to the POE port of the Power Injector with anEthernet cable.2. Connect the LAN port of the Power Injector to the wired network port with an Ethernet cable.3. Plug one end of the Power Adapter into the DC jack on the Power Injector, and the other endin the electrical wall socket.4. Power on the notebooks and other connected devices (such as the Switch).2.3.5 Repeater and Universal RepeaterFigure 2-5 Hardware Installation of the TL-WA7110ND in (Universal) Repeater mode1. Connect the MAIN (PoE) port of TL-WA7110ND to the POE port of the Power Injector with anEthernet cable.2. Plug one end of the Power Adapter into the DC jack on the Power Injector, and the other endin electrical wall socket.3. Power on the PC(s) and other connected devices (such as the Router).Note:Both Repeater and Universal Repeater modes allow the AP with its own BSS to relay data to aroot AP. The wireless repeater relays signal between its stations and the root APfor greater wireless range. However, in Repeater mode, the WDS associated is enabled, whilein Universal Repeater mode, the WDS associated is disabled.2.3.6 Bridge with APTwo Devices are needed in this mode.8
TL-WA7110ND 150Mbps High Power Wireless Access Point User GuideFigure 2-6 Hardware Installation of the TL-WA7110ND in Standard AP -- Bridge mode1. Connect the MAIN (PoE) port of TL-WA7110N to the POE port of the Power Injector with anEthernet cable.2. Plug one end of the Power Adapter into the DC jack on the Power Injector, and the other endin electrical wall socket.3. Power on the PC(s).Note:It is recommended that you connect a PC/notebook to the LAN port of the Device with an Ethernetcable, and then login the Device from the PC/notebook to set the Device in Bridge with AP mode.2.3.7 ClientFigure 2-7 Hardware Installation of the TL-WA7110ND in Client mode1. Connect the MAIN (PoE) port of TL-WA7110N to the POE port of the Power Injector with anEthernet cable.2. Connect the PC to the LAN port of the Power Injector with an Ethernet cable.3. Plug one end of the Power Adapter into the DC jack on the Power Injector, and the other endin electrical wall socket.4. Power on the PC(s) and other connected devices (such as the Router).9
TL-WA7110ND 150Mbps High Power Wireless Access Point User GuideChapter 3. Quick Installation GuideThis Chapter will guide you to configure the AP to function in your network and gain access to theinternet through your ISP immediately after successful configuration. More detailed description ofthe AP’s web-based utility and functions can be found in “Chapter 4 Configuring the AP”3.1 Configure the DeviceThe instructions in this section will help you configure each of your PCsto be able to communicate with the AP.The default IP address of the TL-WA7110ND 150Mbps High Power Wireless AccessPoint is192.168.0.254. And the default Subnet Mask is 255.255.255.0. These values can be seen fromthe LAN. They can be changed as you desire, as an example we use thedefault values for description in this guide.Connect the local PC to the LAN ports of the AP. There are then two ways to configure the IPaddress for your PC.Configure the IP address manually1) Set up the TCP/IP Protocol for your PC. If you need instructions as to how to do this,please refer to Appendix B: Configuring the PC.2) Configure the network parameters. The IP address is 192.168.0.xxx ("xxx" is from 2 to253), Subnet Mask is 255.255.255.0Note:If you configure your device by this way, please remember to change the configuration of your PCto the figure as shown below to make your PC connect to the Internet successfully.Obtain an IP address automaticallyThis method can be available only when DHCP in section 4.8.1 is enabled.1) Set up the TCP/IP Protocol in "Obtain an IP address automatically" mode on your PC.If you need instructions as to how to do this, please refer to Appendix B: Configuring thePC.10
TL-WA7110ND 150Mbps High Power Wireless Access Point User Guide2) Power off the AP and PC. Then turn on the AP and restart the PC. The built-in DHCPserver will assign IP address for the PC.Note:For Windows 98 OS or earlier, the PC and AP may need to be restarted.Now, you can run the Ping command in the command prompt to verify the network connectionbetween your PC and the AP. The following example is in Windows 2000 OS.Open a command prompt, and type ping 192.168.0.254, and then press Enter.If the result displayed is similar to that shown in Figure 3-1, the connection between your PC andthe AP has been established.Figure 3-1 Success result of Ping commandIf the result displayed is similar to that shown in Figure 3-2, it means that your PC has notconnected to the AP.Figure 3-2 Failure result of Ping commandPlease check the connection following these steps:1. Is the connection between your PC and the AP correct?Note:The LED of LAN port you link to on the AP and LEDs on your PC's adapter should be lit.2. Is the TCP/IP configuration for your PC correct?Note:If the AP's IP address is 192.168.0.254, your PC's IP address must be within therange of192.168.0.2 ~ 192.168.0.253.3.2 Quick SetupThe following instructions will guide you through a few easy steps to configure yourAP and connect to Internet. With a Web-based (Internet Explorer or Netscape®Navigator) utility, itis easyto configure and manage the TL-WA7110ND 150Mbps High Power Wireless Access Point. TheWeb-based utility can be used on any Windows, Macintosh or UNIX OS with a Web browser.
11
TL-WA7110ND 150Mbps High Power Wireless Access Point User GuideOpen your web browser and enter the IP address of the AP (192.168.0.254) and a login screenwill display (shown in Figure 3-3).Figure 3-3 Login the routerEnter admin for Username and Password (both in lower case letters) on thefollowing login screen. Click OK or press Enter of your keyboard, and the management page willdisplay.Note:Figure 3-4 Login Windows1) If the above screen does not pop-up, it means that your Web-browser has been set to a proxy.Go to Tools menu>Internet Options>Connections>LAN Settings, in the screen that appears,cancel the Using Proxy checkbox, and click OK to finish it.2) If the device has been restored, the Welcome page will appear as shown inFigure 3-5, please read the TERMS OF USE carefully. Then select I agree to theseterms of use and click Login to continue.Figure 3-5 Welcome pageIf the User Name and Password are correct, you can configure the AP using the Web browser.Please click the Quick Setup link on the left of the main menu and the Quick Setup screen willappear.12
TL-WA7110ND 150Mbps High Power Wireless Access Point User GuideFigure 3-6 Quick SetupClick Next, and then Operation Mode page will appear, shown in Figure 3-7:Figure 3-7 Operation ModeAP Client Router - In this mode, the device enables multi-users to share Internet from WISP.The LAN port devices share the same IP from WISP through Wireless port. While connectingto WISP, the Wireless port works as a WAN port at AP Client Router mode. The Ethernetport acts as a LAN port.AP Router - In this mode, the device enables multi-users to share Internet via ADSL/CableModem. The wireless port share the same IP to ISP through Ethernet WANport. The Wireless port acts the same as a LAN port while at AP Router mode.Access Point - In this mode, the device can be connected to a wired network and transformthe wired access into wireless that multiple devices can share together,especially for a home, office or hotel where only wired network is available.Multi-SSID - In this mode, the device can create up to 4 wireless networkslabeled with different SSIDs and assign each SSID with different security orVLAN, especially for the situation when the various access policies and functions arerequired.Repeater(Range Extender) - In this mode, the device can copy and reinforce the existingwireless signal to extend the coverage of the signal, especially for a large space to eliminatesignal-blind corners.Bridge with AP - In this mode, the device can be used to combine multiple local networkstogether to the same one via wireless connections, especially for a home or office whereseparated networks can't be connected easily together with a cable.Client - In this mode, the device can be connected to another device via Ethernet port andact as an adaptor to grant your wired devices access to a wireless network, especially for aSmart TV, Media Player, or game console only with an Ethernet port.13
Note:TL-WA7110ND 150Mbps High Power Wireless Access Point User GuideWhen you change the operation mode to Client/Repeater, WPS function will stay disabled. Pleasemanually enable this function if needed when you switch back to Access Point/Multi-SSID/Bridgemode.3.2.1 AP Client RouterWhen you choose AP Client Router Mode on Operation Mode page in Figure 3-7 , take thefollowing steps:1. Click Next in Figure 3-7, and then WAN Connection Type page will appear as shown inFigure 3-8.Figure 3-8 WAN Connection TypeDynamic IP- When the Device connects to a DHCP server, or the ISP suppliesyou with DHCP connection, please choose this type. The Device will get the IP addressautomatically from the DHCP server or the WISP if you choose the Dynamic IP type.If you choose Dynamic IP in Figure 3-8 and then click Next, the wireless setting page as inFigure 3-10 will appear.PPPoE - If you have applied ADSL to realize Dial-up service, you should choose this type. Inthis condition, you should fill in both the User Name and Password that your ISP supplies.1) If you choose PPPoE in Figure 3-8 and then click Next, Figure 3-9 will appear.Figure 3-9 PPPoE2) Enter the User Name and Password provided by your ISP, then click Next, Figure 3-10will appear.14
TL-WA7110ND 150Mbps High Power Wireless Access Point User GuideFigure 3-10 WISP Station SettingWireless Name of WISP Station - The SSID of the AP your Device is going to connect toas a client. You can also use the search function to select the SSID to join.MAC Address of WISP Station - The BSSID of the AP your Device is going to connect toas a client. You can also use the search function to select the BSSID to join.Survey - Click this button, you can search the AP which runs in the current channel.Region - Select your region from the pull-down list. This field specifies the region where thewireless function of the Device can be used. It may be illegal to use the wireless function ofthe Device in a region other than one of those specified in this filed. If your country or regionis not listed, please contact your local government agency for assistance.When you select your local region from the pull-down list, the Note Dialog of TERMS OFUSE will pop up. Select I agree to these terms of use, and click Accept to continue.Note:Note DialogEnsure you select a correct country to comply with local laws. Incorrect settings may causeinterference. Limited to local law of the United States, selecting country code and channelfunction was disabled.Transmission Power - The available options of transmission power are determined by theregion selected.15
TL-WA7110ND 150Mbps High Power Wireless Access Point User GuideWireless Security Mode - This option should be chosen according to the AP's securityconfiguration. It is recommended that the security type is the same as your AP's securitytype.Wireless Password - If the AP your Device is going to connect needs password, you needto fill the password in this blank.Static IP - In this type, you should manually fill in the IP address,Subnet Mask,DefaultGateway, and DNS IP address, which are specified by your ISP.1) If you choose Static IP in Figure 3-8 and then click Next, Figure 3-11 will appear.Figure 3-11 Static IPIP Address - This is WAN IP address as seen by external users on the Internet (includingyour ISP). Enter the IP address into the field.Subnet Mask - It is used for the WAN IP address, which is usually 255.255.255.0.Default Gateway - Enter the default gateway in the blank if required.Primary DNS - Enter the DNS IP address in the blank if required.Secondary DNS - If your WISP provides another DNS IP address, enter it in this field.Note:The IP parameters should have been provided by your WISP.2) After you have entered the above necessary parameters and then click Next, the wirelesssetting page as shown in Figure 3-10 will then appear.2. Click Survey in Figure 3-10 to scan the wireless networks, then the AP List page will pop upas shown in , choose the target one, click Connect. You will then return to the previous page.If the AP your Device is going to connect needs password, you need to fill the password.Click Next.16
TL-WA7110ND 150Mbps High Power Wireless Access Point User GuideFigure 3-12 AP List3. The page below will appear. Create a name for the Local Wireless Network. The securitysettings for the local network will be set the same as your WISP by default. Then click Next.Figure 3-13 Local Wireless AP SettingTicking off Use the same security settings for the local wireless network as the remoteWISP station, the page will show as below. You can choose the Wireless Security Modeand fill in Wireless Password for the Local Wireless Network.Figure 3-14 Local Wireless AP Setting4. When you have finished the wireless settings above, you will come to the Finish page shownas Figure 3-15. Please check the configurations you have made. If anything is wrong, pleasego Back to reset. When confirmed, please click Finish/Reboot button in Figure 3-15 to makeall the configurations take effect.17
TL-WA7110ND 150Mbps High Power Wireless Access Point User Guide3.2.2 APRouterFigure 3-15 Finish pageWhen you choose AP Router Mode on Operation Mode page in Figure 3-7, take the followingsteps:1. Click Next in Figure 3-7, and then WAN Connection Type page will appear asshown inFigure 3-16.Figure 3-16 WAN Connection TypePPPoE - If you have applied ADSL to realize Dial-up service, you should choose this type. Inthis condition, you should fill in both the User Name and Password that your ISP provides.1) If you choose PPPoE in Figure 3-16 and then click Next, Figure 3-17 will appear.
18
TL-WA7110ND 150Mbps High Power Wireless Access Point User GuideFigure 3-17 PPPoE2) Enter the User Name and Password provided by your ISP and then click Next, Figure 3-18will appear.Figure 3-18 WirelessWireless Network Name(SSID) - Enter a string of up to 32 characters. The same Name(SSID) must be assigned to all wireless devices in your network. The default SSID is set tobe TP-LINK_xxxxxx (xxxxxx indicates the last unique six characters of each Device's MACaddress), which can ensure your wireless network security. But it is recommended stronglythat you change your networks name (SSID) to a different value. This value is case-sensitive.For example, MYSSID is NOT the same as MySsid.Region - Select your region from the pull-down list. This field specifies the region where thewireless function of the Device can be used. It may be illegal to use the wireless function ofthe Device in a region other than one of those specified in this filed. If your country or regionis not listed, please contact your local government agency for assistance.When you select your local region from the pull-down list, the Note Dialog of TERMS OFUSE will pop up. Select I agree to these terms of use, and click Accept to continue.Note Dialog19
Note:TL-WA7110ND 150Mbps High Power Wireless Access Point User GuideEnsure you select a correct country to comply with local laws. Incorrect settings may causeinterference. Limited to local law of the United States, selecting country code and channelfunction was disabled.Transmission Power - The available options of transmission power are determined by theregion selected.Wireless Security Mode - You can select one of the following security options:WPA/WPA2-PSK - Select WPA based on pre-shared passphrase.WEP - Select WEP based on none pre-shared passphrase.No Security - The wireless security function is disabled. The wireless stations will beable to connect the Device without encryption.Auth Type - This option should be chosen if the Security Mode is WEP. It indicates theauthorization type of the Root AP.Key Format - This option should be chosen if the Security Mode is WEP. It indicates theformat of the WEP key.Wireless Password - If the AP your Device is going to connect needs password, you needto fill the password in this blank.Dynamic IP- When the Device connects to a DHCP server, or the ISP suppliesyou with DHCP connection, please choose this type. The Device will get the IP addressautomatically from the DHCP server or the ISP if you choose the Dynamic IP type.1) If you choose Dynamic IP in Figure 3-16 and then click Next, Figure 3-20 will appear.Figure 3-19 MAC CloneMost Cable ISPs (Internet Service Provider) register the unique MAC Address from the wiredconnection on your MAIN COMPUTER - the last computer used to be connected with theCable Modem and had Internet connection.If you add a router to the network, your ISP may not recognize the MAC address of the routerand not allow it to connect.However, TP-LINK router can "clone" or replicate the registered MAC address of the MAINCOMPUTER. Then your ISP can release the Internet connection to the router and all thecomputers.Click the Next button to continue, or the Back button to return to the previous page.20
Note:TL-WA7110ND 150Mbps High Power Wireless Access Point User GuideIt is strongly recommended to restart the Cable Modem after the Quick Setup is done. Thisimportant operation will solve most issues.2) Choose to clone MAC address or not, if you are unsure, please select YES. Then click Next,and you will come to the page shown in Figure 3-18.Static IP - In this type, you should manually fill in the IP address,Subnet Mask,DefaultGateway, and DNS IP address, which are specified by your ISP.1) If you choose Static IP in Figure 3-16 and then click Next, Figure 3-20 will appear.Figure 3-20 Static IPIP Address- This is WAN IP address as seen by external users on the Internet (including yourISP). Enter the IP address in the field.Subnet Mask- It is used for the WAN IP address, which is usually 255.255.255.0.Default Gateway- Enter the default gateway in the blank if required.Primary DNS- Enter the DNS IP address in the blank if required.Secondary DNS- If your ISP provides another DNS IP address, enter it in this field.Note:The IP parameters should have been provided by your ISP.After you have entered the above necessary parameters and then click Next, Figure 3-18 will thenappear.2. When you finish the wireless setting in Figure 3-18 and click Next, then Figure3-21 will appear, where you can click Finish button to complete the Quick Setup.21
TL-WA7110ND 150Mbps High Power Wireless Access Point User Guide3.2.3 AccessPointFigure 3-21 Finish pageWhen you choose Access Point on Operation Mode page in Figure 3-7, take thefollowing steps:1. Click Next in Figure 3-7, and then Wireless page will appear as shown in Figure 3-22. Createan easy-to-remember name for your wireless network. Select Most Secure(WPA/WPA2-PSK) mode and enter a wireless password below to preventunauthorized access to your AP. Then click Next.Figure 3-22 WirelessWireless Network Name - Enter a string of up to 32 characters. The same Name (SSID)must be assigned to all wireless devices in your network. The default SSID isset to be TP-LINK _xxxxxx(xxxxxx indicates the last unique six characters ofeach Device's MAC address), which can ensure your wireless network security. But it isrecommended strongly that you change your networks name (SSID) to a different value. Thisvalue is case-sensitive. For example, MYSSID is NOT the same as MySsid.Region - Select your region from the pull-down list. This field specifies the region where thewireless function of the AP can be used. It may be illegal to use the wireless function of the AP22
TL-WA7110ND 150Mbps High Power Wireless Access Point User Guidein a region other than one of those specified in this filed. If your country or region is not listed,please contact your local government agency for assistance.When you select your local region from the pull-down list, the Note Dialog of TERMS OF USEwill pop up. Select I agree to these terms of use, and click Accept to continue.Note:Note DialogEnsure you select a correct country to comply with local laws. Incorrect settings may causeinterference. Limited to local law of the United States, selecting country code and channelfunction was disabled.Transmission Power - The available options of transmission power are determined by theregion selected.Wireless Security Mode - You can select one of the following security options:WPA/WPA2-PSK - Select WPA based on pre-shared passphrase.WEP - Select WEP based on none pre-shared passphrase.No Security - The wireless security function is disabled. The wireless stations willbe able to connect the Device without encryption.Auth Type - This option should be chosen if the Security Mode is WEP. Itindicates the authorization type of the Root AP.Key Format - This option should be chosen if the Security Mode is WEP. Itindicates the format of the WEP key.WEP Index - This option should be chosen if the Security Mode is WEP. It indicates the indexof the WEP key.Wireless Password - If the AP your Device is going to connect needs password, you need tofill the password in this blank.Note:The operating distance or range of your wireless connection varies significantly based on thephysical placement of the Device. For best results, place your DeviceNear the center of the area in which your wireless stations will operate.In an elevated location such as a high shelf.Away from the potential sources of interference, such as PCs, microwaves, and cordlessphones.With the Antenna in the upright position.Away from large metal surfaces.23
TL-WA7110ND 150Mbps High Power Wireless Access Point User GuideFailure to follow these guidelines can result in significant performance degradation or inabilityto wirelessly connect to the Device.2. The Network Setting page will appear then. It is recommended that you keep thedefault settings on this page. Click Next.Figure 3-23 Network3. When you finish the wireless setting in Figure 3-23 and click Next, then Figure3-24 will appear, where you can click Finish button to complete the Quick Setup.Figure 3-24 Finish page24
TL-WA7110ND 150Mbps High Power Wireless Access Point User Guide3.2.4 Multi-SSIDWhen you choose Multi-SSID on Operation Mode page in Figure 3-7, take the following steps:1. Click Next in Figure 3-7, and then Wireless page will appear as shown in Figure 3-25. SelectEnable VLAN. Create different SSIDs and enter the password separately for your VLANsdepending on the security requirements for your wireless networks. Click Savebutton to make each configuration take effect. Click Next to continue.Note:The operating distance or range of your wireless connection varies significantly based on thephysical placement of the Device. For best results, place your DeviceNear the center of the area in which your wireless stations will operate.In an elevated location such as a high shelf.Away from the potential sources of interference, such as PCs, microwaves, and cordlessphones.With the Antenna in the upright position.Away from large metal surfaces.Failure to follow these guidelines can result in significant performance degradation or inabilityto wirelessly connect to the Device.Figure 3-25 WirelessEnable VLAN -ON or OFF the VLAN function. The AP supports up to 4 VLANs. All wirelessPCs in the VLANs are able to access this AP. The AP can also work with an IEEE 802.1Q TagVLAN supporting Switch. If this Switch enables the Tag VLAN function, besides all wirelessPCs, only the PCs in the VLAN same with SSID1 are able to access the AP. If a PC is directlyconnected to the LAN port of the AP, please make sure that its adapter supports Tag function,or this PC will not be able to access the AP.25
TL-WA7110ND 150Mbps High Power Wireless Access Point User GuideSSID - Enter a value of up to 32 characters. The same Name (SSID) must be assigned to allwireless devices in your network. In Multi-SSID operation mode, enter SSID for each BSS inthe field "SSID1" ~ "SSID4".VLAN ID - The ID of a VLAN. Only in the same VLAN can a Wireless PC and a wired PCcommunicate with each other. The value can be between 1 and 4095. If the VLAN function isenabled, when AP forwards packets, the packets out from the LAN port will be added with anIEEE 802.1Q VLAN Tag, whose VLAN ID is just the ID of the VLAN wherethe sender belongs.Region - Select your region from the pull-down list. This field specifies the region where thewireless function of the AP can be used. It may be illegal to use the wireless function of the APin a region other than one of those specified in this filed. If your country or region is not listed,please contact your local government agency for assistance.When you select your local region from the pull-down list, the Note Dialog of TERMS OF USEwill pop up. Select I agree to these terms of use, and click Accept to continue.Note:Note DialogEnsure you select a correct country to comply with local laws. Incorrect settings may causeinterference. Limited to local law of the United States, selecting country code and channelfunction was disabled.Transmission Power - The available options of transmission power are determined by theregion selected.Wireless Security Mode - You can select one of the following security options:WPA/WPA2-PSK - Select WPA based on pre-shared passphrase.No Security - The wireless security function is disabled. The wireless stations willbe able to connect the Device without encryption.Wireless Password - If the AP your Device is going to connect needs password, you need tofill the password in this blank.Save - Save the current security configurations for the selected SSID.2. The Network Setting page will appear then. It is recommended that you keep thedefault settings on this page. Click Next.26
TL-WA7110ND 150Mbps High Power Wireless Access Point User GuideFigure 3-26 Network3. When you finish the wireless setting in Figure 3-26 and click Next, then Figure3-27 will appear, where you can click Finish button to complete the Quick Setup.Figure 3-27 Finish page27
TL-WA7110ND 150Mbps High Power Wireless Access Point User Guide3.2.5 Repeater (Range Extender)When you choose Repeater (Range Extender) on Operation Mode page in Figure 3-7, take thefollowing steps:1. Click Next in Figure 3-7, and then Wireless page will appear as shown in Figure 3-28. ClickSurvey button to scan the wireless networks.Figure 3-28 WirelessEnable WDS - The AP client can connect to AP with WDS enabled or disabled. If WDS isenabled, all traffic from wired networks will be forwarded in the format of WDS frames consistof four address fields. If WDS is disabled, three address frames are used. If your AP supportsWDS well, please select the option.Repeater Mode - Choose mode for repeater.WDS Repeater - In WDS Repeater mode, the AP with WDS enabled will relays datato an associated root AP. AP function is enabled meanwhile. The wireless repeaterrelays signal between its stations and the root AP for greater wireless range. Pleaseinput the MAC address of root AP in the field "MAC of AP".Universal Repeater - In Universal Repeater mode, the AP with WDS disabled willrelays data to an associated root AP. AP function is enabledmeanwhile. The wireless repeater relays signal between its stations andthe root AP for greater wireless range. Please input the MAC address of rootAP in the field "MAC of AP".Wireless Name of Root AP - The SSID of the AP your Device is going to connect to as aclient. You can also use the survey function to select the SSID to join.MAC Address of Root AP - The Mac Address of the AP your Device is going to connect to asa client. You can also use the survey function to select the BSSID to join.Survey - Click this button, you can search the APs.Region - Select your region from the pull-down list. This field specifies the region where thewireless function of the AP can be used. It may be illegal to use the wireless function of the APin a region other than one of those specified in this filed. If your country or region is not listed,please contact your local government agency for assistance.When you select your local region from the pull-down list, the Note Dialog of TERMS OF USEwill pop up. Select I agree to these terms of use, and click Accept to continue.28
TL-WA7110ND 150Mbps High Power Wireless Access Point User GuideNote:Note DialogEnsure you select a correct country to comply with local laws. Incorrect settings may causeinterference. Limited to local law of the United States, selecting country code and channelfunction was disabled.Transmission Power - The available options of transmission power are determined by theregion selected.Wireless Security Mode - You can select one of the following security options:WPA/WPA2-PSK - Select WPA based on pre-shared passphrase.WEP - Select WEP based on none pre-shared passphrase.No Security - The wireless security function is disabled. The wireless stations willbe able to connect the Device without encryption.Auth Type - This option should be chosen if the Security Mode is WEP. Itindicates the authorization type of the Root AP.Key Format - This option should be chosen if the Security Mode is WEP. Itindicates the format of the WEP key.WEP Index - This option should be chosen if the Security Mode is WEP. It indicates the indexof the WEP key.Wireless Password - If the AP your Device is going to connect needs password, you need tofill the password in this blank.Note:The operating distance or range of your wireless connection varies significantly based on thephysical placement of the Device. For best results, place your DeviceNear the center of the area in which your wireless stations will operate.In an elevated location such as a high shelf.Away from the potential sources of interference, such as PCs, microwaves, and cordlessphones.With the Antenna in the upright position.Away from large metal surfaces.Failure to follow these guidelines can result in significant performance degradation or inabilityto wirelessly connect to the Device.2. The AP List page will appear shown as Figure 3-29. Find the BSSID (the same as the MACaddress) of the remote AP that you want to repeat, and then click Connect on the right sideof the line.29
TL-WA7110ND 150Mbps High Power Wireless Access Point User GuideFigure 3-29 AP ListYou will then return to the Wireless page as shown in Figure 3-28. The security mode will beselected automatically, please confirm it and enter the same password as is on your router oraccess point, then click Next.3. The Network Setting page will appear then. It is recommended that you keep thedefault settings on this page. Click Next.Figure 3-30 Network4. When you finish the wireless setting in Figure 3-30 and click Next, then Figure3-31 will appear, where you can click Finish button to complete the Quick Setup.30
TL-WA7110ND 150Mbps High Power Wireless Access Point User Guide3.2.6 Bridge withAPFigure 3-31 Finish pageWhen you choose Bridge with AP on Operation Mode page in Figure 3-7, take the followingsteps:1. Click Next in Figure 3-7, and then Wireless page will appear as shown in Figure 3-32. ClickSurvey button to scan the wireless networks.Figure 3-32 Wireless Bridge Setting31
TL-WA7110ND 150Mbps High Power Wireless Access Point User GuideEnable WDS - The AP client can connect to AP with WDS enabled or disabled. If WDS isenabled, all traffic from wired networks will be forwarded in the format of WDS frames consistof four address fields. If WDS is disabled, three address frames are used. If your AP supportsWDS well, please select the option.Wireless Name of Remote AP - The SSID of the AP your Device is going to connect to as aclient. You can also use the survey function to select the SSID to join.Mac Address of Remote AP: - The Mac Address of the AP your Device is going to connectto as a client. You can also use the survey function to select the BSSID to join.Survey - Click this button, you can search the APs.Region - Select your region from the pull-down list. This field specifies the region where thewireless function of the Router can be used. It may be illegal to use the wireless function ofthe Router in a region other than one of those specified in this filed. If your country or region isnot listed, please contact your local government agency for assistance.When you select your local region from the pull-down list, the Note Dialog of TERMS OF USEwill pop up. Select I agree to these terms of use, and click Accept to continue.Note:Note DialogEnsure you select a correct country to comply with local laws. Incorrect settings may causeinterference. Limited to local law of the United States, selecting country code and channelfunction was disabled.Transmission Power - The available options of transmission power are determined by theregion selected.Channel - This field determines which operating frequency will be used. It is not necessary tochange the wireless channel unless you notice interference problems with anothernearby access point.Wireless Security Mode - This option should be chosen according to the AP'ssecurity configuration. It is recommended that the security type is the same as your AP'ssecurity type.WPA/WPA2-PSK - Select WPA based on pre-shared passphrase.WEP - Select WEP based on none pre-shared passphrase.No Security - The wireless security function is disabled. The wireless stations willbe able to connect the Device without encryption.Auth Type - This option should be chosen if the Security Mode is WEP. Itindicates the authorization type of the Root AP.32
TL-WA7110ND 150Mbps High Power Wireless Access Point User GuideKey Format - This option should be chosen if the Security Mode is WEP. Itindicates the format of the WEP key.WEP Index - This option should be chosen if the Security Mode is WEP. It indicates the indexof the WEP key.Wireless Password - If the AP your Device is going to connect needs password, you need tofill the password in this blank.Note:The operating distance or range of your wireless connection varies significantly based on thephysical placement of the Device. For best results, place your DeviceNear the center of the area in which your wireless stations will operate.In an elevated location such as a high shelf.Away from the potential sources of interference, such as PCs, microwaves, and cordlessphones.With the Antenna in the upright position.Away from large metal surfaces.Failure to follow these guidelines can result in significant performance degradation or inabilityto wirelessly connect to the Device.2. The AP List page will appear shown as Figure 3-33. Find the BSSID (the same as the MACaddress) of the remote AP that you want to bridge, and then click Connect on the right sideof the line.Figure 3-33 AP ListYou will then return to the Wireless page as shown in Figure 3-32. The security mode will beselected automatically, please confirm it and enter the same password as is on your router oraccess point, then click Next.3. Create a name for the Local Wireless Network. The security settings for the local network willbe set the same as your root AP by default. Click Next.Figure 3-34 Local Wireless AP Setting33
TL-WA7110ND 150Mbps High Power Wireless Access Point User Guide4. The Network Setting page will appear then. It is recommended that you keep thedefault settings on this page. Click Next.Figure 3-35 Network5. When you finish the wireless setting in Figure 3-35 and click Next, then Figure3-36 will appear, where you can click Finish button to complete the Quick Setup.Figure 3-36 Finish page34
3.2.7ClientTL-WA7110ND 150Mbps High Power Wireless Access Point User GuideWhen you choose Client on Operation Mode page in Figure 3-7, take the following steps:1. Click Next in Figure 3-7, and then Wireless page will appear as shown in Figure 3-37. ClickSurvey button to scan the wireless networks.Figure 3-37 WirelessEnable WDS -The AP client can connect to AP with WDS enabled or disabled. IfWDS is enabled, all traffic from wired networks will be forwarded in the format of WDS framesconsistof four address fields. If WDS is disabled, three address frames are used. If your AP supportsWDS well, please select the option.Wireless Name of Remote AP - The SSID of the AP your Device is going to connect to as aclient. You can also use the survey function to select the SSID to join.Mac Address of Remote AP: - The Mac Address of the AP your Device is going to connectto as a client. You can also use the survey function to select the BSSID to join.Survey - Click this button, you can search the APs.Region - Select your region from the pull-down list. This field specifies the region where thewireless function of the Router can be used. It may be illegal to use the wireless function ofthe Router in a region other than one of those specified in this filed. If your country or region isnot listed, please contact your local government agency for assistance.When you select your local region from the pull-down list, the Note Dialog of TERMS OF USEwill pop up. Select I agree to these terms of use, and click Accept to continue.
35
TL-WA7110ND 150Mbps High Power Wireless Access Point User GuideNote:Note DialogEnsure you select a correct country to comply with local laws. Incorrect settings may causeinterference. Limited to local law of the United States, selecting country code and channelfunction was disabled.Transmission Power - The available options of transmission power are determined by theregion selected.Wireless Security Mode - This option should be chosen according to the AP'ssecurity configuration. It is recommended that the security type is the same as your AP'ssecurity type.WPA/WPA2-PSK - Select WPA based on pre-shared passphrase.WEP - Select WEP based on none pre-shared passphrase.No Security - The wireless security function is disabled. The wireless stations willbe able to connect the Device without encryption.Auth Type - This option should be chosen if the Security Mode is WEP. Itindicates the authorization type of the Root AP.Key Format - This option should be chosen if the Security Mode is WEP. Itindicates the format of the WEP key.WEP Index - This option should be chosen if the Security Mode is WEP. It indicates the indexof the WEP key.Wireless Password - If the AP your Device is going to connect needs password, you need tofill the password in this blank.Note:The operating distance or range of your wireless connection varies significantly based on thephysical placement of the Device. For best results, place your DeviceNear the center of the area in which your wireless stations will operate.In an elevated location such as a high shelf.Away from the potential sources of interference, such as PCs, microwaves, and cordlessphones.With the Antenna in the upright position.Away from large metal surfaces.Failure to follow these guidelines can result in significant performance degradation or inabilityto wirelessly connect to the Device.2. The AP List page will appear shown as Figure 3-38. Find the BSSID (the same as the MACaddress) of the remote AP that you want to repeat, and then click Connect on the right sideof the line.36
TL-WA7110ND 150Mbps High Power Wireless Access Point User GuideFigure 3-38 AP ListYou will then return to the Wireless page as shown in Figure 3-37. The security mode will beselected automatically, please confirm it and enter the same password as is on your router oraccess point, then click Next.3. The Network Setting page will appear then. It is recommended that you keep thedefault settings on this page. Click Next.Figure 3-39 Network4. When you finish the wireless setting in Figure 3-30 and click Next, then Figure3-31 will appear, where you can click Finish button to complete the Quick Setup.37

Navigation menu