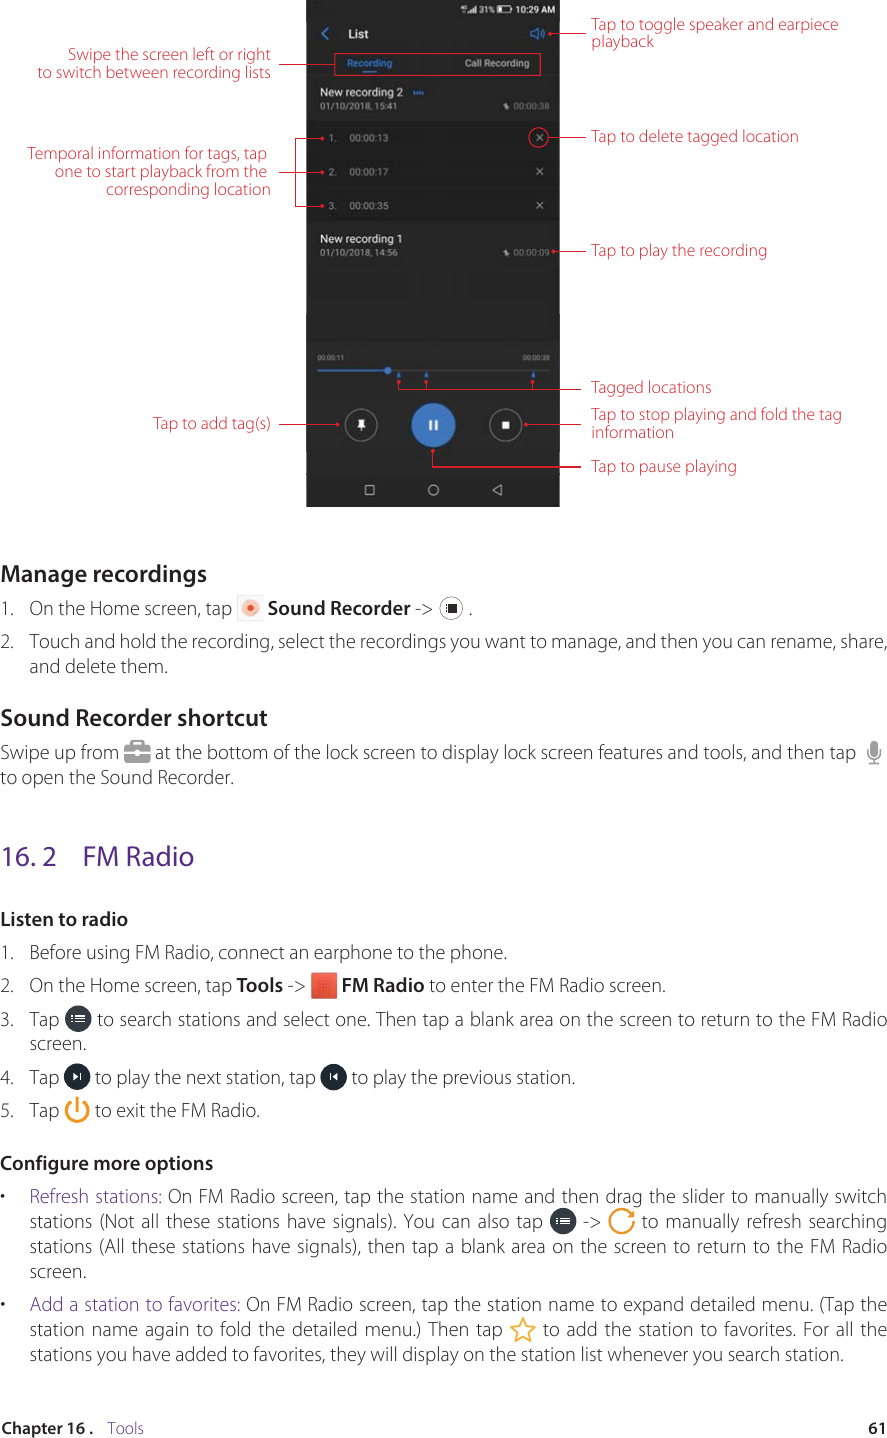
TP Link Technologies X9V1 X9 FDD-LTE Smartphone User Manual TP913A UG0606

TP-Link Technologies Co., Ltd. X9 FDD-LTE Smartphone TP913A UG0606
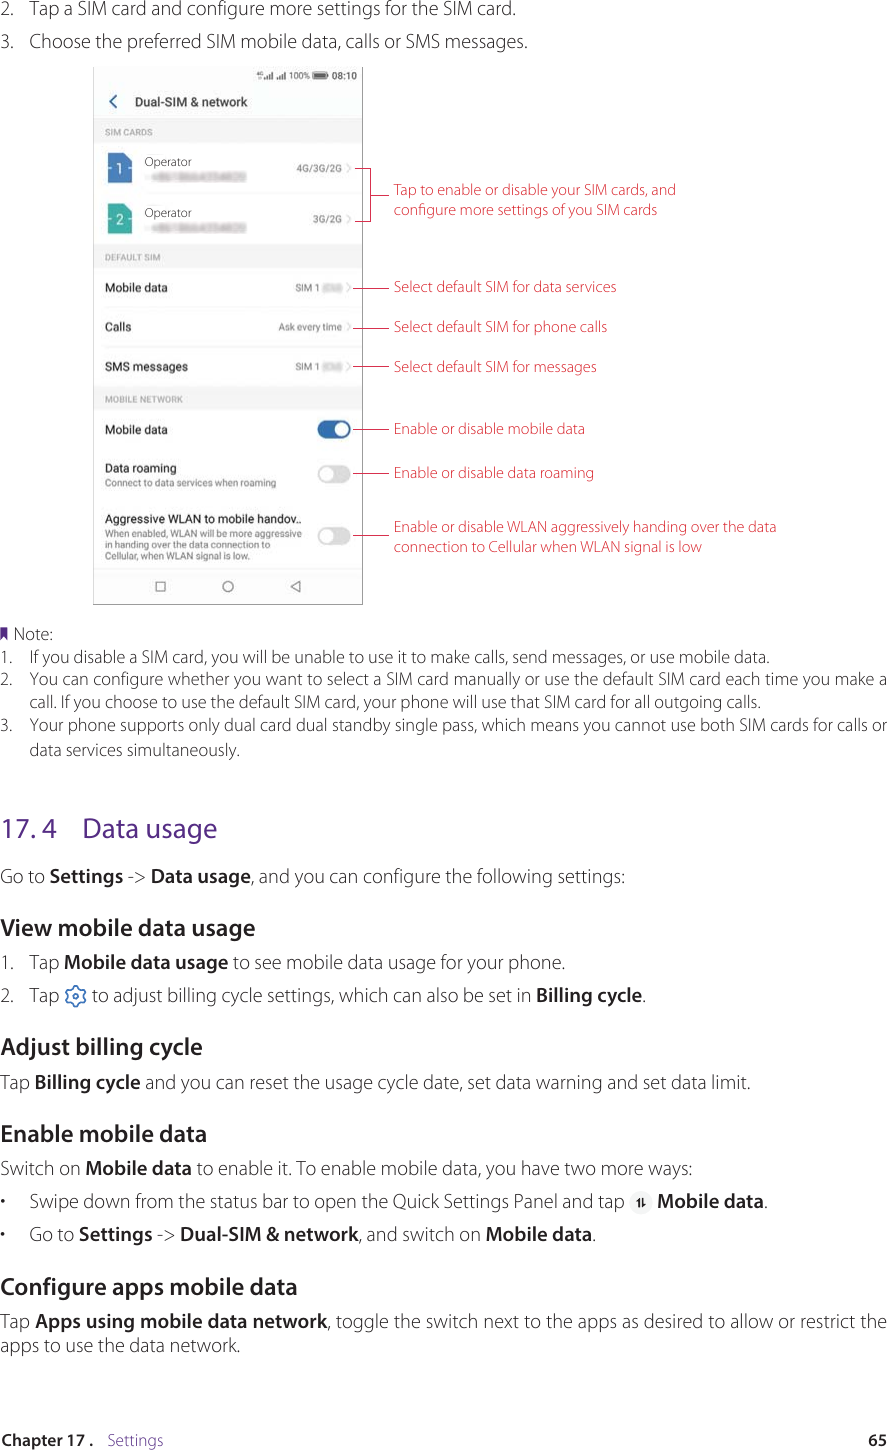
user manuel

1910100140      REV1.0.0
ContentsAbout this guide. . . . . . . . . . . . . . . . . . . . . . . . . . . . . . . . . . . . . . . . . . . . . . . . . . . . iChapter 1.  Get started. . . . . . . . . . . . . . . . . . . . . . . . . . . . . . . . . . . . . . . . . . . . .  11. 1  Overview  . . . . . . . . . . . . . . . . . . . . . . . . . . . . . . . . . . . . . . . . . . . . . . . . . . . . . . . . . . . . . . . . . .  11. 2  Buttons  . . . . . . . . . . . . . . . . . . . . . . . . . . . . . . . . . . . . . . . . . . . . . . . . . . . . . . . . . . . . . . . . . . . .  11. 3  Put in the cards. . . . . . . . . . . . . . . . . . . . . . . . . . . . . . . . . . . . . . . . . . . . . . . . . . . . . . . . . . . . .  31. 4  Initial setup  . . . . . . . . . . . . . . . . . . . . . . . . . . . . . . . . . . . . . . . . . . . . . . . . . . . . . . . . . . . . . . . .  31. 5  Charge your phone. . . . . . . . . . . . . . . . . . . . . . . . . . . . . . . . . . . . . . . . . . . . . . . . . . . . . . . . .  4Chapter 2.  Basics. . . . . . . . . . . . . . . . . . . . . . . . . . . . . . . . . . . . . . . . . . . . . . . . . .  52. 1  Touchscreen gestures  . . . . . . . . . . . . . . . . . . . . . . . . . . . . . . . . . . . . . . . . . . . . . . . . . . . . . .  52. 2  Home screen. . . . . . . . . . . . . . . . . . . . . . . . . . . . . . . . . . . . . . . . . . . . . . . . . . . . . . . . . . . . . . .  82. 3  Access applications. . . . . . . . . . . . . . . . . . . . . . . . . . . . . . . . . . . . . . . . . . . . . . . . . . . . . . . . 112. 4  Status bar . . . . . . . . . . . . . . . . . . . . . . . . . . . . . . . . . . . . . . . . . . . . . . . . . . . . . . . . . . . . . . . . . 122. 5  Notication Panel  . . . . . . . . . . . . . . . . . . . . . . . . . . . . . . . . . . . . . . . . . . . . . . . . . . . . . . . . . 132. 6  Quick Settings Panel. . . . . . . . . . . . . . . . . . . . . . . . . . . . . . . . . . . . . . . . . . . . . . . . . . . . . . . 132. 7  Type text. . . . . . . . . . . . . . . . . . . . . . . . . . . . . . . . . . . . . . . . . . . . . . . . . . . . . . . . . . . . . . . . . . 142. 8  Take a screenshot  . . . . . . . . . . . . . . . . . . . . . . . . . . . . . . . . . . . . . . . . . . . . . . . . . . . . . . . . . 152. 9  Congure your ngerprint. . . . . . . . . . . . . . . . . . . . . . . . . . . . . . . . . . . . . . . . . . . . . . . . . 162. 10  Congure your face data  . . . . . . . . . . . . . . . . . . . . . . . . . . . . . . . . . . . . . . . . . . . . . . . . . . 172. 11  Split-screen mode . . . . . . . . . . . . . . . . . . . . . . . . . . . . . . . . . . . . . . . . . . . . . . . . . . . . . . . . . 17Chapter 3.  Network and Share . . . . . . . . . . . . . . . . . . . . . . . . . . . . . . . . . . . . 193. 1  WLAN. . . . . . . . . . . . . . . . . . . . . . . . . . . . . . . . . . . . . . . . . . . . . . . . . . . . . . . . . . . . . . . . . . . . . 193. 2  Mobile data . . . . . . . . . . . . . . . . . . . . . . . . . . . . . . . . . . . . . . . . . . . . . . . . . . . . . . . . . . . . . . . 203. 3  Connect to computer. . . . . . . . . . . . . . . . . . . . . . . . . . . . . . . . . . . . . . . . . . . . . . . . . . . . . . 203. 4  Bluetooth . . . . . . . . . . . . . . . . . . . . . . . . . . . . . . . . . . . . . . . . . . . . . . . . . . . . . . . . . . . . . . . . . 213. 5  Share your mobile data with other devices  . . . . . . . . . . . . . . . . . . . . . . . . . . . . . . . . . 213. 6  Smart WLAN  . . . . . . . . . . . . . . . . . . . . . . . . . . . . . . . . . . . . . . . . . . . . . . . . . . . . . . . . . . . . . . 22Chapter 4.  Calls  . . . . . . . . . . . . . . . . . . . . . . . . . . . . . . . . . . . . . . . . . . . . . . . . . . 244. 1  Make a call . . . . . . . . . . . . . . . . . . . . . . . . . . . . . . . . . . . . . . . . . . . . . . . . . . . . . . . . . . . . . . . . 244. 2  Answer or reject a call  . . . . . . . . . . . . . . . . . . . . . . . . . . . . . . . . . . . . . . . . . . . . . . . . . . . . . 254. 3  Options during a call  . . . . . . . . . . . . . . . . . . . . . . . . . . . . . . . . . . . . . . . . . . . . . . . . . . . . . . 264. 4  Call log. . . . . . . . . . . . . . . . . . . . . . . . . . . . . . . . . . . . . . . . . . . . . . . . . . . . . . . . . . . . . . . . . . . . 27
4. 5  Manage contacts . . . . . . . . . . . . . . . . . . . . . . . . . . . . . . . . . . . . . . . . . . . . . . . . . . . . . . . . . . 284. 6  Harassment lter . . . . . . . . . . . . . . . . . . . . . . . . . . . . . . . . . . . . . . . . . . . . . . . . . . . . . . . . . . 284. 7  Call settings . . . . . . . . . . . . . . . . . . . . . . . . . . . . . . . . . . . . . . . . . . . . . . . . . . . . . . . . . . . . . . . 294. 8  Advance settings. . . . . . . . . . . . . . . . . . . . . . . . . . . . . . . . . . . . . . . . . . . . . . . . . . . . . . . . . . 304. 9  Contacts  . . . . . . . . . . . . . . . . . . . . . . . . . . . . . . . . . . . . . . . . . . . . . . . . . . . . . . . . . . . . . . . . . . 31Chapter 5.  Messages  . . . . . . . . . . . . . . . . . . . . . . . . . . . . . . . . . . . . . . . . . . . . . 335. 1  Type of messages  . . . . . . . . . . . . . . . . . . . . . . . . . . . . . . . . . . . . . . . . . . . . . . . . . . . . . . . . . 335. 2  Send and reply to a message  . . . . . . . . . . . . . . . . . . . . . . . . . . . . . . . . . . . . . . . . . . . . . . 335. 3  Search for messages. . . . . . . . . . . . . . . . . . . . . . . . . . . . . . . . . . . . . . . . . . . . . . . . . . . . . . . 345. 4  Manage your messages. . . . . . . . . . . . . . . . . . . . . . . . . . . . . . . . . . . . . . . . . . . . . . . . . . . . 34Chapter 6.  Camera and Photos. . . . . . . . . . . . . . . . . . . . . . . . . . . . . . . . . . . . 366. 1  Camera at a glance . . . . . . . . . . . . . . . . . . . . . . . . . . . . . . . . . . . . . . . . . . . . . . . . . . . . . . . . 366. 2  Take a photo  . . . . . . . . . . . . . . . . . . . . . . . . . . . . . . . . . . . . . . . . . . . . . . . . . . . . . . . . . . . . . . 376. 3  Record a video  . . . . . . . . . . . . . . . . . . . . . . . . . . . . . . . . . . . . . . . . . . . . . . . . . . . . . . . . . . . . 376. 4  Shooting modes  . . . . . . . . . . . . . . . . . . . . . . . . . . . . . . . . . . . . . . . . . . . . . . . . . . . . . . . . . . 376. 5  Camera and video settings  . . . . . . . . . . . . . . . . . . . . . . . . . . . . . . . . . . . . . . . . . . . . . . . . 406. 6  Photos . . . . . . . . . . . . . . . . . . . . . . . . . . . . . . . . . . . . . . . . . . . . . . . . . . . . . . . . . . . . . . . . . . . . 41Chapter 7.  Videos . . . . . . . . . . . . . . . . . . . . . . . . . . . . . . . . . . . . . . . . . . . . . . . . 427. 1  Play a video  . . . . . . . . . . . . . . . . . . . . . . . . . . . . . . . . . . . . . . . . . . . . . . . . . . . . . . . . . . . . . . . 427. 2  Video management  . . . . . . . . . . . . . . . . . . . . . . . . . . . . . . . . . . . . . . . . . . . . . . . . . . . . . . . 42Chapter 8.  Clock  . . . . . . . . . . . . . . . . . . . . . . . . . . . . . . . . . . . . . . . . . . . . . . . . . 448. 1  Alarm . . . . . . . . . . . . . . . . . . . . . . . . . . . . . . . . . . . . . . . . . . . . . . . . . . . . . . . . . . . . . . . . . . . . . 448. 2  Worldclock . . . . . . . . . . . . . . . . . . . . . . . . . . . . . . . . . . . . . . . . . . . . . . . . . . . . . . . . . . . . . . . . 458. 3  Stopwatch  . . . . . . . . . . . . . . . . . . . . . . . . . . . . . . . . . . . . . . . . . . . . . . . . . . . . . . . . . . . . . . . . 458. 4  Timer  . . . . . . . . . . . . . . . . . . . . . . . . . . . . . . . . . . . . . . . . . . . . . . . . . . . . . . . . . . . . . . . . . . . . . 468. 5  Settings. . . . . . . . . . . . . . . . . . . . . . . . . . . . . . . . . . . . . . . . . . . . . . . . . . . . . . . . . . . . . . . . . . . 46Chapter 9.  Browser. . . . . . . . . . . . . . . . . . . . . . . . . . . . . . . . . . . . . . . . . . . . . . . 479. 1  Go to a webpage . . . . . . . . . . . . . . . . . . . . . . . . . . . . . . . . . . . . . . . . . . . . . . . . . . . . . . . . . . 479. 2  Browser tabs  . . . . . . . . . . . . . . . . . . . . . . . . . . . . . . . . . . . . . . . . . . . . . . . . . . . . . . . . . . . . . . 48Chapter 10. Google Play Store  . . . . . . . . . . . . . . . . . . . . . . . . . . . . . . . . . . . . . 4910. 1  Add an account to your Google Play Store. . . . . . . . . . . . . . . . . . . . . . . . . . . . . . . . . . 49
10. 2  Download and install applications  . . . . . . . . . . . . . . . . . . . . . . . . . . . . . . . . . . . . . . . . . 49Chapter 11. Themes . . . . . . . . . . . . . . . . . . . . . . . . . . . . . . . . . . . . . . . . . . . . . . . 5011. 1  Change the theme  . . . . . . . . . . . . . . . . . . . . . . . . . . . . . . . . . . . . . . . . . . . . . . . . . . . . . . . . 5011. 2  Change the wallpaper . . . . . . . . . . . . . . . . . . . . . . . . . . . . . . . . . . . . . . . . . . . . . . . . . . . . . 5011. 3  Change Lock screen style . . . . . . . . . . . . . . . . . . . . . . . . . . . . . . . . . . . . . . . . . . . . . . . . . . 5111. 4  Change the icon style  . . . . . . . . . . . . . . . . . . . . . . . . . . . . . . . . . . . . . . . . . . . . . . . . . . . . . 51Chapter 12. Weather  . . . . . . . . . . . . . . . . . . . . . . . . . . . . . . . . . . . . . . . . . . . . . . 5212. 1  Check the weather  . . . . . . . . . . . . . . . . . . . . . . . . . . . . . . . . . . . . . . . . . . . . . . . . . . . . . . . . 5212. 2  Weather settings  . . . . . . . . . . . . . . . . . . . . . . . . . . . . . . . . . . . . . . . . . . . . . . . . . . . . . . . . . . 52Chapter 13. Calendar. . . . . . . . . . . . . . . . . . . . . . . . . . . . . . . . . . . . . . . . . . . . . . 5313. 1  Use the calendar  . . . . . . . . . . . . . . . . . . . . . . . . . . . . . . . . . . . . . . . . . . . . . . . . . . . . . . . . . . 5313. 2  Calendar settings. . . . . . . . . . . . . . . . . . . . . . . . . . . . . . . . . . . . . . . . . . . . . . . . . . . . . . . . . . 54Chapter 14. Notes . . . . . . . . . . . . . . . . . . . . . . . . . . . . . . . . . . . . . . . . . . . . . . . . . 5514. 1  Compose a new note . . . . . . . . . . . . . . . . . . . . . . . . . . . . . . . . . . . . . . . . . . . . . . . . . . . . . . 5514. 2  Note options . . . . . . . . . . . . . . . . . . . . . . . . . . . . . . . . . . . . . . . . . . . . . . . . . . . . . . . . . . . . . . 5514. 3  Manage notes. . . . . . . . . . . . . . . . . . . . . . . . . . . . . . . . . . . . . . . . . . . . . . . . . . . . . . . . . . . . . 56Chapter 15. File Manager . . . . . . . . . . . . . . . . . . . . . . . . . . . . . . . . . . . . . . . . . . 5815. 1  Create a folder  . . . . . . . . . . . . . . . . . . . . . . . . . . . . . . . . . . . . . . . . . . . . . . . . . . . . . . . . . . . . 5815. 2  View les. . . . . . . . . . . . . . . . . . . . . . . . . . . . . . . . . . . . . . . . . . . . . . . . . . . . . . . . . . . . . . . . . . 5815. 3  Manage les  . . . . . . . . . . . . . . . . . . . . . . . . . . . . . . . . . . . . . . . . . . . . . . . . . . . . . . . . . . . . . . 5815. 4  File sharing. . . . . . . . . . . . . . . . . . . . . . . . . . . . . . . . . . . . . . . . . . . . . . . . . . . . . . . . . . . . . . . . 59Chapter 16. Tools  . . . . . . . . . . . . . . . . . . . . . . . . . . . . . . . . . . . . . . . . . . . . . . . . . 6016. 1  Sound Recorder . . . . . . . . . . . . . . . . . . . . . . . . . . . . . . . . . . . . . . . . . . . . . . . . . . . . . . . . . . . 6016. 2  FM Radio. . . . . . . . . . . . . . . . . . . . . . . . . . . . . . . . . . . . . . . . . . . . . . . . . . . . . . . . . . . . . . . . . . 6116. 3  Compass. . . . . . . . . . . . . . . . . . . . . . . . . . . . . . . . . . . . . . . . . . . . . . . . . . . . . . . . . . . . . . . . . . 6216. 4  Downloads. . . . . . . . . . . . . . . . . . . . . . . . . . . . . . . . . . . . . . . . . . . . . . . . . . . . . . . . . . . . . . . . 6216. 5  SIM Toolkit  . . . . . . . . . . . . . . . . . . . . . . . . . . . . . . . . . . . . . . . . . . . . . . . . . . . . . . . . . . . . . . . . 6216. 6  Feedback  . . . . . . . . . . . . . . . . . . . . . . . . . . . . . . . . . . . . . . . . . . . . . . . . . . . . . . . . . . . . . . . . . 6216. 7  Calculator. . . . . . . . . . . . . . . . . . . . . . . . . . . . . . . . . . . . . . . . . . . . . . . . . . . . . . . . . . . . . . . . . 63Chapter 17. Settings. . . . . . . . . . . . . . . . . . . . . . . . . . . . . . . . . . . . . . . . . . . . . . . 64
17. 1  Enter settings  . . . . . . . . . . . . . . . . . . . . . . . . . . . . . . . . . . . . . . . . . . . . . . . . . . . . . . . . . . . . . 6417. 2  Search settings. . . . . . . . . . . . . . . . . . . . . . . . . . . . . . . . . . . . . . . . . . . . . . . . . . . . . . . . . . . . 6417. 3  Dual SIM and network . . . . . . . . . . . . . . . . . . . . . . . . . . . . . . . . . . . . . . . . . . . . . . . . . . . . . 6417. 4  Data usage. . . . . . . . . . . . . . . . . . . . . . . . . . . . . . . . . . . . . . . . . . . . . . . . . . . . . . . . . . . . . . . . 6517. 5  More connection settings  . . . . . . . . . . . . . . . . . . . . . . . . . . . . . . . . . . . . . . . . . . . . . . . . . 6617. 6  Sounds, vibration and Do not disturb  . . . . . . . . . . . . . . . . . . . . . . . . . . . . . . . . . . . . . . 6717. 7  Display. . . . . . . . . . . . . . . . . . . . . . . . . . . . . . . . . . . . . . . . . . . . . . . . . . . . . . . . . . . . . . . . . . . . 6717. 8  Notications  . . . . . . . . . . . . . . . . . . . . . . . . . . . . . . . . . . . . . . . . . . . . . . . . . . . . . . . . . . . . . . 6817. 9  Apps. . . . . . . . . . . . . . . . . . . . . . . . . . . . . . . . . . . . . . . . . . . . . . . . . . . . . . . . . . . . . . . . . . . . . . 6817. 10  Permissions  . . . . . . . . . . . . . . . . . . . . . . . . . . . . . . . . . . . . . . . . . . . . . . . . . . . . . . . . . . . . . . . 6917. 11  App Cloner. . . . . . . . . . . . . . . . . . . . . . . . . . . . . . . . . . . . . . . . . . . . . . . . . . . . . . . . . . . . . . . . 6917. 12  Screen lock, ngerprint and security  . . . . . . . . . . . . . . . . . . . . . . . . . . . . . . . . . . . . . . . 6917. 13  System navigation. . . . . . . . . . . . . . . . . . . . . . . . . . . . . . . . . . . . . . . . . . . . . . . . . . . . . . . . . 7117. 14  Gestures and smart assistance  . . . . . . . . . . . . . . . . . . . . . . . . . . . . . . . . . . . . . . . . . . . . . 7317. 15  Battery. . . . . . . . . . . . . . . . . . . . . . . . . . . . . . . . . . . . . . . . . . . . . . . . . . . . . . . . . . . . . . . . . . . . 7417. 16  Storage  . . . . . . . . . . . . . . . . . . . . . . . . . . . . . . . . . . . . . . . . . . . . . . . . . . . . . . . . . . . . . . . . . . . 7517. 17  Users  . . . . . . . . . . . . . . . . . . . . . . . . . . . . . . . . . . . . . . . . . . . . . . . . . . . . . . . . . . . . . . . . . . . . . 7617. 18  Accounts. . . . . . . . . . . . . . . . . . . . . . . . . . . . . . . . . . . . . . . . . . . . . . . . . . . . . . . . . . . . . . . . . . 7717. 19  Location  . . . . . . . . . . . . . . . . . . . . . . . . . . . . . . . . . . . . . . . . . . . . . . . . . . . . . . . . . . . . . . . . . . 7817. 20  Languages and input . . . . . . . . . . . . . . . . . . . . . . . . . . . . . . . . . . . . . . . . . . . . . . . . . . . . . . 7817. 21  Date and time. . . . . . . . . . . . . . . . . . . . . . . . . . . . . . . . . . . . . . . . . . . . . . . . . . . . . . . . . . . . . 7917. 22  Backup and reset . . . . . . . . . . . . . . . . . . . . . . . . . . . . . . . . . . . . . . . . . . . . . . . . . . . . . . . . . . 7917. 23  System update  . . . . . . . . . . . . . . . . . . . . . . . . . . . . . . . . . . . . . . . . . . . . . . . . . . . . . . . . . . . . 7917. 24  About phone. . . . . . . . . . . . . . . . . . . . . . . . . . . . . . . . . . . . . . . . . . . . . . . . . . . . . . . . . . . . . . 80Appendix A: Specifications  . . . . . . . . . . . . . . . . . . . . . . . . . . . . . . . . . . . . . . . . 81Appendix B: Technical Support  . . . . . . . . . . . . . . . . . . . . . . . . . . . . . . . . . . . . 83Appendix C: Explanation of the symbols on the product label . . . . . . . 87Appendix D: Authentication. . . . . . . . . . . . . . . . . . . . . . . . . . . . . . . . . . . . . . . 88
About this guideThis guide is a complement to Quick Start Guide. The Quick Start Guide provides instructions for quick setup, while this guide provides details of each function and shows how to configure the smart phone appropriate to your needs. When using this guide, please notice that features of the device may vary slightly depending on the model and software version you have, and on your location, language, and Internet service provider. All screenshots, images, parameters and descriptions documented in this guide are used for demonstration only.ConventionsIn this guide, the following conventions are used:Convention DescriptionSmart phone/phone Stands for Neffos X9 without any explanation.Parameters Parameters provided in the screenshots are just references for configuring the smart phone, which may be different from the actual situation. You can set the parameters according to your demand.Underlined Italic and underlined words or phrases are hyperlinks. You can click to redirect to a specific section for more details. Screenshots  The demonstrated screenshots may look a little different from the actual UI of your smart phone due to the various firmware versions. Please just configure your phone based on the actual UI. -> The menu structure which shows the path to enter the corresponding page. For example, Settings -> WLAN  means the WLAN function page is under the Settings menu.Note: Ignoring the notes in the guide might result in a malfunction or damage to the device.
1Chapter 1 .    Get startedGet startedThis chapter introduces the smart phone’s hardware information and guides you how to assemble your phone when you get started on using your new phone.•  Overview•  Buttons•  Put in the cards•  Initial setup•  Charge your phone1. 1  OverviewAmbient light & proximity sensorSIM/SD card tray1LED indicator2Front camera3Earpiece45Volume buttons6SpeakerPrimary microphoneCharging/data port89Headphone jack1110Two-tone flash 12Secondary microphone13Dual-lens camera14Fingerprint sensor157Power button32 4 5961211141510131781. 2  ButtonsThe buttons you use with Neffos include virtual ones and physical ones.Power button•  Lock Neffos: Locking your phone puts the display to sleep, saves the battery and prevents unintended presses. You can still receive phone calls, text messages, alarms and notifications as well as listening to music and adjusting the volume. Press the Power button to manually lock the screen. Neffos locks the screen automatically in a given period of inactivity. 1
2Chapter 1 .    Get started•  Unlock Neffos: Press the Power button to wake the screen.•  Turn Neffos on: Press and hold the Power button until your phone vibrates and the screen turns on.Note:If your device displays the shut down notice after the screen turns on, the battery is empty. Connect your phone to a charger to charge the battery, otherwise your phone will shut down in 30 seconds.•  Turn Neffos off: Press and hold the Power button, then tap  .•  Reboot Neffos: Press and hold the Power button, then tap  .Volume button•  Press the Volume-up or Volume-down button to adjust the audio volume when you’re on the phone, listening to songs, watching movies or using other media.•  Press the Volume button to take a picture or record a video. Refer to Take a photo and Record a video to learn more.•  Press the Power button and Volume-down button at the same time to take a screenshot.Navigation buttonsBack buttonRecent apps buttonHome button•  Home buttonTap Home button to return to the default Home screen.Touch and hold Home button to open GoogleTM search.•  Back buttonTap Back button to return to the previous screen or close an application. When entering text, tap Back button to close the onscreen keyboard.•  Recent apps buttonTap Recent apps button to display recently used applications.Double-tap Recent apps button to switch to the previous application.
3Chapter 1 .    Get started1. 3  Put in the cardsInsert Nano SIM cards and microSD card (optional)OrNano-SIMNano-SIMNano-SIMmicroSD1.  Eject the SIM card tray by inserting the SIM ejector pin provided into the hole on the tray.2.  Place the the card(s) into the tray with the gold contacts face down. The card tray can support two Nano-SIM cards or a Nano-SIM card and a mircoSD card.3.  Insert the card tray back into your phone in the correct orientation.Note:Take care not to scratch your device or harm  yourself when using the SIM ejector pin. Store the SIM ejector pin out of the reach of children to prevent accidental swallowing or injury.1. 4  Initial setupIt is recommended to insert your SIM card before you start the initial setup.Press and hold the Power button to turn on your phone, and then follow the onscreen instructions to complete the initial setup.Note:To avoid low battery power, your phone will shut down automatically if not operated on Initial screen in 30 minutes.1.  Select your language and location, and then tap  .2. Proceed to Connect to mobile network screen. If you insert two SIM cards, follow the onscreen instructions to finish dual-SIM settings. You can always adjust dual-SIM settings in   Settings -> Dual-SIM & network.Your phone will automatically list available WLAN networks. Select the network you want to connect to (If you want to view more Wi-Fi networks, tap See all Wi-Fi networks), and then enter the password to access the Internet (This can take up to 2 minutes). If you have activated mobile data services with your carrier, you can tap Use cellular network for setup. Or if you don’t want to connect to network, just tap SKIP -> CONTINUE to skip this step.Note:Using cellular network for setup may result in additional fees. Contact your carrier for information about your cellular data plan rates.
4Chapter 1 .    Get started3.  If you don’t connect to any networks, your device will proceed to Date & time screen. Set the data and time, then tap NEXT. You also can tap NEXT directly to skip this step. You can always adjust date and time in   Settings -> More general settings -> Date & time.4. Proceed to Name screen. Add your name to allow your phone to personalize some apps. Your name will be saved as ME in   Contacts. Then tap NEXT after finishing. If you don’t want to set now, tap NEXT directly. You can always set your name in   Contacts -> Set up my profile.5. Pcoceed to Protect your phone screen. Select a device protection feature and then follow the onscreen instructions to complete. If you don’t want to set now, choose Not thanks and tap NEXT -> SKIP ANYWAY. You can always set your device protection in   Settings -> Security -> Screen lock.6. Pcoceed to Register fingerprint data screen. Select Register fingerprint and then follow the onscreen instructions to complete. If you don’t want to register now, choose Not thanks and tap NEXT to skip.7. Pcoceed to Register face data screen. Select Register fingerprint and then follow the onscreen instructions to complete. If you don’t want to register now, choose Not thanks and tap NEXT to skip.8. Proceed to Google services screen. Read the Google terms and conditions, then tap I AGREE.9. Pcoceed to Anything else screen. You can set up a few more things there, or you can just skip by tapping NO THANKS.10. Proceed to Terms And Conditions screen. Carefully read the terms and conditions and then tap AGREE.11. Setup completed. Tap START USING YOUR PHONE to start using your phone.1. 5  Charge your phoneYour device displays a low battery warning when the battery is nearly empty. Charge your device immediately to prevent it from switching off automatically.Use the charger to charge your deviceConnect the device to a power outlet using the included USB cable and power adapter.Use a USB port to charge your deviceIf you do not have access to a charger, you can charge your device by connecting it to a computer with a USB cable.When you use a USB cable to connect your device to a computer or another device, Allow access to device data will be displayed in a popup dialog. Touch DENY.If another USB connection mode has been selected, swipe down from the status bar to open the Notification Panel. Tap the notification of USB connection mode, and then select Charge this device.Note:1.  The battery is built into the phone and is not removable. Do not attempt to remove the battery yourself.2.  When charging your phone, only use genuine Neffos batteries, chargers, and USB cables. Third-party accessories are a potential safety hazard and may impair your phone’s performance.3.  Avoid using your phone when it is charging. Do not cover your phone or the power adapter.4.  It is entirely normal that your phone may become warm after prolonged use or when exposed to high ambient temperatures. If your phone becomes hot to the touch, stop charging it and disable unnecessary features. Place your phone in a cool location and allow it to cool down to room temperature. Avoid prolonged contact with the surface of your phone if it becomes hot.5.  A low battery warning will be displayed when the battery level is low. Your phone will turn off automatically when the battery is nearly empty.
5Chapter 2 .    BasicsBasicsLearn about your smart phone’s basic feature.•  Touchscreen gestures•  Home screen•  Access applications•  Status bar•  Notification Panel•  Quick Settings Panel•  Type text•  Take a screenshot•  Configure your fingerprint•  Configure your face data•  Split-screen mode2. 1  Touchscreen gesturesUse simple touchscreen gestures to perform a variety of tasks, such as opening applications, scrolling through lists, and zooming images.Tap: Simply tap an item once. For example, tap to select an option or open an application.Double-tap: Tap the target area of the screen twice in quick succession. For example, double-tap an image in full screen mode to zoom in or zoom out.2
6Chapter 2 .    BasicsTouch and hold: Touch and leave your finger on the screen for 2 seconds or more to activate onscreen items. For example, touch and hold a widget on the Home screen to move it. Swipe: Place your finger on the screen, and drag your finger to the direction you want. For example, you can swipe to scroll through the Home screen or a list.Drag: Touch and hold an item and then move it to another position. For example, you can rearrange applications and widgets on the Home screen.
7Chapter 2 .    BasicsPinch fingers together: Pinch two fingers together on the screen. For example, pinch two fingers together to zoom out on a picture.Spread fingers apart: Spread two fingers apart on the screen. For example, pinch two fingers out to zoom in on a picture.Slide three fingers: Slide down three fingers on the screen to take a screenshot.
8Chapter 2 .    Basics2. 2  Home screenYour Home screens are where you can find your favorite widgets and all your applications. Status bar: Displays status and notification iconsDisplay area: Displays app icons, folders, and widgetsApp drawer: Tap to open application listDock component bar: Shortcuts to your frequently                                         used applicationsOrganize widgets on the Home screen•  Add a widget to the Home screenAdd frequently used widgets to the Home screen for quick access.1.  On the Home screen, touch and hold a blank area (or pinch two fingers together) on the screen to access the Home screen editor.2. Tap   Widgets and select a widget. Tap the widget to add to the Home screen and drag it to a blank area you like. Or you can just touch and hold the widget to drag it to target area.3.  Tap a blank area on the Home screen (or tap Home Button/Back button) to quit the Home screen editor.Note:1.  You must have enough space on the Home screen to add widgets. If there is not enough space, add another Home screen (see Add a Home screen) or free up some space.•  Move a widgetOn the Home screen, touch and hold an widget and then drag it to the desired location.•  Delete a widgetOn the Home screen, touch and hold the widget you want to delete and then move it to Remove in the status bar.Organize folders on the Home screen•  Create a folderCreate Home screen folders to organize your applications as desired. For example, you can create a Camera folder that contains all of your camera applications.1.  On the Home screen, drag an icon onto another icon to create a folder containing both applications.2.  To name the new folder, open the folder, tap Unnamed Folder and enter the folder name.
9Chapter 2 .    Basics•  Rename a folderOn the Home screen, open the folder and touch the folder name, then enter the new name.•  Add apps to a folderOn the Home screen, touch and hold the application you want to remove, then drag it to the folder you want to add it to.•  Remove apps from a folder1.  On the Home screen, open the folder.2.  Touch and hold the application you want to remove, then drag it out of the folder.•  Delete a folderYou can delete a fold in two ways:•  On the Home screen, open the folder. Remove all the applications in it, then the folder will be automatically deleted. •  Touch and hold the folder and drag it to Remove in the status bar. The folder and icons in it will be deleted together.Organize applications on the Home screenNotification dotPop up boxNotification•  App pop up boxOn the Home screen, touch and hold an application to open the pop up box. You can:•  View App info: Tap App info or  .•  Use shortcut to go to the screen you want to go quickly: Tap the shortcut.•  Add the widget to Home screen: Tap Widgets or  . Touch and hold the widget and drag it to your target area.•  Add the shortcut to Home screen: Touch and hold the shortcut and drag it to your target area.Note:Widget and shortcut only appear when the app includes related content.•  Notification dotTouch and hold the app with notification dot to view the notification. Tap to open and swipe left or right to remove the notification.•  App drawerOn the Home screen, tap   or swipe up on the dock component bar to expand app drawer. All of your applications sorted by name. You can tap   to search the App you need.•  Move an applicationOn the Home screen, touch and hold an application and then drag it to the desired location.
10Chapter 2 .    Basics•  Add an app icon to the Home screen1.  On the Home screen, tap   or swipe up on the dock component bar to expand app drawer.2.  Touch and hold an app and drag it to a blank area you like.•  Uninstall an applicationOn the Home screen, touch and hold the application you want to remove, then drag it to Uninstall in the status bar.Note:Some pre-installed system applications cannot be uninstalled.•  Remove an application iconOn the Home screen, touch and hold the application you want to remove, then drag it to Remove in the status bar.•  Batch moving icons1.  On the Home screen, touch and hold a blank area on the screen (or pinch two fingers together) to access the Home screen editor.2. Tap   Adjustment. Tap or drag the icons to put them in the adjustment at the bottom.3.  Swipe left or right to choose the target Home screen.4.  Tap or drag the icons in adjustment to add them to the target Home screen.5.  Tap a blank area on the Home screen (or tap Home Button/Back button) to quit the Home screen editor.Manage Home screenOn the Home screen, touch and hold a blank area on the screen (or pinch two fingers together) to open the Home screen editor. You can:•  Add a Home screenSwipe left and tap   on the rightmost screen to add a new screen.•  Delete a Home screenTap   on the Home screen to delete it.Note:Only blank Home screen can be deleted.•  Adjust screen orderTouch and hold the screen you want to move and drag left or right to adjust page order.•  Set the default home screenTap   at the top of a Home screen to set the chosen Home screen as default. On the default Home screen,  will display at the top.Set the Home screen wallpaper1.  On the Home screen, touch and hold a blank area (or pinch two fingers together) to open the Home screen editor.2. Tap   Wallpapers, and follow the onscreen instructions to set the picture as the Home screen or lock screen wallpaper (or both).Note:You also can set the Home screen wallpaper on   Themes (see Change the wallpaper), or go to   Settings -> Display -> Wallpaper.Home screen settingsOn the home screen, touch and hold a blank area (or pinch two fingers together) on the screen to access the Home screen editor. Then tap   Settings, you can: •  Manage notification dots: Tap Notification dots. You can choose the dot style and toggle the switch to enable or disable the function.
11Chapter 2 .    Basics•  Enable or disable app drawer: Tap App drawer and tap to turn on or turn off App drawer.•  Add icons to the Home screen automatically: When you turn on the switch, the new apps downloaded from Play Store will be added to Home screen automatically.2. 3  Access applicationsLaunch and switch between applications •  From the Home screen: Tap an icon to launch the corresponding application.•  From the Locked screen: Swipe up   to launch the camera application. Swipe up   to open the toolkit.Sound RecorderCalculator FlashlightClock•  Switch to another application: Tap the Home button to return to the Home screen, and then tap the icon of the application you want to open. Or you can tap Recent apps button to view the recently used applications, then tap the application you want to open. Double-tap Recent apps button to switch to the previous application.Viewing recently used applicationsTap Recent apps button to display the list of recently used applications.•  View more applications: Swipe up or down on the screen to view more recently used applications.•  Open an application: Tap a thumbnail to open the corresponding application.•  Close an application: Swipe left or right on a thumbnail to close the corresponding application, or you can tap   on a thumbnail to close it.•  Close all applications: Tap   to close all applications.
12Chapter 2 .    Basics2. 4  Status barUse the status bar to access the Quick Settings Panel, Notification Panel and check your phone’s status.Status iconsStatus icons are displayed on the right-hand side of the status bar and tell you about your phone’s status, including network connections, signal strength, battery, and time.Status icons IndicationsBattery low ChargingBattery fullBattery saver enabledSignal strengthNo signalEConnected over GPRS3G Connected over 3G4G Connected over LTEHeadset mic insertedWLAN connectedVibrate mode enabledBluetooth enabledHotspot enabledNo SIM card installedDo not disturb enabledAirplane mode enabledData saver enabledAlarms enabledNotification iconsNotification icons are displayed on the left-hand side of the status bar when you receive a new message and other notifications.Notifications icons IndicationsDownloading statusUploading dataDownload completeCall in progressMissed callsNew messagesHotspot enabledConnected to a PC using USB cable
13Chapter 2 .    Basics2. 5  Notification PanelNotification Panel collects all the notifications and alerts so that you can review them whenever you like.Tap to display all of the Quick Settings PanelTap to go to SettingsShortcut switches: Tap a switch to enable/disable                                  the corresponding functionTap to remove all the notifications at once.Brightness slider: Use this slider to adjust the                               brightness of the screenAdaptive brightness: Tap to enable                                      auto-brightness•  Open Notification Panel: Swipe down from the status bar to open the Notification Panel.•  View a notification: Tap an item to view the details. New notifications, such as missed calls and messages are displayed on the Lock screen. From the Lock screen, double-tap it to view the details, or swipe left or right to remove it.•  Clear notifications: Swipe the notification left or right to remove the it from the list. You can also tap   to remove all the notifications at once. •  Quickly manage notification: Touch and hold the notification detail to open the quick settings screen. Tap MORE SETTINGS to go to the notification management page. For more information, see Notifications.•  Close Notification Panel: Swipe up, or tap the Home button/Back button.2. 6  Quick Settings PanelUse shortcut switches on the Quick Settings Panel to enable or disable functions quickly without using a settings menu.•  Open the Quick Settings Panel: Swipe down from the status bar, or swipe down and tap   to open the Quick Settings Panel.•  Use shortcut switches: Tap the shortcut switches on the Quick Settings Panel to turn the functions on or off. Touch and hold the shortcut icon to enter the feature’s settings page.•  Close the Quick Settings Panel: Swipe up, or tap the Home button or Back button.
14Chapter 2 .    BasicsEdit: Tap to enter the edit pageSettings: Tap to go to SettingsCollapse/expand the panel: Tap to collapse the Quick Settings PanelShortcut switches: Tap to enable/disable functions quicklyBrightness slider: Use this slider to adjust the brightness of the screenAdaptive brightness: Tap to enable auto-brightnessAdjust the position of shortcut switchesOpen the Quick Settings Panel and tap   to enter the edit page. You can:•  Rearrange shortcut switches: Touch and hold a shortcut switch and then drag the icon to a position of your choice.•  Add a shortcut switch: Drag a shortcut switch from the bottom section of the panel to the top section.•  Remove a shortcut switch: Drag a shortcut switch from the top section of the panel to the bottom section.•  Reset Quick Settings Panel: Tap   -> Reset to reset the Quick Seetings Panel to default settings.2. 7  Type textEnter textThe keyboard enables you to enter text when needed. Your phone use Touchpal by default.Touch and hold the letter to enter the number or symbol next to it.Edit the contentChoose language Set the Keybord Choose the themeInsert emojiTap it and then tap a letter totype uppercase.Double-tap for caps lock.Delete the characters to theleft of the cursor.Start a new line.Enter numbers, punctuationsand symbols.Enter a comma. Touch andhold it to turn on/offprediction.Enter a space.Double-tap to end a sentence with a period.Touch and hold to open Google voice typingEnter a period. Touch andhold to enter a symbol.
15Chapter 2 .    BasicsSpell checkerYou can turn on the Spell checker feature to help you enter correct words.1. Go to   Settings -> More general settings -> Languages & input -> Spell checker.2.  Turn on the switch.Switch input method1.  On the Home screen, tap   Settings -> More general settings -> Languages & input -> Virtual keyboard.2.  Select an input method you need. By default, you can choose Touchpal, AndroidTM keyboard or Google Voice Typing.2. 8  Take a screenshotCapture the entire screenYou can capture the entire screen by following ways:•  Press the Power button and Volume-down button at the same time.•  Open the Quick Settings Panel, then tap   Screenshot.•  Slide down three fingers on the screen.•  If you enabled float button (see Float button), tap   ->   Screenshot.Take scrolling screenshotsUse scrolling screenshots to take screenshots longer than one page, such as conversation threads.1.  Take a full screenshot for the entire screen first.2.  To take a scrolling screenshot, ensure that you touch the thumbnail within 3 seconds after taking the screenshot. Tap the   below the thumbnail of the scrollshot. The screen will scroll down and capture all of the content in one screenshot. Tap the screen to stop scrolling and capture the preceding content.END SCROLLINGScroll capturing...Tap to end scrolling
16Chapter 2 .    BasicsEdit/Share/Delete the screenshotTap the thumbnail after capturing the screen, you can:•  Edit the screenshot: tap  .•  Share the screenshot: tap  .•  Delete the screenshot: tap  .2. 9  Configure your fingerprintUse the fingerprint sensor to unlock the screen, take photos and unlock apps.Enroll a fingerprint for the first timeFor added security and to ensure that you can still access your data if your phone fails to recognize your fingerprint, you will need to set a backup screen lock method when configuring fingerprint unlock.1. Go to   Settings -> Screen lock, fingerprint & security -> Fingerprint management.2.  Select Pattern or PIN or Password, and then follow the onscreen instructions to set a screen lock password.3.  Once you have configured the password, tap Add fingerprint.4.  Place your fingertip on the fingerprint sensor. Press down lightly on the sensor until your phone vibrates. Repeat this step using different parts of your fingertip until your phone has successfully added your fingerprint.5.  Once you have added your fingerprint, tap OK.Note:1. When recording your fingerprint, make sure the fingerprint sensor and your fingers are dry and clean.2. For more security settings, see Screen lock, fingerprint and security.Add, delete or rename your fingerprintAdd multiple fingerprints to make it easier to unlock your phone. You can also delete or rename your fingerprints.1. Go to   Settings -> Screen lock, fingerprint & security -> Fingerprint management.2.  Enter the screen lock pattern/password/PIN.3.  In the Fingerprint list section, you can:•  Add a fingerprint: Tap Add fingerprint to add a new fingerprint. You can add up to five in total.•  Rename/delete a fingerprint: Tap a previously added fingerprint to rename or tap   to delete it.4.  After you enter several fingerprint, there is a list showing all the recorded fingerprint. When you place your fingertip on the fingerprint sensor, the corresponding place turns grey, which helps you easily find the fingerprint.Use fingerprint to take photos or record videosWhen using the camera, tap the fingerprint sensor to take a picture or record a video.If you don’t want to use this function:• Go to   Settings -> Gestures and smart assistance -> Press and hold your fingerprint to capture, and turn off the switch to disable the function.• Go to   Camera, swipe right and tap   , then switch off Press and hold your fingerprint to capture.Access App lock with fingerprint1. Go to   Settings -> Screen lock, fingerprint & security -> Fingerprint management, and enter the screenlock method you have set.2. Tap Access App lock.
17Chapter 2 .    Basics•  If you have enabled App lock before, just switch on Access App lock, and then you can use fingerprint  to access App lock.•  If you have not enabled App lock, you need to set a Pattern, PIN or password first. Follow the onscreen instructions to enble App lock.3. Go to Settings -> Screen lock, fingerprint & security -> App lock. Place your fingerprint on the sensor to enter App lock.4. In the UNENCRYPTED APPS list, turn on the switches next to the apps that you want to encrypt.Note:You can also go to   Settings- > Screen lock, fingerprint & security -> App lock ->   and switch on Fingerprint verification to enable using fingerprint access App lock.2. 10  Configure your face dataUse the facial recognition to unlock your phone.After waking up your phone screen, you can unlock your phone by looking at the screen.Add your face data for the first timeFor added security and to ensure that you can still access your data if your phone fails to recognize your face data, you will need to set a backup screen lock method when configuring fingerprint unlock.1. Go to   Settings -> Screen lock, fingerprint & security -> Facial recognition, and choose the appropriate method to add face data.•  If you have set a pattern, PIN, or password as the screenlock method, enter the screenlock method.•  If you have not set a pattern, PIN or password as the screenlock method, select one and follow the onscreen instructions to complete.2. Tap Add face data and follow the onscreen instructions to register your face data and enable the facial recognition. Then you can use facial recoginiton to unlock your phone.Delete  your face data1. Go to   Settings -> Screen lock, fingerprint & security -> Facial recognition.2.  Enter the screenlock method and tap Remove face data -> DELETE.2. 11  Split-screen modeUse split-screen mode to use two apps at the same time.Enable spilt-screen mode1.  Open an app and tap Recent apps button to open recents apps list.2.  Touch and hold an app, then drag it up. Then you can open another app, and it will be displayed at the bottom of the screen.
18Chapter 2 .    BasicsNote:Split-screen mode is not available for all apps. Some apps may not function properly in split-screen mode.Switch to full screen modeTouch and hold  , and swipe it up or down to switch to full screen mode.
19Chapter 3 .    Network and ShareNetwork and ShareShare your phone data with others by various kinds of connections.•  WLAN•  Mobile data•  Connect to computer•  Bluetooth•  Share your mobile data with other devices•  Smart WLAN3. 1  WLANConnect to a WLAN network to access the Internet and reduce mobile data usage.Note:Your personal data and financial information may be at risk if you connect to insecure public WLAN networks.Connect to a WLAN networkEnable WLAN to connect to the Internet using a WLAN access point or hotspot.If   appears in the status bar, you are connected to a WLAN network.1.  Swipe down from the status bar to open the Quick Settings Panel.2.  Touch and hold   WLAN to open the WLAN settings screen.3.  Turn on the switch. A list of available WLAN networks will be displayed.•  Refresh the list: Tap   to refresh the available WLAN list.•  Add a WLAN network that is not shown in the list: Swipe down to the bottom of the list and tap Add network. Follow the onscreen instructions to configure the WLAN settings and password.4.  Select the WLAN network you want to connect to, and then enter the password if needed. (You can also turn WLAN on in   Settings -> WLAN.) Your phone will remember WLAN networks that you have used before and reconnect to them automatically when you enable WLAN.Connect to a WLAN network through WPSConnecting to a WPS-enabled router over WPS allows you to quickly connect to the network without entering a password. Go to   Settings -> WLAN and you can connect to your router in following two ways:• Tap  -> WPS push button and press the router’s WPS button.• Tap  -> WPS pin entry to generate a PIN, and then enter the PIN on the router.Advanced WLAN settingsGo to   Settings -> WLAN ->   -> Advanced, you can configure these settings:•  Saved networks: Tap Saved networks to view the networks remembered by your device. Tap a network and tap FORGET to forget it.•  Open network notification: Turn on the switch to enable notifying when a high-quality public network is avaible.•  Install certificates: Tap Install certificates to and follow the onscreen instructions to install certificates.•  Choose network rating provider: Tap to choose the provider of network rating. Google is the default provider. You can also choose None to choose network rating.3
20Chapter 3 .    Network and Share•  Install certificates: Tap Install certificates and follow the onscreen instructions to install certificates.•  View MAC and IP address: On the Advabced, you can view your MAC and IP address.WLAN directUse WLAN direct to transfer files between your phone and another device without connecting to a WLAN network. WLAN direct is similar to Bluetooth but offers faster transfer speeds, making it suitable for the transfer of larger files such as videos.Note:1.  Using WLAN direct to transfer files needs third-party applications support.2.  Before using this function, check that both two devices you want to connect support WLAN direct.•  Connect two devices using WLAN direct1.  Switch on WLAN on both two devices.2. Go to WLAN ->   -> WLAN direct, your phone will search for devices automatically.Then keep the WLAN direct search screen open on both devices.3.  When your phone detects the other device, select it. Follow the onscreen instructions to establish a WLAN direct connection between the two devices.•  Rename your deviceOn WLAN direct screen, tap Device name. Enter the device name you want and tap OK to Save.•  Manage peer device and remembered groupsOn WLAN direct screen, you can view your Peer devices and Remembered groups. Tap a peer device and tap OK to disconnect. Tap a remembered group and tap OK to forget the group.3. 2  Mobile dataBefore using mobile data, ensure that you have a data plan with your carrier to avoid incurring excessive data charges.Connect to mobile dataYou can connect to mobile data in following three ways:•  Swipe down from the status bar to open the Quick Settings Panel and tap  . When it lights up, mobile data is enabled.•  Swipe down from the status bar to open the Quick Settings Panel. Touch and hold   to enter the mobile data settings. Turn on the Mobile data switch.• Go to   Settings -> Dual-SIM & network and switch on Mobile data.Note:1.  If a WLAN connection to the Internet isn’t available, apps and services may transfer data over your carrier’s cellular network, which may result in additional fees. Contact your carrier for information about you mobile data plan rates.2.  When you don’t need to access the Internet, disable mobile data to save battery power and reduce data usage.3. 3  Connect to computerTransfer the data on your phone to your computer or transfer the data on your computer to your phone.When you use a USB cable to connect your phone with a computer or another device, Allow access to device data will be displayed in a popup dialog. Tap ALLOW to allow file transfer between your phone and the computer. Tap DENY to deny data conncection and charge only.Select the USB connection modeSwipe down from the status bar to open the Notification Panel, and then tap the USB connection notification. You can choose from the following USB connection modes:
21Chapter 3 .    Network and Share•  Charge this device: Charge your phone only.•  Transfer files: Transfer files between your phone and the computer.•  Transfer photos (PTP): Transfer images between your phone and the computer.•  Use device as MIDI: Use your phone as a MIDI input device and play MIDI files on the computer.3. 4  BluetoothYou can share data on your phone with other devices using Bluetooth. And you can use Bluetooth to connect your phone to Bluetooth headsets and in-car Bluetooth to navigate or listen to music while you drive. You can also connect your phone to Bluetooth wearables to record and manage fitness data.Enable Bluetooth and pair your phone with another device1.  Swipe down from the status bar to open the Quick Settings Panel.2.  Touch and hold   Bluetooth to enter the Bluetooth settings. Tap the switch to turn it on. (You can also turn Bluetooth on in   Settings -> Bluetooth). Your phone will automatically list available devices. If the device you want to pair with is not displayed, check whether the device is discoverable.3.  Select the device you want to pair with and follow the onscreen instructions.Send and receive files using BluetoothCheck that both devices are paired before attempting to transfer files.1.  Send files: Tap the file you want to send and tap   > Bluetooth. Your device will automatically search for nearby devices. Select the receiving device.2.  Receive files: When another device tries to send you files using Bluetooth, select ACCEPT from the dialog box that appears. Open the Notification Panel to view file transfer progress. By default, received files are saved to   File manager -> Internal storage -> bluetooth folder.Unpair Bluetooth devicesGo to   Settings -> Bluetooth. Tap the   icon next to the paired device, and then tap FORGET.Rename your phone1.  On the Home screen, tap   Settings -> Bluetooth and turn on the switch.2. Tap Device name.3.  Edit the device name and tap OK to complete the configuration.3. 5  Share your mobile data with other devicesYou can share your phone’s mobile Internet with other devices (such as phones, tablets, or computers). The following Internet sharing methods can be used:Use WLAN hotspotSet up a portable WLAN hotspot to share your phone’s mobile Internet with other devices. Compared with Bluetooth tethering, the portable WLAN hotspot feature offers quicker, longer range connections, but power consumption is higher.1.  On the Home screen, go to   Settings -> More connection settings -> Hotspot & tethering.2. Switch on Protable WLAN hotspot. After enabling your personal WLAN hotspot,   will be displayed in the status bar.3. Tap Set up WLAN hotspot to configure following settings:
22Chapter 3 .    Network and Share•  Change the hotspot name: The Name is the hotspot name. By default, this is the name of your phone model. You can manually change the name to something that is easier to remember. Tap Name to edit the name of your hotspot and tap SAVE.•  Change the security setting: Tap Security to configure security setting. Your phone uses WPA2 PSK encryption by default. Other devices will require a password to connect to the hotspot. If you choose None, devices will not require a password to connect to the hotspot.•  Configure a password that is easy to remember: The hotspot password is generated randomly by your phone. For security reasons, choose a password that is not easy to guess. Tap Password and enter the new password (the password must have at least 8 characters), then tap SAVE.•  Select AP Band: Tap Select AP Band to choose 2.4 GHz Band or 5 GHz Band.•  Set the maximum connections: Tap Maximum connections and select the number of maximum.•  Set the time for keeping hotspot on when idle: Set the time for keeping WLAN hotspot on when idle. Tap Keep WLAN hotspot on on to choose the duration.Note:Your device can’t access the Internet using WLAN when your Portable WLAN hotspot is turned on.Use USB tetheringUse a USB cable to share your phone’s mobile Internet with a computer. This is useful if your computer’s Internetconnection stops working. To enable mobile data, see Connect to mobile data.1.  Connect your phone to a computer using a USB cable.2.  On the Home screen, go to   Settings -> More connection settings -> Hotspot & tethering.3. Switch on USB tethering. After enabling USB tethering, your phone will display the   icon in the status bar. You can then use the computer to access the Internet.Note:Depending on your computer’s operating system, you may need to install phone drivers on the computer or establish a network connection in order to use USB tethering. Please read the instructions for your operating system.Use Bluetooth tetheringUse Bluetooth tethering to turn your phone into a wireless router and share your mobile Internet with other devices. Compared with a portable hotspot, Bluetooth tethering offers a slower Internet connection, but consumes less power.1.  Establish a Bluetooth connection between two devices and check that they are paired. For more information, see Enable Bluetooth and pair your phone with another device.2.  On the Home screen, go to   Settings -> More connection settings -> Hotspot & tethering.3. Switch on Bluetooth tethering to share your mobile Internet.4. Go to   Settings ->Bluetooth and tap the device you want to connect. Other devices can now connect and use your mobile data.3. 6  Smart WLANUse smart WLAN to share WLAN password, connect to router and extend WLAN.Share WLAN passwordWhen connected to WLAN, you can share the password with other devices.On the Home screen, tap   Smart WLAN ->   Share WLAN password to proceed to QR code screen (You can also tap the connected WLAN in the WLAN networks list to proceed to QR code screen). You can share the password in following two ways:•  Show the QR code. For the other device, see Connect to WLAN by scanning the QR code.•  Touch and hold Password and choose Copy or Share to share the password.
23Chapter 3 .    Network and ShareNote:This feature is currently only supported on Neffos and in some third-party apps.Connect to WLAN by scanning the QR code1.  On the Home screen, go to   Smart WLAN->   Scan.2.  Align the QR code within the frame, or tap   to select a photo to scan. Then your device will connect to the shared WLAN automatically.Note:When ambient light is not enough, you can tap   to turn on light.Connect to router through WPSWPS allows your phone to connect to a WPS-enabled router without having to remember a password.On the Home screen, tap   Smart WLAN->   WPS and press the router’s WPS button.You also can go to   Settings  -> WLAN to connect. For more information, see Connect to a WLAN network through WPS.WLAN extenderUse WLAN extender function to extend WLAN signals to a wider area.•  Extend the WLANBefore using this feature, ensure that you have connected to the WLAN.On the Home screen, tap   Smart WLAN ->   WLAN Extender and turn on the switch. When WLAN Extender is open,   will appear in the status bar.•  Set WLAN ExtenderOn the Home screen, tap   Smart WLAN ->   WLAN Extender -> Set WLAN Extender. You can configure following settings:•  Change the netword name: Tap Name to set netword name, and then tap SAVE. The Network name is the WLAN Extender name. By default, this is the name of your phone model. You can manually change the name to something that is easier to remember.•  Security: Your phone uses WPA2 PSK encryption by default.•  Configure a password that is easy to remember: The network password is generated randomly by your phone. For security reasons, choose a password that is not easy to guess.•  Select AP Band: Tap Select AP Band to choose 2.4 GHz Band or 5 GHz Band.•  Set Maximum connections: Tap Maximum connection to choose the maximum connections.•  Set duration of WLAN Extender: Set the time for keeping WLAN extender on when idle. Tap Keep WLAN extender on to choose the duration.•  Manage the usersOn the Home screen, go to   Smart WLAN ->   WLAN Extender. The connected and blocked devices will be displayed on the list. Select any of the connected devices to set the following options:•  View the details of the connected device: Tap a connected device to view the MAC address and IP address.•  Block a device: Tap the connected device you want to block and tap BLOCK. The blocked device can’t search your WLAN extender singals.•  Unblock a devide: Tap the blocked device you want to unblock and tap UNBLOCK.
24Chapter 4 .    CallsCallsMake calls with your phone to contact one quickly.•  Make a call•  Answer or reject a call•  Options during a call•  Call log•  Manage contacts•  Harassment filter•  Call settings•  Advance settings•  Contacts4. 1  Make a callDial directly from the dialer1.  On the Home screen, tap   Phone -> . 2.  Enter the number of a contact in the dialer. Your phone will search your contacts and call log and list the results above the dialer. 3.  Select the contact you want to call (Or tap   after entering the complete number). If you have inserted two SIM cards, select SIM1 or SIM2 to dial (Or tap   /   after entering the complete number).Note:Check Always use this for calls and tap SIM1/SIM2 to make SIM1 or SIM 2 as the default SIM card to make calls. If you want to change the default SIM card, or if you want to deactivate one of them, go to   Settings -> Dual-SIM & network to configure. For more information, see  Dual SIM and network. Dial a recent number from the Recent callsAll incoming, outgoing and missed call are in Recent calls.1.  On the Home screen, tap   Phone -> Recent calls, a list of recent calls will be displayed.2.  Tap the number or contact to call.Dial from contact list1.  On the Home screen, tap   Phone -> Contacts.2.  Tap a contact and then tap the number to dial.Dial from contact list and call log search results1.  On the Home screen, tap   Phone.2. Tap   and enter the name, initials, or number of a contact in the dialera contact.3.  Tap the contact or number to dial.Note:If no results appear, you can tap   Call to dial directly, or tap   Send SMS to send a message to the number.Make an international callBefore making a long-distance call, contact your carrier to activate international calling or roaming services.4
25Chapter 4 .    Calls1.  On the Home screen, tap   Phone -> .2.  Touch and hold 0 to enter +, then enter the country or region code, area code, and phone number in sequence.3. Tap  .Make an emergency callIn the event of an emergency, you can make emergency calls from your device, even without a SIM card.•  Make an emergency call from unlock screen:1.  On the Home screen, tap   Phone -> .2.  Enter the emergency number for your location in the dialer and tap  .•  Make an emergency call from lock screen:If you enabled the device protection (fingerprint, pattern, PIN or password), you can make an emergency from lock screen by following way:1.  Wake up the screen and swipe up on the screen.2. Tap EMERGENCY.3.  Enter the emergency number of your location in the dialer and tap  .Note:1.  You must be in an area with cellular coverage, when you have to make an emergency call.2.  The ability to make emergency calls depends on local regulations and carriers in your area.3.  Poor network coverage or environmental interference may prevent your call from being connected. Never rely solely on your device for essential communication during emergencies.4. 2  Answer or reject a callOn the incoming call screen:When a call comes in, you can press the Volume button (or Power button ) to mute the ringtone.When the screen is locked• Drag   right to   to answer the call.• Drag   left to   to reject the call.• Slide up Message to reject the call and send SMS. You can choose a quick response or tap   to edit a new message and tap   to send it out.Note:You can go to   Phone ->   -> Advance settings -> Quick responses to edit the predefined text messages.
26Chapter 4 .    CallsWhen the screen is unlocked• Tap   to answer the call.• Tap   to reject the call.• Slide up Message to reject the call and send SMS. You can choose a quick response or tap   to edit a new message and tap   to send out.4. 3  Options during a callYour phone provides a variety of functions that you can use during a call.In-call menuDuring a call, your phone will display an in-call menu.Mute the callPlace the current call on holdEnable hands-free modeMake notes during the callRecord the callOpen the dialerEnd the callAdd a new callHide the in-call menuTap the Home button or Back button to hide the in-call menu. To return to the in-call menu:•  Tap the green status bar at the top of the screen.•  Slide down from the status bar to open the Notification Panel and tap the call item.
27Chapter 4 .    CallsTo end the call, return to the in-call menu and tap  . You also can tap   on the Notification Panel to end the call.Adjust the call volumePress the Volume buttons to increase or decrease the volume.Answer a third-party callIf you receive a call when already in another call, tap   to answer the call. The previous call will be holded on automatically.Note:Before using this feature, check that you have subscribed to a call hold service and enabled call waiting on your phone. For more details, contact your carrier.Use an application during a callTo use an app during a call, tap Recent apps button to open the list of recently used apps, and then tap the desired app (Or tap Home button to go to the Home screen, then tap the desired app). The Dialer app will continue to run in the background.4. 4  Call logAll incoming, outgoing and missed calls are recorded in the call log. Missed calls are displayed in red.Tap or swipe leftto view all the callsTap  or swipe rightto view missed calls onlyNote:If a contact (or a number) has more than one log, tap  to proceed to details page. Swipe down to the bottom of the page and tap VIEW MORE, you can view all the call history of this number.Add a number from the call logGo to   Phone -> Recent calls to select a number from the call log and save it to your contacts.1. Tap  beside the number you want to add and then tap  .2.  If you want to save the number as a new contact, tap Create new contact. If you want to add the number to an existing contact, tap the target contact, then tap OK.Clear the call log•  Clear call history: Go to   Phone -> Recent calls, touch and hold the number or contact you want to remove and then tap Delete.•  Delete call history in batches: Go to   Phone -> Recent calls, touch and hold a number or a contact, then tap Batch. Check the logs you want to remove and tap   -> DELETE.
28Chapter 4 .    Calls•  Clear the whole call log of a number (or contact): Select the number you want to remove, then tap  . Tap  -> Clear call history.Add a number to blacklist from the call log1. Go to   Phone -> Recent calls, tap the number you want to add to the blacklist. 2. Tap    ->   -> Add to blacklist (Or just touch and hold the number and tap Add to blacklist). And you will not receive calls from this number any more.Do more settings about the call logGo to   Phone -> Recent calls, touch and hold a number and you can:•  Send a message: Send a message directly to this number.•  Copy number: Copy the number and paste in other place, such as in your notes.•  New contact (for Strange numbers): Add the number to create a new contact.•  Share contacts (for contacts): Share the contact.•  Add to blacklist: Add the number to blacklist and you will not receive calls from this number any more.•  Delete: Delete the call log.•  Batch: Select several numbers at a time.4. 5  Manage contactsGo to   Phone ->   -> Manage contacts to configure the following settings:Import or export contactsYour phone supports .vcf contact files. VCF is a standard file format for storing contact information, including names, addresses, and phone numbers.Go to Manage contacts -> Import/export contacts. You can:•  Import contacts from a storage device:1 )  Tap Import from storage device.2 )  Select one vcf file.•  Import contacts from a SIM card:1 )  Tap Import from SIM 1 or Import from SIM2.2 )  Select the contacts you want to import.•  Export contacts to a storage device: Tap Export to storage device.•  Export contacts to a SIM card: Tap Export to SIM 1 or Export to SIM2.Manage accountsGo to Manage contacts -> Manage accounts to view your accounts. If you want to add a new account, tap Add account and follow the onscreen instructions to add your account.4. 6  Harassment filterThe Harassment filter automatically blocks calls and messages from unknown or blacklisted sources.Go to   Phone ->   -> Harassment filter to view the blocked messages and calls.Add numbers to blacklistGo to Harassment filter ->   to add numbers to blacklist.
29Chapter 4 .    Calls•  Add phone number: Tap Add phone number, enter the number you want to block and tap  .•  Add prefix: Tap Add prefix, enter the number prefix you want to block and tap  .•  Add numbers from contacts/call log: Tap Add from contacts, select the numbers you want to block from contact or call log, and tap  .•  Add numers from messages: Tap  Add from messages, select the numbers you want to block from messages list, and tap  .Clear blacklist numbersGo to Harassment filter, touch and hold a number, select the mumbers you want to delete, and then tap   -> DELETE.Edit numbers in blacklistGo to Harassment filter, tap a number to edit it. Tap   after finishing to save changes.View the locked messages and callsGo to Harassment filter ->   -> Blocked numbers to view the blocked messages and calls.Harassment filter settingsGo to Harassment filter ->   -> Settings to configure the following settings:•  Block unknown number: Turn on the switch to block unknown numbers.•  Block notification: Turn on the switch to get reminders when your phone intercepts a harassing call or spam message.4. 7  Call settingsGo to   Phone ->   -> Call settings to configure the following call settings:Note:1.  The following features may vary depending on your carrier.2.  If you insert two SIM cards and you don’t set the default SIM card for calls, Select SIM for calls will display on the list. You can choose your default for calls, or choose Ask every time.VoicemailDivert calls to your voicemail when your phone is switched off or when there is no cellular coverage. Callers can leave a voice message which you can listen to later. •  Service: Your carrier.•  Set up: Tap Setup -> Voicemail number to enter your voicemail number and tap OK.•  Notifications:  Tap  Notifications, you can set sound, enable or disable vibration, and configure other advaced settings.Note:Voicemail must be supported by your carrier. Please ensure that you have subscribed to this service. Contact your carrier for information about their voicemail service.Fixed Dialing NumbersUse fixed dialing numbers to restrict outgoing calls to whitelisted numbers.•  Enable FDN: Tap Enable FDN, enter PIN2 and tap OK. •  Change PIN2: Tap Change PIN2 and follow the onscreen instructions to change your PIN2.•  FDN list: Tap FDN list to view your FDN numbers. Tap   -> Add contact to add a FDN number. Note:1.  Your PIN2 code is required to enable fixed dialing numbers. To obtain your PIN2 code, contact your carrier.
30Chapter 4 .    Calls2.  Numbers are added to the FDN list, and when activated, FDN restricts outgoing calls to only those numbers listed, or to numbers with certain prefixes.3.  PIN2 must be entered before hand or when applying such settings, which is unique to each card and initially provided by the network operator. Call forwardingIf your phone can not answer or you do not want to answer the call, you can transfer the call to another phone number.Tap Always forward/When busy/When unanswered/When unreachable, enter the phone number you want to transfer to and tap TURN ON. Then the call will be transfered to the present number always, when your own number is busy, unanswered, or unreacheable.Call barringTurn on the switch to prevent all or certain calls from reaching to or from your phone number.•  Cancel all barring: Tap Cancel all, enter the barring password and tap OK.•  Change barring password: Tap  Change barring password, then follow the onscreen instructions to change your barring password.Additional settings•  Caller ID: Display your number in outgoing calls.•  Call waiting: Turn on the switch to enable call waiting, then your will be notified of incoming calls during a call.4. 8  Advance settingsGo to   Phone ->   -> Advance settings to configure the following settings:Display options•  Sort order: Tap Sort by to choose sorting by First name/Last name.•  Name format: Tap Name format to choose First name first/Last name first.Sounds & vibration•  Ringtone: Tap SIM1 ringtone and SIM2 ringtone to choose the ringtone you like.•  Also vibrate for calls: If Also vibrate for calls is enabled, your phone will vibrate when receiving incoming calls.•  Dial pad touch tones: Turn on or turn off the switch to enable or disable dial pad touch tones.Quick responsesTap the quick response you want to edit. Tap OK after finishing.Auxiliary funtions•  TTY mode: Tap TTY mode to configure the TTY mode. Tap  to view the information of TTY mode. •  Power buttons ends call: If Power buttons ends call is enabled, you can end call by pressing Power button.
31Chapter 4 .    Calls4. 9  ContactsAdd contactsYou have four ways to add new contacts:•  Add new contacts with Contacts app:1 )  Go to   Contacts and tap   (You can also tap ADD A CONTACT if you are adding a contact for the first time). Tap   to save the contact to your phone or tap ADD NEW ACCOUNT and follow the onscreen instructions to save contact to your personal account so that you can always get the contact information when logging in the account. Now begin adding new contact(s).2 )  Tap the contact’s profile picture to choose a photo. Enter the contact’s name, company, title, phone number and other contact information, and then tap  .•  Add contacts from call log: See Add a number from the call log.•  Add contacts from dialer:1 )  Go to Home screen, tap   Phone -> Recent calls ->   to enter the phone number.2 )  You can add the number to new contacts, tap   -> Create new contact and enter the information, then tap  ; you can also add the number to an existing contact, tap to choose the contact and tap .•  Add contacts from messages:1 )  Go to Home screen, tap   and select the message whose number you want to add to contacts.2 )  Tap   -> Add to contact -> Create new contact and enter the information, then tap  ; you can also add the number to an existing contact, tap and choose the contact, then tap  .Set up your profile1.  After you have created contacts, on the Contacts screen, tap Set up my profile to enter your personal information and then tap   to save.2.  After saving the information, you can directly tap   -> Share on the page to share it to others as your card. Or you can go to   Contacts -> the name under ME ->   -> Share.Manage contactsGo to   Contacts, you can:•  Edit a contact: After creating a contact, you can edit their contact information at any time. This includes adding or deleting default information such as phone numbers or email addresses. You can also choose a custom ringtone or add more options, such as a birthday, nickname, or photo. Tap the contact you want to edit and tap   to start editing, then tap   to save the information. You can also touch and hold the contact and then tap Edit to edit the information.•  View contact information: Tap the contact to view the detailed contact information. You can also touch and hold the contact and then tap View to get the contact information.•  Share contacts:1 )  To share one contact, touch and hold the contact you want to share, then tap Share, choose your sharing method and follow the onscreen instructions. You can also tap the contact you want to share, then tap   -> Share, choose your sharing method and follow the onscreen instructions.2 )  To share multiple contacts, touch and hold one of the contacts you want to share and tap Batch, select the contacts you want to share, then tap   , choose your sharing method and follow the onscreen instructions.•  Add a contact to your favorites: Tap the contact you want to add to your favorites, and then tap  . You can tap   to remove the contact from your favorites (The contacts you have added to favorites will display on the top of you contact list under ME).
32Chapter 4 .    Calls•  Add a contact to blacklist: Touch and hold the contact you want to block and then tap Add to blacklist; you can also tap the contact and then tap   -> Add to blacklist.. (To remove the number from blacklist, tap the contact and then tap   -> Remove from blacklist. You can also touch and hold the contact, then tap Remove from blacklist.)•  Delete contacts:1 )  To delete one contact, touch and hold the contact you want to delete, then tap Delete -> OK. You can also tap the contact you want to delete and tap   -> Delete -> DELETE.2 )  To delete multiple contacts, touch and hold one of the contacts you want to delete and tap Batch, check the contacts you want to delete, then tap   -> OK.•  Divert calls to voicemail: Tap the contact, then tap   and check All calls to voicemail to divert the calls from this contact to voicemail when your phone is switched off or when there is no cellular. Callers can leave a voice message which you can listen to later.Note:Voicemail must be supported by your carrier. Please ensure that you have subscribed to this service. Contact your carrier for information about their voicemail service.Contact groupsAfter you have created contact(s), go to   Contacts, you can:•  Create a group: Tap Groups ->   to enter a group name, and then tap to select the contacts you want to add to the group and tap to save.•  View groups: Tap Groups to view all the contact groups. The figure beside the group name shows the number of contacts in that group. Tap the group name to view the detailed contacts.•  Edit a group: Tap Groups and tap the group you want to edit, then tap   and you can rename the group, add new members or remove members from the group.•  Delete a group: Tap Groups and tap the group you want to delete, then tap   -> OK.
33Chapter 5 .    MessagesMessagesUse Messages to keep in touch with your friends.•  Type of messages•  Send and reply to a message•  Search for messages•  Manage your messages5. 1  Type of messagesText Messages (SMS)The Short Messages Service (SMS) lets you send and receive text messages to and from other mobile phones. Multimedia Messages (MMS)The Multimedia Messaging Service (MMS) lets you send and receive multimedia messages (such as pictures, videos, and audio messages) to and from other mobile phones. 5. 2  Send and reply to a messageSend messagesSpice up your messages by adding emotions, images, videos, music, recordings, and more.1.  On the Home screen, open   Messages.2.  In the list of message threads, tap   .3.  Select the recipient box and enter the contact name or phone number. You can also touch   to open your contact list and choose a contact or contact group.4.  Select the text field and enter your message (You can tap   to add emotions and tap   to add attachments). 5. Tap   to send.Go back to list ofmessage threadsRecipient boxChoose recipientsGo back to keyboard SendSwipe left or right to selectattachment typeText fieldChoose SIM1/SIM2 to send the message5
34Chapter 5 .    MessagesReply to a messageYou can reply to a message by following ways: •  On the Home screen, tap   Messages. In the list of message threads, tap a contact name or phone number to view your conversations. Select the text field and enter your message, and then tap   .•  New messages will be displayed in a popup box at the top of the screen, you can also swipe down from the top of the screen to open the message Notification Panel, tap REPLY VIA SMS and enter your message in the text field to reply quickly, tap MARK AS READ to mark the message as read. If you tap the new message, the conversations will be displayed on the screen. Note:1.  In the list of message threads, tap a contact name or phone number to open the conversations, you can reply a call by tapping   .2.  Save message attachments: Tap the attachment that you want to save and tap   , the attachment will be saved to Messages album.5. 3  Search for messagesUse the message search feature to find messages quickly.1.  On the Home screen, tap   Messages ->   .2.  Enter one or more keywords. The search results will be displayed underneath the search bar.5. 4  Manage your messagesCopy/forward/share/delete a message1.  On the Home screen, tap   Messages.2.  In the list of message threads, tap a contact name or phone number to view your conversations.3.  Touch and hold the message, you can copy, forward, share or delete the message and delete multiple messages by tapping More. Delete a conversation1.  On the Home screen, tap   Messages.2.  In the list of message threads, you can delete a conversation by following two ways:•  Touch and hold a coversation, and then select the conversations you want to delete, and tap   -> DELETE.•  Tap a contact name or phone number to view your conversations, and then tap   -> Delete -> DELETE.Stick a conversation to topPin important messages to the top of your message list so that you can access them quickly.1.  On the Home screen, tap   Messages.2.  In the list of conversations, touch and hold a contact name or phone number to enter bulk selection mode. 3.  Choose one or more conversations, and tap   to stick them to top. For the stuck top conversation, tap    to unstick.View the contact details and add a contact1.  On the Home screen, tap   Messages.2.  In the list of messages, tap a contact name or phone number to view your conversations.3. Tap  -> Contact details to view the datails of the contact. For phone number, you can tap   -> Add to contact to add the number to your contacts.
35Chapter 5 .    MessagesAdd to blacklist1.  On the Home screen, tap   Messages.2.  In the list of messages, tap a contact name or phone number to view your conversations.3. Tap  -> Add to blacklist, then you will not receive the message from the contact or phone number. You can go to   -> Harassment filter to see all blocked incoming calls and messages.Mark all of conversations as readMark unwanted messages as read to keep your inbox organized.1.  On the Home screen, tap   Messages.2.  In the list of messages, tap   -> Mark all as read.Cell BroadcastOne Cell Broadcast message can reach a large number of terminals at once. You can go to   Messages ->   -> Settings -> Cell broadcast to view the cell broadcast messages.SMS centerThe number in the SMS center is used to send and receive messages on the SIM card by the operator. Generally, one operator will fix the SMS center number. Incorrect settings will result in failure to send SMS messages. You can change the SMS center number by following way:1.  Contact the operator to obtain the correct SMS center number. 2. Go to   Messages ->   -> Settings -> SMS center.3.  Click the SMS center number, enter the correct SMS center number in the popup box and tap OK. SMS delivery reportsGo to   Messages ->   -> Settings -> SMS delivery reports, turn on the switch, and then you can view a Delivered shown beside the messages you sent successfully.
36Chapter 6 .    Camera and PhotosCamera and PhotosUse multiple features of your camera to capture your precious moments.•  Camera at a glance•  Take a photo•  Record a video•  Shooting modes•  Camera and video settings•  Photos6. 1  Camera at a glanceLaunch your camera•  On the Home screen: Tap   Camera.•  On the Lock screen: Just swipe   up.•  On the off screen: Press the Volume-down button twice to snapshot.Camera screenSwitch flash modesSwitch HDR modesSwitch aspect ratioSwitch beauty modeSwitch wide aperture modeToggle rear and front cameraNight modeSwitch camera modeSwitch filtersRecord a videoTake a photoView the photos and videos you’ve takenChange shooting modes or configure the camera settings1. Tap   to display flash modes’ three options:•   Automatically enable or disable the flash based on the ambient brightness.•   Enable the flash.•    Disable the flash.6
37Chapter 6 .    Camera and Photos2.  Tap the viewfinder to manually focus. Touch and hold an area of the viewfinder to lock the focus when AE/AF Lock appears.3.  Swipe up or down the viewfinder to switch the rear and front camera.4.  Swipe right on the viewfinder to display the list of shooting modes.5.  Swipe left on the viewfinder to access the filter settings.6. 2  Take a photo1. Open   Camera.2. Tap   to choose the camera mode, frame the scene you want to capture, tap any part of the viewfinder to focus on the corresponding area, and lock the exposure and focus by touching and holding the screen. To adjust the focal length, pinch two fingers together or spread them apart on the viewfinder.3. Tap   to switch between the front camera and rear camera.4. Tap   or press the Volume button, or press and hold your fingerprint sensor to take a photo. If you can’t use fingerprint sensor to capture, go to Settings -> Gestures and smart assistance and switch on Press and hold your fingerprint to capture.6. 3  Record a video1. Open   Camera.2. Tap   to switch to video mode, frame the scene you want to capture, tap any part of the viewfinder to focus on the corresponding area, and lock the exposure and focus by touching and holding the screen. To adjust the focal length, pinch two fingers together or spread them apart on the viewfinder.3. Tap   to switch between the front camera and rear camera.4. Tap   or press the Volume button, or press and hold your fingerprint sensor to start a video recording. Tap  to pause the recording and tap   to continue the recording. Tap   on the screen during recording to save the current scene as a photo.5. Tap   or press the Volume button, or press and hold your fingerprint sensor to stop and save the recording.6. 4  Shooting modesYour phone features a variety of different camera modes for different shooting scenarios.Beauty mode Use beauty mode for stunning selfies and smoother-looking skin.1. Open   Camera and tap   on the upper screen to turn it on.2. Tap   to switch between the front camera and rear camera.3.  Drag the slider to adjust the beauty level.4.  Frame the scene you want to capture, and then tap   or press the Volume button, or press and hold your fingerprint sensor to take a photo. The camera will automatically detect each face in the photo and apply the beauty settings.Wide aperture modeUse wide aperture mode for close-up shots of objects and people. You can adjust the focal point after taking a photo to blur the background and make the subject stand out.1. Open   Camera and tap   on the upper screen to turn it on.
38Chapter 6 .    Camera and Photos2.  Tap the viewfinder to focus on a particular area. Swipe left or right on the slider next to icon   to preview the blurred background. 3. Tap   or press the Volume button, or press and hold your fingerprint sensor to start shooting.4.  Tap the thumbnail image on the bottom left-hand corner. Select a photo tagged with   , and tap   to edit the photo. •  Tap the subject of the photo to adjust the focal point.•  To adjust the blurred background effect, touch the screen, and then swipe left or right on the slider next to icon   .5. Tap   to save the photo. Tap   -> CONFIRM to abandon the changes you have made.Note: 1.  For optimal results, ensure that the subject is less than 2 meters (6 ft) from the camera.2.  The wide aperture mode is only available to rear camera in the camera mode.CAMERA (Auto) Your phone is set to use camera mode by default. You can also tap   Camera, tap   on the screen or swipe right on the screen and choose   CAMERA mode.PROIn PRO (professional) mode, you can adjust the parameters manually. 1. Tap   on the screen or swipe right on the screen and choose   PRO mode. Tap   to view the details about Pro mode. 2. Tap ON or  OFF to display flash mode’s three options and select a flash mode. Tap  4:34:3  to set aspect ratio as 4:3, 1:1 or 18:9.3.  You can set the functions like the following:  •  Select metering mode: Tap   to select a metering mode. You can select   Center-weighted metering,   Average metering or   Spot metering.•  Adjust image parameters: Tap   . You can adjust the Hue, Saturation, Brightness and Contrast to make your image look more vivid.•  Adjust the ISO: Tap ISO and drag the slider to set the ISO. The ISO determines the camera’s sensitivity to light. Increasing the ISO will create a brighter image, but there will be a noticeable increase in noise.•  Adjust the shutter speed: Tap S and drag the slider to set the shutter speed. By default, the shutter speed is set to Auto.•  Set the white balance: Tap AWB and drag the slider to select a white balance. You can choose from filament lamp, fluorescent lamp, daylight, cloudy and shadows. You can also adjust the color temperature. •  Adjust the exposure compensation: Tap EV and drag the slider to adjust the exposure compensation. This setting changes the brightness of the image. Touch and hold a setting to lock it.•  Change the focus mode: Tap AF and drag the slider to select a focus mode. You can choose from AF and MF (manual focus). Touch and hold an area of the screen to lock the focus.4.  Choose the view you want to capture, position the camera, and then tap   or press the Volume button, or press and hold your fingerprint sensor to start shooting. VIDEOTap   on the screen or swipe right on the screen and choose   VIDEO mode. See Record a video for details.SLOW-MOTIONRecord videos in slow motion to enjoy fast moving scenes in detail, such as falling water droplets or dance moves.1. Tap   on the screen or swipe right on the screen and choose   SLOW-MOTION. Tap   to view the details about SLOW-MOTION mode.
39Chapter 6 .    Camera and Photos2. Tap ON or  OFF to display flash mode’s three options and select a flash mode. 3.  Tap the screen to focus on an object or area. Then tap   or press the Volume button, or press and hold your fingerprint sensor to start recording. 4. Tap   or press the Volume button, or press and hold your fingerprint sensor to end the recording.TIME-LAPSEMake an accelerated video of a slow-changing scene. For example, you can record the opening of a flower or the movement of clouds. 1. Tap   on the screen or swipe right on the screen and choose   TIME-LAPSE. Tap   to view the details about TIME-LAPSE mode.2. Tap   to switch between the front camera and rear camera.3. Tap ON or  OFF to display flash mode’s three options and select a flash mode. Tap 720P to set the pixel as 1080P, 720P or 480P, and tap  1s  to set time-lapse as 1s, 2s, 5s or 10s.4.  Tap the screen to focus on an object or area. Then tap   or press the Volume button, or press and hold your fingerprint sensor to start recording. 5. Tap   or press the Volume button, or press and hold your fingerprint sensor to end the recording.PANORAMAUse this mode to take wide-angle shots.1. Tap   on the screen or swipe right on the screen and choose   PANORAMA. Tap   to view the details about PANORAMA mode.2.  Select a suitable location and hold your phone steady, and then tap   or press the Volume button, or press and hold your fingerprint sensor to start shooting.3.  Follow the onscreen instructions to take the photo. Slowly move your camera from horizontally, ensuring that the arrow stays level with the center line.4. Tap   or press the Volume button, or press and hold your fingerprint sensor to stop capturing. The camera automatically stitches the photos together to create one panoramic photograph.Note: Excessive deviation and moving too fast will lead to failure in capture.MONOCHROMEThe camera comes with a separate monochrome lens that takes black and white photos with greater contrast and detail.1. Tap   on the screen or swipe right on the screen and choose   MONOCHROME.2. Tap ON or  OFF to display flash mode’s three options and select a flash mode. Tap  4:34:3  to set aspect ratio as 4:3, 1:1 or 18:9. Tap   to switch between the front camera and rear camera.3.  Choose the view you want to capture, position the camera, and then tap   or press the Volume button, or press and hold your fingerprint sensor to start shooting.FOOD1. Tap   on the screen or swipe right on the screen and choose   FOOD. 2. Tap ON or  OFF to display flash mode’s three options and select a flash mode. Tap  4:34:3  to set aspect ratio as 4:3, 1:1 or 18:9. Tap   to switch between the front camera and rear camera.3.  Choose the view you want to capture, position the camera, and then tap   or press the Volume button, or press and hold your fingerprint sensor to start shooting. STREAMERStreamer mode automatically sets a slow shutter speed to take long-exposure shots of light trails. This mode produces stunning photos that have an ethereal quality. Streamer mode offers two creative shooting modes
40Chapter 6 .    Camera and Photosfor different subjects and light conditions: Traffic flow and Light painting.1. Tap   on the screen or swipe right on the screen and choose   STREAMER. Tap   to view the details about STREAMER mode.2. Tap   to change the shooting mode. You can tap   to set the flash time as 0s, 3s, 10s or 20s in the Light painting mode.3.  Choose the view you want to capture, position the camera, and then tap   or press the Volume button, or press and hold your fingerprint sensor to start shooting. 4.  A preview of the image is displayed in the viewfinder. Tap   or press the Volume button, or press and hold your fingerprint sensor to stop capturing. Continuous shotUse continuous shot when you want to take a photo of a moving subject, such as during a football match. The camera will capture several images in quick succession.1. Touch and hold the   or press and hold the Volume button to start the burst sequence. The number of captured photos will be displayed in the bottom of the viewfinder. 2. Release   or Volume button to stop the burst shooting.3.  Tap the image thumbnail or go to   Photos -> Camera to view the photos.Note: 1.  This feature is not available in Pro mode, Panorama mode, Streamer mode and Face beauty mode.2.  You can take up to 40 photos in one burst sequence, provided that there is enough storage space on your phone.6. 5  Camera and video settingsOpen   Camera, tap   or swipe right on the screen and tap   to configure the following camera settings. •  Auto night view: Turn on the switch to enable night mode when there is inadequate ambient light.•  Save the location: Save the location where the photo was taken (only when your phone is connected to the Internet and enabled location access). 1 )  Switch on Save the location and then take a photo.2 )  Connect your phone to a computer (taking Windows 7 as an example) with a USB cable, Allow access to device data will be displayed in a popup dialog. Tap ALLOW. 3 )  Go to Computer -> Neffos X9 -> Internal storage -> DCIM -> Camera.4 )  Right-click on a picture and click Properties, you can see the location where the photo was taken.•  Grids: When Grids is on, composition of pictures is more convenient.•  Camera watermark: When Camera watermark is on, there will be a watermark of brand model added to the photo.•  Shutter sound: When Shutter sound is on, a shutter sound is played during taking a picture or recording a video.•  Timer: Set time-lapse interval, such as Off/3/10 seconds.•  Take photos with volume buttons: Turn on the switch, you can press the Volume-up button or Volume-down button to take photos.•  Press and hold your fingerprint to capture: Turn on the switch, you can take photos with pressing and holding your fingerprint.•  Screen off snapshot: Turn on the switch, you can press the Volume-down button twice to take a photo when the screen is off. Due to the rapid capture time, the image quality may decrease for night-time or close-up shots. Choose a location with ample light and shoot from a suitable distance. The feature is not available during music playback or when your phone has less than 2% battery power remaining. Flash mode is not available when your phone has less than 5% power remaining.
41Chapter 6 .    Camera and Photos•  Mirrored selfie: When Mirrored selfie is on, the preview direction will be consistent with the selfie shooting direction. Otherwise the photos appears to reverse left and right.•  Mirrored video for front camera: When Mirrored video for front camera is on, the preview direction will be consistent with the selfie recording direction.•  Smart selfie zoom: Turn on the switch to make the selfie camera smart zoom.6. 6  PhotosView photos and videosYou can view the following photos and videos in   Photos:•  Photos and videos shot with the camera.•  Photos and videos that your friends shared with you.•  Photos and videos synced from your computer.•  Photos and videos saved from messages, emails, or websites, as well as screenshots.Manage photos and videosGo to   Photos:•  Select a photo, you can manage your photo with the following options: play in slideshow, move to folder, copy to folder use as contact photo or wallpaper, print the photo and delete from device.•  Select a video, you can manage your video with the following options: play in slideshow, play the video on loop, move to folder, copy to folder and delete from device. • Go to   -> Trash, you can restore the photos (videos) or permanently delete the photos (videos).Edit an imageYou can use the image editing tools to bring your photos to life. Select an image you want to edit and tap   , you can add a filter to the image, adjust the image parameters, crop the image, straighten the image and rotate the image.Edit a videoYou can use the photos‘ video editing tools to edit a video. Select a video you want to edit and tap   , you can stabilize the video, rotate the video and clip the video.
42Chapter 7 .    VideosVideosUse Videos to enjoy videos stored on Neffos.•  Play a video•  Video management7. 1  Play a videoOn the Home screen, go to   Videos, tap the video you want to play.Playback sliderTap to play the previous video Tap to play the next videoTap to pause the videoTap to lock playbackorientationTap to show/hide controlsDouble-tap to pause/playTap to rotate playbackorientationDuring playback, you can:•  Adjust the screen brightness: Swipe up or down on the left-hand side of the screen. Swipe up to increase the brightness, or swipe down to decrease the brightness.•  Adjust the volume: Swipe up or down on the right-hand side of the screen. Swipe up to increase the volume or swipe down to decrease the volume.•  Rewind or fast-forward: Swipe left or right on the screen to accurately adjust the video progress bar. Drag the progress bar left to rewind or right to fast-forward.7. 2  Video managementShare/delete a video and see the details of a video1.  On the Home screen, go to   Videos -> ALL Videos, or go to  Videos -> Folders and tap to open a folder.2.  Touch and hold a video, you can:•  Share the video: tap   .•  Delete the video: tap   .•  See the details of the video: tap  . Delete the video folders1.  On the Home screen, go to   Videos -> Folders.2.  Touch and hold a video folder, then select the folders you want to delete, tap   -> DELETE.7
43Chapter 7 .    VideosSort the videos1.  On the Home screen, go to   Videos -> ALL Videos, or go to  Videos -> Folders and tap to open a folder.2. Tap   to choose sort the videos by name or by date added or by recently played.Search the videos1.  On the Home screen, go to   Videos -> ALL Videos, or go to  Videos -> Folders and tap to open a folder.2. Tap   and then enter the key words to search.
44Chapter 8 .    ClockClockIn the Clock application, you can add alarms, view world times, use the stopwatch and timer features.•  Alarm•  Worldclock•  Stopwatch•  Timer•  Settings8. 1  AlarmSet an alarm to wake you up or remind you about important events. Launch your Alarm•  On the Home screen: Go to   Clock ->   Alarm.•  On the Lock screen: When your phone doesn’t have a screen lock with pattern or PIN or password, just swipe   up and tap   ->   Alarm.Create an alarm1. Tap   , choose a time for the alarm.2. Tap Repeat to select the mode for your alarm clock frequency:• Choose Only once to make the alarm ring for once.• Choose Every day to make the alarm ring every day.• Choose Week customized to customize your alarm clock frequency as desired.• Choose Every other day to customize your alarm clock frequency as desired.• Choose Custom monthly to customize your alarm clock frequency as desired.3. Tap Alarm ringtone to select the alarm sound, or tap Alarm ringtone -> Custom to select an audio to customize your alarm sound.4. Toggle Vibrate to enable or disable vibration when the alarm rings.5. Tap Label to add a label for your alarm clock.6. Toggle Alarm ring notification to enable or disable dismissing an alarm with this notification 20 minutes before the alarm rings.7.  Configure the alarm settings above and tap   to save.Manage alarms•  Enable or disable an alarm: Toggle the switch next to the alarm to enable or disable the alarm.•  Delete an alarm: Touch and hold the alarm you want to delete and then tap   -> DELETE. You can also delete alarms in batches by touching and holding an alarm to select multiple alarms at a time. •  Snooze: You can snooze the alarm in three ways:•  When the screen is locked, tap   then the alarm will go off again after 5 minutes; when the screen is on, tap SNOOZING on the pop-up prompts then the alarm will go off again after 5 minutes.•  When the screen is locked, press the Power button then the alarm will go off again after 5 minutes. When the screen is on, press the Power button twice then the alarm will go off again after 5 minutes.8
45Chapter 8 .    Clock•  Swipe down from the status bar to open the Notification Panel, and then tap the alarm notification. Press the Volume button then the alarm will go off again after 5 minutes.•  Dismiss: When the screen is locked, slide   to stop the alarm; when the screen is on, tap DISMISS on the pop-up prompts to stop the alarm.•  Mute an alarm: When the alarm goes off, open   Clock and you can press the Volume-down button to mute an alarm.8. 2  WorldclockCheck the time in various cities around the world using Worldclock.Launch your Worldclock•  On the Home screen: Go to   Clock ->   Worldclock.•  On the Lock screen: When your phone doesn’t have a screen lock with pattern or PIN or password, just swipe   up and tap   ->   Worldclock.Configure the Worldclock1. Tap   Worldclock.2.  From the Worldclock screen, you can:•  Add a city: Tap   . Enter a city name or select a city from the list.•  Search for a city: Go to   ->   , enter a city name to search for a city and tap to add it to the list.•  Delete a city: Touch and hold a city, then check the cities you want to delete and then tap   -> DELETE.Home timeAdd cityChosen citiesTouch the home time or the cities to switch the time display modes.8. 3  StopwatchYou can use Stopwatch to keep time or record lap times. Launch your Stopwatch•  On the Home screen: Go to   Clock ->   Stopwatch.•  On the Lock screen: Just swipe   up and tap   ->   Stopwatch.
46Chapter 8 .    ClockConfigure the Stopwatch1. Tap   Stopwatch.2. Tap   to start timing. While timing, Tap   to count laps. Lap data will be displayed on the screen. Tap   to copy the lap.3. Tap   to pause the stopwatch.4. Tap   to clear the stopwatch records and restart.8. 4  TimerSet a timer to count down and alert you when time’s up. Launch your Timer•  On the Home screen: Go to   Clock ->   Timer.•  On the Lock screen: Just swipe   up and tap   ->    Timer.Configure the Timer1. Tap   Timer.2. Tap   to add the timer’s label.3.  Turn the wheel to set the countdown time. You can also quickly add 5/15/30 minutes by using the shortcut keys under the wheel.4. Tap   to start the timer. When the timer is counting, you can tap   to add another timer, and swipe up or down to switch the timers’ interface. tap   to pause the countdown of current interface’s timer, tap   to continue or tap   to reset the countdown of current interface’s timer.5.  When the timer goes off, tap OK on the pop-up promts to silence the ringtone when the screen is on; tap  when the screen is locked.8. 5  SettingsOn the Home screen, tap   Clock ->   -> Settings to personalize your clock.•  Ring duration: Tap to select the ring duration.•  Interval before ringing again: Tap to choose a proper interval time. If you tap SNOOZING when the alarm rings, then it will ring again after the interval time. •  Sound after shutdown: Turn on the switch if you want to enable the alarm after turning off your phone.
47Chapter 9 .    BrowserBrowserUse your phone browser to surf the Internet and find out all that you are curious about.•  Go to a webpage•  Browser tabs9. 1  Go to a webpageBefore you use the   Chrome, it will pop up Chrome’s Terms of service and Privacy Notice, read the terms and conditions, then tap ACCEPT & CONTINUE. Then you can sign in to Chrome, or you can tap No, Thanks to ignore the sign in process.View a webpage1.  On the Home screen, tap   Chrome, then tap the address bar and enter the web address you want to visit.2. Tap Go on the keyboard.Do more options about the web pageTap   and choose the options that you want to configure.•  Add a bookmark: Tap   to add a bookmark for the site you want to collect so that you can quickly find the site next time by tapping   -> Bookmarks.•  Download a site: Tap   to download the site you want so that you can quickly find the site next time by tapping   -> Downloads.•  Check the site: Tap   to check whether the website you open is safe or not.•  Refresh the site: Tap   to refresh the site.9
48Chapter 9 .    Browser•  New tab: Open a new tab.•  New incognito tab: Open a new incognito tab.•  Bookmarks: View your bookmarks.•  Recent tabs: View the recent visited tabs.•  History: View your browsing history.•  Downloads: View the contents you have downloaded.•  Desktop site: Check the option to turn the page to a desktop site.•  Settings: Configure the browser settings.•  Help & feedback: Search for help or send your feedback.9. 2  Browser tabsYou can view multiple pages simultaneously using tabs. Tap the icon   and all the pages will be displayed. Thenumber on the icon means the current number of the web pages.Open a new tabYou can open a tab by the following ways:•  On the Home screen, tap   Chrome ->   -> New tab.•  On the Home screen, tap   Chrome ->   ->   .•  On the Home screen, tap   Chrome ->   ->   -> New tab.Close tabs1. Tap   Chrome ->   and choose the tab you want to close.2.  Drag the tab left or right to close the tab or tap   to close the tab (To close all the tabs one time, tap   -> Close all tabs).
49Chapter 10 .    Play StoreGoogle Play StoreUse Google Play Store to download applications to you phone as desired. Applications are available through Google Play Store either free of charge or at a cost.•  Add an account to your Google Play Store•  Download and install applications10. 1  Add an account to your Google Play StoreTo get applications from the Google Play Store, you’ll need to log in an account on your device. When you add an account, information associatied with that account automatically syncs with your phone.When using Google Play Store for the first time, you will first enter Sign in screen, then enter your account on the Email or phone line or tap Or create a new account to apply for a new account, then follow the onscreen instructions to log in your account.10. 2  Download and install applications1.  Find the application you want. There are three ways: •  Use the search bar or voice search to manually find the applications you want.•  Swipe the screen left to find the category of the app you want and tap the category, related applications will display on the screen.•  Swipe the screen down to get the latest push applications.            Tap to configure more optionsTap to enter the name/key words of the app you want, then related information will displayTap to say the name/key words of the app you want, then related information will displaySwipe left to view related apps2.  Tap the application and then tap INSTALL.3.  When downloading, you can always swipe down from the status bar to view the download progress. When downloading completed, the application will be installed on your phone automatically. 4.  The app will be displayed in App drawer by default. (To configure more settings about this, see Home screen settings). Tap the app icon, follow the onscreen instructions to set the application permissions to protect your phone and privacy, then you can start using it.10
50Chapter 11 .    ThemesThemesThemes helps you to personalize your Home screen by changing the theme, wallpaper, Lock screen style, and icon style.•  Change the theme•  Change the wallpaper•  Change Lock screen style•  Change the icon style11. 1  Change the theme1.  On the Home screen, tap   Themes.2.  Select a theme, then the preview of the currently selected theme will display on the screen.3.  If the theme is right for you, tap APPLY to apply the theme; if it is not appropriate, tap   in the upper left corner and repeat step 2 and step 3 above.11. 2  Change the wallpaperWallpaper settings let you set an image or photo as wallpaper for the Lock screen or Home screen. You can choose from dynamic and still images.Launch the wallpaperThere are three ways to Launch the wallpaper.• Tap   Themes -> CUSTOM -> Lock screen wallpaper/Home screen wallpaper.• Tap   Settings -> Display -> Wallpaper.•  Touch and hold the Home screen’s blank area or pinch two fingers together on the Home screen, then tap  Wallpapers.Change the wallpaper with system-provided wallpapers1.  On the Home screen, tap   Themes -> CUSTOM -> Lock screen wallpaper/Home screen wallpaper. 2.  Select a desired wallpaper from system-provided wallpapers.3.  Tap screen to toggle Lockscreen Preview/Homescreen Preview which shows a preview of the currently selected wallpaper without applying it. You can swipe the screen left or right to change the wallpaper.4. Tap APPLY, and then follow the onscreen instructions to set it as the Home screen or Lock screen wallpaper (or both).Customize your Wallpaper1.  On the Home screen, tap   Themes -> CUSTOM -> Lock screen wallpaper/Home screen wallpaper. 2. Tap   and select an image.3.  Tap screen to toggle Lockscreen Preview/Homescreen Preview which shows a preview of the currently selected wallpaper without applying it. You can zoom in the picture, swipe it and select the part you want. On Homescreen Preview screen, check Scrolling effect, and you can zoom and move the image to adjust the maximum display area of the wallpaper.4. Tap APPLY, and then follow the onscreen instructions to set it as the Home screen or Lock screen wallpaper (or both).11
51Chapter 11 .    ThemesSet loop Lock screen wallpapers1.  On the Home screen, tap   Themes -> CUSTOM -> Lock screen wallpaper/Home screen wallpaper. 2.  Swipe the screen left or tap Loop wallpapers. 3. Switch on Loop lock screen wallpapers. If you haven’t selected a screen lock method, follow the onscreen instructions to set.4. Tap Interval to make the Lock screen wallpaper change automatically at preset intervals.5. Tap Loop wallpaper library, you can:•  Preview Lock screen wallpaper effect: Tap the picture and a preview of the currently selected wallpaper will be displayed. You can swipe the screen left or right to preview more Lock screen wallpaper effect.•  Add pictures into loop Lock screen wallpaper library: Tap   to add pictures into your loop Lock screen wallpaper library as desired.•  Remove from your loop Lock screen wallpaper library: Tap the picture you don’t like and then tap   at the bottom of the screen. You can also touch and hold one of the exsited pictures and select the ones you want to remove from your loop Lock screen wallpaper library, then tap  .11. 3  Change Lock screen style1.  On the Home screen, tap   Themes -> CUSTOM -> Lock screen style.2.  Tap one of the Lock screen styles and swipe the screen left or right to preview the different Lock screen style effect. Select the desired Lock screen style and tap APPLY.11. 4  Change the icon style1.  On the Home screen, tap   Themes -> CUSTOM -> Icons.2.  Tap one of the icon styles and swipe the screen left or right to preview the icon style effect.3.  Select the desired icon style and tap APPLY.
52Chapter 12.    WeatherWeatherUse Weather to check the current weather and multi-day forecast for your location and many other cities around the world. •  Check the weather•  Weather settings12. 1  Check the weatherAdd a cityAdd multiple cities to the weather application so that you can keep track of the weather in cities of interest to you. Before adding a city, please connect to the mobile data or connect to WLAN and enable location-based services.1.  On the Home screen, tap   Weather.2.  Enter a city name in the City field and a list of cities will be displayed on the screen. Or you can tap Add current location to quickly get the weather of your current location.3.  You can add more cities by tapping   and then enter the city name. 4.  Tap a city to view its weather information. After adding two or more cities, slide the screen left or right to view the weather information of different cities.5.  On weather information screen, swipe the screen down to refresh the weather information; swipe the screen up to view the future weather and detailed information of the day: relative humidity, UV, wind speed, dew point, visibility and pressure.Remove a city1. Tap   Weather ->   to log into the City list.2.  Swipe left the city you don’t need and tap   to remove the city.12. 2  Weather settingsTap   Weather ->   to configure the weather settings.•  Weather alerts: Tap to choose the city from which you want to receive weather alerts. Switch on or switch off  Weather warnings,  Rain alerts,  Snow and hail alerts,  Falling temperature alerts to enable or disable the Weather application to inform you of weather warnings, rain alerts, snow and hail alerts, falling temperature alerts for the city you choose. •  Auto refresh: Turn on the switch to make the phone auto refresh the weather information.•  Refresh interval: Tap to set the refresh interval.•  Temperature units: 8ETXSGLSSWI̚SV̛EWXLIXIQTIVEXYVIYRMX•  Wind speed unit: Tap to choose km/h, m/s, mph or kts as the wind speed unit.•  Air preesure unit: Tap to choose hPa, mb, mm or in as the air pressure unit.12
53Chapter 13 .    CalendarCalendarUse Google Calendar to capture your precious moments.•  Use the calendar•  Calendar settings13. 1  Use the calendarRefreshShow events for current dayTap to expand and collapse the monthAdd goals/reminders/eventsMenuGo to todayView the calendar1.  On the Home screen, tap   Calendar.2. Tap   to select Schedule/Day/3 Day/Week/Month to zoom in or out your calendar.Add goals/reminders/eventsAdd goals/reminders/events to help you plan ahead.1.  On the Home screen, tap   Calendar.2. Tap  , choose   Goal/ Reminder/ Event.3.  Follow the onscreen instructions to enter the related information and save it.Search events/holidays1.  On the Home screen, tap   Calendar.2. Tap   ->   Search and enter the key words you want to search, and tap Search on the keyboard. Related results will be displayed under the search bar. 13
54Chapter 13 .    CalendarEdit/delete an event1.  On the Home screen, tap   Calendar and tap the event you want to edit or delete.2. Tap   to start editing.3. Tap  -> Delete -> DELETE to delete the event. 13. 2  Calendar settingsOn the Home screen, go to   Calendar ->   -> Settings -> General.•  Start of the week: Tap to choose the day when a week starts on (Saturday/Sunday/Monday).•  Use device time zone: Turn on the switch to use device time zone, or turn off the switch and tap Time zone to choose a country time zone.•  Alternate calendar: Tap to choose an alternate calendar, such as Chinese calendar.•  Show week number: Turn on or turn off the switch to show or hide week number.•  Show declined events: Turn on or turn off the switch to show or hide declined events.•  Default event duration: This is the default duration of a newly created event. For non-Google accounts, the default is 1 hour.•  Notify on this device: Turn on the switch and tap Calendar notifications to configure more settings for calendar notifications.•  Quick responses: Tap to edit the quick responses.
55Chapter 14.    NotesNotesUse Notes to record important information to save and view at a later time.•  Compose a new note•  Note options•  Manage notes14. 1  Compose a new note1.  On the Home screen, tap   Notes ->   at the bottom right corner and begin composing a new note.2.  For the content of your note, you can:•  Add pictures: Tap   to select a picture from your gallery or tap   to take a picture.•  Add checklists: Tap   to add checklist in the note.•  Add graffiti: Tap   to add graffiti in the note. Once you have finished the graffiti, tap   and it will display in your note.•  Undo/Restore your operations: Tap   ->   to undo the operation you have done; tap   ->   to restore the operation you have done.3.  After finishing composing, tap   to save the note.Note:Tap   Notes on the call interface to edit notes during a call and then tap SAVE. (These notes are saved in   Notes ->   ->   Call by default.)14. 2  Note optionsOn the Home screen, tap   Notes and select the note you want to edit more, you can:Set remindersTap   to set times for your notes to receive reminders so you can deal with them on time.Add the note to favoritesTap   in the upper right corner to light it up for important contents.   means the note have been saved in  Favorites.To remove the note from favorites, tap the note and then tap  .Note:To see the notes you have added to favorites, tap   Notes ->   -> Favorites.Change the note background colorAt the upper right corner, tap   -> Background Color and select the color you want to set as your note background color. The default background color is white.Share the noteAt the upper right corner, tap   -> Share and choose the way you want to share: Share as text/Share as image, then choose the way you want to share and follow the onscreen instrutions. It is noted that when there are pictures or graffiti in the note, they can only be shared in the form of image.14
56Chapter 14.    NotesSave the note as pictureAt the upper right corner, tap   -> Saved as picture  and  the  note  will  be  saved  as  picture  and  kept  in                         Photos. Note:If you have ever shared the note, then it is already saved as picture in   Photos.Modify a groupAt the upper right corner, tap   -> Modify a group, then you can either set a new group for the note by tapping  Add group, entering the group name and tapping OK, or you can select one of the groups displayed.Pin to Home screenAt the upper right corner, tap   -> Pin to home screen and the note will be pinned to Home screen. Note:To remove the note from Home screen, touch and hold the note on the Home screen, then drag it to Remove in the status bar.Print the noteMake sure your printer and phone connect to the same LAN network. Then in the upper right corner, tap   -> Print -> Select a printer to choose your printer, and follow the onscreen instructions to print the note as desired.Delete the noteAt the upper right corner, tap   -> Delete -> DELETE to delete the note.14. 3  Manage notesSearch notesOn the Home screen, tap   Notes ->   and enter the key words to quickly find the notes you want.View your notes in an organized way1.  On the Home screen, tap   Notes and all your notes are displayed in chronological order.2. Tap   to enter the Group screen and view your notes in an organized way: • Tap All notes to view all your notes.• Tap Quick notes to view the notes you neither set for a group nor added to favorites.• Tap Favorites to view the notes you added to favorites. • Tap Call to view the notes you composed during a call.• Tap Life, Work, Study to view the notes you classified into Life group, Work group, Study group.Delete notesOn the Home screen, tap   Notes, touch and hold the notes, select the notes you want to delete, and then tap   -> DELETE.Move multiple notes to the same group1.  On the Home screen, tap   Notes,2.  Touch and hold the notes, select the notes you want to move to the same group.3.  you can either tap   ->   Add a group to move these note to a new group, or you can tap   and select the group you want to move theses notes to.
57Chapter 14.    NotesManage groupsOn the Home screen, tap   Notes ->  , you can:•  Add a group: You have three ways to add a group:• Tap  , enter a new group name and then tap OK.• Tap Group management ->  , enter a new group name and then tap OK.•  Tap a note and then tap   -> Modify a group ->   Add a group, enter a new group name and then tap OK.•  Rename a group: Tap Group management, tap the group you want to rename, enter a new group name and then tap OK.•  Delete groups: Tap Group management, touch and hold a group, select the groups you want to delete, and then tap   -> DELETE.•  Change display order of groups: Tap Group management. For example, when you have added many groups in Group screen and you want to view Life notes quickly, you can tap Group management, touch and hold   next to Life and swipe it up to the top, then Life group will display on the top under Call notes on Group screen.Note:All notes, Quick notes, Favorites, Call these four groups cannot be renamed, deleted or changed display order.Add note watermarkOn the Home screen, tap   Notes ->    -> Note watermark, you can switch on or switch off Add watermark to enable or disable add neffos watermark when creating images from notes.
58Chapter 15 .    File ManagerFile ManagerAccess files stored on your device (including Audio, Video, Image, Document, Archive, APK, Downloads and My Favorites).•  Create a folder•  View files•  Manage files•  File sharing15. 1  Create a folderKeep your device organized by creating folders for your files.1. Go to   File Manager -> Internal storage ->   -> New folder.2.  Enter the name of the new folder and touch SAVE.15. 2  View filesOn the Home screen, tap   File Manager. Files are organized into eight categories (Audio, Video, Image, Document, Archive, APK, Downloads and My Favorites). Tap a category to view the relevant files or tap Internal storage to view all the files.Search filesUse the search feature to find files quickly.Go to   File Manager ->   , enter the file name or keywords. Search result will be displayed below the search bar. Sort filesUse the sort feature to arrange your files by type, name, size, or date.1. Go to   File Manager, tap the file of which you want to change the sort type for the documents: Audio, Video, Document, Archive, APK, Downloads, My Favorites.2. Tap  , select a sort type to sort files by Date/Name/Type/Size as desired and set the order posted by Asc (ascending order) or Desc (descending order).Sort Internal storageUse the sort feature to arrange your files by type, name, size, or date.1. Go to   File Manager -> Internal storage ->   -> Sort mode.2.  Select a sorting type to sort files by Date/Name/Type/Size as desired and set the order posted by Asc  (ascending order) or Desc (descending order).15. 3  Manage filesView the device storage1. Go to   File Manager -> Internal storage  .2.  Tap to view overall storage availability and storage used by different types of applications.15
59Chapter 15 .    File ManagerConfigure more options for files1. Go to   File Manager, tap Audio, Video, Image, Document, Archive, APK, Downloads, My Favorites, or  Internal storage. Then touch and hold a folder or file, you can:•  Copy: Tap   -> Copy, select a destination folder, and then tap Paste.•  Move: Tap   -> Move , select a destination folder, and then tap Paste.•  Rename: Tap   -> Rename, enter a new name and tap SAVE.•  See the details: Tap   -> Details to see the detailed information.•  Add to favorites: Tap   -> Favorite to add the folder or file to favorites. You can always view the files you added to favorites in   File Manager -> My Favorites. To remove the folder or file from favorites, tap   -> Unfavorite.•  Browse the directory: This function only exists in the folder or file in  Audio, Video, Image, Document, Archive, APK, Downloads, and My Favorites. Tap   -> Browse the directory to view the directory of the folder or file.•  Delete: Tap   -> DELETE.•  Share: Tap   , choose a sharing method and follow the onscreen instructions to share your files (Folder cannot be shared directly. You can choose one or more files to share).Note:When you touch and hold a folder or file, you can select multiple folders and files at a time.Extract archives1. Go to   File Manager -> Archive.2.  Touch and hold the archive file and then tap   -> Extract. Or tap the archive file, tap   .3.  Select where the contents of the archive should be extracted to and tap Extract.15. 4  File sharingFiles can be shared and managed on mobile phones and computers connected to the same local area network.Before sharing files, make sure that your computer supports the network neighborhood feature.1.  Connect the computer and your phone to the same LAN network. For more information on connecting your phone to a WLAN network, see Connect to a WLAN network.2.  On your phone, go to   File Manager -> File Sharing and tap Enable file sharing.3.  In Windows, enter the IP address shown on your phone screen into the address bar of My computer. In  MAC, enter the IP address shown on your phone screen into the Finder. Then you can access the files on your phone. Tap Disable file sharing when you want to stop sharing files with your computer.
60Chapter 16 .    ToolsToolsUse Tools to enjoy more features of your phone.•  Sound Recorder•  FM Radio•  Compass•  Downloads•  SIM Toolkit•  Feedback•  Calculator16. 1  Sound RecorderYou can use the   Sound Recorder to record sound in a variety of different scenarios, such as meetings, interviews, or your own voice.Record sound1.  On the Home screen, tap   Sound Recorder.2. Tap   to start recording. In order to ensure optimum recording quality, place your phone on a flat surface and do not cover the microphone.3. Tap   to add a tag for easy reference, tap   to pause or stop recording.4.  After stopping recording, tap   to name the sound record and tap SAVE to save it.Note:1.  To make a call recording, on the in-call menu, tap   to start recording, and tap   to end. Recording will end automatically when the call ends. In some countries, recording during the call is illegal, so their phone may not have this feature.2.  The Sound Recorder app will pause recording automatically when you receive a call.3.  When the Sound Recorder app is recording sound in the background, use the controller in the Notification Panel to pause it by tapping   , then tap   to continue recording; or you can save the recording by tapping  .Play a recording1.  On the Home screen, tap   Sound Recorder.2. Tap   , select the recording file you want to play.3.  When playing a record, you can:16
61Chapter 16 .    ToolsSwipe the screen left or rightto switch between recording listsTemporal information for tags, tap one to start playback from the corresponding locationTap to delete tagged locationTap to play the recordingTap to toggle speaker and earpiece playbackTap to add tag(s)Tagged locationsTap to stop playing and fold the tag informationTap to pause playingManage recordings1.  On the Home screen, tap   Sound Recorder ->   .2.  Touch and hold the recording, select the recordings you want to manage, and then you can rename, share,  and delete them.Sound Recorder shortcutSwipe up from   at the bottom of the lock screen to display lock screen features and tools, and then tap   to open the Sound Recorder.16. 2  FM RadioListen to radio1.  Before using FM Radio, connect an earphone to the phone.2.  On the Home screen, tap Tools ->   FM Radio to enter the FM Radio screen.3. Tap   to search stations and select one. Then tap a blank area on the screen to return to the FM Radio screen.4. Tap   to play the next station, tap   to play the previous station.5. Tap   to exit the FM Radio.Configure more options•  Refresh stations: On FM Radio screen, tap the station name and then drag the slider to manually switch stations (Not all these stations have signals). You can also tap   ->   to manually refresh searching stations (All these stations have signals), then tap a blank area on the screen to return to the FM Radio screen.•  Add a station to favorites: On FM Radio screen, tap the station name to expand detailed menu. (Tap the station name again to fold the detailed menu.) Then tap   to add the station to favorites. For all the stations you have added to favorites, they will display on the station list whenever you search station.
62Chapter 16 .    Tools•  Mute the radio: On FM Radio screen, tap the station name and tap   to mute the radio. Then you can tap  to resume normal listening.•  Configure more settings: Tap   and you can check Speak mode to enable loud speaker function (To use this function, an earphone should also be connected to phone). Tap   -> Auto-off to set auto-off time.16. 3  Compass1.  On the Home screen, swipe down from the status bar to open the Quick Settings Panel and tap   Location (If it is turned on already, move to step 2).2. When opening Compass for the first time, follow the onscreen instructions to tilt your phone and calibrate the compass. Tap Tools ->   Compass to open the compass and view your bearings. Swipe the screen left to view the spirit level.16. 4  DownloadsOn the Home screen, tap Tools ->   Downloads to view the downloaded and downloading information.View filesGo to   Downloads ->   , you can tap Images/Videos/Audio/Recent to view the pictures/videos/audio/recent files in your phone.Rank filesSelect a ranking type to display your files in a list or a tile.Go to   Downloads ->   , tap it and switch the ranking type of files diaplay mode.Sort filesUse the sort feature to arrange your files by name or date modified.Go to   Downloads -> Modified, select a sorting type to sort files: by Name/Modified/Type/Size.Configure more optionsGo to   Downloads ->  , you can:•  Open a new window: Tap New window to do operations in a new window.•  Create a new folder: Tap New folder, enter the folder name, and tap OK to save it.•  Select all files once: Tap Select all to select all the files in Downloads.•  Show internal storage: Tap Show internal storage to make the storage of the files in Downloads seen.16. 5  SIM Toolkit1.  Before you launch the SIM toolkit, insert SIM card first.2.  On the Home screen, tap Tools ->   SIM Toolkit.3.  Choose SIM 1 or SIM 2 to check the SIM card details.16. 6  FeedbackOn the Home screen, tap Tools ->   Feedback, you can:
63Chapter 16 .    Tools•  View frequently asked questions: Some frequently asked questions are displayed on the Feedback screen. Tap the question you are interested to get the answer. You can also tap   See more FAQ to view more frequently asked questions and their answers. •  Search questions: To quickly find the question you want, you can tap   and enter the key words of your question. It is noted that you can only find the questions that are already included in Feedback. For more questions, you can tap Contact us to contact us and get the answer.•  Send feedback: Tap FEEDBACK and follow the onscreen instrutions to enter your feedback, then tap Submit. You can always go to   Feedback ->   to view the feedabacks you have sent.16. 7  CalculatorUse the calculator1.  On the Home screen, tap   Calculator to open the standard calculators.2.  Rotate the screen to access the scientific calculator (The calculator will still rotate when auto-rotation is disabled).3.  Tap numbers and use the arithmetic feature to complete an operation.Calculator shortcutSwipe up from   at the bottom of the lock screen to display lock screen features and tools, and then tap   to open the calculator.
64Chapter 17 .    SettingsSettingsThis chapter contains the following sections.•  Enter settings•  Search settings•  Dual SIM and network•  Data usage•  More connection settings•  Sounds, vibration and Do not disturb•  Display•  Notifications•  Apps•  Permissions•  App Cloner•  Screen lock, fingerprint and security•  System navigation•  Gestures and smart assistance•  Battery•  Storage•  Users•  Accounts•  Location•  Languages and input•  Date and time•  Backup and reset•  System update•  About phone17. 1  Enter settingsYou can enter Settings in two ways:•  On the Home screen, tap   Settings.•  Swipe down from the status bar to open the Quick Settings Panel, and then tap   to enter Settings.17. 2  Search settingsGo to Settings, tap   and enter the key words; then the related functions from Settings will display on the screen. Select the function you want to know more.17. 3  Dual SIM and networkWhen two SIM cards are inserted, you can configure the default card for mobile data, phone calls and SMS messages according to your plan.1. Go to Settings -> Dual-SIM & network.17
65Chapter 17 .    Settings2.  Tap a SIM card and configure more settings for the SIM card. 3.  Choose the preferred SIM mobile data, calls or SMS messages.OperatorOperatorSelect default SIM for data servicesTap to enable or disable your SIM cards, and configure more settings of you SIM cardsEnable or disable mobile dataEnable or disable data roamingEnable or disable WLAN aggressively handing over the data connection to Cellular when WLAN signal is lowSelect default SIM for phone callsSelect default SIM for messagesNote:1.  If you disable a SIM card, you will be unable to use it to make calls, send messages, or use mobile data.2.  You can configure whether you want to select a SIM card manually or use the default SIM card each time you make a call. If you choose to use the default SIM card, your phone will use that SIM card for all outgoing calls.3.  Your phone supports only dual card dual standby single pass, which means you cannot use both SIM cards for calls or data services simultaneously.17. 4  Data usageGo to Settings -> Data usage, and you can configure the following settings:View mobile data usage1. Tap Mobile data usage to see mobile data usage for your phone. 2. Tap   to adjust billing cycle settings, which can also be set in Billing cycle.Adjust billing cycleTap Billing cycle and you can reset the usage cycle date, set data warning and set data limit.Enable mobile dataSwitch on Mobile data to enable it. To enable mobile data, you have two more ways: •  Swipe down from the status bar to open the Quick Settings Panel and tap   Mobile data.• Go to Settings -> Dual-SIM & network, and switch on Mobile data.Configure apps mobile data Tap Apps using mobile data network, toggle the switch next to the apps as desired to allow or restrict the apps to use the data network.
66Chapter 17 .    SettingsEnable data saverTap Data saver and turn on the switch to enable data saver, and then some apps will be prevented from sending or receiving data in the background. Note:Still, you can have some apps allowed to use unrestricted data when Data Saver is on. Tap Unrestricted data access and turn on the switch next to the app you want to enable using unrestricted data.View WLAN data usage1. Tap WLAN data usage to view the detailed information.2.  Select an app and you can view the app information and configure the data usage.Set WLAN network restrictions1.  Connect your phone to WLAN before selecting metered networks. See WLAN and follow the instructions. 2. Tap Network restrictions, select WLAN networks as desired and choose Metered. Then the metered networks are treated like mobile networks when background data is restricted. Apps may warn before using these networks for large downloads.17. 5  More connection settingsGo to Settings -> More connection settings to configure the following settings:Airplane modeTo avoid interference, please enable airplane mode or power off your phone when you are on board a plane. When enabled airplane mode, call, mobile data, Bluetooth, and WLAN will be disabled. You can enable Bluetooth and WLAN manually, and you can still be able to play music, watch videos and use applications that do not require an Internet connection.Use any of the following methods to enable airplane mode:•  Use the shortcut switch: Swipe down from the status bar to open the Quick Settings Panel, and then tap  Airplane mode.•  Go to Settings: Go to Settings -> More connection settings and then switch on Airplane mode.Note:When airplane mode is on,   will display in the status bar.Hotspot and tetheringTap Hotspot & tethering to configure tethering & portable hotspot options to share your phone’s mobile Internet with other devices (such as phones, tablets, or computers). For more information, see Share your mobile data with other devices.VPNA VPN (virtual private network) is a secure connection that allows you to send and receive data across shared or public networks. You can use a VPN to connect to your company network and email server. Tap VPN -> Add VPN, and follow the onscreen instructions to use it.CastMirror your screen to a larger display device when playing games or sharing content with others. Ensure that your device is connected to the same LAN network as your display device or set-top box. Then tap Cast and follow the onscreen instructions to use it.PrintingMake sure your printer and phone connect to the same LAN network. Then tap Printing and your printer will
67Chapter 17 .    Settingsdisplay on the screen, and then follow the onscreen instructions to use it.17. 6  Sounds, vibration and Do not disturbGo to Settings -> Sounds, vibration & Do not disturb to configure the volume, ringtones, and vibrations for your phone.Do not disturbWhen Do not disturb is enabled,   will appear in the status bar. Calls and alerts will be silenced except the items you set as priority. Tap Do not disturb, and you can configure the following settings:•  Manually enable Do not disturb: Switch on Manual to enable Do not disturb immediately. You can also swipe down from the status bar to open the Quick Settings Panel, and then tap   Do not disturb.•  Scheduledly enable Do not disturb: Switch on Scheduled and set the start time, end time and repeat for  Do not disturb.•  Set exceptions for Do not disturb: Tap Exceptions and you can choose the following modes:•  Priority only: You can set priority only allows alarms, reminders, events, calls and messages. Tap Priority only allows to configure the settings as desired.•  Alarms only: Only allow alarm to send notifications when enabling Do not disturb.•  Total silence: Disable all notifications.17. 7  DisplayConfigure the display settings to personalize your phone. For example, you can change the wallpaper, font size, and screen-off time.Go to Settings -> Display. You can configure the following settings: Enable adaptive brightnessYou have following two ways to enable adaptive brightness:• Switch on Adaptive brightness and your phone will automatically adjust the screen brightness according to the ambient brightness. •  Swipe down from the status bar to open the Quick Settings Panel, and check Auto  to optimize the brightness level for available light.Enable LED indicator•  Notifications indicator: Tap  LED indicator and switch on Notifications indicator, and then the LED indicator will blink green when you receive notifications. •  Charging indicator: Tap LED indicator and switch on Charging indicator, and then the LED indicator will light in yellow when your phone is offscreen charging, and it turns to green when the charging is complete.Enable Eye protection modeYou can enable Eye protection mode to decrease the blue light of the screen so as to reduce harm to the retina.1. Tap Eye protection mode and switch on Eye protection mode 2.  Drag the slider to adjust the color temperature for a cooler or warmer screen color.3.  Make a schedule by switching on Scheduled and setting the specific time.
68Chapter 17 .    SettingsAdjust font sizeTap Font size, and then tap or drag the slider to set a desired font size (small/medium/large/extra large/huge). Automatically lock screenTap Automatically lock and select a time to make the phone lock automatically after a certain time of inacticity.Auto-rotate screenYou have following two ways to adjust the screen rotation:• Switch on Auto-rotate screen, and your screen’s orientation will switch automatically depending on how you hold your phone when performing certain operations, such as browsing a web page or viewing a picture.•  Slide down from the status bar to open the Quick Settings Panel, and tap  .17. 8  Notifications1. Go to Settings -> Notifications.2.  Select an app to personalize its notification mode based on your needs. You can configure the following options: •  Allow notifications: Turn on the switch to enable all notifications for the application.•  Notification dots: Turn on the switch, and then a notification dot will appear in the upper right corner of an app when receiving new notifications. For more information, see Notification dot. For some apps, multiple notifications types display in the CATEGORIES list, you can select one and switch on Notification dots to enable it for this notification category.•  Notificaiton categories: You can configure categories that belong to each app.3. Tap  -> Advanced, and then you can configure the following options:•  Notificaitons on the lock screen: Tap On the lock screen and you can choose Show all notification content, hide sensitive notification content or Don’t show notifications at all for applications in your phone. •  Notification dots: Turn on the switch to enable notification dots for all the apps. (You can also enable Notification dots in Home screen editor, see Home screen settings.•  Notification indicator: Turn on the switch and the notification indicator will blink green when receiving notifications.•  Default notification sound: Tap Default notification sound to select a desired sound for notificaitons.17. 9  Apps1. Go to Settings -> Apps, and view the apps in your phone.•  View installed apps: Tap Installed to view the apps you have installed. •  View all apps: Tap All or swipe the screen left to view all the apps in your phone.2.  Tap an app and you can configure the following options:•  Disable apps: Tap DISABLE button to disable an app (Some pre-installed apps cannot be disabled).•  Force stop apps: Tap FORCE STOP button to force stop an app.•  Uninstall apps: For an installed app, you can tap UNINSTALL button to uninstall the app.•  Notifications: Configure the notification settings for the application. For details, see Notifications.•  Permissions: Configure permissions for the application.•  Storage: Clear data, clear cache and view the status about the used space of your phone.
69Chapter 17 .    Settings•  Data usage: View the data usage of the app, allow app to use the mobile data network, enable usage of mobile data in the background, and allow unrestricted data access when Data Saver is on.•  Battery: View and adjust the power use details.•  Open by default: Configure the settings for opening supported links in the app. 3. Tap  -> Default apps to configure more settings for default app, including assist apps, opening links in apps and so on.17. 10  PermissionsYour phone comes with a permission manager that you can use to restrict app permissions and protect your personal data. Configure permissions for appsGo to Settings -> Permissions, and you can select either Apps or Permissions to configure the following options:•  Apps: Select an app and you can enable or disable the relevant permissions for the app. To learn more about all the permissions, tap   -> All permissions. •  Permissions: Select a permission and you can authorize certain apps. Manage auto start for appsManage auto start of apps and controls uncessary mutual wakening between associated apps from the bottom level, as well as auto start and background start.1. Go to Settings -> Permissions ->  -> Startup manager.2.  Turn on or turn off the switches next to the apps to allow or restrict the apps to run automatically. Special app access1. Go to Settings -> Permissions ->  -> Special app access.2.  Select a permission type and configure the access for the apps as desired.17. 11  App ClonerApp Cloner allows you to log in to two accounts at once.1. Go to Settings -> App Cloner. Apps available for App Cloner display on the screen.2.  Turn on the switch to enable App cloner for an app,   will show on the lower right corner of the cloned app icon on the Home screen, differing from the original app icon.Note:App Cloner is not supported on third-party home screens.17. 12  Screen lock, fingerprint and securityGo to Settings -> Screen lock, fingerprint & security to configure the following settings:Add screen lock methodTap Screen lock, choose one of the following methods and follow the onscreeen instructions to add a screen lock method.•  None: Set no screen lock for your phone.•  Swipe: Swipe the screen to unlock your phone.
70Chapter 17 .    Settings•  Pattern: Use a pattern to unlock yur phone.•  PIN: Use PIN to unlock your phone.•  Password: Use password to unlock your phone.Note:To display characters and pattern when entering password and pattern on the lock screen, you can go to Settings -> Screen lock, fingerprints & security and switch on Show passwords. Add lock screen message1. Tap Lock screen message, and enter the message.2. Tap Save, and then the message will appear on the lock screen.Configure fingerprint and facial recognitionTo configure fingerprint and facial recognition, see Configure your fingerprint and Configure your face data.Enable palm rejection modeDistance sensor can help prevent misoperation of the mobile phone due to squeezing or sliding in the pocket.Switch on Palm rejection mode to enable it. Enable smart lock1.  To use Smart Lock, set a screen lock first. See Add screen lock method.2. Tap Smart Lock, and enter the screenlock method you have set.3.  Read the introduction of Smart Lock. Tap GOT IT to continue and you can configure the following options.• Tap On-body detection and turn on the switch to keep your device unlocked when it is on you.• Tap  -> Help to know more about Smart Lock. Enable app lockApp lock enhances the protection of your private information and prevents unauthorized access to important apps on your device. Once you restart your phone or unlock the phone screen, you will be asked to enter your app lock method when initially opening the apps. You can use following app lock method: •  Use pattern/PIN/password as app lock method1. Tap App lock.2.  Choose an app lock method (pattern/PIN/password) and follow the onscreen instructions to complete the configuration. 3. In the UNENCRYPTED APPS list, turn on the switches next to the apps that you want to encrypt.4.  Tap Back button to verify the settings. •  Use fingerprint as app lock method1.  To use fingerprint as app lock method, you need to add fingerprint and enable fingerprint verification first. See Access App lock with fingerprint.2. Tap App lock, place your fingerprint on the sensor to enter App lock.3. In the UNENCRYPTED APPS list, turn on the switches next to the apps that you want to encrypt.4.  Tap Back button to verify the settings.Change App lock password1. Tap App lock, and then use the app lock method (either pattern, PIN, password or fingerprint) to unlock.2. Tap   -> Change password.3.  Choose another app lock method and follow the onscreen instructions to change the password.
71Chapter 17 .    SettingsSet up SIM card lockEnable SIM card lock to prevent others from using your SIM card. You will need to enter your SIM card PIN each time you turn on your phone or insert your SIM card into another phone.1.  Contact your local carrier to get the default SIM PIN for your SIM card.2. Tap SIM card lock, and select a SIM card.3. Tap Lock SIM card, enter the SIM PIN and tap OK.Change SIM PIN1.  To change a SIM PIN, you need to set up a SIM card lock first. See Set up SIM card lock.2. Tap SIM card lock, and select a SIM card.3. Tap Change SIM PIN, enter the old SIM PIN and tap OK.4.  Enter a new SIM PIN twice, and tap OK.Note:When you change you SIM PIN for the first time, contact your local carrier for the default SIM PIN (old SIM PIN).Remove SIM card lock1. Tap SIM card lock, and select a SIM card.2. Tap Lock SIM card, enter the SIM PIN you have set before, and then tap OK.17. 13  System navigationGo to Settings -> System navigation, and then you can choose one of the following navigation modes as desired:Navigation buttons1. Select Navigation buttons as the navigation mode.2.  Select a button setting, and then the virtual buttons on your screen will change as desired.Navigation gestures1. Select Navigation gestures as the navigation mode.
72Chapter 17 .    Settings2.  Use the following gestures to control your phone:•  Back gesture: You can choose to slide left from the right edge of the screen only to go back to the previous screen, slide right from the left edge of the screen only to go back to the previous screen, or slide towards the center from the left or right edge of the screen to go back to the previous screen. •  Home gesture: Slide up from the bottom edge and release to go back to the Home screen.•  Recent gesture: Slide up from the bottom edge and hold to view multi-tasking.•  App define gesture: On the screen edge that triggers the back gesture, slide towards the center from the upper half and release to set the app’s definition of the gesture. Different app’s definition of the gesture may be different.
73Chapter 17 .    SettingsVisual feedbackSwitch on Visual feedback, and then you will get a visual indication of the gesture direction as shown below.Prevent mistaken gestureSwitch on Prevent mistaken gestures on landscape screen, and then you will need to slide twice for the gesture to take effect in full-screen landscape mode, such as when playing games or watching full-screen videos.17. 14  Gestures and smart assistanceGo to Settings -> Gestures and smart assistance, and you can configure the following settings:Use screen-off gestures1. Tap Screen-off gestures, and turn on the switch. 2.  To enable the gestures for screen control, music control, or applications control, turn on the switch next to the relevant features.Use gestures to take screenshotsSwitch on Taking screenshots by gestures, and then you can slide three fingers on the screen to take screenshots.
74Chapter 17 .    SettingsUse fingerprint gestures to control notifications1. Switch on Fingerprint gestures for notification panel. 2.  Use the following gestures to control notifications when the screen is not locked:•  Show the Notification Panel: Slide your finger downward on the fingerprint sensor.•  Clear notifications: Double-tap the fingerprint sensor.•  Collapse the Notification Panel: Slide your finger upward on the fingerprint sensor.Use fingerprint to take pictures 1. Switch on Press and hold your fingerprint to capture. 2.  When using camera, press and hold the fingerprint sensor to take pictures.Float buttonThe Float button gives you access to a number of frequently-used options and features, such as the Back button, Home button, Recent apps button, taking a screenshot and locking screen. You can move the Float button around the screen for easy one-hand use.1. Tap Float button and turn on the switch, and the Float button   will display on the screen (except the Lock screen and Notification Panel). 2. Tap   to expand the Float button menu.• Tap   to return to the Home screen.• Tap  to display the list of recently used applications.• Tap  to take a screenshot.• Tap   to return to the previous screen.• Tap  to lock the screen.HomeRecents ScreenshotLockBackGlove modeSwitch on Glove mode to increase screen sensitivity so that it can be operated even when wearing gloves.Touch sensitivityTap or slide the slider to adjust the sensitivity of the screen.17. 15  BatteryGo to Settings -> Battery and configure the following settings:
75Chapter 17 .    SettingsView battery details1. Tap Details to view the software power consumption and hardware power consumption.2.  Tap an app and you can view the battery use details of the app.Optimize battery for apps1.  To optimize battery for apps, tap Details -> BATTERY OPTIMIZATION.2.  Turn on the switches next to the apps that you want to optimize; then the battery will be optimized and the battery life will be extended. Note:Apps with higher real-time requirements, such as email and chat apps are better not optimized, otherwise you may not receive timely information.Change power saving modeYou can use either the following power saving mode:•  Smart power saving mode: Switch on Smart power saving to enable it, and then the location information service and app autostart function will be restricted; notifications will not light the screen, and visual effects will be reduced.•  Ultra power saving mode: Switch on Ultra power saving to enable it, and only Phone and SMS are allowed. To exit ultra power saving mode, tap   -> EXIT.Close apps when screen is offOff-screen cleanup enables to clear up background apps three minutes after the screen is off. 1. Tap Off-screen cleanup.2.  Turn on the switch next the app that you want to close when the screen is off for more than 3 minutes.Manage background power consuming apps•  Clean up power consuming apps1. Tap Background power consumption apps, and the power consuming apps running on the background will display on the screen.2.  Select the apps and tap CLOSE to reduce power consumption.•  Enable power-hungry alerts1. Tap Background power consumption apps, and switch on Power-hungry alerts.2. Tap High power consumption reminder, and turn on the switches of apps as desired; then a notification will be sent to you once high power consumption behavior by any app is detected. Configure battery settingsTap   and you can configure the following settings:•  Auto-exit power saving mod: Switch on Auto-exit power saving mode; then your phone will auto exit power saving mode after the battery reaches 80%. •  Show battery percentage: Switch on Show battery percentage; then the battery percentage will display in the status bar. 17. 16  StorageGo to Settings -> Storage to view storage use of your phone.Free up space1. Tap FREE UP SPACE button.
76Chapter 17 .    Settings2.  Select the items you want to remove, and tap FREE UP -> REMOVE to free up space.17. 17  UsersCreate multiple user accounts to prevent others from viewing your confidential information, or to keep your work and personal life separate.Go to Settings -> More general settings -> User & account -> Users to configure the following settings:User typesYour phone supports user types as follows:•  Owner: Only the owner can log in to this account. As the owner, you can control all user permissions. For example, you can add or delete users, or authorize other users calling and messaging permissions. You can tap You (Owner) to change your username and tap   to choose a profile picture from your Gallery or take a photo and use it as your profile picture.•  Guest: Guests only have limited access to your device’s features. Tap   next to Guest and switch on Turn on phones calls, then your call history will be shared with the guest user.•  User: Create multiple user accounts to keep your work and personal life separate. For detailed information, see Create user accounts below. You can add up to three user accounts.Add usersYou can add up to four user accounts (including the owner and guest accounts). Use any way below to create user accounts:• Tap   Add user -> OK. You can choose to set up user now or later.•  Set up now: Tap SET UP NOW on the pop up prompt and it will switch to the new user account. Then tap CONTINUE and follow the onscreen instructions to customize the user settings. •  Set up later: Tap NOT NOW on the pop up prompt, then a new user account will appear on the screen. Tap  New user -> SET UP NOW if you want to set up the user account, and follow the onscreen instructions to customize the user settings.•  Swipe down from the status bar to open the Quick Settings Panel, tap   ->   Add user -> OK, then follow the onscreen instructions to customize the user account settings.• Go to Settings -> More general settings -> User & account, and switch on Add users from lock screen. On the lock screen, swipe down from the status bar to open the Quick Settings Panel and tap   ->   Add user, and then follow the onscreen instructions to customize the user account settings.Remove usersYou can use either way below to remove user accounts:• Go to Settings -> More general settings -> User & account -> Users, tap   of the user account you want to delete and tap Remove user -> DELETE. •  Switch to the user account you want to delete, and go to Settings -> More general settings -> User & account -> Users, tap   -> Delete from this device.Switch between usersYou can switch users in following ways:•  Swipe down from the status bar, tap   and then select another user  to switch accounts.• Go to Settings -> More general settings -> User & account -> Users, tap any account to switch.•  On the lock screen, swipe down from the status bar to open the Quick Settings Panel. Tap   and tap any user account to switch.
77Chapter 17 .    SettingsAuthorize users and guest to share call and message featuresLog in as the owner and you can authorize users or guest to access your contacts, call log, and call and messaging features.1. Go to Settings -> More general settings -> User & account -> Users. 2. Tap   of a user account and then switch on Turn on phone calls & SMS. Tap   of a guest account and then switch on Turn on phone calls.Remove guest Log in as a guest and three ways are available for you to delete the guest account.•  Swipe down from the status bar to open the Notification Panel, then tap REMOVE GUEST.•  Swipe down from the status bar to open the Quick Settings Panel and tap   -> Remove guest, or tap More settings-> Remove guest.• Go to Settings -> More general settings -> User & account -> Users and tap Remove guest or tap   -> Delete Guest from this device.Note:When logging in as the owner, deleting the guest account is not allowed.17. 18  AccountsWhen you use your phone for the first time, you can set up a connection with your existing account or create a new account.Add an account1. Go to Settings -> More general settings -> User & account.2. Tap   Add account.3.  Select an account type, and then follow the onscreen instructions to enter your account information.Delete an account1. Go to Settings -> More general settings -> User & account. The account you have added displays on the screen.2.  Tap the account that you want to delete, and tap REMOVE ACCOUNT to delete it.Synchronize accountsEnable the sync feature to keep all of your phone’s data up-to-date and prevent data loss. You can sync emails, contacts, and other data from your old phone or computer. The type of data that can be synced depends on the account type. Some applications may not support syncing for all data types.1. Go to Settings -> More general settings -> User & account. 2.  Synchronize accounts according to your needs: •  Auto sync data of all accounts: Switch on Automatically sync data to let apps refresh data automatically. Then any changes you make to your accounts on the web will be automatically copied to your phone. Some accounts may also automatically copy any changes you make on the phone to the web. A Google account works this way.•  Auto sync data of certain accounts: Go to Settings -> More general settings -> User & account, select the account you want to synchronize and tap Account sync. Turn on the switches of apps you want to sync, and tap   -> Sync now.
78Chapter 17 .    Settings17. 19  LocationEnable location-based services to ensure that map, navigation, and weather applications can access your location information.Go to Settings -> More general settings -> Location to configure the following settings:Enable Location service1.  Turn on the switch to enable the location services. You can also swipe down from the status bar to open the Quick Settings Panel, and tap   Location.2. Tap Mode and you can choose from three different modes:•  High accuracy: Use GPS, WLAN, Bluetooth, or mobile networks to determine location. Select this option for highly accurate positioning.•  Battery saving: Use WLAN, Bluetooth, or mobile networks to determine location. Select this option for reduced power consumption and longer standby times.•  Device only: Use GPS to determine location. Select this option to reduce mobile data usage.Configure Location permissionsTap Location permissions, and toggle the switches of the apps to enable or disable the location permissions for the apps in your phone. Improve Location serviceTap Scanning, and you can select from following two scanning mode:•  WLAN scanning: Improve location by allowing system apps and services to detect WLAN networks at any time.•  Bluetooth scanning: Improve location by allowing system apps and services to detect Bluetooth devices at any time.17. 20  Languages and inputGo to Settings -> More general settings -> Languages & input to manage your phone’s language and input settings.Change the system language1.  To change the system language, tap Languages ->   Add a language and select the language you need.2.  Tap the language to change the system language, or touch and hold the language and drag it to the top of the list to change the system language as you need.Remove the system language1. Tap Languages ->   -> Remove. 2.  Select the language you don’t want and tap  . If the selected language you remove is your device’s current system language, text will be displayed in second language on the language list. Switch input method•  Virtual keyboard: Tap to select the keyboards you need and turn on the switch next to the keyboard.•  Physical keyboard: Tap and switch on Show virtual keyboard to enable keeping the virtual board on screen when your phone is connected to a physical keyboard. Tap Keyboard shortcuts helper to view the available shortcuts in your phone.
79Chapter 17 .    Settings17. 21  Date and timeGo to Settings -> More general settings -> Date & time.•  Automatic date & time: Turn on the switch to use network-provided time. You can also switch it off to manually adjust the date and time by tapping Set date and Set time.•  Automatic time zone: Turn on the switch to use the network-provided time zone. You can also turn off the switch to manually adjust the time zone by tapping Select time zone.•  Date format: Toggle the Use 24-hour format switch to enable or disable 24-hour format.•  Week starts on: Tap Week starts on and choose the day when a week starts on as desired. 17. 22  Backup and resetBackups help ensure that you never lose your data. You can back up app data, WLAN passwords and other settings to Google servers. Restore your phone to its factory settings if it crashes or is slow to respond.Back up your dataGo to Settings -> More general settings -> Backup, and switch on Back up to Google Drive. Then data of your device will regularly being saved to the Google server, including apps and apps data, call history, contacts, SMS, and device settings (including WLAN passwords and permission).Reset network settings1. Go to Settings -> More general settings -> Reset -> Network settings reset.2. Tap RESET SETTINGS to reset all network settings including WLAN, mobile data and Bluetooth settings. If you have set a screen lock, you will need to confirm your pattern/PIN/password first to continue.Reset app preferencesGo to Settings -> More general settings -> Reset -> Reset app preferences, and tap RESET APPS.Reset factory dataRestore your phone to factory settings if it crashes or is slow to respond.1.  Back up important data on your phone before you reset your phone to factory settings. See Back up your data.2. Go to Settings -> More general settings -> Reset -> Factory data reset. 3. Tap FACTORY DATA RESET. If you have set a screen lock, you will need to confirm your pattern/PIN/password first so as to continue. Then your phone will restart automatically when the process is complete.17. 23  System updateOver-the-Air updates (OTA updates)1.  To use OTA updates, you need to connect the mobile network or WLAN network, and ensure that your phone has at least 30% battery power remaining.2. Go to Settings -> System update. Your phone will automatically check for updates.3.  If it turns out to be the latest version for your system, you have no need to update; if a new system version displays on the screen, follow the onscreen instructions to update your system.
80Chapter 17 .    SettingsLocal updates1. Go to http://www.neffos.com/en/support and find your phone model; then download the updates package under Firmware to your phone. You can also go to your nearest Neffos service center to download the updates package to your phone (It is recommended to use OTA updates and sometimes the updates package will not be placed on the website).2.  Ensure that your phone has at least 30% battery porwer remaining. 3. Go to Settings -> System update ->   -> Local updates, tap the file and then tap OK to confirm update. During the update process, please do not turn off or restart the phone manually. After updating, your phone will restart automatically.Check versionGo to Settings -> System update ->   -> current to check your phone’s version number.Configure auto download settingsGo to Settings -> System update ->   -> Settings, and you can toggle the switch to enable auto download update packages over WLAN or mobile network, or auto update overnight when the phone is in standby mode. Note:1.  Using unauthorized third-party software to update your phone may render your phone unusable or put your personal information at risk. Always update through your phone’s online update feature or send your phone to a nearby authorized Neffos service center for assistance.2.  Your personal data will not be erased during a system update unless you have installed an incompatible app. It is better to back up important data before updating your phone.3.  When updating, ensure that your phone has at least 30% battery power remaining.4.  After updating, you may find that some third-party applications are incompatible with your system, such as Internet banking applications and games. This is because it takes a while for third-party application developers to release updates for new Android releases. Please wait until a new version of the application is released.5.  You can also check your phone’s version number in Settings -> About phone -> Software information -> Build number.6.  If there is any issuse with your current system version, your phone will download an intact new version in your phone automatically. After downloading, there will be a notification reminding you to update your system. Then follow the onscreen instructions to update.17. 24  About phone1. Go to Settings -> About phone. 2.  Swipe up or down on the screen to view information about your phone, such as the Software information, IMEI information, SIM status, model number, build number and more.
81Appendix A: SpecificationsSpecificationsSize and WeightHeight: 159.47mmWidth: 76.31mmDepth: 7.85mmWeight: 168gColor Space Black/Moonlight SilverDisplay5.99 inches, HD+(1440 x 720)269PPIIPSCPUMTK  MT6750 4*Cortex-A53 1.5GHz + 4*Cortex-A53 1.0GHzGPU: ARM Mali-T860MP2 520MHzMemory ROM: 32 GBRAM: 3 GB External Memory Micro SD Card (up to 128 GB)Camera Front 8 Mega-pixelRear 13 Mega-pixel+5 Mega-pixel, Dual CameraNetworkFDD-LTE Cat4 (up to 150Mbps DL / 50Mbps UL)HSPA+ (up to 21Mbps DL / 5.76Mbps UL)DC-HSPA+ (up to 42Mbps DL / 5.76Mbps UL)Network StandardFDD-LTE/WCDMA/GSM TP913A: FDD-LTE:Band1/2/3/4/5/7/8/20 WCDMA: Band 1/2/4/5/8 GSM: Band 2/3/5/8Location Technology GPS/A-GPS, GLONASSConnectivityWi-Fi 802.11a/b/g/n, 2.4GHz, 5GHz Bluetooth: 4.1Dual Nano SIM Cards (Dual SIM Dual Standby)SIM1 Support 2G/3G/4GSIM2 Support 2G/3G/4GSensors Fingerprint Sensor, Compass, Accelerometer, Ambient Light Sensor, Proximity SensorAudioAudio formats:MP3, AAC, WAV, M4A, OGG, OGA, AMR, AWB, FLAC, MID, MIDI, XMF, IMY, RTTTL, RTX, OTA, MP4, 3GPDual MicVideoVideo formats:M4V, MP4, MOV, AVI, 3GP, 3G2, FLV, MKV, WEBMDecoder: 1080p/30fpsEncoder: 1080p/30fps
82SpecificationsCloud Service SupportedBattery 3060 mAh (Typical), 3000 mAh (Minimum)Operation System Android 8.1In the boxNeffos X9ChargerUSB CableQuick Start GuideWarranty NoticeSafety NoticeEarphones
83Appendix B: Technical SupportContact our technical support if you have any questions related to this product.Countries/Regions SupportGlobalWebsite: www.neffos.comTel: +86 755 26504400E-mail: info@neffos.com             support@neffos.comAddress: South Building, No.5 Keyuan Road, Central Zone, Science & Technology Park, Nanshan, Shenzhen, P. R. China Postcode: 518057AmericasBrazilE-mail: suporte.br@neffos.comTel: 4007-2172 (Capitais e Regiões metropolitanas)       0800-608-9799 (Demais localidades)       11 2222-1245 (SP) 21 3180-0092 (RJ)Service Time: segunda a sexta-feira das 09:00 as 18:00 Sábado das 09:00 as 15:00MexicoWebsite: www.neffos.com.mxTel: +52 55 91388104E-mail: sales.mx@tp-link.com             support.mx@tp-link.comAddress: Goldsmith 53, Piso 1, Col. Polanco Chapultepec Del. Miguel Hidalgo, México , Distrito Federal C.P. 11560.ColumbiaWebsite: http://www.neffos.com/co/Tel: +57 (1)8773545E-mail: support.co@tp-link.comAddress: Autop. Medellín Km 1.5 Vía Parque la Florida, Bod. 45 Parque Ind. Terrapuerto, Cota, Cund.PeruWebsite: www.neffos.com.peTel: +51 1 2402960 Anexo 2967E-mail: Alejandro.torres@tp-link.comAddress: Avenida Republica de Panamá 3545 Oficina 802. San Isidro. Lima PerúVenezuelaWebsite: www.neffos.comTel: +86 755 26504400E-mail: info@neffos.com             support@neffos.comAddress: South Building, No.5 Keyuan Road, Central Zone, Science & Technology Park, Nanshan, Shenzhen, P. R. China Postcode: 518057Middle East& Africa United Arab EmiratesWebsite: www.neffos.aeTel: +971-4-396-6356 (UAE)       +966-9200-07658 (Saudi)E-mail: support.mea@neffos.comAddress: Office 501, The Business Center, Khalid Bin Al Waleed Road, P.O. Box 125857, Dubai, U.A.E
84Countries/Regions SupportEuropeGermanyWebsite: www.neffos.deTel: +49 1806-633367 (Mon-Fr 8: 00-17: 00; 20ct/Anruf aus dem dt. Festnetz)E-mail: support.de@neffos.com             sales.de@neffos.comAddress: TP-LINK Deutschland GmbH, Robert-Bosch-Straße 9, 65719 Hofheim am TaunusFranceSupport technique: support.fr@neffos.comAdresse: 16-18 avenue Morane Saulnier, 78140 Vélizy-Villacoublay, France.Téléphone: +33 (0)5 63 21 27 41Commercial: sales.fr@neffos.comQuestions d’ordres générales: info.fr@neffos.comService après-vente: rma.fr@neffos.comGreeceWebsite: www.neffos.grTel: 210-5197500E-mail: support.gr@neffos.comService time: 09.00 - 17.00Address: Λ. Κηφισού38 – 38A, 104-42PortugalTel: +351 219 667 944/5/6E-mail: suporte.pt@neffos.comDe Segunda a Sexta (excepto feriados), das 09h00 às 13h00 e das 14h00 às 18h00.ItalyWebsite: www.neffos.itVia Gobetti 2/A, 20063 Cernusco sul Naviglio (MI)Per informazioni per il tuo business:E-mail: sales.it@neffos.com Tel: +39 02 92392211 Per supporto tecnico post vendita:Email: support.it@neffos.comTel: +39 0221116579 RussiaТелефон: 8 (495) 228 55 66Телефон тех. поддержки: 8 (495) 228-55-60 (для Москвы и Московской области)Телефон тех. поддержки: 8 (800) 250-55-60 (бесплатно из любого региона РФ)E-mail: Info.ru@neffos.comE-mail технической поддержки: support.ru@neffos.comE-mail отдела сервиса: service.ru@neffos.comАдрес: г. Москва, ул. Электрозаводская, 27 стр. 7 офис 501SpainWebsite: www.neffos.esTel: 902 060 365E-mail: info.es@neffos.com             soporte.es@neffos.comAddress: Calle Quintanavides 17, 3ª planta Puerta E, 28050 Madrid
85Countries/Regions SupportEuropeBulgariaWebsite: http://www.neffos.bgTel: +40 311 070 963       +40 311 011 290E-mail: support.ro@neffos.com             service.ro@neffos.com             sales.ro@neffos.com             info.ro@neffos.comRomaniaWebsite: http://www.neffos.roTel: +40 311 070 963       +40 311 011 290E-mail: support.ro@neffos.com             sales.ro@neffos.com             info.ro@neffos.com             service.ro@neffos.comCzechWebsite: http://cz.neffos.com/E-mail: sales.cz@neffos.comTel: CZ +420 212 812 625 / SK +421 233 056 981Address: Kutvirtova 339/5, Praha 5, 150 00PolandYP3ĿEVS[WOE(YGLRMGI4SPERHneffos.pl@tp-link.comWsparcie techniczne:support.pl@neffos.comTelefon:+48 (0) 801 002 228 HPETSąÈG^Ić^XIPIJSR¶[OSQ¶VOS[]GL3TąEXE>KSHRMI^XEV]JÈSTIVEXSVE+SH^MR]TVEG]3HTSRMIH^MEąOYHSTMÈXOY[KSH^MREGLTurkey+IRTE8IPIOSQ¿RMOEW]SRZIóPIXMĢMQ,M^QIXPIVM7ER8MG%ġ%HVIW)XMPIV1EL2MWTIXM]I'EH2S)XMPIV&IĢMOXEĢóWXERFYPTELEFON / FAKS: 0212 359 0 359 / 0212 287 27 27support.tr@neffos.comsales.tr@neffos.comUkraineУкраина, 04053, Киев, ул. Металлистов, 20, Офисний центр VEDA, 2-й этажwww.neffos.com/uk-ua/+38 (044) 590-51-13sales.ua@tp-link.com0 (800) 505-508 та (044) 590-51-14 Часы работы: ПН-ЧТ, с 10:00 до 22:00,ПТ с 10:00 до 21:00, СБ, ВС – нерабочие дни. Стоимость звонков на горячую линию согласно тарифов вашего оператора и бесплатно со всех стационарных телефонов Украины.support.ua@tp-link.com+38 (044) 590-51-77service.ua@tp-link.com
86Countries/Regions SupportAsia-pacificIndiaWebsite: www.neffos.inE-mail: marketing.in@neffos.comAddress: 401, peninsula heights, C.D. Barfiwala Road, Juhu lane. Andheri (west) Mumbai 400058 - India.IndonesiaWebsite: www.neffos.comTel: +86 755 26504400E-mail: info@neffos.com             support@neffos.comAddress: South Building, No.5 Keyuan Road, Central Zone, Science & Technology Park, Nanshan, Shenzhen, P. R. China Postcode: 518057MalaysiaWebsite: www.neffos.com.myE-mail: support.my@neffos.comTel: +603 2110 0862 (Mon - Sun, 10am - 10pm)       +603 2141 4358 (Mon - Sun, 10am - 10pm)Address: UG-CB4, Plaza Low Yat, Off Jalan Bukit Bintang, 55100 Kuala Lumpur.ThailandWebsite: www.neffos.com/thTel: 02-4400029ǰÙŠćïøĉÖćø×ċĚîĂ÷ĎŠÖĆïđÙøČĂ׊ć÷ìĊęĔßšÜćîE-mail:support.th@neffos.comService Time: 08:30 - 17:30 üĆîÝĆîìøŤđÿćøŤAddress:ǰïøĉþĆìǰìĊóĊúĉÜÙŤǰđĂĘîđêĂøŤĕóøÿŤǰðøąđìýĕì÷ǰÝĞćÖĆéǰÿĞćîĆÖÜćîĔĀâŠǰ77/159ǰĂćÙćøÿĉîÿćíøÿćüđüĂøŤǰßĆĚîǰ36ǰëîîÖøčÜíîïčøĊǰĒ×üÜÙúĂÜêšîĕìøǰđ×êÙúĂÜÿćîǰÖøčÜđìóĄǰ10600VietnamWebsite: www.neffos.vnE-mail: press.vn@neffos.com             support.vn@neffos.com             sales.vn@neffos.com/ sales.vn@tp-link.com8IP+M˜L£RLGL°RL%HHVIWW%8µERL£:MRGSQ%0À8˰8VˌRK5YʬR84,˒'L°1MRL:MˆX2EQBangladeshWebsite: www.neffos.comTel: +86 755 26504400E-mail: info@neffos.com             support@neffos.comAddress: South Building, No.5 Keyuan Road, Central Zone, Science & Technology Park, Nanshan, Shenzhen, P. R. China Postcode: 518057SingaporeWebsite: www.neffos.comTel: +86 755 26504400E-mail: info@neffos.com             support@neffos.comAddress: South Building, No.5 Keyuan Road, Central Zone, Science & Technology Park, Nanshan, Shenzhen, P. R. China Postcode: 518057
Symbol ExplanationRECYCLINGThis product bears the selective sorting symbol for Waste electrical and electronic equipment (WEEE). This means that this product must be handled pursuant to European directive 2012/19/EU in order to be recycled or dismantled to minimize its impact on the environment. User has the choice to give his product to a competent recycling organization or to the retailer when he buys a new electrical or electronic equipment.To prevent possible hearing damage, do not listen at hign volume levels for long periods.Appendix C: Explanation of the symbols on the product labelThe meaning of symbols on the product label is explained below.
Appendix D: AuthenticationCOPYRIGHT & TRADEMARKSSpecifications are subject to change without notice.     is a registered trademark of  TP-Link Technologies Co., Ltd.  Other brands and product names are trademarks or registered trademarks of their respective holders.No part of the specifications may be reproduced in any form or by any means or used to make any derivative such as translation, transformation, or adaptation without permission from TP-Link Technologies Co., Ltd. Copyright © 2018 TP-Link Technologies Co., Ltd. All rights reserved.Google, Android, Google Play and other marks are trademarks of Google LLC.The Bluetooth® word mark and logos are registered trademarks owned by Bluetooth SIG, Inc. And any use of such marks by TP-Link Technologies Co., Ltd. is under license.http://www.neffos.com
FCC STATEMENTThis equipment has been tested and found to comply with the limits for a Class B digital device, pursuant to part 15 of the FCC Rules. These limits are designed to provide reasonable protection against harmful interference in a residential installation. This equipment generates, uses and can radiate radio frequency energy and, if not installed and used in accordance with the instructions, may cause harmful interference to radio communications. However, there is no guarantee that interference will not occur in a particular installation. If this equipment does cause harmful interference to radio or television reception, which can be determined by turning the equipment off and on, the user is encouraged to try to correct the interference by one or more of the following measures:•  Reorient or relocate the receiving antenna.•  Increase the separation between the equipment and receiver.•  Connect the equipment into an outlet on a circuit different from that to which the receiver is connected. •  Consult the dealer or an experienced radio/ TV technician for help.This device complies with part 15 of the FCC Rules. Operation is subject to the following two conditions:1.  This device may not cause harmful interference.2.  This device must accept any interference received, including interference that may cause undesired operation.Any changes or modifications not expressly approved by the party responsible for compliance could void the user’s authority to operate the equipment. Note: The manufacturer is not responsible for any radio or TV interference caused by unauthorized modifications to this equipment. Such modifications could void the user’s authority to operate the equipment. FCC RF Radiation Exposure Statement The exposure recommendations for mobile phones use a measurement unit known as the Specific Absorption Rate (SAR). The SAR limit recommended by the ICNIRP for the mobile phones used by the general public is 1.6W/kg averaged over one gram of tissue by IEEE Std 1528 for the head.The highest SAR value for this model phone when tested was 0.492 W/kg for head, 0.644 W/kg for Body-worn and 1.060W/kg for hotspot.For limiting the radio waves exposure, it is recommended to reduce the mobile phone call duration or to use a headset. The purpose of those precautions is to take the mobile phone away from the head and the body.For body worn operation, this phone has been tested and meets FCC RF exposure guidelines when used with an accessory that contains no metal and that positions the handset a minimum of 10mm from the body. For hotspot operation, the distance is 10mm. Use of other accessories may not ensure compliance with FCC RFexposure guidelines.Продукт сертифіковано згідно с правилами системи УкрСЕПРО на відповідність вимогам нормативних документів та вимогам, що передбачені чинними законодавчими актами України.Personal information and data securityThe use of some functions or third-party applications on your device could result in your personal information and data being lost or becoming accessible to others. Several measures are recommended to help you protect personal and confidential information.Place your device in a safe area to prevent it from unauthorized use.•  Set your device screen to lock and create a password or unlock pattern to open it.
•  Periodically back up personal information kept on your USIM card, memory card, or stored in your device memory. If you change to a different device, be sure to move or delete any personal information on your old device.•  If you are worried about viruses when you receive messages or emails from a stranger, you can delete them without opening them.•  If you use your device to browse the Internet, avoid websites that might pose a security risk to avoid theft of your personal information.•  If you use services such as Wi-Fi tether or Bluetooth, set passwords for these services to prevent unauthorized access. When these services are not in use, turn them off.•  Install or upgrade device security software and regularly scan for viruses.•  Be sure to obtain third-party applications from a legitimate source. Downloaded third-party applications should be scanned for viruses.•  Install security software or patches released by Neffos or third-party application providers.•  Some applications require and transmit location information. As a result, a third-party may be able to share your location information.•  Your device may provide detection and diagnostic information to third-party application providers. Third party vendors use this information to improve their products and services.•  If you have concerns about the security of your personal information and data, please contact support@neffos.com.Legal noticeCopyright © 2018 TP-Link Technologies Co., Ltd. All rights reserved.Trademarks and permissions is a registered trademark of TP-Link Technologies Co., Ltd.Google, Android, Google Play and other marks are trademarks of Google LLC.The Bluetooth® word mark and logos are registered trademarks owned by Bluetooth SIG, Inc. and any use of such marks by TP-Link Technologies Co., Ltd. is under license.Other trademarks, product, service and company names mentioned may be the property of their respective owners.Third-Party software statementNeffos does not own the intellectual property of the third-party software and applications that are delivered with this product. Therefore, Neffos will not provide any warranty of any kind for third party software and applications. Neither will Neffos provide support to customers who use third-party software and applications, nor be responsible or liable for the functions or performance of third-party software and applications. Third-party software and applications services may be interrupted or terminated at any time, and Neffos does not guarantee the availability of any content or service. Third-party service providers provide content and services through network or transmission tools outside of the control of Neffos. To the greatest extent permitted by applicable law, it is explicitly stated that Neffos shall not compensate or be liable for services provided by third-party service providers, or the interruption or termination of third-party contents or services. Neffos shall not be responsible for the legality, quality, or any other aspects of any software installed on this product, or for any uploaded or downloaded third-party works in any form, including but not limited to texts, images, videos, or software etc. Customers shall bear the risk for any and all effects, including incompatibility between the software and this product, which result from installing software or uploading or downloading the third-party works.This product is based on the open-source Android platform. Neffos has made necessary changes to the platform.Therefore, this product may not support all the functions that are supported by the standard Android platform or may be incompatible with third-party software. Neffos does not provide any warranty or representation in connect with any such compatibility and expressly excludes all liability in connection with such matters.
DISCLAIMERALL CONTENTS OF THIS MANUAL ARE PROVIDED “AS IS”. EXCEPT AS REQUIRED BY APPLICABLE LAWS, NO WARRANTIES OF ANY KIND, EITHER EXPRESS OR IMPLIED, INCLUDING BUT NOT LIMITED TO, THE IMPLIED WARRANTIES OF MERCHANTABILITY AND FITNESS FOR A PARTICULAR PURPOSE, ARE MADE IN RELATION TO THE ACCURACY, RELIABILITY OR CONTENTS OF THIS MANUAL.TO THE MAXIMUM EXTENT PERMITTED BY APPLICABLE LAW, IN NO EVENT SHALL NEFFOS BE LIABLE FOR ANY SPECIAL, INCIDENTAL, INDIRECT, OR CONSEQUENTIAL DAMAGES, OR LOSS OF PROFITS, BUSINESS, REVENUE, DATA, GOODWILL SAVINGS OR ANTICIPATED SAVINGS REGARDLESS OF WHETHER SUCH LOSSES ARE FORSEEABLE OR NOT.THE MAXIMUM LIABILITY (THIS LIMITATION SHALL NOT APPLY TO LIABILITY FOR PERSONAL INJURY TO THE EXTENT APPLICABLE LAW PROHIBITS SUCH A LIMITATION) OF NEFFOS ARISING FROM THE USE OF THE PRODUCT DESCRIBED IN THIS MANUAL SHALL BE LIMITED TO THE AMOUNT PAID BY CUSTOMERS FOR THE PURCHASE OF THIS PRODUCT.Privacy policyTo better understand how we protect your personal information, please see the privacy policy at www.neffos.com.Safety informationThis section contains important information about the operation of your device. It also contains information about how to use the device safely. Read this information carefully before using your device.Electronic deviceDo not use your device if using the device is prohibited. Do not use the device if doing so causes danger or interference with other electronic devices.Interference with medical equipment•  Follow rules and regulations set forth by hospitals and health care facilities. Do not use your device where prohibited.•  Some wireless devices may affect the performance of hearing aids or pacemakers. Consult your service provider for more information.•  Avoid using your device within a 15 cm range of a pacemaker if possible, as your device can interfere with the pacemaker. To minimize possible interference with a pacemaker, use your device only on the side of your body that is opposite the pacemaker.•  If you use medical equipment, contact the equipment manufacturer before using your device to determine whether or not the equipment will be affected by radio frequencies emitted by the device.•  Do not use your device near devices or apparatuses that emit radio frequencies, such as sound systems or radio towers Radio frequencies may cause your device to malfunction.•  Do not use your device near devices or apparatuses that emit radio frequencies, such as sound systems or radio towers. Radio frequencies may cause your device to malfunction.•  Electronic devices in your car may malfunction, due to radio interference from your device. Contact the manufacturer for more information.Protecting your hearing when using a headset•  To prevent possible hearing damage, do not listen at high volume levels for long periods.•  Using a headset at high volumes may damage your hearing. To reduce this risk, lower the headset volume to a safe and comfortable level.•  Exposure to high volumes while driving may cause distraction and increase your risk of an accident.•  Do not use a headset while driving or riding. Doing so may distract your attention and cause an accident, or may be illegal depending on your region.
Areas with flammables and explosives•  Turn off your device in potentially explosive environments instead of removing the battery. Always comply with regulations, instructions and signs in potentially explosive environments.•  Do not use your device at refueling points (petrol stations), near fuels or chemicals, or in blasting areas.•  Do not store or carry flammable liquids, gases, or explosive materials in the same compartment as the device, its parts, or accessories.Traffic security•  Observe local laws and regulations while using the device. To reduce the risk of accidents, do not use your wireless device while driving.•  Concentrate on driving. Your first responsibility is to drive safely.•  Do not hold the device while driving. Use hands-free accessories.•  When you must make or answer a call, pull of the road safely and park the vehicle first.•  RF signals may affect the electronic systems of motor vehicles. For more information, consult the vehicle manufacturer.•  Do not place the device over the air bag or in the air bag deployment area in a motor vehicle. Doing so may hurt you because of the strong force when the air bag inflates.•  On an aircraft, using electronic devices can interfere with the aircraft’s electronic navigational instruments. Make sure the device is turned off during takeoff and landing. After takeoff, you can use the device in flight mode if allowed by aircraft personnel.Operating environment•  Do not expose the device to heavy smoke or fumes. Doing so may damage the outside of the device or cause it to malfunction.•  Do not use or store your device in areas with high concentrations of dust or airborne materials. Dust or foreign materials can cause your device to malfunction and may result in fire or electric shock.•  Do not use your device during thunderstorms to protect your device against any danger caused by lightning.•  Avoid exposing your device and battery to very cold or very hot temperatures. Extreme temperatures can damage the device and reduce the charging capacity and life of your device and battery.•  Prevent the battery from coming into contact with metal objects, as this can create a connection between the + and – terminals of your battery and lead to temporary or permanent battery damage.•  Do not expose your device to direct sunlight (such as on a car dashboard) for prolonged periods.•  To protect your device or accessories from fire or electrical shock hazards, avoid rain and moisture.•  Keep the device away from sources of heat and fire, such as a heater, microwave oven, stove, water heater, radiator, or candle.•  Do not place sharp metal objects, such as pins, near the earpiece or speaker. The earpiece may attract these objects and result in injury.•  Prevent the multipurpose jack and the small end of the charger from contact with conductive materials, such as liquids, dust, metal powders, and pencil leads. Conductive materials may cause a short circuit or corrosion of the terminals, which may result in an explosion or fire.•  Stop using your device or applications for a while if the device is overheated. If skin is exposed to an overheated device for an extended period, low temperature burn symptoms, such as red spots and darker pigmentation, may occur.•  Do not touch the device’s antenna. Otherwise, communication quality may be reduced.•  Do not allow children or pets to bite or suck the device or accessories. Doing so may result in damage or explosion.•  Observe local laws and regulations, and respect the privacy and legal rights of others.
•  Do not use your device’s camera flash directly in the eyes of people or pets. Otherwise temporary loss of vision or damage to the eyes may occur.•  While using your device, leave some lights on in the room and do not hold the screen too close to your eyes. Child’s safety•  Comply with all precautions with regard to child’s safety. Letting children play with the device or its accessories may be dangerous. The device includes detachable parts that may present a choking hazard. Keep away from children.•  The device and its accessories are not intended for use by children. Children should only use the device with adult supervision.Accessories•  Using an unapproved or incompatible power adapter, charger or battery may cause fire, explosion or other hazards.•  Use manufacturer-approved batteries, chargers, accessories, and supplies•  Using generic batteries or chargers may shorten the life of your device or cause the device to malfunction. They may also cause a fire or cause the battery to explode.•  TP-LINK cannot be responsible for the user’s safety when using accessories or supplies that are not approved by TP-LINK.Charger safety•  For pluggable devices, the socket-outlet shall be installed near the devices and shall be easily accessible.•  Unplug the charger from electrical outlets and the device when not in use.•  Do not drop or cause an impact to the charger.•  Do not use damaged power cords or plugs, or loose electrical sockets. Unsecured connections can cause electric shock or fire.•  Never use a damaged charger or battery.•  Do not touch the device or the charger with wet hands. Doing so may lead to short circuits, malfunctions, or electric shocks.•  If your charger has been exposed to water, other liquids, or excessive moisture, take it to an authorized service center for inspection.•  Ensure that the charger meets the requirements of Clause 2.5 in IEC60950-1/EN60950-1 and has been tested and approved according to national or local standards.•  Connect the device only to products with the USB-IF logo or with USB-IF compliance program completion.•  Do not bend or damage the power cord. Doing so may cause electric shock or fire.•  Do not use your device while it is charging or touch your device with wet hands. Doing so may cause electric shock.•  Do not short-circuit the charger or the device. Doing so may cause electric shock or fire, or the battery may malfunction or explode.Battery safety•  Do not connect battery poles with conductors, such as keys, jewelry, or other metal materials. Doing so may short-circuit the battery and cause injuries or burns.•  Keep the battery away from excessive heat and direct sunlight. Do not place it on or in heating devices, such as microwave ovens, stoves, or radiators. Batteries may explode if overheated.•  Do not attempt to modify or remanufacture the battery, insert foreign objects into it, or immerse or expose it to water or other liquids. Doing so may lead to fire, explosion, or other hazards.
•  If the battery leaks, ensure that the electrolyte does not make direct contact with your skins or eyes. If the electrolyte touches your skins or splashes into your eyes, immediately flush with clean water and consult a doctor.•  In case of battery deformation, color change, or overheating while charging or storing, immediately stop using the device and remove the battery. Continued use may lead to battery leakage, fire, or explosion.•  Do not put batteries in fire as they may explode. Damaged batteries may also explode.•  Dispose of used batteries in accordance with local regulations. Improper battery use may lead to fire, explosion, or other hazards.•  Do not bite or suck the device or the battery. Doing so may damage the device or result in an explosion or fire. •  Do not smash or pierce the battery, or expose it to high external pressure. Doing so may lead to a short circuit or overheating.•  Do not drop the device or battery. If the device or battery is dropped, especially on a hard surface, and may be damaged.•  If the device standby time shortens significantly, replace the battery.•  Do not handle a damaged or leaking Lithium Ion (Li-Ion) battery. For safe disposal of your Li-Ion battery, contact your nearest authorized service center.•  If you notice strange smells or sounds coming from your device or the battery, or if you see smoke or liquids leaking from the device or battery, stop using the device immediately and take it to a TP-LINK Service Centre. Failure to do so may result in fire or explosion.CAUTIONRISK OF EXPLOSION IF BATTERY IS REPLACED BY AN INCORRECT TYPE. DISPOSE OF USED BATTERIES ACCORDING TO THE INSTRUCTIONS.Cleaning and maintenance•  Keep the device and accessories dry. Do not attempt to dry it with an external heat source, such as a microwave oven or hair dryer. Do not turn on your device if it is wet. If your device is already on, turn it off and remove the battery immediately (if the device will not turn off or you cannot remove the battery, leave it as-is). Then, dry the device with a towel and take it to a service canter.•  Do not expose your device or accessories to extreme heat or cold. These environments may interfere with proper function and may lead to fire or explosion.•  Avoid collision, which may lead to device malfunctions, overheating, fire, or explosion.•  Before you clean or maintain the device, stop using it, stop all applications, and disconnect all cables connected to it.•  Do not use any chemical detergent, powder, or other chemical agents (such as alcohol and benzene) to clean the device or accessories. These substances may cause damage to parts or present a fire hazard. Use a clean, soft, and dry cloth to clean the device and accessories.•  Do not store your device near magnetic fields for extended periods of time. Your device may malfunction or the battery may discharge from exposure to magnetic fields. Magnetic stripe cards, including credit cards, phone cards, passbooks, and boarding passes, may be damaged by magnetic fields.•  Do not use your device with the back cover removed. The battery may fall out of the device, which may result in damage or malfunction.•  Do not dismantle or remanufacture the device and its accessories. This voids the warranty and releases the manufacturer from liability for damage. In case of damage, contact an authorized service center for assistance or repair.•  If the device screen is broken in a collision, immediately stop using the device. Do not touch or attempt to remove the broken parts. Promptly contact an authorized service center.
•  Do not store your device with metal objects, such as coins, keys, and necklaces. Your device may be scratched or may malfunction. If the battery terminals come into contact with metal objects, this may cause a fire.Emergency callsThe availability of emergency calls is subject to your cellular network quality, service provider policy, and local laws and regulations. Never rely solely on your device for critical communications like medical emergencies.Environmental protection•  The device and its accessories (if included), such as the power adapter, headset, and battery should not be disposed of with household garbage.•  Disposal of the device and its accessories is subject to local regulations. Support proper collection and recycling.Disposal and recycling informationThis marking on the product, accessories or literature indicates that the product and its electronic accessories (e.g. charger, batteries, headset, USB cable) should not be disposed of with other household waste.To prevent possible harm to the environment or human health from uncontrolled waste disposal, please separate these items from other types of waste and recycle them responsibly to promote the sustainable reuse of material resources.Household users should contact either the retailer where they purchased this product, or their local government office, for details of where and how they can take these items for environmentally safe recycling.Business users should contact their supplier and check the terms and conditions of the purchase contract. This product and its electronic accessories should not be mixed with other commercial wastes for disposal.This product is RoHS compliant.EU regulatory conformance.Body worn operationThe device complies with RF specifications when used near your ear or at a distance of 5mm from your body. Ensure that the device accessories, such as a device case and device holster, are not composed of metal components. Keep the device away from your body to meet the distance requirement.Certification information (SAR)This device meets guidelines for exposure to radio waves.  Your device is a low-power radio transmitter and receiver. As recommended by international guidelines, the device is designed not to exceed the limits for exposure to radio waves. These guidelines were developed by the International Commission on Non-Ionizing Radiation Protection (ICNIRP), an independent scientific organization, and include safety measures designed to ensure the safety of all users, regardless of age and health.The Specific Absorption Rate (SAR) is the unit of measurement for the amount of radio frequency energy absorbed by the body when using a device. The SAR value is determined at the highest certified power level in laboratory conditions, but the actual SAR level during operation can be well below the value. This is because the device is designed to use the minimum power required to reach the network.The SAR limit adopted by Europe is 2.0 W/kg averaged over 10 grams of tissue, and the highest SAR value for this device complies with this limit.The highest SAR value reported for this device type when tested at the ear is 0.316 W/kg, and when properly worn on the body is 1.179 W/kg.Operating Frequency(transmit power):Operating Frequency:GSM900 : Tx 880~915, Rx 925~960, Power Class: Class 4
GSM1800 : Tx 1710~1785, Rx 1805~1880, Power Class: Class 1WCDMA Band I: Tx 1920~1980, Rx 2110~2170, Power Class: Class 3WCDMA Band VIII : Tx 880~915, Rx 925~960, Power Class: Class 3LTE Band 1: Tx 1920~1980, Rx 2110~2170, Power Class: Class 3LTE Band 3: Tx 1710~1785, Rx 1805~1880, Power Class: Class 3LTE Band 7: Tx 2500~2570, Rx 2620~2690, Power Class: Class 3LTE Band8: Tx 880~915, Rx 925~960, Power Class: Class 3LTE Band20: Tx 832~862, Rx 791~821, Power Class: Class 3WLAN 802.11 a/b/g/n: 2412~2472, Power: 16.50dBm, e.i.r.p5150~5250, Power: 15.50dBm, e.i.r.p5725~5850, Power: 13.5dBm, e.i.r.pBluetooth: 2402~2480, Power: 8.50dBm, e.i.r.pBluetooth (BLE): 2402~2480, Power: 8.50dBm, e.i.r.pDeclaration of conformity:TP-Link hereby declares that the device is incompliance with the essential requirements and other relevant provisions of directives 2014/53/EU and 2011/65/EU.The original EU declaration of conformity may be found at http://www.neffos.com/en/ce.The following marking is included in the product:This device may be operated in all member states of the EU. Observe national and local regulations where the device is used.This device may be restricted for use, depending on the local network.Restrictions or Requirements in following countries: Operations in the 5.15-5.25 GHz band are restricted to indoor usage only.AT BE BG CH CY CZ DE DKEE EL ES FI FR HR HU IEIS IT LI LT LU LV MT NLNO PL PT RO SE SI SK UK

Navigation menu