TR Controls 110671 Asset Tracking Device User Manual General
TR Controls Inc. Asset Tracking Device General
user manual
T25
Installation
Guide
Please call
ZTR Connected Asset Technical Support
With any questions:
1-888-320-8332

Title:
T25 Installation Guide
PN:
110953
Page:
2 of 19
Author:
Christopher R. Boltë
VER:
1.0
Date:
July 05, 2017
T25 Installation Guide
This page was left blank intentionally.
Title:
T25 Installation Guide
PN:
110953
Page:
3 of 19
Author:
Christopher R. Boltë
VER:
1.0
Date:
July 05, 2017
T25 Installation Guide
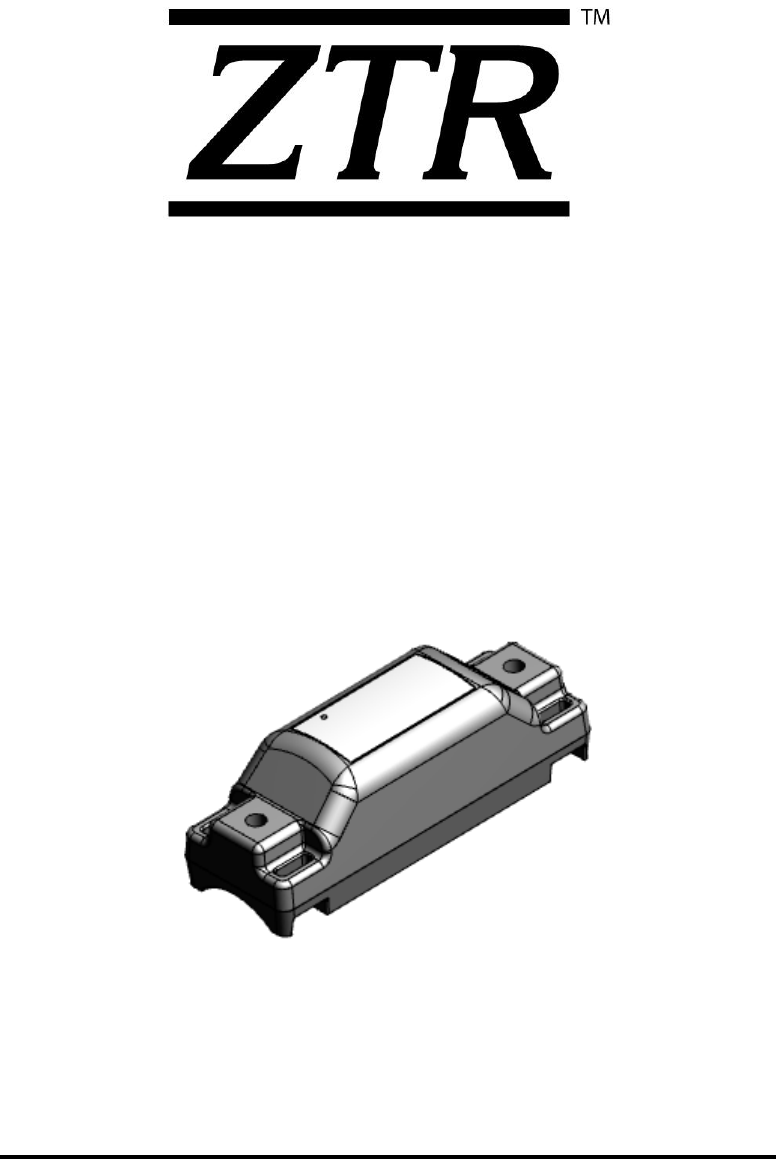
ZTR Control Systems – T25 Device
Regulatory and Compliance Statements – FCC/ISED
This device complies with Part 15 of the FCC Rules. Operation is subject to the following two
conditions: (1) this device may not cause harmful interference, and (2) this device must
accept any interference received, including interference that may cause undesired operation.
Note:
This equipment has been tested and found to comply with the limits for a Class B digital
device, pursuant to part 15 of the FCC Rules. These limits are designed to provide
reasonable protection against harmful interference in a residential installation. This equipment
generates, uses and can radiate radio frequency energy and, if not installed and used in
accordance with the instructions, may cause harmful interference to radio communications.
However, there is no guarantee that interference will not occur in a particular installation. If
this equipment does cause harmful interference to radio or television reception, which can be
determined by turning the equipment off and on, the user is encouraged to try to correct the
interference by one or more of the following measures:
- Reorient or relocate the receiving antenna.
- Increase the separation between the equipment and receiver.
- Connect the equipment into an outlet on a circuit different from that to which the
receiver is connected.
- Consult the dealer or an experienced radio/TV technician for help.
This device complies with Industry Canada’s licence-exempt RSSs. Operation is subject to
the following two conditions: (1) This device may not cause interference; and (2) This device
must accept any interference, including interference that may cause undesired operation of
the device.
Le présent appareil est conforme aux CNR d'Industrie Canada applicables aux appareils
radio exempts de licence. L'exploitation est autorisée aux deux conditions suivantes : (1)
l'appareil ne doit pas produire de brouillage, et (2) l'utilisateur de l'appareil doit accepter tout
brouillage radioélectrique subi, même si le brouillage est susceptible d'en compromettre le
fonctionnement.
CAN ICES-3 (B)/NMB-3(B) – This Class B Digital Apparatus Complies with Canadian ICES-
003.
Cet Appareil numerique de la classe (B) est conforme a la norme NMB-003 du Canada.
Changes or modifications not expressly approved by the party responsible for compliance
could void the user’s authority to operate the equipment.

Title:
T25 Installation Guide
PN:
110953
Page:
4 of 19
Author:
Christopher R. Boltë
VER:
1.0
Date:
July 05, 2017
T25 Installation Guide
OWNERSHIP AND CONFIDENTIALITY
The Software, Software Materials and Printed Documents constitute proprietary property of
ZTR Control Systems (ZTR) and include trade secrets and confidential information of ZTR.
Customer acknowledges that it acquires only the right to use the Software and Software
Materials as permitted hereunder and does not acquire any ownership, right or title in or to
the Software, the Software Materials or any Third Party Software.
The customer acknowledges that the information contained on the Software, Software
Materials and Printed Documents could be used to the detriment of ZTR and that the
disclosure could cause irreparable harm to ZTR. Accordingly, the customer undertakes to
treat confidentially all information and not to disclose it to any third party.
No part of this document may be reproduced in any form or by any means, electronic or
mechanical, including photocopying or printing, without the express written permission of ZTR
Control Systems.
The data and illustrations found in this book are not binding. ZTR Control Systems reserves
the right to modify its products in line with its policy of continuous product development. A
notice of changes may be released for any modifications that may significantly affect the user.
All ZTR Control Systems products, images and marketing materials are protected by various
patents, copyrights, and/or trademarks.
©2017 ZTR Control Systems, LLC All Rights Reserved. (07/05)

Title:
T25 Installation Guide
PN:
110953
Page:
5 of 19
Author:
Christopher R. Boltë
VER:
1.0
Date:
July 05, 2017
T25 Installation Guide
Introduction
*
**
*
P
PL
LE
EA
AS
SE
E
R
RE
EA
AD
D
T
TH
HE
ES
SE
E
I
IN
NS
ST
TA
AL
LL
LA
AT
TI
IO
ON
N
I
IN
NS
ST
TR
RU
UC
CT
TI
IO
ON
NS
S
T
TH
HR
RO
OU
UG
GH
H
F
FI
IR
RS
ST
T
T
TO
O
B
BE
EC
CO
OM
ME
E
F
FA
AM
MI
IL
LI
IA
AR
R
W
WI
IT
TH
H
T
TH
HE
E
I
IN
NS
ST
TA
AL
LL
LA
AT
TI
IO
ON
N,
,
W
WI
IR
RI
IN
NG
G
A
AN
ND
D
T
TE
ES
ST
TI
IN
NG
G
P
PR
RO
OC
CE
ED
DU
UR
RE
ES
S.
.
T
TH
HI
IS
S
W
WI
IL
LL
L
S
SA
AV
VE
E
I
IN
NS
ST
TA
AL
LL
LA
AT
TI
IO
ON
N
T
TI
IM
ME
E
A
AN
ND
D
B
BE
ET
TT
TE
ER
R
P
PR
RE
EP
PA
AR
RE
E
Y
YO
OU
U
F
FO
OR
R
T
TE
ES
ST
TI
IN
NG
G
*
**
*
This manual includes instructions for permanent installation of the T25 monitoring system.
The general flow of the instructions are as follows:
1. Installation Requirements Page 6
2. Supplies - (Included vs. Not Included) Page 6
3. Considerations Before Installation Page 7
4. T25 Installation Page 8
5. ONE i3 – Mobile Application Page 9
6. T25 Provisioning Page 14
7. T25 Provisioning Confirmation Page 17
Appendix A: Label Revision History Page 18
Appendix B: Installation Guide Revision History Page 19

Title:
T25 Installation Guide
PN:
110953
Page:
6 of 19
Author:
Christopher R. Boltë
VER:
1.0
Date:
July 05, 2017
T25 Installation Guide
The following instructions and any accompanying documentation, drawings and
specifications are the property of ZTR CONTROL SYSTEMS. They are issued in strict
confidence and shall not be reproduced, copied or used as the basis for sale or
manufacture of any apparatus without prior written permission from ZTR CONTROL
SYSTEMS.
1. Installation Requirements
For reference during the installation of the T25, please be sure to bring along the
following documents for your reference as needed:
• Schematics of the equipment you are working on, if applicable
2. Supplies
a. What Comes in the Kit:
• T25
• 3M Double Sided Tape
• T25 Installation Manual
b. What is Not Included in the Kit:
The following are optional supplies that are not provided in this kit which you may
need to use during the installation of the M6:
• Tie Wraps.
• Self-tapping screws for Mounting.
• Screws, Nuts & Washers.
**Please be sure to meet your company’s Standard Safety Protocols for Installations**
Title:
T25 Installation Guide
PN:
110953
Page:
7 of 19
Author:
Christopher R. Boltë
VER:
1.0
Date:
July 05, 2017
T25 Installation Guide
3. Considerations before Installation
The ideal way to ensure a trouble-free installation is to consider your options and make
some decisions before starting the install. Take a good look at the asset (equipment or
tool) to determine how to best install the T25.
Some factors to consider when planning the installation of the T25 are:
• T25 Mounting Considerations.
o T25 shouldn’t be mounted close to radiating heat
o T25 should be mounted in an area where it cannot be damaged by falling
and moving objects
o T25 should be mounted in an area where it does not interfere with
regular operations of the equipment/tool or the operator
o T25 should be mounted in a way that the label is easily readable as NFC
is beneath the label. It will be easier to read the barcode via
camera/scanner and tap the NFC module as needed
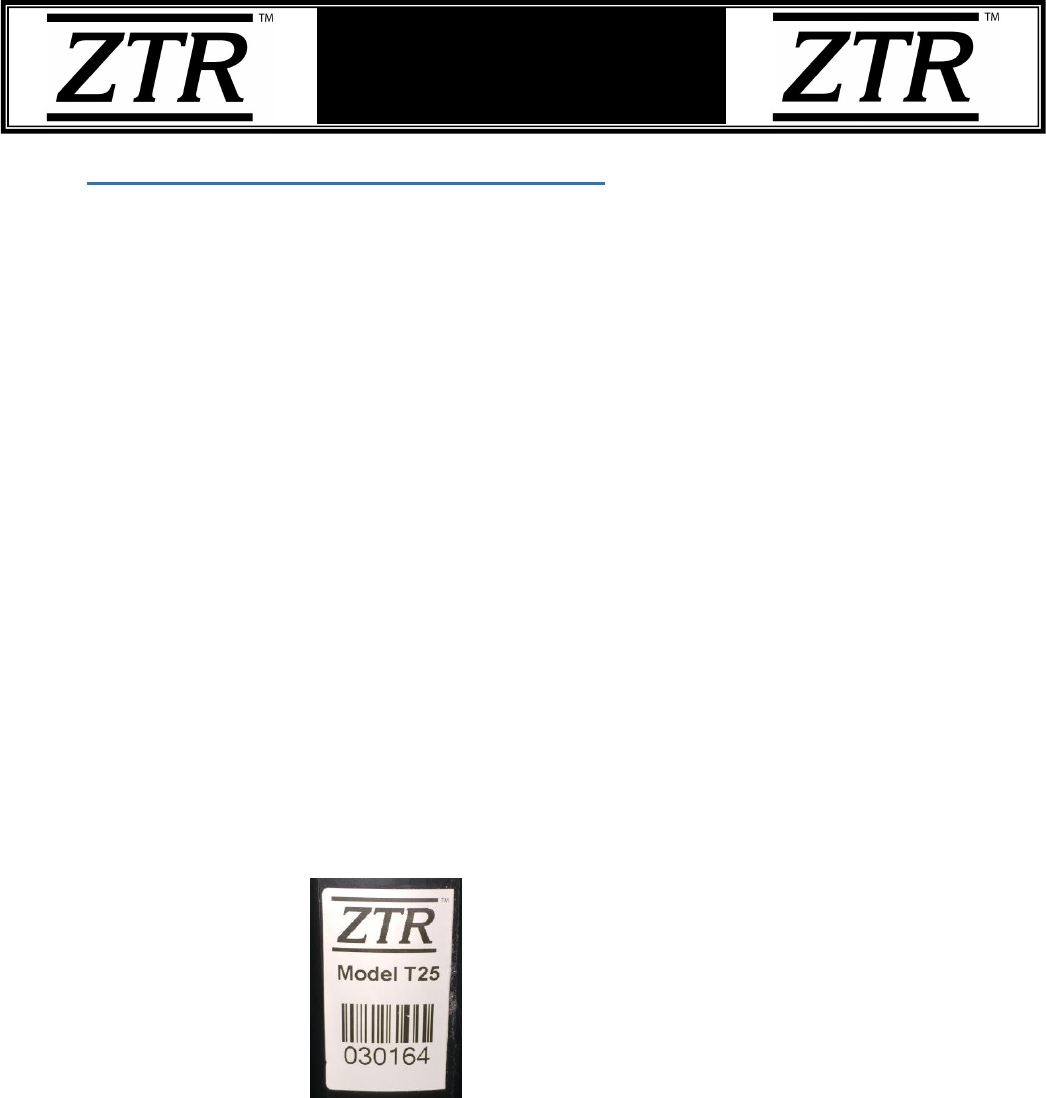
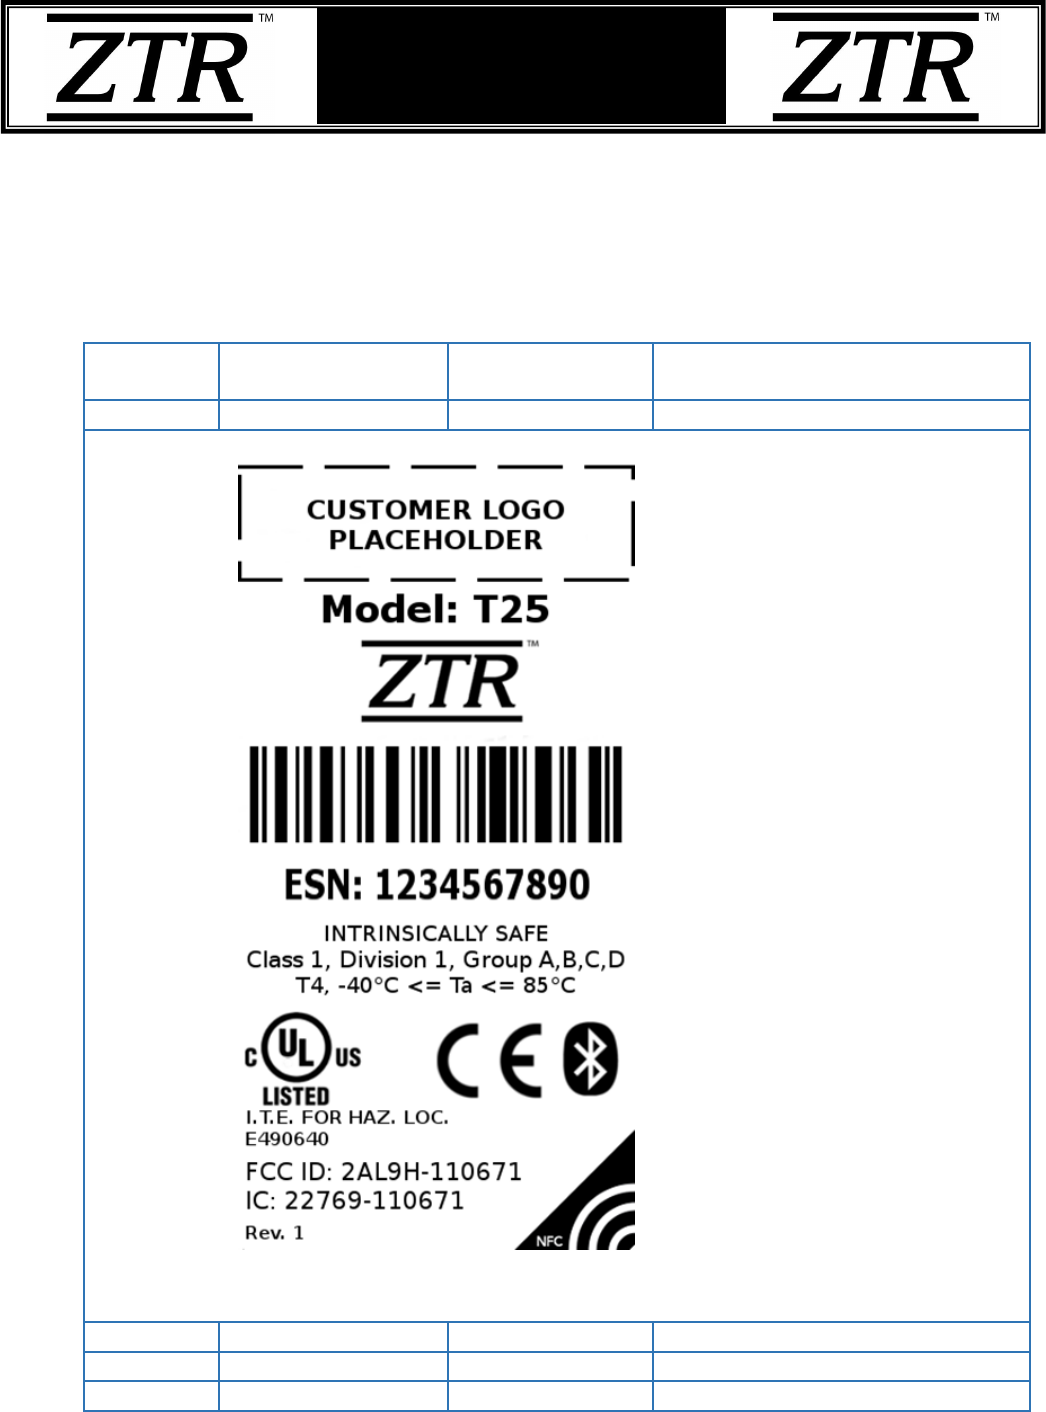
• Copy and Record the ESN # from the label in case you need to change any
details later after activation.
Figure 2: T25 Serial Number Label (This label is an example only! Please
use the ESN from the T25 that is being installed. Do not use the above
ESN!!)

Title:
T25 Installation Guide
PN:
110953
Page:
8 of 19
Author:
Christopher R. Boltë
VER:
1.0
Date:
July 05, 2017
T25 Installation Guide
4. T25 Installation
Installation will be dependent on the type of equipment or tool it is being installed on.
Always use the provided 3M VHB tape so the T25 can remain stable where it is
mounted, even on cylindrical surfaces.
The screw holes can be used to screw the T25 onto the equipment as shown in the
picture below.
The T25 can also be strapped down using Zip Ties strung through the holes provided
at both ends. See the example pictured below.
Title:
T25 Installation Guide
PN:
110953
Page:
9 of 19
Author:
Christopher R. Boltë
VER:
1.0
Date:
July 05, 2017
T25 Installation Guide
5. ONE i3 - Mobile Application
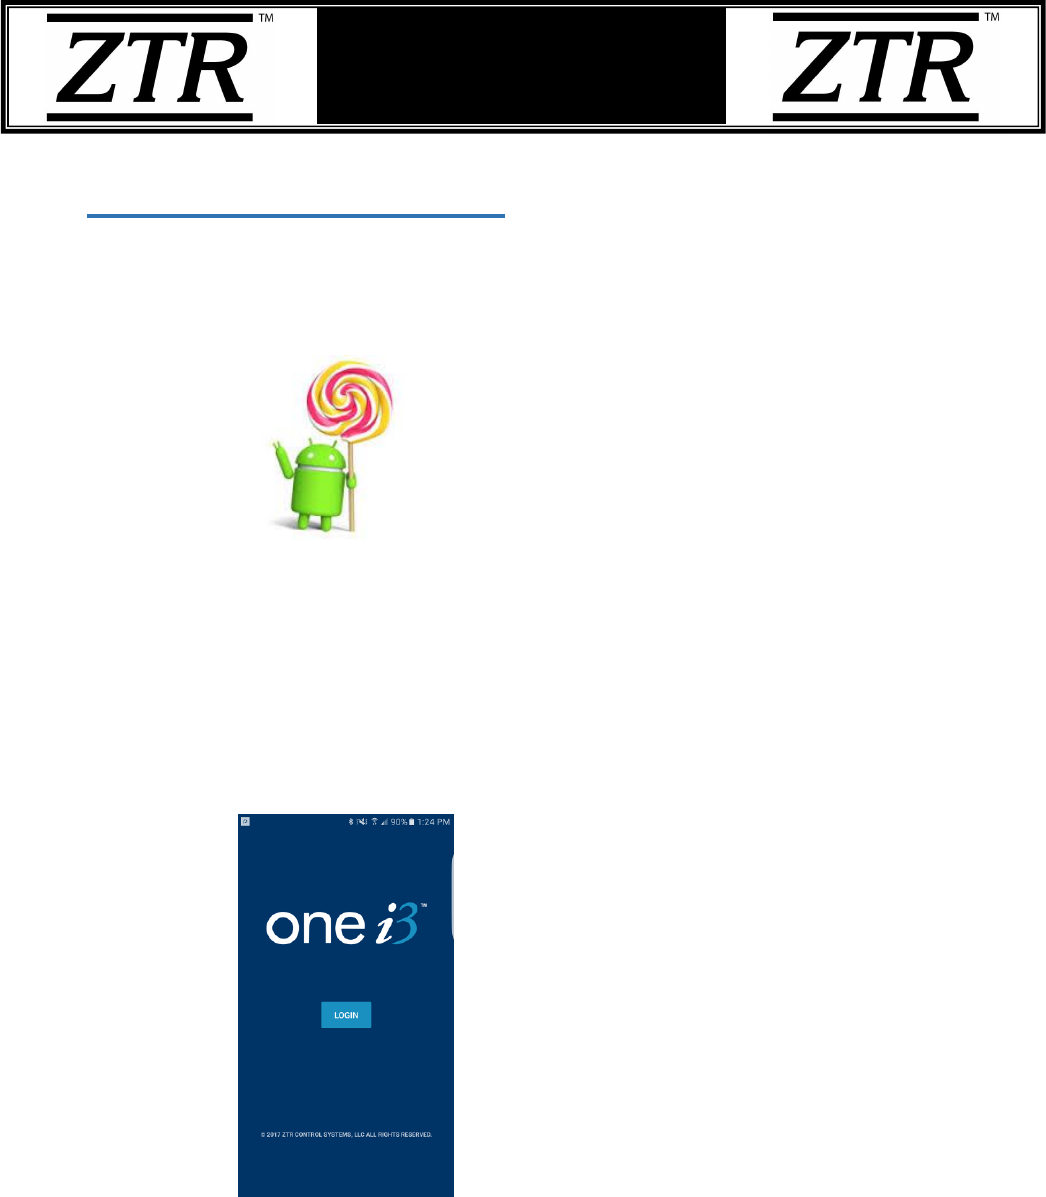
The mobile application is used to provision the T25 tags. In order to run the ONE i3
mobile application, the minimum Android version that must be running on your Android
compatible smart phone is:
Version 5.0 (Lollipop)
The following steps illustrate the installation of the ONE i3 mobile application:
a. Download the ONE i3 mobile application from the Google Play store and install it
on your Android device.
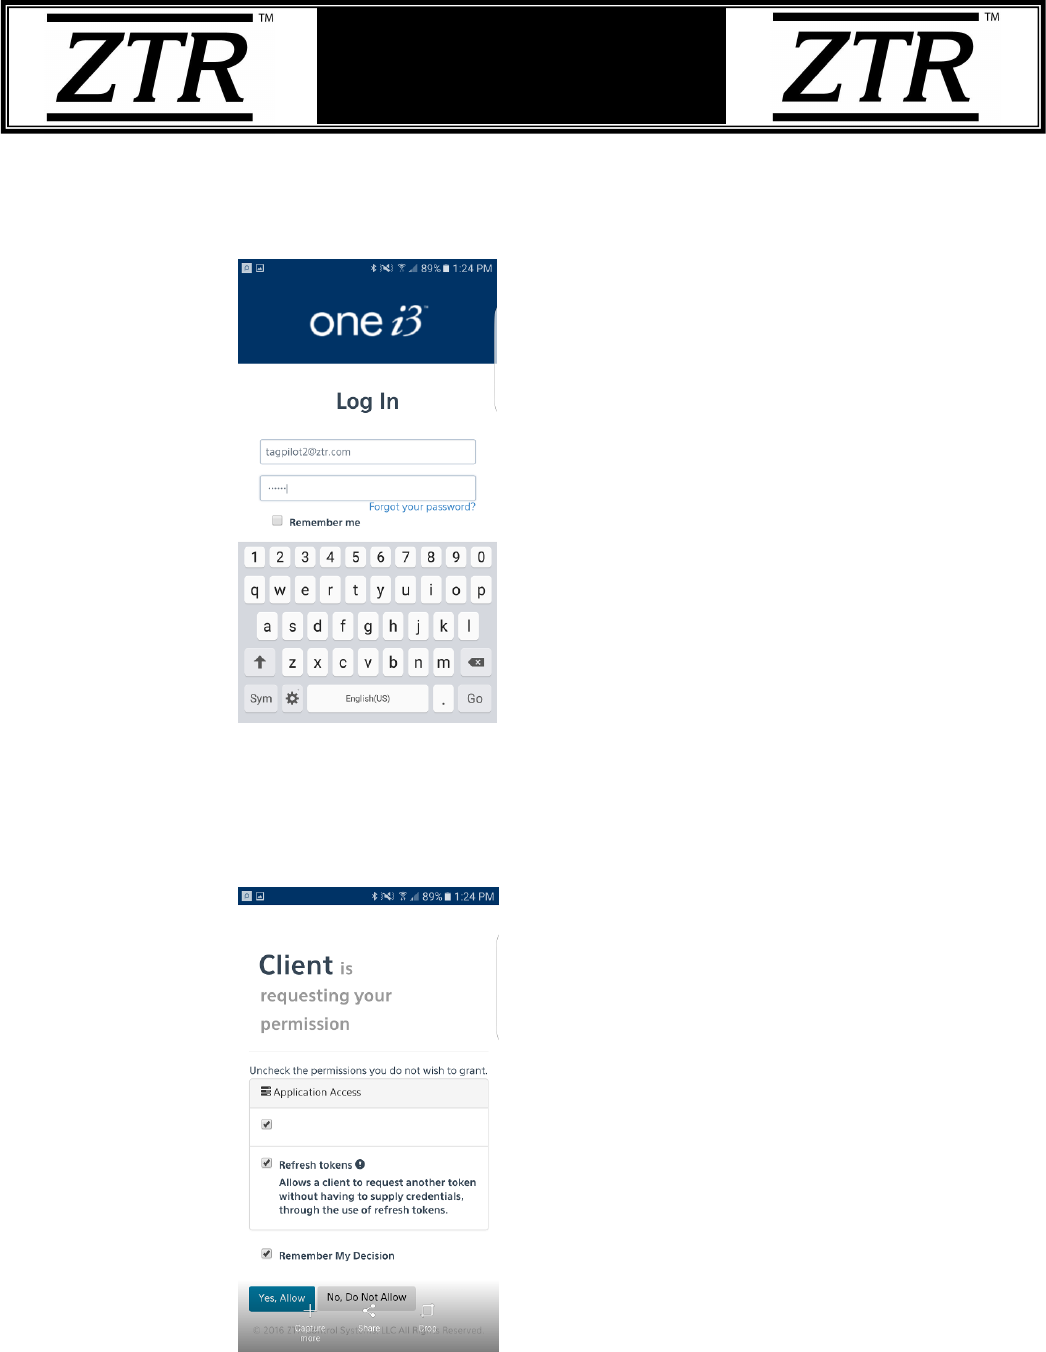
b. Once the mobile application is installed, launch it. You will see the screen below.
Title:
T25 Installation Guide
PN:
110953
Page:
10 of 19
Author:
Christopher R. Boltë
VER:
1.0
Date:
July 05, 2017
T25 Installation Guide
c. Press the ‘Login’ button and enter your ONE i3 credentials. If you do not have ONE
i3 login credentials, please contact your local administrator.
d. Once you are logged in, the phone will ask you to acknowledge a series of
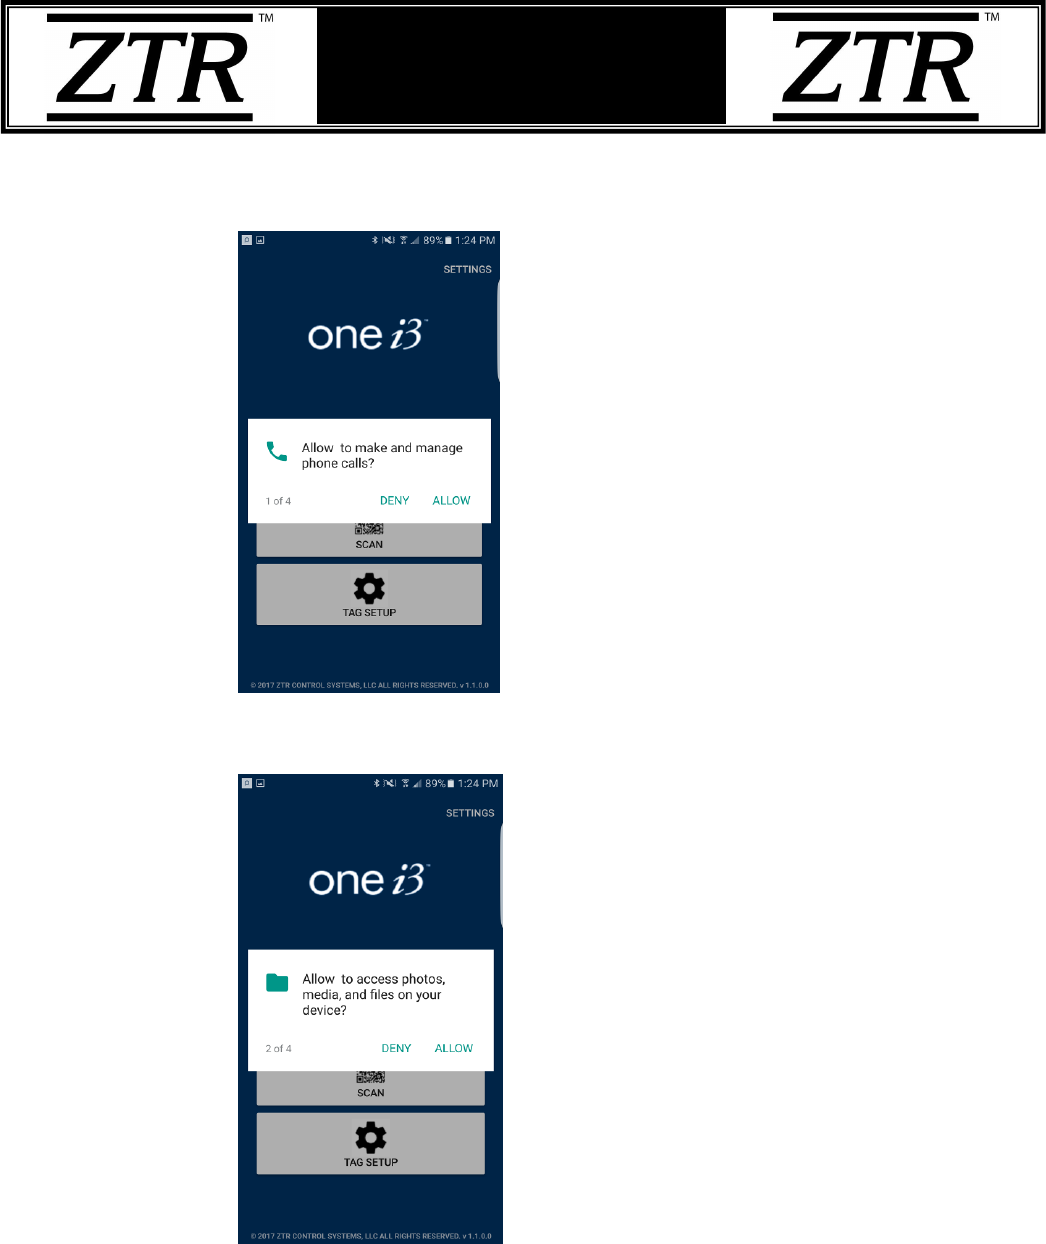
permissions. Please say Yes or Allow to all of them per below:
1) Client Permissions = Yes, Allow
Title:
T25 Installation Guide
PN:
110953
Page:
11 of 19
Author:
Christopher R. Boltë
VER:
1.0
Date:
July 05, 2017
T25 Installation Guide
2) Telecommunications Access = ALLOW
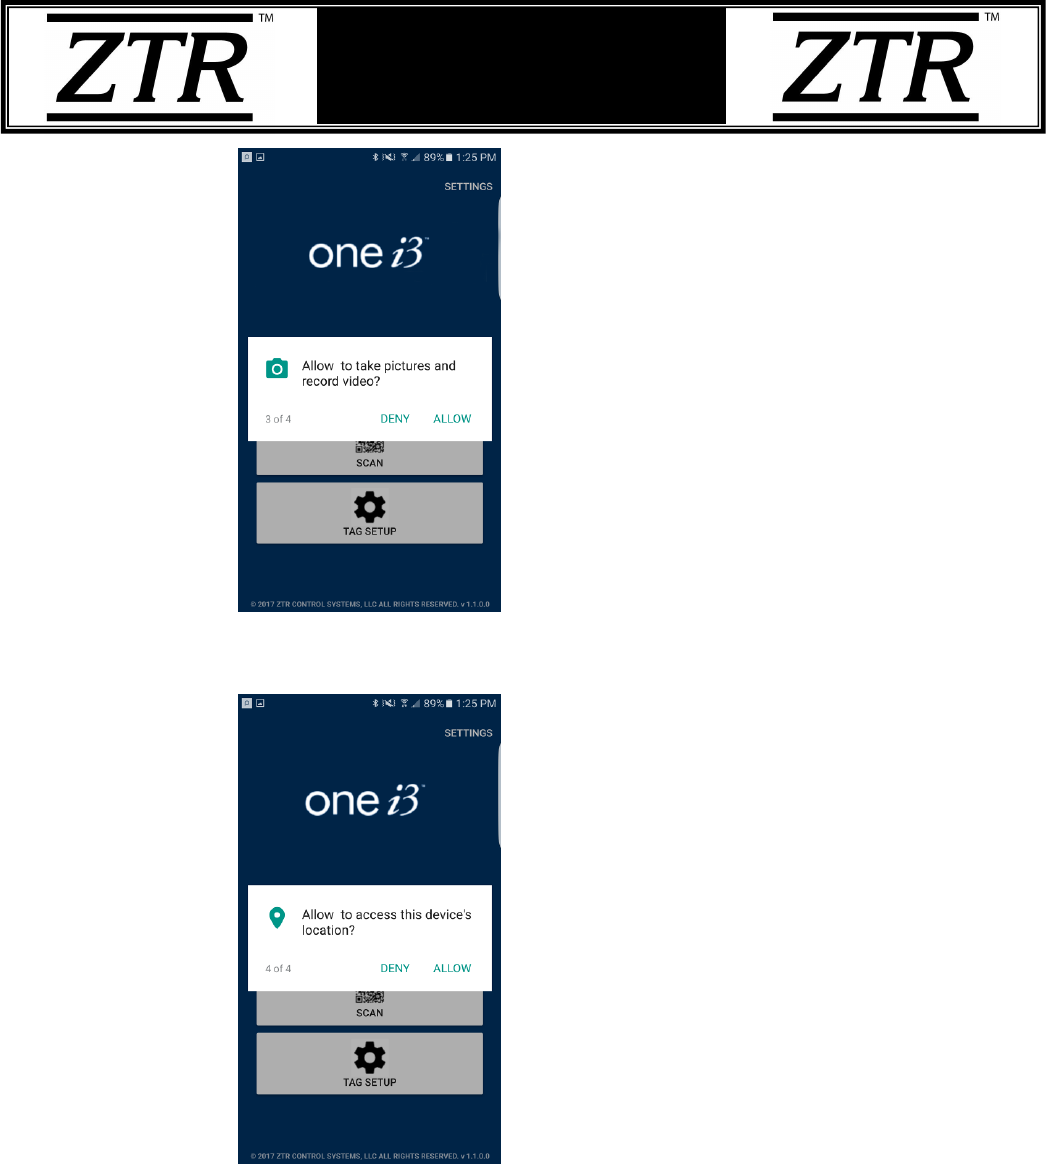
3) Photo, Media and File Access = ALLOW
4) Camera Access = ALLOW
Title:
T25 Installation Guide
PN:
110953
Page:
12 of 19
Author:
Christopher R. Boltë
VER:
1.0
Date:
July 05, 2017
T25 Installation Guide
5) Location Access = ALLOW
After all the permissions have been attended to, you will be at the ‘Home’ screen of the
mobile application per the screen shot below.

Title:
T25 Installation Guide
PN:
110953
Page:
13 of 19
Author:
Christopher R. Boltë
VER:
1.0
Date:
July 05, 2017
T25 Installation Guide
Once at the ‘Home’ screen, make sure the Phones NFC and Bluetooth functions are
turned ON. You should see the following icons at the top of your phone’s screen if they
are:
NFC
Bluetooth
Title:
T25 Installation Guide
PN:
110953
Page:
14 of 19
Author:
Christopher R. Boltë
VER:
1.0
Date:
July 05, 2017
T25 Installation Guide
6. T25 Provisioning
Provisioning T25 tags will make them active within the ONE i3 platform, allowing you to
monitor them through the ONE i3 web application and mobile application.
Each T25 needs to be provisioned, one at a time. Select ‘Tag Setup’ from the home
screen to access the provisioning features directly or perform one of the following
methods for provisioning:
a. Tap with Phone – From the home screen, tap the label on the T25 with the
back of phone to start the ‘Tag Setup’ via the NFC method
i. You can also click the ‘TAG Setup’ button on the ONE i3 app home
screen and then tap the label on the T25 with the back of the phone
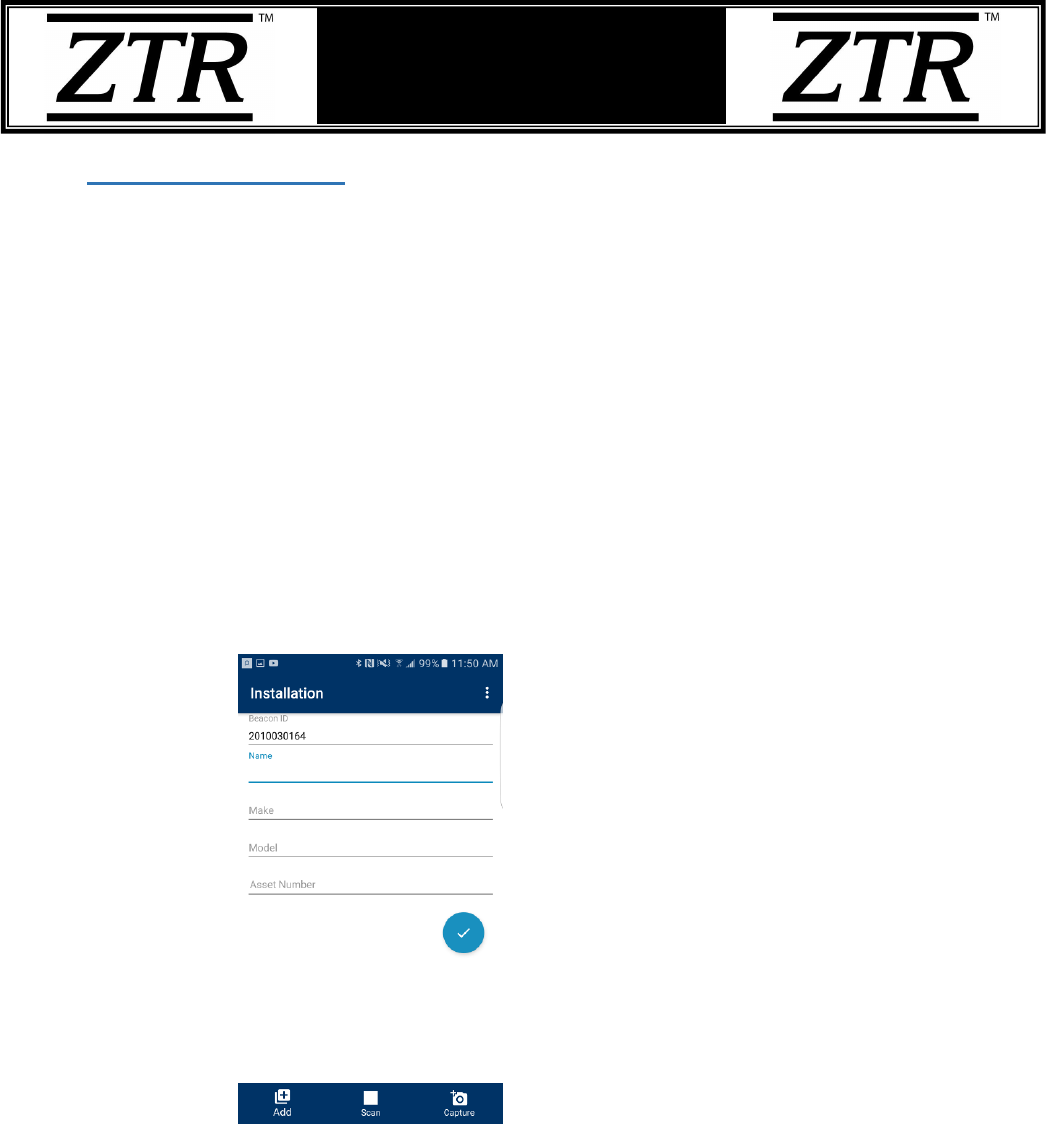
ii. This should take you to the Installation screen and display the tag serial
number in the ‘Beacon ID’ field per the example below.
TIP: While on the ONE i3 app home screen, turn the notification volume
up on your phone and you will hear a tone when the phone has
successfully read the information from the T25. Be sure to leave the back
of the phone in contact with the T25 after the tap as the read that is done
can take a few seconds.
Title:
T25 Installation Guide
PN:
110953
Page:
15 of 19
Author:
Christopher R. Boltë
VER:
1.0
Date:
July 05, 2017
T25 Installation Guide
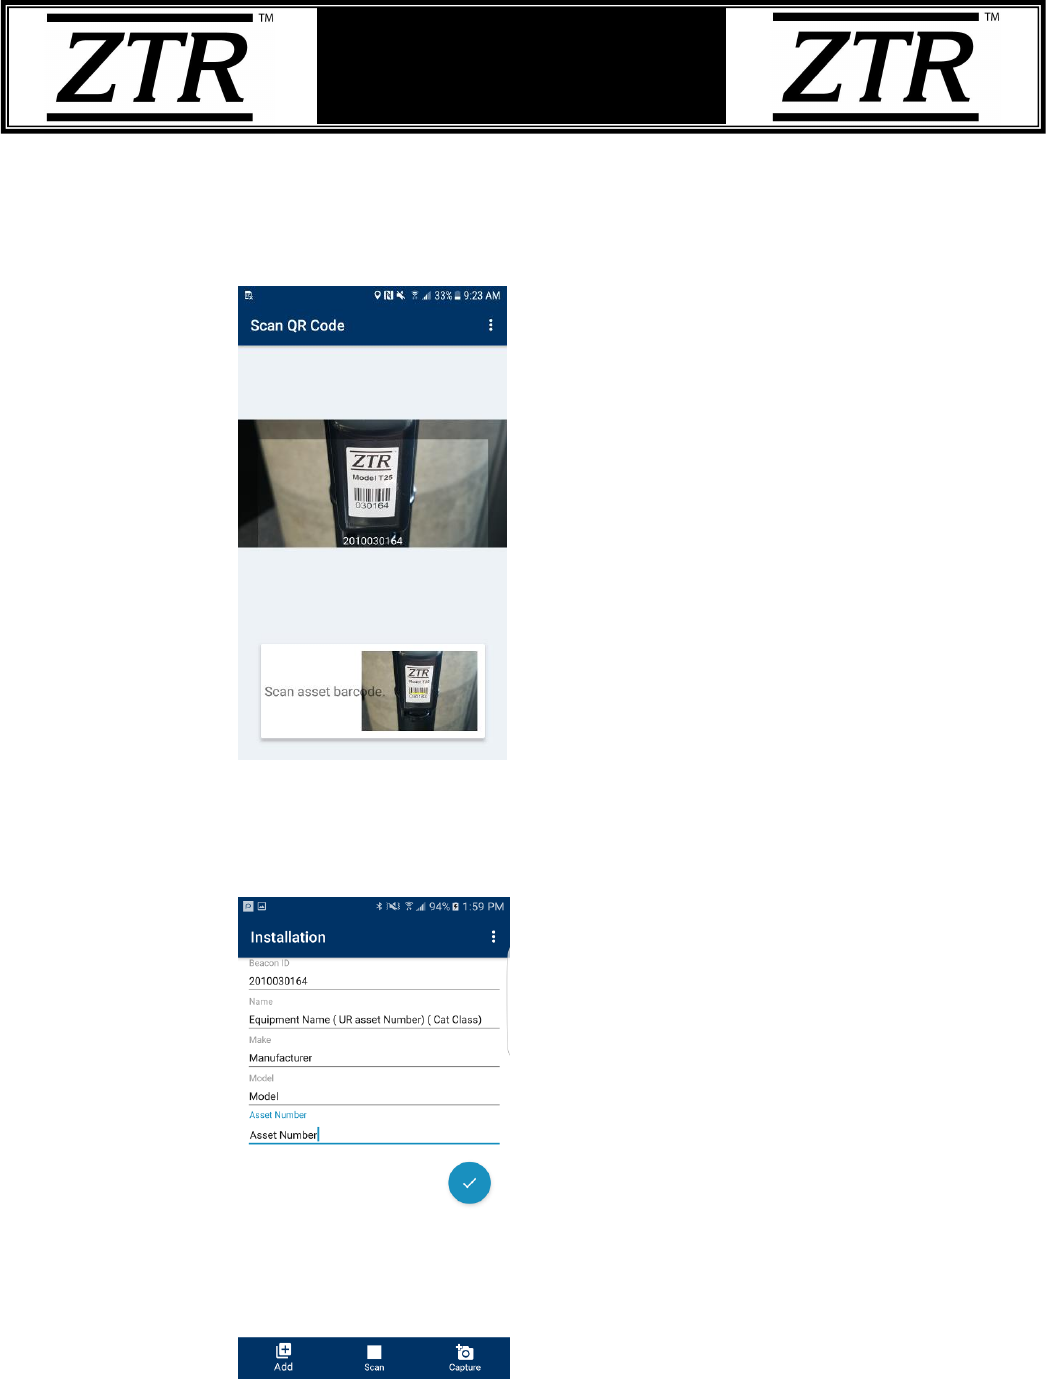
b. Scan QR Code - Tap the ‘Scan’ button on the ONE i3 mobile applications
home. This method uses the camera view to scan the barcode label on the T25.
Putting the barcode in view of the camera will capture the ‘Beacon ID’ value.
See the example below.
c. Once the ‘Beacon ID’ value is populated on the Installation screen, enter all
relevant equipment information in the remaining fields for the ‘Tag Setup’ per
the example below.
Title:
T25 Installation Guide
PN:
110953
Page:
16 of 19
Author:
Christopher R. Boltë
VER:
1.0
Date:
July 05, 2017
T25 Installation Guide
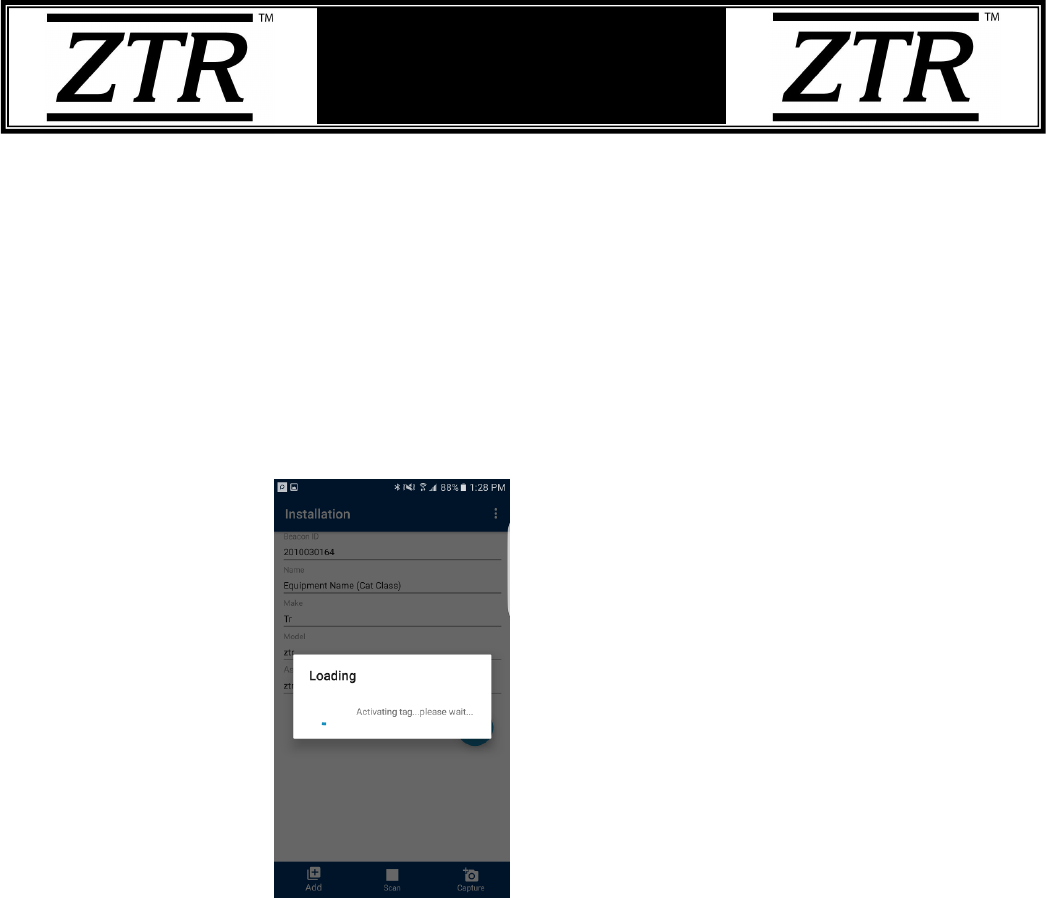
d. Once you have added all the asset information. Tap the ‘Capture’ button to take
a picture of the asset the T25 has been installed on.
i. The picture will be stored in the ONE i3 platform associated with the
asset and is accessible from the ONE i3 web or mobile applications.
e. After the picture has been taken, tap the blue Check Mark circle to finish the
set-up.
i. You will see a screen with a progress bar indicating the information is
being uploaded to the ONE i3 platform.
ii. Once the information has been uploaded successfully, you will see a
message that says “Tag has been successfully installed”. The T25 is now
activate within the ONE i3 platform.

Title:
T25 Installation Guide
PN:
110953
Page:
17 of 19
Author:
Christopher R. Boltë
VER:
1.0
Date:
July 05, 2017
T25 Installation Guide
7. T25 Provisioning Confirmation
To confirm provisioning is complete, perform the following.
a. There are two ways to confirm the T25 is functioning properly:
i. Tap ‘Find’ on the mobile applications’ home screen to have the application
detect the T25 and then tap the listing for the newly provisioned T25 when it
appears
OR
ii. Tap ‘Scan’ on the mobile applications’ home screen you can scan the barcode
of the T25.
b. This will then display a screen with the T25’s information per below
To test the provisioning of the T25, end-to-end, you can push current T25 data to the
ONE i3 platform by pressing the ‘CHECK IN’ button on the current assets’ details view.
This will force the T25 to push its current data to the ONE i3 platform. Once this forced
update is finished, the blue status bar above the ‘CHECK IN’ button will say “Check in
Successful”.
NOTE: The T25 sends data automatically to the ONE i3 platform after a scheduled
interval. The ‘CHECK IN’ option is useful if you require an immediate update to the

Title:
T25 Installation Guide
PN:
110953
Page:
18 of 19
Author:
Christopher R. Boltë
VER:
1.0
Date:
July 05, 2017
T25 Installation Guide
asset information on the website for manual updates, testing and/or troubleshooting
needs.
Title:
T25 Installation Guide
PN:
110953
Page:
19 of 19
Author:
Christopher R. Boltë
VER:
1.0
Date:
July 05, 2017
T25 Installation Guide
Appendix A: Label Revision History
This section will illustrate any changes to the product label as a result of a
revision/update.
Revision:
Date:
(MM/DD/YYYY)
Author:
Reason:
1
07/05/2017
C. Moulton
Initial release

Title:
T25 Installation Guide
PN:
110953
Page:
20 of 19
Author:
Christopher R. Boltë
VER:
1.0
Date:
July 05, 2017
T25 Installation Guide
Title:
T25 Installation Guide
PN:
110953
Page:
21 of 19
Author:
Christopher R. Boltë
VER:
1.0
Date:
July 05, 2017
T25 Installation Guide
Appendix B: Installation Guide Revision History
This section will detail any changes to the content of this document as a result of a
revision/update.
Revision:
Date:
(MM/DD/YYYY)
Author:
Reason:
1.0
07/05/2017
C. Boltë
Initial release