TRENDNET TEW653AP 300Mbps Wireless N PoE Access Point User Manual UG TEW 653AP
TRENDNET, INC. 300Mbps Wireless N PoE Access Point UG TEW 653AP
TRENDNET >
Manual
TRENDnet
TEW-653AP
300Mbps Wireless N PoE Access Point
Table of Content
Introduction..........................................................................................................................................4
Features and Benefits...................................................................................................................4
Wireless Performance Considerations .........................................................................................5
Package Contents.........................................................................................................................6
System Requirement ....................................................................................................................6
Hardware Installation...................................................................................................................6
Modes...................................................................................................................................................7
Using the Web Browser .......................................................................................................................8
Setup Wizard........................................................................................................................................8
System................................................................................................................................................10
Operation Mode .........................................................................................................................10
Status..........................................................................................................................................10
LAN ...........................................................................................................................................11
SNMP.........................................................................................................................................12
Schedule.....................................................................................................................................13
Event Log...................................................................................................................................13
Monitor.......................................................................................................................................14
Wireless Access Point Mode..............................................................................................................15
Basic...........................................................................................................................................15
Advanced ...................................................................................................................................16
Security ......................................................................................................................................17
Encryption: WEP ...............................................................................................................17
Encryption: WPA pre-shared key.......................................................................................18
Encryption: WPA RADIUS................................................................................................19
Filter...........................................................................................................................................20
WPS ...........................................................................................................................................21
Client List...................................................................................................................................22
VLAN.........................................................................................................................................22
WMM.........................................................................................................................................23
Wireless WDS Bridge Mode..............................................................................................................24
Basic...........................................................................................................................................24
Security: Disabled..............................................................................................................24
Security: WEP....................................................................................................................25
Security: WPA pre-shared key ...........................................................................................25
Advanced ...................................................................................................................................26
WMM.........................................................................................................................................27
Repeater Mode...................................................................................................................................28
Wireless Basic............................................................................................................................28
Advanced ...................................................................................................................................29
Repeater Mode Security.............................................................................................................30
WEP ...................................................................................................................................30
WPA pre-shared key...........................................................................................................31
Filter...........................................................................................................................................32
WPS ...........................................................................................................................................33
Client List...................................................................................................................................34
WMM.........................................................................................................................................34
Tools...................................................................................................................................................35
Admin.................................................................................................................................35
Time Setting...............................................................................................................................35
Power Saving .............................................................................................................................36
LED Control...............................................................................................................................36
Diagnosis....................................................................................................................................37
Firmware....................................................................................................................................37
Backup .......................................................................................................................................38
Restart ........................................................................................................................................38
FCC Interference Statement...............................................................................................................39
IC Interference Statement ..................................................................................................................40
Limited Warranty ...............................................................................................................................41

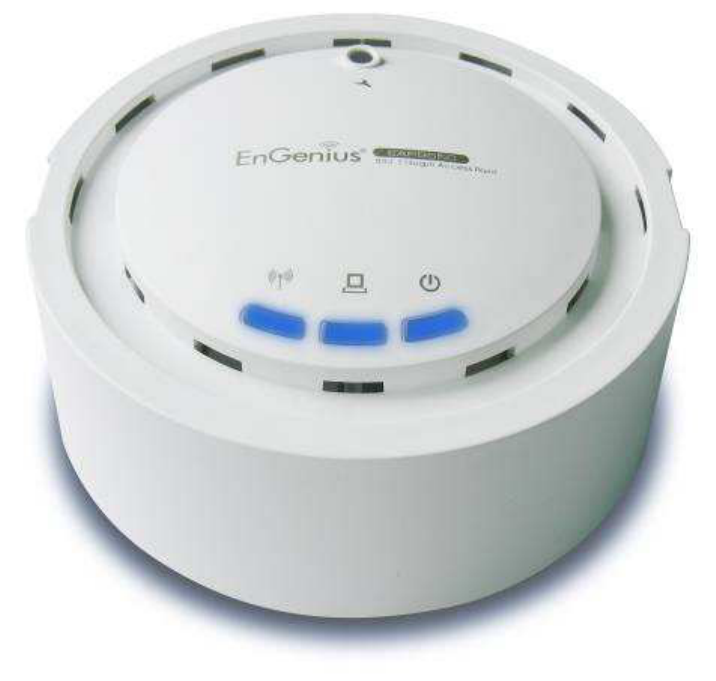
Introduction
TEW-653AP
is a powerful and multi-functioned 11n Access Point and it can act three modes
AP/WDS/Universal Repeater. Smoke detector appearance will minimize visibility. So this model can
work properly at Hotel or public area.
TEW-653AP is a Wireless Network device that delivers up to 6x faster speeds and 7x extended
coverage than 802.11g devices. Product’s RF performance is finely tuned so it will bring best
wireless signal for each client. TEW-653AP supports home network with superior throughput,
performance and unparalleled wireless range. To protect data during wireless transmissions,
TEW-653AP encrypts all wireless transmissions through WEP data encryption and supports
WPA/WPA2. Its MAC address filter allows users to select stations with access to connect network.
TEW-653AP thus is the best product to ensure network quality for hotspots.
Features and Benefits
• Wi-Fi compliant with IEEE 802.11n and IEEE 802.11b/g standards
• Power device by an Ethernet cable using standard IEEE802.3af Power over Ethernet (PoE)
protocol
• Functional Access Point, WDS and Universal Repeater modes provide network flexibility
• Advance wireless security with 64/128-bit WEP, WPA/WPA2 Radius and
WPA-PSK/WPA2-PSK
• Supports multiple SSID (up to 4 SSIDs) with 802.1q VLAN tagging (AP mode)
• High-speed up to 300Mbps data rate using 802.11n connection
• User isolation support (AP mode)
• Monitor bandwidth allocation through graphical interface
• Support Wi-Fi Protected Setup (WPS) for easy configuration
• 802.1x Authentication protocol support
• Support for Wireless Multimedia (WMM) QoS
• Easy web management via web browser
• Remote network management and SNMP support (v1, v2c)
• 3-year limited warranty

Wireless Performance Considerations
There are a number of factors that can impact the range of wireless devices.
1. Adjust your wireless devices so that the signal is traveling in a straight path, rather than at an
angle. The more material the signal has to pass through the more signal you will lose.
2. Keep the number of obstructions to a minimum. Each obstruction can reduce the range of a
wireless device. Position the wireless devices in a manner that will minimize the amount of
obstructions between them.
3. Building materials can have a large impact on your wireless signal. In an indoor environment, try
to position the wireless devices so that the signal passes through less dense material such as dry
wall. Dense materials like metal, solid wood, glass or even furniture may block or degrade the
signal.
4. Antenna orientation can also have a large impact on your wireless signal. Use the wireless
adapter’s site survey tool to determine the best antenna orientation for your wireless devices.
5. Interference from devices that produce RF (radio frequency) noise can also impact your signal.
Position your wireless devices away from anything that generates RF noise, such as microwaves,
radios and baby monitors.
6. Any device operating on the 2.4GHz frequency will cause interference. Devices such as 2.4GHz
cordless phones or other wireless remotes operating on the 2.4GHz frequency can potentially
drop the wireless signal. Although the phone may not be in use, the base can still transmit
wireless signal. Move the phone’s base station as far away as possible from your wireless
devices.
If you are still experiencing low or no signal consider repositioning the wireless devices or installing
additional access points. The use of higher gain antennas may also provide the necessary
coverage depending on the environment.
Package Contents
The package contains the following items. In case of return, please keep the original box
set, and the complete box set must be included for full refund.
• TEW-653AP
• 12V/1A 100V~240V Power Adapter
• Quick Installation
• CD-Rom (User’s Guide)
System Requirement
The following are the minimum system requirements in order to configure the device.
• PC/AT compatible computer with an Ethernet interface.
• Operating system that supports HTTP web-browser
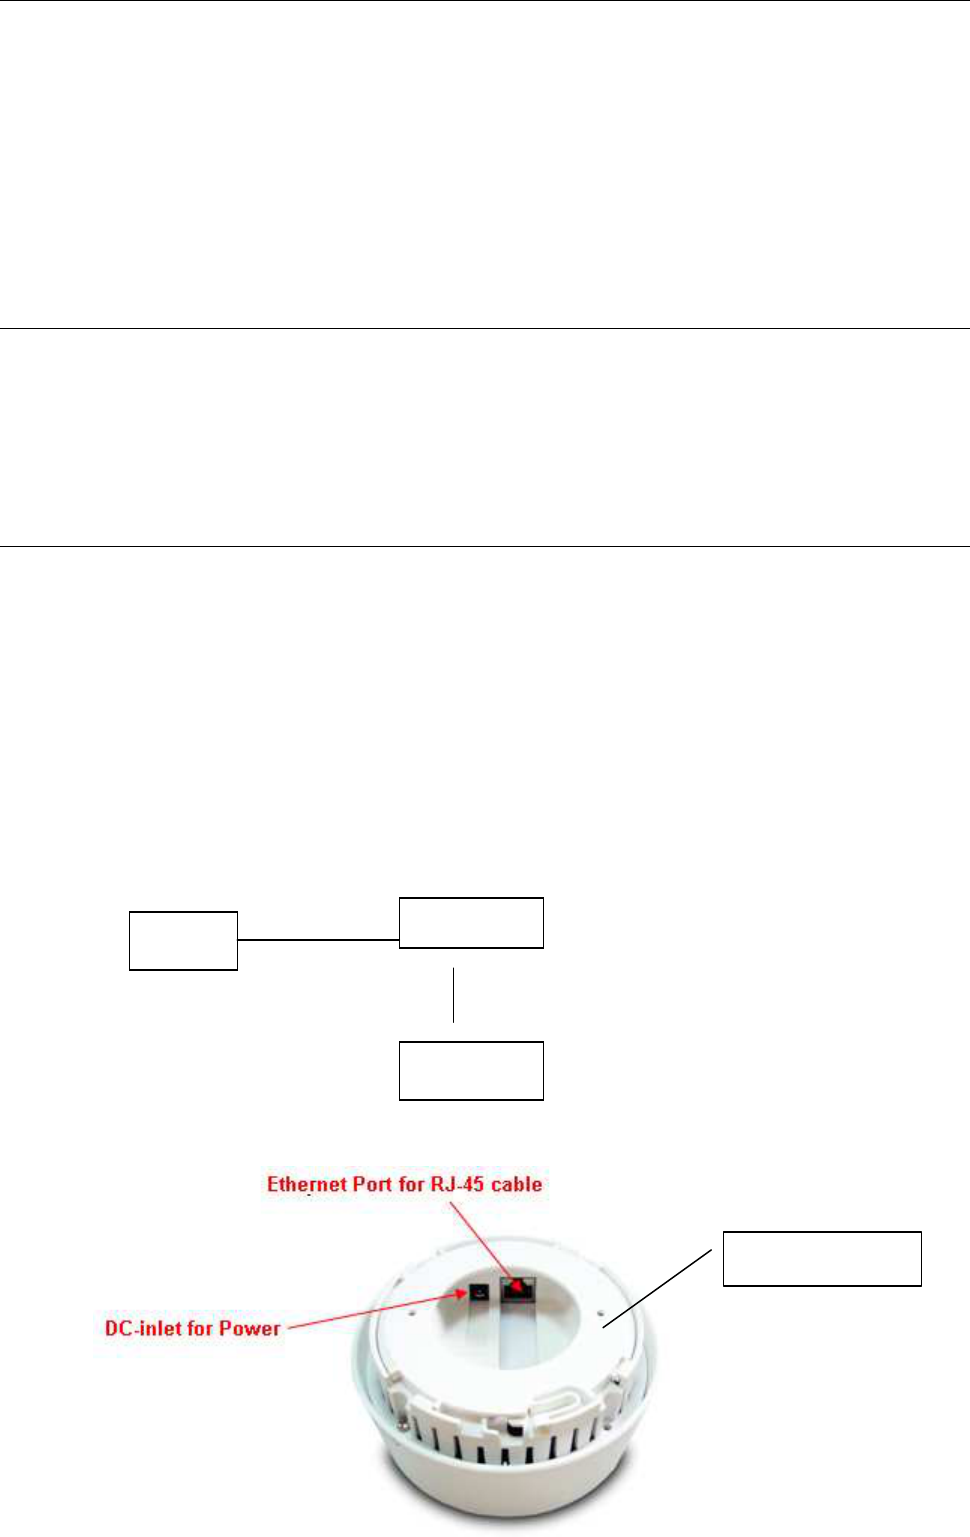
Hardware Installation
1 Place the unit in an appropriate place after conducting a site survey.
2 Plug one end of the Ethernet cable into the RJ-45 port on the rear panel of the device
and another end into your PC/Notebook.
3 Insert the DC-inlet of the power adapter into the port labeled “DC-IN” and the other end
into the power socket on the wall.
4 Regarding wall mount please use Φ3.0 screw for fixing.
This diagram depicts the hardware configuration
Access Point
PC
Power Outlet
Ethernet
AC/DC cable
Φ3.0 screw

Modes
You are allowed to configure TEW-653AP into different modes: AP, WDS Bridge and
Repeater. AP/WDS/Universal Repeater
Access Point
In AP (Access Point) mode, your device acts as a communication hub for users with a
wireless device to connect to a wired LAN/WAN.
WDS Bridge
You can only connect to the device via Ethernet Port
WDS (Wireless Distribution System) allows AP to communicate with one another wirelessly.
This capability is critical in providing a seamless experience for roaming clients and for
managing multiple wireless networks.
Repeater
Repeater is used to regenerate or replicate signals that are weakened or distorted by
transmission over long distances and through areas with high levels of electromagnetic
interference (EMI). Repeater (AP) mode on one radio channel is usually configured along
with Universal (STA) mode on AP channel.
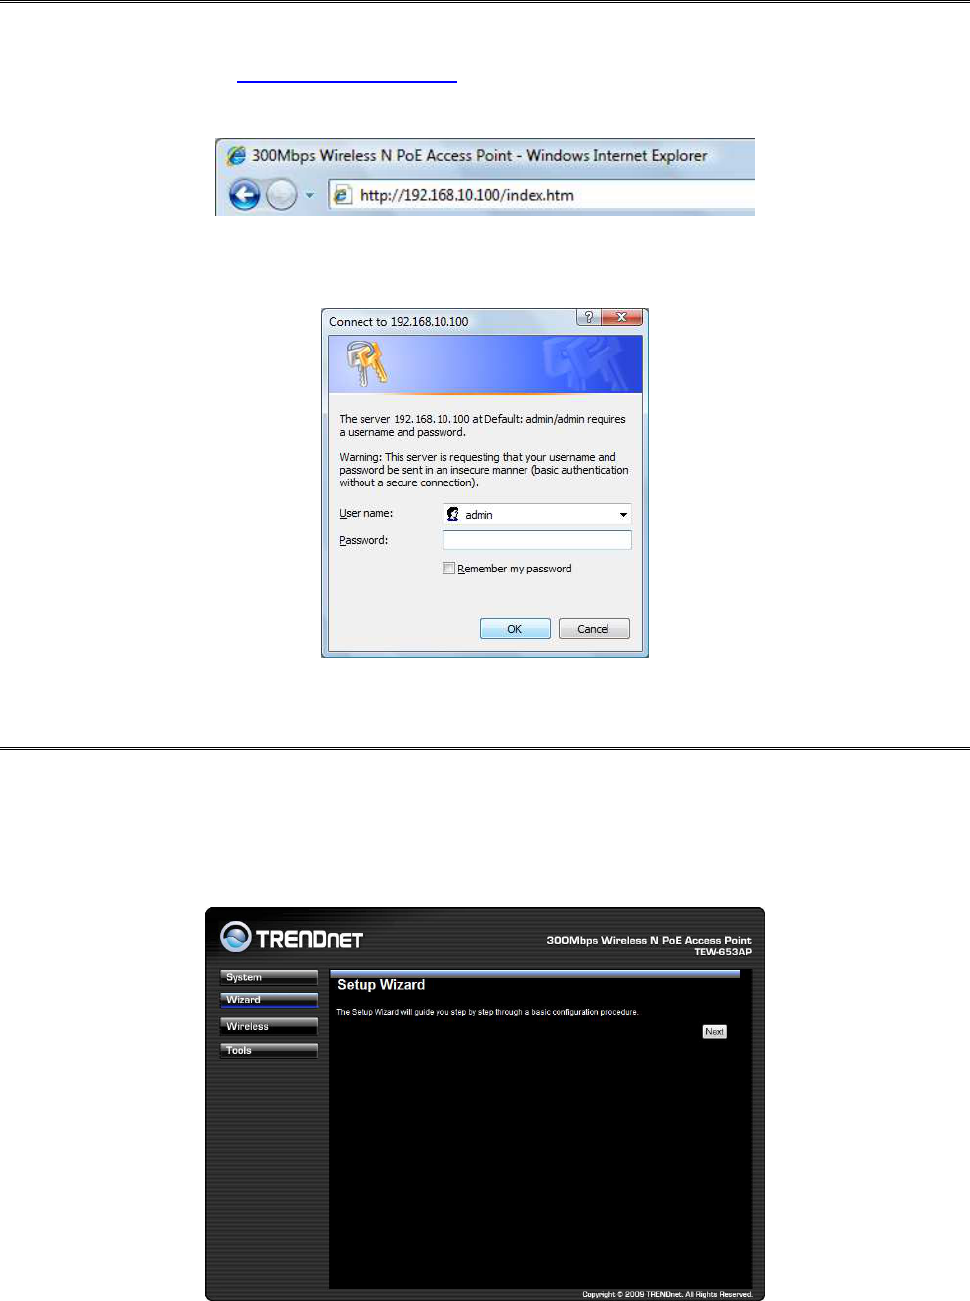
Using the Web Browser
1. Open Internet Explorer 5.0 or above Internet browser.
2. Enter IP address http://192.168.100.1 (the factory-default IP address setting) to the
URL web address location.
3. When the following dialog box appears, enter the user name and password to login to
the main configuration window, the default username and password is “admin”.
Setup Wizard
Setup wizard is provided as part of the web configuration utility. User can simply follow the
step-by-step process to get the wireless Access Point configuration ready to run in these
easy steps by clicking on` the “Wizard” button on the function menu. The following screen
will appear. Please click “Next” to continue.
Step 1: Set the Operation Mode of the Access Point by selecting AP Mode, WDS Bridge
Mode or Repeater Mode. Please click “Next” to continue.
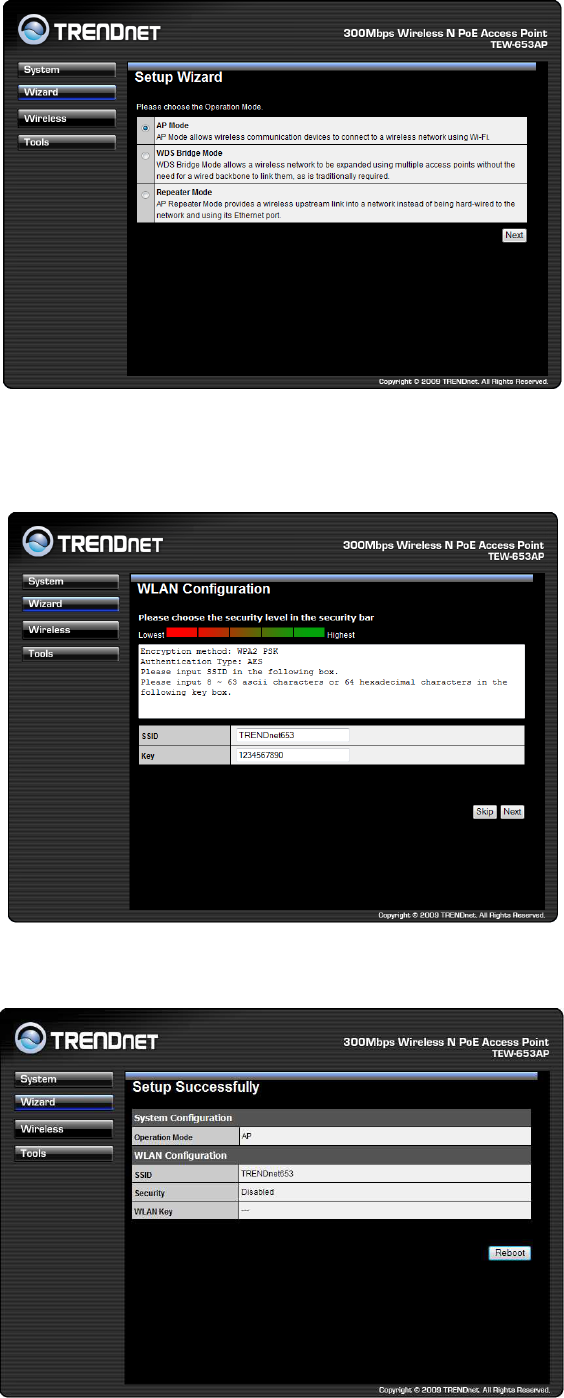
Step 2: Select the level of security you would like to apply on the Access Point between
Lowest to Highest. You can type in your personal settings by entering in the SSID and KEY
information. Please click “Next” to continue.
Step 3: Your settings will appear and click Reboot to apply settings.
System
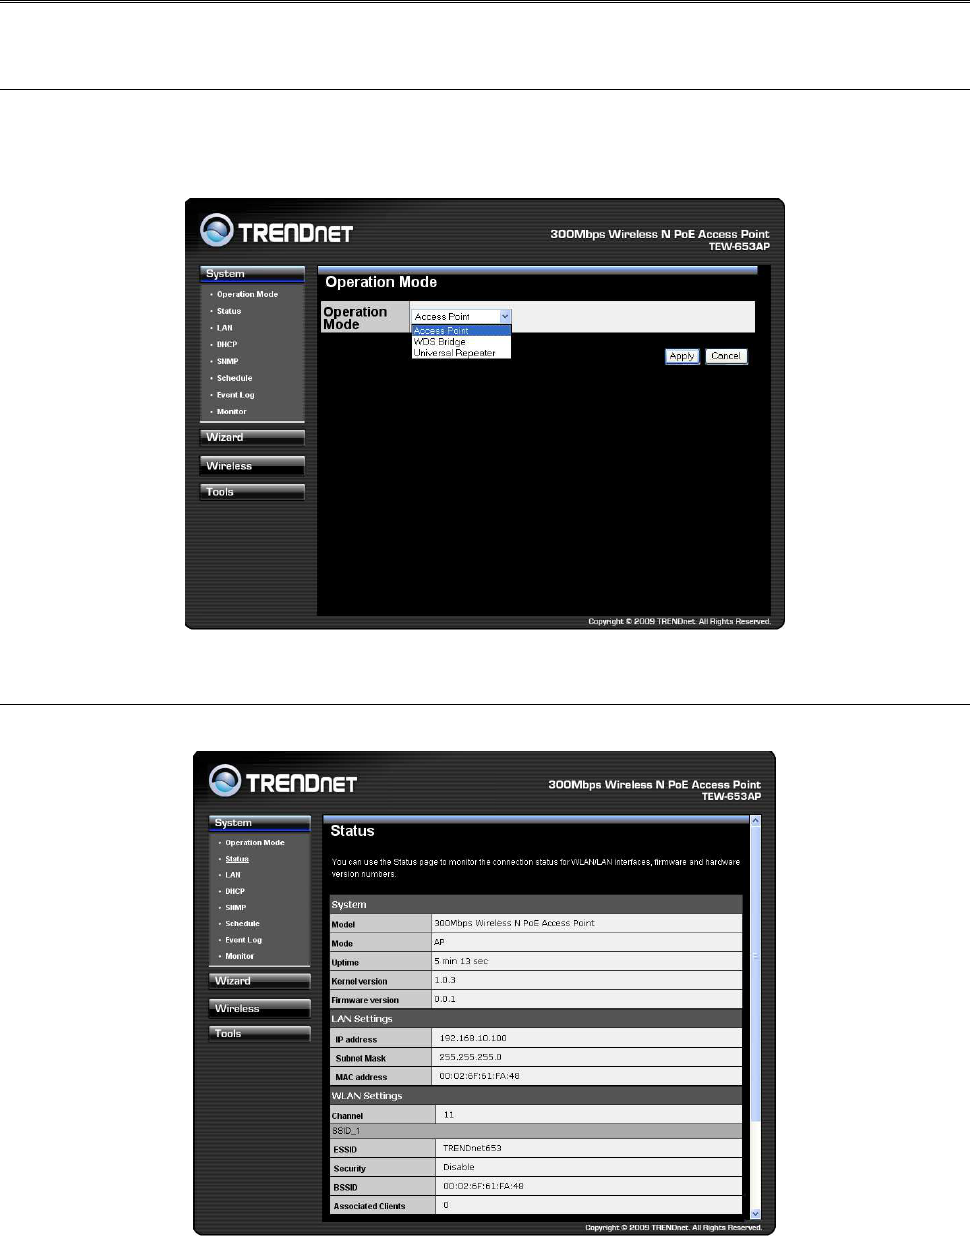
Operation Mode
You are allowed to configure TEW-653AP into different modes: AP, WDS Bridge and
Repeater.
Status
This selection enables users to view the current applied settings of the Access Point.
System: Basic information of the device.
WLAN Settings: WLAN channel.
SSID_1: SSID information.
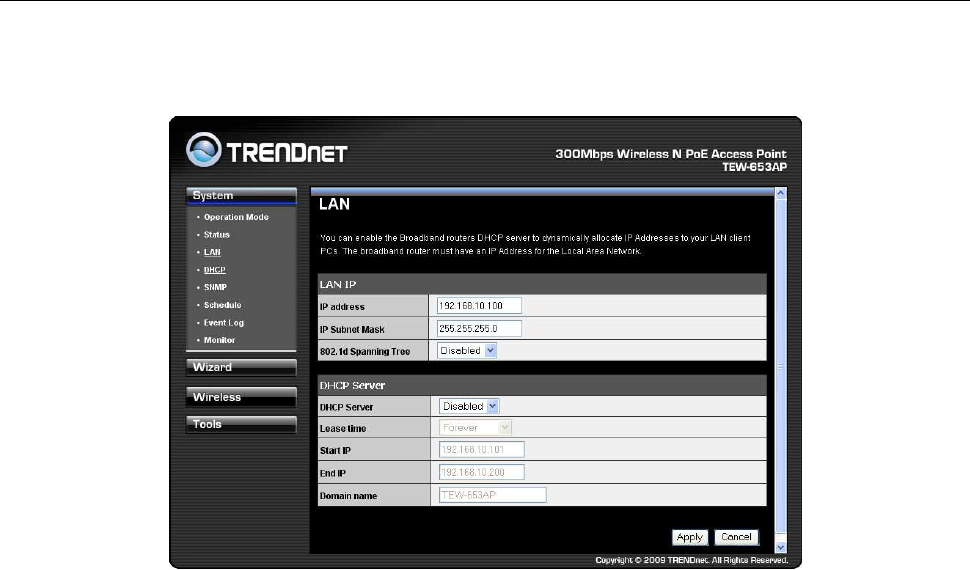
LAN
This screen allows users to configure the LAN settings of the access point and to configure
the DHCP settings.
Bridge Type: Select Static IP or Dynamic IP from the drop-down list. If you select Static IP,
you will be required to specify an IP address and subnet mask. If Dynamic IP is selected,
then the IP address is received automatically from the external DHCP server.
IP Address: Specify an IP address.
IP Subnet Mask: Specify a subnet mask for the IP address.
802.1d Spanning Tree: Select Enable or Disable from the drop-down list. Enabling
spanning tree will avoid redundant data loops.
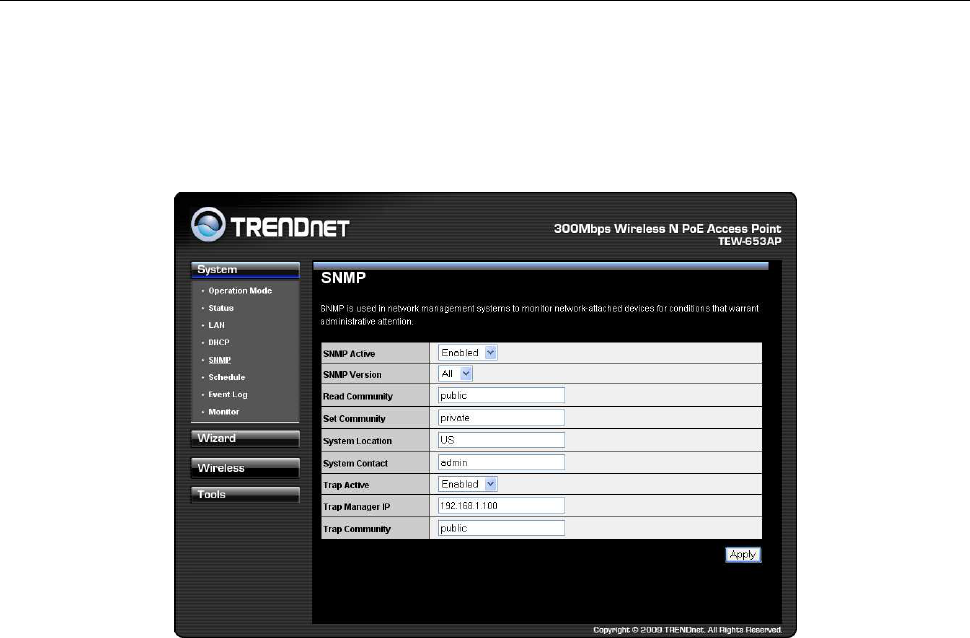
SNMP
Allows you to assign the contact details, location, community name and trap settings for
SNMP. This is a networking management protocol used to monitor network-attached
devices. SNMP allows messages (called protocol data units) to be sent to various parts of a
network. Upon receiving these messages, SNMP-compatible devices (called agents) return
data stored in their Management Information Bases.
SNMP Active: Choose to enable or disable the SNMP feature.
SNMP Version: You may select a specific version or select All from the drop-down list.
Read Community Name: Specify the password for access the SNMP community for read
only access.
Set Community Name: Specify the password for access to the SNMP community with
read/write access.
System Location: Specify the location of the device.
System Contact: Specify the contact details of the device.
Trap Active: Choose to enable or disable the SNMP trapping feature. .
Trap Manager IP: Specify the password for the SNMP trap community.
Trap Community: Specify the name of SNMP trap community.
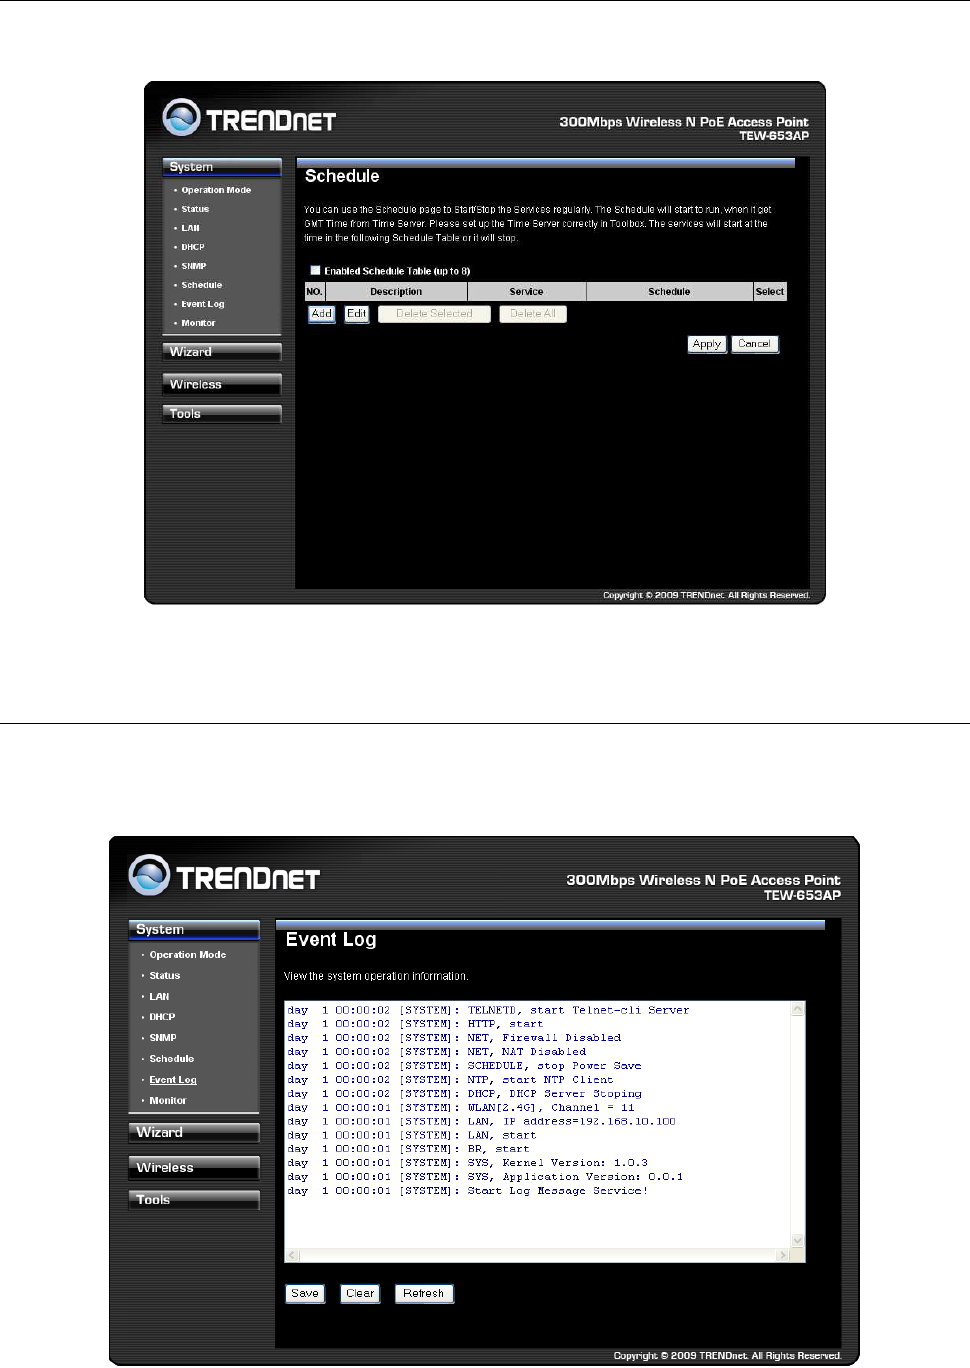
Schedule
This screen allows users to set schedules on the access point.
Event Log
This screen allows users to view a running log of the access point system statistics, events
and activities.
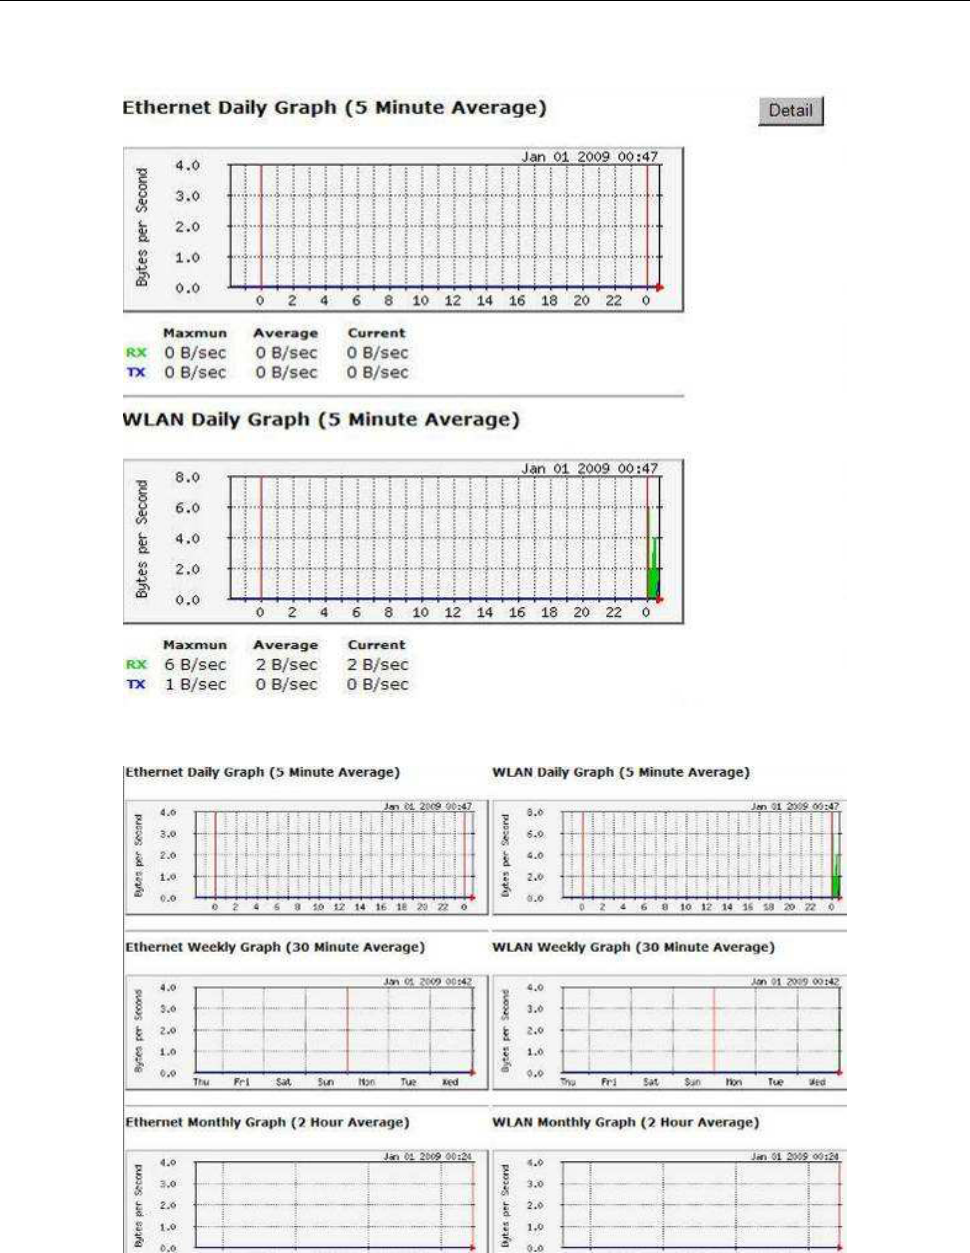
Monitor
This screen allows users to view graphical diagram of the data rates running through the
access point.
Detail: Click into detail to see historical record.
Wireless Access Point Mode
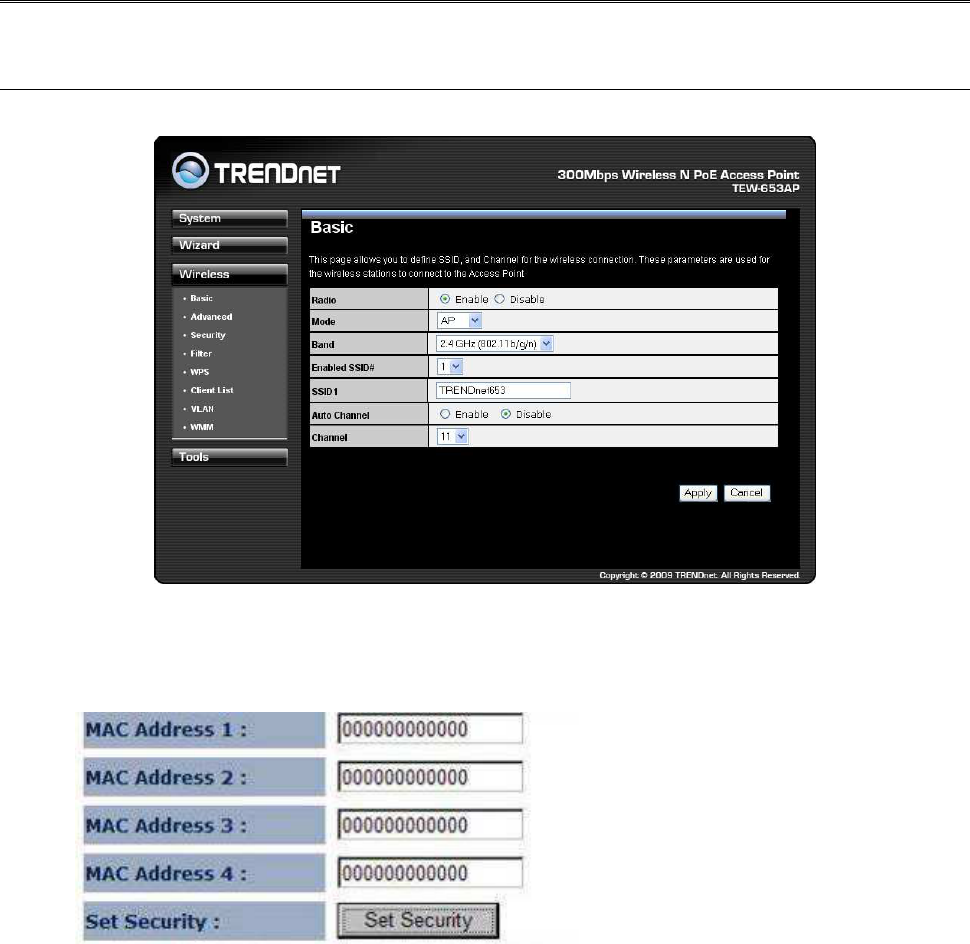
Basic
This screen allows users configure the access point under Access Point mode.
Radio: To enable/disable wireless signal.
Mode: Select AP or WDS mode. WDS mode allows the access point to interlink with other
AP devices through WDS connection.
Band: Configure the device into different wireless modes.
• 2.4 GHz (B)
• 2.4 GHz (N)
• 2.4 GHz (B+G)
• 2.4 GHz (G)
• 2.4 GHz (B+G+N)
Enabled SSID#: The device allows you to add up to 4 unique SSID
ESSID#: Description of each configured SSID
MAC Address 1~4: When WDS is selected enter the MAC address of the access points you
would like to establish a WDS connection with.
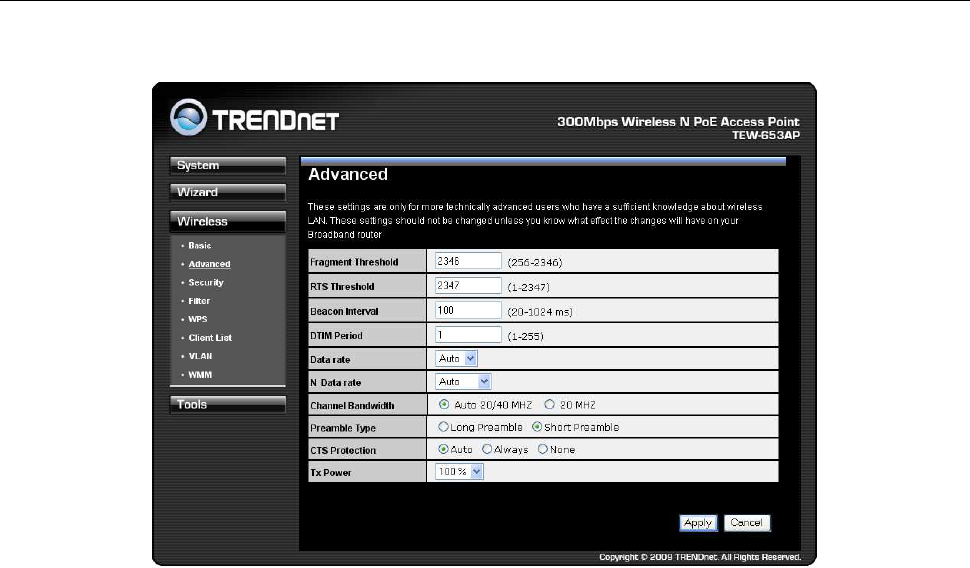
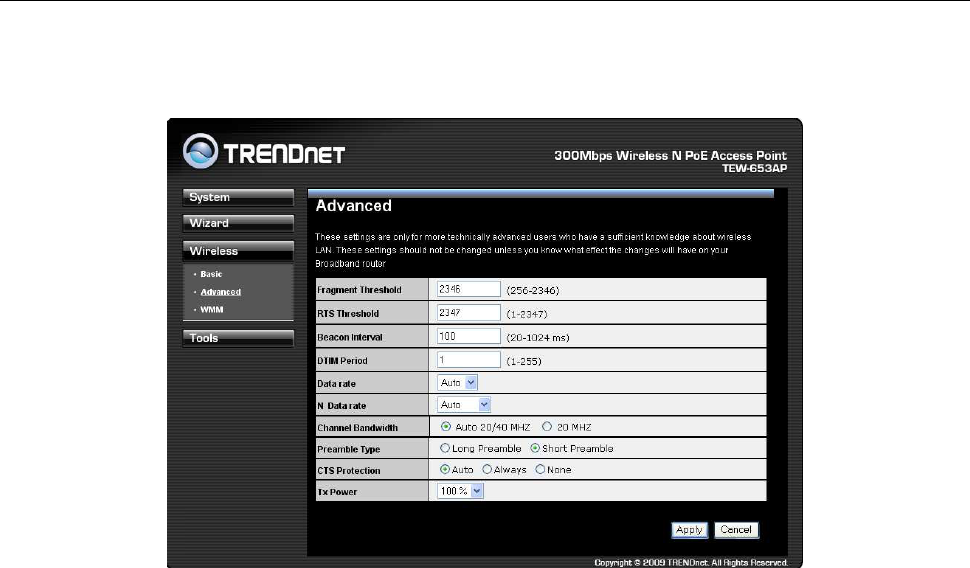
Advanced
This screen allows users to configure advance settings of the access point.
Fragment Threshold: Packets over the specified size will be fragmented in order to
improve performance on noisy networks. Specify a value between 256 and 2346. The
default value is 2346.
RTS Threshold: Packets over the specified size will use the RTS/CTS mechanism to
maintain performance in noisy networks and preventing hidden nodes from degrading the
performance. Specify a value between 0 and 2347. The default value is 2347.
Beacon Interval: Beacons are packets sent by a wireless Access Point to synchronize
wireless devices. Specify a Beacon Interval value between 24 and 1024. The default value
is set to 100 milliseconds.
DTIM Period: A DTIM is a countdown informing clients of the next window for listening to
broadcast and multicast messages. When the wireless Access Point has buffered broadcast
or multicast messages for associated clients, it sends the next DTIM with a DTIM Period
value. Wireless clients detect the beacons and awaken to receive the broadcast and
multicast messages. The default value is 1. Valid settings are between 1 and 10.
Data rate: You may select a data rate from the drop-down list, however, it is recommended
to select auto. This is also known as auto-fallback.
N Data Rate: You may select N data rate from the drop-down list, however, it is
recommended to select auto.
Channel Bandwidth: Select channel bandwidth.
Preamble Type: Select a short or long preamble. For optimum performance it is
recommended to also configure the client device as the same preamble type.
CTS Protection: CTS (Clear to Send) can be always enabled, auto, or disabled. By enabled
CTS, the Access Point and clients will wait for a ‘clear’ signal before transmitting. It is
recommended to select auto.
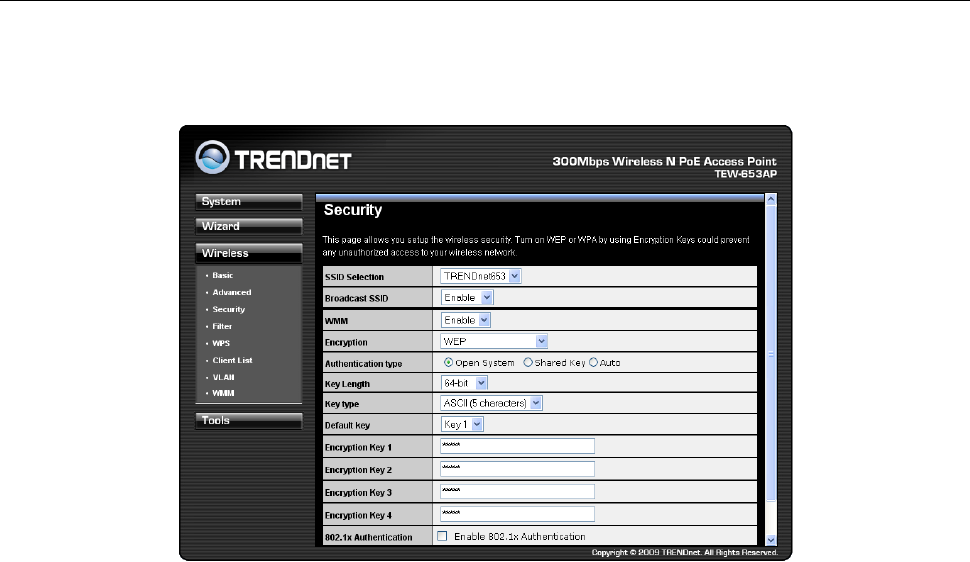
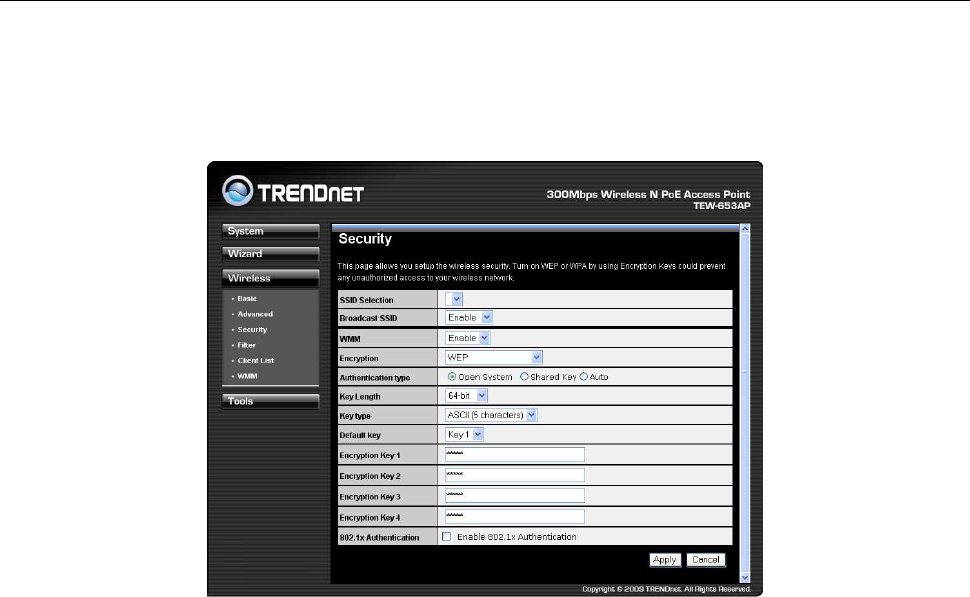
Security
This screen allows users to configure the wireless security settings of the access point.
Encryption: WEP
ESSID Selection: As this device supports multiple SSIDs, it is possible to configure a
different security mode for each SSID (profile). Select an SSID from the drop-down list.
Broadcast SSID: Select Enable or Disable from the drop-down list. This is the SSID
broadcast feature. When this option is set to Enable, your wireless network name is
broadcast to anyone within the range of your signal. If you're not using encryption then they
could connect to your network. When this is disabled, you must enter the Wireless Network
Name (SSID) on the client manually to connect to the network.
WMM: Choose to Enable or Disable WMM. This is the Quality of Service (QoS) feature for
prioritizing voice and video applications. This option can be further configured in WMM
under the Wireless drop-down menu.
Encryption: Select WEP from the drop-down list.
Authentication Type: Select Open System, Shared Key, or auto. Authentication method
from the drop-down list. An open system allows any client to authenticate as long as it
conforms to any MAC address filter policies that may have been set. All authentication
packets are transmitted without encryption. Shared Key sends an unencrypted challenge
text string to any device attempting to communicate with the AP. The device requesting
authentication encrypts the challenge text and sends it back to the access point. If the
challenge text is encrypted correctly, the access point allows the requesting device to
authenticate. It is recommended to select Auto if you are not sure which authentication type
is used.
Key Length: Select a 64-bit or 128-bit WEP key length from the drop-down list.
Key Type: Select a key type from the drop-down list. 128-bit encryption requires a longer
key than 64-bit encryption. Keys are defined by entering in a string in HEX (hexadecimal -
using characters 0-9, A-F) or ASCII (American Standard Code for Information Interchange -
alphanumeric characters) format. ASCII format is provided so you can enter a string that is
easier to remember.
Default Key: You may choose one of your 4 different WEP keys from below.
Encryption Key 1-4: You may enter four different WEP keys.
Enable 802.1x Authentication: Place a check in this box if you would like to use RADIUS
authentication. This option works with a RADIUS Server to authenticate wireless clients.
Wireless clients should have established the necessary credentials before attempting to
authenticate to the Server through this Gateway. Furthermore, it may be necessary to
configure the RADIUS Server to allow this Gateway to authenticate users. You will then be
required to specify the RADIUS Server’s IP address, port, and password.
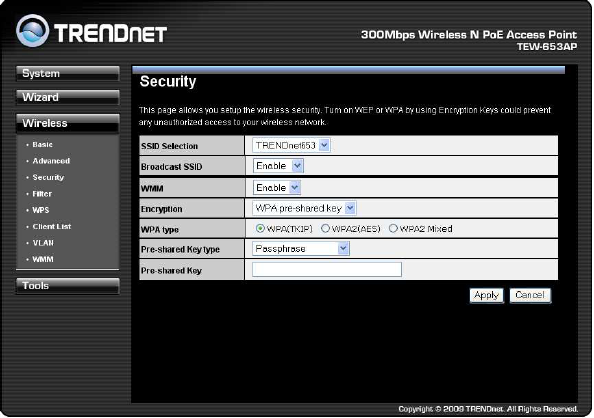
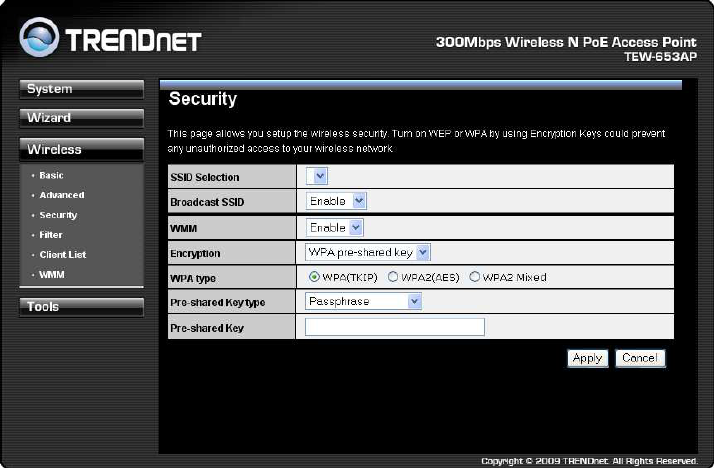
Encryption: WPA pre-shared key
ESSID Selection: As this device supports multiple SSIDs, it is possible to configure a
different security mode for each SSID (profile). Select an SSID from the drop-down list.
Broadcast SSID: Select Enable or Disable from the drop-down list. This is the SSID
broadcast feature. When this option is set to Enable, your wireless network name is
broadcast to anyone within the range of your signal. If you're not using encryption then they
could connect to your network. When this is disabled, you must enter the Wireless Network
Name (SSID) on the client manually to connect to the network.
WMM: Choose to Enable or Disable WMM. This is the Quality of Service (QoS) feature for
prioritizing voice and video applications. This option can be further configured in WMM
under the Wireless drop-down menu.
Encryption: Select WPA pre-shared key from the drop-down list.
WPA Type: Select TKIP, AES, or WPA2 Mixed. The encryption algorithm used to secure
the data communication. TKIP (Temporal Key Integrity Protocol) provides per-packet key
generation and is based on WEP. AES (Advanced Encryption Standard) is a very secure
block based encryption. Note that, if the bridge uses the AES option, the bridge can
associate with the access point only if the access point is also set to use only AES.
Pre-shared Key Type: The Key Type can be passphrase or Hex format.
Pre-Shared Key: The key is entered as a pass-phrase of up to 63 alphanumeric characters
in ASCII (American Standard Code for Information Interchange) format at both ends of the
wireless connection. It cannot be shorter than eight characters, although for proper security
it needs to be of ample length and should not be a commonly known phrase. This phrase is
used to generate session keys that are unique for each wireless client.
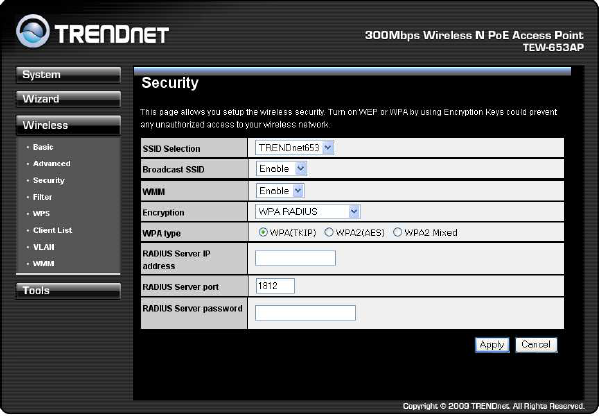
Encryption: WPA RADIUS
ESSID Selection: As this device supports multiple SSIDs, it is possible to configure a
different security mode for each SSID (profile). Select an SSID from the drop-down list.
Broadcast SSID: Select Enable or Disable from the drop-down list. This is the SSID
broadcast feature. When this option is set to Enable, your wireless network name is
broadcast to anyone within the range of your signal. If you're not using encryption then they
could connect to your network. When this is disabled, you must enter the Wireless Network
Name (SSID) on the client manually to connect to the network.
WMM: Choose to Enable or Disable WMM. This is the Quality of Service (QoS) feature for
prioritizing voice and video applications. This option can be further configured in WMM
under the Wireless drop-down menu.
Encryption: Select WPA RADIUS from the drop-down list.
WPA Type: Select TKIP, AES, or WPA2 Mixed. The encryption algorithm used to secure
the data communication. TKIP (Temporal Key Integrity Protocol) provides per-packet key
generation and is based on WEP. AES (Advanced Encryption Standard) is a very secure
block based encryption. Note that, if the bridge uses the AES option, the bridge can
associate with the access point only if the access point is also set to use only AES.
RADIUS Server IP Address: Specify the IP address of the RADIUS server.
RADIUS Server Port: Specify the port number of the RADIUS server, the default port is
1812.
RADIUS Server Password: Specify the pass-phrase that is matched on the RADIUS
Server.
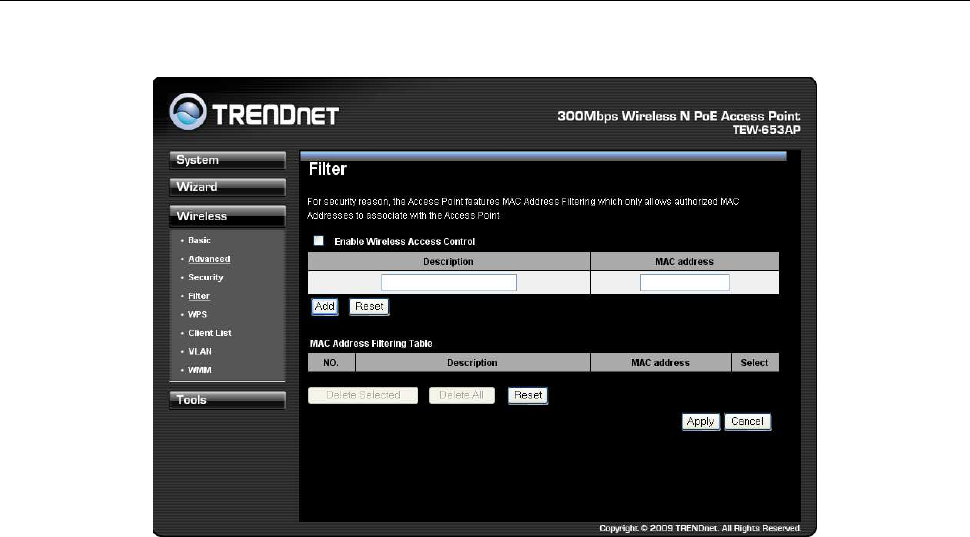
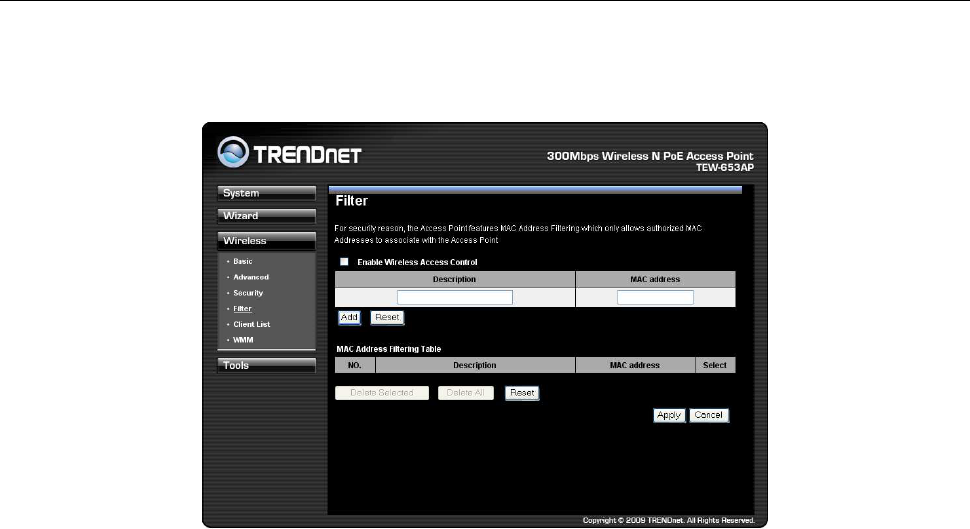
Filter
This page enabled you to define access to the access point. Computers in the MAC address
table are only authorized to associate with the access point.
Enable Wireless Access Control: Check box to enable feature
Description: Enter the name of the device
MAC address: Enter the device’s MAC address
ADD: Click to add MAC address into table
Reset: Click to reset entry
Delete Selected: Allows you to delete selected entry
Delete All: Deletes all entries in the MAC address table
Reset: Reset all entries
Apply: Cllick to apply changes made
Cancel: Click to cancel any new setting changes made.
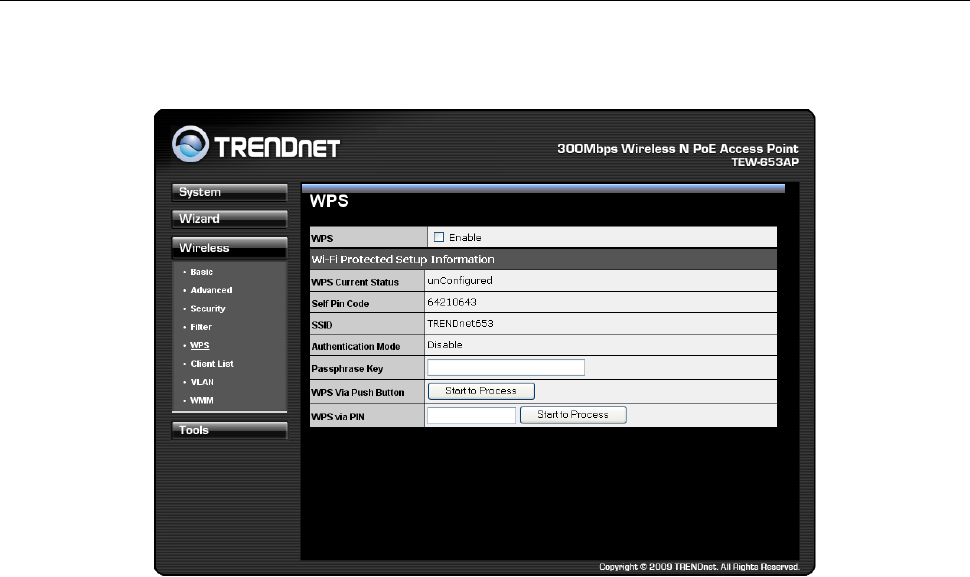
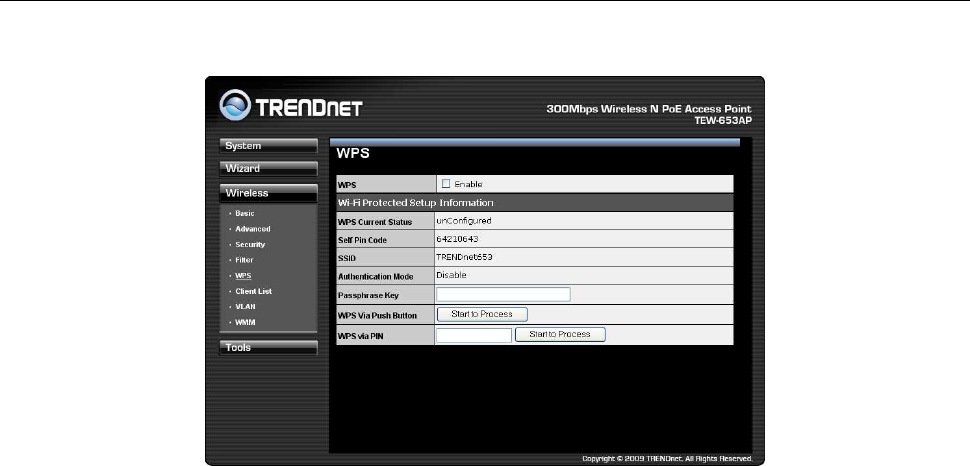
WPS
This screen allows users to configure the Wi-Fi Protected Setup function under Access
Point mode.
WPS: Place a check in this box to enable this feature.
WPS Current Status: Displays the current status of the WPS configuration.
Self Pin Code: Displays the current PIN.
SSID: Displays the current SSID.
Authentication Mode: Displays the current authentication mode.
Passphrase Key: Displays the current passphrase.
Interface: Displays the current interface.
WPS Via Push Button: Click on the Start to Process button if you would like to enable
WPS through the Push Button instead of the PIN. After pressing this button you will be
required to press the WPS on the client device within two minutes. Click on the OK button in
the dialog box.
WPS via PIN: Specify a PIN, which unique number that can be used to add the router to an
existing network or to create a new network. Then click on the Start to Process button.
Apply: Click on the button to save the changes.
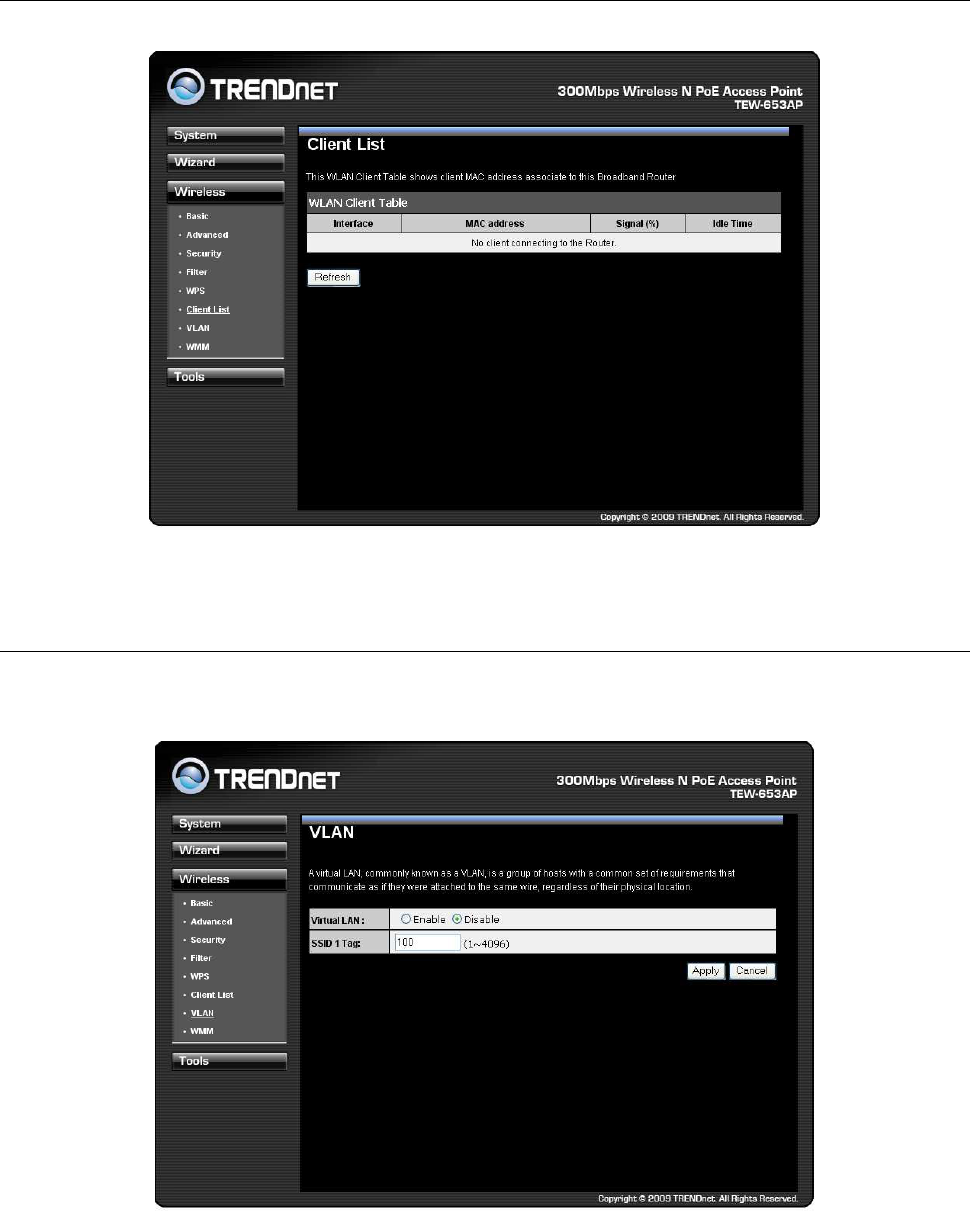
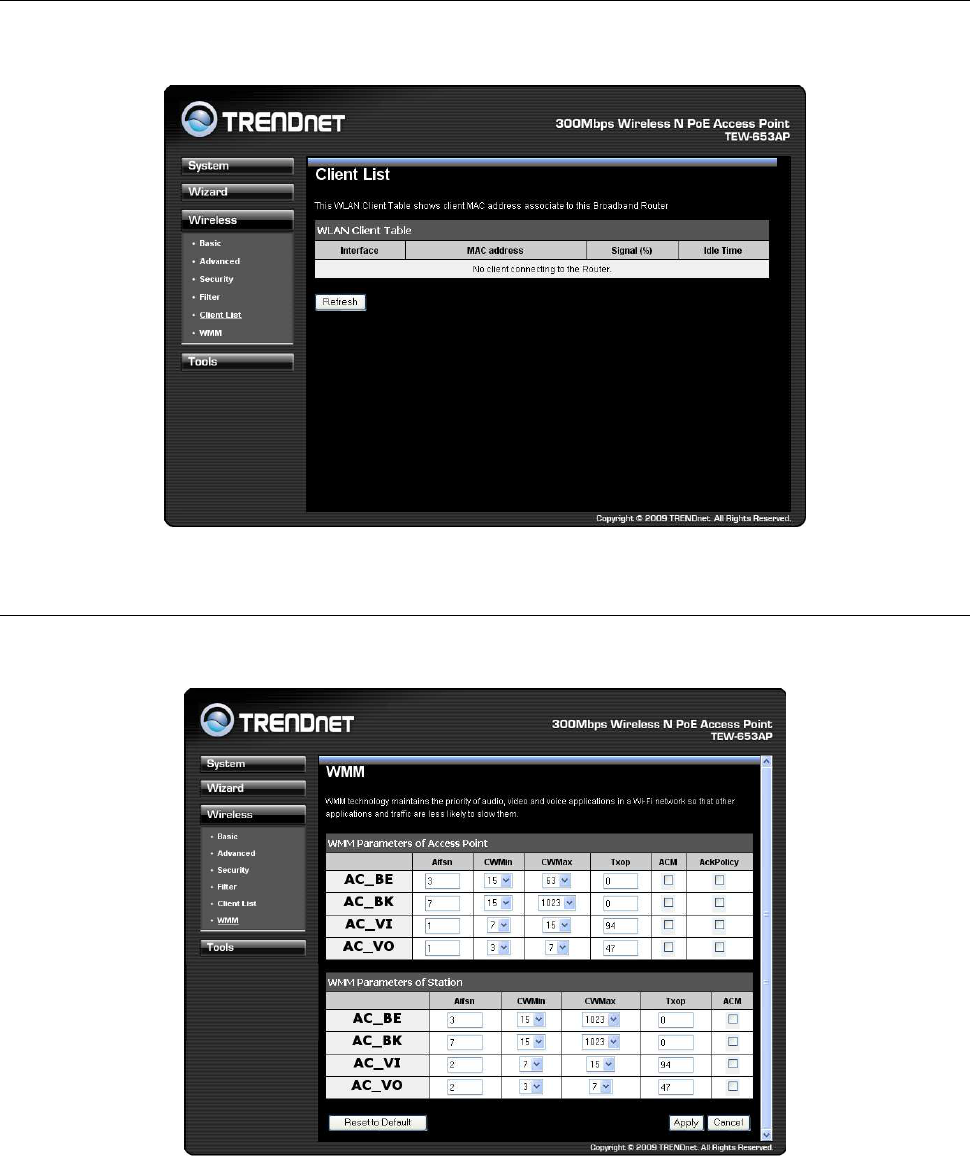
Client List
This screen allows users to view a list of connected clients.
VLAN
This feaute is only available under AP mode and allows users to configure the VLAN
settings of the access point.
Virtual LAN: Choose to Enable or Disable the VLAN features.
SSID1 Tag: Specify the VLAN tag.
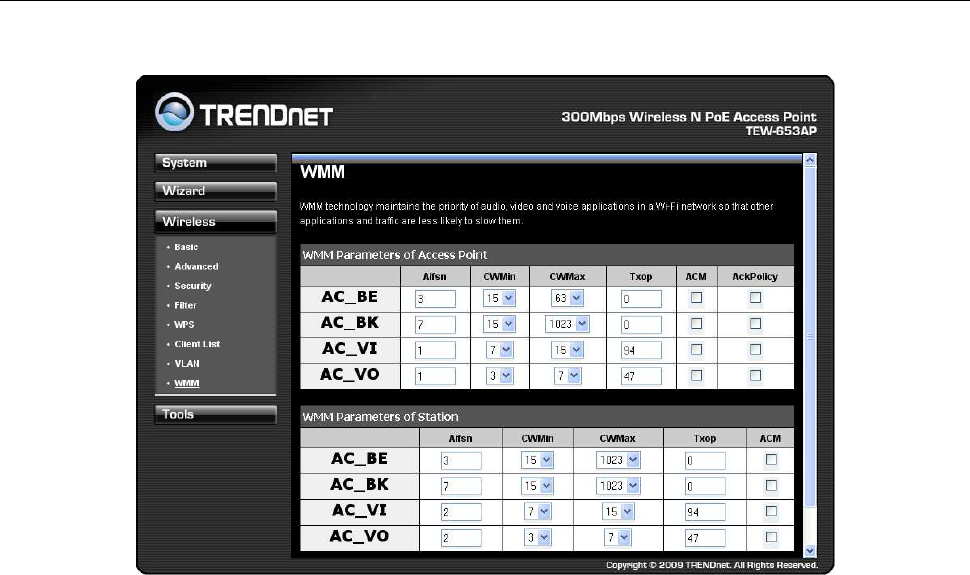
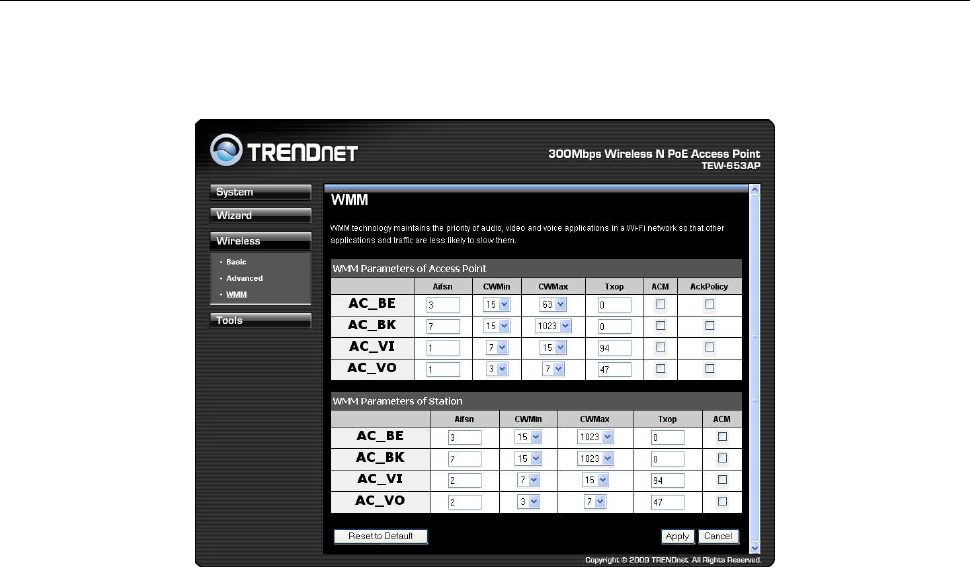
WMM
This screen allows users to configure the WMM (Wireless Multi-Media) settings of the
access point under AP mode.
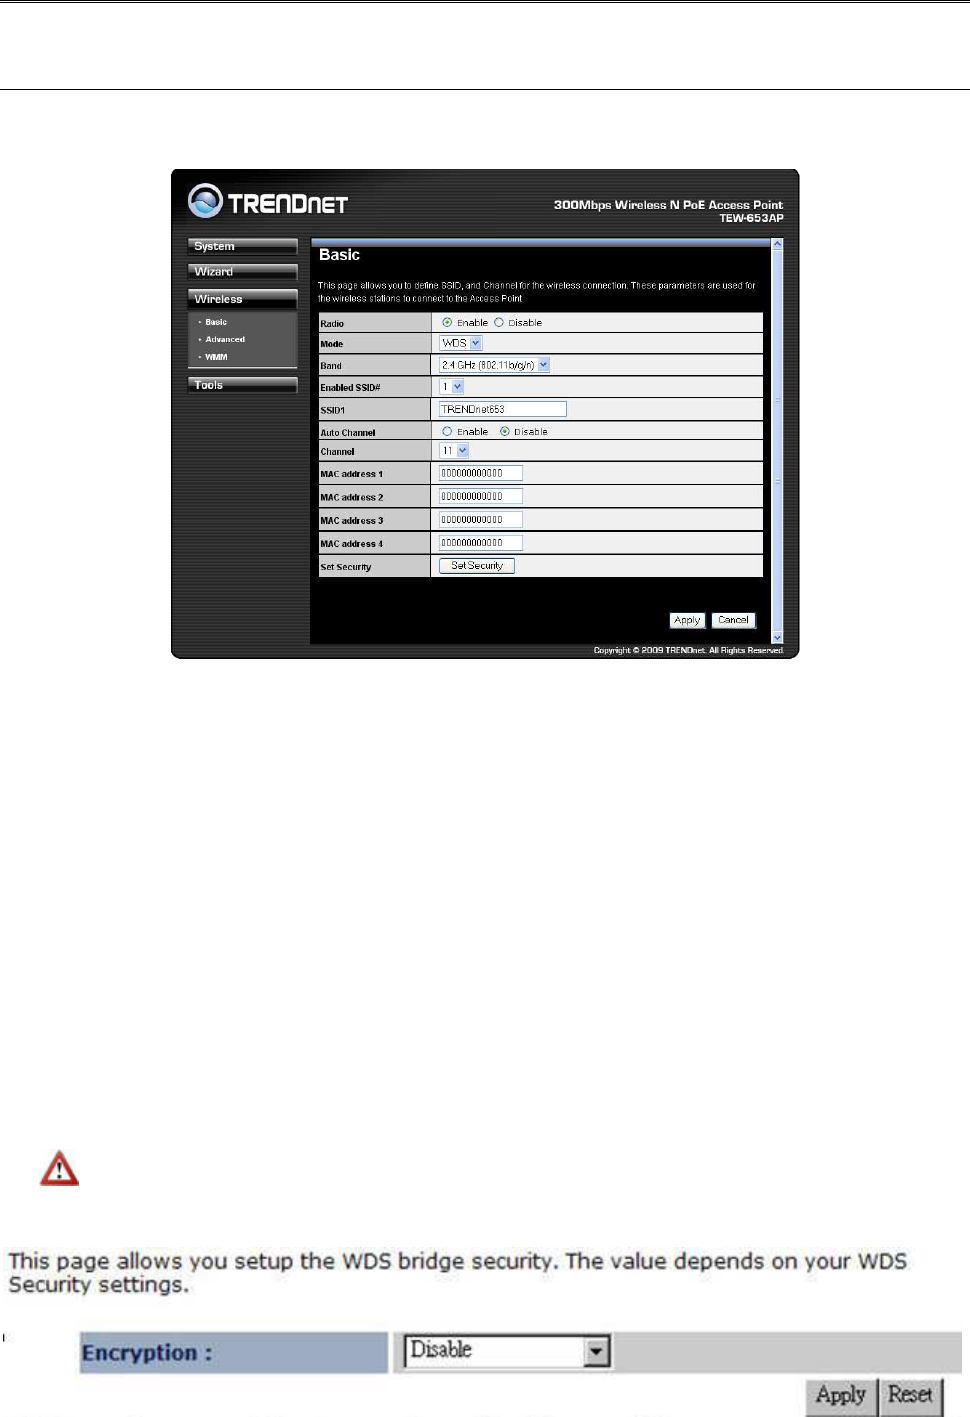
Wireless WDS Bridge Mode
Basic
This screen allows users to configure the access point’s WDS bridge settings.
Radio: To enable/disable radio frequency.
Mode: WDS mode allows you to interlink with other AP devices. Setting MAC address and
encryption algorithm
Band: Configure the device into different wireless modes.
2.4 GHz (B)
2.4 GHz (N)
2.4 GHz (B+G)
2.4 GHz (G)
2.4 GHz (B+G+N)
Enabled SSID#: The device allows you to add up to 4 unique SSID
ESSID#: Description of each configured SSID
Channel: You can manually configure a channel to be used.
MAC Address 1~4: To specify MAC address of other AP devices.
MAC address will only shows when configured in WDS AP mode.
Security: Disabled
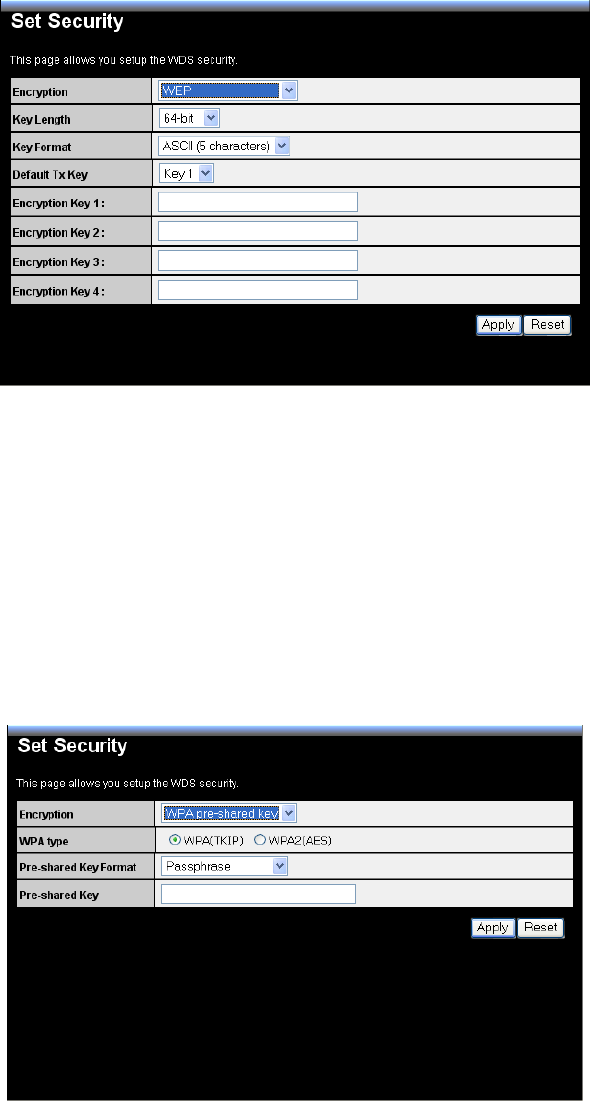
Security: WEP
Key Length: Select a 64-bit or 128-bit WEP key length from the drop-down list.
Key Format: Select a key type from the drop-down list. 128-bit encryption requires a longer
key than 64-bit encryption. Keys are defined by entering in a string in HEX (hexadecimal -
using characters 0-9, A-F) or ASCII (American Standard Code for Information Interchange -
alphanumeric characters) format. ASCII format is provided so you can enter a string that is
easier to remember.
Default Tx Key: You may choose one of your 4 different WEP keys from below.
Encryption Key 1-4: You may enter four different WEP keys.
Security: WPA pre-shared key
WPA Type: Select TKIP, AES, or WPA2 Mixed. The encryption algorithm used to secure
the data communication. TKIP (Temporal Key Integrity Protocol) provides per-packet key
generation and is based on WEP. AES (Advanced Encryption Standard) is a very secure
block based encryption. Note that, if the bridge uses the AES option, the bridge can
associate with the access point only if the access point is also set to use only AES.
Pre-shared Key Type: The Key Type can be passphrase or Hex format.
Pre-Shared Key: The key is entered as a pass-phrase of up to 63 alphanumeric characters
in ASCII (American Standard Code for Information Interchange) format at both ends of the
wireless connection. It cannot be shorter than eight characters, although for proper security
it needs to be of ample length and should not be a commonly known phrase. This phrase is
used to generate session keys that are unique for each wireless client.
Advanced
This screen allows users to configure the advance wireless settings of the access point in
WDS mode.
Fragment Threshold: Packets over the specified size will be fragmented in order to improve
performance on noisy networks. Specify a value between 256 and 2346. The default value is 2346.
RTS Threshold: Packets over the specified size will use the RTS/CTS mechanism to
maintain performance in noisy networks and preventing hidden nodes from degrading the
performance. Specify a value between 0 and 2347. The default value is 2347.
Beacon Interval: Beacons are packets sent by a wireless Access Point to synchronize
wireless devices. Specify a Beacon Interval value between 25 and 1000. The default value
is set to 100 milliseconds.
DTIM Period: A DTIM is a countdown informing clients of the next window for listening to
broadcast and multicast messages. When the wireless Access Point has buffered broadcast
or multicast messages for associated clients, it sends the next DTIM with a DTIM Period
value. Wireless clients detect the beacons and awaken to receive the broadcast and
multicast messages. The default value is 1. Valid settings are between 1 and 10.
Data rate: You may select a data rate from the drop-down list, however, it is recommended
to select auto. This is also known as auto-fallback.
N Data Rate: You may select N data rate from the drop-down list, however, it is
recommended to select auto.
Channel Bandwidth: Select channel bandwidth.
Preamble Type: Select a short or long preamble. For optimum performance it is
recommended to also configure the client device as the same preamble type.
CTS Protection: CTS (Clear to Send) can be always enabled, auto, or disabled. By enabled
CTS, the Access Point and clients will wait for a ‘clear’ signal before transmitting. It is
recommended to select auto
.
WMM
This screen allows users to configure the WMM (Wi-Fi Multi-Media) settings of the access
point in WDS mode.
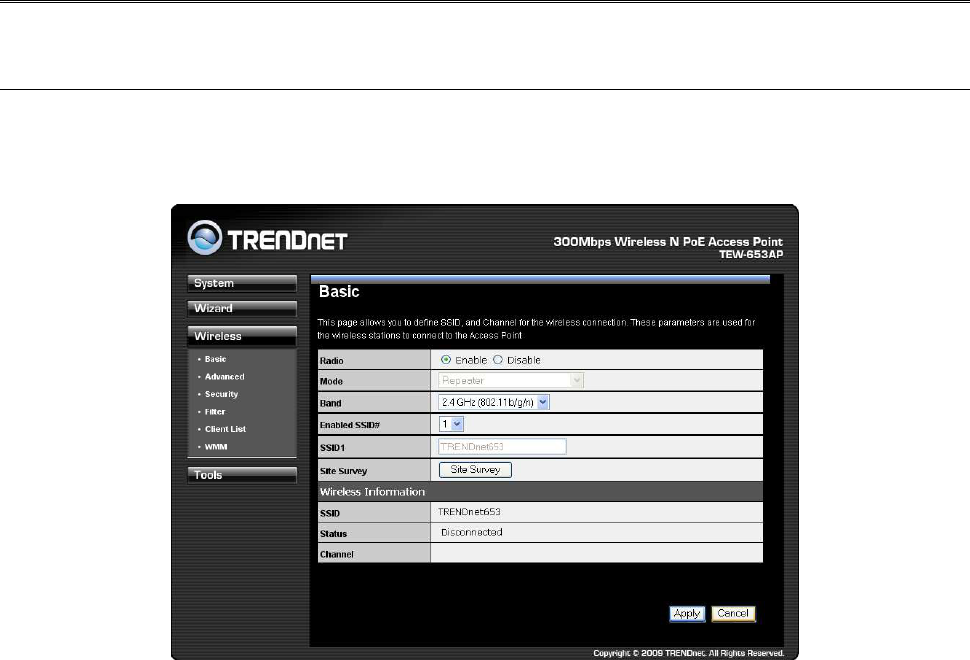
Repeater Mode
Wireless Basic
This screen allows users to configure the wireless settings of the access point in Repeater
mode.
Radio: To enable/disable radio frequency.
Mode: Universal Repeater
Band: Configure the device into different wireless modes.
2.4 GHz (B)
2.4 GHz (N)
2.4 GHz (B+G)
2.4 GHz (G)
2.4 GHz (B+G+N)
Enabled SSID#: The device allows you to add up to 4 unique SSID
ESSID#: Description of each configured SSID
Channel: You can manually configure a channel to be used.
Site Survey: List out all connected devices.
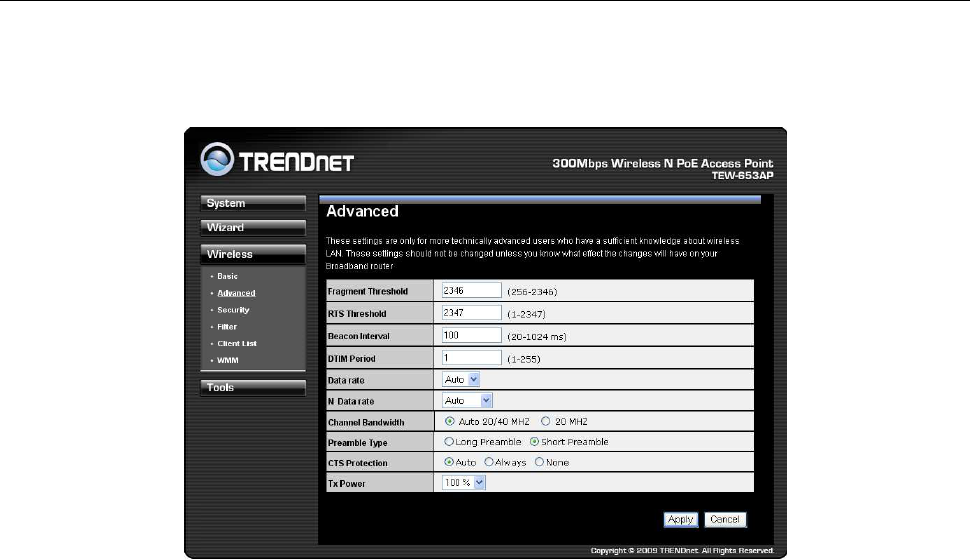
Advanced
This screen allows users to configure the advance wireless settings of the access point in
Repeater mode.
Fragment Threshold: Packets over the specified size will be fragmented in order to
improve performance on noisy networks. Specify a value between 256 and 2346. The
default value is 2346.
RTS Threshold: Packets over the specified size will use the RTS/CTS mechanism to
maintain performance in noisy networks and preventing hidden nodes from degrading the
performance. Specify a value between 0 and 2347. The default value is 2347.
Beacon Interval: Beacons are packets sent by a wireless Access Point to synchronize
wireless devices. Specify a Beacon Interval value between 25 and 1000. The default value
is set to 100 milliseconds.
DTIM Period: A DTIM is a countdown informing clients of the next window for listening to
broadcast and multicast messages. When the wireless Access Point has buffered broadcast
or multicast messages for associated clients, it sends the next DTIM with a DTIM Period
value. Wireless clients detect the beacons and awaken to receive the broadcast and
multicast messages. The default value is 1. Valid settings are between 1 and 10.
Data rate: You may select a data rate from the drop-down list, however, it is recommended
to select auto. This is also known as auto-fallback.
Preamble Type: Select a short or long preamble. For optimum performance it is
recommended to also configure the client device as the same preamble type.
CTS Protection: CTS (Clear to Send) can be always enabled, auto, or disabled. By enabled
CTS, the Access Point and clients will wait for a ‘clear’ signal before transmitting. It is
recommended to select auto.
Repeater Mode Security
This screen allows users to configure the wireless security settings of the access point in
Repeater mode.
WEP
ESSID Selection: As this device supports multiple SSIDs, it is possible to configure a
different security mode for each SSID (profile). Select an SSID from the drop-down list.
Broadcast SSID: Select Enable or Disable from the drop-down list. This is the SSID
broadcast feature. When this option is set to Enable, your wireless network name is
broadcast to anyone within the range of your signal. If you're not using encryption then they
could connect to your network. When this is disabled, you must enter the Wireless Network
Name (SSID) on the client manually to connect to the network.
WMM: Choose to Enable or Disable WMM. This is the Quality of Service (QoS) feature for
prioritizing voice and video applications. This option can be further configured in WMM
under the Wireless drop-down menu.
Encryption: Select WEP from the drop-down list.
Authentication Type: Select Open System, Shared Key, or auto. Authentication method
from the drop-down list. An open system allows any client to authenticate as long as it
conforms to any MAC address filter policies that may have been set. All authentication
packets are transmitted without encryption. Shared Key sends an unencrypted challenge
text string to any device attempting to communicate with the AP. The device requesting
authentication encrypts the challenge text and sends it back to the access point. If the
challenge text is encrypted correctly, the access point allows the requesting device to
authenticate. It is recommended to select Auto if you are not sure which authentication type
is used.
Key Length: Select a 64-bit or 128-bit WEP key length from the drop-down list.
Key Type: Select a key type from the drop-down list. 128-bit encryption requires a longer
key than 64-bit encryption. Keys are defined by entering in a string in HEX (hexadecimal -
using characters 0-9, A-F) or ASCII (American Standard Code for Information Interchange -
alphanumeric characters) format. ASCII format is provided so you can enter a string that is
easier to remember.
Default Key: You may choose one of your 4 different WEP keys from below.
Encryption Key 1-4: You may enter four different WEP keys.
Enable 802.1x Authentication: Place a check in this box if you would like to use RADIUS
authentication. This option works with a RADIUS Server to authenticate wireless clients.
Wireless clients should have established the necessary credentials before attempting to
authenticate to the Server through this Gateway. Furthermore, it may be necessary to
configure the RADIUS Server to allow this Gateway to authenticate users. You will then be
required to specify the RADIUS Server’s IP address, port, and password.
WPA pre-shared key
ESSID Selection: As this device supports multiple SSIDs, it is possible to configure a
different security mode for each SSID (profile). Select an SSID from the drop-down list.
Broadcast SSID: Select Enable or Disable from the drop-down list. This is the SSID
broadcast feature. When this option is set to Enable, your wireless network name is
broadcast to anyone within the range of your signal. If you're not using encryption then
they could connect to your network. When this is disabled, you must enter the Wireless
Network Name (SSID) on the client manually to connect to the network.
WMM: Choose to Enable or Disable WMM. This is the Quality of Service (QoS) feature
for prioritizing voice and video applications. This option can be further configured in
WMM under the Wireless drop-down menu.
Encryption: Select WPA pre-shared key from the drop-down list.
WPA Type: Select TKIP, AES, or WPA2 Mixed. The encryption algorithm used to
secure the data communication. TKIP (Temporal Key Integrity Protocol) provides
per-packet key generation and is based on WEP. AES (Advanced Encryption Standard)
is a very secure block based encryption. Note that, if the bridge uses the AES option,
the bridge can associate with the access point only if the access point is also set to use
only AES.
Pre-shared Key Type: The Key Type can be passphrase or Hex format.
Pre-Shared Key: The key is entered as a pass-phrase of up to 63 alphanumeric
characters in ASCII (American Standard Code for Information Interchange) format at
both ends of the wireless connection. It cannot be shorter than eight characters,
although for proper security it needs to be of ample length and should not be a
commonly known phrase. This phrase is used to generate session keys that are unique
for each wireless client.
Filter
This page enabled you to define access to the access point. Computers in the MAC address
table are only authorized to associate with the access point.
WPS
This screen allows users to configure the Wi-Fi Protected Setup function in Repeater mode
.
WPS: Place a check in this box to enable this feature.
WPS Current Status: Displays the current status of the WPS configuration.
Self Pin Code: Displays the current PIN.
SSID: Displays the current SSID.
Authentication Mode: Displays the current authentication mode.
Passphrase Key: Displays the current passphrase.
Interface: Displays the current interface.
WPS Via Push Button: Click on the Start to Process button if you would like to enable
WPS through the Push Button instead of the PIN. After pressing this button you will be
required to press the WPS on the client device within two minutes. Click on the OK button in
the dialog box.
WPS via PIN: Specify a PIN, which unique number that can be used to add the router to an
existing network or to create a new network. Then click on the Start to Process button.
Click on the Apply button to save the changes.
Client List
This screen allows users to view a list of connected clients.
WMM
This screen allows users to configure the WMM (Wi-Fi Multi-Media) settings in Repeater
mode.
Tools
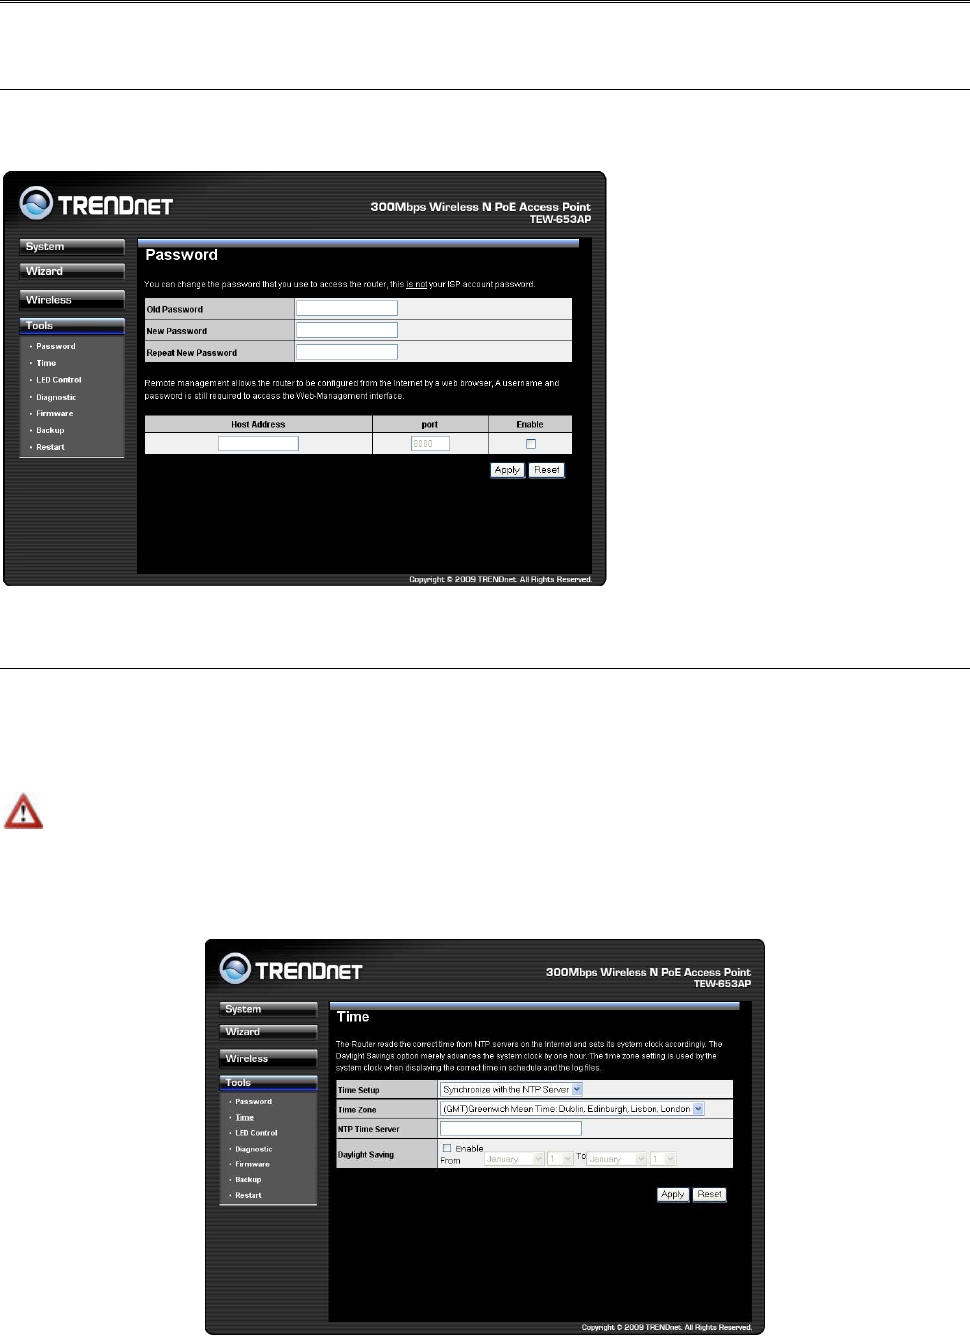
Admin
Change current login password of the device. It is recommended to change the default
password for security reasons.
Time Setting
This feature allows users to configure, update, and maintain the correct time on the
device’s internal system clock as well as configure the time zone. The date and time of the
device can be configured manually or by synchronizing with a time server.
If the device losses power for any reason, it will not be able to keep its clock running, and will not
display the correct time once the device has been restarted. Therefore, you must re-enter the correct
date and time.
Time Zone: Select time zone.
NTP Time Server: Specify the NTP server’s IP address for time synchronization.
Daylight Saving: To enable daylight savings time.
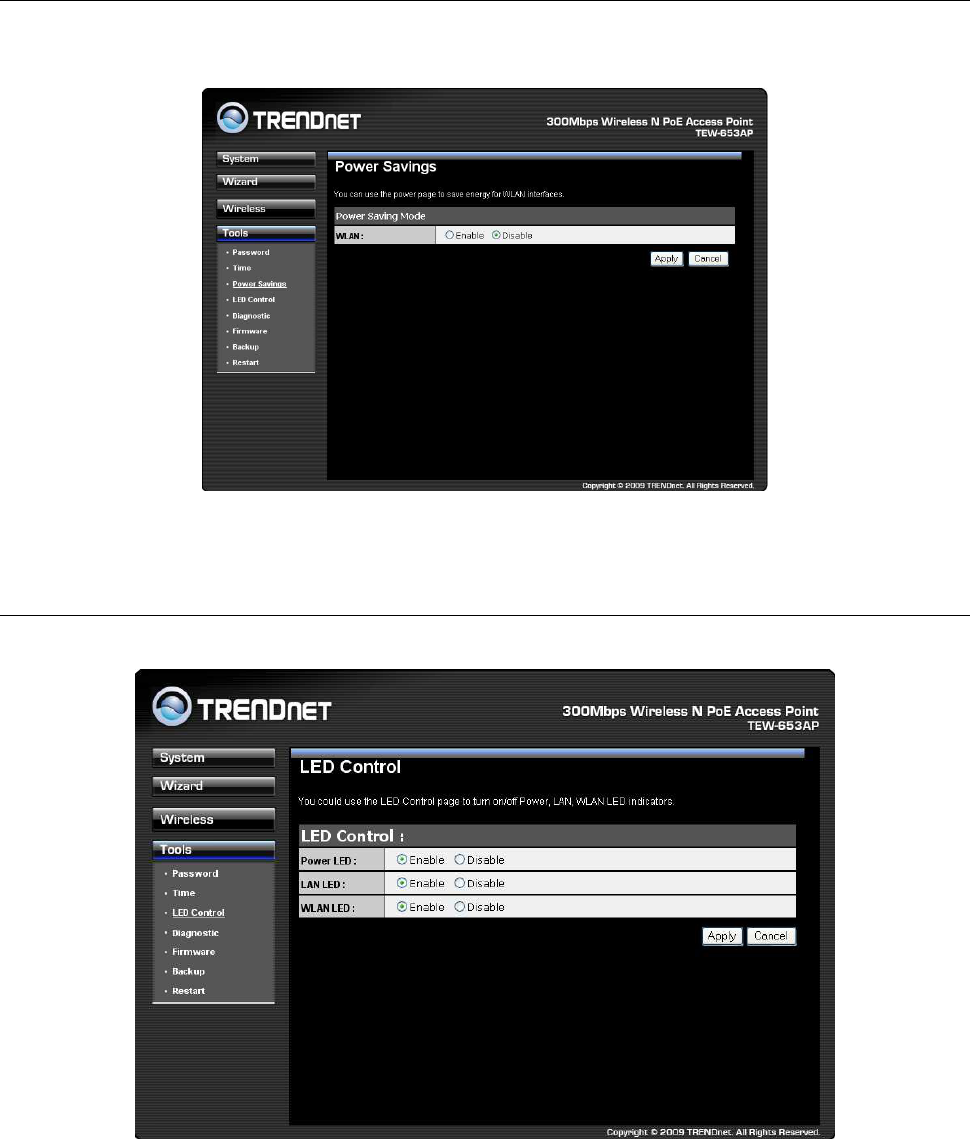
Power Saving
This screen allows users to enable the Power Saving feature of the access point. Please
note that users must enable the power saving schedule.
LED Control
This screen allows users to control the LED behavior of the access point.
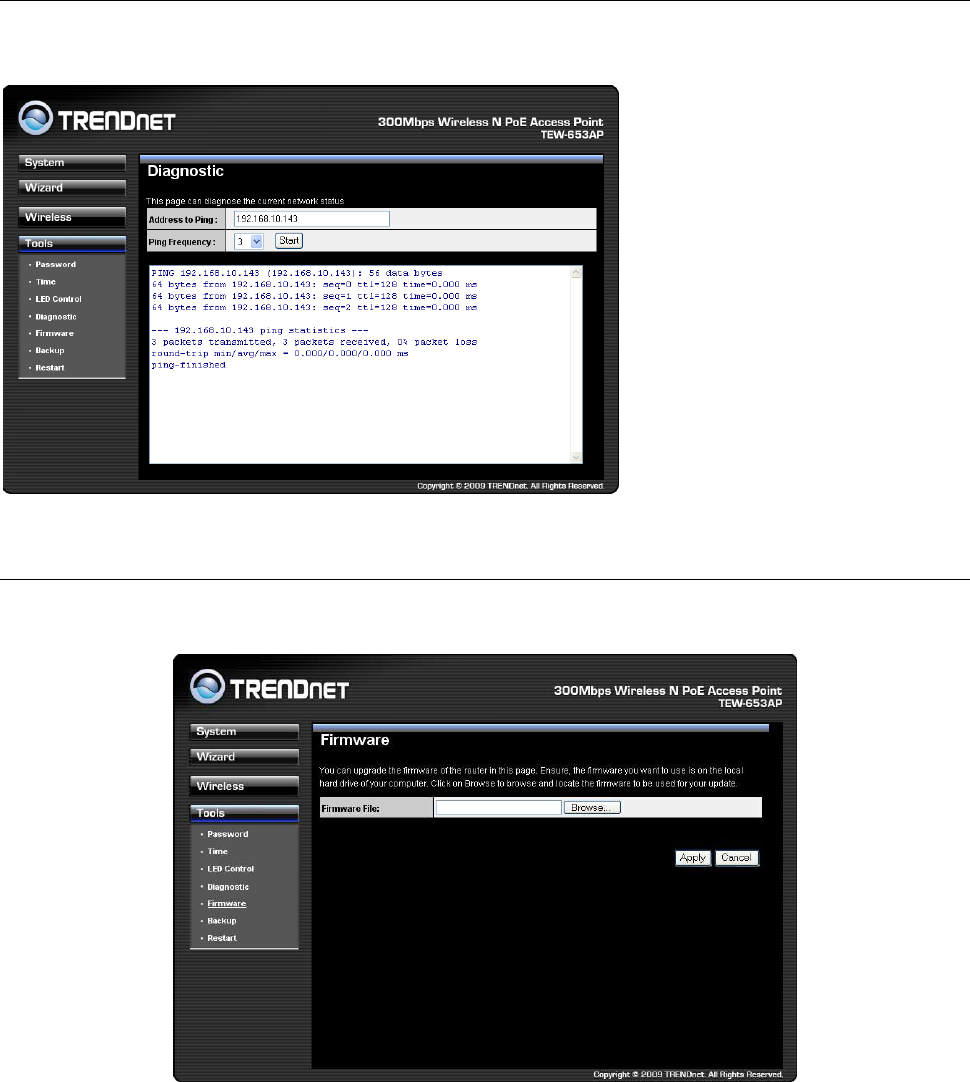
Diagnosis
Check whether a network destination is reachable with ping service.
Firmware
It allows you to upgrade the firmware of the device in order to improve the functionality and
performance.
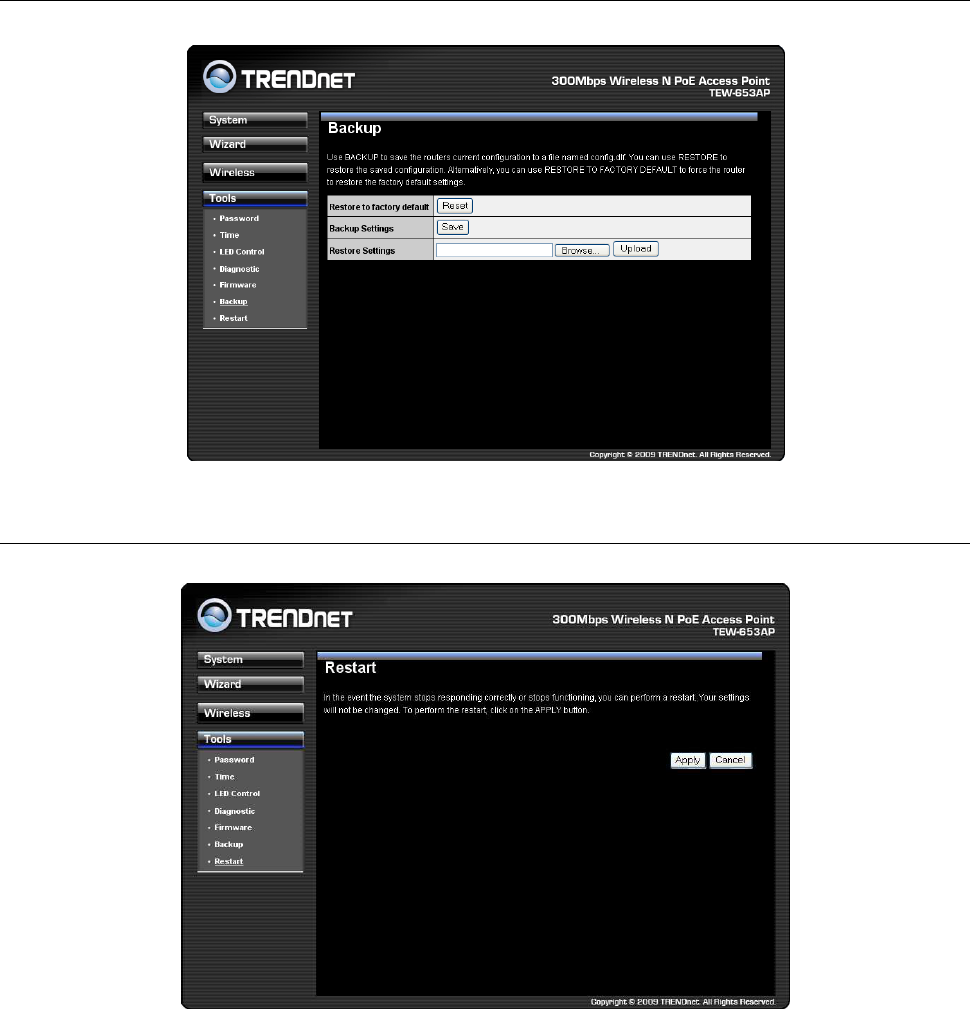
Backup
This allows you to restore to factory default setting or backup/restore your current setting.
Restart
This will only reset you devices with current configuration unaffected.

FCC Interference Statement
Federal Communication Commission Interference Statement
This equipment has been tested and found to comply with the limits for a Class B digital
device, pursuant to Part 15 of the FCC Rules. These limits are designed to provide
reasonable protection against harmful interference in a residential installation. This
equipment generates, uses and can radiate radio frequency energy and, if not installed and
used in accordance with the instructions, may cause harmful interference to radio
communications. However, there is no guarantee that interference will not occur in a
particular installation. If this equipment does cause harmful interference to radio or
television reception, which can be determined by turning the equipment off and on, the user
is encouraged to try to correct the interference by one of the following measures:
Reorient or relocate the receiving antenna.
Increase the separation between the equipment and receiver.
Connect the equipment into an outlet on a circuit different from that to which the
receiver is connected.
Consult the dealer or an experienced radio/TV technician for help.
This device complies with Part 15 of the FCC Rules. Operation is subject to the following
two conditions: (1) This device may not cause harmful interference, and (2) this device
must accept any interference received, including interference that may cause undesired
operation.
FCC Caution: Any changes or modifications not expressly approved by the party
responsible for compliance could void the user's authority to operate this equipment.
IMPORTANT NOTE:
FCC Radiation Exposure Statement:
This equipment complies with FCC radiation exposure limits set forth for an uncontrolled
environment. This equipment should be installed and operated with minimum distance
20cm between the radiator & your body.
We declare that the product is limited in CH1~CH11 by specified firmware controlled in the
USA.
This transmitter must not be co-located or operating in conjunction with any other antenna
or transmitter.

IC Interference Statement
Industry Canada statement:
This device complies with RSS-210 of the Industry Canada Rules. Operation is subject to
the following two conditions:
(1) This device may not cause harmful interference, and (2) this device must accept any
interference received, including interference that may cause undesired operation.
IMPORTANT NOTE:
Radiation Exposure Statement:
This equipment complies with IC radiation exposure limits set forth for an uncontrolled
environment. This equipment should be installed and operated with minimum distance
20cm between the radiator & your body.
This device has been designed to operate with an antenna having a maximum gain of 2 dBi.
Antenna having a higher gain is strictly prohibited per regulations of Industry Canada. The
required antenna impedance is 50 ohms.

Limited Warranty
TRENDnet warrants its products against defects in material and workmanship, under
normal use and service, for the following lengths of time from the date of purchase.
TEW-653AP – 3 Years Warranty
AC/DC Power Adapter, Cooling Fan, and Power Supply carry 1 year warranty.
If a product does not operate as warranted during the applicable warranty period,
TRENDnet shall reserve the right, at its expense, to repair or replace the defective product
or part and deliver an equivalent product or part to the customer. The repair/replacement
unit’s warranty continues from the original date of purchase. All products that are replaced
become the property of TRENDnet. Replacement products may be new or reconditioned.
TRENDnet does not issue refunds or credit. Please contact the point-of-purchase for their
return policies.
TRENDnet shall not be responsible for any software, firmware, information, or memory data
of customer contained in, stored on, or integrated with any products returned to TRENDnet
pursuant to any warranty.
There are no user serviceable parts inside the product. Do not remove or attempt to
service the product by any unauthorized service center. This warranty is voided if (i) the
product has been modified or repaired by any unauthorized service center, (ii) the product
was subject to accident, abuse, or improper use (iii) the product was subject to conditions
more severe than those specified in the manual.
Warranty service may be obtained by contacting TRENDnet within the applicable warranty
period and providing a copy of the dated proof of the purchase. Upon proper submission of
required documentation a Return Material Authorization (RMA) number will be issued. An
RMA number is required in order to initiate warranty service support for all TRENDnet
products. Products that are sent to TRENDnet for RMA service must have the RMA number
marked on the outside of return packages and sent to TRENDnet prepaid, insured and
packaged appropriately for safe shipment. Customers shipping from outside of the USA
and Canada are responsible for return shipping fees. Customers shipping from outside of
the USA are responsible for custom charges, including but not limited to, duty, tax, and
other fees.
WARRANTIES EXCLUSIVE: IF THE TRENDNET PRODUCT DOES NOT OPERATE AS
WARRANTED ABOVE, THE CUSTOMER’S SOLE REMEDY SHALL BE, AT TRENDNET’S

OPTION, REPAIR OR REPLACE. THE FOREGOING WARRANTIES AND REMEDIES
ARE EXCLUSIVE AND ARE IN LIEU OF ALL OTHER WARRANTIES, EXPRESSED OR
IMPLIED, EITHER IN FACT OR BY OPERATION OF LAW, STATUTORY OR OTHERWISE,
INCLUDING WARRANTIES OF MERCHANTABILITY AND FITNESS FOR A PARTICULAR
PURPOSE. TRENDNET NEITHER ASSUMES NOR AUTHORIZES ANY OTHER
PERSON TO ASSUME FOR IT ANY OTHER LIABILITY IN CONNECTION WITH THE
SALE, INSTALLATION MAINTENANCE OR USE OF TRENDNET’S PRODUCTS.
TRENDNET SHALL NOT BE LIABLE UNDER THIS WARRANTY IF ITS TESTING AND
EXAMINATION DISCLOSE THAT THE ALLEGED DEFECT IN THE PRODUCT DOES
NOT EXIST OR WAS CAUSED BY CUSTOMER’S OR ANY THIRD PERSON’S MISUSE,
NEGLECT, IMPROPER INSTALLATION OR TESTING, UNAUTHORIZED ATTEMPTS TO
REPAIR OR MODIFY, OR ANY OTHER CAUSE BEYOND THE RANGE OF THE
INTENDED USE, OR BY ACCIDENT, FIRE, LIGHTNING, OR OTHER HAZARD.
LIMITATION OF LIABILITY: TO THE FULL EXTENT ALLOWED BY LAW TRENDNET
ALSO EXCLUDES FOR ITSELF AND ITS SUPPLIERS ANY LIABILITY, WHETHER
BASED IN CONTRACT OR TORT (INCLUDING NEGLIGENCE), FOR INCIDENTAL,
CONSEQUENTIAL, INDIRECT, SPECIAL, OR PUNITIVE DAMAGES OF ANY KIND, OR
FOR LOSS OF REVENUE OR PROFITS, LOSS OF BUSINESS, LOSS OF
INFORMATION OR DATE, OR OTHER FINANCIAL LOSS ARISING OUT OF OR IN
CONNECTION WITH THE SALE, INSTALLATION, MAINTENANCE, USE,
PERFORMANCE, FAILURE, OR INTERRUPTION OF THE POSSIBILITY OF SUCH
DAMAGES, AND LIMITS ITS LIABILITY TO REPAIR, REPLACEMENT, OR REFUND OF
THE PURCHASE PRICE PAID, AT TRENDNET’S OPTION. THIS DISCLAIMER OF
LIABILITY FOR DAMAGES WILL NOT BE AFFECTED IF ANY REMEDY PROVIDED
HEREIN SHALL FAIL OF ITS ESSENTIAL PURPOSE.
Governing Law: This Limited Warranty shall be governed by the laws of the state of
California.
Some TRENDnet products include software code written by third party developers. These
codes are subject to the GNU General Public License ("GPL") or GNU Lesser General
Public License ("LGPL").
Go to http://www.trendnet.com/gpl or http://www.trendnet.com Download section and look
for the desired TRENDnet product to access to the GPL Code or LGPL Code. These codes
are distributed WITHOUT WARRANTY and are subject to the copyrights of the developers.
TRENDnet does not provide technical support for these codes. Please go to
http://www.gnu.org/licenses/gpl.txt or http://www.gnu.org/licenses/lgpl.txt for specific terms
of each license.