TRENDNET TEW750DAP N600 Dual Band Wireless Access Point User Manual TEW 750DAP 20130614 Momokox
TRENDNET, Inc. N600 Dual Band Wireless Access Point TEW 750DAP 20130614 Momokox
TRENDNET >
User Manual.pdf
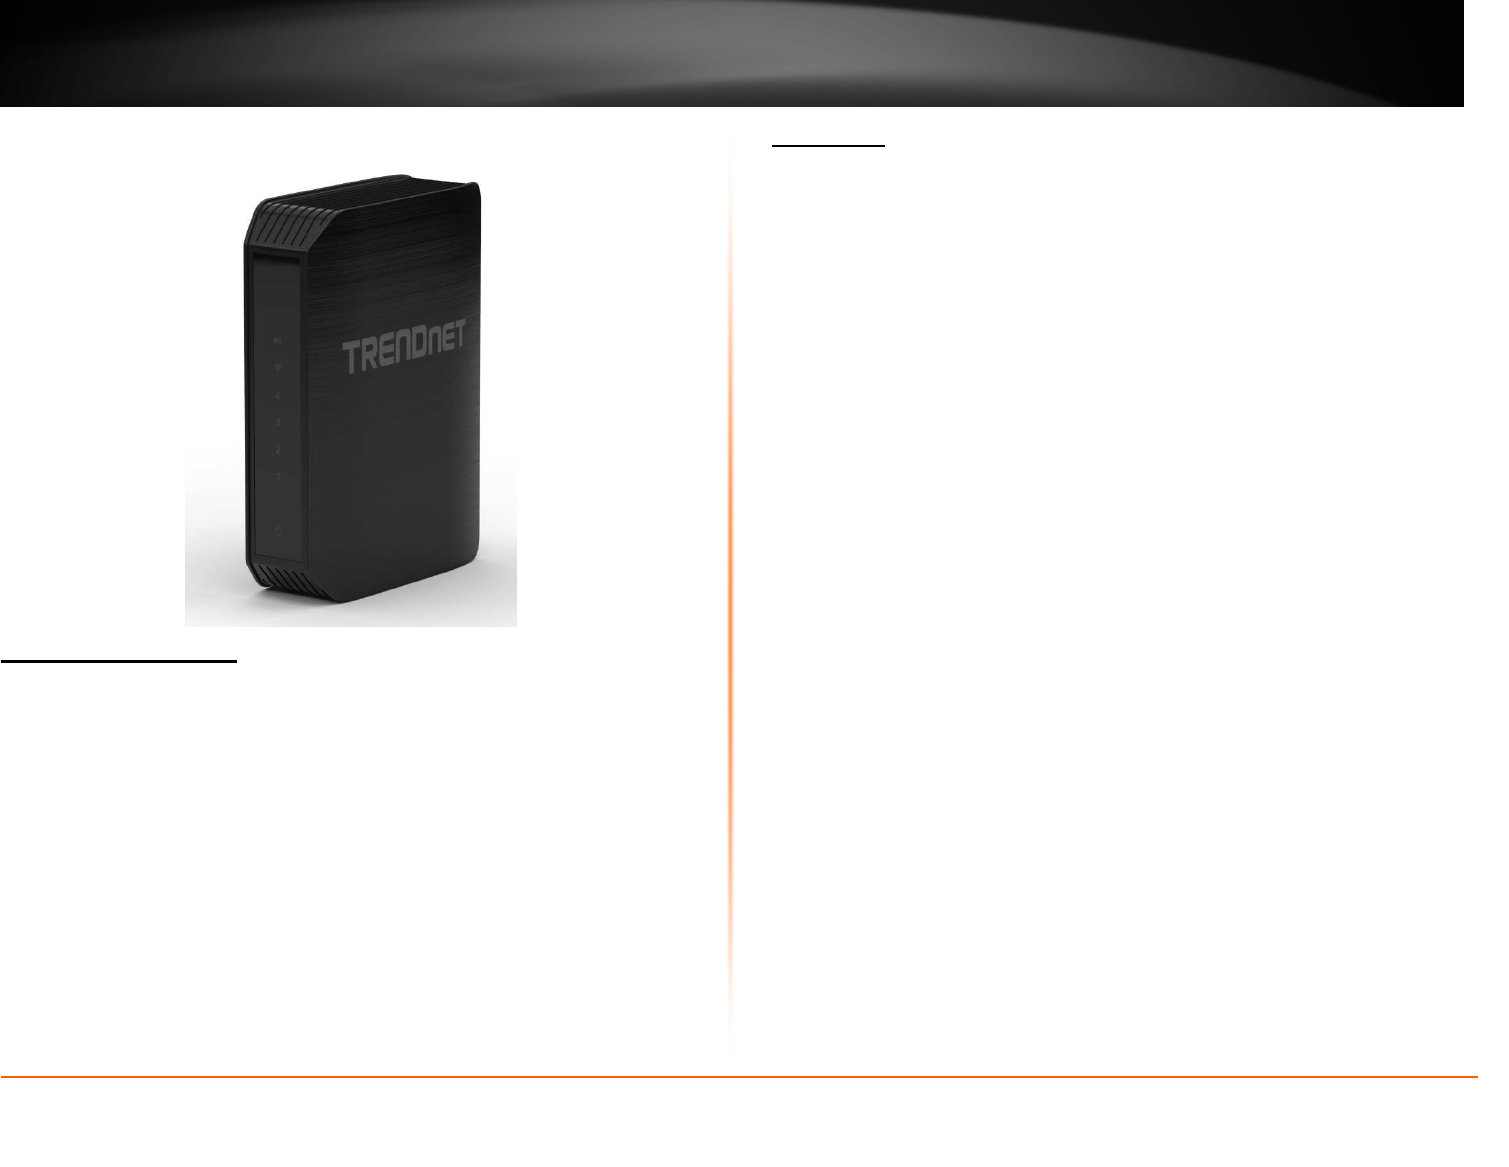
TRENDnet User’s Guide
Cover Page
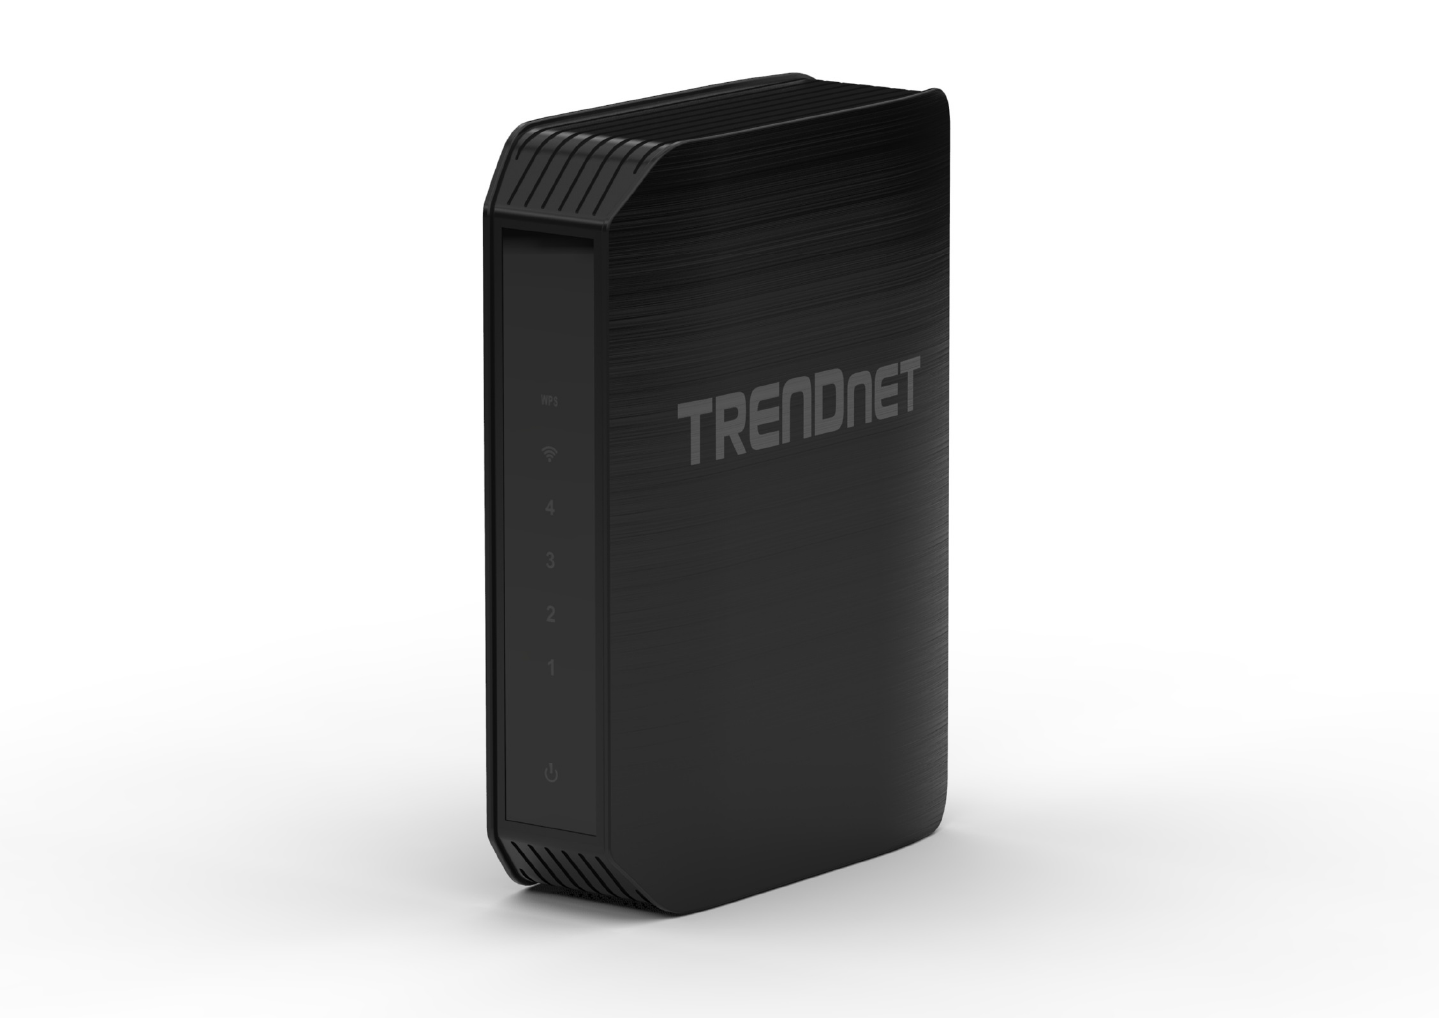
TEW-750DAP
User’s Guide

© Copyright 2013 TRENDnet. All Rights Reserved.
TRENDnet User’s Guide
Table of Contents
i
Contents
Product Overview .......................................................................... 2
Package Contents .......................................................................................... 2
Features ......................................................................................................... 2
Product Hardware Features ............................................................................ 3
Installation ..................................................................................... 4
Wireless Performance Considerations ............................................................ 4
Hardware Installation ...................................................................................... 5
Configuration ................................................................................. 5
Log in the Web-based Management ............................................................... 5
Main > Wizard ................................................................................................ 6
Main > LAN .................................................................................................... 7
LAN Connection Type – Static IP ................................................................ 8
Main > Password ............................................................................................ 9
Main > Time ................................................................................................. 10
Main > IPv6 .................................................................................................. 11
IPv6 Connection Type – Static IPv6 .......................................................... 11
IPv6 Connection Type – Auto-configuration (SLAAC/DHCPv6) ................. 12
IPv6 Connection Type – Link-local Only .................................................... 12
Wireless > Basic ........................................................................................... 12
Wireless Network Settings – 2.4GHz Band ............................................... 13
Wireless Mode – WDS .............................................................................. 14
Wireless Mode – WDS+AP ....................................................................... 14
Wireless Security Mode ............................................................................ 14
Wireless Security Mode – None ................................................................ 14
Wireless Security Mode – WEP ................................................................ 15
Wireless Security Mode – WPA-Personal ................................................. 15
Wireless Security Mode – WPA-Enterprise ............................................... 16
Wireless Network Settings – 5GHz Band .................................................. 17
Wireless Mode – WDS ............................................................................. 17
Wireless Mode – WDS+AP ...................................................................... 17
Wireless Security Mode – None ............................................................... 18
Wireless Security Mode – WEP ................................................................ 18
Wireless Security Mode – WPA-Personal ................................................. 18
Wireless > Advanced ................................................................................... 19
Wireless > Wi-Fi Protected Setup ................................................................. 19
Status > Device Information ......................................................................... 22
Status > Log ................................................................................................ 23
Status > Statistic .......................................................................................... 23
Status > Wireless ......................................................................................... 24
Status > IPv6 ............................................................................................... 24
Access > MAC Filters ................................................................................... 25
Access > Guest Zone ................................................................................... 26
Access > Advanced Network ........................................................................ 26
Tools > Restart ............................................................................................ 27
Tools > Firmware ......................................................................................... 27
Tools > Ping Test ......................................................................................... 28
Tools > Email Settings ................................................................................. 28
Tools > Syslog ............................................................................................. 29
Tools > Schedules ....................................................................................... 29
Networking Basics ...................................................................... 30
Wireless Basics ........................................................................... 31
Wireless Security ......................................................................... 32
Technical Specifications ............................................................. 33
© Copyright 2013 TRENDnet. All Rights Reserved.
TRENDnet User’s Guide
TEW750DAP
2
Product Overview
Package Contents
The package includes:
• TEW-750DAP Wireless Access Point (AP)
• CD-ROM (Utility & User’s Guide)
• Multi-language Quick Installation Guide
• Network cable (1.5m / 5ft)
• Power adapter (DC12V, 1A)
If any package contents are missing or damaged, please contact the retail store, online
retailer, or reseller/distributor that the item was purchased.
Features
TRENDnet TEW-750DAP Dual Band Wireless AP produces the ultimate wireless
experience with up to 300Mbps for the 802.11n wireless connection.
• 4 x 10/100Mbps Auto-MDIX LAN ports
• 1 x Wi-Fi Protected Setup (WPS) button
• On / Off power switch
• Compliant with IEEE 802.11a/b/g
• Compliant with IEEE 802.11n 2.0
• Compliant with IEEE 802.3 and 802.3u
• One touch wireless connection using the WPS button
• Easy setup via Web browser
• User-friendly Setup Wizard
© Copyright 2013 TRENDnet. All Rights Reserved.
TRENDnet User’s Guide
TEW750DAP
3
Product Hardware Features
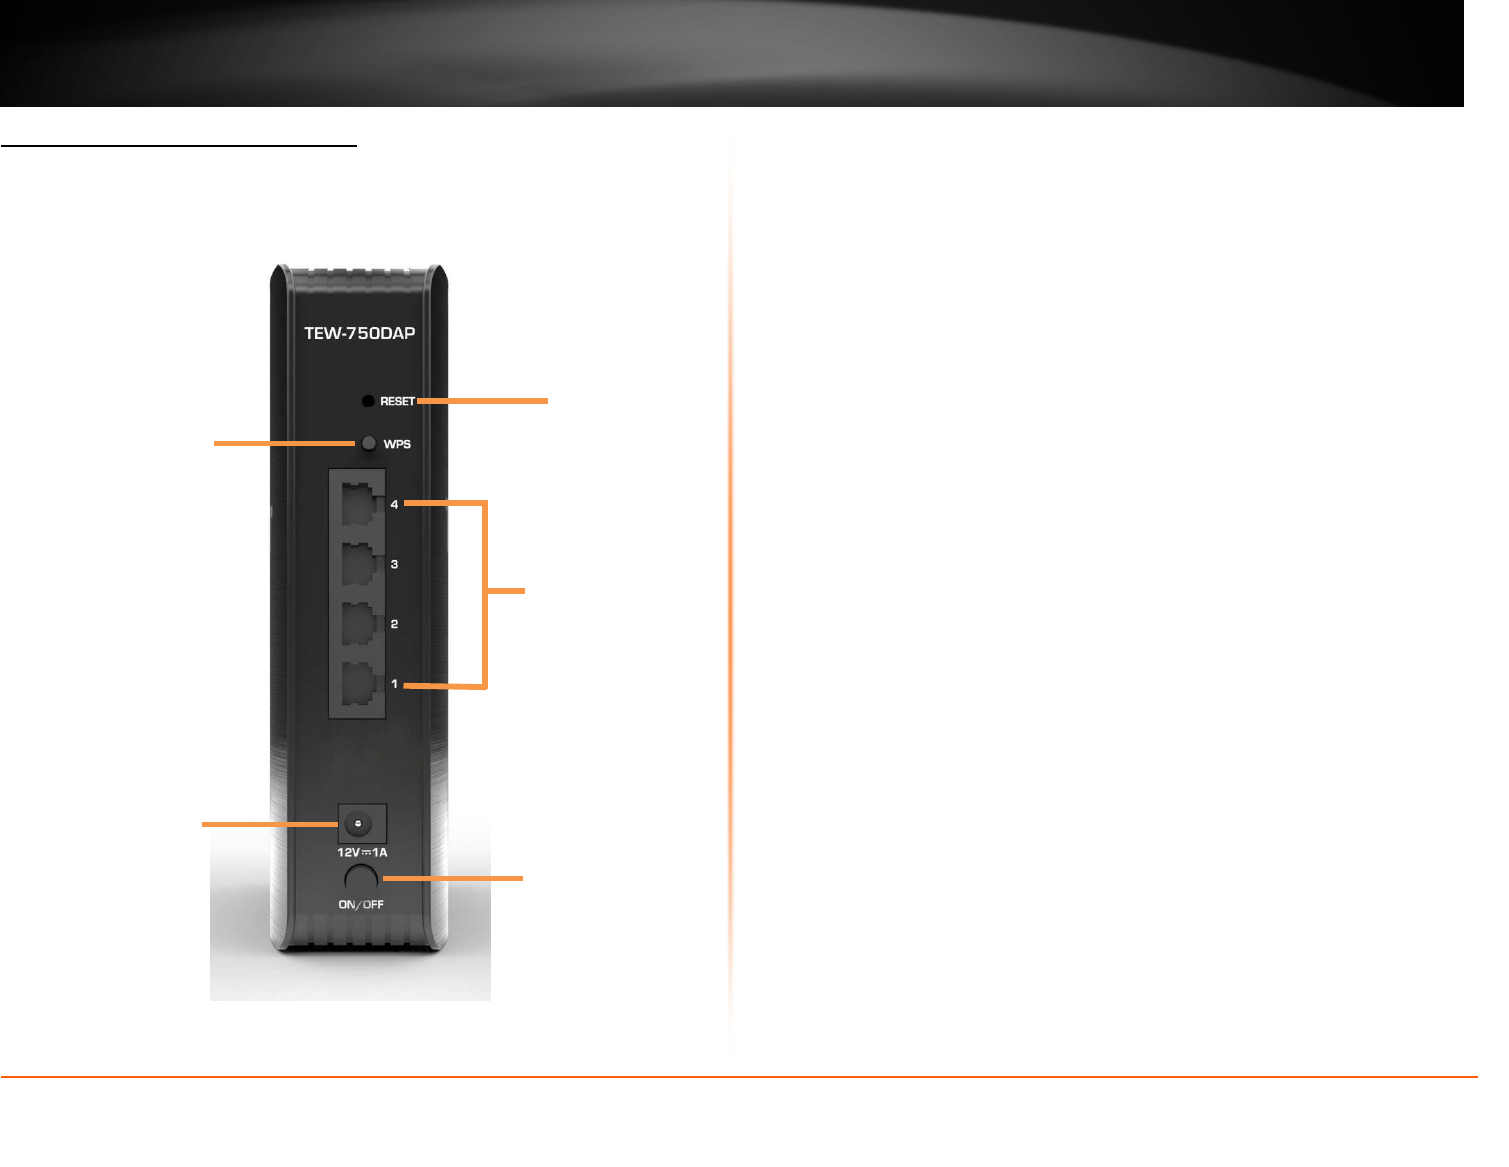
Rear Panel View
• Reset Button Press and hold this button for 10 seconds to reset your AP
to default settings.
• WPS Button – Push and hold this button for 5 seconds to activate WPS.
• LAN Ports – Connect Ethernet cables (also called network cables) from
your AP LAN ports to your wired network devices.
• Power Port – Connect the included power adapter from your AP power
port and to an available power outlet.
Note: Use only the adapter that came with the AP.
• ON/OFF Button – Press the button to power on and off.
LAN Ports
Reset Button
WPS Button
Power Port
ON/OFF Button
© Copyright 2013 TRENDnet. All Rights Reserved.
TRENDnet User’s Guide
TEW750DAP
4
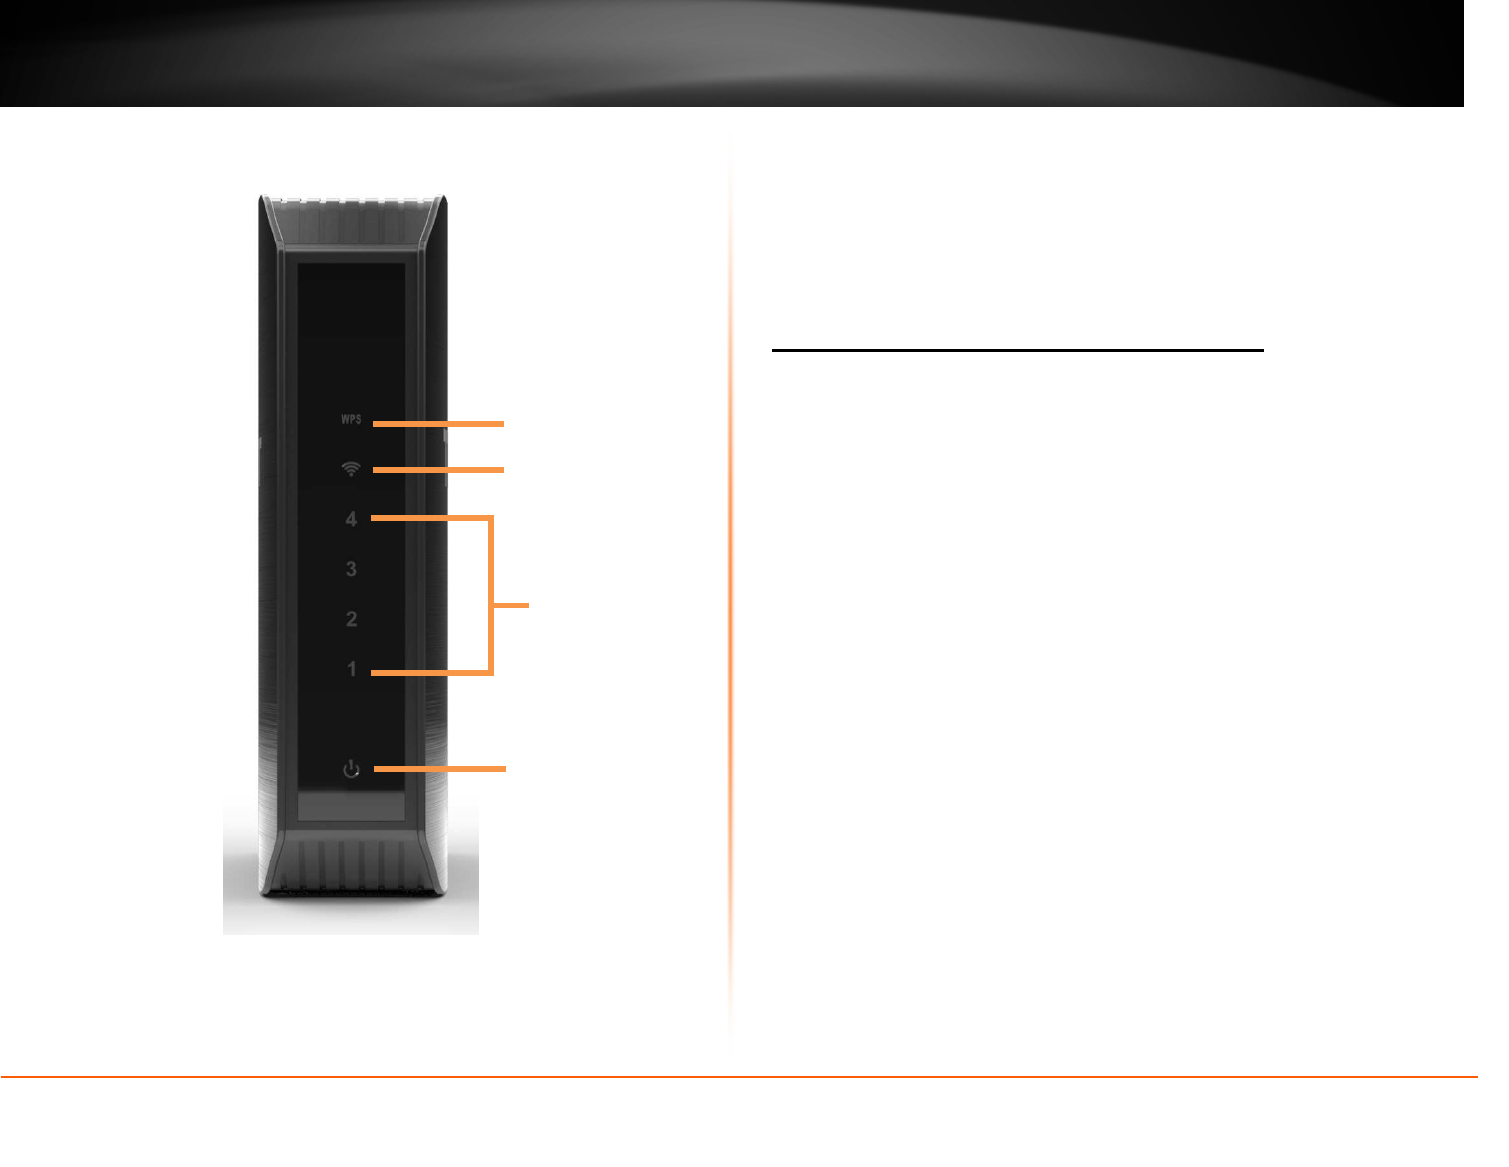
Front Panel View
• WPS LED – This indicator is turned on and blinks when WPS is
activated. The LED will turn off automatically once WPS is completed.
• Wireless LAN LED – This indicator lights on when the link is established.
The indicator blinks when there is data transmission.
• LAN LEDs – This indicator lights when there is a connection on the port.
• Power LED - This indicator lights on when the AP is powered on.
Installation
Placement of the AP is very important. Do not place the AP in an enclosed area
such as a closet, cabinet, or in the attic or garage.
Wireless Performance Considerations
The wireless AP allows you to access your network using a wireless connection
from virtually anywhere within the operating range of your wireless network.
However, the number, thickness and location of walls, ceilings, or other objects
that the wireless signals must pass through, may limit the range. Typical ranges
vary depending on the types of materials and background RF (radio frequency)
noise in your home or business. The key to maximizing wireless range is to
follow these basic guidelines:
1. Keep the number of walls and ceilings between the AP and other
network devices to a minimum - each wall or ceiling can reduce your
adapter’s range from 3-90 feet (1-30 meters.) Position your devices so
that the number of walls or ceilings is minimized.
2. Be aware of the direct line between network devices. A wall that is 1.5
feet thick (.5 meters), at a 45-degree angle appears to be almost 3 feet
(1 meter) thick. At a 2-degree angle it looks over 42 feet (14 meters)
thick! Position devices so that the signal will travel straight through a wall
or ceiling (instead of at an angle) for better reception.
3. Building Materials make a difference. A solid metal door or aluminum
studs may have a negative effect on range. Try to position access points,
wireless APs, and computers so that the signal passes through drywall
or open doorways. Materials and objects such as glass, steel, metal,
walls with insulation, water (fish tanks), mirrors, file cabinets, brick, and
concrete will degrade your wireless signal.
4. Keep your product away (at least 3-6 feet or 1-2 meters) from electrical
devices or appliances that generate RF noise.
5. If you are using 2.4GHz cordless phones or X-10 (wireless products such
as ceiling fans, lights, and home security systems), your wireless
connection may degrade dramatically or drop completely. Make sure
your 2.4GHz phone base is as far away from your wireless devices as
possible. The base transmits a signal even if the phone in not in use.
WPS LED
Wireless LAN LED
Power LED
LAN LEDs
© Copyright 2013 TRENDnet. All Rights Reserved.
TRENDnet User’s Guide
TEW750DAP
5
Hardware Installation
1. Position your AP close to your computer. Place the AP in an open area
of your intended work area for better wireless coverage.
2. Plug one end of the included blue Ethernet cable that came with your AP
into one of the four Ethernet ports on the back of the AP. Plug the other
end of this cable into the Ethernet port of your PC.
3. Connect the supplied power adapter into the power port on the back of
the AP and then plug it into a power outlet or surge protector. Press the
power button and verify that the power LED is lit. Allow 1 minute for the
AP to boot up.
Configuration
Log in the Web-based Management
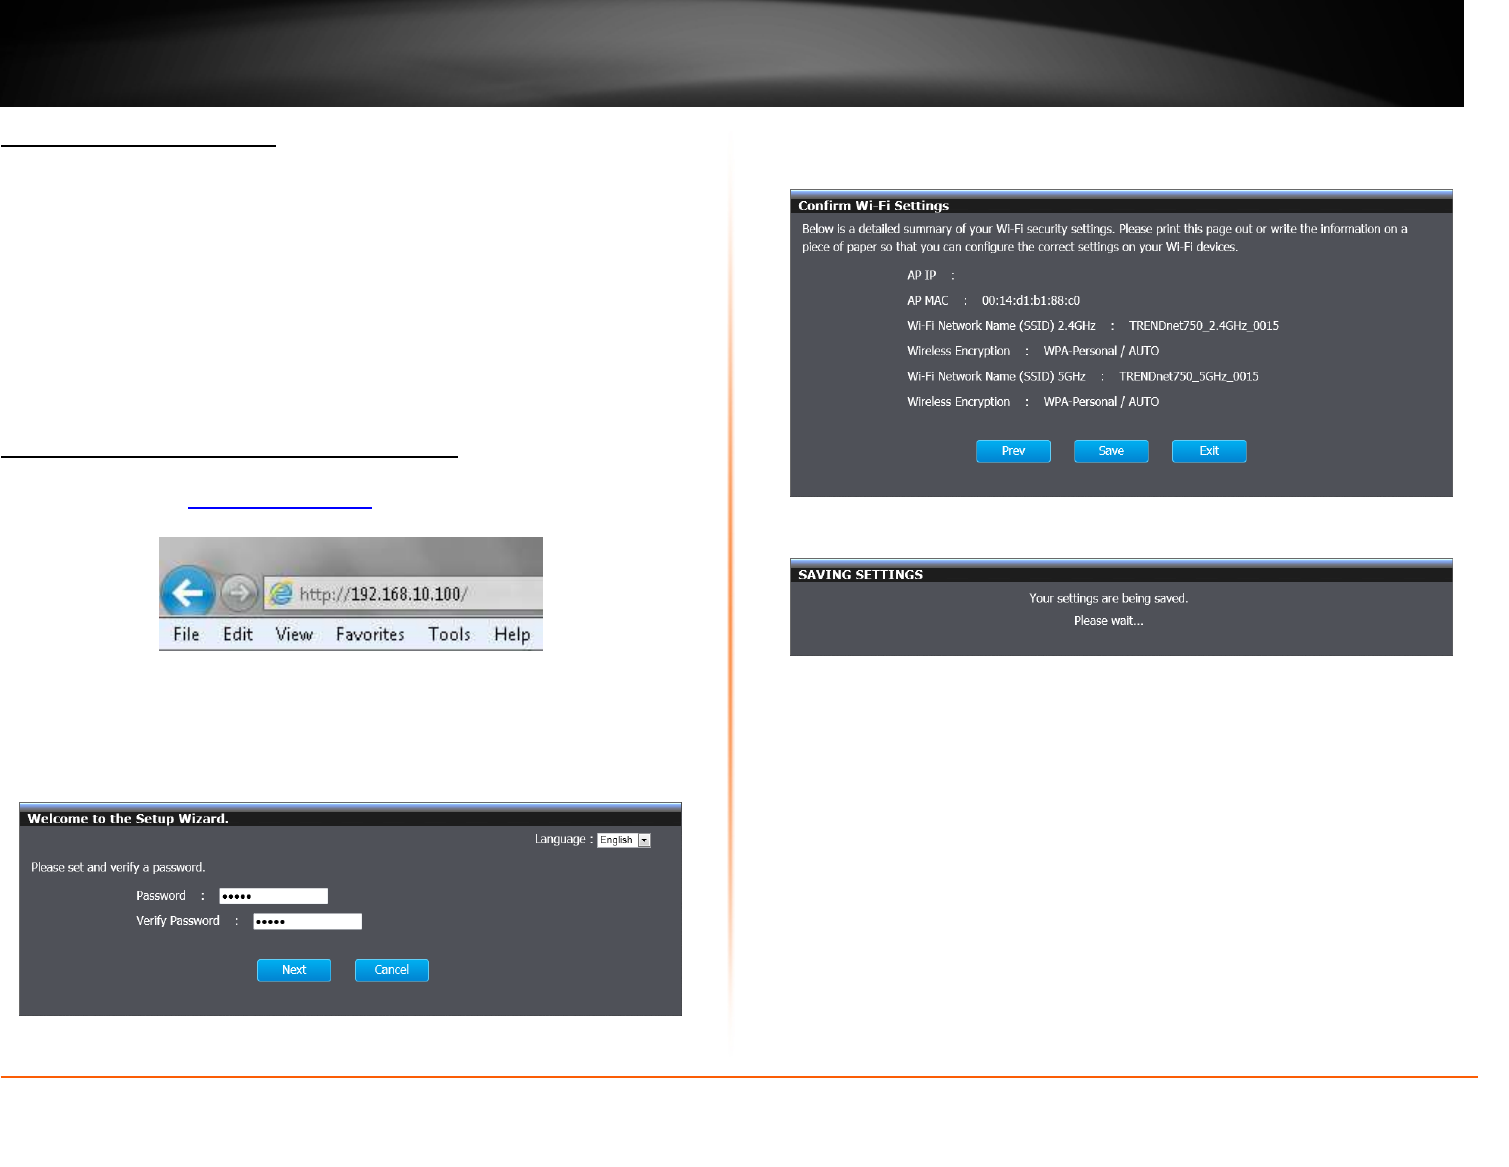
1. Open your web browser (e.g. Internet Explorer, Firefox, Safari, Chrome, or
Opera) and go to http://192.168.10.100. Your AP will prompt you for a user
name and password.
2. When entering the user interface at the first time, the AP requests the user to
change the password. It is highly recommended to change to a new
password. Enter the new password in the Password and Verify Password
field, and click Next. If the user does not change the password, the default
password is admin.
3. The window displays the wireless settings of the AP. The user can print out
or write down the information for Wi-Fi settings. Click Save to implement the
changes and continue.
4. The AP is saving the settings.
© Copyright 2013 TRENDnet. All Rights Reserved.
TRENDnet User’s Guide
TEW750DAP
6
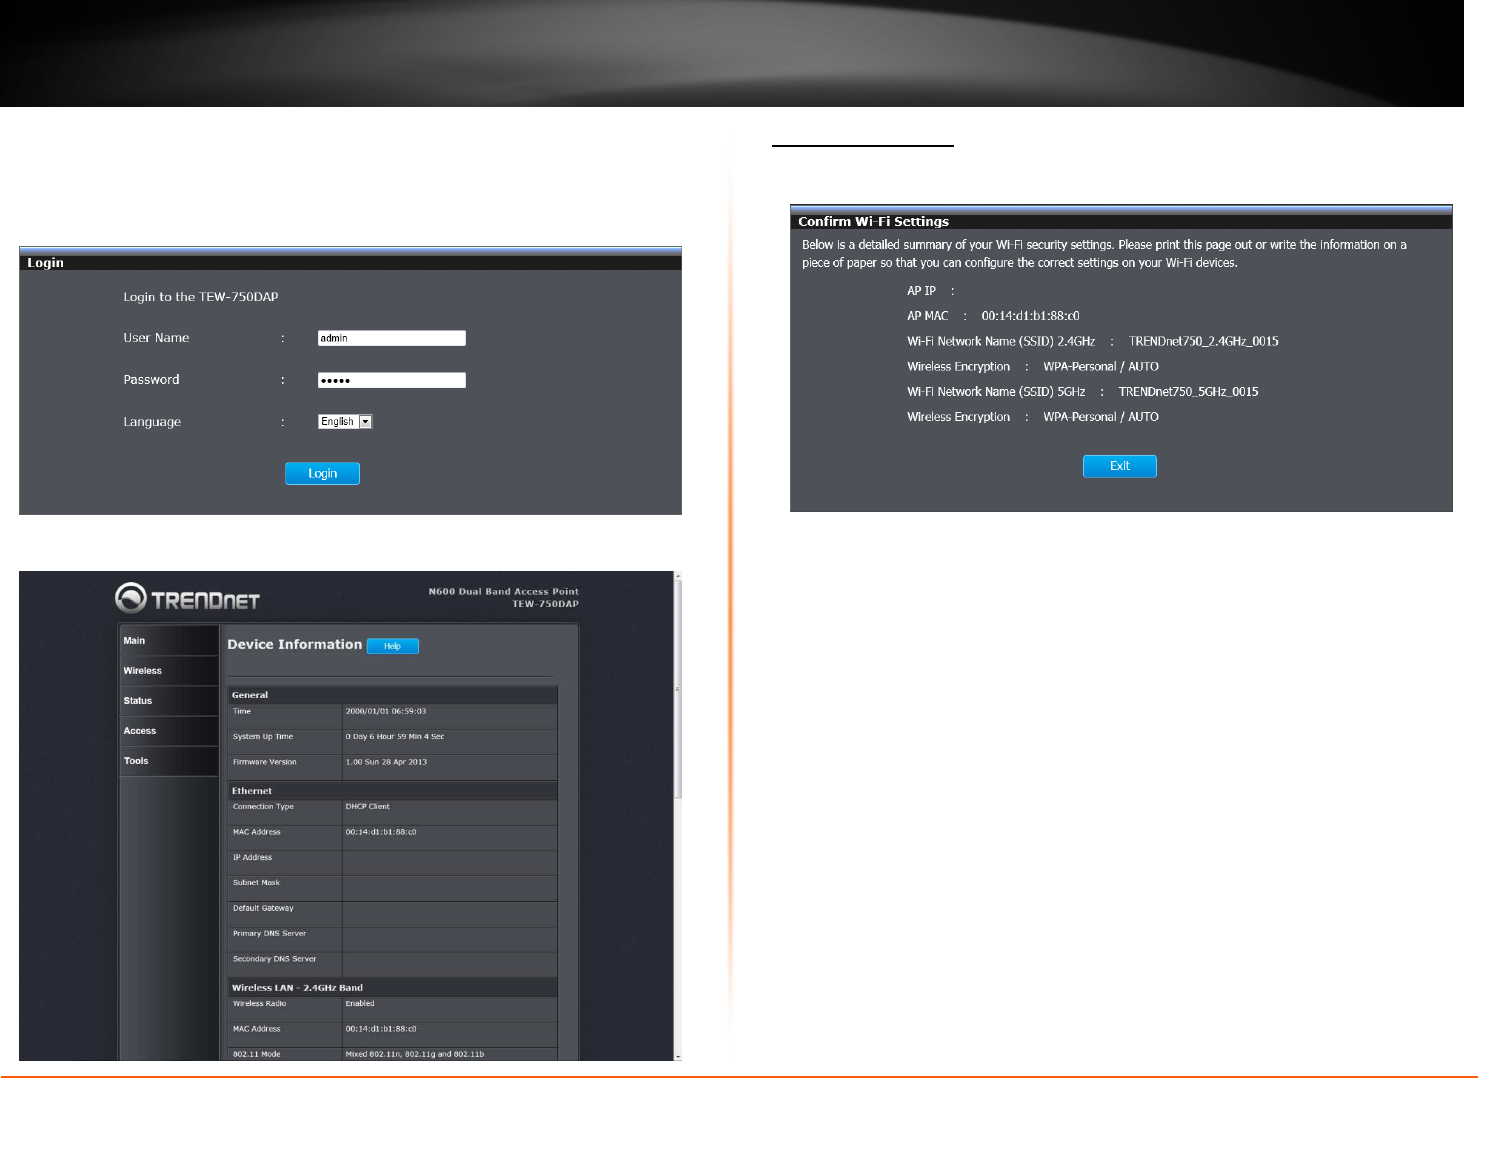
5. After first-time, you will see the following login window when log in the AP.
Enter the default user name and password and then click Login. If you
changed the password in first-time login, enter the new password you set.
Default User Name: admin
Default Password: admin
6. The main window appears. You can configure the AP by using the Setup
Wizard or detail manual configuration.
Main > Wizard
The wizard displays the information of wireless connection. Click Exit to finish
the configuration.
© Copyright 2013 TRENDnet. All Rights Reserved.
TRENDnet User’s Guide
TEW750DAP
7
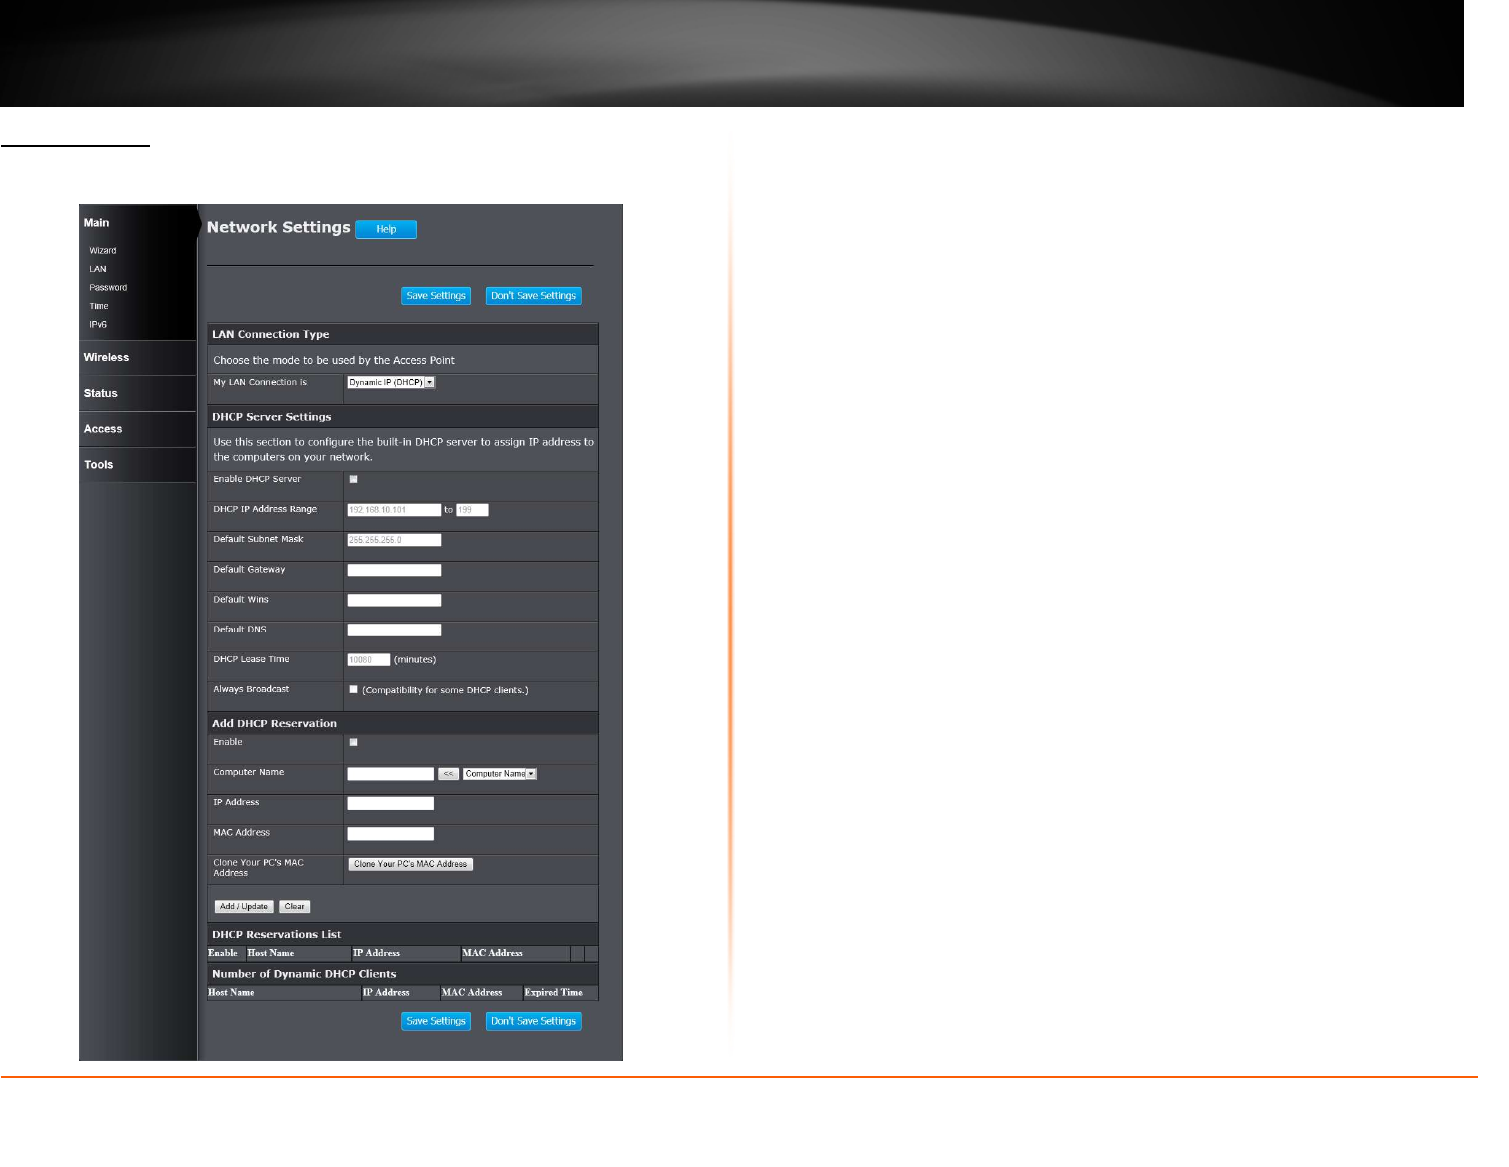
Main > LAN
This window allows you to configure the local network settings and DHCP
settings.
LAN Connection Type
My LAN Connection is: Use the drop-down list to select the LAN connection
type. The available types are Static IP and Dynamic IP (DHCP).
When selecting Static IP, the user need to manually configure the AP’s network
settings. When selecting Dynamic IP (DHCP), the AP will automatically obtain
the network settings from an existing DHCP server on the network.
© Copyright 2013 TRENDnet. All Rights Reserved.
TRENDnet User’s Guide
TEW750DAP
8
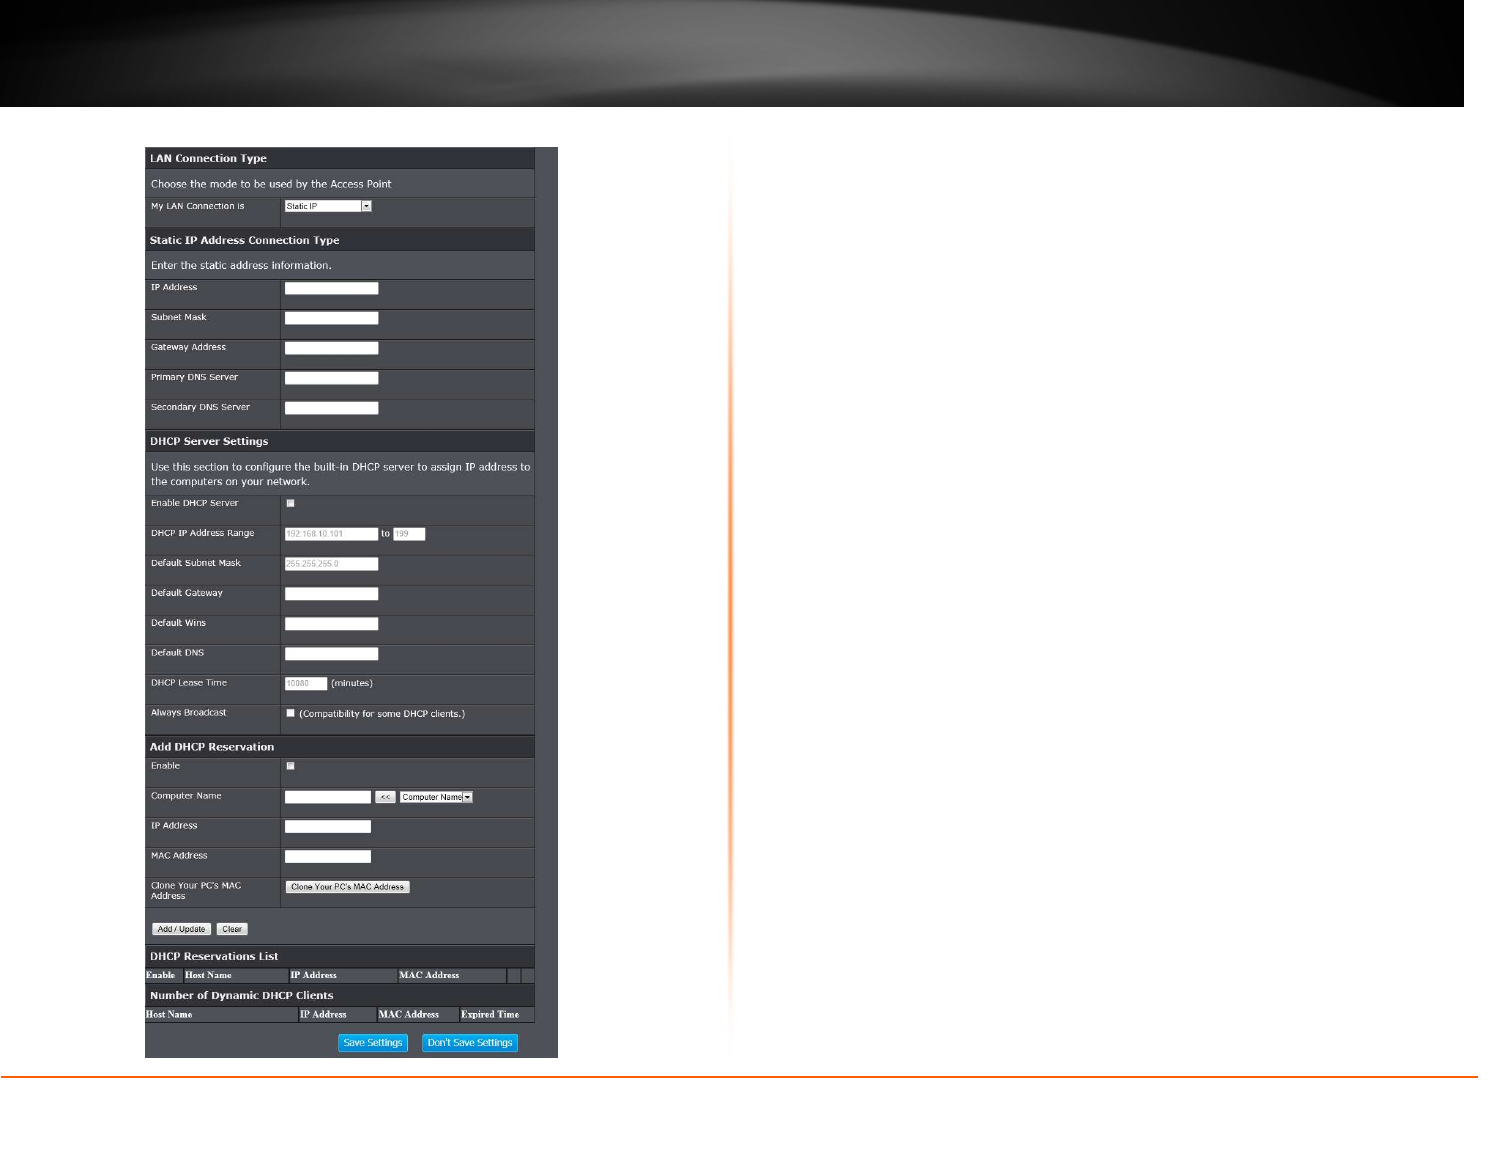
LAN Connection Type – Static IP
After selecting Static IP from the My LAN Connection is drop-down list, the
following parameters will be available to be configured.
IP Address: Enter the IP address of the AP. This IP address must be within your
local network address range.
Subnet Mask: Enter the Subnet Mask of the AP.
Default Gateway: Enter the Gateway IP address. This is normally the local IP
address of the Internet gateway within the network.
Primary DNS Server: Enter the primary Domain Name System (DNS) server IP
address that is supplied by your ISP.
Secondary DNS Server: Enter the secondary DNS server IP address that is
supplied by your ISP.
DHCP Server Settings
Enable DHCP Server: When enabling this feature, the AP will host the DHCP
server on the network.
DHCP IP Address Range: Enter the starting and ending IP address for the
DHCP server’s IP assignment.
Default Subnet Mask: Enter the subnet mask of the IP address.
Default Gateway: Enter the default gateway for DHCP server.
Default WINS: Enter the default Windows Internet Name Servers (WINS)
address.
Default DNS: Enter the default DNS server address.
DHCP Lease Time: The length of time for the IP address lease. Enter the time in
minutes.
Always Broadcast: If all the computers on the LAN successfully obtain their IP
addresses from the router’s DHCP server as expected, this option can remain
disabled. However, if one of the computers on the LAN fails to obtain an IP
address from the router’s DHCP server, it may have an old DHCP client that
incorrectly turns off the broadcast flag of DHCP packets.
Enabling this option will cause the router to always broadcast its responses to all
clients, thereby working around the problem, at the cost of increased broadcast
traffic on the LAN.
Add DHCP Reservation
Enable: Tick the check box to enable the reservation.
Computer Name: Enter the computer name or select from the drop-down menu
and click <<.
© Copyright 2013 TRENDnet. All Rights Reserved.
TRENDnet User’s Guide
TEW750DAP
9
IP Address: Enter the IP address you want to assign to the computer or device.
This IP Address must be within the DHCP IP Address Range.
MAC Address: Enter the MAC address of the computer or device.
Clone Your PC’s MAC Address: If you want to assign an IP address to the
computer you are currently on, click this button to populate the fields.
Click the Add / Update button to save the entry. Click the Clear button to delete
all the information in this section.
DHCP Reservation List
This section displays the reservation entries. The entries include host name, IP
address and MAC address. Tick the Enable check box of the corresponding
entry to enable the reservation. Click the button box of the corresponding
entry to modify the entry. Click the button of the corresponding entry to
remove the entry.
Number of Dynamic DHCP Clients
This section displays the available DHCP clients.
Click the Save Settings button to accept the changes made.
Click the Don’t Save Settings button to discard the changes made.
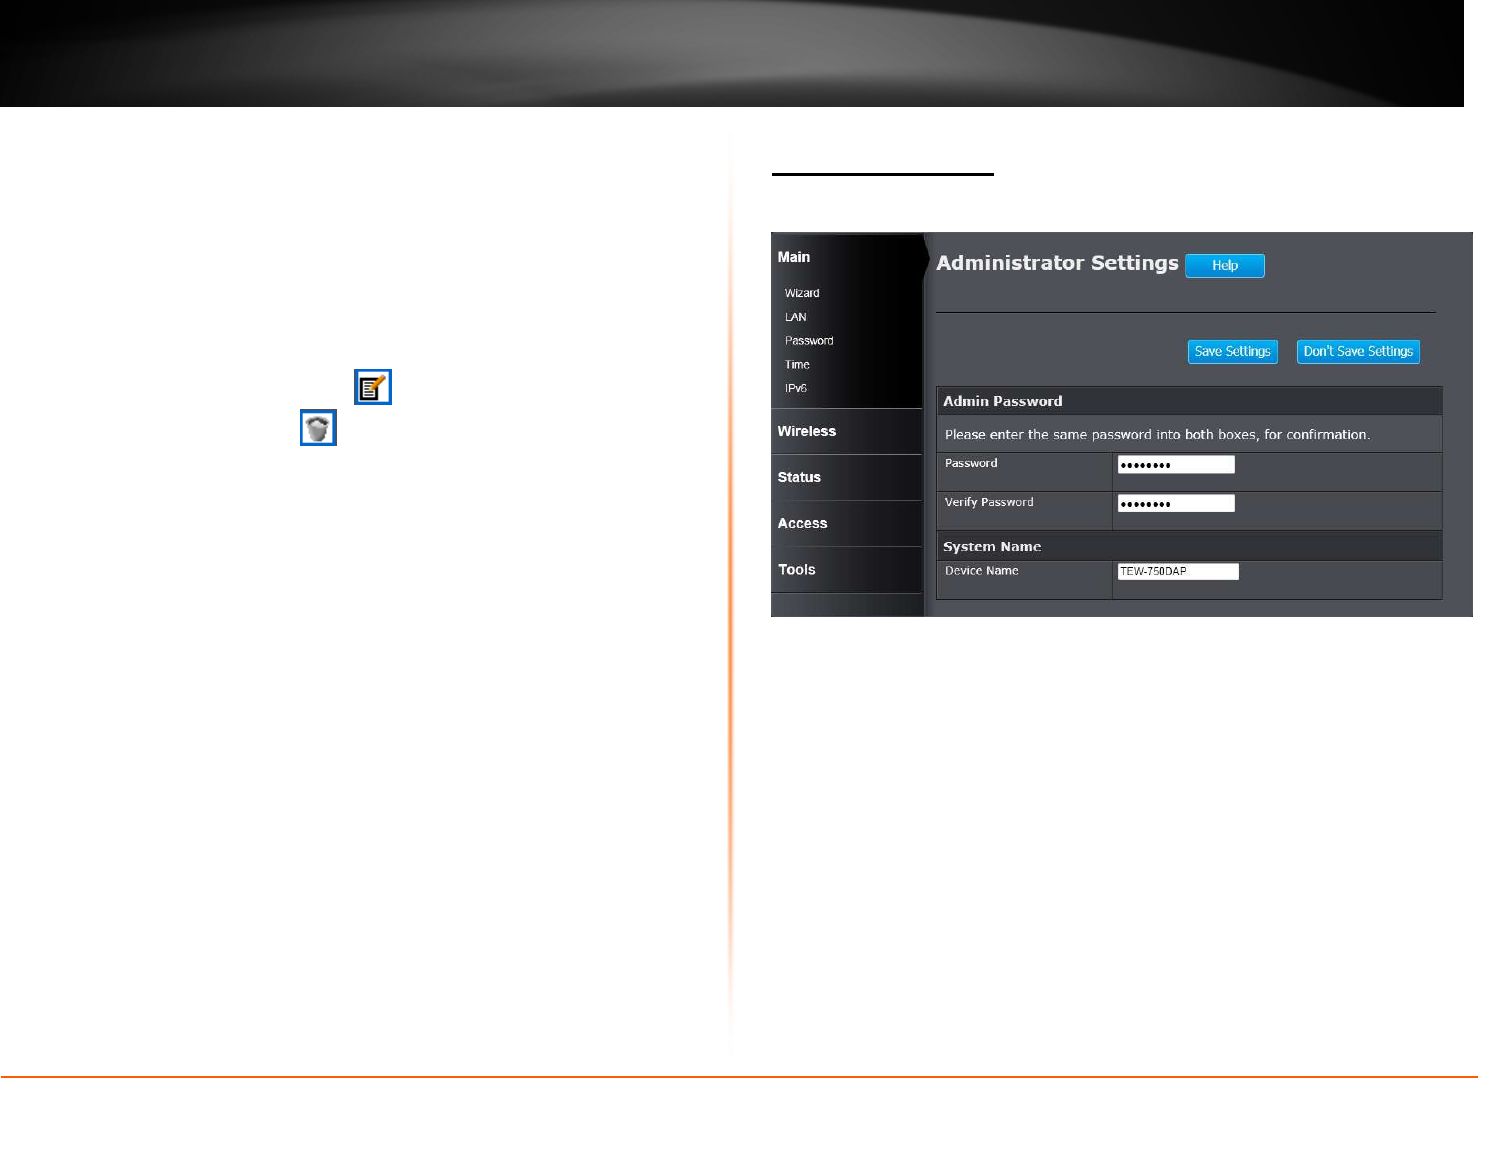
Main > Password
This window allows you to change the Administrator password. You can also
enable Remote Management.
Admin Password
Password: Enter a password for the administrator login.
Verify Password: Re-type the administrator password.
System Name
Gateway Name: Enter a name for the AP.
Click the Save Settings button to accept the changes made.
Click the Don’t Save Settings button to discard the changes made.
© Copyright 2013 TRENDnet. All Rights Reserved.
TRENDnet User’s Guide
TEW750DAP
10
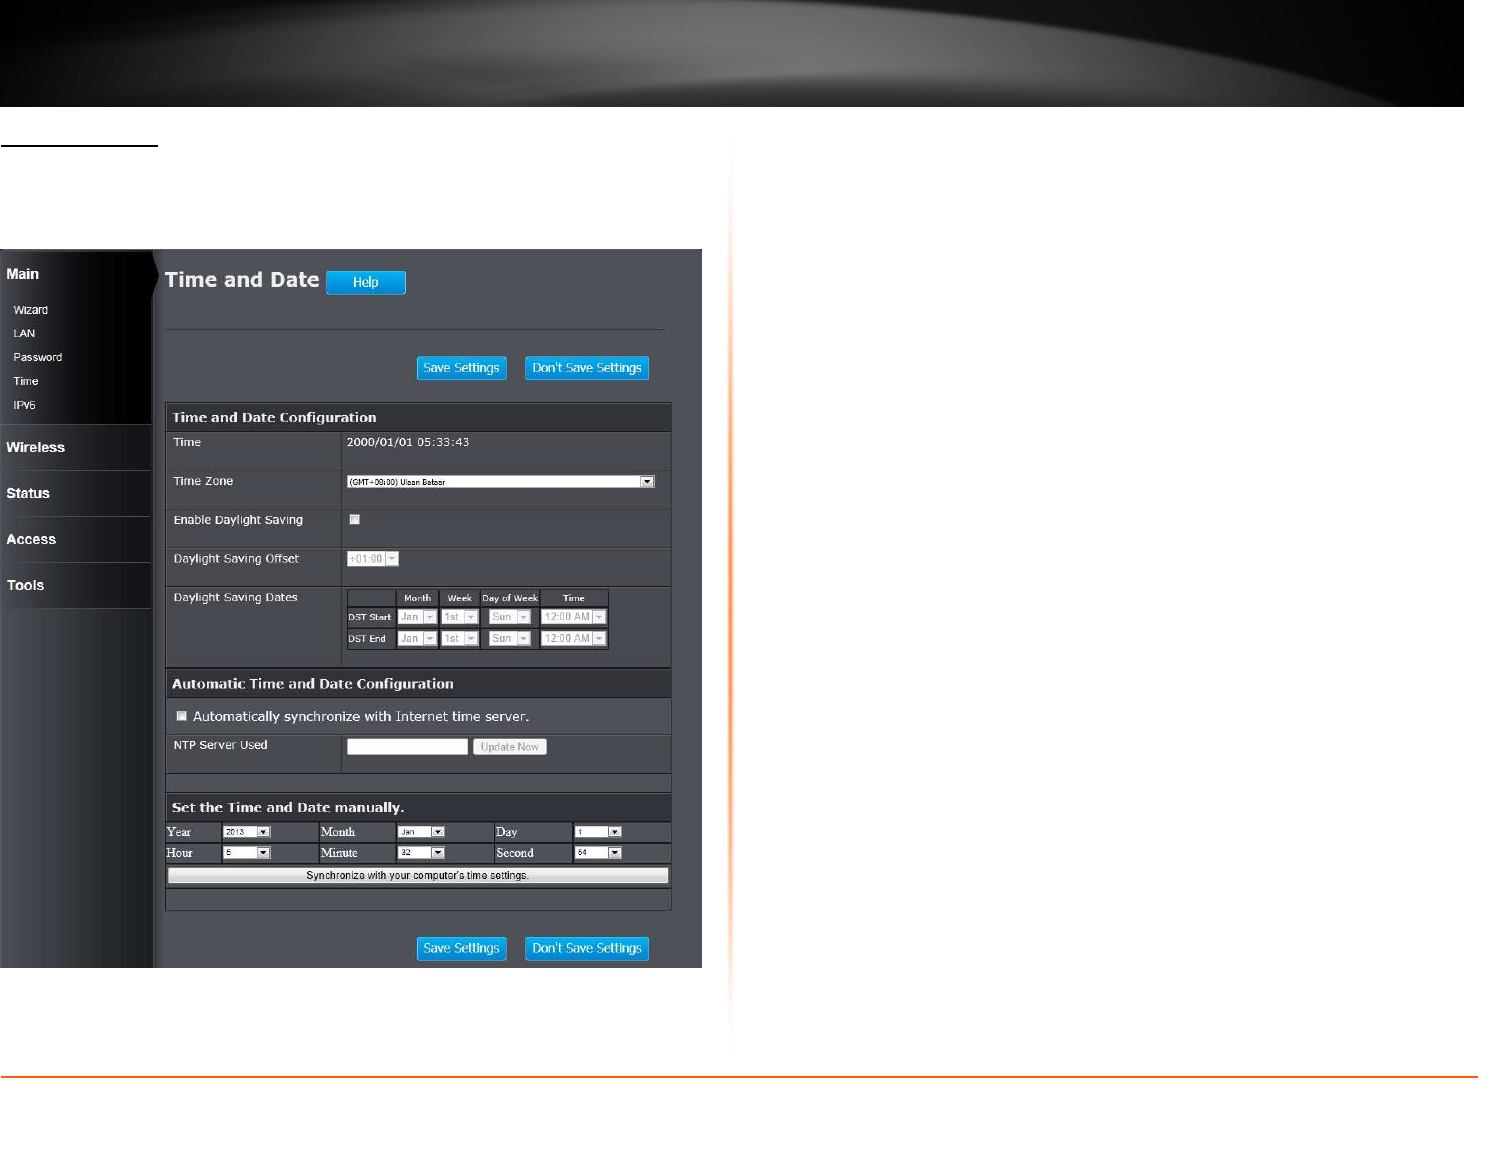
Main > Time
This window allows you to configure, update, and maintain the correct time on
the internal system clock. You can set the time zone that you are in and set the
Time Server. Daylight saving can also be configured to automatically adjust the
time when needed.
Time and Date Configuration
Time: Displays the current date and time of the AP
Time Zone: Select your time zone from the drop-down menu.
Enable Daylight Saving: Tick the check box to enable the daylight saving when
your local time has daylight saving.
Daylight Saving Offset: Use the drop-down menu to select the daylight savings
offset from standard time.
Daylight Saving Dates: Use the drop-down menu to select the start and end
date for daylight saving time.
Automatic Time and Date Configuration
Automatically synchronize with Internet time server: Tick the check box to
automatically synchronize the AP’s time with a NTP server.
NTP Server Used: Enter the IP address of a NTP server that the AP
synchronizes the time with.
Click the Update Now button to connect to the NTP server and synchronize the
time.
Set the Time and Date Manually
In this section, you can manually select the specific time for the AP. Use the
drop-down menus of Year, Month, Day, Hour, Minute and Second to configure
the AP’s time. You can also click the Synchronize with Your Computer’s Time
Settings button to have the AP’s time the same as your local computer.
Click the Save Settings button to accept the changes made.
Click the Don’t Save Settings button to discard the changes made.
© Copyright 2013 TRENDnet. All Rights Reserved.
TRENDnet User’s Guide
TEW750DAP
11
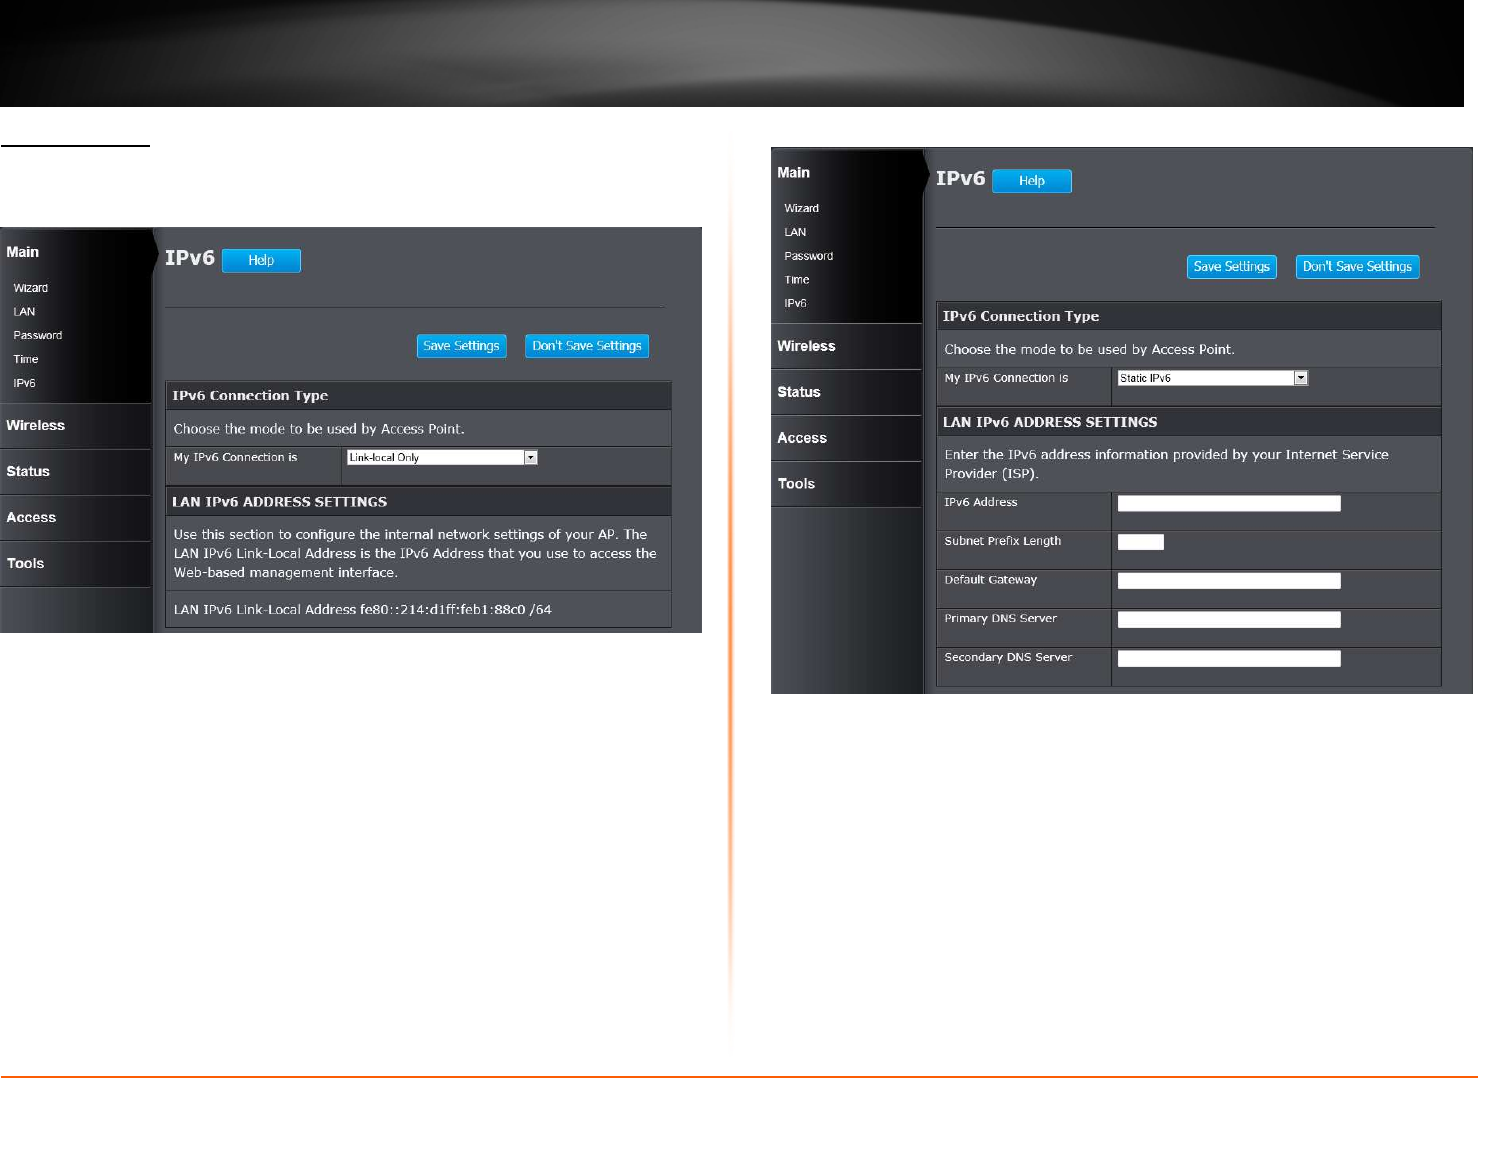
Main > IPv6
This window allows you to configure the IPv6 connection. The available IPv6
connection are Static IPv6, Auto-configuration (SLAAC/DHCPv6), and Link-
local Only.
IPv6 Connection Type – Static IPv6
LAN IPv6 Address Settings
IPv6 Address: Enter the IPv6 address of the AP.
Subnet Prefix Length: Enter the subnet prefix length.
Default Gateway: Enter the default gateway IPv6 address.
Primary DNS Server: Enter the primary IPv6 DNS server address.
Secondary DNS Server: Enter the secondary IPv6 DNS server address.
© Copyright 2013 TRENDnet. All Rights Reserved.
TRENDnet User’s Guide
TEW750DAP
12
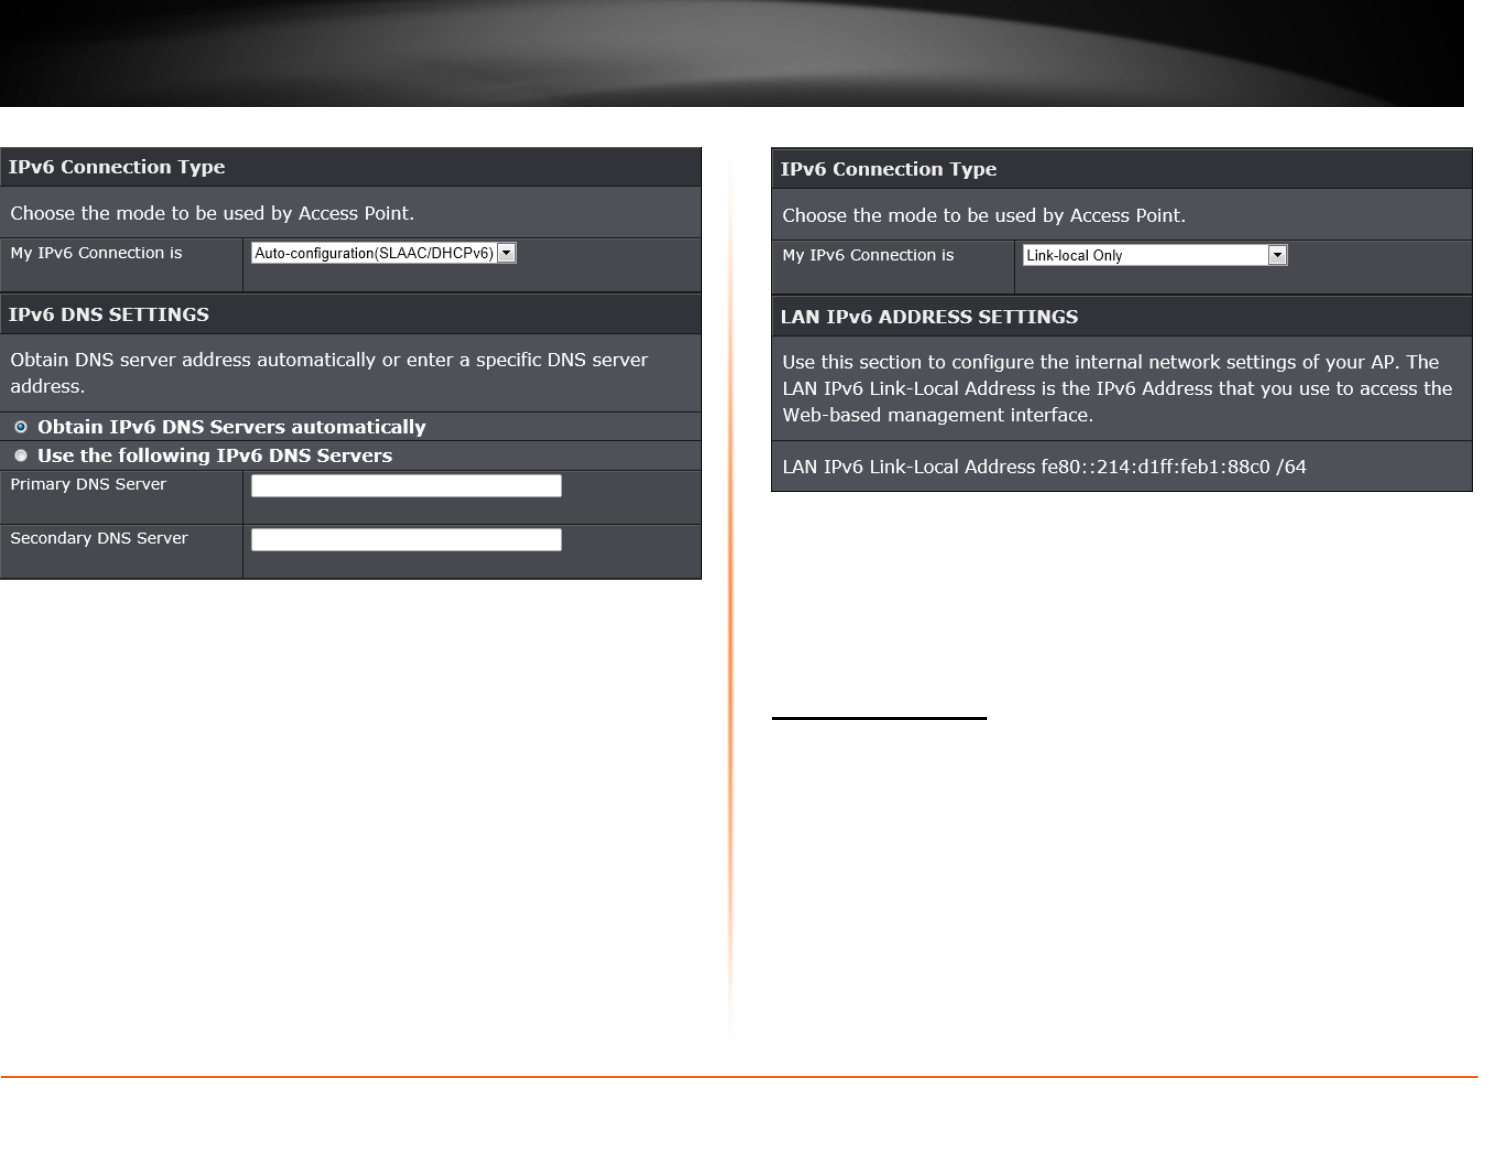
IPv6 Connection Type – Auto-configuration (SLAAC/DHCPv6)
IPv6 DNS Settings
Obtain IPv6 DNS Servers automatically: Allows the AP to automatically obtain
IPv6 DNS server IP addresses.
Use the following IPv6 DNS Servers: Manually enters the IPv6 DNS server IP
addresses.
Primary DNS Server: Enter the primary IPv6 DNS server address. This field is
only available when Use the following IPv6 DNS Servers is selected.
Secondary DNS Server: Enter the secondary IPv6 DNS server address. This
field is only available when Use the following IPv6 DNS Servers is selected.
IPv6 Connection Type – Link-local Only
LAN IPv6 Address Settings
LAN IPv6 Link-local Address: This field displays the LAN IPv6 link-local
address.
Click the Save Settings button to accept the changes made.
Click the Don’t Save Settings button to discard the changes made.
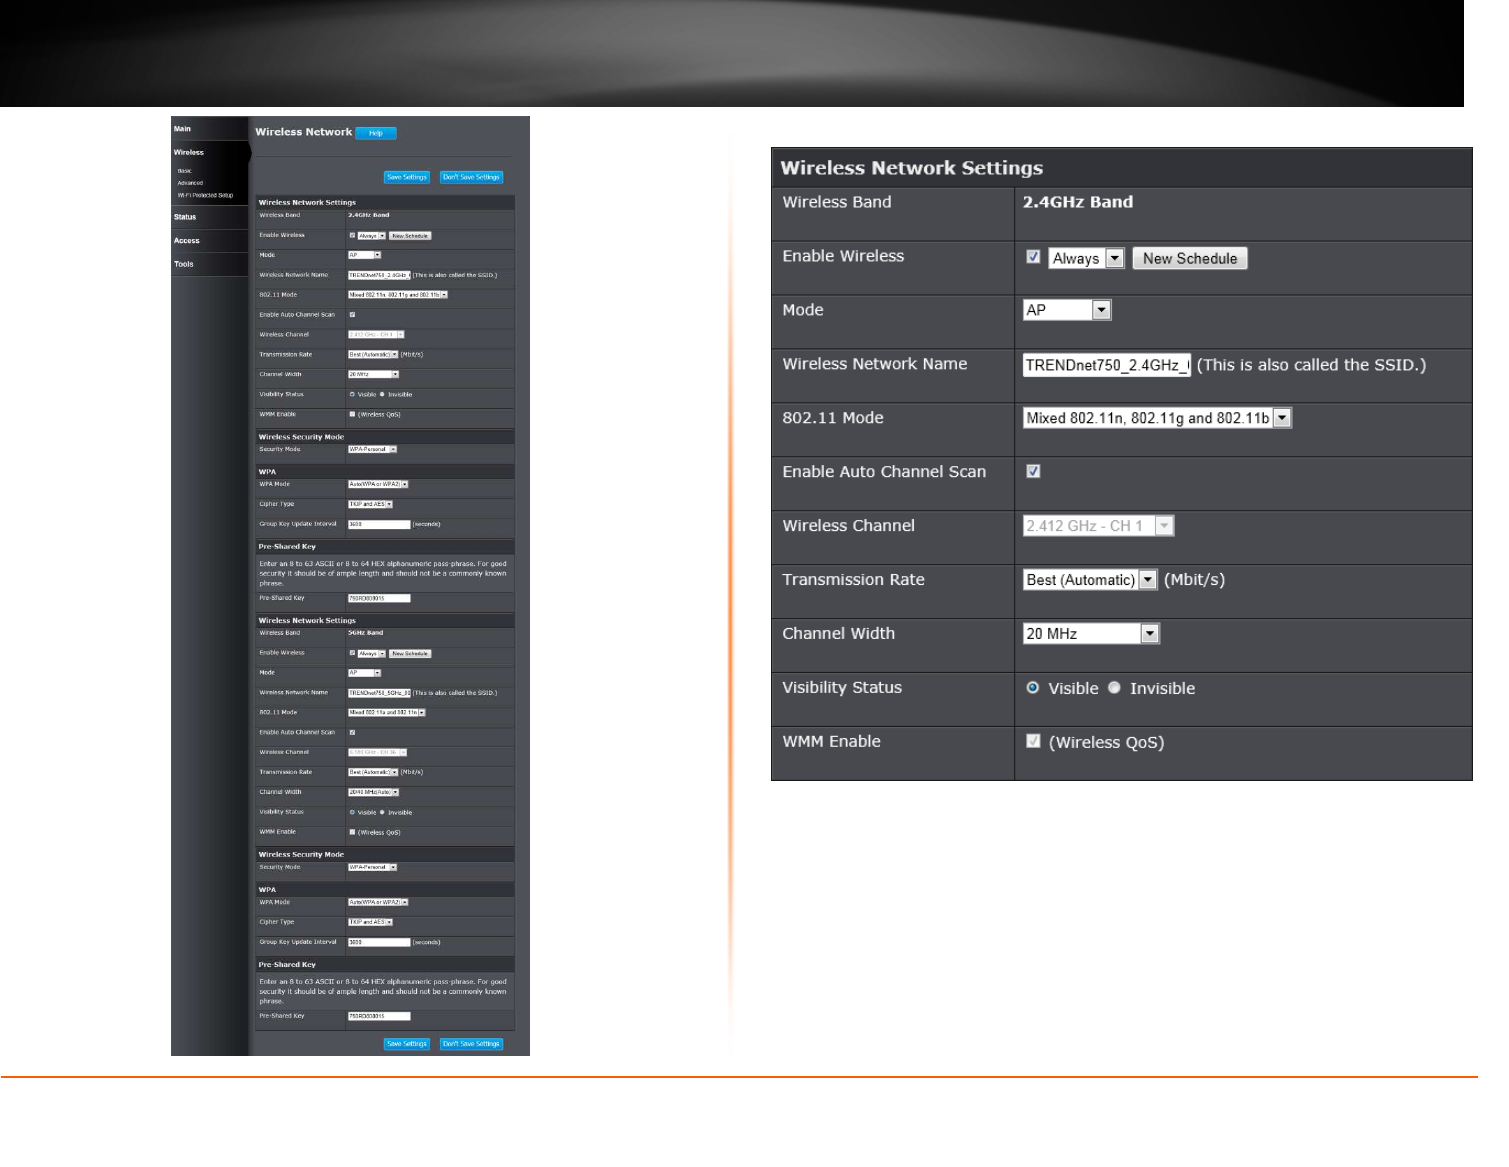
Wireless > Basic
This window allows you to set up wireless settings of the AP.
© Copyright 2013 TRENDnet. All Rights Reserved.
TRENDnet User’s Guide
TEW750DAP
13
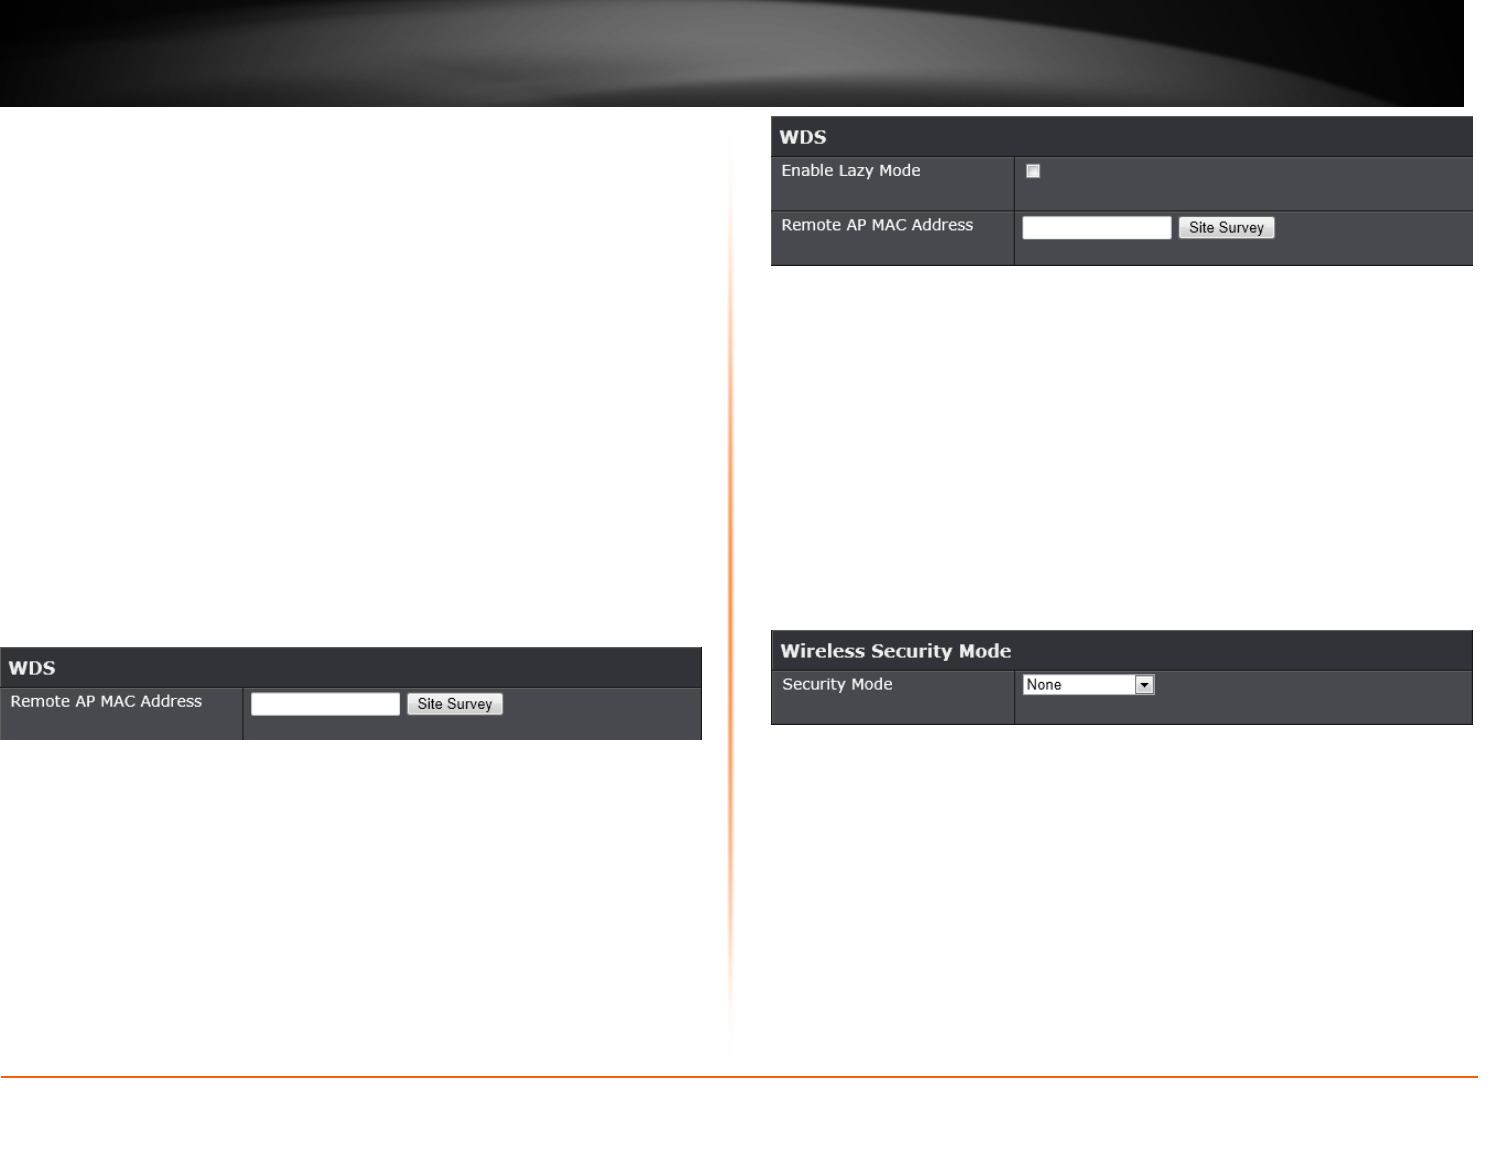
Wireless Network Settings – 2.4GHz Band
Wireless Band: This displays the wireless band that the AP is used.
Enable Wireless: Tick the check box to enable the wireless feature for the
2.4GHz band on this AP. Use the drop-down menu to apply a time schedule to
this wireless network.
Mode: Use the drop-down menu to select the wireless mode. Available options
are AP, WDS, and WDS+AP.
Wireless Network Name: Enter the wireless network name (SSID). This name
will be available when wireless clients scan for available wireless networks.
However, when Visibility Status is set to Invisible, this name will not be visible
to wireless clients.
© Copyright 2013 TRENDnet. All Rights Reserved.
TRENDnet User’s Guide
TEW750DAP
14
802.11 Mode: Select which 802.11 wireless modes to use from the drop-down
menu. Options to choose from are 802.11b only, 802.11g only, 802.11n only,
Mixed 802.11g and 802.11b, Mixed 802.11n and 802.11g, and Mixed 802.11n,
802.11g and 802.11b. If you are not sure, select Mixed 802.11n, 802.11g and
802.11b.
Enable Auto Channel Scan: Tick the check box to allow the AP to find and use
the wireless channel with the least interference in your environment.
Wireless Channel: Deselect Enable Auto Channel Scan to be able to
configure this. Use the drop-down menu to select a wireless channel.
Transmission Rate: Select the wireless transmission rate. It is advisable to keep
this option on Best (Automatic).
Channel Width: Select the wireless channel width used. Options to choose from
are 20MHz and 20/40MHz (Auto).
Visibility Status: Click Invisible to hide the Wireless SSID and Visible to reveal
it.
WMM Enable: WMM is QoS for your wireless network. This will improve the
quality of video and voice applications for your wireless clients.
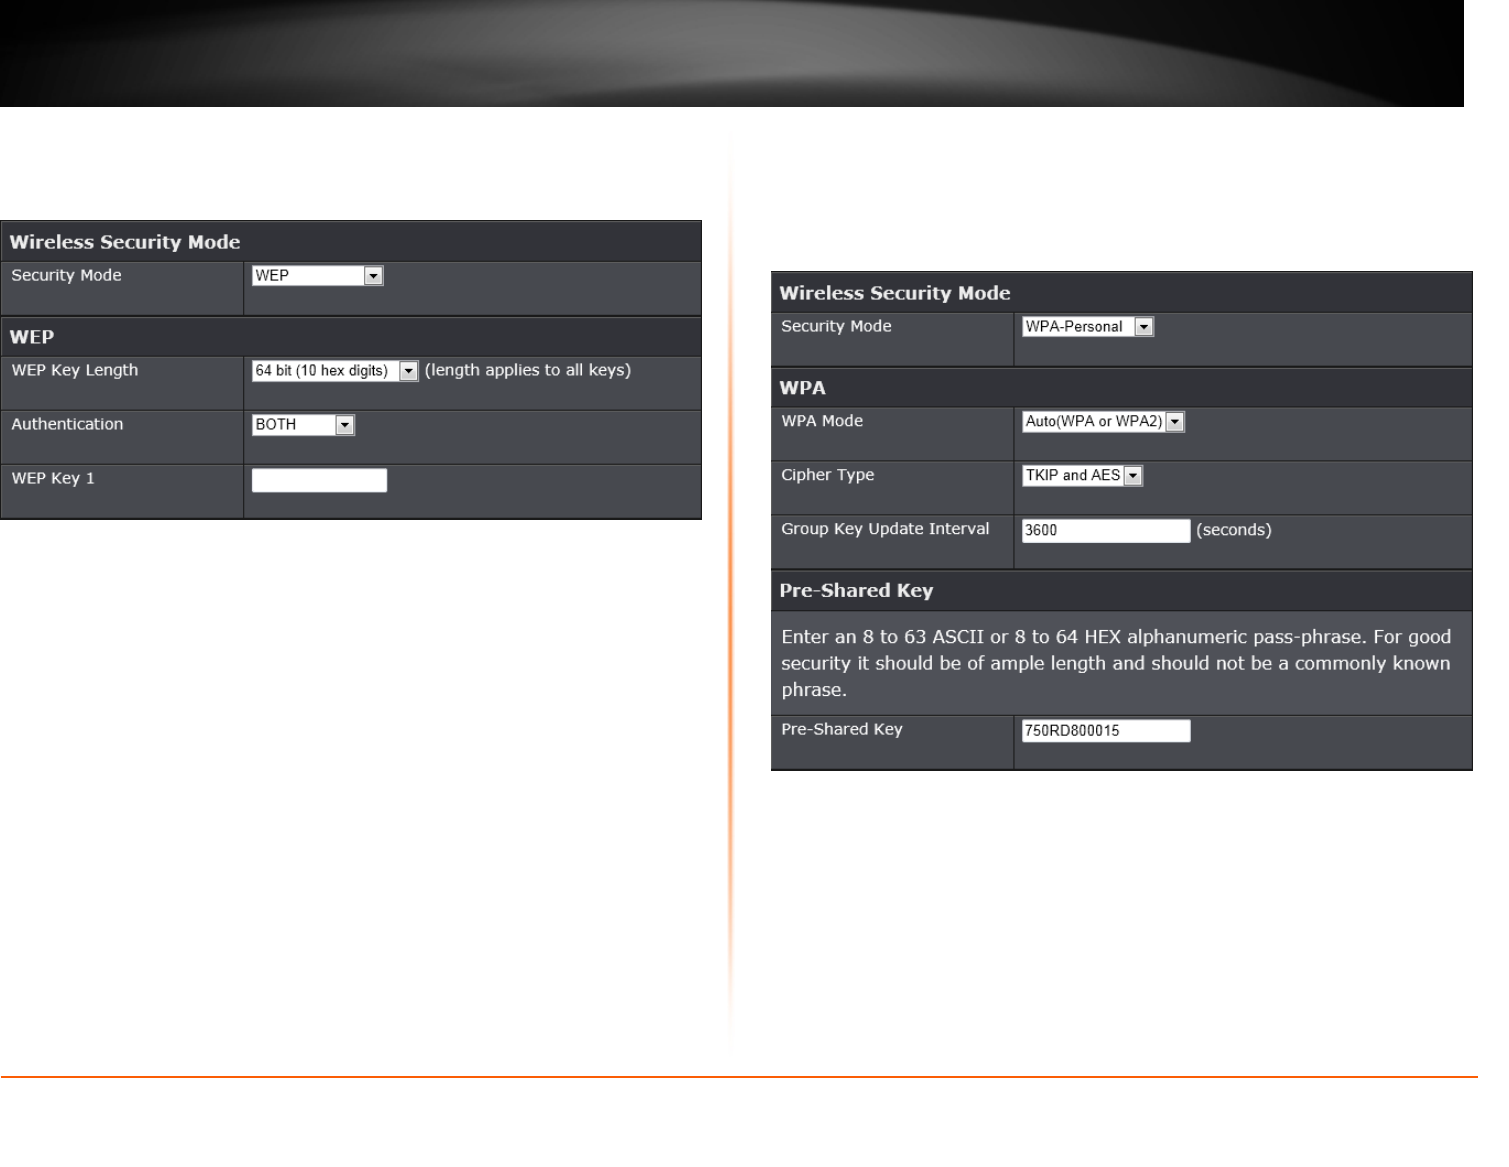
Wireless Mode – WDS
When selecting WDS in the Mode drop-down menu, the following section
appears.
Remote AP MAC Address: Enter the MAC address of a remote AP. Click the
Site Survey button to see the available AP in the area. Click the radio button to
select the corresponding AP and Connect to have the AP’s MAC address in the
field.
Wireless Mode – WDS+AP
When selecting WDS+AP in the Mode drop-down menu, the following section
appears.
Enable Lazy Mode: Tick the check box to enable the Lazy mode. When
enabling the Lazy mode, there is no need to enter the MAC address of any
remote AP.
Remote AP MAC Address: Enter the MAC address of a remote AP. Click the
radio button to select the corresponding AP and Connect to have the AP’s MAC
address in the field.
Wireless Security Mode
This section allows you to select various wireless security modes for the 2.4GHz
band. The corresponding configuration will then appear at the bottom half of the
window. Available options are None, WEP, WPA-Personal and WPA-
Enterprise.
Wireless Security Mode – None
By selecting this mode, there will be no wireless security applied to your wireless
network. This means that anyone with a wireless adapter can connect to your
network.
© Copyright 2013 TRENDnet. All Rights Reserved.
TRENDnet User’s Guide
TEW750DAP
15
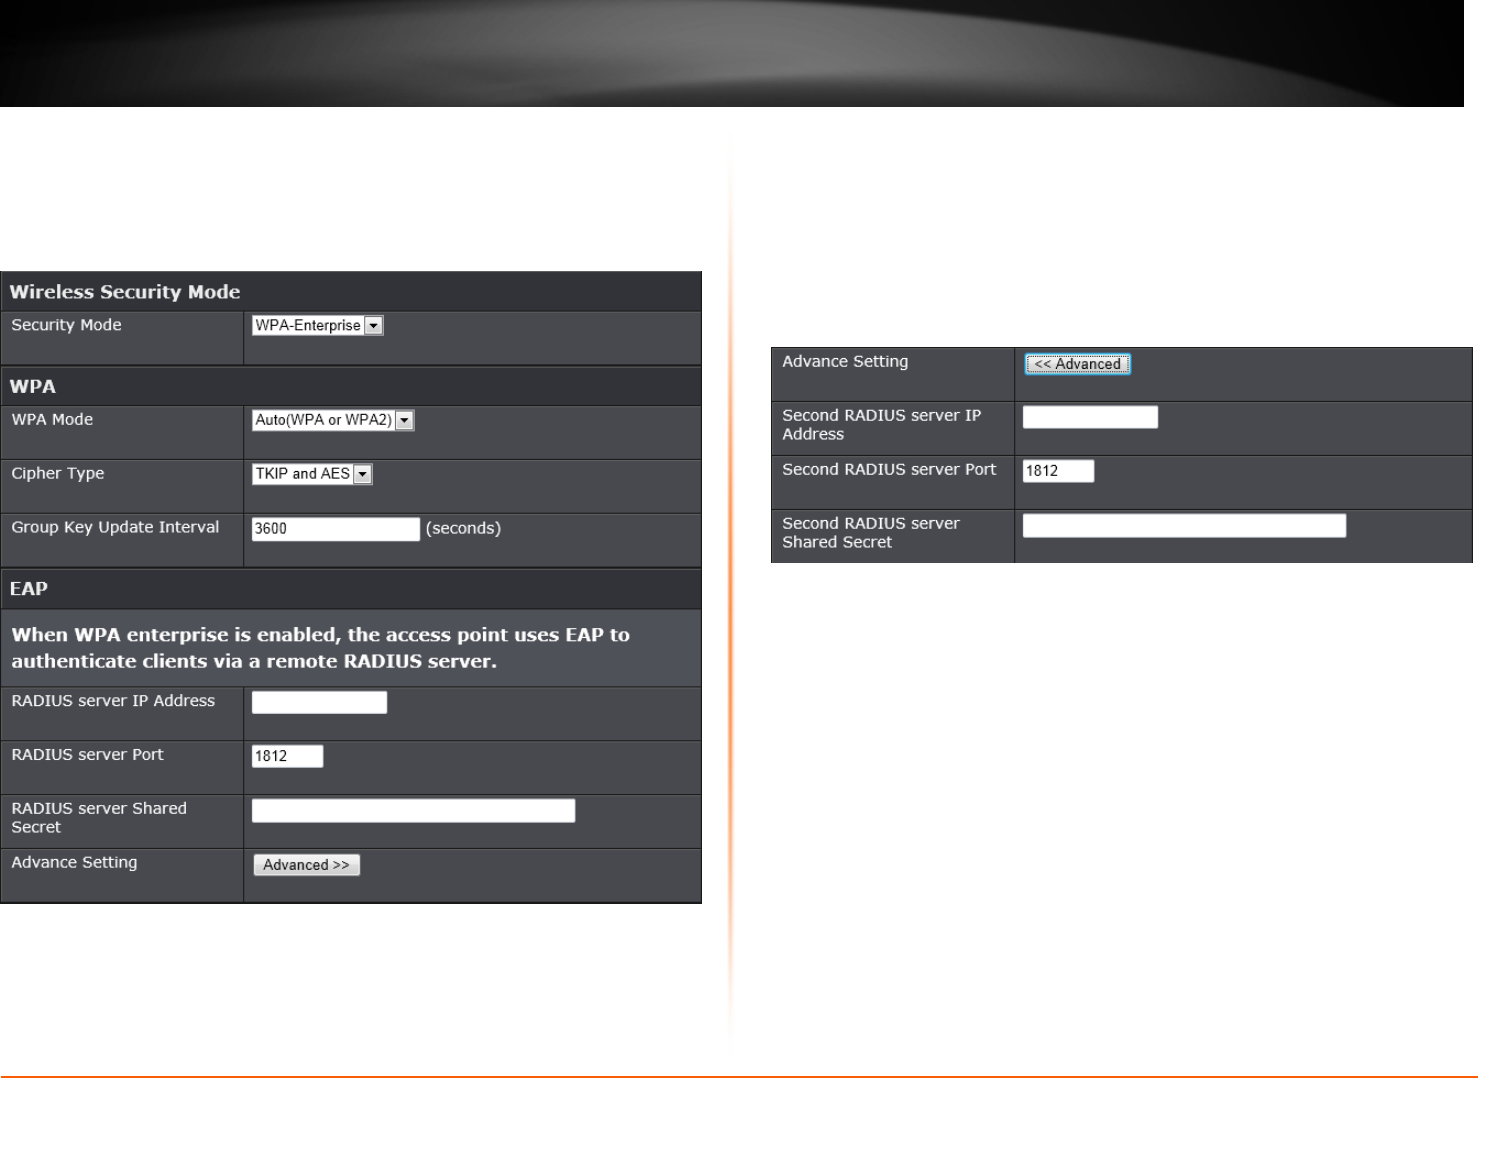
Wireless Security Mode – WEP
Wired Equivalent Privacy (WEP) is any entry level wireless security method that
we can use to prevent unauthorized wireless access to this AP. WEP is not a
very secure option, but it is better than no wireless security.
WEP Key Length: Select the WEP Key Length value as 64 bit (10 hex digits)
or 128 bit (26 hex digits).
Authentication: Select the WEP authentication option. Options to choose from
are Both and Shared Key.
WEP Key: Enter a wireless security key here. This key must be configured on all
the wireless clients for them to be able to connect to your wireless network.
Wireless Security Mode – WPA-Personal
Wi-Fi Protected Access (WPA) is a more advanced wireless security method that
we can use to prevent unauthorized wireless access to this AP. Wi-Fi Protected
Access (WPA2) is the most advanced wireless security method that we can use
to prevent unauthorized wireless access to this AP.
WPA Personal does not require an authentication server.
WPA Mode: Select which WPA mode to use. Options to choose from are Auto
(WPA or WPA2), WPA2 Only, and WPA Only.
Cipher Type: Select the wireless cipher type here. Options to choose from are
TKIP and AES, TKIP, and AES.
Group Key Update Interval: Enter the group key update interval time in
seconds.
Pre-shared Key
Pre-shared Key: Enter the WPA-Personal wireless Pre-Shared Key. This key
must be configured on all the wireless clients for them to be able to connect to
your wireless network.
© Copyright 2013 TRENDnet. All Rights Reserved.
TRENDnet User’s Guide
TEW750DAP
16
Wireless Security Mode – WPA-Enterprise
Wi-Fi Protected Access (WPA) is a more advanced wireless security method that
we can use to prevent unauthorized wireless access to this AP. Wi-Fi Protected
Access (WPA2) is the most advanced wireless security method that we can use
to prevent unauthorized wireless access to this AP.
WPA-Enterprise requires the use of an external RADIUS server.
WPA Mode: Select which WPA mode to use. Options to choose from are Auto
(WPA or WPA2), WPA2 Only, and WPA Only.
Cipher Type: Select the wireless cipher type here. Options to choose from are
TKIP and AES, TKIP, and AES.
Group Key Update Interval: Enter the group key update interval time in
seconds.
EAP
RADIUS Server IP Address: Enter the IP address of the external RADIUS
server.
RADIUS Server Port: Enter the external RADIUS server port number.
RADIUS Server Shared Secret: Enter the RADIUS server shared secret. This
key must be configured on all the wireless clients for them to be able to connect
to your wireless network.
Advance Setting: Click the Advanced >> button to configure settings for an
optional secondary RADIUS server.
Second RADIUS Server IP Address: Enter the IP address of the external
RADIUS server.
Second RADIUS Server Port: Enter the external RADIUS server port number.
Second RADIUS Server Shared Secret: Enter the RADIUS server shared
secret. This key must be configured on all the wireless clients for them to be able
to connect to your wireless network.
© Copyright 2013 TRENDnet. All Rights Reserved.
TRENDnet User’s Guide
TEW750DAP
17
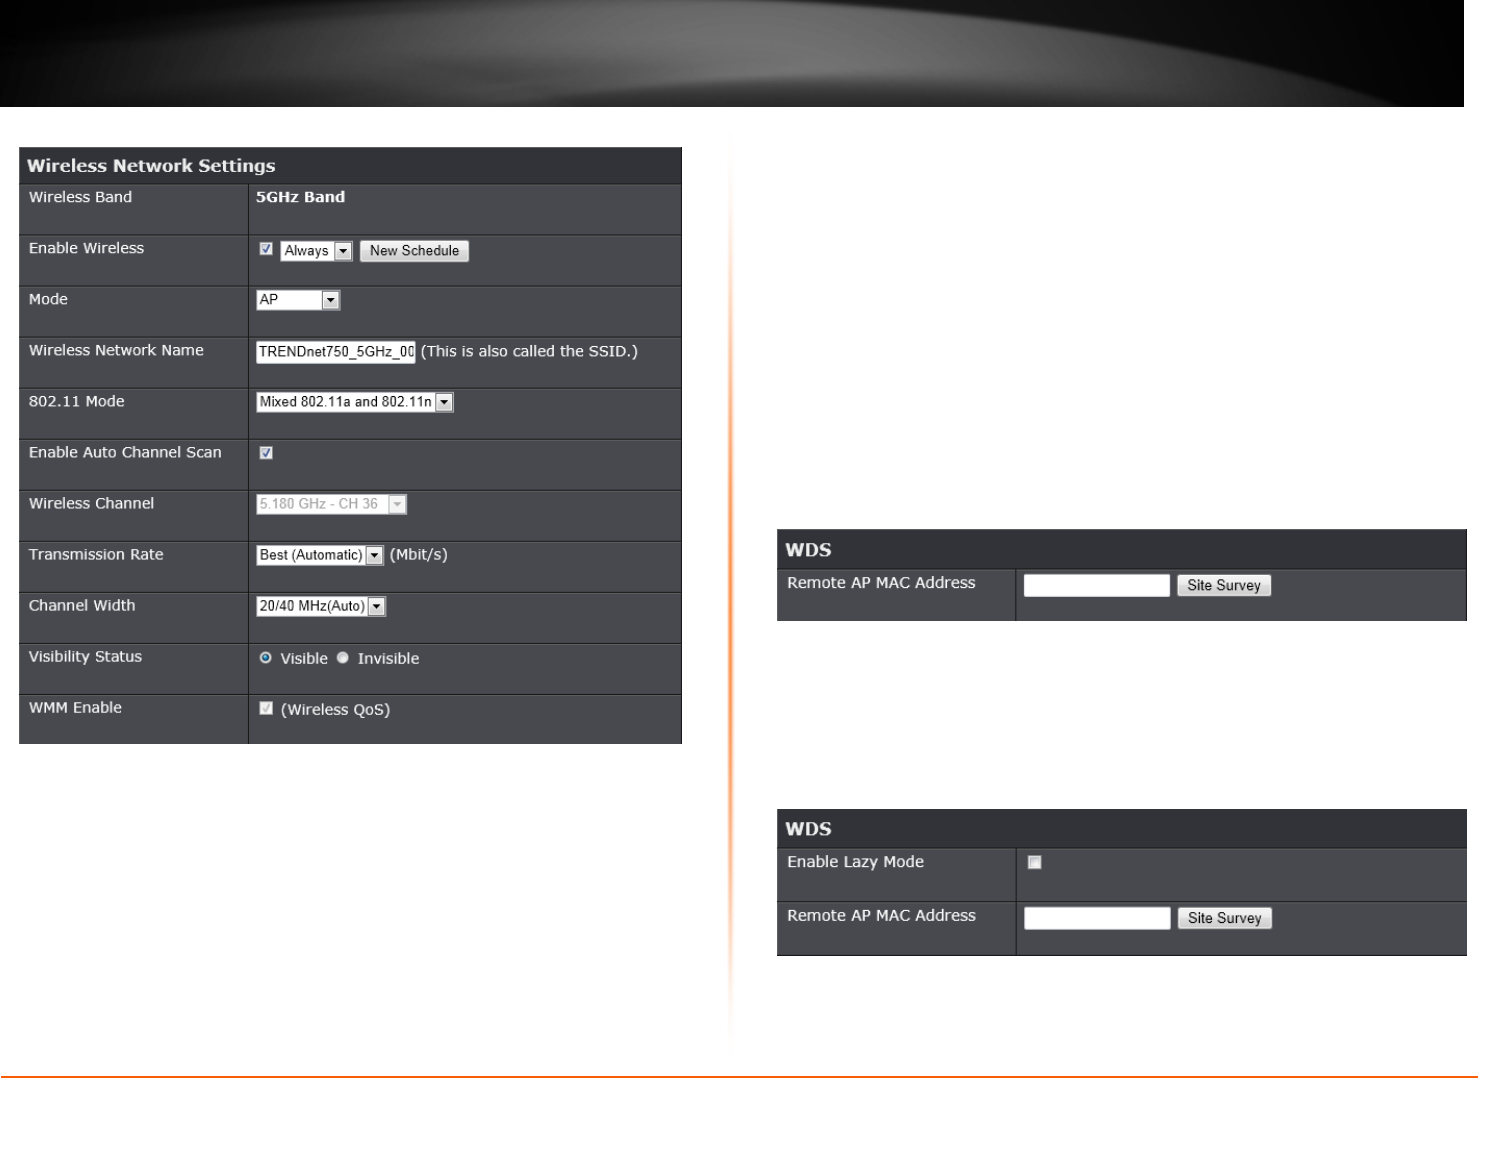
Wireless Network Settings – 5GHz Band
Wireless Band: This displays the wireless band that the AP is used.
Enable Wireless: Tick the check box to enable the wireless feature for the 5GHz
band on this AP. Use the drop-down menu to apply a time schedule to this
wireless network.
Mode: Use the drop-down menu to select the wireless mode. Available options
are AP, WDS, and WDS+AP.
Wireless Network Name: Enter the wireless network name (SSID). This name
will be available when wireless clients scan for available wireless networks.
However, when Visibility Status is set to Invisible, this name will not be visible
to wireless clients.
802.11 Mode: Select which 802.11 wireless modes to use from the drop-down
menu. Options to choose from are 802.11a only, 802.11n only, and Mixed
802.11a and 802.11n. If you are not sure, select Mixed 802.11a and 802.11n.
Enable Auto Channel Scan: Tick the check box to allow the AP to find and use
the wireless channel with the least interference in your environment.
Wireless Channel: Deselect Enable Auto Channel Scan to be able to
configure this. Use the drop-down menu to select a wireless channel.
Transmission Rate: Select the wireless transmission rate. It is advisable to keep
this option on Best (Automatic).
Channel Width: Select the wireless channel width used. Options to choose from
are 20MHz and 20/40MHz (Auto).
Visibility Status: Click Invisible to hide the Wireless SSID and Visible to reveal
it.
WMM Enable: WMM is QoS for your wireless network. This will improve the
quality of video and voice applications for your wireless clients.
Wireless Mode – WDS
When selecting WDS in the Mode drop-down menu, the following section
appears.
Remote AP MAC Address: Enter the MAC address of a remote AP. Click the
radio button to select the corresponding AP and Connect to have the AP’s MAC
address in the field.
Wireless Mode – WDS+AP
When selecting WDS+AP in the Mode drop-down menu, the following section
appears.
Enable Lazy Mode: Tick the check box to enable the Lazy mode. When
enabling the Lazy mode, there is no need to enter the MAC address of any
remote AP.
© Copyright 2013 TRENDnet. All Rights Reserved.
TRENDnet User’s Guide
TEW750DAP
18
Remote AP MAC Address: Enter the MAC address of a remote AP. Click the
radio button to select the corresponding AP and Connect to have the AP’s MAC
address in the field.
Wireless Security Mode
This section allows you to select various wireless security modes for the 5GHz
band. The corresponding configuration will then appear at the bottom half of the
window. Available options are None, WEP, WPA-Personal and WPA-
Enterprise.
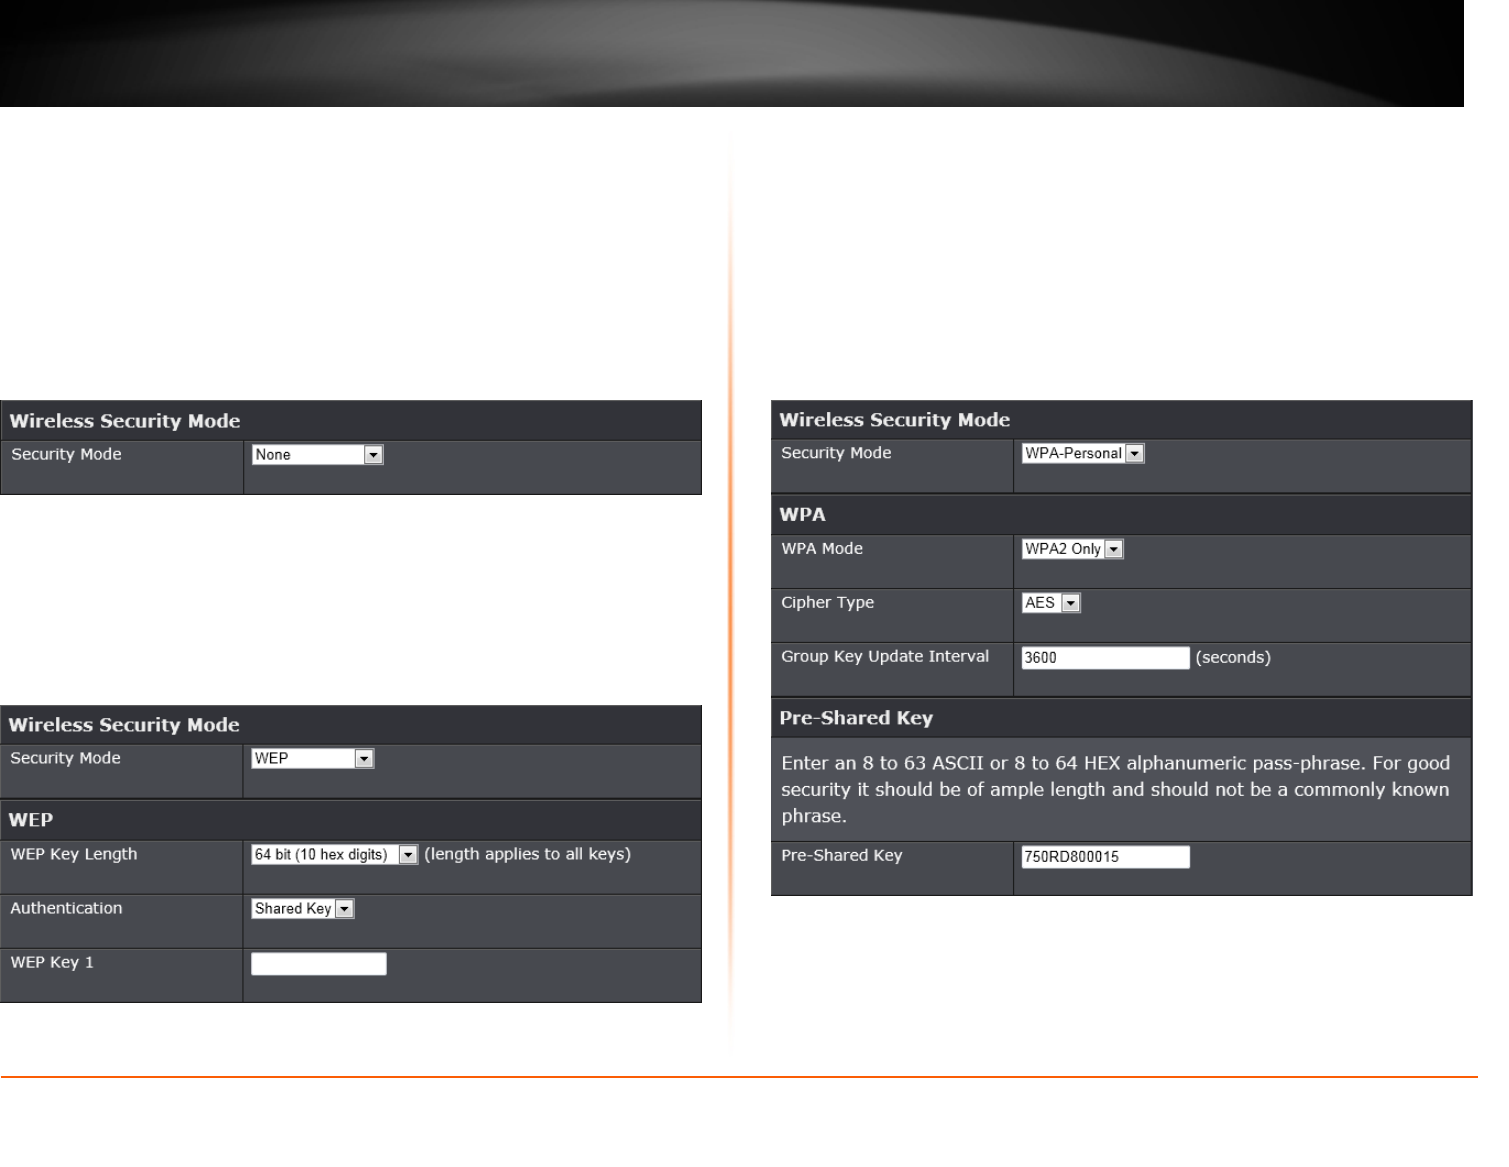
Wireless Security Mode – None
By selecting this mode, there will be no wireless security applied to your wireless
network. This means that anyone with a wireless adapter can connect to your
network.
Wireless Security Mode – WEP
Wired Equivalent Privacy (WEP) is any entry level wireless security method that
we can use to prevent unauthorized wireless access to this AP. WEP is not a
very secure option, but it is better than no wireless security.
WEP Key Length: Select the WEP Key Length value as 64 bit (10 hex digits)
or 128 bit (26 hex digits).
Authentication: Select the WEP authentication option. Options to choose from
are Both and Shared Key.
WEP Key: Enter a wireless security key here. This key must be configured on all
the wireless clients for them to be able to connect to your wireless network.
Wireless Security Mode – WPA-Personal
Wi-Fi Protected Access (WPA) is a more advanced wireless security method that
we can use to prevent unauthorized wireless access to this AP. Wi-Fi Protected
Access (WPA2) is the most advanced wireless security method that we can use
to prevent unauthorized wireless access to this AP.
WPA Personal does not require an authentication server.
WPA Mode: Select which WPA mode to use. Options to choose from are Auto
(WPA or WPA2), WPA2 Only, and WPA Only.
Cipher Type: Select the wireless cipher type here. Options to choose from are
TKIP and AES, TKIP, and AES.
Group Key Update Interval: Enter the group key update interval time in
seconds.
© Copyright 2013 TRENDnet. All Rights Reserved.
TRENDnet User’s Guide
TEW750DAP
19
Pre-shared Key
Pre-shared Key: Enter the WPA-Personal wireless Pre-Shared Key. This key
must be configured on all the wireless clients for them to be able to connect to
your wireless network.
Click the Save Settings button to accept the changes made.
Click the Don’t Save Settings button to discard the changes made.
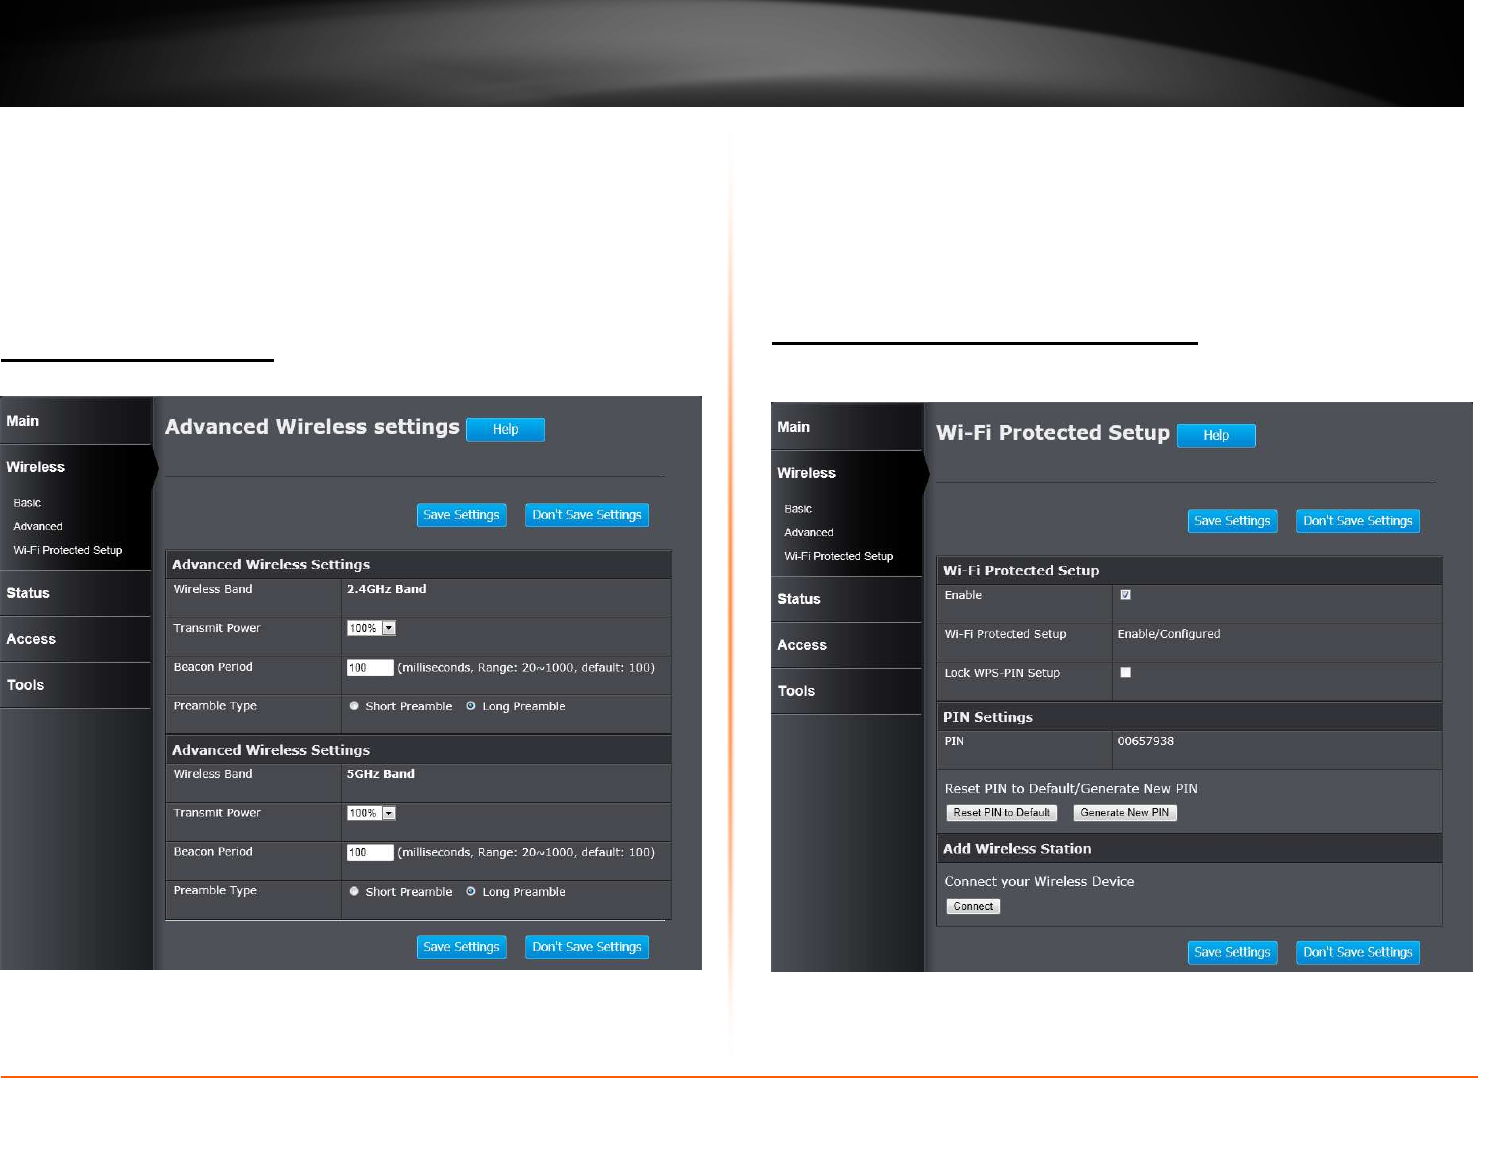
Wireless > Advanced
This window is used to configure more advanced wireless settings on the AP.
Wireless Band: Displays the wireless band that can be configured.
Transmit Power: Select the wireless transmit power for the 2.4GHz band.
Options to choose from are 100%, 50%, 25% and 12.5%.
Beacon Period: Enter the duration between beacon packets in milliseconds.
Preamble Type: Click to select Short Preamble or Long Preamble.
DTIM Interval: Enter a Delivery Traffic Indication Message interval.
Click the Save Settings button to accept the changes made.
Click the Don’t Save Settings button to discard the changes made.
Wireless > Wi-Fi Protected Setup
This window is used to configure the Wi-Fi Protected Setup (WPS) settings on
the AP.
Wi-Fi Protected Setup
Enable: Tick the check box to enable the Wi-Fi Protected Setup (WPS) feature.
Wi-Fi Protected Setup: Displays the status of the WPS feature.
© Copyright 2013 TRENDnet. All Rights Reserved.
TRENDnet User’s Guide
TEW750DAP
20
Lock WPS-PIN Setup: Un-tick the check box to unlock the WPS-PIN setup
when the WPS-PIN setup is locked.
PIN Settings
PIN: Displays the WPS PIN.
Reset PIN to Default/Generate New PIN: Click the Reset PIN to Default button
to to clear the PIN number used. Click the Generate New PIN button to generate
a new WPS PIN.
Add Wireless Station
Connect your Wireless Device: Click the Connect button to initiate the Wi-Fi
Protected Setup (WPS) setup wizard.
Click the Save Settings button to accept the changes made.
Click the Don’t Save Settings button to discard the changes made.
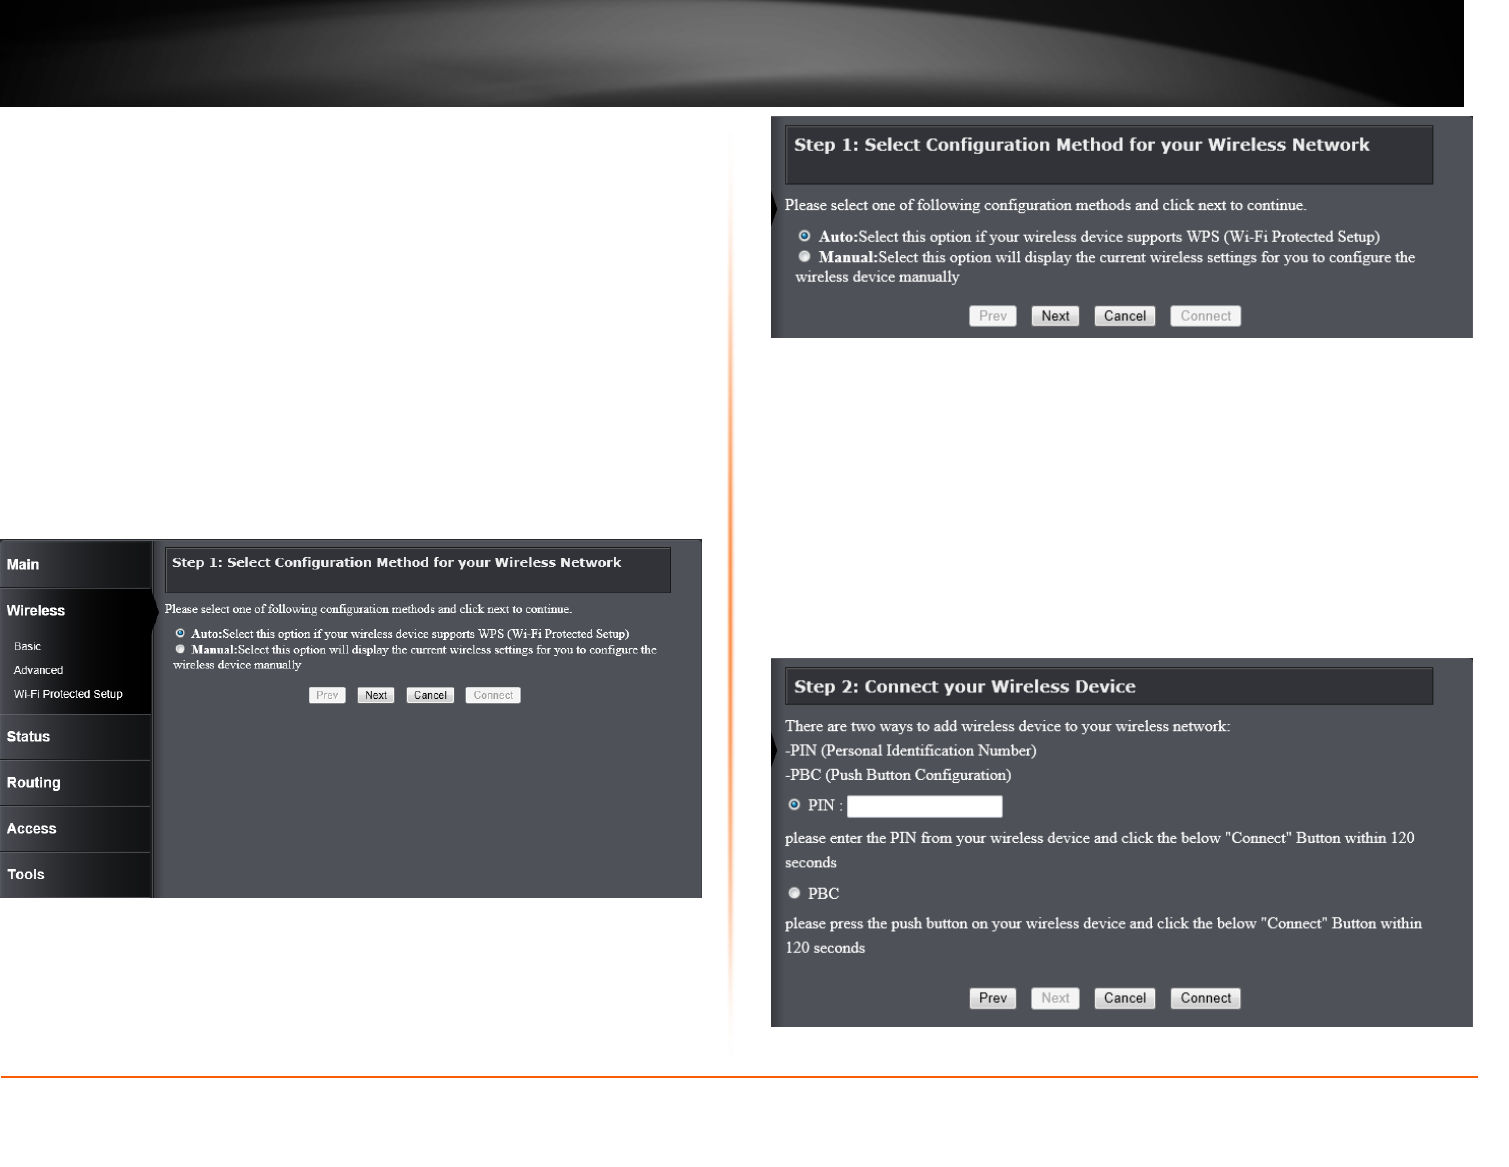
When clicking the Connect button in the Add Wireless Station section, the
following window appears.
Step 1: Select Configuration Method for your Wireless Network
Auto: Select this option to automatically allow the AP and the wireless client to
connect to each other by means of WPS.
Manual: Select this option to display the configured wireless settings. This
information can then be configured of the wireless clients manually to initiate a
wireless connection.
Click the Next button to continue to the next step.
Click the Cancel button to discard the changes made and return to the main
menu.
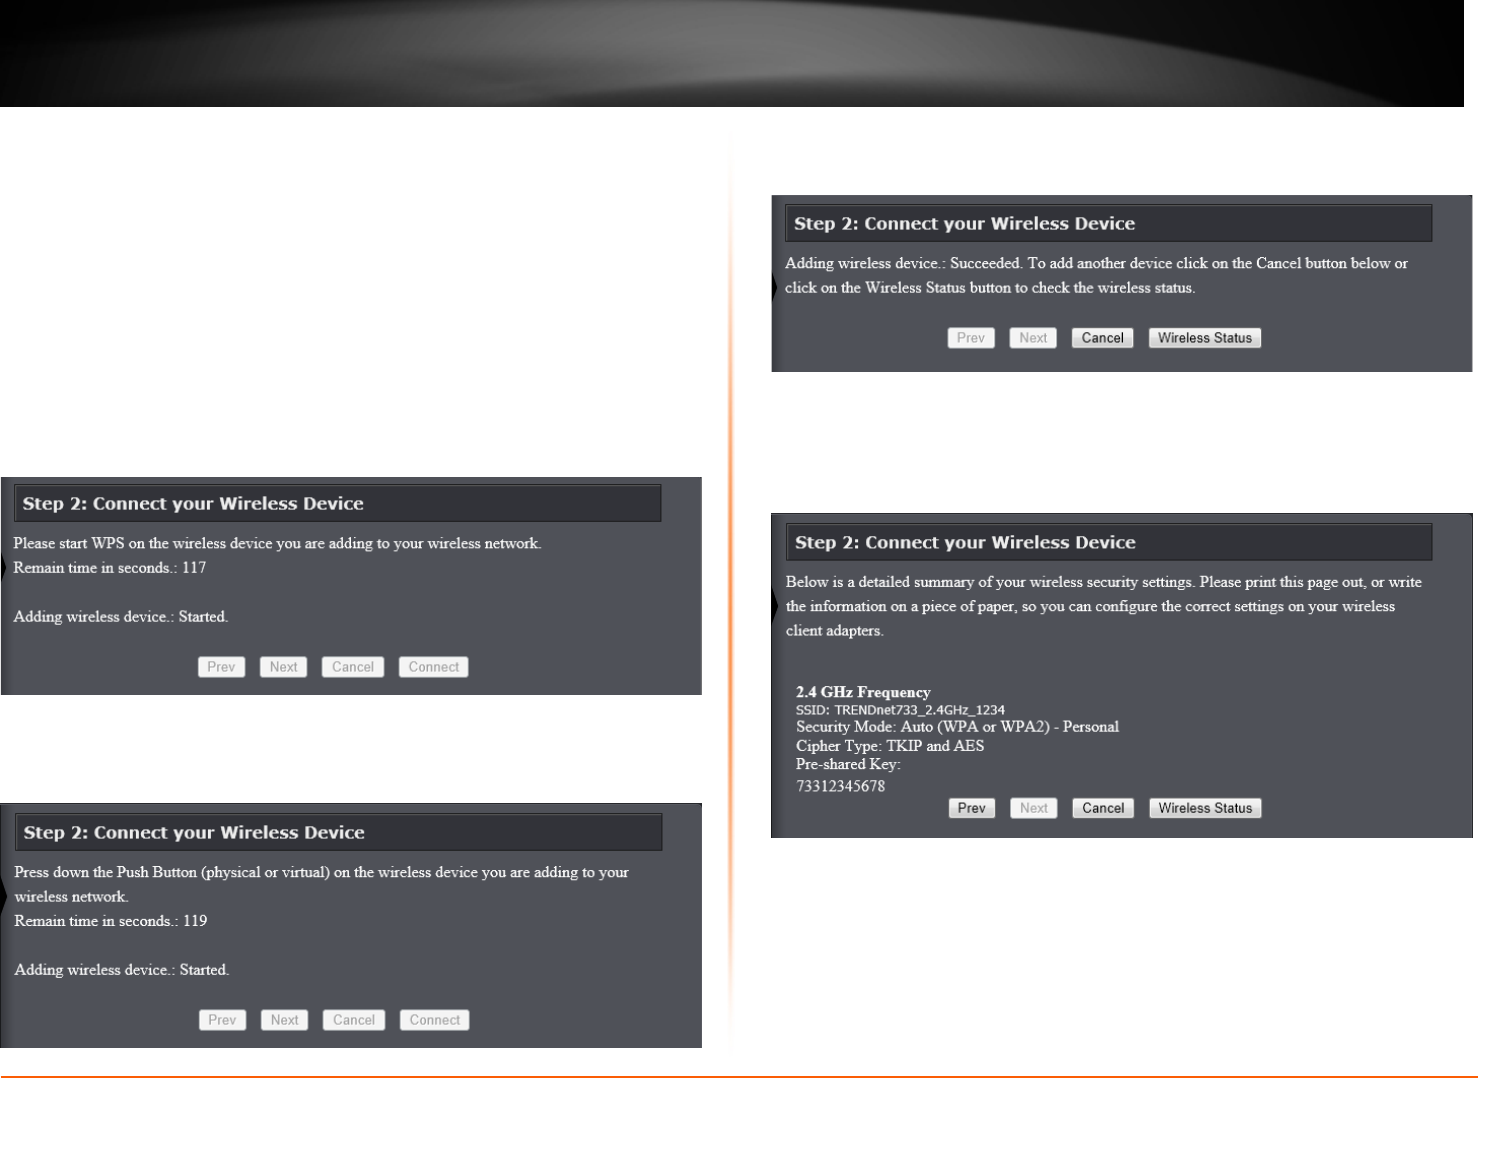
Step 2: Connect your Wireless Device
After selecting the Auto radio button in Step 1, the window will be available.
© Copyright 2013 TRENDnet. All Rights Reserved.
TRENDnet User’s Guide
TEW750DAP
21
PIN: Select this option to use the Personal Identification Number (PIN) method
to connect the two devices. Enter the PIN number here. Enter the same
PIN number at the wireless client software.
PBC: Select this option to use the Push Button Configuration (PBC) method to
connect the two devices.
Click the Connect button to initiate the WPS connection.
Click the Prev button to return to the previous step.
Click the Cancel button to discard the changes made and return to the main
menu.
Select the PIN radio button, enter the PIN the PIN field, and click the Connect
button in Step 2, the following window will be available. The AP will allow 120
seconds for the WPS connection to initiate.
Select the PBC radio button, and click the Connect button in Step 2, the
following window will be available. Press the WPS button on the wireless client to
initiate the connection within 120 seconds.
After successfully connecting the AP and the wireless client, by means of WPS,
the following window will be available.
Click the Cancel button to finish the setup and return to the main menu.
Click the Wireless Status button to view information about wireless clients
connected to the AP.
After selecting the Manual radio button in Step 1, the window will be available.
This information can then be configured of the wireless clients manually to initiate
a wireless connection.
Click the Prev button to return to the previous step.
Click the Cancel button to finish the setup and return to the main menu.
Click the Wireless Status button to view information about wireless clients
connected to the AP.
© Copyright 2013 TRENDnet. All Rights Reserved.
TRENDnet User’s Guide
TEW750DAP
22
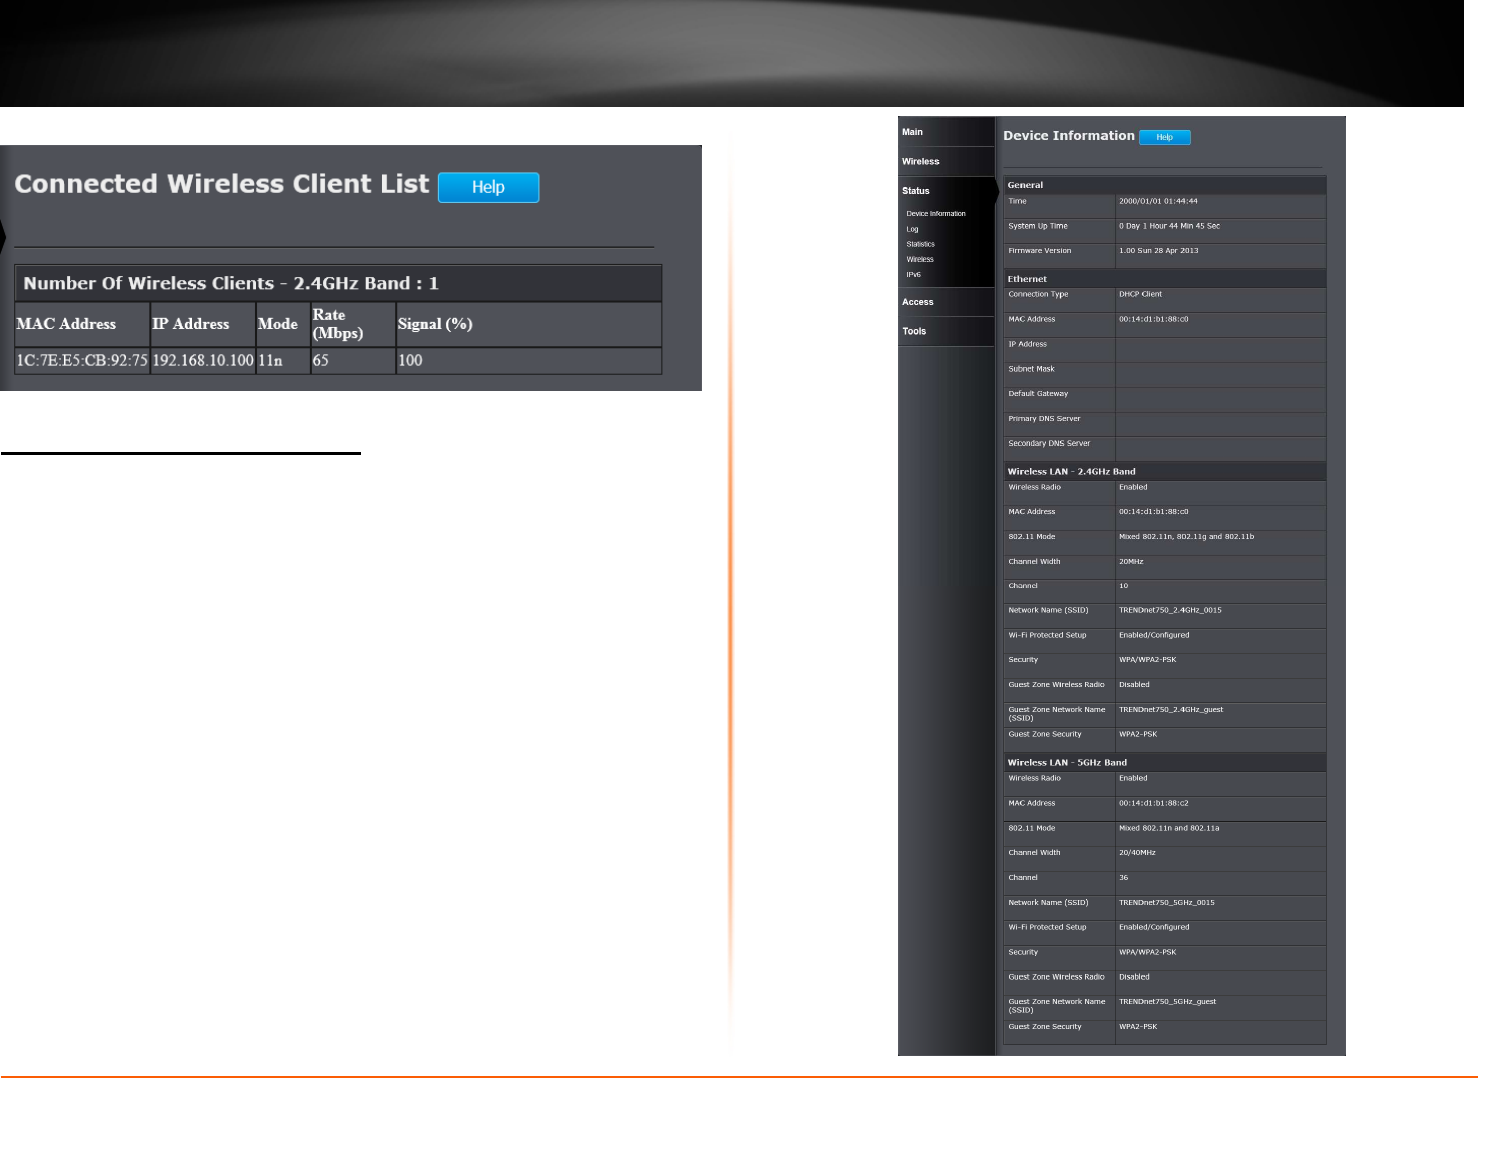
After clicking the Wireless Status button, the following window appears.
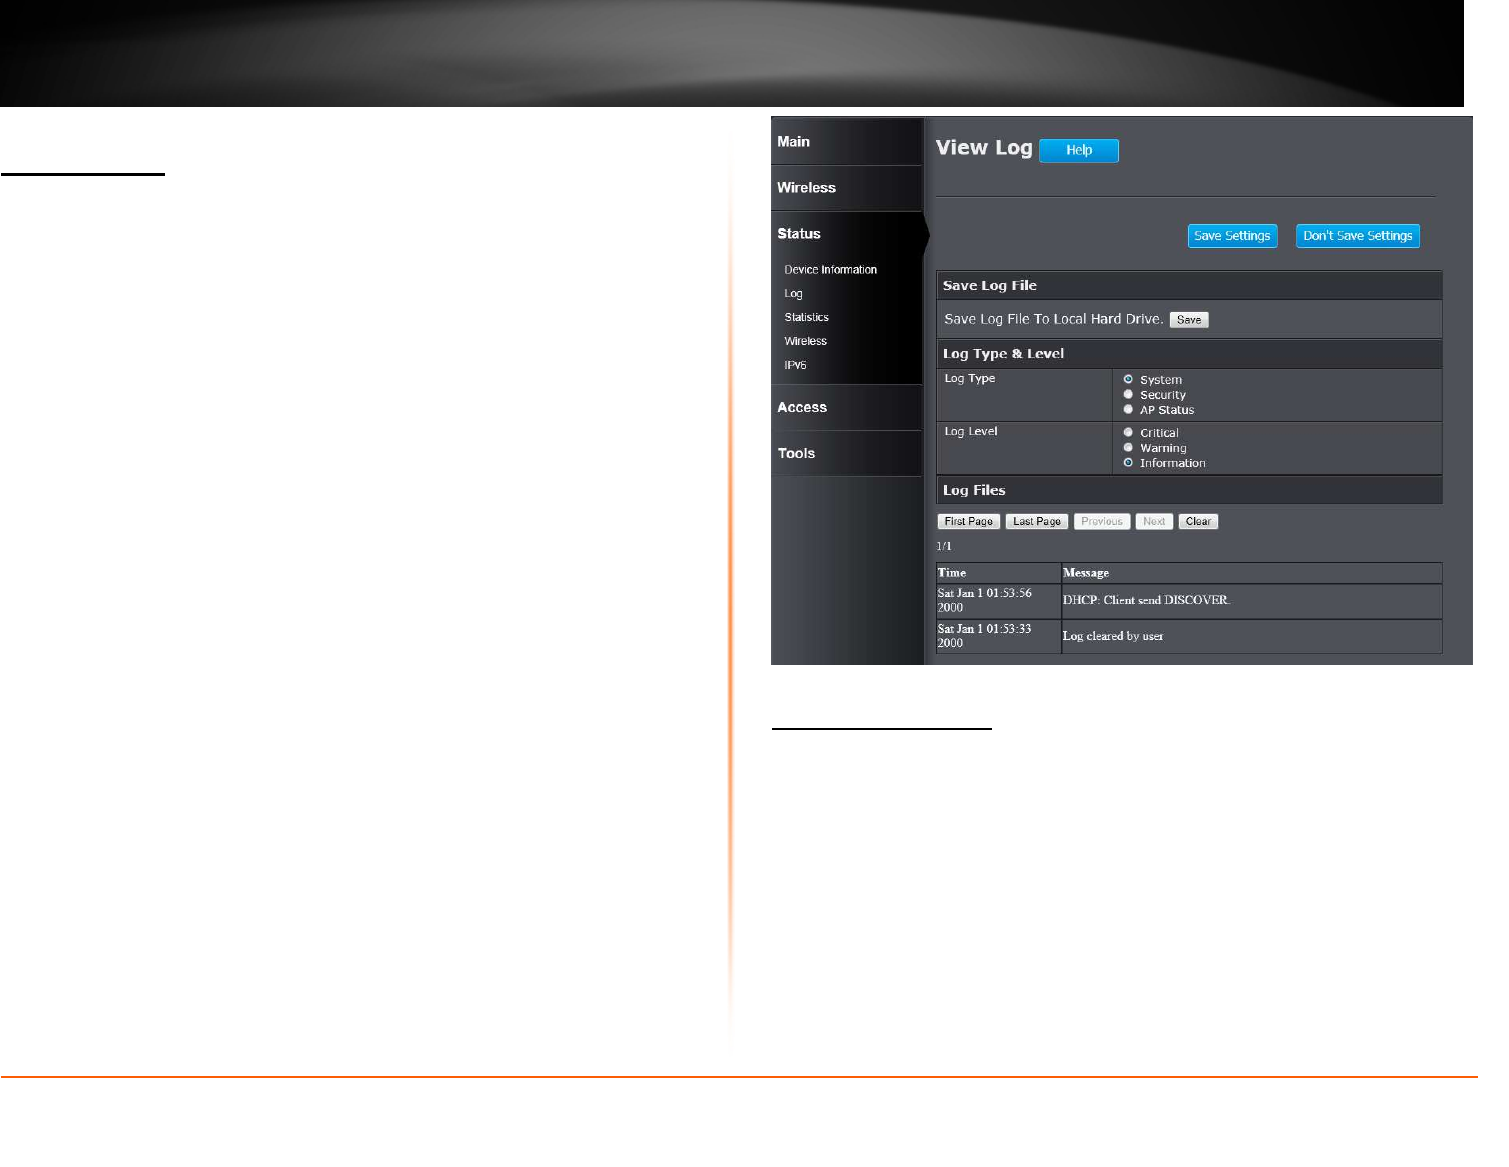
Status > Device Information
This window displays the detail information about the AP. You can view General,
Ethernet, and Wireless LAN information.
© Copyright 2013 TRENDnet. All Rights Reserved.
TRENDnet User’s Guide
TEW750DAP
23
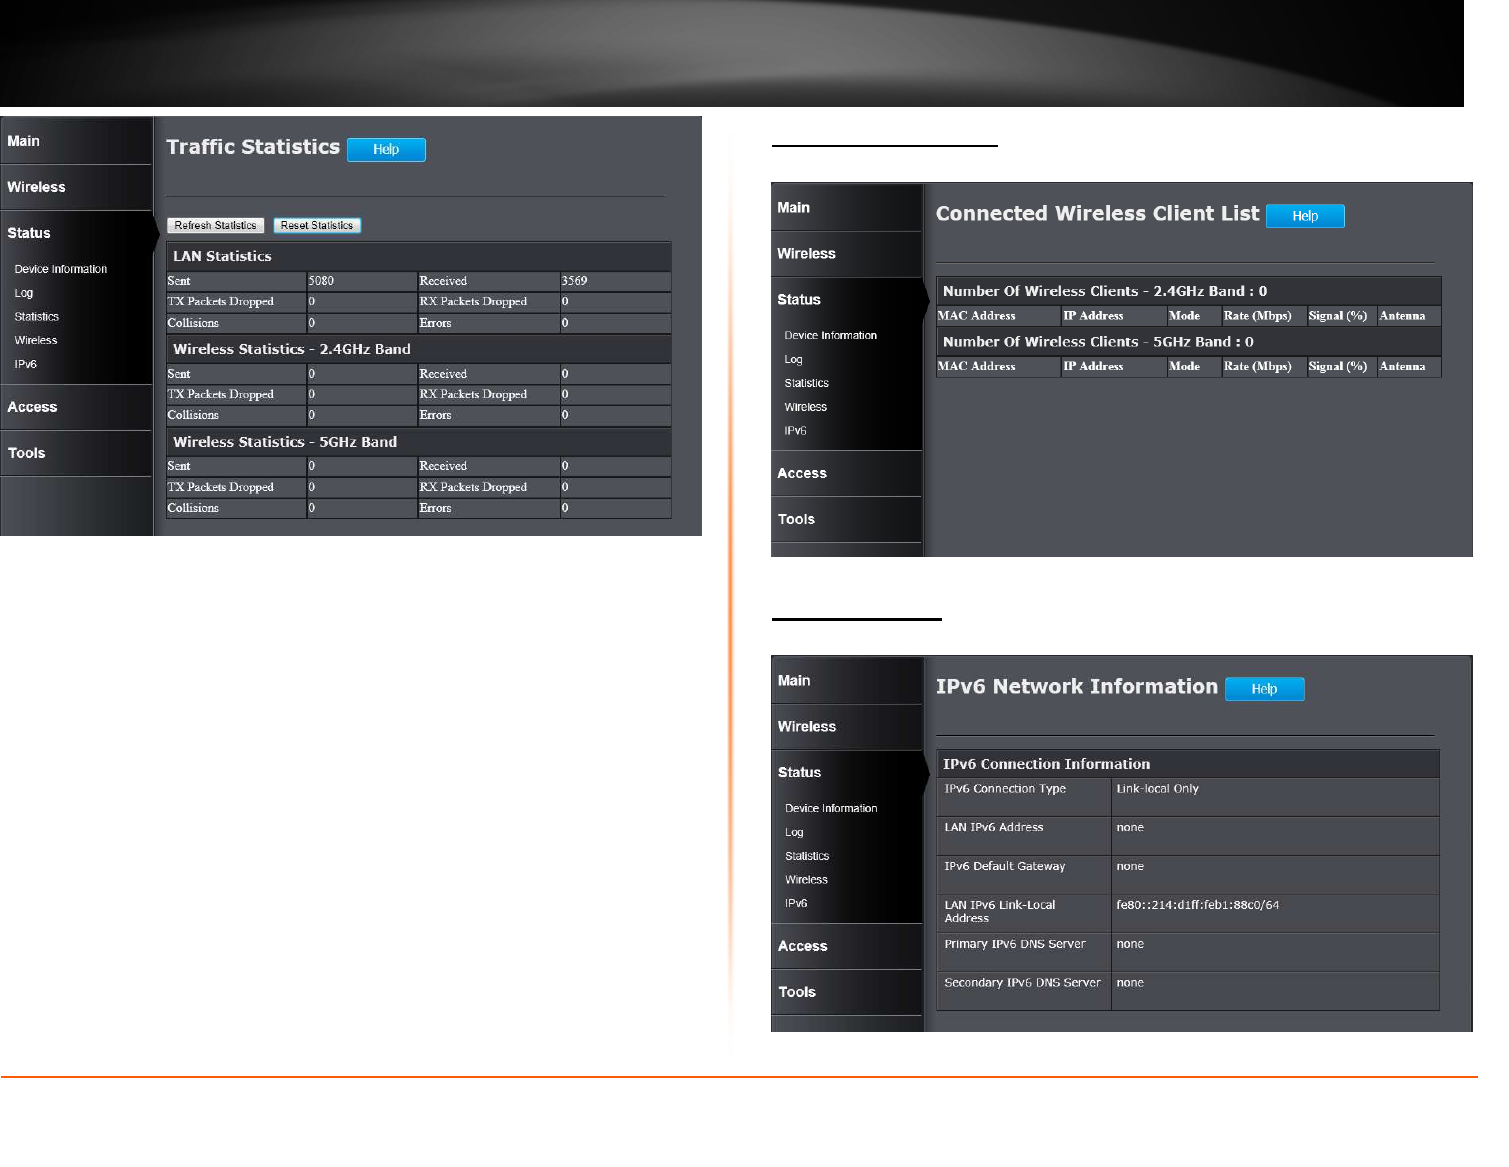
Status > Log
This window allows you to view and configure the system log settings for this AP.
Save Log File
You can initiate the saving of the log file to the management computer. Click the
Save button to download the log file to the management computer.
Log Type & Level
This section allows you to configure the log type and level.
Log Type: Select the log type to be displayed. Available options are System,
Security, and AP Status.
Log Level: Select the log level to be displayed. Available options are Critical,
Warning, and Information.
Log Files
The system log is displayed in the section.
Click the First Page button to view the first page.
Click the Last Page button to view the last page.
Click the Previous button to view the previous page.
Click the Next button to view the next page.
Click the Clear button to the log.
Click the Save Settings button to accept the changes made.
Click the Don’t Save Settings button to discard the changes made.
Status > Statistic
This window displays the LAN, and Wireless interface statistics for the AP.
© Copyright 2013 TRENDnet. All Rights Reserved.
TRENDnet User’s Guide
TEW750DAP
24
Click the Refresh Statistics button to refresh the information on this page.
Click the Reset Statistics button to clear the information on the page.
Status > Wireless
This window displays a list of wireless clients connected to the AP.
Status > IPv6
This window displays the detail IPv6 network information.
© Copyright 2013 TRENDnet. All Rights Reserved.
TRENDnet User’s Guide
TEW750DAP
25
Access > MAC Filters
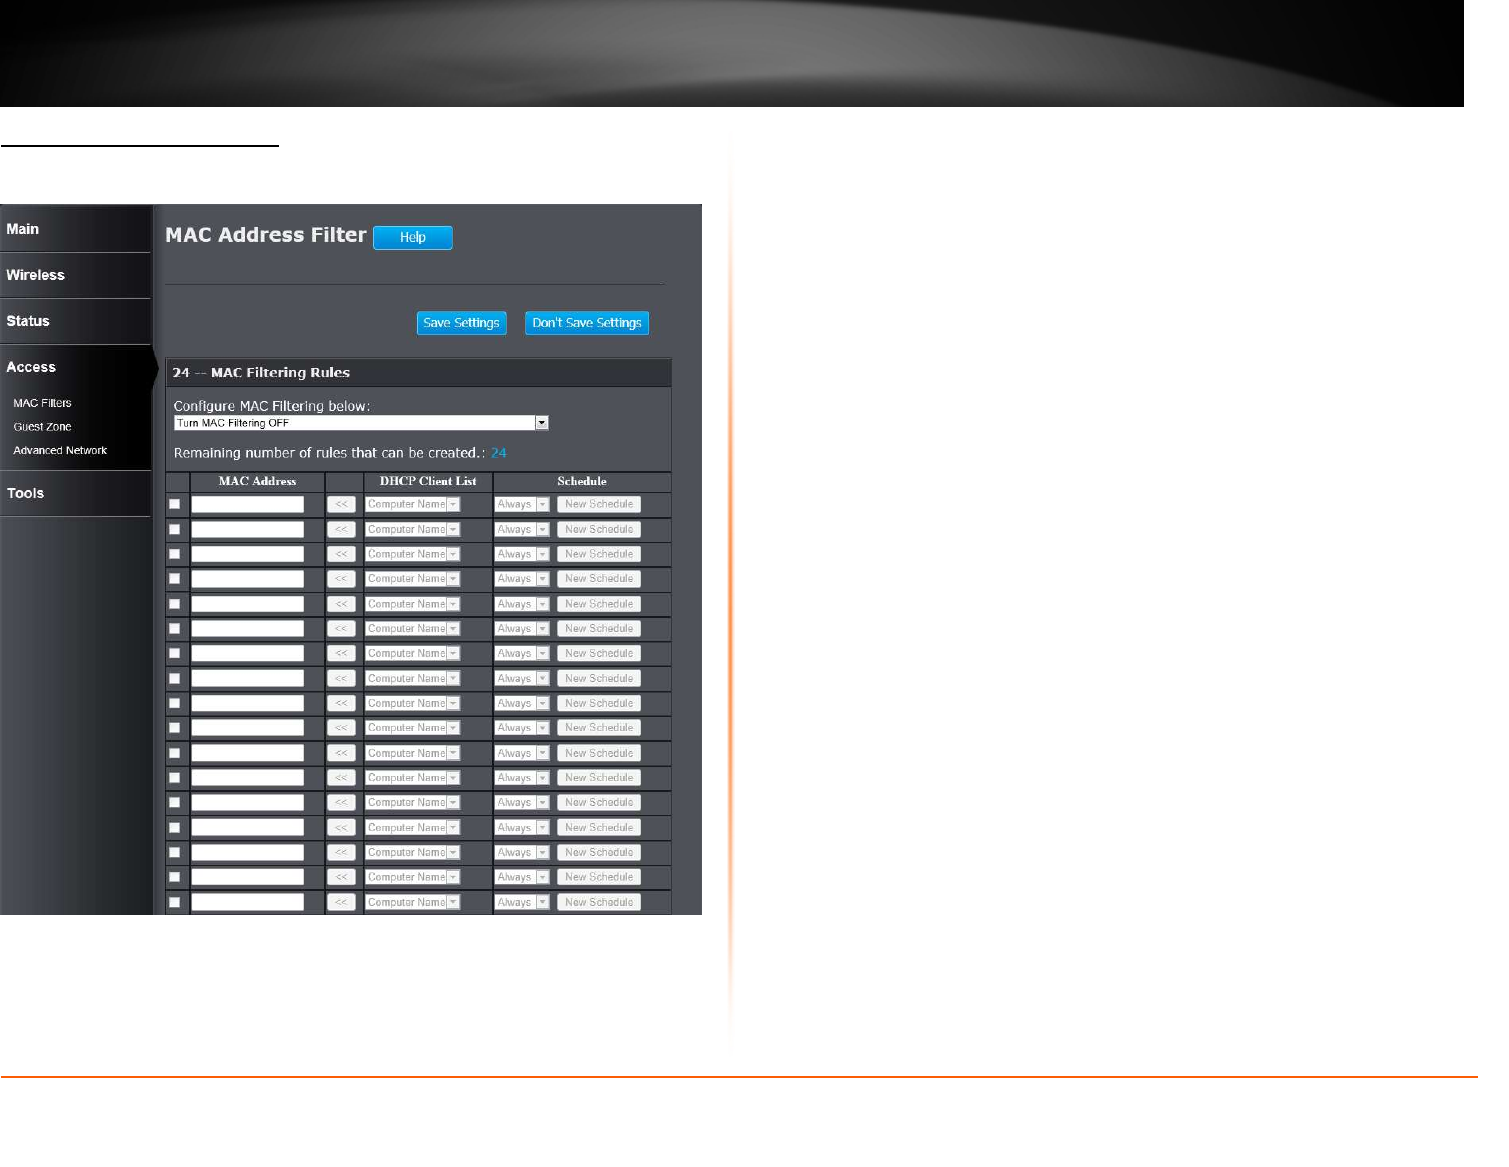
This window allows you to configure the MAC address filter. The rules can be set
up to 24 entries.
Configure MAC Filtering below: Select the MAC filtering method. Select Turn
MAC Filtering OFF to disable this feature. Select Turn MAC Filtering ON and
ALLOW computers listed to access the network to enable this feature and
only allow the computers, by MAC address, to access the network. Select Turn
MAC Filtering ON and DENY computers listed to access the network to
enable this feature and only deny the computers, by MAC address, access to the
network.
Checkbox: Tick the check box of each entry to enable the selected rule.
MAC Address: Enter the MAC address to be filtered.
DHCP Client List: Select the DHCP client from the drop-down menu to be
filtered.
Schedule: Select the time schedule for the rule. Click the New Schedule button
to create time schedules.
Click the Save Settings button to accept the changes made.
Click the Don’t Save Settings button to discard the changes made.
© Copyright 2013 TRENDnet. All Rights Reserved.
TRENDnet User’s Guide
TEW750DAP
26
Access > Guest Zone
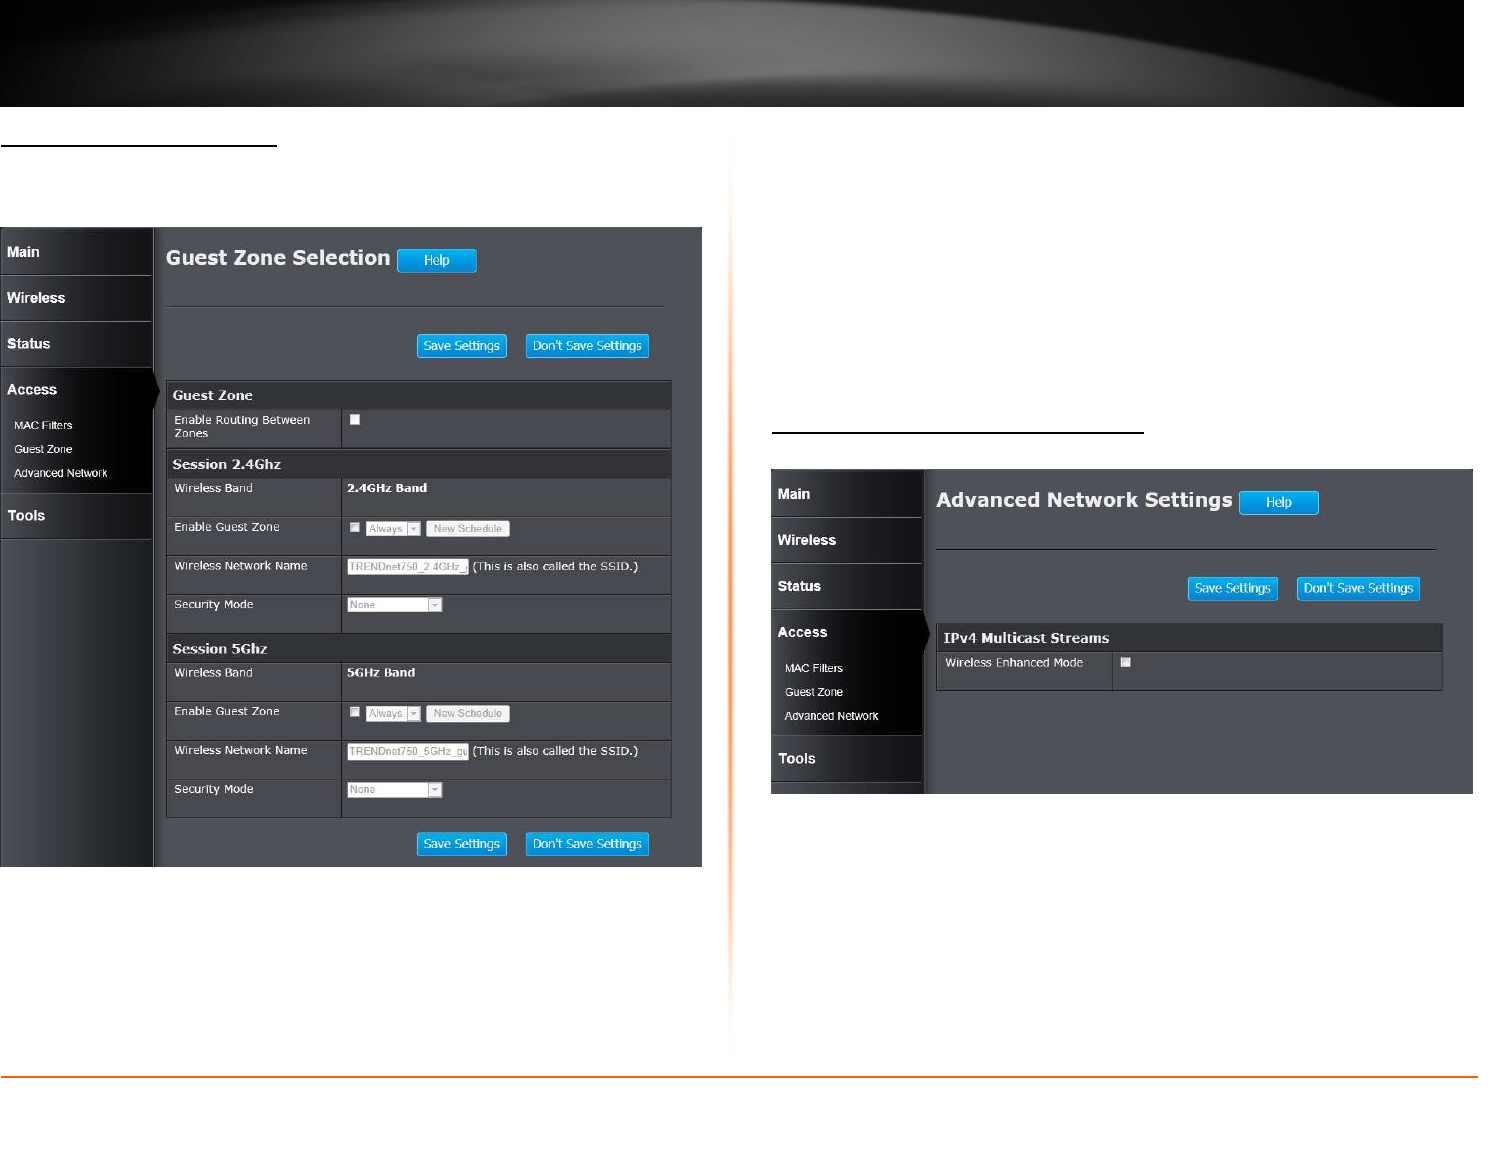
This window allows you to create temporary zones that can be used by guests to
access the Internet. The guest zone will be separated from your main wireless
network.
Guest Zone
Enable Routing Between Zones: Tick the check box to allow the routing
between zones.
Wireless Band: Displays the wireless band.
Enable Guest Zone: Tick the check box to enable the Guest Zone feature, and
use the drop-down menu to select the time schedule or click the New Schedule
button to create time schedules.
Wireless Network Name: Enter a wireless network name (SSID) that is different
from your main wireless network.
Enable Routing Between Zones: Check to allow network connectivity between
the different zones created.
Security Mode: Select the type of security or encryption you would like to enable
for the guest zone. Refer to Wireless > Basic > Wireless Security Mode for
configuring the wireless security mode.
Click the Save Settings button to accept the changes made.
Click the Don’t Save Settings button to discard the changes made.
Access > Advanced Network
This window is used to configure more advanced network settings on the AP.
Wireless Enhanced Mode: Tick the check box to enable wireless enhanced
mode.
Click the Save Settings button to accept the changes made.
Click the Don’t Save Settings button to discard the changes made.
© Copyright 2013 TRENDnet. All Rights Reserved.
TRENDnet User’s Guide
TEW750DAP
27
Tools > Restart
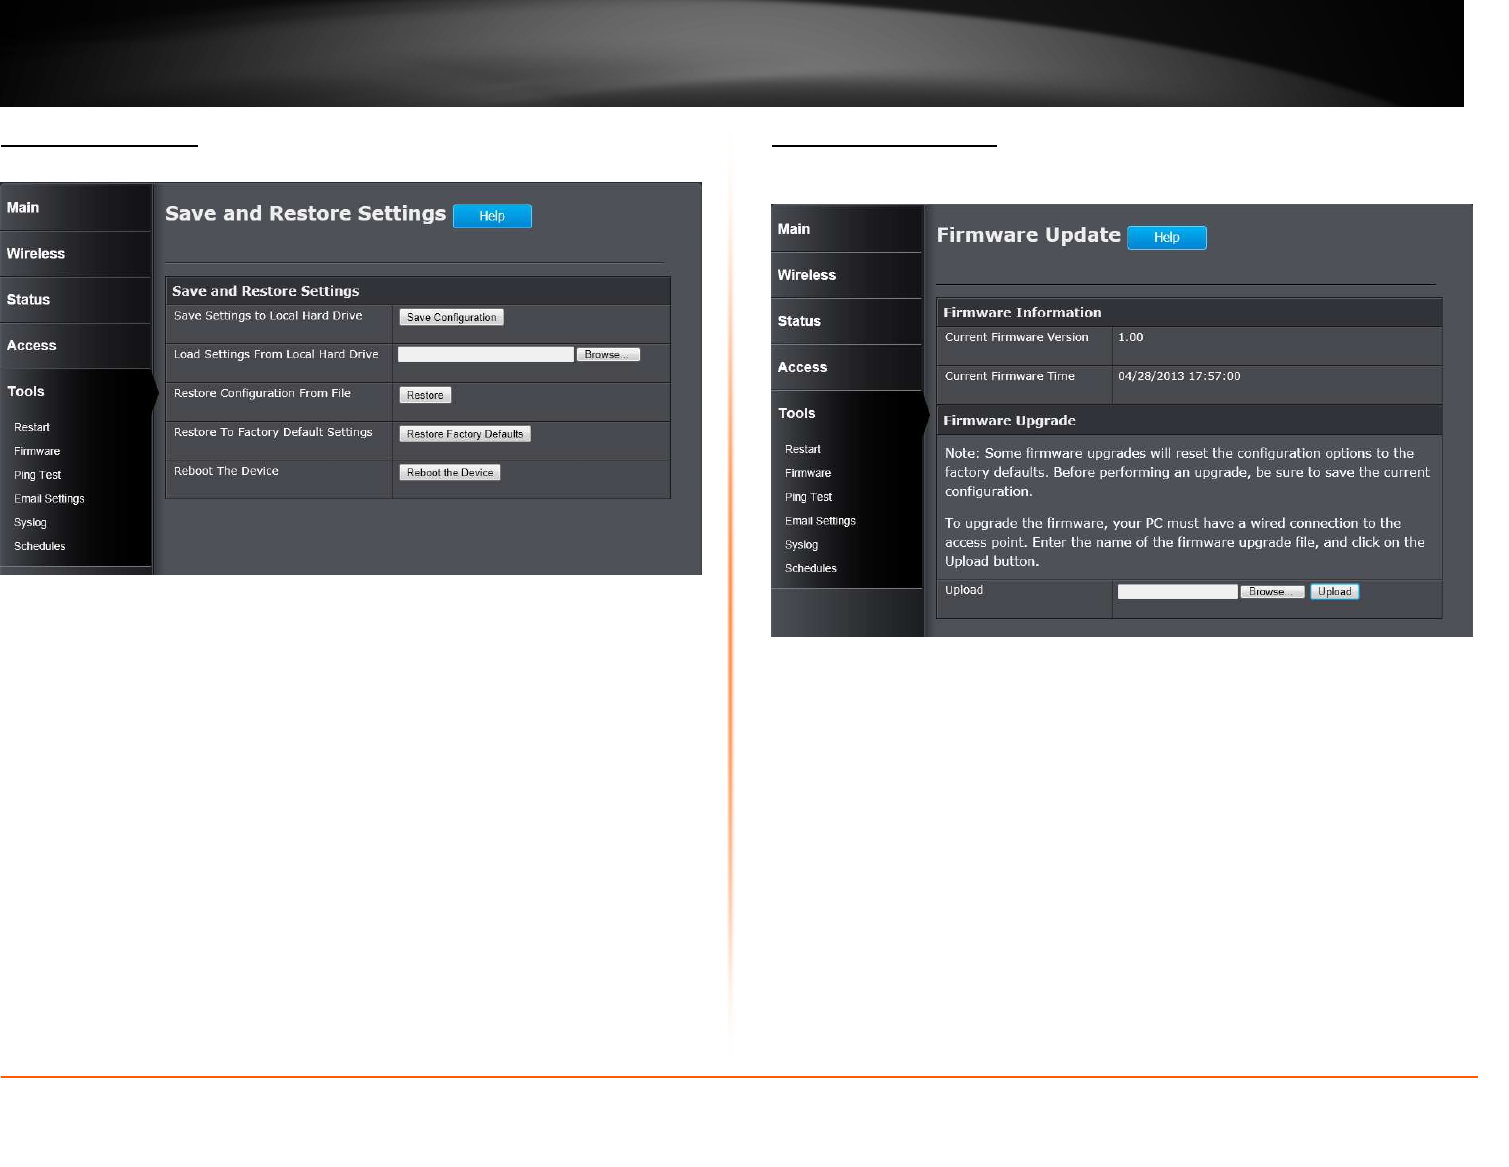
This window is used to save and restore the configuration, and restart the AP.
Save Settings to Local Hard Drive: Click the Save Configuration button to
download the AP’s settings to the management computers.
Load Settings From Local Hard Drive: Click the Browse button to navigate to
the saved configuration file on the management computer and click the Restore
button to restore the AP’s configuration to the settings configured on the
configuration file.
Restore To Factory Default Settings: Click the Restore Factory Defaults
button to remove all the settings configured on this AP and return the settings to
the factory defaults.
Reboot The Device: Click the Reboot the Device button to reboot the AP. All
unsaved configurations will be discarded.
Tools > Firmware
This window is used to display the current firmware information and initiate a
firmware upgrade for the AP.
Upload: Click the Browse button to navigate to the new firmware file located on
the management computers, and click the Upload button to initiate the firmware
upgrade procedure. The firmware upgrades sometimes will reset the
configuration to the factory defaults. Make sure to save the current configuration
to the management computer, before performing firmware upgrade.
© Copyright 2013 TRENDnet. All Rights Reserved.
TRENDnet User’s Guide
TEW750DAP
28
Tools > Ping Test
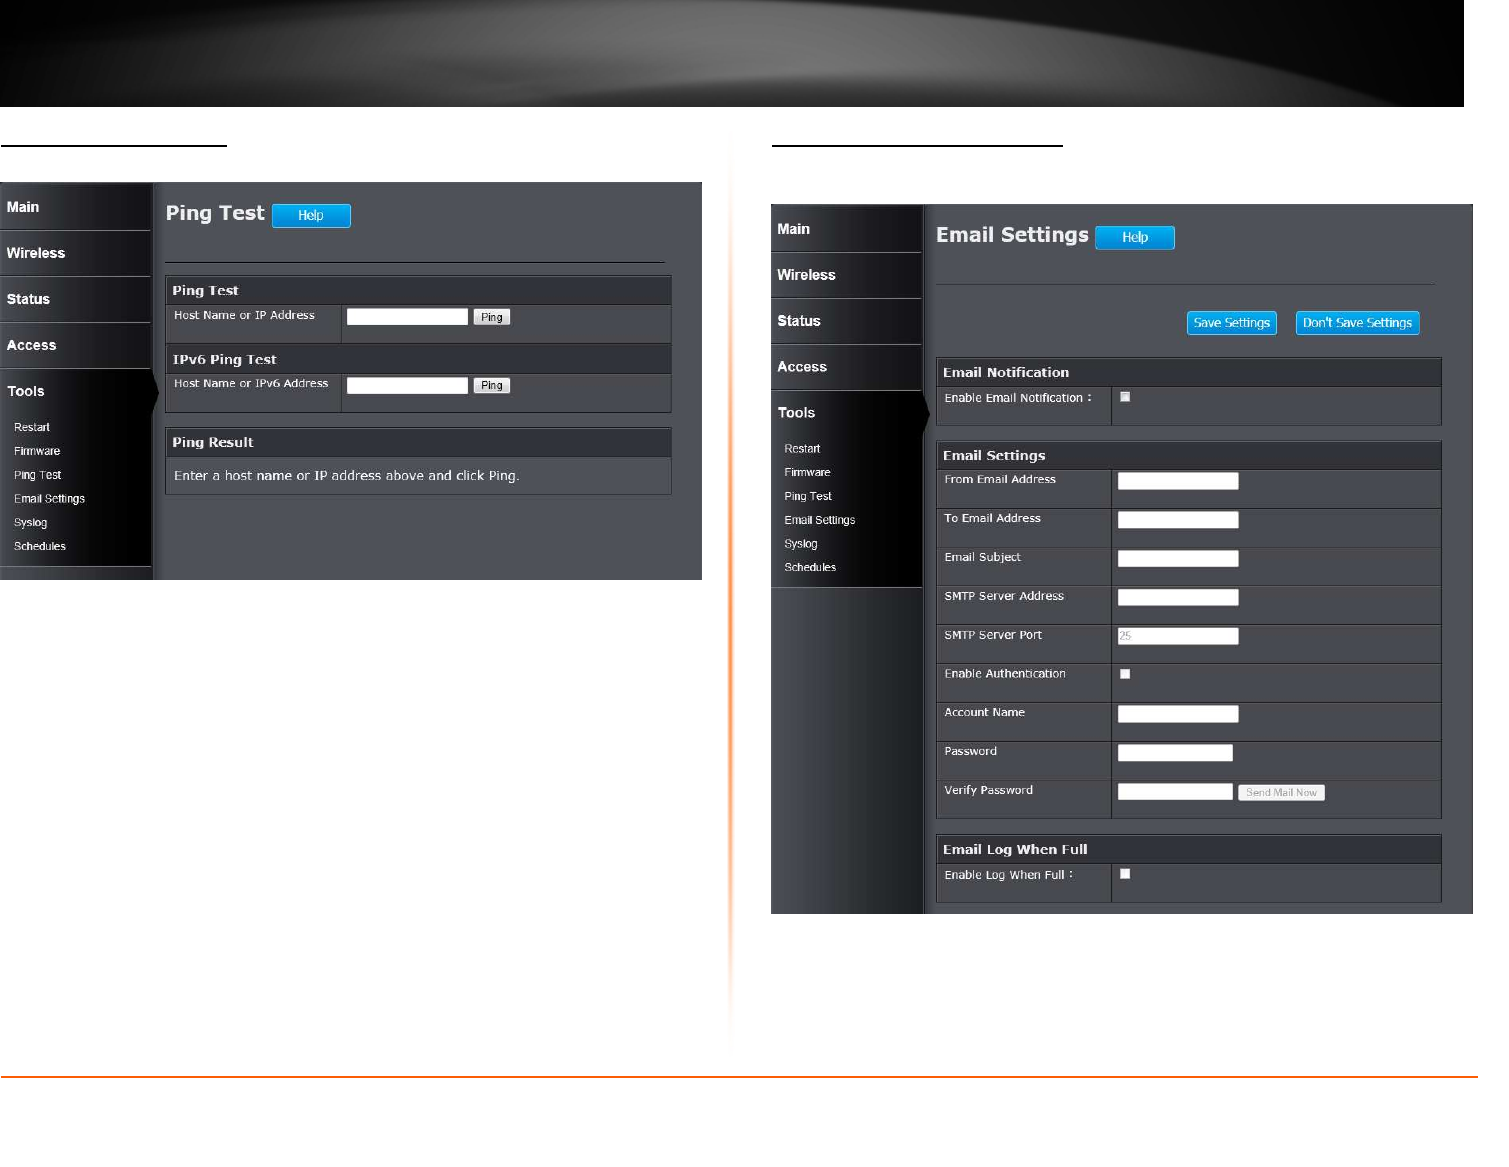
This window is used to initiate a ping test to IPv4 and IPv6 address.
Ping Test
Host Name or IP Address: Enter the IPv4 address or host name of the target in
the text box and click the Ping button to initiate the Ping test.
IPv6 Ping Test
Host Name or IPv6 Address: Enter the IPv6 address or host name of the target
in the text box and click the Ping button to initiate the Ping test.
Ping Result
The ping result will display in this section.
Tools > Email Settings
This window allows you to configure the e-mail settings for the AP to send the
notification to the e-mail account.
Email Notification
Enable Email Notification: Tick the check box to enable the email notification
feature.
Email Settings
From Email Address: Enter the sender’s email address.
© Copyright 2013 TRENDnet. All Rights Reserved.
TRENDnet User’s Guide
TEW750DAP
29
To Email Address: Enter the recipient’s email address.
Email Subject: Enter the email’s subject information.
SMTP Server Address: Enter the SMTP server’s IP address.
SMTP Server Port: Enter the SMTP server’s port number.
Enable Authentication: Tick the check box to enable SMTP authentication.
Account Name: Enter the email account username.
Password: Enter the email account password.
Verify Password: Re-type the email account password.
Email Log when Full
Enable Log When Full: Tick the check box to send out an email when the log
space is close to depletion.
Click the Save Settings button to accept the changes made.
Click the Don’t Save Settings button to discard the changes made.
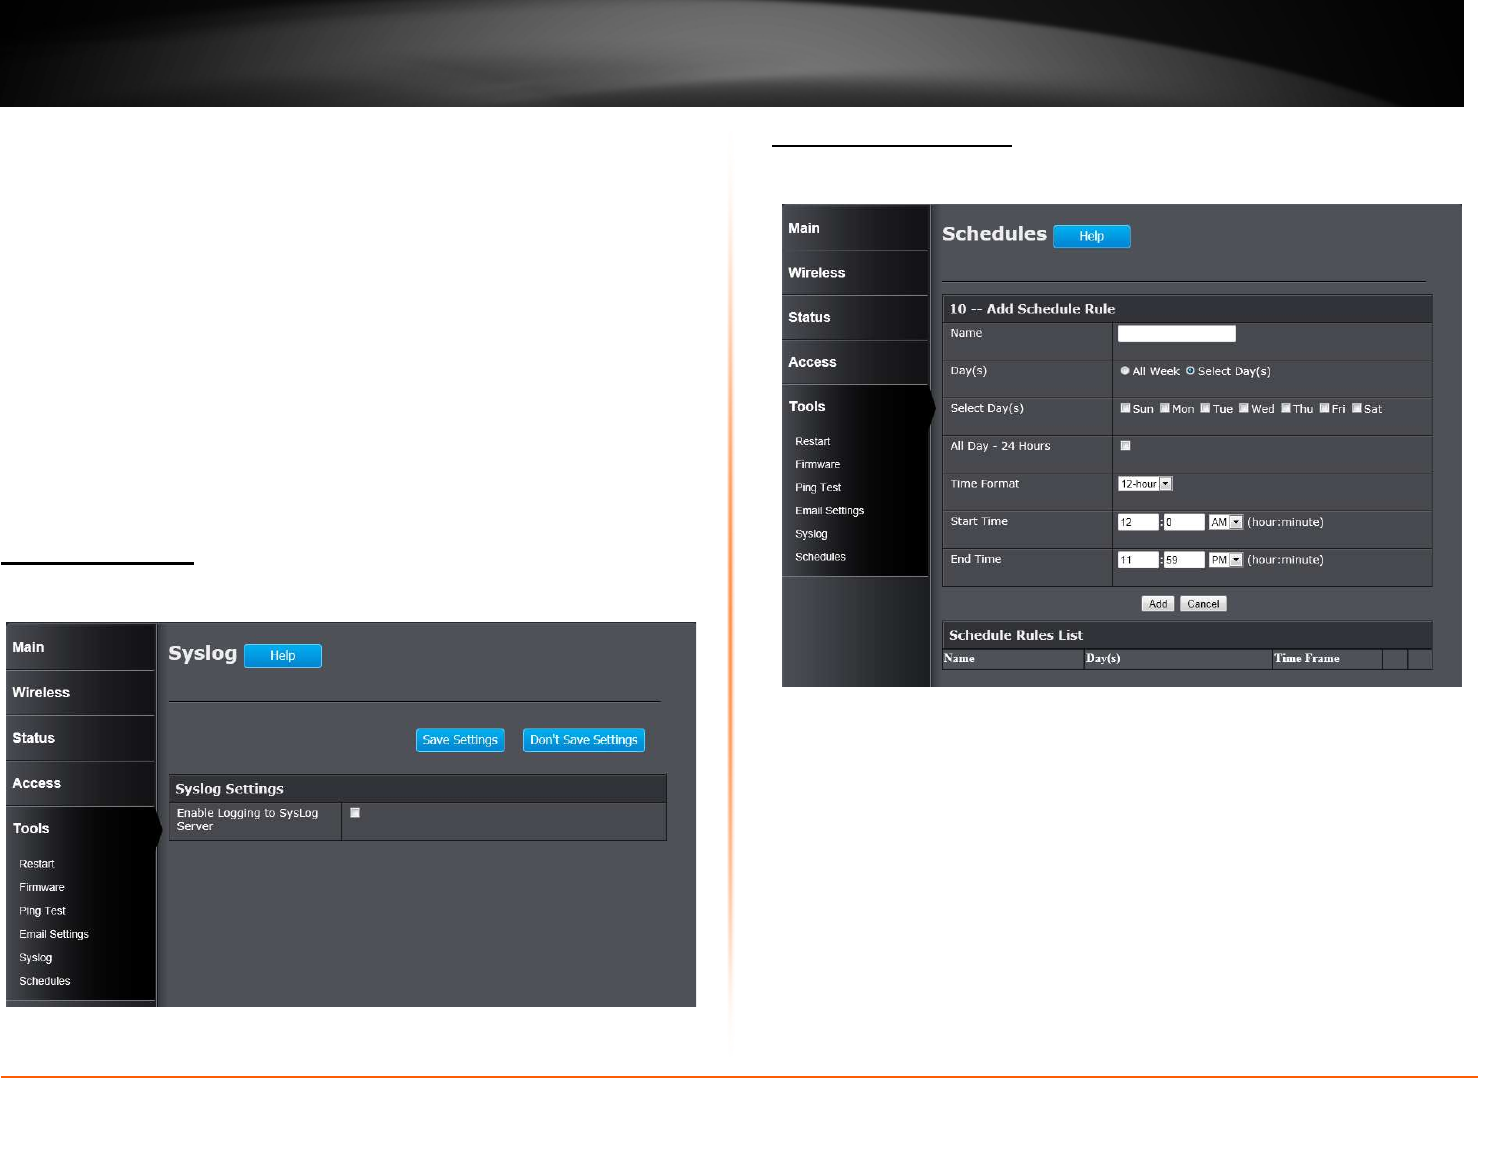
Tools > Syslog
The AP keeps a running log of events and activities occurring on the AP. You
may send these logs to a SysLog server on your network.
Enable Logging to SysLog Server: Tick the box to send the AP logs to a
SysLog Server.
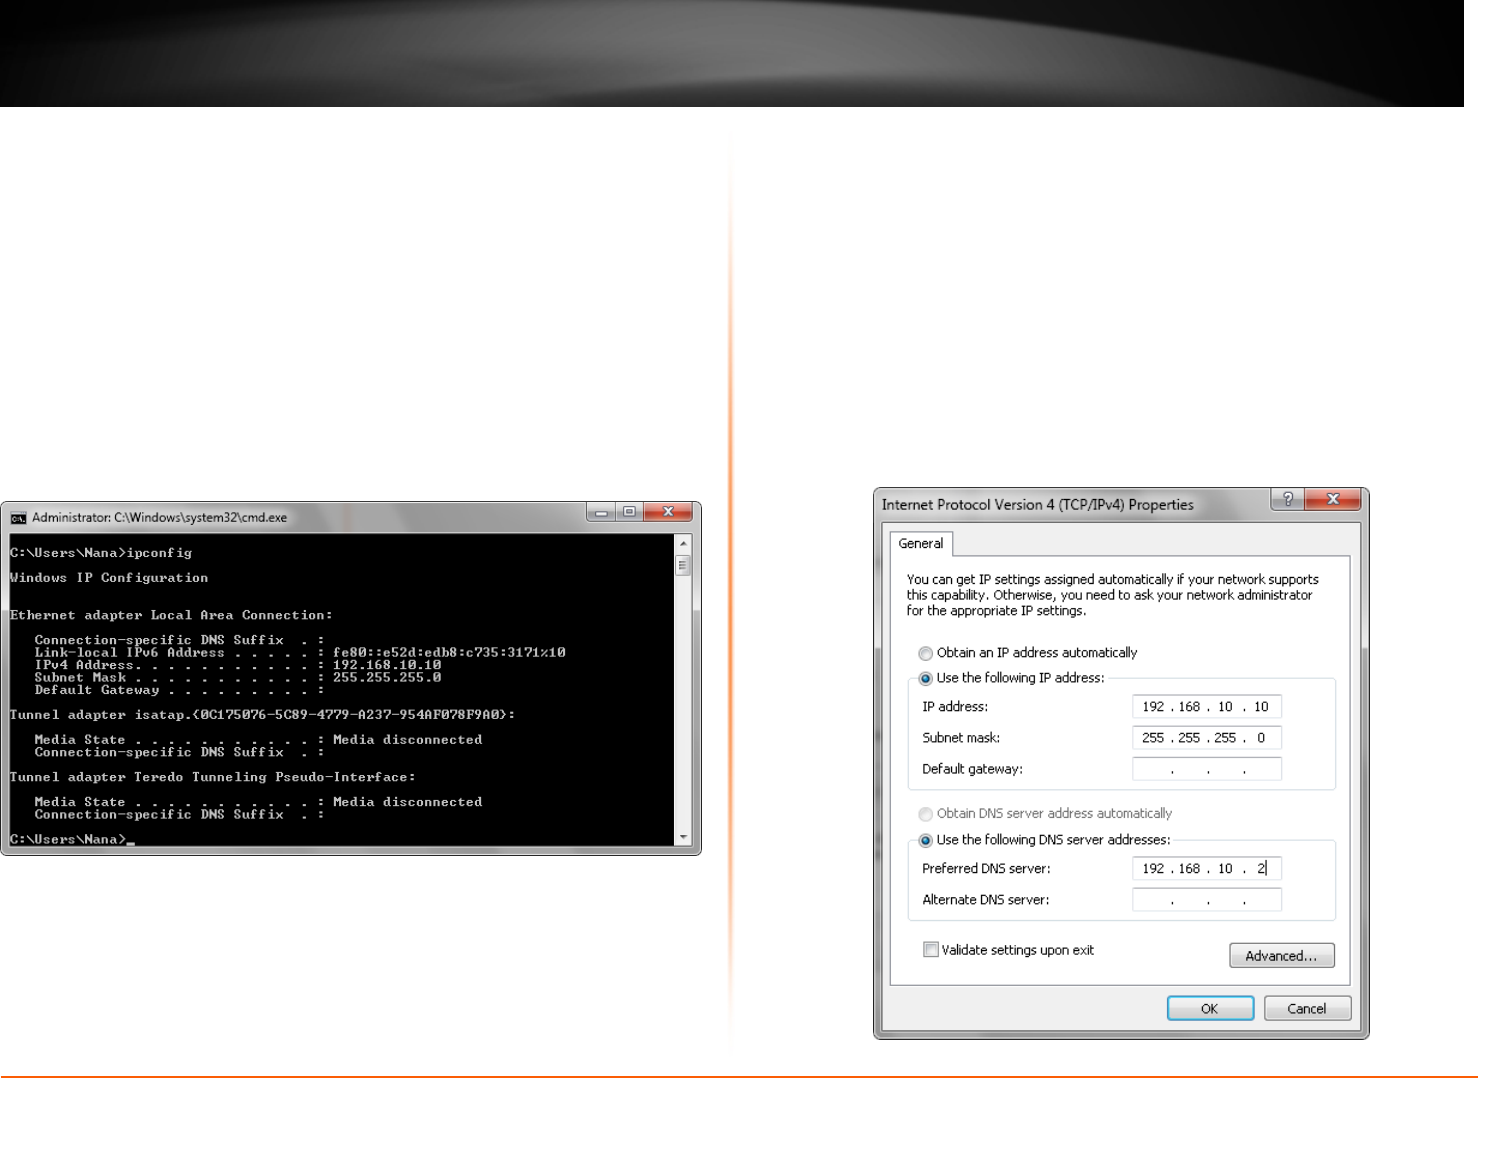
Tools > Schedules
This window is used to configure the time and date schedules. The configured
schedule can be applied to various functions.
Name: Enter the name for the time and date schedule.
Days(s): Click the All Week radio button to use all the weekdays for this
schedule. Click the Select Day(s) radio button to use only the selected days in
the week.
Select Day(s): When the Select Day(s) radio button is selected, tick the check
box to select which day of the week to be used.
All Day – 24 hrs: Tick the check box to use all the hours in a day.
Time Format: Select the time format. Options to choose from are 12-hour and
24-hour.
Start Time: Enter the starting time of a day.
End Time: Enter the ending time of a day.
Click the Add button to add this schedule into the schedule rules list.
Click the Cancel button to discard the changes made.
© Copyright 2013 TRENDnet. All Rights Reserved.
TRENDnet User’s Guide
TEW750DAP
30
Networking Basics
After you installed your new network or wireless adapter, by default, the TCP/IP
settings should be set to obtain an IP address automatically from a DHCP server.
By default the DHCP server option on your AP is enabled.
To verify your IP address, please follow the steps below:
• Click the Windows Start button and open the Run application.
• In the Open check box, type cmd and click OK.
• At the command prompt, type in the command ipconfig and press Enter.
This will display the IP address, Subnet Mask, and the Default Gateway
of your adapter. If the address is 0.0.0.0, it means that your network
adapter did not receive an IP address from the DHCP server. Check your
adapter installation, security settings, and the settings on your AP. Some
firewall software programs may block a DHCP request on newly installed
adapters.
Statically Assign an IP address
If you are not using a DHCP capable gateway/AP, or you need to assign a static
IP address, please follow the steps below:
• Click the Windows Start button and navigate to the Control Panel >
Network and Sharing Center and click the Change Adapter Settings
option on the left panel.
• Right-click the Local Area Connection, which represents your network
adapter, and select Properties.
• Select the Internet Protocol Version 4 (TCP/IPv4) option and click the
Properties button.
• Select Use the following IP address and enter an IP address that is on
the same subnet as your AP. For example: If your AP is running on the
IP address of 192.168.10.100, use any IP address from 192.168.10.1 to
192.168.10.99, or 192.168.10.101 to 192.168.10.254. Use the Subnet
Mask of 255.255.255.0. Set Default Gateway the same as the LAN IP
address of your AP. Set Preferred DNS server IP address the same as
the LAN IP address of your AP. The Secondary DNS is not needed at
this stage.
• Click the OK button twice to return to the Network Connections window.

© Copyright 2013 TRENDnet. All Rights Reserved.
TRENDnet User’s Guide
TEW750DAP
31
Wireless Basics
Wireless products are based on industry standards to provide easy-to-use and
compatible high-speed wireless connectivity within your home, business or public
access wireless networks. Strictly adhering to the IEEE standard, the wireless
family of products will allow you to securely access the data you want, when and
where you want it. You will be able to enjoy the freedom that wireless networking
delivers.
A wireless local area network (WLAN) is a cellular computer network that
transmits and receives data with radio signals instead of wires. Wireless LANs
are used increasingly in both home and office environments, and public areas
such as airports, coffee shops and universities. Innovative ways to utilize WLAN
technology are helping people to work and communicate more efficiently.
Increased mobility and the absence of cabling and other fixed infrastructure have
proven to be beneficial for many users.
Wireless users can use the same applications they use on a wired network.
Wireless adapter cards used on laptop and desktop systems support the same
protocols as Ethernet adapter cards.
Under many circumstances, it may be desirable for mobile network devices to
link to a conventional Ethernet LAN in order to use servers, printers or an Internet
connection supplied through the wired LAN. A Wireless AP is a device used to
provide this link.
What is Wireless?
Wireless or Wi-Fi technology is another way of connecting your computer to the
network without using wires. Wi-Fi uses radio frequency to connect wirelessly, so
you have the freedom to connect computers anywhere in your home or office
network.
How does Wireless work?
Wireless works similar to how cordless phone work, through radio signals to
transmit data from one point A to point B. But wireless technology has restrictions
as to how you can access the network. You must be within the wireless network
range area to be able to connect your computer. There are two different types of
wireless networks Wireless Local Area Network (WLAN), and Wireless Personal
Area Network (WPAN).
Wireless Local Area Network (WLAN)
In a wireless local area network, a device called an Access Point (AP) connects
computers to the network. The access point has a small antenna attached to it,
which allows it to transmit data back and forth over radio signals. With an indoor
access point as seen in the picture, the signal can travel up to 300 feet. With an
outdoor access point the signal can reach out up to 30 miles to serve places like
manufacturing plants, industrial locations, college and high school campuses,
airports, golf courses, and many other outdoor venues.
Wireless Personal Area Network (WPAN)
Bluetooth is the industry standard wireless technology used for WPAN. Bluetooth
devices in WPAN operate in a range up to 30 feet away. Compared to WLAN the
speed and wireless operation range are both less than WLAN, but in return it
doesn’t use nearly as much power which makes it ideal for personal devices,
such as mobile phones, PDAs, headphones, laptops, speakers, and other
devices that operate on batteries.
Who uses wireless?
Wireless technology has become so popular in recent years that almost
everyone is using it, whether it’s for home, office, business, we have a wireless
solution for it.
Home
• Gives everyone at home broadband access.
• Surf the web, check email, instant message, etc.
• Gets rid of the cables around the house.
• Simple and easy to use.
Small Office and Home Office
• Stay on top of everything at home as you would at office.
• Remotely access your office network from home.
• Share Internet connection and printer with multiple computers.
• No need to dedicate office space.
Where is wireless used?
Wireless technology is expanding everywhere not just at home or office. People
like the freedom of mobility and it’s becoming so popular that more and more

© Copyright 2013 TRENDnet. All Rights Reserved.
TRENDnet User’s Guide
TEW750DAP
32
public facilities now provide wireless access to attract people. The wireless
connection in public places is usually called “hotspots”.
Using a Wireless Cardbus Adapter with your laptop, you can access the hotspot
to connect to Internet from remote locations like: Airports, Hotels, Coffee Shops,
Libraries, Restaurants, and Convention Centers.
Wireless network is easy to setup, but if you’re installing it for the first time it
could be quite a task not knowing where to start. That’s why we’ve put together a
few setup steps and tips to help you through the process of setting up a wireless
network.
Tips
Here are a few things to keep in mind, when you install a wireless network.
Centralize your AP or Access Point
Make sure you place the AP/access point in a centralized location within your
network for the best performance. Try to place the AP/access point as high as
possible in the room, so the signal gets dispersed throughout your home. If you
have a two-story home, you may need a repeater to boost the signal to extend
the range.
Eliminate Interference
Place home appliances such as cordless telephones, microwaves, and
televisions as far away as possible from the AP/access point. This would
significantly reduce any interference that the appliances might cause since they
operate on same frequency.
Security
Don’t let your next-door neighbors or intruders connect to your wireless network.
Secure your wireless network by turning on the WPA or WEP security feature on
the AP. Refer to product manual for detail information on how to set it up.
Wireless Modes
There are basically two modes of networking:
• Infrastructure – All wireless clients will connect to an access point or
wireless AP.
• Ad-Hoc – Directly connecting to another computer, for peer-to-peer
communication, using wireless network adapters on each computer,
such as two or more wireless network Cardbus adapters.
An Infrastructure network contains an Access Point or wireless AP. All the
wireless devices, or clients, will connect to the wireless AP or access point.
An Ad-Hoc network contains only clients, such as laptops with wireless Cardbus
adapters. All the adapters must be in Ad-Hoc mode to communicate.
Wireless Security
This section will show you the different levels of security you can use to protect
your data from intruders. The AP offers wireless security options like WPA/WPA2
PSK/EAP.
What is WPA?
WPA (Wi-Fi Protected Access) is a Wi-Fi standard that was designed to improve
the security features of WEP (Wired Equivalent Privacy).
The 2 major improvements over WEP:
• Improved data encryption through the Temporal Key Integrity Protocol
(TKIP). TKIP scrambles the keys using a hashing algorithm and, by
adding an integrity-checking feature, ensures that the keys haven’t been
tampered with. WPA2 is based on 802.11i and uses Advanced
Encryption Standard (AES) instead of TKIP.
• User authentication, which is generally missing in WEP, through the
extensible authentication protocol (EAP). WEP regulates access to a
wireless network based on a computer’s hardware-specific MAC address,
which is relatively simple to be sniffed out and stolen. EAP is built on a
more secure public-key encryption system to ensure that only authorized
network users can access the network.
WPA-PSK/WPA2-PSK uses a passphrase or key to authenticate your wireless
connection. The key is an alpha-numeric password between 8 and 63 characters
long. The password can include symbols (!?*&_) and spaces. This key must be
the exact same key entered on your wireless AP or access point.
WPA/WPA2 incorporates user authentication through the Extensible
Authentication Protocol (EAP). EAP is built on a more secure public key
encryption system to ensure that only authorized network users can access the
network.

© Copyright 2012 TRENDnet. All Rights Reserved.
TRENDnet User’s Guide
Back Page
33
Technical Specifications
Hardware Specifications
• LAN Interface: Four 10/100Mbps LAN ports
• WPS button
• Reset button
• Power button
• Wireless Interface (2.4GHz): IEEE 802.11b/g/n
• Wireless Interface (5GHz): IEEE 802.11a/n
Operating Voltage
• Input: 100~240V (±10%), 50~60Hz
• Output: DC12V, 1A
• Power Consumption: 10.1 Watt
Temperature
• Operating: 0
o
C~40
o
C (32
o
F~104
o
F)
• Non-Operating: -20
o
C~65
o
C (-4
o
F~149
o
F)
Humidity
• Operating: 10%~90% non-condensing
• Non-Operating: 5%~95% non-condensing
Wireless Frequency Range
• For 15.407
802.11a/n:5.18~5.24GHz
• For 15.247
802.11b/g/n:2.412~2.462GHz
802.11a/n:5.745~5.825GHz
Wireless Bandwidth Rate
• IEEE 802.11b: 11, 5.5, 2, and 1 Mbps
• IEEE 802.11a/g: 54, 48, 36, 24, 18, 12, 9, and 6 Mbps
• IEEE 802.11n: 6.5 to 300 Mbps
Wireless Channel Numbers
• For 15.407
4 for 802.11a,802.11n(HT20)
2 for 802.11n(HT40)
• For 15.247(2.4G)
11 for 802.11b, 802.11g,802.11n(HT20)
7 for 802.11n(HT40)
• For 15.247(5G)
5 for 802.11a,802.11n(HT20)
2 for 802.11n(HT40)

© Copyright 2012 TRENDnet. All Rights Reserved.
TRENDnet User’s Guide
Back Page
34
Wireless Security
• WEP (64/128bit)
• WPA/WPA2-Personal
• WPA/WPA2-Enterprise
• WPS (PIN & PBC)
• 802.1X
Wireless Modulation
• IEEE 802.11a: BPSK, QPSK, 16QAM, 64QAM, and OFDM
• IEEE 802.11b: DQPSK, DBPSK, and CCK
• IEEE 802.11g: BPSK, QPSK, 16QAM, 64QAM, and OFDM
• IEEE 802.11n: BPSK, QPSK, 16QAM, and 64QAM with OFDM
Safety and Emission
• EMI: FCC Class B, CE Class B
• Safety: UL, TUV
Dimensions & Weight
• 120 x 164 x 45 mm
• 241.7 grams
Federal Communication Commission
Interference Statement
This device complies with Part 15 of the FCC Rules. Operation is subject
to the following two conditions: (1) This device may not cause harmful
interference, and (2) this device must accept any interference received,
including interference that may cause undesired operation.
This equipment has been tested and found to comply with the limits for a
Class B digital device, pursuant to Part 15 of the FCC Rules. These
limits are designed to provide reasonable protection against harmful
interference in a residential installation. This equipment generates, uses
and can radiate radio frequency energy and, if not installed and used in
accordance with the instructions, may cause harmful interference to
radio communications. However, there is no guarantee that interference
will not occur in a particular installation. If this equipment does cause
harmful interference to radio or television reception, which can be
determined by turning the equipment off and on, the user is encouraged
to try to correct the interference by one of the following measures:
- Reorient or relocate the receiving antenna.
- Increase the separation between the equipment and receiver.

© Copyright 2012 TRENDnet. All Rights Reserved.
TRENDnet User’s Guide
Back Page
35
- Connect the equipment into an outlet on a circuit different from
that
to which the receiver is connected.
- Consult the dealer or an experienced radio/TV technician for
help.
FCC Caution: Any changes or modifications not expressly approved by
the party responsible for compliance could void the user's authority to
operate this equipment.
This transmitter must not be co-located or operating in conjunction with
any other antenna or transmitter.
For operation within 5.15 ~ 5.25GHz frequency range, it is restricted to
indoor environment. This device meets all the other requirements
specified in Part 15E, Section 15.407 of the FCC Rules.

© Copyright 2012 TRENDnet. All Rights Reserved.
TRENDnet User’s Guide
Back Page
36
Radiation Exposure Statement:
This equipment complies with FCC radiation exposure limits set forth for
an uncontrolled environment. This equipment should be installed and
operated with minimum distance 20cm between the radiator & your body.
Note: The country code selection is for non-US model only and is not
available to all US model. Per FCC regulation, all WiFi product marketed
in US must fixed to US operation channels only.