TRENDNET TEW821DAP AC1200 Dual Band PoE Access Point User Manual
TRENDNET, Inc. AC1200 Dual Band PoE Access Point Users Manual
UserManual.wiki
>
TRENDNET
>
TEW821DAP User Manual
Users Manual
Navigation menu
Upload a User Manual
Namespaces
Wiki Guide
HTML
PDF
Info
Views
User Manual
Discussion / Help
Navigation


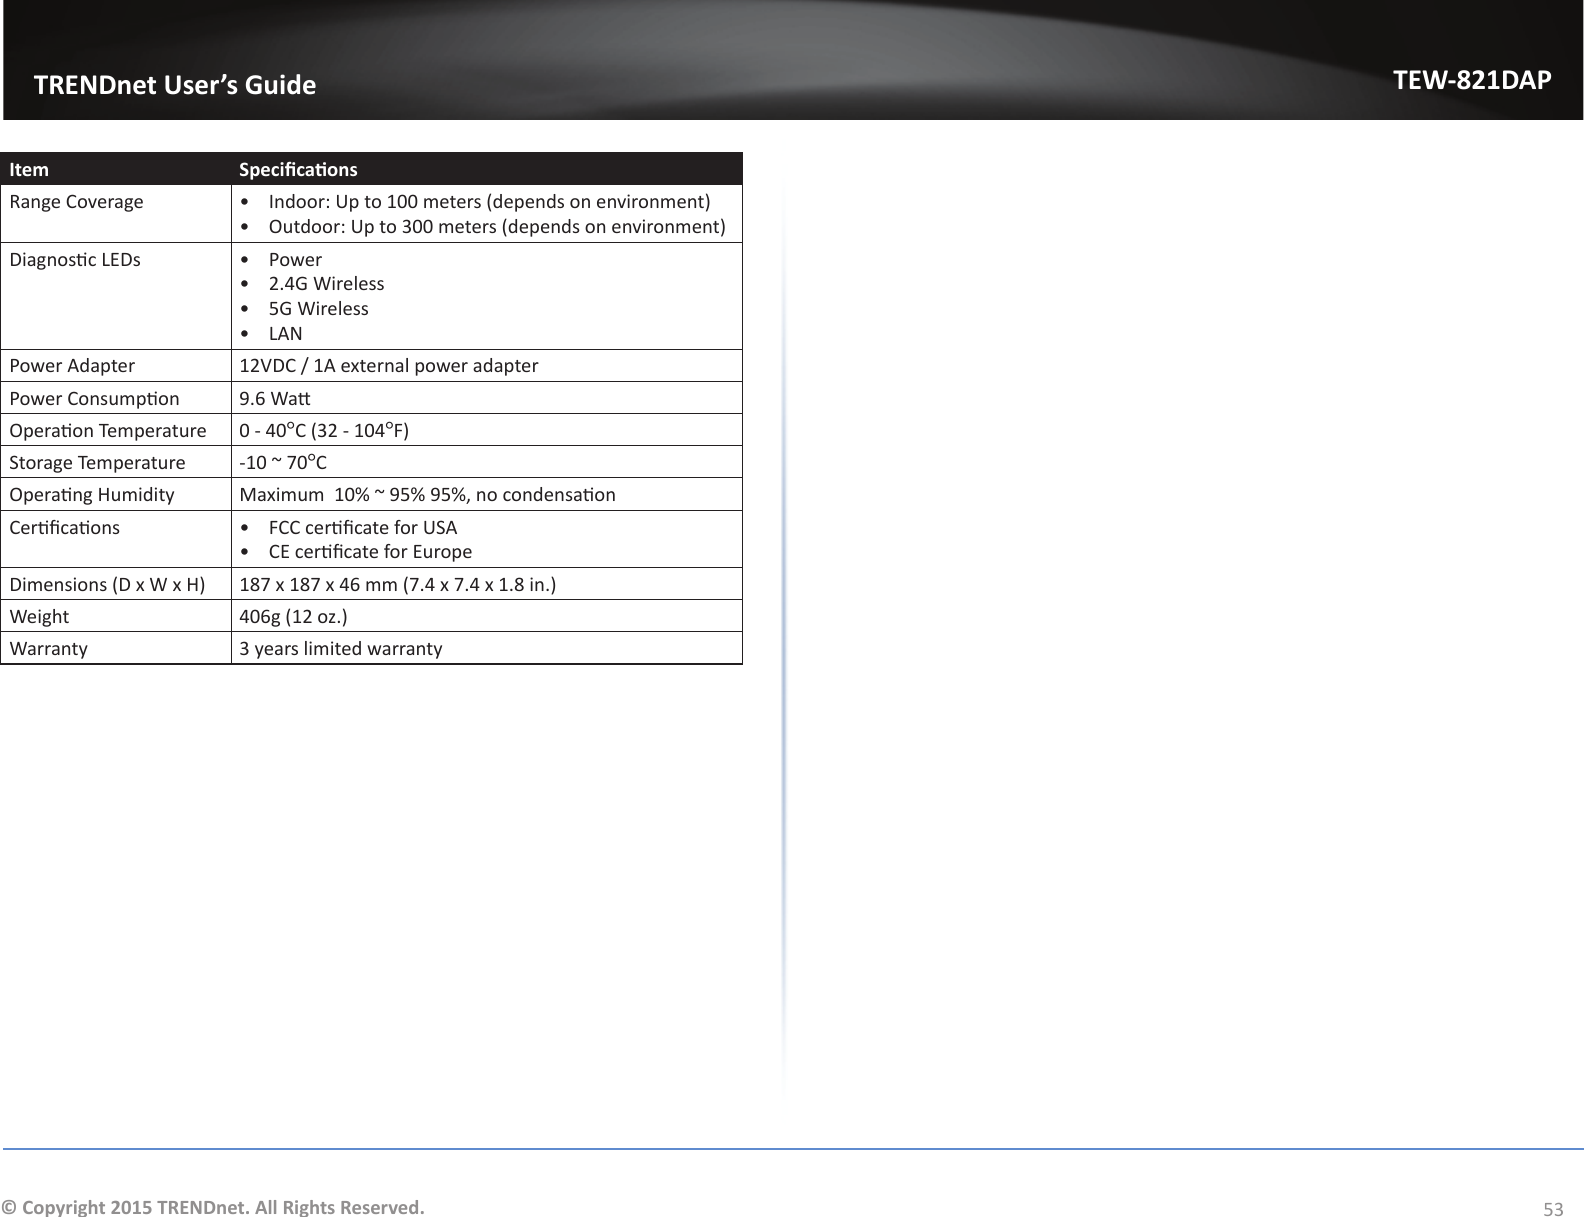
![TRENDnet User’s GuideTEW-821DAP55© Copyright 2015 TRENDnet. All Rights Reserved.Industry Canada Statement:This device complies with Industry Canada’s licence-exempt RSSs. Operaon is subject to the following two condions: (1) This device may not cause interference; and (2) This device must accept any interference, including interference that may cause undesired operaon of the device. Cet appareil est conforme aux CNR exemptes de licence d’Industrie Canada. Son fonconnement est soumis aux deux condions suivantes:(1) Ce disposif ne peut causer d’interférences; et(2) Ce disposif doit accepter toute interférence, y compris les interférences qui peuvent causer un mauvais fonconnement de l’appareil.Cauon:(i) the device for operaon in the band 5150-5250 MHz is only for indoor use to reduce the potenal for harmful interference to co-channel mobile satellite systems;Averssement:(i) les disposifs fonconnant dans la bande 5150-5250 MHz sont réservés uniquement pour une ulisaon à l’intérieur an de réduire les risques de brouillage préjudiciable aux systèmes de satellites mobiles ulisant les mêmes canaux;Radiaon Exposure Statement:This equipment complies with IC radiaon exposure limits set forth for an uncontrolled environment. This equipment should be installed and operated with minimum distance 20cm between the radiator & your body.Déclaraon d’exposion aux radiaons:Cet équipement est conforme aux limites d’exposion aux rayonnements IC établies pour un environnement non contrôlé. Cet équipement doit être installé et ulisé avec un minimum de 20 cm de distance entre la source de rayonnement et votre corps. Česky [Czech] TRENDnet mto prohlašuje, že tento TEW-814DAP je ve shodě se základními požadavky a dalšími příslušnými ustanoveními směrnice 1999/5/ES, 2006/95/ES, a 2009/125/ES. Dansk [Danish]Undertegnede TRENDnet erklærer herved, at følgende udstyr TEW-814DAP overholder de væsentlige krav og øvrige relevante krav i direkv 1999/5/EF, 2006/95/EF, og 2009/125/EF. Deutsch [German]Hiermit erklärt TRENDnet, dass sich das Gerät TEW-814DAP in Übereinsmmung mit den grundlegenden Anforderungen und den übrigen einschlägigen Besmmungen der Richtlinie 1999/5/EG, 2006/95/EG und 2009/125/EG bendet. Ees [Estonian]Käesolevaga kinnitab TRENDnet seadme TEW814DAP vastavust direkivi 1999/5/EÜ, 2006/95/EÜ ja 2009/125/EÜ põhinõuetele ja nimetatud direkivist tulenevatele teistele asjakohastele sätetele. English Hereby, TRENDnet, declares that this TEW-814DAP is in compliance with the essenal requirements and other relevant provisions of Direcve 1999/5/EC, 2006/95/EC, and 2009/125/EC. Español [Spanish]Por medio de la presente TRENDnet declara que el TEW-814DAP cumple con los requisitos esenciales y cualesquiera otras disposiciones aplicables o exigibles de la Direcva 1999/5/CE, 2006/95/CE, 2009/125/CE y. Ελληνική [Greek]ΜΕ ΤΗΝ ΠΑΡΟΥΣΑTRENDnet ΔΗΛΩΝΕΙ ΟΤΙ TEW-814DAP ΣΥΜΜΟΡΦΩΝΕΤΑΙ ΠΡΟΣ ΤΙΣ ΟΥΣΙΩΔΕΙΣ ΑΠΑΙΤΗΣΕΙΣ ΚΑΙ ΤΙΣ ΛΟΙΠΕΣ ΣΧΕΤΙΚΕΣ ΔΙΑΤΑΞΕΙΣ ΤΗΣ ΟΔΗΓΙΑΣ 1999/5/ΕΚ, 2006/95/ΕΚ, 2009/125/ΕΚ και. Français [French]Par la présente TRENDnet déclare que l’appareil TEW-814DAP est conforme aux exigences essenelles et aux autres disposions pernentes de la direcve 1999/5/CE, 2006/95/CE, 2009/125/CE et. Italiano [Italian]Con la presente TRENDnet dichiara che questo TEW-814DAP è conforme ai requisi essenziali ed alle altre disposizioni pernen stabilite dalla direva 1999/5/CE, 2006/95/CE e 2009/125/CE. Latviski [Latvian]AršoTRENDnetdeklarē, ka TEW-814DAP atbilstDirekvas 1999/5/EK, 2006/95/EK, un 2009/125/EK būskajāmprasībām un ciemar to saistajiemnoteikumiem.](https://usermanual.wiki/TRENDNET/TEW821DAP/User-Guide-2704048-Page-55.png)
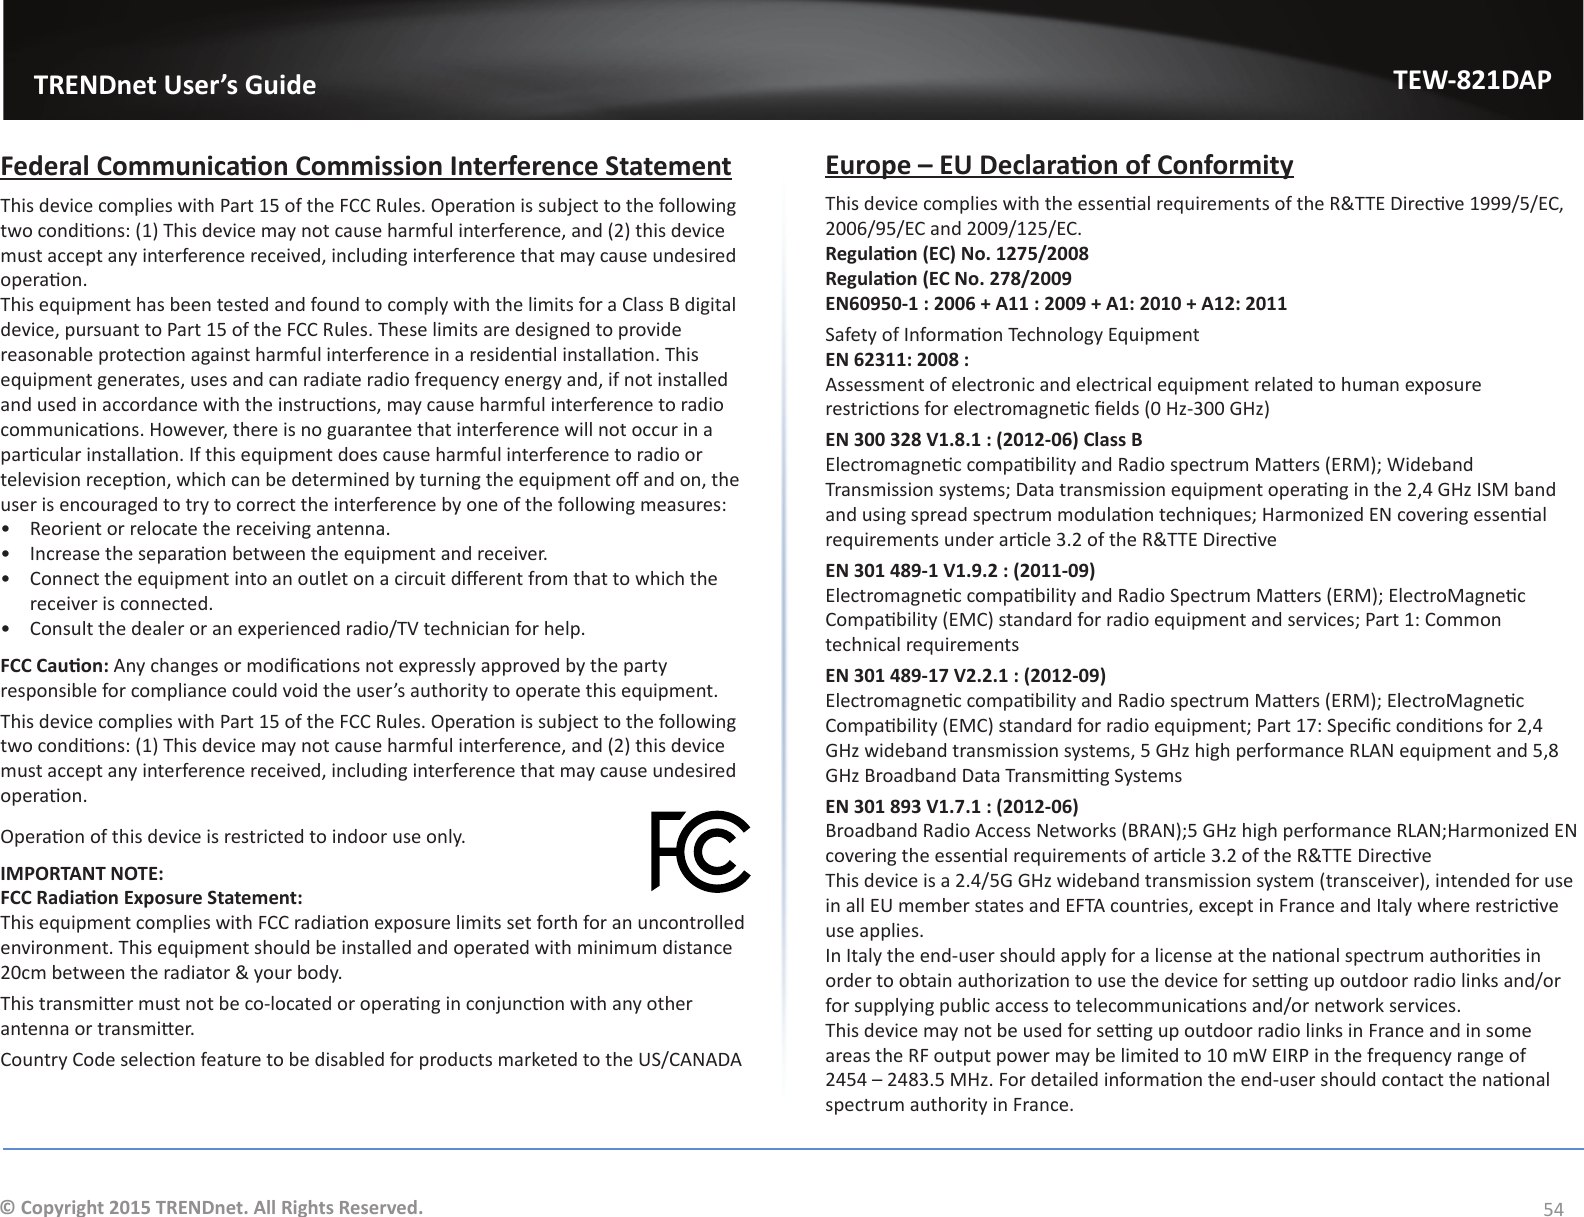
![TRENDnet User’s GuideTEW-821DAP56© Copyright 2015 TRENDnet. All Rights Reserved. Lietuvių [Lithuanian]Šiuo TRENDnet deklaruoja, kad šis TEW-814DAP anka esminius reikalavimus ir kitas 1999/5/EB, 2006/95/EB ir 2009/125/EB Direktyvos nuostatas. Nederlands [Dutch]Hierbij verklaart TRENDnet dat het toestel TEW-814DAP in overeenstemming is met de essenële eisen en de andere relevante bepalingen van richtlijn 1999/5/EG, 2006/95/EG, en 2009/125/EG. Mal [Maltese]Hawnhekk, TRENDnet, jiddikjara li dan TEW-814DAP jikkonforma mal-ħġijiet essenzjali u ma provvedimen oħrajn relevan li hemm d-Dirreva 1999/5/KE, 2006/95/KE, u 2009/125/KE. Magyar [Hungarian]Alulíro, TRENDnet nyilatkozom, hogy a TEW-814DAP megfelel a vonatkozó alapvetõ követelményeknek és az 1999/5/EK irányelv, a 2006/95/EK és a 2009/125/EK irányelv egyéb elõírásainak. Polski [Polish] Niniejszym TRENDnet oświadcza, że TEW-814DAP jest zgodny z zasadniczymi wymogami oraz pozostałymi stosownymi postanowieniami Dyrektywy 1999/5/WE, 2006/95/WE i 2009/125/WE. Português [Portuguese]TRENDnet declara que este TEW-814DAP está conforme com os requisitos essenciais e outras disposições da Direcva 1999/5/CE, 2006/95/CE e 2009/125/CE. Slovensko [Slovenian]TRENDnet izjavlja, da je ta TEW-814DAP v skladu z bistvenimi zahtevami in ostalimi relevantnimi določili direkve 1999/5/ES, 2006/95/ES in 2009/125/ES. Slovensky [Slovak]TRENDneýmtovyhlasuje, že TEW-814DAP spĺňazákladnépožiadavky a všetkypríslušnéustanoveniaSmernice 1999/5/ES, 2006/95/ES, a 2009/125/ES. Suomi [Finnish]TRENDnet vakuuaa täten eä TEW-814DAP tyyppinen laite on direkivin 1999/5/EY, 2006/95/EY ja 2009/125/EY oleellisten vaamusten ja sitä koskevien direkivin muiden ehtojen mukainen. Svenska [Swedish]Härmed intygar TRENDnet a denna TEW-814DAP står I överensstämmelse med de väsentliga egenskapskrav och övriga relevanta bestämmelser som framgår av direkv 1999/5/EG, 2006/95/EG och 2009/125/EG.Limited WarrantyTRENDnet warrants its products against defects in material and workmanship, undernormal use and service, for the following lengths of me from the date of purchase.• TEW-821DAP – 3 Years Warranty• AC/DC Power Adapter, Cooling Fan, and Power Supply carry 1 year warranty.If a product does not operate as warranted during the applicable warranty period,TRENDnet shall reserve the right, at its expense, to repair or replace the defecveproduct or part and deliver an equivalent product or part to the customer. Therepair/replacement unit’s warranty connues from the original date of purchase. Allproducts that are replaced become the property of TRENDnet. Replacement productsmay be new or recondioned. TRENDnet does not issue refunds or credit. Pleasecontact the point-of-purchase for their return policies.TRENDnet shall not be responsible for any soware, rmware, informaon, ormemory data of customer contained in, stored on, or integrated with any productsreturned to TRENDnet pursuant to any warranty.There are no user serviceable parts inside the product. Do not remove or aempt toservice the product by any unauthorized service center. This warranty is voided if (i)the product has been modied or repaired by any unauthorized service center, (ii) theproduct was subject to accident, abuse, or improper use (iii) the product was subjectto condions more severe than those specied in the manual.Warranty service may be obtained by contacng TRENDnet within the applicablewarranty period and providing a copy of the dated proof of the purchase. Uponproper submission of required documentaon a Return Material Authorizaon (RMA)number will be issued. An RMA number is required in order to iniate warrantyservice support for all TRENDnet products. Products that are sent to TRENDnet forRMA service must have the RMA number marked on the outside of return packagesand sent to TRENDnet prepaid, insured and packaged appropriately for safe shipment.Customers shipping from outside of the USA and Canada are responsible for returnshipping fees. Customers shipping from outside of the USA are responsible for customcharges, including but not limited to, duty, tax, and other fees.](https://usermanual.wiki/TRENDNET/TEW821DAP/User-Guide-2704048-Page-56.png)