TRENDNET TVIP745SIC WiFi HD Baby Cam User Manual EN Draft TV IP745SIC V1 0R
TRENDNET, Inc. WiFi HD Baby Cam EN Draft TV IP745SIC V1 0R
TRENDNET >
Contents
(TV-IP745SIC)UserMan
WiFi HD Baby Cam
TV-IP745SIC
TV-IP745SIC (V1)/ 08.05.2014
ŸQuick Installation Guide (1)
1
Minimum Requirements
Package Contents
1. Before You Start
ŸTV-IP745SIC
ŸMulti-Language Quick Installation Guide
ŸCD-ROM (User’s Guide)
ŸPower adapter (5V DC, 1A) (3 m / 10 ft.)
ŸCamera mounting hardware
ŸExisting Wireless N network
ŸMobile device (e.g. smartphone, tablet) with Android (version 2.3 or higher) or iOS (version 6.1
or higher)
ŸTRENDnet CloudView app installed on mobile device
Video Installation Guide
The camera video installation guide is provided on the CD. Please navigate to the Manuals folder
and open VideoInstallationGuide.mp4. The camera video installation guide is also available on the
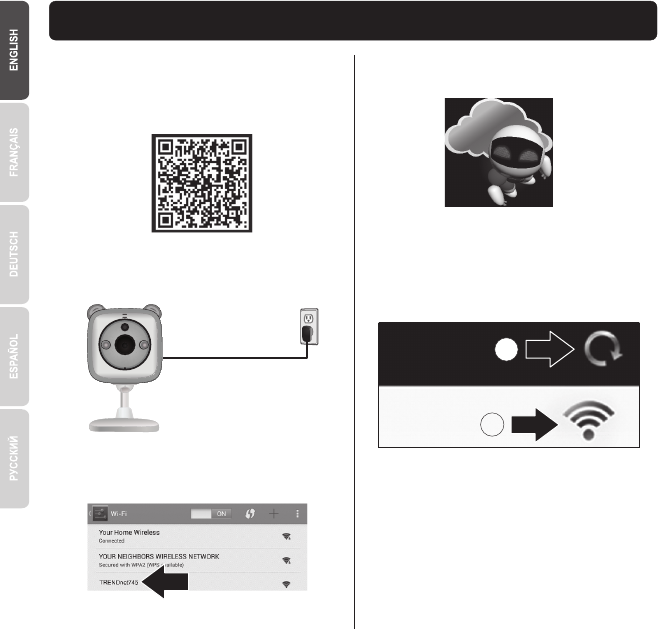
web. Please visit https://www.trendnet.com/mobile/743_745SIC.html or scan the QR code below.
2
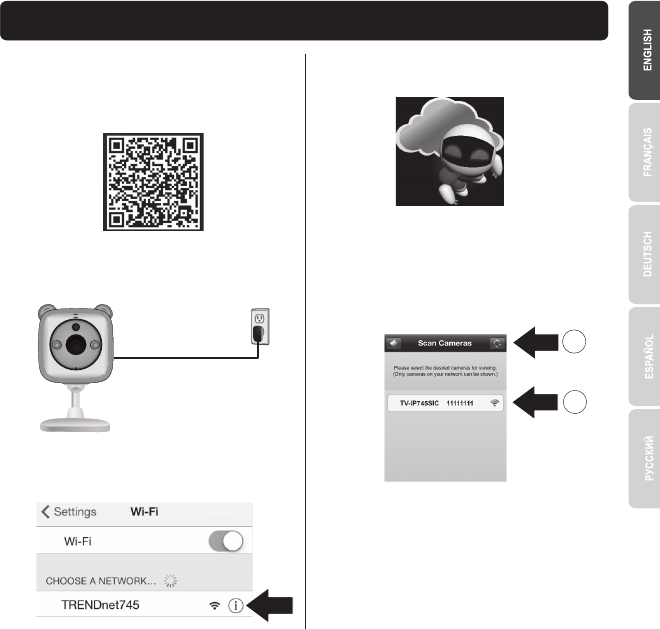
2. Installation with Apple Mobile Device
1. Tap the App Store icon to download and install
the TRENDnet CloudView app. Alternatively,
scan the QR code to download and install the
free TRENDnet CloudView app.
2. Connect the power adapter to the TV-IP745SIC
and then plug it in. Wait 30 seconds until the
amber light turns on.
3. Enable the Wi-Fi settings on your Apple mobile
device, forget your home network and connect
to TRENDnet745.
4. Open the TRENDnet CloudView app and
agree with the terms of use.
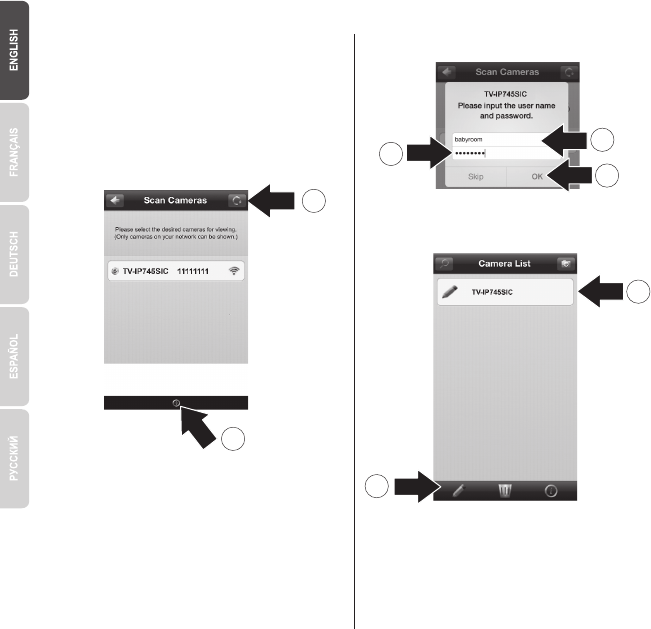
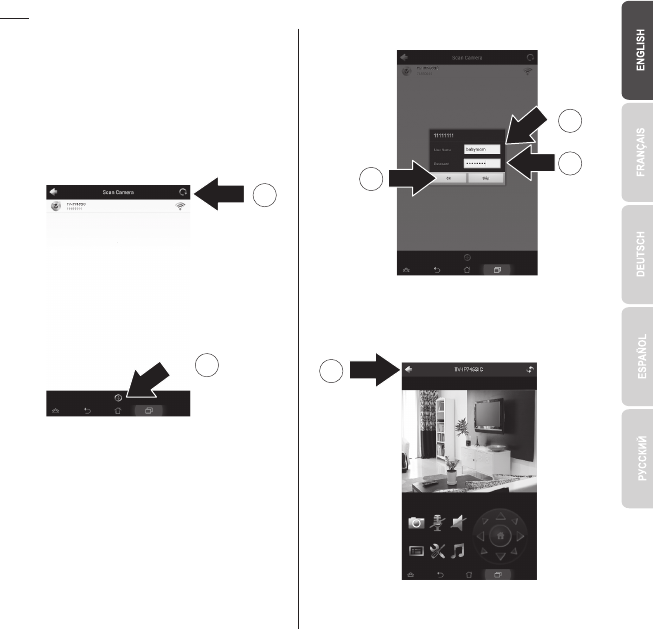
5. The TRENDnet CloudView app will start
searching for your camera automatically. If the
search has failed, tap on the scan icon again.
6. Tap the wireless signal icon to the right of the
baby cam.
7. Enter the camera's default username (admin)
and password (admin).
5
6
3
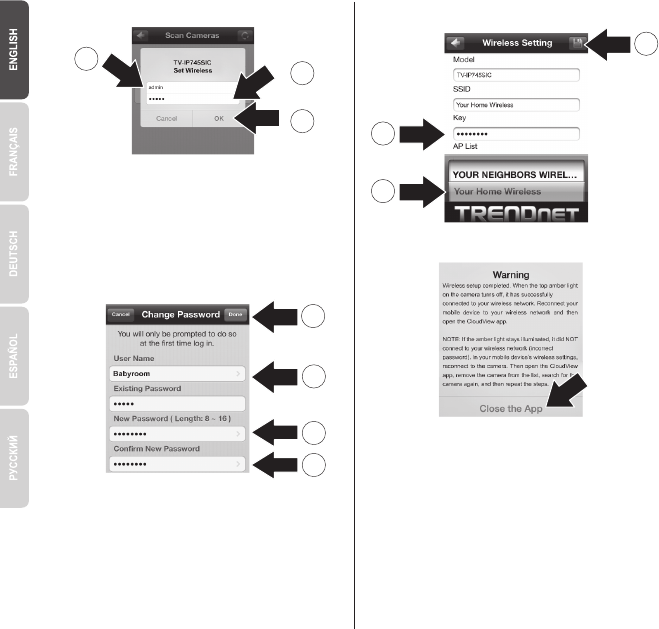
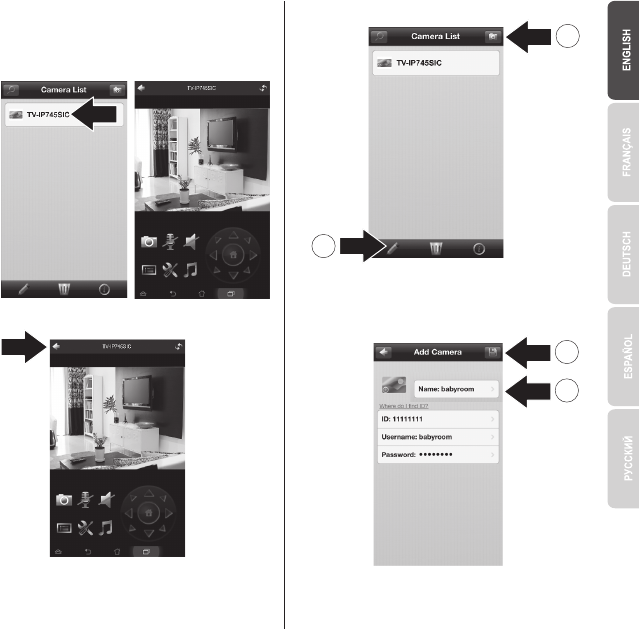
9. Enter an easy to remember username such as
'babyroom'.
10. Enter a password between 8 and 16
characters.
15. Tap the Save icon.
12
9
10
11. Enter the password again.
12. Tap Done to save the changes.
11
13. The app now automatically searches for your
wireless network. Select your wireless
network.
14. Enter the Key (wireless password).
16. Tap Close the App.
8. Tap OK.
7
8
7
14
13
15
4
17. Connect your iPhone or iPad to your wireless
network and relaunch TRENDnet CloudView
app to confirm connectivity to the camera. Tap
the camera to view video.
18. Tap the back icon.
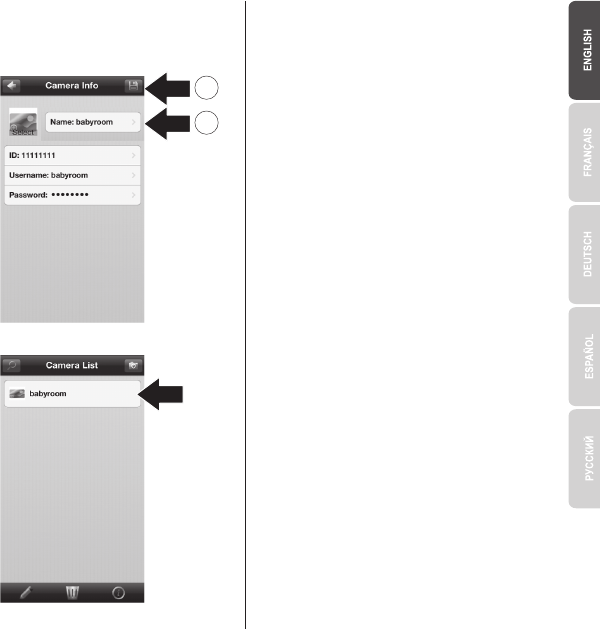
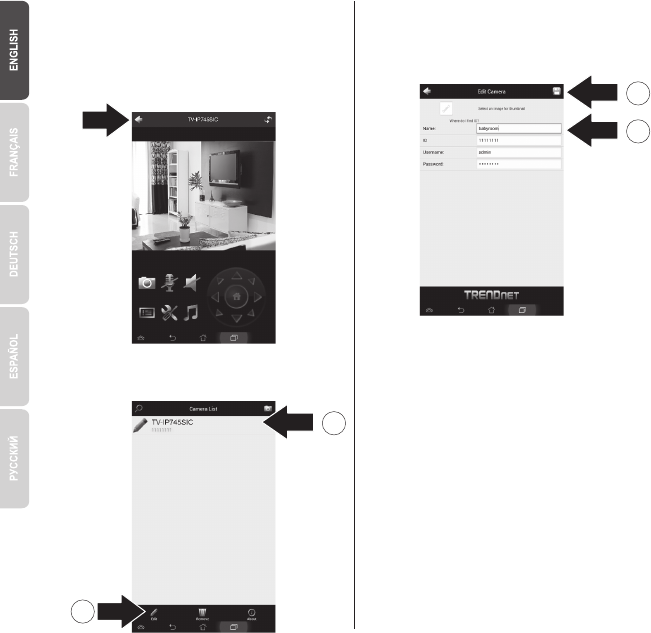
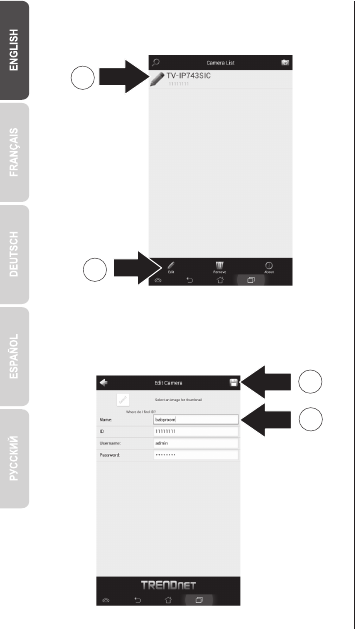
19. In the Camera List, select the camera.
20. Tap the Edit icon.
21. Enter an easy to remember name for the
camera (e.g. babyroom).
22. Tap the save icon.
22
21
23. Install the camera in your desired location.
Before installation, confirm wireless network
coverage is present in the chosen location.
20
19
5
24. Connect your iPhone or iPad to your wireless
network and launch TRENDnet CloudView
app.
25. The TRENDnet CloudView app will start
searching for your camera automatically. If the
search has failed, tap on the scan icon again.
26. Click the add icon.
27. Enter the username and password that you
configured for the camera.
28. Tap OK.
30. Tap the Edit icon.
29
25
26
Note: Please follow the directions below to view the camera on another iPhone or iPad.
30
29. In the Camera List, select the camera.
27
28
27
6
31. Enter an easy to remember name for the
camera (e.g. babyroom).
32. Tap the save icon.
32
31
33. Tap on the camera to confirm connectivity.
34. You can now view your baby cam anywhere
with Internet access. No further installation is
needed. Expect to wait up to 5 minutes if you
are connecting your baby cam remotely for
the first time with a 3G or 4G connection.
Video will display automatically after the first
connection. For instructions on adding camera
through your 3G or 4G connection, please
refer to the CloudView user's guide on the
provided CD.
7
3. Installation with Android Device
1. Tap on the Play Store icon to download and
install the TRENDnet CloudView app.
Alternatively, scan the QR code to download
and install the free TRENDnet CloudView app.
2. Connect the power adapter to the TV-IP745SIC
and then plug it in. Wait 30 seconds until the
amber light turns on.
3. Enable the Wi-Fi settings on your Android
mobile device, forget your home network and
connect to TRENDnet745.
4. Open the TRENDnet CloudView app and
agree with the terms of use.
5. The TRENDnet CloudView app will start
searching for your camera automatically. If the
search has failed, tap on the scan icon again.
6. Tap the wireless signal icon to the right of the
baby cam.
5
6
7. Enter the baby cam's default username
(admin) and password (admin).

8
8. Tap OK.
9. Enter an easy to remember user name such as
'babyroom'.
10. Enter a password between 8 and 16
characters.
13. The app now automatically searches for your
wireless network. Select your wireless
network.
14. Enter the Key (wireless password).
15. Tap the Save icon.
16. Tap Close the App.
11. Enter the password again.
12. Tap the check icon to save the changes.
7
7
8
9
11
10
12
14
15
13
9
17. Connect your Android smartphone or tablet to
your wireless network and relaunch
TRENDnet CloudView app to confirm
connectivity to the baby cam.
18. Tap the back icon.
19. In the Camera List, select the camera.
21. Enter an easy to remember name for the
baby cam (e.g. babyroom).
22. Tap the save icon.
22
21
23. Install the camera in your desired location.
Before installation, confirm wireless network
coverage is present in the chosen location.
20
20. Tap Edit.
19
10
26. Click the add icon.
27. Enter the username and password that you
configured for the camera.
29. Video will appear, confirming connectivity to
the camera.
28. Tap OK.
30. Tap the back icon.
30
25
24. Connect another Android smartphone or
tablet to your wireless network and launch
TRENDnet CloudView app.
25. The TRENDnet CloudView app will start
searching for your camera automatically. If the
search has failed, tap on the scan icon again.
Note: Please follow the directions below to view the camera on another android device.
26
28
27
27
11
33. Enter an easy to remember name for the
camera (e.g. babyroom).
35. You can now view your camera anywhere with
Internet access. No further installation is
needed. Expect to wait up to 5 minutes if you
are connecting your baby cam remotely for the
first time with a 3G or 4G connection. Video
will display automatically after the first
connection. For instructions on adding camera
through your 3G or 4G connection, please
refer to the CloudView user's guide on the
provide CD.
34. Tap the save icon.
32. Tap Edit.
31. In the Camera List, select the baby cam.
34
33
31
32
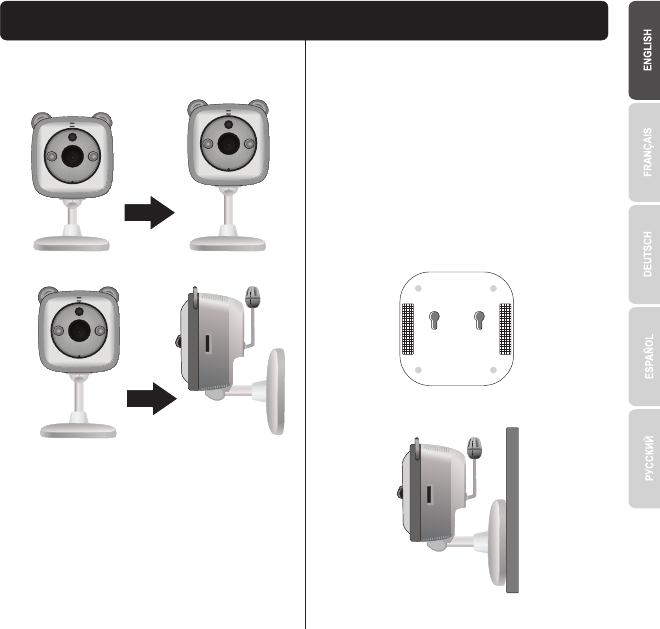
1. Pull the mounting base up to extend it from the
camera.
4. Vertical Surface Installation
2. Rotate the base 90 degrees.
3. While the camera is powered on, position the
camera in the desired location and confirm that
the desired viewing field is displayed on your
mobile app.
4. Mark the mounting location on the wall.
a. Screw Mounting Option:
(a) measure and mark screw hole locations;
(b) drill holes in wall;
(c) insert expansion holders in the holes;
(d) install screws into expansion holders.
b. Adhesive Tape Mounting Option:
(a) Remove protective strip from one side of
the adhesive tape strips and firmly apply
both to the camera base;
(b) Remove remaining protective strips.
5. Mount camera in desired location.
12
Company Information:
Company Name:
TRENDnet, Inc.
Company Address:
20675 Manhattan Place
Torrance, CA 90501
USA
Product Information:
Product Description:
WiFi HD Baby Cam
Model Number:
Brand Name:
TRENDnet
Technical Standards:
EN 300 328 V1.7.1: 10-2006
EN 301 489-1 V1.9.2: 09-2011
EN 301 489-17 V2.2.1: 09-2012
EN 61000-3-2: 2006+A2: 2009
EN 61000-3-3: 2008
EN 62311 : 2008
EN 60950-1: 2006 + A11 : 2009 + A1 : 2010 + A12: 2011
Regulation (EC) No. 278/2009
Declaration:
I hereby declare that the products and devices mentioned above are consistent with the
standards and provisions of the guidelines.
This product is herewith confirmed to comply with the Directive of 1999/5/EC,
2006/95/EC and 2009/125/EC.
Note:
This device is designed to provide uninterrupted monitoring and/or recording. This device does not
offer power management functionality such as Off mode or Standby mode.
Sonny Su
Name
Date
Director of Technology
Title
Signature
August 1, 2014
TV-IP745SIC
TRENDnet
Modèle:
Nom Commercial:
Nom du produit:
Détails du produit:
Détails standard applicable:
Coordonnées du fournisseur:
Nom:
Adresse:
20675 Manhattan Place
Torrance, CA 90501
USA
TRENDnet, Inc.
EN 300 328 V1.7.1: 10-2006
EN 301 489-1 V1.9.2: 09-2011
EN 301 489-17 V2.2.1: 09-2012
EN 61000-3-2: 2006+A2: 2009
EN 61000-3-3: 2008
EN 62311 : 2008
EN 60950-1: 2006 + A11 : 2009 + A1 : 2010 + A12: 2011
Réglement (CE) N° 278/2009
TV-IP745SIC
Déclaration:
Ce produit est conforme à la directive 1999/5/CE, 2006/95/CE et 2009/125/CE.
Je declare par la présente que les produits et appareils mentionnés ci-dessus sont
conformes aux standards et aux dispositions des directives.
Ce dispositif a été conçu pour assurer la surveillance et / ou l'enregistrement ininterrompu.
Ce dispositif n'offre pas la fonctionnalité d'administration de l'énergie, comme par exemple la
fonction d'arrêt (Off) ou bien celle du mode de veille (Standby).
WiFi HD Cam Bébé
Sonny Su
Name
Date
Director of Technology
Title
Signature
August 1, 2014

20675 Manhattan Place, Torrance, CA 90501, USA. Tel: (310) 961-5500, Fax: (310) 961-5511
Federal Communication Commission Interference Statement
This device complies with Part 15 of the FCC Rules. Operation is subject to the following two
conditions: (1) This device may not cause harmful interference, and (2) this device must accept
any interference received, including interference that may cause undesired operation.
This equipment has been tested and found to comply with the limits for a Class B digital device,
pursuant to Part 15 of the FCC Rules. These limits are designed to provide reasonable protection
against harmful interference in a residential installation. This equipment generates, uses and can
radiate radio frequency energy and, if not installed and used in accordance with the instructions,
may cause harmful interference to radio communications. However, there is no guarantee that
interference will not occur in a particular installation. If this equipment does cause harmful
interference to radio or television reception, which can be determined by turning the equipment
off and on, the user is encouraged to try to correct the interference by one of the following measures:
Reorient or relocate the receiving antenna.
Increase the separation between the equipment and receiver.
Connect the equipment into an outlet on a circuit different from that to which the receiver is
connected.
Consult the dealer or an experienced radio/TV technician for help.
FCC Caution: Any changes or modifications not expressly approved by the party responsible for
compliance could void the user's authority to operate this equipment.
This transmitter must not be co-located or operating in conjunction with any other antenna or
transmitter.
Radiation Exposure Statement:
This equipment complies with FCC radiation exposure limits set forth for an uncontrolled
environment. This equipment should be installed and operated with minimum distance 20cm
between the radiator & your body.
Note: The country code selection is for non-US model only and is not available to all US model.
Per FCC regulation, all WiFi product marketed in US must fixed to US operation channels only.

20675 Manhattan Place, Torrance, CA 90501, USA. Tel: (310) 961-5500, Fax: (310) 961-5511
Industry Canada statement:
This device complies with RSS-210 of the Industry Canada Rules. Operation is subject to the
following two conditions: (1) This device may not cause harmful interference, and (2) this device
must accept any interference received, including interference that may cause undesired
operation.
Ce dispositif est conforme à la norme CNR-210 d'Industrie Canada applicable aux appareils
radio exempts de licence. Son fonctionnement est sujet aux deux conditions suivantes: (1) le
dispositif ne doit pas produire de brouillage préjudiciable, et (2) ce dispositif doit accepter tout
brouillage reçu, y compris un brouillage susceptible de provoquer un fonctionnement indésirable.
Radiation Exposure Statement:
This equipment complies with IC radiation exposure limits set forth for an uncontrolled
environment. This equipment should be installed and operated with minimum distance 20cm
between the radiator & your body.
Déclaration d'exposition aux radiations:
Cet équipement est conforme aux limites d'exposition aux rayonnements IC établies pour un
environnement non contrôlé. Cet équipement doit être installé et utilisé avec un minimum de 20
cm de distance entre la source de rayonnement et votre corps.
以下警語適用台灣地區
經型式認證合格之低功率射頻電機,非經許可,公司、商號或使用者均不得擅自變更頻率、加大功率或變
更原設計之特性及功能。
低功率射頻電機之使用不得影響飛航安全及干擾合法通信;經發現有干擾現象時,應立即停用,並改善至
無干擾時方得繼續使用。前項合法通信,指依電信法規定作業之無線電通信。低功率射頻電機須忍受合法
通信或工業、科學及醫療用電波輻射性電機設備之干擾。
Limited Warranty
TRENDnet warrants its products against defects in material and workmanship, under normal use and service, for the following length
of time from the date of purchase. Warranty: 3 year limited warranty (When Applicable: 1 year warranty for power adapter, power
supply, and cooling fan components.) Visit TRENDnet.com to review the full warranty policy, rights, and restrictions for this product.
Garantie Limitée
TRENDnet garantit ses produits contre les défauts matériels et de fabrication, dans des conditions normales d’utilisation et de service,
pour les durées suivantes, à compter de la date de leur achat. Limitée: 3 ans de garantie limitée (Si applicable: 1 an de garantie sur
l’adaptateur secteur, l’alimentation en énergie et les composants du ventilateur de refroidissement.) Visitez TRENDnet.com pour lire la
politique complète de garantie, les droits et les restrictions s’appliquant à ce produit.
Begrenzte Garantie
TRENDnet garantiert, dass seine Produkte bei normaler Benutzung und Wartung während der nachfolgend genannten Zeit ab dem
Kaufdatum keine Material- und Verarbeitungsschäden aufweisen. Garantie: 3-Jahres-Garantie (Soweit zutreffend: 1 Jahr Garantie für
Netzteil, Stromkabel und Ventilator.) Alle Garantiebedingungen, Rechte und Einschränkungen für dieses Produkt finden Sie auf
TRENDnet.com.
Garantía Limitada
TRENDnet garantiza sus productos contra defectos en los materiales y mano de obra, bajo uso y servicio normales, durante el
siguiente periodo de tiempo a partir de la fecha de compra. Garantía: 3 años (Cuando proceda: 1 año de garantía para componentes
de adaptadores de corriente, fuente de alimentación y ventiladores de refrigeración.) Visite TRENDnet.com para revisar la política de
garantía, derechos y restricciones para este producto.
Ограниченная гарантия
Гарантия компании TRENDnet распространяется на дефекты, возникшие по вине производителя при соблюдении условий
эксплуатации и обслуживания в течение установленного периода с момента приобретения (Продукт: Ограниченная
гарантия: Трехлетняя ограниченная гарантия (Распространяется: На протяжении 1 года на силовые адаптеры, источники
питания и компоненты вентилятора охлаждения. Полную версию гарантийных обязательств, а также права пользователя и
ограничения при эксплуатации данного продукта смотрите на вебсайте www.trendnetrussia.ru
Garantia Limitada
TRENDnet garante seus produtos contra defeitos em material e mão de obra, sob condições normais de uso e serviço, pelo seguinte
tempo a partir da data da compra. Garantia: Garantia limitada de 3 anos. (Quando aplicável: 1 ano de garantia para adaptador de
tensão, fonte e componentes de ventoinhas). Visite TRENDnet.com para conhecer a política de garantia completa, direitos e
restrições para este produto.)
Piiratud garantii
TRENDneti tavatingimustes kasutatavatel ja hooldatavatel toodetel on järgmise ajavahemiku jooksul (alates ostukuupäevast)
tootmis-ja materjalidefektide garantii. garantii: 3-aastane piiratud garantii. (Garantii kohaldatakse: toiteadapteri, toiteallika ja
jahutusventilaatori osadel on 1-aastane garantii.) Täisgarantii põhimõtete, õiguste ja piirangute kohta leiate lisateavet saidilt
TRENDnet.com.
Certifications
This device complies with Part 15 of the FCC Rules.
Operation is subject to the following two conditions:
(1) This device may not cause harmful interference.
(2) This device must accept any interference received.
Including interference that may cause undesired operation.
Note
The Manufacturer is not responsible for any radio or TV interference
caused by unauthorized modifications to this equipment. Such
modifications could void the user’s authority to operate the
equipment.
Advertencia
En todos nuestros equipos se mencionan claramente las
caracteristicas del adaptador de alimentacón necesario para su
funcionamiento. El uso de un adaptador distinto al mencionado
puede producir daños fisicos y/o daños al equipo conectado. El
adaptador de alimentación debe operar con voltaje y frecuencia de la
energia electrica domiciliaria exitente en el pais o zona de
instalación.
Waste electrical an electronic products must not be
disposed of with household waste. Please recycle
where facilities exist. Check with your Local
Authority or Retailer for recycling advice.
Product Warranty Registration
Please take a moment to register your
product online. Go to TRENDnet’s website at:
http://www.trendnet.com/register
TRENDnet
20675 Manhattan Place, Torrance, CA 90501. USA
Copyright © 2014. All Rights Reserved. TRENDnet.
Technical Support
If you have any questions regarding the product
installation, please contact our Technical Support.
Toll free US/Canada: 1-866-845-3673
Regional phone numbers available
at www.trendnet.com/support
Гарантія компанії
Гарантія компанії TRENDnet поширюється на дефекти, що виникли з вини виробника, при дотриманні умов експлуатації та
обслуговування протягом встановленого періоду з моменту придбання. (Продукт: Обмежена гарантія: 3 роки обмеженої
гарантії (Поширюється: Протягом 1 року на силові адаптери, джерела живлення і компоненти вентилятора охолодження)
Повну версію гарантійних зобов'язань, а також права користувача та обмеження при експлуатації даного продукту дивіться на
вебсайті TRENDnet.com.
TV-IP745SIC (V1) /08.05.2014
TV-IP745SIC