TRIMBLE EUROPE 11705900 Rugged Smart Phone User Manual UT10 Quick start guild
TRIMBLE EUROPE BV Rugged Smart Phone UT10 Quick start guild
UserManual.wiki
>
TRIMBLE EUROPE
>
11705900 User Manual
>
User Manual
Contents
1.
User Manual
2.
User_Manual
3.
User_manual
User Manual
User_Manual
Navigation menu
Upload a User Manual
Namespaces
Wiki Guide
HTML
PDF
Info
Views
User Manual
Discussion / Help
Navigation


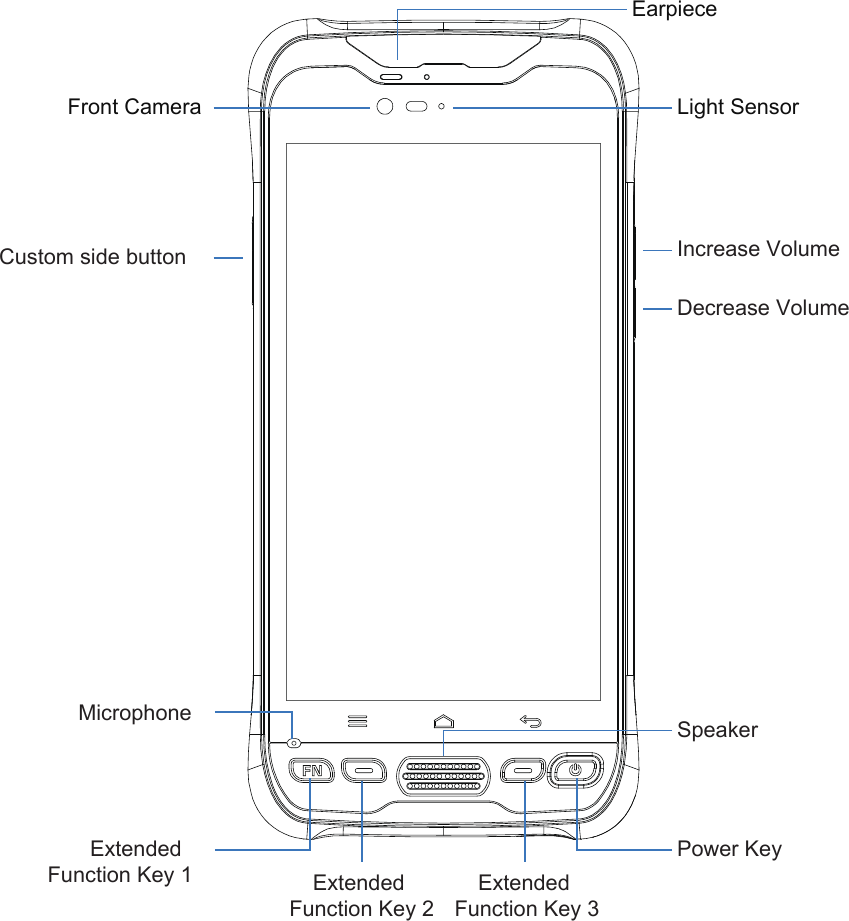
![3. Turning the device on and offTo turn on the device, firmly press and hold the bottom right【Power Button】until the bootscreen appears.To turn off the device, firmly press and hold the 【Power Button】 to display the options menu. Select the Power off option to shutdown.With the device turned on, press the 【Power Button】to turn off the screen and go into sleep mode; Press the 【Power Button】 again to wake the device, swipe upwards on the screen to unlock; If the device has been idle for a period of time, the screen will automatical-ly turn off and go into sleep mode.4. Home screen operationFrom the home screen, you can view the device status and access the applications.The home screen can have multiple panels; Swipe left or right on the screen to view each panel.At the top of the home screen is the status bar, which contains the notification area, the status area and the display area; the shortcut panel is at the bottom. •Using the notification panelWhen new notification icons appear in the notificationarea of the status bar, hold the status bar and dragdown to open the notification panel; To hide the panel,drag the bottom border of the panel upwards.•Customize the shortcut panelYou can customize the shortcuts at the bottom of thehome screen by adding or removing “Shortcut Icons”.To remove the “Shortcut icon”, press and hold the“Shortcut icon” and drag it to the “Delete icon”.To add a “Shortcut icon”, press and hold the iconon the home screen and drag it to the Shortcut panel.•Using applicationsSlide the screen left and right to see all the includedapplications.Touch the [Home button] below the screento close it and return to the home screen. Figure 3](https://usermanual.wiki/TRIMBLE-EUROPE/11705900.User-Manual/User-Guide-4125724-Page-6.png)
![•Expanding the home screenSwipe your finger horizontally on the home screen to expand to the left or right of the homescreen.- Adding an icon on the home screenPress and hold any application or widget icon and drag it to an empty area on the homescreen.- Moving icons on the home screenPress and hold the icon on the home screen and drag the icon to the desired location onthe screen.- Removing icons on the home screenPress and hold the home screen icon and drag the icon to the "Delete" icon until the iconturns red.•Create folder- On the home screen, folders are automatically formed when you drag an icon onto anothericon.- Touch the new folder on the screen to open it.Click on the folder’s label to rename it.•Changing the home screen wallpaperPress and hold a blank area on the home screen or touch the [Menu button] → "Wallpaper"to change the home screen wallpaper by selecting options such as wallpaper, live wallpa-per, gallery, etc.5. Connecting to a computerUse the USB data cable to connect the device to the computer, pull down the top status bar,and you can see the message "Connected as a media device" in the notification area. Clicking on that notification bar will bring up 3 options "Media device", "Camera" and "Charging mode", which can be selected according to your needs. Select "Media device" mode to transfer files between the device and the computer.If you need to remove the MicroSD card when the device is turned on, slide the screen to the left or right "→ Settings, or touch the [Menu button] → "System Settings", go into the Settings panel, scroll down the screen, and then select "Save"→"Uninstall SD Card".](https://usermanual.wiki/TRIMBLE-EUROPE/11705900.User-Manual/User-Guide-4125724-Page-7.png)
![6. Installation and management of applicationsUsers can enter the applications store to download and install related application programs.Slide the screen left or right → "Settings", select "Apps", or touch the [Menu button] → "Manage apps" to view and manage application programs on your device.7. Using Beidou/GPS positioning functionSlide the screen left or right → "Settings", select "Location Information" to go into thelocation service panel, turn on the location information switch. In the "Satellite Positioning Mode" option, select GPS + BDS or GPS + GLONASS or BDS options as needed.The meaning of the following 2 options:(1) The NMEA switch turns on the NMEA data output function, which requires the use of adedicated data line.(2) SBAS: To use differential positioning.The user can view the status of the BeiDou Satellite, GPS satellites and GLONASS satel-lites at the current position through an application with the corresponding functions. Theprogram can display real-time information such as the serial number, signal strength,position of the satellite, etc. at the current position.After the location service is turned on, the applications downloaded and installed from the applications store can obtain the current location information and provide location-related services and applications through the corresponding service interfaces.Note: "Satellite Positioning Mode" "SBAS" is only supported in certain models.8. Camera and videosSlide the screen left or right → "Camera", to turn on the camera, the screen orientationwill change according to how the device is held. Use two fingers to make a gesture of zooming in or zooming out on the subject.Touch the camera switch icon on the top middle part of the screen to select the front orrear camera.Touch the button at the bottom right of the screen to switch between taking photos and videos.After taking a photo or video, tap the gallery button at the bottom left of the screen to share, delete, edit or other operations.](https://usermanual.wiki/TRIMBLE-EUROPE/11705900.User-Manual/User-Guide-4125724-Page-8.png)
![NOTICE:The SAR limit of Europe is 2.0 W/kg. Device type TDC600 has also been tested against this SAR limit. The highest SAR value reported under this standard during product certification for use at the ear is 0.256W/kg and when properly worn on the body is 1.644W/kg This device was tested for typical body - worn operations with the back of the handset kept 0.5cm from the body. To main-tain compliance with RF exposure requirements, use accessories that maintain a 0.5 cm separa-tion distance between the user's body and the back of the handset. The use of belt clips, holsters and similar accessories should not contain metallic components in its assembly. The use of accessories that do not satisfy these requirements may not comply with RF exposure require-ments, and should be avoided. Working Temperature: -20℃ ~ +45℃Storage Temperature: -40℃ ~ +70℃CAUTION RISK OF EXPLOSION IF BATTERY IS REPLACED BY AN INCORRECT TYPE. DISPOSE OF USED BATTERIES ACCORDING TO THE INSTRUCTIONSHereby, Trimble Inc. declares that the radio equipment type [TDC600] is in compliance with Directive 2014 / 53 /EU. This device complies with Part 22 & 24 and Part 27 of the FCC Rules.SAR INFORMATIONThe SAR limit of FCC and ISED is 1.6 W/kg averaged over one gram of tissue. Device type TDC600 has also been tested against this SAR limit. The highest SAR value reported under this standard during product certification for use at the ear is 0.253 W/kg and when properly worn on the body is 1.05 W/kg. This device was tested for typical body -worn operations with the back of the handset kept 1 cm from the body. To maintain compliance with FCC and ISED RF exposure requirements, use accessories that maintain a 1 cm separation distance between the user's body and the back of the handset. The use of belt clips, holsters and similar accessories should not contain metallic components in its assembly. The use of accessories that do not satisfy these requirements may not comply with FCC and ISED RF exposure requirements, and should be avoided.Charging mode need to operate indoors, please pay attention to the environment temperature should be -20℃ ~ +35℃](https://usermanual.wiki/TRIMBLE-EUROPE/11705900.User-Manual/User-Guide-4125724-Page-12.png)
![NOTICE:This device complies with Part 15 of the FCC Rules and with RSS-210 of Industry Canada.Operation is subject to the following two conditions: (1) this device may not cause harmful interference, and(2) this device must accept any interference received, including interference that may causeundesired operation.Le présent appareil est conforme aux CNR d'Industrie Canada applicables aux appareils radio exempts de licence. L'exploitation est autorisée aux deux conditions suivantes : (1) l'appareil ne doit pas produire de brouillage, et (2) l'utilisateur de l'appareil doit accepter tout brouillage radioélectrique subi, même si le brouillage est susceptible d'en compromettre le fonctionnement.NOTICE:This equipment has been tested and found to comply with the limits for a Class B digital device, pursuant to Part 15 of the FCC Rules. These limits are designed to provide reasonable protection against harmful interference in a residential installation. This equipment generates, uses and can radiate radio frequency energy and, if not installe d and used in accordance with the instructions, may cause harmful interference to radio communications. However, there is no guarantee that interference will not occur in a particular installation. If this equipment does cause harmful interference to radio or television reception, which can be determined by turning the equipment off and on, the user is encouraged to try to correct the interference by one or more of the following measures: Reorient or relocate the receiving antenna. Increase the separation between the equipment and receiver. Connect the equipment into an outlet on a circuit different from that to which the receiver is connected. Consult the dealer or an experienced radio/TV technician for help. Changes or modifications made to this equipment not expressly approved by manufacturer may void the FCC authorization to operate this equipment. NOTICE: This Class [B] digital apparatus complies with Canadian ICES -003.Cet appareil numérique de la classe [B] est conforme à la norme NMB - 003 du Canada. RF mode and power tune-up refer to appendix A](https://usermanual.wiki/TRIMBLE-EUROPE/11705900.User-Manual/User-Guide-4125724-Page-13.png)


![3. Turning the device on and offTo turn on the device, firmly press and hold the bottom right【Power Button】until the bootscreen appears.To turn off the device, firmly press and hold the 【Power Button】 to display the options menu. Select the Power off option to shutdown.With the device turned on, press the 【Power Button】to turn off the screen and go into sleep mode; Press the 【Power Button】 again to wake the device, swipe upwards on the screen to unlock; If the device has been idle for a period of time, the screen will automatical-ly turn off and go into sleep mode.4. Home screen operationFrom the home screen, you can view the device status and access the applications.The home screen can have multiple panels; Swipe left or right on the screen to view each panel.At the top of the home screen is the status bar, which contains the notification area, the status area and the display area; the shortcut panel is at the bottom. •Using the notification panelWhen new notification icons appear in the notificationarea of the status bar, hold the status bar and dragdown to open the notification panel; To hide the panel,drag the bottom border of the panel upwards.•Customize the shortcut panelYou can customize the shortcuts at the bottom of thehome screen by adding or removing “Shortcut Icons”.To remove the “Shortcut icon”, press and hold the“Shortcut icon” and drag it to the “Delete icon”.To add a “Shortcut icon”, press and hold the iconon the home screen and drag it to the Shortcut panel.•Using applicationsSlide the screen left and right to see all the includedapplications.Touch the [Home button] below the screento close it and return to the home screen. Figure 3](https://usermanual.wiki/TRIMBLE-EUROPE/11705900.User-Manual/User-Guide-4125772-Page-6.png)
![•Expanding the home screenSwipe your finger horizontally on the home screen to expand to the left or right of the homescreen.- Adding an icon on the home screenPress and hold any application or widget icon and drag it to an empty area on the homescreen.- Moving icons on the home screenPress and hold the icon on the home screen and drag the icon to the desired location onthe screen.- Removing icons on the home screenPress and hold the home screen icon and drag the icon to the "Delete" icon until the iconturns red.•Create folder- On the home screen, folders are automatically formed when you drag an icon onto anothericon.- Touch the new folder on the screen to open it.Click on the folder’s label to rename it.•Changing the home screen wallpaperPress and hold a blank area on the home screen or touch the [Menu button] → "Wallpaper"to change the home screen wallpaper by selecting options such as wallpaper, live wallpa-per, gallery, etc.5. Connecting to a computerUse the USB data cable to connect the device to the computer, pull down the top status bar,and you can see the message "Connected as a media device" in the notification area. Clicking on that notification bar will bring up 3 options "Media device", "Camera" and "Charging mode", which can be selected according to your needs. Select "Media device" mode to transfer files between the device and the computer.If you need to remove the MicroSD card when the device is turned on, slide the screen to the left or right "→ Settings, or touch the [Menu button] → "System Settings", go into the Settings panel, scroll down the screen, and then select "Save"→"Uninstall SD Card".](https://usermanual.wiki/TRIMBLE-EUROPE/11705900.User-Manual/User-Guide-4125772-Page-7.png)
![6. Installation and management of applicationsUsers can enter the applications store to download and install related application programs.Slide the screen left or right → "Settings", select "Apps", or touch the [Menu button] → "Manage apps" to view and manage application programs on your device.7. Using Beidou/GPS positioning functionSlide the screen left or right → "Settings", select "Location Information" to go into thelocation service panel, turn on the location information switch. In the "Satellite Positioning Mode" option, select GPS + BDS or GPS + GLONASS or BDS options as needed.The meaning of the following 2 options:(1) The NMEA switch turns on the NMEA data output function, which requires the use of adedicated data line.(2) SBAS: To use differential positioning.The user can view the status of the BeiDou Satellite, GPS satellites and GLONASS satel-lites at the current position through an application with the corresponding functions. Theprogram can display real-time information such as the serial number, signal strength,position of the satellite, etc. at the current position.After the location service is turned on, the applications downloaded and installed from the applications store can obtain the current location information and provide location-related services and applications through the corresponding service interfaces.Note: "Satellite Positioning Mode" "SBAS" is only supported in certain models.8. Camera and videosSlide the screen left or right → "Camera", to turn on the camera, the screen orientationwill change according to how the device is held. Use two fingers to make a gesture of zooming in or zooming out on the subject.Touch the camera switch icon on the top middle part of the screen to select the front orrear camera.Touch the button at the bottom right of the screen to switch between taking photos and videos.After taking a photo or video, tap the gallery button at the bottom left of the screen to share, delete, edit or other operations.](https://usermanual.wiki/TRIMBLE-EUROPE/11705900.User-Manual/User-Guide-4125772-Page-8.png)


![NOTICE:The SAR limit of Europe is 2.0 W/kg. Device type TDC600 has also been tested against this SAR limit. The highest SAR value reported under this standard during product certification for use at the ear is 0.256W/kg and when properly worn on the body is 1.644W/kg This device was tested for typical body - worn operations with the back of the handset kept 0.5cm from the body. To main-tain compliance with RF exposure requirements, use accessories that maintain a 0.5 cm separa-tion distance between the user's body and the back of the handset. The use of belt clips, holsters and similar accessories should not contain metallic components in its assembly. The use of accessories that do not satisfy these requirements may not comply with RF exposure require-ments, and should be avoided. Working Temperature: -20℃ ~ +45℃Storage Temperature: -40℃ ~ +70℃CAUTION RISK OF EXPLOSION IF BATTERY IS REPLACED BY AN INCORRECT TYPE. DISPOSE OF USED BATTERIES ACCORDING TO THE INSTRUCTIONSHereby, Trimble Inc. declares that the radio equipment type [TDC600] is in compliance with Directive 2014 / 53 /EU. This device complies with Part 22 & 24 and Part 27 of the FCC Rules.SAR INFORMATIONThe SAR limit of FCC and ISED is 1.6 W/kg averaged over one gram of tissue. Device type TDC600 has also been tested against this SAR limit. The highest SAR value reported under this standard during product certification for use at the ear is 0.253 W/kg and when properly worn on the body is 1.05 W/kg. This device was tested for typical body -worn operations with the back of the handset kept 1 cm from the body. To maintain compliance with FCC and ISED RF exposure requirements, use accessories that maintain a 1 cm separation distance between the user's body and the back of the handset. The use of belt clips, holsters and similar accessories should not contain metallic components in its assembly. The use of accessories that do not satisfy these requirements may not comply with FCC and ISED RF exposure requirements, and should be avoided.Charging mode need to operate indoors, please pay attention to the environment temperature should be -20℃ ~ +35℃](https://usermanual.wiki/TRIMBLE-EUROPE/11705900.User-Manual/User-Guide-4125772-Page-12.png)
![NOTICE:This device complies with Part 15 of the FCC Rules and with RSS-210 of Industry Canada.Operation is subject to the following two conditions: (1) this device may not cause harmful interference, and(2) this device must accept any interference received, including interference that may causeundesired operation.Le présent appareil est conforme aux CNR d'Industrie Canada applicables aux appareils radio exempts de licence. L'exploitation est autorisée aux deux conditions suivantes : (1) l'appareil ne doit pas produire de brouillage, et (2) l'utilisateur de l'appareil doit accepter tout brouillage radioélectrique subi, même si le brouillage est susceptible d'en compromettre le fonctionnement.NOTICE:This equipment has been tested and found to comply with the limits for a Class B digital device, pursuant to Part 15 of the FCC Rules. These limits are designed to provide reasonable protection against harmful interference in a residential installation. This equipment generates, uses and can radiate radio frequency energy and, if not installe d and used in accordance with the instructions, may cause harmful interference to radio communications. However, there is no guarantee that interference will not occur in a particular installation. If this equipment does cause harmful interference to radio or television reception, which can be determined by turning the equipment off and on, the user is encouraged to try to correct the interference by one or more of the following measures: Reorient or relocate the receiving antenna. Increase the separation between the equipment and receiver. Connect the equipment into an outlet on a circuit different from that to which the receiver is connected. Consult the dealer or an experienced radio/TV technician for help. Changes or modifications made to this equipment not expressly approved by manufacturer may void the FCC authorization to operate this equipment. NOTICE: This Class [B] digital apparatus complies with Canadian ICES -003.Cet appareil numérique de la classe [B] est conforme à la norme NMB - 003 du Canada. RF mode and power tune-up refer to appendix A](https://usermanual.wiki/TRIMBLE-EUROPE/11705900.User-Manual/User-Guide-4125772-Page-13.png)