TRIMBLE EUROPE 802140 Portable GNSS Receiver User Manual
TRIMBLE NANTES S.A.S. Portable GNSS Receiver
UserManual.wiki
>
TRIMBLE EUROPE
>
802140 User Manual
User Manual
Navigation menu
Upload a User Manual
Namespaces
Wiki Guide
HTML
PDF
Info
Views
User Manual
Discussion / Help
Navigation

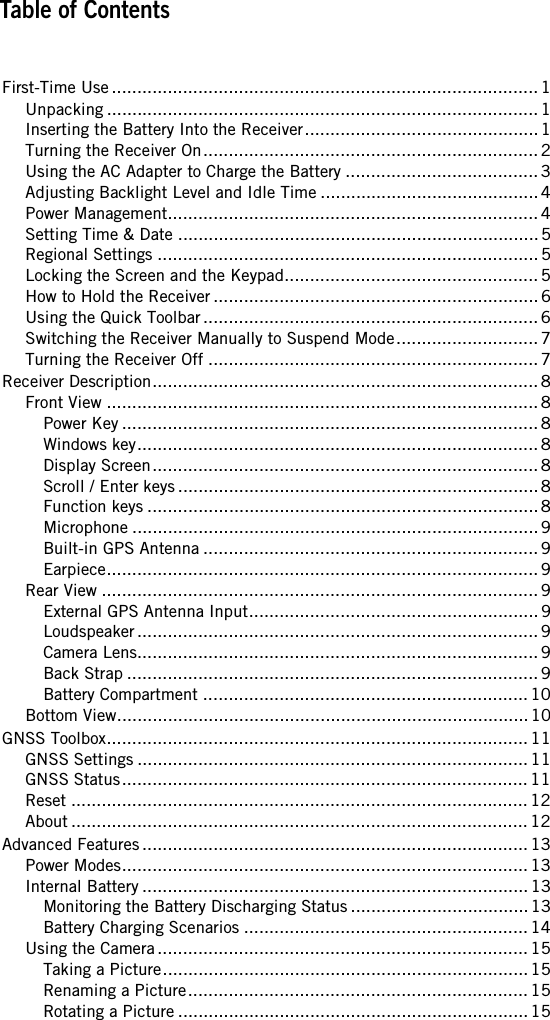
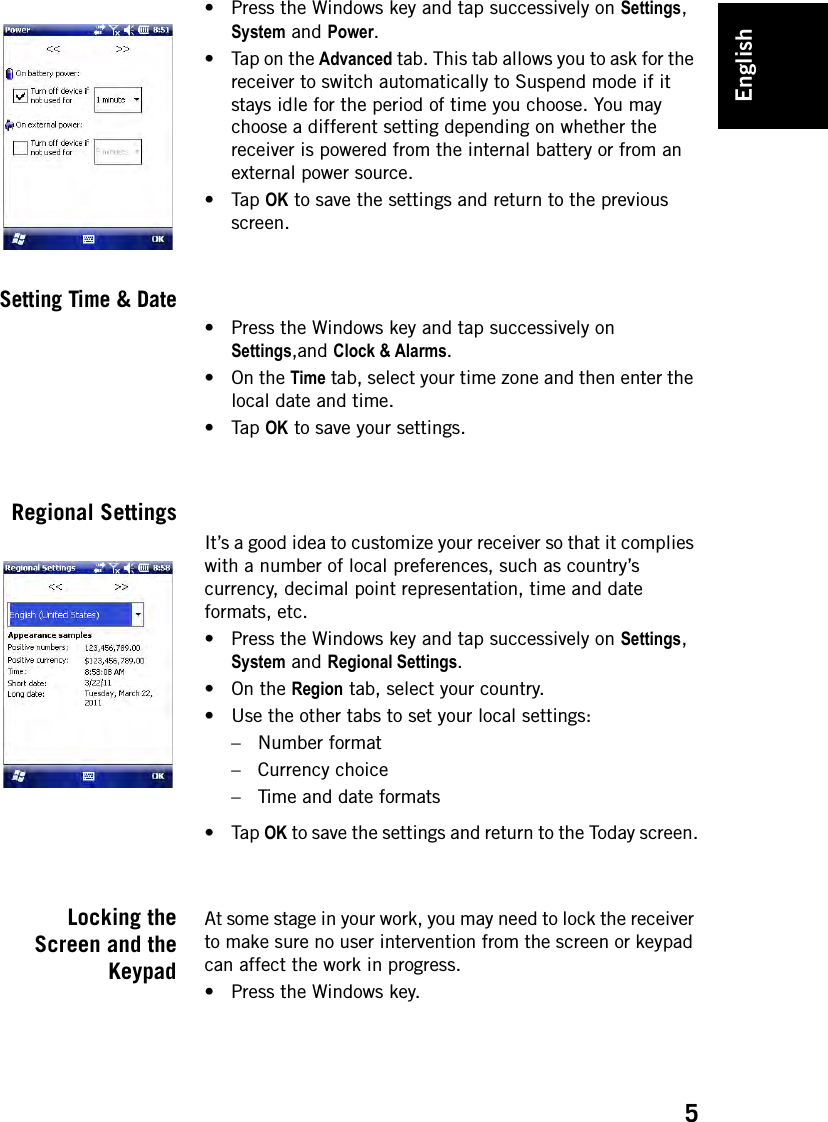
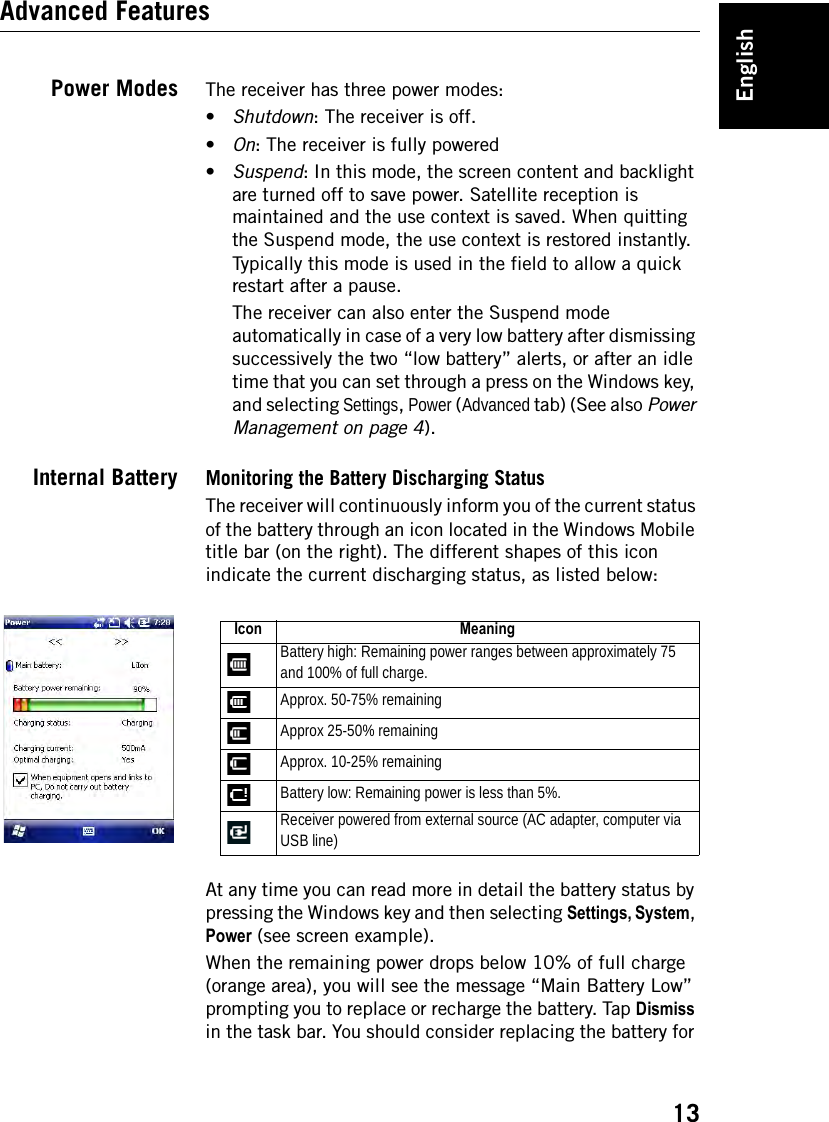
![English2• Then push the door against the receiver case and rotate the two screws back in their initial positions to seal the battery compartment. Turning theReceiver On• Press the Power key [1] for a couple of seconds until you feel a vibration in your hand, then release the key.Let the receiver run its boot sequence. Wait until the screen displays the Windows Mobile Home screen.The operating system used in the receiver is Microsoft Windows Mobile Professional version 6.5. For more information on how to use the different applications, you can visit the Microsoft web site at:http://www.microsoft.com/windowsmobile/en-us/help/v6-5/Basics.aspxDepending on how long your product was stored in its package before being shipped to you, the remaining power in the battery may be too low to allow the receiver to operate for your entire working session. For this reason, the first thing to do is to check the battery charge status:• Press the Windows key [2] • Using the stylus or your finger, tap successively on the following function icons on the screen: Settings, System and Power (you need to drag the stylus upward on the screen to scroll down to the Power icon• The Power function shows the status of the battery. If the remaining power is greater than 50%, then you can use the receiver without having to charge the battery first (with 50% of remaining charge, you can use the receiver for several hours). Skip the next section and go to Adjusting Backlight Level and Idle Time on page 4.If it less, Ashtech recommends you first charge the battery as explained in Using the AC Adapter to Charge the Battery on page 3.[1][1][2][2]](https://usermanual.wiki/TRIMBLE-EUROPE/802140/User-Guide-1471770-Page-5.png)
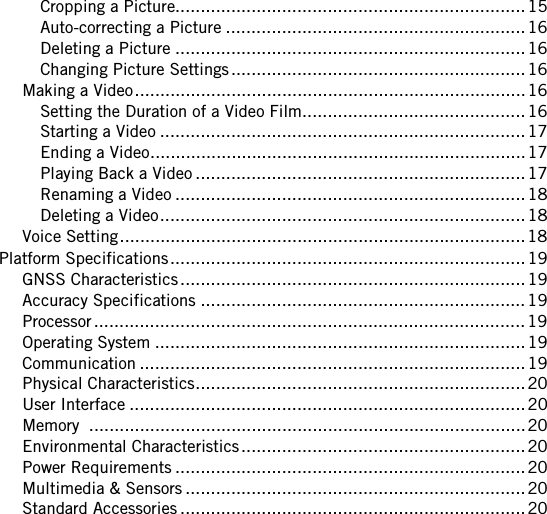
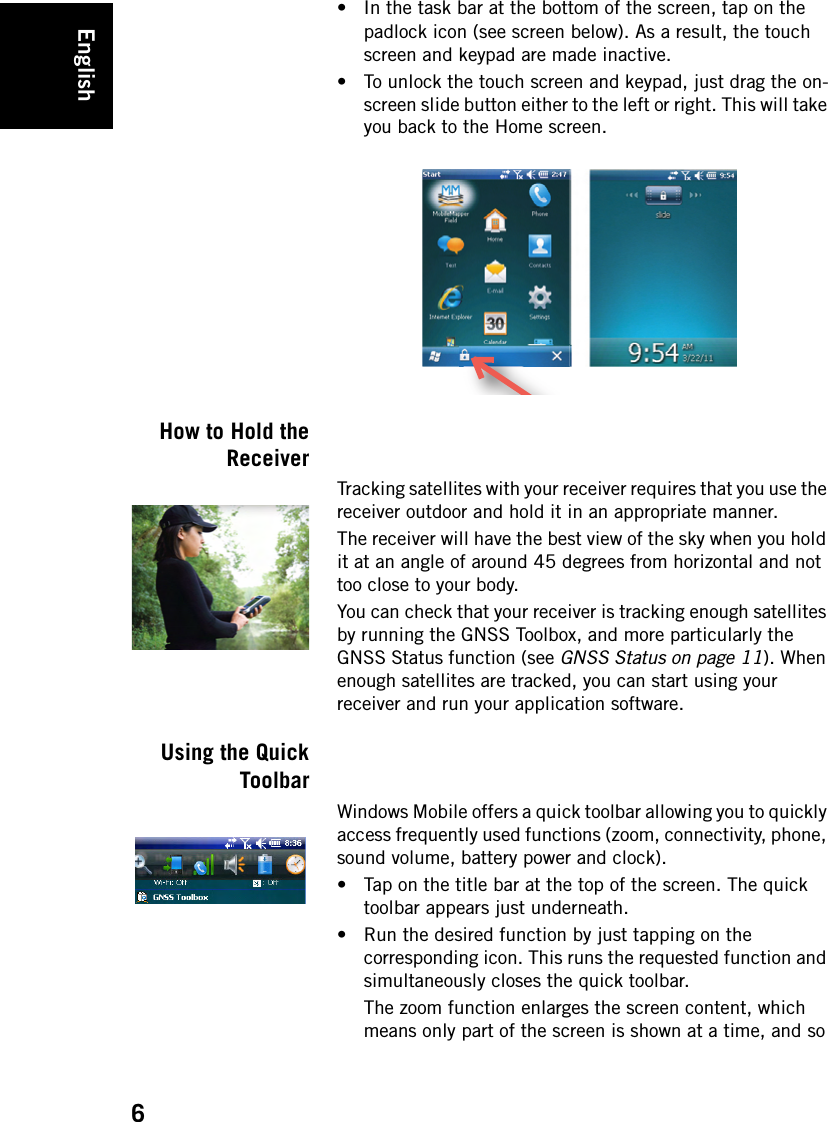
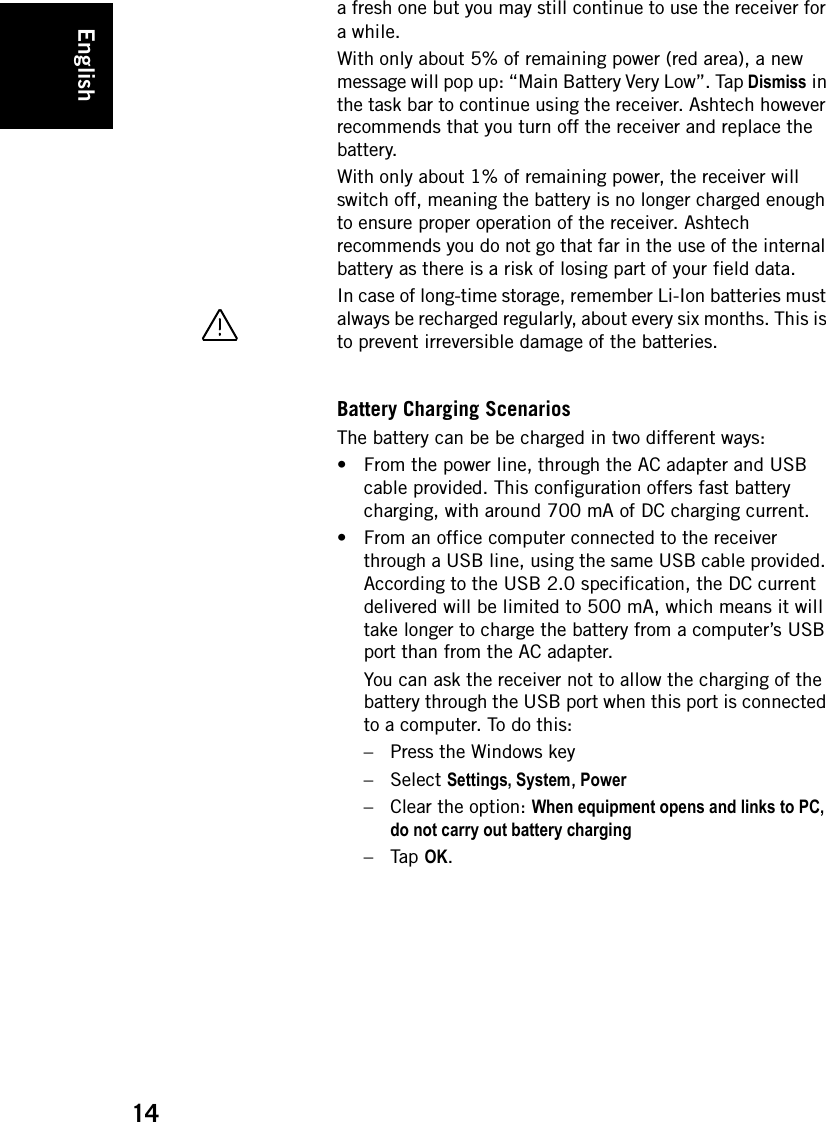
![English3Using the ACAdapter to Chargethe BatteryFollow the instructions below.• Prepare the AC adapter: – Remove the protective cover [1] by pushing the button then sliding the cover forward.– Choose the plug that fits your country’s AC outlet standard (see [2]) and slide it into the AC adapter [3}. (A “click” must be heard when fully inserted.)• Take the USB cable provided [4]. Connect the end fitted with a standard USB connector to the AC adapter. Connect the other end (fitted with a mini-USB connector) to the bottom side of the receiver (open the flap [5] first).• Connect the AC adapter to an electric outlet. The receiver screen lights up and an icon shows up indicating that the battery is being charged. • Let the AC adapter charge the battery. To read the battery charging status, refer to the instructions in Turning the Receiver On on page 2. You may not wait until the battery is fully charged if you are in a rush, but you should make [1] [2] [3][4][4][4][3][3][5]](https://usermanual.wiki/TRIMBLE-EUROPE/802140/User-Guide-1471770-Page-6.png)
![English7you should drag the stylus over the screen to scroll through the whole data displayed.To return to 1:1 zoom, just tap on the title bar again to re-open the quick toolbar, and then tap on the zoom function again.Switching theReceiver Manuallyto Suspend ModeSwitching the receiver to Suspend mode is the right thing to do when you need to make a short pause in your work and you want to save the operating time of your battery.In Suspend mode, the receiver uses a minimum of energy: the screen content and backlight is off. The receiver however continues to track satellites and the use context is saved.To switch to Suspend mode, just press briefly on the Power button [1]. The receiver screen is turned off instantly.To wake up the receiver, just press briefly the same button again. This will instantly switch the screen back on and restore the use context in which the receiver was before entering the Suspend mode. Turning theReceiver OffAfter you have finished your work, turn off your receiver by holding the Power button [1] pressed until a Warning message is displayed on the screen asking you to confirm the power-off request. Tap Yes. The receiver will shut down in the next couple of seconds after a duo-tone sound has been heard.](https://usermanual.wiki/TRIMBLE-EUROPE/802140/User-Guide-1471770-Page-10.png)
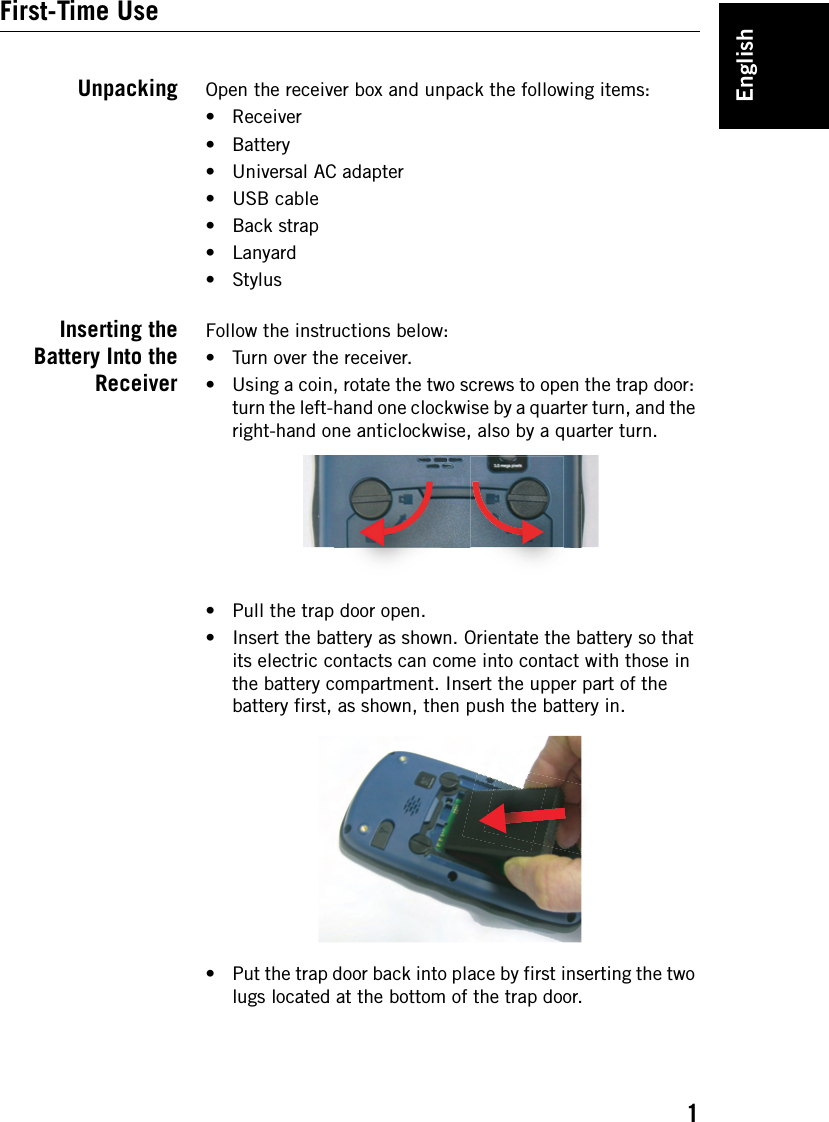
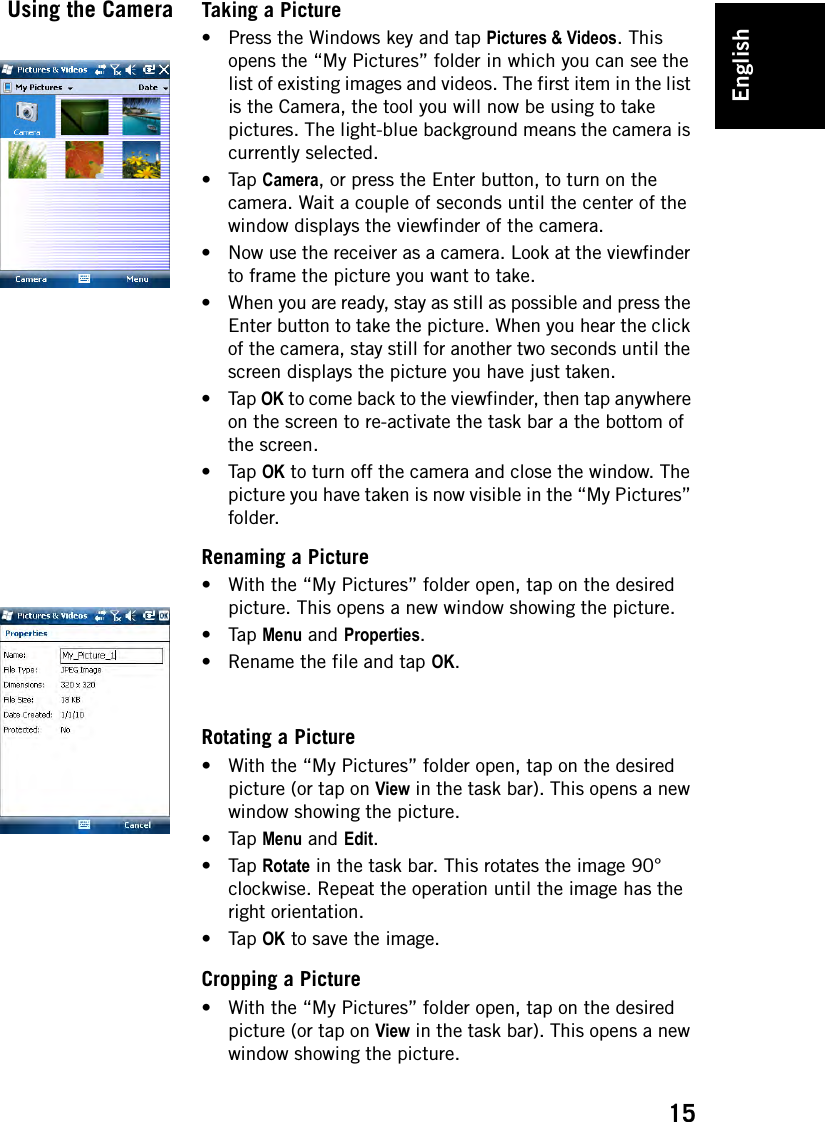
![English8Receiver DescriptionFront View Power KeyUse the Power key [1] to turn on or off the receiver.To turn on the receiver, press the Power key [1] until you can feel a vibration in your hand, meaning the receiver has started a power-on procedure. You can then release the key.To turn off the receiver press the Power key [1] until a sound is heard and a warning message pops up on the screen asking you to confirm the power shutdown request. Tap Yes on the screen. A two-tone sound can then be heard just before the receiver shuts down.Windows keyThe Windows key [2] is used to give immediate and unconditional access to the Windows Start menu.Display ScreenThe display screen [3] is a 3.5-inch, QVGA, 256-color (18-bit RGB) touch screen (240 x 320 pixels).Scroll / Enter keysThe Enter button [4] is used to accept highlighted input and initiate various functions.The Scroll button [5] is the ring around the Enter button. It is used to move the cursor on the screen, from one data field to the next on a parameter screen, from one option to another in a menu, from one geographical location to another on a map screen.Function keysThe receiver is fitted with four function keys [6]. The specific function of each of them is given in the table below.[8][3][9][1] [7] [4] [5] [2] [6]Button FunctionThe keypad includes two of these buttons, one on the right, the other on the left.Each of them is a convenient alternative to tapping on the functions appearing just above in the task bar at the bottom of the screen (e.g. Notifications, Contacts, Menu, Log, etc.).Use this button to enlarge the map displayed on the screen (zoom in).Use this button to reduce the map displayed on the screen (zoom out).](https://usermanual.wiki/TRIMBLE-EUROPE/802140/User-Guide-1471770-Page-11.png)
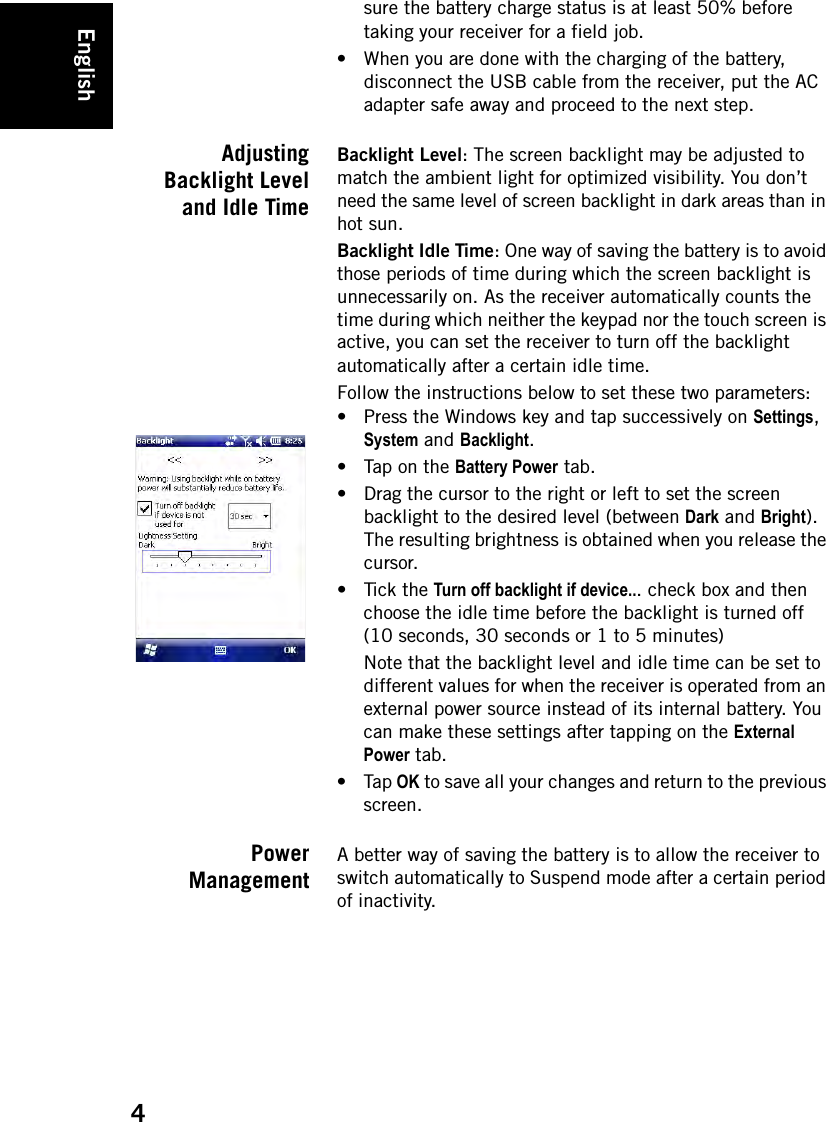
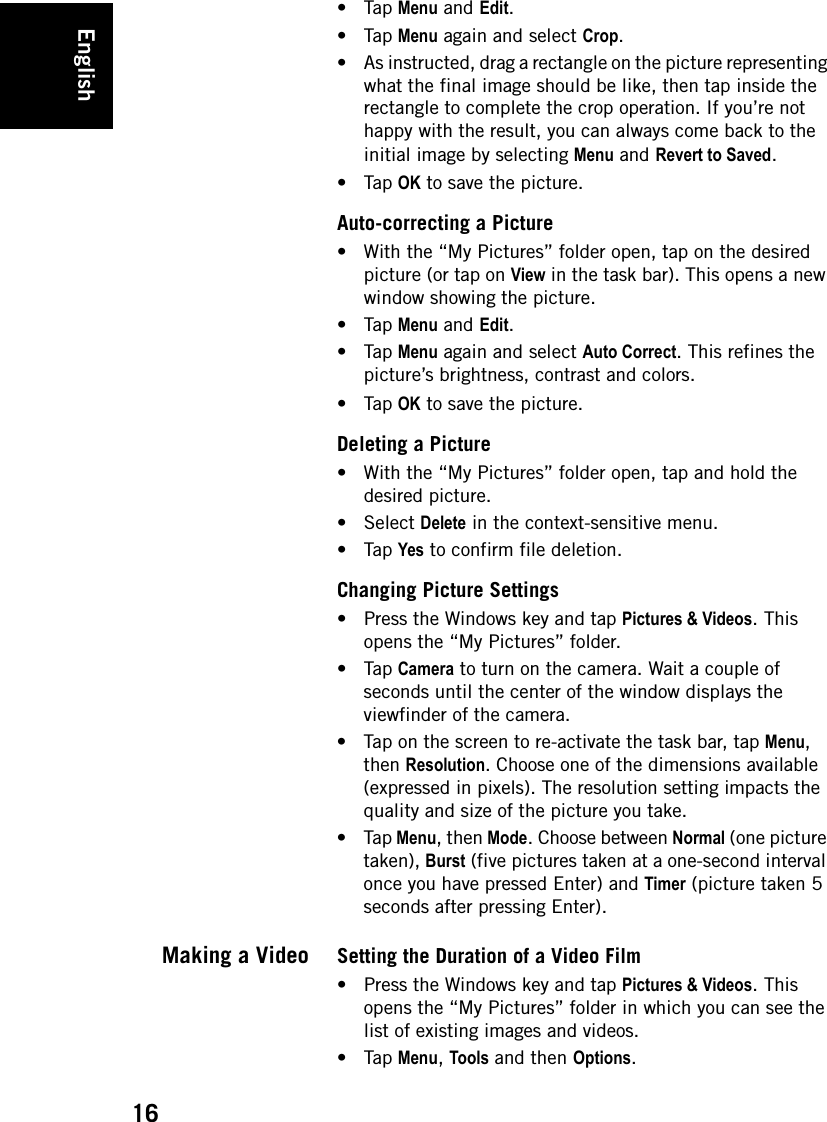
![English9MicrophoneA microphone is used by the voice recorder. Keep the small aperture [7] clear when recording a vocal comment. Built-in GPS AntennaThe receiver incorporates a built-in GPS antenna [8]. The receiver should be held properly to optimize satellite reception. EarpieceAs a multi-media device, the receiver includes an earpiece [9], which can be used by any voice-based software application.Rear ViewExternal GPS Antenna InputUse this input [10] to connect an external GPS antenna to the receiver. When an external antenna is connected, the built-in GPS antenna is automatically disconnected from the receiver input.The antenna input connector is protected by a rubber flap.Although a waterproof coaxial connector is used, Ashtech recommends you keep the flap close when no external antenna is used.LoudspeakerAs a multi-media device, the receiver includes a high-quality loudspeaker [11], which can be used by any voice-based software application.Camera LensKeep the camera lens [12] clear when taking pictures or recording videos. Back StrapThe back strap provided may be attached to the back of the receiver through two threaded holes [13] and [14] and the two recesses located at the bottom of the receiver (see Bottom View below).The back strap may also accommodate the stylus, which can also be attached to the leather strip of the back strap using the lanyard provided.Using the back strap allows you to hold the receiver and the stylus around your forearm while keeping your hand free for some other tasks.[10][17][12][11][15] [16][13] [14]](https://usermanual.wiki/TRIMBLE-EUROPE/802140/User-Guide-1471770-Page-12.png)
![English10Battery CompartmentThe receiver makes use of a rechargeable Li-Ion battery pack. Loosen the quarter-turn screws [15] [16] using a coin to access the battery compartment [17]. The two screws use opposite directions of rotation for opening and closing the trap door.The battery compartment can also accommodate a SIM card [18] and a micro SD card [19].When putting back the trap door, insert the bottom first, push the trap door against the back of the receiver and seal the battery compartment by fully rotating the two screws in the opposite direction.Information on battery charging: see ??.Bottom ViewThe bottom view provides access to a standard mini-USB connector [20]. You first need to open the protective rubber flap [21], using a finger nail or a sharp and rigid tip to pull the flap from its left-hand side.The mini-USB port is used to connect the receiver to the AC adapter, for a fast battery charging cycle, or to a computer for file transfer through Microsoft ActiveSync. In both cases, you need to use the USB cable provided.Information on battery charging: see ??.The bottom part of the receiver also accommodates a Reset button [22], which is accessible after you have opened the rubber flap [21].The bottom view also shows the two recesses [23] in which the back strap [24] can be anchored.[19][18][22] [21][20][23][23][24]](https://usermanual.wiki/TRIMBLE-EUROPE/802140/User-Guide-1471770-Page-13.png)
![Manual Requirements according 15.19 / RSS-210 NOTICE: This device complies with Part 15 of the FCC Rules [and with RSS-210 of Industry Canada]. Operation is subject to the following two conditions: (1) this device may not cause harmful interference, and (2) this device must accept any interference received, including interference that may cause undesired operation. Manual Requirements according 15.21 NOTICE: Changes or modifications made to this equipment not expressly approved by (manufacturer name) may void the FCC authorization to operate this equipment. Manual Requirements according 15.105 NOTE: This equipment has been tested and found to comply with the limits for a Class B digital device, pursuant to Part 15 of the FCC Rules. These limits are designed to provide reasonable protection against harmful interference in a residential installation. This equipment generates, uses and can radiate radio frequency energy and, if not installed and used in accordance with the instructions, may cause harmful interference to radio communications. However, there is no guarantee that interference will not occur in a particular installation. If this equipment does cause harmful interference to radio or television reception, which can be determined by turning the equipment off and on, the user is encouraged to try to correct the interference by one or more of the following measures: Reorient or relocate the receiving antenna. Increase the separation between the equipment and receiver. Connect the equipment into an outlet on a circuit different from that to which the receiver is connected. Consult the dealer or an experienced radio/TV technician for help. Manual / Label requirements according ICES-003 NOTICE: This Class [B] digital apparatus complies with Canadian ICES-003. Cet appareil numérique de la classe [B] est conforme à la norme NMB-003 du Canada.](https://usermanual.wiki/TRIMBLE-EUROPE/802140/User-Guide-1471770-Page-25.png)
![NOTICE: This device complies with Industry Canada licence-exempt RSS standard(s). Operation is subject to the following two conditions: (1) this device may not cause interference, and (2) this device must accept any interference, including interference that may cause undesired operation of the device. [Le présent appareil est conforme aux CNR d'Industrie Canada applicables aux appareils radio exempts de licence. L'exploitation est autorisée aux deux conditions suivantes : (1) l'appareil ne doit pas produire de brouillage, et (2) l'utilisateur de l'appareil doit accepter tout brouillage radioélectrique subi, même si le brouillage est susceptible d'en compromettre le fonctionnement.] SAR Information: The SAR limit adopted by USA (FCC) is 1.6 Watts/kilogram (W/kg) averaged over one gram of tissue. Device types (FCC ID: NZI802140) has also been tested against this SAR limit. The highest SAR value reported under this standard during product certification for the body is 0.792 W/kg. This device was tested for typical body-worn operations with the back of the handset kept 0 cm from the body. To maintain compliance with FCC RF exposure requirements, use accessories that maintain a 0 cm separation distance between the user’s body and the back of handset. The use of belt clips, holsters and similar accessories should not contain metallic components in its assembly. The use of accessories that do not satisfy these requirements may not comply with FCC RF exposure requirements, and should be avoided.](https://usermanual.wiki/TRIMBLE-EUROPE/802140/User-Guide-1471770-Page-26.png)