TTE Technology L32HDF11TA LCD TV User Manual L32HDF11TA
TTE Technology, Inc. LCD TV L32HDF11TA
UserManual.wiki
>
TTE Technology
>
L32HDF11TA User Manual
(L32HDF11TA) User Manual
Navigation menu
Upload a User Manual
Namespaces
Wiki Guide
HTML
PDF
Info
Views
User Manual
Discussion / Help
Navigation

![2Important InformationThis symbol indicates that this product contains mercury. Special disposal of this product for environmental reasons may be required under the laws applicable to your jurisdiction. For disposal or recycling information, please contact your local authorities or the Electronic Industries Alliance: www.eiae.org.Refer to thHLGHQWL¿FDWLRQUDWLQJODEHOORFDWHGRQWKHEDFNSDQHORI\RXUSURGXFWIRULWVSURSHURSHUDWLQJYROWDJH)&&UHJXODWLRQVVWDWHWKDWXQDXWKRUL]HGFKDQJHVRUPRGL¿FDWLRQVWRWKLVHTXLSPHQWPD\YRLGWKHXVHU¶VDXWKRULW\WRoperate it.Cable TV Installer: This reminder is provided to call your attention to Article 820-40 of the National Electrical Code (Section 54 of the Canadian Electrical Code, Part 1) which provides guidelines for proper grounding and, in particular, VSHFL¿HVWKDWWKHFDEOHJURXQGVKRXOGEHFRQQHFWHGWRWKHJURXQGLQJV\VWHPRIWKHEXLOGLQJDVFORVHWRWKHSRLQWRIcable entry as practical.Important: 7KLVWHOHYLVLRQLVDWDEOHPRGHODQGLVGHVLJQHGWRVLWRQD¿UPÀDWVXUIDFH'RQ¶WSODFHWKH79RQVRIWFDUSHWLQJRUVLPLODUVXUIDFHEHFDXVHWKHYHQWLODWLRQVORWVRQWKHERWWRPRIWKHXQLWZLOOEHEORFNHGUHVXOWLQJLQUHGXFHGlifetime from overheating. To assure adequate ventilation for this product, maintain a spacing of 4 inches from the top DQGVLGHRIWKH79UHFHLYHUDQGLQFKHVIURPWKHUHDURIWKH79UHFHLYHUDQGRWKHUVXUIDFHV$OVRPDNHVXUHWKHVWDQGRUEDVH\RXXVHLVRIDGHTXDWHVL]HDQGVWUHQJWKWRSUHYHQWWKH79IURPEHLQJDFFLGHQWDOO\WLSSHGRYHUSXVKHGRIIRUSXOOHGRII7KLVFRXOGFDXVHSHUVRQDOLQMXU\DQGRUGDPDJHWRWKH795HIHUWRWKHImportant Safety Instructions on the next page.7KH3RZHUEXWWRQIROORZHGE\WKHSRZHUV\PERORQWKLV79DQG\RXUUHPRWHFRQWUROSXWVWKH79LQWRDYHU\low-power standby mode but will not completely turn the power off. In order to completely shut the power off, you will QHHGWRGLVFRQQHFWWKHSRZHUFRUGIURPWKHRXWOHW7KHUHIRUH\RXVKRXOGHQVXUHWKDWWKH79LVLQVWDOOHGLQDPDQQHUthat allows you to disconnect the power cord when desired.Product InformationKeep your sales receipt to obtain warranty parts and service and for proof of purchase. Attach it here and record the serial and model numbers in case you need them. These numbers are located on the product.Model No. ______________________ Serial No._____________________________________Purchase Date __________________ Dealer/Address/Phone___________________________WARNING 7KHEDWWHULHVVKDOOQRWEHH[SRVHGWRH[FHVVLYHKHDWVXFKDVVXQVKLQH¿UHRUWKHOLNH&DXWLRQ7RUHGXFHWKHULVNRIHOHFWULFVKRFNGRQRWUHPRYHFRYHURUEDFN1RXVHUVHUYLFHDEOHSDUWVLQVLGH5HIHUVHUYLFLQJWRTXDOL¿HGVHUYLFHSHUVRQQHOThis symbol indicates “dangerous voltage” LQVLGHWKHSURGXFWWKDWSUHVHQWVDULVNRIHOHFWULFVKRFNRUSHUVRQDOLQMXU\This symbol indicates important instructions accompanying the product.This symbol indicates that this product incorporates double insulation between hazardous main voltage and user accessible parts. When servicing, use only identical replacement parts.WARNING7RUHGXFHWKHULVNRI¿UHRUHOHFWULFVKRFNGRQRWexpose this product to rain or moisture. This product should not be exposed to dripping or splashing. No REMHFWV¿OOHGZLWKOLTXLGVVXFKDVYDVHVVKRXOGEHplaced on the component.7KH79LVXQVWDEOHLILWLVQRWSURSHUO\DWWDFKHGWRthe base or mounted to the wall. Please follow the base or wall mounting instructions provided in the 8VHU¶V*XLGHWRHQVXUH\RXUVDIHW\WARNINGCAUTIONRISK OF ELECTRIC SHOCK.'212723(1Product Registration3OHDVHUHJLVWHU\RXU7&/SXUFKDVHRQOLQHDWZZZWFOXVDFRP,WZLOOPDNHLWHDVLHUWRFRQWDFW\RXVKRXOGLWHYHUEHnecessary. Registration is not required for warranty coverage.](https://usermanual.wiki/TTE-Technology/L32HDF11TA/User-Guide-1290695-Page-2.png)
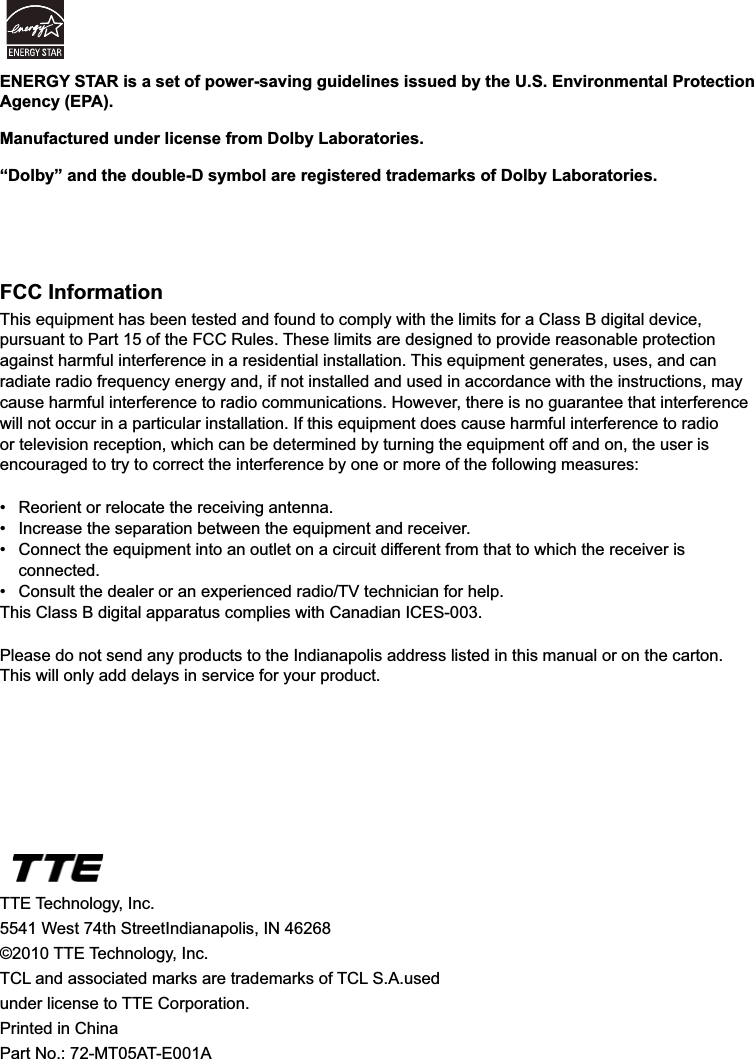
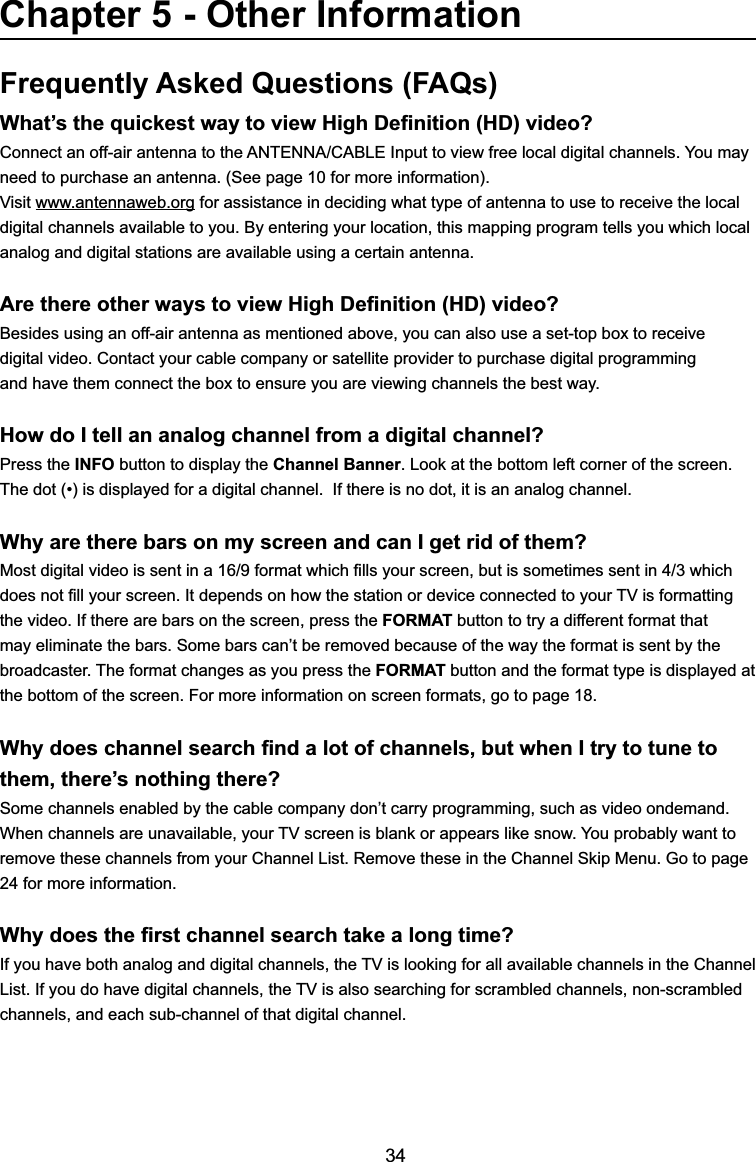
![3Important Safety Instructions1. Read and follow all instructions.2. Keep these instructions.3. Heed all warnings. 'RQRWEORFNDQ\YHQWLODWLRQRSHQLQJV,QVWDOOLQDFFRUGDQFHZLWKWKHPDQXIDFWXUHU¶VLQVWUXFWLRQV 'RQRWLQVWDOOQHDUDQ\KHDWVRXUFHVVXFKDVUDGLDWRUVKHDWUHJLVWHUVVWRYHVRURWKHUDSSDUDWXV LQFOXGLQJDPSOL¿HUVWKDWSURGXFHKHDW 'RQRWQHJDWHWKHVDIHW\SXUSRVHRIWKHSRODUL]HGRUJURXQGLQJW\SHSOXJ$SRODUL]HGSOXJKDVtwo blades with one wider than the other. A grounding type plug has two blades and a third grounding prong. The wide blade or the third prong is provided for your safety. If the provided plug GRHVQRW¿W\RXURXWOHWFRQVXOWDQHOHFWULFLDQIRUUHSODFHPHQWRIWKHREVROHWHRXWOHW 3URWHFWWKHSRZHUFRUGIURPEHLQJZDONHGRQRUSLQFKHGSDUWLFXODUO\DWSOXJVUHFHSWDFOHVDQGWKHpoint where it exits from the component. 'RQRWXVHWKLVFRPSRQHQWQHDUZDWHU 2QO\XVHWKHDWWDFKPHQWVDFFHVVRULHVVSHFL¿HGE\WKHPDQXIDFWXUHU10. Clean only with dry cloth.8VHRQO\ZLWKWKHFDUWVWDQGWULSRGEUDFNHWRUWDEOHVSHFL¿HGE\WKHPDQXIDFWXUHURUVROGZLWK WKHFRPSRQHQW:KHQWKH79LVSODFHGRQDFDUWXVHFDXWLRQZKHQPRYLQJWKHFDUWWRDYRLGLQMXU\from tip-over.12. Unplug this component during lightning storms or when unused for long periods of time.5HIHUDOOVHUYLFLQJWRTXDOL¿HGVHUYLFHSHUVRQQHO6HUYLFHLVUHTXLUHGZKHQWKHFRPSRQHQWLVdamaged in any way, such as power supply cord or plug damage, liquid spilled on or objects falling onto the component, rain or moisture exposure, abnormal operation, or if the component has been dropped.14. If an outside antenna or cable system is connected to the product, be sure the antenna or cable system is grounded so as to provide some protection against voltage surges and built-up VWDWLFFKDUJHV6HFWLRQRIWKH1DWLRQDO(OHFWULFDO&RGH$16,1)3$1R6HFWLRQ54 of Canadian Electrical Code, Part 1) provides information with respect to proper grounding of the mast and supporting structure, grounding of the lead-in wire to an antenna-discharge unit, size of grounding conductors, location of antenna-discharge unit, connection to grounding electrodes, and requirements for the grounding electrode. See following example:ANTENNA LEAD IN WIREGROUND CLAMPGROUNDING CONDUCTORS(NEC SECTION 810-21)GROUND CLAMPSPOWER SERVICE GROUNDINGELECTRODE SYSTEM(NEC ART 250, PARTH)ELECTRIC SERVICEEQUIPMENTANTENNA DISCHARGE UNIT(NEC SECTION 810-20)](https://usermanual.wiki/TTE-Technology/L32HDF11TA/User-Guide-1290695-Page-3.png)
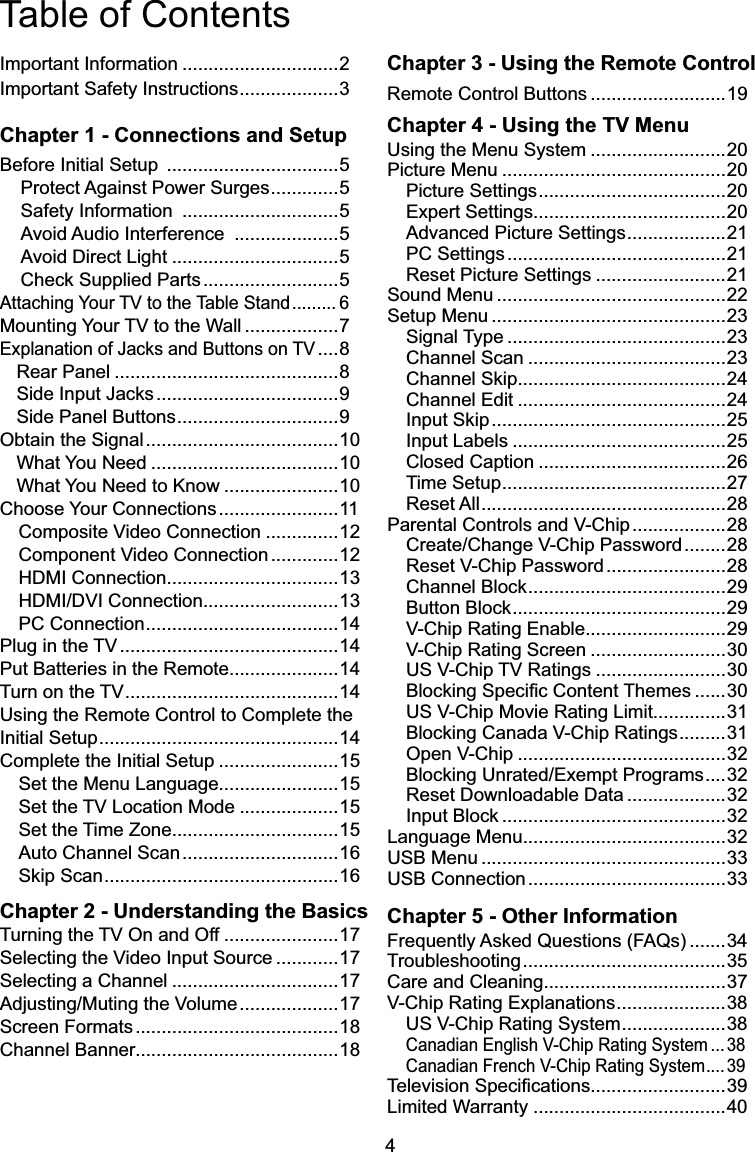
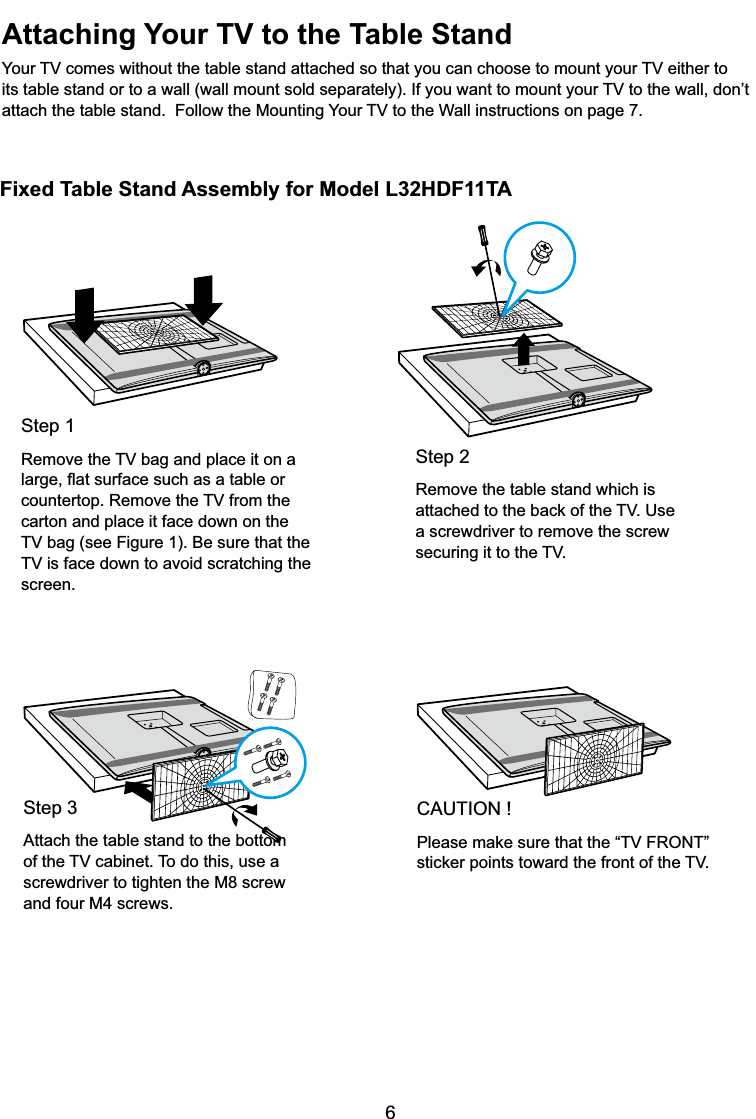
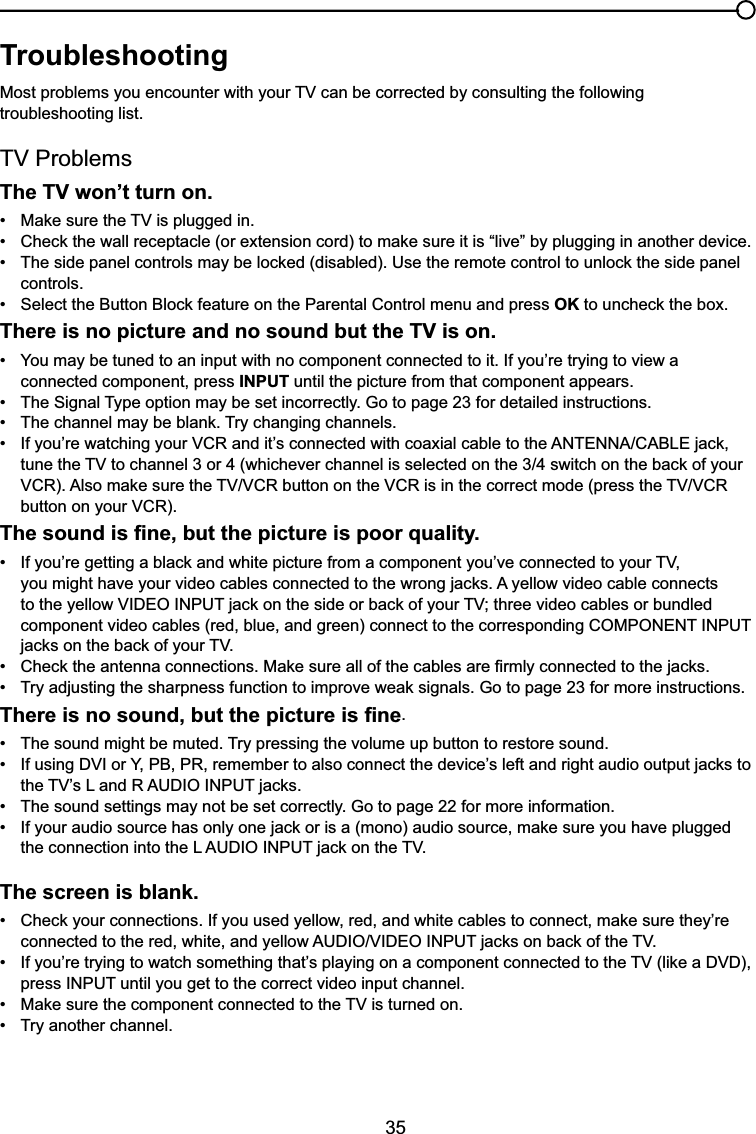
![7Fixed Table Stand Assembly for Model L26HDF11TA,I\RXDUHPRXQWLQJ\RXU79WRWKHZDOO¿UVWUHPRYHWKHWDEOHVWDQGDWWDFKHGWRWKHEDFNRIWKH796HHStep 2 above).Step 2Remove the table stand which is DWWDFKHGWRWKHEDFNRIWKH798VHDscrewdriver to remove the three M4 VWVFUHZVVHFXULQJLWWRWKH79Step 15HPRYHWKH79EDJDQGSODFHLWRQDODUJHÀDWVXUIDFHVXFKDVDWDEOHRUFRXQWHUWRS5HPRYHWKH79IURPWKHcarton and place it face down on the 79EDJVHH)LJXUH%HVXUHWKDWWKH79LVIDFHGRZQWRDYRLGVFUDWFKLQJWKHscreen.Step 3Attach the table stand to the ERWWRPRIWKH79FDELQHW7RGRthis, use a screwdriver to tighten the three M4 st-screws.0RXQWLQJ<RXU79WRWKH:DOO7KH9(6$QXPEHULVWKHKRUL]RQWDODQGYHUWLFDOPHDVXUHPHQWRIWKHPRXQWLQJKROHV)RUH[DPSOH200x100 refers to the fact that the mounting measurements are 200mm horizontally and 100mm vertically.Notes: Follow the directions included with the wall mount to mount the TV to the wall.Caution: <RXUZDOOPRXQWPXVWEHDEOHWREHDUDPLQLPXPRI¿YHWLPHVWKH79¶VQHWZHLJKWWRDYRLGFDXVLQJGDPDJH7RPRXQW\RXU79WRWKHZDOOSXUFKDVHD9(6$ZDOOPRXQW0RGHOV/+')7$/+')7$ Purchase a VESA 200 x 100, M4 screw](https://usermanual.wiki/TTE-Technology/L32HDF11TA/User-Guide-1290695-Page-7.png)
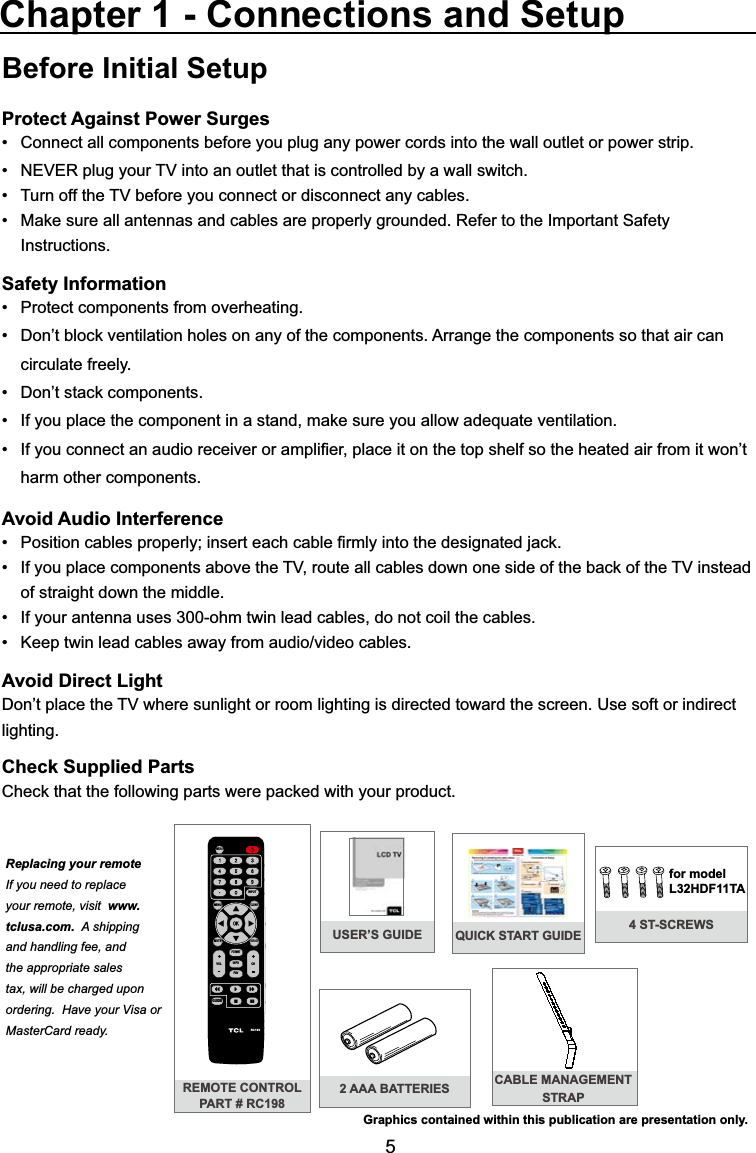
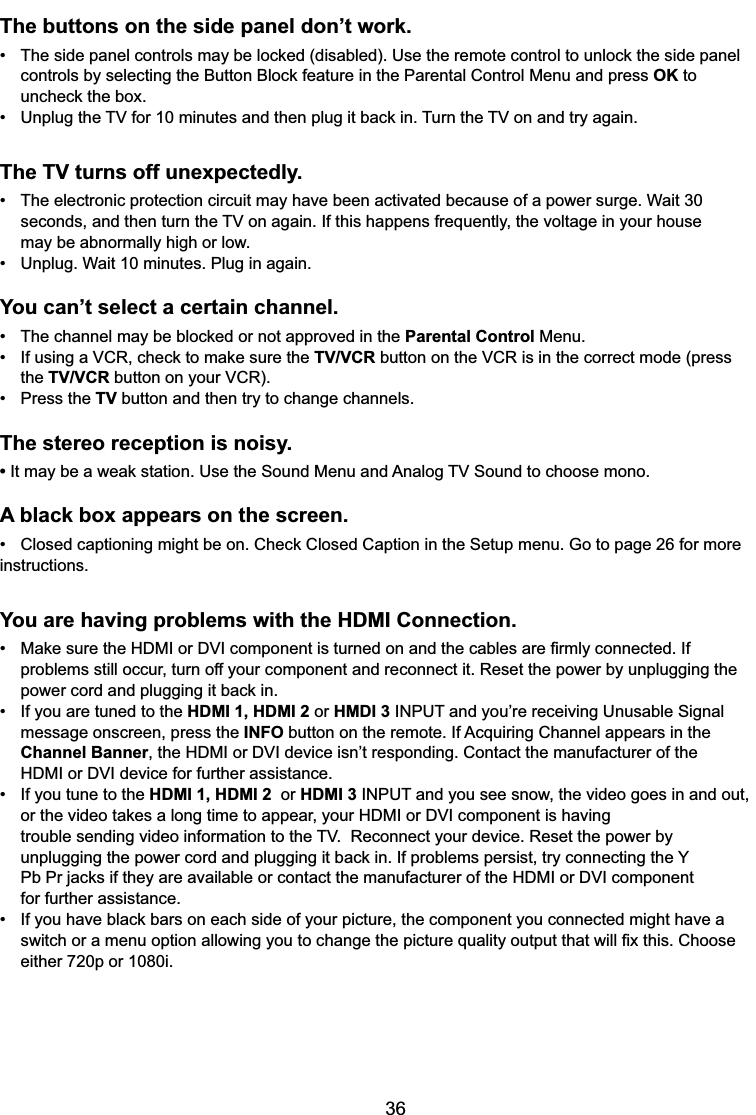
![15Complete the Initial Setup7KHPHQXV\VWHPLQ\RXU79DOORZVDOORIWKH79¶VIHDWXUHVWRZRUNSURSHUO\7KH¿UVWWLPH\RXWXUQRQ\RXU79WKH,QLWLDO6HWXS:L]DUGRSHQVZKLFKJXLGHV\RXWKURXJKWKHVHWXSSURFHVVLQFOXGLQJ/DQJXDJH79/RFDWLRQ7LPH=RQH7XQHUDQG&KDQQHO6FDQSet the Menu Language7KH¿UVWVWHSRIWKHVHWXSUHTXLUHV\RXWRVHOHFW\RXUpreferred language for the menu system. If English is your preferred language, press the OK button on the remote control. To select another language use the down arrow button ( ) until that language is selected then press OK or the right arrow button ( ) to proceed to the next screen.6HWWKH79/RFDWLRQ0RGH$IWHUFKRRVLQJWKHODQJXDJHDPHQXVFUHHQDVNV\RXWRVHWWKH79/RFDWLRQ &KRRVLQJ³Home´IRUWKH79/RFDWLRQDVVLJQV the optimal picture settings for most home environments. &KRRVLQJ³Retail,” which is not Energy Star FRPSOLDQWVHWVWKHXQLWXSZLWKSUHGH¿QHG settings for retail displays. In this setting, the power consumption may exceed the requirements of the (QHUJ\6WDUTXDOL¿FDWLRQUse the up or down arrow ( ) to select the desired location setting (Home/RetailWKHQSUHVVWKHOK button or right arrow ( ) to continue to the next screen.Set the Time ZoneUse the up or down arrows ( ) to select the current local time zone. Press the OK button or right arrow ( )to continue to the next screen.Initial SetupPlease select your language: LanguageEspañolFrançaisEnglishSelect OK NextInitial Setup TV LocationTV Location This mode is Energy Star compliant. RetailHomeBack OK NextSelectInitial Setup Time ZonePlease select your time zone: AlaskaPacificHawaiiMountainCentralEasternAtlanticNewfoudlandBack OK NextSelect ExitCLEAREASTERN](https://usermanual.wiki/TTE-Technology/L32HDF11TA/User-Guide-1290695-Page-15.png)
![16Auto Channel Scan1. On the Tuner screen, select either Antenna or Cable.Press the OK button or right arrow ( ) to continue to the next screen. Note: If you are using a satellite or cable set-top box,you do not have to complete the Channel Search.2. The Channel Scan screen is now displayed. The default choice is to scan. Press the OK button or the right arrow ( ) to begin the channel scan for available FKDQQHOVWREHVWRUHGLQWKH79¶VPHPRU\Note: If you do not want to scan for channels at this time, press CLEAR to stop the scanning process.3. The screen will change to show the progress of the scanning process. :KHQWKHVFDQQLQJLV¿QLVKHGWKHComplete screen appears to inform you that the unit has completed the Initial Setup.5. Press CLEAR to exit the Wizard and begin watching 796NLS6FDQ,I\RXHOHFWWRVNLSWKH$XWR6FDQQLQJSURFHVVE\FKRRVLQJSkip Scan or by pressing the CLEAR button, you will need to follow this process the next time you decide to complete this procedure.1. Select the TV as input (using the INPUTNH\ *RWKURXJKWKHPHQXRSWLRQVWRVHOHFWWKHSignal Type,which will display the option of scanning the channels again.3. If you are using a satellite or cable set-top box, you do not have to complete the Channel Search.Note: See the Setup Menu to: 6FDQFKDQQHOVDXWRPDWLFDOO\DJDLQSDJH $GGGHVLUHGFKDQQHOVQRWPHPRUL]HGE\WKH&KDQQHOScan (page 23). 5HVHWWKHWLPH]RQHSDJHSee the Language Menu to: &KDQJHWRDQRWKHUODQJXDJHSDJHInitial Setup TunerPlease select your tuner mode: CableAntennaBack OK NextSelect ExitCLEARInitial Setup Channel ScanPlease connect antenna or cable. Start Channel Scan now?If you skip this step, the ChannelScan can be performed by going tothe Setup menu later.Skip ScanScanBack OK NextSelect ExitCLEAR0%Initial Setup CompleteBackCongratulations!The Initial Setup is complete.Please press [OK] to exit the InitialSetup Menu.ExitCLEAR](https://usermanual.wiki/TTE-Technology/L32HDF11TA/User-Guide-1290695-Page-16.png)
![17Selecting a Channel1. Select the desired channel by using the CH+/- RUWKHQXPHULFNH\SDG The CH+/- can select only memorized channels. 6HOHFWQRQPHPRUL]HGFKDQQHOVXVLQJWKHQXPHULFNH\SDG 7RXVHWKHQXPHULFNH\SDGAnalog TV Channels – When selecting an analog channel, such as channel 12, press the 1, then the 2, then press OK.DTV ±:KHQVHOHFWLQJGLJLWDOFKDQQHOVVXFKDVEHVXUHWRSUHVVWKHGRWLQWKH appropriate place. So, for 12.3, you would press 1, then 2, then dot, then 3. Press OK to select.3. Press GO BACK to return to the previously viewed channel.What is a Sub-channel?A sub-channel is a channel such as 12.3. By using high-compression technology, digital broadcasting enables multiple signals to be sent simultaneously. Therefore, you can select more than one program per main channel, since digital broadcasting technology can distinguish between multiple channels on DVLQJOHQHWZRUNTurning the TV On and Off3OXJWKHSRZHUFRUGIURPWKH79LQWRDQ$&SRZHURXWOHW2. Press WRWXUQRQWKH793. Press WRWXUQRIIWKH79:KHQ\RXWXUQWKH79RIILWDXWRPDWLFDOO\JRHVLQWR6WDQGE\0RGHNote: When your TV is in Standby Mode, it is still receiving some power. To completely disconnect the power, unplug the power cord.Selecting the Video Input Source 7XUQRQWKH79WKHQSUHVV INPUT on the remote control. The INPUT list appears.2. To select an input source, press the INPUT button repeatedly or use the up and down arrows ( ) to highlight the video source and press OK to select. Adjusting/Muting the Volume1.Use the VOL +/- to adjust the volume. The volume bar will be displayed at the bottom part of your 79VFUHHQZKHQ\RXDUHDGMXVWLQJWKHYROXPH7KHYROXPHEDUGLVDSSHDUVDIHZVHFRQGVDIWHU you have completed the adjustment.2. Press MUTEWRWXUQWKHVRXQGRQDQGRII7KH087(PDUNLVGLVSOD\HGRQWKH79VFUHHQIRUD few seconds.3. When you press MUTE again, the volume reverts to its previous level.Chapter 2 - Understanding the BasicsInputAVCMPT No LabelPC No LabelHDMI1 No LabelHDMI2 No LabelTVNo LabelHDMI3 No Label](https://usermanual.wiki/TTE-Technology/L32HDF11TA/User-Guide-1290695-Page-17.png)
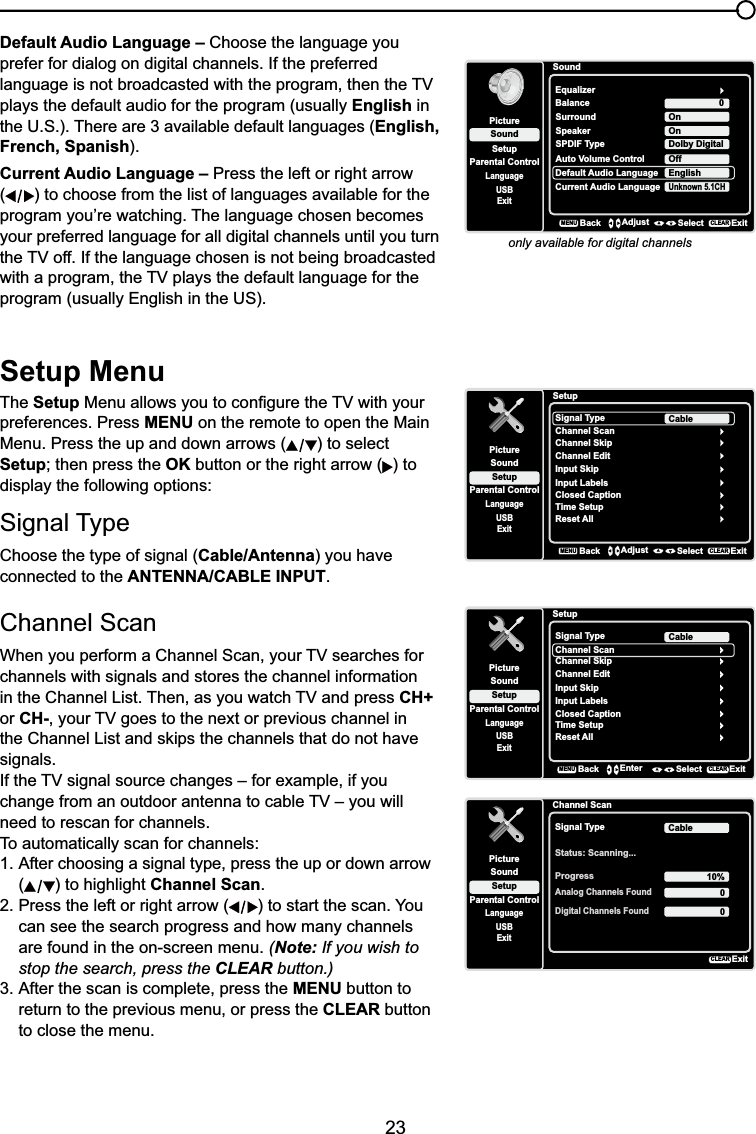
![22Sound MenuThe Sound Menu lets you adjust audio output. To access the Sound Menu, press MENU on the remote, and then use the up and down arrows ( ) to highlight Sound from the Main Menu. Press the OK button RUULJKWDUURZNH\ )to select. The following options will be displayed:Equalizer – 7KH¿YHEDQGHTXDOL]HUDOORZV\RXWRDGMXVWWKHDXGLRIUHTXHQF\VHWWLQJV<RXFDQVHOHFWRQHRIWKH¿YHpreset options or create a custom preset.Equalizer±$OORZV\RXWRFKRRVHDVSHFL¿Fsound preset. Press the left and right arrows ( )to cycle through the options: Standard, Movie, Voice, Music and Personal.Frequency Range – 'LVSOD\VWKHGLIIHUHQWJUDSKLFequalizer names set for each Sound Preset option. &KRRVHDEDQGDQGPDNHDGMXVWPHQWV:KHQPDNLQJadjustments, the Sound Preset option automatically changes to Personal. Press the left or right arrow ( ) to select the desired frequency (100Hz, 300Hz, 1KHz, 3KHz, 10KHz) you wish to adjust. Use the up and down arrows ( ) to adjust the level. When you KDYH¿QLVKHGDGMXVWLQJWKHOHYHOVSUHVVWKHMENUbutton to exit.SoundSetupParental ControlLanguageSoundPictureEqualizerBalanceSurroundAnalog TV SoundUSBExit0OnStereoBackMENUEnter Select ExitCLEARSpeaker OnSPDIF Type Dolby DigitalAuto Volume Control OffBalance – Use the left or right arrows ( ) to adjust the DPRXQWRIDXGLRVHQWWRWKHOHIWDQGULJKWVSHDNHUVSurround – Option On/Off. When turned on, this option enables a mode which simulates a surround sound effect.Speaker – Option On/Off. When you select the Off option, WKHVRXQGVSHDNHURQWKH79ZLOOEHWXUQHGRIISPDIF Type – Press the left or right arrow ( ) to select SPDIF Type. This option controls the type of audio stream VHQWWRWKH'LJLWDO$XGLR2XWSXWMDFN$YDLODEOHRSWLRQVDUHDolby Digital, PCM, or Off.only available for analog channelsAuto Volume Control – Option On/Off. This option reduces the annoying blasts in volume that often RFFXUGXULQJFRPPHUFLDOEUHDNVDQGDOVRDPSOL¿HVVRIWHUVRXQGVLQSURJUDPPDWHULDOHOLPLQDWLQJWKHneed for constant volume adjustment. Analog TV Sound – This option controls the manner in which the sound comes through your VSHDNHUV2SWLRQVDYDLODEOHYDU\DFFRUGLQJWRWKHLQSXWVHOHFWHG 0RQRDYDLODEOHIRUUHJXODU79YLHZLQJRQO\± This option plays the sound in mono only. Use WKLVVHWWLQJZKHQUHFHLYLQJEURDGFDVWVZLWKZHDNVWHUHRVLJQDOV Stereo –7KLVRSWLRQVSOLWVWKHLQFRPLQJVWHUHRDXGLRVLJQDOLQWROHIWDQGULJKWFKDQQHOV0RVW79programs and recorded materials have stereo audio. The word “Stereo” appears in the ChannelBanner when you tune to a program that is broadcast in stereo. Second Audio Program (SAP) – 7KLVRSWLRQSOD\VWKHSURJUDP¶VDXGLRLQDVHFRQGODQJXDJHif available. The letters “SAP” appear in the Channel Banner when you tune to a program that is broadcast with SAP information. SAP audio is broadcast in mono only. SAP is also used to EURDGFDVWDSURJUDP¶VDXGLRZLWKGHVFULSWLRQVRIWKHYLGHRIRUWKHYLVXDOO\LPSDLUHGSoundSetupParental ControlLanguageSoundPictureEqualizerBalanceSurroundAnalog TV SoundUSBExit0OnStereoSpeaker OnSPDIF Type Dolby DigitalAuto Volume Control OffBackMENUAdjust Select ExitCLEAR](https://usermanual.wiki/TTE-Technology/L32HDF11TA/User-Guide-1290695-Page-22.png)
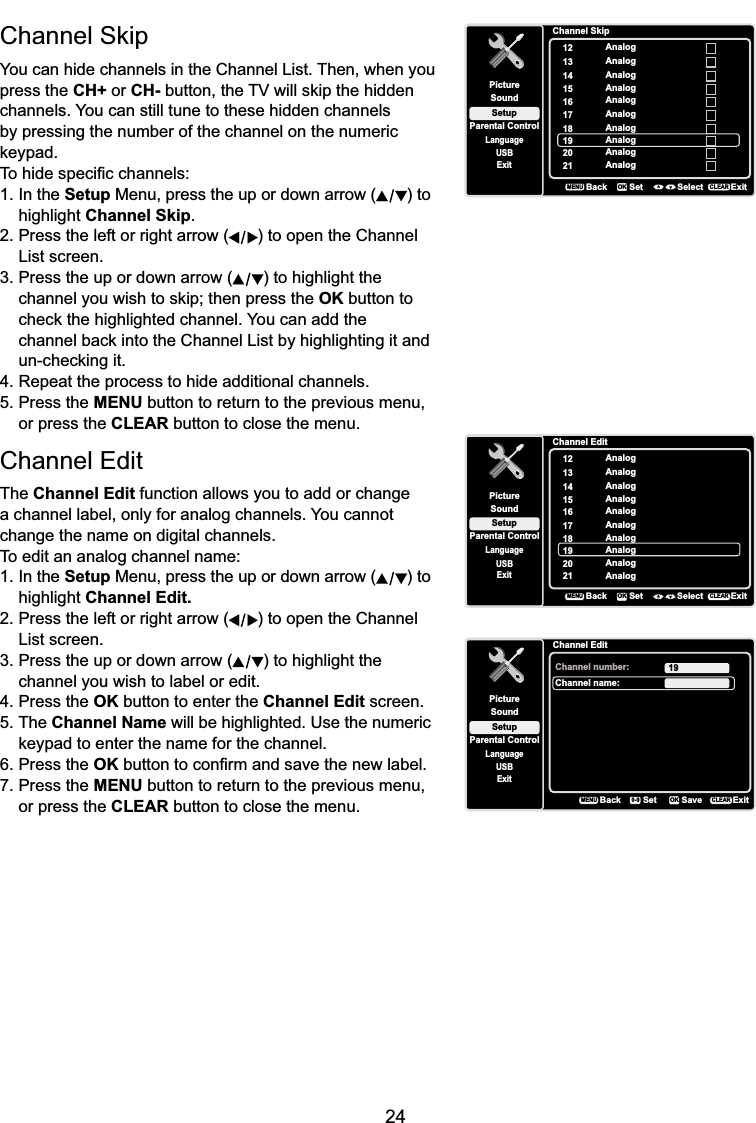
![32Language MenuTo select the preferred language for all menus, follow the steps below. You can choose between English, Espanol, or Francais.1. Press MENU on the remote control (the Main Menu appears).2. Use the up or down arrow ( ) to select Language.LanguageSetupParental ControlLanguageSoundPictureEnglish OnUSBExitEspañolDesactivadoFrançaisDésactivéBackMENUAdjust Select ExitCLEAR%ORFNLQJ8QUDWHG([HPSW3URJUDPV7KH8QUDWHG([HPSW5DWLQJVRSWLRQOHWV\RXGHFLGHLISURJUDPVWKDWWKH9&KLSUHFRJQL]HVDVXQUDWHGRUH[HPSWFDQEHYLHZHG8QUDWHG79SURJUDPVPD\LQFOXGHQHZVVSRUWVSROLWLFDOUHOLJLRXVORFDOand weather programs, emergency bulletins, public announcements, and programs without ratings. The Exempt option applies to both US and Canadian unrated programs and Canadian programs rated E.1. Press the up or down arrow ( ) to select V-Chip in the Parental Control submenu.2. Press the left or right arrow ( ) to proceed to the next screen.3. Press the up or down arrow ( ) to highlight Unrated/Exempt Ratings.4. Press the left or right arrow ( ) to toggle between View and Block.View All unrated programs are available.Block All unrated programs are not available.5HVHW'RZQORDGDEOH'DWD1. Press the up or down arrow ( ) to select V-Chip in the Parental Control submenu.2. Press the left or right arrow ( ) to proceed to the next screen. 6HOHFWWKLVRSWLRQWRUHVHWWKHGRZQORDGDEOH9&KLSGDWD:KHQ\RXVHOHFWWKLVRSWLRQD FRQ¿UPDWLRQER[RSHQV3UHVVWKHOHIWRUULJKWDUURZ ) to select.4. Press the OK button to reset the downloadable rating data, if present.,QSXW%ORFN1. Press MENU on the remote control (the Main Menu appears).2. Select Parental Control. If parental controls have SUHYLRXVO\EHHQORFNHG\RXPXVWHQWHU\RXUSDVVZRUG3. Press the up or down arrow ( ) to highlight Input Block.4. Press the left or right arrow ( ) to display the Input Source List screen.5. Press the up or down arrow ( ) to place a FKHFNPDUNLQWKHER[WREORFNWKHLQSXW:KHQyou tune to that input, you will need to enter a password to view the channel.6. Press the OKEXWWRQWRFRQ¿UP\RXUVHOHFWLRQ$ ORFNHGXQORFNHGLFRQDSSHDUVQH[WWRWKHVHOHFWHGLQSXWSetupParental ControlLanguageSoundPictureUSBExitInput BlockAVCMPTHDMI1HDMI2BackMENUSet Select ExitCLEAROKNo LabelNo LabelNo LabelPC No LabelNo LabelHDMI3 No LabelTV6. Press the left or right arrow ( ) to proceed.7. Press the up or down arrow ( ) to select the desired rating.8. Press the OK EXWWRQWRWRJJOHEHWZHHQ9LHZDQG%ORFN2SHQ9&KLS- allows you to select the downloadable rating level. In the event that a new rating system is provided by the broadcaster, the new rating options would appear within this menu.cable.](https://usermanual.wiki/TTE-Technology/L32HDF11TA/User-Guide-1290695-Page-32.png)
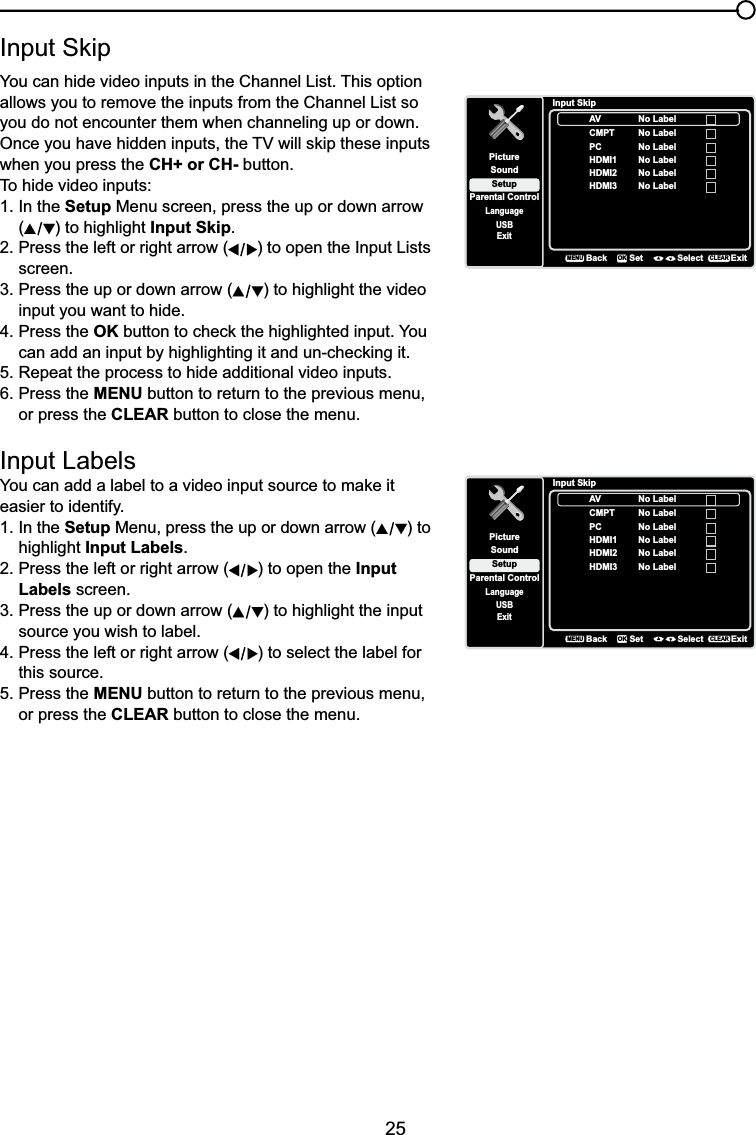
![33SetupParental ControlLanguageSoundPictureUSBExitUSB Menu7KH86%IHDWXUHRQ\RXU79DOORZV\RXWRSOD\DXGLR¿OHVIRUPDWVXSSRUWHG03RUGLVSOD\SLFWXUHVIRUPDWVXSSRUWHG-3(*7RXWLOL]HWKLVIHDWXUHIROORZWKHVHVWHSV1. Press MENU on the remote control (the Main Menu appears).2. Use the up or down arrow ( ) to select USB.3. Press the OK button or the right arrow ( ) to proceed to the USB Screen.Or, you can press the MEDIA button on the remote control to display the USB screen directly.4. Press the left or right arrow ( WRVHOHFWWKH¿OHRUIROGHURQ\RXU86% GHYLFHFRQQHFWHGWR\RXU795. Press the OKEXWWRQWRFRQ¿UPRUSOD\EDFN2U\RXFDQSUHVVWKHMENUbutton to use the menu option.Media TypePhoto-,I\RXKDYHSKRWRVRQ\RXU86%GHYLFHFRQQHFWHGWR\RXU79WKLVPHQXDOORZV\RXWRYLHZWKHphotos individually by pressing the left or right arrow ( ) to highlight the picture, then press OK for SOD\EDFN)RUVOLGHVKRZRSWLRQVSUHVVMENUDJDLQWRJRWRWKH3OD\EDFN2SWLRQVPHQXMusic-,I\RXKDYHPSDXGLR¿OHVRQ\RXU86%GHYLFHFRQQHFWHGWR\RXU79WKLVPHQXDOORZV\RXWRSOD\¿OHVLQGLYLGXDOO\E\SUHVVLQJWKH to highlight the song, then press OKIRUSOD\EDFNFor slideshow options, press MENUDJDLQWRJRWRWKH3OD\EDFN2SWLRQVPHQXThumbnail Size - <RXFDQVHOHFWWRGLVSOD\WKH¿OHVRUIROGHUVRQ\RXU86%GHYLFHLQSmall,Middle or Large size.USB Connection<RXFDQFRQQHFWDGHYLFHZLWK86%WR\RXU79RUXVHD86%ÀDVKGULYH7KLVFRQQHFWLRQDOORZV\RXWRLQVHUWD86%ÀDVKGULYHGLUHFWO\RUFRQQHFWDFRPSDWLEOHPDVVVWRUDJHdevice with USB, such as a digital camera, a multi-format card reader, or an MP3 player. If you have a USB drive, plug it into the drive directly. If you have a device with a USB port, connect one end of WKH86%FDEOHWRWKH86%SRUWDQGWKHRWKHUHQGWRWKH86%MDFNRQWKHVLGHRIWKH797RDFFHVVDQGadjust the options of the USB device, refer to USB Menu.Side of this unitOr3. Press the OK button or right arrow ( ) to display the Language Screen.4. Press the up or down arrow ( ) to select the preferred language for the menu.5. Press the left or right arrow ( ) to select On or Off.6. Press the MENU or CLEARNH\WRH[LWWKHPHQX](https://usermanual.wiki/TTE-Technology/L32HDF11TA/User-Guide-1290695-Page-33.png)
![37The remote control doesn’t work. 6RPHWKLQJPLJKWEHEHWZHHQWKHUHPRWHDQGWKHUHPRWHOLJKWVHQVRURQWKHIURQWRIWKH790DNH sure there is a clear path. 7KHUHPRWHPD\QRWEHDLPHGGLUHFWO\DWWKH79 7KHEDWWHULHVLQWKHUHPRWHPD\EHZHDNGHDGRULQVWDOOHGLQFRUUHFWO\3XWQHZEDWWHULHVLQWKH remote.The Universal Remote control doesn’t work.7KLV79XWLOL]HVQHZUHPRWHFRQWUROVLJQDOVDQGPD\QRWEHFRPSDWLEOHZLWK\RXUH[LVWLQJXQLYHUVDOremote (e.g. satellite box remotes, cable box remotes, and generic universal remotes, etc.). Over time, QHZHUXQLYHUVDOUHPRWHVZLOOEHFRPHDYDLODEOHWKDWVKRXOGSLFNXSWKHQHZ79FRGHVYou are experiencing problems with V-Chip/Parental Controls.,IWKHUDWLQJOLPLWVGRQ¶WZRUN\RXPXVWORFNWKHVHWWLQJV*RWRWKH0DLQ0HQXSUHVV0(18RQ\RXUUHPRWHVHOHFW3DUHQWDO&RQWURO6HOHFW9&KLSDQGWKHQSUHVVWKHOHIWRUULJKWDUURZ ) to proceed to the next screen. Rating Enable is highlighted. Press the left or right arrow ( ) to select On to have WKHUDWLQJOLPLWVWDNHHIIHFWThe V-Chip won’t let me watch a program even though it’s not rated as violent.0D\EHWKHPRYLHZDVJLYHQDQ151RW5DWHGVWDWXV$IWHU\RXEORFNPRYLHUDWLQJV\RXPXVWVHW15WR9LHZ6HSDUDWHO\LQRUGHUWRYLHZPRYLHVZLWKDQ15UDWLQJWhat else can I do?,I\RX¶YHEHHQWKURXJKWKH7URXEOHVKRRWLQJVHFWLRQDQGQRWKLQJKDV¿[HG\RXUSUREOHPWU\UHERRWLQJ\RXU791RWHWKDWDIWHUDUHERRW\RXPD\QHHGWRUXQ\RXU79WKURXJKWKHVHWXSSURFHVVDJDLQ7RGRDUHERRWXQSOXJWKHSRZHUFRUGIURPWKHZDOORXWOHWRUSRZHUVWULS.HHS\RXU79XQSOXJJHGIRUDERXWPLQXWHV7KHQSOXJLQWKH79DQGWXUQLWRQ6HHLIWKHSUREOHPLV¿[HG,IWKHSUREOHPUHPDLQVWKHQSOHDVHYLVLWZZZWFOXVDFRPIRUXSGDWHG)$4VRUFRQWDFW7&/&XVWRPHU6XSSRUWDWWKHVXSSRUWQXPEHUSURYLGHGLQ\RXU:DUUDQW\XQGHU³+RZ7R*HW6HUYLFH´Care and Cleaning&DXWLRQ7XUQ2))\RXU79EHIRUHFOHDQLQJ<RXFDQFOHDQWKH79DVUHTXLUHGXVLQJDVRIWOLQWIUHHFORWK%HVXUHWRRFFDVLRQDOO\GXVWWKHventilation slots in the cabinet to help assure adequate ventilation.IMPORTANT: Never use strong cleaning agents, such as ammonia-based cleaners, or abrasive SRZGHU 7KHVH W\SHV RI FOHDQHUV ZLOO GDPDJH WKH 79 7KH79¶V VFUHHQ PD\ EH FOHDQHG ZLWK D VRIWOLQWIUHHFORWKDVZHOO7DNHFDUHQRWWRVFUDWFKRUPDUWKHVFUHHQ,IQHFHVVDU\\RX PD\XVHDFORWKdampened with warm water. While cleaning, do not spray liquid directly on the screen, or allow liquid to UXQGRZQWKHVFUHHQDQGLQVLGHWKH79$OVRQHYHUSODFHGULQNVRUYDVHVZLWKZDWHURQWRSRIWKH797KLVFRXOGLQFUHDVHWKHULVNRI¿UHVKRFNKD]DUGRUGDPDJHWRWKH79](https://usermanual.wiki/TTE-Technology/L32HDF11TA/User-Guide-1290695-Page-37.png)
![40TTE Technology, Inc. (“TTE”) Limited Warranty$OO/&'0RGHOV(;&(37727+((;7(17352+,%,7('%<$33/,&$%/(/$:7+,6:$55$17<'2(6127&29(5$1'$6'(6&5,%('%(/2:77((;35(66/<',6&/$,06$//$&78$/$1',03/,(':$55$17,(6:,7+5(63(&772$1<352'8&786(')25,167,787,21$/2527+(5&200(5&,$/385326(6,1&/8',1*%87127/,0,7('725(17$/385326(6What your warranty covers:'HIHFWVLQ PDWHULDOVRUZRUNPDQVKLSWRWKH RULJLQDORZQHURIWKLV7&/SURGXFWZKHQSXUFKDVHG IURPDQ$XWKRUL]HG'HDOHURI7&/EUDQGSURGXFWVDQGSDFNDJHGZLWKthis warranty statement.New LCD TelevisionsFor how long after your purchase:7ZR\HDUVIURPGDWHRISXUFKDVHIRUSDUWV7ZR\HDUVIURPGDWHRISXUFKDVHIRUODERUWhat we will do:$W77(¶VGLVFUHWLRQSD\DQ$XWKRUL]HG7&/6HUYLFH&HQWHUIRUERWKODERUFKDUJHVDQGSDUWVWR UHSDLU\RXUWHOHYLVLRQRUUHSODFH\RXUWHOHYLVLRQZLWKDQHZRUUHIXUELVKHGUHPDQXIDFWXUHG unit. See “How to get service”. How to get service:&DOO1-877-300-88373OHDVHKDYH\RXUXQLW¶VGDWHRISXUFKDVHSODFHRISXUFKDVHDQGPRGHO VHULDOQXPEHUUHDG\7KHPRGHOVHULDOQXPEHULQIRUPDWLRQFDQEHIRXQGRQWKHEDFNRI\RXUXQLW$UHSUHVHQWDWLYHZLOOWURXEOHVKRRW\RXUSUREOHPRYHUWKHSKRQH,ILWLVGHWHUPLQHGWKDW\RXUXQLW requires service, the service location will be at the sole discretion of TTE based upon the TTE Limited Warranty statement.$WWKHVROHGLVFUHWLRQRI77(WHOHYLVLRQVFUHHQVL]HV´DQGVPDOOHUZLOOHLWKHUEHUHSDLUHGDWDQ $XWKRUL]HG7&/6HUYLFH&HQWHURUGLUHFWO\H[FKDQJHGIRUDQHZRUUHIXUELVKHGUHPDQXIDFWXUHG unit. At the sole discretion of TTE, television screen sizes 33” through 55” will either be repaired at an Authorized TCL Service Center or repaired in-home. If repaired at an Authorized TCL Service Center, TTE is not responsible for transportation costs to the Authorized TCL Service Center. However, TTE will pay for return shipping. TTE will SURYLGHLQVWUXFWLRQVIRUSDFNDJLQJDQGVKLSSLQJWKHXQLW3URRIRISXUFKDVHLQWKHIRUPRIDELOORI VDOHRUUHFHLSWHGLQYRLFHIURPDQ$XWKRUL]HG'HDOHUZKLFKLVHYLGHQFHWKDWWKHSURGXFWLVZLWKLQ the warranty period must be presented to obtain warranty service.What your warranty does not cove:&XVWRPHULQVWUXFWLRQ<RXU2ZQHU¶V0DQXDOGHVFULEHVKRZWRLQVWDOODGMXVWDQGRSHUDWH\RXU XQLW$Q\DGGLWLRQDOLQIRUPDWLRQVKRXOGEHREWDLQHGIURP\RXU$XWKRUL]HG'HDOHU,QVWDOODWLRQDQGUHODWHGDGMXVWPHQWV'DPDJHUHVXOWLQJIURPQRQDSSURYHGLQVWDOODWLRQPHWKRGV6LJQDOUHFHSWLRQSUREOHPVQRWFDXVHGE\\RXUXQLW'DPDJHIURPPLVXVHRUQHJOHFW%DWWHULHV$WHOHYLVLRQWKDWKDVEHHQPRGL¿HGRULQFRUSRUDWHGLQWRRWKHUSURGXFWVRULVXVHGIRULQVWLWXWLRQDOor other commercial purposes (including but not limited to rental purposes).$XQLWSXUFKDVHGRUVHUYLFHGRXWVLGHWKH86$$XQLWVROGDVLVRUZLWKDOOIDXOWV$FWVRIQDWXUHVXFKDVEXWQRWOLPLWHGWROLJKWQLQJGDPDJH6SHFLDOLQFLGHQWDORUFRQVHTXHQWLDOGDPDJHV](https://usermanual.wiki/TTE-Technology/L32HDF11TA/User-Guide-1290695-Page-40.png)