TTE Technology L42FHD2X48 LCD TV User Manual
TTE Technology, Inc. LCD TV
UserManual.wiki
>
TTE Technology
>
L42FHD2X48 User Manual
User Manual
Navigation menu
Upload a User Manual
Namespaces
Wiki Guide
HTML
PDF
Info
Views
User Manual
Discussion / Help
Navigation
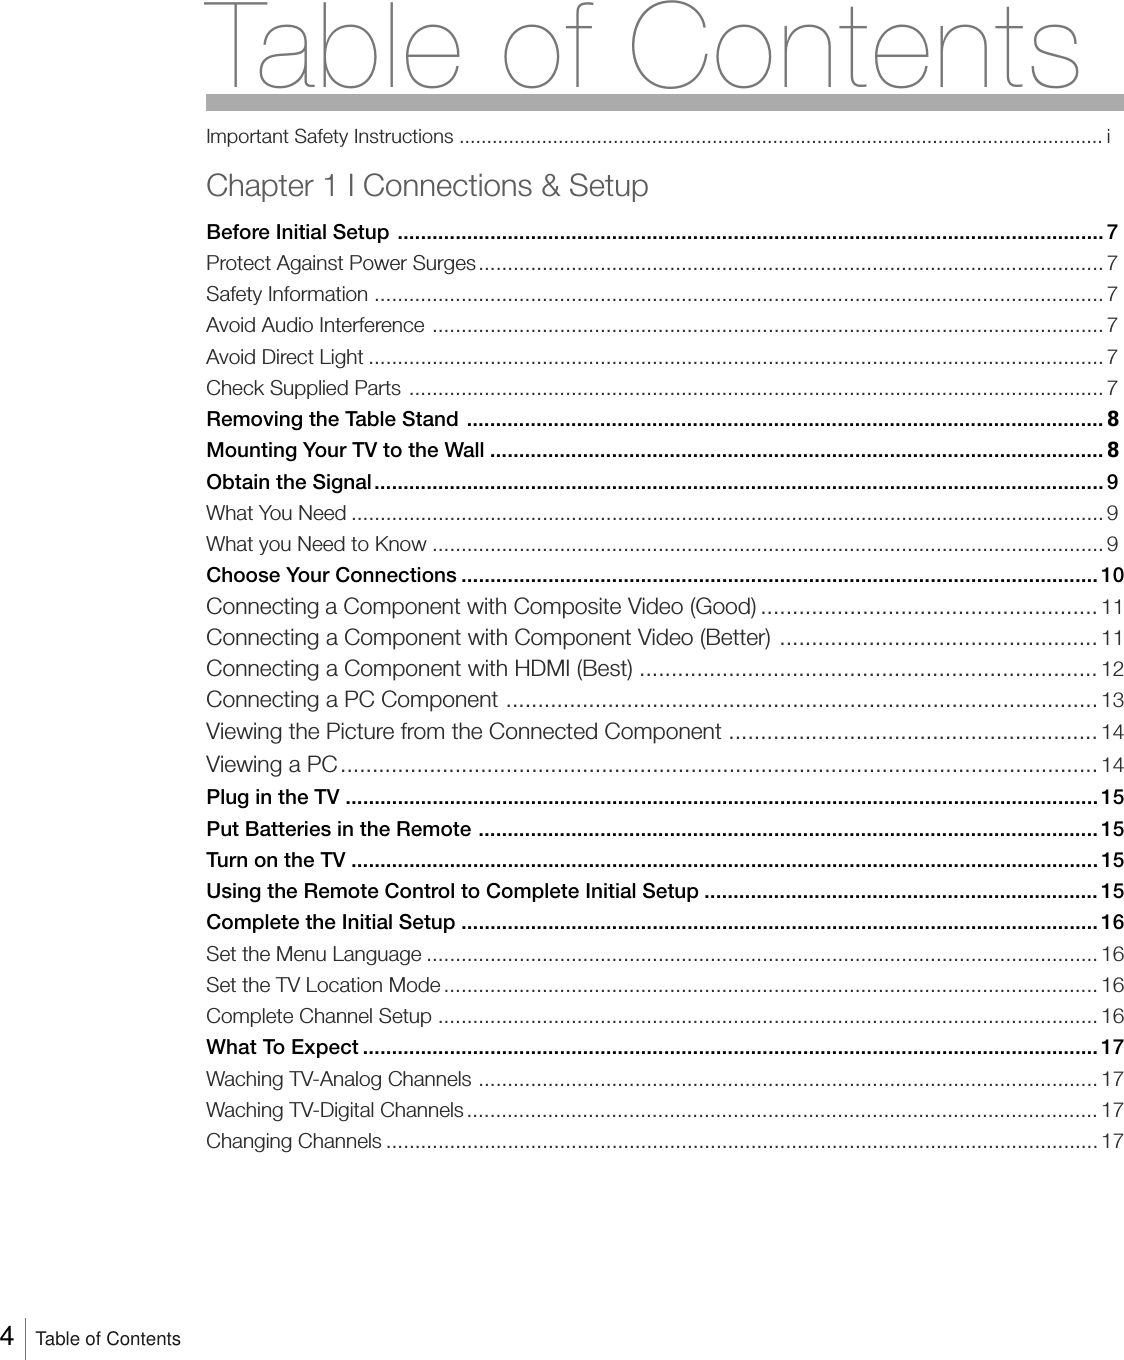
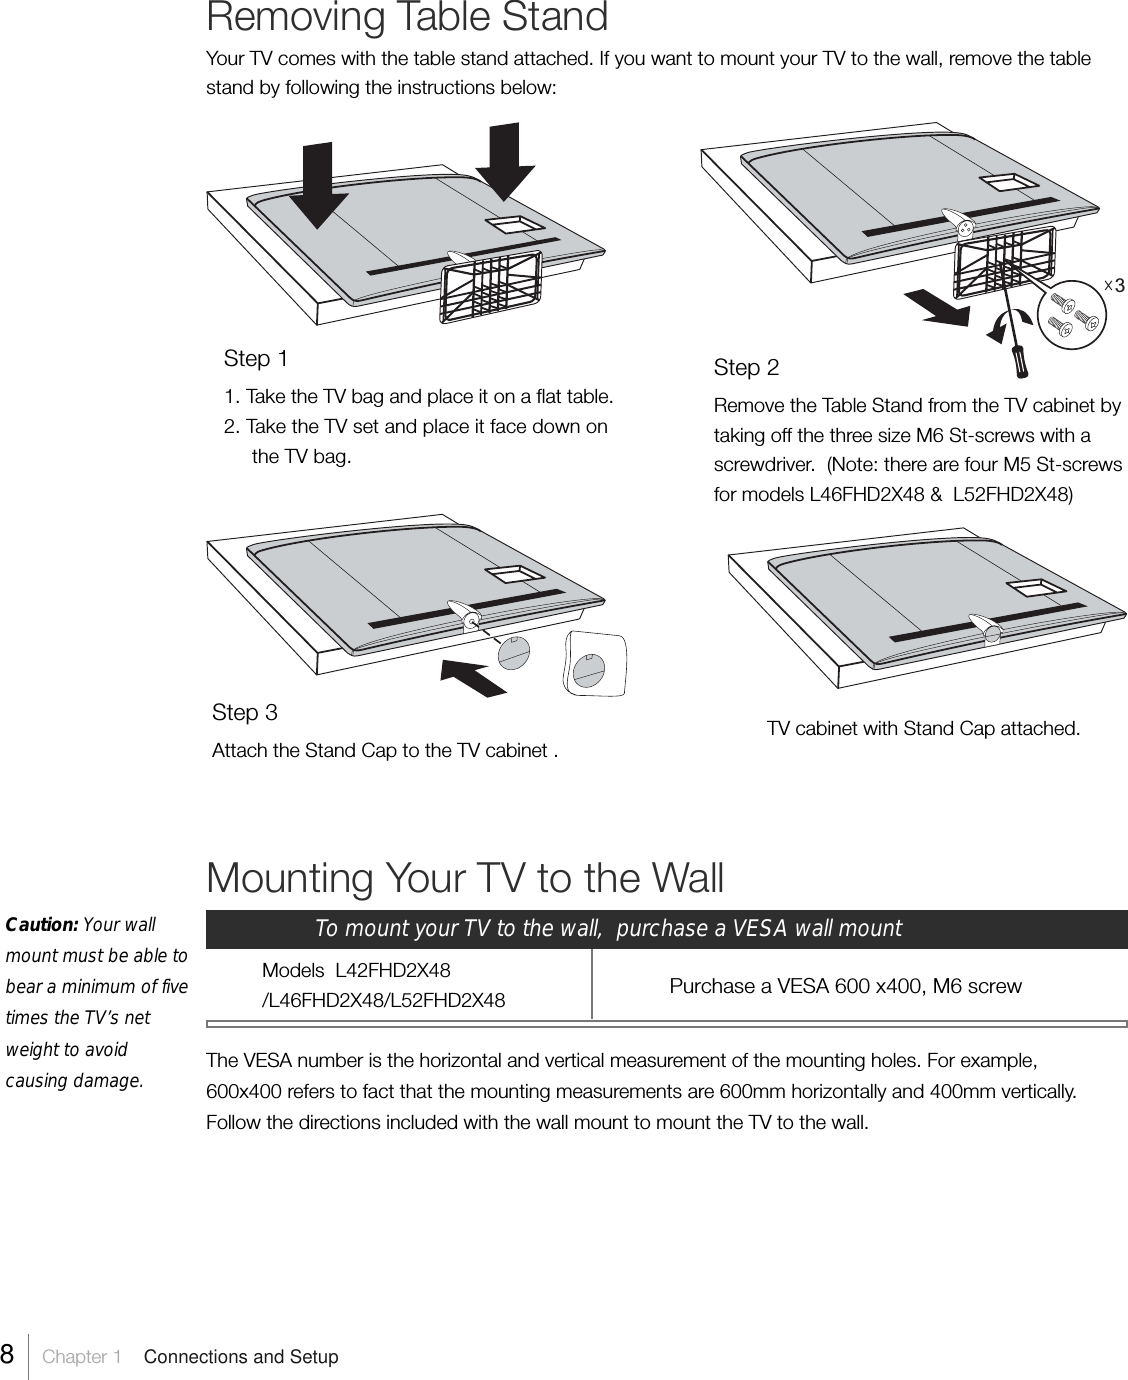

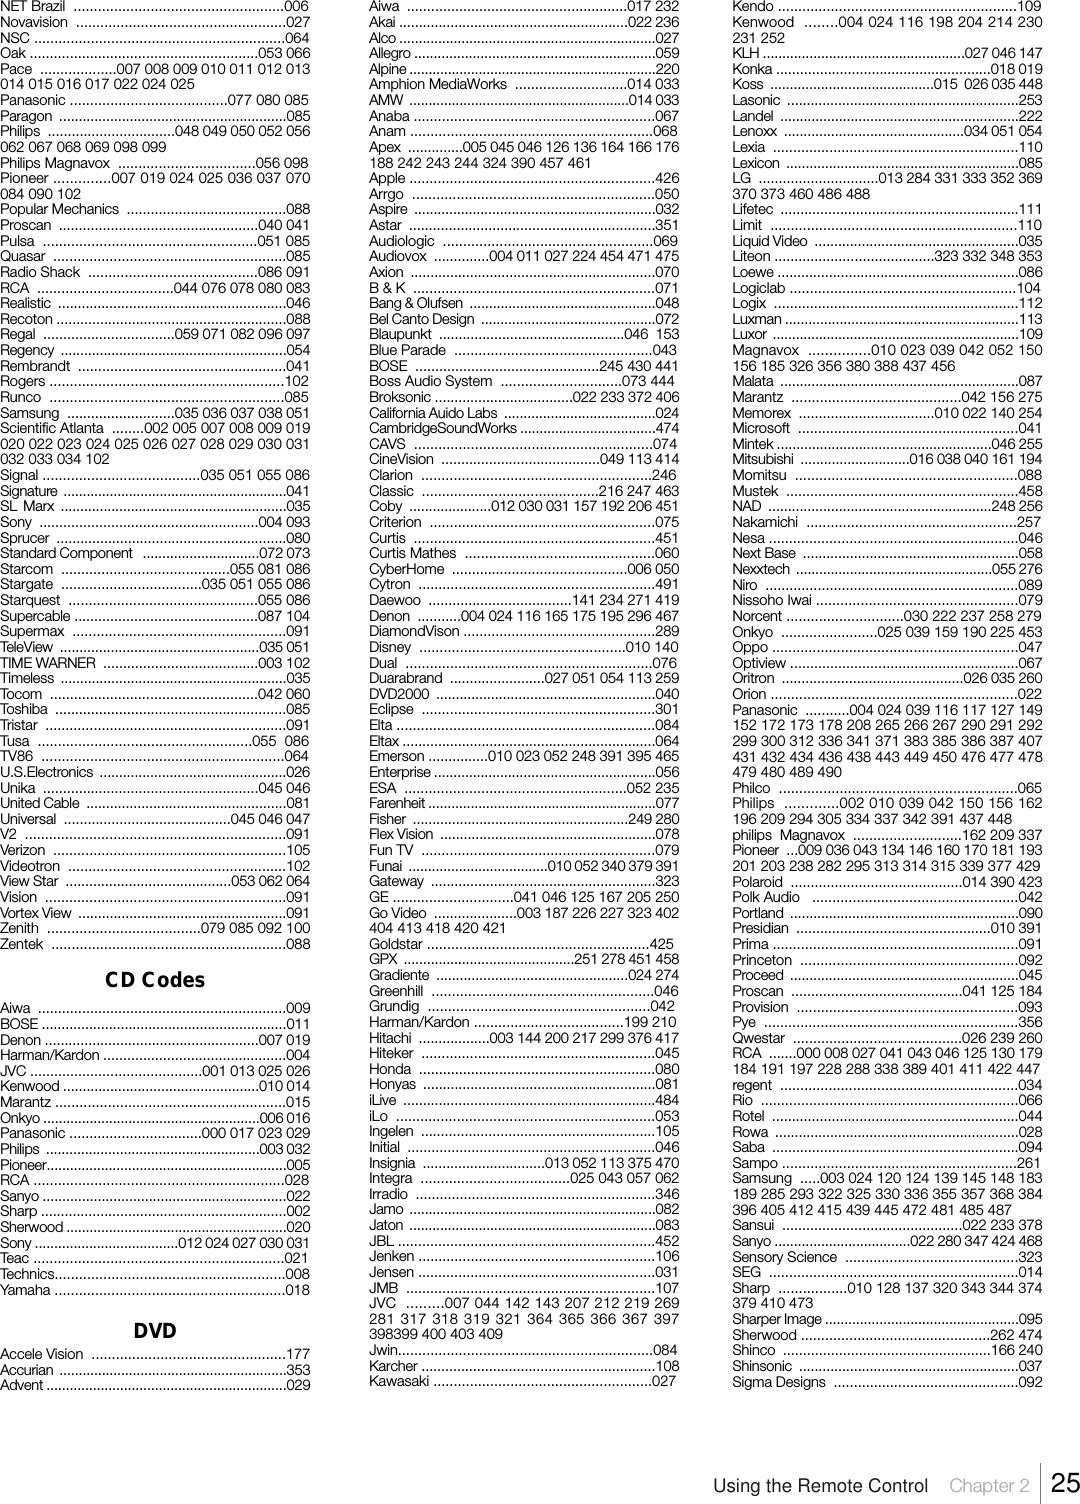
![Sonic Blue ...................................059 061 063 066Sony ..........001 020 037 115 118 121 122 123131 133 135 154 155 158 163 168 223 229 268283 306 307 308 335 354 358 360 362 381 392394 427 428 433 435 440 442 446 455 464 466482 483Sungale ........................................................270Superscan ........................................................023SVA ..............................................................096Sylvania ................010 023 052 340 391 395 416Symphonic ..............................................010 391Teac .......................................................027 224Technics ................................................004 024Technosonic .................................................097Techwood ...............................................241 263Terapin ..........................................................098Theta Digital .....................................................043Tivo ..............................................................099Toshiba ...............002 021 022 039 119 129 132138 171 180 182 286 297 302 303 304 309 310311 316 327 328 329 359 363 382 393 408 462Tredex ...........................................................100Trutech ...........................................................273TView .............................................................067Urban Concepts ............................................039US Logic ........................................................224Venturer ..................................................027 469Vizio ...............................................................101Vocopro............................................................102Westinghouse ..................................................492Xbox ...............................................................041Xwave ...............................................................103Yamaha ....................024 042 116 150 169 174196 202 211 215 218 277 345 459Zenith .............013 039 113 151 186 213 227 264298 349 350 369 425 460WHITE WESTINGHOUSE ................................492DVD/VCR Combo CodesWhere the code is listed as [### ###] the first is forthe DVD and the second is for the VCR. Otherwisejust the one code operates both the DVD and theVCR. Remember to add the code for the databasedevice type 0 for DVD, 4 for VCR, [0### 4###].Broksonic ..............[372 062] [022 072] [406 088]Hitachi ..................................[376 013] [417 103]Insignia .................[375 016] [013 047] [113 117]JVC ....................[364 052] [365 053] [366 054][367 055] [317 056] [318 058] [319 059] [403 094][397 079] [398 080] [399 081] [400 082] [403 085][409 095] [317 056] [318 058] [319 059]LG ......................[369 016] [373 060] [013 047][331 060] [370 060]Pioneer ................................................[377 064]Sansui .....................................[378 065] [022 072]Sharp ....................[374 124] [379 125] [410 111]Toshiba ....................[363 051] [382 067] [119 091][119 096] [393 076] [408 092] [393 115]Zenith ....................[369 016] [151 116] [227 099]Apex ....................................................[390 074]CineVision .............................[113 101] [414 117]Daewoo ...............................................[419 107]Durabrand ...............................................[113 117]Emerson ..............................[395 010] [395 103]Funai ....................................................[379 125]Go Video .................[227 100] [402 084] [404 086][413 087] [418 106] [420 108] [421 109]Goldstar ................................................[425 114]Magnavox .............[156 009] [380 126] [156 104][388 071]Memorex ................................................[022 072]Panasonic .............[383 061] [385 068] [386 069][407 089] [407 105] [371 061]Philips ...................................[156 009] [391 075]Polaroid ...................................[390 074] [423 112]Presidian ..............................................[391 075]RCA .........[389 073] [401 083] [411 097] [422 110]Samsung ..............[368 005] [384 070] [396 078][405 087] [412 098] [415 087]Sanyo ....................................................[424 113]Sony .....................[360 048] [361 049] [362 050][381 066] [392 093] [394 093] [394 077] [392 090]Sylvania ...................[391 075] [395 102] [416 103]Symphonic .............................................[391 075]Diamond Vision ......................................[289 126]AKAI .....................................................[236 127]Superscan .............................................[023 128]DVR CodesABS ..............................................................020Alienware..........................................................020AT&T ...........................................................030Bang & Olufsen ................................................023Cyberpower ..................................................020Dell ...............................................................020DIRECTV ..............002 007 008 010 011 012 015019 021 024 026 027Dish Network ..........................................017 018Dishpro .............................................................017Echostar ...................................................017 018Expressvu .........................................................017Gateway.........................................................020GOI.................................................................017Hewlett Packard .............................................020HNS ..............................................................009Howard Computers .........................................020HP ................................................................020HTS ...............................................................017Hughes...............................001 010 011 012 015Hughes Network System .................001 010011012 015 024 026 027Humax............................................................015Hush...............................................................020iBUYPOWER....................................................020JVC ....................................................001 017 018Linksys ...........................................................020Media Center PC..............................................020Microsoft.........................................................020Mind ..............................................................020Niveus Media ...................................................020Northgate..........................................................020Panasonic...........................................005 022 030Philips............................001 009 012 015 024 025Pioneer............................................................031Proscan...........................................................019RCA ..............................001 002 009 016 019 021ReplayTV ..........................................004 022 030Samsung..................................................009 024Sonic Blue.........................................004 022 030Sony............................................000 013 014 020Stack 9 .............................................................020Systemax .........................................................020Tagar Systems ..................................................020Tivo ..............................000 001 002 003 010 013014 015 025 026 027 028Toshiba ......................................................006 020Touch ..............................................................020UltimateTV ........................................................021Viewsonic ........................................................020Voodoo ............................................................020ZT Group ..........................................................020Home Theatre in a BoxWhere the code is listed as [### ###] the first is forthe DVD and the second is for the AUDIO. Other-wise just the one code operates both the DVD andthe AUDIO. Remember to add the code for the data-base device Type, 0 for DVD, 5 for Audio [0### 5###].Apex ....................................[457 403] [461 407]Audiovox .................[471 417] [475 399] [454 399]BOSE ......................................[430 384] [441 010]CambridgeSoundWorks ..........................[474 418]Classic .................................................[463 411]Coby ....................................................[451 018]Curtis ....................................................[451 409]Denon ....................................................[467 413]Emerson ...............................................[465 017]GPX ......................................[451 421] [458 404]iLive .....................................................[484 429]Insignia ....................................................[470 416]Jamo ....................................................[082 275]JBL ......................................................[452 397]Koss ....................................................[448 394]LG .......................[284 432] [460 406] [486 406][488 406]Magnavox ................................[437 016] [456 401]Onkyo ....................................................[453 398]Panasonic ................[431 385] [432 390] [434 386][436 385] [438 385] [449 395] [450 396] [476 422][477 423] [478 425] [479 426] [480 427] [489 433][490 434] [438 424]Philips .....................................[437 016] [448 412]Pioneer ....................................................[429 383]RCA .....................................................[447 393]Samsung ................[439 011] [445 011] [481 332][485 431] [487 431] [481 428]Sanyo ..................................................[468 414]Sharp ...................................................[473 419]Sherwood ............................................[474 420]Sony .......................[427 382] [433 430] [435 387][440 430] [442 387] [446 430] [455 400] [464 387][466 430] [482 430] [483 430] [433 392]Toshiba ....................................................[462 410]Venturer ................................................[469 415]Yamaha ..................................................[459 405]Zenith .....................[460 406] [425 019] [425 333]Durabrand ..............................................[259 434]JVC ........................................................[143 408]Satellite TV CodesAlphastar ..........................................................051Amstrad..........................................................100Chaparral ........................................................045DIRECTV ..................001 006 007 008 009 010013 014 015 031 032 034 036 039 043 044 054055 057 058 059 062 063 064 066 067 068 069074 078 079 080 081 084 086 087Dish Network ................002 004 017 018 019 020021 022 023 024 025 026 027 028 029 030 033035 037 041 061 083Dishpro ...........................................035 037 061Drake ............................................................046Echostar ........002 004 033 035 037 061 071 083Expressvu ........................................037 061 07BELL EXPRESSVU ..........................................071FORTEC STAR ..............................................101GE ..........................................................063 087General Instrument ...........................047 048 056GOI ...............................................................061Grundig ..........................................................100Hisense ..........................................................060Hitachi ..........................................................009HTS ..............................................................061Hughes Network Systems..........................003 006008 015 031 043 057 064 073Humax ..........................................................090iLo ................................................................060Jerrold ..........................................................056JVC .............................002 004 033 052 061 083LG ..........................................................011 059Magnavox ........................................................014Memorex ..........................................................014Mitsubishi ................................006 008 064 093Motorola ............................................038 056 065Next Level ........................................................056Pace ............................................................100Panasonic .....................010 062 086 092 096 100Pansat ..........................................................088Paysat ..........................................................014Philips ..........................001 003 009 014 015 031054 055 057 064 081Philips Magnavox ............................009 054 055Pioneer ..........................................................015Primestar ......................................................050Proscan ......................................013 036 063 095Proton ..........................................................060Radio Shack .....................................................056RCA ........................000 003 013 034 040 044058 063 075 076 077 078 080 082 091 094 095097Realistic ..........................................................049Samsung ............003 007 015 057 070 085 098Sharp ............................................................016SKY NETWORK ..............................................100Sony .....................005 032 042 066 074 079 084Star Choice ....................................038 056 072STS ..............................................................053Sylvania ..........................................................099Tivo .................................................003 015 057Toshiba ......................................006 008 009 064UltimateTV .......................................................058Uniden ..........................................................014US Digital .....................................................060USDTV ..........................................................060Viewsat ..........................................................089Voom ............................................................056Zenith .....................................................012 067VCR CodesABS ...............................................................038Adventura ...........................................010 028 125ADMIRAL ..........................................................097Aiwa..............................................010 028 035 125Aiko ...............................................................10726 Chapter 2 Using the Remote Control](https://usermanual.wiki/TTE-Technology/L42FHD2X48/User-Guide-1094793-Page-26.png)