TTE Technology LE55FHDF3300Z LCD TV User Manual LE55FHDF3300Z
TTE Technology, Inc. LCD TV LE55FHDF3300Z
LE55FHDF3300Z-user manual

LED TV
User’s Guide
For use with models: LE32HDF3300 / LE39FHDF3300
/ LE43FHDF3300 / LE48FHDF3300Z / LE55FHDF3300Z
Need Assistance?
Please visit our website at www.tclusa.com
or call 1-877-300-8837.
1
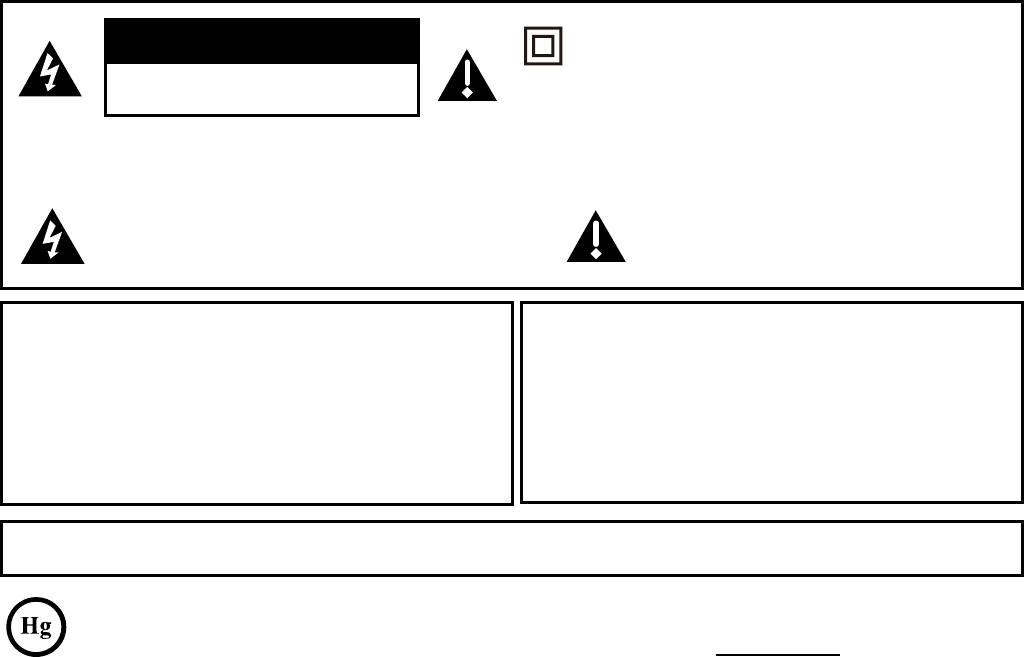
This symbol indicates that this product contains mercury. Special disposal of this product for environmental
reasons may be required under the laws applicable to your jurisdiction. For disposal or recycling information,
please contact your local authorities or the Electronic Industries Alliance: www.eiae.org.
Refer to thHLGHQWL¿FDWLRQUDWLQJODEHOORFDWHGRQWKHEDFNSDQHORI\RXUSURGXFWIRULWVSURSHURSHUDWLQJYROWDJH
)&&UHJXODWLRQVVWDWHWKDWXQDXWKRUL]HGFKDQJHVRUPRGL¿FDWLRQVWRWKLVHTXLSPHQWPD\YRLGWKHXVHU¶VDXWKRULW\WR
operate it.
Cable TV Installer: This reminder is provided to call your attention to Article 820-40 of the National Electrical Code
(Section 54 of the Canadian Electrical Code, Part 1) which provides guidelines for proper grounding and, in particular,
VSHFL¿HVWKDWWKHFDEOHJURXQGVKRXOGEHFRQQHFWHGWRWKHJURXQGLQJV\VWHPRIWKHEXLOGLQJDVFORVHWRWKHSRLQWRI
cable entry as practical.
Important: 7KLVWHOHYLVLRQLVDWDEOHPRGHODQGLVGHVLJQHGWRVLWRQD¿UPÀDWVXUIDFH'RQ¶WSODFHWKH79RQVRIW
FDUSHWLQJRUVLPLODUVXUIDFHEHFDXVHWKHYHQWLODWLRQVORWVRQWKHERWWRPRIWKHXQLWZLOOEHEORFNHGUHVXOWLQJLQUHGXFHG
lifetime from overheating. To assure adequate ventilation for this product, maintain a spacing of 4 inches from the top
DQGVLGHRIWKH79UHFHLYHUDQGLQFKHVIURPWKHUHDURIWKH79UHFHLYHUDQGRWKHUVXUIDFHV
$OVRPDNHVXUHWKHVWDQGRUEDVH\RXXVHLVRIDGHTXDWHVL]HDQGVWUHQJWKWRSUHYHQWWKH79IURPEHLQJDFFLGHQWDOO\
WLSSHGRYHUSXVKHGRIIRUSXOOHGRII7KLVFRXOGFDXVHSHUVRQDOLQMXU\DQGRUGDPDJHWRWKH795HIHUWRWKH
Important Safety Instructions on the next page.
7KH3RZHUEXWWRQIROORZHGE\WKHSRZHUV\PERORQWKLV79DQG\RXUUHPRWHFRQWUROSXWVWKH79LQWRDYHU\
low-power standby mode but will not completely turn the power off. In order to completely shut the power off, you will
need to disconnect the power cord from the outlet. The mains plug/appliance coupler is used as disconnect device,
WKHGLVFRQQHFWGHYLFHVKDOOUHPDLQUHDGLO\RSHUDEOH7KHUHIRUH\RXVKRXOGHQVXUHWKDWWKH79LVLQVWDOOHGLQDPDQQHU
that allows you to disconnect the power cord when desired.
Product Information
Keep your sales receipt to obtain warranty parts and service and for proof of purchase. Attach it here and record the
serial and model numbers in case you need them. These numbers are located on the product.
Model No. ______________________ Serial No._____________________________________
Purchase Date __________________ Dealer/Address/Phone___________________________
WARNING 7KHEDWWHULHVVKDOOQRWEHH[SRVHGWRH[FHVVLYHKHDWVXFKDVVXQVKLQH¿UHRUWKHOLNH
&DXWLRQ7RUHGXFHWKHULVNRIHOHFWULFVKRFNGRQRWUHPRYHFRYHURUEDFN1RXVHUVHUYLFHDEOHSDUWVLQVLGH
5HIHUVHUYLFLQJWRTXDOL¿HGVHUYLFHSHUVRQQHO
This symbol indicates “dangerous voltage”
LQVLGHWKHSURGXFWWKDWSUHVHQWVDULVNRI
HOHFWULFVKRFNRUSHUVRQDOLQMXU\
This symbol indicates important
instructions accompanying the product.
This symbol indicates that this product incorporates
double insulation between hazardous main voltage
and user accessible parts. When servicing, use only
identical replacement parts.
WARNING
7RUHGXFHWKHULVNRI¿UHRUHOHFWULFVKRFNGRQRW
expose this product to rain or moisture. This product
should not be exposed to dripping or splashing. No
REMHFWV¿OOHGZLWKOLTXLGVVXFKDVYDVHVVKRXOGEH
placed on the component.
7KH79LVXQVWDEOHLILWLVQRWSURSHUO\DWWDFKHGWR
the base or mounted to the wall. Please follow the
base or wall mounting instructions provided in the
User’s Guide to ensure your safety.
WARNING
CAUTION
RISK OF ELECTRIC SHOCK.
DO NOT OPEN.
Product Registration
3OHDVHUHJLVWHU\RXU7&/SXUFKDVHRQOLQHDWZZZWFOXVDFRP,WZLOOPDNHLWHDVLHUWRFRQWDFW\RXVKRXOGLWHYHUEH
necessary. Registration is not required for warranty coverage.
Important Information
2
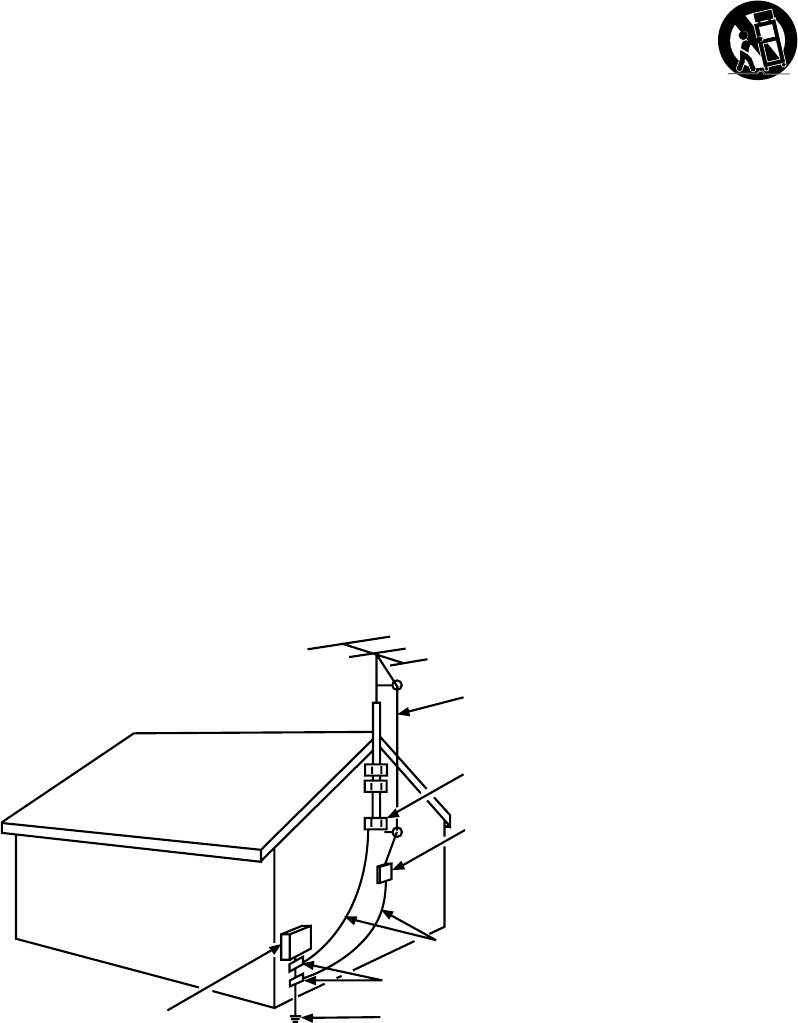
ANTENNA LEAD IN WIRE
GROUND CLAMP
GROUNDING CONDUCTORS
(NEC SECTION 810-21)
GROUND CLAMPS
POWER SERVICE GROUNDING
ELECTRODE SYSTEM
(NEC ART 250, PARTH)
ELECTRIC SERVICE
EQUIPMENT
ANTENNA DISCHARGE
UNIT(NEC SECTION 810-20)
Important Safety Instructions
1. Read and follow all instructions.
2. Keep these instructions.
3. Heed all warnings.
'RQRWEORFNDQ\YHQWLODWLRQRSHQLQJV,QVWDOOLQDFFRUGDQFHZLWKWKHPDQXIDFWXUHU¶VLQVWUXFWLRQV
5. Do not install near any heat sources such as radiators, heat registers, stoves, or other apparatus
LQFOXGLQJDPSOL¿HUVWKDWSURGXFHKHDW
6. Do not negate the safety purpose of the polarized or grounding-type plug. A polarized plug has
two blades with one wider than the other. A grounding type plug has two blades and a third
grounding prong. The wide blade or the third prong is provided for your safety. If the provided plug
GRHVQRW¿W\RXURXWOHWFRQVXOWDQHOHFWULFLDQIRUUHSODFHPHQWRIWKHREVROHWHRXWOHW
3URWHFWWKHSRZHUFRUGIURPEHLQJZDONHGRQRUSLQFKHGSDUWLFXODUO\DWSOXJVUHFHSWDFOHVDQGWKH
point where it exits from the component.
8. Do not use this component near water.
2QO\XVHWKHDWWDFKPHQWVDFFHVVRULHVVSHFL¿HGE\WKHPDQXIDFWXUHU
10. Clean only with dry cloth.
8VHRQO\ZLWKWKHFDUWVWDQGWULSRGEUDFNHWRUWDEOHVSHFL¿HGE\WKHPDQXIDFWXUHURUVROGZLWK
WKHFRPSRQHQW:KHQWKH79LVSODFHGRQDFDUWXVHFDXWLRQZKHQPRYLQJWKHFDUWWRDYRLGLQMXU\
from tip-over.
12. Warning: To avoid any injury caused by lean of the product, please always ensure the whole
product was place within the table surface in horizontal.
13. Unplug this component during lightning storms or when unused for long periods of time.
5HIHUDOOVHUYLFLQJWRTXDOL¿HGVHUYLFHSHUVRQQHO6HUYLFHLVUHTXLUHGZKHQWKHFRPSRQHQWLV
damaged in any way, such as power supply cord or plug damage, liquid spilled on or objects falling
onto the component, rain or moisture exposure, abnormal operation, or if the component has been
dropped.
15. If an outside antenna or cable system is connected to the product, be sure the antenna or
cable system is grounded so as to provide some protection against voltage surges and built-up
static charges. Section 810 of the National Electrical Code, ANSI/NFPA No. 70-1984 (Section
54 of Canadian Electrical Code, Part 1) provides information with respect to proper grounding of
the mast and supporting structure, grounding of the lead-in wire to an antenna-discharge unit, size
of grounding conductors, location of antenna-discharge unit, connection to grounding electrodes,
and requirements for the grounding electrode. See following example:

3
Table of Contents
Important Information ................................ 1
Important Safety Instructions..................... 2
Chapter 1 - Connections and Setup
Before Initial Setup .....................................4
&KHFN6XSSOLHG3DUWV............................... 4
$WWDFKLQJ<RXU79WRWKH7DEOH6WDQG............5
0RXQWLQJ<RXU79WRWKH:DOO .................... 5
%XWWRQVRQ79
............................................. 6
([SODQDWLRQRI-DFNVRQ79
......................... 6
Choose Your Connections......................... 7
Remote Control Functions......................... 9
Obtain the Signal..................................... 10
Switching On ........................................... 10
Switching Off ........................................... 10
Initial Set-up..............................................11
Chapter 2 - Menu Operation
Menu Display........................................... 12
Using Menu System ................................ 13
Picture Menu ........................................... 13
Picture Preset ................................................13
Brightness ......................................................13
Contrast .........................................................13
Sharpness .....................................................13
Expert Settings ..............................................13
Advanced Settings .........................................13
PC Settings ....................................................13
Reset Picture Settings ....................................13
Sound Menu ............................................ 13
Equalizer ........................................................13
Balance ..........................................................14
Surround ........................................................14
6SHDNHU
SPDIF Type ...................................................14
$XWR9ROXPH&RQWURO
$QDORJ796RXQG
Default Audio Language .................................14
Current Audio Language ................................14
Setup Menu..............................................14
Signal Type ....................................................14
Channel Scan ................................................14
&KDQQHO6NLS
Channel Edit ..................................................15
,QSXW6NLS
Input Labels ...................................................15
Closed Caption ..............................................15
Time Setup .....................................................16
System Information ........................................16
Reset All .........................................................16
Parental Control Menu .............................16
&KDQJH9&KLS3DVVZRUG
&KDQQHO%ORFN6
%XWWRQ%ORFN
9&KLS
,QSXW%ORFN
Language Menu .......................................18
USB Menu ...............................................18
Chapter 3 - Other Information
)UHTXHQWO\$VNHG4XHVWLRQV)$4V
Troubleshooting .......................................20
Care and Cleaning ...................................22
7HOHYLVLRQ6SHFL¿FDWLRQV
Limited Warranty ......................................23

4
Chapter 1 Connections and Setup
Before Initial Setup
Protect Against Power Surges
Connect all components before you plug any power cords into the wall outlet or power strip.
1(9(5SOXJ\RXU79LQWRDQRXWOHWWKDWLVFRQWUROOHGE\DZDOOVZLWFK
7XUQRIIWKH79EHIRUH\RXFRQQHFWRUGLVFRQQHFWDQ\FDEOHV
0DNHVXUHDOODQWHQQDVDQGFDEOHVDUHSURSHUO\JURXQGHG5HIHUWRWKH,PSRUWDQW6DIHW\
Instructions.
Safety Information
Protect components from overheating.
'RQ¶WEORFNYHQWLODWLRQKROHVRQDQ\RIWKHFRPSRQHQWV$UUDQJHWKHFRPSRQHQWVVRWKDWDLUFDQ
circulate freely.
'RQ¶WVWDFNFRPSRQHQWV
,I\RXSODFHWKHFRPSRQHQWLQDVWDQGPDNHVXUH\RXDOORZDGHTXDWHYHQWLODWLRQ
,I\RXFRQQHFWDQDXGLRUHFHLYHURUDPSOL¿HUSODFHLWRQWKHWRSVKHOIVRWKHKHDWHGDLUIURPLWZRQ¶W
harm other components.
Avoid Audio Interference
3RVLWLRQFDEOHVSURSHUO\LQVHUWHDFKFDEOH¿UPO\LQWRWKHGHVLJQDWHGMDFN
,I\RXSODFHFRPSRQHQWVDERYHWKH79URXWHDOOFDEOHVGRZQRQHVLGHRIWKHEDFNRIWKH79LQVWHDG
of straight down the middle.
,I\RXUDQWHQQDXVHVRKPWZLQOHDGFDEOHVGRQRWFRLOWKHFDEOHV
.HHSWZLQOHDGFDEOHVDZD\IURPDXGLRYLGHRFDEOHV
Avoid Direct Light
'RQ¶WSODFHWKH79ZKHUHVXQOLJKWRUURRPOLJKWLQJLVGLUHFWHGWRZDUGWKHVFUHHQ8VHVRIWRULQGLUHFW
lighting.
Check Supplied Parts
&KHFNWKDWWKHIROORZLQJSDUWVZHUHSDFNHGZLWK\RXUSURGXFW
5HPRWH&RQWURODQG2 AAA Batteries
8VHU¶V*XLGH
4XLFN6WDUW*XLGH
3DUWVIRU7DEOH6WDQG
Replacing your remote
If you need to replace your remote, visit www.tclusa.com. A shipping and handling fee, and the appropriate sales tax, will be charged
upon ordering. Have your Visa or MasterCard ready.
Graphics contained within this publication are presentation only.
5
Connections and Setup
Attaching Your TV to the Table Stand
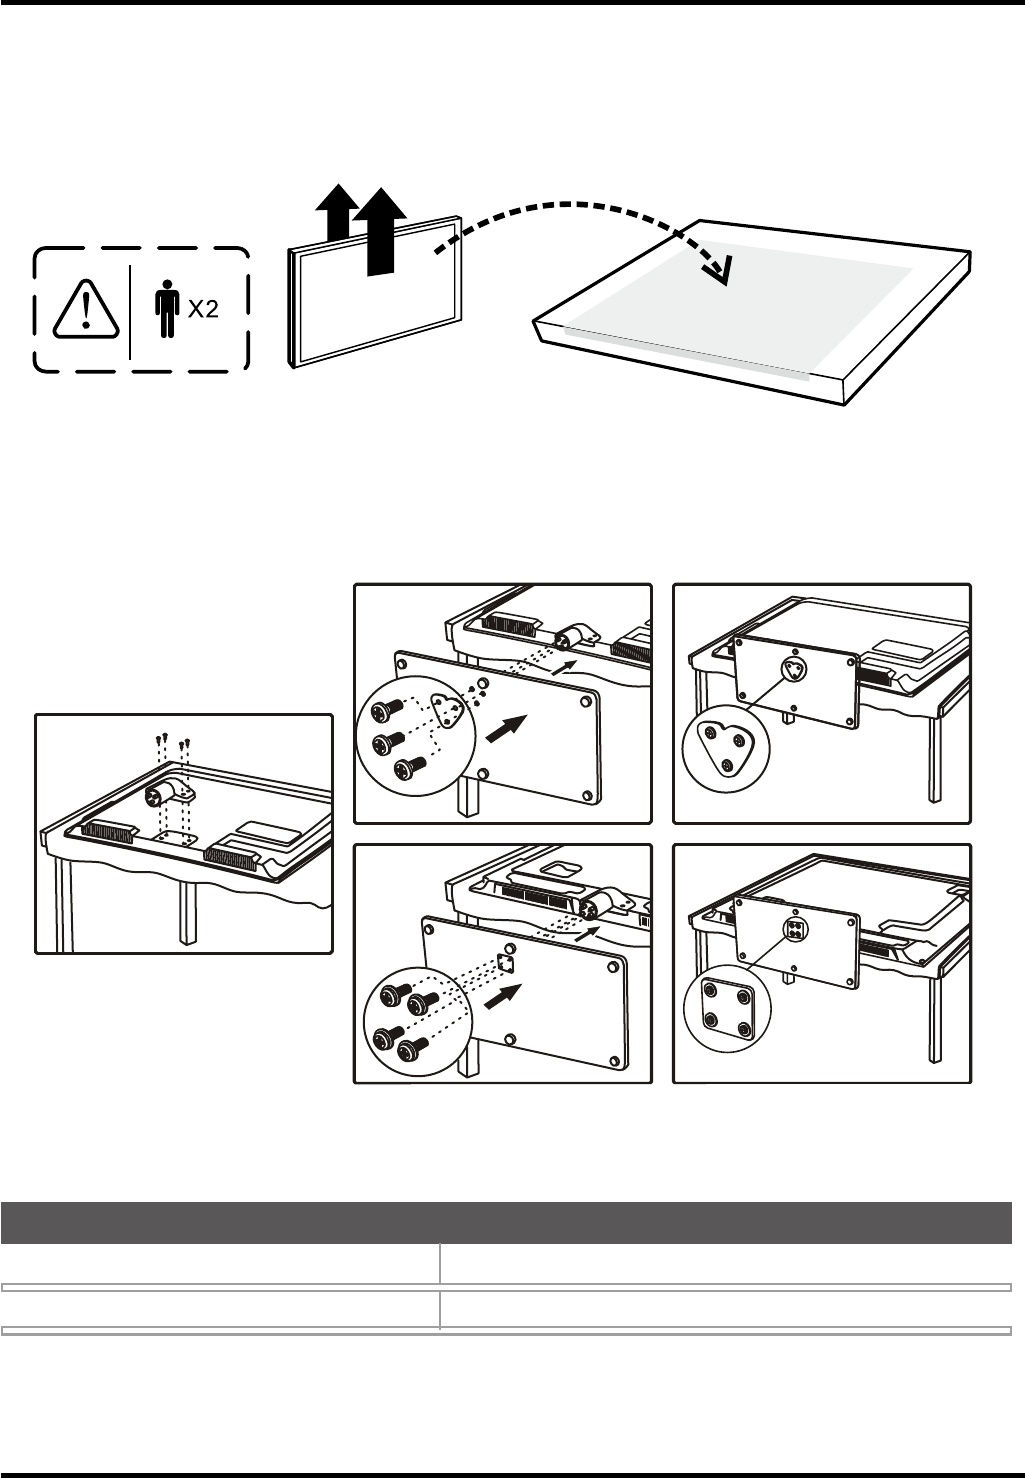
<RXU79FRPHVZLWKRXWWKHWDEOHVWDQGDWWDFKHGVRWKDW\RXFDQFKRRVHWRPRXQW\RXU79HLWKHUWRLWVWDEOH
VWDQGRUWRDZDOOZDOOPRXQWVROGVHSDUDWHO\,I\RXZDQWWRPRXQW\RXU79WRWKHZDOOGRQ¶WDWWDFKWKHWDEOH
VWDQG)ROORZWKH0RXQWLQJ<RXU79WRWKH:DOOLQVWUXFWLRQV
)LUVWUHPRYHWKH79EDJDQGSODFHLWRQDODUJHÀDWVXUIDFHVXFKDVDWDEOHRUFRXQWHUWRS5HPRYHWKH79
IURPWKHFDUWRQDQGSODFHLWIDFHGRZQRQWKH79EDJ%HVXUHWKDWWKH79LVIDFHGRZQWRDYRLGVFUDWFKLQJ
the screen.
Then follow the steps below:
Note: A is applied to models of 32” or under 32”; B is applied to models of 39” or larger size . For some
models, the step 1 is no needed.
Mounting Your TV to the Wall
7KH9(6$QXPEHULVWKHKRUL]RQWDODQGYHUWLFDOPHDVXUHPHQWRIWKHPRXQWLQJKROHV)RUH[DPSOH
200x200 refers to the fact that the mounting measurements are 200mm horizontally and 200mm vertically.
Notes: Follow the directions included with the wall mount to mount the TV to the wall.
Caution: <RXUZDOOPRXQWPXVWEHDEOHWREHDUDPLQLPXPRI¿YHWLPHVWKH79¶VQHWZHLJKWWRDYRLGFDXVLQJGDPDJH
7RPRXQW\RXU79WRWKHZDOOSXUFKDVHD9(6$ZDOOPRXQW
Models of 32” or under 32”
Models of 39” or larger size
Purchase a VESA 100 x 100, M4 screw
Purchase a VESA 200 x 200, M6 screw
,I\RXDUHPRXQWLQJ\RXU79WRWKHZDOOGRQ¶WDWWDFKWKHWDEOHVWDQG
6
Connections and Setup
Buttons on TV
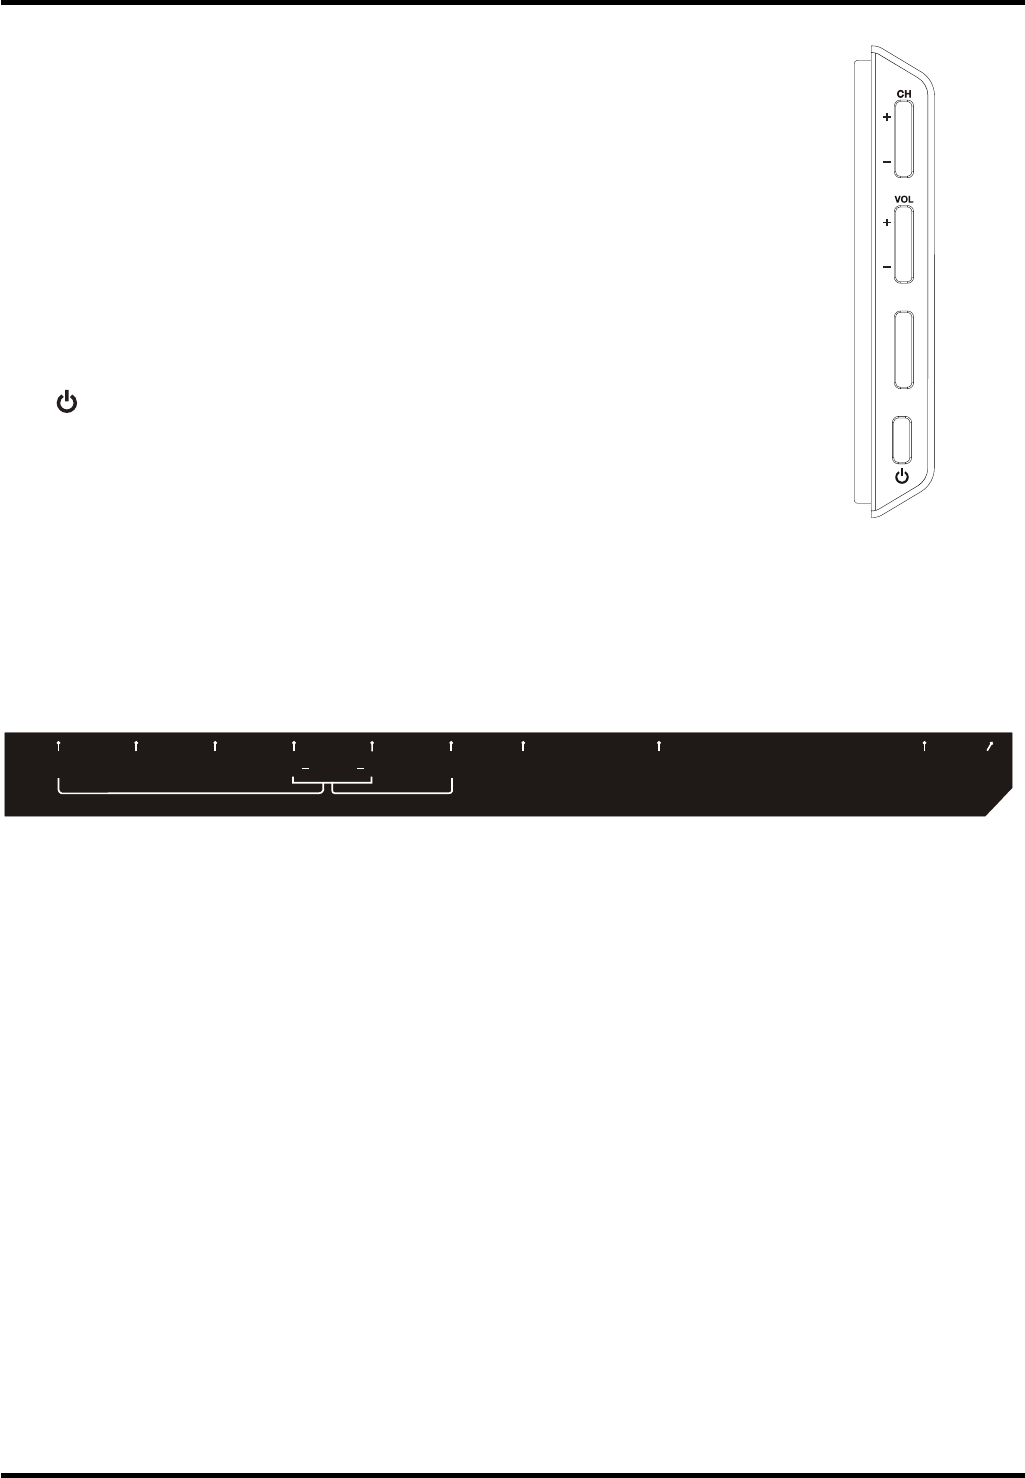
If you cannot locate your remote, you can use the 79 panel buttons on
\RXU79WRRSHUDWHPDQ\79IHDWXUHV
CH+/- Selects channels stored in the channel list or acts as the up/
GRZQDUURZŸźWKURXJKWKHPHQXLWHPV
VOL+/- Increases/decreases the volume or acts as the right/left
DUURZŻŹWKURXJKWKHPHQXLWHPV
VOL+ also acts as the OK button when in the menu system.
MENU %ULQJVXSWKH79¶VPDLQPHQX
INPUT Selects the signal source.
(POWER EXWWRQ7XUQVWKH79RQRUWRVWDQGE\PRGH
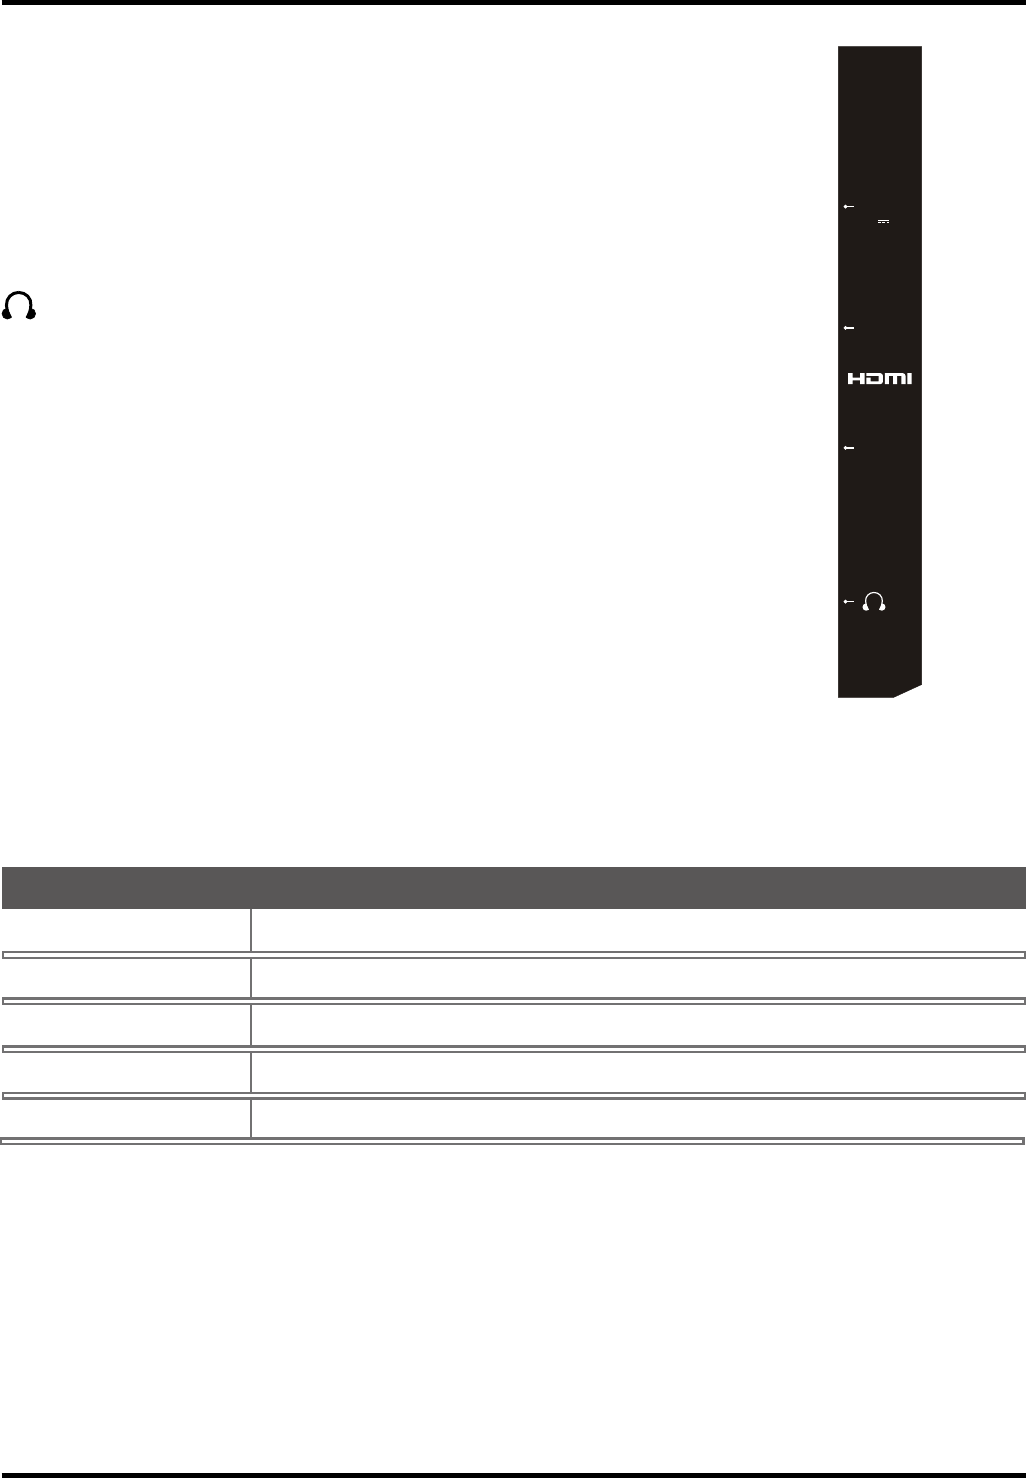
Explanation of Jacks on TV
7KLVVHFWLRQGHVFULEHVWKHMDFNVRQWKHVLGHEDFNSDQHORI\RXU797KHUHDUHVHYHUDOZD\VWRFRQQHFW
components.
COMPONENT IN (CMPT) /HWV\RXFRQQHFWDFRPSRQHQWWKDWKDVFRPSRQHQWYLGHRMDFNVVXFKDVD'9'
player or set-top box.
( Green jack for Y, Blue jack for Pb and Red jack for Pr )
Y Pb Pr (Component Video) Provides good picture quality because the video is separated into three
signals. Use three video-grade or component video cables for the connection.
L/R AUDIO3URYLGHVOHIWDQGULJKWDXGLRFRQQHFWLRQZKHQXVLQJWKH&0379,'(2LQSXW
Red and
white jacks for R AUDIO and L AUDIO connection. (
For mono audio sources, be sure to use the L AUDIO
input.
) (Note: AUDIO/VIDEO IN and COMPONENT IN share the same L/R AUDIO input jacks.)
AUDIO/VIDEO IN (AV) /HWV\RXFRQQHFWDFRPSRQHQWWKDWKDVFRPSRVLWHYLGHRMDFNVVXFKDVD9&5
'9'SOD\HURUVHWWRSER[
Yellow jack for VIDEO connection, red and white jacks for R AUDIO and L AUDIO
connection. (
For mono audio sources, be sure to use the L AUDIO INPUT.
)
DVI/PC AUDIO IN (used for DVI/PC only) 3URYLGHVDXGLRFRQQHFWLRQZKHQXVLQJ+'0,'9,,1387MDFN
IRU'9,RUZKHQXVLQJ3&9,'(2,1
Note: If using a DVI component, remember to connect the audio cable because the DVI cable carries only
the picture signal, not the sound.
VGA (PC VIDEO IN) &RQQHFW\RXUFRPSXWHURURWKHUFRPSRQHQWZLWKD9*$RXWSXWWRWKLVMDFNXVLQJD
pin,D-sub cable.
SPDIF OUT - DIGITAL AUDIO OUT (coaxial) 8VHDGLJLWDOFRD[LDOFDEOHWRFRQQHFW\RXU79WRDFRPSDWLEOHDXGLR
receiver.
ANT/CABLE/SAT IN Lets you connect a coaxial cable to receive the signal from your antenna, cable, or
cable box, or satellite receiver.
7
Connections and Setup
USB Allows you to connect a compatible mass storage device.
HDMI 1 /DVI IN +LJK'H¿QLWLRQ0XOWLPHGLD,QWHUIDFH'LJLWDO9LVXDO,QWHUIDFH
Provides an uncompressed digital connection that carries both video and
audio data by way of an integrated mini-plug cable. Since HDMI technology is
EDVHGRQ'LJLWDO9LVXDO,QWHUIDFH'9,WKHMDFNRQWKHEDFNRI\RXU79LVDOVR
FRPSDWLEOHZLWK'9,FRPSRQHQWV
HDMI 2 IN Lets you connect a component, such as a digital cable box, with an
HDMI output for the best picture quality.
(HEADPHONE) Allow you to connect headphones to listen to the sound
FRPLQJIURPWKH79
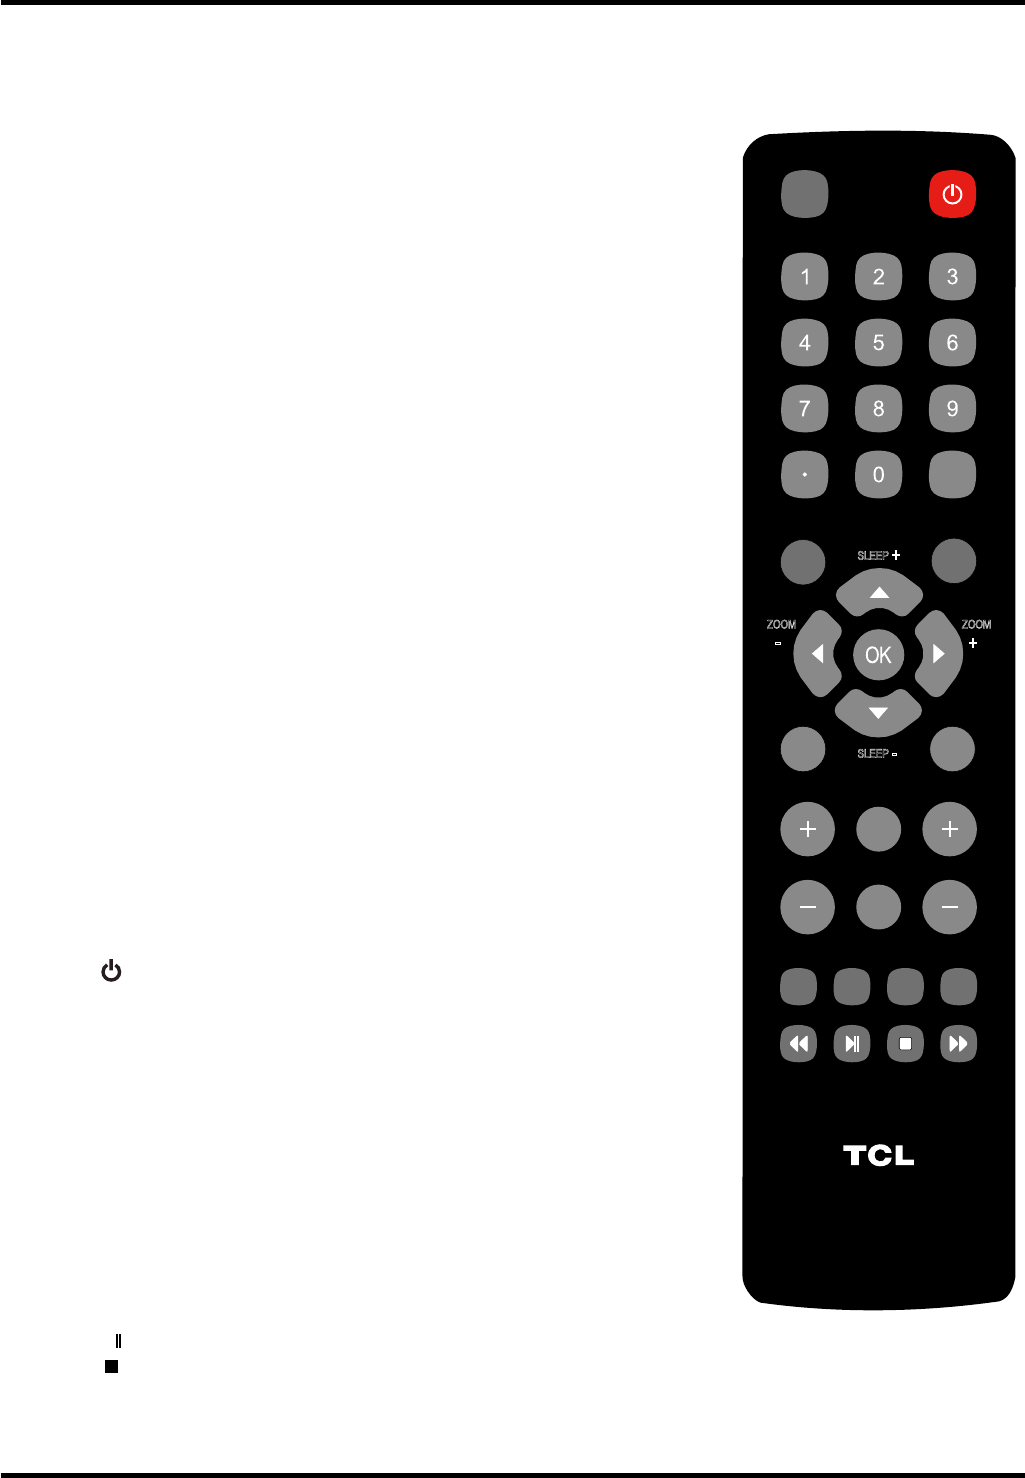
Choose Your Connections
7KHUHDUHVHYHUDOZD\VWRFRQQHFWFRPSRQHQWVVXFKDV'9'SOD\HUVDQGVHWWRSER[HVWR\RXU79
Note: No cables are supplied with this unit. Please purchase the necessary cables. A high-speed HDMI cable
is recommended for better compatibility.
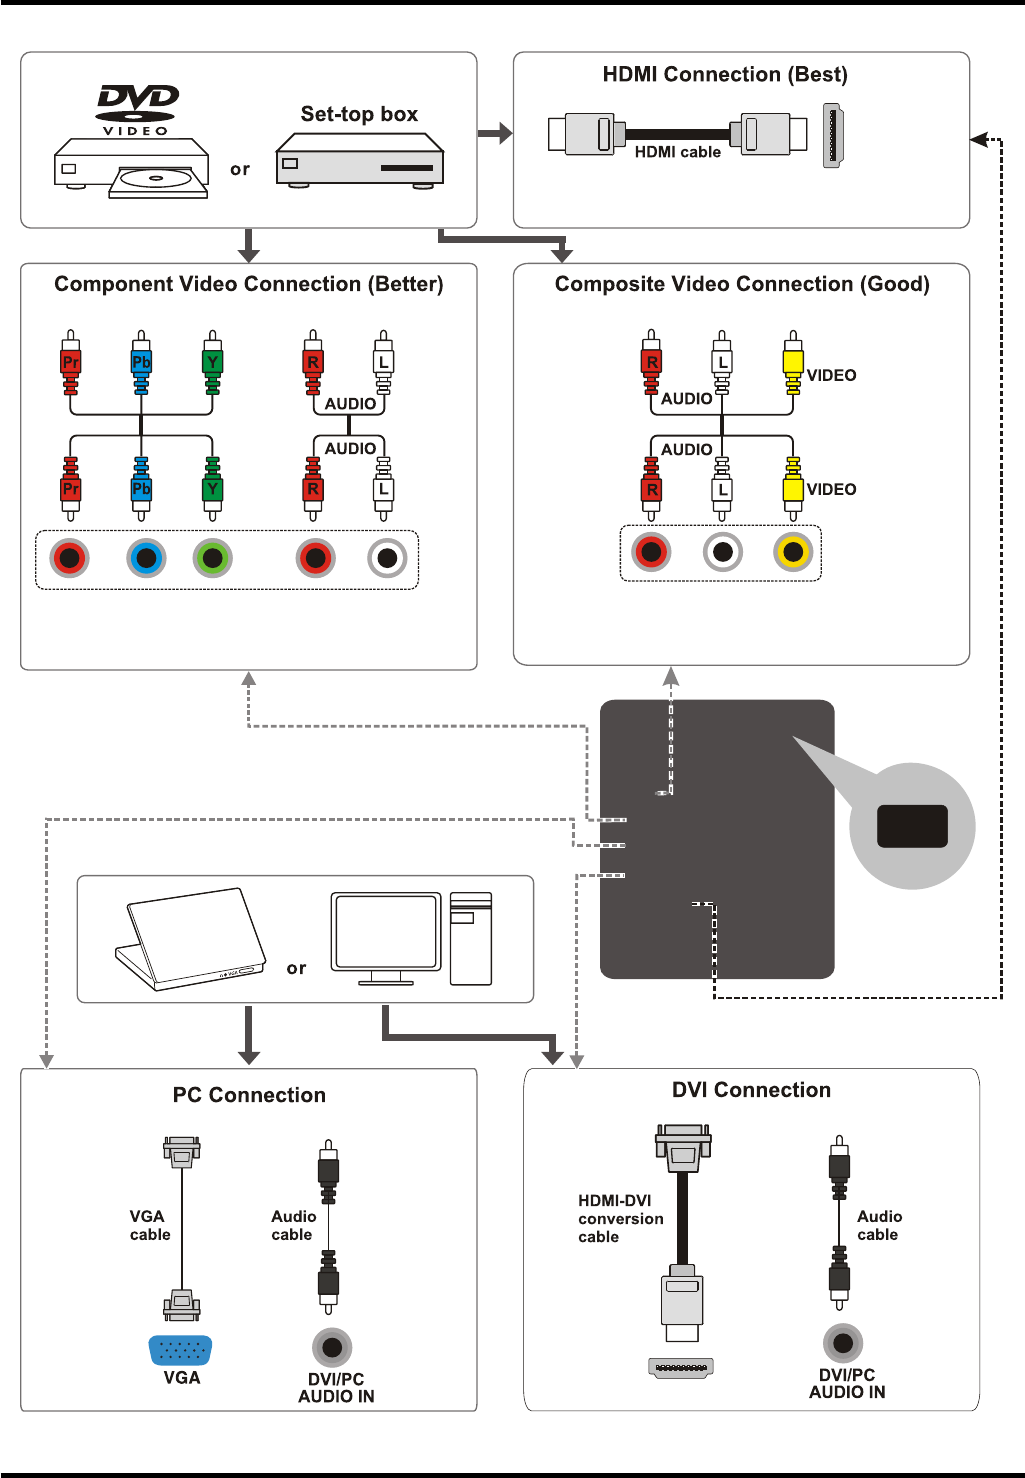
Antenna/Cable 480i, 480p, 720p, 1080i (NTSC, ATSC, and QAM formats)
&RPSRVLWH9LGHR480i
&RPSRQHQW9LGHR 480i, 480p, 720p/60Hz, 1080i/60Hz
HDMI 480i, 480p, 720p/60Hz, 1080i/60Hz, 1080p/60Hz
PC VGA SVGA XGA
Input Signal Compatability
8
Connections and Setup
9
Connections and Setup
VOL CH
RC3000N02
INPUT
GUIDE
MENU
CLEAR
GO BACK
INFO
MUTE
FAV
MEDIA
MTS
TV
PIC
ZOOM
SLEEP
SLEEP
+
+
ZOOM
-
-
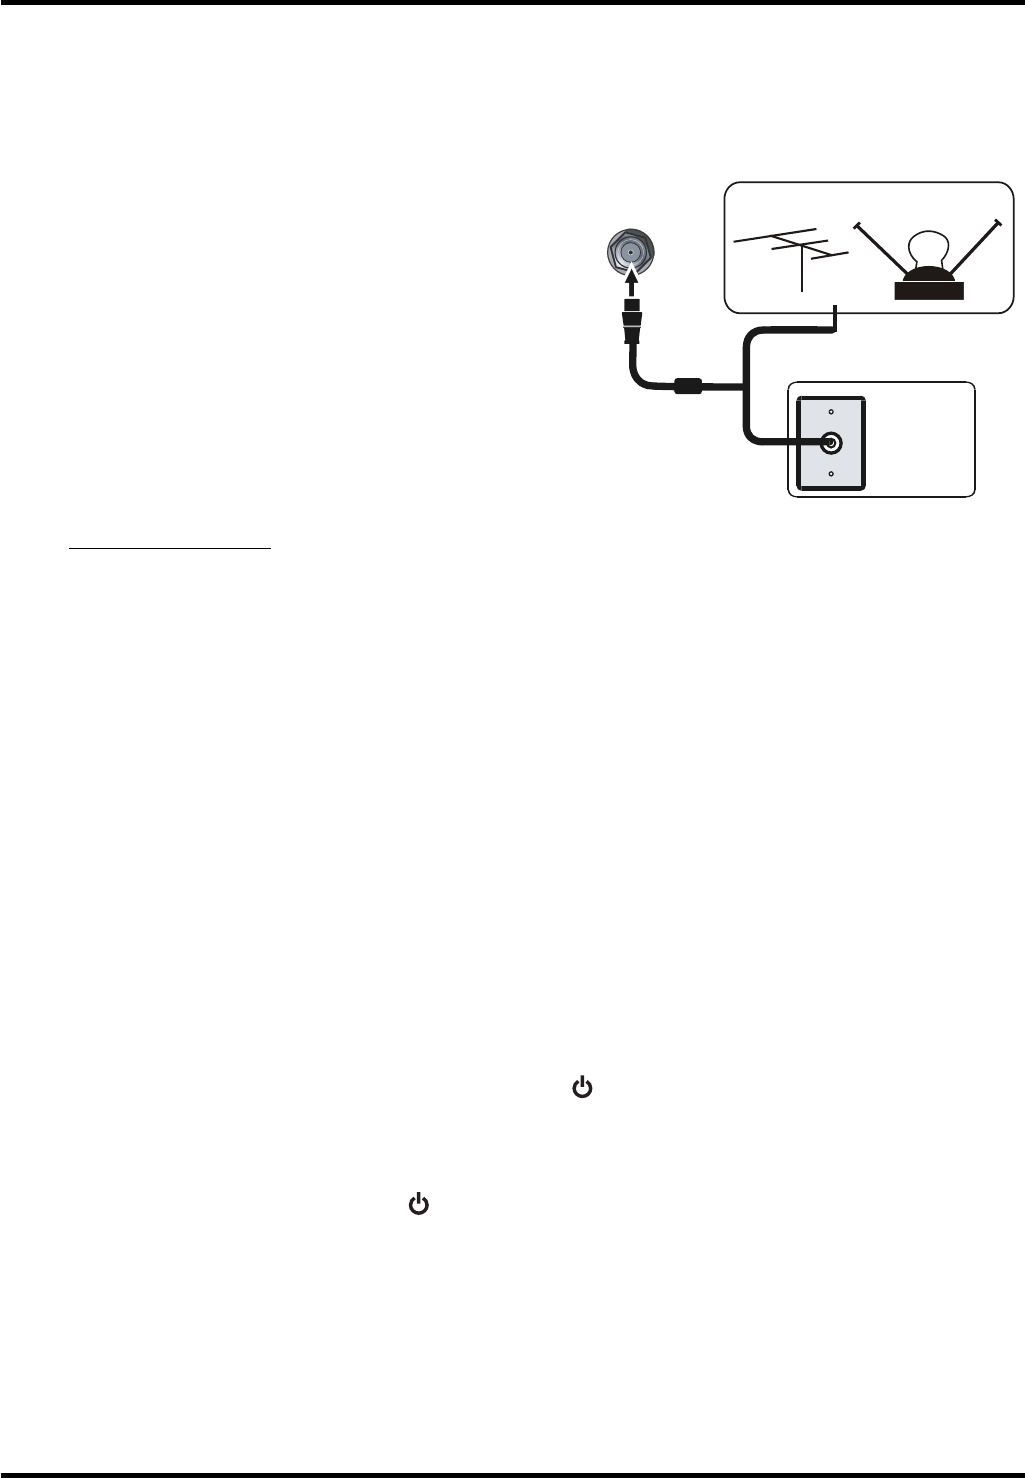
Remote Control Functions
INPUT Opens the
InputOLVWWKHQSUHVVINPUT repeatedly to
select the video input, or press
ŸźWRKLJKOLJKWDQ
options, and press OK to select the desired option.
0-9 (Alphanumeric buttons) Enters a channel number, then
press OK (or let the entry timeout).
(dot) To enter a digital channel with a sub-channel,
HQWHUWKHPDLQFKDQQHOWKHQSUHVVWKHGRWWKHVXE
channel, and then the OK button.
MENU Brings up the main menu or press to return to the
previous menu.
ŸźŻŹ (arrows)+LJKOLJKWVGLIIHUHQWLWHPVLQWKH79PHQXDQG
adjusts the menu controls.
Note: In USB mode, the up or down arrow (
Ÿź
can
also be used for rotating a photo when the photo is being
diaplayed.
ZOOM+/- (ŻŹ)Selects the desired screen format.
SLEEP+/- Ÿź6HWVWKH79WRWXUQRIIDIWHUDJLYHQDPRXQWRI
time.
PIC Selects picture mode.
INFO If no menus are currently active, press INFO to display
the Channel information.
VOL+/- ,QFUHDVHVRUGHFUHDVHVWKH79YROXPH
MUTE Turns the volume on and off.
FAV Press the FAV button to browse the channels in your
IDYRULWHOLVW8VHŸźWRKLJKOLJKWRSWLRQVWKHQSUHVV
OK to select.
MEDIA Goes to the USB menu.
(POWEREXWWRQ7XUQVWKH79RQRUVWDQGE\
GUIDE Toggles the Electronic Programme Guide between on
and off. Only available for digital channels.
CLEAR Removes any menu or display from the screen and
return to normal viewing.
OK 'LVSOD\V&KDQQHO/LVWPHQX:KHQWKH79LVLQWKH
PHQXV\VWHPSUHVVWRFRQ¿UP\RXUVHOHFWLRQ
GO BACK Returns you to the previously viewed channel.
CH+/- Selects channels and external input mode.
TV 3UHVVWRDFFHVVWRWKH79PRGH
MTS Press to select your desired sound mode.
ŻŻŹŹŹ
/
These buttons can be used for playing music and
photos in the USB menu.
10
!"
Connections and Setup
Obtain the Signal
7KH¿UVWVWHSLQFRQQHFWLQJ\RXU79LVREWDLQLQJWKHVLJQDO7KHEDFNSDQHORI\RXU79DOORZV\RXWRUHFHLYH
analog and/or digital channels by using the ANT/CABLE/SAT IN.
&RQQHFWWKHRXWVLGHDHULDORUFDEOHQHWZRUNWRWKH
ANT/CABLE/SAT INRQWKHEDFNRIWKH79VHWWR
receive off-air channels or cable channnels.
,I\RXKDYHDVHWWRSER[\RXPD\QHHGWRFDOO\RXU
cable company or satellite service provider. They may
recommend special cables to allow you to view digital
channels.
7KHDHULDOVRFNHW2+09+)8+)FDEOHFDQEH
used for connecting an external aerial or other equipment
¿WWHGZLWKDPRGXODWRUYLGHRUHFRUGHUVDWHOOLWHUHFHLYHUHWF
We recommend that you do not connect other equipment
YLGHRUHFRUGHUVDWHOOLWHUHFHLYHUHWFWR\RXU79VHWWR
begin with, so as not to complicate the set-up procedure
with the additional steps involved. Connect them when
\RXKDYH¿QLVKHGVHWWLQJXSWKHFKDQQHOV
9LVLWwww.antennaweb.org for help in deciding what type of antenna to use in order to receive the local
digital channels available to you. Enter your location, and the program will list local analog and digital
stations available using your antenna.
Switching On
)ROORZWKHLQVWUXFWLRQVRQWKLVSDJHRQKRZWRVZLWFKRQ\RXU79VHWDQGXVHWKHUHPRWHFRQWUROEHIRUHJRLQJ
on to following pages describing how to use the channel scan procedure.
1. Insert two AAA batteries in the remote control.
Precautions on using batteries:
2QO\XVHWKHEDWWHU\W\SHVVSHFL¿HG
0DNHVXUH\RXXVHWKHFRUUHFWSRODULW\
- Do not mix new and used batteries.
- Do not use rechargeable batteries.
'RQRWH[SRVHEDWWHULHVWRH[FHVVLYHKHDWVXFKDVVXQVKLQH¿UHRUWKHOLNHWKURZWKHPLQD¿UHUHFKDUJH
WKHPRUWU\WRRSHQWKHPDVWKLVFRXOGFDXVHWKHPWROHDNRUH[SORGH
- Remove the batteries from the remote control if you are not using it for a long period of time.
&RQQHFWWKHSRZHUFDEOHWRDPDLQVVRFNHW,IWKHSRZHUFDEOHLVQRWFRQQHFWHGWRWKHWHOHYLVLRQSOHDVH
¿UVWFRQQHFWWKHSRZHUFDEOHWRWKHWHOHYLVLRQ<RXU79VHWVKRXOGRQO\EHFRQQHFWHGWRDQ$&VXSSO\
It must not be connected to a DC supply. If the plug is detached from the cable, do not, under any
FLUFXPVWDQFHVFRQQHFWLWWRDPDLQVVRFNHWDVWKHUHLVDULVNRIHOHFWULFVKRFN
:KHQSRZHUHGRQLIWKH79VHWLVLQVWDQGE\PRGHSUHVV RQWKHUHPRWHFRQWURORURQWKH79VHWWRWXUQ
RQWKH79
Switching Off
7RSXWWKH79VHWLQWRVWDQGE\PRGHSUHVV RQWKHUHPRWHFRQWURORURQWKH79WKH79VHWUHPDLQV
powered up, but with low energy consumption.
7RVZLWFKRIIWKH79VHWXQSOXJWKHPDLQVVRFNHWIURPWKHPDLQVRXWOHW
11
Connections and Setup
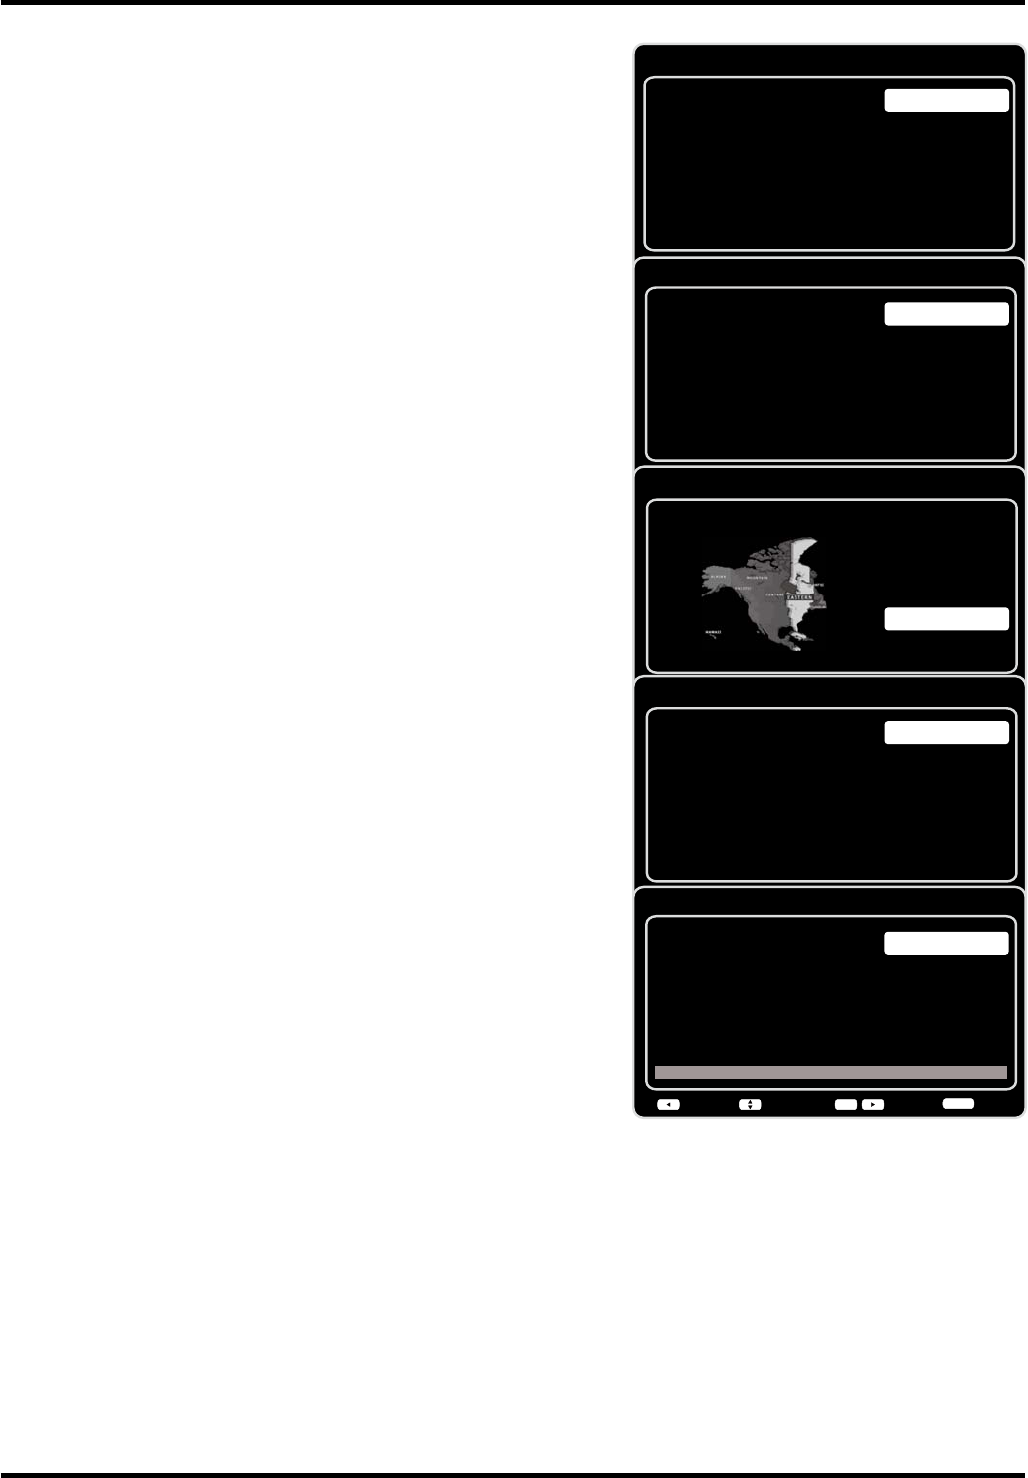
Initial Setup
Initial setup involves selecting all the settings required to be
able to search for and store all the channels you can receive.
0DNHVXUHWKDWWKHWHOHYLVLRQLVVZLWFKHGRQDQGIROORZDOOWKH
VWHSVLQWXUQVSHFL¿HGKHUHDIWHU
7KH¿UVWWLPH\RXVZLWFKWKHVHWRQWKHInitial Setup Wizard
opens, which guides you through the initial setup
process.
7KH¿UVWVWHSRIWKHVHWXSUHTXLUHV\RXWRVHOHFW\RXU
SUHIHUUHGODQJXDJHIRUWKHPHQXV\VWHP3UHVVŸźWR
select your language, then press OKŹWRHQWHUWKHQH[W
screen.
$PHQXVFUHHQDVNV\RXWRVHWWKH79/RFDWLRQ
&KRRVLQJ³Home´IRUWKH79/RFDWLRQDVVLJQVWKHRSWLPDO
picture settings for most home environments.
&KRRVLQJ³Retail”, which is not Energy Star compliant,
VHWVWKHXQLWXSZLWKSUHGH¿QHGVHWWLQJVIRUUHWDLOGLVSOD\V
In this setting, the power consumption may exceed the
UHTXLUHPHQWVRIWKH(QHUJ\6WDUTXDOL¿FDWLRQ
8VHŸźWRVHOHFWWKHGHVLUHGORFDWLRQVHWWLQJHome/
RetailWKHQSUHVVOKŹWRFRQWLQXHWRWKHQH[WVFUHHQ
Note: if you select
Retail
, a screen menu will display to ask
you go back to the previous menu to select Home again, or
\RXFDQFRQ¿UPWRSURFHHGWRWKHQH[WVFUHHQ
8VHŸźWRVHOHFWWKHFXUUHQWORFDOWLPH]RQH3UHVVOKŹ
to continue to the next screen.
4. On the Tuner screen, select either Antenna or Cable/Sat.
Press OKŹWRFRQWLQXHWRWKHQH[WVFUHHQ
Note: If you are using a satellite or cable set-top box,
you do
not have to complete the Channel Scan.
5. The Channel Scan screen is now displayed. The default
choice is to scan. Press OKŹWREHJLQWKHFKDQQHOVFDQIRU
DYDLODEOHFKDQQHOVWREHVWRUHGLQWKH79¶VPHPRU\
Note: If you do not want to scan for channels at this time,
you can select Skip Scan or press OK/Ź to stop the
scanning process, and perform the channel scan later in the
Setup menu.
6. The screen will change to show the progress of the
process.
:KHQWKHVFDQQLQJLV¿QLVKHGWKHXQLWKDVFRPSOHWHGWKH
Initial Setup.
8. Press CLEARWRH[LWWKH:L]DUGDQGEHJLQZDWFKLQJ79
Initial Setup
Please select your language:
Language
NextSelect
OK
Español
Français
English
Initial Setup TV Location
TV Location
Retail
Home
Back NextSelect
OK
This mode is Energy Star compliant.
Initial Setup Time Zone
Please select your time zone:
Alaska
Pacific
Hawaii
Mountain
Central
Eastern
Atlantic
Newfoudland
EASTERN
Back NextSelect Exit
CLEAR
OK
Initial Setup Tuner
Please select your tuner mode:
Cable/Sat
Antenna
Back NextSelect Exit
CLEAR
OK
Initial Setup Channel Scan
First, please connect Cable/Sat or
Antenna. Start Channel Scan
now?
If you skip this step, the
Channel Scan could be performed
in Setup menu later.
Skip Scan
Scan
0%
Back NextSelect Exit
CLEAR
OK
12
Chapter 2 Menu Operation
Menu Display
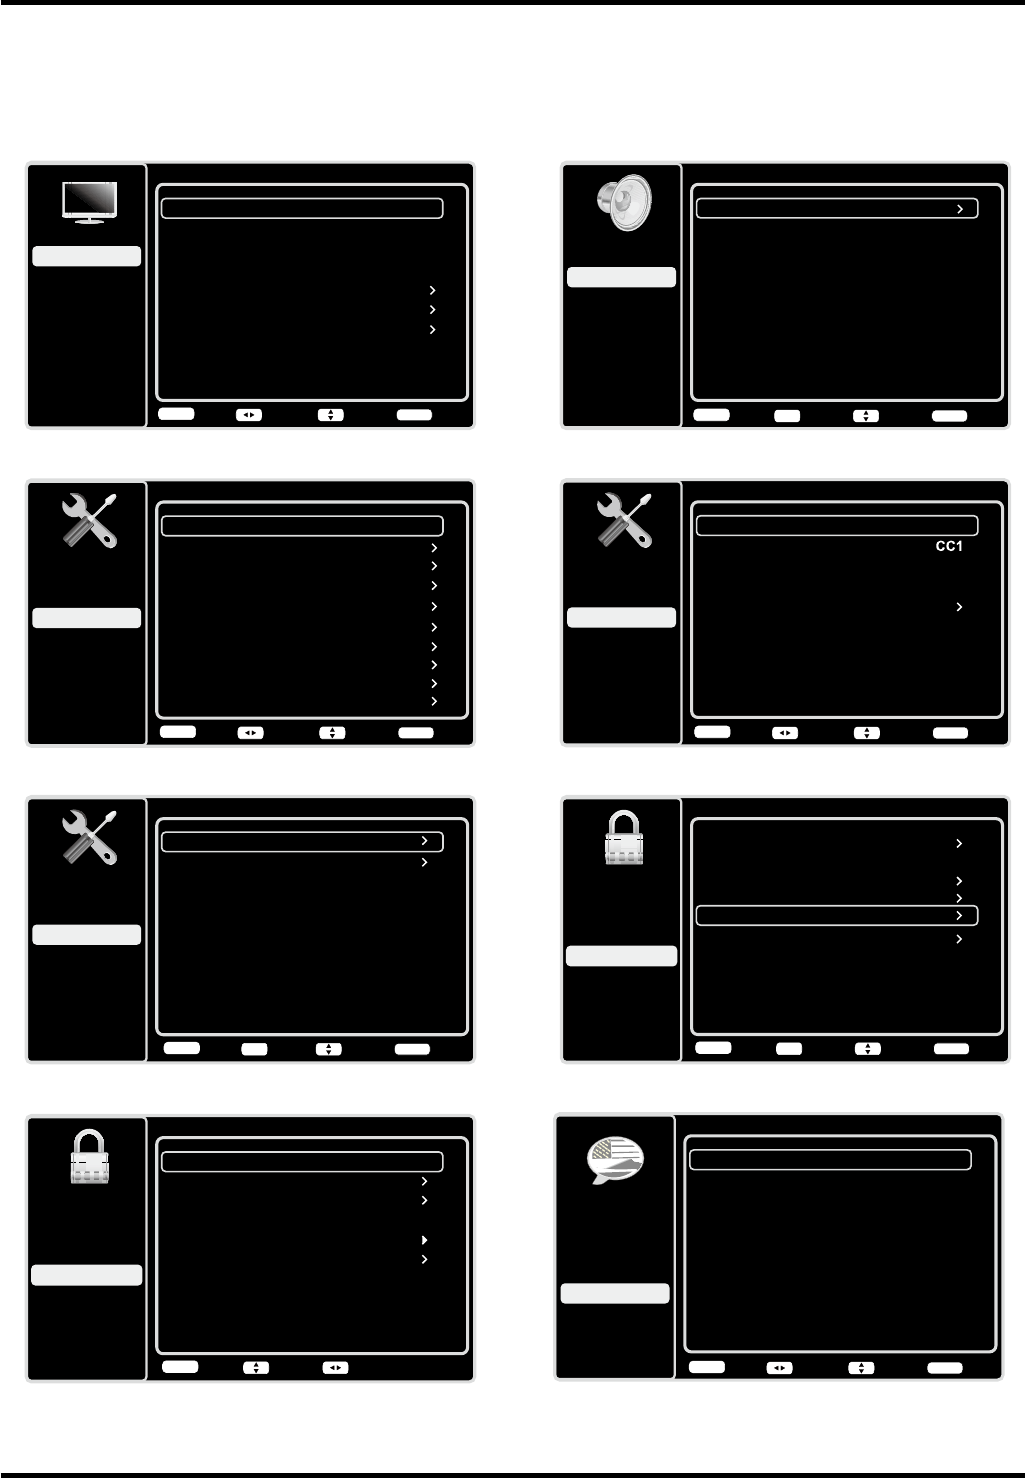
Following are just the illustration of the menu display.
Sound
Setup
Parental Control
Language
Sound
Picture
Equalizer
Balance
Surround
Analog TV Sound
USB
Exit
0
On
Stereo
Speaker On
SPDIF Type Dolby Digital
Auto Volume Control Off
Back
MENU Enter Select Exit
CLEAR
OK
Language
Setup
Parental Control
Language
Sound
Picture
English On
USB
Exit
Español
Desactivado
Français
Désactivé
Back
MENU Adjust Select Exit
CLEAR
Closed Caption
Setup
Parental Control
Language
Sound
Picture
CC Setting
Analog CC Type
USB
Exit
On Always
Digital CC Type
Digital CC Preset
Digital CC Style
Off
On
Back
MENU Adjust Select Exit
CLEAR
Time Setup
Setup
Parental Control
Language
Sound
Picture
Time Zone
Time
USB
Exit
OFF
Sleep Timer
Back
MENU Enter Select Exit
CLEAR
OK
Picture
Setup
Parental Control
Language
Sound
Picture
USB
Exit
Picture Preset
Brightness
Natural
Advanced Settings
50
Sharpness 5
Contrast 75
Reset Picture Settings
Expert Settings
Back
MENU Adjust Select Exit
CLEAR
Parental Control
Channel Block
Button Block
Setup
Parental Control
Language
Sound
Picture
USB
Exit
V-Chip
Input Block
Change Password
Off
Back
MENU Enter Select Exit
CLEAR
OK
Reset All
V-Chip
Rating Enable
US V-Chip
Setup
Parental Control
Language
Sound
Picture
USB
Exit
Canada V-Chip
Unrated/Exempt Ratings
On
Reset Downloadable Data
View
Back
MENU AdjustSelect
Open V-Chip
Figure 1
Figure 3
Figure 5
Figure 7
Figure 2
Figure 4
Figure 6
Figure 8
Setup
Setup
Parental Control
Language
Sound
Picture
Signal Type
Channel Scan
USB
Exit
Antenna
Channel Skip
Channel Edit
Input Skip
Input Labels
Close Caption
Time Setup
System Information
Back
MENU Adjust Select Exit
CLEAR
Reset All

13
Menu Operation
Using Menu System
7KLVVHFWLRQH[SORUHVWKHPHQXVRI\RXU79(DFK
menu is outlined and detailed to help you get the
PRVWIURP\RXU797RDFFHVVWKHPHQXV\VWHP
1. Press MENU to display the main menu.
3UHVVŸźWRKLJKOLJKWDQRSWLRQWKHQSUHVV
OKŹWRRSHQWKHFRUUHVSRQGLQJVXEPHQX
,QVXEPHQXVXVHŸźWRVHOHFW\RXUGHVLUHG
LWHPWKHQXVHŻŹWRVHWIXQFWLRQVRUFKDQJH
values, or use OKŹWRRSHQWKHFRUUHVSRQGLQJ
submenu.
4. Press OKWRFRQ¿UP\RXUVHOHFWLRQV
5. Press MENU to return to the previous menu or
press CLEAR to close the menu.
Picture Menu
The menus for adjusting the picture are used to
obtain the best picture settings according to your
preference, the type of program you are watching
and the ambient lighting.
To access the Picture Menu, press the MENU
button on the remote to open the Main menu.
3UHVVŸźWRVHOHFWPicture, then press OKŹWR
display options.(Refer to Figure 1.)
Note: some options may be not available for certain
signal sources.
Picture Preset: displays a list that lets you select
one of the preset picture settings: Natural, Sports,
Personal or ECO, Vibrant, Cinematic. Choose the
setting that is best for your viewing environment.
Note: ECO is the default setting, if you select some
other options, the power consumption may change.
Brightness: adjusts the brightness of the picture.
Contrast: adjusts the difference between the light
DQGGDUNDUHDVRIWKHSLFWXUH
Sharpness: adjusts the crispness of the edges in
the picture.
Expert Settings
Backlight: DGMXVWVWKHEDFNOLJKWOHYHOWKHPHQX
line is grayed out by default. Only when “Dynamic
Backlight” and “Light Sensor” are both set to
“Off”, the menu line can be adjustable.
Color: adjusts the richness of the color.
Tint: this option adjusts the balance between the
red and green levels.
Color Temperature: adjusts the color temperature
from cool to warm.
Note: Color and Tint are not available in PC
mode.
Advanced Settings
Light Sensor: when activated, this feature
monitors the ambient light conditions in the room
DQGDGMXVWVWKH79¶VEDFNOLJKWIRURSWLPXP
viewing. It also serves as an energy-saving
IHDWXUHE\ORZHULQJWKHEDFNOLJKWSRZHUOHYHOZKHQ
DSSURSULDWHW\SLFDOO\LQGDUNHUFRQGLWLRQV
Dynamic Backlight: this option automatically
DGMXVWVWKHEULJKWQHVVRIWKHEDFNOLJKWDFFRUGLQJ
to the content of the incoming signal. Dynamic
Backlight optimizes the picture quality and
decreases power consumption.
Note: when Light Sensor or Dynamic Backlight
is set to Off,the power consumption may exceed
WKHUHTXLUHPHQWVRIWKH(QHUJ\6WDUTXDOL¿FDWLRQ
Noise Reduction: This setting reduces picture
“static” or any type of interference. This feature is
especially useful for providing a clearer picture in
ZHDNDQDORJVLJQDOFRQGLWLRQV&KRRVHEHWZHHQ
these options:
Low for a softer, smoother picture that retains
picture sharpness and detail.
Middle for a slightly softer picture than the Low
setting.
High for an even softer, smoother picture than
the other settings (the picture detail is somewhat
decreased).
SABC (Scene Adaptive Brightness Control):
Option: On/Off. If set to On mode, distribution of
EULJKWQHVVHYHU\VFHQHLVSLFNHGRXWDXWRPDWLFDOO\
79DOZD\VDGMXVWVDSSURSULDWHEULJKWQHVVE\IXOO
automation.
PC Settings: this option allows you to adjust the PC
settings when in PC mode.
Reset Picture Settings: this function allows you to
reset all the picture settings to the factory default
settings.
Sound Menu
The Sound Menu lets you adjust audio output. To
access the Sound Menu, press MENU on the
UHPRWHDQGWKHQXVHŸźWRKLJKOLJKWSound from
the Main Menu. Press OKŹWRVHOHFW7KHIROORZLQJ
options will be displayed: (Refer to Figure 2.)
Equalizer: WKH¿YHEDQGHTXDOL]HUDOORZV\RXWR
adjust the audio frequency settings. You can select
RQHRIWKH¿YHSUHVHWRSWLRQVRUFUHDWHDFXVWRP
preset.
Equalizer:DOORZV\RXWRFKRRVHDVSHFL¿F
sound
preset:
Standard, Music, Voice, Movie, and
Personal.

14
Menu Operation
Frequency Range: displays the different graphic
equalizer names set for each sound preset option.
&KRRVHDEDQGDQGPDNHDGMXVWPHQWV:KHQ
PDNLQJDGMXVWPHQWVWKHEqualizer option
automatically changes to Personal3UHVVŻŹ
to select the desired frequency (100Hz, 300Hz,
1KHz, 3KHz, 10KHz) you wish to adjust. Use
ŸźWRDGMXVWWKHOHYHO:KHQ\RXKDYH¿QLVKHG
adjusting the levels, press MENU to exit.
Balance: adjust the amount of audio sent to the left
DQGULJKWVSHDNHUV
Surround: option On/Off. When turned on, this
option enables a mode which simulates a surround
sound effect.
Speaker: option On/Off. When you select the Off
RSWLRQWKHVRXQGVSHDNHURQWKH79ZLOOEHWXUQHG
off.
SPDIF Type: this option controls the type of audio
VWUHDPVHQWWRWKH'LJLWDO$XGLR2XWSXWMDFN
Available options are Dolby Digital, PCM, or Off.
Auto Volume Control: option On/Off. This option
reduces the annoying blasts in volume that often
RFFXUGXULQJFRPPHUFLDOEUHDNVDQGDOVRDPSOL¿HV
softer sounds in program material, eliminating the
need for constant volume adjustment.
Analog TV Sound: this option controls the manner
LQZKLFKWKHVRXQGFRPHVWKURXJK\RXUVSHDNHUV
Options available vary according to the input
selected.
Note: The Analog TV Sound option is only available
for analog channels.
Mono (available for regular TV viewing only):
this option plays the sound in mono only. Use
WKLVVHWWLQJZKHQUHFHLYLQJEURDGFDVWVZLWKZHDN
stereo signals.
Stereo : this option splits the incoming stereo
DXGLRVLJQDOLQWROHIWDQGULJKWFKDQQHOV0RVW79
programs and recorded materials have stereo
audio. The word “Stereo” appears in the Channel
Banner when you tune to a program that is
broadcast in stereo.
Second Audio Program (SAP): this option plays
the program’s audio in a second language, if
available. The letters “SAP” appear in the Channel
anner when you tune to a program that is broadcast
with SAP information. SAP audio is broadcast in
mono only. SAP is also used to broadcast a
program’s audio with descriptions of the video for
the visually impaired.
Default Audio Language: choose the language you
prefer for dialog on digital channels. If the preferred
language is not broadcasted with the program,
WKHQWKH79SOD\VWKHGHIDXOWDXGLRIRUWKHSURJUDP
(usually English in the US). There are 3 available
default languages (English, French, Spanish).
Note: The Default Audio Language option is only
available for ditital channels.
Current Audio LanguageSUHVVŻŹWRFKRRVH
from the list of languages available for the program
you’re watching. The language chosen becomes
your preferred language for all digital channels until
\RXWXUQWKH79RII,IWKHODQJXDJHFKRVHQLVQRW
EHLQJEURDGFDVWHGZLWKDSURJUDPWKH79SOD\VWKH
default language for the program (usually English in
the US).
Note: The Current Audio Language option is only
available for ditital channels.
Setup Menu
The Setup0HQXDOORZV\RXWRFRQ¿JXUHWKH79
with your preferences. Press MENU on the remote
WRRSHQWKH0DLQ0HQX3UHVVŸźWRVHOHFWSetup
then press OKŹWRGLVSOD\WKHIROORZLQJRSWLRQV
(Refer to Figure 3.)
Signal Type: choose the type of signal (Cable/Sat
or Antenna) you have connected to the ANT/
CABLE/SAT IN.
Channel Scan
:KHQ\RXSHUIRUPD&KDQQHO6FDQ\RXU79
searches for channels with signals and stores the
channel information in the Channel List. Then, as
\RXZDWFK79DQGSUHVVCH+ or CH-\RXU79JRHV
to the next or previous channel in the Channel List
DQGVNLSVWKHFKDQQHOVWKDWGRQRWKDYHVLJQDOV
,IWKH79VLJQDOVRXUFHFKDQJHV±IRUH[DPSOHLI\RX
FKDQJHIURPDQRXWGRRUDQWHQQDWRFDEOH79±\RX
will need to rescan for channels.
To automatically scan for channels:
$IWHUFKRRVLQJDVLJQDOW\SHSUHVVŸźWR
highlight Channel Scan.
2. Press OKŹWRVWDUWWKHVFDQ<RXFDQVHHWKH
search progress and how many channels are
found in the on-screen menu. (Note: If you wish
to stop the search, press the CLEAR button.)
3. After the scan is complete, press OK to restart
scan, or press the MENU button to return to the
previous menu, or press the CLEAR button to
close the menu.
Channel Skip
You can hide channels in the Channel List. Then,
when you press the CH+ or CH-EXWWRQWKH79ZLOO
VNLSWKHKLGGHQFKDQQHOV<RXFDQVWLOOWXQHWRWKHVH

15
Menu Operation
hidden channels by pressing the number of the
FKDQQHORQWKHQXPHULFNH\SDG
7RKLGHVSHFL¿FFKDQQHOV
1. Select Setup > Channel Skip, press OKŹWR
open the Channel Skip screen.
3UHVVŸźWRKLJKOLJKWWKHFKDQQHO\RXZLVKWR
VNLSWKHQSUHVVOKWRFKHFNWKHKLJKOLJKWHG
FKDQQHO<RXFDQDGGWKHFKDQQHOEDFNLQWRWKH
&KDQQHO/LVWE\KLJKOLJKWLQJLWDQGXQFKHFNLQJLW
3. Repeat the process to hide additional channels.
4. Press MENU to return to the previous menu, or
press CLEAR to close the menu.
Channel Edit
The Channel Edit function allows you to add or
change a channel label, only for analog channels.
You cannot change the name on digital channels.
To edit an analog channel name:
1. Select Setup > Channel Edit, press OKŹWR
open to enter the next screen.
3UHVVŸźWRKLJKOLJKWWKHFKDQQHO\RXZLVKWR
label or edit.
3. Press OK to enter the Channel Edit screen.
4. The Channel Name will be highlighted, press OK
to start editting.
8VHŻŹWRVHOHFWWKHLQSXW¿HOGWKHQXVHŸź
to enter the name for the channel.
6. Press OKWRFRQ¿UPDQGVDYHWKHQHZODEHO
7. Press MENU to return to the previous menu, or
press CLEAR to close the menu.
Input Skip
You can hide video inputs in the Channel List. This
option allows you to remove the inputs from the
Channel List so you do not encounter them when
channeling up or down. Once you have hidden
LQSXWVWKH79ZLOOVNLSWKHVHLQSXWVZKHQ\RXSUHVV
the CH+ or CH- button.
To hide video inputs:
1. Select Setup > Input Skip, press OKŹWR
display the Input Skip screen.
3UHVVŸźWRKLJKOLJKWWKHYLGHRLQSXW\RXZDQW
to hide.
3. Press OKWRFKHFNWKHKLJKOLJKWHGLQSXW<RXFDQ
DGGDQLQSXWE\KLJKOLJKWLQJLWDQGXQFKHFNLQJLW
4. Repeat the process to hide additional video
inputs.
5. Press MENU to return to the previous menu, or
press CLEAR to close the menu.
Input Labels
<RXFDQDGGDODEHOWRDYLGHRLQSXWVRXUFHWRPDNH
it easier to identify.
1. Select Setup > Input Labels, press OKŹWR
display the Input Labels screen.
3UHVVŸźWRKLJKOLJKWWKHLQSXWVRXUFH\RXZLVK
to label.
3UHVVŻŹWRVHOHFWWKHODEHOIRUWKLVVRXUFH
4. Press MENU to return to the previous menu, or
press CLEAR to close the menu.
Closed Caption
Many programs are encoded with closed captioning
information, which allows you to display the audio
SRUWLRQRIDSURJUDPDVWH[WRQWKH79VFUHHQ
Note: Closed caption settings are not available
for HDMI, CMPT or PC inputs. These settings
PXVWEHVHWLQWKHFRQQHFWHGFRPSRQHQW¶VPHQX
Closed captioning is not available on all channels
DWDOOWLPHV2QO\VSHFL¿FSURJUDPVDUHHQFRGHG
with closed captioning information. When a digital
program is closed captioned, CC is displayed in the
channel banner.
The Closed Caption options are: (Refer to Figure 4.)
CC Setting: this option allows you to choose the
way closed captioning information appears on the
screen.
Off- No captioning information displayed.
On Always- Chooses this option if you want
captioning information to be shown whenever
available.
On When Mute- This option allows the
closed captioning to display (when available)
ZKHQHYHUWKH79¶VVRXQGLVPXWHG7KH
captioning information is not displayed when the
sound is not muted.
Analog CC Type : this option lets you select
the captioning mode used for displaying caption
information, when available. If you are unsure of the
differences among the modes, you may prefer to
leave the closed captioned mode set to CC1, which
displays complete text of the program in the primary
language in your area.
Digital CC Type: if available, this allows you to
select a closed caption service mode (1-6) for digital
channels.
Digital CC Preset: if available, this allows you to
select between Off and On options. On mode allows
you to set the options below.
Digital CC Style: this option lets you customize the
following display options, if available:
Caption Style - Select either As Broadcaster or
Custom options. If you choose Custom options,
the setting changes according to the options you
choose.
Digital CC Size - Set the size of the digital closed
caption text.

16
Menu Operation
Digital CC Font - Select a character design for
the digital closed caption text. A font is a complete
assortment of letters, numbers, punctuation
PDUNVHWFLQDJLYHQGHVLJQ<RXFDQFKRRVH
from a variety of fonts.
Digital CC Background Color - lets you set the
color of the area behind the digital closed caption
text.
Digital CC Background Opacity - Set the
appearance of the area behind the digital closed
caption text.
Digital CC Color - Sets the color of the digital
closed caption text.
Digital CC Opacity - Sets the appearance of the
digital closed caption text.
Time Setup
Time Zone
You can set the correct Time Zone for your area.
To choose a time zone:
1. Select Setup > Time Setup > Time Zone, (Refer
to Figure 5.) press OKŹWRSURFHHGWRWKHQH[W
screen.
3UHVVŻŹWRVHOHFWWKHWLPH]RQHIRU\RXUDUHD
3. Press MENU button to return to the previous
menu, or press CLEAR to close the menu.
Time
To set the time:
1. Select Setup > Time Setup > Time, press OKŹ
to proceed to the next screen.
2. Options on this screen include:
Auto Synchronization -3UHVVŻŹWRFKRRVH
On to acquire the time automatically from digital
channels.
Daylight Saving - Select Auto to set the daylight
saving time for your area automatically.
Date -:KHQ'DWHLVKLJKOLJKWHGXVHŻŹWR
VHOHFWWKHLQSXW¿HOGWKHQSUHVVOK to start to
LQSXWDJDLQXVHŻŹWRVHWWKHGDWH¿QDOO\SUHVV
OKWRFRQ¿UPNote: using the same way to set
the time below)
Time - Lets you set the time manually.
Power On Timer - Select Once/Daily/Off.
Power On Time - Allows you to set the time you
ZDQWWKH79WRWXUQLWVHOIRQ
Power Off Timer - Select Select Once/Daily/Off.
Power Off Time - Allows you to set the time you
ZDQWWKH79WRWXUQLWVHOIRII
Sleep Timer:3UHVVŻŹWRVHWWKH79WRWXUQRII
after a given amount of time.
System Information
This option allows you to see the system information
LQFOXGLQJ3DQHO,'6:9HUVLRQ6HUYLFH0RGHO1R
Reset All
This option resets all settings (except parental
control settings) to the factory defaults. When you
VHOHFWWKLVRSWLRQDFRQ¿UPDWLRQER[RSHQV
3UHVVŻŹWRVHOHFWOK or Cancel.
2. Press OKWRFRQ¿UP
Parental Control Menu
7KHFKRLFHVLQWKH869&KLSDQG&DQDGD9&KLS
PHQXVLQYROYHVRIWZDUHLQVLGH\RXU79UHIHUUHGWR
DV9&KLSZKLFKDOORZV\RXWREORFN79SURJUDPV
DQGPRYLHV79SURJUDPVFDQEHEORFNHGE\DJH
EDVHGUDWLQJVVXFKDV790$,IDYDLODEOH79
SURJUDPVFDQDOVREHEORFNHGE\FRQWHQWVXFKDV
DGXOWODQJXDJH/0RYLHVFDQRQO\EHEORFNHG
E\DJHEDVHGUDWLQJV2QFH\RXEORFNSURJUDPV
\RXFDQXQEORFNWKHPE\HQWHULQJDSDVVZRUG%\
GHIDXOWWKHVRIWZDUHLQVLGH\RXU79LVWXUQHGRIIRU
XQORFNHG
9&KLSUHDGVWKHSURJUDP¶VDJHEDVHGUDWLQJ79
0$79HWFDQGFRQWHQWWKHPHV9LROHQFH
9$GXOW/DQJXDJH/HWF,I\RXKDYHEORFNHG
the rating and/or content themes that the program
contains, you receive a message that the channel
LVFXUUHQWO\EORFNHG&KDQJHWKHFKDQQHORUWR
enter your password and temporarily deactivate the
parental controls.
Broadcasters are not required to provide content
themes, so programs received with no content
WKHPHVDUHEORFNHGRQO\LI\RXEORFNWKHLUDJH
EDVHGUDWLQJ<RXFDQDOVREORFNSURJUDPVWKDWKDYH
been given an Exempt rating, and programs that are
considered unrated.
Change V-Chip Password
7KH¿UVWWLPH\RXHQWHUWKH3DUHQWDO&RQWUROPHQX\RX
must set a password in order to adjust other parental
FRQWUROVHWWLQJV7RHQWHUD9&KLS3DVVZRUGIROORZ
these steps:
1. Selelct Parental Control >
Change
Password,
(Refer to Figure 6.) press OKŹWRHQWHUWKH
Change
Password screen.
2. Use the number buttons to enter the four-digit
number for your password.
5HHQWHUWKHVDPHFRGHWRFRQ¿UPWKHSDVVZRUG
Note: The password must be entered before
the TV will continue with Parental settings next
time. The super password is 2458, If you forget
your password, enter it to override any existing
password.
Channel Block
7REORFNDVSHFL¿FFKDQQHOIROORZWKHVHVWHSV

17
Menu Operation
1. Select Parental Control > Channel Block, press
OKŹWRHQWHUWKHQH[WVFUHHQZLWKFKDQQQHOOLVW
on.
3UHVVŸźWRVHOHFWWKHFKDQQHO\RXZLVKWR
EORFN
3. Press OKWRSODFHDFKHFNPDUNLQWKHER[WR
EORFNWKDWFKDQQHO:KHQ\RXWXQHWRWKDW
channel, you will need to enter a password to
view the channel programming.
Button Block
7KLVRSWLRQDOORZV\RXWREORFNGLVDEOHRUXQEORFN
HQDEOHWKH79SDQHOEXWWRQV7KHUHPRWHFRQWURO
still tunes to any channel. If you are using this to
NHHSFKLOGUHQIURPFKDQJLQJFKDQQHOVEHVXUHWR
remove access to any remote that is capable of
RSHUDWLQJWKH79ZKLOH\RXKDYHWKH79SDQHOEXWWRQ
EORFNHG7REORFNWKH79SDQHOEXWWRQVVHOHFW
Parental Control > Button Block,DQGSUHVVŻŹ
to choose the On option. To enable these buttons
again, return to this menu and choose the Off
option.
V-Chip
Press OKŹWRGLVSOD\LWVVXEPHQXV5HIHUWR
Figure 7.)
V-Chip Rating Enable
Select Parental Control > V-Chip > Rating Enable,
then press ŻŹto turn this option on or off.
You must remember to set Rating Enable to On
PRGHWRKDYHWKHIROORZLQJ9&KLSUDWLQJOLPLWVWR
WDNHHIIHFW
US V-Chip TV Ratings
<RXFDQDXWRPDWLFDOO\EORFNDOOSURJUDPUDWLQJV
DERYHDVSHFL¿HGDJHEDVHGUDWLQJOHYHO
1. Select Parental Control > V-Chip > US V-Chip
>US TV Ratings, press OKŹ to enter the US
TV Ratings screen.
,QWKH86795DWLQJVSDQHO\RXFDQFXVWRPL]H
WKHSURJUDPEORFNLQJRIWKHIROORZLQJ79UDWLQJV
TV–Y All children
TV–Y7 Children 7 years and older
TV–G General audience
TV–PG Parental guidance suggested
TV–14 Parents strongly cautioned
TV–MA Mature audience only
<RXFDQDOVRFXVWRPL]HWKH79UDWLQJVIRUWKH
following content:
ASexual dialog
DSexual explicit dialog
LAdult language
SSexual situations
V 9LROHQFH
FV Fantasy violence
3UHVVŸźŻŹWRQDYLJDWHWKURXJKWKH79
rating options. Press OKWREORFNORFNHGRUDOORZ
XQORFNHG
US V-Chip Movie Ratings
<RXFDQDXWRPDWLFDOO\EORFNDOOSURJUDPUDWLQJV
DERYHDVSHFL¿HGDJHEDVHGUDWLQJOHYHO
1. Select Parental Control > V-Chip > US V-Chip >
US Movie Ratings, press OKŹ to enter the US
Movie Ratings screen.
In the US Movie Ratings panel you can customize
WKHSURJUDPEORFNLQJRIWKHIROORZLQJ0RYLH
ratings:
GGeneral audience
PG Parental guidance suggested
PG-13 Unsuitable for children under 13
RRestricted, under 17 requires companying
parent or adult guardian
NC-17 No one under 17 admitted
XMature audience only
Canada English or French V-Chip Ratings
,I\RXUHFHLYH&DQDGLDQSURJUDPV\RXFDQEORFN
&DQDGLDQ(QJOLVKDQG)UHQFK9&KLSE\UDWLQJVRQO\
:KHQ\RXEORFNDSDUWLFXODUUDWLQJ\RXDXWRPDWLFDOO\
EORFNWKHKLJKHUUDWHGSURJUDPVDVZHOO7REORFN
Canadian English and French program ratings,
follow these steps:
1. Select Parental Control > V-Chip > Canada
V-Chip, press OKŹ to enter the next screen.
3UHVVŸźWRVHOHFWCanadian English Ratings
or Canadian French Ratings.Press OKŹ to
proceed.
Canandian Enlish Ratings:
C Children
C8+ Children 8 and older
G General audience
PG Parental guidance
14+ 9LHZHUDQGRYHU
18+ Adult
Canandian French Ratings:
G General audience
8 ans+ 9LHZHUDQGROGHU
13 ans+9LHZHUDQGROGHU
16 ans+9LHZHUDQGROGHU
18 ans+ Adult
3. Press Ÿź to select the desired rating. Press
OK WRWRJJOHEHWZHHQ9LHZDQG%ORFN
Open V-Chip: Allows you to select the downloadable
rating level. In the event that a new rating system is
provided by the broadcaster, the new rating options
would appear within this menu.
Blocking Unrated/Exempt Programs
The Unrated/Exempt Ratings option lets you decide

18
Menu Operation
LISURJUDPVWKDWWKH9&KLSUHFRJQL]HVDVXQUDWHG
RUH[HPSWFDQEHYLHZHG8QUDWHG79SURJUDPV
may include news, sports, political, religious, local
and weather programs, emergency bulletins, public
announcements, and programs without ratings. The
Exempt option applies to both US and Canadian
unrated programs and Canadian programs rated E.
1. Select Parental Control > V-Chip > Unrated/
Exempt Ratings, press OKŹ to enter the next
screen.
3UHVVŻŹWRWRJJOHEHWZHHQView and Block.
View All unrated programs are available.
Block All unrated programs are not available.
Reset Downloadable Data
1. Select Parental Control > V-Chip > Reset
Downloadable Data, press OKŹWRUHVHWWKH
GRZQORDGDEOH9&KLSGDWD
$FRQ¿UPDWLRQER[RSHQV3UHVVŻŹWRVHOHFW
3. Press OK to reset the downloadable rating data, if
present.
Input Block
1. Select Parental Control > Input Block, press
OKŹ to display the Input source list screen.
3UHVVŸźWRSODFHDFKHFNPDUNLQWKHER[WR
EORFNWKHLQSXW:KHQ\RXWXQHWRWKDWLQSXW\RX
will need to enter a password to view the channel.
3. Press OKWRFRQ¿UP\RXUVHOHFWLRQ$ORFNHG
XQORFNHGLFRQDSSHDUVQH[WWRWKHVHOHFWHGLQSXW
Language Menu
To select the preferred language for all menus, follow
the steps below. You can choose between English,
Espanol, or Francais.
1. Select Language, press
OKŹ
to display the
Language Screen.
(Refer to Figure 8.)
2. Press
Ÿź
to select the preferred language for the
menu.
3. Press
ŻŹ
to select On or Off.
4. Press the MENU or CLEAR button to exit the menu.
USB Menu
<RXFDQFRQQHFWDGHYLFHZLWK86%WR\RXU79RU
XVHD86%ÀDVKGULYH
only suppport FAT format and
unpartitioned USB device
. This connection allows
\RXWRLQVHUWD86%ÀDVKGULYHGLUHFWO\RUFRQQHFWD
compatible mass storage device with USB, such as
a digital camera, a multi-format card reader, or an
MP3 player. If you have a USB drive, plug it into the
drive directly. If you have a device with a USB port,
connect one end of the USB cable to the USB port
DQGWKHRWKHUHQGWRWKH86%MDFNRQWKHVLGHRIWKH
79
7KH86%IHDWXUHRQ\RXU79DOORZV\RXWRSOD\DXGLR
¿OHVIRUPDWVXSSRUWHG03RUGLVSOD\SLFWXUHVIRUPDW
supported: JPEG). To utilize this feature, follow these
steps:
1. Press MENU on the remote control (the Main Menu
appears).
2. Use
Ÿź
to select USB.
3. Press
OKŹ
to proceed to the USB Screen.
Or, you can press the MEDIA button on the remote
control to display the USBVFUHHQGLUHFWO\\RXFDQ
also press the INPUT button to display the input list
and select USB.
(Note: if no USB device is inserted, “No Media”
displays on the screen, only suppport FAT format
and unpartitioned USB device)
Media Brower:
select
Media Brower, press OK
to enter, then
press
Ÿź
WRVHOHFWD¿OHRU¿OH
folder, press OK and use the following menus:
Open -
6HOHFWWRGLVSOD\WKHIROGHU¿OHOLVWLQWKH
USB device.
Thumbnail -
Select to
display the thumbnail of
WKHIROGHUV¿OHVRQO\DYDLODEOHIRUSKRWRIROGHUV
¿OHV
Slideshow -
Select to to start photo slideshow.
7KHPHQXOLQHLVJUD\HGRXWLIWKHUHLVQRSKRWR¿OH
in the root of the current USB device.
Play Music -
6HOHFWWRSOD\EDFNWKHPXVLF7KH
PHQXOLQHLVJUD\HGRXWLIWKHUHLVQRPXVLF¿OHLQ
WKHURRWRIWKHFXUUHQW8GLVN
Return -
Select to return to the previous menu.
Media Settings:
select
Media Settings, press
OK to enter, then
use the following menus:
Photo Settings -
Select to display Photo
Settings submenu.
Slideshow Interval
-
Select the Slideshow
Interval:5 Seconds, 10 Seconds, 20
Seconds
.
Slideshow Effect -
Select the Slideshow
Effect.
Slideshow Repeat
-
Select the options: Off/On.
Thumbnail Size-
Select to
display the
thumbnail size: 5X3 and 3X2.
Music Settings:
select to display Music Settings
submenu.
Music Play Mode
-
Select the options: Once,
Play All, Random.
Music Play
Repeat -
Select the options: Off/On.
Music Auto Play
-
Select the options: Off/On.
4.
Press MENUWRJREDFNWRWKHSUHYLRXVPHQXRUSUHVV
CLEAR to exit.

19
Chapter 3 Other Information
Frequently Asked Questions (FAQs)
:KDW¶VWKHTXLFNHVWZD\WRYLHZ+LJK'H¿QLWLRQ+'YLGHR"
Connect an off-air antenna to the ANT/CABLE/SAT IN to view free local digital channels. You may need to
purchase an antenna.
9LVLWwww.antennaweb.org for assistance in deciding what type of antenna to use to receive the local digital
channels available to you. By entering your location, this mapping program tells you which local analog and
digital stations are available using a certain antenna.
$UHWKHUHRWKHUZD\VWRYLHZ+LJK'H¿QLWLRQ+'YLGHR"
Besides using an off-air antenna as mentioned above, you can also use a set-top box to receive
digital video. Contact your cable company or satellite provider to purchase digital programming
and have them connect the box to ensure you are viewing channels the best way.
+RZGR,WHOODQDQDORJFKDQQHOIURPDGLJLWDOFKDQQHO"
3UHVVWKH,1)2EXWWRQWRGLVSOD\WKH&KDQQHO%DQQHU/RRNDWWKHERWWRPULJKWFRUQHURIWKHVFUHHQ7KHGRW
is displayed for a digital channel. If there is no dot, it is an analog channel.
:K\DUHWKHUHEDUVRQP\VFUHHQDQGFDQ,JHWULGRIWKHP"
0RVWGLJLWDOYLGHRLVVHQWLQDIRUPDWZKLFK¿OOV\RXUVFUHHQEXWLVVRPHWLPHVVHQWLQZKLFKGRHVQRW
¿OO\RXUVFUHHQ,WGHSHQGVRQKRZWKHVWDWLRQRUGHYLFHFRQQHFWHGWR\RXU79LVIRUPDWWLQJWKHYLGHR,IWKHUH
are bars on the screen, press the ZOOM -/+ button to try a different format that may eliminate the bars. Some
bars can’t be removed because of the way the format is sent by the broadcaster. The format changes as you
press the ZOOM -/+ button and the format type is displayed at the bottom of the screen.
:K\GRHVFKDQQHOVHDUFK¿QGDORWRIFKDQQHOVEXWZKHQ,WU\WRWXQHWRWKHPWKHUH¶VQRWKLQJ
WKHUH"
Some channels enabled by the cable company don’t carry programming, such as video ondemand. When
FKDQQHOVDUHXQDYDLODEOH\RXU79VFUHHQLVEODQNRUDSSHDUVOLNHVQRZ<RXSUREDEO\ZDQWWRUHPRYHWKHVH
FKDQQHOVIURP\RXU&KDQQHO/LVW5HPRYHWKHVHLQWKH&KDQQHO6NLS0HQX
:K\GRHVWKH¿UVWFKDQQHOVHDUFKWDNHDORQJWLPH"
,I\RXKDYHERWKDQDORJDQGGLJLWDOFKDQQHOVWKH79LVORRNLQJIRUDOODYDLODEOHFKDQQHOVLQWKH&KDQQHO/LVW,I
\RXGRKDYHGLJLWDOFKDQQHOVWKH79LVDOVRVHDUFKLQJIRUVFUDPEOHGFKDQQHOVQRQVFUDPEOHGFKDQQHOVDQG
each sub-channel of that digital channel.

20
Other Information
Troubleshooting
0RVWSUREOHPV\RXHQFRXQWHUZLWK\RXU79FDQEHFRUUHFWHGE\FRQVXOWLQJWKHIROORZLQJWURXEOHVKRRWLQJOLVW
TV Problems
The TV won’t turn on.
0DNHVXUHWKH79LVSOXJJHGLQ
&KHFNWKHZDOOUHFHSWDFOHRUH[WHQVLRQFRUGWRPDNHVXUHLWLV³OLYH´E\SOXJJLQJLQDQRWKHUGHYLFH
7KH79SDQHOFRQWUROVPD\EHORFNHGGLVDEOHG8VHWKHUHPRWHFRQWUROWRXQORFNWKH79SDQHOFRQWUROV
6HOHFWWKH%XWWRQ%ORFNIHDWXUHRQWKH3DUHQWDO&RQWUROPHQXDQGSUHVVOKWRXQFKHFNWKHER[
There is no picture and no sound but the TV is on.
You may be tuned to an input with no component connected to it. If you’re trying to view a connected
component, press INPUT until the picture from that component appears.
7KH6LJQDO7\SHRSWLRQPD\EHVHWLQFRUUHFWO\
7KHFKDQQHOPD\EHEODQN7U\FKDQJLQJFKDQQHOV
,I\RX¶UHZDWFKLQJ\RXU9&5DQGLW¶VFRQQHFWHGZLWKFRD[LDOFDEOHWRWKHANT/CABLE/SAT INMDFNWXQH
WKH79WRFKDQQHORUZKLFKHYHUFKDQQHOLVVHOHFWHGRQWKHVZLWFKRQWKHEDFNRI\RXU9&5$OVR
PDNHVXUHWKH799&5EXWWRQRQWKH9&5LVLQWKHFRUUHFWPRGHSUHVVWKH799&5EXWWRQRQ\RXU9&5.
7KHVRXQGLV¿QHEXWWKHSLFWXUHLVSRRUTXDOLW\
,I\RX¶UHJHWWLQJDEODFNDQGZKLWHSLFWXUHIURPDFRPSRQHQW\RX¶YHFRQQHFWHGWR\RXU79\RXPLJKWKDYH
\RXUYLGHRFDEOHVFRQQHFWHGWRWKHZURQJMDFNV$\HOORZYLGHRFDEOHFRQQHFWVWRWKH\HOORZ9,'(2
,1387MDFNRQWKHVLGHRUEDFNRI\RXU79WKUHHYLGHRFDEOHVRUEXQGOHGFRPSRQHQWYLGHRFDEOHVUHG
EOXHDQGJUHHQFRQQHFWWRWKHFRUUHVSRQGLQJ&20321(17,1387MDFNVRQWKHEDFNRI\RXU79
&KHFNWKHDQWHQQDFRQQHFWLRQV0DNHVXUHDOORIWKHFDEOHVDUH¿UPO\FRQQHFWHGWRWKHMDFNV
7KHUHLVQRVRXQGEXWWKHSLFWXUHLV¿QH.
7KHVRXQGPLJKWEHPXWHG7U\SUHVVLQJWKHYROXPHXSEXWWRQWRUHVWRUHVRXQG
,IXVLQJ'9,RU<3%35UHPHPEHUWRDOVRFRQQHFWWKHGHYLFH¶VOHIWDQGULJKWDXGLRRXWSXWMDFNVWRWKH
79¶V/DQG5$8',2,1387MDFNV
7KHVRXQGVHWWLQJVPD\QRWEHVHWFRUUHFWO\
,I\RXUDXGLRVRXUFHKDVRQO\RQHMDFNRULVDPRQRDXGLRVRXUFHPDNHVXUH\RXKDYHSOXJJHGWKH
FRQQHFWLRQLQWRWKH/$8',2,1387MDFNRQWKH79
The screen is blank.
&KHFN\RXUFRQQHFWLRQV,I\RXXVHG\HOORZUHGDQGZKLWHFDEOHVWRFRQQHFWPDNHVXUHWKH\¶UH
FRQQHFWHGWRWKHUHGZKLWHDQG\HOORZ$8',29,'(2,1387MDFNVRQWKHVLGHRUEDFNRIWKH79
,I\RX¶UHWU\LQJWRZDWFKVRPHWKLQJWKDW¶VSOD\LQJRQDFRPSRQHQWFRQQHFWHGWRWKH79OLNHD'9'SUHVV
INPUT until you get to the correct video input channel.
0DNHVXUHWKHFRPSRQHQWFRQQHFWHGWRWKH79LVWXUQHGRQ
7U\DQRWKHUFKDQQHO
The buttons on the TV panel don’t work.
7KH79SDQHOFRQWUROVPD\EHORFNHGGLVDEOHG8VHWKHUHPRWHFRQWUROWRXQORFNWKH79SDQHOFRQWUROV
E\VHOHFWLQJWKH%XWWRQ%ORFNIHDWXUHLQWKH3DUHQWDO&RQWURO0HQXDQGSUHVVŻŹWRXQFKHFNWKHER[
8QSOXJWKH79IRUPLQXWHVDQGWKHQSOXJLWEDFNLQ7XUQWKH79RQDQGWU\DJDLQ
The TV turns off unexpectedly.
7KHHOHFWURQLFSURWHFWLRQFLUFXLWPD\KDYHEHHQDFWLYDWHGEHFDXVHRIDSRZHUVXUJH:DLWVHFRQGV
DQGWKHQWXUQWKH79RQDJDLQ,IWKLVKDSSHQVIUHTXHQWO\WKHYROWDJHLQ\RXUKRXVHPD\EHDEQRUPDOO\
high or low.
8QSOXJ:DLWPLQXWHV3OXJLQDJDLQ

21
Other Information
You can’t select a certain channel.
7KHFKDQQHOPD\EHEORFNHGRUQRWDSSURYHGLQWKHParental Control Menu.
,IXVLQJD9&5FKHFNWRPDNHVXUHWKHTV/VCREXWWRQRQWKH9&5LVLQWKHFRUUHFWPRGHSUHVVWKHTV/
VCREXWWRQRQ\RXU9&5
3UHVVWKHTV button and then try to change channels.
The stereo reception is noisy.
,WPD\EHDZHDNVWDWLRQ8VHWKH6RXQG0HQXDQG$QDORJ796RXQGWRFKRRVHPRQR
A black box appears on the screen.
&ORVHGFDSWLRQLQJPLJKWEHRQ&KHFN&ORVHG&DSWLRQLQWKH6HWXSPHQX
You are having problems with the HDMI Connection.
0DNHVXUHWKH+'0,RU'9,FRPSRQHQWLVWXUQHGRQDQGWKHFDEOHVDUH¿UPO\FRQQHFWHG,ISUREOHPVVWLOO
occur, turn off your component and reconnect it. Reset the power by unplugging the power cord and
SOXJJLQJLWEDFNLQ
,I\RXDUHWXQHGWRWKHHDMI 1, or other HDMI INPUT and you’re receiving Unusable Signal message
screen, press the INFO button on the remote. If Acquiring Channel appears in the Channel Banner, the
+'0,RU'9,GHYLFHLVQ¶WUHVSRQGLQJ&RQWDFWWKHPDQXIDFWXUHURIWKH+'0,RU'9,GHYLFHIRUIXUWKHU
assistance.
,I\RXWXQHWRWKHHDMI 1, or other HDMI INPUT and you see snow, the video goes in and out, or the
YLGHRWDNHVDORQJWLPHWRDSSHDU\RXU+'0,RU'9,FRPSRQHQWLVKDYLQJWURXEOHVHQGLQJYLGHR
LQIRUPDWLRQWRWKH795HFRQQHFW\RXUGHYLFH5HVHWWKHSRZHUE\XQSOXJJLQJWKHSRZHUFRUGDQGSOXJJLQJ
LWEDFNLQ,ISUREOHPVSHUVLVWWU\FRQQHFWLQJWKH<3E3UMDFNVLIWKH\DUHDYDLODEOHRUFRQWDFWWKH
PDQXIDFWXUHURIWKH+'0,RU'9,FRPSRQHQWIRUIXUWKHUDVVLVWDQFH
,I\RXKDYHEODFNEDUVRQHDFKVLGHRI\RXUSLFWXUHWKHFRPSRQHQW\RXFRQQHFWHGPLJKWKDYHDVZLWFKRU
a menu RSWLRQDOORZLQJ\RXWRFKDQJHWKHSLFWXUHTXDOLW\RXWSXWWKDWZLOO¿[WKLV&KRRVHHLWKHUSRUL
The remote control doesn’t work.
6RPHWKLQJPLJKWEHEHWZHHQWKHUHPRWHDQGWKHUHPRWHOLJKWVHQVRURQWKHIURQWRIWKH790DNHVXUH
there is a clear path.
7KHUHPRWHPD\QRWEHDLPHGGLUHFWO\DWWKH79
7KHEDWWHULHVLQWKHUHPRWHPD\EHZHDNGHDGRULQVWDOOHGLQFRUUHFWO\3XWQHZEDWWHULHVLQWKHUHPRWH
The Universal Remote control doesn’t work.
7KLV79XWLOL]HVQHZUHPRWHFRQWUROVLJQDOVDQGPD\QRWEHFRPSDWLEOHZLWK\RXUH[LVWLQJXQLYHUVDOUHPRWHHJ
satellite box remotes, cable box remotes, and generic universal remotes, etc.). Over time, newer universal
UHPRWHVZLOOEHFRPHDYDLODEOHWKDWVKRXOGSLFNXSWKHQHZ79FRGHV
You are experiencing problems with V-Chip/Parental Controls.
IIWKHUDWLQJOLPLWVGRQ¶WZRUN\RXPXVWORFNWKHVHWWLQJV*RWRWKH0DLQ0HQXSUHVV0(18RQ\RXUUHPRWH
select Parental > Program Block > Rating Enable,5DWLQJ(QDEOHLVKLJKOLJKWHG3UHVVŻŹWRVHOHFW2Q
WRKDYHWKHUDWLQJOLPLWVWDNHHIIHFW
:KDWHOVHFDQ,GR"
,I\RX¶YHEHHQWKURXJKWKH7URXEOHVKRRWLQJVHFWLRQDQGQRWKLQJKDV¿[HG\RXUSUREOHPWU\UHERRWLQJ\RXU
791RWHWKDWDIWHUDUHERRW\RXPD\QHHGWRUXQ\RXU79WKURXJKWKHVHWXSSURFHVVDJDLQ7RGRDUHERRW
XQSOXJWKHSRZHUFRUGIURPWKHZDOORXWOHWRUSRZHUVWULS.HHS\RXU79XQSOXJJHGIRUDERXWPLQXWHV7KHQ
SOXJLQWKH79DQGWXUQLWRQ6HHLIWKHSUREOHPLV¿[HG,IWKHSUREOHPUHPDLQVWKHQSOHDVHYLVLWZZZWFOXVD
FRPIRUXSGDWHG)$4VRUFRQWDFW7&/&XVWRPHU6XSSRUWDWWKHVXSSRUWQXPEHUSURYLGHGLQ\RXU:DUUDQW\
under “How To Get Service.”

22
Other Information
Care and Cleaning
CDXWLRQ7XUQ2))\RXU79EHIRUHFOHDQLQJ
<RXFDQFOHDQWKH79DVUHTXLUHGXVLQJDVRIWOLQWIUHHFORWK%HVXUHWRRFFDVLRQDOO\GXVWWKHYHQWLODWLRQVORWV
in the cabinet to help assure adequate ventilation.
IMPORTANT: Never use strong cleaning agents, such as ammonia-based cleaners, or abrasive powder.
7KHVHW\SHVRIFOHDQHUVZLOOGDPDJHWKH797KH79¶VVFUHHQPD\EHFOHDQHGZLWKDVRIWOLQWIUHHFORWKDV
ZHOO 7DNH FDUH QRW WR VFUDWFK RU PDU WKH VFUHHQ ,I QHFHVVDU\ \RX PD\ XVH D FORWK GDPSHQHG ZLWK ZDUP
water. While cleaning, do not spray liquid directly on the screen, or allow liquid to run down the screen and
LQVLGHWKH79$OVRQHYHUSODFHGULQNVRUYDVHVZLWKZDWHURQWRSRIWKH797KLVFRXOGLQFUHDVHWKHULVNRI
¿UHVKRFNKD]DUGRUGDPDJHWRWKH79
7HOHYLVLRQ6SHFL¿FDWLRQV
Broadcasting system US System NTSC-M
$76&VWDQGDUG96%4$0
5HFHLYLQJ&KDQQHOV 9+)
UHF14-69
&$79 $:
37-59 (AA)-(WW)
60-85 (AAA)-(ZZZ)
86-94 (86)-(94)95-99 (A-5)-(A-1)
100-135 (100)-(135)
01 (4A)
Tuner type Frequency synthesized
Screen refresh rate 60Hz
240Hz (only for models of 48inch and above)
23
TTE Technology, Inc. (“TTE”) Limited Warranty
All LCD/LED Models
EXCEPT TO THE EXTENT PROHIBITED BY APPLICABLE LAW, THIS WARRANTY
'2(6127&29(5$1'$6'(6&5,%('%(/2:77((;35(66/<',6&/$,06$//
ACTUAL AND IMPLIED WARRANTIES WITH RESPECT TO ANY PRODUCT USED FOR
INSTITUTIONAL OR OTHER COMMERCIAL PURPOSES (INCLUDING BUT NOT
LIMITED TO RENTAL PURPOSES).
What your warranty covers:'HIHFWVLQPDWHULDOVRUZRUNPDQVKLSWRWKHRULJLQDORZQHURIWKLV
7&/SURGXFWZKHQSXUFKDVHGIURPDQ$XWKRUL]HG'HDOHURI7&/EUDQGSURGXFWVDQGSDFNDJHGZLWK
this warranty statement.
New LCD/LED Televisions
For how long after your purchase:
7ZR\HDUVIURPGDWHRISXUFKDVHIRUSDUWV
7ZR\HDUVIURPGDWHRISXUFKDVHIRUODERU
What we will do:
$W77(¶VGLVFUHWLRQSD\DQ$XWKRUL]HG7&/6HUYLFH&HQWHUIRUERWKODERUFKDUJHVDQGSDUWVWR
repair your television, or replace your television with a new or refurbished/remanufactured
unit. See “How to get service”.
How to get service:
&DOO1-877-300-8837. Please have your unit’s date of purchase, place of purchase and model/
VHULDOQXPEHUUHDG\7KHPRGHOVHULDOQXPEHULQIRUPDWLRQFDQEHIRXQGRQWKHEDFNRI\RXUXQLW
$UHSUHVHQWDWLYHZLOOWURXEOHVKRRW\RXUSUREOHPRYHUWKHSKRQH,ILWLVGHWHUPLQHGWKDW\RXUXQLW
requires service, the service location will be at the sole discretion of TTE based upon the TTE
Limited Warranty statement.
$WWKHVROHGLVFUHWLRQRI77(WHOHYLVLRQVFUHHQVL]HV´DQGVPDOOHUZLOOHLWKHUEHUHSDLUHGDWDQ
Authorized TCL Service Center or directly exchanged for a new or refurbished/remanufactured
unit. At the sole discretion of TTE, television screen sizes 33” through 55” will either be repaired
at an Authorized TCL Service Center or repaired in-home.
If repaired at an Authorized TCL Service Center, TTE is not responsible for transportation costs
to the Authorized TCL Service Center. However, TTE will pay for return shipping. TTE will
SURYLGHLQVWUXFWLRQVIRUSDFNDJLQJDQGVKLSSLQJWKHXQLW3URRIRISXUFKDVHLQWKHIRUPRIDELOORI
sale or receipted invoice from an Authorized Dealer which is evidence that the product is within
the warranty period must be presented to obtain warranty service.
What your warranty does not cover:
&XVWRPHULQVWUXFWLRQ<RXU2ZQHU¶V0DQXDOGHVFULEHVKRZWRLQVWDOODGMXVWDQGRSHUDWH\RXU
unit. Any additional information should be obtained from your Authorized Dealer.)
,QVWDOODWLRQDQGUHODWHGDGMXVWPHQWV
'DPDJHUHVXOWLQJIURPQRQDSSURYHGLQVWDOODWLRQPHWKRGV
6LJQDOUHFHSWLRQSUREOHPVQRWFDXVHGE\\RXUXQLW
'DPDJHIURPPLVXVHRUQHJOHFW
%DWWHULHV
$WHOHYLVLRQWKDWKDVEHHQPRGL¿HGRULQFRUSRUDWHGLQWRRWKHUSURGXFWVRULVXVHGIRULQVWLWXWLRQDO
or other commercial purposes (including but not limited to rental purposes).
$XQLWSXUFKDVHGRUVHUYLFHGRXWVLGHWKH86$
$XQLWVROGDVLVRUZLWKDOOIDXOWV
$FWVRIQDWXUHVXFKDVEXWQRWOLPLWHGWROLJKWQLQJGDPDJH
6SHFLDOLQFLGHQWDORUFRQVHTXHQWLDOGDPDJHV
24
Product Registration:
3OHDVHUHJLVWHU\RXU7&/SXUFKDVHRQOLQHDWZZZWFOXVDFRP,WZLOOPDNHLWHDVLHUWRFRQWDFW\RXVKRXOGLWHYHUEH
necessary. Registration is not required for warranty coverage.
Limitation of Warranty:
7+(:$55$17<67$7('$%29(,67+(21/<:$55$17<$33/,&$%/(727+,6
PRODUCT. NO VERBAL OR WRITTEN INFORMATION GIVEN BY TTE TECHNOLOGY,
INC., ITS AGENTS OR EMPLOYEES SHALL CREATE A GUARANTY OR IN ANY WAY
INCREASE OR MODIFY THE SCOPE OF THIS WARRANTY.
5(3$,5255(3/$&(0(17$63529,'('81'(57+,6:$55$17<,67+((;&/86,9(
REMEDY OF THE CONSUMER. TTE TECHNOLOGY, INC. SHALL NOT BE LIABLE FOR
SPECIAL, INCIDENTAL OR CONSEQUENTIAL DAMAGES RESULTING FROM
THE USE OF THIS PRODUCT OR ARISING OUT OF ANY BREACH OF ANY EXPRESS OR
IMPLIED WARRANTY ON THIS PRODUCT. THIS DISCLAIMER OF WARRANTIES AND LIMITED
WARRANTY ARE GOVERNED BY THE LAWS OF THE STATE OF CALIFORNIA.
EXCEPT TO THE EXTENT PROHIBITED BY APPLICABLE LAW, ANY IMPLIED WARRANTY
OF MERCHANTABILITY OR FITNESS FOR A PARTICULAR PURPOSE ON THIS PRODUCT IS
LIMITED TO THE APPLICABLE WARRANTY AND WARRANTY PERIOD SET FORTH ABOVE.
How State Law relates to this warranty:
6RPHVWDWHVGRQRWDOORZWKHH[FOXVLRQQRUOLPLWDWLRQRILQFLGHQWDORUFRQVHTXHQWLDOGDPDJHVRU
limitations on how long an implied warranty lasts, so the above limitations or exclusions may
not apply to you.
7KLVZDUUDQW\JLYHV\RXVSHFL¿FOHJDOULJKWVDQG\RXDOVRPD\KDYHRWKHUULJKWVWKDWYDU\IURPVWDWH
to state.
If you purchased your unit outside the United States or seek warranty coverage outside the
United States: This warranty does not apply. Contact your dealer for warranty information.
Service calls which do not involve defective materials or workmanship are not covered by this
warranty. Costs of such service calls are the sole responsibility of the purchaser.

TTE Technology, Inc.
1255 Graphite Drive Corona, CA 92881
©2012 TTE Technology, Inc.
7&/DQGDVVRFLDWHGPDUNVDUHWUDGHPDUNVRI7&/6$XVHGXQGHUOLFHQVH
to TTE Corporation.
Printed in China
Part No.: 72-F33C8L-XNA1A
ENERGY STAR is a set of power-saving guidelines issued by the U.S. Environmental Protection
Agency (EPA).
ENERGY STAR is a joint program of the U.S. Environmental Protection Agency and the U.S.
'HSDUWPHQWRI(QHUJ\KHOSLQJXVDOOVDYHPRQH\DQGSURWHFWWKHHQYLURQPHQWWKURXJKHQHUJ\HI¿FLHQW
products and practices.
Manufactured under license from Dolby Laboratories.
“Dolby” and the double-D symbol are registered trademarks of Dolby Laboratories.
FCC Information
This equipment has been tested and found to comply with the limits for a Class B digital device, pursuant to Part
15 of the FCC Rules. These limits are designed to provide reasonable protection against harmful interference in a
residential installation. This equipment generates, uses, and can radiate radio frequency energy and, if not installed
and used in accordance with the instructions, may cause harmful interference to radio communications. However,
there is no guarantee that interference will not occur in a particular installation. If this equipment does cause harmful
interference to radio or television reception, which can be determined by turning the equipment off and on, the user is
encouraged to try to correct the interference by one or more of the following measures:
5HRULHQWRUUHORFDWHWKHUHFHLYLQJDQWHQQD
,QFUHDVHWKHVHSDUDWLRQEHWZHHQWKHHTXLSPHQWDQGUHFHLYHU
&RQQHFWWKHHTXLSPHQWLQWRDQRXWOHWRQDFLUFXLWGLIIHUHQWIURPWKDWWRZKLFKWKHUHFHLYHULVFRQQHFWHG
&RQVXOWWKHGHDOHURUDQH[SHULHQFHGUDGLR79WHFKQLFLDQIRUKHOS
This Class B digital apparatus complies with Canadian ICES-003.
Please do not send any products to the California address listed in this manual or on the carton. This will only add
delays in service for your product.
This product incorporates HDMI technology.
+'0,WKH+'0,ORJRDQG+LJK'H¿QLWLRQ0XOWLPHGLD,QWHUIDFHDUHWUDGHPDUNVRU
UHJLVWHUHGWUDGHPDUNVRI+'0,/LFHQVLQJ//&