TTI Tech GMRS-1200 2-WAY PORTABLE HANHELD RADIO User Manual Revised to include FCC license info and RF exposure info
TTI Tech Co., Ltd. 2-WAY PORTABLE HANHELD RADIO Revised to include FCC license info and RF exposure info
TTI Tech >
Contents
- 1. User Manual
- 2. Revised user manual to include FCC license info and RF exposure info
- 3. CRN 21965 Revised User Manual
Revised user manual to include FCC license info and RF exposure info
1/16
GMRS-1200
USER MANUAL
2-WAY PORTABLE
HANDHELD
RADIO
NOVEMBER 2, 2001
2/16
FCC License required
This Transceiver is intended for use in the operation of commercial
activities.
The Federal Communications commission (FCC) requires you to be
licensed before you
operate this transceiver. Unless you are already licensed to operate
on one of the preset
frequencies, you must apply for a frequency through the PCIA (Personal
Communication
Industry Association), a non-profit organization that assigns
frequencies nationwide to help
prevent conflicts between different businesses using transceivers in
the same area. For
more information about getting a license, contact the PCIA at 800-759-
0300, extension 3068 (in Virginia 703-739-0300, extension 3068)
For other questions concerning the license application, contact the
FCC at 717-337-1212, or wirte: FCC
P.O.Box 1040
Gettysburg, PA 17325
For the latest FCC application form and instructions, call the FCC’s
fax-on-demand service
at 1-202-418-0177 from a fax machine and request one or more of the
following documents:
All forms and instructions ……………………000600
Form 600 instructions only……………………006001
Main Form 600 only……………………………006002
Form 600 schedules only………………………006003
If you do not have a fax machine, you can call the Government Forms
Distribution Center at
1-800-418-FORM and request that the form and instructions be mailed to
you.
FCC Part 95 Rules
You must be familiar with Part 95 of FCC Rules before you operate your
transceiver. The
operation instructions in this manual conform to Part 95, but do not
cover all items in Part
95.
Overall, Part 95 states that:
! You must have a valid license before you use the transceiver.
! As licensee, you are responsible for proper operation of all
transceivers operating under
your license’s authority.
! You can let unlicensed persons operate transmitter, as long as you
take precautions to
prevent unauthorized transmissions.
! You must use this transceiver only for commercial use of your
business, and only when
other commercial channels (such as the telephone) are either not
available or not
practical.
! You must always yield the operating frequency to communications that
3/16
involve the
safety of life or property.
! You must take reasonable precautions to prevent harmful interference
to other services
operating on the same frequency.
! You must not transmit program material of any kind used in
connection with commercial
broadcasting.
! You must not provide a service that is normally handles by telephone
or telegraph
unless such broadcasts involve the safety of life and property or in
emergencies such
as an earthquake, hurricane, flood or a similar disaster where normal
communications
channels are disrupted.
! During each transmissions or exchange of transmissions, you must
identify your station
with the call sign issued to you by the FCC, or once each 15 minutes
during periods of
continuous operation.
! You must keep a written record of any maintenance or modifications
made to the
transceiver, and you must make this record available for inspection
upon demand by
the FCC.
Violating any of the provisions of Part 95 can result in fines and/or
confiscation of
equipment.
Your transceiver might cause TV or Radio interference even when it is
operating properly.
To determine whether your transceiver is causing the interference,
turn off your transceiver.
If the interference goes away, your transceiver us causing it. Try to
eliminate the
interference by:
! Moving your transceiver away from the receiver
! Contacting your local RadioShack store for help
If you cannot eliminate the interference, the FCC requires that you
stop using your
transceiver.
Before you operate the transceiver, you must obtain your license. It
is illegal to transmit
without the appropriate license, which you can get by submitting a
completed FCC Form
600 to the FCC (or through the PCIA). Furthermore, your are required
to understand Part 95 of the FCC Rules and Regulations prior to
operating your transceiver. It is the user’s
responsibility to see that this unit is operating at all times in
accordance with the FCC Rules
and Regulations.
4/16
Safety Information
Your radio contains a low power transmitter. When the PTT button is pushed it sends out radio frequency
(RF) signals. In August 1996, the FCC adopted RF exposure guidelines
with safety levels for hand-held wireless devices.
Cautions:
• To maintain compliance with the FCC’s RF exposure guidelines, hold the entire radio,
including the antenna, at least 2 inches (5 cm) from your face, with the antenna pointed
up and away from your face.
• If you wear the radio on your body, to maintain compliance with the FCC’s RF
exposure guidelines, you must unclip it from your body before transmitting. Hold the
entire radio, including the antenna, at least 2 inches (5 cm) from your body while
transmitting.
• Use only the supplied antenna. Unauthorized antennas, modifications or attachments
could damage the transmitter and may violate FCC regulations.
5/16
CONTENT
1.
GENERAL
1.1 General
1.2 Characteristic
1.3 Composition
2.
SPECIFICATION
2.1 General Specification
2.2 Electrical Specification
3.
OPERATION
3.1 ICON on LCD
3.2 Key Functions
3.3 Setting and Operation
4.
CHANNEL DATA
1. GENERAL
1.1 GENERAL
This equipment, GMRS-1200 is called 2 way portable handheld radios.
The frequency range is 462MHz, UHF operating Channel for international 2 way
radio. Also it has a 38 CTCSS feature to get the clear communication without
interference.
6/16
1.2 CHARACTERISTIC
a) All active device in this radio is composed of semiconductor and
high density IC.
b) To design this radio in compact and weight approximately 110g with
out battery.
c) CPU of this equipment is H8/3802 from HITACHI
d) It’s power can operate by use of alkaline 4 cell(1.5V AAA) battery.
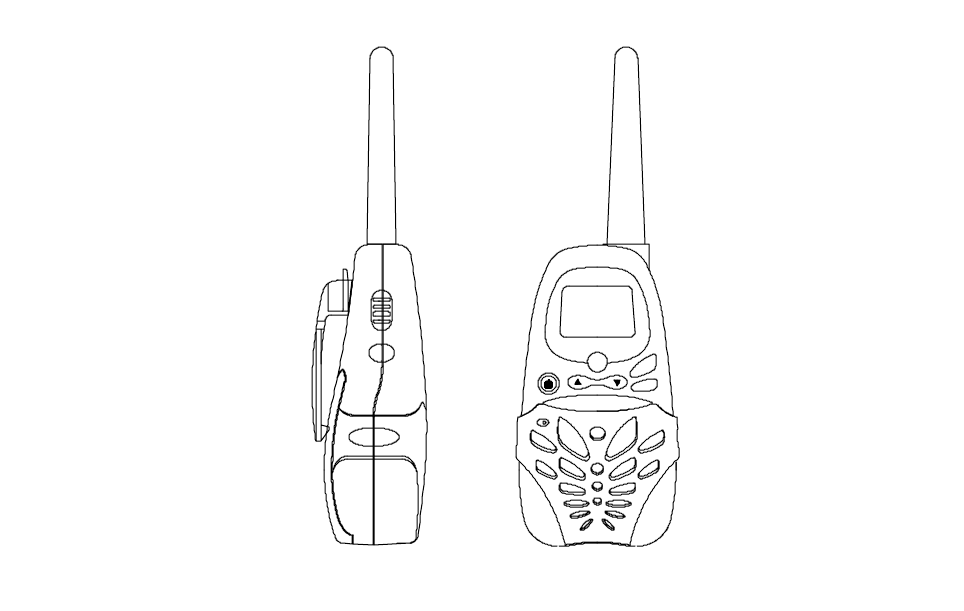
1.3 COMPOSITION
This radio is composed of following.
a) Transceiver (W/Antenna)
b) Belt clip
2. SPECIFICATION
2.1 GENERAL SPECIFICATIONS
a) Frequency range : 462.5625 ~ 462.7250 MHz
b) Communication Mode : Half duplex
c) Channel Capacity : 15 channel
d) Channel Spacing : 12.5 kHz
e) Power : 6.0V(alkaline)
f) Battery Life : Alkaline. 20hours (Tx5%, Rx5%, Stand-by90%)
g) Operating Temperature : -20°C ~ +60°C
h) Dimension : 174(H) x 58(W) x 39(D)
i) Weight : 110g (without battery)
7/16
2.2 ELECTRICAL SPECIFICATION
a) TRANSMITTER
1) Output power : Max . 1.8W
2) Frequency Stability : ± 5 ppm(-20°C ~ +60°C)
3) Modulation Method : FM
4) Oscillation Method : PLL SYNTHESIZER
5) Max. Frequency Deviation : < ± 2.5 kHz (with tone)
6) Cooling Method : air-cooling Method
7) Spurious Emission : < -60dB
8) FM Hum/Noise : > -40dB(1kHz 60% modulation, w/CCITT)
9) Distortion : < 5% (1kHz 60% modulation)
10) Tx Audio Response : 6dB / OCT ± 3dB Pre-Emphasis(300Hz ~ 3kHz)
b) RECEIVER
1) Receiver Method : Double Super Heterodyne
2) Receiver Sensitivity : < 0.28uV(12dB SINAD) : > -118dBm
3) Squelch Sensitivity : -120dBm ~ -130dBm(AUDIO On/Off Point)
4) Bandwidth : > 8kHz (6dB ATT point)
5) Selectivity : < - 60 dB (12.5kHz)
6) Local Frequency Stability : ± 2.5ppm(-30°C ~ +60°C)
7) Spurious Response : > 45 dB
8) Audio output : 200mW (Internal 8Ω load THD 10%)
9) Distortion : < 5% (1kHz 60% Modulation)
10) RxAudio Response : 6dB/OCT +1/-10dB De-Emphasis(300Hz~2.5kHz)
11) S/N Radio : < 40 dB(1kHz 60% Modulation)
12) IF : 1’st IF --- 21.7MHz
2’nd IF --- 450kHz
13) Local Frequency : 1’st Local Frequency --- fc – 21.7MHz
2’nd Local Frequency --- 21.250MHz
3. OPERATION
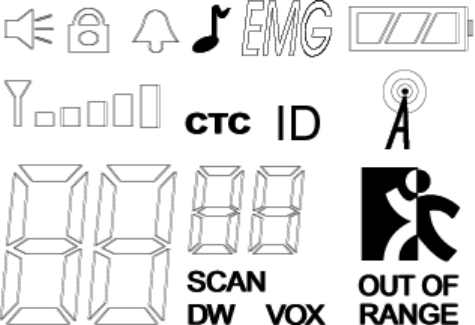
3.1 ICONS on LCD
8/16
1) Monitor indicator : Appears when the CTCSS isn’t in use and squelch is open.
2) Key lock indicator : Indicates that the key lock function is in use.
3) Beep ON/OFF indicator : Appears while key tone is in use.
4) Roger On/Off indicator : Appears while Roger tone is in use.
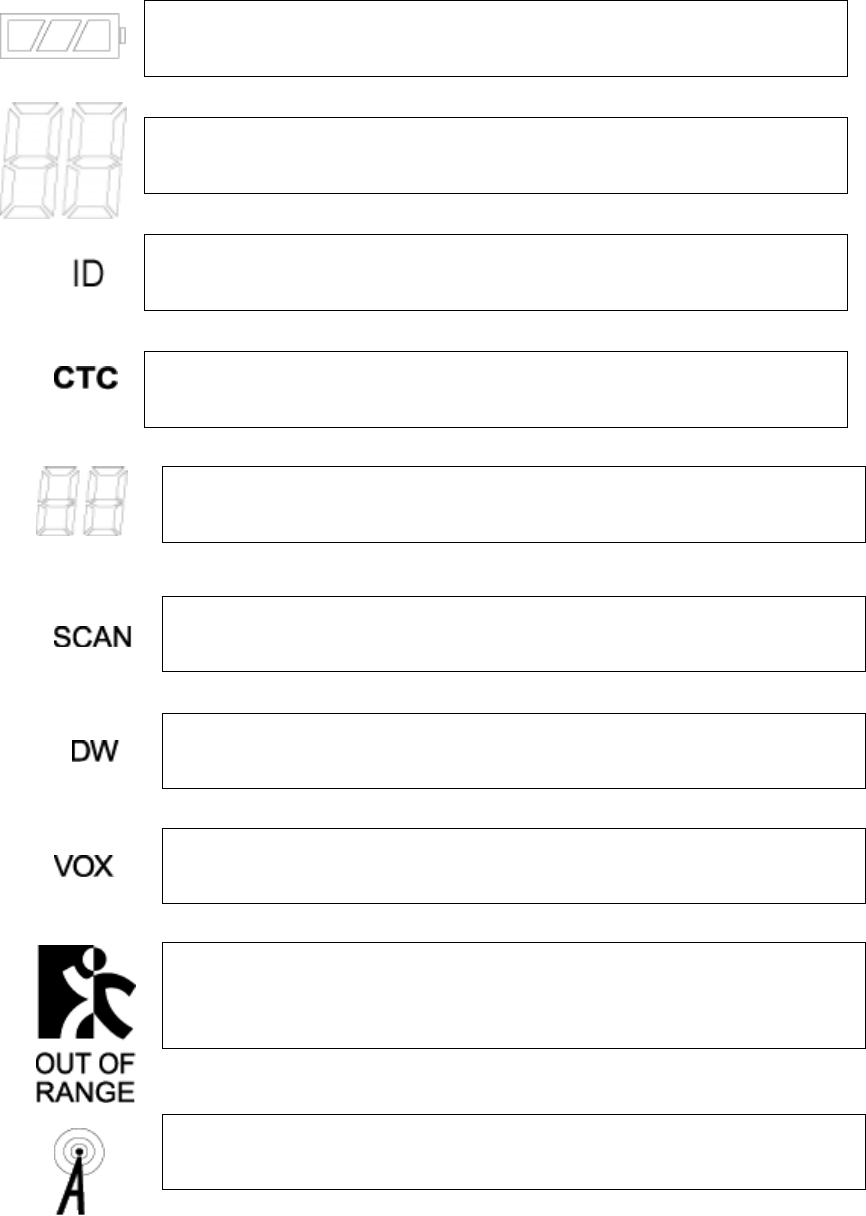
5) Battery indicator : Indicates the battery status
6) Receive signal indicator : Appears when receiving signal or squelch noise is
existing.
7) ID indicator : Appears when the ID function is in use.
8) Weather mode indicator : Icon will be on steady when in the weather band
mode. The Icon will blink in every 2 seconds when in the FRS mode with the
alert active.
9) Channel readout : Shows the current channel number.
10) CTCSS readout : Shows the operating CTCSS frequency or code.
11) SCAN indicator : Indicates that scan is enabled.
12) CTCSS indicator : Appears when the CTCSS function is in use.
13) Dual Watch indicator : Appears when the Dual Watch function is in use.
14) Out Of Range indicator : Appears when the Out Of Range function is in use.
15) VOX (Voice Activated Transmit) Indicator : Turning on the
power while pressing PTT button activates VOX function.
3.2 Key Function
MO DE
SCA N
EMG
1) PTT switch : Push and hold to transmit ; release to receive.

9/16
2) Monitor : Press and hold this key for over 2 seconds to enable the receive
CTCSS feature.
3) Up/Down key : In the stand-by mode, Pressing this button will increment or
decrement the listening volume. When in function edit mode,
this button will be used to adjust the unit settings..
4) Scan / Lock key : Push this key to momentarily to enable or disable the
scan. Press and hold this key for over 2seconds to lock or
unlock keypad.
5) Mode (Function) key : Push to select the following function setting mode.
Brief press mode : 1'st press – Channel ,
2’nd press – CTCSS,
3’rd press – VOX level,
4'th press – Dual Watch Channel,
5’th press – Roger On/Off,
6'th press – Beep On/Off,
7’th press – Out Of Range On/Off,
8’th press – ID,
9’th press – Alert On/Off,
10’th press – Call
6) Speaker / Microphone
7) LCD (Liquid Crystal Display)
8) Transmit / Receive indicator : When receiving an incoming signal, the LED
indicator will light green, and while the PTT
button is pressed, the LED will light red.
These LED’s are used for backlighting as
well.
9)External speaker/mic jacks : Connect an optional speaker/mic or headset,
if desired. The internal mic and speaker will not
function when either is connected.
2) Function display
Monitor Indicator: Icon appears when the monitor button is pressed and the channel
monitor function is activated.
Key Lock Indicator: Icon appears when the keypad is locked. This function
disables keys such as channel up/down and mode.
Signal Strength Indicator: Icon appears when a signal is being received. The Icon
consists of five bars to indicate the received signal level.
Beep Tone Indicator: Icon appears when beep tone confirmation tone is selected.
Icon disappears when tone is off.
Roger Beep Tone On/Off Indicator: Icon appears when the roger beep tone is
selected. Icon disappears when tone is off.
10/16
Battery Level Indicator: Icon indicates the battery charge level.
Large Segment Display: Indicates the channel number in use.
Caller ID Indicator: Icon appears when caller ID function is turned on. Icon
disappears when the function is off. This work with small segment display.
Coded Tone Controlled Squelch System(CTC) Indicator: Icon appears when the
CTCSS tone function is active.
Small Segment Display: Displays CTCSS tone option in the channel from 00 to 38,
and also displays the caller ID number(01–10) when caller ID function is active.
Scan Indicator: This function allows users to scan a channel to search for a valid
signal.
Dual Watch mode Indicator: Icon appears when dual watch mode is active.
Voice Activated Transmission (VOX) Indicator: This function allows handsfree
conversation. The Icon appears when the VOX mode is activated.
Out of Range Alarm Indicator: When this function is active, Icon blinks the
receiving signal is getting weaker. The Icon stops blinking when the receiving
signal comes back to the normal strength.
Weather Mode Indicator: Icon will be on steady when in the weather band mode.
The icon will blink when in the GMRS mode with the alert active.
11/16
3-3. SETTING AND OPERATION
In order to communicate with other GMRS/FRS units, both you and the
receiving party must be on the same channel.
GMRS-1200 has 15channels indicated by the large digits on the
LCD display panel. Before trying to transmit on the selected channel,
you should press the Monitor Button to check the activity on that channel.
If someone is already on the selected channel, you should try another
channel that is clear
1) On/Off & Volume control Switch
Radio ON : Press the power button at least for 2 seconds.You will hear
confirming melody to indicated the unit is on.
Radio OFF : Press the power button at least for 2 seconds.
Volume setting : Press up[″]or down[…] button to adjust a level that is
comfortable for you while monitor is active.
2) Setting the Channel and Tone Code(CTCSS)
GMRS-1200 has 15 main channels and 38 sub-channels.
* 14 Frequency channels
* 38 CTCSS Code ( indicated by CTC icon on the LCD )
To select the channel
* Turn the radio on.
* Press MODE button once, [XX] digit will blink on the LCD. XX is a
channel.
* Press up[″]or down[…] button to choose the channel.
* Press the PTT button or MODE button to confirm.
To set the tone codes(CTCSS)
* Press MODE button once more, [XX 00 up to 38] will appear and CTC icon
and tone code digit will blink on the LCD. “00” means no CTCSS code.
* Press up[″]or down[…] button to choose the desired sub-channel to use.
* Press the PTT button or MODE button to confirm.
NOTE : To communicate with other GMRS/FRS units, they must
be switched to the same channel and CTCSS sub-code. To
communicate with other GMRS/FRS units that do not have sub-codes,
switch your unit to the same channel with the sub-code set to OFF.
3) VOX (Voice Operated Switching)
This option enables you to have hands-free conversation. You do not have to
operate the PTT button each time when you want to transmit.
You can also choose the VOX sensitivity so suit your environment of
operation.
12/16
( Ex : noisy road, motor bike, factory etc. )
To Set the VOX mode
* Press the MODE button until the [Uo oF Or XX] appears. XX is a vox level
* VOX icon will be appeared on the LCD.
To Set the VOX level
* Press the up[″]or down[…] button to set the VOX level from 1 to 5.
“oF” is disable the VOX function.
“01” is least sensitive.
“05” is most sensitive.
* Press the PTT button or MODE button to confirm.
4) Setting the DW (dual watch)
To set the DW mode
* Press the MODE button until the [ oF of 01 up to 15] and DW icon blink on
the LCD.
* DW icon will appear on the LCD.
To set the dual watch(DW) channel
* Press the up[″]or down[…] button to choose the channel.
“oF” means no DW mode.
“01 up to 15” means the channel that is dual-watched.
* Press the PTT button or MODE button to confirm.
5) Roger tone
This feature will give the tone signal to other parties when transmitting finished
(when PTT button is released.)
To activate or disable the Roger tone
* Press the Mode button until [rb on or oF] and the roger icon blink on the
LCD.
* Press the up[″]or down[…] button.
* Press the PTT button or MODE button to confirm.
6) Beep tone
To set the beep tone
* Press the Mode button until [bP on or oF] and the BELL icon blink on the
LCD.
* Press the up[″]or down[…] button.
* Press the PTT button or MODE button to confirm.
7) Setting Out of Range
13/16
To set the Out of Range
* Press the Mode button until [ir on or oF] and the Out of Range icon blink
on the LCD.
* Press the up[″]or down[…] button.
* Press the PTT button or MODE button to confirm.
8) Setting ID code
To set the Caller ID
! Press the MODE button until the ID Icon and small segment display blinks.
! Then press the Up or Down button to select the desired ID number from 01
to 10. “oF” means no ID mode.
! Press the PTT button or Mode button momentarily to confirm the ID
number.
** When a signal is received from the radio where the one Caller ID is
selected, the radio that is receiving the signal displays the Caller ID number of
the transmitting radio.
9) Weather alert setting
To set the Weather alert receiving mode
* Press the MODE button until the [AL on or oF] blinks
* Press the up[″]button or down […]button to set the alert function.
* While the alert is ON, weather icon will blink both in FRS and weather
mode.
* Weather icon will stop the blinking on the LCD when the alert is OFF.
** While the unit is GMRS/FRS mode, if the alert signal is received, the unit
will set to Weather Radio mode automatically and warning beep tone will
generate.
** While the unit is in Weather mode, if the alert signal is received, the unit
will generate the warning beep tone.
10) Call Ringer Selection Mode
This feature Provides 3 user selectable call ringer signal.
To set your favorite call ringer signal.
* Press the MODE button until the [C 01 or up to 03] appears on the LCD.
* Press the up[″]or down[…] button to select the call melody type.
* Press the PTT button to confirm.
* To activate the call, click the “PTT” button twice quickly.
11) Transmitting
* Press and hold the PTT button (The LED light red during transmission.)
* Speak slowly and clearly
* To Stop the transmission, release the PTT button.
14/16
* if there are no more receiving signal for 5 seconds, the unit will go into
power save mode.
12) Receiving
The Coding feature reduces the possibility of interference and provide
enhanced Communication. You can only listen to a call that has correct
matching code.
** Upon receiving a signal, the LED lights green. When radio is on CTCSS mode
and then a signal that has different CTCSS code on the same channel is received, the
LED blinks in green.
Important :
Before transmitting or receiving to the other parties
* Correct channel is selected (1 to 15) and
* Correct code is set ( 00 to 38 )
13) Channel Scanning
This feature allows you to monitor all activated channels while scanning.
To activate the Scan
* Press the SCAN button
* Radio will begin scanning.
* When in scan mode, the display will show each scanning channel.
* After an activated channel is scanned and received signal and then if there is
no more signal, the scan will resume automatically
** Once a channel has been scanned, pushing the monitor button makes the
radio resume the scanning with the scanned channel skipped.
14) Call
* Click the PTT button twice quickly.
15) Monitoring the Channel
It is used for listening the week signal or to here all activities on the channel by
Manually overriding channel sub tone code setting.
To activate the monitor feature
* Press and hold the “MON”(monitor) button for over two seconds.
* When you hear the sound, release the “MON” button.
( The monitor icon will appear on the LCD.)
To disable the monitor feature
* Press and hold the “MON”(monitor) button for over two seconds.
( The monitor icon will disappear on the LCD.)
16) Keypad Lock

15/16
The lock function is to avoid the accidental changes to channel with other radio
settings. All buttons will be locked except the Power, PTT, Monitor, Charger
and Volume UP/Down.
To lock the keypad
* Press and hold the “SCAN” button for over two seconds.
* Keypad will lock. (LOCK icon will appear on the LCD)
To disable the monitor feature
* Press and hold the “SCAN” button for over two seconds.
* Keypad will unlock. (LOCK icon will disappear on the LCD)
17) Battery status indicator
The Battery icon will blink when the radio is in low battery power.
Charge the rechargeable battery or replace the batteries.
* Full battery – three segments are displayed.
* Low battery – one segments is displayed
* Low battery Warning – one segments will blinking.
4. CHANNEL DATA
1) FRS Frequency Chart
Channel Frequency (MHz) Channel Frequency (MHz)
1 462.5625 8 462.5750
2 462.5875 9 462.6250
3 462.6125 10 462.6750
4 462.6375 11 462.5500

16/16
5 462.6625 12 462.6000
6 462.6875 13 462.6500
7 462.7125 14 462.7000
15 462.7250
2) CTCSS Tone Frequency Chart
NO FREQ.(Hz) NO FREQ. (Hz) NO FREQ. (Hz)
1 67.0 14 107.2 27 167.9
2 71.9 15 110.9 28 186.2
3 74.4 16 114.8 29 179.9
4 77.0 17 118.8 30 186.2
5 79.7 18 123.0 31 192.8
6 82.5 19 127.3 32 203.5
7 85.4 20 131.8 33 210.7
8 88.5 21 136.5 34 218.1
9 91.5 22 141.3 35 225.7
10 94.8 23 146.2 36 233.6
11 97.4 24 151.4 37 241.8
12 100.0 25 156.7 38 250.3
13 103.5 26 162.2 OF 0