TTI Tech GMRS-3000 FRS/GMRS Combination Transceiver User Manual Manual
TTI Tech Co., Ltd. FRS/GMRS Combination Transceiver Manual
TTI Tech >
users manual
3. OPERATION
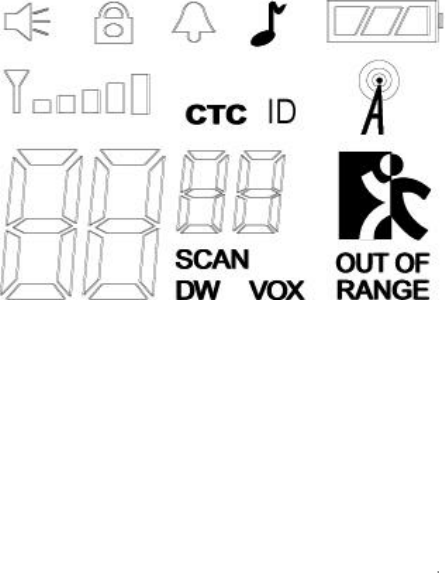
3.1 ICONS on LCD
1) Monitor indicator : Appears when the CTCSS isn’t in use and squelch is open.
2) Key lock indicator : Indicates that the key lock function is in use.
3) Beep ON/OFF indicator : Appears while key tone is in use.
4) Roger On/Off indicator : Appears while Roger tone is in use.
5) Battery indicator : Indicates the battery status
6) Receive signal indicator : Appears when receiving signal or squelch noise is
existing.
7) ID indicator : Appears when the ID function is in use.
8) Weather mode indicator : Icon will be on steady when in the weather band
mode. The Icon will blink in every 2 seconds when in the FRS mode with the
alert active.
9) Channel readout : Shows the current channel number.
10) CTCSS readout : Shows the operating CTCSS frequency or code.
11) SCAN indicator : Indicates that scan is enabled.
12) CTCSS indicator : Appears when the CTCSS function is in use.
13) Dual Watch indicator : Appears when the Dual Watch function is in use.
14) Out Of Range indicator : Appears when the Out Of Range function is in use.
15) VOX (Voice Activated Transmit) Indicator : Turning on the
power while pressing PTT button activates VOX function.
3.2 Key Function
1) PTT switch : Push and hold to transmit ; release to receive.
2) Monitor/EMG : Press and hold this key for over 0.5seconds to enable the receive
CTCSS feature. Long press EMG
3) Up/Down key : In the stand-by mode, Pressing this button will increment or
decrement the listening volume. When in function edit mode,
this button will be used to adjust the unit.
4) Scan / Lock key : Push this key to momentarily to enable or disable the
scan. Press and hold this key for over 2seconds to lock or
unlock keypad.
5) Charger key : This base station is set up in charge protection mode to prevent
Alkaline batteries in the handset from being charged by mistake.
Once the charger key is pressed, this radio begins to charge the
Ni-MH batteries in the handset. When the button is pressed once
again, the batteries is not charged anymore.
6) Mode (Function) key : Push to select the following function setting mode.
Brief press mode : 1'st press – Channel ,
2’nd press – CTCSS,
3’rd press – Power Hi/Low,
4'th press – VOX Level,
5’th press – Dual Watch Channel,
6'th press – Roger On/Off,
7’th press – Beep On/Off,
8’th press – ID,
9’th press – Call,
Long press mode : The radio goes to weather radio.
8) Speaker / Microphone
9) External DC power jack : 9V DC adaptor should be used for power supply
10) HAND Chager Teminal : This is used for charging handset batteries.
11) LCD (Liquid Crystal Display)
12) Transmit / Receive indicator : When receiving an incoming signal, the LED
indicator will light green, and while the PTT
button is pressed, the LED will light red.
These LED’s are used for backlighting as
well.
13) External speaker/mic Jacks : Connect an optional speaker/mic or headset,
if desird. The internal mic and speaker will
not function when either one is connected.
3.3 Function display
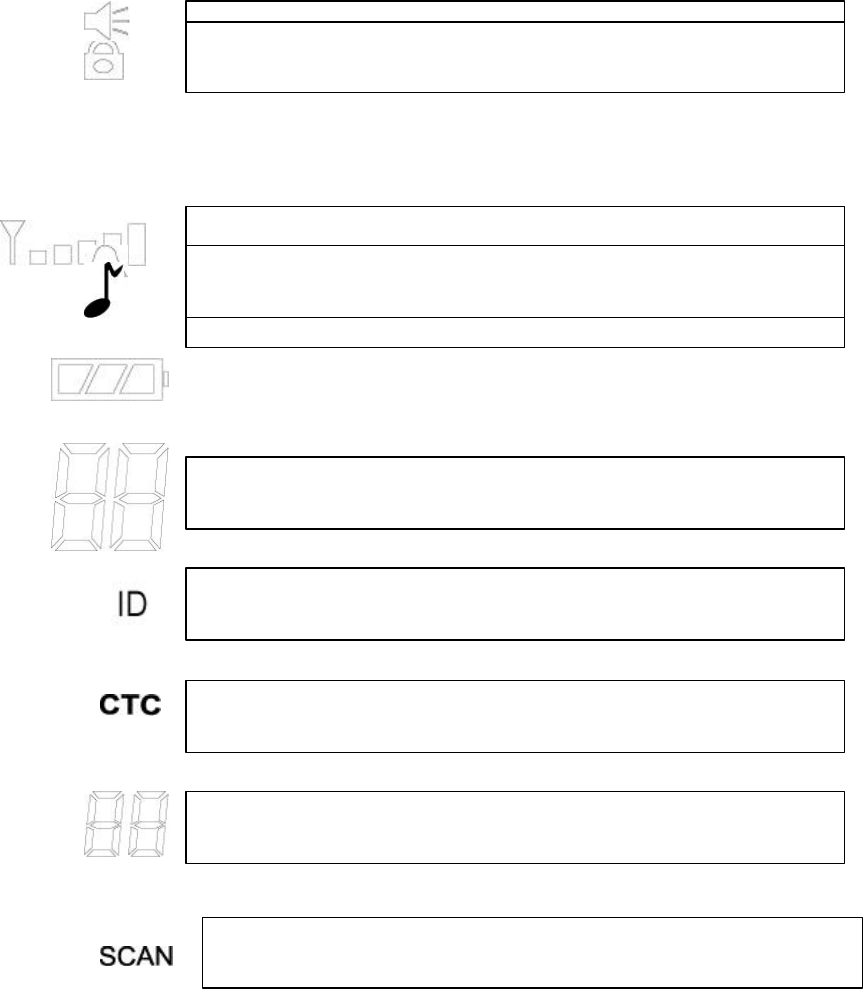
Monitor Indicator: Icon appears when the monitor button is pressed and the channel
monitor function is activated.
Key Lock Indicator: Icon appears when the keypad is locked. This function
disables keys such as channel up/down and mode.
Signal Strength Indicator: Icon appears when a signal is being received. The Icon
consists of five bars to indicate the received signal level.
Beep Tone Indicator: Icon appears when beep tone confirmation tone is selected.
Icon disappears when tone is off.
Roger Beep Tone On/Off Indicator: Icon appears when the roger beep tone is
selected. Icon disappears when tone is off.
Battery Level Indicator: Icon indicates the battery charge level.
Large Segment Display: Indicates the channel number in use.
Caller ID Indicator: Icon appears when caller ID function is turned on. Icon
disappears when the function is off. This works with small segment display.
Coded Tone Controlled Squelch System(CTC) Indicator: Icon appears when the
CTCSS tone function is active.
Small Segment Display: Displays CTCSS tone option in the channel from 00 to 38,
and also displays the caller ID number(01–10) when caller ID function is active.
Scan Ind
icator: This function allows users to scan a channel to search for a valid
signal.
3.4 SETTING AND OPERATION
In order to communicate with other GMRS/FRS units, both you and the
receiving party must be on the same channel.
GMRS-3000PK has 22channels indicated by the large digits on the
LCD display panel. Before trying to transmit on the selected channel,
you should press the Monitor Button to check the activity on that channel.
If someone is already on the selected channel, you should try another
channel that is clear
1) On/Off & Volume control Switch
Radio ON : Press the power button at least for 2 seconds.You will hear
confirming melody to indicated the unit is on.
Radio OFF : Press the power button at least for 2 seconds.
Volume setting : Press up[ù] or down[ü] button to adjust a level that is most
comfortable for you while monitor is active.
2) Setting the Channel and Tone Code(CTCSS)
GMRS-3000PK has 22 main channels and 38 sub-channels.
* 22 Frequency channels
* 38 CTCSS Code ( indicated by CTC icon on the LCD )
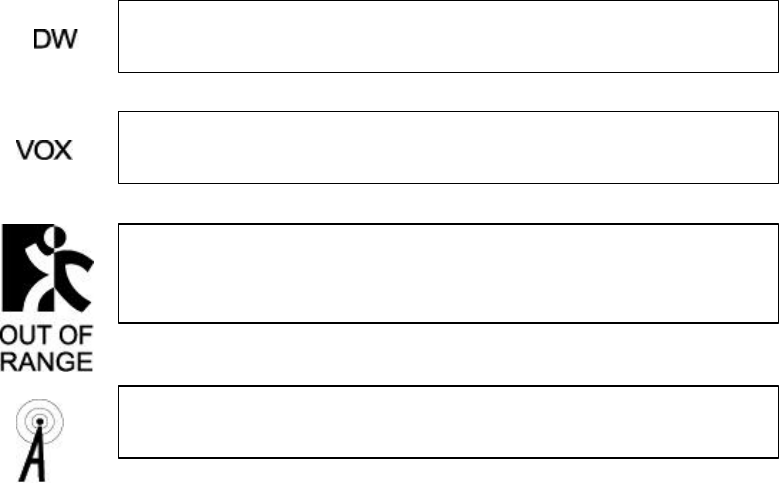
Dual Watch mode Indicator: Icon appears when dual watch mode is active.
Voice
Activated Transmission (VOX) Indicator: This function allows handsfree
conversation. The Icon appears when the VOX mode is activated.
Out of Range Alarm Indicator: When this function is active, Icon blinks the
receiving signal is getting weaker. The Ico
n stops blinking when the receiving
signal comes back to the normal strength.
Weather Mode Indicator: Icon will be on steady when in the weather band mode.
The icon will blink when in the GMRS mode with the alert active.
To select the channel
* Turn the radio on.
* Press MODE button once, [XX] digit will blink on the LCD. XX is a channel.
* Press up[ù] or down[ü]button to choose the channel.
* Press the PTT button or MODE button to confirm.
To set the tone codes(CTCSS)
* Press MODE button once more, [XX 00 up to 38] will appear and CTC icon
and tone code digit will blink on the LCD. “00” means no CTCSS code.
* Press up[ù] or down[ü]button to choose the desired sub-channel to use.
* Press the PTT button or MODE button to confirm.
NOTE : To communicate with other GMRS/ FRS units, they must be switched to
the same channel and CTCSS sub-code. To communicate
with other GMRS/FRS units that do not have sub-codes, switch your unit
to the same channel with the sub-code set to OFF.
3) Setting the Transmit Power HI/LO
To Set the Tx output power
* Press the MODE button until the [Po Lo/Hi] appears.
* Press the up[ù] or down[ü]button to set the Tx Power.
* Press the PTT button or MODE button to confirm.
4) VOX (Voice Operated Switching)
This option enables you to have hands-free conversation. You do not have to
operate the PTT button each time when you want to transmit.
You can also choose the VOX sensitivity so suit your environment of operation.
( Ex : noisy road, motor bike, factory etc. )
To Set the VO X mode
* Press the MODE button until the [Uo oF Or XX] appears. XX is a vox level
* VOX icon will be appeared on the LCD.
To Set the VOX level
* Press the up[ù]button or down [ü] button to set the VOX level from 1 to 5.
“oF” is disable the VOX function.
“01” is least sensitive.
“05” is most sensitive.
* Press the PTT button or MODE button to confirm.
5) Setting the DW (dual watch)
To set the DW mode
* Press the MODE button until the [ oF of 01 up to 22] and DW icon blink on
the LCD.
* DW icon will appear on the LCD.
To set the dual watch(DW) channel
* Press the up[ù]button or down [ü]button to choose the channel.
“oF” means no DW mode.
“01 up to 22” means the channel that is dual-watched.
* Press the PTT button or MODE button to confirm.
6) Roger tone
This feature will give the tone signal to other parties when transmitting finished
(when PTT button is released.)
To activate or disable the Roger tone
* Press the Mode button until [rb on or oF] and the roger icon blink on the
LCD.
* Press the up[ù]button or down [ü]button.
* Press the PTT button or MODE button to confirm.
7) Beep tone
To set the beep tone
* Press the Mode button until [bP on or oF] and the BELL icon blink on the
LCD.
* Press the up[ù]button or down[ü] button.
* Press the PTT button or MODE button to confirm.
8) Setting ID code
To set the Caller ID
* Press the MODE button until the ID Icon and small segment display blinks.
* Then press the Up or Down button to select the desired ID number from 01 to
10. “oF” means no ID mode.
* Press the PTT button or Mode button momentarily to confirm the ID number.
** When a signal is received from the radio where the one Caller ID is selected,
the radio that is receiving the signal displays the Caller ID number of the
transmitting radio.
9) Weather alert setting
To set the Weather alert receiving mode
* Press the MODE button until the [AL on or oF] blinks
* Press the up[ù]button or down [ü]button to set the alert function.
* While the alert is ON, weather icon will blink both in FRS and weather
mode.
* Weather icon will stop the blinking on the LCD when the alert is OFF.
** While the unit is FRS mode, if the alert signal is received, the unit will set to
Weather Radio mode automatically and warning beep tone will generate.
** While the unit is in Weather mode, if the alert signal is received, the unit will
generate the warning beep tone.
10) Call Ringer Selection Mode
This feature Provides 3 user selectable call ringer signal.
To set your favorite call ringer signal.
* Press the MODE button until the [C 01 or up to 03] appears on the LCD.
* Press the up[ù]button or down [ü]button to select the call melody type.
* Press the PTT button to confirm.
* To activate the call, click the “PTT” button twice quickly.
11) Transmitting
* Press and hold the PTT button (The LED on the right lights red during
transmission.)
* Speak slowly and clearly
* To Stop the transmission, release the PTT button.
* if there are no more receiving signal for 5 seconds, the unit will go into
power save mode.
12) Receiving
The Coding feature reduce the possibility of interference and provide enhanced
Communication. You can only listen to a call that has correct matching code.
** Upon receiving a signal, the LED lights green. When radio is on CTCSS
mode and then a signal that has different CTCSS code on the same channel is
received, the LED blinks in green.
Important :
Before transmitting or receiving to the other parties
* Correct channel is selected (1 to 22) and
* Correct code is set ( 00 to 38 )
13) Channel Scanning
This feature allows you to monitor all activated channels while scanning.
To activate the Scan
* Press the SCAN button
* Radio will begin scanning.
* When in scan mode, the display will show each scanning channel.
* After an activated channel is scaned and received signal and then if there is
no more signal, the scan will resume automatically
** Once a channel has been scanned, pushing the monitor button makes the
radio resume the scanning with the scanned channel skipped.
14) Call
* Click the PTT button twice quickly.
15) Monitoring the Channel
It is used for listening the week signal or to here all activities on the channel by
Manually overriding channel sub tone code setting.
To activate the monitor feature
* Press and hold the “MON”(monitor) button for over two seconds.
* When you hear the sound, release the “MON” button.
( The monitor icon will appear on the LCD.)
To disable the monitor feature
* Press and hold the “MON”(monitor) button for over two seconds.
( The monitor icon will disappear on the LCD.)
16) Keypad Lock
The lock function is to avoid the accidental changes to channel with other radio
settings. All buttons will be locked except the Power, PTT, Monitor, Charger
and Volume UP/Down.
To lock the keypad
* Press and hold the “SCAN” button for over two seconds.
* Keypad will lock. (LOCK icon will appear on the LCD)
To disable the monitor feature
* Press and hold the “SCAN” button for over two seconds.
* Keypad will unlock. (LOCK icon will disappear on the LCD)
17) Battery status indicator
The Battery icon will blink when the radio is in low battery power.
Charge the rechargeable battery or replace the batteries.
* Full battery – three segments are displayed.
* Low battery – one segments is displayed
* Low battery Warning – one segments will brinking.
4. ADJUSTMENT
4-1. Frequency synthesizer
a) After connecting the power meter and dummy load(50 ohm), join the
antenna connector of GMRS-3000PK with above equipment.
b) Check the voltage between RF BOARD BT POINT & GND in digital volt
meter
c) Then set the low channel of GMRS-3000PK the lowest frequency.

tti….
Trident Technology
International Ltd.
Room 402, Eundo Bldg.
737 -19, Banpo-1 dong,
Seocho-ku, Seoul, Korea
137 -041
(T) +82 2 518 2417/8
(F) +82 2 518 2419
[RF EXPOSURE STATEMENT : PDHGMRS-3000 / TTI TECH CO., LTD.]
- CAUTION! -
IMPORTANT SAFETY INFORMATION
Your wireless transceiver contains a radio frequency transmitter. When the PTT
button is pushed the transmitter sends out RF signals.
CAUTION: To comply with FCC RF exposure compliance requirements, a separation
distance of at least 8 inches (20 cm) must be maintained between the antenna of this
transmitter and all persons, during normal operation. The antenna used for this
transmitter must not be co-located or operating in conjunction with any other antenna or
transmitter. Unauthorized antennas, modifications, or attachments could damage the
transceiver and may violate FCC regulations.
CAUTION: DO NOT transmit for more than 50% of total radio use time (50% duty
cycle). Transmitting more than 50% of the time can cause FCC RF exposure
compliance requirements to be exceeded.
Failure to observe these restrictions is in violation with the FCC rules.
GMRS License :
Use of GMRS radios within the United States requires a FCC GMRS license. An
individual 18 years of age or older, who is not a representative of a foreign government
is eligible to apply for a GMRS system license. You will need two forms from the FCC,
FCC Form 159 and FCC Form 605 Main Form and Schedule F. You can find the
forms online at http://www.fcc.gov/formpage.html, or call 1-800-418-3676.