TTI Tech GMRSWP1 FRS/GMRS Combination User Manual TMR 300 PMR
TTI Tech Co., Ltd. FRS/GMRS Combination TMR 300 PMR
TTI Tech >
users manual
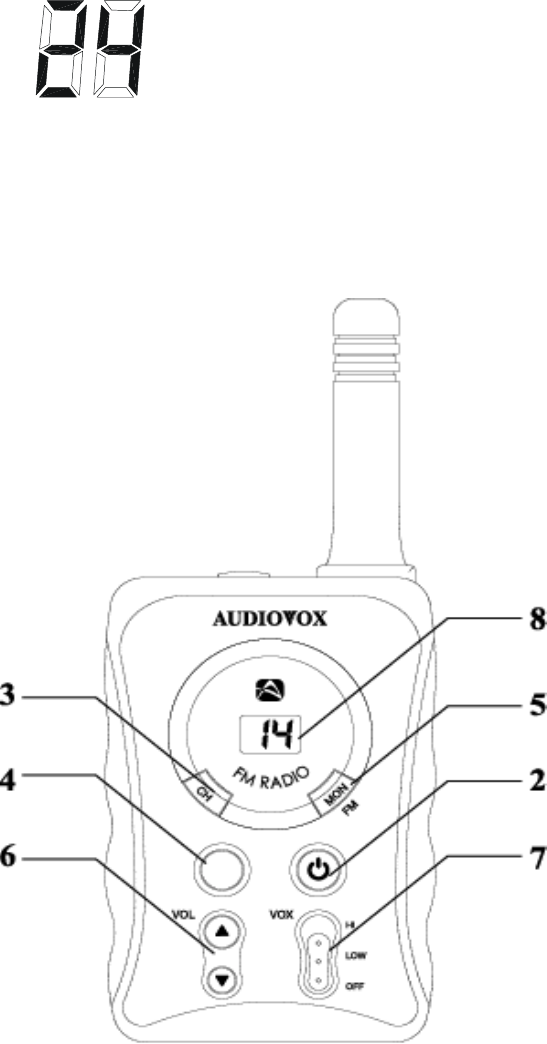
3. OPERATION
3.1 ICONS on LCD
- Channel readout : Shows the current channel number.
3.2 Key Function
1) PTT switch : Push and hold to transmit ; release to receive.
2) Power Key : Turn on or off the Power
3) Channel Key : After pressing the Channel Key, the 2 Way Radio frequency
channel can be changed by pressing the Up/Down Key. In a FM Radio Mode,
the Channel Key is used as the FM frequency seek function.
4) Call Key : A call signal is transmitted by pressing the Call Key.
5) Monitor Key : This Key is used as a Squelch On/Off function when pressed
short, and as a conversion Key of 2 Way Radio and FM Radio mode when
pressed long.
6) Up/Down Key
: Normally the Key is used to adjust the volume but this key is
also used when setting a function.
7) Vox Level Switch : By pressing the Switch, a Vox Level ( High/Low/Off )
can be selected.
8) LCD (Liquid Crystal Display) : On the LCD, a Channel of the Radio is
displayed.
9) Transmit indicator : When transmitting signals, a red light appears on the
LCD.
3-3. SETTING AND OPERATION
In order to communicate with other GMRS/FRS units, both you and the
receiving party must be on the same channel.
GMRSWP1 has 22channels indicated by the large digits on the
LCD display panel. Before trying to transmit on the selected channel,
you should press the Monitor Button to check the activity on that channel.
If someone is already on the selected channel, you should try another
channel that is clear
1) On/Off & Volume control Switch
Radio ON : Press the power button at least for 2 seconds.You will hear
confirming melody to indicated the unit is on.
Radio OFF : Press the power button at least for 2 seconds.
Volume setting : Press up[▲] or down[▼] button to adjust a level that is most
comfortable for you while monitor is active.
2) Setting the Channel
GMRSWP1 has 22 main channels
* 22 Frequency channels ( indicated by CTC icon on the LCD )
To select the channel
* Turn the radio on.
* Press Channel button once, [XX] digit will blink on the LCD. XX is a channel.
* Press up[▲] or down[▼] button to choose the channel.
* Press the PTT button or Channel button to confirm.
3) VOX (Voice Operated Switching)
You do not have to operate the PTT button each time when you want to
transmit. You can also choose the VOX sensitivity so suit your environment of
operation.
( Ex : noisy road, motor bike, factory etc. )
To Set the VOX level
Vox Level can be selected by the Vox Level Switch.
“Off” means that the Vox function is disabled.
“ High” means that the Vox sensitivity is high.
“ Low” means that the Vox sensitivity is Low.
4) Call
* Click the PTT button.
5) Monitoring the Channel
It is used for listening the week signal or to here all activities on the channel by
Manually overriding channel sub tone code setting.
To activate the monitor feature
* Press and hold the “MON”(mointor) button quickly
* When you hear the sound, release the “MON” button.
To disable the monitor feature
* Press and hold the “MON”(mointor) button quickly
6) Setting FM Radio Mode
2 Way Radio mode can be converted to FM Radio Mode and at a FM Radio
Mode, when the 2 Way Radio signal comes in, the FM Radio Mode is
converted to 2 Way Radio Mode. If there is no more signal coming at a 2 Way
Radio Mode, the Radio gets back to the FM Radio Mode.
To activate the FM Radio Mode
By pressing the Monitor Button long, the 2 Way Radio Mode can be converted
to FM Radio Mode. To get back to the 2 Way Radio Mode from FM Radio
Mode, the Monitor button should be pressed long one more time.
7) FM Radio Frequency Scanning
With the Frequency Scanning, a frequency of FM Radio can be selected. By
pressing the scanning button, a desirable frequency can be chosen.
To activate the Scan
* Set the FM Radio Mode by pressing the Monitor Button long.
* Scanning is initiated when the Channel Button is pressed.
* If the Channel Button is pressed after a FM frequency was selected by
scanning, the selected FM frequency is skipped and the scanning resumes.
8) Receiving
The Coding feature reduce the possibility of interference and provide enhanced
Communication. You can only listen to a call that has correct matching code.
Important :
Before transmitting or receiving to the other parties
* Correct channel is selected (1 to 22)
9) Transmitting
* Press and hold the PTT button
* Speak slowly and clearly
* To Stop the transmisstion, release the PTT button.
* if there are no more receiving signal for 5 seconds, the unit will go into
power save mode.

[RF EXPOSURE STATEMENT : PDHGMRSWP1 / TTI TECH CO., LTD.]
- CAUTION! -
IMPORTANT SAFETY INFORMATION
Your wireless hand-held portable transceiver contains a radio frequency
transmitter. When the PTT button is pushed, the transmitter sends out RF
signals. The device is authorized to operate at a transmit duty factor not
exceeding 50% using alkaline “AAA” size batteries to comply with Federal
Communications Commissions (FCC) RF exposure safety level guidelines for
hand-held wireless devices.
This device has been tested for SAR (SPECIFIC ABSORBTION RATE) and has
been found to meet the requirements for body-worn transceiver. If you wear
the radio, always use the manufacturer-supplied belt clip. Use of non-
manufacturer-approved accessories may exceed the FCC RF exposure
guidelines.
Unauthorized antennas, modifications, or attachments could damage the
transceiver and may violate FCC regulations.
GMRS License :
Use of GRMS radios within the United States requires a FCC GMRS license.
An individual of 18 years of age or older, who is not a representative of a foreign
government is eligible to apply for a GMRS system license. You will need two
forms from the FCC - FCC FORM 159 and FCC Form 605 Main Form and
Schedule F.
You can find the forms online at http://www.fcc.gov/formpage.html or call 1-800-
418-3676.