TZ MEDICAL TZMR AERA CT MOBILE CARDIAC MONITOR User Manual
TZ MEDICAL INC AERA CT MOBILE CARDIAC MONITOR Users Manual
Users Manual
Revision 0.3
Document No. 11573
Page 1
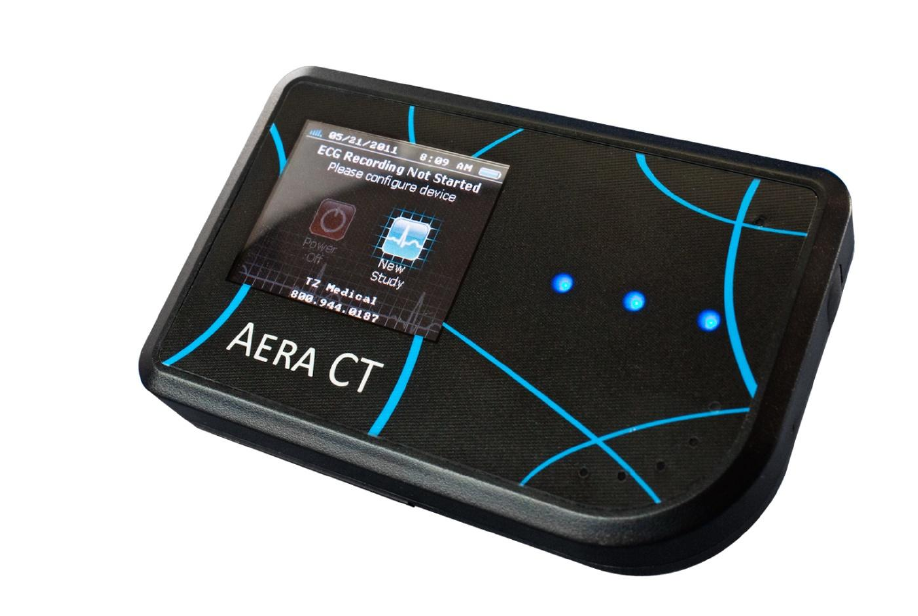
Aera CT
Mobile Cardiac Monitor
Operator Manual

Revision 0.3
Document No. 11573
Page 2
Contents
Device Overview ........................................................................................................................................................3
Description .......................................................................................................................................................................... 3
Indications for Use .............................................................................................................................................................. 4
Contraindications ................................................................................................................................................................ 4
Recorder Components ........................................................................................................................................................ 5
Equipment Symbols ............................................................................................................................................................ 7
Precautions ......................................................................................................................................................................... 8
Operation ..................................................................................................................................................................9
Initial Device Setup ............................................................................................................................................................. 9
User Interface ................................................................................................................................................................... 10
Starting a Study ................................................................................................................................................................. 11
Monitoring a Study ........................................................................................................................................................... 16
Ending a Study ................................................................................................................................................................... 18
Electrode Application ........................................................................................................................................................ 21
Patient Use Precautions .................................................................................................................................................... 23
Maintenance ........................................................................................................................................................... 24
Charging ............................................................................................................................................................................ 24
Storage .............................................................................................................................................................................. 24
Cleaning ............................................................................................................................................................................. 26
Testing ............................................................................................................................................................................... 26
Troubleshooting ...................................................................................................................................................... 27
Error Messages.................................................................................................................................................................. 27
Server Errors ..................................................................................................................................................................... 28
Wireless Compliance ................................................................................................................................................ 29
Specifications ........................................................................................................................................................... 31
TZ Medical Warranty ................................................................................................................................................ 33
Limited Warranty ..................................................................................................................................................... 33
Obtaining Warranty Service ..................................................................................................................................... 33
Accessories .............................................................................................................................................................. 34

Revision 0.3
Document No. 11573
Page 3
Device Overview
Description
Caution: US Federal law restricts this device to sale by or on the order of a physician.
The Aera CT is a battery operated ambulatory electrocardiograph recorder for use in mobile cardiovascular
telemetry. It is capable of storing 3 channels of patient ECG data acquired from three or five surface electrodes
adhered to the body for over 28 days of continuous recording. The Aera CT employs a rechargeable Lithium-
Ion battery to achieve such an extended recording duration.
The Aera CT provides the ability to automatically detect and record pacemaker pulses as well as several
common arrhythmias in accordance with the applicable standards of the Association for the Advancement of
Medical Instrumentation (AAMI).
The Aera CT contains an internal cellular modem to allow access to the patient ECG data and analysis results.
Any piece of data recorded on the device may be queried wirelessly during the course of the study. Additionally,
data transmissions may be triggered automatically or manually as a result of arrhythmia analysis, or manual
patient input, respectively.
The Aera CT provides a multitude of options to control recording parameters such as bit resolution, sampling
rate, and frequency response as well as analysis parameters such as heart rate thresholds. These settings may
be updated wirelessly during the course of a study to allow the device to dynamically adapt to the needs of the
operator.
The Aera CT does not provide interpretive or diagnostic statements. Interpretation and diagnosis are the
responsibilities of a trained healthcare professional or physician.

Revision 0.3
Document No. 11573
Page 4
Device Overview
Indications for Use
The Aera CT is intended for acquiring ambulatory ECG signals from patients who either are at risk of
having cardiac disease or have intermittent symptoms indicative of cardiac disease and who have
demonstrated a need to be monitored on a continuing basis.
Indications for conducting ambulatory recording include:
Patients requiring monitoring for non life-threatening arrhythmias such as supraventricular
tachycardias and ventricular ectopy.
Patients requiring monitoring for evaluation of bradyarrhythmias and intermittent bundle
branch block including after cardiovascular surgery and myocardial infarction.
Patients requiring monitoring for arrhythmias associated with co-morbid conditions such as
hyperthyroidism or chronic lung disease.
Patients experiencing symptoms such as a) syncope of unknown etiology or b) shortness of
breath which may be due to cardiac arrhythmias.
Patients with palpitations with or without known arrhythmias to obtain correlation of
arrhythmias with symptoms.
Patients who require monitoring of the effects of drugs to control ventricular rate in atrial
arrhythmias.
Patients recovering from cardiac surgery that are indicated for outpatient arrhythmia
monitoring.
Patients with diagnosed sleep disordered breathing including sleep apnea (obstructive central)
to evaluate possible nocturnal arrhythmias.
Patients requiring arrhythmia evaluation of etiology of stroke or transient cerebral ischemia,
possibly secondary to atrial fibrillation or flutter.
Data from this device may be used by another device to analyze, measure, or report QT interval. The
device is not intended to sound any alarms for QT interval changes.
Contraindications
The Aera CT is not intended for use under the following conditions:
Infants weighing less than 10 kg. (22 lbs.).
Patients with potentially life-threatening arrhythmias who require inpatient monitoring.
Patients who the attending physician thinks should be hospitalized.
Revision 0.3
Document No. 11573
Page 5
Device Overview
Recorder Components
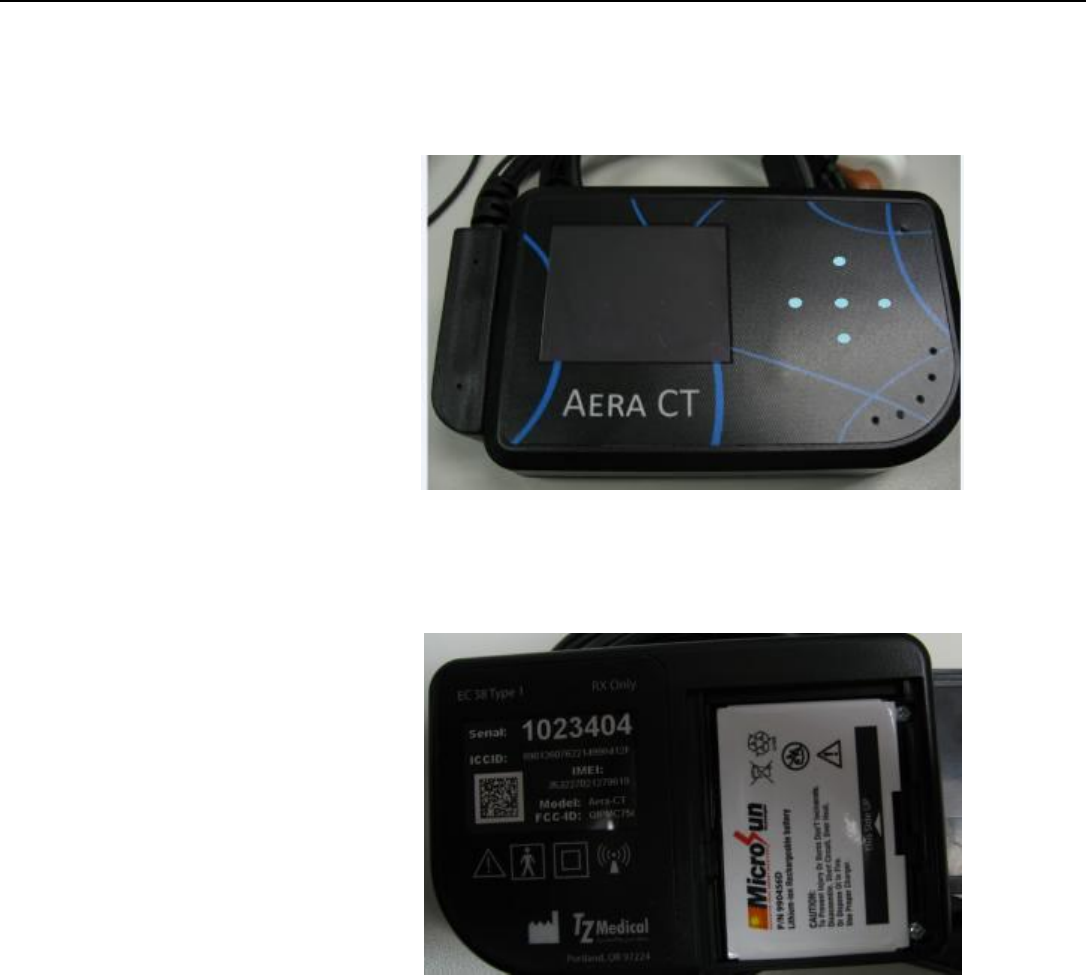
Figure 1
1. Patient Cable
2. Color Display
3. Patient Event Button
4. Up Key
5. Left Key
6. Select Key
7. Right Key
8. Down
9. Event Button
Front view of the Aera CT.
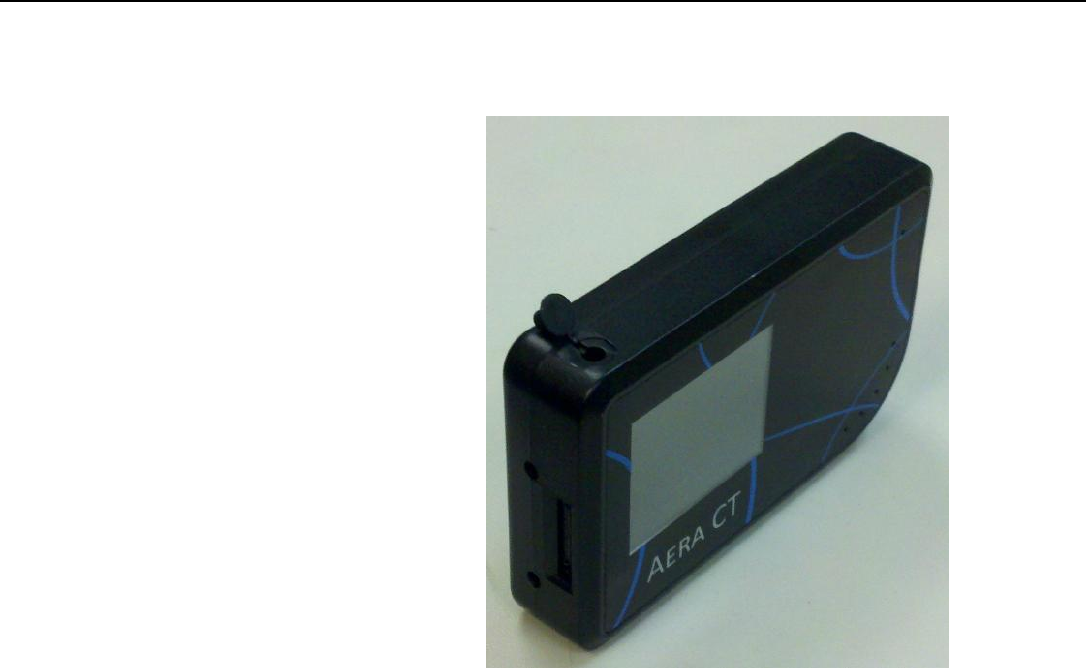
Figure 2
1. Battery
Compartment
2. microSD Card
Holder
3. Serial Number
Back view of the Aera CT.
Revision 0.3
Document No. 11573
Page 6
Device Overview (continued)
Figure 3
1. Patient Cable Receptacle
2. Power Cable Receptacle
3. Power Receptacle Plug
Side view of the Aera CT.
Revision 0.3
Document No. 11573
Page 7
Device Overview
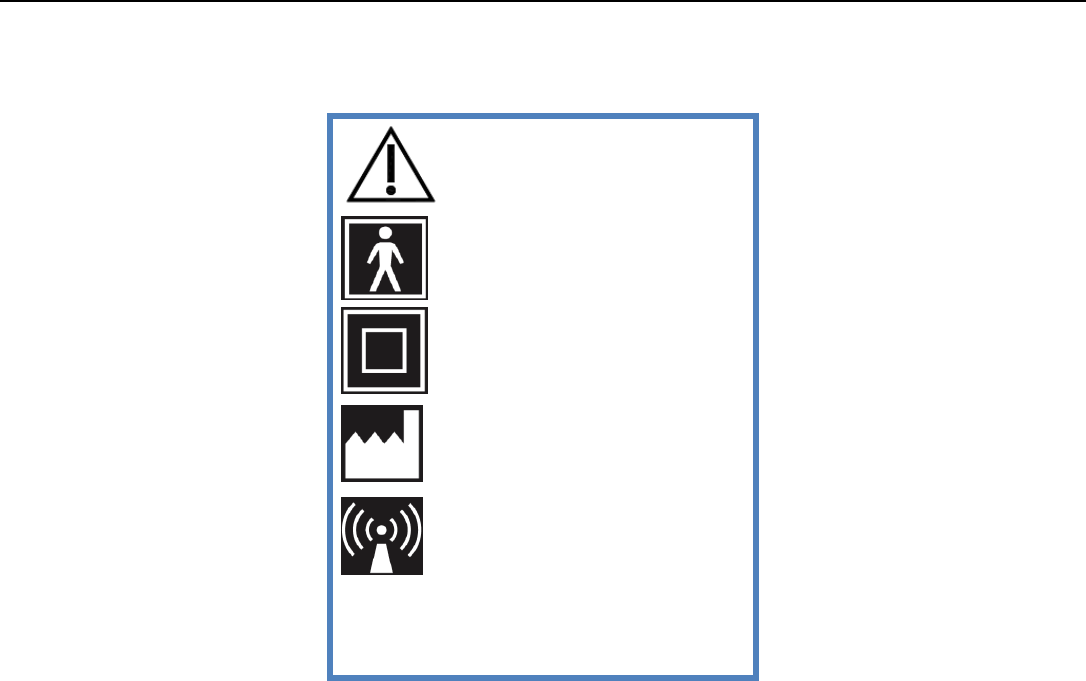
Equipment Symbols
Consult the
Directions For Use
Type B device
Electrically
Isolated
Manufacturer
Info
Emits Non-ionizing
Radiation
RX Only
Prescription Only

Revision 0.3
Document No. 11573
Page 8
Device Overview
Precautions
Use only a TZ Medical, Inc. certified microSD memory card for recording.
Do not connect anything other than the battery charger provided by TZ Medical, Inc. to the charge
port on the Aera CT.
Use only patient cables provided by TZ Medical, Inc. with the Aera CT.
Observe the procedures for early recording cessation. Failure to do so may result in the loss of
recorded data. (Page 17)
Disconnect patient leads before defibrillation.
False positive and false negative pacer pulse detects may occur when using Pacemaker Pulse
Detection.
False positives – may result from poor electrode connection to the patient or a large amount
of electrical interference from nearby source.
False negatives – may occur with pacemakers that are bipolar because of a weak pacemaker
pulse signal at the patient’s skin.
When viewing the ECG data, the presence of pacemaker signals in the ECG trace should not be
considered true representations of the actual pacemaker stimulus amplitude.
To avoid unintended battery discharge, do not leave the battery in the recorder when it is not in use.
To receive the best recording results, instruct patients to stay away from heavy electrical equipment
or other sources of electromagnetic interference. This includes equipment such as electric blankets
and heating pads.
Avoid exposing device to water or excessive moisture.
Do not expose device to extreme temperatures (beyond the limits shown in the environmental
specifications).
Revision 0.3
Document No. 11573
Page 9
Operation
Initial Device Setup
When you first receive your Aera CT device, the wireless system must be configured to communicate with your
receiving software. To achieve this, follow the instructions from your software provider to load the necessary
wireless settings onto the provided microSD card.
Insert the configured microSD card into the card holder, located in the battery compartment, of the Aera CT.
Insert the battery and replace the battery cover.
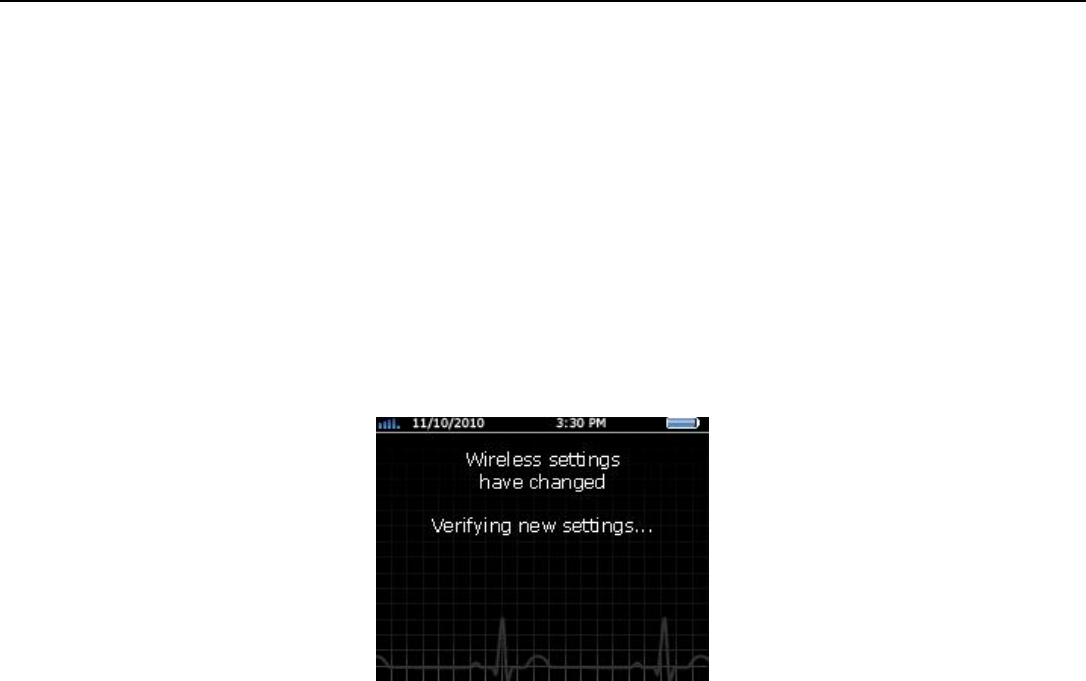
On power-up, the Aera CT will detect the wireless settings and attempt to connect to the new server to verify
the new settings. This process may take a few moments to complete.
Figure 3
This screen will be displayed while the
Aera CT is verifying new wireless settings.
Once the Aera CT has successfully connected to the new server, it will store the wireless settings internally for
future use. The device will then delete all settings from the microSD card for security purposes and begin
normal operation.
If the Aera CT cannot connect to the server using the settings provided on the microSD card, it will display an
error message on the screen. The Aera CT will not function properly until it has been successfully configured
with valid wireless settings.
Revision 0.3
Document No. 11573
Page 10
Operation
User Interface
The Aera CT employs a graphical user interface consisting of a color LCD and 5 touch-sensitive keys for
configuration and patient hookup procedures. The only touch-sensitive areas of the device are the 5 keys. The
LCD is NOT a touch screen.
Note: Aggressive attempts to use the LCD as a touch-screen can result in irreparable damage
to the LCD.
The 5 keys are arranged in the shape of a plus sign (+) with a blue light in the center of each key. (See Fig. 1)
The center key is the select key, and the 4 surrounding keys are the directional keys, which can be used to
scroll left, right, up, and down.
The keys can be used by lightly touching and then releasing the blue light. Each key must be released before
any additional key may be pressed. This helps protect against accidental selections. The keys will only be lit
when they are usable. There may be times where none, or only some, of the keys are functional.
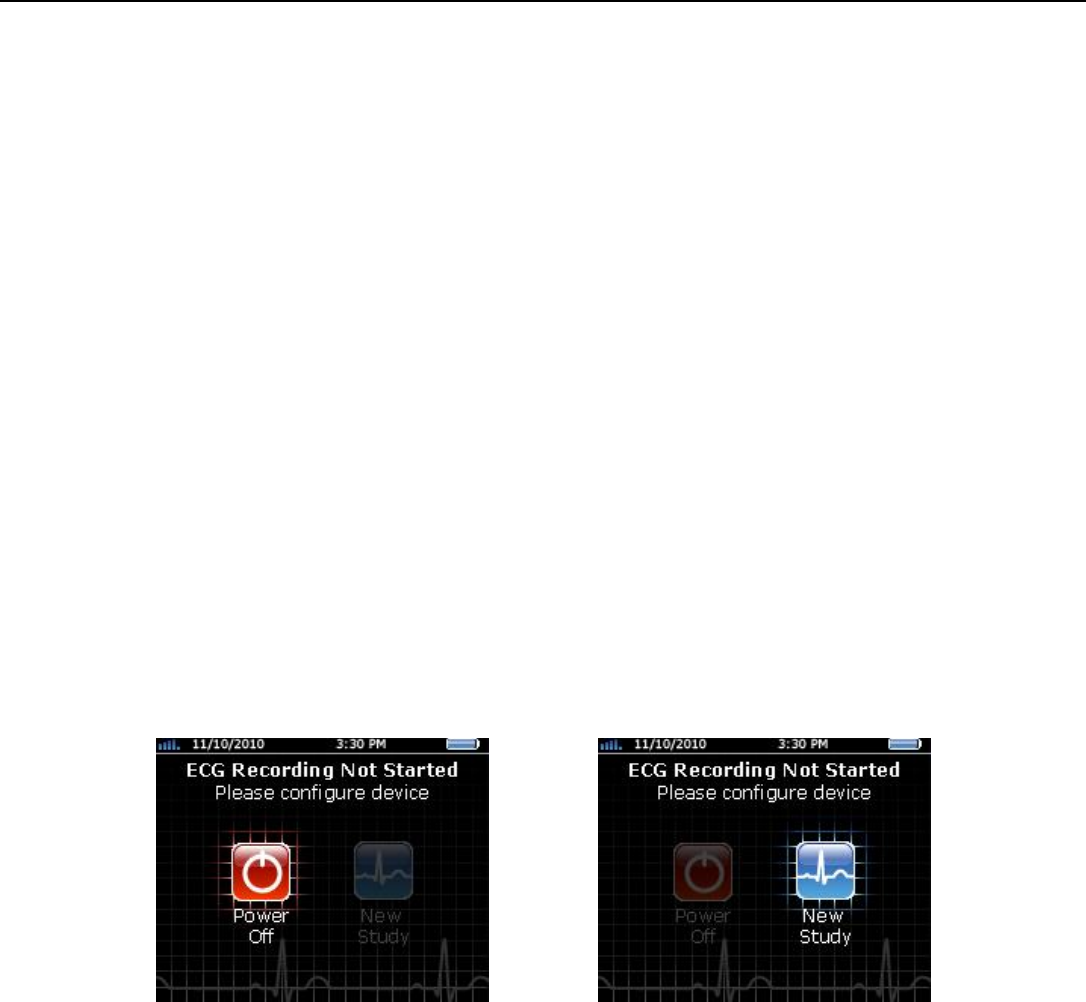
To interact with the Aera CT menu system, choose an on-screen element using the directional keys and then
select it with the center, select key. The currently selected icon on the screen will always be highlighted, while
all non-selected elements will be dimmed. (See Figs. 4 and 5)
Figure 4
Figure 5
On this screen, the Power Off
element is currently selected.
On this screen, the New Study
element is currently selected.
The status bar found at the top of the display on the Aera CT displays information about cellular connectivity,
battery life, and the current date and time. On the Aera CT, the date is always displayed in the format year-
month-day (yyyy-mm-dd). The time is always displayed as a 24-hour clock in the format hours:minutes
(hh:mm).
Revision 0.3
Document No. 11573
Page 11
Operation
Starting a Study
To begin a new patient study, the receiving software must first be configured. Follow the instructions from your
software provider to set all of the relevant parameters and prepare the server for the new patient study. If it is
anticipated that the patient hookup procedure will be performed in a location that does not have reliable
wireless connectivity, this process should include loading the settings for the study onto the microSD card in
the device, according to the instructions from your software provider.
Once the server has been properly configured, the Aera CT device may be synchronized with the server.
Begin by powering on the device by inserting the Lithium-Ion battery into the battery compartment. Upon
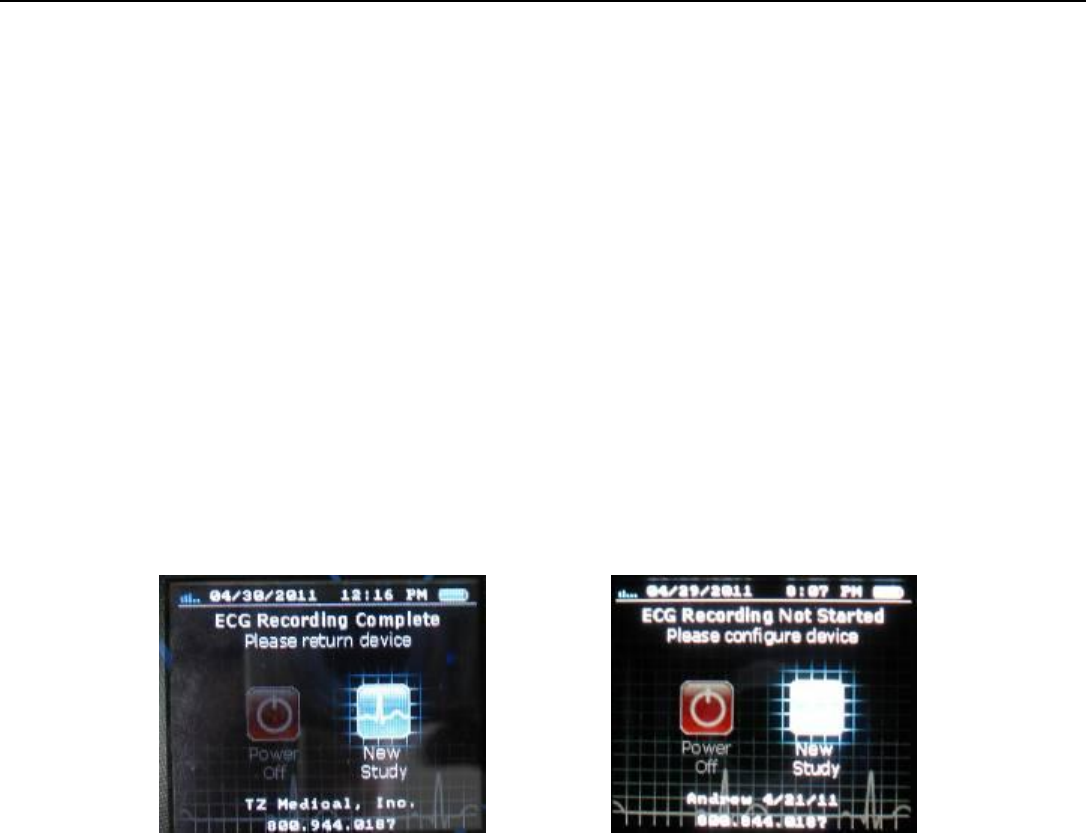
power-up, you should see one of two screens: a screen indicating that a recording has been completed or a
screen indicating that a recording has not yet been configured. Both of these screens provide options to either
power off the device or to start a new study.
Note: If the screen indicates that the Aera CT is recording, or attempting to record data, the
current study must be ended before a new study may be configured.
Figure 6
Figure 7
This device has old data in its memory
that must first be erased.
This device has no old data in its memory
and is ready to start a new study.
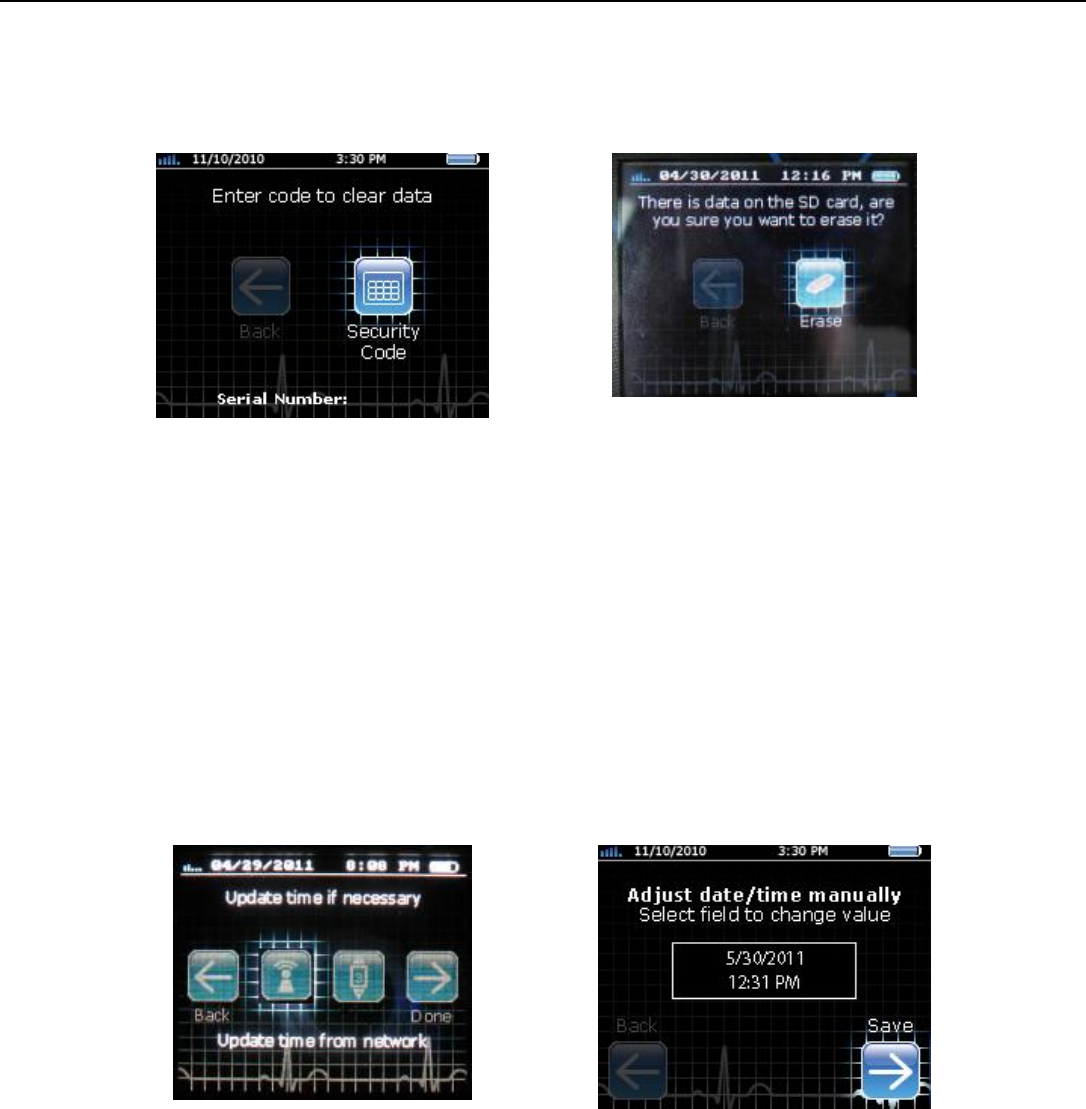
Once the Aera CT has been powered up, select the NEW STUDY option to begin the new study process. If
there is still data present on the microSD card from a previous study, you will be prompted to erase the data
before continuing.
In order to erase the microSD card from the user interface, you will be required to enter a security code. This
code is the first 4 digits of the device’s serial number. After entering the code, you will be asked one more time
if you are sure you want to erase the data.
Select ERASE to continue.
Revision 0.3
Document No. 11573
Page 12
Operation
Starting a Study (continued)
Figure 8
Figure 9
This device needs to erase the SD card
before it can continue with a new study.
The device will double check to make sure
that you want to erase all the data.
When there is no data on the microSD card, you will be prompted to update the device’s clock. See User
Interface section on pg. 8 for information on the display format for date and time. If a network connection is
available, the time should be automatically updated. If a network connection is not available, it may be
necessary to manually update the data and time using prompts on the device.
To Set the Time and Date Manually:
Select the ADJUST DATE/TIME MANUALLY option and follow the on-screen instructions to update the
device clock. Once the device is displaying the proper date and time, select the SAVE option to continue.
Figure10
Figure 11
The device will prompt you to check that
the device time is correct.
Use this page to manually enter the time
when the network is unavailable.
Revision 0.3
Document No. 11573
Page 13
Operation
Starting a Study (continued)
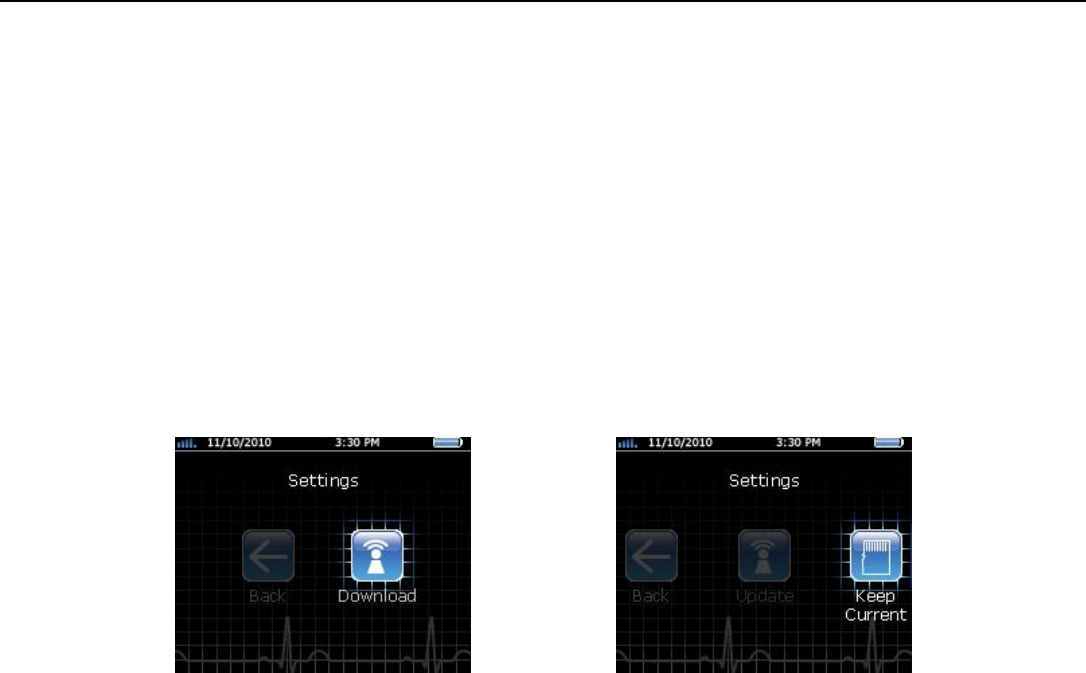
Once the device time has been verified, the Aera CT must load the proper settings for the new study.
If the settings were previously loaded onto the microSD card, select the KEEP CURRENT option to continue.
This could be used when poor wireless reception is expected.
If you wish to have the settings updated, select the UPDATE option to connect to the server and download the
latest device settings.
Note: If the server has not been properly configured, or if wireless reception is poor, selecting
UPDATE will result in an error message.
Figure 12
Figure 13
This device needs to download the settings
for the study to continue.
This device has been loaded with settings
prior to this setup procedure.
Revision 0.3
Document No. 11573
Page 14
Operation
Starting a Study (continued)
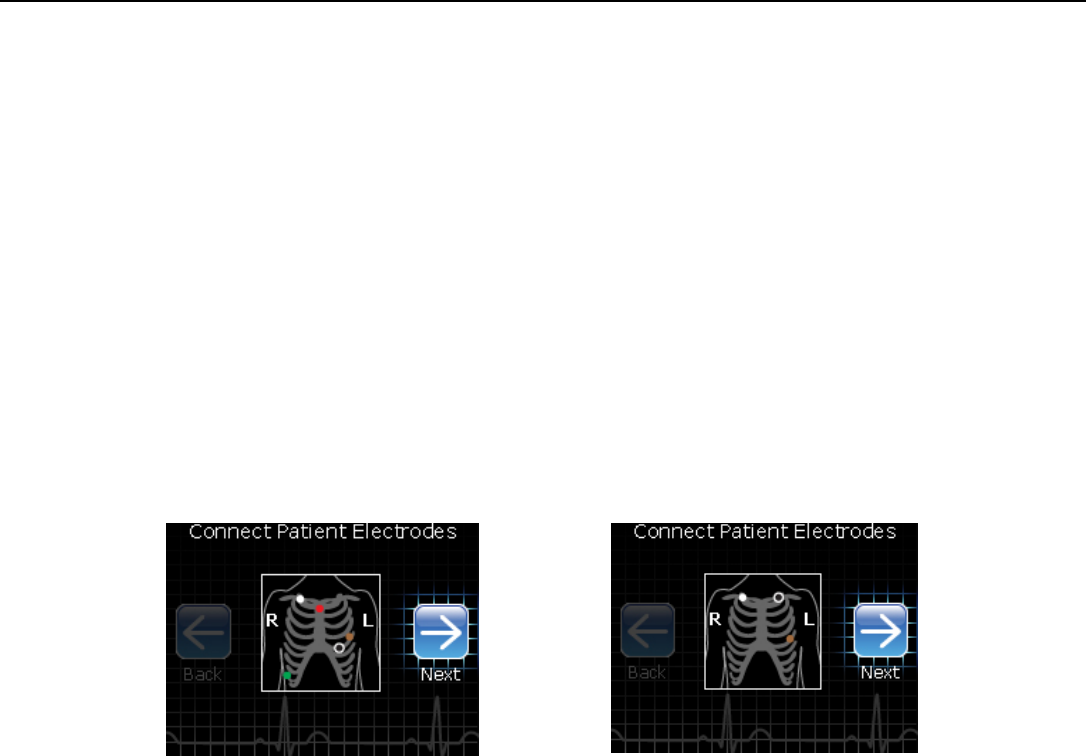
Once the device has successfully downloaded the latest settings, it will automatically prompt you to connect the
patient to the device by displaying the selected electrode configuration on the display. It will also silently report
the successful settings download action to the server in the background.
Apply the electrodes to the patient and connect the patient cable to the device.
Note: if the Aera CT has been configured for use with a 3-electrode cable, it will not work with
a 5-electrode cable and vice-versa. If an error message appears and indicates that you are
using the wrong patient cable, you must either change the configuration on the server and
update the settings on the device or switch to a compatible patient cable.
Once all of the electrodes have been connected, the Aera CT will automatically proceed to the signal quality
check screen. If necessary, select the NEXT option to manually proceed to the signal quality check.
Figure 14
Figure 15
This device has been configured to
use a 5-electrode patient cable.
This device has been configured
to use a 3-electrode patient cable.
Revision 0.3
Document No. 11573
Page 15
Operation
Starting a Study (continued)
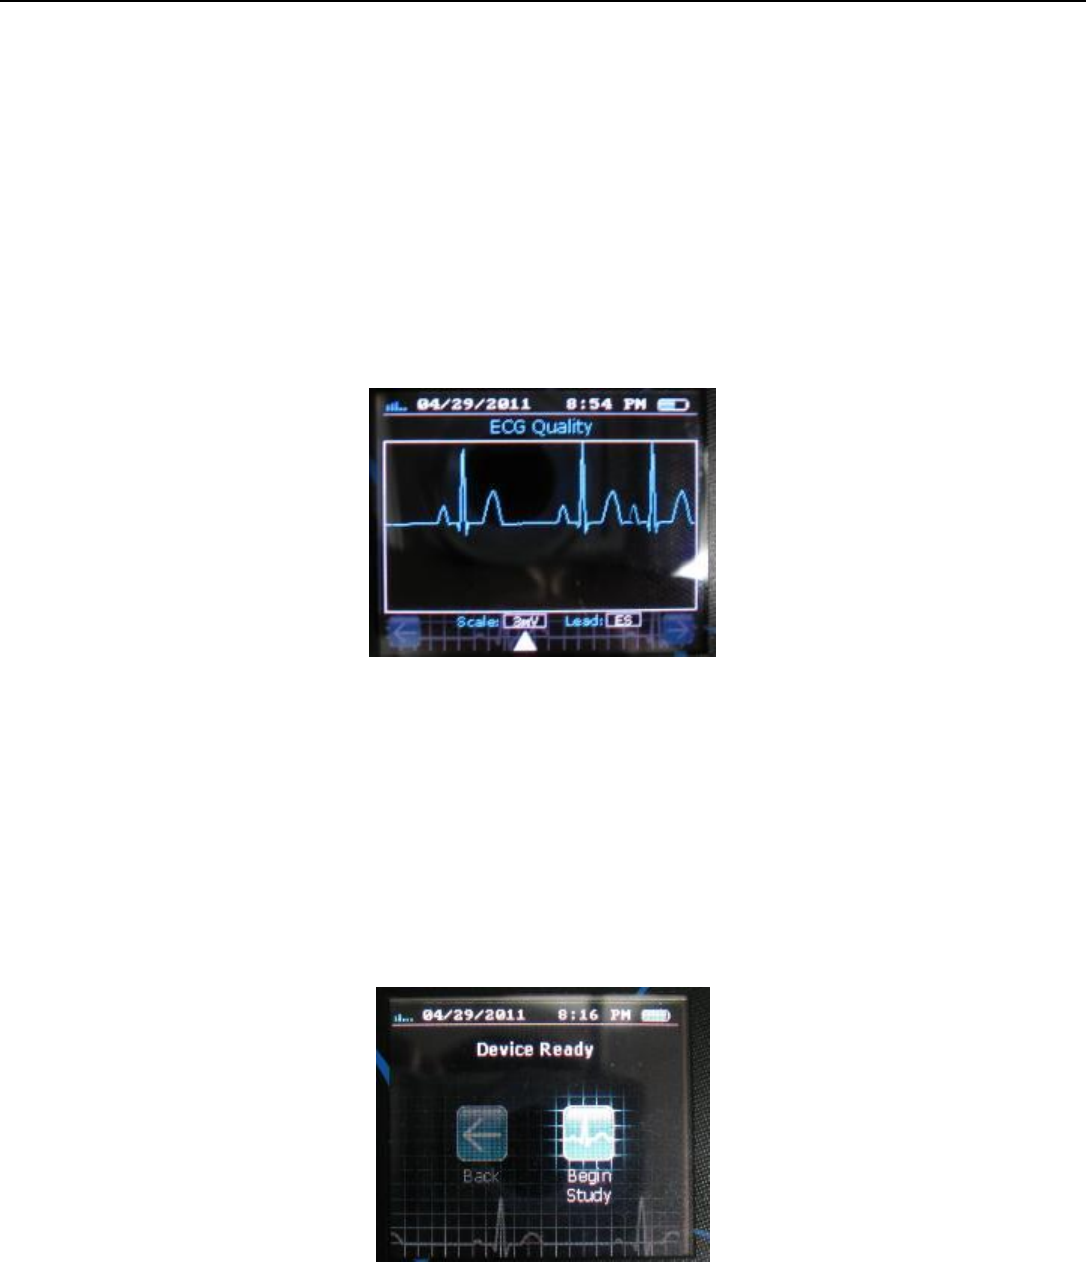
On the “ECG Quality” screen, the Aera CT will draw the ECG trace from one of its three input channels in real
time.
Toggle which channel is being drawn by highlighting the LEAD option and pressing SELECT. If necessary,
highlight the SCALE option and press SELECT to change the dynamic range of the display. Once all three
channels are showing acceptable ECG traces, select the right-arrow icon to continue.
Note: changing the scale here is for previewing purposes only; it does change the scale of the recording.
Figure 16
A typical ECG signal as seen
during the hookup procedure.
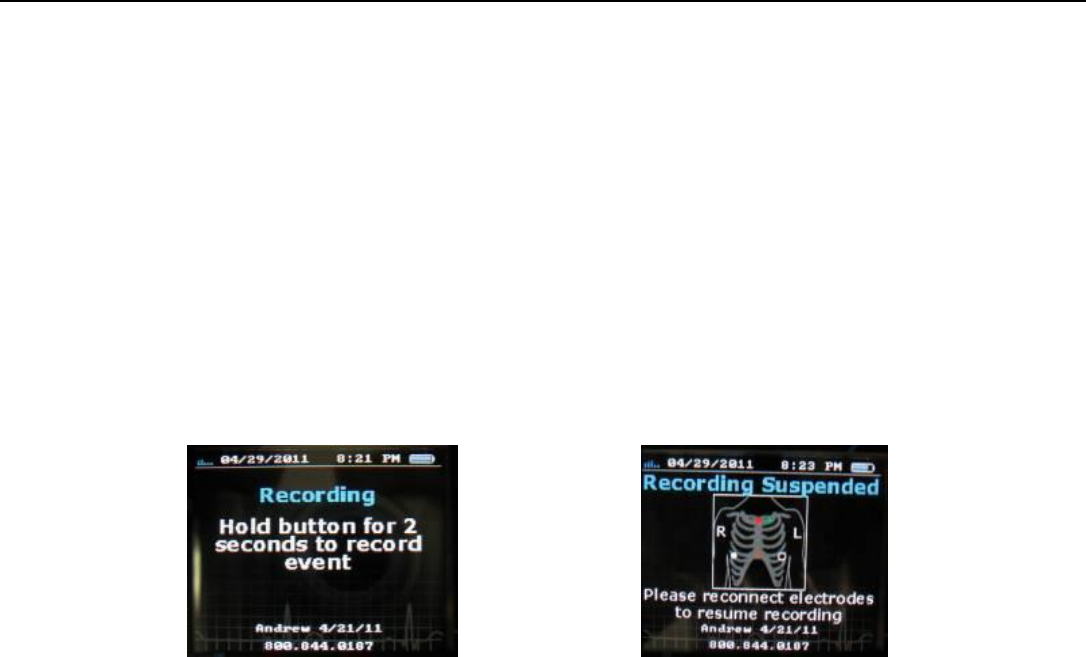
Once the signal quality has been verified, the Aera CT will display the message DEVICE READY, and prompt
you to begin the study. Select the BEGIN STUDY option to start the recording. As soon as this option is
pressed, the Aera CT will begin recording and analyzing ECG data. After successfully recording the first 60
seconds of data, the device will silently report that the recording has started, and send the first minute of data
to the server.
Figure 17
The last screen before the study begins.
Revision 0.3
Document No. 11573
Page 16
Operation
Monitoring a Study
Once a study has been started, the Aera CT will silently record and transmit ECG data with no intervention
from the patient. The patient can wake the display by briefly pressing the patient event button to view a status
screen with instructions on how to mark an event.
If enough of the patient electrodes are disconnected so that the Aera CT cannot continue recording ECG on any
channel, the device will automatically wake the display and show a message to the patient instructing him or
her to reconnect the patient cable.
The bottom 2 lines of text on these screens may be programmed to display the name and phone number of the
monitoring center. Follow the instructions from your software provider to change this text.
Figure 18
Figure 19
The device is currently recording and
analyzing ECG data from the patient.
The device has stopped recording ECG
data because the leads are disconnected.

Revision 0.3
Document No. 11573
Page 17
Operation
Monitoring a Study (continued)
For the duration of the study, the Aera CT will periodically upload files to the receiving server. These event files
provide information on the status of the device, (such as battery life, recording state, and electrode connection
status), as well as information on detected arrhythmias and patient activated events. Follow the instructions
from your software provider to monitor the server for these event files.
The Aera CT also provides the means to request specific data from the device and to send messages in plain text
to the patient. In the event that the device’s operating settings need to be adjusted to reduce the amount of data
being reported to the server, the Aera CT provides the tools to wirelessly download new settings from the
server. Follow the instructions from your software provider to access this functionality.
Figure 20
A text message being displayed to the
patient on the Aera CT’s screen.
Revision 0.3
Document No. 11573
Page 18
Operation
Ending a Study
The Aera CT provides 2 automated methods and 2 manual methods for ending a study. When the Aera CT is
configured at the beginning of the study, it can be programmed to automatically end the study after a specific
length of data has been recorded, or to end the study at a specific date and time. Follow your software
provider’s instructions to control the Aera CT with these parameters. When either of these preconfigured
stopping points is reached, the Aera CT will stop the study and report the completion to the server.
When the study is ended by reaching a preconfigured stopping point, the Aera CT will wake the display and
report to the patient that the study is complete. If necessary, the study may be resumed by simply adjusting the
study end parameters and performing a wireless settings update.
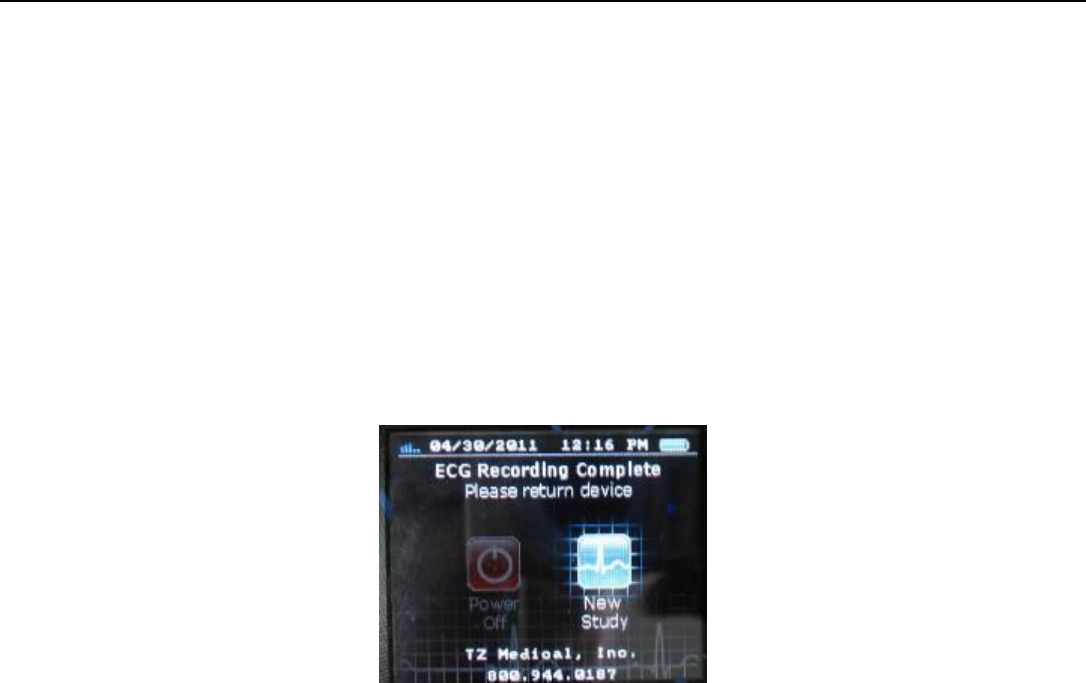
Figure 21
The patient will be notified
once the study is complete.
The Aera CT can also be wirelessly instructed by the server to end the study immediately. If this method is used
to end the study, the device cannot be instructed to resume recording; a new study will have to be configured
and started as before.
Revision 0.3
Document No. 11573
Page 19
Operation
Ending a Study (continued)
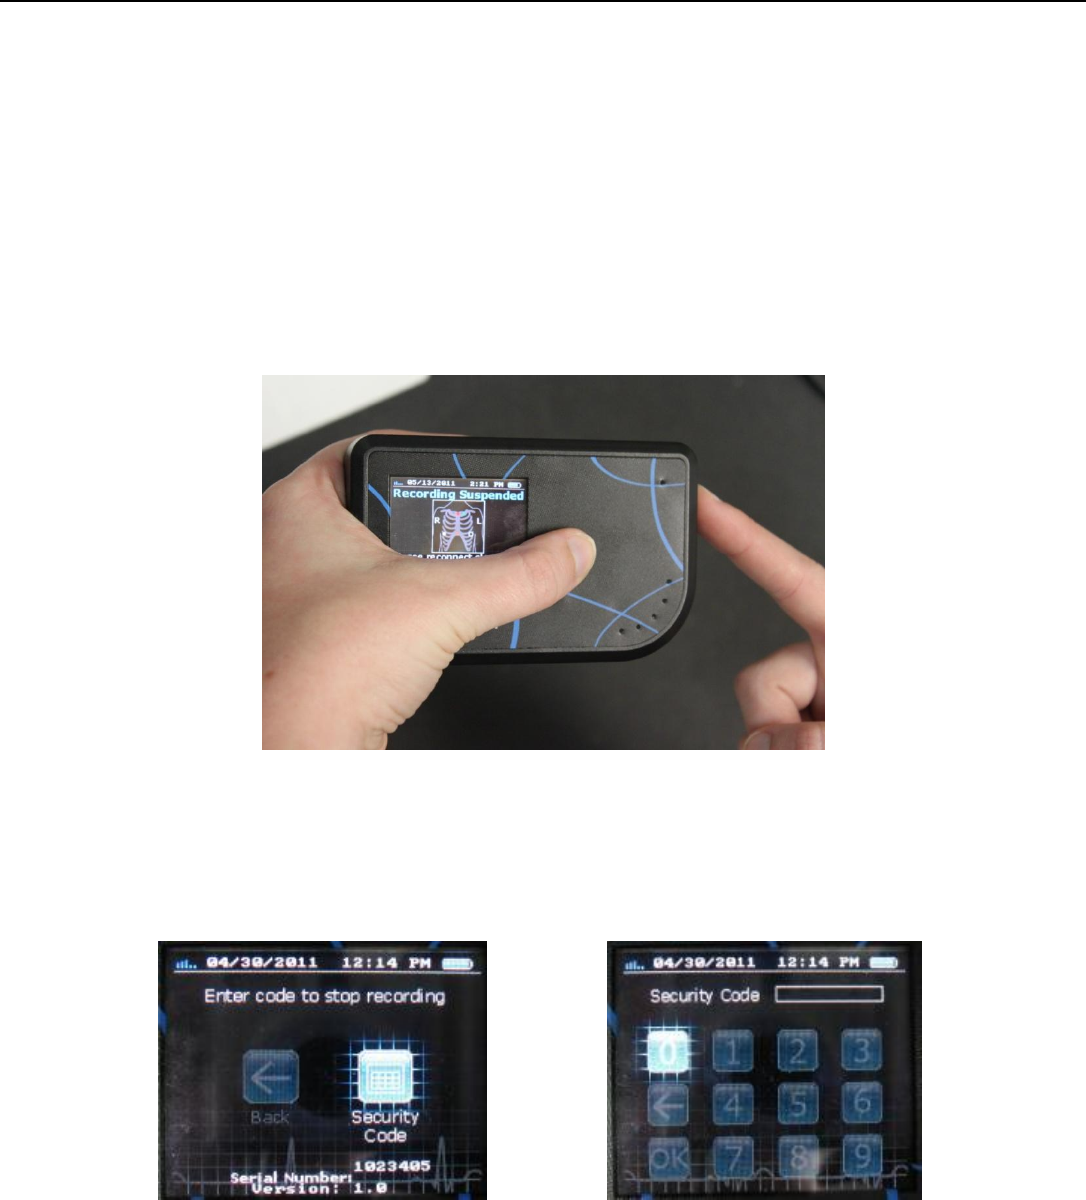
It is also possible to end the study from the device itself using the early-out procedure:
1. Make sure the recording is suspended by disconnecting the patient cable from the device.
2. Simultaneously hold the left key on the keypad while briefly pressing the patient event button to
access the “security code screen”. (See fig. 22)
3. Select the SECURITY CODE option to display the numeric keypad. Enter the first 4 digits of the
device’s serial number as the security code and then select OK to continue.
Figure 22
Hold the left key while pressing the patient event button
to access the security screen.
Figure 23
Figure 24
This is the screen that appears when
performing the early-out procedure.
Enter the first 4 digits of the device’s
serial number as the security code.
Revision 0.3
Document No. 11573
Page 20
Operation
Ending a Study (continued)
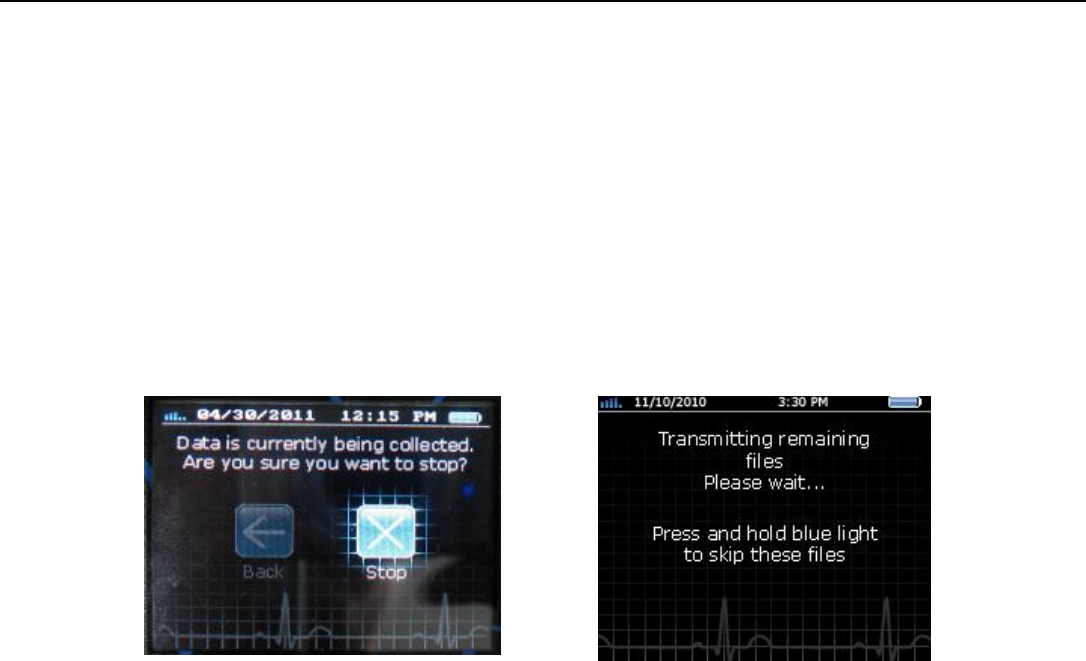
After entering the first 4 digits of the device’s serial number, the Aera CT will prompt you one last time to make
sure that you wish to end the study. Select the STOP option to end the study and transmit any remaining
pending data to the server.
If necessary, it is possible to skip the final data transmissions when ending a study by holding the select key
for 1 second. When this is done, the remaining data will be removed from the queue and the device will proceed
to the startup screen. Once the recording has been ended using this method the device cannot resume
recording; a new study will have to be configured and started as before.
Figure 25
Figure 26
The device will give you one last chance
to cancel after entering the code.
The device has to finish transmitting
its data before the study is finished.
Revision 0.3
Document No. 11573
Page 21
Operation
Electrode Application
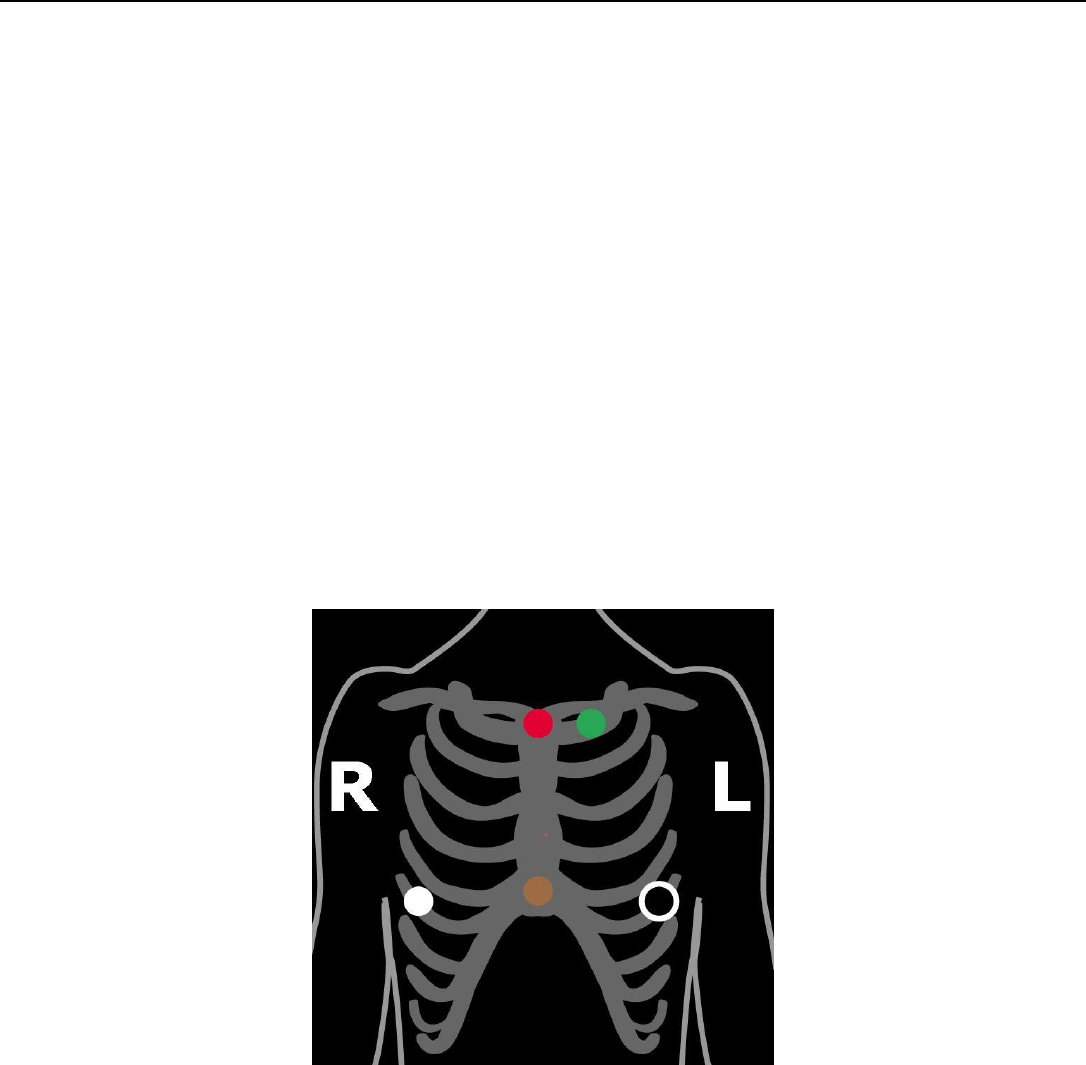
Employ the following procedure when applying electrodes to a patient and connecting them to the Aera CT:
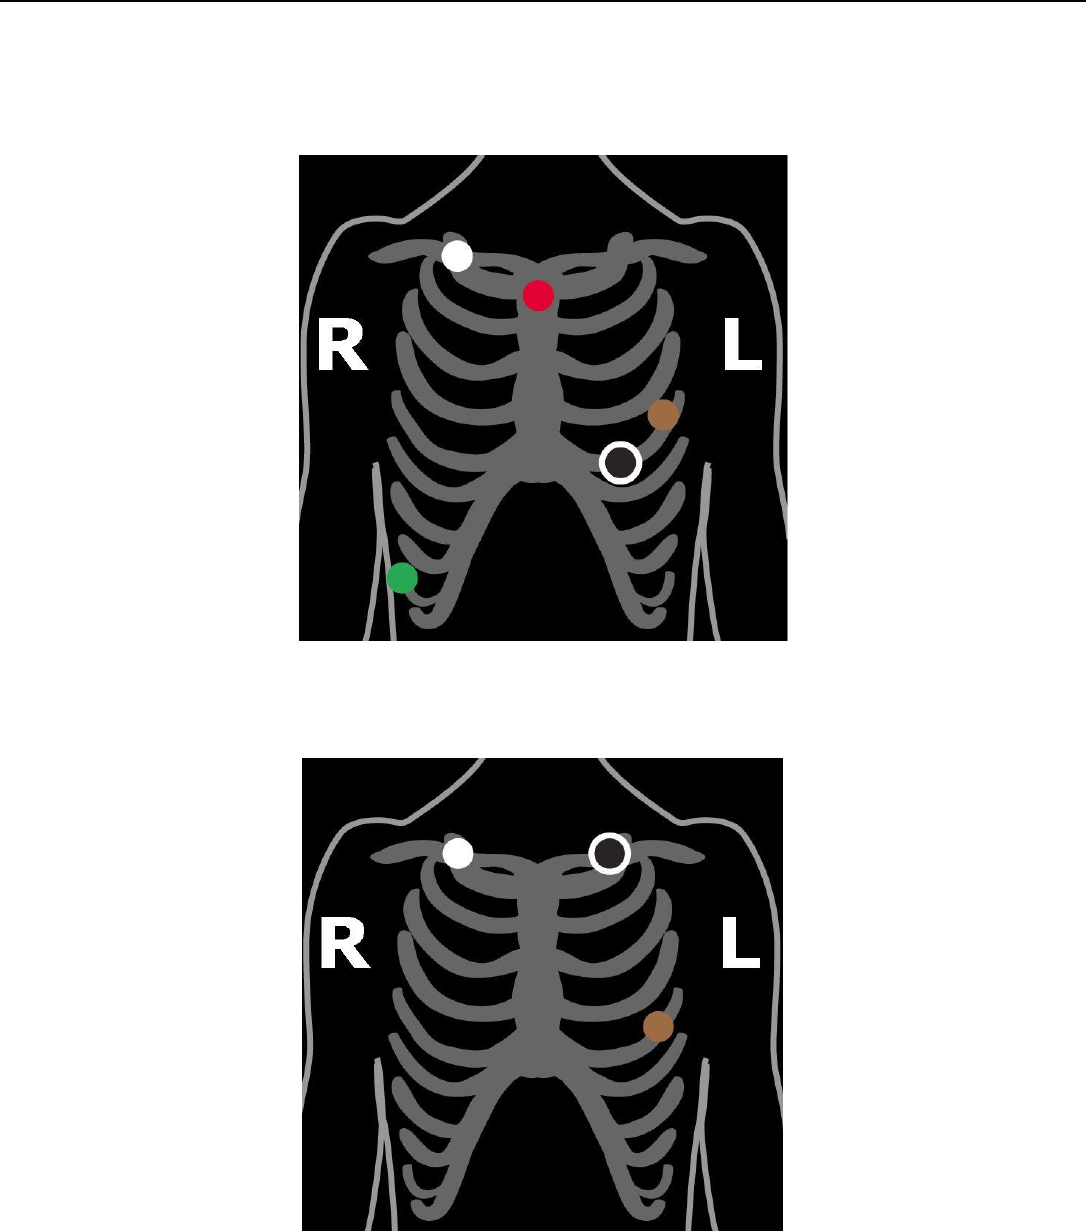
1. Select electrode sites to match the configured electrode configuration shown in the following figures or
as instructed by the physician. Select areas over bone, avoiding muscle areas and breast tissue.
2. Clean electrode sites with alcohol and use a razor to remove hair.
3. Abrade electrode sites with a scrub pad or gauze. Allow sites to dry before applying electrodes.
4. Connect the patient lead wire to the electrode snap.
5. Remove the protective backing from the electrode.
6. Apply the electrode to the patient’s skin, matching electrodes to the selected configuration from the
following figures or as instructed by the physician.
7. Press adhesive border firmly for consistent adhesion.
8. To alleviate tension on electrode snaps, loop patient lead wires and tape down.
Figure 27
Electrode Configuration #1 (5 electrodes)
Revision 0.3
Document No. 11573
Page 22
Operation
Electrode Application (Continued)
Figure 28
Electrode Configuration #2 (5 electrodes)
Figure 29
Electrode Configuration #3 (3 electrodes)

Revision 0.3
Document No. 11573
Page 23
Operation
Patient Use Precautions
The Aera CT contains sensitive electronic circuitry. Please observe the following precautions while using the
Aera CT. Failure to do so may result in serious damage to the device.
Avoid Exposure to Moisture
The Aera CT should not be used while swimming, showering, bathing, or
participating in any aquatic activities. Use caution to avoid inadvertent
submersion in water.
Avoid Sharp Impacts
While the Aera CT has been designed to survive minor drops, it is possible to
damage the internal structure, or outer casing, if the device suffers a sharp
impact or is otherwise traumatized. Such use may irreparably damage the
Aera CT and void its warranty.
Avoid Pulling on Wires
Always disconnect cables from the device by grasping the rubberized
connector, not by pulling directly on the wire. Yanking on the wires may
result in irreparable damage to the cables.
As the patient, it is your responsibility to fulfill the following responsibilities while using the Aera CT in order
to ensure proper detection and analysis of your heart’s symptoms.
Keep Electrodes Connected
The Aera CT can only record data when it is properly connected to the
electrodes on your body. The device will emit a short beep whenever it detects
that one of the electrodes has been disconnected. If too many of the electrodes
become disconnected, the Aera CT will stop recording and prompt you to
reconnect the electrodes.
Keep the Battery Charged
The Aera CT can record for up to 48 hours on a single battery charge. Connect
the provided wall charger to the charge port on the device to recharge the
battery when wearing the Aera CT for more than 48 hours. You may keep the
Aera CT connected to the electrodes so that it can continue to record data
while it is recharging.
Report Any Heart-Related Events
Hold the Patient Event Button, located opposite the cable connector on the
device, for 3 seconds to mark when you feel any heart-related symptoms.
Revision 0.3
Document No. 11573
Page 24
Maintenance
Charging
The Aera CT employs a rechargeable lithium-ion battery to meet the demanding power requirements of cellular
data transmissions. This battery can be recharged in the device without interrupting the data recording.
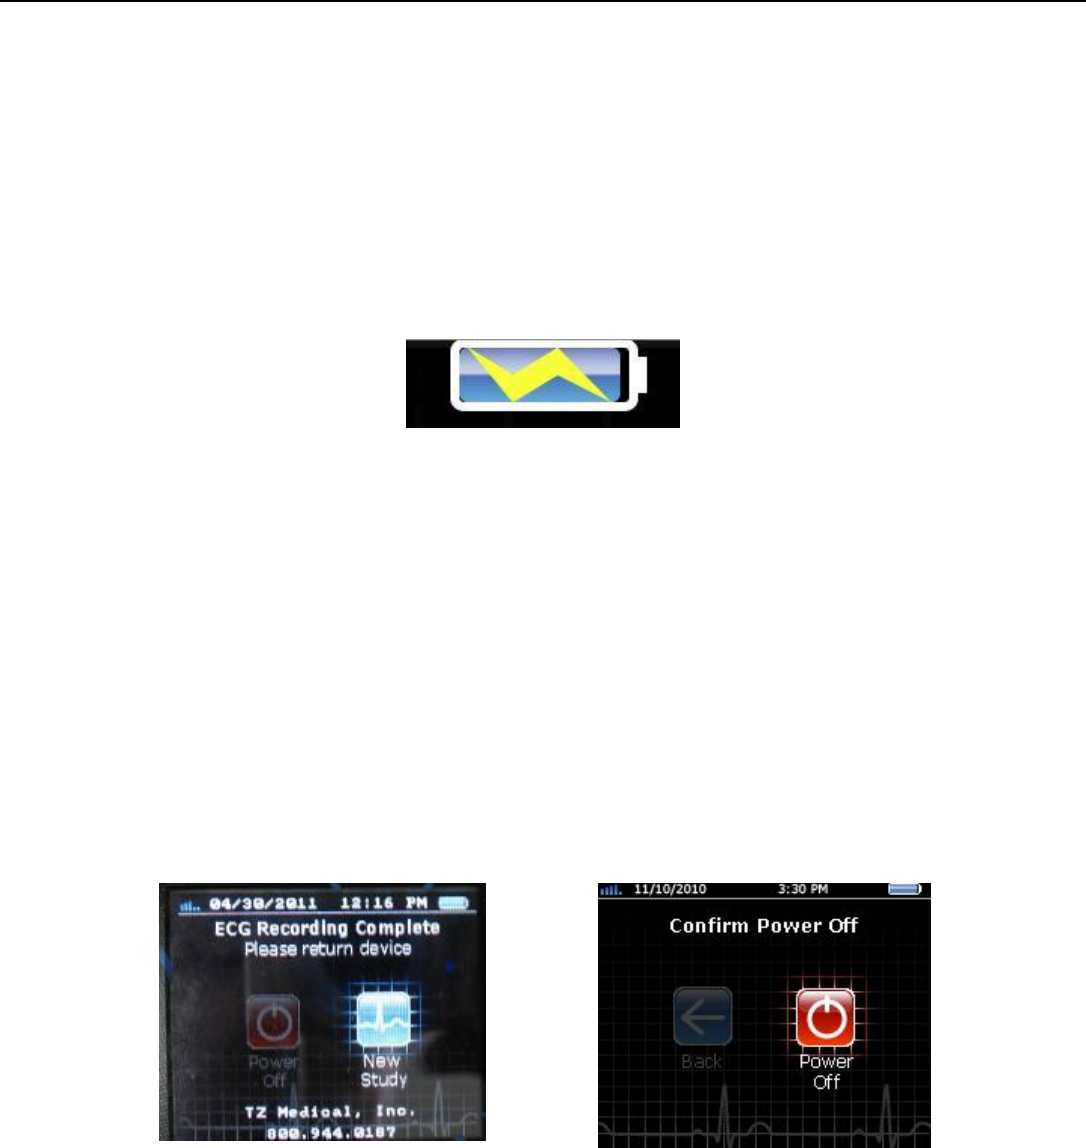
To charge the battery, connect the battery charger to the charge port on the device. The Aera CT will indicate
that the battery is charging by replacing the battery status indicator on the screen with a charging indicator.
(See fig. 30)
Figure 30
The screen will display the charging
indicator in the top left corner.
Storage
When not being used for recording data, the Aera CT provides an option to power down the device to reduce
the amount of power drawn from the rechargeable battery.
To power down the device, select the POWER OFF option. The Aera CT will ask you to confirm that it should
power down. Select the POWER OFF option again to confirm that you wish to power down the device.
To wake the Aera CT after it has been powered down, press the patient event button for 1 second.
Figure 31
Figure 32
Select Power Off to power down the
device.
Confirm power off to finish the power
down process.
Revision 0.3
Document No. 11573
Page 25
Even in power down mode, the device will still drain the battery over the course of a week. It is therefore highly
recommended that the Aera CT be stored either with the battery removed or with the battery charger
connected to the device. The battery will continue to charge even when the device is powered off.

Revision 0.3
Document No. 11573
Page 26
Maintenance
Cleaning
Do not attempt to submerse, autoclave, or steam clean the Aera CT or the patient cable.
Do not use acetone, ether, Freon, petroleum derivatives, or other solvents to clean the device.
Observe the following procedure to clean the Aera CT between patient uses:
1. Remove the battery and close the battery cover.
2. Disconnect the patient cable.
3. Wipe the exterior of the Aera CT and its accessories with a damp cloth. Use mild detergent diluted in
water. Take care not to allow water or moisture to enter the Area CT, especially around the cable
receptacles.
4. Dry with a clean cloth or paper towel.
5. Reconnect the patient cable to the device.
6. Clean the patient cable in the same manner before each procedure.
Testing
Observe the following procedure to periodically verify hardware functionality on Aera CT devices. This
procedure is meant to detect hardware failures before a device is connected to a patient. It is not intended to
verify conformance with any electrical performance specifications.
1. Make sure the device is idle, with no study ongoing.
2. Power on the device and connect the Aera CT Device Tester to the patient cable port on the Aera CT
device.
3. When properly connected, the blue LED on the Device Tester will be illuminated.
4. The Aera CT will automatically switch into device test mode once the Device Tester has been connected.
5. Follow the onscreen instructions to step through each of the device tests.
6. Each test typically ends with a success message after which you may press the patient event button
to continue.
7. In case of a failure, the Aera CT will generally attempt the test again, rather than displaying a failure
message.
Note: If an Aera CT device repeatedly fails any of the device tests, the device will need to be
returned to TZ Medical for servicing.
Revision 0.3
Document No. 11573
Page 27
Troubleshooting
Error Messages
The Aera CT has been designed to detect and recover from error conditions automatically, if at all possible.
Unfortunately, there are situations that may occur where the device simply cannot recover on its own. This is
generally limited to situations such as the microSD card being forcibly ejected from its holder due to an abrupt
impact, or a short-circuit due to water ingress.
In most such cases the Aera CT will display an informative error message to the user. If an error has occurred
that prevents the device from displaying this error message, the Aera CT will attempt to notify the user by
lighting the directional keys and emitting a short vibration once per second.
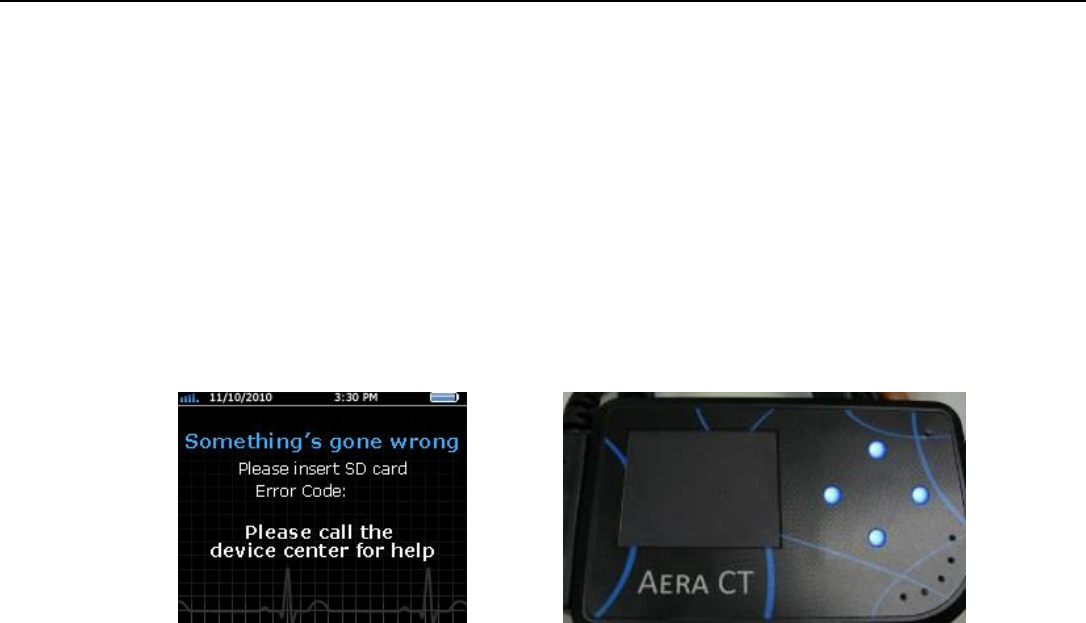
Figure 33
Figure 34
An error message displayed
on the Aera CT screen.
An error has occurred that is preventing
the Aera CT from displaying anything.
These errors can often be resolved by removing the battery and mircoSD card, formatting the card, and then re-
inserting the card and battery.
If the error message persists, the device will need to be returned to TZ Medical Inc. for servicing. See the
Warranty section of this manual for instructions on returning a device for service.
On rare occasions, the electrostatic discharge (ESD) protection system in the battery will prevent the device
from powering up when the battery is inserted. If this happens, simply connect the battery charger to power on
the device and reset the ESD protection system.
Revision 0.3
Document No. 11573
Page 28
Troubleshooting
Server Errors
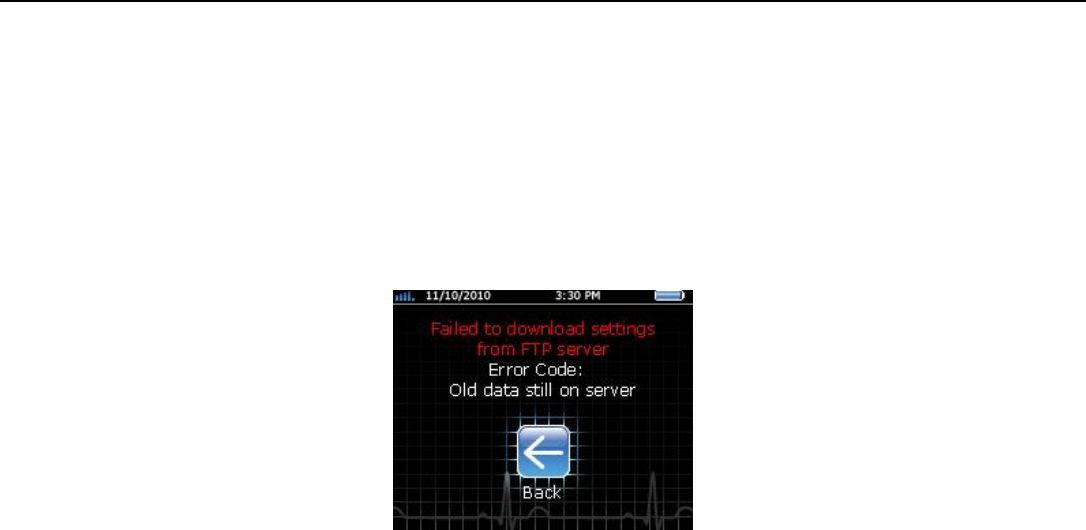
The Aera CT may also display an error message when attempting to download settings from the server. In this
case, the error message is typically not indicative of a failure with the device; it is generally an indication of a
server error that is preventing the Aera CT from operating properly. Follow the instructions from your software
provider to resolve these error messages.
Figure 35
A problem on the server has prevented the
Aera CT from downloading new settings.

Revision 0.3
Document No. 11573
Page 29
Wireless Compliance
FCC ID: ZIMTZMR
FCC Compliance Statement
The Federal Communications Commission (FCC) has adopted a safety standard for human exposure to Radio
Frequency (RF) electromagnetic energy emitted by FCC-certified equipment. This wireless electro-
cardiovascular monitor has been evaluated under FCC Bulletin OET 65C (01-01) and found to be compliant to
the requirements of uncontrolled environmental limits as set forth in CFR 47 Sections 2.1091, 2.1093
addressing RF Exposure from radio frequency devices when operated in accordance with the operation
guidelines described in this manual. Proper operation of this radio device according to the instruction in this
publication will result in user exposure substantially below the FCC recommended limits.
The Aera CT contains a radio transmitter and receiver. It is designed and manufactured not to exceed the
emission limits for exposure to radio frequency (RF) energy set by the Federal Communications Commission of
the U.S. Government. These limits are part of comprehensive guidelines and establish permitted levels of RF
energy for the general population. The guidelines are based on standards that were developed by independent
scientific organizations through periodic and thorough evaluation of scientific studies. The standards include a
substantial safety margin designed to assure the safety of all persons, regardless of age and health.
The exposure standard for wireless mobile devices employs a unit of measurement known as the Specific
Absorption Rate, or SAR. The SAR limit set by the FCC is 1.6W/kg. Tests for SAR are conducted using
standard operating positions accepted by the FCC with the device transmitting at its highest certified power
level in all tested frequency bands. Although the SAR is determined at the highest certified power level, the
actual SAR level of the device while operating can be well below the maximum value. This is because the device
is designed to operate at multiple power levels so as to use only the power required to reach the network. In
general, the closer you are to a wireless base station antenna, the lower the power output.
Before a device model is available for sale to the public, it must be tested and certified to the FCC that it does
not exceed the limit established by the government-adopted requirement for safe exposure. The tests are
performed in positions and locations (for example, worn on the body) as required by the FCC for each model.
This device has been tested and meets FCC RF exposure guidelines when worn on the body using the Aera CT
Leather Carrying Case (PN: 7110-02). Use of other accessories may not ensure compliance with FCC RF
exposure guidelines.
The highest reported SAR value for this body-worn device is: 1.15 W/kg.
The FCC has granted an Equipment Authorization for this wireless electro-cardiovascular monitor with all
reported SAR levels evaluated as in compliance with the FCC RF exposure guidelines. SAR information on this
device is on file with the FCC and can be found under the “Display Grant” section of:
http://transition.fcc.gov/oet/ea/fccid/ after searching on FCC ID: ZIMTZMR.
Revision 0.3
Document No. 11573
Page 30
IC ID: 9647A-TZMR
Canadian Compliance Statement
Complies with the Canadian ICES-003 Class B specifications. Cet appareil numérique de la Classe B est
conforme à la norme NMB-003 du Canada. This device complies with RSS 210 of Industry Canada. This Class
B device meets all the requirements of the Canadian interference-causing equipment regulations. Cet appareil
numérique de la Classe B respecte toutes les exigences du Réglement sur le matériel brouilleur du Canada.
This device complies with Industry Canada license exempt RSS standard(s). Operation is subject to the
following two conditions: (1) this device may not cause interference, and (2) this device must accept any
interference, including interference that may cause undesired operation of the device.
Cet appareil est conforme aux normes CNR exemptes de licence d’Industrie Canada. Le fonctionnement est
soumis aux deux conditions suivantes : (1) cet appareil ne doit pas provoquer d’interférences et (2) cet appareil
doit accepter toute interférence, y compris celles susceptibles de provoquer un fonctionnement non souhaité de
l’appareil.

Revision 0.3
Document No. 11573
Page 31
Specifications
Functional
ECG Channels
3
Sample Rate
256 or 512 Samples per Second
User Interface
Color graphic display with direction pad and select
Memory
Total Recording Time
28 Days
Maximum Event Duration
11 minutes
Media
microSDHC card*
Data Retention
10 years
* Use only TZ-supplied memory cards or the recorder will not function properly
Physical
Case Dimensions
4.25 x 2.70 x 0.89 inches (108.0 x 68.6 x 22.6 mm)
Weight with Battery
6.4 oz. (181 g)
Electrical
Input Impedance
>10M Ohms
CMRR
>60 dB
AC Signal Range
± 6 mV
DC Signal Range
± 300 mV
Resolution
3 μV (12 bits)
Frequency Response
0.05 Hz to 40 Hz (default) [LPF adj: 30 Hz – 100 Hz]
Pacemaker Detection
ANSI/AAMI EC38:2007
Environmental
Operating Temperature
0 C (32 F) to 50 C (122 F)
Operating Humidity
10% to 95%, non-condensing
Storage Temperature
-20 C (-4 F) to 70 C (158 F)
Storage Humidity
5% to 95%, non-condensing
Operating Shock
75mm drop on a hard surface
Vibration
10 minutes, 3 axis, 0.3G RMS to 500 Hz, random

Revision 0.3
Document No. 11573
Page 32
Specifications
Wireless Transmission
Service
GPRS/EGPRS
Bands
850/900/1800/1900 MHz
Battery
Type
Single Cell, Lithium-Ion Rechargeable
Life
24 to 48 hours, from full charge
Additional equipment classification information as required in EN 60601-1
EQUIPMENT not suitable for use in the presence of a FLAMMABLE ANAESTHETIC MIXTURE WITH
AIR or WITH OXYGEN OR NITROUS OXIDE
IPX0-Ordinary Equipment (enclosed equipment without protection against ingress of water)
Internally Powered Equipment
Mode of Operation – Continuous
Conformance to Regulatory Standards
TZ Medical, Inc. declares that his device complies with the essential requirements of Article 3 of the R&TTE
199/5/EC Directive, if used for its intended use and that the following standards have been applied:
BS EN 62209-2: 2010
ETSI EN 301 489-1 V1.8.1
ETSI EN 301 489-7 V1.3.1
ETSI EN 301 511 V9.0.2
International Electrotechnical Commission (IEC)
IEC 62209-2: 2010
American Advancement of Medical Instrumentation (AAMI)
ANSI/AAMI EC38:2007
Manufactured by
TZ Medical, Inc.
Portland, OR 97224
EU Authorized Representative:
CEPartner4U
3951 DB: 13. NL
Tel: +31 (0)6-516.536.26

Revision 0.3
Document No. 11573
Page 33
TZ Medical Warranty
Limited Warranty
This TZ Medical product is warranted to be free from manufacturing and material defects for a period of one
(1) year from the date of shipment from TZ Medical to the original purchaser (“Warranty Period”). If a
hardware defect arises and a valid claim is received within the Warranty Period, TZ Medical will either repair
or replace the defective product free of charge for parts or labor.
Excluded from this warranty are expendable supply items including, but not limited to, electrodes, patient
cables, charging adapters, and batteries. This warranty does not apply to any product which TZ Medical
determines has been modified or which has been damaged due to customer abuse or misuse (e.g. corrosion
from water ingress or cracking of the LCD glass).
Except for the express warranties stated above, TZ Medical disclaims all warranties including
implied warranties of merchantability and fitness. The stated express warranties are in lieu of
all obligations of liabilities on the part of TZ Medical for damages, including but not limited to,
special indirect or consequential, arising out of or in connection with the use or performance of
TZ Medical products.
Any action for breach of warranty shall be commenced within one (1) year of said breach or be forever barred.
Any repairs made to the product that are not covered by the warranty shall be billed to the customer.
Obtaining Warranty Service
To obtain repairs, the device should be shipped pre-paid to TZ Medical at the address shown below. Units that
are repaired under warranty will be returned postage paid. Any device serviced by TZ Medical will be factory
reset, removing all custom device settings and formatting all data storage devices.
TZ Medical, Inc.
17750 SW Upper Boones Ferry Rd
Suite 150
Portland, OR 97224
Phone:
Fax:
800.944.0187
503.639.0239

Revision 0.3
Document No. 11573
Page 34
Accessories
The following accessories are available for use with the Aera CT.
Part Number
Description
3500-02
Aera CT Rechargeable Li-Ion Battery
5500-20
Aera CT 4GB microSDHC Card
6111-00
Aera CT 5-Electrode Patient Cable
6111-01
Aera CT 3-Electrode Patient Cable
7110-02
Aera CT Leather Carrying Case
7200-01
Aera CT Wall Charger
8510-00
Aera CT Device Tester
8520-00
Aera CT Multi-Battery Charger Unit
7200-22
Aera CT Multi-Battery Charger Power Supply
The following materials are provided with the Aera CT device.
Part Number
Description
3500-02
Rechargeable Li-Ion Battery
5500-20
MicroSD Card (4 GB)
7200-01
Aera CT Wall Charger