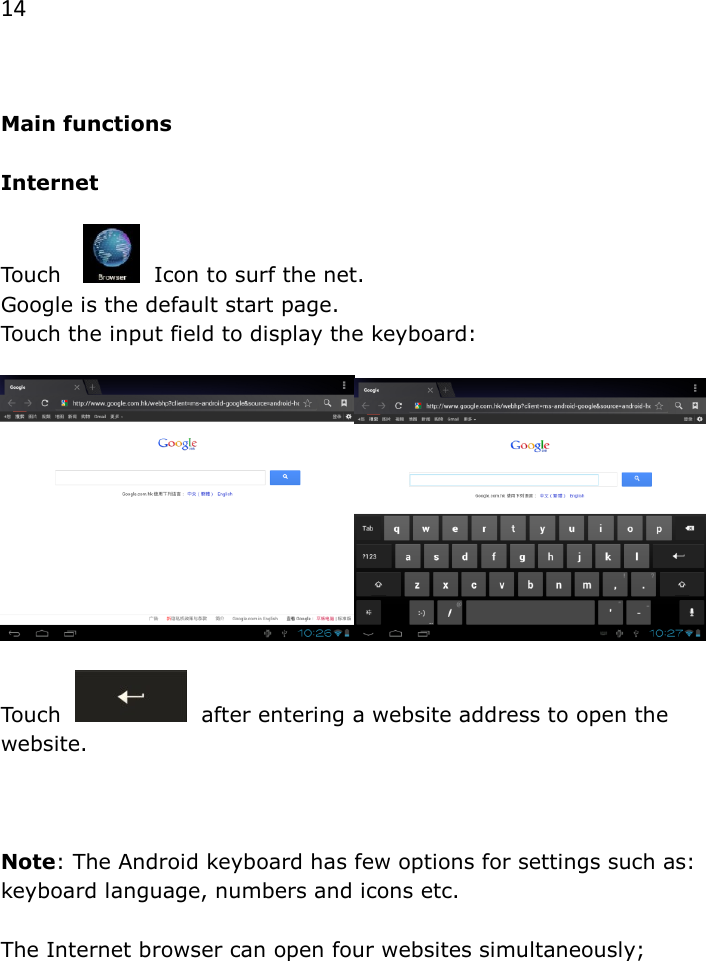
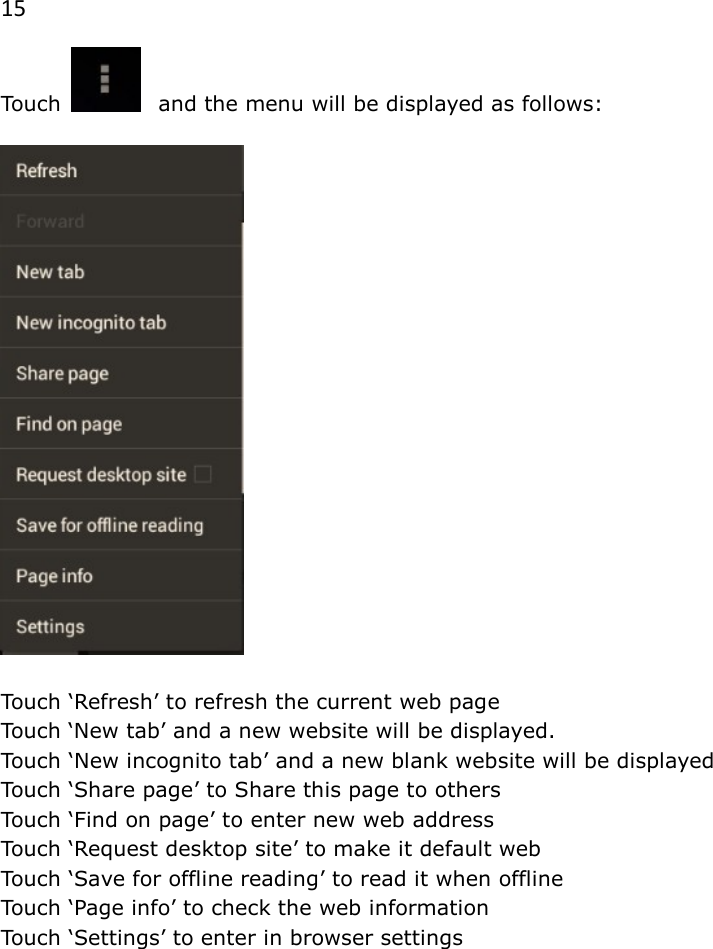
TabPilot Learning Systems HD1 9.7 inch tablet PC with WiFi and BT built in User Manual Benutzerhandbuch

TabPilot Learning Systems, Inc. 9.7 inch tablet PC with WiFi and BT built in Benutzerhandbuch

User Manual

1  User Manual        Applicant :TabPilot Learning Systems, Inc. Address: 517 Oothcalooga St. Ste. C, Calhoun, Georgia 30701, United States Description of  Equipment: 9.7 inch tablet PC with WiFi and BT built in Model: HD1 trade Name: Tabpilot    Congratulations for buying tablet pc Thank you very much for your trust and your decision to buy our product!   As we constantly update and improve our pad there may be small differences between the printed manual and your pad in some cases. You have  the option of downloading the current version of the manual and firmware updates
2  Table of Contents                                   Safety instructions        3 Description of the buttons       4 Language settings        5 Power monitoring    and charging the batteries      5 Screen lock          6 Connecting with computer and data transfer  6 Functions of the buttons on the   user interface          7 Programme menu        8 System settings          11   1. Wireless & Networks      11   2. Sound settings       13   3. Display settings      13   4. Location & safety      13   5. Application        13   6. Accounts & synchr.      13   7. Data protection      14   8. Memory        14   9. Language & keyboard      14   10. Date & time        14             11. Bluetooth                                            14   12. Telephone info      14 Internet           15 Open Source Code & GNU General Public License  16 Technical Data          17
3   Description of the buttons    1. POWER button                     9. ESC button 2. Card Slot  10. Front camera 3. USB/ OTG Port  11. Rear camera   4. DC-in    5. MIC                                  6. Earphone                               7. SPEAKERS       8. Volume Button
4   Language setting  PC is delivered with English as a default language.  To change the language setting, please do the following:  -  Press on the programme menu symbol     on the right side of the screen. -  Select ‘Settings’ . -  Scroll to the end of the list. -  Select ‘Language & keyboard’. -  Select ‘Select language’. -  Type your preferred language. -  Press the ‘Home’ button to return to the home screen.  Power monitoring and charging the batteries  The battery charge symbol in on the status bar indicates  the charging status of the batteries. If the power goes down, the device     shuts itself off automatically. If less power is shown, use the power adapter or a computer  via USB to charge the device.   The charging time for the battery is approximately six hours.
5   Screen lock  If the device is not used for specified time or the ‘Power’ button  is pressed briefly, the screen is switched off and display lock  is activated. By pressing the ‘Power’ button briefly the screen will be reactivated. For locking the screen press the ‘Lock’ button in the specified direction.  Connecting to the computer and data transfer  PC is equipped with a High-Speed USB2.0 Interface.  After you connect the device to a computer, it appears in  the status display .  Pull the status bar down and press ‘USB Connection’ to activate  the USB Memory. When using the device for data transfer,  you cannot access the Micro SD/TF Card from PC!
6   Functions of the buttons on the user interface:     Home Button:  To go back to the start screen.     Menu Button: To open the context menu.   Back Button:  To go back to the previous menu / previous page.    Program Menu Button:  To display the programs and applications.         Change Window Button:  The device has five desktops. You can press this button  or push your finger on the touch screen to the side to navigate between different desktops.     WIFI / WLAN Signal Icon    System instructions: Pull the status bar down to view messages about new e-mails,
7 downloaded documents, USB Connection Status or other information.  Program menu   ApkInstaller:  Program for installing and uninstalling Apps that were not downloaded from the Android Market.  Market(Google play store):  Load Apps (programs) from the Android Market. You can download and install apps, games and other applications. Many are free.   Explorer:  Open the Explorer to access Micro SD TF Cards, USB sticks and other storage media. The Explorer is a practical manager for documents and all types of data.                                Internet browser  Front& back 2.0MP camera    E-mail:  Program for retrieving, processing and sending e-mails.  G-mail:  Program for retrieving, processing and sending e-mails through Google account.
8 Google Maps:  Program for the display of maps or satellite images – Route planner.  Calendar:  Managing schedules – can be synchronised automatically with a Google account.  Pocket Calculator  Time:  Time display and setting alarm functions.    Settings:  Changing the basic settings of EasyPad.   Sound Recorder:  Dictation Device Function.    Video Player  Gallery:  Manage and display images and videos – also enables  synchronisation with Picasa web albums.
9                  System settings  Touch the icon for the settings  to open the system settings menu:  1. Wireless & Networks  Touch ‘Wireless & Networks’.
10    WIFI: Touch      =>     to switch on the WLAN function.  The device automatically searches for available WLAN networks.  WLAN Settings: Select your network here.  If needed you will be requested to enter your WLAN password:
11     Advanced WLAN / Wi-Fi settings:  Touch   in the menu for WLAN / Wi-Fi Settings, the menu for advanced settings will open up automatically. In the menu for the advanced settings you can view the current status, the IP address and other device information.
12  2. Sound settings The ‘Sound’ settings contain the volume control, and selection of notification sounds, system sounds, signal tones for Micro SD/TF Cards and USB signal tone.  3. Display settings Includes brightness, automatic screen rotation (G-sensor), animations and display timeout time,  Switch off display after: 15 seconds, 30 seconds, 1 minute, 2 minutes, 10 minutes or  30 minutes are available. For example, if you select 30 seconds,  the display will be switched after 30 seconds of inactivity and screen lock is activated. Press the ‘Power’ button to reactivate the Display. Push the ‘Lock’ button up to lift the screen lock.   4. Location & safety  Here you can activate the automatic recognition of the location.  You can also set security passwords which will prevent unauthorised access to your EasyPad.  5. Application Here you can manage your apps and define if apps from sources other than the Android Market are allowed to be installed.  6. Accounts & synchr. General synchronisation settings:   1. Background data  2. Automatic synchronisation
13 Account management: Management of user accounts  7. Data protection Secure my data: Here you can define if different settings  should be stored on Google servers.  Touch ‘Reset to default’ to reset the device to factory settings.  All settings, self-installed apps and data stored on internal memory can be deleted.   8. Memory Here the current memory use is displayed. Touch ‘Remove SD Card’ to remove the Micro SD/TF Card  during use.  9. Language and keyboard Set the system language and input method.  10. Date and time If your network does not support automatic setting of time,  you can set the time, time zone and date manually after deactivating automatic settings.  11. Bluetooth Setting  In Wireless & Networks settings,After it scans and detects the Bluetooth phone devices, users should pair the phone, when it is paired, it will work.  12. Telephone info Here you can view device internal values such as operating system version, battery status, signal strength of the mobile network etc.
14   Main functions  Internet  Touch      Icon to surf the net.  Google is the default start page.  Touch the input field to display the keyboard:     Touch     after entering a website address to open the website.     Note: The Android keyboard has few options for settings such as: keyboard language, numbers and icons etc.   The Internet browser can open four websites simultaneously;
15 Touch   and the menu will be displayed as follows:    Touch ‘Refresh’ to refresh the current web page Touch ‘New tab’ and a new website will be displayed. Touch ‘New incognito tab’ and a new blank website will be displayed  Touch ‘Share page’ to Share this page to others Touch ‘Find on page’ to enter new web address Touch ‘Request desktop site’ to make it default web Touch ‘Save for offline reading’ to read it when offline Touch ‘Page info’ to check the web information Touch ‘Settings’ to enter in browser settings
16 Technical Data  CPU      Rockchip 3188 1.5GHz GPU                               4 cores Mali 400MP   OS                                 Android 4.1,1– Jelly bean RAM      2GB DDR3 Internal Memory    8/16/32GB NAND Flash Memory Expansion  Micro SD/SDHC up to 32GB Camera      Front 2.0MP, Back 2.0MP MIC      Yes  WIFI      802.11b/g/n (high sensitivity) I/O ports    1x DC In, 1x headphone, 1x TF Card-Slot,        1x USB 2.0/OTG Video-Formats    H.264, VP8, RV, WMV, AVS, H.263, MPEG4 etc 1080P,                   YouTube, 720P, HTML5, Flash 11 Office      Word / Excel / PDF / PPT, Microsoft Word pad,        Microsoft Spread Excel        The software is not on the device and       must be downloaded by the user. Images      JPG, BMP, PNG etc.  A.Please select the headphone output mode to listen music in public place, so as not to disturb others.  C Please keep the device away from places with high temperatures, high humidity or dust.  D In particular please avoid leaving the device in the car during summer if the doors are closed.  E Avoid shocks and do not let the device fall, as otherwise it may cause damage to
17 the device.  F The Standby Time of the batteries may vary due to different environmental influences.   G We are not responsible for data losses that are caused by damage to the product, repairs or any other reasons.   H Do not open the housing of the device. Doing this will void your warranty claims.  I Do not use alcohol, thinners or petrol to clean the display  – use only a dry cloth.  FCC  Warning Statement:   This equipment has been tested and found to comply with the limits for a Class B digital device, pursuant to part 15 of the FCC Rules. These limits are designed to provide reasonable protection against harmful interference in a residential installation. This equipment generates, uses and can radiate radio frequency energy and, if not installed and used in accordance with the instructions, may cause harmful interference to radio communications. However, there is no guarantee that interference will not occur in a particular installation. If this equipment does cause harmful interference to radio or television reception, which can be determined by turning the equipment off and on, the user is encouraged to try to correct the interference by one or more of the following measures: • Reorient or relocate the receiving antenna. • Increase the separation between the equipment and receiver. • Connect the equipment into an outlet on a circuit different from that to which the receiver is connected. • Consult the dealer or an experienced radio/TV technician for help.  Caution: Any changes or modifications to this device not explicitly approved by manufacturer could void your authority to operate this equipment.  This device complies with part 15 of the FCC Rules. Operation is subject to the following two conditions: (1) This device may not cause harmful interference, and (2) this device must accept any interference received, including interference that may cause undesired operation.
18   The device has been evaluated to meet general RF exposure requirement. The device can be used in portable exposure condition without restriction.  This equipment complies with FCC RF radiation exposure limits set forth for an uncontrolled environment. This device and its antenna must not be located or operating in conjunction with any other antenna or transmitter.

Navigation menu