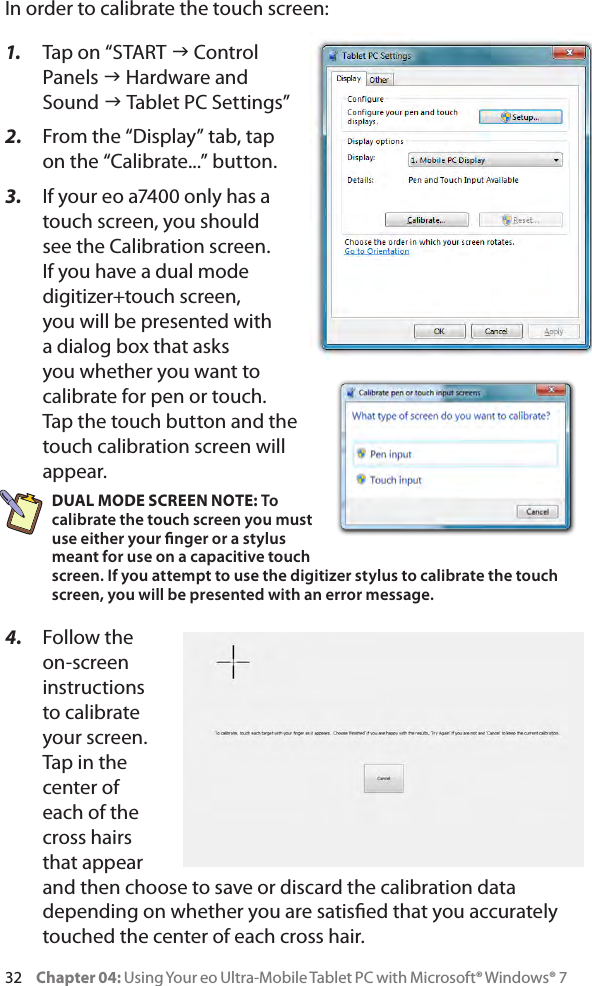
Tabletkiosk TK72BGNTE7400 Tablet PC User Manual eo a7400 User s Guide
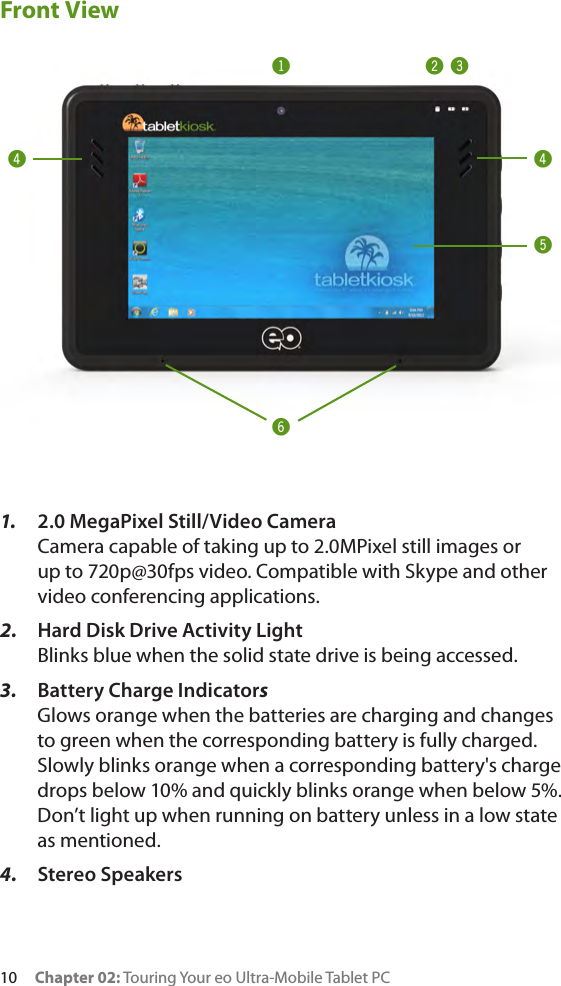
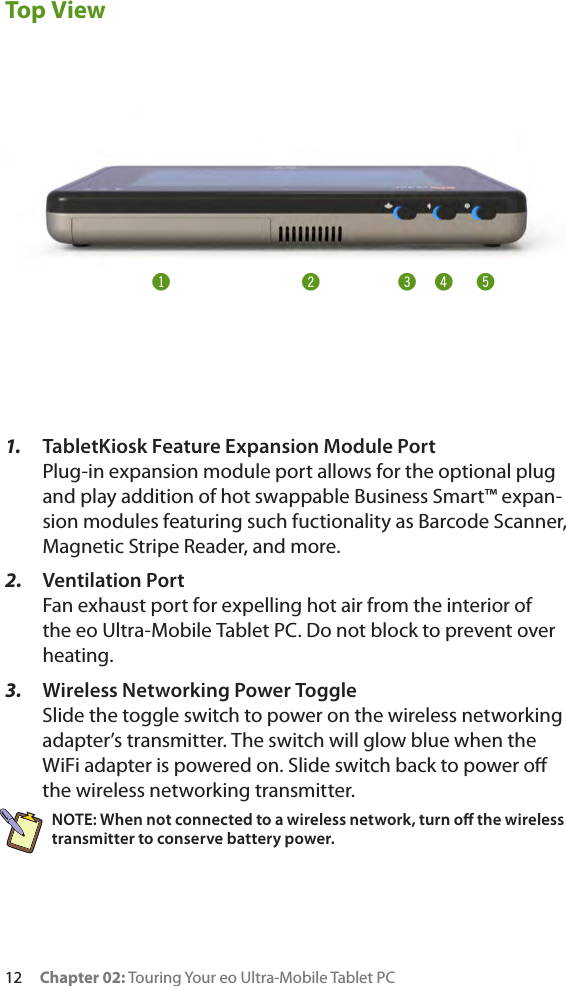
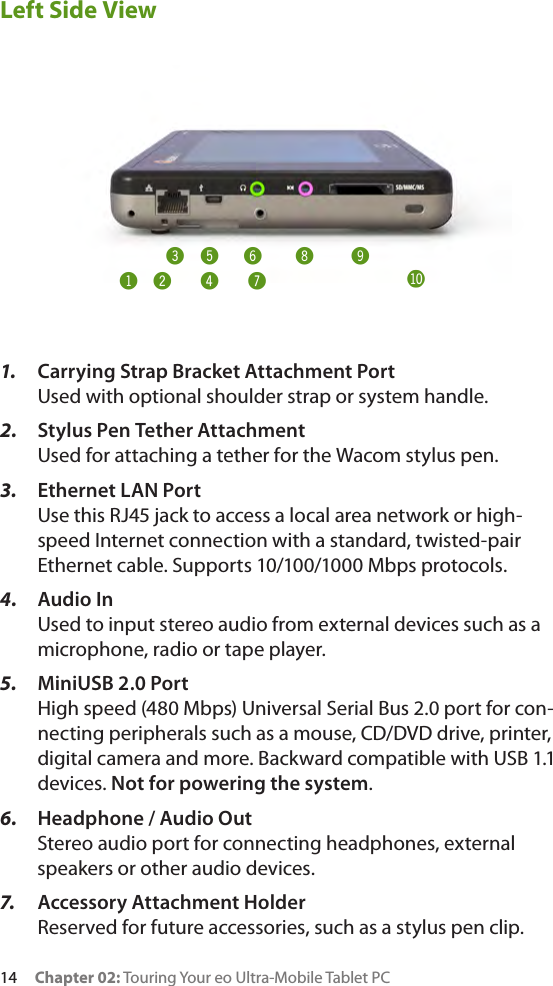
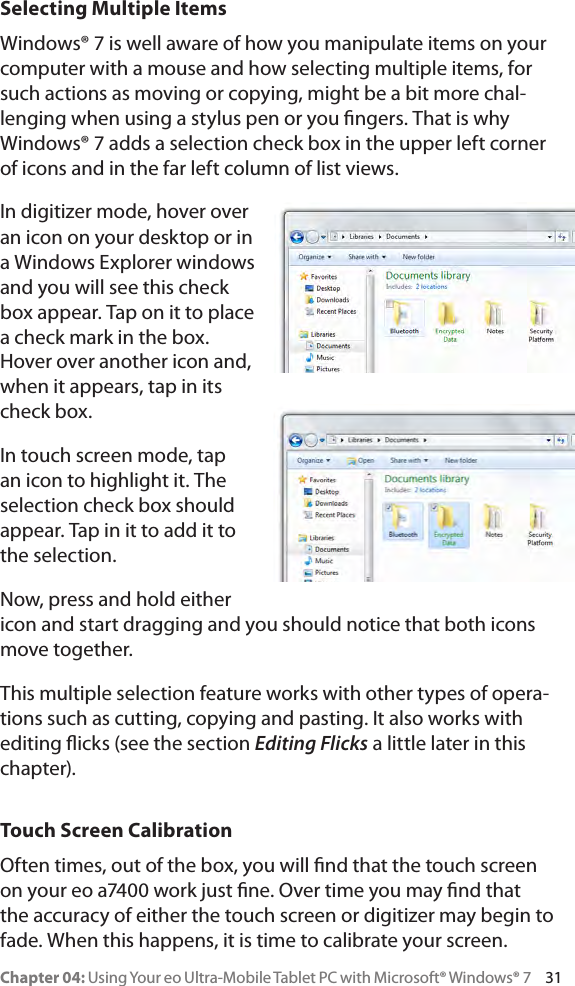
Tabletkiosk Tablet PC eo a7400 User s Guide
UserManual.wiki
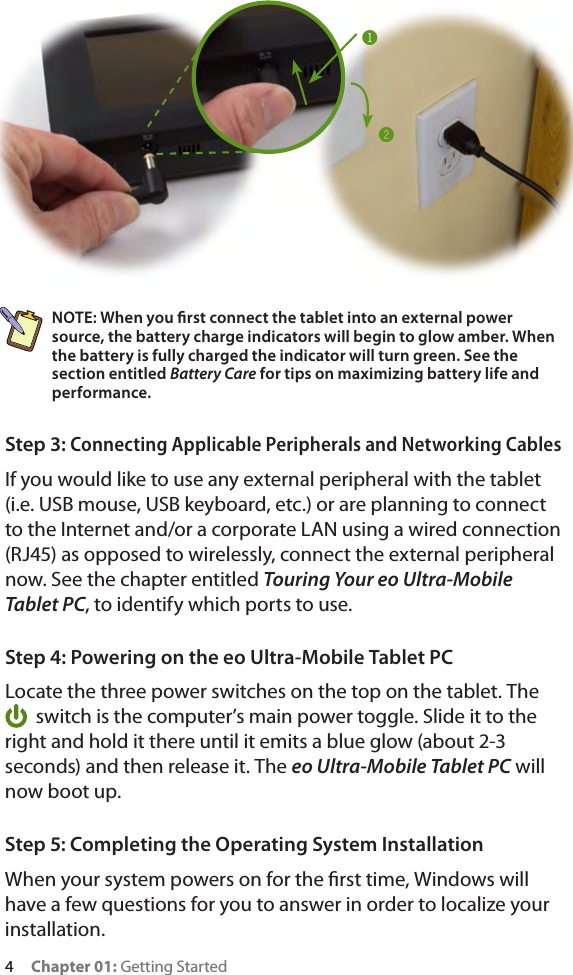
>
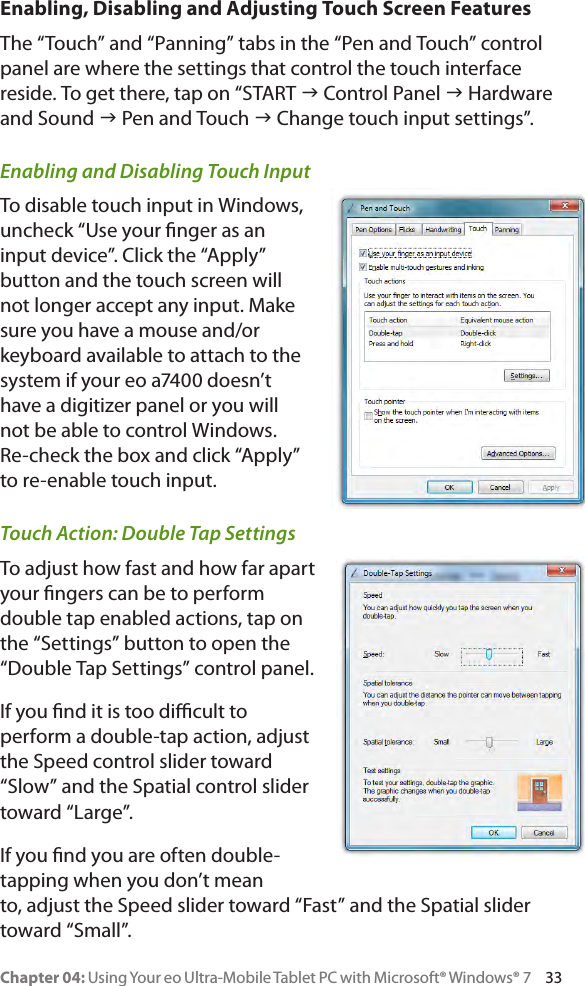
Tabletkiosk
>
TK72BGNTE7400 User Manual
Manual
Navigation menu
Upload a User Manual
Namespaces
Wiki Guide
HTML
PDF
Info
Views
User Manual
Discussion / Help
Navigation


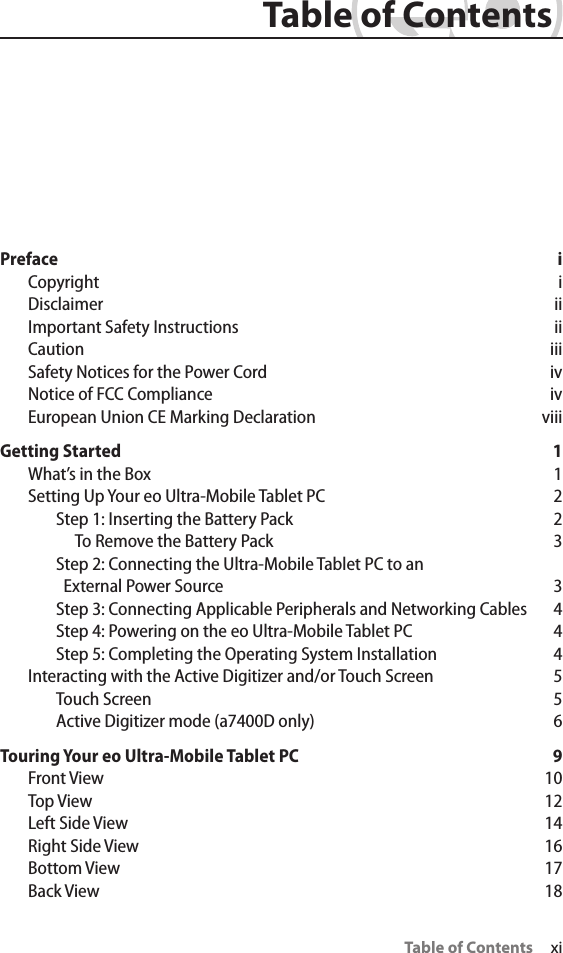


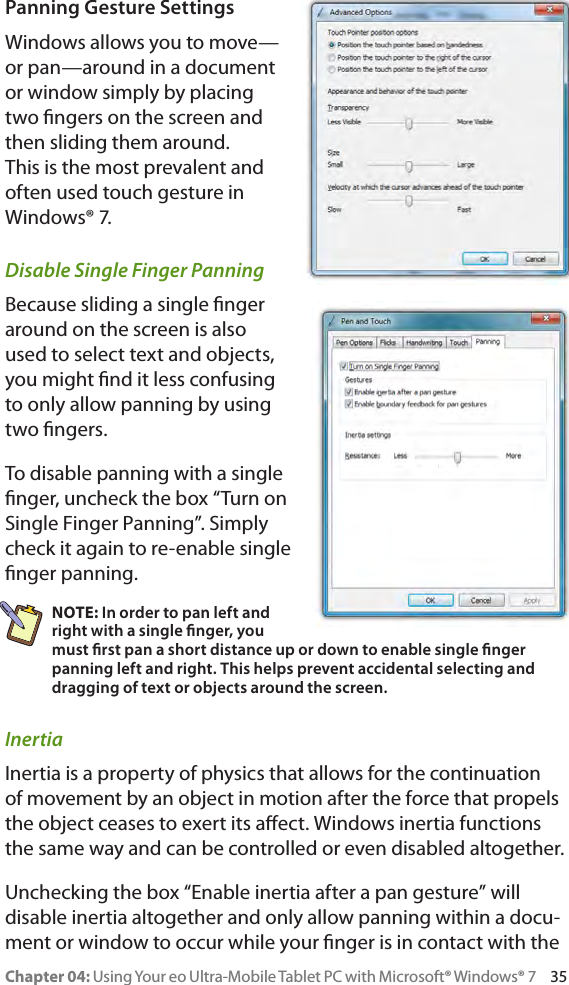
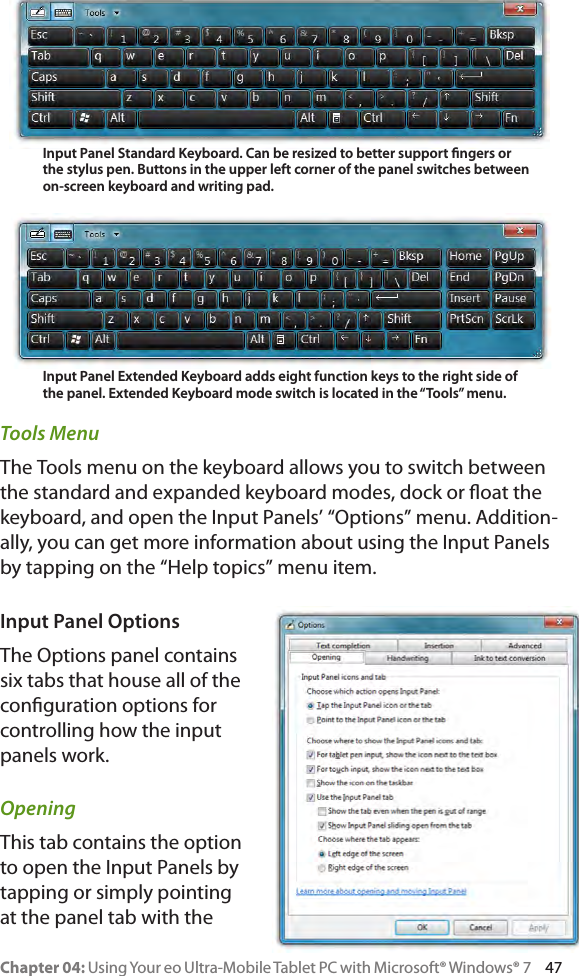

![56 Chapter 04: Using Your eo Ultra-Mobile Tablet PC with Microsoft® Windows® 7the [Windows] modier key and then the [E] key to open the Windows Explorer.4. Tap the “Save” button to save your custom ick action.When you are done customizing all of your icks, tap on the “OK” button at the bottom of the panel to return to the “Pen and Touch” control panel and then tap on the “Apply” button to activate and test your icks.Touch GesturesAs the name implies, touch gestures are meant to be used when navigating on a touch screen. Windows Touch enables several gestures that support both single and multi-touch contacts. Standard Windows multi-touch gestures only support capacitive touch screens.Enabling and Disabling Multi-Touch GesturesMany of the most useful gestures built into Windows® 7 require two nger touch. To disable these behaviors, simply uncheck the box “Enable multi-touch gestures and inking”.Panning with (or without) InertiaPanning is similar to scrolling up/down or left/right on a page with a mouse, except it is easier and more natural. You can use either one or two ngers to pan up or down, but you must use two ngers to pan left and right.Simply place your nger tip or stylus on the page and move your nger in the direction you want to page to pan. To pan rapidly in](https://usermanual.wiki/Tabletkiosk/TK72BGNTE7400/User-Guide-1886560-Page-74.png)


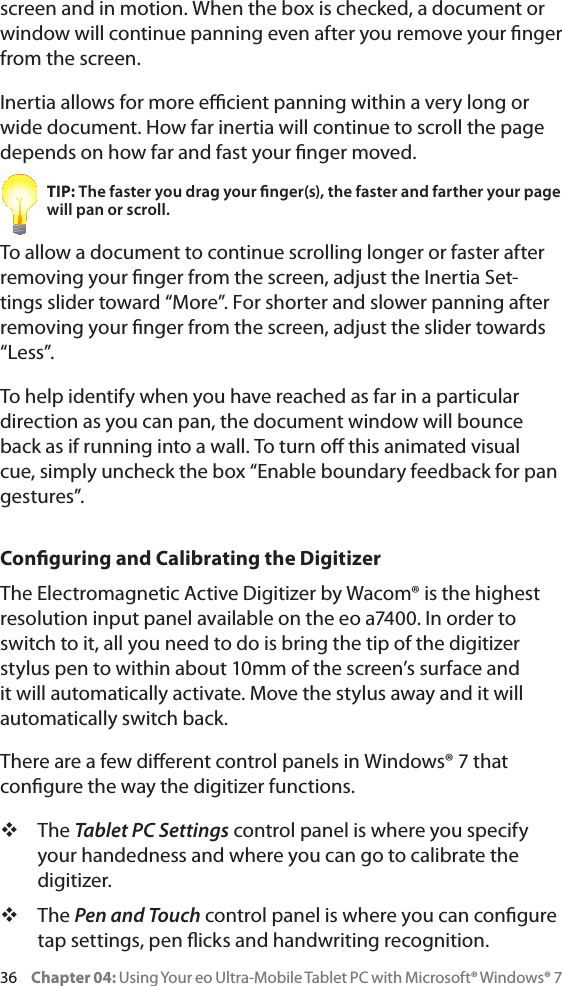
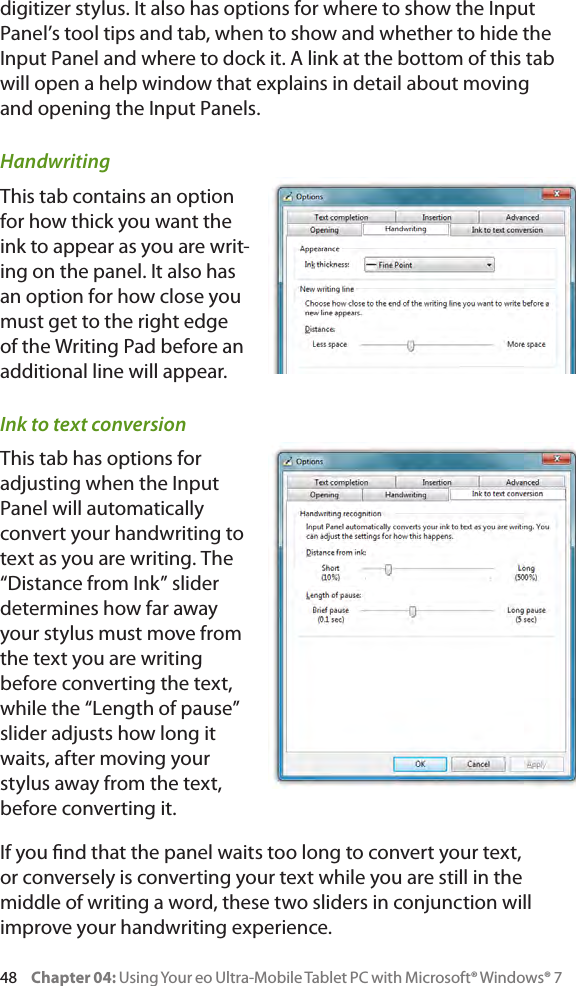
![Chapter 05: Troubleshooting 85the Advanced Boot Options menu by hitting the [F8] key on your keyboard when your eo a7400 rst starts up.NOTE: The easiest way to enter the Advanced Boot Menu is by repeatedly pressing the [F8] key as soon as you see the TabletKiosk logo screen and not stopping until the Advanced Boot Options menu screen appears.1. When the Advanced Boot Options menu appears, select “Re-pair Your Computer” and press [Enter] to launch Windows Recovery.2. When the recovery system starts, choose your preferred keyboard language.3. In order to access the recovery options, you will need to login using your current Windows login.NOTE: Your current account must have administrator privileges in order to successfully login.4. After successfully logging in, you will be taken to the System Recovery Options menu where you can choose to: Repair your Windows installation. Restore Windows to a earlier point in time. Recover your system using a system image you previ-ously created in the Windows backup program. Run a memory diagnostic program to check your computer for memory hardware errors. Open a command prompt window.](https://usermanual.wiki/Tabletkiosk/TK72BGNTE7400/User-Guide-1886560-Page-103.png)


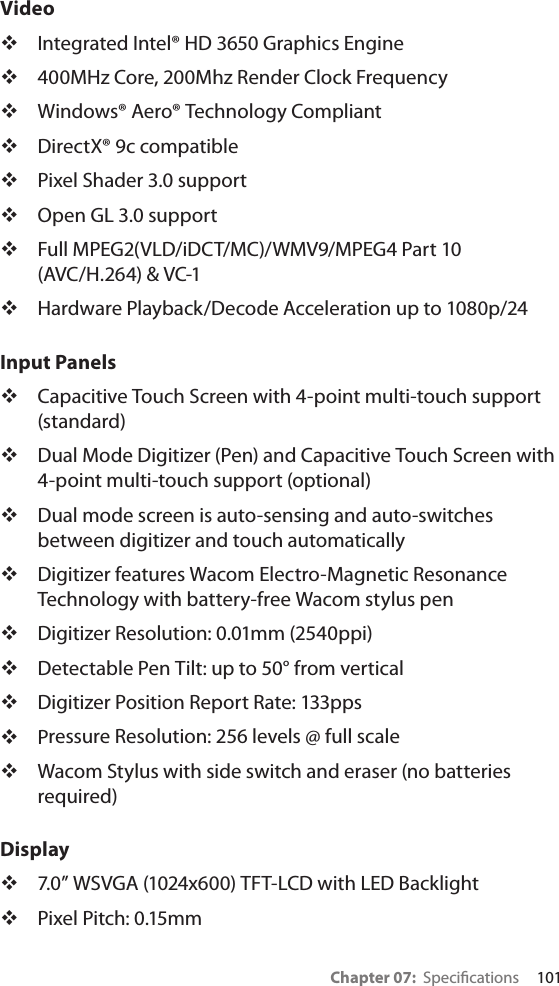
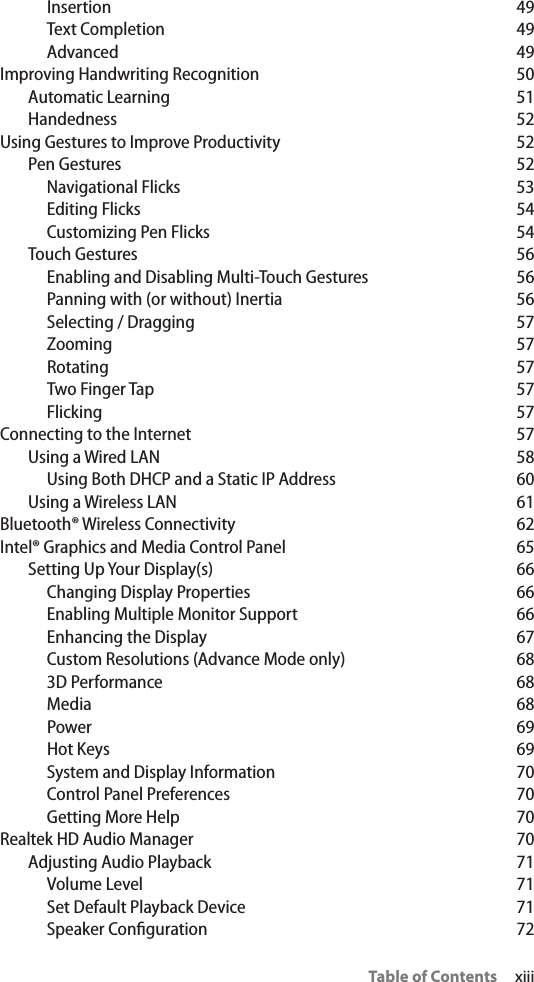
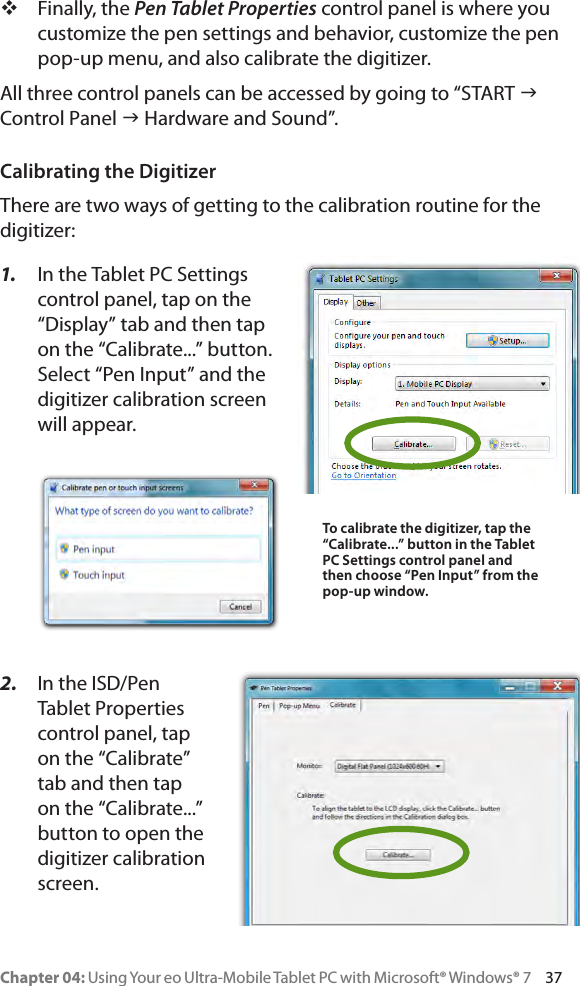
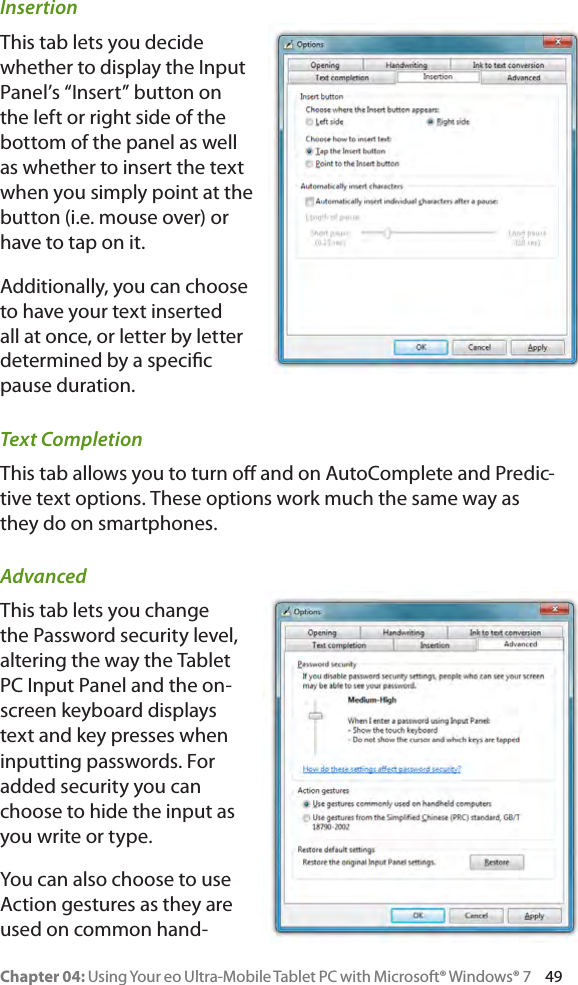
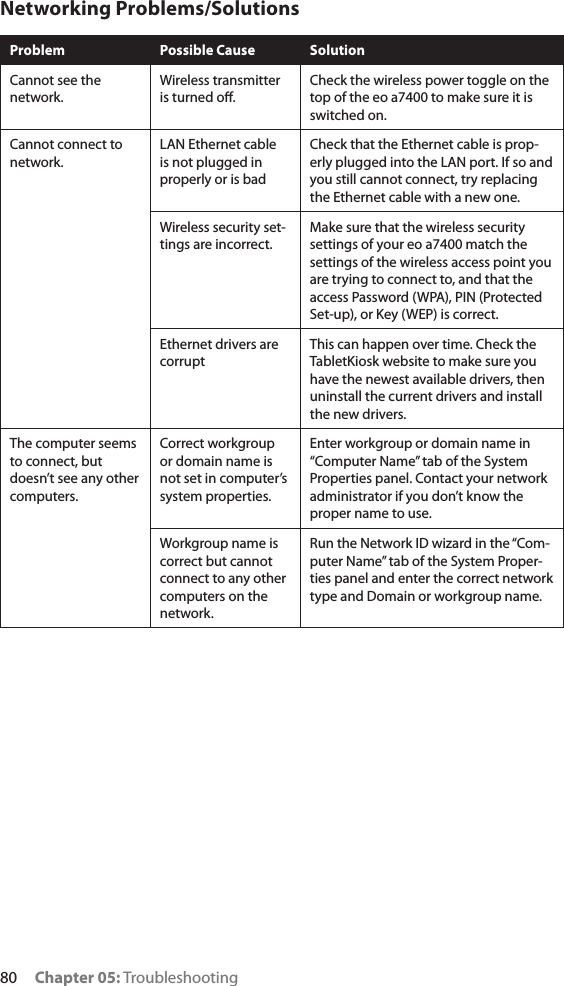
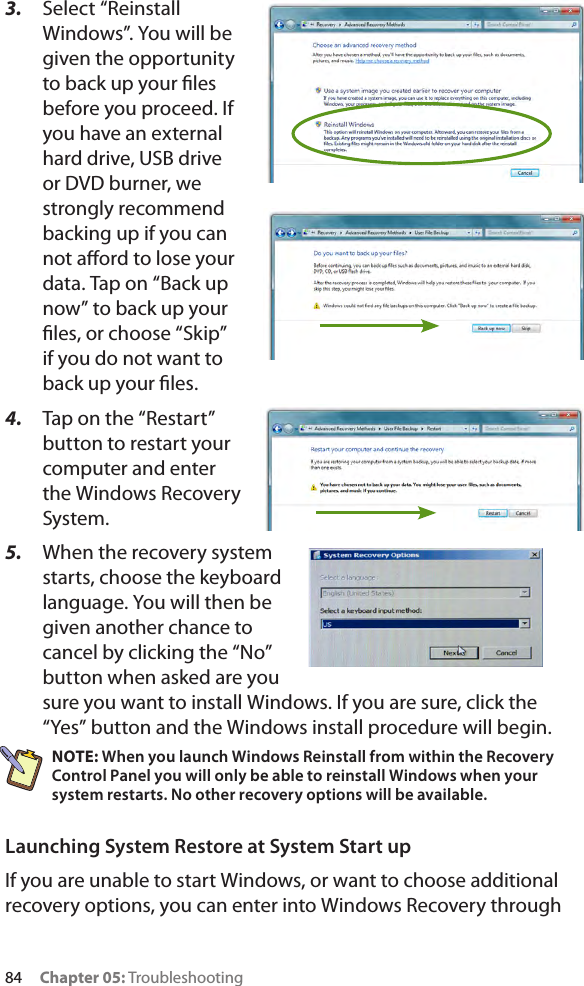
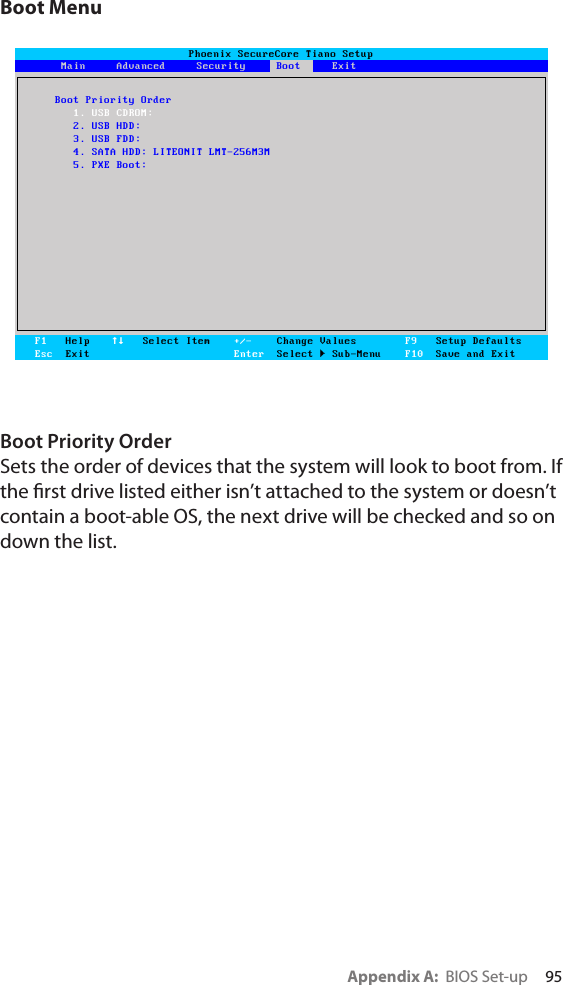
![90 Appendix A: BIOS Set-upNavigating in the BIOSPhoenix SecureCore Tiano SetupMain Advanced Security Boot ExitF1 HelpEsc Exit Select Item +/- Change ValuesEnter Select Sub-MenuF9 Setup DefaultsF10 Save and ExitMainCPU Type Intel(R) Atom(TM) CPU N2600 @ 1.60GHzCPU Speed 1.60 GHzInstalled Memory 2048 MBSystem BIOS Version N26K_0.32.IA32Build Date 10/10/2012KBC Version 0.58Serial Number SYN0000000000001Asset Tag Number Asset TagUUID 00000000-0000-0000-0000000000000000Product Name a7400Manufacturer Name TabletKioskSystem Time [15:08:31]System Date [10/12/2012]To navigate in the BIOS, simple tap on the options you want to select using either your nger or the stylus pen. Tap on the navigation options at the bottom of the screen for pressing [F1], [Esc], [Enter], [F9] or [F10]. You may also tap on the arrow symbols to move up, down, left or right as well as on the +/- to change values in selected elds.NOTE: How you enter the BIOS, tapping with either your nger or the digitizer stylus pen, is also how you will navigate in the BIOS. For example, if you tapped the screen with your nger, then the BIOS will activate with the touch screen and will only respond to your nger. On a system with a dual mode screen, if you tapped with the digitizer stylus, the BIOS will activate using the digitizer panel and only respond to the stylus.As with any standard PC, you can also navigate the BIOS by plugging in a USB keyboard before powering on the system and using the corresponding keys from the navigation legend.The navigation legend at the bottom of the BIOS screen doubles as a control pad when navigating the BIOS with either touch or the digitizer stylus.](https://usermanual.wiki/Tabletkiosk/TK72BGNTE7400/User-Guide-1886560-Page-108.png)
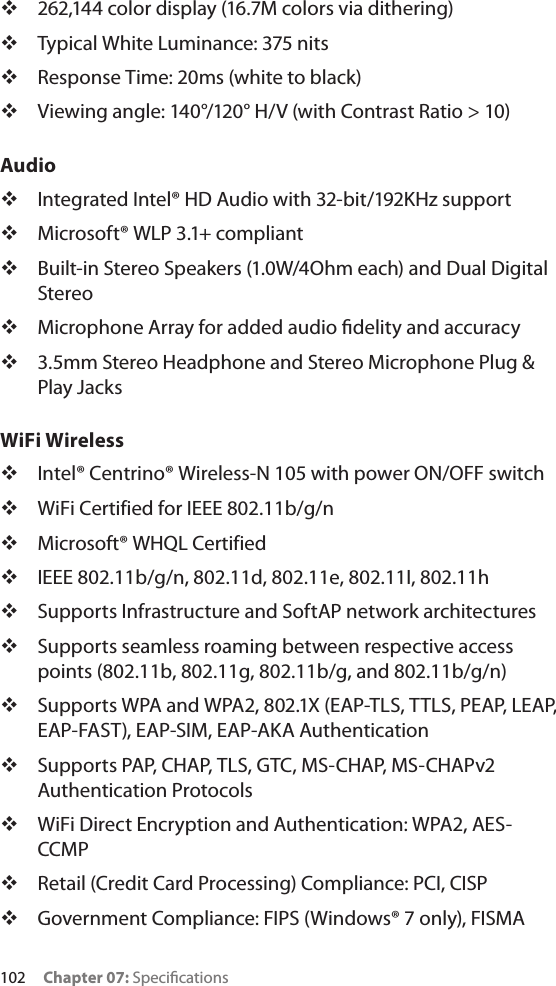
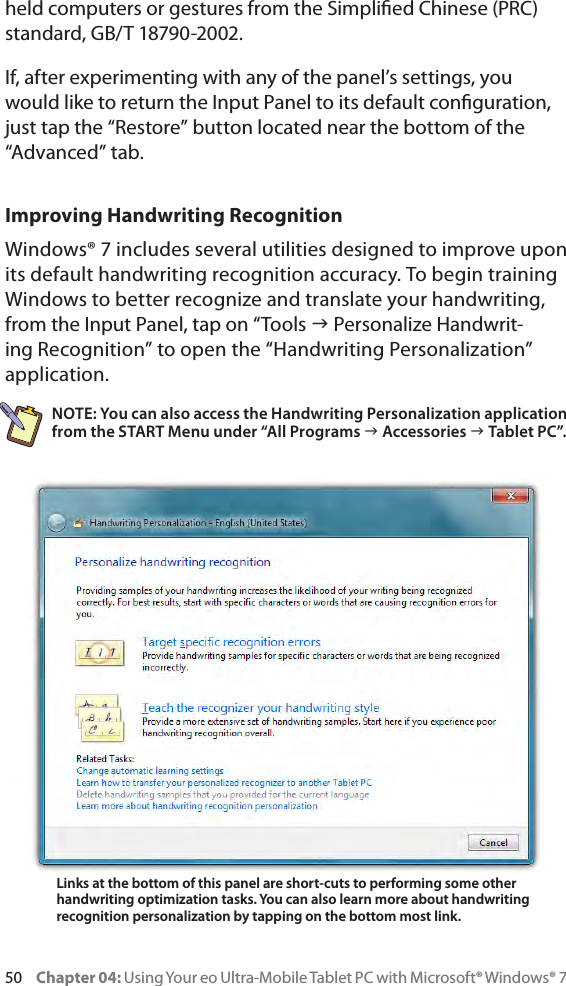
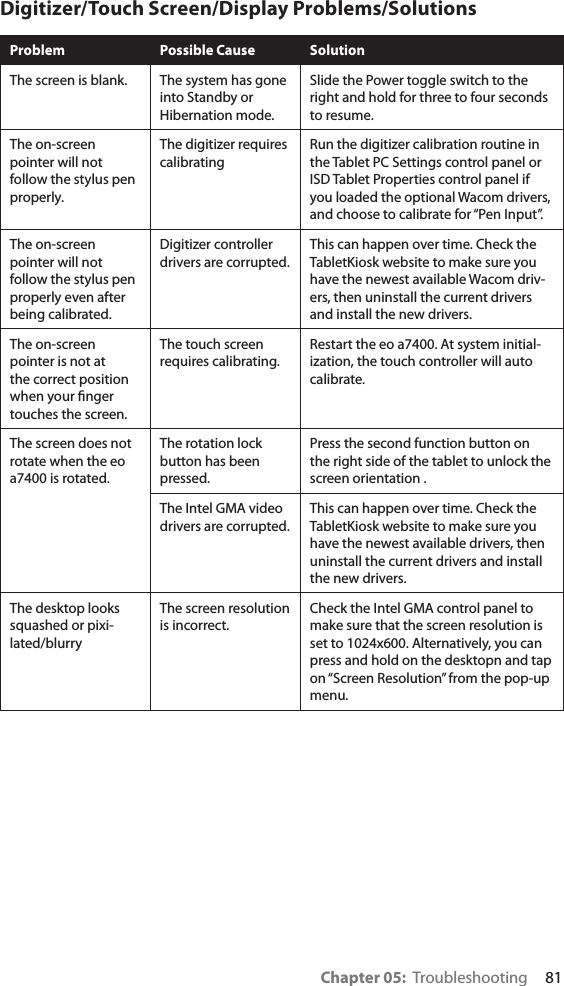
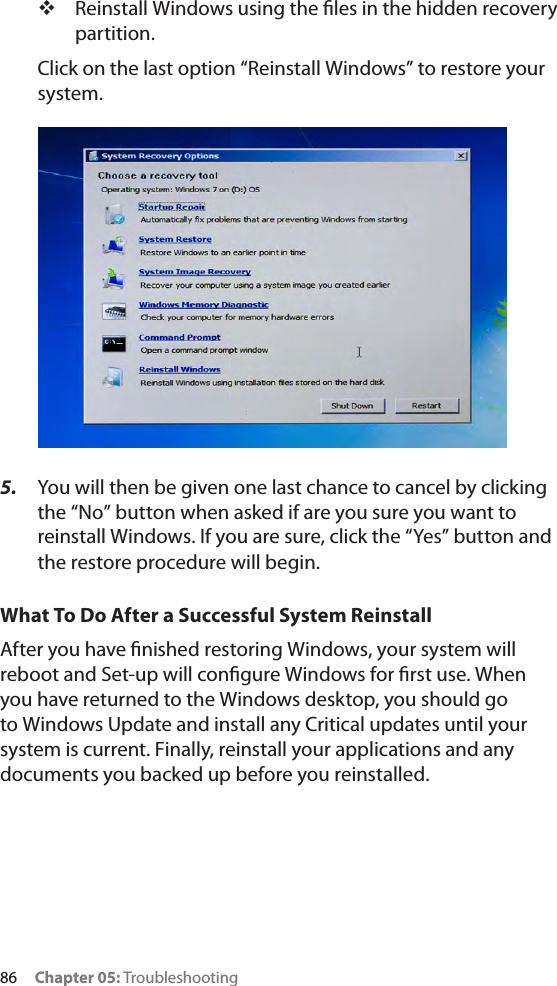
![Appendix A: BIOS Set-up 91Main MenuSystem TimeSets the system time. Accepts and displays values in 24 hour format. System DateSets the system date. Accepts a value from January 1, 1980 to December 31, 2099. This value takes eect immediately.Phoenix SecureCore Tiano SetupMain Advanced Security Boot ExitF1 HelpEsc Exit Select Item +/- Change ValuesEnter Select Sub-MenuF9 Setup DefaultsF10 Save and ExitMainCPU Type Intel(R) Atom(TM) CPU N2600 @ 1.60GHzCPU Speed 1.60 GHzInstalled Memory 2048 MBSystem BIOS Version N26K_0.32.IA32Build Date 10/10/2012KBC Version 0.58Serial Number SYN0000000000001Asset Tag Number Asset TagUUID 00000000-0000-0000-0000000000000000Product Name a7400Manufacturer Name TabletKioskSystem Time [15:08:31]System Date [10/12/2012]](https://usermanual.wiki/Tabletkiosk/TK72BGNTE7400/User-Guide-1886560-Page-109.png)
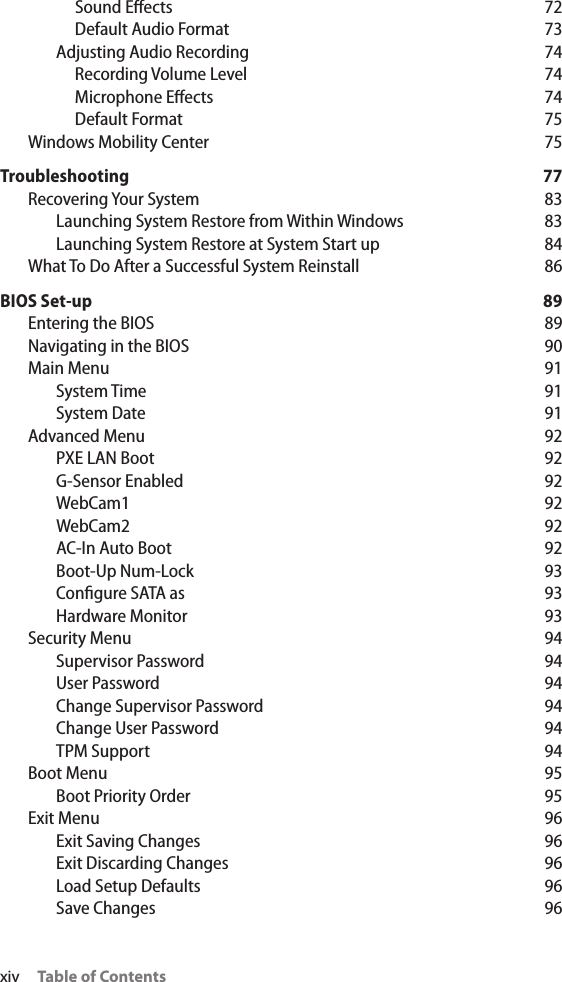
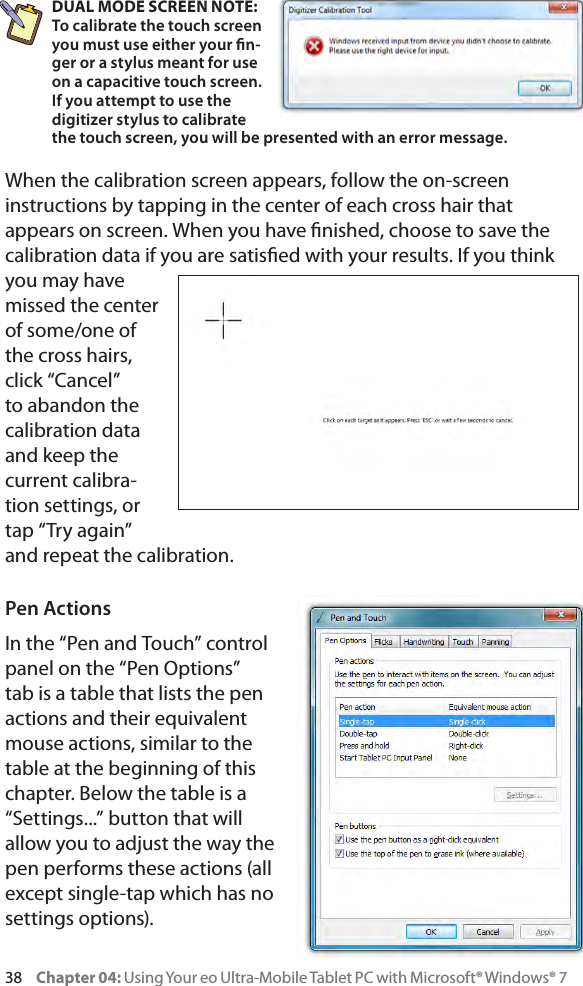
![92 Appendix A: BIOS Set-upAdvanced MenuPXE LAN BootWhen enabled, system can boot from a network drive.G-Sensor EnabledWhen enabled screen will automatically rotate to match the system orientation.WebCam1Enables and disables the front webcam.WebCam2Enables and disables the rear webcam.AC-In Auto BootWhen enabled, system will automatically power on and boot-up when the system is plugged in.Phoenix SecureCore Tiano SetupMain Advanced Security Boot ExitF1 HelpEsc Exit Select Item +/- Change ValuesEnter Select Sub-MenuF9 Setup DefaultsF10 Save and ExitAdvancedPXE LAN BOOT [Disabled]G-Sensor Enable [Enabled]WebCam1 [Enabled]WebCam2 [Enabled]AC-In Auto Boot [Disabled]Boot-Up Num-Lock [Off]Configure SATA as [AHCI]Hardware MonitorBattery Calibration](https://usermanual.wiki/Tabletkiosk/TK72BGNTE7400/User-Guide-1886560-Page-110.png)
![94 Appendix A: BIOS Set-upSecurity MenuSupervisor PasswordShows the state of the Supervisor password.User PasswordShows the state of the User password.Change Supervisor PasswordSets password to enter and change settings in BIOS. Setting only this password will not require a password to be entered in order to boot the system, but a password will be required to enter the BIOS.Change User PasswordSets password to allow the system to boot. If no Supervisor password is set, user will be allowed to enter BIOS without being required to enter an additional password.TPM SupportEnables/Disables the Trusted Platform Module.Phoenix SecureCore Tiano SetupMain Advanced Security Boot ExitF1 HelpEsc Exit Select Item +/- Change ValuesEnter Select Sub-MenuF9 Setup DefaultsF10 Save and ExitSecuritySupervisor Password: ClearedUser Password: ClearedChange Supervisor Password [Enter]Change User Password [Enter]TPM Support [Disabled]Phoenix SecureCore Tiano SetupMain Advanced Security Boot ExitF1 HelpEsc Exit Select Item +/- Change ValuesEnter Select Sub-MenuF9 Setup DefaultsF10 Save and ExitSecuritySupervisor Password: ClearedUser Password: ClearedChange Supervisor Password [Enter]Change User Password [Enter]TPM Support [Disabled]](https://usermanual.wiki/Tabletkiosk/TK72BGNTE7400/User-Guide-1886560-Page-112.png)
![96 Appendix A: BIOS Set-upExit MenuExit Saving ChangesSaves the changes made to the BIOS and exits. Selecting [Yes] saves changes and exits. Selecting [No] returns to menu without saving any changes.Exit Discarding ChangesDiscards changes made to the BIOS and exits. Selecting [Yes] exits BIOS without saving any changes. Selecting [No] returns to menu without saving changes.Load Setup DefaultsLoads the optimized system defaults as congured from the factory. Selecting [Yes] changes all the BIOS settings back to their original optimized factory settings. Selecting [No] keeps the BIOS settings as they are currently and returns to the menu.Save ChangesSaves the changes made in the BIOS but does not exit.Phoenix SecureCore Tiano SetupMain Advanced Security Boot ExitF1 HelpEsc Exit Select Item +/- Change ValuesEnter Select Sub-MenuF9 Setup DefaultsF10 Save and ExitExitExit Saving ChangesExit Discarding ChangesLoad Setup DefaultsDiscard ChangesSave Changes](https://usermanual.wiki/Tabletkiosk/TK72BGNTE7400/User-Guide-1886560-Page-114.png)