Tait TEL0047 One way paging transmitters T836-26-1010 & T836-26 User Manual 8c300 a3 bk

Tait Limited One way paging transmitters T836-26-1010 & T836-26 8c300 a3 bk

Contents

Installation Guide

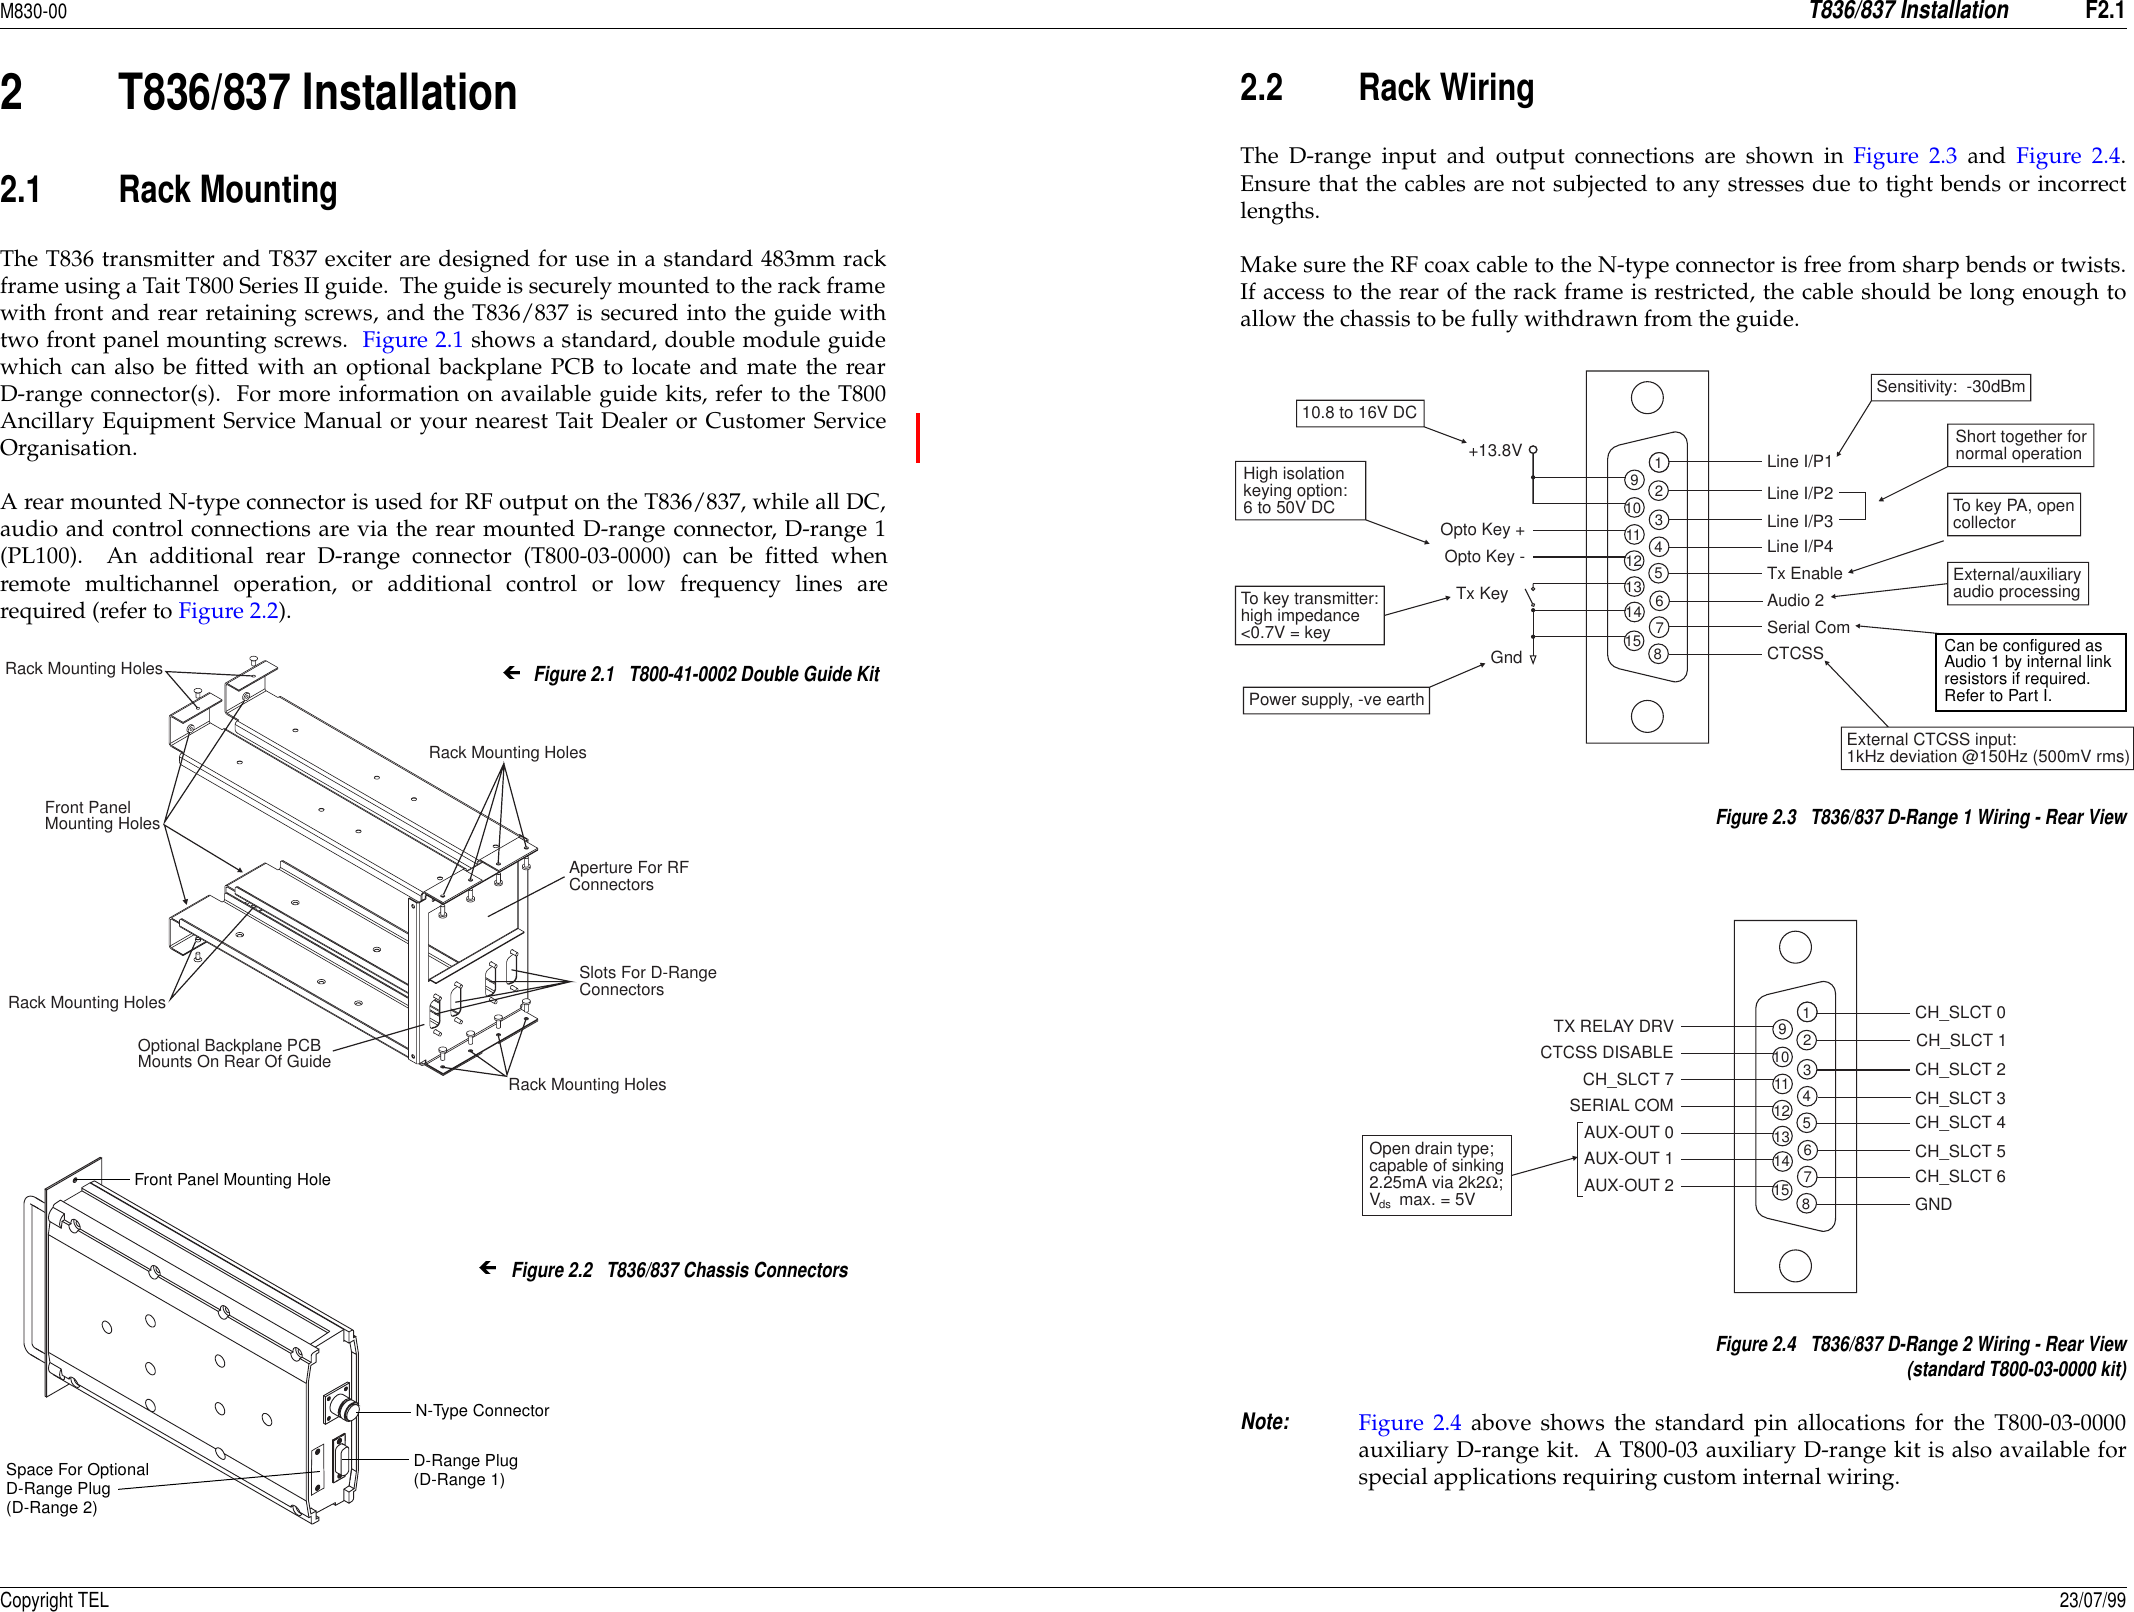
M830-00T836/837 InstallationF2.1Copyright TEL 23/07/992 T836/837 Installation2.1 Rack MountingThe T836 transmitter and T837 exciter are designed for use in a standard 483mm rackframe using a Tait T800 Series II guide.  The guide is securely mounted to the rack framewith front and rear retaining screws, and the T836/837 is secured into the guide withtwo front panel mounting screws.  Figure 2.1 shows a standard, double module guidewhich can also be fitted with an optional backplane PCB to locate and mate the rearD-range connector(s).  For more information on available guide kits, refer to the T800Ancillary Equipment Service Manual or your nearest Tait Dealer or Customer ServiceOrganisation.  A rear mounted N-type connector is used for RF output on the T836/837, while all DC,audio and control connections are via the rear mounted D-range connector, D-range 1(PL100).  An additional rear D-range connector (T800-03-0000) can be fitted whenremote multichannel operation, or additional control or low frequency lines arerequired (refer to Figure 2.2).2.2 Rack WiringThe D-range input and output connections are shown in Figure 2.3 and Figure 2.4.Ensure that the cables are not subjected to any stresses due to tight bends or incorrectlengths.Make sure the RF coax cable to the N-type connector is free from sharp bends or twists.If access to the rear of the rack frame is restricted, the cable should be long enough toallow the chassis to be fully withdrawn from the guide.Figure 2.3   T836/837 D-Range 1 Wiring - Rear ViewFigure 2.4   T836/837 D-Range 2 Wiring - Rear View(standard T800-03-0000 kit)Note:Figure 2.4 above shows the standard pin allocations for the T800-03-0000auxiliary D-range kit.  A T800-03 auxiliary D-range kit is also available forspecial applications requiring custom internal wiring.Front PanelMounting HolesRack Mounting HolesRack Mounting HolesRack Mounting HolesSlots For D-RangeConnectorsRack Mounting HolesAperture For RFConnectorsOptional Backplane PCBMounts On Rear Of GuideN-Type ConnectorD-Range Plug(D-Range 1)Space For OptionalD-Range Plug(D-Range 2)Front Panel Mounting HoleFigure 2.2   T836/837 Chassis ConnectorsFigure 2.1   T800-41-0002 Double Guide Kit123456789101112131415External CTCSS input:1kHz deviation @150Hz (500mV rms)To key transmitter:high impedance<0.7V = keyHigh isolationkeying option:6 to 50V DC To key PA, opencollectorCan be configured asAudio 1 by internallink resistors if requiredShort together fornormal operationSensitivity:  -30dBmExternal/auxiliaryaudio processingPower supply, -ve earth10.8 to 16V DCLine I/P1CTCSSSerial ComAudio 2Tx EnableLine I/P4Line I/P3Line I/P2Opto Key +Opto Key - +13.8VGndTx KeyCan be configured as Audio 1 by internal link resistors if required.Refer to Part I.Open drain type;capable of sinking2.25mA via 2k2Ω;V    max. = 5Vds123456789101112131415CH_SLCT 0CH_SLCT 1CH_SLCT 2CH_SLCT 3CH_SLCT 4CH_SLCT 5CH_SLCT 6CH_SLCT 7GNDTX RELAY DRVCTCSS DISABLESERIAL COMAUX-OUT 0AUX-OUT 1AUX-OUT 2
F2.2T836/837 InstallationM830-0023/07/99 Copyright TEL2.3 Power SupplyIf a power supply other than an appropriate Tait model is used, ensure that it is capableof providing enough current to drive the T800 system and is also free from excessiveripple or noise.The system should be protected by the use of appropriately rated fuses in the powersupply.Note:It is particularly important when the prime power source is a battery thatfuses be employed in all supply lines.2.4 Reverse Polarity ProtectionA crowbar diode is fitted to all T836 transmitters and T837 exciters for protectionagainst connection to a power supply of incorrect polarity.  It also provides overvoltageprotection from voltage transients caused by lightning strikes.Note:A fuse must be fitted in the power supply line for the diode to provide effec-tive protection.

Navigation menu