Tait TEL0062 Hand Portable Transmitter User Manual User Guide
Tait Limited Hand Portable Transmitter User Guide
Tait >
Contents
- 1. User Guide
- 2. Operators Manual
- 3. User Guide Training Supplement
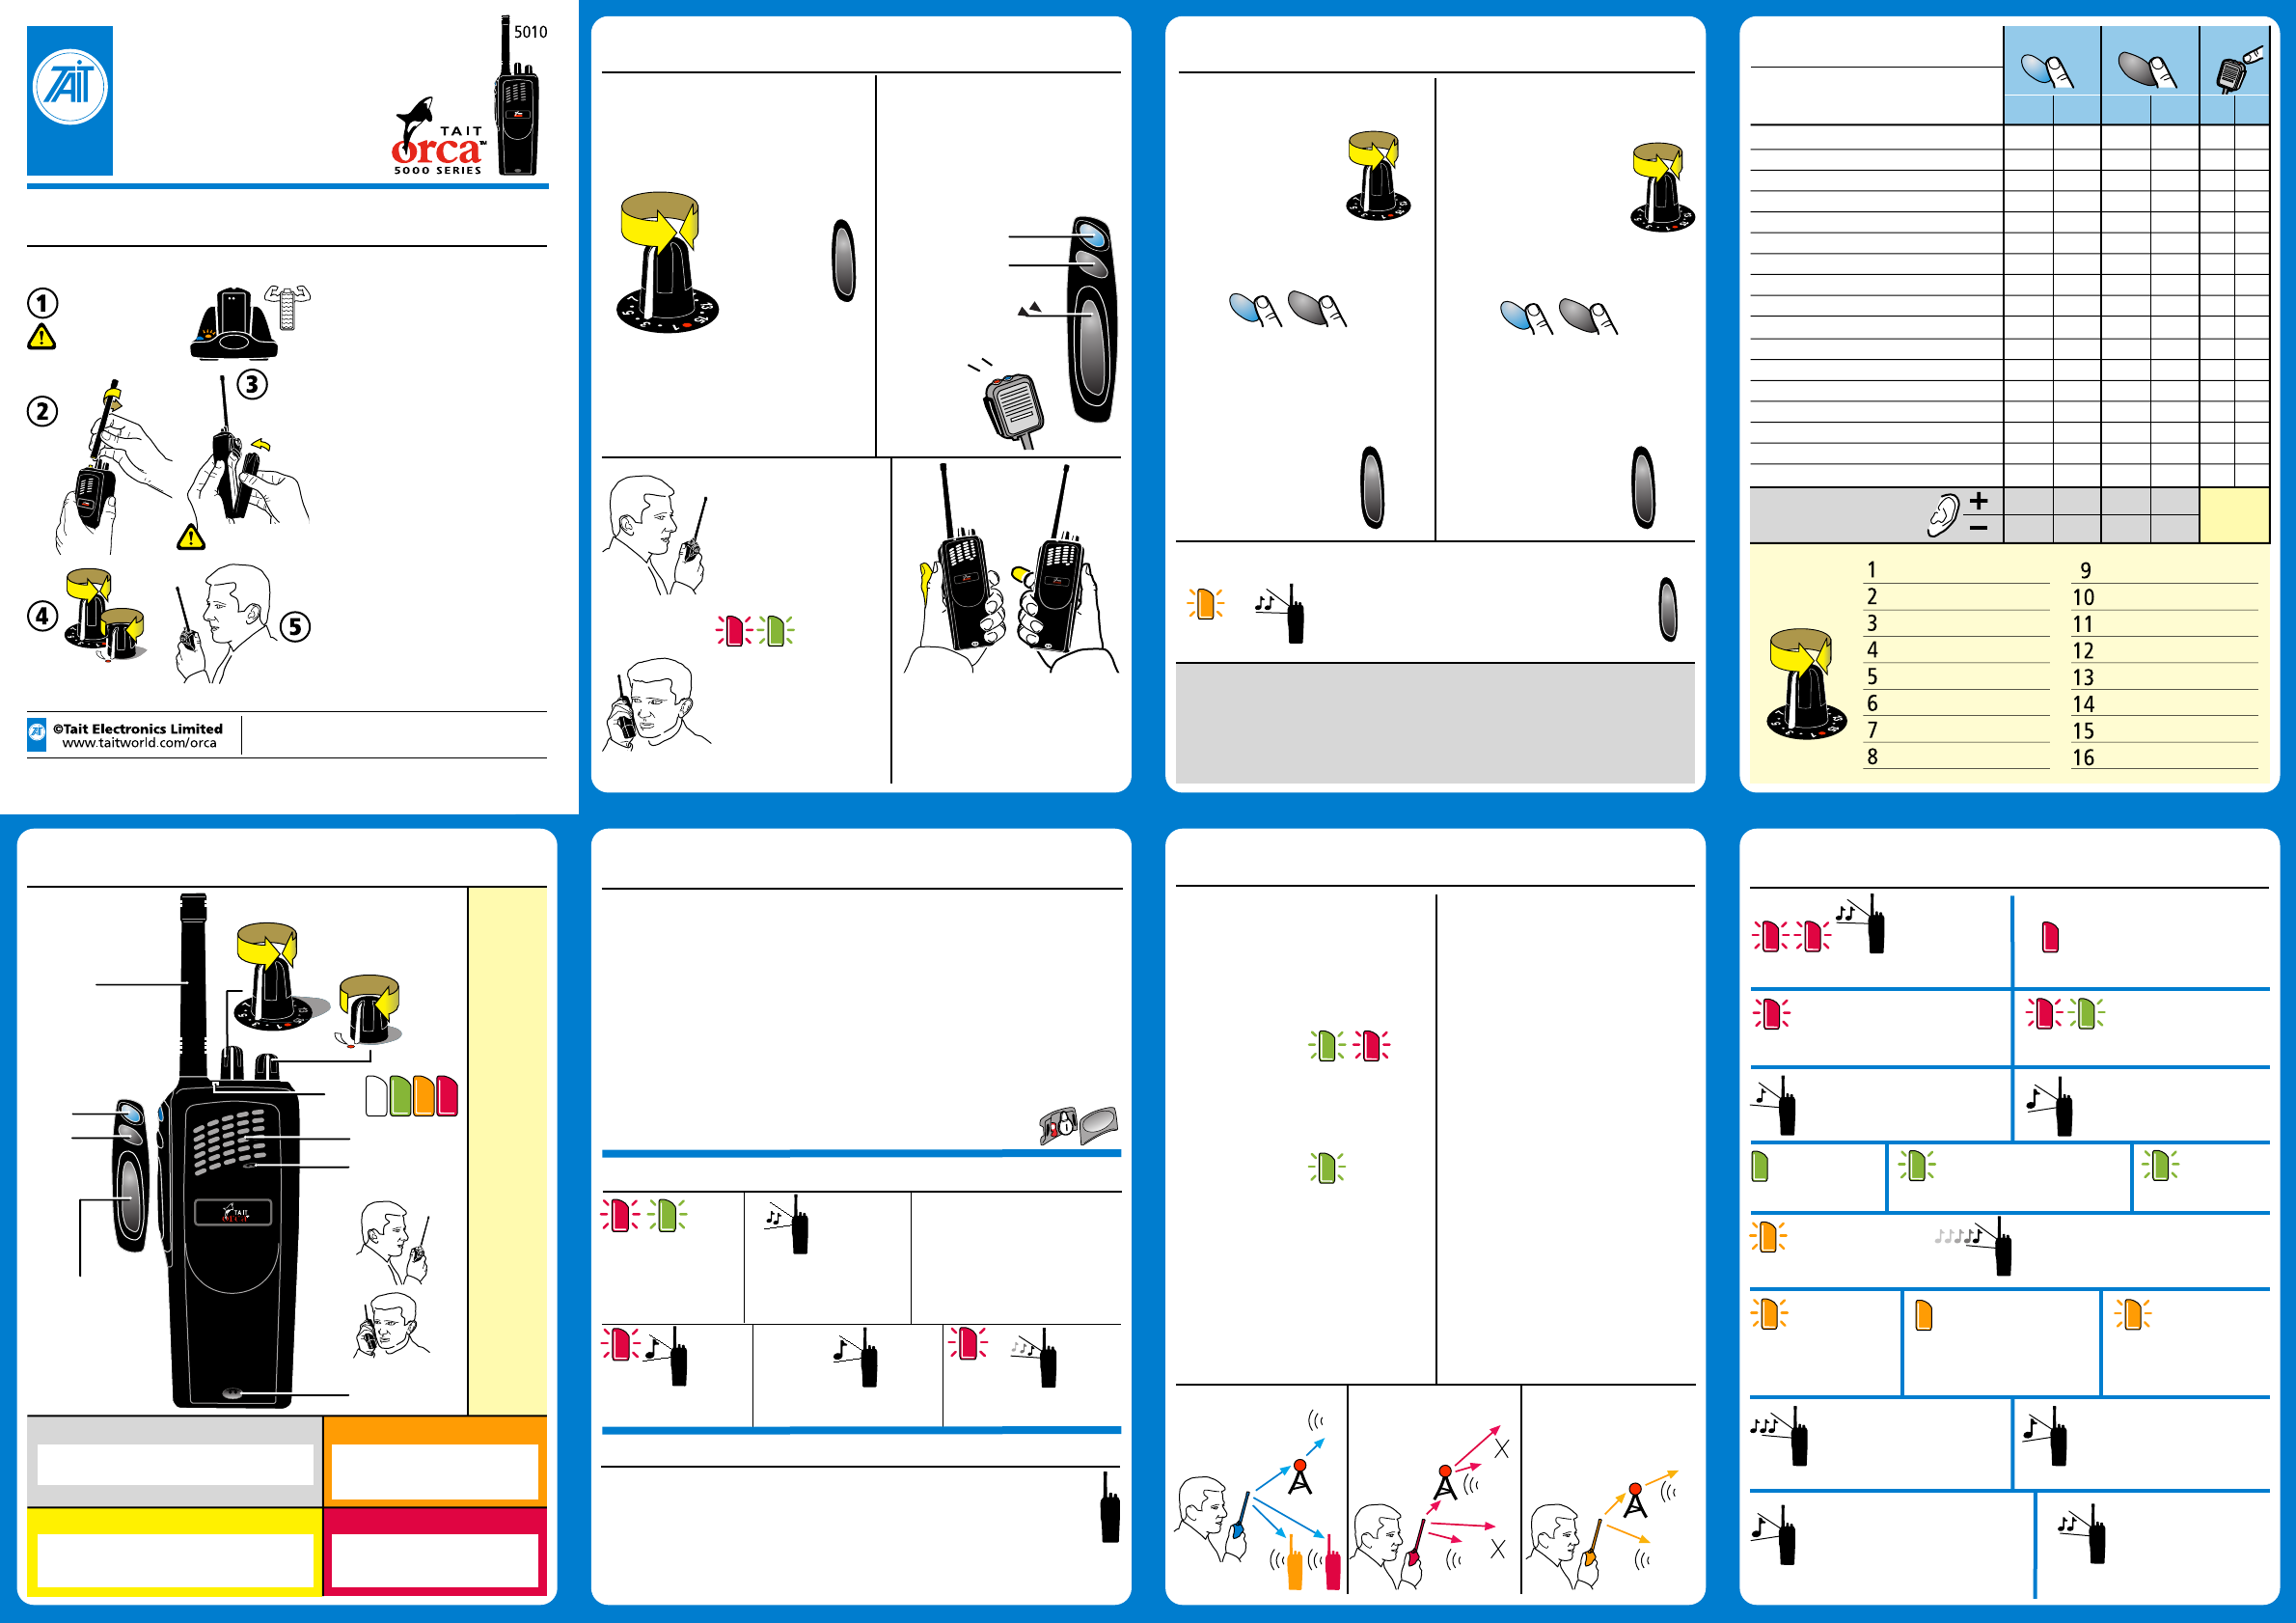
User Guide
F1 F2
1 2
Tait Orca 5010
Conventional
Portable Radio
User Guide
Making Calls
100% Synthetic Paper: Waterproof, Strong,
Chemical Resistant, Recyclable. Solvent based ink.
Use a standard pencil or ballpoint pen. No solvent based pens. To erase pencil use a rubber eraser. To erase ballpoint pen, use a water moistened cloth.
Batteries
Use Tait Orca 5000 NiCd/NiMH
batteries or Tait Orca Elan/Excel/Eclipse
NiCd/NiMH batteries. For more
information on batteries, refer to the
Battery Care Guide.
IMPORTANT
Do not put Tait Orca 5000 batteries
into older battery chargers. Tait Orca
5000 NiCd/NiMH batteries are ONLY
for Tait Orca battery chargers with
software version 2.07+.
Radio Configuration
Your Tait Orca radio has been
configured for your requirements by
your authorised Tait Dealer or your
company administrator. Therefore,
some functions will vary in operation
or will not be available. The
configuration information can be
written onto this User Guide.
Parts
If any parts are damaged or missing,
report this to your authorised Tait dealer
immediately.
Disabled
Tones: Beeps on / off
Economy Mode Control on / off
One Touch Call (Selcall)
Channel's DTMF Preset
Fixed Selcall Sequence
Preset Call #1 (Selcall)
Preset Call #2 (Selcall)
Emergency (Selcall)
Nuisance Delete
Repeater Talk Around on / off
Repeater Access Tone
Handset Mode on / off
Low Power on / off
Toggle Monitor on / off
Disable Monitor
Squelch Override on / off
Install the
Antenna
Install the
Battery
IMPORTANT
Long condition the
battery. Refer to the
Battery Charger
User Guide.
Getting Started
Printed in New Zealand
First Use of Radio
Conventional Features
Use a standard pencil or ballpoint pen. No solvent based pens. To erase pencil use a rubber eraser. To erase ballpoint pen, use a water moistened cloth.
Turn
on radio,
adjust speaker volume,
select channel.
Radio is stunned.
Contact the despatcher.
Handset Mode
Speaker volume is reduced so that
radio can be held near to the ear
like a cellphone. Press PTT to talk,
release PTT to listen.
Monitor Mode
Listen to all traffic and all groups
on a channel. Monitor mode
automatically turns off after a preset
time.
It can be reset by the despatcher or
when some types of calls are made.
It can be configured to override
Selcall (Selcall mute) or both Selcall
and CTCSS/DCS.
Squelch Override
This overrides the squelch feature so
that all signals are made audible.
This may improve the signal reception
in marginal areas, but will likely
increase noise. It cannot be activated
when a scan group is selected. Set
via a function key.
16-way
Selector
Nuisance Delete
If a Channel in a Scan group is busy
for a long time and you do not want
to listen to the conversation, you
can temporarily remove it from the
scanning regime using Nuisance
Delete.
To apply Nuisance Delete to the
currently selected Channel, press
the function key (if configured). This
will remove the currently selected
Channel from the scanning regime.
Select the Scan Group again to reset
and remove Nuisance Delete.
Flash
slow
Radio power-up sequence
Medium pitch
beep, short
duration, twice.
Flash medium Flash slow
Medium pitch beep,
short duration. Low pitch beep,
short duration.
Transmit at normal power
Transmit at low power Handset mode
Function turned on Function turned off
Channel is busy
Flash medium
Monitor or Squelch Override
Slow flash = every 2 seconds
Medium flash = every 1 second
Fast flash = four per second
Flash fast
Medium pitch warble, long
duration, repeating.
Call received but not answered
Flash fast continues until answered.
Medium pitch beep, long
duration, three times. Low pitch beep, for
1.5 seconds.
Low pitch beep, long duration. Medium pitch beep,
short duration, two
times.
Call time is almost up,
10 seconds to go Transmit timer
has expired
No transmit
Channel is busy or transmit is
inhibited by Selcall muting. Wait
or use a free channel. Squelch Override
Economy mode
Flash slow
Flash
slow
Repeater talk
around (RTA)
Scan Group for
activity or greatest
signal strength Activity detected
on a Scan Group
Flash
medium
Steady
Steady
Steady
Flash fast
Selcall Calls
Preset/Fixed Selcall
Short press or Long press
Select the appropriate Function Key
to make the call:
Select a Selcall Channel.
uPreset Call #1
uPreset Call #2
uFixed Selcall Sequence
Emergency Calls and
One Touch Selcalls
You may need to Select a
Selcall Channel.
uEmergency Call
uOne Touch Call
Press PTT to talk. There is usually no need to
respond to a Group Selcall.
Receive a Selcall Call
Standard Mode
Users on the same
Channel can hear
the message.
Repeater
CTCSS/DCS Mode
Sub-audible tones
enable specific
calls to Channels
or Groups.
Receive Receive Ignore
Repeater
Selcall Mode
Audible tones (beeps)
enable selective calls
to be made to
Individuals or Groups.
Receive
Repeater
Using the PTT
Press PTT to talk to all persons
on the same Channel. Release
PTT to listen. You can only
transmit or receive on one
Channel at a time.
Function Key
To make a call, use a short press or
a long press to operate the function
keys 1&2. Then press PTT to talk and
release PTT to listen. See Radio
Configuration for settings.
When you select a Scan Group
of Channels, scanning for activity
will begin automatically.
M5010-200-00-051 M5010-200-00-051
Press PTT to
Talk. Release
to Listen.
Short Condition the
battery every week.
Emergency Call Numbers
Antenna
Function
Key 1
PTT
Press to Talk,
Release to Listen.
Standard
Microphone
Function
Key 2
Handset
Microphone
16-way Selector
On/Off and
Volume
Speaker
LED
Main Items
Notes
Radio Identification
Group Information
Phonetic
Alphabet
Alpha A
Bravo B
Charlie C
Delta D
Echo E
Foxtrot F
Golf G
Hotel H
India I
Juliet J
Kilo K
Lima L
Mike M
November N
Oscar O
Papa P
Quebec Q
Romeo R
Sierra S
Tango T
Uniform U
Victor V
Whisky W
X-ray X
Yankee Y
Zulu Z
Function Key 1
Function Key 2
Press PTT to talk.
Release PTT to listen.
External
Function
Keys 1 and 2
Handset mode
Illustration shows
the recommended
method for use in
handset mode.
Use the lower
microphone to speak.
Standard Operation
Illustration shows the
recommended method
for standard operation.
Use the upper
microphone to speak.
16-way Selector
To make a call, turn to select to the desired
Channel or Scan Group, then press PTT
to talk, release PTT to listen.
Indicators
Flash slow
Handset
Mode
Inactivity
seconds
=
External
Note: Function keys use a toggle action e.g. on/off
Short press is less than 1 second
Long press is more than 1 second
Volume
Radio Configuration
Write your settings
Performance
To maintain the optimum performance of the radio:
uUse only the supplied antenna.
uUse only the radio and accessories for their design purpose.
uUse only accessories that are approved by Tait Electronics Ltd.
uAvoid high temperatures. If the temperature exceeds 80ºC (176ºF) the radio will make
two short high-pitched beeps and will not work. Temperatures above 90ºC (194ºF) cause
permanent damage to the radio.
uYour radio does not require routine maintenance. However, it is a
sophisticated electronic device and should be treated with care.
u Clean the radio, accessories and charger weekly using a clean dry lint-free
cloth. When cleaning, do not use solvents, detergents, alcohol, aerosol sprays
or petroleum-based products.
uClean the electrical contacts on the battery and charger weekly using a fibre
glass pencil, or the graphite tip of a type 4h (#4) or harder pencil.
uDo not put the radio and accessories in fluids.
uDo not drop the radio onto hard surfaces, place it down carefully.
uDo not use if the radio, antenna or accessories are damaged.
uRepairs and modifications must only be carried out by a Tait approved dealer.
uAlways have the D-Clip or protective cover installed to protect
the radio from dust ingress and electrostatic discharges.
Looking after your Radio
uIs radio turned on?
uIs correct channel selected?
uIs battery installed on radio?
uIs battery charged?
uIs antenna damaged?
uIs battery charger working?
Checklist
Troubleshooting
Radio is incorrectly
configured. Contact
your authorised Tait
dealer or your company
administrator.
Battery is low.
Charge the battery.
Battery is
too low
to operate
the radio. Turn
off the radio.Charge the battery.
The temperature is too
high. You should stop
transmitting and allow
the radio to cool down.
High pitch beep
twice, short
duration.
Low pitch
beep, long
duration.
Squelch
Squelch allows reception of
intellgible signals that are above
the factory-set signal threshold,
thus reducing noise. Set via the
Menu to city or country.
Press PTT to
talk. Release
PTT to listen.
Flash fast
Press PTT to talk.
Release PTT to listen. Press PTT to talk.
Release PTT to listen.
Select the appropriate Function Key
to make the call:
Deferred Callback for Selcall: If busy, the call will be sent when
the Channel is free: up to 15 tries (if configured).
To cancel Selcall: Use the function key to turn the monitor off (auto-
quiet timer), wait for the auto-quiet timer, or turn the radio off then on.
Fast flash
Fast
flash
High pitch
beeps.
Low pitch
beep every
5 seconds.
Slow flash
Short
Press Long
Press Short
Press Long
Press
Flash
medium
Short press or Long press
Looking after your Battery
uDo not put the battery in fluids.
uDo not drop the battery onto hard surfaces. Place it down carefully.
uRepairs and modifications must only be carried out by a Tait approved
dealer.
uTo maintain the optimum performance of the battery, refer to the
section on Battery Performance.
Battery Problems
Crystalline growth and the formation of inter-metallic compounds are
the main causes of poor battery performance.
Conditioning helps to break up crystalline formations that cause reduced
surface area for charge and thus reduced capacity/shift life. Crystalline
formations can cause self-discharge in extreme cases where the crystals
grow through the separator.
Conditioning also helps to break up the inter-metallic compounds that
can form and cause resistance and thus reduced capacity/shift life.
IMPORTANT: Excessive short and long conditioning will reduce the life
of the battery. Follow these recommendations:
uShort condition the battery weekly.
uLong condition the battery only for the following reasons: on first use
of new battery, if performance is poor, and after more than two weeks
of storage.
Recycle
Recycle batteries that
are of no use. Contact
your authorised Tait
dealer for
more advice.
Safety Precautions
Earphones,
Palm
and Lapel
Microphones
Battery
Charger
6-Way
Multi-Charger
Battery
Antennas
Accessory
Connector Kits
D-Clip
Leather Carry Cases
Belt Loop
Car Kit
Accessory
Adaptors
Headphones
Servicing and Programming Kits
Speaker
Microphones
Accessories
Contact your authorised Tait Dealer
Accessory Use
Carry Case
Belt Loop
Installing
the D-clip
Note for Accessories
To use the belt loop,
the accessory needs
the D-clip fitting.
For example: a lapel
microphone.
Using the
radio, lapel
microphone
and carry
case
Remove by
peeling
apart
Install the
Belt Loop
Removing
the D-clip
Installing
the Battery
Removing
the Battery
Installing the
Radio and
Carry Case
Removing the Radio
and Carry Case
Rotate
the Carry
Case by
180
degrees
Slide the Carry
Case upwards
Unfasten
the Clip and
remove the
Radio
Install
the clip
Install
the
Radio
Install
the
Carry
Case
Battery Performance
Battery Types
There are two types of battery for your Tait Orca radio: Nickel Cadmium
(NiCd) and Nickel Metal Hydride (NiMH). NiCd batteries are the preferred
choice for shelf life, service life, high transmit duty cycles, extreme
temperatures and general use. NiMH Batteries are best suited to low
transmit duty cycles where a long standby duration is required.
Battery Safety
Do not install or remove batteries in hazardous atmospheres as an
explosion or fire could occur, even if the radio is qualified for use in such
environments. A hazardous atmosphere has the potential for fire or
explosion from dusts, gases, liquids and solids.
Battery Storage
uIf storing the radio for long periods, remove the battery to ensure no
power loss.
uFor best results, discharge the battery until the ‘low battery’ warning
is given.
uNiMH batteries can typically be useless after 2 years of storage at
room temperature.
uStore batteries in a cool and dry location, away from direct sunlight.
uLong condition the battery after storage.
Charging Batteries
Tait Orca 5000 – IMPORTANT
Do not put Tait Orca 5000 batteries into older battery chargers such as
the ‘green button’ models. Tait Orca 5000 NiCd/NiMH batteries are ONLY
for battery chargers with software version 2·07+. The software version
number is on the label underneath the battery charger.
Charging Batteries – Tait Orca Elan, Excel and Eclipse
All Tait Orca batteries (TOPB100, TOPB200, TOPB400, TOPB500, TOPB600,
TOPB700) are compatible with Tait Orca radios and chargers (software
version 2·07+). However, care needs to be taken to ensure appropriate
choice of belt clips and carry accessories.
Battery Shift Life
Battery shift life is affected by many factors. For example:
uTrunked radios will generally use more power than conventional radios
u1500mAh is the minimum recommended battery size for trunked
radios
uA radio on standby will use less power than a radio that is used to
transmit and receive regularly
Battery Service Life
uBattery service life is ultimately reduced by the number of charges
and discharges, and the way it is treated.
uBatteries can typically have a longer service life if there is some residual
charge remaining after every shift prior to recharging, and if the battery
is short conditioned every week.
uAlthough important for battery maintenance, long conditioning and
short conditioning affect the battery service life, and should therefore
not be done more frequently than recommended.
Battery Temperature
uTemperatures below –20ºC (–4ºF) will permanently damage NiMH
batteries.
uNiHM batteries are not recommended for temperatures below 0ºC
(32ºF) or above 40ºC (104ºF).
uNiCd batteries are more resistant to very warm and cold environments
compared with NiMH.
Battery Performance
We recommend the use of a battery analyser to monitor the performance of
batteries. Note that different analysers produce different results.
To maintain the optimum performance of the battery:
Note: Excessive short and long conditioning will reduce the life of the battery.
Follow these recommendations to maintain the optimum performance of the
battery:
uCharge the battery as soon as the radio gives the ‘low battery’ warning.
uShort condition the battery weekly.
uLong condition the battery only for the following reasons: on first use of new
battery, if performance is poor, and after more than two weeks of storage.
uDo not charge a charged battery that has had little or no use.
uDo not leave charged batteries in the charger for more than a day.
uTurn the radio off when it is unattended for long periods.
uClean electrical contacts of the battery and charger weekly using a fibre glass
pencil, or the graphite tip of a type 4h (#4) or harder pencil.
uUse only batteries that are approved by Tait Electronics Ltd.
Battery Power Saving Features of a Typical Radio
* A typical duty cycle is: 5% transmit, 5% receive, 90% standby.
This is based on a typical 8 hour shift plus 1 hour break.
Reduces transmission
power from maximum
to 1 Watt.
Low, medium and high
economy modes.
Battery LifeBatteries
Battery Care
Economy mode Up to 15–25%
Percent increase
in shift life on
5-5-90% duty cycle* Method
DescriptionName
Function key or
program the radio
Function key or
program the radio
Transmit in low
power mode Up to 25%
uWhen transmitting, hold the radio microphone 25–50mm (1–2 inches) from your mouth.
uWhen transmitting, keep the antenna at least 25mm (1 inch) from any part of your
body, especially your face and eyes.
uTurn off the radio where radio waves could interfere with electronic devices.
uTurn off the radio at fuel/gas stations.
uTurn off the radio in an area where detonators/explosives are being used.
uTurn off the radio before boarding/leaving an aircraft and whilst on board an aircraft.
uDo not use the radio whilst driving vehicles or operating machinery.
uDo not use earphones or headsets at high volume levels.
uDo not transmit in frequency bands that are reserved for use by distress beacons, such
as 406 to 406.1 MHz.
uDo not put the radio, battery or accessories in liquids as they will be damaged.
uDo not allow children to play with the radio; it is not a toy.
Hazardous Atmospheres
A hazardous atmosphere has the potential for fire or explosion from dusts, gases, liquids
and solids. Make sure of the following in hazardous atmospheres:
uTurn off the radio, unless the radio is qualified for use in hazardous atmospheres.
uDo not replace batteries, even if the radio is qualified for use in hazardous atmospheres.
uDo not use damaged radios. If the radio was originally qualified for use in such
environments, the radio is not qualified if it has a cracked casing.
uDo not modify the configuration of a radio that is qualified as intrinsically safe for use
in hazardous atmospheres. If you do, it will not be qualified.
Electromagnetic Interference
Turn off your radio where radio waves could interfere with electronic devices. Some facilities
use equipment that is sensitive to Electromagnetic Interference such as: hospitals, medical
centres, aircraft and some industrial facilities. Only use your radio in these situations if the
radio is qualified for use in such areas.
Note: The following warning applies to FCC approved radios in the 800 MHz and 900 MHz
frequency bands:
FCC RF Exposure Limits
This product generates radio frequency energy during transmissions. It is class-
ified by the FCC as suitable for general population use in an uncontrolled ex-
posure environment. The following conditions apply to the use of this radio:
uIt must only be used with authorised accessories and antennas.
uDo not exceed a duty cycle ratio of 20% transmit mode to stand-by or receive modes.
The radio is in transmit mode when the PTT key on the radio is pressed and the TX
indicator LED is lit.