Tait TPAH5A Portable Transceiver User Manual DP1 FCC UserGuide
Tait Limited Portable Transceiver DP1 FCC UserGuide
Tait >
Contents
- 1. Exhibit D Users Manual per 2 1033 c3
- 2. Exhibit D Users Manual RF Safety Information per 2 1033 c3
Exhibit D Users Manual per 2 1033 c3

TP9100 portables
User’s Guide
Version 0.1
July 2004

For your safety i
For your safety
For your safety
Please read the following safety and compliance
information before using your radio.
Radio frequency exposure information
For your own safety and to ensure you comply with the
Federal Communication Commission’s (FCC) radio
frequency (RF) exposure guidelines, please read the
following information before using this radio.
Using this radio
You should use this radio only for work-related
purposes (it is not authorized for any other use) and if
you are fully aware of, and can exercise control over,
your exposure to RF energy. To prevent exceeding FCC
RF exposure limits, you must control the amount and
duration of RF that you and other people are exposed
to.
It is also important that you:
■Do not remove the RF Exposure label from the
radio.
■Ensure this RF exposure information accompanies
the radio when it is transferred to other users.
■Do not use the radio if you do not adhere to the
guidelines on controlling your exposure to RF.
Controlling your exposure to RF energy
This radio emits radio frequency (RF) energy or radio
waves primarily when calls are made. RF is a form of
electromagnetic energy (as is sunlight), and there are
recommended levels of maximum RF exposure.
To control your exposure to RF and comply with the
maximum exposure limits for occupational/controlled
environments, follow these guidelines:
■Do not talk (transmit) on the radio more than the
rated transmit duty cycle. This is important because

ii For your safety
For your safety
the radio radiates more energy when it is transmit-
ting than when it is receiving.
■When listening and talking on the radio, hold it
upright in front of your face so that it is at least one
inch (2.5 cm) away from any part of your face.
Keeping the radio at the recommended distance is
important because exposure to RF decreases rapidly
the further away the antenna is from your body.
■Keep the antenna at least one inch (2.5 cm) from
your face at all times.
■If you wear your radio, you must always put it in a
carrying accessory that has been specifically
approved by Tait for this radio. Using non-approved
body-worn accessories may mean you expose your-
self to higher levels of RF than recommended by the
FCC’s occupational/controlled environment RF expo-
sure limits.
■Ensure you only use Tait-approved antennas, batter-
ies, and accessories.
For more information on what RF energy is and how to
control your exposure to it, visit the FCC website at
http://www.fcc.gov/oet/rfsafety/rf-faqs.html.
Compliance with RF energy exposure
standards
This two-way radio complies with these RF energy
exposure standards and guidelines:
■United States Federal Communications Commis-
sion, Code of Federal Regulations; 47 CFR §§
1.1307, 1.1310, and 2.1093.
■American National Standards Institute (ANSI) / Insti-
tute of Electrical and Electronic Engineers (IEEE)
C95.1-1992
■Institute of Electrical and Electronic Engineers (IEEE)
C95.1-1999 Edition.

For your safety iii
For your safety
This radio complies with the IEEE (FCC) and ICNIRP
exposure limits for occupational/controlled RF exposure
environments at operating duty factors of up to 50%
transmitting (even though the approved batteries for
this radio are rated for a 5-5-90 duty factor (5% talk-
5% listen-90% standby)).
Radio frequency emissions limits in the
USA
Part 15 of the FCC Rules imposes RF emission limits on
electronic equipment to prevent interference to
reception of broadcast services.
This radio complies with Part 15 of the FCC Rules.
Operation is subject to the condition that this device
does not cause harmful interference.
Unapproved modifications or changes to
radio
The radio is designed to satisfy the applicable
compliance regulations. Do not make modifications or
changes to the radio that are not expressly approved by
Tait Electronics Ltd. Failure to do so could invalidate
compliance requirements and void the user’s authority
to operate the radio.
Interference to radio communications
This radio complies with Part 15 of the FCC Rules which
specifies the limits for a Class B digital device.
This radio generates, uses, and can radiate RF energy.
This energy may cause harmful interference to radio
communications if the radio is not installed and used
according to the instructions in the user guide. If this
radio does cause harmful interference, you should
contact your radio provider for assistance.

iv For your safety
For your safety
Frequency band reserved for distress
beacons
Frequency band 406 to 406.1 MHz is reserved for use by
distress beacons. Transmissions should not be made
within this frequency band.
Safe radio operation
Switch off the radio:
■at petrol filling stations or near flammable liquids
or gases
■in the vicinity of explosive devices and blasting
zones
■before boarding an aircraft. Using your radio
while in the air is not permitted.
Using a handheld microphone or a radio while driving a
vehicle may violate the laws and legislation that apply in
your country or state. Please check the vehicle
regulations in your area.
Interference with electronic devices
Some electronic devices may be prone to malfunction
due to the lack of protection from RF energy that is
present when your radio is transmitting.
Examples of electronic devices that may be affected by
RF energy are:
■vehicular electronic systems such as fuel injection,
anti-skid brakes, and cruise control
■medical devices such as hearing aids and pacemak-
ers
■medical equipment in hospitals or health care facili-
ties.
Consult the manufacturer (or its representative) of the
equipment to determine whether these electronic
circuits will perform normally when the radio is
transmitting.

For your safety v
For your safety

vi For your safety
For your safety

Contents vii
Contents
Contents
For your safety ................................................................i
Radio frequency exposure information ......................... i
Using this radio........................................................ i
Controlling your exposure to RF energy ................... i
Compliance with RF energy exposure standards...... ii
Radio frequency emissions limits in the USA............... iii
Unapproved modifications or changes to radio .......... iii
Interference to radio communications ........................ iii
Frequency band reserved for distress beacons ............ iv
Safe radio operation .................................................. iv
Interference with electronic devices............................ iv
1 About this guide.......................................... 1
Document conventions ............................................... 1
Safety symbols used in this guide............................ 1
Feedback about this manual ....................................... 1
Copyright information ................................................ 2
Disclaimer................................................................... 2
2 Charging the battery before first use ........ 3
3 About your radio ......................................... 5
About your digital radio .................................................6
Lack of static noise...................................................... 6
Coverage .................................................................... 6
Basic operation ...............................................................7
Turning your radio on/off............................................ 7
Adjusting the volume.................................................. 7
About the channel selector ......................................... 7
Making calls................................................................ 7
Using keys to access commonly used features ................9
Three-way selector control .......................................... 9
Emergency key............................................................ 9
Viewing your function key settings.............................. 9
Understanding the radio display ...................................10
Display symbols......................................................... 10
Using the menus to access settings ...............................11

viii Contents
Contents
Selection keys........................................................... 11
Scroll keys ................................................................ 11
Accessing menus ...................................................... 11
Accessing frequently used menus ............................. 12
Using the scroll key Quick Access menu................ 12
Using the left selection key Quick Access menu .... 12
Understanding the radio indicators .............................. 14
Alert tones ............................................................... 14
Status indicators ....................................................... 15
About this guide 1
About this guide
1 About this guide
This user’s guide provides information about the
TP9155 and TP9160 portable radios.
Document conventions
The following conventions are used in this guide:
Safety symbols used in this guide
Within this guide, the following symbols are used to
alert you to important safety information:
Warning: There is a potential risk of death or serious
injury.
Caution: There is the risk of minor or moderate injury
to people.
Important: There is a risk of equipment damage or
malfunction.
Feedback about this manual
Any enquiries regarding this manual as well as any
comments, suggestions and notifications of errors,
should be addressed to support@taitworld.com or to
the Support Group Manager, Tait Electronics Limited,
PO Box 1645, Christchurch, New Zealand.
Convention Explanation
Bold text Indicates text that appears on the
radio display.
Note: Indicates additional information
that you may find useful to know.
Tip: Provides a helpful hint.

2 About this guide
About this guide
Copyright information
All information contained in this manual is the property
of Tait Electronics Limited. All rights are reserved. These
manuals may not, in whole or in part, be copied,
photocopied, reproduced, translated, stored, or
reduced to any electronic medium or machine-readable
form, without prior written permission from Tait
Electronics Limited. All trade names referenced are the
service mark, trademark, or registered trademark of the
respective manufacturers.
Disclaimer
In the interests of improving the performance, reliability
or servicing of the equipment, Tait Electronics Ltd
reserves the right to update both the equipment or this
user’s guide, without prior notice.

Charging the battery before first use 3
Charging the battery before first use
2Charging the battery before
first use
Once you have unpacked your battery, you’ll need to
charge it for the first time. This first charge is important
because it prepares the battery for use. You should
allow 12 hours for this first charge.
1Put the battery in the charger.
2Leave the battery to charge. Allow 12 hours.
3When the battery is fully charged (as indicated by the
charger's LED), remove it from the charger.

4 Charging the battery before first use
Charging the battery before first use

About your radio 5
About your radio
3 About your radio
This section describes all the various buttons and keys
on your radio.
This section covers:
■About your digital radio
■Basic operation
■Using keys to access commonly used features
■Understanding the radio display
■Using the menus to access settings
■Understanding the radio indicators

6 About your digital radio
About your radio
About your digital radio
You may notice some differences in the way digital and
analog radios perform: the lack of static in low signal
areas and consequently where you notice that coverage
is poor.
Lack of static noise
You may notice the lack of static noise on digital
channels. This lack of static is because your digital radio
removes the “noise” from the transmission so that you
hear only clear voice.
Coverage
With analog radios, a transmission gets progressively
worse when you are in fringe areas or even slightly
outside normal coverage areas. In these circumstances,
you are probably able to still understand the
transmission despite the amount of static because the
human brain can interpret speech even when it is not
perfectly clear.
With digital radios, the signal remains clear and then
drops off quite quickly at the border of a transmission
area. The reason for this is that a digital transmission is
either received or it isn't.
Because of this difference you may notice that digital
radios have different coverage patterns to analog
radios. However, the actual coverage area between an
analog and a digital voice system is very similar.

Basic operation 7
About your radio
Basic operation
The radio controls are the PTT key, power/volume
control, channel selector, three-way selector control,
scroll keys, selection keys, and function keys. Some keys
have functions assigned to both short and long key
presses:
■a short key press is less than one second, and
■a long key press is more than one second
The radio controls and their functions are described in
the following sections.
Turning your radio on/off
Turn the power/volume control switch clockwise to turn
on the radio. Turn the switch counterclockwise to turn
the radio off.
Note: Your radio will automatically power-down if
there is insufficient charge in the battery.
Adjusting the volume
Rotate the power/volume control clockwise to increase
the speaker volume and counterclockwise to decrease
the volume.
Note: The volume control also changes the volume
level of the radio’s audible indicators.
About the channel selector
The channel selector allows you to select and change
channels. When the radio is first switched on, the
channel that is acquired is the one indicated by the
current position of the channel selector switch.
Making calls
1Select the required channel, scan group, zone or
preset call.

8 Basic operation
About your radio
2Hold the radio so that the microphone is about 2.5
cm (1 inch) from your mouth and press the PTT key
to transmit.
Note: If the channel is busy, you will not be able to
transmit. Wait until the red status LED has stopped
flashing, and then try again.
3Speak clearly into the microphone and release the
PTT key when you have finished talking.

Using keys to access commonly used features 9
About your radio
Using keys to access commonly
used features
The function keys and three-way selector control
provide quick access to the features you will use most
often. The action that they perform (when pressed or
turned) will depend on how your radio has been
programmed.
Three-way selector control
You may be able to change zones using the three-way
selector control (if your radio has been programmed in
this way).
Emergency key
You may be able to activate emergency mode by
pressing the emergency key (if your radio has been
programmed in this way).
Viewing your function key settings
You can easily check which functions are assigned to
the function keys, if you have forgotten.
1Press Menu, scroll to Radio Information and press
Select.
2Scroll to Key Settings and press Select.
3In the menu list, scroll to a function key and press
Select to view the function assigned to it.

10 Understanding the radio display
About your radio
Understanding the radio display
The messages and symbols you see on your radio display
depends on the mode in which your radio is operating
and the way it has been programmed.
Display symbols
These are the various symbols you may see on your radio
display.
Symbol Meaning
RSSI (received signal strength indicator):
the more bars, the stronger the signal
being received by your radio
Network available: your radio has access
to a digital network
Transmit: your radio is transmitting
Low-power transmit: your radio is
transmitting on low power
Zone symbol: your radio is operating in
this zone (the example shown is zone 3)
Scanning: your radio is monitoring a
group of channels for activity
Monitor or squelch override: monitor or
squelch override is active
Scrolling: you can use the scroll keys
or to move through a list
Using the menus to access settings 11
About your radio
Using the menus to access
settings
You can access settings and features for your radio
using the menu. The menus available will depend on the
way your radio has been programmed.
The selection and scroll keys enable you to select and
move around the menus.
Selection keys
There are two selection keys beneath the display screen.
How these keys work depends on the word that
appears above them on the screen.
Scroll keys
The up and down scroll keys allow you to:
■access the quick access menu
■scroll up and down through a list, and select items.
Tip: If you press and hold the scroll keys, the scroll
speed increases.
■display the previous or next part of a message that
is too long to be displayed on the screen.
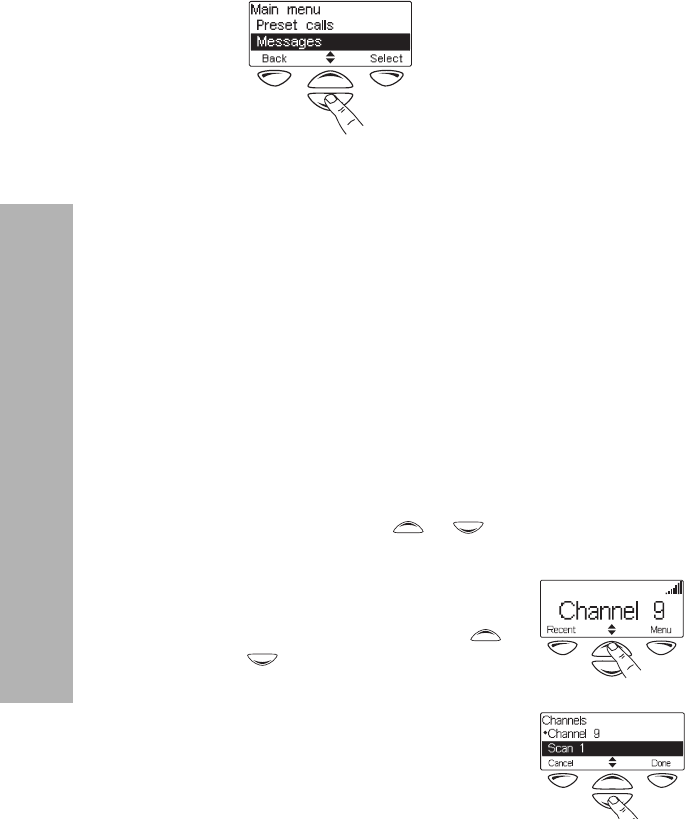
Accessing menus
1To access the main menu, press the right selection
key whenever Menu appears above it.
12 Using the menus to access settings
About your radio
2Use the scroll keys to move through the list of
menus.
3When the menu you want is highlighted, press
Select to enter the menu you have chosen.
Accessing frequently used menus
Depending on how your radio has been programmed,
you may have two different ‘quick access’ menus. One
quick access menu is displayed when you press a scroll
key, and the other when you press the left selection key.
These give you easy access to the menus you use most
often.
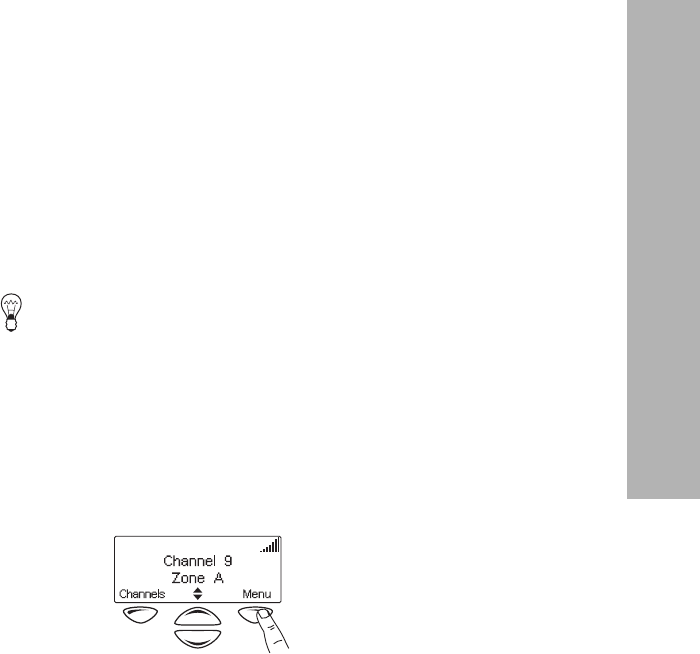
Using the scroll key Quick Access menu
To use this Quick Access menu:
■Press a scroll key or , and the Quick Access
menu appears.
In this example, the Channels
menu is the Quick Access menu.
You can press a scroll key or
to go directly to the
Channels menu.
The Channels menu, with a list of
your available channels and scan
groups, is now displayed.
Using the left selection key
Quick Access menu
The text above the left selection key corresponds to the
Quick Access menu, for example, Channels.
To use this Quick Access menu:

Using the menus to access settings 13
About your radio
■Press your left selection key , and the associated
menu appears.

14 Understanding the radio indicators
About your radio
Understanding the radio
indicators
The status LED indicator and the radio’s audible tones—
together with the radio display—all combine to give you
information about the state of your radio.
The most common operation of the indicators are
described in the following sections.
Alert tones
Note: If quiet or silent mode has been turned on, you
will not hear any alert tones.
Tone Meaning
Two short
beeps
Radio turned on: the radio is powered on
and ready to use
One short
beep
Radio turned off: the radio is powered
off, or
Valid keypress: the action you have
attempted is permitted
One long,
low-
pitched
beep
Invalid keypress: the action you have
attempted is not permitted, or
Transmission inhibited: you have
attempted to transmit but for some
reason transmission is not permitted at
this time
Understanding the radio indicators 15
About your radio
Status indicators
Note: The way these indicators behave may be affected
by the way your radio is programmed.
Colour Meaning
Red
(transmit)
Glowing: your radio is transmitting
Flashing: your transmit timer is about to
expire, or your radio is stunned.
Green
(receive)
Glowing: you are receiving
Flashing: you have received a call
Amber
(scanning)
Glowing: your radio is scanning a group
of channels for activity
Flashing: your radio has detected activity
on a channel, and has halted on this
channel

16 Understanding the radio indicators
About your radio