Taiyo A40349 jet helio-transmitter User Manual HELIO En cover p65
Taiyo Co., Ltd. jet helio-transmitter HELIO En cover p65
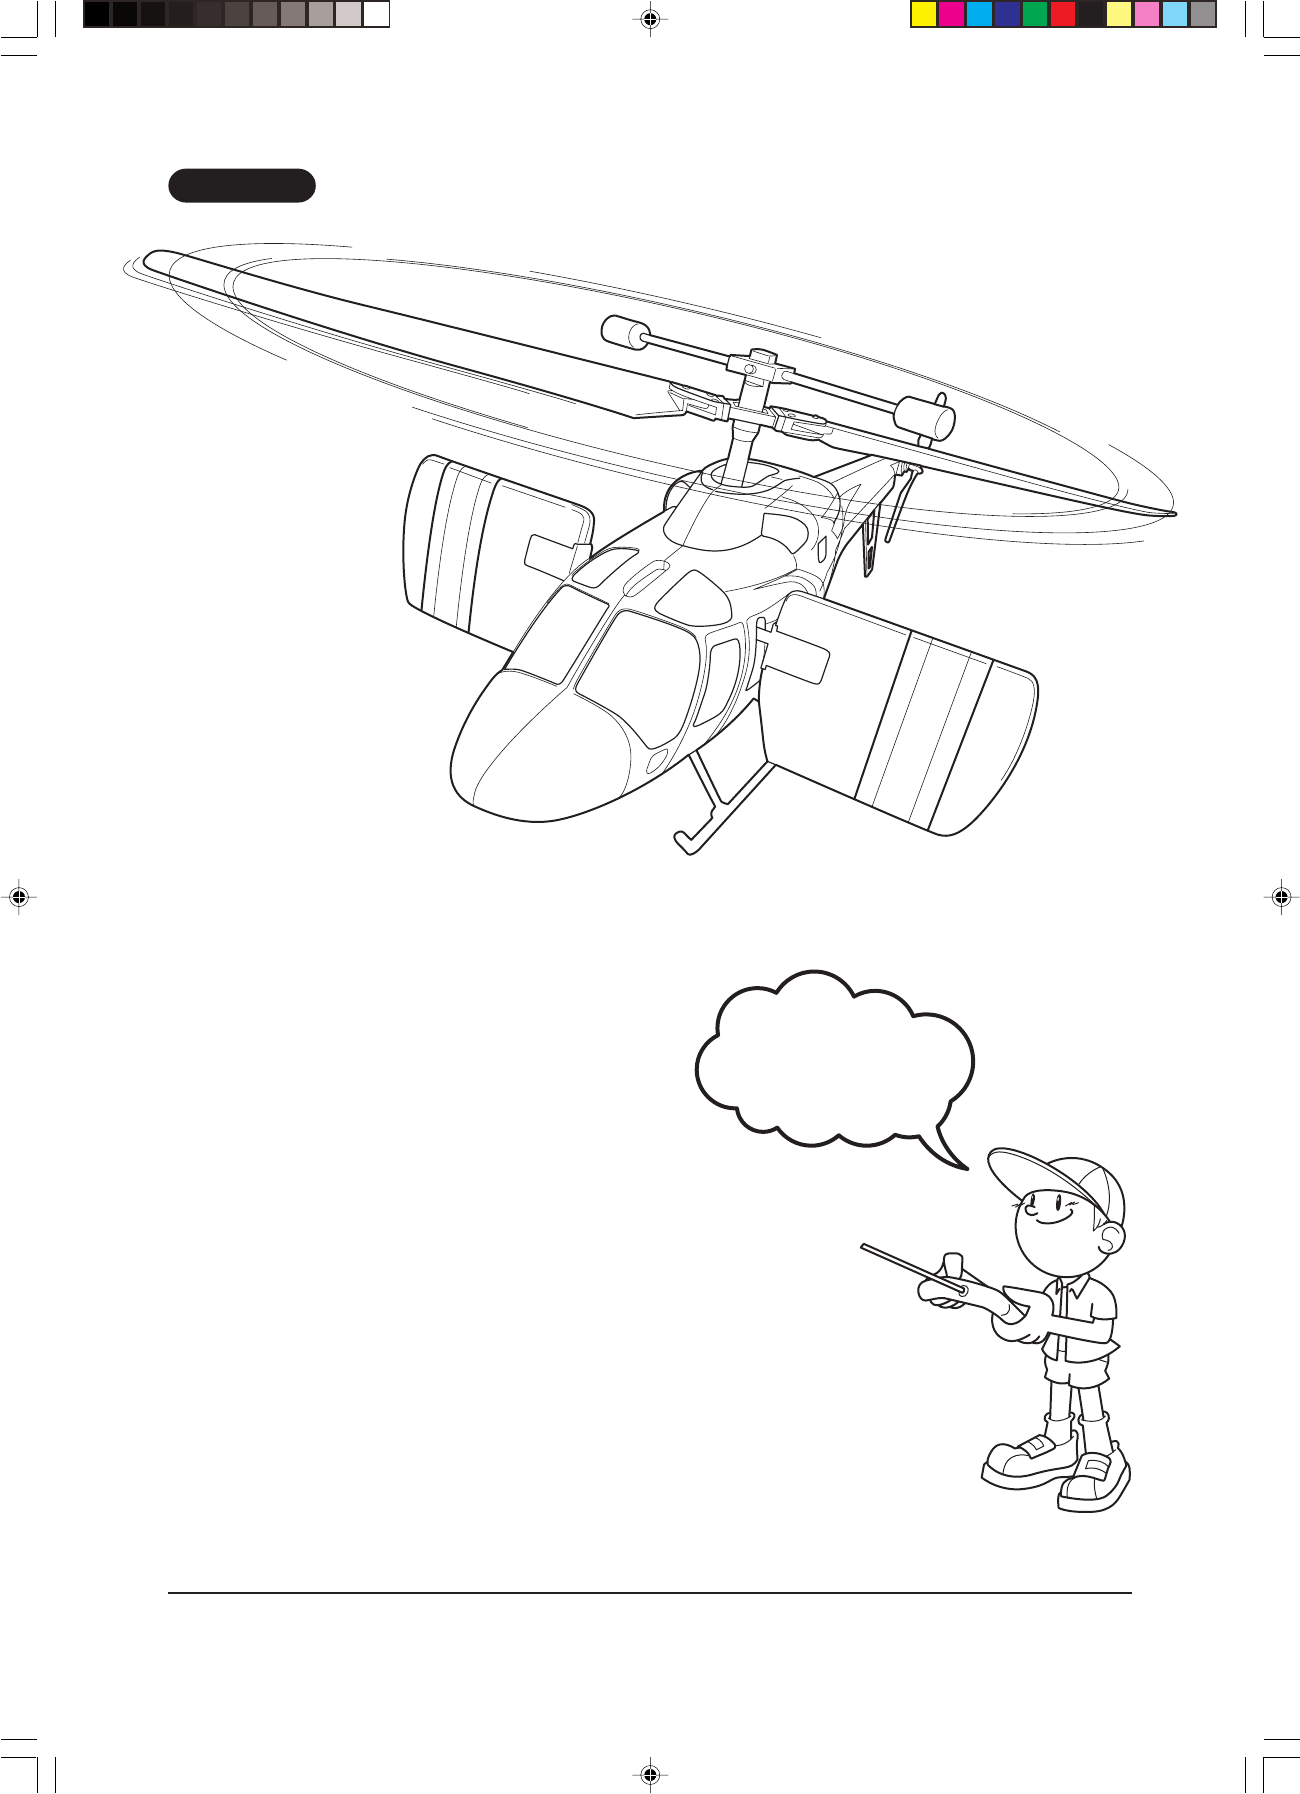
Taiyo >
USERS MANUAL
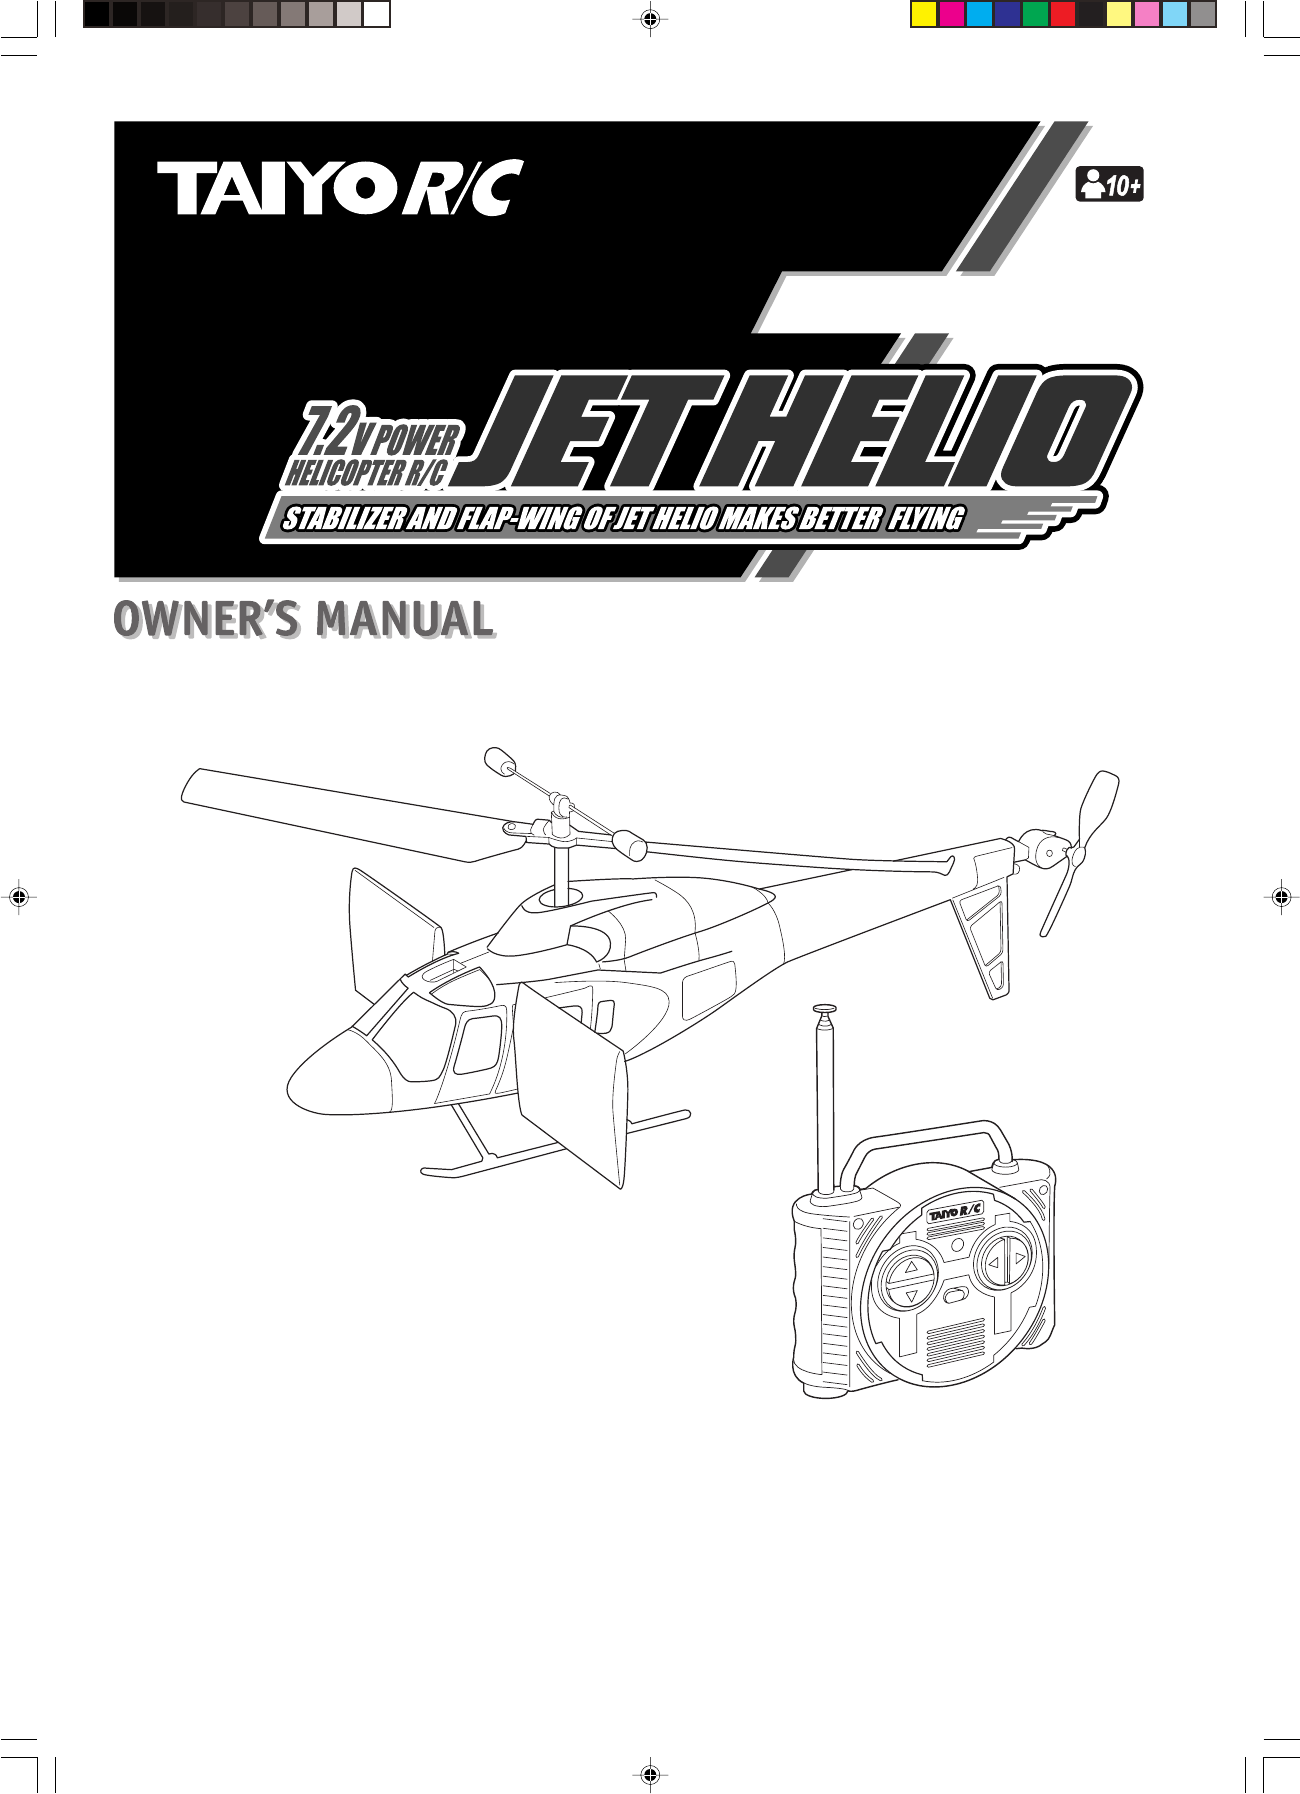
HELICOPTER R/C
• This helicopter is the first in the industry that can be turned in the right and left direc-
tions with simple operation of the transmitter.
• Rigid structural design and materials are used.
• The power is automatically shut off gradually when the helicopter is out of the radio
wave range to prevent the helicopter from dropping suddenly.
HELIO_En_cover.p65 4/9/04, 10:01 AM1

English
2
BEFORE USING THE PRODUCT
Thank you for purchasing this TAIYO product.
Please read this owner’s manual thoroughly to get the most use
from the helicopter and to learn how to operate it safely.
Also, keep this manual with you when using the helicopter.
!
WARNING
Be sure to read the following.
If the 7.2 V Ni-MH battery pack is used incorrectly, it may over-
heat, explode, or start a fire. Pay attention to the following items.
• Be sure to follow the charging instructions in this manual.
• Do not try to charge any battery pack other than the included
7.2 V Ni-MH battery pack.
• After playing with the helicopter, be sure to turn off the switch.
• If the battery pack is short-circuited, a large current will flow
and this is a dangerous situation. Do not ever short-circuit the
battery pack.
• Never drop the battery pack into water, throw it into a fire or
disassemble it.
• Do not use, charge, or store the battery pack near a fire or in any
place where exposed to high temperatures or high humidity.
• When using the 7.2 V Ni-MH battery pack for the first time,
be sure to charge it. Even if the 7.2 V Ni-MH battery pack is
not used, it will self-discharge over time. If the battery pack
has not been used for about six months, be sure to charge the
battery pack before using the product. Once the battery pack
is charged, make sure to use it until it is completely dead be-
fore recharging it.
• Even when the battery pack has been charged correctly, if the
flying time is noticeably reduced, the 7.2 V Ni-MH battery
pack may have reached the limit of its useful life.
• If the 7.2 V Ni-MH battery pack is still warm after use, do not
recharge it.
• Do not recharge the battery pack within reach of infants or
children.
• Do not recharge the 7.2 V Ni-MH battery pack once it is al-
ready recharged. The battery pack may become very warm.
• Use the dedicated charger to recharge the 7.2 V Ni-MH bat-
tery.
If you use a cigarette lighter inside the car to recharge the 7.2 V
Ni-MH battery pack, pay attention to the following items.
• Do not recharge the power pack while you are driving.
• The inside of the cigarette lighter socket becomes hot after
you use it to light the cigarette. Use the cigarette lighter socket
after it becomes sufficiently cool.
• Do not pull the cable to remove the cigarette lighter plug. Do-
ing so may break the cable.
• In some cars, recharging can be performed after removing the
key from the car. Remove the cigarette lighter plug from the
socket and stop recharging when you leave the car.
• Soon after playing with the helicopter, the included 7.2 V Ni-
MH power pack becomes hot. Be sure to cool down the in-
cluded 7.2 V Ni-MH power pack before recharging it again.
In recharging, the cigarette lighter plug, charger body and the
included 7.2 V Ni-MH power pack will have a little heat, but
this phenomenon is not an indication of trouble.
• Do not get the 7.2 V Ni-MH power pack or the charger body
wet. Doing so may cause malfunction. In addition, never throw
the included power pack into a fire, disassemble it or short-
circuit it.
• Leave the engine running while recharging the 7.2 V Ni-MH
power pack.
• When a child recharges the 7.2 V Ni-MH power pack, an adult
with a valid driver’s license should be with the child until the
battery is charged and the power pack is disconnected. Also,
do not recharge the power pack within reach of infants or young
children.
• Do not recharge or leave the battery pack in any place where
exposed to strong direct sunlight.
• Be sure to remove the charger from the car when the battery is
not used.
• The cigarette lighter plug is for exclusive use with cars that
have a 12 V cigarette lighter (accessory socket). This plug
cannot be used in cars with a 24 V or 100 V cigarette lighter.
If the batteries for the charger (D alkaline batteries / TAIYO 9.6
V Power Pack) and transmitter (006P-9 V battery) are used in-
correctly, they may overheat, explode, start a fire, or let electro-
lyte leak. Pay attention to the following items.
• Never use the charger as a DC power source for any other
purpose. Never recharge the power pack using any other
charger.
• Use eight D alkaline batteries for the charger.
• Use a 006P-9 V battery for the transmitter.
• Never use a rechargeable battery such as a Ni-Cd battery.
• Do not use a combination of new and old batteries or different
kinds of batteries.
• Turn off power to the charger before replacing the batteries.
• Set the batteries so that the and are correctly positioned.
• Be sure to remove the batteries after use.
• Never short-circuit the batteries, charge them, heat them, throw
them into a fire, or disassemble them.
• If any electrolyte from the battery is splashed into an eye,
immediately flush it with clean water and consult a physician.
If the electrolyte gets on your skin or clothes, wash it off with
water.
• When you use the TAIYO 9.6 V Power Pack to recharge the
batteries, follow the instructions on the manual of the charger
set.
Precautions when playing with the helicopter
• After use, never store the helicopter within reach of the chil-
dren under 3 years of age.
• Incorrect use of the helicopter may cause an accident. Do not
let children 15 years old or younger operate the helicopter.
Children should operate the helicopter only under the super-
vision of an adult.
• Play with the helicopter in a wide-open, safe location with no
obstacles nearby. Do not fly the helicopter in a place where
other people or animals are nearby.
• Do not launch the helicopter toward another person. Some
one may be injured.
• Never store the helicopter in any place where exposed to high
temperatures, such as in a closed car in summer. Do not put it
in front of a heater which blows hot air.
• Do not fly the helicopter on windy days or when there is light-
ning.
• Never fly the helicopter on the road, a railroad, near power
lines, any place where there are lots of people, or in narrow
areas.
• If the helicopter gets caught in a tree, on a building or in power
lines, it is dangerous. Do not try to recover it. Notify the owner
of the property. (If the helicopter gets caught in power lines,
contact the electric power company.)
• Keep face and hands away from the rotating rotor. Wear gog-
gles for safety. It is dangerous if the rotor should come near
your face.
HELIO_En_p02_15.p65 4/9/04, 10:01 AM2

English
3
•When the helicopter is broken, disfigured and unrecoverable,
do not use it.
•Do not take your eyes off the helicopter while it is flying.
•Do not touch the helicopter or the charging terminal of the
charger (metal part) with your hands.
•Do not operate the helicopter indoors. It can be used only out-
doors.
•Do not point the transmitter antenna at people or animals. It
may cause an accident. Do not bend the antenna.
•Do not look steadily at the flashing LED on the charger. You
may feel sick.
•Do not disassemble or modify the helicopter.
•Do not bend or pull the parts with force.
•Do not operate the helicopter with the main rotor locked.
•Do not drop the helicopter or subject it to shock.
•Do not subject the helicopter to shock while charging. It may
cause damage to the charging port.
•After charging is complete, turn off the power switch of the
charger.
•Before playing with the helicopter, be sure to check that no
one operates an R/C model using the same frequency with
you.
Before flying the helicopter, be sure to read the following.
The conditions of the location where the helicopter is operated, or incorrect operation by the operator may cause injury to another
person, damage property or result in unexpected accident. In such case, the operator may be responsible for the trouble. It is recom-
mended to have liability insurance when playing with the helicopter.
7.2 V Ni-MH battery service life
The included 7.2 V Ni-MH battery can be charged and discharged about 200 times in ordinary use.
This product uses a recyclable 7.2 V Ni-MH battery. The spent 7.2 V Ni-MH battery is reused as a valuable resource. When
you dispose the battery, observe local waste regulations or bring it to a cooperating battery recycle shop. Do not disassem-
ble the battery when you dispose it.
CONTENTS
BEFORE USING THE PRODUCT ........................................................................................................................ 2
PRODUCT DETAILS .............................................................................................................................................. 4
Components / Specifications .................................................................................................................................................... 4
NAMES OF PARTS.................................................................................................................................................. 5
HOW TO ASSEMBLE THE HELICOPTER ........................................................................................................ 7
1. How to Install the Flap Wing ................................................................................................................................................ 7
2. How to Install and Remove the Antenna .............................................................................................................................. 7
3. How to Load the Batteries into the Transmitter .................................................................................................................... 8
4. How to Load the Batteries into the Charger ......................................................................................................................... 8
HOW TO CHARGE THE HELICOPTER ............................................................................................................ 9
1. Using the Eight D Alkaline Batteries .................................................................................................................................... 9
2. Using the TAIYO 9.6 V Power Pack .................................................................................................................................... 9
3. Using the Cigarette Lighter Socket of a Car (12 V) ........................................................................................................... 10
LOCATIONS AND CONDITIONS FOR FLYING THE HELICOPTER ........................................................ 11
Flying Conditions ................................................................................................................................................................... 11
How to Take Off ..................................................................................................................................................................... 11
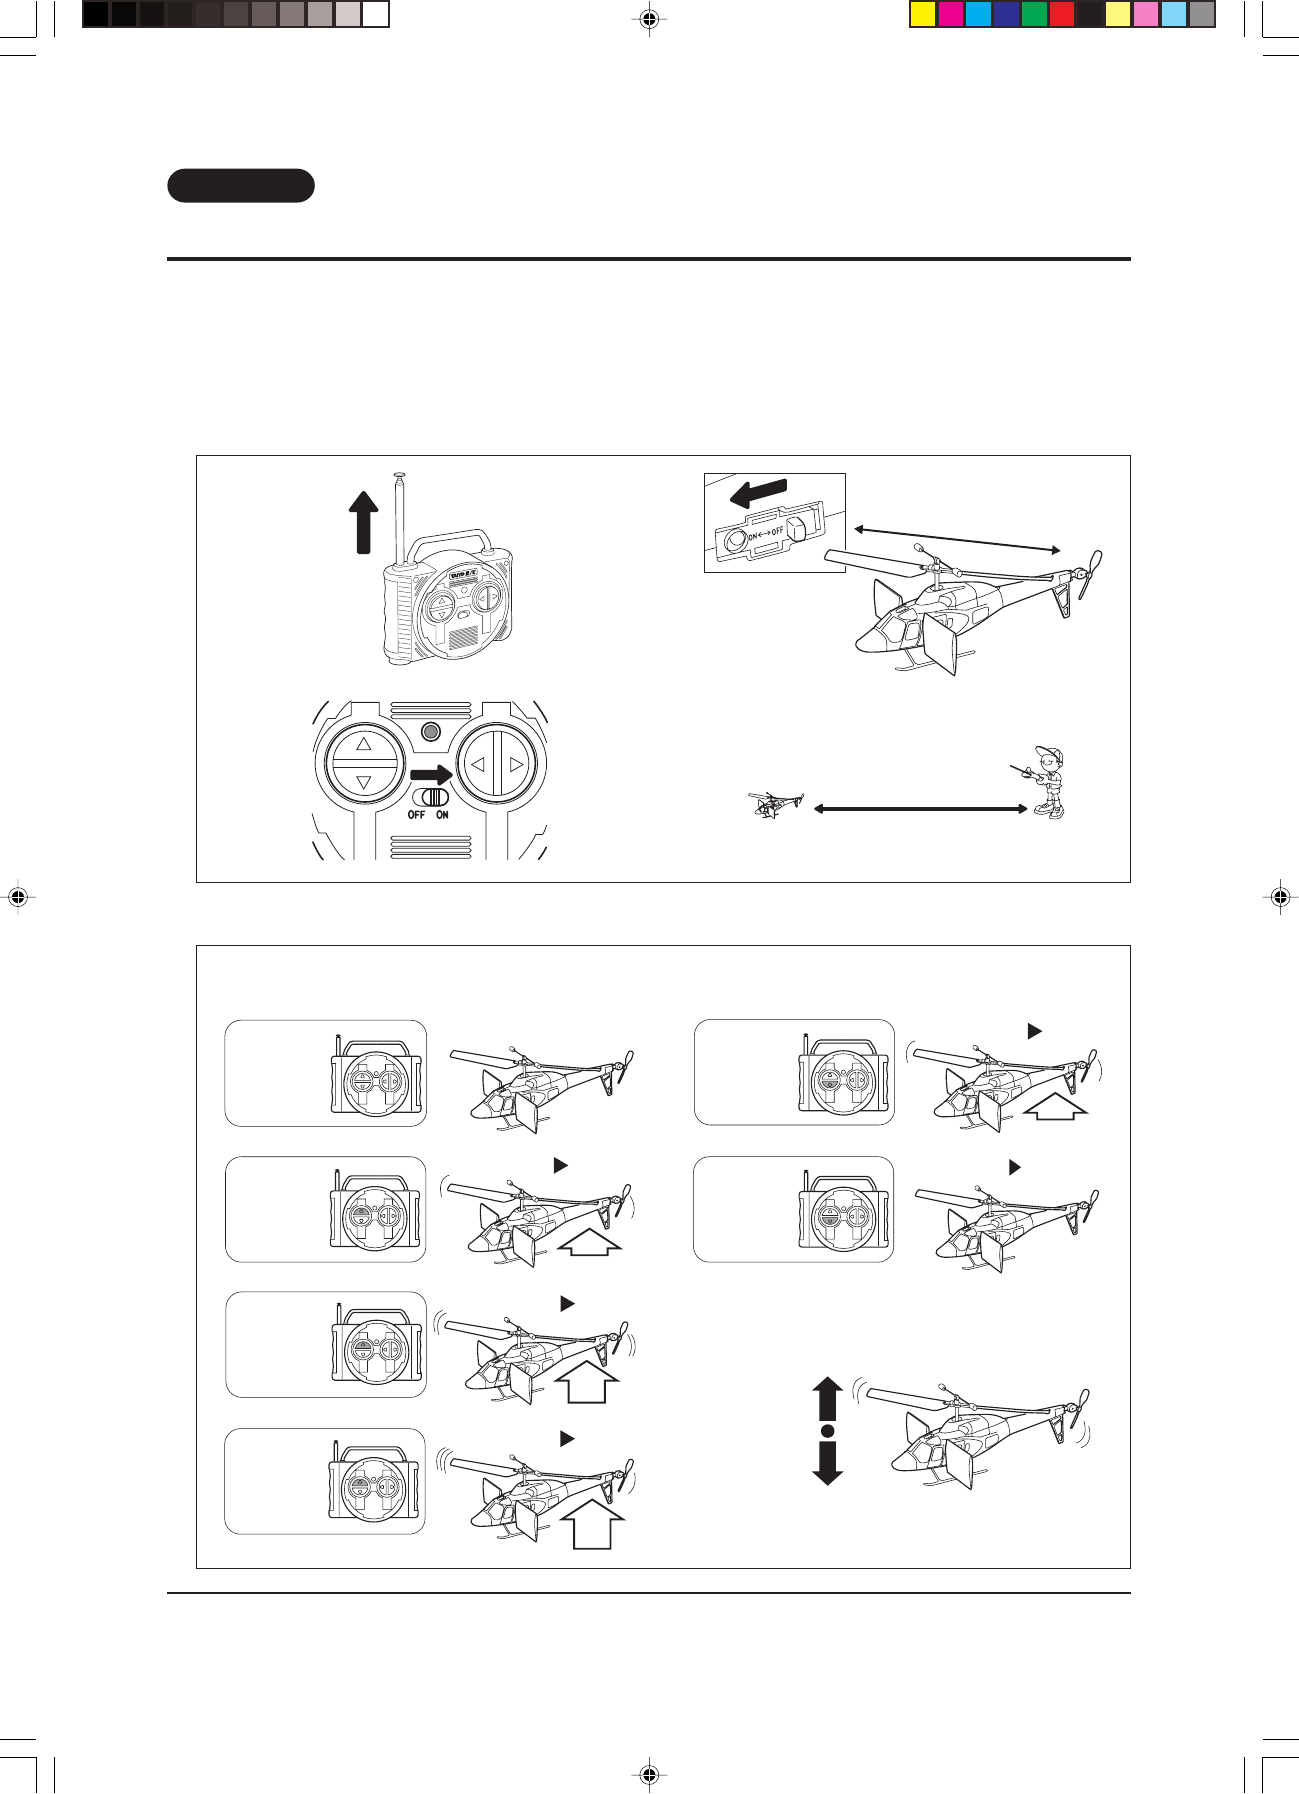
HOW TO FLY THE HELICOPTER .................................................................................................................... 13
1. Before Flying ...................................................................................................................................................................... 13
2. Transmitter Functions (Ascend / Descend) ......................................................................................................................... 13
3. Transmitter Functions (Right / Left Turning) ..................................................................................................................... 14
4. After Playing with the Helicopter ....................................................................................................................................... 14
5. Let’s Fly .............................................................................................................................................................................. 14
HELICOPTER MAINTENANCE ........................................................................................................................ 15
AFTER-SALES SERVICE .................................................................................................................................... 15
HELIO_En_p02_15.p65 4/9/04, 10:01 AM3

English
4
PRODUCT DETAILS
Completed Helicopter: 1 Flap Wing: 2
Transmitter: 1 Charger: 1
To the customer: The box and packing materials are needed to prevent the helicopter from being damaged when transporting it
or when sending it for repair. Keep them in a safe place.
* The actual components may differ slightly from the illustrations.
SPECI FICATIO N S
Fuselage length : 510 mm
Overall width : 240 mm
Weight : Approx. 160 g
Switch-ON time of motor : Approx. 1 minute
Operational Distance : Approx. 30 m or less, outdoors
Batteries and Charger
Helicopter : 7.2V Ni-MH battery pack <included>
Transmitter : One 006P 9V battery <not included>
Charger : Eight D alkaline batteries <not included>
One TAIYO 9.6 V Power Pack <optional set that includes a charger >
Charged from car cigarette socket lighter (12 V)
Charging condition : Charging time / Approx. 4 minutes
(However, the alkaline batteries in the transmitter must have sufficient charge.)
Transmitter Antenna: 1 Socket Cable for 12 V Cigarette Lighter: 1
HELIO_En_p02_15.p65 4/9/04, 10:01 AM4

English
5
NAMES OF THE PARTS
Helicopter
Transmitter
Main rotor
Tail rotor
Antenna
Charging port / Power switch
Included 7.2V Ni-MH battery pack
Fuselage
Flap wing
Skid
* The main rotor is not
completely fixed to enable play
necessary for safety. When the
rotor is turned, it is correctly
operated by centrifugal force.
Stabilizer
* Part for hovering
* The flap wings can be installed
and removed.The installation
angle can be selected from two
items (vertical and 15° tilt).The
balance of right and left
turning directions and the fine
movement of forward/reverse
travel can be adjusted.
* A safety clutch is included. If
the rotation is stopped by
force, it tick-tacks. However,
this is not a malfunction.
* Do not cut.
Stabilizer link
* If the link comes off due to shock, the
helicopter cannot fly correctly. If the
stabilizer link comes off accidentally,
attach it in the original position.
LED
UP button
DOWN button
Antenna * Removable
Left turning button
Right turning button
Power switch
HELIO_En_p02_15.p65 4/9/04, 10:01 AM5
English
6
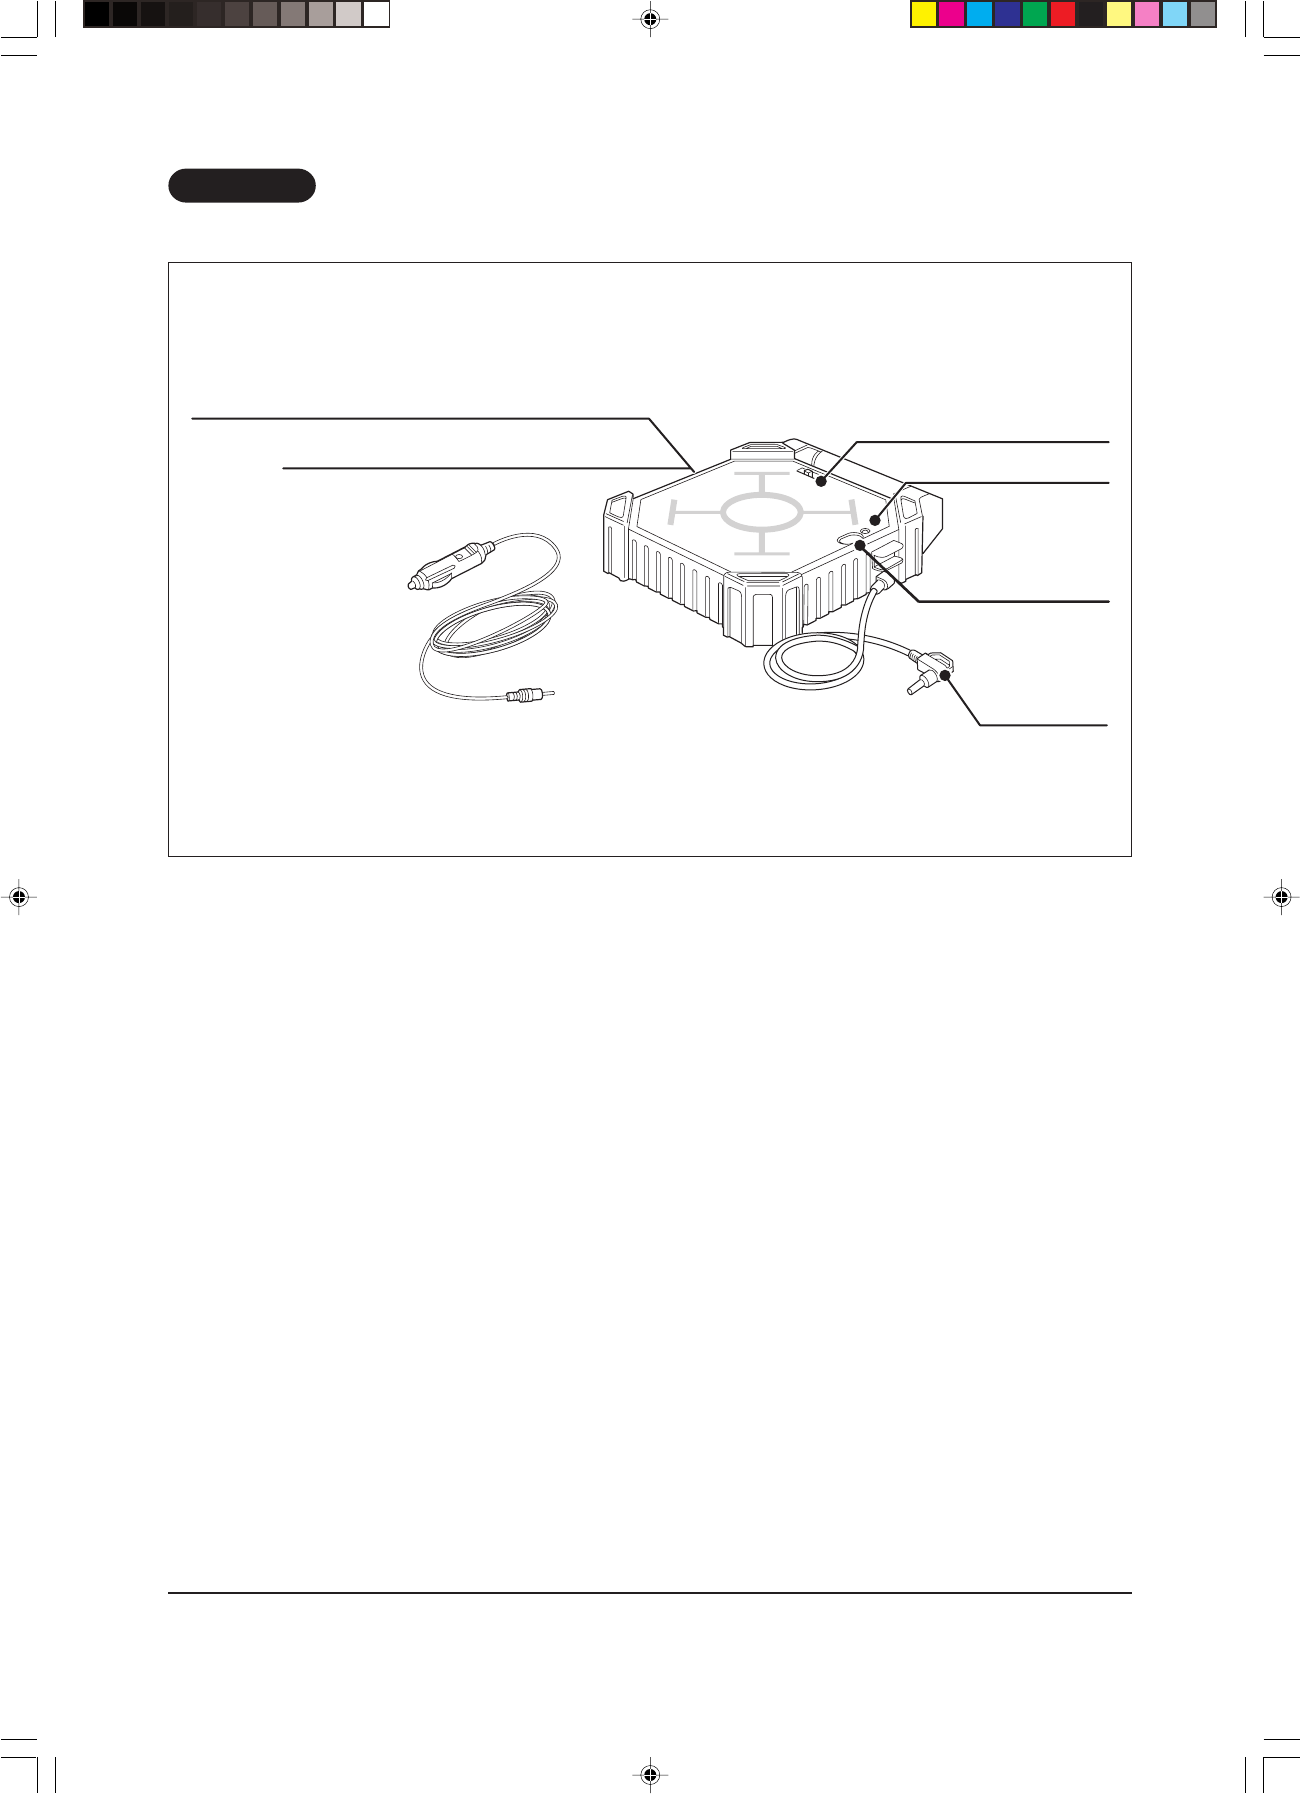
Charger
Charging plug
Charging type selector switch
Car (12 V) cigarette lighter cable socket (upper)
TAIYO 9.6 V Power Pack socket (lower)
Charger start button
LED
Cable / Socket for
car (12 V) cigarette
lighter cable
HELIO_En_p02_15.p65 4/9/04, 10:01 AM6

English
7
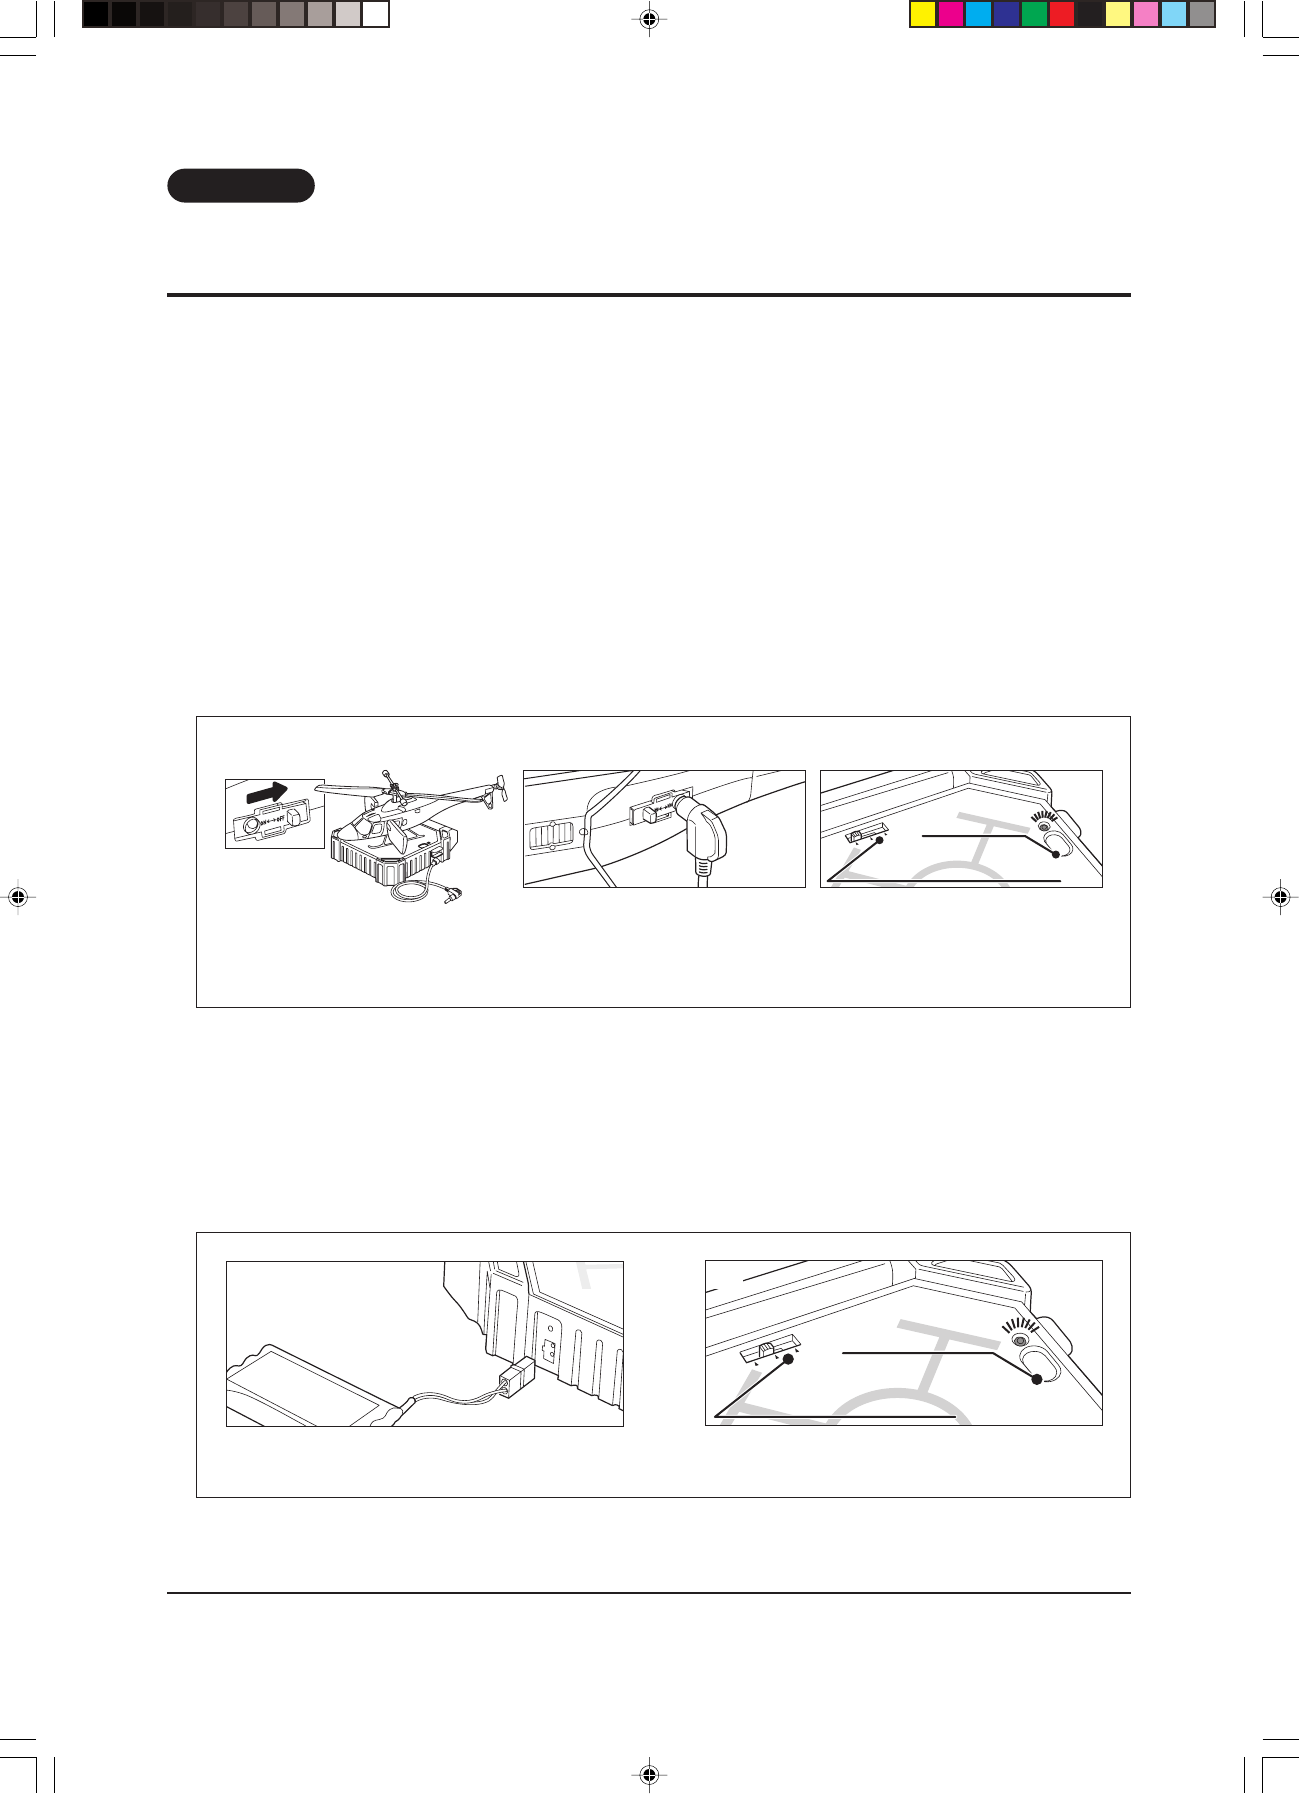
HOW TO ASSEMBLE THE HELICOPTER
1. How to Install the Flap Wing
(1) As the basic installation, insert the included flap wings vertically into both sides of the fuselage as shown in the figure below.
Note: The helicopter does not turn in the right or left direction unless the flap wings are installed vertically.
2. How to Install and Remove the Antenna
* The flap wings can be installed with a 15° tilt as well as vertically. According to the selected installation angle, the balance
of right and left turning directions and the fine movement of forward/reverse travel can be adjusted.
How to install the antenna
(1) Screw the antenna clockwise into the transmitter to
install the antenna.
* The antenna is a screw-in type. A loose antenna may cause the helicopter to malfunction. Be sure to screw it in tightly.
Flap Wing
15°
How to remove the antenna
(1) Turn the antenna counterclockwise to remove. To retract
the antenna, pull it from the lower part a little at a time.
This procedure will prevent the antenna from bending.
HELIO_En_p02_15.p65 4/9/04, 10:01 AM7

English
8
3. How to Load the Batteries into the Transmitter
This transmitter uses a 006P-9V battery (option).
(1) Slide the battery cover forward until detached.
(2) Pay attention to the and directions of the battery when inserting it.
(3) Reattach the battery cover in the opposite order from which it was detached.
4. How to Load the Batteries into the Charger (When D alkaline batteries are used)
This charger requires eight D alkaline batteries (option).
(1) Loosen the screws of the battery cover with a Philips screwdriver.
(2) Slide the battery cover until detached.
(3) Match the and marks at both ends of each battery with the and marks in the battery case and insert the eight D
alkaline batteries.
(4) Reattach the battery cover in the original position and tighten the screws.
(1) (2) (3)
Note: Load the 006P-9V battery cor-
rectly, paying attention to the
and directions. See the figure
above.
* When the battery capacity of the transmitter becomes low, the power LED will be dark. Also, the distance that radio waves
reach becomes shorter. Replace the 9 V battery (Alkaline or Zinc) with a new one soon.
(1) (2) (3)
HELIO_En_p02_15.p65 4/9/04, 10:01 AM8
English
9
HOW TO CHARGE THE HELICOPTER
(There are 3 charging methods as shown below.)
The rechargeable battery is built in the fuselage of the helicopter. This battery should be
charged before you play with the helicopter.
Important:
Before using the helicopter the first time after purchase, charge the included battery twice in order to fully charge it. After that, if you use
the helicopter throughout the day, charge the battery only once before each use. Charge the battery twice every first time of the day
before using the helicopter.
1. Using the Eight D Alkaline Batteries
The alkaline batteries can be recharged 25 to 30 times, in normal use.
(1) Set the power switch of the helicopter to OFF and put the helicopter on the charger. Unless the power switch is set to OFF, the
charging nozzle cannot be inserted.
(2) Insert the charging plug of the charger into the helicopter charging port till it stops.
(3) Switch over the charging type selector switch to “Dx8” and press the charging start button of the charger. The red LED blinks
while charging is in progress.
(4) The helicopter will be charged completely in about 4 minutes. The red LED stops blinking and goes out, when charging is
complete. Remove the charging plug from the helicopter charging port.
2. Using the TAIYO 9.6 V Power Pack
The fully-charged TAIYO 9.6 V power pack can be recharged about 5 times. The TAIYO 9.6 V power pack / charger set is an option.
(1) Charge the TAIYO 9.6 V power pack. For the recharging method, read the instruction manual of the “TAIYO 9.6 V Power Pack
/ Charger Set”.
(2) Insert the TAIYO 9.6 V power pack into the charger socket.
(3) Perform steps 1-(1) to 1-(4).
(4) After recharging the TAIYO 9.6 V power pack, remove it from the charger.
(2)
Charging type selector switch
Charging start button
(3)
* Switch over the charging type selector switch to “9.6 V PACK”.
Note: If the red LED does not blink, the charging plug may not be completely inserted into the helicopter charging port. In
such case, press the charging plug into the charging port again until it stops.
(1) (2) (3)
Charging type selector switch
Charging start
button
HELIO_En_p02_15.p65 4/9/04, 10:01 AM9

English
10
3. Using the Cigarette Lighter Socket of a Car (12 V)
Be sure to recharge the battery with an adult who has a valid driver’s license.
(1) Connect the cigarette lighter cable to the car cigarette lighter socket and the charger.
(2) Check that the car is 12 V and start the engine.
(3) Insert the plug into the car cigarette lighter socket securely till it stops.
(4) Perform steps 1-(1) to 1-(4).
(5) After recharging the battery, remove the plug from the cigarette lighter socket.
(6) Stop the engine.
Important:
•Be sure to use alkaline batteries when you charge the battery using D batteries. An off-quality alkaline battery or manganese battery
cannot perform 100% charging, therefore the helicopter cannot fly due to insufficient power.
•If you feel the flying time becomes a little shorter than usual or if you feel the propeller does not turn with full power regardless of the
full-power setting of the helicopter, the capacity of the alkaline battery or the TAIYO 9.6 V power pack is insufficient. In such case,
100% recharging cannot be performed and the helicopter cannot fly due to insufficient power. (The power LED also lights darker than
when a new battery is used.) If you use the alkaline batteries, replace all 8 alkaline batteries with new ones. And, if you use the TAIYO
9.6 V power pack, recharge it. After that, start recharging the helicopter.
•When you recharge the helicopter from a car cigarette lighter socket, be sure to confirm that the car runs on 12 V. You cannot recharge
the helicopter with a car of other than 12 V. Recharge the helicopter with the engine running. In addition, be sure to recharge the
helicopter with an adult who has a valid driver’s license.
•Be sure to recharge the helicopter just before flying it. If you don’t play with the helicopter just after recharging the helicopter, the
charger is discharged and the helicopter cannot fly due to insufficient power.
•When battery temperature reaches a specified high value, the circuit will automatically shut off and the helicopter or charger will stop
to protect the receiving circuit and the battery. In such case, it is recommended to cool down the helicopter before recharging or
playing with it.
•If a rechargeable battery is repeated charged without the battery being sufficiently discharged first, the fully rechargeable capacity
gradually lowers (memory effect of the battery). This is a characteristic of rechargeable batteries. Be sure to start recharging after
operating the main rotor until it nearly stops.
(1)
Charging type selector switch
Charging start button
(4)
* Switch over the charging type selector switch to “CIGAR ADAPTOR”.
* A glass tube fuse is set to protect the inner circuit in the cigarette lighter socket. If the fuse is blown and doesn’t operate,
replace it with one of the same rating.
HELIO_En_p02_15.p65 4/9/04, 10:01 AM10
English
11
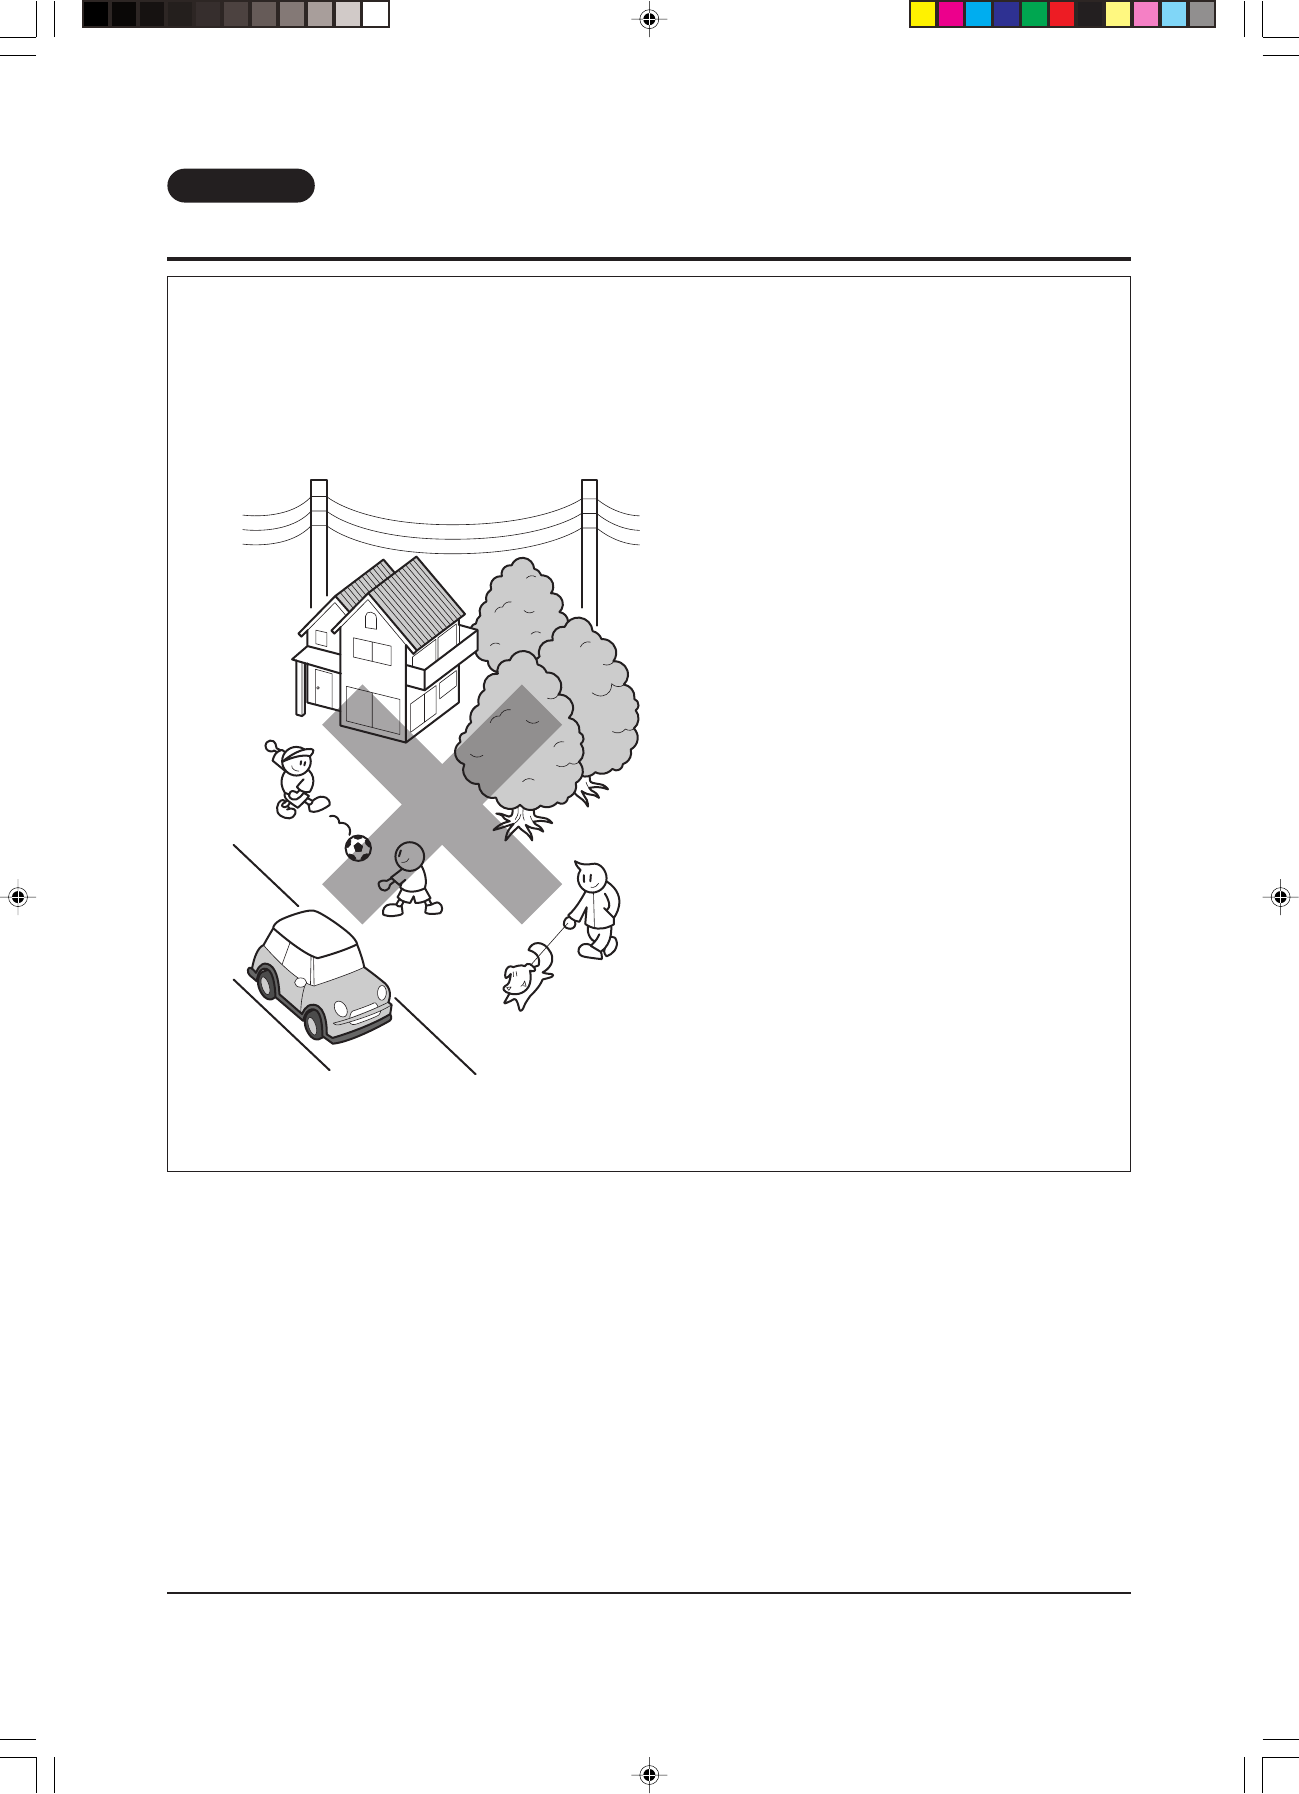
LOCATIONS AND CONDITIONS FOR FLYING THE HELICOPTER
Locations
Look for a good place for flying.
Before flying the helicopter, be sure to check no obstacles are nearby.
Do not fly the helicopter around a road, people, animals, trees, over-
head power lines, or other obstacles. Play in an open area with good
visibility.
Fly the helicopter after making sure that no
obstacles are above or around you.
Flying Conditions
If the ambient temperature is low, the flying perform-
ance of the helicopter may decrease. Fly the heli-
copter on a warm day.
If wind blows, it is hard to control the helicopter. It
is recommended to fly the helicopter under no-wind
conditions.
Do not fly the helicopter in heavy thunderstorms,
rain, sleet, snow or other bad weather.
Important:
* Before playing with the helicopter, be sure to check
that no one operates an R/C model using the same
frequency as you.
* Do not take your eyes off the helicopter while fly-
ing it.
* A child who cannot fly the helicopter confidently
should fly it with the supervision of an adult.
HELIO_En_p02_15.p65 4/9/04, 10:01 AM11
English
12
Is everything ready?
If the preparation is perfect,
let’s fly the helicopter.
HELIO_En_p02_15.p65 4/9/04, 10:01 AM12
English
13
HOW TO FLY THE HELICOPTER Before Flying~Let’s Fly
1. Before Flying
(1) Extend the antenna of the transmitter as much as possible.
(2) Set the power switch of the transmitter in the ON position. The red LED comes on.
(3) Set the power switch of the helicopter in the ON position and put the helicopter on the ground. Adjust the main rotor so that it is
positioned in a straight line.
(4) Be sure to keep stay 5 m or more away from the helicopter before ascent with the helicopter.
(5) Recheck the area around you. If there are no obstacles around you, you can fly the helicopter.
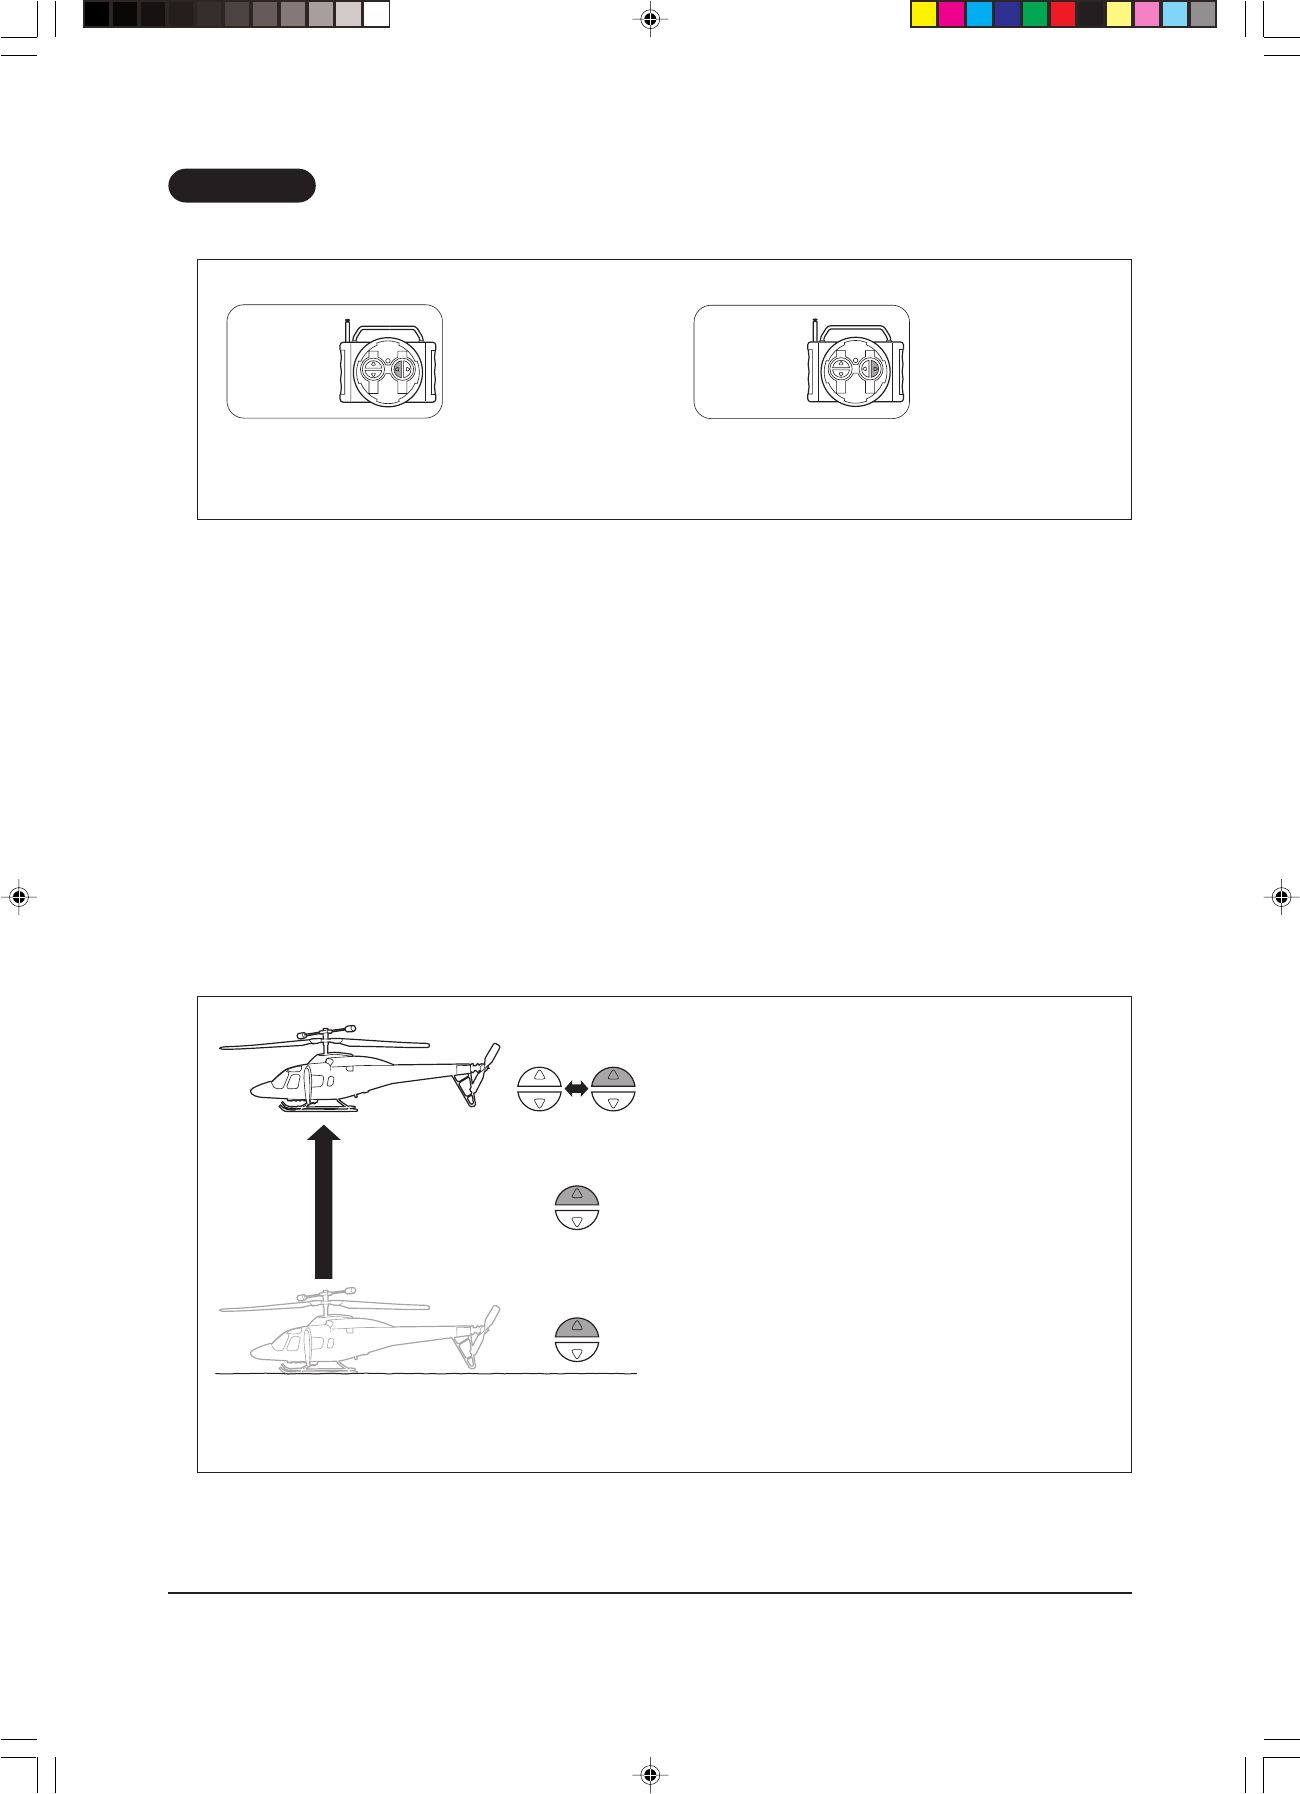
2. Transmitter Functions (Ascend / Descend)
(1)
(2)
4~5m
(4)
(3)
UP button DOWN button
* Assuming that the helicopter is flying at 75% power
Do not press
the button.
Power: 0% (Stop)
Press the
button once.
25%
Power: 0% 25%
Press the
button
once more.
75
%
Power: 25% 75%
Only while
the button
is pressed.
100%
Power: 75% 100%
Press the
button once.
25
%
Power: 75% 25%
Press the
button
once more.
Power: 25% 0% (Stop)
Ascent flight
100% power
Hovering
75% power
Descent flight
25% power
Relationship between Power and Operation
Assume that 75% power is for hovering, 25% power is for
descent, and 100% power is for ascent.
* The condition will differ according to the amount of bat-
tery power.
HELIO_En_p02_15.p65 4/9/04, 10:01 AM13
English
14
3. Transmitter Functions (Right / Left Turning)
Im por t a nt :
* If anyone is playing with an R/C plane or an R/C car near you, check with them about which frequencies are being used. When you
turn on the helicopter switch, if the propellers start rotating, there may be someone nearby using the same frequency.
* Do not cut or bend the transmitter antenna even if it is too long.
* If wind blows weakly on the ground, it may blow stronger in the sky. In such case, the helicopter may be carried away by wind. Fly
the helicopter in an area where there are no rivers or marshes downwind. Fly it where it is safe even if driven out by wind.
4. After Playing with the H elicopter
After the helicopter lands, set the switch on the helicopter and that of the transmitter in the OFF position in this order.
Also, if you stop flying the helicopter, be sure to retract the transmitter antenna.
5. Let's Fly
How to make a successful ascent or descent
(1) Press the "UP button" on the transmitter 3 times and set the power to 100 % while the button is pressed. The helicopter ascends.
When the helicopter ascends about 5 m, take your finger off the "UP button" and set the power to 75%. When the helicopter
starts descending, press the UP button again and set the power to 100%. Repeat the procedure above to make the helicopter
hover.
(2) To descend slowly, keep the power at 75%. Or, you can press the "DOWN button" once to set the power to 25% and land the
helicopter. After that, press the "DOWN button" once again and set the power to 0% to stop the helicopter.
The helicopter turns
in the left direction.
Only while
the Left turning
button is
pressed.
The helicopter turns
in the right direction.
Only while
the Right
turning button
is pressed.
About 5 m
Power: 100%
Power: 100%
Power: 75% Power: 100%
About 5 m
Power: 25% 0%
Power: 0%
Power: 75%
* If you cannot fly the helicopter well the first time, do not give up. Practice makes perfect.
HELIO_En_p02_15.p65 4/9/04, 10:01 AM14
Note:The manufacturer is not responsible for any radio or TV interference caused by unauthorized modifications to
this equipment. Such modifications could void the user's authority to operate the equipment.

English
15
HELICOPTER MAINTENANCE
AFTER-SALES SERVICE
A403-English
HELIO_En_p02_15.p65 4/9/04, 10:01 AM15

HELIO_En_cover.p65 4/9/04, 10:01 AM2