TandD 10020 Wireless Base Station/Repeater User Manual 500 manual indd
TandD Corporation Wireless Base Station/Repeater 500 manual indd
TandD >
Users Manual Rev 1

Thank you for purchasing our product.
Carefully read this instruction manual
before using this unit.
© Copyright T&D Corporation. All rights reserved.
2009. 07 16004584010 (1st Edition)
RTR-500
Wireless Base Station / Repeater
Introductory Manual
Details about how to use the software and its
functions, can be found in the Software "Help".

For product information or questions contact us at:
817-1 Shimadachi, Matsumoto, Nagano, JAPAN 390-0852
Tel : +81-263-40-0131 Fax: +81-263-40-3152
E-mail: support@tandd.com
Office Hours: Monday to Friday
9:00-12:00/13:00-17:00 (GMT +9:00 Tokyo Time)
Website
http://www.tandd.com/
We have opened an English Website for your convenience. Here you can find
information about our company, news, product, news, products, upcoming
events, software and user's manuals downloads, as well as, other support.
Please stop by and see what we have to offer.
Wireless Base Station / Repeater RTR-500
Introductory Manual
Published by T&D Corporation (1st Edition)
© Copyright T&D Corporation. All rights reserved.
This is printed on recycled paper.

Wireless Base Station RTR-500 Warranty
Customer's name:
Address:
Phone No.:
Dealer's name:
Address:
Phone No.:
Guarantee period: 12 months from date of purchase
Date of purchase:
Statement of Limited Warranty
1. This product is warranted to be free from defects in materials and workmanship for a period of
one (1) year following the date of purchase. Should the product fail to operate per specification in
normal use during this period T&D will repair the unit or provide a replacement free of charge. T&D
will not accept returns for any reason other than defects during the warranty period, and will not
accept any product that has been misused, dropped, abused or inappropriately used or mistreated
at any time.
2. This warranty is strictly limited to repair or replacement-in-kind for defective product. T&D makes
no other warranty, either express or implied, and will not accept liability beyond the remedies
stated herein. Specifically, T&D will not accept liability for direct, indirect, special, consequential or
incidental damages arising from the use of this product.
3. Customers wishing to submit a defective product for repair or replacement during the warranty
period should first contact the dealer from whom it was originally purchased. After receiving a
return authorization the defective product should then be packaged along with a description of
the difficulties being experienced, proof of purchase and all included accessories and materials,
and return it to the dealer. In the event of difficulty contacting the original dealer, customers should
contact the nearest authorized T&D sales representative. A list of these can be found on the
company's website, www.tandd.com, or it can be obtained by contacting TandD directly.
4. This limited warranty statement gives the customer specific legal rights. The customer may also
have other rights which vary from state to state in the United States, from province to province in
Canada, and from country to country elsewhere in the world. To the extent this limited warranty
statement is inconsistent with local law, this statement shall be deemed modified to be consistent
with such local law.
5. For further information relating to product repair or replacement, or for other service questions after
the termination of the warranty period, customers should contact their local authorized T&D sales
representative.

Notices ------------------------------------------------------------------ 2
Safety Precautions and Instructions ----------------------------- 3
Notes and Precautions for Installing Wireless Communication Devices - 7
What are Base Units, Remote Units and Repeaters? ------- 9
Features of RTR-500 -----------------------------------------------10
Using as a Base Unit --------------------------------------------------------------- 10
Using as a Repeater --------------------------------------------------------------- 10
RTR-500 Appearance Diagram and Part Names -----------11
Package Contents ------------------------------------------------------------------- 11
Getting the RTR-500 Ready to Use -----------------------------12
Connect the Antenna --------------------------------------------------------------- 12
Install Batteries ----------------------------------------------------------------------- 12
About the Sortware --------------------------------------------------13
When using an RTR-500 as a Base Unit -------------------------------------- 13
When using an RTR-500 as a Repeater -------------------------------------- 13
Installing the USB Device Driver ---------------------------------14
Windows XP (SP2 or higher) ----------------------------------------------------- 14
Checking the USB Device Driver Installation (XP Sp2 or higher) -------- 16
For Windows Vista ------------------------------------------------------------------ 17
Checking the USB Device Driver Installation (Vista) ----------------------- 17
Re-installing the USB Device Driver ----------------------------18
For Windows XP (SP2 or higher) ------------------------------------------------ 18
For Windows Vista ------------------------------------------------------------------ 21
Tips for placing the RTR-500 ------------------------------------24
Product Specifications ----------------------------------------------25
Options -----------------------------------------------------------------26
RTR-500 Warranty ----------------------------------------------- Back
Index

2
Notices
Carefully read this manual so that you can properly use this product.
T&D Corporation accepts no responsibility for any malfunction of and/or
trouble with this product or with your computer that is caused by the
improper handling of this product and will deem such trouble or
malfunction as falling outside the conditions for free repair of the attached
warranty.
- All rights of this User's Manual belong to T&D Corporation. It is prohibited
to use, duplicate and/or arrange a part or whole of this User's Manual
without the permission of T&D Corporation.
- Microsoft and Windows are registered trademarks of Microsoft Corporation
USA and are binding in the USA and all other countries.
- Company names and product names are trademarks or registered
trademarks of each company.
- Specifications, design and other contents are subject to change without
notice.
- On screen messages in this manual may vary slightly from the actual
messages.
- Please notify the shop where you purchased this product or T&D
Corporation of any mistakes, errors or unclear explanations in this manual.
T&D Corporation accepts no responsibility for any damage or loss of
income caused by the use of our product.
- This product has been designed for private or industrial use only. It is not
for use in situations where strict safety precautions are necessary such as
in connection with medical equipment, whether directly or indirectly.
- We are not responsible for any malfunction or trouble caused by the use of
our product or by any problem caused by the use of measurement results
of our unit. Please be fully aware of this before using our product.
- Some of our products, which come under the category of strategic goods in
foreign trade law, need the permission of the Japanese government to be
exported outside of Japan.
- The Manual itself can be downloaded from our Home Page:
http://www.tandd.com/
3
Safety Precautions and Instructions
Before using please read the following precautions and instructions.
The following items should be strictly obeyed for the safe usage of this
unit, and for protecting yourself and other people from bodily harm and/
or damage to property.
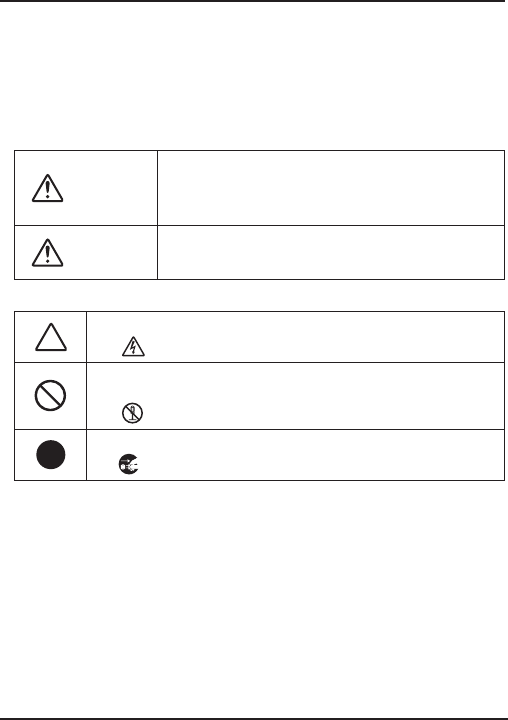
Explanation of Symbols
Explanation of Warning Symbols
DANGER
These entries are actions that absolutely under no
circumstance should be taken. The taking of such
an action may cause serious personal physical
damage or death.
CAUTION These entries are actions that if taken may lead to
physical injury or damage to persons or things.
Explanation of Picture Symbols
Denotes a forbidden action.
(EX : stands for CAUTION AGAINST ELECTRIC SHOCK)
Denotes a forbidden action. Inside or near the symbol will
appear another symbol giving details.
(EX : stands for DO NOT TAKE APART)
Denotes an action that you must take.
(EX : Unplug power plug from outlet)
4
DANGER
Be sure to follow the warnings and notices about use from your PC
maker when installing and using this unit.
Do not take apart, repair or modify the unit.
Doing so may cause fire or electrocution.
If water or a foreign body enters the unit, immediately disconnect the
cables from the unit, remove batteries, and stop using.
Continued use may cause fire or electrocution.
Do not use this unit in wet or humid places, such as a bathroom.
It may cause a fire or other trouble including malfunction.
Store main unit, batteries and communication cables out of the
reach of children.
It is dangerous to touch or swallow them.
Do not connect the communication cable to a telephone line.
It may cause a fire or other trouble including malfunction.
If any smoke or strange smells are emitted from the unit,
immediately disconnect the cables from the unit, remove batteries,
and stop using.
Continued use may cause fire or electrocution.
Do not drop the unit, or expose the unit to a strong impact. If that
happens to the unit, immediately disconnect the cables from the
unit, remove batteries, and stop using.
Continued use may cause fire or electrocution.
Make sure to periodically remove dust and dirt from the AC adaptor
plug.
If dust is allowed to accumulate on the plug, moisture may cause poor insulation and
result in fire.
Do not unplug the AC adaptor with wet hands.
This may cause electrocution.
5
CAUTION
This product has been designed for private or industrial use only. It
is not for use in situations where strict safety precautions are
necessary such as in connection with medical equipment, whether
directly or indirectly.
Harmful gases or chemicals may cause corrosion and/or other
danger to the unit. Also, by coming in contact with hazardous
substances, harm may occur to the people handling the unit.
Therefore, do not use in any environment that is exposed to
chemicals and harmful gases.
This unit is not water-resistant.
If the unit gets dirty, wipe it with a clean cloth and a mild detergent.
Please do not insert your fingers or any foreign objects into any of
the devices' jacks.
Make sure that the cable and AC adaptor are inserted fully, so as
not to cause an improper connection. Also, when unplugging the
cable from the main unit, do not pull the cord, but hold the
connector to disconnect.
Battery life depends on the easurement environment,
communication frequency, recording interval and battery quality.
Do not use any other batteries and AC adaptor than those that are
specified in this User's Manual.
It may cause a fire or other trouble including malfunction.
Do not put anything on top of the AC adaptor.
This may cause overheating.
Remove batteries from any unit that is not to be used for a long
period of time.
Batteries left in a unit not being used for a long time may leak and cause a
malfunction.
Battery terminals may provide insufficient contact due to age or
vibration.
This may lead to data loss.
Condensation may occur if the unit is moved from one environment
to another where the difference in temperature is great.
Use the unit in an environment where the ambient temperature is from -10 to 60oC
and the humidity is 90%RH (no condensation) or less.

6
To prevent damage to the unit from static electricity, remove static
electricity from your body by touching metal around you (door knob,
window frame) before touching the unit.
Static electricity may cause not only damage to the unit, but may cause breaks in or
a loss of data.
Do not use or store the Unit in any of the following places. Doing so
may cause electrocution, fire and/or other adverse effects to the
device and/or your computer.
- Areas exposed to direct sunlight.
This will cause the inside of the device to become overheated and may cause fire,
deformation, and/or other damage including malfunction.
- Areas prone to strong magnetic fields.
This may cause damage including malfunction.
- Areas exposed to water leakage.
This may cause electrocution or other damage incluing malfunction.
- Areas exposed to static electricity.
This may cause damage including malfunction.
- Areas exposed to excessive vibration.
This may cause injury, malfunction, damage or loss of proper electrical contact.
- Areas that are not flat or level.
This may cause the unit to fall and result in injury and/or damage.
- Areas near fire or exposed to excessive heat.
This may cause damage including malfunction and deformation.
- Areas prone to smoke, duct and dirt.
This may cause damage including malfunction.

7
Notes and Precautions for Installing Wireless
Communication Devices
When installing wireless communication devices take special care in selecting locations so
as to ensure proper communication.
Note that even after a successful installation, due to changes in environmental conditions,
communication errors may occur when restarting the system.
Keep wireless communication devices away from metals and computers.
-
-
-
Please take note that in many instances, walls, floors, stairs, barriers of all types and
desks will contain metals.
Please install these devices at least 30 cm away from walls or boards containing metal.
Please place units more than 1 meter away from computers.
Objects which contain lots of water, such as plants or soil, absorb radio
waves. We highly recommend that such objects not be placed between or
near wireless communication units.
-
-
A study made in measuring temperature in a greenhouse has shown that as tomatoes
grew, communication errors also increased.
Do not place units directly on the ground. Set them up in a high unobstructed position.
If wireless communication units are placed in a metal container such as a
freezer or refrigerator, the wireless communication range will be shortened.
-
-
Please check wireless signal strength to find the best possible communication points.
In most cases radio waves are transmitted via doors and door openings so place
devices as near to doors as possible.
Keep all wires as far away as possible from wireless communication
devices.
- Be careful about placing devices near any wiring or cables such as power supply cables,
telephone wires or LAN cables.
Do not place devices which are using the same communication frequency
channel in the same area.
- If more than one device is being used make sure to set a different communication
frequency channel for each device. If the same channel is used for multiple devices not
only will more communication errors occur, but battery life will also be shortened.
Keep the devices away from noise-emitting sources.
-Equipment such as some industrial instruments, electronic devices or fluorescent lamps
generate noise. Place devices at least 30 cm away from any noise-emitting sources.
After having made an installation check the wireless signal strength.
- The software application includes a function to check wireless signal strength.
If you are transmitting between indoors and outdoors we suggest installing
the device near a window or some such place where signals can easily
pass through.
- Note that moving units 10 cm in any one direction may result in communication results
being significantly changed.
If no change occurs after moving the units to several nearby locations, we strongly
suggest adding one or more Repeaters to enhance communication.

8
Wireless Regulations
Radio, EMC and Safety Regulations
This device complies with part 15 of the Federal Communications
Commission (FCC) rules and with RSS-210 of the Industry Canada
(IC). Operation is subject to the following conditions:
(1) This device may not cause harmful interference, and
(2) This device must accept any interference received, including
interference that may cause undesired operation.
Changes or Modifications not expressly approved by the manufacturer for compliance
could void the user’s authority to operate the equipment.
Note: This equipment has been tested and found to comply with the limits for a Class
B Digital Device, pursuant to Part 15 of the FCC Rules. These limits are designed to
provide reasonable protection against harmful interference in a residential installation.
This equipment generates, uses and can radiate radio frequency energy and, if not
installed and used in accordance with the instructions, may cause harmful interference
to radio communications.
However, there is no guarantee that interference will not occur in a particular
installation. If this equipment does cause harmful interference to radio or television
reception, which can be determined by turning the equipment off and on, the user is
encouraged to try to correct the interference by one or more of the following measures:
-Reorient or relocate the receiving antenna.
-Increase the separation between the equipment and receiver.
-Connect the equipment into an outlet on a circuit different from that to which the receiver is
connected.
-Consult the dealer or an experienced radio/TV technician for help.
9
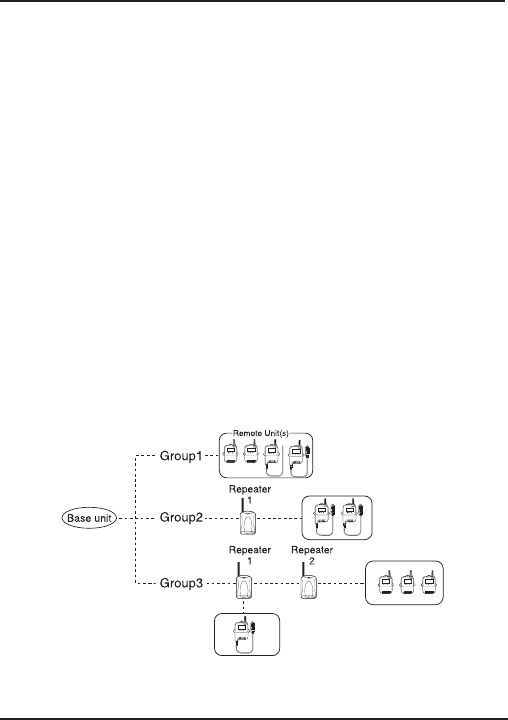
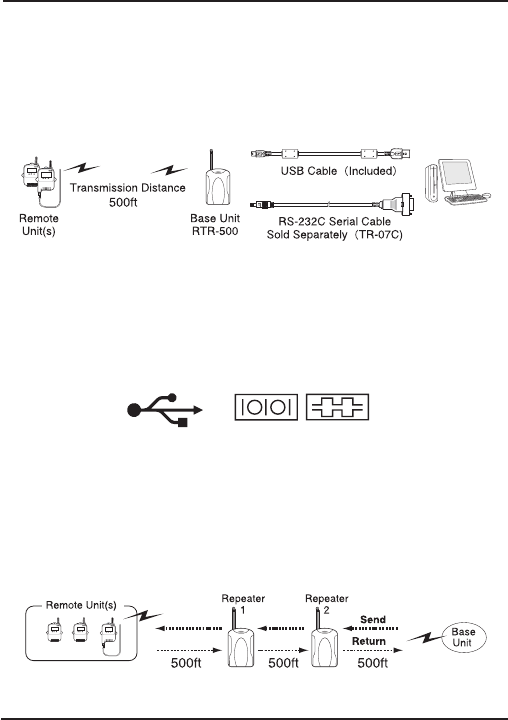
What are Base Units, Remote Units and Repeaters?
Base Units
A Base Unit can collect data measured by and recorded in Remote Units via
wireless communication, and send the collected data either by FTP or e-mail to
a server whereby the data can be downloaded to your computer via an external
network, such as the internet. Also, by setting Upper and Lower Limits, warning
monitoring can be carried out for each Remote Unit at each Location.
Remote Units
A Remote Unit is a Data Logger designed to measure and record temperature
and humidity. The wireless communication range between a Remote Unit and a
Base Unit, if unobstructed and direct, is about 500ft.
Repeaters
If wireless communication cannot successfully be carried out due to obstacles,
or if you wish to extend the wireless communication range, please add
Repeater(s) between Remote Unit(s) and the Base Unit.
About Registration
It is first necessary to register the desired Remote and Repeater Units (where
needed) to a Base Unit. It is possible to register them into Groups by place or
by purpose. Assign a Wireless Communication Frequency Channel for each
Group. Remote Units and Repeaters can only be registered to one Group at a
time.
10
Features of RTR-500
RTR-500 can be used both as a Base Unit and a Repeater.
Using as a Base Unit
An RTR-500 Base Unit can collect data measured by and recorded in
Remote Units via wireless communication, and send the collected data to
your computer connected to the Base Unit with a USB or Serial
Communication Cable.
* If you wish to communicate by serial communication, an optional cable
(TR-07C) is needed.
* The RS-232C communication cable connector is a D-Sub 9 pin female.
* Make sure to connect it to the correct place to ensure communication, and
also make sure the cable is inserted fully, so as not to cause an improper
connection.
* The USB / Serial Ports on your computer have markings as shown below.
for USB for Serial (RS-232C)
Using as a Repeater
If the distance between an RTR-500 Base Unit and an Remote Unit exceeds
the possible range of wireless communication, it is possible to set up one or,
if necessary, multiple RTR-500 unit(s) as Repeater(s) between them in order
to route wireless communication from the Base Unit to the Remote Unit.
Compatible Base Units are RTR-500GSM and RTR-500 models.
11
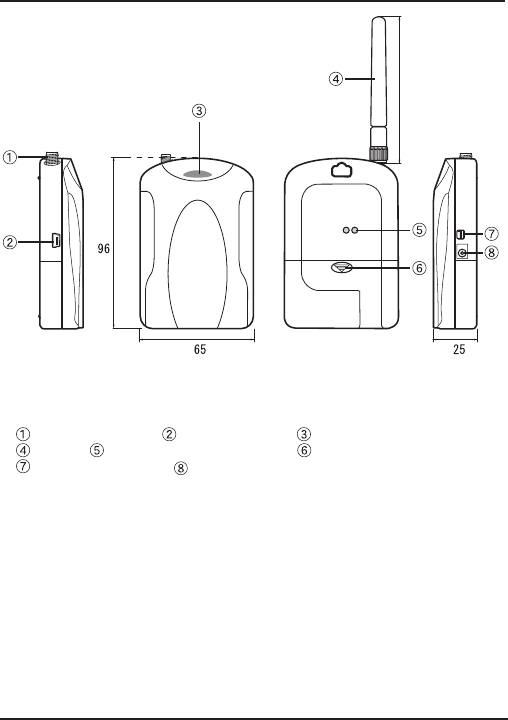
RTR-500 Appearance Diagrams and Part Names
109
Front BackLeft Side Right Side
Unit: mm
Antenna Connector USB (MiniB) Jack Monitor LED
Antenna Optical Communication Area Battery Cover
RS-232C (mini) Jack AC Adaptor Connection Jack
Package Contents
The following items are included in the package:
RTR-500 x 1
Antenna x 1
USB Communication Cable x 1
Introductory Manual (Warranty) x 1
Memo Sticker x 1
* Please write Repeater names, numbers or any other memos on the sticker
and fasten it to the unit.
12
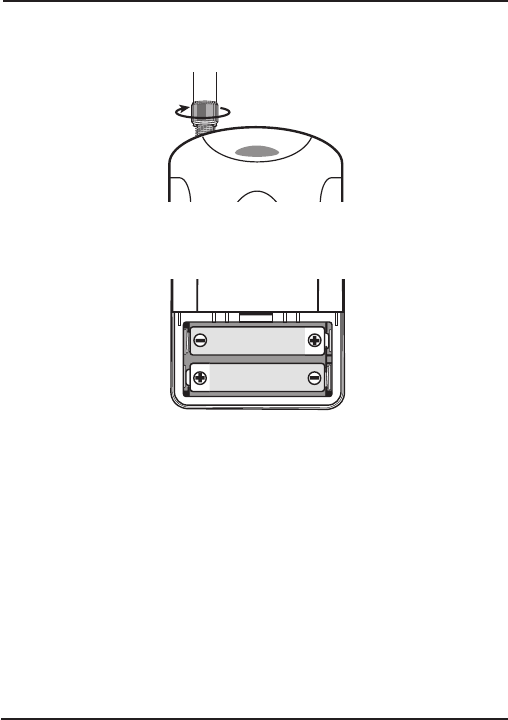
Getting the RTR-500 Ready to Use
Connect the Antenna
Connect the supplied antenna to the antenna connector.
Install Batteries
Insert 2 AA alkaline batteries as shown in the figure.
* When the RTR-500 is connected by a USB communication cable to your
computer or power is supplied by an optional AC Adaptor to the RTR-500,
there is no need to insert batteries.
* Always use two batteries of the same type.
* Make sure not to mistake + / -.
* A battery cannot be charged inside the RTR-500.
* The Monitor LED will blink once when usable batteries are installed.

13
About the Software
Before connecting an RTR-500 to your computer,
make sure to install the software into the computer.
If you have connected an RTR-500 to your computer before installing the
software, make sure to click the [Cancel] button in the Wizard window when
it pops up on the computer display.
When using an RTR-500 as a Base Unit
It is necessary to go to our Website and download the software
designed for RTR-500.
http://www.tandd.com/
For information about how to download or install the software and other details,
please see the download page.
When using an RTR-500 as a Repeater
Please install the software designed for the Base Unit you are using.
For information about how to install the software and other details,
please see the Introductory Manual that came with the Base Unit or the
Help Menu in the Software.
After the software installation has been completed, please install the
USB Device Driver. (See the pages hereafter for details.)
14
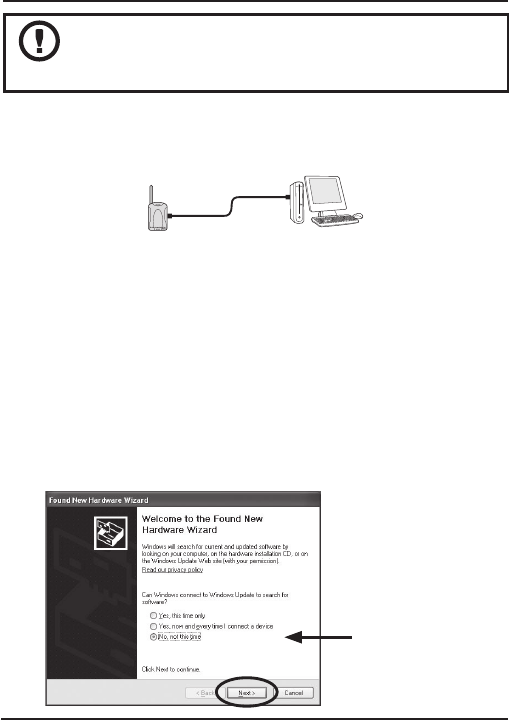
Installing the USB Device Driver
Have you already installed the software?
Before connecting an RTR-500 to your computer via USB,
make sure to install the software into the computer.
Connecting an RTR-500 to a Computer
Connect the RTR-500 with the supplied USB communication cable to the
computer.
- Make sure that the USB cable is inserted fully, so as not to cause an
improper connection.
- Please login using a User Account with Administrator (Computer
Administrator) rights.
For Windows XP (SP2 or higher)
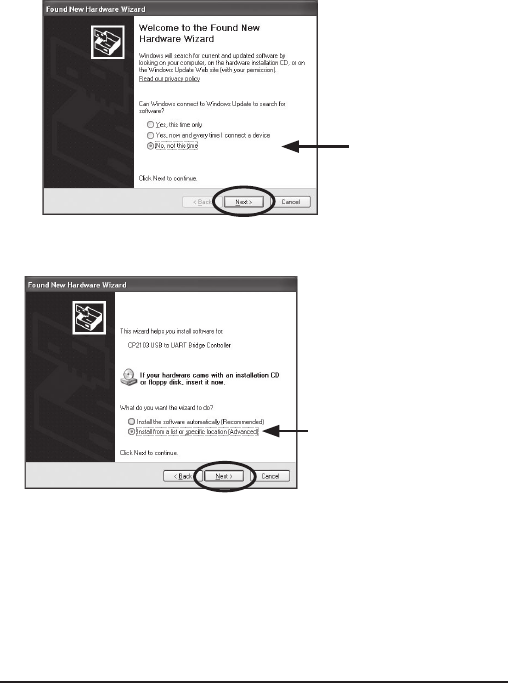
1. By connecting the RTR-500 to the computer, the [Found New
Hardware] Wizard will automatically open.
- If that window does not automatically open, installation may have been
completed or failed. Please check whether the USB device driver has been
properly installed by following the directions on page 16.
2. Check "No, not this time" and then click the [Next] button.
Check the
"No, not this time".
15
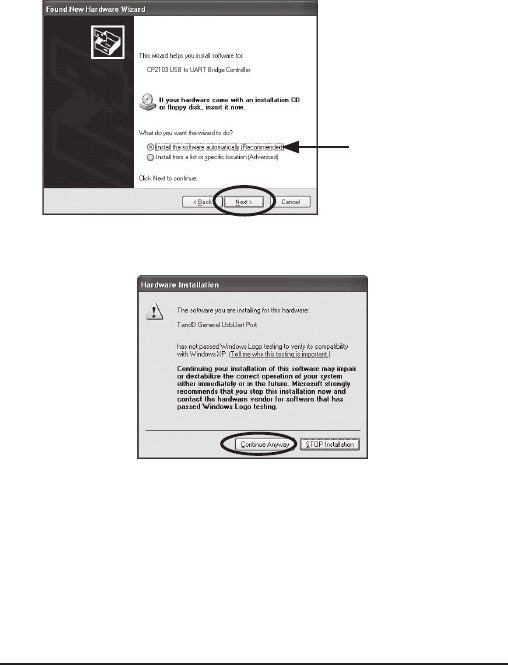
3. By checking "Install the software automatically (Recommended)"
and clicking [Next], the software will automatically be installed.
Check the
"Install the software
automatically
(Recommended)"
4. If a window appears such as the one below during installation,
click the [Continue Anyway] button.
5. After installation has been completed, please check whether the
USB device driver has been properly installed.
16
Checking the USB Device Driver Installation (XP Sp2 or
higher)
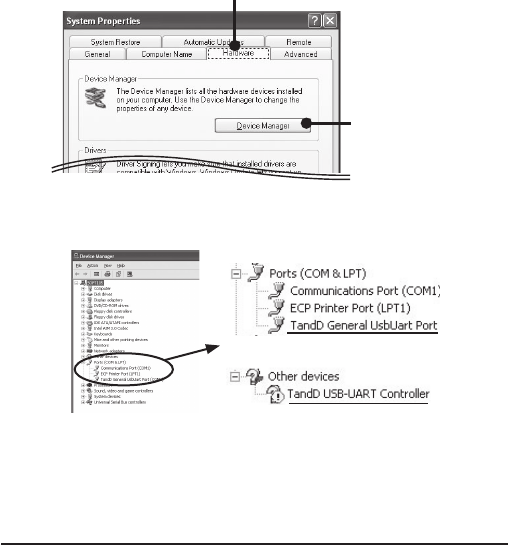
1. Open the System Properties Window by opening the [Control
Panel] and double click on [System] to display that window.
2. In the [System Properties] window, click the [Hardware] tab, and
then click the [Device Manager] button in the Device Manager
area.
[Hardware] Tab
[Device Manager]
Button
3. If under "Port (COM & LPT)" appears "TandD General UsbUart
Port" the USB device driver has been properly installed.
If successful
If failed (ex.)
- "TandD General UsbUart Port" will not appear if the RTR-500 has not been
connected to the computer.
- If "? Other Device" - "?! TandD USB-UART Controller" appears, it means the
USB device driver was not properly installed.
Please reinstall by following the directions on page 18.
17
For Windows Vista
For Windows Vista, by installing the software, the USB device driver will
also be automatically installed.
Please check whether the USB device driver has been properly
installed.
Checking the USB Device Driver Installation ( Vista)
1. Connect the RTR-500 with the supplied USB communication
cable to the computer.
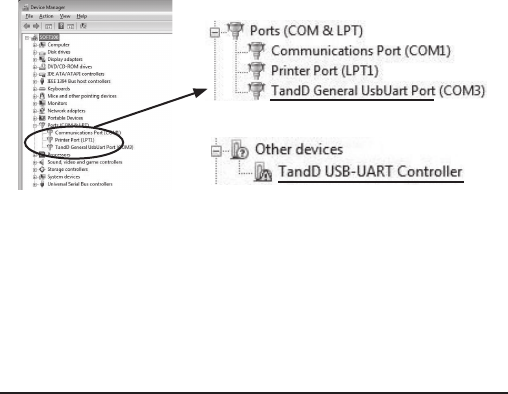
2. Open the Device Manager Window by Opening the [Control
Panel] and click on [System and Maintenance] - [System] - [Device
Manager].
3. If under "Port (COM & LPT)" appears "TandD General UsbUart
Port" the USB device driver has been properly installed.
If successful
If failed (ex.)
- "TandD General UsbUart Port" will not appear if the RTR-500 has not been
connected to the computer.
- If "? Other Device" - "?! TandD USB-UART Controller" appears, it means the
USB device driver was not properly installed.
Please reinstall by following the directions on page 21.
18
Re-installing the USB Device Driver
For Windows XP (SP2 or higher)
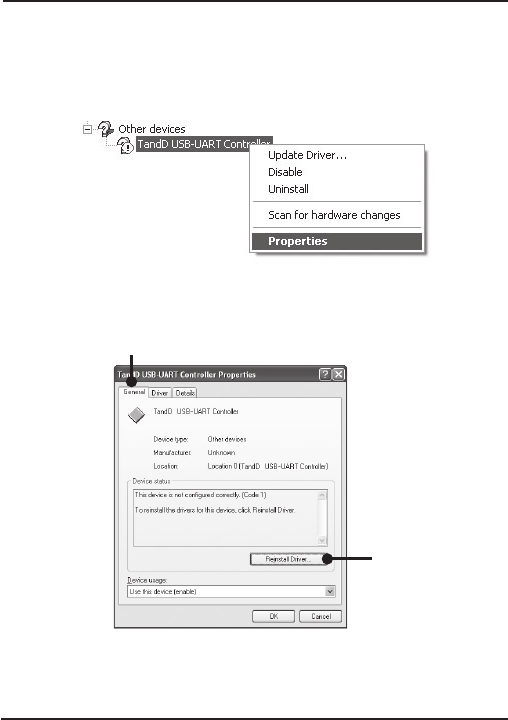
1. In the Device Manager window, right click on the unknown
device "TandD USB-UART Controller".
From the pop-up menu click on "Properties".
2. In the "TandD USB-UART Controller Properties" window, click
the [General] tab, and then click on the [Reinstall Driver] button
to display the [Found New Hardware] Wizard.
[General] Tab
[ReInstall Driver]
Button
19
3. Check "No, not this time" and then click the [Next] button.
Check the
"No, not this time".
4. Check "Install from a list or specific location (Advanced)" and
then click the [Next] button.
Check the "Install from a list or
specific location (Advanced)"
20
5. Check "Include this location in the search" and then click the
[Browse] button to specify the location of the device driver.
Click [Next] to start the installation.
Check the "Include this
location in the search:"
[Browse] Button to
specify the location of
the device driver
- In the software folder, select "Driver RTR-500".
EX: C:\Program Files\software name\Driver RTR-500
6. If a window appears such as the one below during installation,
click the [Continue Anyway] button.
7. After the installation has been completed, please check whether
the USB device driver has been properly installed.

21
For Windows Vista
1. In the Device Manager window, right click on the unknown
device "TandD USB-UART Controller".
From the pop-up menu click on "Properties".
2. In the "TandD USB-UART Controller Properties" window, click
the [General] tab, and then click on the [Reinstall Driver] button
to display the [Update Driver Software TandD USB UART
Controller].
[Reinstall Driver]
Button
[General] Tab
22
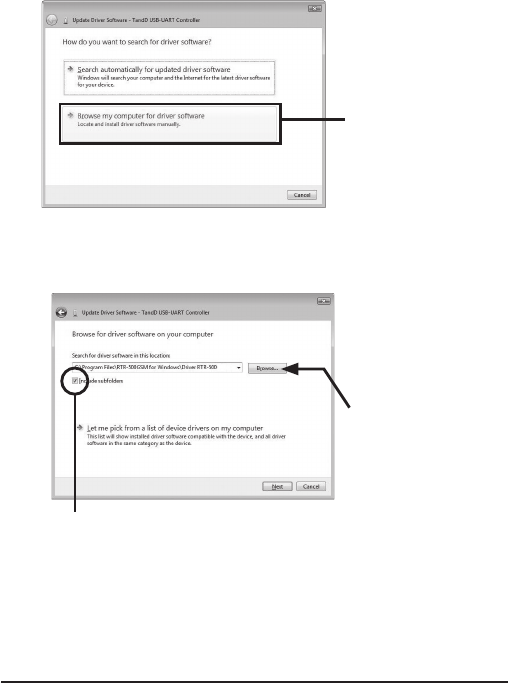
3. Click the "Browse my computer for driver software".
Click the "Browse my
computer for driver
software"
4. Click the [Browse] button to specify the location of the device
driver.
Click [Next] to start the installation.
Check here
[Browse] button to
specify the location
of the device driver.
- In the Software folder, select "Driver RTR-500".
EX: C:\Program Files\software name\Driver RTR-500
23
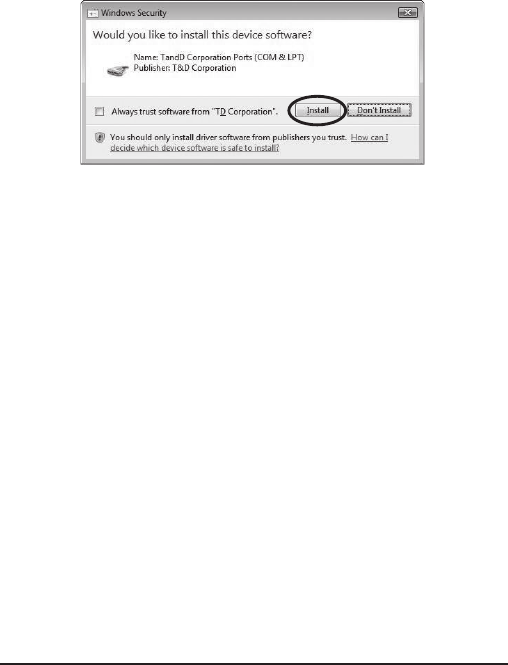
5. If a window appears such as the one below during installation,
click the [Install] button.
6. After the installation has been completed, please check whether
the USB device driver has been properly installed.
24
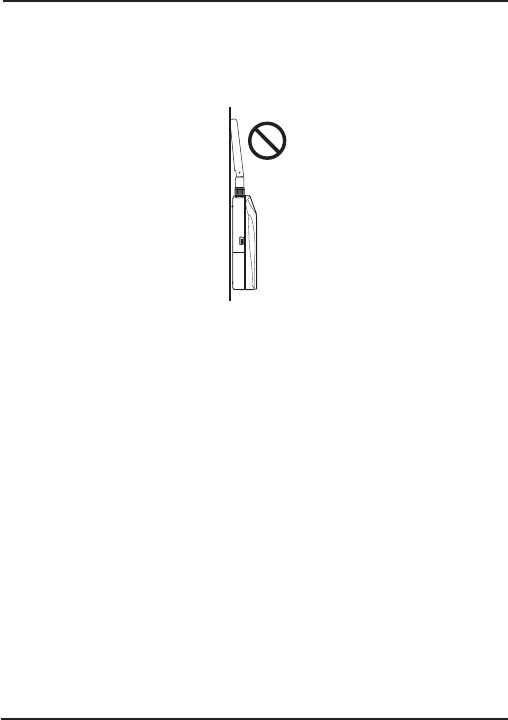
Tips for placing the RTR-500
We strongly suggest setting the RTR-500 unit up in a high,
unobstructed position to enhance the radio signal strength.
When positioning the units try to keep the antennas away from objects
or walls.
Please carry out a "Signal Strength Test" to check the radio signal
strength before using the product and adjust the antenna direction
accordingly. For more details please see "Notes and Precautions for
Installing Wireless Communication Devices" on page 7.
* Signal Strength Tests are tests carried out for checking the wireless signal
strength between Base, Remote, and Repeater Units after the units have
been deployed and settings had been completed. Use the Application
function in the software to carry out this test.

25
Product Specifications
Compatible
Devices
Remote Unit :
Base Unit :
RTR-501, RTR-502, RTR-503, RTR-502Pt
RTR-500, RTR-500GSM
Power Base Unit : USB bus power / AC Adaptor (AD-0638)
Repeater : 2 AA batteries / AC Adaptor (AD-0638)
Battery Life
6 Months of continued use on 2 AA alkaline batteries when used as
Repeater for five minutes a day.
* It depends on measurement environment, recording interval and
battery performance.
PC Interface (*1) USB miniB Connector
Serial [Mini serial] (19200bps)
Wireless
Communication
Time
1 unit of full data takes about 120 seconds (when Repeater not used)
When communicating via Repeaters, the approximate time for that
communication is calculated as follows: "120 seconds + (Number of
Repeaters 120seconds)".
Wireless
Specifications
FCC Part15 Section247 / IC RSS-210
[Frequency Range: 902 to 928MHz ]
Transmission
Range Approx. 500ft (May vary with conditions)
LED Green LED
Blinks during Wireless Communication and PC Communication.
Operating
Environment
Temperature:
Humidity:
-10 to 60oC (-30 to 60oC when external power connected)
20 to 80%RH (No condensation)
Operating Voltage 2.5V to 7.0V
Consumption Current Approx. 50mA (Wireless Communication)
Dimensions H 96mm x W 65mm x D 39mm / Antenna Length : 109mm
Weight Approx. 71g (Batteries not included)
(*1) If you wish to communicate by serial communication, an optional cable (TR-07C) is
needed.
26
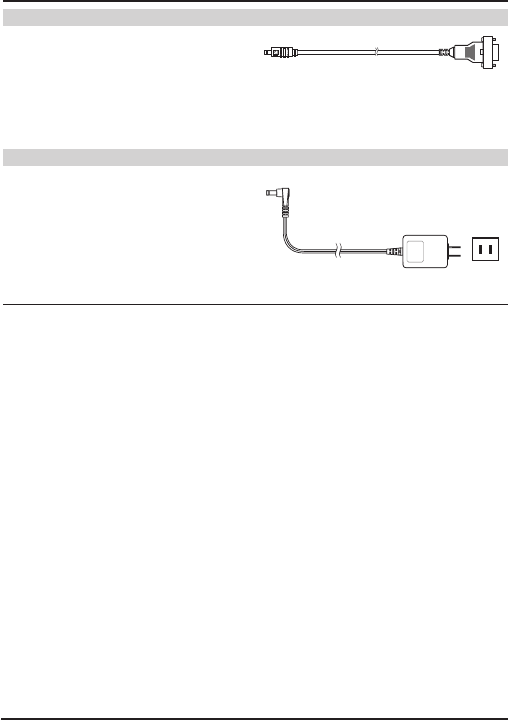
Options
RS-232C (Serial) Communication Cable
Type : TR-07C
Cable Length:1.0m
Connector Type:
Specialized Connector D-sub9pin
For communication with computer
AC Adaptor
Type: AD-0638
Input: AC100-240V
Output: DC6V 500mA
Frequency: 50/60Hz
Cable length: 74in (1.85m)
Plug Figure: A