TandD RTR57C 900 MHz Wireless Handheld Data Collector User Manual
TandD Corporation 900 MHz Wireless Handheld Data Collector Users Manual
UserManual.wiki
>
TandD
>
RTR57C User Manual
Users Manual
Navigation menu
Upload a User Manual
Namespaces
Wiki Guide
HTML
PDF
Info
Views
User Manual
Discussion / Help
Navigation
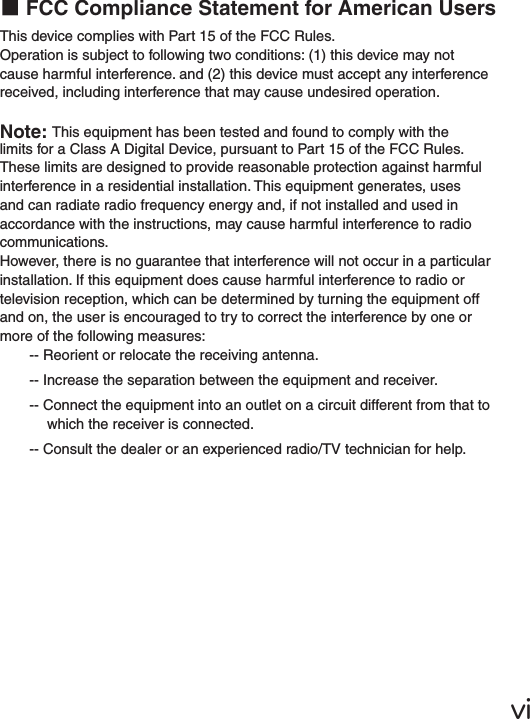
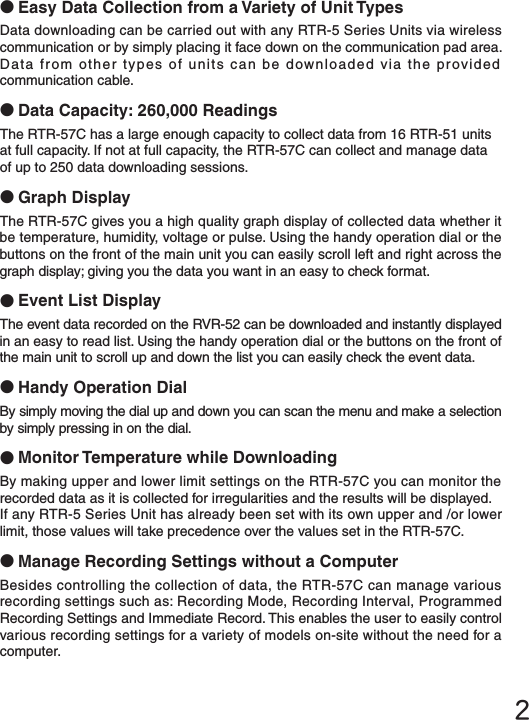
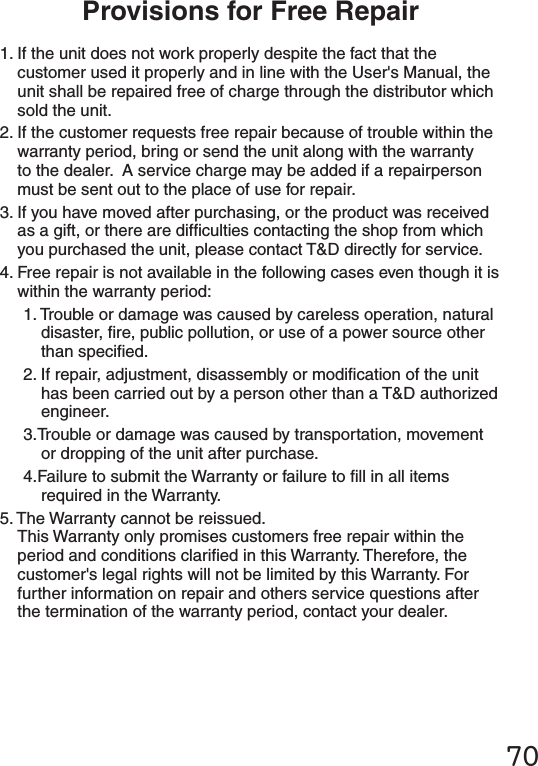
![5◆Part NamesCollect List①⑧①Operation Dial②LCD Display③Operation Buttons④Optical Communication Port⑤Communication cable connection jack⑥AC adaptor connection jack⑦Antenna⑧Battery Compartment◆Explanation of the Button Functions List・The downloaded data list will be displayed.・Allows you to swift-scroll across data when viewing a graph or an event list.・Allows you to swiftly make changes to the upper and lower limit value settings.・Switch Power ON/OFF.・When downloading via wireless communication the [Select Group] display will appear.・Allows you to swift-scroll across data when viewing a graph or an event list.・Allows you to swiftly make changes to the upper and lower limit value settings.Collect②Part Names and Functions⑦③⑤⑥④](https://usermanual.wiki/TandD/RTR57C/User-Guide-502049-Page-14.png)
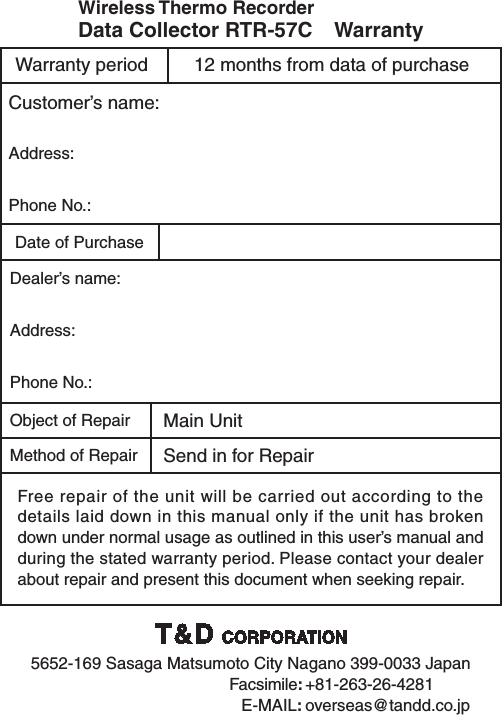
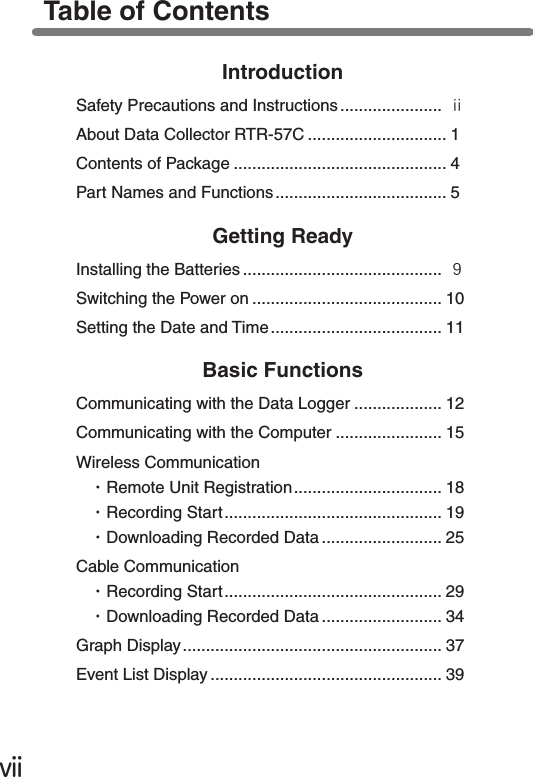
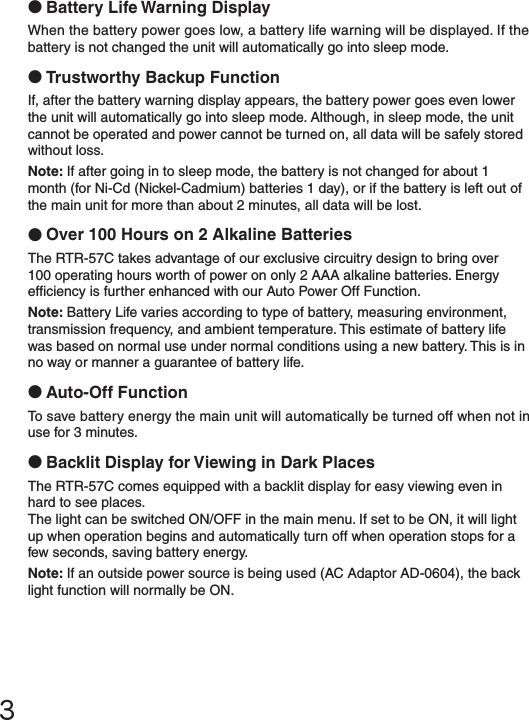
![7◆LCD Display●After making a setting, adjust the dial to select [OK] and press to complete the setting procedure.●A▲indicates that there are more menu items above ( ▲) or below the ( ▼) to view.●Items marked with( )indicate menus for Wireless Communication.●The item marked with an arrow( )denotes it has been selected. If you move the operation dial up and down, the arro w will move accordingly and by pressing in the dial the item selected will be activated.](https://usermanual.wiki/TandD/RTR57C/User-Guide-502049-Page-16.png)
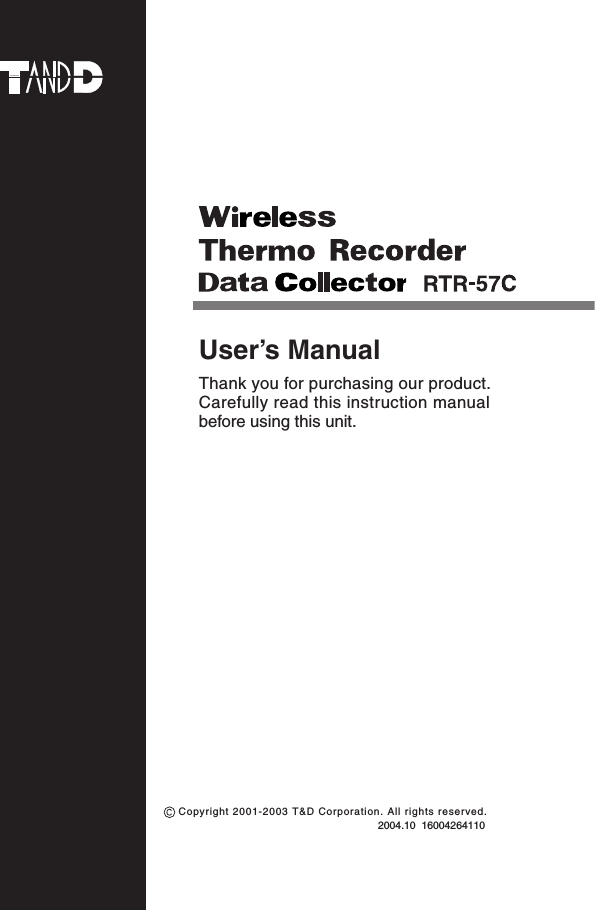
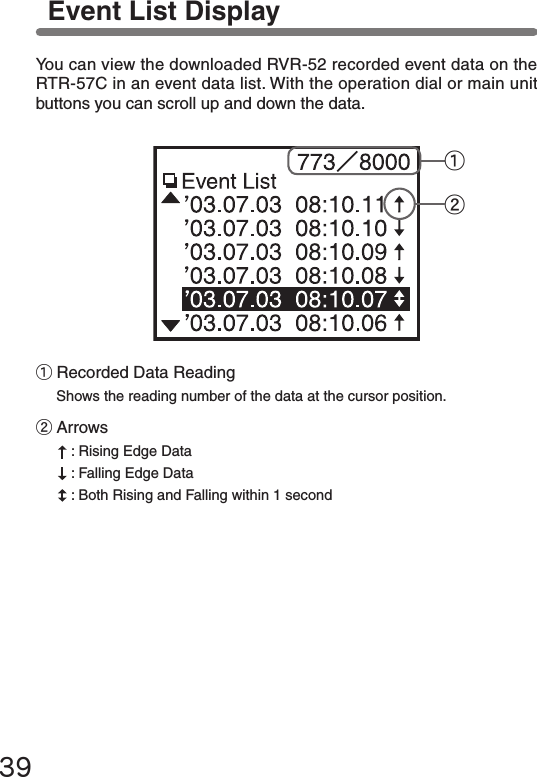
![8●If there is no [OK] in the setting display, but a [BACK] is displayed, adjust the arrow to [BACK] and press it to complete the setting and take you back to the menu display.●When carrying out a Remote Unit search, a mark will appear next to Group Names in which Remote Units that can carry out wireless communication are registered, as well as, next to any Remote Unit name that can carry out wireless communication.●Graph DisplayTemperature, Humidity, Voltage and Pulse Data that has been downloaded to an RTR-57C unit can be displayed in Graph form. See p.37 for details about the display.●Event List DisplayEvent Data that has been recorded by RVR-52 and downloaded to RTR-57C can be viewed in a List Display. See p.39 for details about the display.〔Recorded Data Displays〕OKCH1](https://usermanual.wiki/TandD/RTR57C/User-Guide-502049-Page-17.png)
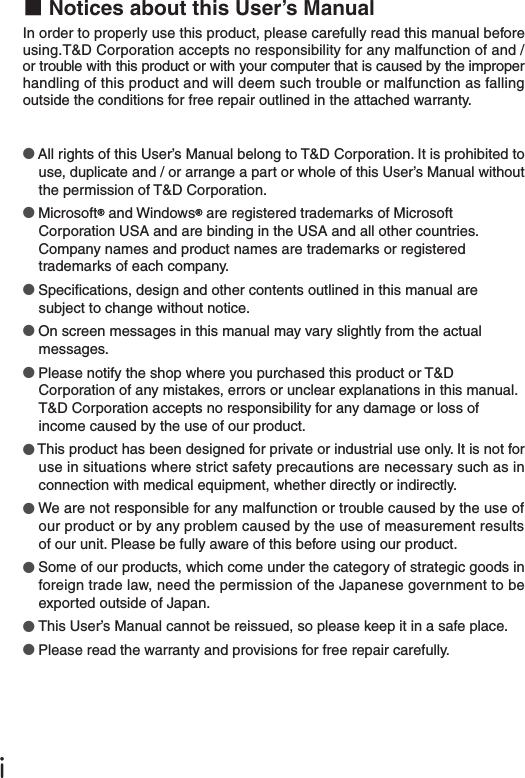
![10●To switch the power OFF, press the [POWER] button. You cannot switch the power OFF with the Operation Dial.●During communication, even by pressing the [POWER] button, it is impossible to switch the power OFF.◆Switch the power ON by pressing the POWER button or the Operation Dial.Switching the Power on《Press the POWER button》《Press the Operation Dial》NOTE:If using the monitoring function, the Auto Power Off function will not go into effect.【Auto Power Off Function】If the main unit is not in use for 3 minutes, the power will be automatically switched off in order to save battery power. If you wish to continue to use, switch the power on again.](https://usermanual.wiki/TandD/RTR57C/User-Guide-502049-Page-19.png)
![111.In the main menu open [SET FUNCTIONS] and then [Set Clock].2.Setting the desired values.①By moving the operation dial up and down, the selection item of the display changes in the order of year, month, day, hour, and minute. By pressing the dial, the value for that item will ash.②Set to the desired value by moving the operation dial up and down and press the dial to set that value. Move to the next item and follow the same procedure.3.When settings are completed, adjust to [OK] and press the dial to complete the setting procedure.Setting the Date and TimeCAUTION !●After purchasing this product, please be sure to use the attached softwareto set the clock and date.●The difference between your local time and GMT will automatically becalculated and written, after which the correct time will be displayed.●If the date and time of the RTR-57C main unit are not accurate, the starting time of a programmed start and the recorded time of downloaded data will be different from the actual one, so please set the date and time accurately.●When changing the battery, the time of the main unit may become incorrect; please check the time after every change.](https://usermanual.wiki/TandD/RTR57C/User-Guide-502049-Page-20.png)
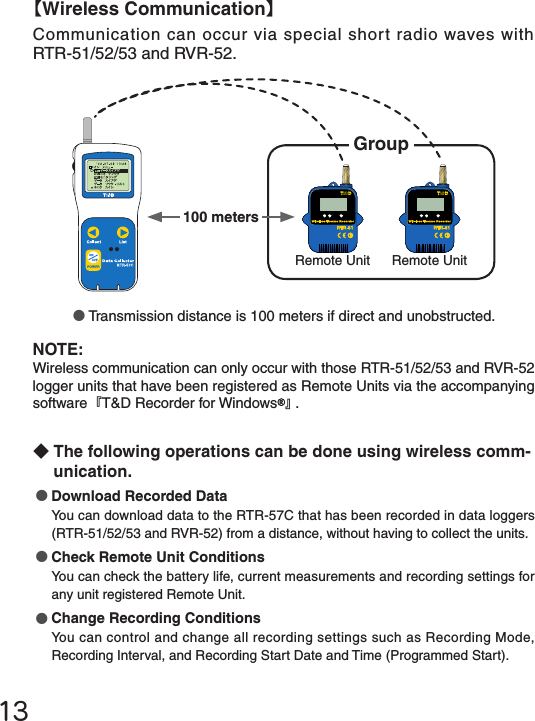
![14●Read Logger Settings The RTR-57C can read and display all settings for any selected data logger that has been registered.●Search for Remote Unit (s)A mark appears next to the name of any Remote Unit with which wireless communication is possible.●Monitor Current ReadingsYou can monitor the current measurements of a Remote Unit at a set interval or in groups with the measurements displayed consecutively.◆One Remote Unit can be set up to communicate with any number of RTR-57C Units.By registering the same Remote Unit info into a number of RTR-57C Units it is possible to check and control settings, as well as download to any RTR-57C Unit that carries that Remote Unit’s registration information.NOTE: If you try to carry out communication between one Remote Unit and several RTR-57C Units at the same time, an error message will appear.GroupYou can transfer the registration contents from one RTR-57C to another via the attached software. For details see the [Help Menu] in『T&D Recorder for Windows』 or the User’s Manual that accompanies it.](https://usermanual.wiki/TandD/RTR57C/User-Guide-502049-Page-23.png)
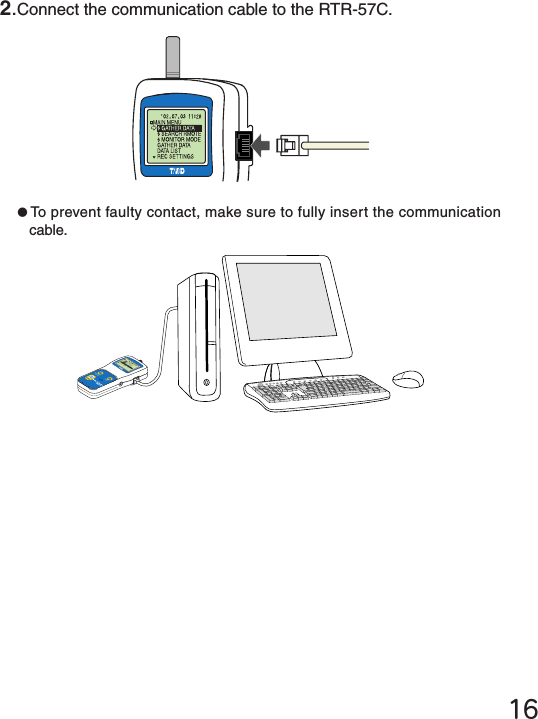
![1.Connect the communication cable to your computer.●Connect the provided communication cable (RS-232C) to a serial port of your computer.Examples of Serial Port SymbolsThe cable connection is a D-sub 9pin male. Please connect to the place that has such a symbol.●Be sure the connection is correct. If wrong, communication will not be possible.●To prevent faulty contact, make sure to fully insert the communication cable. To download collected data to your computer, connect the RTR-57C Unit to your computer with the communication cable provided.NOTE:Wireless communication cannot be done with the computer.Communicating with the Computer15【Communication between RTR-57C and your Computer】※Downloading, editing and managing collected data can be done with the provided software. For details about how to use the software, refer to the User’s Manual that comes with『T&D Recorder for Windows 』or the [Help Menu] in『T&D Recorder for Windows』.](https://usermanual.wiki/TandD/RTR57C/User-Guide-502049-Page-24.png)
![2.In order to carry out wireless communication, register Groups and Remote Units.※For details about how to register, see the [Help Menu] in the provided software『T&D Recorder for Windows 』or the accompanying User’s Manual.1.Connect the communication cable.①Connect the RTR-57C Unit to your computer with the provided communication cable (RS-232C).②Place the data logger on the RTR-57C.メイン メニュー WL データスイアゲ WL コキ ケンサク WL モニタリングデータ スイアゲデータ ソウサ・リストキロク カイシCommunication Cable (to computer)Place the unit face down on the RTR-57C.NOTE:If light enters during communication, an error will occur. Please make sure to place the unit within the ridges for an exact t.17【Communication between RTR-51/52/53RVR-52 and your Computer】](https://usermanual.wiki/TandD/RTR57C/User-Guide-502049-Page-26.png)
![18Wireless Communication: Remote Unit RegistrationNOTE:●Wireless communication can only be carried out with RTR-51/52/53 and RVR-52 units that have been registered as Remote Units via the provided software『T&D Recorder for Windows』.●Please extend the antenna when using wireless communication.1.Connect the cable so that communication can occur between the data logger and your computer. (See p.15-17)2.Open『T&D Recorder for Windows 』.3.In the Main Window, click [Remote Unit Registration] and carry out the registration.◆Register the data logger unit to be used as a Remote Unit.If you wish to make Recording Start settings via computer, see the [Help Menu] in the display for the type of logger you wish to make settings for. Details can also be found in the『T&D Recorder for Windows』User’s Manual explanation of the [Recording Start] display.メイン メニュー WL データスイアゲ WL コキ ケンサク WL モニタリングデータ スイアゲデータ ソウサ・リストキロク カイシCommunication Cable (to computer)Place the unit face down on the RTR-57C.[Remote Unit Registration] Icon](https://usermanual.wiki/TandD/RTR57C/User-Guide-502049-Page-27.png)
![19The following settings and changes can be made from the main unit:●Recording Start Date and Time (Programmed Start)●Recording Mode●Recording Interval※To change the unit of temperature ( ゜C or ゜F) in the RTR-51/52/53 units and the measurement mode in the RVR-52 units, please use your computer and the software『T&D Recorder for Windows 』.1.In the Main Menu, click [REC SETTINGS] and then [ Wireless].2.Select the Remote Unit for which you wish to make settings.【Immediate Start】NOTE:●If you make recording condition changes while recording, all previously recorded data will be lost. Please make sure to download all recorded data before making changes.●Changes in recording conditions will result in a lifting of the upper and lower limits that had been set for each unit. If you wish for those settings to remain in effect, please make sure to use the [Read Settings] function before making any changes. (See p.24 for details.)Wireless Communication: Recording StartWireless Communication: Recording Start①Select a Group in which Remote Units are registered.②Select a Remote Unit or a Group.](https://usermanual.wiki/TandD/RTR57C/User-Guide-502049-Page-28.png)
![20●Before selecting a Remote Unit you can run a search to nd all Remote Units with which communication is possible. Those units with which communication is possible will appear with a mark next to them. (See p.45 for details)●Recording Modes: One Time: Recording will stop when the data capacity becomes full. Endless: Recording will continue with oldest data continuously overwritten.●Recording Interval:Choose from 15 intervals: 1,2,5,10,15,20,30 seconds and 1,2,5,10,15,20, 30 and 60 minutes.3.Make Recording Condition Settings.●If you wish to make no changes and want to restart recording under the same conditions, please read the current settings rst and then restart recording. (See p.24 for details)4.After having completed the settings, adjust the arrow (>) to [REC Immediate] and press dial to transmit the recording conditions to the Remote Unit.](https://usermanual.wiki/TandD/RTR57C/User-Guide-502049-Page-29.png)
![22Recording Modes:One Time: Recording will stop when the data capacity becomes full.Endless: Recording will continue with oldest data continuously overwritten.Recording Interval:Choose from 15 intervals: 1,2,5,10,15,20,30 seconds and 1,2,5,10,15,20,30 and60 minutes.3.Make Recording Condition Settings.●Before selecting a Remote Unit you can run a search to nd all Remote Units with which communication is possible. Those units with which communication is possible will appear with a mark next to them. (See p.45 for details)1.In the Main Menu, click [REC SETTINGS] and then [ Wireless].2.Select the Remote Unit for which you wish to make settings.【Programmed Start】①Select a Group in which Remote Units are registered.②Select a Remote Unit or a Group.](https://usermanual.wiki/TandD/RTR57C/User-Guide-502049-Page-31.png)
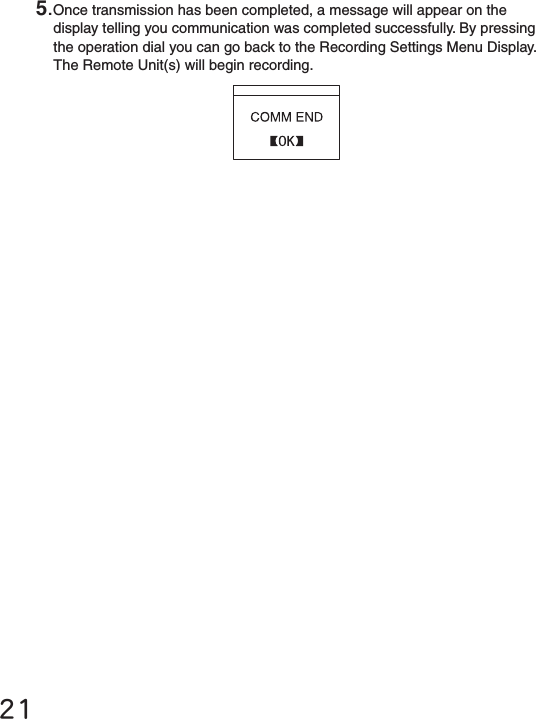
![4.After having completed the settings, adjust the arrow (>) to [REC Programmed] and press dial.5.After having set the desired recording start date and time, adjust the arrow (>) to [REC SETTINGS] and press the dial to transmit the info.236.Once transmission has been completed, a message will appear on the display telling you communication was completed successfully. By pressing the operation dial you can go back to the Recording Settings Menu Display.The Remote Unit(s) will be put on Record Standby.](https://usermanual.wiki/TandD/RTR57C/User-Guide-502049-Page-32.png)
![24●If a selected Remote Unit has been set to only start recording via computer and has been to set to be protected against changes in the recording start via wireless communication, the following message will appear.【How to Lift the Protection】For details about how to lift the protection see the Help Menu in the provided software『T&D Recorder for Windows 』or see its User’s Manual.◆About Reading the Recording SettingsSelect a Remote Unit and press on [Read Settings] in the REC SETTINGS Menu. After reading, the recording settings information for the selected Remote Unit will be displayed.NOTE: If you select a Group, this reading of settings cannot be done.◆About the Default SettingsAt any time, you can return the RTR-57C to its default settings of Recording Mode: Endless and Recording Interval: 10 minutes.●When starting recording by Group, a list will appear showing the Remote Units with which communication occurred.[PROT] will appear next to those Remote Units which have been set to only start recording via computer and have been set to be protected against changes in recording conditions via wireless communication.◆About Forbidding Recording Start by Wireless](https://usermanual.wiki/TandD/RTR57C/User-Guide-502049-Page-33.png)
![About 2000 data readings can be downloaded per minute.※About 1000 event data readings can be downloaded per minute.NOTE:●Wireless communication can only be done with RTR-51/52/53 and RVR-52 units that have been registered as Remote Units via the software『T&D Recorder for Windows』.●Please extend the antenna before carrying out wireless communication.1.In the Main Menu, open [ GATHER DATA].2.Select a Remote Unit.●Before selecting a Remote Unit you can run a search to nd all Remote Units with which communication is possible. Those units with which communication is possible will appear with a mark next to them. (See p.45 for details)25Wireless Communication: Downloading Recorded Data①Select a Group in which Remote Units are registered.②Select the Remote Unit you wish to download the data from.](https://usermanual.wiki/TandD/RTR57C/User-Guide-502049-Page-34.png)
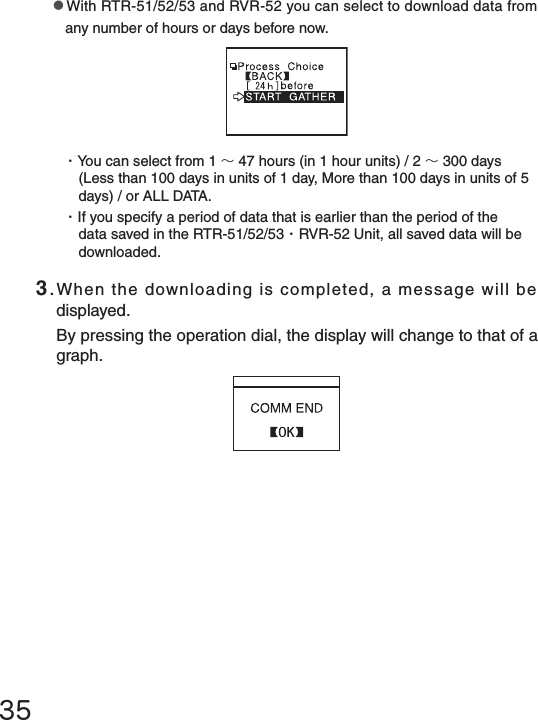
![263.Click [Download Data].4.Set the period of data you wish to download and click [START GATHER] to start downloading.【Period of Data】You can set the period (how many hours or days before now) from which you wish to download data.●You can select from 1 ~47 hours (in 1 hour units) / 2 ~300 days (Less than 100 days in units of 1 day, More than 100 days in units of 5 days)/ or ALL DATA.●If you specify the period of data that is earlier than the period of the data saved in the remote unit, all saved data will be downloaded.](https://usermanual.wiki/TandD/RTR57C/User-Guide-502049-Page-35.png)
![27●If you have set the judgment [ON] in [Set ↑↓ Limits] before downloading, the result will be displayed when the downloading is completed. 5.When the downloading is completed, a message will be displayed.By pressing the operation dial, the display will change to that of a graph.Result](https://usermanual.wiki/TandD/RTR57C/User-Guide-502049-Page-36.png)
![28◆If the amount of main unit memory is low, the downloading of recorded data may be impossible.When you check the amount of the memory to conrm whether the data you wish to download can be saved in the RTR-57C, and the data cannot be saved, the message [Memory Full] will be displayed and the downloading will be canceled.Carry out any new download only after having downloaded and saved the recorded data you wish to save into your computer and having deleted the data from the RTR-57C main unit to make space.See Page 51-52 for details about deleting data.●The memory capacity is about 16 units of RTR-51 at full data (16,000 readings) capacity or about 256,000 readings.The maximum number of times you can download recorded data before clearing the memory is 250; this holds true even if there remains empty memory. ●See Page 54 for details about checking the memory.](https://usermanual.wiki/TandD/RTR57C/User-Guide-502049-Page-37.png)
![29The following settings or changes can be made via the main unit.●Recording Start Time Setting (Programmed Start)●Recording Mode●Recording Interval※Please make temperature unit changes for the RTR-51/52/53 main units and Measurement Mode changes for the RVR-52 units via the supplied software『T&D Recorder for Windows 』NOTE:●If you set the conditions during recording, all previously recorded data will be lost. Make sure to make all Recording Start settings after having download the recorded data.●If you make changes to the recording condition via the RTR-57C unit, channel names may change. When you do not wish to change the names, make sure to Read Settings before making changes.※RTR-51/52/53 and RVR-52 are not channel names, but are group or remote unit names, so these names will not change.1.In the Main Menu. open [REC SETTINGS] - [Direct].2.Set the recording conditions.【Immediate Start】【What does [Read Settings] mean?】The recording conditions of a specied Remote Unit can be read into an RTR-57C unit.If you wish to restart recording without making any changes to the recording conditions, specify the Remote Unit and click [Read Settings]. The recording conditions of the specied Remote Unit will be displayed.Cable Communication: Recording Start](https://usermanual.wiki/TandD/RTR57C/User-Guide-502049-Page-38.png)
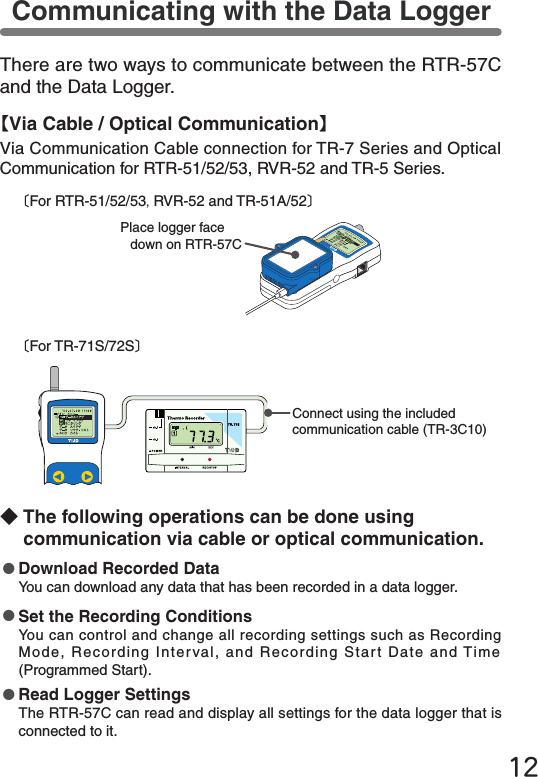
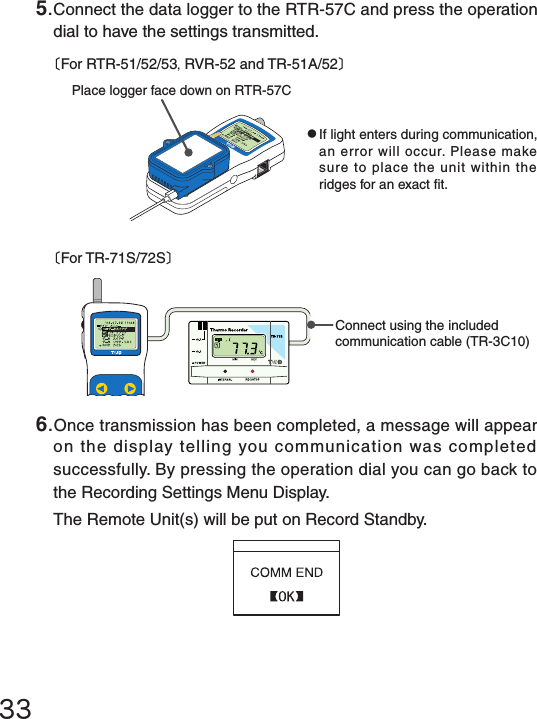
![304.Connect the data logger to the RTR-57C and press the operation dial to have the settings transmitted.3.Move the arrow to [Immediate] after setting the conditions.Recording Modes:One Time: Recording will stop when the data capacity becomes full.Endless: Recording will continue with oldest data continuously overwritten.Recording Interval:Choose from 15 intervals: 1,2,5,10,15,20,30 seconds and 1,2,5,10,15,20,30 and60 minutes.※Some recording intervals cannot be set on some types of the devices.〔For RTR-51/52/53,RVR-52 and TR-51A/52〕●If light enters during communication, an error will occur. Please make sure to place the unit within the ridges for an exact t.Place logger face down on RTR-57C〔For TR-71S/72S〕Connect using the included communication cable (TR-3C10)](https://usermanual.wiki/TandD/RTR57C/User-Guide-502049-Page-39.png)
![31◆About the Default SettingsAt anytime, you can return the RTR-57C to its default settings. Recording Mode: Endless Recording Interval: 10 minutes Channel Names: 1 channel…ch.1, 2 channel…ch.25.When communication has been completed the message [COMM END] will be displayed and by pressing the operation dial, the display will return to the menu. The Remote Unit will start recording.](https://usermanual.wiki/TandD/RTR57C/User-Guide-502049-Page-40.png)
![323.Move the arrow to [Programmed] after setting the conditions.4.Set the recording start time and move the arrow to [REC START].1.In the Main Menu, open [REC SETTINGS]-[Direct].2.Set the recording conditions.【Programmed Start】Recording Modes: One Time: Recording will stop when the data capacity becomes full. Endless: Recording will continue with oldest data continuously overwritten.Recording Interval:Choose from 15 intervals: 1,2,5,10,15,20,30 seconds and 1,2,5,10,15,20,30 and60 minutes.](https://usermanual.wiki/TandD/RTR57C/User-Guide-502049-Page-41.png)
![34Download recorded data by connecting the data logger to the RTR-57C.1.Connect the data logger to the RTR-57C.〔For RTR-51/52/53,RVR-52 and TR-51A/52〕●If light enters during communication, an error will occur. Please make sure to place the unit within the ridges for an exact t.Place logger face down on RTR-57C〔For TR-71S/72S〕Connect using the included communication cable (TR-3C10)Cable Communication: Download Recorded Data2.In the Main Menu, open [GATHER DATA] and downloading will start.](https://usermanual.wiki/TandD/RTR57C/User-Guide-502049-Page-43.png)
![36●If you have set the judgment [ON] in [Set ↑↓ Limits] before downloading, the result will be displayed when the downloading is completed.Result◆If the amount of main unit memory is low, the downloading of recorded data may be impossible.When you check the amount of the memory to conrm whether the data you wish to download can be saved in the RTR-57C, and the data cannot be saved, the message [Memory Full] will be displayed and the downloading will be canceled.Carry out any new download only after having downloaded and saved the recorded data you wish to save into your computer and having deleted the data from the RTR-57C main unit to make space.See Page 51-52 for details about deleting data.●The memory capacity is about 16 units of RTR-51 at full data (16,000 readings) capacity or about 256,000 readings.The maximum number of times you can download recorded data before clearing the memory is 250; this holds true even if there remains empty memory. ●See Page 54 for details about checking the memory.](https://usermanual.wiki/TandD/RTR57C/User-Guide-502049-Page-45.png)
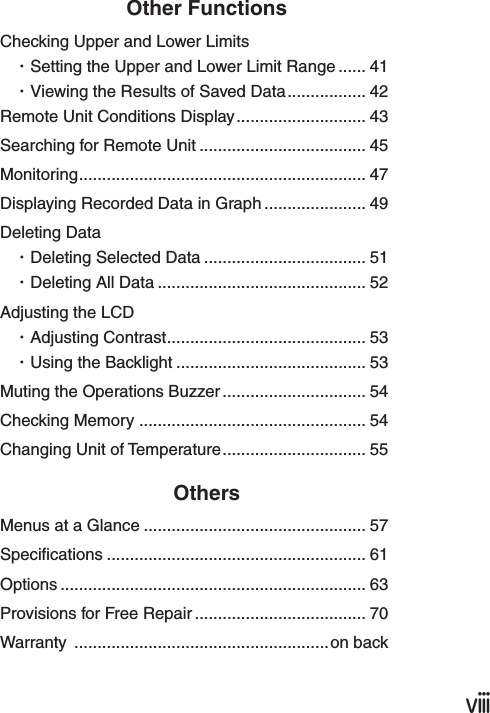
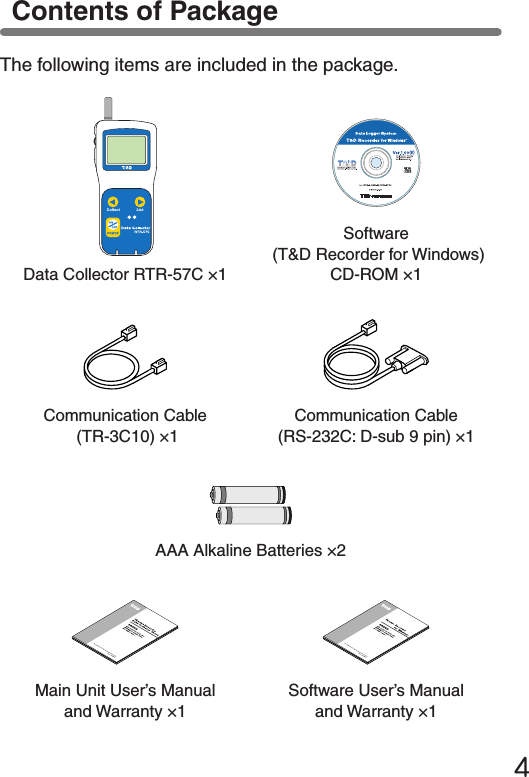
![①Displayed ChannelIf there is recorded data in two channels, by holding in the operation dial for more than 1.5 seconds the channel will change. ②ScaleIf you want to set the temperature display unit for Fahrenheit (゜F), open [SET FUNCTIONS]-[Temp Unit C/F].③Vertical Axis Unit[C] : Celsius, [F] : Fahrenheit, [%] : Humidity, [V] : Voltage, [P] : Pulse37In this display you can view in graph form the downloaded temperature, humidity, voltage, and pulse data. A graph is displayed for each channel of data and can be scrolled left and right with the operation dial or by the buttons on the main unit.※⑥・⑦ are displayed when [Set ↑↓ Limits] has been set as ON.Graph DisplayOKCH1①②④③⑤⑦⑧⑥](https://usermanual.wiki/TandD/RTR57C/User-Guide-502049-Page-46.png)
![38⑤Cursor Bar (Fixed Display)Cursor position is displayed and measurement information is displayed at the top of the LCD display.⑥Upper and Lower Judge RangeWhen [ ↑↓ Judge] is ON, the range is displayed.⑦Upper and Lower Limit Judging ResultWhen [ ↑↓ Judge] is ON, the result is displayed.⑧CursorShows which part of entire data is presently displayed in graph.The display can be scrolled with the operation dial or the buttons on the main unit.Recording Dateand TimeRecording IntervalS:Seconds M: MinutesRecording ModeOne Time: Endless: Temperature Unit④Data InformationDisplays the measurement information of the cursor bar position.【For Pulse Data】Response PolarityRising Edge (OFF →ON) : Falling Edge (ON →OFF) :](https://usermanual.wiki/TandD/RTR57C/User-Guide-502049-Page-47.png)
![41Checking Upper and Lower LimitsBy setting upper and lower limits you can check data as it is downloaded to see if all measurements fall within the limit range and have the results displayed.◆Setting the Upper and Lower Limit RangeNOTE:Upper and lower limit settings that were set by computer when setting up the recording start time for the Remote Unit will take precedence over other limit settings.1.In the Main Menu, open [SET FUNCTIONS]-[ Set ↑↓ Limits] .2.Move the arrow to the item you wish to make settings for and open.3.By clicking [Judgment OFF], it will change to [ON] .4.By moving the arrow to the upper or lower limit and clicking, it will allow you to make changes. By turning the operation dial, you can make changes to the value; click to activate the new setting.Upper LimitLower Limit●By holding down the ・buttons on the main unit you can make rapid changes to the values.Pressing the button will make the value lower.Pressing the button will make the value higher.](https://usermanual.wiki/TandD/RTR57C/User-Guide-502049-Page-50.png)
![42◆Viewing the Results of Saved Data●If no upper and lower limits have been set before downloading, the result will appear as [--] and only the high and low values will appear.●If the data is pulse data, the total number of pulse readings will appear.5.When settings are completed, click on [Back] to activate and nish.※Settings can also be made via the computer. For details see the [Help] Menu in the software『T&D Recorder for Windows 』or the User’s Manual that accompanies it.1.In the Main Menu, open [DATA LIST] and select the data you wish to check. 2.By clicking on [Judge], the results will be displayed.Highest TempLowest TempResultSetting RangeHIGHLOWHIGHLOWHIGHLOW](https://usermanual.wiki/TandD/RTR57C/User-Guide-502049-Page-51.png)
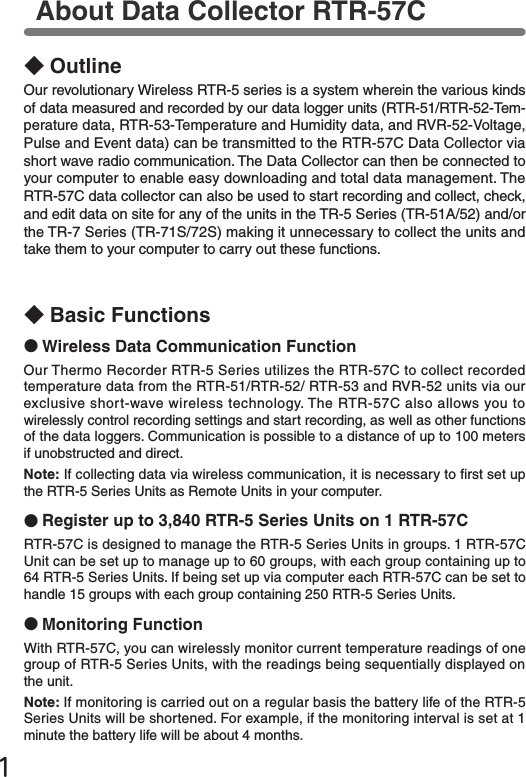
![43⑧④③②①⑤⑦⑥①Recording Status: …Recording …Stopped②Recording Interval:10 min③Recording Mode: …One Time …Endless④Battery Life⑤Communication Date and Time⑥Group Name⑦Remote Unit Name⑧Measurement at Time of CommunicationRemote Unit Conditions DisplayYou can check selected Remote Unit info (Recording Conditions, Current Measurements, and Battery Life, etc.)②Select the unit you wish to view.①Select the group in which the unit is registered.※Before selecting a Remote Unit you can run a search to nd all Remote Units with which communication is possible.Those units with which communication is possible will appear with a mark next to them. (See p.45 for details)1.In the Main Menu, open [ Gather Data] .2.Select the Remote Unit you wish to view.3.Click [ Get Rmote Info] .4.Once communication has been completed, the Remote Unit info will be displayed.](https://usermanual.wiki/TandD/RTR57C/User-Guide-502049-Page-52.png)
![44●If upper and lower limits have been set a ▼will appear in the lower left corner of the display. By turning the operation dial you can view the limit settings and the judgment results.【For RVR-52 Pulse Recording】【If RVR-52 has been set for Event Recording Mode】If no event data has been recorded, [No Event Data] will appear.Recording Signal Condition●The total number of pulse readings during the recording interval set when recording settings were made for the Remote Unit will be displayed.・Rising Edge (OFF →ON) : ・Falling Edge (ON →OFF) : # of Pulses / Recording Interval](https://usermanual.wiki/TandD/RTR57C/User-Guide-502049-Page-53.png)
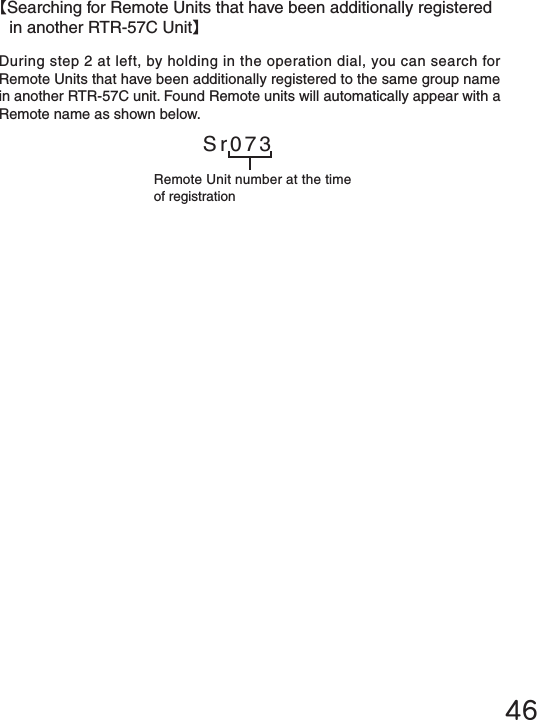
![45Searching for Remote Units●The mark will continue to appear next to Remote Units with which communication has become impossible until a new search is conducted.●A search of 1 group will take about 20 seconds to complete. (The search time depends on the number of Remote Units registered in the group.)●By selecting a Remote Unit with which communication is possible and clicking on it, you can either download data or get info about that unit.●By selecting [All Groups], the search will be for Remote Units in all groups registered in the RTR-57C unit.●By selecting [Specify Group], the search will be for Remote Units in the specied group.A mark will appear next to all Remote Unit Names with which communication is possible. This function can be useful when selecting Remote Units for downloading data or starting recording.1.In the Main Menu, open [ SEARCH RMOTE].2.Select the search range from ([All Groups] or [Specify Group]) and click to start the search.3.After the search has been completed, a list will appear showing only the Remote Units with which communication is possible.●A mark will appear next to the Remote Unit names with which communication is possible.](https://usermanual.wiki/TandD/RTR57C/User-Guide-502049-Page-54.png)
![47MonitoringThe RTR-57C can be set to patrol and monitor RTR-51/52/53 or RVR-52 groups and display in order the current readings for view.NOTE:●The amount of communication time depends on the number of registered groups and remote units. Please note that if the monitoring interval is set for less time than communication takes to complete a round of monitoring, the system will automatically extend the interval to allow for the necessary amount of communication time.1.In the Main Menu, open [ MONITOR MODE].2.Select the monitoring range.[All Groups] :Remote Units in all groups registered to the RTR-57C will be contacted via wireless communication, and current measurement readings for those units with which communication is possible will be displayed consecutively every 2 seconds. This can be done for up to 120 units; the 121st unit’s reading cannot be displayed.[Specify Group] :All Remote Units in the selected groups will be contacted via wireless communication, and current measurement readings for those units will be displayed consecutively every 2 seconds.For those units with which communication is impossible the measurement will be displayed as [----].3.Select and set the Monitoring Interval[Interval] :The monitoring interval is the amount of time between the starting of wireless communication to gather current Remote Unit readings. Selections can be made from 15 sec, 30 sec, and 1 to 60 minutes (in 1 minute units).](https://usermanual.wiki/TandD/RTR57C/User-Guide-502049-Page-56.png)
![48【If the upper and lower limitsettings are activated.】NOTE:●The shorter the monitoring interval the sooner batteries will loose their power.●<Communication Time for [All Groups] >・If there are 64 Remote Units registered to the group(24 seconds per group x Number of groups)・If there are 250 Remote Units registered to the group(54 seconds per group x Number of groups)Moreover, the display time for each unit is about 2 seconds.●<Communication Time for [Specify Groups]>The communication time will depend on the number of registered remote units. For 250 units registered to 1 group the time will be 54 seconds plus a display time for each unit of 2 seconds.4.By selecting the monitoring range and clicking, the monitoring search will begin.●If using [Specify Group], by specifying the group and clicking, the monitoring search will begin.5.After the search has been completed, the current measurement readings for those remotes registered in the group(s) will be consecutively displayed.●For RTR-53, the display will show in the order of temp / humidity.●If the buzzer has been set to ON and a result is NG, a beeping sound will go off.ResultUpper and Lower Limits](https://usermanual.wiki/TandD/RTR57C/User-Guide-502049-Page-57.png)
![49Displaying Recorded Data in GraphOKCH1《Graph Display》《Event List Display》●In the case of event list data, click [Event List]1.In the Main Menu, open [DATA LIST] or press the [List] button on the main unit to view the data list.2.Select the data you wish to view from the data selection display.3.Click [Display Graph]3.The graph or event list will appear.](https://usermanual.wiki/TandD/RTR57C/User-Guide-502049-Page-58.png)
![50【Viewing a data list】●Unregistered data loggers will appear by channel name.●If a channel name shows [……].This means that when the recording conditions were set via direct cable connection between the data logger and the computer the channel name was entered using two byte code ●Only the rst 6 letters of group and remote names will be displayed.Group Name / Remote Unit Name(If the data logger has been registered)Downloaded dateDevice NameData Number (No. 7 of 7)The most recently downloaded data will be on top.・RTR51 08 /10 GROUP2 Sample](https://usermanual.wiki/TandD/RTR57C/User-Guide-502049-Page-59.png)
![51Deleting Data ◆Deleting Selected DataInfo about data to be deleted2.By clicking [Select Delete], a permission message will appear asking if it is [OK] to delete. If yes, move arrow to and click [OK] .1.In the Main Menu, open [Data List] or press the [List] button on the main unit. Select the data you wish to delete from the list and click.3.When completed, a message will appear. Press the operation dial to nish the deletion process.](https://usermanual.wiki/TandD/RTR57C/User-Guide-502049-Page-60.png)
![52◆Deleting All Data●Recording Conditions and other settings will not be deleted.Recording conditions can be returned to the original factory settings by going to [REC SETTINGS] – [Initialize] .●Data deletion can also be carried out via the software and your computer.For details, see the Help menu in『T&D Recorder for Windows 』or the User’s Manual that accompanies it.1.In the Main Menu, open [Set Functions] and [Clear MEMORY] .2.A message asking for permission will appear, if OK, move arrow to and click [OK] .3.When completed, a message will appear. Press the operation dial to nish the deletion process.](https://usermanual.wiki/TandD/RTR57C/User-Guide-502049-Page-61.png)
![53◆Adjusting Contrast◆Using the Backlight2.By moving the arrow to [ON] and pressing the dial, the setting will be completed.Adjusting the LCDThe present setting will be displayed.Upon completion the new present setting will be displayed.2.After completing the setting, press the dial to nish.1.In the Main Menu, open [SET FUNCTIONS] and [Set Contrast]●Move the operation dial up to make the display darker and down to make it lighter.1.In the Main Menu, open [SET FUNCTIONS] and [Backlight] .3.Move the arrow to and click [BACK] to nish.](https://usermanual.wiki/TandD/RTR57C/User-Guide-502049-Page-62.png)
![54Muting the Operations BuzzerChecking MemoryNumber of Saved ReadingsThe present setting will be displayed.Upon completion the new present setting will be displayed.2.By moving the arrow to [OFF] and pressing the dial, the setting will be completed.1.In the Main Menu, open [SET FUNCTIONS] and [Beep] .3.Move the arrow to and click [BACK] to nish.2.By pressing the operation dial you can return to the SET FUNCTIONS Display.1.In the Main Menu, open [SET FUNCTIONS] and [Check MEMORY] .](https://usermanual.wiki/TandD/RTR57C/User-Guide-502049-Page-63.png)
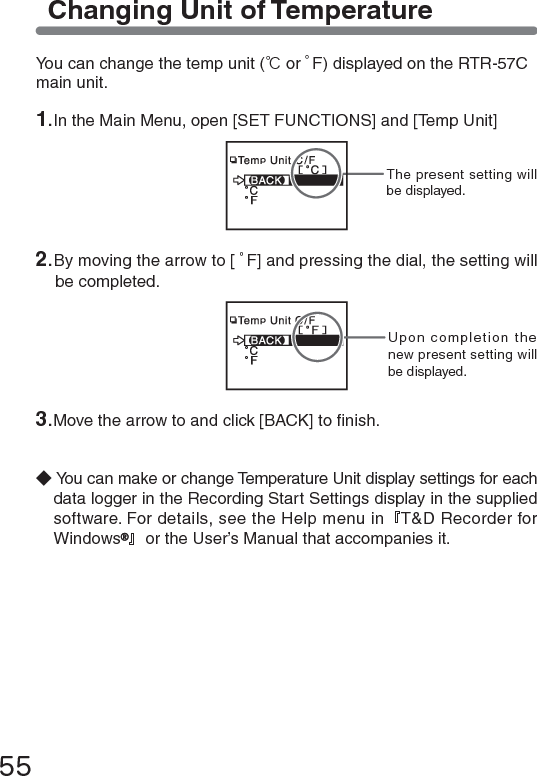
![55Changing Unit of TemperatureThe present setting will be displayed.Upon completion the new present setting will be displayed.You can change the temp unit (℃or ゜F) displayed on the RTR-57C main unit.◆You can make or change Temperature Unit display settings for each data logger in the Recording Start Settings display in the supplied software. For details, see the Help menu in『T&D Recorder for Windows 』or the User’s Manual that accompanies it.2.By moving the arrow to [ ゜F] and pressing the dial, the setting will be completed.1.In the Main Menu, open [SET FUNCTIONS] and [Temp Unit]3.Move the arrow to and click [BACK] to nish.](https://usermanual.wiki/TandD/RTR57C/User-Guide-502049-Page-64.png)
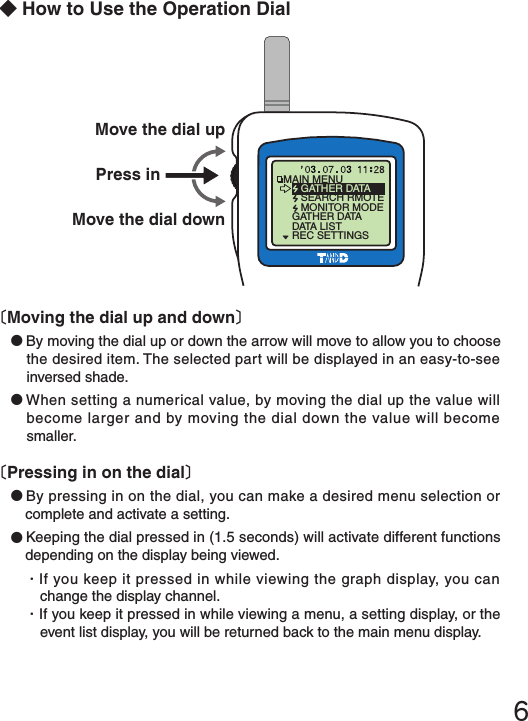
![57… Menus at a Glance … Call by name Call by nameSEARCH REMOTES (See p.45)【BACK】All GroupsSpecify GroupStart searchinggroups Call by GroupStart searching for all remotes Call by groupTo [ GATHER DATA] MENUTo [ GATHER DATA] MENUSearch for selected remotesFor details about operations please see the relevant pages.*1 You can select to download all data from any number of hours or days before now.GATHER DATA【BACK】Download Data (See p.25)Get Remote Info(See p.43)After downloading, graph will be displayed Call by Group Call by NameView Remote Unit Info【BACK】[ALL DATA]*1Start Gather](https://usermanual.wiki/TandD/RTR57C/User-Guide-502049-Page-66.png)
![58DATA LISTSelect Data【BACK】【BACK】Display Graph(See p.37)↑↓ Judge(See p.41)Select Delete(See p.51)Displays the graph for that dataView results of judgementAfter conrmation, select [OK] tonishMONITOR MODE…View Current Measurements (See p.47)【BACK】All GroupsSpecify GroupIntervalStart search for contactable remotes Consecutive display of current measurements of contacted remotes.Consecutive display of current data of all remotes in group regardless of contactability. Call by GroupSelect from 15 sec, 30 sec, and 1 to 60 minutes(in 1 minute units)GATHER DATA (See p.34)Upon completetion, a graph will be displayed the current data / time of downloading.Start GatherDATA LIST (For an Event List)Select Data【BACK】【BACK】Event List(See p.39)Select Delete(See p.51)Displays the event list dataAfter conrmation, select [OK] to nish.](https://usermanual.wiki/TandD/RTR57C/User-Guide-502049-Page-67.png)
![59【BACK】REC ImmediateREC ProgrammedSet Rec modeSet IntervalRead Settings*2InitializeREC SETTINGSSetting Display【BACK】After completing settings, click [BACK] to nish.【BACK】REC STARTChange StartREC StartSettings Display【BACK】Starts the reading of present settings.【BACK】One TimeEndlessAfter selecting, click [BACK] to nish.After setting, click [BACK] to nish.After conrming, click [OK] to nish【BACK】Wireless(See p.19)Direct(See p.27)REC SETTINGSPackageCall by Name*2 [Read Settings] is not displayed if you have selected [ Wireless] and [Package].Record Standby Call by Group](https://usermanual.wiki/TandD/RTR57C/User-Guide-502049-Page-68.png)
![60【BACK】Upper and Lower Limit Settings(See p.41)Backlight(See p.53)Set Clock(See p.11)Check Memory(See p.54)Clear Memory(See p.52)Beep(See p.54)Temp Unit(See p.55)Set Contrast(See p.53)Display【BACK】After selecting, click [BACK] to nish.【BACK】ONOFF【BACK】ONOFF【BACK】℃゜FSettings Display【BACK】TemperatureHumidityVoltagePulseAfter setting, click [BACK] to nish.After selecting, click [BACK] to nish.After selecting, click [BACK] to nish.After conrming, click [OK] to nish.ConrmationDisplay【BACK】【OK】After setting, click [BACK] to nish.Settings Display【OK】【Cancel】SET FUNCTIONSSettings Display【BACK】After setting, click [BACK] to nish](https://usermanual.wiki/TandD/RTR57C/User-Guide-502049-Page-69.png)


![■For product information or questions contact us at:Ofce Hours:Monday to Friday 9:00-12:00/13:00-17:00(GMT +9:00 Tokyo Time)[Home Page / T&D Online]We have opened an English Homepage called "T&D Online" for your convenience. Here you can nd information about our company, news, products, upcoming events, software and user’s guides downloads, as well as, other support. Please stop by and see what we have to offer.http://www.tandd.com/This is printed on 100% recycled paper.Published by T&D CORPORATIONCopyright 2001-2003 T&D Corporation. All rights reserved.695652-169 Sasaga Matsumoto, Nagano Japan 399-0033 Tel: +81-263-27-2131 Fax: +81-263-26-4281 E-mail: overseas@tandd.co.jpThermo Recorder RTR-57C User's Manual](https://usermanual.wiki/TandD/RTR57C/User-Guide-502049-Page-78.png)