Tantalus Systems T90001 TUNet 1200 User Manual TUNet 1200 Installation Manual 900 0001
Tantalus Systems Corp TUNet 1200 TUNet 1200 Installation Manual 900 0001
users manual

TANTALUS SYSTEMS CORP.
DOCUMENT NUMBER 900-0001
REV. 1.0
TUNet 1200
Installation Manual
Copyright 2003 Tantalus Systems Corp. All rights reserved. No part of this publication, or any software included with it may be
reproduced, stored in a retrieval system, or transmitted in any form or by any means including photocopying, electronic,
mechanical, recording or otherwise without the prior written permission of the copyright holder. This document contains
proprietary information of Tantalus Systems Corp.

Notice
The information contained in this document is subject to change without notice.
Tantalus makes no warranty of any kind with regard to this material, including, but not limited to the implied
warranties of merchantability and fitness for a particular purpose. Tantalus shall not be liable for errors
contained herein or incidental consequential damages in connection with the furnishing, performance, or use
of this material.
FCC COMPLIANCE STATEMENT
Changes or modifications not expressly approved by Tantalus Systems Corp. may void your authority to
operate the equipment described in this manual.
This equipment has been tested and found to comply with the limits for a Class B digital device, pursuant to
part 15 of the FCC Rules. These limits are designed to provide reasonable protection against harmful
interference in a residential installation. This equipment generates, uses and can radiate radio frequency
energy and, if not installed and used in accordance with the instructions, may cause harmful interference to
radio communications. However, there is no guarantee that interference will not occur in a particular
installation. If this equipment does cause harmful interference to radio or television reception, which can be
determined by turning the equipment off and on, you are encouraged to try and correct the interference by
one of more of the following measures:
• Reorient or relocate the receiving antenna.
• Increase the separation between the equipment and receiver.
• Connect the equipment into an outlet on a circuit different from that to which the receiver is
connected.
• Consult the dealer or an experienced radio/TV technician for help.
Tantalus Systems Corp.
4224 Manor St.
Burnaby, BC
Canada V5G 1B2
Tel: 604-299-0458
Fax: 604-451-4111
Email: info@tantalusnetworks.com

2
Product Description
The TUNet 1200 is an electromechanical meter reader and Local Area Network (LAN)
transceiver, designed to fit under-the-glass of single-phase electricity meters. As part of the LAN,
the TUNet 1200 transmits and receives data to and from other TUNet devices within a controlled
area. It then connects to the Network Controller, which is the central control point between the
network and the utility.
GENERAL INFORMATION
Tantalus provides two-way, real-time data communications networks to monitor and control
electric utilities. Our long-range wireless networks unite a utility’s applications, making meter
reading, load management, and distribution automation cost-effective and practical throughout
urban and rural service areas.
The Tantalus Utility Network (TUNet) uses long-range 220 MHz spectrum to deliver valued
applications such as outage management, power quality monitoring, meter reading, load
management, and distribution automation to utilities. The Network provides robust two-way
communications throughout a utility’s diverse service territory – including residential, commercial,
and industrial.

3
TUNET 1200 PRODUCT SPECIFICATIONS
Functional
• Two-way communications
• Optical sensor counts meter disk rotations to determine meter reading
• Delivers meter readings on request or on a programmed schedule for Time-of-Use
applications
• Monitors power quality including voltage (plus sag/swell alarms) and momentary outages
(blinks)
• Optional outage reporting
• Manages local area network
• Optical interface for data transfer
• Remotely programmable operating parameters
• Non-volatile memory maintains data during power outages
Radio
• Frequency: 902 to 928 MHz frequency hopping, license exempt
• Modulation: FSK
• Antenna: under the meter glass
Power
• Power supply: nominal 240 VAC from AC line mains
• Quiescent power: 1.9 watts typical
Physical
• Retrofits in existing meters
• Operating temperature: -22° to +140° F/-30° to +60° C
• Operating humidity: 5% to 95% non-condensing
Agency Approvals
• FCC for CFR Title 47 Part 15

4
Installing the TUNET 1200
BEFORE YOU BEGIN
1. Assemble the necessary equipment: Tantalus TUNET 1200 Module Installation Kit and
required tools and materials.
TUNET 1200 MODULE INSTALLATION KIT
Each kit for installing a Tantalus TUNET 1200 module includes the following items:
• One TUNET 1200 module
• One IR serial interface
In addition to the retrofit kit the following items are required:
• Mounting screws for GE I-70-S meter: UNF 4-48 x ¾” (Two required per meter)
• Mounting screws for ABB AB-1 meter: UNF 6-40 x ¾” (Two required per meter)
• Power clips to attach to bus bars (Two required per meter): Part number dependant on
bus bar diameter.
Tantalus P/N Bus Bar Diameter
13811300003A 0.20” – 0.22”
13811300003B 0.18”
13811300003C 0.26” – 0.28”
13811300003D 0.32” – 0.36”
REQUIRED TOOLS AND MATERIALS
• 3/8” electric hand drill and 3/8” drill bit
• Drill alignment jig (recommended for GE meters)
• Needle nose pliers
• #2 Phillips screwdriver
• Rubbing alcohol
• Soft cloth or paper towels
• Disk marking template and paint pen
• Anti-static wrist strap
• Computer for programming TUNET 1200 module (Desktop, laptop or handheld
computer)
• Tantalus TUNET 1200 module programming software
• DC power supply, 6 – 8 VDC, for powering the module for programming
• TUNET 1200 Programming Cable

5
CAUTION: The TUNet 1200 modules contain electrostatic sensitive
devices. You must work with the modules at a protected workstation.
Persons handling the modules must be grounded with a protective wrist
strap. When you remove the modules from their packaging, place them
on antistatic foam. When handling the modules, hold them only by the
edge of the plastic holder.
DRILL THE METER BASE
GE I-70-S
1. Remove the glass cover from the meter and place the meter face down into a fixture for
holding the meter.
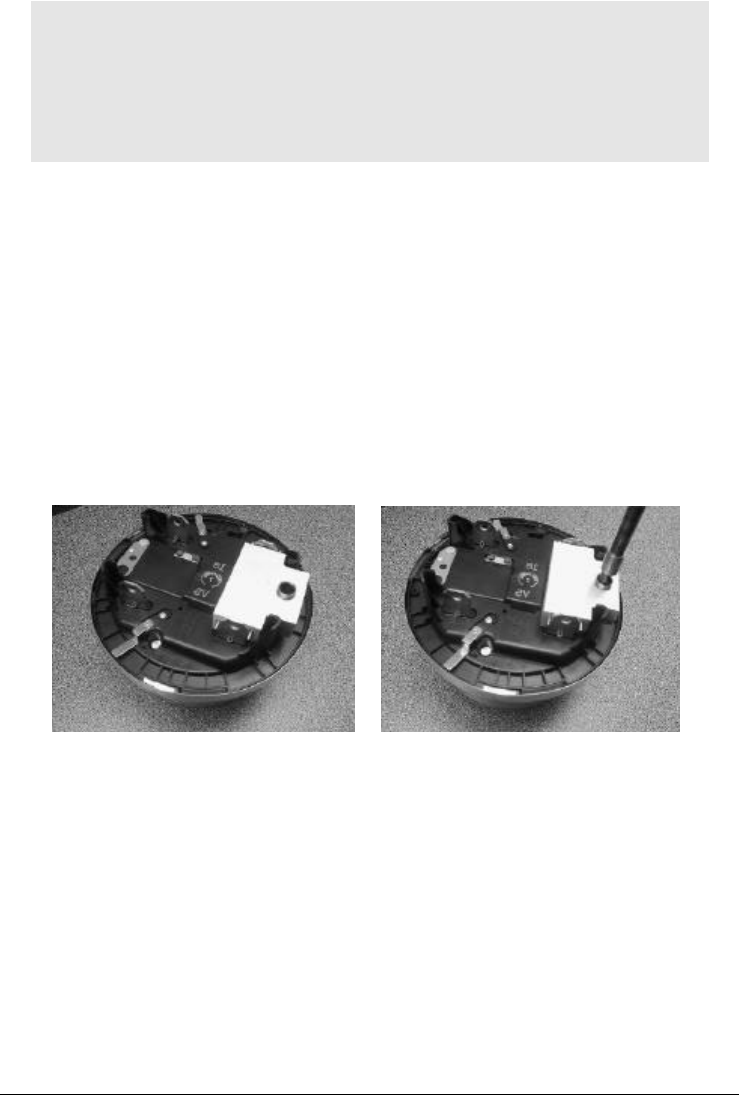
2. Using a 3/8″ electric hand drill and 3/8″ bit, position the drill alignment jig over the
meter base as shown in Figure 1a.
3. Drill a hole in the meter base as shown in Figure 1b.
4. Make sure the meter is clear of any debris by cleaning it with compressed air.
Figure 1a Figure 1b
Figure 1: Drill alignment jig
ABB AB-1
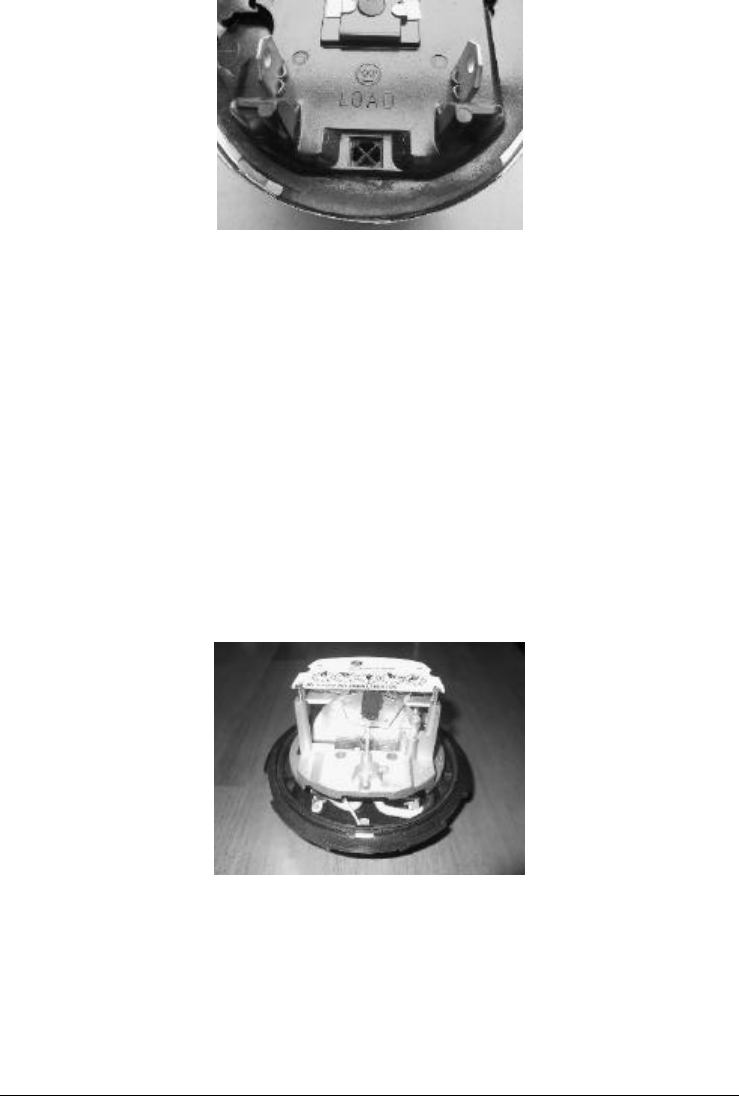
ABB meters usually have venting holes at the bottom center of the meter base. These can be used
as a guide for drilling a 3/8" hole in the meter base. The vent holes are typically covered with a
metal screen and a fiber filter that can be removed with needle nose pliers. These vent holes are
usually circular but smaller than 3/8" and are sometimes octagonal with “crosshairs” inside as
shown in Figure 2.
1. Using a 3/8" electric hand drill and 3/8" bit, drill the size of the circular hole to 3/8" in
diameter.
2. Limit the drill insertion to ½ inch so that the drill tip does not contact the meter frame.

6
3. For the octagonal shape, remove the “crosshairs” with needle nose pliers.
Figure 2: ABB AB-1 Vent hole with “crosshairs”.
4. Make sure there is no debris in the meter by cleaning it with compressed air.
Mark the disk
1. If the disk is not already marked, remove the meter nameplate and set the original
nameplate mounting screws aside. (you will need longer screws to mount the module
under the nameplate).
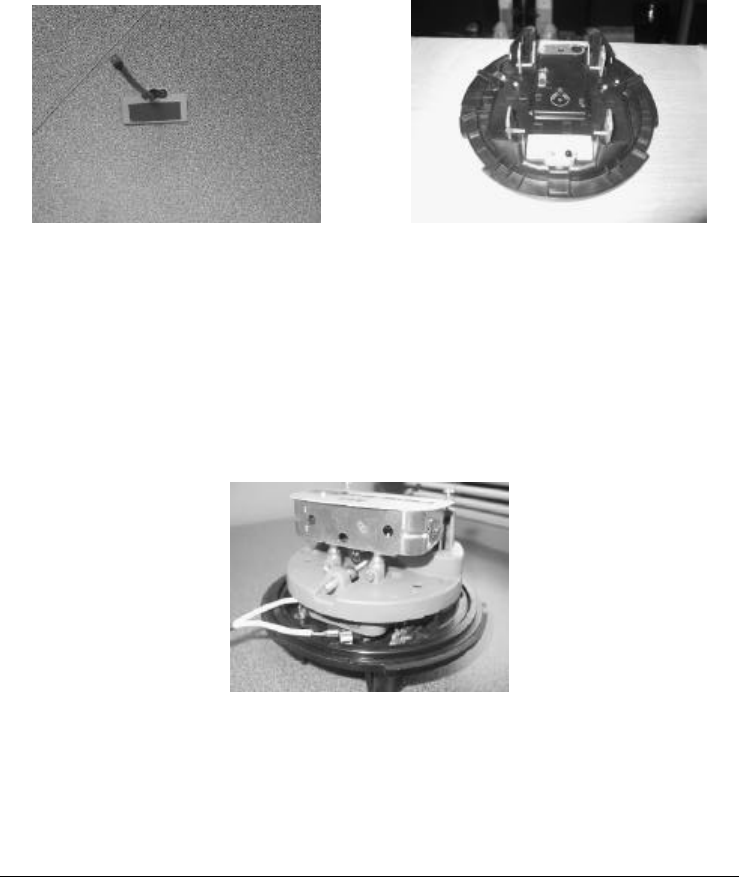
2. Align the disk marking template on the disk, with the upper left corner of the template
opening aligned with the left side of the timing mark on the disk, as shown in Figure 3.
3. Mark the inside edges of the template opening with a pencil.
4. Remove the template and carefully fill in the area between the pencil-marked lines with
the disk marking paint pen. (Note: do not substitute the paint pen with any other type of
permanent marker as this may make the mark undetectable).
Figure 3: Disk marking template aligned on disk
Mount the IR Serial Interface Adapter
1. Clean the flat area on the external side of the meter base between the lower power pins
with rubbing (isopropyl) alcohol.
2. Wait until the surface is dried or dry it with a clean cloth or paper towel.

7
3. Peel the red liner from the adhesive tape on the IR interface adapter.
4. Insert the IR interface cable through the drilled hole from outside to inside the meter.
5. Arrange the IR interface so that the flat side of the sensor is toward the center of the
meter. The legs of the meter will guide the sensor positioning.
6. Make sure you position the sensor in place as straight as possible. The split cylindrical
protrusion on the adhesive side of the sensor will fit into the 3/8" drilled hole.
7. Apply pressure gently for one minute over the flat side of the interface adapter.
Figure 4a Figure 4b
Figure 4: IR Serial Interface Adapter
Attach Module Power Leads to Meter Bus Bars
1. Select the appropriate power clips for the size of the bus bars in the meters.
2. Using needle nose pliers, attach a pair of power clips to the Fast-on tabs on the ends of
the power leads of the TUNET 1200 module.
3. With the needle nose pliers attach the power clips to the bus bars at the topside of the
meter as shown in Figure 5.
Figure 5: Connecting the module power leads to the meter power bus bars
Mount the TUNET 1200 Module
1. Once the power leads are attached to the meter bus bars, press the power leads together
around the left side of the meter.

8
2. Attach the connector of the IR serial interface to the mating connector on the TUNET
1200 module.
3. Position the module over the mounting posts on the meter.
4. Position the nameplate over the module.
5. Using the appropriate ¾" mounting screws, secure the module to the mounting posts
taking care not to interfere with the meter disk.
The module is now ready for initial programming.
Program the TUNET 1200 Module
Before placing the meter and module into service, the module must be programmed with initial
operating parameters. Refer to the Guide to Programming Tantalus UTG Meter Modules.
1. Using the software provided, program the module with the following minimum
parameters:
• Meter serial number or utility identification number
• Meter Kh constant
• Tantalus assigned Utility Business ID
• Initial kWh (meter face) reading
• Initial AMR reporting interval
• Additional parameters which may be programmed include power outage reporting and
PQM parameters:
• Blink period threshold
• Swell and Sag alarm voltage threshold and time threshold
• Initial PQM reporting interval
• After the TUNET 1200 module is programmed, replace the glass cover. The meter is
ready for final calibration and service.
Final Calibration
Prior to placing the meter into service, you must calibrate and seal it.