Tarana Wireless AA25GM Fixed Multi-Link Wireless Backhaul Product User Manual Quick Start Guide v working x
Tarana Wireless Fixed Multi-Link Wireless Backhaul Product Quick Start Guide v working x
Quick Start Guide
leading The
Manual
Quick-Start Guide
The essentials of getting a link up and running
Tarana Wireless, Inc. Proprietary, Confidential, and ©2016. All rights reserved. vAA2-2016-09 Quick Start — 1
Preparation
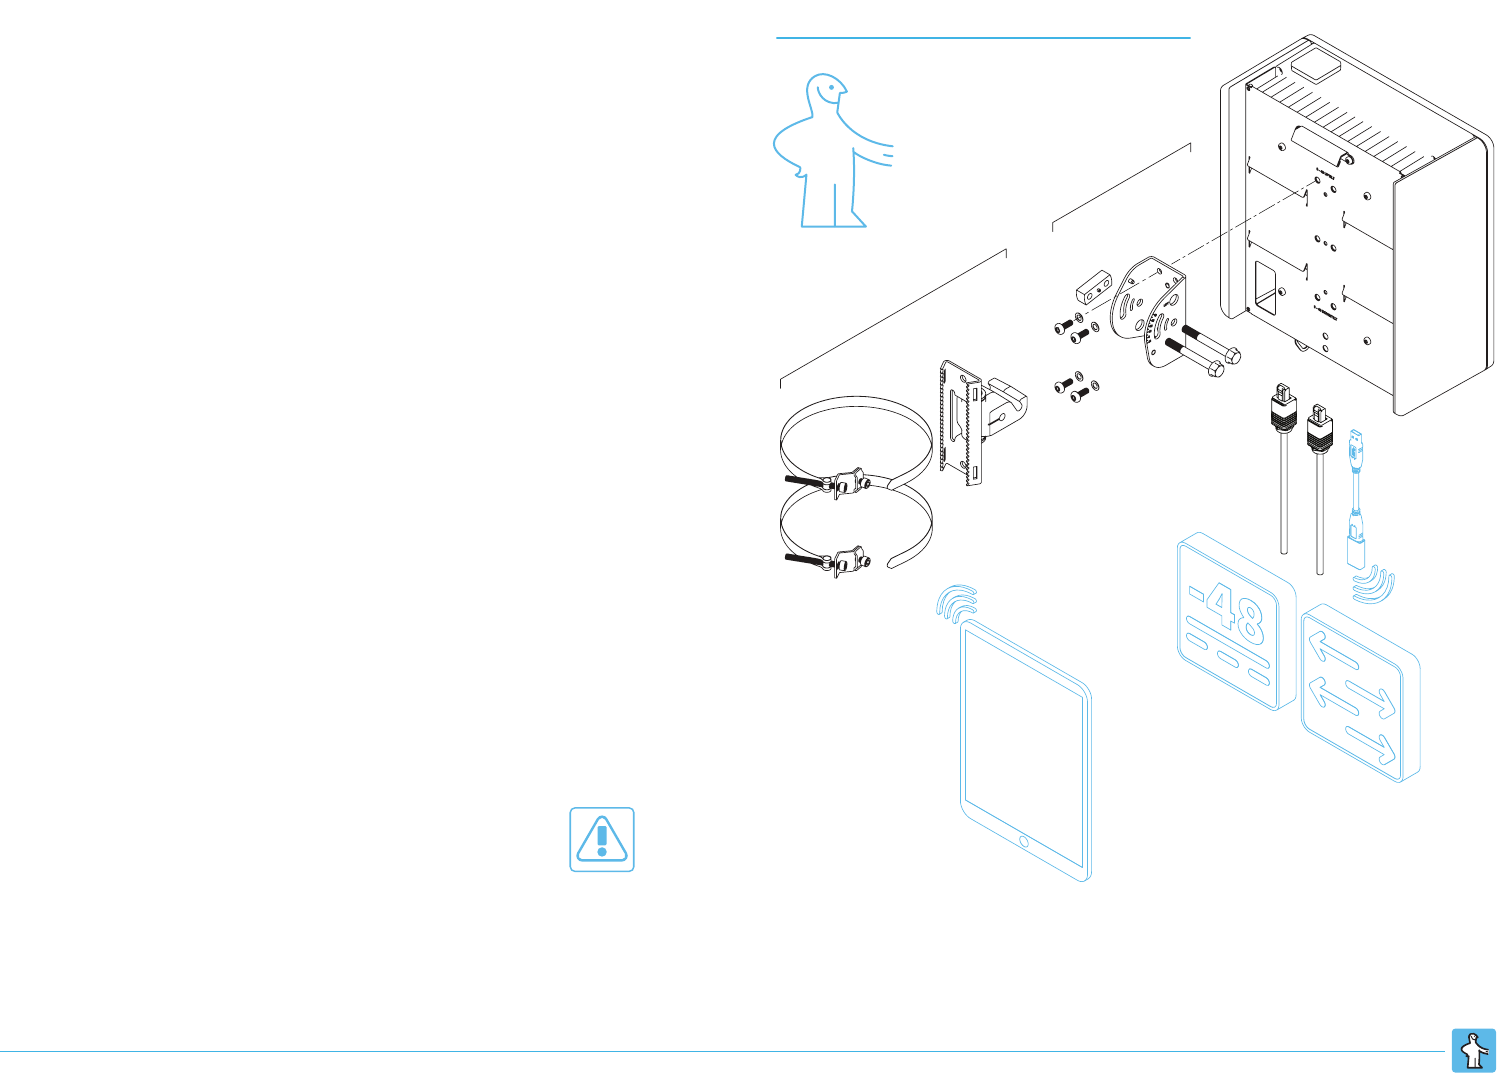
Setting up a Tarana Wireless® link requires gathering, at a minimum, the following:
Tools
! 13 mm combination or socket wrench
! 5 mm hex driver or wrench
! T30 Torx driver
! Wi-Fi USB dongle and short USB extension cable
! mobile device for setup and alignment (smartphone, tablet, or laptop) with
terminal app and current browser
Hardware
! 1 CN and 1 EN radio unit
! 2 elevation-adjust mounting bracket kits
! 2 pole/wall mounting kits
! 2 power sources and cables
! 2 Ethernet cables (+ SFPs, if fiber)
! 2 target mounting locations (wall or pole)
Information
! frequency of operation
! Transmit (Tx) power limit
! link code
! 2 IP addresses (if not DHCP)
Regulatory, Safety, and Best Practices
Tarana AbsoluteAir® equipment is designed for installation and use by trained
professionals and requires adherence to all relevant regulatory, safety, and telecom
industry best practice guidelines for outdoor radios. See our Safety, Warnings, and
Regulatory section for details.
Power and Connectivity Sources
CN or
EN Unit
Elevation-Adjust
Bracket Kit
Power and
Ethernet
Cable(s)
Wi-Fi
Dongle
Mobile Device for
Config, Alignment,
and Verification
Pole/Wall Mounting Kit
Essentials of a Tarana Link Installation
Tarana Wireless, Inc. Proprietary, Confidential, and ©2016. All rights reserved. vAA2-2016-09 Quick Start — 2
Sequence
For a single point-to-point link, the EN and CN can be installed in whichever order is most convenient. Otherwise, CNs should be installed before ENs, as the latter have more
alignment flexibility when multiple links are involved that can be leveraged to maximize link headroom and resilience.
Physical Installation
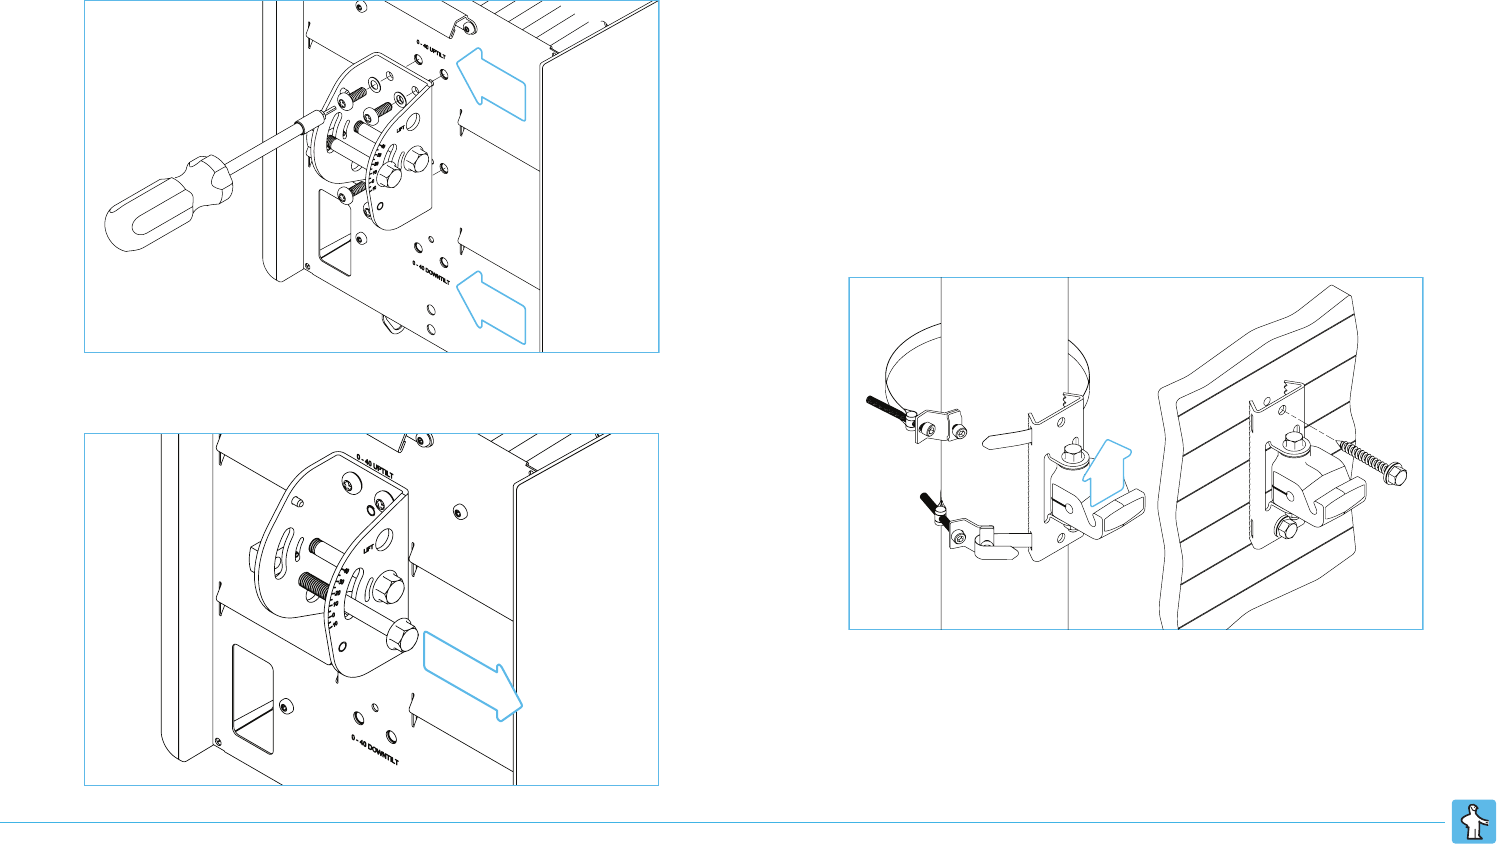
Step 1. Attach elevation-adjust bracket to rear of unit. Torque these screws to 42-
60 in-lb (5-7 Nm). Note uptilt v. downtilt position options, used typically for
ENs and CNs, respectively.
Step 2. Remove outer M8x70 hex/flange bolt from elevation-adjust bracket.
Step 3. Attach assembled gimbal and mounting bracket with groove opening in
gimbal facing up. Do not torque the azimuth adjustment bolt at this time,
as you may want to adjust the angle as part of link alignment. After
alignment is complete, torque to 25 ft-lb (33 Nm).
For wall mounting, use fasteners appropriate to wall material. A load rating
of 220 lbs. is recommended per fastener.
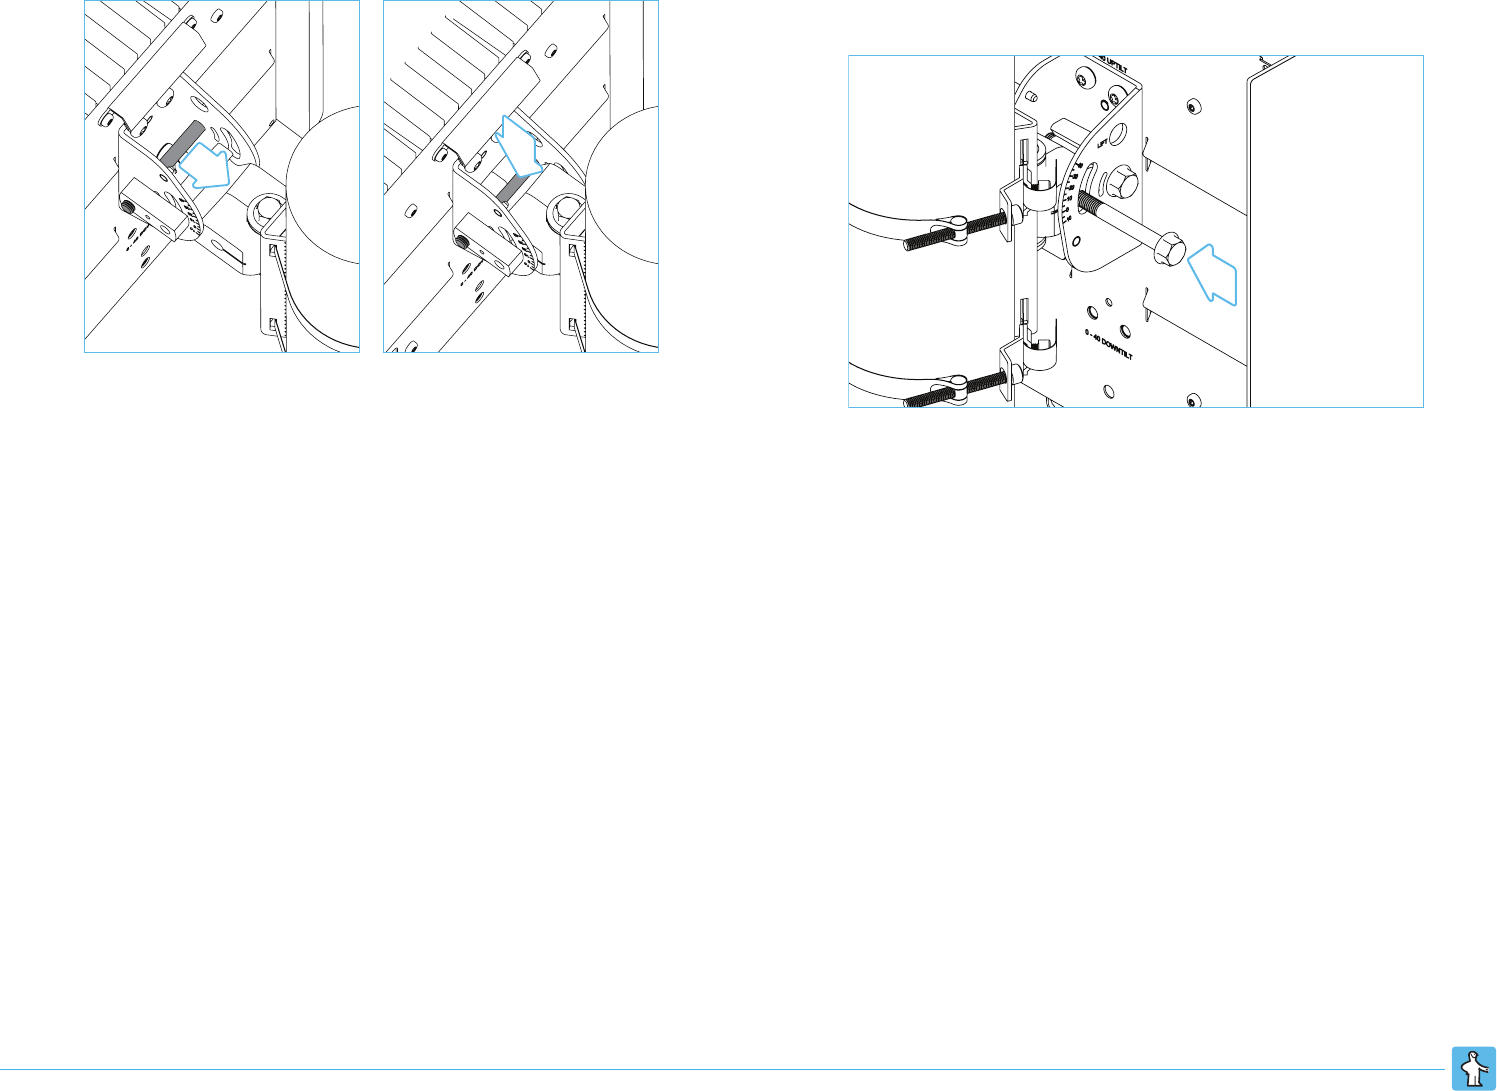
For pole mounting, insert the band through the slot under the hex-head
locking bolt. Pull the band through the slot until nearly tight, then fold over
the band at the edge of the locking bolt/slot. Torque the locking bolt to 42-
44 in-lb (4.75-5 Nm). Clip off excess band if required. Partially tighten the
tension bolt to secure to the pole. Do not torque the bolt at this time, as
you may want to adjust the position as part of link alignment. After
alignment is complete, torque the tension bolt to 70-75 in-lb (8-8.5 Nm).
Up
Down
Remove
Up
Gimbal
Tarana Wireless, Inc. Proprietary, Confidential, and ©2016. All rights reserved. vAA2-2016-09 Quick Start — 3
Step 4. Hang unit on gimbal, hooking inner hex/flange bolt into groove.
Step 5. Return outer hex/flange bolt to bracket, orient unit, and tighten. Do not
torque the bolt at this time, as you may want to adjust the angle as part of
link alignment. After alignment is complete, torque to 25 ft-lb (33 Nm).
Tarana Wireless, Inc. Proprietary, Confidential, and ©2016. All rights reserved. vAA2-2016-09 Quick Start — 4
Ground
1 2 3 4 5 6
Ground
1 2 3 5 6
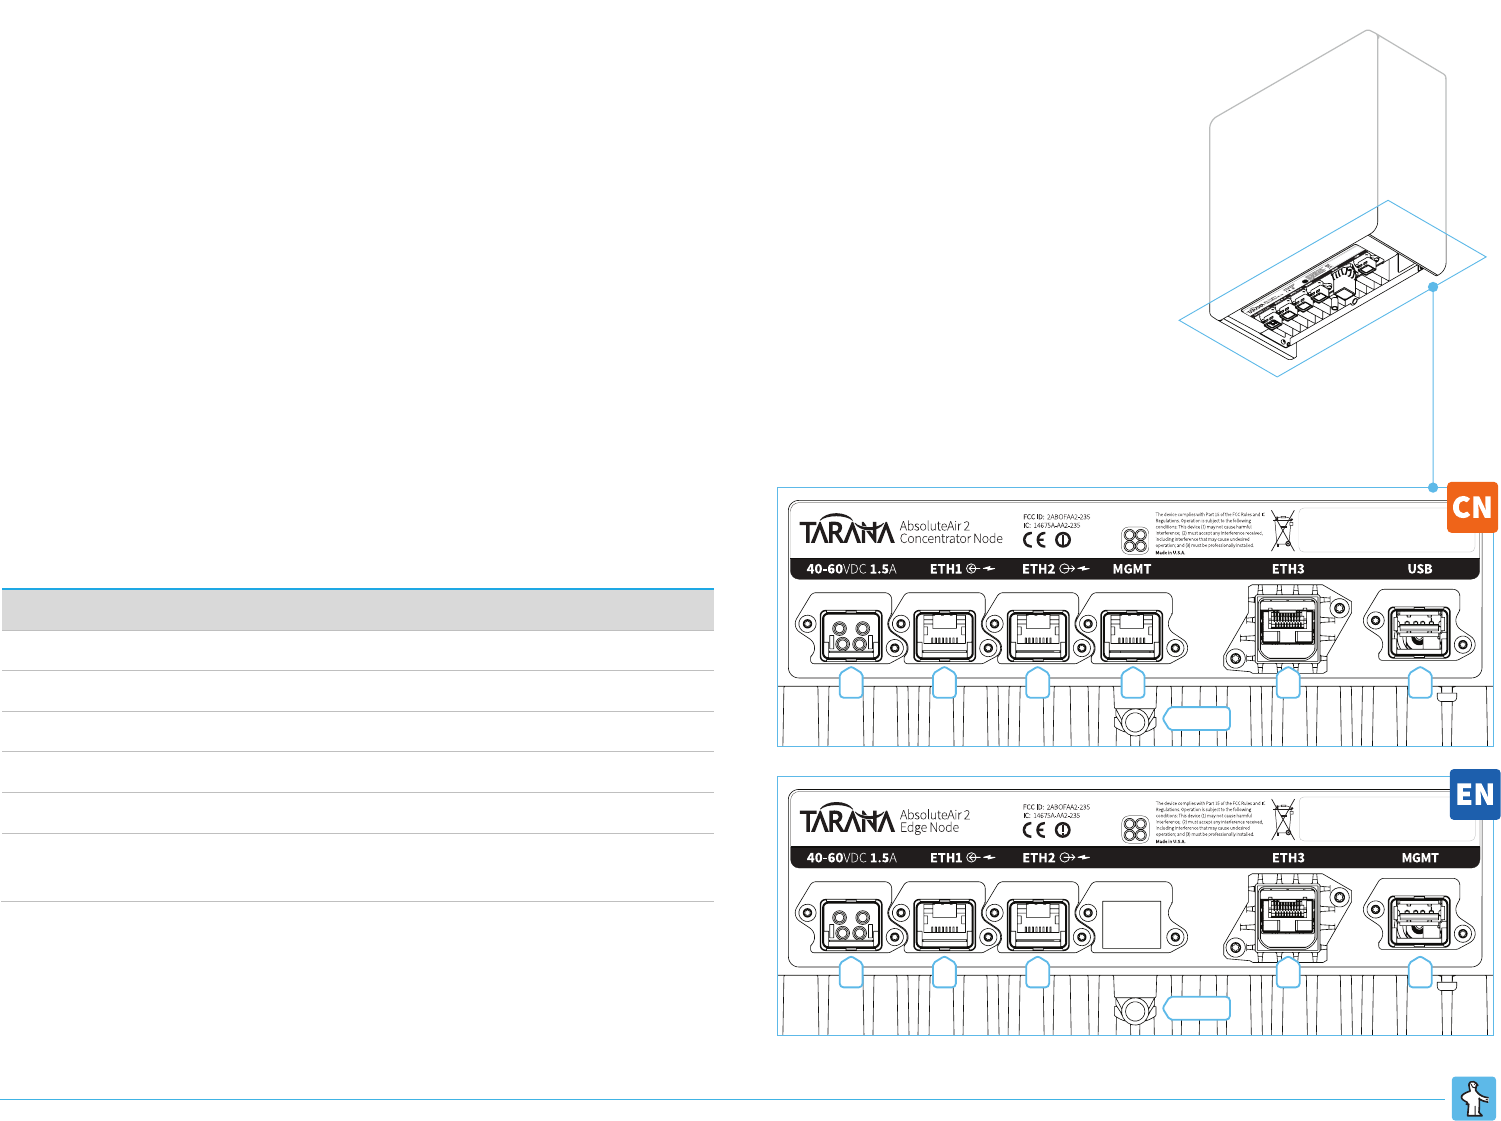
Power and Connectivity
Supply -48 VDC to the unit through either its power port (1) or PoE-in enabled
Ethernet port (2). Ethernet connectivity can be established for link and
management traffic in a variety of configurations using the three or four Ethernet
ports — see our Configuration section for more details. Absent other network
design constraints or goals, a single ETH<n> port can be used for both, separating
traffic with VLANs. In any configuration, all power and signal cables must be
terminated with Harting weatherproof connectors. Proper lightning or surge
suppression devices and associated grounding are required for all connections.
Grounding
Install the ground wire prior to hanging the unit on the gimbal, as the pole or wall
may block access to the ground port. Ground the unit by attaching the grounding
wire via a standard barrel copper lug (PN#48-0061-001). Use an M8-1 X 10MM pan-
head screw and appropriate locking hardware (lock washers or thread-locker
adhesive) to secure the lug to the unit. Ensure the grounding wire is attached to
earth ground in accordance with local electrical code requirements.
Interfaces
Port
Description
1
Dedicated -48 VDC input, from AC adapter or other site power source
2
1000BASE-T, RJ45, with PoE-in option for powering unit
3
1000BASE-T, RJ45
4
(CN only) 1000BASE-T, RJ45, dedicated management interface
5
SFP socket (1000BASE-X fiber or 1000BASE-T copper)
6
USB-A for direct management access during installation or
maintenance via Wi-Fi or Ethernet dongle
CN and EN Power, Data, and Management Interfaces
Tarana Wireless, Inc. Proprietary, Confidential, and ©2016. All rights reserved. vAA2-2016-09 Quick Start — 5
Setup
Connecting the unit to DC power initiates its boot-up process. When that is
complete (in typically 3–4 minutes), the rear panel Power LED shows steady green.
Basic setup requires the following steps; see our Configuration section for detailed
instructions.
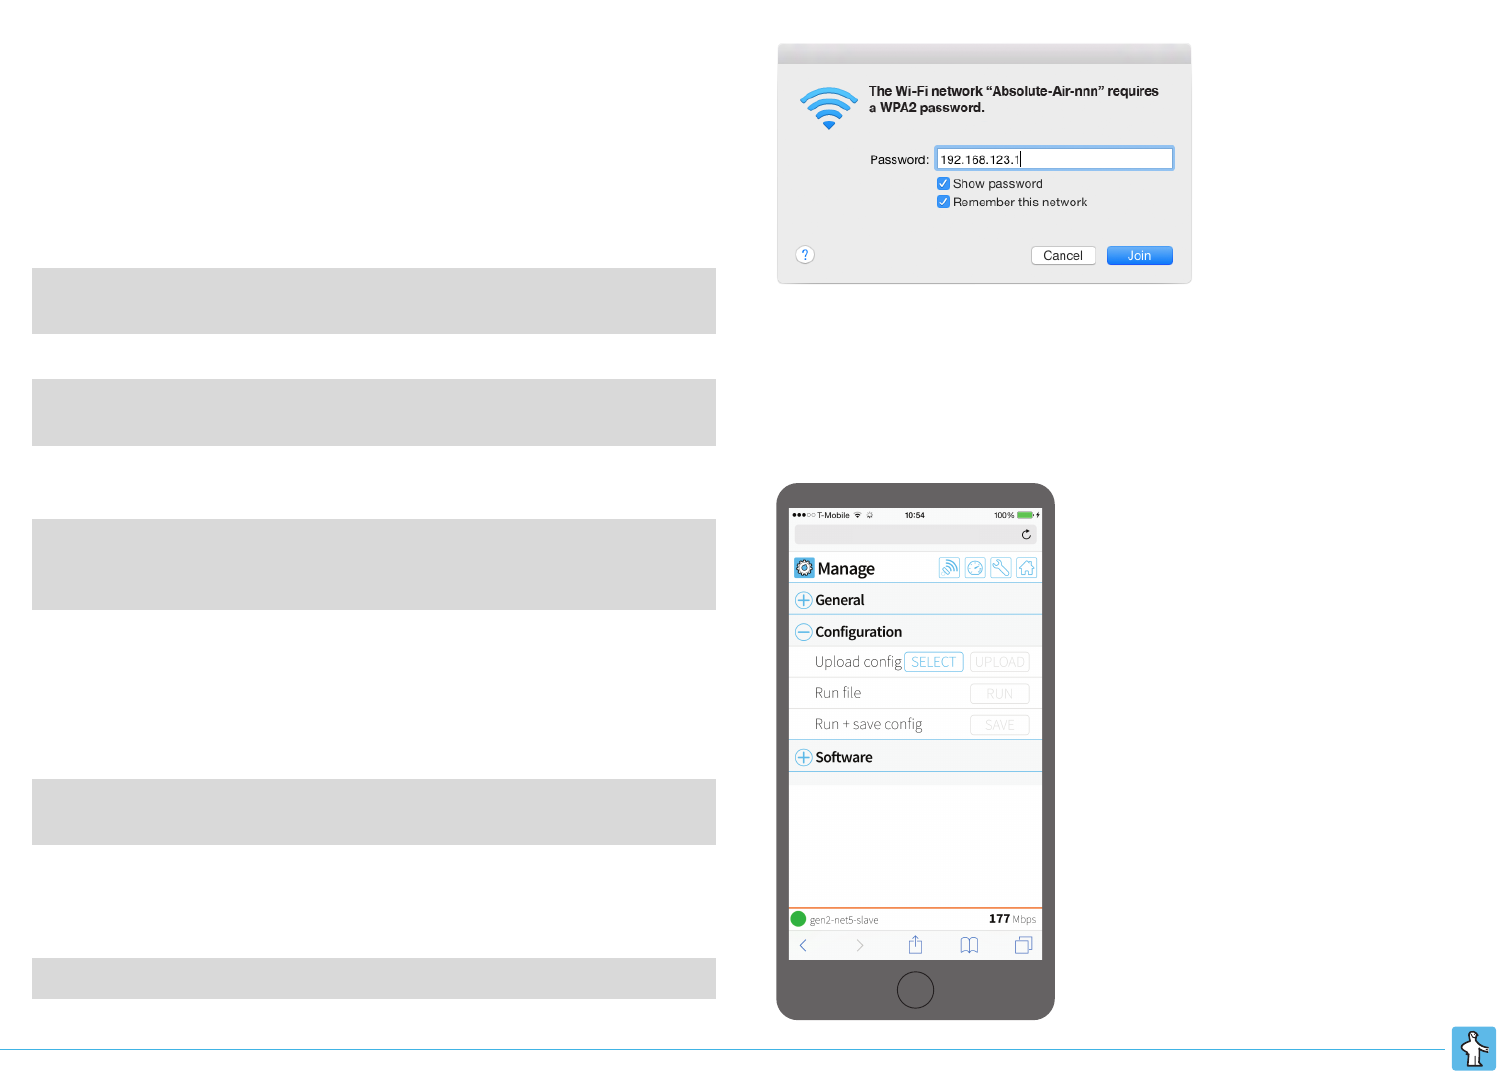
! Plug the Wi-Fi dongle into the unit’s USB port, and watch for SSID “AbsoluteAir-
<9 digit unit serial number> on your mobile device. Authenticate with password
192.168.123.1
! Use your terminal app to SSH into the unit at its static Wi-Fi address:
System:~ user$ ssh admin@192.168.123.1
admin@192.168.123.1's password: admin123
! Set the country code:
admin@system-name# configure terminal
admin@system-name(config)# radio country USA domain FCC
! Enter these commands to configure the radio link [example: CN (CN=master,
EN=slave), 3.46 GHz, link code 1.2.0.0, and max Tx power of 30 dBm]:
admin@system-name(config)# quick-setup node-mode master
frequency 3460.0 profile 1 link-code 1.2.0.0
admin@system-name(config)# radio max-permitted-pa-power 30.0
Note that unique link codes for a small number of links can be simple serial
assignations in the format g.s.c.l, where each letter is an integer referring to its
respective type of id. The last digit will be 0. For PtMP, see Configuration section.
! Configure your unit with its assigned static management IP address x.x.x.x and
subnet mask y.y.y.y:
admin@system-name(config)# interface vlan 1
admin@system-name(config-if)# ip address x.x.x.x y.y.y.y
(You may loose connection at this point. Open a new SSH session to the new IP
address. See our Configuration section for details on networking configuration.)
! For reference, give the unit a meaningful name:
admin@system-name(config)# system name "unit name here"
Access unit via Wi-Fi for config and alignment
Advanced alternative: Upload prepared config file to unit
See our Configuration section for more details on template-based config using the
Node Manager web app (introduced on the next page).
http://172.31.216.195
Tarana Wireless, Inc. Proprietary, Confidential, and ©2016. All rights reserved. vAA2-2016-09 Quick Start — 6
If setting up indoors, enable indoor-lab-mode:
admin@system-name(config)# configure indoor-lab-mode enable
! The final step with the radio is to turn its transmit power on:
admin@system-name(config)# radio tx-opmode on
! Finally, save configuration:
admin@system-name(config)# configure save
Configuration saved
To confirm:
admin@system-name(config)# exit
admin@system-name# show radio config <content follows...>
admin@system-name# show system information <content follows...>
Note: It is recommended to configure the units one at a time. If you connect both
to the same physical network prior to configuration, you will create a loop.
Alignment and Validation
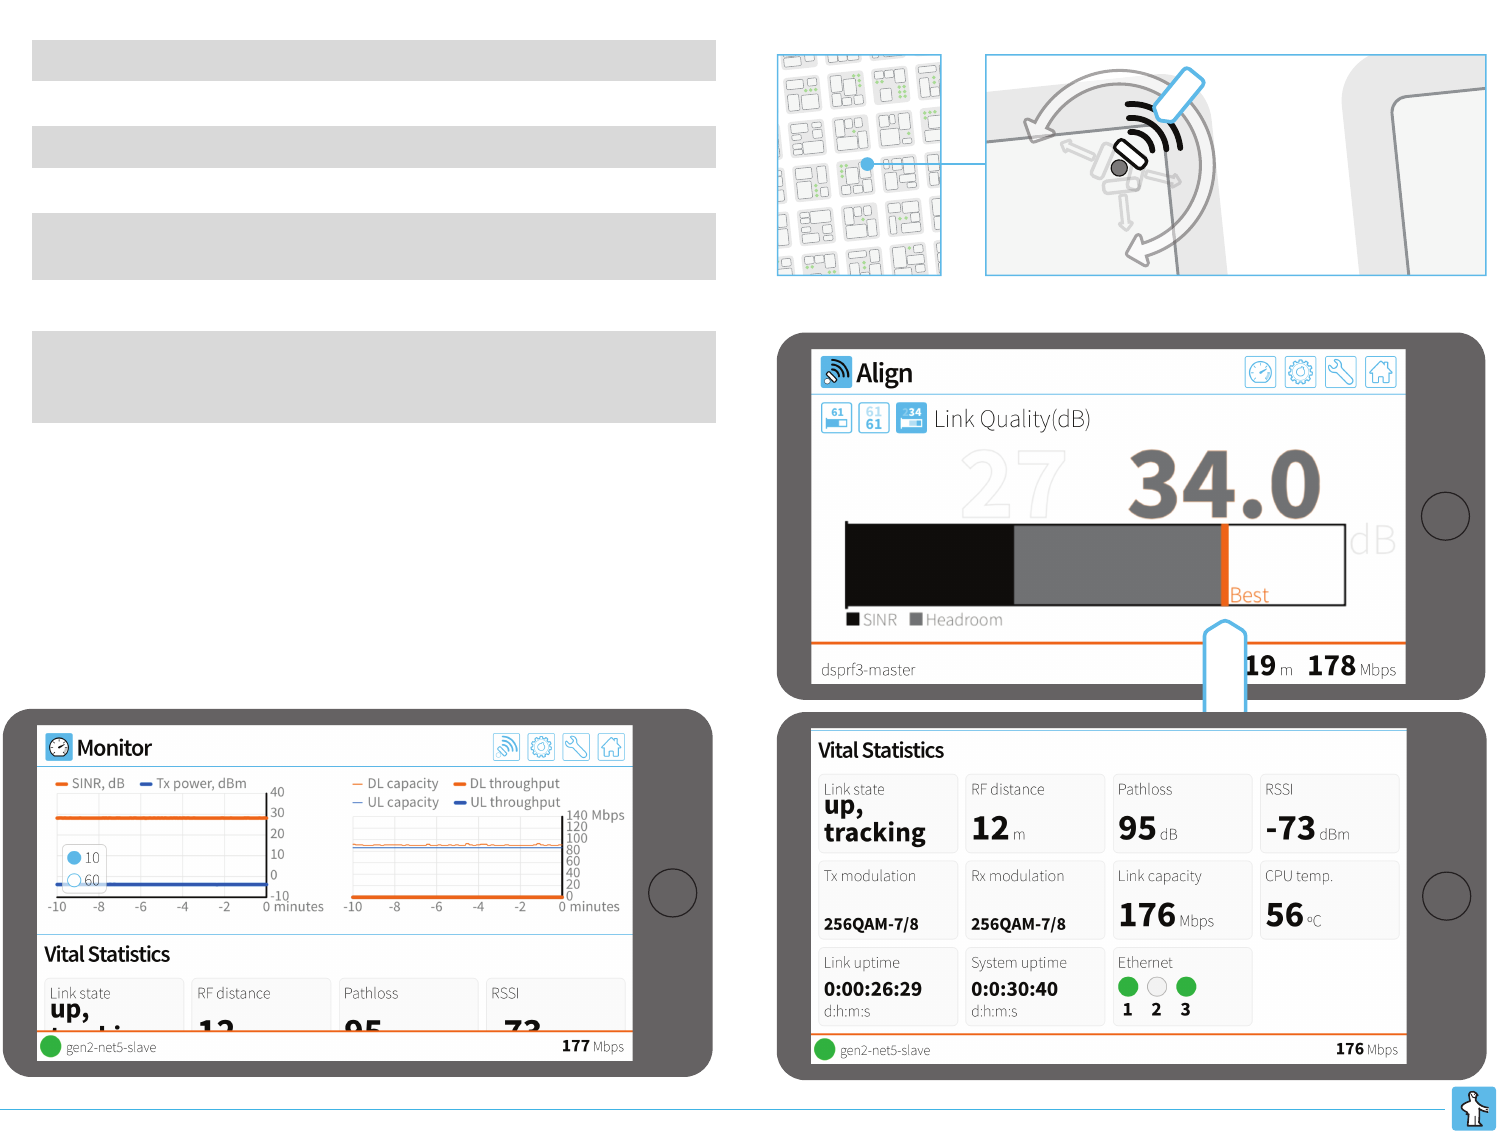
Point your mobile device’s browser at the unit’s IP address (either 192.168.123.1
over Wi-Fi or the static public IP address you've assigned it) to launch the Tarana
Node Manager, the unit’s web-based user interface. The UI uses the same
authentication credentials as the CLI.
Use the UI to optimize and validate link and system performance.
Use the unit’s webUI for visual feedback on link performance
Check range of
orientations for
best performance
leading The
Reference
Safety, Warnings, and Regulatory Information
Tarana Wireless, Inc. Proprietary, Confidential, and ©2016. All rights reserved. vAA2-2016-04 Safety, Warnings, Regulatory — 1
Safety and Warnings
General Warnings
Failure to observe these safety precautions may result in personal injury or damage
to equipment.
• Follow all warnings and instructions marked on this product.
• Use standard safety guidelines when mounting. Installation and
maintenance procedures must be followed and performed by trained
personnel only.
• Before unmounting the product, disconnect power input to reduce the risk
of hazards.
• Do not exceed 60 V of input.
• Do not open the device. Opening the device voids the warranty.
• Do not stack anything on the radome.
• Dust covers must be installed on all connectors when not in use.
• Cable ends must be protected from weather if not connected to the device.
• This is a Class 1 laser product. Invisible laser radiation can be emitted from
the aperture of the port when no fiber is connected; therefore, avoid
exposure to laser radiation and do not stare into open apertures.
FCC Information
The FCC occupational controlled limit for maximum permissible exposure (MPE) is 5
mW/cm2. It is estimated that the maximum power density at the radome is 1.25
mW/cm2, which is below the FCC MPE limit. Since the power density for an
occupational controlled environment is less than the FCC limit, no additional
precautions are necessary. The occupational uncontrolled environment limit for
maximum permissible exposure (MPE) is 1 mW/cm2. To meet this MPE requirement,
the operator must be at a distance of 5.41 in or 29 cm away from the radome cover
of the system. However, an installer can reduce exposure further by turning off the
power to the device or by issuing a CLI command to the device to mute its power.
General Health and Safety Information
Topic
Explanation
Flammability
The equipment is designed and constructed to
minimize the risk of smoke and fumes during a fire.
Hazardous Materials
No hazardous materials are used in the construction
of this equipment.
Hazardous Voltage
The AbsoluteAir® system meets global product
safety requirements for safety extra-low voltage
(SELV) rated equipment.
Safety Signs
External warning signs or other indicators on the
equipment are not required.
Surface Temperatures
The external equipment surfaces become warm
during operation, due to heat dissipation. However,
the temperatures reached are not considered
hazardous.
Operator Health and Safety Information
Topic
Explanation
Equipment Protrusions
The equipment is designed and constructed to
minimize the risk of smoke and fumes during a fire.
Lifting Equipment
No hazardous materials are used in the construction
of this equipment.
Protection from RF
Exposure
The AbsoluteAir system meets global product safety
requirements for safety extra-low voltage (SELV)
rated equipment.
Safety Warnings
External warning signs or other indicators on the
equipment are not required.

Tarana Wireless, Inc. Proprietary, Confidential, and ©2016. All rights reserved. vAA2-2016-04 Safety, Warnings, Regulatory — 2
Health and Safety Warning
All personnel must comply with the relevant health and safety practices
when working on or around the AbsoluteAir radio equipment.
The AbsoluteAir system has been designed to meet relevant US and European
health and safety standards as outlined in IEC Publication 60950-1.
AbsoluteAir is a Class B product. It is intended to be used exclusively in
telecommunications centers.
Local safety regulations must be used if required. Safety instructions in this section
should be used in addition to the local safety regulations. In the case of conflict
between safety instructions stated herein and those indicated in local regulations,
mandatory local norms will prevail. Should local regulations not be mandatory,
then safety norms herein will prevail.
Warning Labels
WARRANTY VOID
DO NOT BREAK THE TAMPER SEALS ON HARDWARE. DOING SO WILL VOID THE
WARRANTY.
WARNING
Making adjustments and/or modifications to this equipment that are not in
accordance with the provisions of this User Guide, the Installation Guide or other
supplementary documentation may result in personal injury or damage to the
equipment, and may void the equipment warranty.
AVERTISSEMENT
Tout réglage ou modification faits à cet équipement hors du cadre édicté par ce
guide d’utilisation ou par toute autre documentation supplémentaire pourraient
causer des blessures ou endommager l’équipement et peut entraîner l’annulation
de sa garantie.
WARNUNG
Die an diesen Geräten gemachte Einstellungen und/oder Änderungen, welche nicht
gemäß dieser Bedienungsanleitung, oder gemäß anderen zusätzlichen Anleitungen,
ausgeführt werden, können Verletzungen oder Materialschäden zur Folge haben
und eventuell die Garantie ungültig machen.
ATENCIÓN
Llevar a cabo ajustamientos y/o modificaciones a este equipo, sin seguir las
instrucciones provistas por este manual u otro documento adicional, podría
resultar en lesiones a su persona o daños al equipo, y anular la garantía de este
último.
警告
行整和/或修改本是不符合本用指南的定,安装手册或其他
充文件可能致人身害或坏,并可能会使保修。
Tarana Wireless, Inc. Proprietary, Confidential, and ©2016. All rights reserved. vAA2-2016-04 Safety, Warnings, Regulatory — 3
General Hazards
Topic
Explanation
Chassis Earthing
The AbsoluteAir chassis earth must be connected directly to the DC supply system earthing conductor, or to a bonding jumper from an earthing
terminal bar, or bus to which the DC supply system earthing is connected.
Protection from RF
Exposure
When installing, servicing or inspecting an antenna always comply with the following:
•
Locate the antenna such that it does not infringe the RF Exposure Limit Distance, relating to the Compliance Boundary General Public.
•Stay aware of the potential risk of RF exposure and take appropriate precautions.
•Do not stand in front of or look into an antenna without first ensuring the associated transmitter or transmitters are switched off.
•At a multi-antenna site ask the site owner or operator for details of other radio services active at the site and for their
requirements/recommendations for protection against potentially harmful exposure to RF radiation.
•When it is not possible to switch transmitters off at a multi-antenna site and there is potential for exposure to harmful levels of RF
radiation, wear a protective suit.
Fiber Optic Cables
•Handle optical fibers with care. Keep them in a safe and secure location during installation.
•Do not attempt to bend them beyond their minimum bending radius.
•Protect/cover unconnected optical fiber connectors with dust caps.
Grounding Connections
Reliable grounding of the AbsoluteAir chassis must be maintained.
Mains Power Supply
Routing
AbsoluteAir DC power is not to be routed with any AC mains power lines. They are also to be kept away from any power lines which cross them.
Maximum Ambient
Temperature
The maximum ambient temperature for the AbsoluteAir product is 60 degrees C. To ensure correct operation and to maximize long term
component reliability, ambient temperatures must not be exceeded. Operational specification compliance is not guaranteed for higher
ambients. AbsoluteAir should be mounted in such a way as to permit the vertical free flow of air through its cooling fins.
Mechanical Loading
When installing the AbsoluteAir on a tower, ensure that the tower is securely anchored. Ensure that the additional loading of devices will not
cause any reduction in the mechanical stability of the tower.
Power Supply
Connection
AbsoluteAir operates from a nominal -48 VDC power supply.
Power Supply
Disconnect
An appropriate power supply disconnect device should be provided as part of the installation.
Rack Mount
Temperature
Considerations
AbsoluteAir is designed to operate in an outdoor environment with no significant obstructions in front of the radome. Do not install AbsoluteAir
in a closed or multi-unit rack assembly, because such a closed rack would impede the propagation of the RF signals. The maximum ambient
temperature applies to the immediate operating environment of the AbsoluteAir product.

Tarana Wireless, Inc. Proprietary, Confidential, and ©2016. All rights reserved. vAA2-2016-04 Safety, Warnings, Regulatory — 4
Regulatory Information
Compliance
Safety
● IEC 60950-1:2005, 2nd Edition + Am1:2009 +
Am2:2013
●
EN 60950-1:2006
+A11:2009+A12010+A12:2011+A2:2013
●
IEC 60950-22:2005,
●
EN 60950-22:2006+A11
●
UL 60950, 2nd Edition Amendment 2
● CAN/CSA-C22.2 No. 60950-1-07
Immunity
● EN61000-4-5 Level 4 AC Surge Immunity
●
EN61000-4-4 Level 4 Electrical Fast Transient Burst
Immunity
●
EN61000-4-3 Level 4 EMC Field Immunity
●
EN61000-4-2 Level 2 ESD Immunity
● EN60950-1 Overvoltage Category II
Radio Approvals
● FCC Part 2
●
FCC Part 15
●
FCC Part 27
●
FCC Part 90
●
RSS-192,
●
RSS-197
●
RSS-199
●
EN 302 326-2
● EN 302 502
EMI and susceptibility
●
FCC part 15.207, 15.209
●
ICES-003; RSS-Gen
● EN 301 489-1, -4, -17 Class B

Tarana Wireless, Inc. Proprietary, Confidential, and ©2016. All rights reserved. vAA2-2016-04 Safety, Warnings, Regulatory — 5
Deployment in the US – FCC Statement
This product must be professionally installed.
This device complies with FCC Rules for Class B limits. Operation is subject to the
following two conditions: (1) this device may not cause harmful interference, and (2)
this device must accept any interference received, including interference that may
cause undesired operation.
Modifications not expressly approved by Tarana Wireless Inc. could void the user's
authority to operate the equipment.
NOTE: This equipment has been tested and found to comply with the limits for a
Class B digital device, pursuant to part 15 of the FCC Rules. These limits are
designed to provide reasonable protection against harmful interference in a
residential installation.
This equipment generates, uses and can radiate radio frequency energy and, if not
installed and used in accordance with the instructions, may cause harmful
interference to radio communications. However, there is no guarantee that
interference will not occur in a particular installation. If this equipment does cause
harmful interference to radio or television reception, which can be determined by
turning the equipment off and on, the user is encouraged to try to correct the
interference by one or more of the following measures:
—Reorient or relocate the receiving antenna.
—Increase the separation between the equipment and receiver.
—Connect the equipment into an outlet on a circuit different from that to which the
receiver is connected.
—Consult the dealer or an experienced radio/TV technician for help.
This device complies with FCC RF exposure limits. This equipment should be
installed and operated with a minimum distance of 29 cm (11.4 in.) between the
radiator and user. This transmitter must not be co-located or operating in
conjunction with any other antenna or transmitter.

Tarana Wireless, Inc. Proprietary, Confidential, and ©2016. All rights reserved. vAA2-2016-04 Safety, Warnings, Regulatory — 6
Deployment in Canada - Industry Canada Statements
This product must be professionally installed.
This Class B Digital apparatus meets all the requirements of ICES-003.
To satisfy IC RF exposure requirements for RF transmit ting devices, the following
distances should be maintained between the antenna of this device and persons
during device operation: 58cm.
This device has been designed to ensure that radio frequency emissions are
maintained within the band of operation under all normal operating conditions
listed in this manual.
This device complies with Industry Canada RSS standard(s). Operation is subject to
the following two conditions:
This device may not cause interference, and
This device must accept any interference, including interference that may
cause undesired operation of the device.
Le produit final doit être installé par un professionnel
Cet appareil numérique de la classe B est conforme à la norme NMB-003 du
Canada.
IC avertissements d'exposition RF Pour satisfaire les exigencies d’IC en ce qui a trait
aux expositions aux RF pour RF dispositifs de transmission, les distances
suivantes doit être maintenue entre l'antenne de ce dispositive et des personnes
pendant le fonctionnement du dispositif: 58cm.
Ce dispositif a été conçu pour veiller à ce que les émissions de radiofréquences
sont maintenus dans la bande de fonctionnement dans toutes les conditions
normales de fonctionnement figurant dans ce manuel.
Cet appareil est conforme la norme d'Industrie Canada RSS (s). Son
fonctionnement est soumis aux deux conditions suivantes:
Cet appareil ne peut pas causer d'interférences, et.
Cet appareil doit accepter toute interférence, y compris les interférences
qui peuvent causer un mauvais fonctionnement de l'appareil.
Tarana Wireless, Inc. Proprietary, Confidential, and ©2016. All rights reserved. vAA2-2016-04 Safety, Warnings, Regulatory — 7
Deployment in the European Union – CE Mark Statements
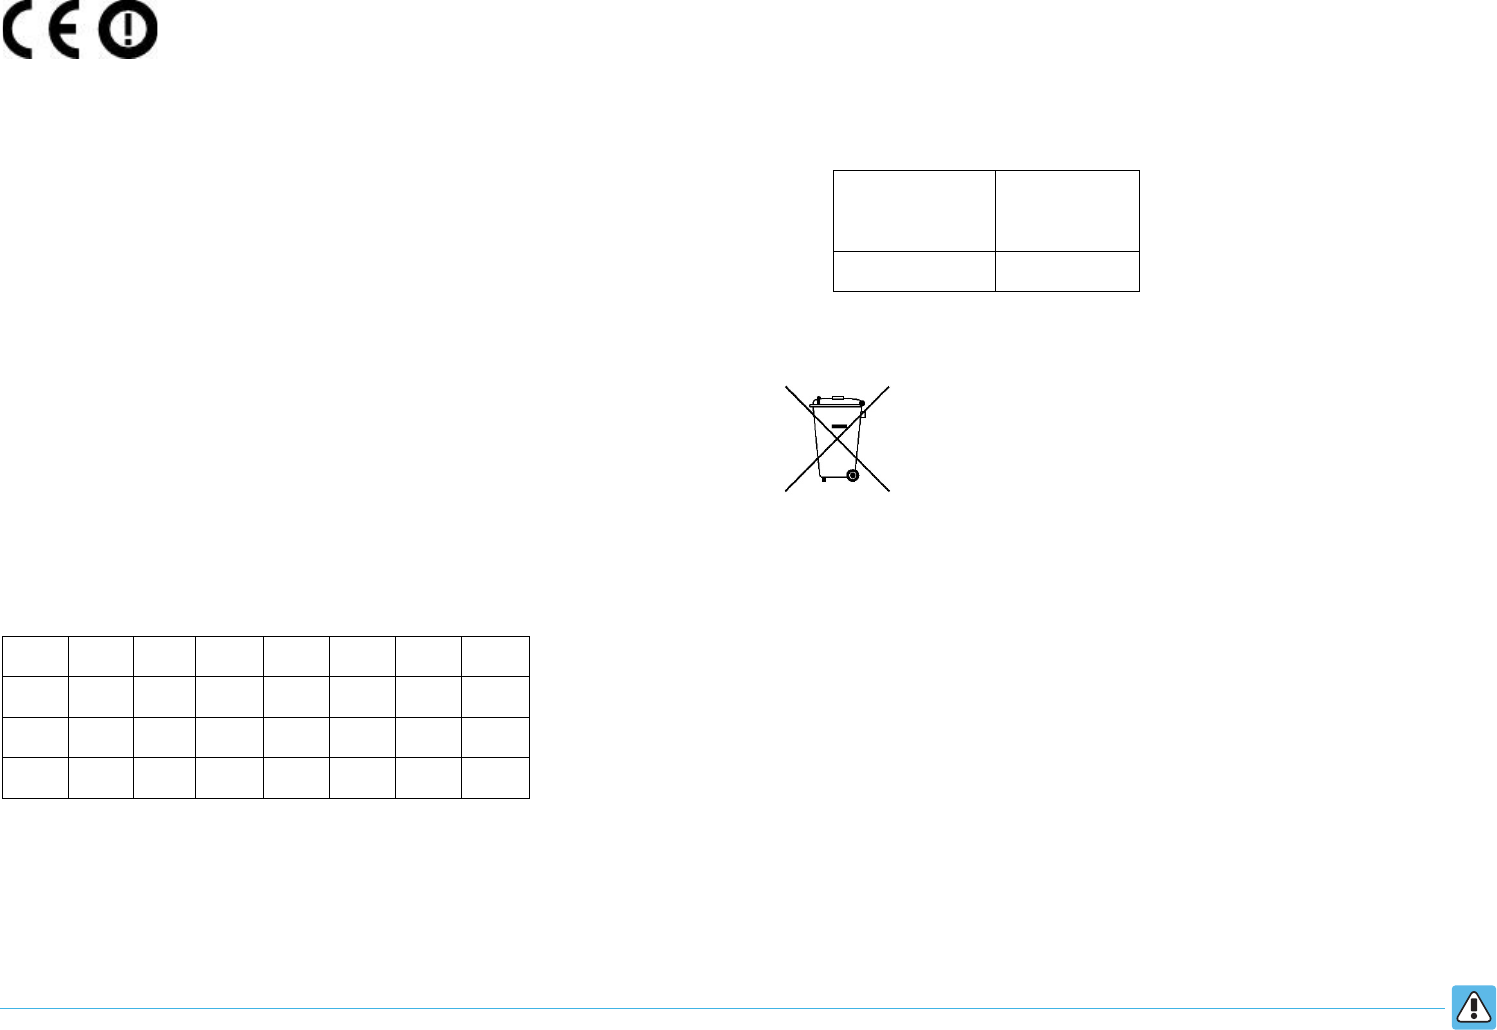
This Product carries CE Mark:
Declaration of Conformity for radio and telecommunication
terminal equipment under the scope of Directive 1999/5/EC
statement
Hereby, Tarana Wireless Inc. declares that the equipment documented in this
publication is in Compliance with the essential requirements and other relevant
provisions of Directive 1999/5/EC.
The technical documentation as required by the Conformity Assessment procedure
is kept at Tarana Wireless Inc. location which is responsible for this product. For
more information please contact your local Tarana Wireless Inc. Customer Service
or Sales representative.
This declaration is only valid for AbsoluteAir 2 systems (hardware, software, and
firmware) that are provided for use within the EU. If this equipment is used in a
manner not specified by Tarana Wireless Inc. (including use of unsupported
software or firmware), it may result in the equipment no longer being compliant
with the regulatory requirements.
Tarana Products described above are intended to be used in the
following Countries:
BE
DE
ES
LV
MT
PT
FI
NO
BG
EE
FR
LT
NL
RO
SE
CH
CZ
IE
IT
LU
AT
SI
GB
LI
DK
GR
CY
HU
PL
SK
IS
TR
This Product meets International guidelines for human exposure to
RF fields
Tarana Wireless systems are designed to be operated as to avoid contact with the
antennas by the end user. It is recommended to install the system in a location
where the antennas can remain at least a minimum distance as specified from the
user in accordance to the regulatory guidelines which are designed to reduce the
overall exposure of the user or operator.
E-Field Limit
(V/m)
Distance
(m)
61
0.7083
Eco-Environmental Statements
Electronic products and batteries bearing or referencing the symbols shown above
shall be collected and treated at the end of their useful life, in compliance with
applicable European Union and other local legislation. They shall not be disposed
of as part of unsorted municipal waste. Due to materials that may be contained in
the product and batteries, such as heavy metals, the environment and human
health may be negatively impacted as a result of inappropriate disposal.
Tarana Wireless, Inc. Proprietary, Confidential, and ©2016. All rights reserved. vAA2-2016-04 Safety, Warnings, Regulatory — 8
Nederlands
Dutch
De apparatuur is in overeenstemming met de essentiële eisen
en andere relevante bepalingen van Richtlijn 1999/5 / EG
Malti
Malteese
Dan it-tagħmir huwa konformi mar-rekwiżiti essenzjali u
dispożizzjonijiet rilevanti oħra tad-Direttiva 1999/5 / KE
Magyar
Hungarian
Ez a berendezés megfelel az alapvető követelményeknek és más
vonatkozó rendelkezéseinek a 1999/5/ EK
Norsk
Norwegian
Dette utstyret er i samsvar med grunnleggende krav og øvrige
relevante krav i direktiv 1999/5/ EC
Polski
Polish
Ten sprzęt jest zgodny z zasadniczymi wymaganiami oraz
pozostałymi stosownymi postanowieniami Dyrektywy 1999/5 /
WE
Portugues
Portuguese
Este equipamento está em conformidade com os requisitos
essenciais e outras disposições relevantes da Directiva 1999/5 /
CE
Română
Romanian
Acest echipament este în conformitate cu cerințele esențiale și
alte prevederi relevante ale Directivei 1999/5/CE
Slovensko
Slovenian
Ta oprema je v skladu z bistvenimi zahtevami in drugimi
ustreznimi določbami Direktive 1999/5 / ES
Slovenski
Slovak
Toto zariadenie je v súlade so základnými požiadavkami a
ďalšími príslušnými ustanoveniami smernice 1999/5 / EC
Suomi
Finish
Tämä laite on olennaisten vaatimusten ja muiden määräysten
mukainen direktiivin 1999/5 / EY
Swenska
Swedish
Denna utrustning är i överensstämmelse med väsentliga krav
och andra relevanta bestämmelser i direktivet 1999/5/EG
Hrvatski
Croatian
Ova oprema je u skladu s osnovnim zahtjevima i drugim
relevantnim odredbama Direktive 1999/5 / EC
English
This equipment is in compliance with essential requirements
and other relevant provisions of Directive 1999/5/EC
Български
Bulgarian
Това
оборудване
е
в
съответствие
с
основните
изисквания
и
съответ
ващите разпоредби на Директива 1999/5/ЕО
Cesky
Czech
Toto zařízení je v souladu se základními požadavky a dalšími
příslušnými ustanoveními směrnice 1999/5/EC
Dansk
Danish
Dette udstyr er i overensstemmelse med væsentlige krav og
øvrige relevante bestemmelser i direktiv 1999/5/EF
Deuch
German
Dieses Gerät ist in Übereinstimmung mit den grundlegenden
Anforderungen und anderen Bestimmungen der Richtlinie
1999/5/EU
Esti
Estonian
See seade on vastavuses põhinõuetele ja muudele direktiivi
1999/5/EC
Español
Spanish
Este equipo cumple con los requisitos esenciales y otras
disposiciones pertinentes de la Directiva 1999/5/CE
E
λλη
νική
Greek
Αυτός
ο
εξο
π
λισµός
είναι
σε
συµµόρφωση
µε
τις
ουσιώδεις
α
παιτήσεις και τις λοιπές σχετικές διατάξεις της οδηγίας
1999/5/εκ
Français
French
Cet équipement est conforme aux exigences essentielles et aux
autres dispositions pertinentes de la Directive 1999/5/CE
Islenska
Islandic
Þessi búnaður er í samræmi við grunnkröfur og aðrar kröfur sem
gerðar eru í tilskipun 1999/5 / EC
Italiano
Italian
Questa apparecchiatura è conforme ai requisiti essenziali e altre
disposizioni contenute nella Direttiva 1999/5/CE
Latviešu
Latvian
Šī iekārta atbilst būtiskajām prasībām un citiem ar to
saistītajiem noteikumiem Direktīvas 1999/5/EK
Lietuvių
Lithuanian
Ši įranga atitinka esminius reikalavimus ir kitas susijusias
nuostatas Direktyvos 1999/5 / EB