Targus 000016 Bluetooth Comfort Laser Mouse User Manual 410 1690 001A AMB09US 09Jul03
Targus Group International, Inc. Bluetooth Comfort Laser Mouse 410 1690 001A AMB09US 09Jul03
Targus >
Manual

User Guide

Targus Bluetooth Comfort Laser Mouse
2
Introduction
Thank you for your purchase of the Targus Bluetooth Comfort Laser
Mouse. This mouse uses Bluetooth technology which provides a seamless
connection up to 33 ft (10 m) away. This is a plug and play device so no
additional software is required. The advance scroll wheel feature program
can be downloaded from the Targus web-site.
System Requirements
Hardware
s"LUETOOTHENABLEDCOMPUTER
Operating System
s-ICROSOFT7INDOWS® 2000
s-ICROSOFT7INDOWS® XP
s-ICROSOFT7INDOWS6ISTA®
s-ICROSOFT7INDOWS® 7
s-AC/3® X 10.4 or later
Contents
s4ARGUS"LUETOOTH#OMFORT,ASER-OUSE
sX!!BATTERIES
s5SERGUIDE
Targus Bluetooth Comfort Laser Mouse
3
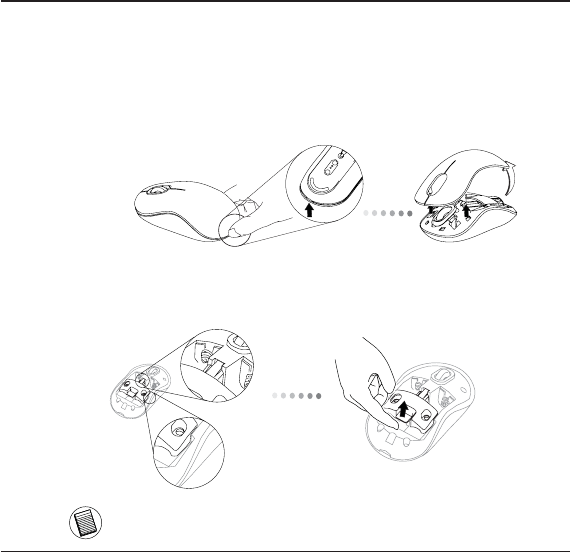
1. Remove the battery cover from the top of the mouse by using the notch
on the back. Carefully lift the cover up as shown in the diagram.
Installing the Batteries
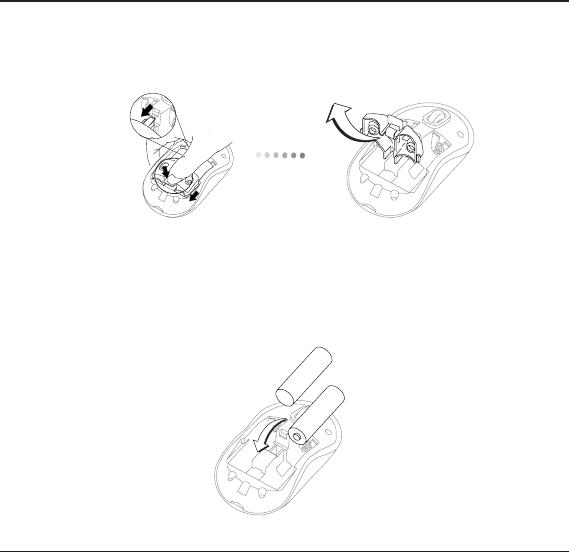
2. Remove the battery safety clip by squeezing the center of the clip and
sliding it back, towards the rear of the mouse. Lift up and rotate the clip
out of the way.
NOTE: THE BATTERY SAFETY CLIP WILL NEED TO BE IN THE SECURE, LOCKED POSI-
TION BEFORE THE BATTERY COVER CAN BE PUT BACK IN PLACE.
Targus Bluetooth Comfort Laser Mouse
4
3. Slide and lift to remove the battery holder as shown.
4. Insert the two AA batteries, making sure that the positive (+) and
negative (-) ends of each battery match the polarity indicators inside
the battery compartment.
Targus Bluetooth Comfort Laser Mouse
5
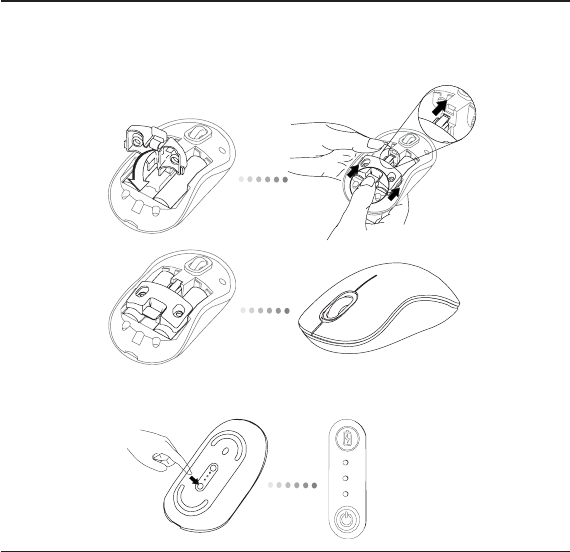
6. Turn on the mouse by pressing the power on/off button on the bottom
of the mouse. Hold for 3 seconds and then release.
5. Replace the battery safety clip and by sliding it forward until it clicks into
place and then replace the battery cover.
Power Button

Targus Bluetooth Comfort Laser Mouse
6
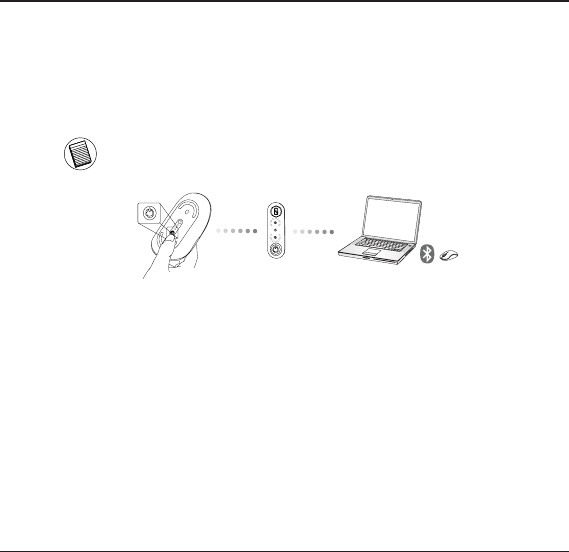
Enable Discovery mode:
The mouse will go into pairing mode automatically after it is powered on. The 1st and
3rd LED will flash alternately for 60 seconds; this indicates that the pairing sequence
ISINOPERATION/NCETHECONNECTIONISESTABLISHEDTHESTANDRD,%$LIGHTWILLLIGHT
up steadily for 3 seconds.
Power On:
Press and hold the power button for 3 seconds and then release.
The battery life indicator will briefly light up showing the current power level of the
batteries.
Power Off:
Press and hold the power button for 3 seconds and then release.
The battery life indicator will briefly light up and then fade out.
Battery Check:
After the mouse is turned on, quickly press and release the power button. The
battery life indicator will light up showing the current power level of the batteries.
Initial Mouse Setup
If the connection is not established by the end of 60 seconds, the mouse will go
INTOSLEEP MODE #LICKONANYMOUSEBUTTONTOEXITFROMSLEEPMODE4HEPAIRING
sequence will re-start automatically.
1st LED
3rd LED
Targus Bluetooth Comfort Laser Mouse
7
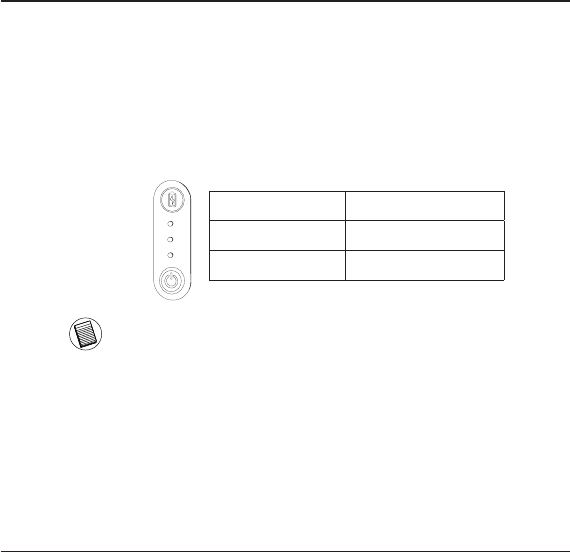
Battery Life Indicator
NOTE: WHEN THE FIRST LIGHT IS BLINKING, PLEASE REPLACE THE BATTERIES
3 LEDs lit Full power
2 LEDs lit Half power
1 LED lit Low power
Power Saving mode:
!FTERANEXTENDEDPERIODOFTIMEIFTHEMOUSEISNOTUSEDITWILLAUTOMATICALLYENTER
power saving mode to conserve power and increase battery life. Click on any mouse
button to resume the normal operation. The mouse may take a few seconds to re-
connect with your computer.
Targus Bluetooth Comfort Laser Mouse
8
Initial Configuration
Before you can begin using your Bluetooth® mouse, you will first need to
perform some initial setup steps.
NOTE: PLEASE USE THE LATEST BLUETOOTH DEVICE DRIVER. INSTRUCTION SCREENS MIGHT VARY
DEPENDING ON THE VERSION OF YOUR BLUETOOTH DEVICE DRIVER.
fi
Targus Bluetooth Comfort Laser Mouse
9
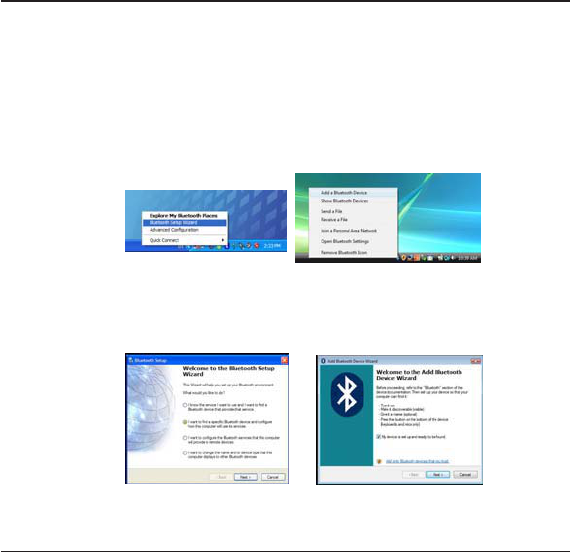
Connecting with Bluetooth Software:
7)$#/--OR-ICROSOFT 7INDOWS807INDOWS6ISTA
1. Go to the Bluetooth Places icon located on your desktop or in the system tray and
double click, then click Add a Bluetooth Device.
(Windows XP)
7INDOWS6ISTA
2. The Bluetooth Wizard screen will prompt. Please follow the onscreen instructions.
7INDOWS6ISTA
(Windows XP)
Targus Bluetooth Comfort Laser Mouse
10
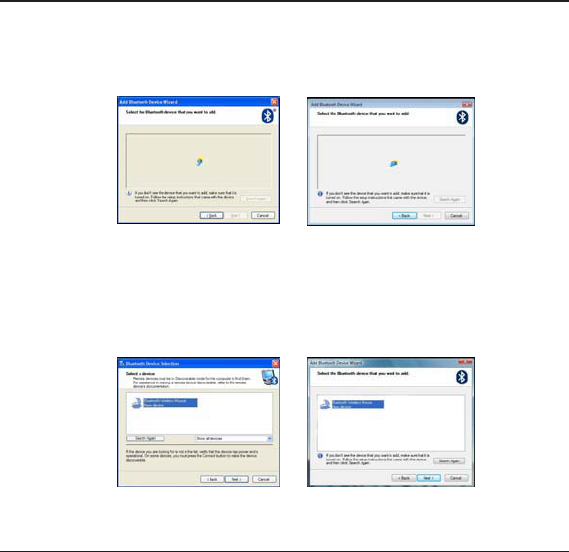
3. Power on the mouse and it will automactically go into discovery mode. Click Next
to continue pairing and the computer will search for the mouse.
4. The confirmation window will appear after the computer finishes detecting
the Bluetooth devices. Select the Bluetooth Wireless Mouse and click Next to
continue. (There may be one or more different Bluetooth devices detected.) If the
mouse is not detected, please make sure the power is on and in discovery mode.
Press Search Again to re-pair the device.
7INDOWS6ISTA
(Windows XP)
7INDOWS6ISTA
(Windows XP)
Targus Bluetooth Comfort Laser Mouse
11
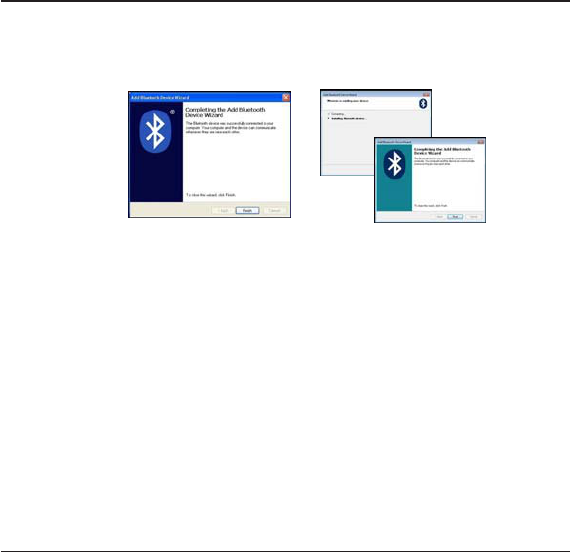
5. After selecting the correct device, the computer will finish establishing the
connection. Please wait until the setup is completed.
7INDOWS6ISTA
(Windows XP)
Targus Bluetooth Comfort Laser Mouse
12
Connecting with Bluetooth Software:
4/3()"! 7INDOWS6ISTA
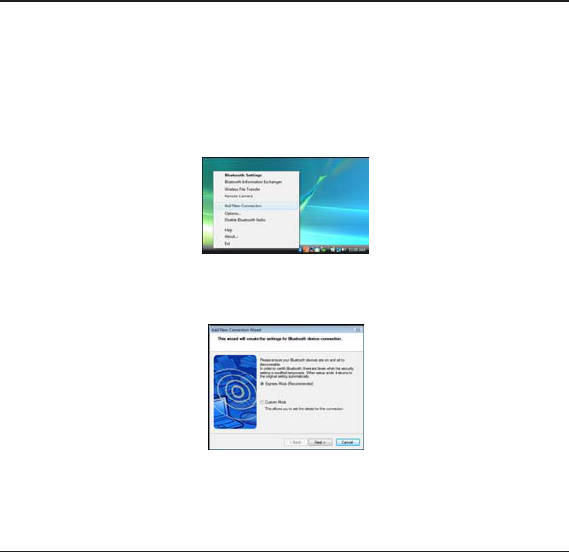
1. Double click on the Bluetooth Manager icon in the system tray, and then click
Add New Connection.
2. Power on the mouse and it will automactically go into discovery mode. Click Next
to continue pairing and the computer will search for the mouse.
Targus Bluetooth Comfort Laser Mouse
13
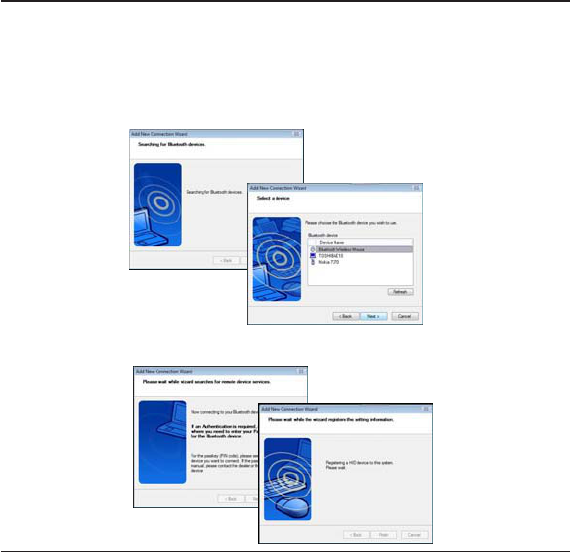
3. The computer will now search for the Bluetooth mouse and other Bluetooth devices.
Please wait until the search is completed. Choose the device you wish to connect.
There may be more than one Bluetooth device detected. Select Bluetooth Wireless
Mouse and click Next to continue. If the mouse is not detected, please make sure the
mouse is in discovery mode and click Refresh.
4. The computer will begin connecting with the device.
Targus Bluetooth Comfort Laser Mouse
14
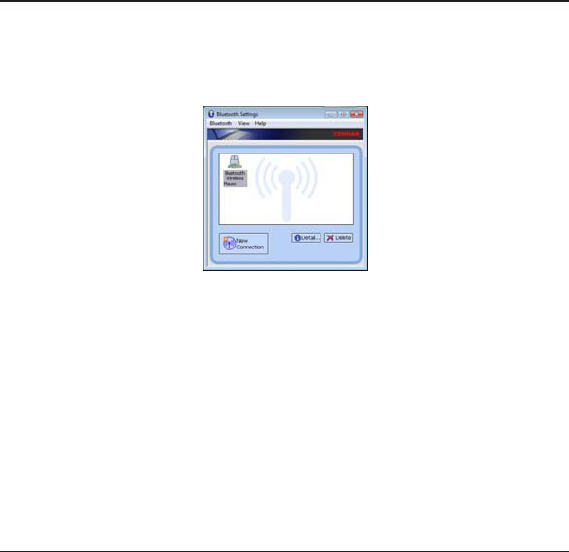
5. The connection is established and setup is complete. The device is ready to use. If
the connection is not successful, please click Back and search the device again. You
can continue to add other Bluetooth devices or close the window.
Targus Bluetooth Comfort Laser Mouse
15
Bluetooth Software: Mac
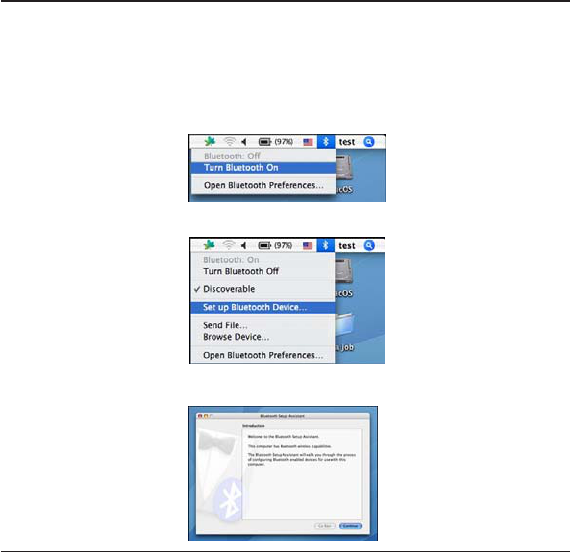
1. Go to the Bluetooth icon located on your desktop or in the system bar and click the
ICONTOBEGINSETUP3ELECTh4URN"LUETOOTH/NvTOACTIVATETHE"LUETOOTHFUNCTION
on your Mac.
3CROLLDOWNTHELISTANDSELECTh3ETUP"LUETOOTH$EVICEv
3. The Bluetooth Setup Assistant will begin. Please follow the on-screen instructions.
Targus Bluetooth Comfort Laser Mouse
16
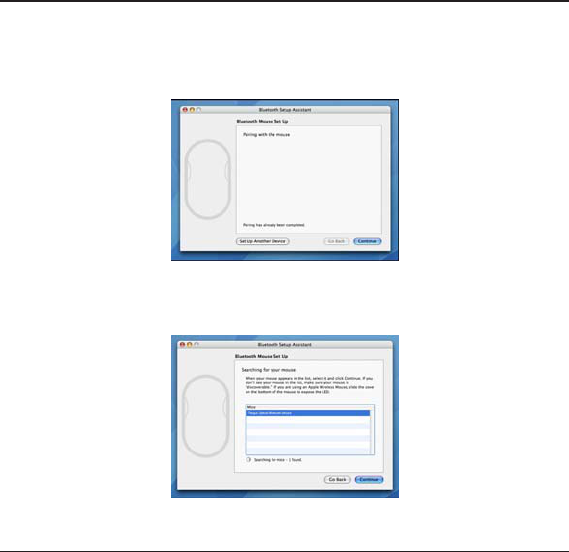
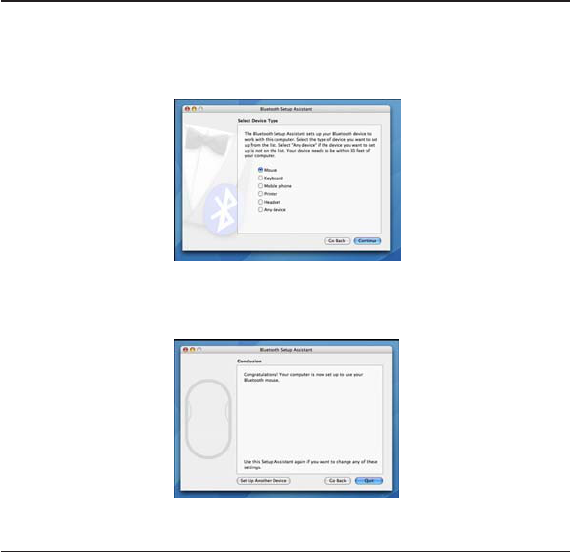
3ELECThMOUSEvANDCLICKCONTINUETOPROCEEDWITHSETUP9OURMOUSEWILLNEEDTOBE
INhDISCOVERYvMODETOCONNECT0OWERONTHE MOUSEANDIT WILLAUTOMACTICALLYGO
into discovery mode.
9OURCOMPUTERWILLBEGINTOSEARCHFORTHEMOUSE/NCETHEMOUSEISFOUNDITWILL
show up in the list. Highlight your mouse and press continue.
Targus Bluetooth Comfort Laser Mouse
17
6. The Bluetooth mouse will now begin pairing. Click continue to proceed.
7. Congratulations. Your Bluetooth mouse is setup and ready to use. You can choose to
SETUPANOTHERDEVICEORCLICK1UITTOEXITSETUP

Targus Bluetooth Comfort Laser Mouse
18
Programming Your Mouse
7INDOWS/NLY
/NCE INSTALLATION IS COMPLETE OPEN THE DRIVER SOFTWARE AND SELECT THE
desired setting for the scroll-wheel button. Close the driver software
application and you’re ready to go. Activate your selected feature by
pressing down on the scroll wheel.
To access the advanced scroll wheel features you will need to download
and install the software driver. This can be downloaded from the following
location:
6ISITwww.targus.com to download and install the driver.

Targus Bluetooth Comfort Laser Mouse
19
Troubleshooting
The mouse is not working.
s-AKESURETHATTHEPOLARITYOFTHEBATTERIESISCORRECT4HEPOSITIVEAND
negative (-) ends of each battery must match the positive (+) and negative (-)
connections in the battery housing.
s-AKESURETHEBATTERIESARECHARGED2ECHARGEORREPLACEIFNECESSARY
s6ERIFYTHATTHECOMPUTERIS"LUETOOTHENABLED
s6ERIFYTHATTHEDEVICEDRIVERSAREINSTALLED
1. Click Start/ Settings/ Control Panel/ System/ Hardware/ Device Manager
#HECKUNDERh"LUETOOTH$EVICESvTHATAh3OFT4OUCH"LUETOOTHvISINSTALLED
s0AIREDDEVICESAREALWAYSDISPLAYEDIN-Y"LUETOOTH0LACESEVENIFTHEMOUSEIS
out of range or not powered up.

Targus Bluetooth Comfort Laser Mouse
20
Regulatory Compliance
Technical Support
For technical questions, please visit:
Product Registration
Warranty
4HIS DEVICE COMPLIES WITH 0ART OF THE &## 2ULES /PERATION IS SUBJECT TO THE
following two conditions: (1) This device may not cause harmful interference, and (2)
This device must accept any interference received, including interference that may
cause undesired operation.
US Internet: www.targus.com/support.asp
Australia Internet: www.targus.com/au
Email: infoaust@targus.com
Telephone: 1800-641-645
New Zealand Telephone: 0800-633-222
Targus recommends that you register your Targus accessory shortly after purchasing
it. Go to:
http://www.targus.com/registration.asp
You will need to provide your full name, email address, country of residence and
product information.
Targus warrants this product to be free from defects in materials and workmanship
for one year. If your Targus accessory is found to be defective within that time, we will
promptly repair or replace it. This warranty does not cover accidental damage, wear
and tear, or consequential or incidental loss. Under no conditions is Targus liable for
loss of, or damage to devices; nor loss of, or damage to, programs, records, or data;
nor any consequential or incidental damages, even if Targus has been informed of
their possibility. This warranty does not affect your statutory rights.
FCC Statement
This equipment has been tested and found to comply with the limits for a Class B digital device,
pursuant to part 15 of the FCC rules. These limits are designed to provide reasonable protection
against harmful interference in a residential installation. This equipment generates, uses and can
radiate radio frequency energy and, if not installed and used in accordance with the instructions,
may cause harmful interference to radio communications. However, there is no guarantee that
interference will not occur in a particular installation. If this equipment does cause harmful
interference
to radio or television reception, which can be determined by turning the equipment off and on, the
user is encouraged to try to correct the interference by one or more of the following measures:
-Reorient or relocate the receiving antenna.
-Increase the separation between the equipment and receiver.
-Connect the equipment into an outlet on a circuit different from that to which the receiver is
connected.
-Consult the dealer or an experienced radio/TV technician for help.
To assure continued compliance, any changes or modifications not expressly approved by the party
responsible for compliance could void the user’s authority to operate this equipment. (Example- use
only shielded interface cables when connecting to computer or peripheral devices).
FCC Radiation Exposure Statement
This equipment complies with FCC radiation exposure limits set forth for an uncontrolled
environment and it also complies with Part 15 of FCC RF Rules. Operation is subject to the
following two conditions:
1) This device may not cause interference and
2) This device must accept any interference, including interference that may cause undesired
operation of the device.
Caution!
The manufacturer is not responsible for any radio or TV interference caused by unauthorized
modifications to this equipment. Such modifications could void the user authority to operate the
equipment.
Canada Statement
This Device complies with RSS-210 of the IC Rules, Operation is subject to the following two
conditions:
(1). This device may not cause interference and
(2). This device must accept any interference received,, including interference that may cause
undesired operation.
Declaration of Conformity
Hereby, Targus, declares that this device is in compliance with the essential requirements and other
relevant provisions of Directive 1999/5/EC.
Targus Bluetooth Comfort Laser Mouse
22
,!3%22!$)!4)/.$/./434!2%).4/4(%"%!-/26)%7 $)2%#4,97)4(
/04)#!,).3425-%.43#,!33),!3%202/$5#4
.%6%20/).4!,!3%2"%!-).4/!0%23/.3%9%3/26)%7!,!3%2"%!-
$)2%#4,9!302/,/.'%$%80/352%#!."%(!:!2$/534/4(%%9%3
-/-%.4!29%80/352%&2/-!,!3%20/).4%235#(!3!.).!$6%24%.4
37%%0/&4(%,)'(4!#2/33!0%23/.3%9%3-!9#!53%4%-0/2!29
&,!3( ",).$.%33 3)-),!2 4/ 4(% %&&%#4 /& ! #!-%2! &,!3( "5,"
!,4(/5'( 4()3 #/.$)4)/. )3 4%-0/2!29 )4 #!. "%#/-% -/2%
$!.'%2/53 )&4(% %80/3%$ 0%23/. )3 %.'!'%$ ). !6)3)/.#2)4)#!,
!#4)6)4935#(!3$2)6).'
CAUTION