Targus 000024 Targus Mouse Receiver User Manual
Targus Group International, Inc. Targus Mouse Receiver
Targus >
User Manual

User Guide
410-1923-001A / AMW55US
N2953
1 YEAR LIMITED WARRANTY: We pride ourselves
on the quality of our products. For complete warranty
details and a list of our worldwide ofces, please visit
www.targus.com. Features and specications are
subject to change without notice. Microsoft, Windows
and Windows Vista are registered trademarks or
trademarks of Microsoft Corporation in the United
States and/or other countries. Mac is a trademark of
Apple Inc., registered in the U.S. and other countries.
Logitech is a registered trademark of Logitech
International in the United States and other countries.
All trademarks and registered trademarks are the
property of their respective owners. ©2010 Targus
Group International, Inc.
WIRELESS COMPACT
LASER MOUSE

Targus Wireless Compact Laser Mouse
2
Targus Wireless Compact Laser Mouse
3
Introduction
Thank you for your purchase of the Targus Wireless Compact Laser Mouse.
The accompanying micro USB receiver is small enough to leave plugged into
your computer or simply store it inside the mouse when travelling. This is a
plug and play device so no additional software is required.
System Requirements
Hardware
• USB port
Operating System
• Microsoft Windows® 2000
• Microsoft Windows® XP
• Microsoft Windows Vista®
• Microsoft Windows® 7
• Mac OS® X 10.4 or later
Contents
• Targus Wireless Compact Laser Mouse
• 2 x AAA Energizer® MAX® Batteries
• Micro USB Receiver
• User Guide
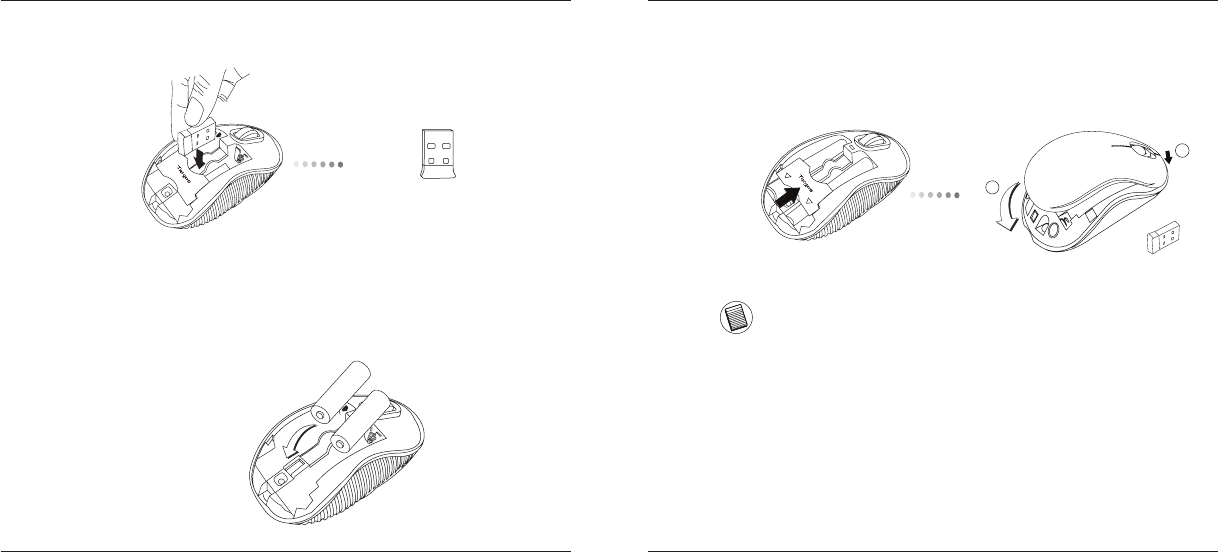
1. Remove the battery cover from the top of the mouse by using the notch
on the back. Carefully lift the cover up as shown in the diagram.
Installing the Batteries
2. Remove the battery safety clip by squeezing the center of the clip and
sliding it back, towards the rear of the mouse. Lift up and rotate the
clip out of the way.
NOTE: THE BATTERY SAFETY CLIP WILL NEED TO BE IN THE SECURE, LOCKED POSITION
BEFORE THE BATTERY COVER CAN BE PUT BACK IN PLACE.
Targus Wireless Compact Laser Mouse
4
Targus Wireless Compact Laser Mouse
5
3. Remove the micro USB receiver stored inside the center compartment .
Micro USB receiver
4. Insert the two AAA batteries, making sure that the positive (+) and negative
(-) ends of each battery match the polarity indicators inside the battery
compartment.
5. Replace the battery safety clip by sliding it forward until it clicks into
place and then replace the battery cover.
1
2
NOTE: THE FRONT OF THE LID SHOULD BE INSERTED FIRST BEFORE SNAPPING THE
BACK OF THE LID DOWN.
Targus Wireless Compact Laser Mouse
6
Targus Wireless Compact Laser Mouse
7
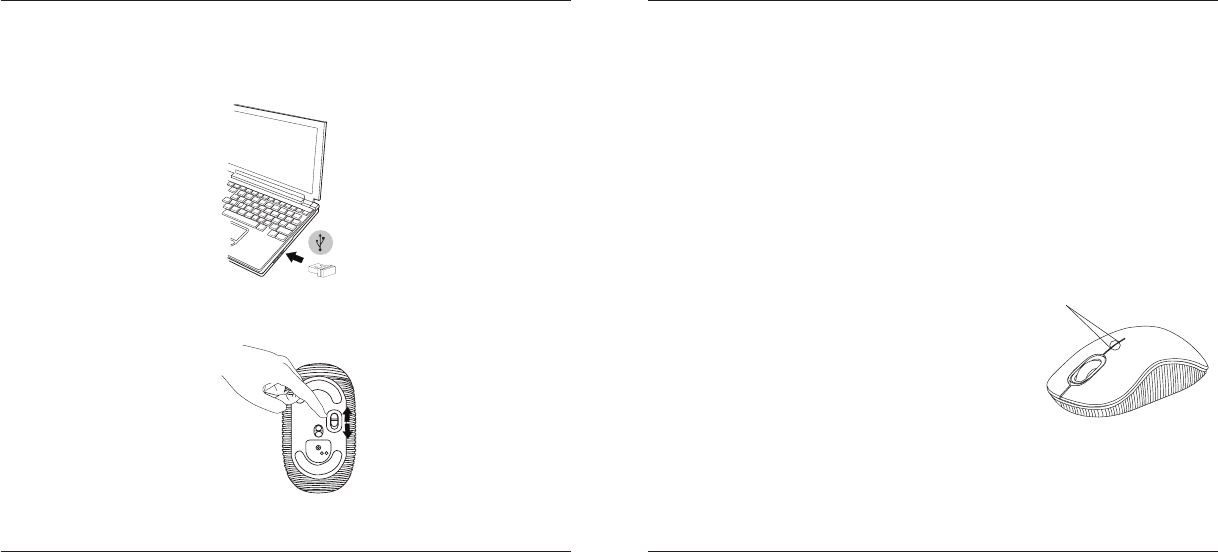
(B) Turn on the mouse by sliding the power switch to the ON position, located
on the bottom of the mouse.
This mouse is a plug and play device. It will automatically operate when
the USB receiver is connected to the computer.
(A) Plug the USB receiver into an available USB port on your computer.
Establishing the Connection
Power Saving mode:
After an extended period of time, if the mouse is not used, it will automatically
enter power saving mode to conserve power and increase battery life. Click
on any mouse button or simply move the mouse to resume the normal opera-
tion. The mouse may take a few seconds to reconnect with your computer.
ON
OFF
Power On:
Slide the power switch to the ON position.
Power Off:
Slide the power switch to the OFF position.
Battery Life Indicator
Power Management
• To extend the life of your battery, turn off the mouse while travelling or when
you’re not using it.
• When the mouse is turned on, the LED
illuminates for 3 seconds and then fades
out
• The low power light will start ashing every
3 seconds when less than 5% of the battery
power remains. Replace the batteries as
soon as possible”
Battery Life Indicator

Targus Wireless Compact Laser Mouse
8
Targus Wireless Compact Laser Mouse
9
Regulatory Compliance
This device complies with Part 15 of the FCC Rules. Operation is subject to the
following two conditions: (1) This device may not cause harmful interference, and (2)
This device must accept any interference received, including interference that may
cause undesired operation.
Technical Support
For technical questions, please visit:
Product Registration
Targus recommends that you register your Targus accessory shortly after purchasing
it. Go to:
http://www.targus.com/registration.asp
You will need to provide your full name, email address, country of residence and
product information.
Warranty
Targus warrants this product to be free from defects in materials and workmanship
for one year. If your Targus accessory is found to be defective within that time, we will
promptly repair or replace it. This warranty does not cover accidental damage, wear
and tear, or consequential or incidental loss. Under no conditions is Targus liable for
loss of, or damage to devices; nor loss of, or damage to, programs, records, or data;
nor any consequential or incidental damages, even if Targus has been informed of
their possibility. This warranty does not affect your statutory rights.
US Internet: www.targus.com/support.asp
Australia Internet: www.targus.com/au
Email: infoaust@targus.com
Telephone: 1800-641-645
New Zealand Telephone: 0800-633-222
FCC Statement
Tested to Comply
This equipment has been tested and found to comply with the limits of a Class
B digital device, pursuant to Part 15 of the FCC Rules. These limits are designed
to provide reasonable protection against harmful interference in a residential
installation. This equipment generates, uses, and can radiate radio frequency
energy and if not installed and used in accordance with the instructions, may cause
harmful interference to radio communications. However, there is no guarantee that
interference will not occur in a particular installation. If this equipment does cause
harmful interference to radio or television reception, which can be determined
by turning the equipment off and on, the user is encouraged to try to correct the
interference by one or more of the following measures:
• Reorient or relocate the receiving antenna;
• Increase the separation between the equipment and receiver;
• Connect the equipment into an outlet on a circuit different from that to which the
receiver is connected;
• Consult the dealer or an experienced radio/TV technician for help.
Changes or modications not authorized by the party responsible for compliance
could void the user’s authority to operate this product.
Declaration of Conformity
Hereby, Targus, declares that this device is in compliance with the essential
requirements and other relevant provisions of Directive 1999/5/EC.
Compliance with 21 CFR 1040.10 and 1040.11 except for deviations pursuant to
Laser Notice No. 50, dated June 24, 2007

Targus Wireless Compact Laser Mouse
10
Targus Wireless Compact Laser Mouse
11
Microsoft, Windows, and Windows Vista are either registered trademarks or trademarks of Microsoft Corporation in the
United States and/or other countries. All trademarks and registered trademarks are the property of their respective owners.
All rights reserved. Features and specications are subject to change without notice. © 2009. Targus Group International,
Inc. and Targus, Inc., Anaheim, CA 92806 USA
LASER RADIATION. DO NOT STARE INTO THE BEAM OR VIEW DIRECTLY WITH
OPTICAL INSTRUMENTS. CLASS I LASER PRODUCT.
NEVER POINT A LASER BEAM INTO A PERSON’S EYES OR VIEW A LASER BEAM
DIRECTLY, AS PROLONGED EXPOSURE CAN BE HAZARDOUS TO THE EYES.
MOMENTARY EXPOSURE FROM A LASER POINTER, SUCH AS AN INADVERTENT
SWEEP OF THE LIGHT ACROSS A PERSON’S EYES, MAY CAUSE TEMPORARY
FLASH BLINDNESS SIMILAR TO THE EFFECT OF A CAMERA FLASH BULB.
ALTHOUGH THIS CONDITION IS TEMPORARY, IT CAN BECOME MORE
DANGEROUS IF THE EXPOSED PERSON IS ENGAGED IN A VISION-CRITICAL
ACTIVITY SUCH AS DRIVING.
CAUTION