Targus 000051 Targus wireless USB Receiver User Manual 410 2409 001A AMW060US 11Nov4
Targus Group International, Inc. Targus wireless USB Receiver 410 2409 001A AMW060US 11Nov4
Targus >
User Manual

Quick Start Guide
Technical Support
For technical questions, please visit:
US
Internet: www.targus.com/support.asp
Australia
Internet: www.targus.com/au
Email: infoaust@targus.com
Telephone: 1800-641-645
New Zealand
Telephone: 0800-633-222
Product Registration
Targus recommends that you register your Targus accessory shortly
after purchasing it.
Go to: http://www.targus.com/registration.asp
You will need to provide your full name, email address, phone number,
and company information (if applicable).
Warranty
Targus warrants this product to be free from defects in materials and
workmanship for one year. If your Targus accessory is found to be
defective within that time, we will promptly repair or replace it. This
warranty does not cover accidental damage, wear and tear, or
consequential or incidental loss. Under no conditions is Targus liable for
loss of, or damage to a computer; nor loss of, or damage to, programs,
records, or data; nor any consequential or incidental damages, even if
Targus has been informed of their possibility. This warranty does not
affect your statutory rights.
Regulatory Compliance
FCC Statement
Tested to Comply
AMW060US / 410-2409-001A
This equipment has been tested and found to comply with the limits of a Class B digital
device, pursuant to Part 15 of the FCC Rules. These limits are designed to provide
reasonable protection against harmful interference in a residential installation. This
equipment generates, uses, and can radiate radio frequency energy and if not installed
and used in accordance with the instructions, may cause harmful interference to radio
communications. However, there is no guarantee that interference will not occur in a
particular installation. If this equipment does cause harmful interference to radio or
television reception, which can be determined by turning the equipment off and on, the
user is encouraged to try to correct the interference by one or more of the following
measures:
• Reorient or relocate the receiving antenna;
• Increase the separation between the equipment and receiver;
• Connect the equipment into an outlet on a circuit different from that to
which the receiver is connected;
• Consult the dealer or an experienced radio/TV technician for help.
Changes or modifications not authorized by the party responsible for compliance
could void the user’s authority to operate this product.
Microsoft, Windows®, and Windows Vista™ are either registered trademarks or trademarks of Microsoft Corporation in the United States and/or other countries. All trademarks and
registered trademarks are the properties of their respective owners. All rights reserved. Features and specifications subject to change without notice. © 2011, Targus Group
International, Inc. and Targus, Inc., Anaheim, CA 92806 USA.
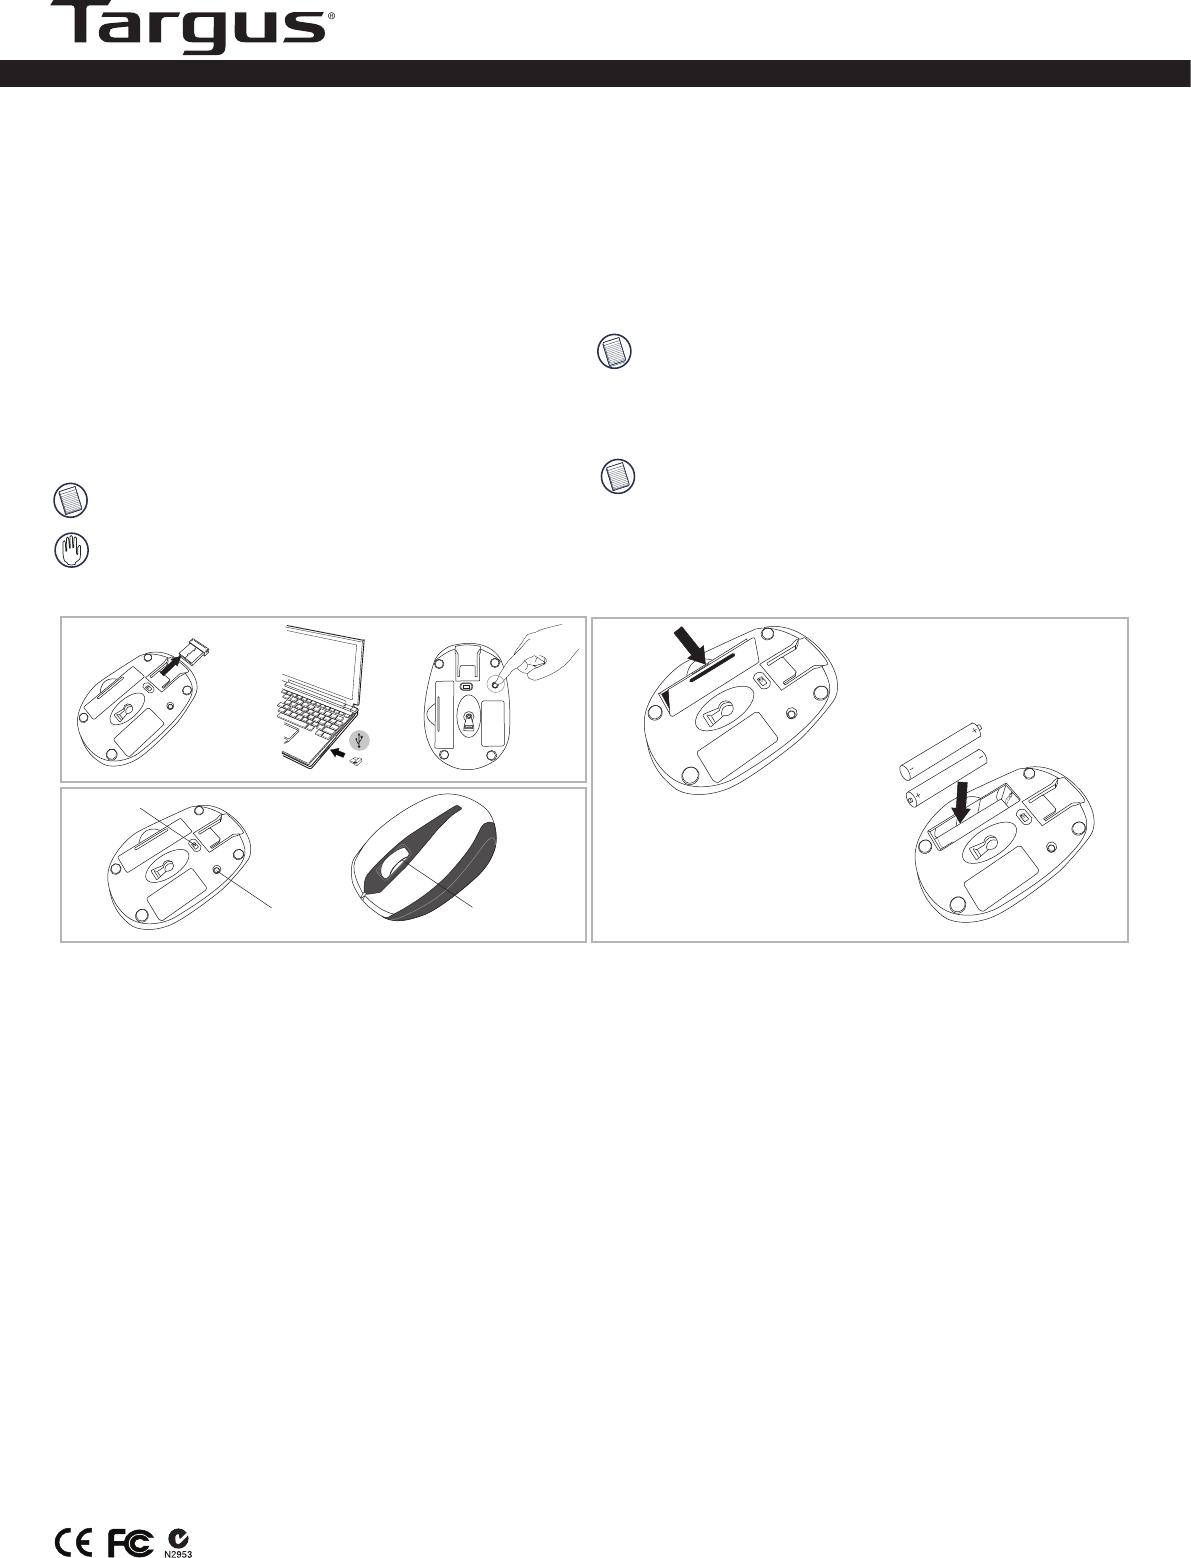
1 Remove the battery cover from the back of the mouse.
2 Insert the supplied batteries, making sure that the positive
(+) and negative (-) ends of each battery match the polarity
indicators inside the battery housing.
3 Replace the battery cover into position until it “clicks” firmly
into place.
Using the Mouse
Installing the Batteries
(A) Remove the USB receiver from the bottom of the mouse.
(B) Plug the USB receiver into an available USB port on your
computer.
(C) Press the Connect Button on the bottom of the mouse.
You are now ready to use the mouse.
WARNINGS: WHEN REPLACING THE BATTERIES, YOU MAY USE
ALKALINE OR OTHER HEAVY-DUTY NIMH BATTERIES. NEVER USE AN
ALKALINE WITH A NIMH BATTERY IN A DEVICE. AVOID MIXING NEW AND
USED BATTERIES IN A DEVICE.
Safety Measures
Never point the optical sensor toward the face, particularly the eyes, to
avoid possible injury.
NOTE: WHILE THE MOUSE IS FUNCTIONING, OPTICAL LIGHT IS VISIBLE TO
THE NAKED EYE. BE CAREFUL NOT TO LOOK DIRECTLY INTO THE EMITTER
HOLE WHILE THE MOUSE IS ACTIVE.
Power On:
Slide the power button to ON position.
Power Off:
Slide the button to OFF position.
Power Saving Mode:
After an extended period of time, if the mouse is not used, it will
automatically enter power saving mode to conserve power and
increase battery life. Click on any mouse button to resume the
normal operation. The mouse may take a few seconds to reconnect
with your computer.
NOTE: TO EXTEND THE LIFE OF YOUR BATTERY, TURN OFF THE MOUSE
WHILE TRAVELLING OR WHEN YOU’RE NOT USING IT.
NOTE: YOU MUST ESTABLISH A CONNECTION LINK EVERY TIME YOU
CHANGE THE BATTERIES.
1.
2.
This device complies with Part 15 of the FCC Rules. Operation is subject to the
following two conditions: (1) This device may not cause harmful interference, and
(2) This device must accept any interference received, including interference that
may cause undesired operation.
(C)
(B)
(A)
• Hardware - USB port
• Windows 2000/ XP/ 7
• Windows Vista
• Mac OS X 10.4 (or later)
System Requirements
Optical Wireless Mouse
®
®
ON/OFF switch
Connect Button
connect
OFF ON
connect
OFF ON
connect
OFF ON
connect
OFF ON
AAA
AAA
OFF ON Connect
®
Battery Life Indicator
The low power light will start flashing when less than 5% of the battery
power remains. Replace the batteries as soon as possible.
Battery Life Indicator
AMW060-A / AMW060R-A
Targus Wireless Mouse/Targus wireless USB Receiver