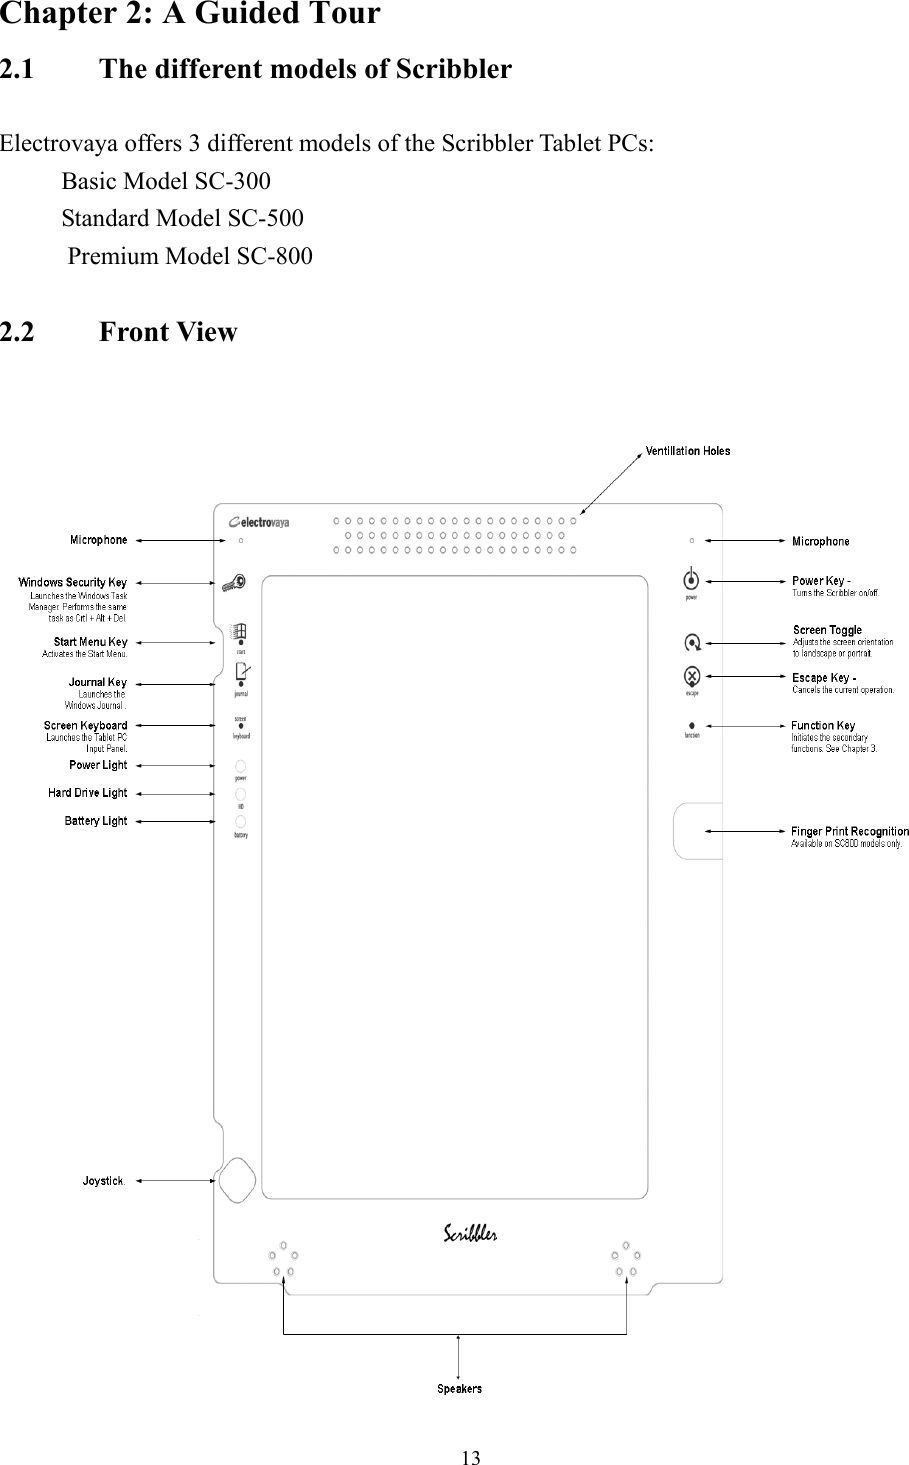
Tatung TABLETSC800 Tablet PC User Manual Manual

Tatung Company Tablet PC Manual

Manual

    1
Federal Communication Commission Interference Statement  This equipment has been tested and found to comply with the limits for a Class B digital device, pursuant to Part 15 of the FCC Rules.    These limits are designed to provide reasonable protection against harmful interference in a residential installation.  This equipment generates, uses and can radiate radio frequency energy and, if not installed and used in accordance with the instructions, may cause harmful interference to radio communications.   However, there is no guarantee that interference will not occur in a particular installation.    If this equipment does cause harmful interference to radio or television reception, which can be determined by turning the equipment off and on, the user is encouraged to try to correct the interference by one of the following measures:  -  Reorient or relocate the receiving antenna. -  Increase the separation between the equipment and receiver. -  Connect the equipment into an outlet on a circuit different from that to which the receiver is connected. -  Consult the dealer or an experienced radio/TV technician for help.  FCC Caution: Any changes or modifications not expressly approved by the party responsible for compliance could void the user's authority to operate this equipment.  This device complies with Part 15 of the FCC Rules. Operation is subject to the following two conditions: (1) This device may not cause harmful interference, and (2) this device must accept any interference received, including interference that may cause undesired operation.   IMPORTANT NOTE: FCC Radiation Exposure Statement: This equipment complies with FCC radiation exposure limits set forth for an uncontrolled environment.   This transmitter must not be co-located or operating in conjunction with any other antenna or transmitter.   2
 FEDERAL COMMUNICATION COMMISSION INTERFERENCE STATEMENT ___ 2 SAFETY INFORMATION______________________________________________ 7 PREFACE _________________________________________________________ 9 CHAPTER 1: INTRODUCING THE SCRIBBLER__________________________ 10 1.1   Inventory Checklist ______________________________________________________________ 10 1.2    Scribbler Features ________________________________________________________________ 10 CHAPTER 2: A GUIDED TOUR _______________________________________ 13 2.1   The different models of Scribbler ___________________________________________________ 13 2.2   Front View ______________________________________________________________________ 13 2.2.1 Shortcut Keys__________________________________________________________________ 14 2.2.2 Indicator Lights ________________________________________________________________ 14 2.3  Back View _____________________________________________________________________ 15 2.4  Top Panel View _________________________________________________________________ 15 2.6   Right-Side Panel View ____________________________________________________________ 17 2.5 Bottom Panel View ___________________________________________________________________ 18 CHAPTER 3: SHORTCUT & FUNCTION KEYS___________________________ 19 3.1   Using the Shortcut Keys on the Front Panel _________________________________________ 19 3.2  Using the Function Key __________________________________________________________ 20 3.2.1   Default Combinations ___________________________________________________________ 20 3.2.2 Assigning a shortcut_____________________________________________________________ 20 CHAPTER 4: GETTING STARTED_____________________________________ 22 4.1   Connecting the AC Adaptor________________________________________________________ 22  3
4.2   Turning on the power _____________________________________________________________ 22 4.3   Turning off the power_____________________________________________________________ 23 4.4   The Battery _____________________________________________________________________ 25 4.4.1    How to Determining the remaining battery power _______________________________________ 25 4.4.2    How to Charge the Battery_________________________________________________________ 25 4.4.3 Approximate Charging Time ______________________________________________________ 25 4.5  The Stylus _____________________________________________________________________ 26 4.5.1 How to Use the Stylus ___________________________________________________________ 26 4.5.2 The “Right - Click” button________________________________________________________ 26 4.5.3   Calibrating the Screen for Stylus Accuracy __________________________________________ 27 4.5.4 Changing the Stylus Tips _________________________________________________________ 27 4.5.5 Joystick ______________________________________________________________________ 30 4.6   Putting the Scribbler in Standby Mode______________________________________________ 30 4.7  The Screen _____________________________________________________________________ 31 4.7.1   Adjusting the Screen Brightness ___________________________________________________ 31 4.7.2 Selecting Screen Orientation ______________________________________________________ 32 4.8  Connecting Accessories___________________________________________________________ 33 4.8.1 Connecting an external USB Mouse ________________________________________________ 33 4.8.2   Connecting an external USB Keyboard _____________________________________________ 33 4.8.3  Connecting a Printer and Setting it up ______________________________________________ 33 4.8.4   Connecting the Modem _________________________________________________________ 34 4.8.5  Connecting to a Phone Line______________________________________________________ 34 4.8.6   Connecting to a network ________________________________________________________ 34 4.8.7 Connecting to an external USB diskette drive _________________________________________ 34 CHAPTER 5: GETTING TO KNOW THE SCRIBBLER _____________________ 35 5.1 Creating User Accounts ___________________________________________________________ 35 5.2  Setting up Passwords ________________________________________________________________ 35 5.3 Saving__________________________________________________________________________ 36 5.4  Printing your Work _________________________________________________________________ 36 5.5    Backing Up your Work ______________________________________________________________ 36  4
5.6 Setting Up Communication ____________________________________________________________ 37 5.6.1 Connection Your Computer to a Network ____________________________________________ 37 5.7 Overview – How to use the Internet _________________________________________________ 37 5.7.1 The Internet ___________________________________________________________________ 37 5.7.2    The World Wide Web _____________________________________________________________ 38 5.7.3 ISP’S (Internet Service Providers) ____________________________________________________ 38 5.7.4 Connecting to the Internet ___________________________________________________________ 38 5.7.5 Surfing the Internet ________________________________________________________________ 38 5.7.6  Internet Features_________________________________________________________________ 39 5.7.7 Uploading and downloading _________________________________________________________ 39 5.8 Adding a Memory Module_________________________________________________________ 39 5.9  Removing a Memory Module _________________________________________________________ 40 5.10   Using External Display Devices _____________________________________________________ 40 5.11  Transferring Files__________________________________________________________________ 41 5.12 Inserting a PC Card ______________________________________________________________ 41 5.13   Removing a PC Card ____________________________________________________________ 41 5.14 Using the Audio Features __________________________________________________________ 41 5.14.1 Playing Audio Files _______________________________________________________________ 42 5.15 Recording Sounds ________________________________________________________________ 42 5.16   Using a Microphone _____________________________________________________________ 42 5.17    Inserting a CF (Compact Flash) Card _________________________________________________ 43 5.18 Removing a CF Card _____________________________________________________________ 43 5.19 Biometrics – Fingerprint _____________________________________________________________ 43 CHAPTER 6: SCRIBBLER MAINTENANCE _____________________________ 44 6.1 The Battery _____________________________________________________________________ 44 6.1.1 How to Charge the Battery________________________________________________________ 44 6.1.2 Troubleshooting ________________________________________________________________ 44 6.1.3 Approximate Charging Time ______________________________________________________ 44  5
6.1.4 How to Determining the remaining battery power______________________________________ 45 6.1.5 Charging a drained battery________________________________________________________ 45 6.2  Cleaning the Scribbler ___________________________________________________________ 46 6.3   Protecting the Scribbler ___________________________________________________________ 46 6.4   Battery Maintenance _____________________________________________________________ 46 6.5  Battery Safety Precautions________________________________________________________ 47 6.6 Software Recovery ___________________________________________________________________ 47 7.1 Simple problems _________________________________________________________________ 51 7.1.1    Power and the Battery ____________________________________________________________ 52 7.2 Problems that may occur when you power on the Scribbler______________________________ 52 7.3 WINDOWS Operating System Problems___________________________________________ 53 7.4  Windows XP Operating System Assistance ______________________________________________ 54 7.5  Software Recovery __________________________________________________________________ 54 There will be two (2) recovery CD’s sent with each system.    Please refer to the chart below for the appropriate procedure. __________________________________________________________________ 54 7.6    Resolving a Hardware Conflict________________________________________________________ 55 7.7    Fixing a device problem with Device Manager ___________________________________________ 55 7.8 Help and Support ________________________________________________________________ 56 7.9 Troubleshooting Checklist _________________________________________________________ 57 LIMITED WARRANTY _______________________________________________ 60 FCC COMPLIANCE_________________________________________________ 61       6
Safety Information Messages are used in this manual to bring important information to your attention.    Be aware of the following two symbols used in this user manual.   Each symbol indicates important and helpful information that will benefit you while using the tablet PC.       Warning! This symbol informs you that improper use of equipment or failure to follow instructions may cause property damage or bodily injury.   Note!   This symbol offers advice that helps you to take full advantage of the Tablet PC.  *  To preserve your Scribbler Tablet PC in the best possible condition, please follow the safety measures below.     Warning!   Never remove the rear cover of the PC. Some PC parts contain high voltage.      To remove or replace the battery pack, always contact an authorized Electrovaya service provider.    Warning! Never attempt to disassemble, tamper with or repair the PC. This may cause a fire, electric shock, serious physical injury, or death.    Always contact an authorized Electrovaya service provider for appropriate assistance.  Warning! Never leave the plastic bags used for packaging the PC or any of its components in places where children or infants may access them to prevent possible suffocation.   Warning! Never allow any liquids to spill into any part of the Scribbler and never expose the PC to rain, water, seawater or moisture. This will avoid any risk of electric shock, fire or other damage to the unit.    If the unit does get wet, unplug the AC Adapter (if any) and immediately shut off the Scribbler. Leave the Scribbler turned off overnight to give it time to dry out before you use it again. If there are further problems call an authorized Electrovaya service provider or dial our help center for assistance.    7
  Warning! If the PC has been dropped, or if you detect the emission of smoke, unusual odor or excessive heat, immediately unplug the AC Adaptor (if any) and shut off the Scribbler.   Contact an authorized Electrovaya service provider for appropriate assistance.                     8
Preface  Congratulations on your purchase of the Scribbler Tablet PC. This powerful tablet combines the versatility of a pen and paper with the functionality of a laptop to bring you a truly mobile tool for your work and personal use. Its design gives you easy access for retrieving and entering information using the latest Windows-based applications.     9
Chapter 1: Introducing the Scribbler 1.1   Inventory Checklist Carefully unpack your Scribbler. Below is a checklist of all the items you should find packaged with your new product.               ○2○3 ○5○6                          ○1  Tablet PC  ○2  Stylus  ○3  Mini VGA Cable ○4  AC Adapter ○5  AC Power Cord  ○6  Soft Cleaning Cloth ○7  User Manual  ○8  Recover CD  * Also included (not shown) is a box   ○1○4    with extra Stylus tips    1.2    Scribbler Features   Processor The Scribbler is equipped with an Intel® Pentium® III mobile processor with a speed of either 733MHz or 866MHz, depending on the model. The 733 MHz processor can be found in the SC300 model and the 866 MHz in both the SC500 and SC800 models.    Memory Three memory sizes are available: •  256 MB is built into the SC 300 model •  512 MB is built into the SC 500 and SC 800 models •  768 MB is an optional expansion on all three models      Power The Scribbler is powered by Electrovaya’s patented rechargeable Lithium-ion SuperPolymer battery pack. This battery provides the most power for its volume in the  10
world. It will give you between 8-16 hours of runtime depending on the battery pack.  Display   The computer’s LCD panel supports extra-high-resolution video graphics of up to 123 dpi (dots per inch). The XGA screen provides maximum resolution of 768 X 1024.    *      Note!   Avoid putting any objects on the screen.    *   Note!   You need to view the PC screen from 15” to 18” away for best viewing.  *   Note! For comfortable viewing and glare reduction, keep the PC screen away from direct sunlight and other powerful sources of light.  *   Note!   Avoid touching the screen with your fingers, because skin oils are hard to remove.  Video Card The internal video card is an Intel 830 MG. 48 MB is provided for video display. The video card will translate what the processor produces into a form that the monitor can display. The video card, along with the monitor, determine the quality of the image you see when you use your PC. This has an important impact on how comfortable the PC is to use. Poor quality video cards don't allow for sufficiently high refresh rates, causing eyestrain and fatigue  Wireless LAN Scribbler has a built-in LAN. 802.11b mini-PCI module that is compatible with other LAN systems based on Direct Sequence Spread Spectrum radio technology. It supports data transfer up to 11 Mbits/s. It has Frequency Channel Selection at 2.4GHz and allows roaming over multiple channels.       Software  Windows XP Tablet PC Edition with supported note taking, ink annotation, Ink &  11
Handwriting recognition, speech recognition and On-Screen keyboard.    It has the ability to support all software that is designed to work with Windows XP Tablet Edition.                                                          Additional preinstalled software and external software is available. See your software manual for instructions.  Hard Drive The Scribbler comes pre-installed with either a 20GB or 30GB hard drive, depending on the model. The SC 300 model has a 20 GB HDD. The SC 500 and the SC 800 models have a 30GB HDD.   12
Chapter 2: A Guided Tour   2.1   The different models of Scribbler        Electrovaya offers 3 different models of the Scribbler Tablet PCs:       Basic Model SC-300   Standard Model SC-500             Premium Model SC-800  2.2   Front View    13
2.2.1 Shortcut Keys     Start Menu Key activates the Start Menu.  Journal Key launches the Windows Journal application.      Power Key turns on/off the PC.  Windows Security Key launches the Windows Task Manager.  It performs the same task as Ctrl + Alt +Del.  Screen Keyboard launches the Tablet PC Input Panel.  Screen Rotational Key changes the screen display in four different directions  Escape Key cancels the current operation  Function Key initiates the secondary functions. See Chapter 3.  Please refer to Chapter 3 for a further discussion of these keys.  2.2.2 Indicator Lights  Power Indicator  Steady Green Light  Tablet PC is ON  Flashing Green Light  Tablet PC is in Standby Mode No Light  Tablet PC is OFF    Hard Drive Indicator  Flashing Green Light  Hard Drive is currently in use   Battery Indicator  Green Light  Battery is fully charged  Red Light  Battery is charging  Flashing Red Light  Low Battery  14
 No illumination    Battery not in use   2.3   Back View     Warning! Never open the back or remove any tablet panels except those that are designed to be opened by the user (eg. Rubber panels to access ports) in order to prevent the risk of fire possibly resulting in death or serious physical injury.  Warning!   Never remove the rear cover of the PC. Some PC parts contain high voltage. Risks include fire, possibly resulting in serious physical injury or death.      2.4   Top Panel View This is the top view of the Scribbler after you have removed the rubber panels used to protect the ports.          Note!  Keep the protective rubber in place when not using the ports.   15
 Lock Hole This hole serves as a security option. External locks, available from a local retailer, can be used to secure the Scribbler to discourage theft.  Air Cooling Holes Air cooling holes provide ventilation to keep the computer’s processor from overheating. The vent lets the processor continue performing at its maximum speed.  IEEE 1394 The IEEE 1394 (Firewire) 1394 is a high-speed serial bus which provides enhanced PC connectivity for consumer electronics audio/video (A/V) appliances, storage peripherals, other PCs, and portable devices.  Universal Serial Bus There are two Universal Serial Bus (USB) 1.1 ports. The USB gives you a single, standardized, easy-to-use way to connect a large number of devices to a computer.    You can connect such devices as external drives, keyboards, mice, USB storage drives, printers and joysticks.  Note! Keep foreign objects out of the USB connectors.    A pin or similar objects can damage the Scribbler’s circuitry.  PCMCIA This slot is for type II PC cards for plugging in additional communication devices such as external wireless cards, GPS modules, LAN and modem.  Note!    Keep foreign objects out of the PC Card Slot.    A pin or similar object can damage the computer’s circuitry.      Compact Flash This slot is for plug-in devices with a type II compact Flash form factor. These devices may include external memory and wireless modules.   Stylus Holder This convenient slot allows you to store the stylus when it is not in use to prevent it from getting misplaced.   16
  2.6   Right-Side Panel View This is the Right side view of the Scribbler after you have removed the rubber panels used to protect the ports.    Note! Keep the protective rubber in place when not using the ports.    Ethernet Port – RJ 45 The Scribbler is equipped with a Ethernet LAN port.  Modem (56K)-RJ 11 An internal modem 56Kbps provides capability for data and fax communication.    It supports V.90.    The speed of data transfer and fax depends only on telephone line conditions.    It has a modem jack (RJ-11) for connecting to the telephone line.  Microphone Jack The 3.5 mm microphone jack enables the connection of a stereo microphone or three-conductor mini jack for audio input purposes. It also lets you connect an external monaural microphone or other audio input device. Connecting a microphone or other device to this jack automatically disables the internal microphone.      17
 Headphone Jack The 3.5 mm headphone jack lets you connect stereo headphones or other audio output devices. Connecting headphones or other devices to this jack automatically disables the internal speakers.   Universal Serial Bus There are two Universal Serial Bus (USB) 1.1 ports. The USB gives you a single, standardized, easy-to-use way to connect a large number of devices to a computer.    You can connect such devices as external drives, keyboards, mice, USB storage drives, printers and joysticks.  Note! Keep foreign objects out of the USB connectors.    A pin or similar objects can damage the Scribbler’s circuitry.  VGA Port (External Monitor) The analog VGA port supports VESA DDC2B compatible functions such as an external CRT computer monitor and supported projectors.   2.5 Bottom Panel View     AC adapter jack This jack allows you to power the Scribbler and to recharge the Scribbler battery.        18
Chapter 3: Shortcut & Function Keys 3.1    Using the Shortcut Keys on the Front Panel On the front panel are control keys. See Chapter 2, A Guided Tour. These keys provide a specific shortcut.    How to operate a shortcut: •  Press and briefly hold the stylus in the shortcut key •  The appropriate program should then activate  Please refer to Section 4.5.1 on how to operate a stylus.     Start Menu Key activates the Start Menu.  Journal Key launches the Windows Journal application.      Power Key turns on/off the PC.  Windows Security Key launches the Windows Task Manager.  It performs the same task as Ctrl + Alt +Del.  Screen Keyboard launches the Tablet PC Input Panel.  Screen Rotational Key changes the screen display in four different directions  Escape Key cancels the current operation  Function Key – initiates the secondary functions. See Chapter 3.2 below       19
3.2    Using the Function Key By using the function key in combination with a shortcut key you are able to activate a range of applications. These can include shortcuts to a program, open a file, or display a folder.  See Section 3.2.1 for predefined combinations. See Section 3.2.2 for user-defined combinations.    3.2.1   Default Combinations   Internet Explorer  Step1: Press and briefly hold the stylus to the Function Key Step2: Press and briefly hold the stylus to the Start Key  Increase Volume  Step1: Press and briefly hold the stylus to the Function Key Step2: Press and briefly hold the stylus to the Journal Key  Decrease Volume  Step1: Press and briefly hold the stylus to the Function Key Step2: Press and briefly hold the stylus to the Screen Keyboard Key  Microsoft Outlook  Step1: Press and briefly hold the stylus to the Function Key Step2: Press and briefly hold the stylus to the Rotate Key   3.2.2  Assigning a shortcut How to make a user-defined shortcut key:  1.  Go to the Start menu  2.  Go to Control Panel  3.  Click on the Tablet and Pen Settings or double click on the icon seen in figure 3.1  4.  Go to the Tablet Buttons tab  5.  Of the four Tablet Button options available in the box, select the action you wish to use as your key assignment.  You should see the four choices labeled as: figure 3.1 •  Fn+Hot1 Button •  Fn +Journal Button  20
•  Fn +Input Panel Button •  Fn +Rotate Button    5.  Tap on the    Change…  option.   6.    Select the desired secondary function from the Action scroll bar.    You have 54 different choices in which to choose from in that list.     7.  Confirm your selection by tapping     OK   .     *  Note!   Hot1 Button stands for the Start Menu button.  * Note! Of the 54 possible secondary functions you can select (seen in the change tablet button actions tab), Application 1 launches My Computer and Application 2 launches the Calculator.   21
Chapter 4: Getting Started 4.1    Connecting the AC Adaptor An AC Adaptor is included in your purchase of a Scribbler. Using this adaptor when you want to charge the battery or when you want to operate from AC power. It is also the fastest way to get started, because the battery pack will need to be charged before you can operate from battery power.  The AC adaptor can be connected to any power source supplying from 100 to 240 volts and 50 to 60 hertz.    CAUTION: Use of the wrong adaptor could damage your Scribbler Tablet PC. ELECTROVAYA assumes no liability for any damage in such an event.  Step 1: Connect the power cord to the AC adaptor.  Step 2: Connect the AC adaptor’s DC output to the DC IN input port on the bottom panel of the Scribbler.    Step 3: Plug the power cord into a wall power outlet. The AC adapter indicators should glow.               22
4.2    Turning on the power  To turn on the Scribbler:  1.  Make sure all external devices (such as the AC adaptor, if you plan to use AC power rather than battery power) are properly connected and ready.  2.  If an optional external diskette drive is connected, check that the drive is empty.  3.  In the upper right hand corner of the Scribbler is a power button. Press and hold your stylus into the power hole until the on/off light on the system indicator panel glows green – about one second.    4.  The preinstalled operating system will load automatically     CAUTION: When you turn on the Scribbler for the first time, don’t turn off the power again until the operating system has loaded completely.  CAUTION: Never turn off the computer while any of the drives are in use. Doing so may damage the media in use and result in loss of data.   4.3    Turning off the power Generally, it’s a good idea to turn off your Scribbler when you are not using it for a while.  If you are using the Scribbler for the first time, leave the computer plugged into a power source (even though the Scribbler is off). This will allow the battery to charge. When the battery light glows green, the battery is fully charged.  Guidelines •  If you have work in progress use the Hibernate command to save your  system settings to the hard disk. Then, when you turn on the computer again, you will  23
automatically return to where you left off. •  To leave the computer off for longer periods power off the computer. To do this, use the Shut Down command for the Windows® XP Professional operating system.    CAUTION: When the hard disk drive light on the system indicator panel is on, o not turn off the power. Doing so, may damage your hard disk.  There are 3 ways of turning off the Scribbler with your stylus.  METHOD 1:  1.  Go to the Start Menu on your Windows XP operating system 2.  Select Turn Off Computer 3.  Select Turn Off          METHOD 2: 1.  Quickly press the power button once with your stylus  2.  The following screen will appear:    3. Select Turn Off    24
METHOD 3:  1.  Press and hold the stylus to the power button for about 5 seconds.   Forcibly turning off the power to the Scribbler on a regular basis may damage the Tablet PC        4.4    The Battery For detailed information on your battery maintenance and operation please refer to Chapter 6.  4.4.1    How to Determining the remaining battery power The computer’s battery light gives you an indication of the battery’s current charge:  No illumination means the battery is not in use and the AC adapter is not connected. ♦ ♦ ♦ ♦ Green means the battery is fully charged. Amber means the battery is charging (AC Adapter connected). Flashing amber means the battery charge is low and it is time to recharge the battery or plug in the AC Adapter.  4.4.2    How to Charge the Battery When the battery indicator light flashes, less than half an hour of battery power remains. Plug the AC adapter into the Scribbler to charge the battery. See Section 4.1  4.4.3 Approximate Charging Time  It will take 5 hours to fully charge your battery when the unit is turned off and 6 hours when the unit is on and running.            25
4.5   The Stylus 4.5.1  How to Use the Stylus The stylus is a pointing device. Use it like you would a pen. With the stylus, you are able to move, delete, open folders on the screen, etc. See the table below:  Selecting an Object  •  place your stylus over the icon •  gently tap the screen Dragging an Object  •  place your stylus on the icon •  drag the stylus across the screen to the desired area      To select an object, and.    (a double tap may be required in certain instance).    Be careful not to push the button on the stylus at the same time.  4.5.2  The “Right - Click” button     The stylus has a button on body of the pen. This button acts as a ‘right’ click of a standard mouse.    As you can see below, initiating the button on the stylus will activate this function.     The scenario to the left appears when you initiate right-clicking function.       Follow the methods below to trigger three (3) typical mouse functions with your stylus.    Mouse Functions  Stylus Functions Double-left click  Double Tap Single-left click  Single Tap Right-click  Tap and Hold    26
*   Note! You can customize the pen settings so that speeds, double tap spatial tolerance can all be adjusted to your liking: 1. Go to Start 2.  Control Panel 3.  Tablet and Pen Settings 4. Select the Settings tab.  *   Note! You can also access Tablet and Pen Settings in the system tray by tapping on the icon   found on the system toolbar.    4.5.3    Calibrating the Screen for Stylus Accuracy You can make your Tablet PC screen respond better to your stylus.   The first step in this process is to select the type of screen orientation you wish to calibrate: Landscape or portrait.      1  Go to Start 2.  Control Panel 5.  Tablet and Pen Settings 6. Select the Settings tab.  1.  Select the appropriate screen orientation to calibrate: Landscape or portrait.   2.  Now, you are ready to calibrate the screen.    Tap the Calibrate… box.                       27
4.5.4  Changing the Stylus Tips All Scribblers are shipped with a stylus box.    The box contains the following items: 1. One Stylus 2.  Five Stylus tips 3.  One silver ring  When the current tip of the stlus is ready to be replaced, use the silver ring to remove the tip from the stylus.    The silver ring has a cut through it.    In that cut is a smaller circle.    This smaller circle is where you place the tip of the pen.  Apply pressure when squeezing the silver ring around the tip that is in the stylus.    Pull the tip out.    Use the same method, with the silver ring, to put a new tip back into the stylus.  3.7  Getting to Know the Operating System   Task Bar  Control Panel Views You can view the Control Panel in 2 views, Category and Classic.    To select the view most comfortable for you, follow the steps below.        ○1              28
1. Go to Start 2.  Control Panel  The following are illustrations of the two views of the control panel.     ○2          Classic View            Category View   29
4.5.5 Joystick The joystick is a small moveable stick on the bottom left-hand corner of your Scribbler. It enables you to move the cursor with your hand.    How to scroll using the joystick: •  To move the cursor up, push the joystick away from you. •  To move the cursor down, push the joystick down towards you. •  To move the cursor left, push the joystick to the left. •  To move the cursor right, push the joystick to the right.    The joystick can also be used to select items.    1.  Use the stylus or joystick to move the cursor.  2.  Place the cursor on the desired item.  3.  Press down on the joystick, like you would click a button.     4.6    Putting the Scribbler in Standby Mode You have 2 methods to place the Tablet PC in standby mode.  This is the default setting where you press the power button        for less than 4 seconds.    The system is then automatically placed in standby mode.     ○1  To recall the system from the standby mode, simply press the power button       once more.         Or you can choose Standby from           as shown below.     ○2        ○3   By leaving the system idle for longer than a set time period (set from the control panel) the computer will automatically switch to standby.  30
4.7   The Screen 4.7.1    Adjusting the Screen Brightness You can adjust the screen brightness of your Scribbler to fit your needs.    You have the choice of adjusting the screen brightness for 2 system settings as described below.   When tablet is powered by batteries ♦ ♦  When AC Adapter is plugged in  There are 2 methods to adjust the screen brightness.      ○1  1. Go to Start   2.  Control Panel   3.  Tablet and Pen Settings 4. Select the Display tab, then choose your desired setting.                    Or you can simply double-tap on the         icon (Change Tablet and Pen Settings icon)    found in the system toolbar to open up the Tablet and Pen Settings (Properties) window.    31
4.7.2  Selecting Screen Orientation There are 4 different screen orientations.    They are:   Primary portrait  Primary landscape   Secondary portrait Secondary landscape          There are 2 ways in which you can select your screen orientation.  ○11. Go to Start 2.  Control Panel 3.  Double tap on the Tablet and Pen Settings icon. 4. Select the Display tab. 5. From the Orientation Preview pull down menu, select the orientation of your choice.  32
6. Select Apply to confirm it. 7.  OK                        You can also use your stylus to press the screen rotational button to alter your screen display.   ○2   4.8   Connecting Accessories  4.8.1  Connecting an external USB Mouse You may want to use a mouse instead of the Stylus.    You can attach an external mouse to one of the computer’s USB ports, provided the mouse is USB-compatible.  To connect the mouse to the Scribbler, plug its cable into one of the USB ports.    You can connect it while the Scribbler is on.  Windows Tablet PC edition automatically detects the mouse.    The mouse and Stylus can be used at the same time.  4.8.2    Connecting an external USB Keyboard   You can attach an external standard keyboard to one of the USB ports on the Scribbler, provided that the keyboard is USB-compatible.  4.8.3    Connecting a Printer and Setting it up You can connect a local USB printer to the Scribbler.    If the printer has a USB interface, you can connect it directly to the computer.   You also need a USB cable, which may come with your printer or purchase one from your  33
local computer or electronics store.  1.  Connect the flat end of the USB cable to the USB port. 2.  Connect the other end of the USB cable to the printer. 3.  Connect the printer’s power cable to a power outlet and turn on the printer.  Consult your printer manual for configuration.       4.8.4    Connecting the Modem The Scribbler comes with a built-in modem that can be connected tgo a standard voice-grade telephone line.   The 56K modem allows you to: •  Access the Internet •  Communicate with your office’s local area network (LAN), or a larger corporate wide area network (WAN). •  Send a fax directly from the Scribbler. 4.8.5    Connecting to a Phone Line Before you can communicate using the modem, you need to connect it to a telephone line.   The Scribbler’s built-in modem provides an RJ11 jack. 1.  Plug one end of the telephone cable into the modem port on the left-side of the computer. 2.  Connect the other end to the RJ11 wall jack. Note! The modem is designed for use with a standard analog telephone line.    Never connect the modem to a digital telephone line.    A digital line will damage the modem.  4.8.6    Connecting to a network To access a network: •  At the office, connect the compuer to a Local Area network (LAN).  For specific information about connecting to the LAN, consult your network administrator. •  Use your compuer’s optional Wi-Fi capability to connect to a wireless LAN.  4.8.7  Connecting to an external USB diskette drive   An optional external USB diskette drive allows you to use diskettes.  It is useful for  34
installing software on the hard disk, exchanging information with other systems and making backup copies of the files stored on your hard disk.      You can attach the optional external USB diskette drive to one of the two USB ports on the Scribbler. Note! If you attempt to access the drive when it is not attached to the computer, you will receive an error message.  To attach the optional external USB diskette drive cable to a USB port on the computer, gently push the connector into the USB port.   The computer automatically recognizes the optional USB disk drive.     Chapter 5: Getting to Know the Scribbler 5.1 Creating User Accounts This chapter explains how to use Scribbler’s Setup program, to configure your tablet and how to set passwords.  1. Go to Start   2.  Control Panel 3.  User Account 4.  Create a new Account 5.  Type in the desired name of your account.   6.  Proceed by tapping on the next button on your screen. 7.  Select the account type. 8.  Create the account. You can now choose the way you log on and off the system.  5.2  Setting up Passwords  You can set passwords that will keep your documents safe from others while you are away from the Scribbler.    Follow the steps below.  1.  Go to Start  2. Control Panel  35
3.  Double click on the User Account icon. 4.  Select the desired task you wish to do.    You can   a.  Change an account b.  Create a new account c.  Change the way users log on or off 5.  To proceed, tap on the account you wish to change. 6.  Tap on the Create a password link. 7.  Follow the onscreen directions.    5.3 Saving Before you turn off the computer, save your work to the hard disk drive or to a network location. *NOTE! : Save your data at all times even while using the Stand by command.  The automatic save feature offers to save documents at regular intervals. Check your programs’ documentation to see whether they have an automatic save feature. 5.4  Printing your Work After following your printer hardware setup do the following steps to print a file: 1.  If your printer is not on, turn it on now. 2.  In the File menu of your program, click Print.       The program displays a Print dialog box. 3.  Click OK to print.  5.5  Backing Up your Work  To back up several files at one time, use the Backup or Restore Wizard.    Using the manufacturer’s instructions connect the backup device to your computer. 1. Click Start 2. All Programs   3.Accessories 4.System Tools 5.Backup 6.    The Backup or Restore Wizard window appears.. 7.    Follow the on-screen instructions.   36
5.6 Setting Up Communication  In order to use the Internet, the Scribbler comes equipped with the following;  1.  Modem   2.  Telephone line  3.  Browser or communications program  Before you can use the modem, you must connect it to a standard voice-grade telephone line. See “Connecting the modem” for details.  You must also get in touch with an Internet service provider. 5.6.1    Connection Your Computer to a Network To access a network consult your network administrator for specific information  You can use the Scribbler’s built in Wi-Fi capability to connect to a wireless LAN. Ask your network administrator for the telephone number of the network.  Use the Dial-Up Networking to setup the connection  1. Click Start and tap to All Programs. 2. Point to Accessories, then to Communications, and tap to Network Setup Wizard or Network Connections. 3.    Enter the phone number of your network connection and let the program dial the number..  5.7  Overview – How to use the Internet The following is a brief introduction to the Internet    5.7.1  The Internet 5.7.2 .The World Wide Web 5.7.3  .Internet Service Providers 5.7.4    .Connecting to the Internet 5.7.5  .Surfing the Internet 5.7.6  .Internet features 5.7.7    .Uploading and downloading files from the Internet  5.7.1 The Internet The Internet is an association of thousands of networks and millions of computers around the world connected by communications lines. They all work together to share information.  37
5.7.2    The World Wide Web The World Wide Web (or ‘Web’) is a subset of the Internet —a collection of interlinked documents (located on computers connected to the Internet) that work together using a specific Internet protocol called Hypertext Transfer Protocol (HTTP). The World Wide Web offers information as text, images, audio, or video to be referenced from anywhere in the world. Special programs called Web browsers are specifically designed to work with HTTP. They make it easier to connect to a particular network address.  5.7.3 ISP’S (Internet Service Providers) To connect a computer directly to the Internet, many people and businesses use an Internet Service Provider (ISP). An ISP is a company that has the equipment and the telecommunication lines necessary to maintain an Internet connection. You can connect to the Internet by using a telephone and modem or through other higher-speed communication methods such as Digital Subscriber Lines (DSL), cable, and satellite links. 5.7.4 Connecting to the Internet To connect to the Internet, you need the following: 1.  A modem and telephone line, or a LAN connection 2. A Web browser 3.  An Internet Service Provider (ISP) account  The Microsoft ® Web browser Internet Explorer is automatically configured on your system so that when you first start it, it guides you through signing up for a new ISP Account.    It also assists you in setting up your computer to work with your existing ISP.  Once you have established an ISP account, you can connect to the Internet. To do this follow these steps: 1.   Connect your computer’s modem to a telephone line.    For more information on connecting to a modem, see    “Connecting the modem” on page 49. 2.      Start your Web browser. Have your modem dial the ISP’s telephone number, and establish a connection with the ISP’s computer. If you are using your computer at the office, then you probably connect to the Internet through your company’s network.   See your network administrator about connecting to   5.7.5 Surfing the Internet  Once connected to the Internet, the Web browser displays a home page, for example, your  38
ISP’s home page on the Internet or your company’s Web site home page. To visit a desired Web site, type in the Web address. The Web address, or Uniform Resource Locator (URL), is a unique identifier for that computer system linked to the Internet. Web addresses can also appear within a Web page’s text, and are known as links. Clicking a link automatically displays the site on your Web browser. You can also use a Search Engine, a Web site specifically designed to help you look for information.     5.7.6  Internet Features The Internet offers many types of communication tools to help you perform many tasks. 1.    Internet Email:    To send and receive email of your own, you need a mailbox on the Web, or an email address.    If you have an account with an ISP, you can probably setup an email address at the same time as you sign up for the service. 2.    Internet Chat Rooms:    A chat room is a Web site that offers a place where people with similar interests and ideas can communicate in real-time, one-on-one or in groups, by typing messages    which are instantly viewed by others on their computer screens. 3.    Internet News Groups:    A news group is similar to a chat room, but instead of using a dedicated site to converse about a specialized subject with others in real-time, it uses a Web   5.7.7 Uploading and downloading Transferring files from one computer to another is termed uploading (transferring data from your computer to a site on the Web), or downloading (transferring data from a site on the Web to your computer).There are several ways to upload or download data. It can be as simple as attaching a file or document to an email, or you can use the File Transfer Protocol (FTP) features of your Web browser to transfer large amounts of data.  5.8  Adding a Memory Module Before proceeding, ensure that the Scribbler is turned off.  (section 3.3)  Unplug and remove any cables connected to the Scribbler  Warning! Static electricity can damage the memory module.   Before you handle the module, touch a grounded metal surface to discharge any static electricity you may have built up.    1.  Using a standard Phillips no. 1 screwdriver, unscrew the screws to remove the back plate. 2.  Remove the battery clip. 3.  Remove the new memory module from its antistatic packaging. 4.  Holding the memory module by its edges, insert the memory into the slot ensuring  39
that the pins are aligned properly. 5.  Place the battery control back into the slot. 6.  Align the back plate in. 7.  Replace the screws back in using the Phillips no.1 screwdriver and tighten it. 8.  Reconnect any cables you removed.  5.9    Removing a Memory Module   If you need to remove a memory module: 1.  Ensure that the Scribbler is turned off and all cables are disconnected. 2.  Repeat steps 1-2 in “Adding a memory module”. 3.  Slide the memory module by it’s edges from the slot. Repeat steps 5-8 in “Adding a memory module”.  5.10    Using External Display Devices The Scribbler comes with an LCD display, but it can easily attach an external monitor if a larger screen is required.       1.  Connect the monitor’s video cable to the RGB (monitor) port on the Scribbler. 2.  Connect the monitor’s power cable to a live electrical outlet. 3.  Turn on the external monitor. 4.  Hold the “right click” and tap on the screen. 5. Select Graphics Option 6.  Output to 7.  You now have four of the available options:  Notebook ♦ ♦ ♦ ♦ Monitor  Intel(R) Dual Display Clone Extended Desktop  The system automatically sets the screen to display on Notebook.  Only the Scribbler screen is on.    The  Monitor option allows you to project materials onto another screen, while leaving the Scribbler screen blank.      The Intel(R) Dual Display Clone option allows materials to project onto both the screen of  40
the Scribbler and another screen.      The  Extended Desktop option transfers the Scribbler desktop activities on to another computer screen while letting you have access to the Scribbler screen and the monitor screen to work from.    Note! Ensure that your tablet is on Landscape mode and set to 800x1600 resolution.  5.11  Transferring Files Files can be transferred using one of methods below.   1.  an external USB key 2.  an external hard drive 3.  an external USB diskette drive 4. Accessing LAN 5.  Accessing the wireless modules using your system tray  For more information, see section 4.8 on how to connect to the external accessories.  5.12  Inserting a PC Card Before inserting a PC Card, read the documentation that came with the card to see if it has any special requirements.  To insert a PC card: 1.  Locate the PC Card slot on top side view of the Scribbler. 2.  Insert the PC Card 3.  When the card is almost all the way into the slot, push firmly, but gently, to ensure a firm connection with the scribbler has been made.  Avoid forcing the card into position.  5.13    Removing a PC Card 1.  Locate the PC Card eject tab. 2.  Push the eject button, the eject button pops out from the slot. 3.  Push the eject button again so the card will pop out. 4.  Hold the PC card by the edges and slide it out of the slot.  5.14  Using the Audio Features   41
The Scribbler is equipped with a sound system with internal speakers.    Instead of using the internal speakers, you can connect headphones or a pair of external stereo speakers.  To play back sound files through headphones or external speakers: 1.  Locate the headphone jack on the computer. 2.  Using any necessary adapters, plug the cable from the headphones or external speakers in the headphone jack.  To Adjust the volume: 1.  For external speakers, use the volume controls on each speaker, 2.  For headphones, use the computer’s volume control dial.  5.14.1 Playing Audio Files  The Scribbler can play audio files.    Adjusting the controls on your operating system’s Windows Media ™ Player can do this.    Access Windows Media ™ Player   1. Tap on Start using the stylus Start 2.    Tap on Windows Media Player.  5.15 Recording Sounds The external microphone may be used with other software to record monaural audio sounds and save them as digital audio.    WAV files on disk. You may also record sounds as .WAV files by connecting an external microphone or other sound source to the microphone jack.  5.16    Using a Microphone 1.  Connect an external microphone to the Scribbler 2. Click Start 3. Point to All Programs, Accessories, Entertainment 4. Then click Sound Recorder. 5. Click the Record button and speak normally into the microphone. Note! You can only record 60 seconds at a time. 6.  When you have finished recording, click the Stop button. 7.  To listen to what you just recorded, tap on the Play button. 8. Select Save from the File menu to save.    42
5.17    Inserting a CF (Compact Flash) Card Before inserting a CF Card, read the documentation that came with the card to see if it has any special requirements.  To insert a CF card:  1.  Locate the CF Card slot on top side view of the Scribbler. 2.  Insert the CF Card 3.  When the card is almost all the way into the slot, push firmly, but gently, to ensure a firm connection with the scribbler has been made.  Avoid forcing the card into position. 4.  The CF card eject button will pop up    5.18  Removing a CF Card  1.  Locate the CF Card eject tab. 2.  Push the eject button again so the card will pop out. 3.  Hold the CF card by the edges and slide it out of the slot.  5.19 Biometrics – Fingerprint The biometrics option is available with the SC800 model.    You have to enroll your fingerprint before you can use the biometrics option in the Scribbler  1.  Tap on start 2.  Tap on All Programs 3.  Tap on Softex and then on OmniPass Enrollment Wizard 4.  Once the Wizard appears tap on Enroll 5.  Enter a password and store it in a safe place 6.  Click on next 7.  Choose a finger by tapping on the finger you wish to enroll 8.  Place the finger on the sensor and remove it 9.  Do this again for a total of 7 times 10. You will have to verify your finger for the last time 11. Tap on Finished Enrollment  To administer fingerprints and passwords    1.  Tap on start  43
2.  Tap on All Programs 3.  Tap on Softex 4.  Tap on OmniPass Control Center Using this menu you can administer numerous options   Chapter 6: Scribbler Maintenance 6.1 The Battery 6.1.1  How to Charge the Battery  When the battery indicator light flashes, less than half an hour of battery power remains. The battery light glows amber while the battery is being charged and glows green when it is fully charged.  6.1.2 Troubleshooting A battery may not start charging immediately under the following conditions:   The battery is extremely hot or cold.    To ensure that the battery charges to its full capacity, wait until it reaches room temperature.  The battery is almost completely discharged.    Leave the power connected and the battery should begin charging after a few minutes. To recharge the battery, connect the AC adaptor to a power source and the computer. See Section 4.1 for complete details on how to connect the AC Adaptor. NOTE!: Use of the wrong adaptor could damage your Scribbler Tablet PC. ELECTROVAYA assumes no liability for any damage in such an event. 6.1.3 Approximate Charging Time It will take 5 hours to fully charge your battery when the unit is turned off and 6 hours when the unit is on and running.   The computer’s battery light gives you an indication of the battery’s current charge:  No illumination means the battery is not in use and the AC adapter is not connected. ♦ ♦ ♦ ♦ Green means the battery is fully charged. Amber means the battery is charging (AC Adapter connected). Flashing amber means the battery charge is low and it is time to recharge the  44
battery or plug in the AC Adapter.  Note! Be careful not to confuse the battery light with the on/off light.    When the on/off light flashes amber, it indicates that the system is suspended (using the operating system Standby command).  6.1.4  How to Determining the remaining battery power   Note!  Wait at least 16 seconds after turning on the computer before trying to monitor the remaining battery power.    The Scribbler needs this time to check the battery’s remaining capacity and perform its calculations. Click Start, then click Control Panel. ♦ ♦ ♦ Click Performance and Maintenance. Click the Toshiba Power Saver icon.  The Power Saver Properties window appears.    The current power source and battery power remaining section displays the current charge state of the battery.    The value is shown as a percentage of the remaining battery charge.  6.1.5  Charging a drained battery When the battery light starts flashing, you will need to charge the battery in order to save your work.    This is done as follows.    1.  Unplug everything from the system.    (For example, unplug the VGA cable.) 2.  Place the system in standby mode. 3.  Connect the AC adapter to the electric outlet. Plug in the AC Adapter into the AC/DC Power Jack at the bottom of Scribbler 4.  Return the system to operating mode.    AC Adaptor   The AC adaptor converts AC power to DC power and reduces the voltage to a controlled 12V for the Scribbler.    It can automatically adjust to any voltage from 100 to 240 volts and to a frequency of either 50 or 60 hertz, enabling you to use the computer in almost any country.   Note! Use of the wrong adaptor may damage the Scribbler. Note!  45
When changing the battery, attach the new battery within 5 minutes from the time you first take off the battery to when you attach the new battery.  If this is not done within 5 minutes, any unsaved work will be lost.  The 5 minutes allotted for the process means no device attached to the system such as no PCMCIA or no VGA cable. Delete or not?     6.2    Cleaning the Scribbler To help ensure long, trouble-free operation of the Scribbler, keep it free from dust and use caution when consuming liquids around the Scribbler.  *  Note! Keep liquids, including cleaning fluids, out of the Scribbler’s openings.    Never spray cleaner directly onto the computer.  Never use harsh or toxic chemical products to clean the Scribbler.  To keep the Scribbler clean, gently wipe the screen with the cleaning cloth provided.      Be careful not to spill liquids onto the Scribbler.  If the Scribbler does get wet, turn the power off immediately and let the tablet PC dry completely before you turn it on again.  6.3    Protecting the Scribbler A few precautions should be taken when handling the Scribbler to help ensure trouble-free operation.    •  Use the carrying case provided when transporting the Scribbler. •  When not using the Scribbler for long periods of time, ensure that you completely shut it off.    If you are not using it for a short period of time, ensure that the stand-by mode is enabled. •  Avoid using the Scribbler in extreme temperatures(above 60 degrees Celsius)   •  As much as possible, use the Scribbler keyboard as a screen protector.  6.4   Battery Maintenance The Scribbler contains a lithium ion SuperPolymer battery that powers the Scribbler when users are away from an AC outlet.  The battery life may vary depending on applications, power management settings and the features utilized.  The recharge time will vary depending on the usage.    The battery may not charge while the computer is consuming full power.  To extend battery life, it is recommended that you recharge your battery when it is less than  46
15%.   To ensure that the battery maintains its maximum capacity, avoid leaving the Scribbler uncharged for extended periods of time.  If the Scribbler is continuously operated on AC power through an AC adapter for an extended period of more than a month the battery may fail to retain a charge.    This may shorten the life of the battery and the battery light may not indicate a low-battery condition.  6.5    Battery Safety Precautions         Warning!     Do not store the Scribbler at temperatures above 60°C.     Warning!                   Do not charge the battery if the external temperature exceeds 40°C.               Warning!           Never remove the rear cover of the PC. Some PC parts contain high voltage.      To remove or replace the battery pack, always contact an authorized    Electrovaya service provider.      Warning! Never attempt to disassemble, tamper with or repair the PC. This may cause a fire, electric shock, serious physical injury, or death.    Always contact an authorized Electrovaya service provider for appropriate assistance.     Warning! If the PC has been dropped, or if you detect the emission of smoke, unusual odor or excessive heat, immediately unplug the AC Adaptor (if any) and shut off the Scribbler.   Contact an authorized Electrovaya service provider for appropriate assistance.   6.6 Software Recovery  The re will be two (2) recovery CD’s sent with each system.    Please refer to the chart below for the appropriate procedure.    47
Steps Procedures 1  Insert a USB Keyboard and a USB CD DRIVE into the USB drives either on the side or at the top of the Scribbler. 2  Boot up Scribbler 3  Press ESCAPE to go to the BIOS SETUP info 4  Go to BOOT sequence and change the BOOTABLE sequence from CD ROM (by applying + and – keys of your Keyboard) 5  Insert RECOVERY CD #1 (one) in CD drive – systems will boot up from it. 6  Press “R” to display system recovery option 7  Three options will be displayed: 1.  “R” for Standard Systems Recovery Option 2.  “F” to format drive and perform a full system recovery 3.  “Q” to quit and to boot the OS on Hard Disk (Preferably it is better to select “F” for a clean system installation) 8  System Recovery Partition will be created.   Please wait until it is completed. 9  SCRIBBLER SYSTEMS RECOVERY – Step by step, it will finish the installation, no interaction in between is necessary   10  When asked for the RECOVERY CD #2 (two), please insert the relevant CD into the drive and press OK (enter) 11  The system will ask to take out all of the CD’s, please do so, disconnect the CD Drive and reboot the Scribbler 12  “Welcome to Microsoft Windows” screen will pop up, click NEXT 13  Select your Systems setting with relevant REGION-LANGUAGE-TYPE OF KEYBOARD, click NEXT 14  Select your Time Zone (click automatically adjust clock for daylight saving time – if relevant), click NEXT 15  “The End User Licensing Agreement” – screen will pop up click “Yes I Accept” and then click NEXT 16  “What’s your Computer’s Name” will pop up, please fill in the relevant info, and then click NEXT (you have the option to SKIP this screen) 17  System will check your Internet connectivity, click NEXT 18  Register with Microsoft, after that click NEXT 19  “Who will use this computer” – screen will pop up please fill in the relevant fields, and click NEXT 20  CONGRATULATIONS – you have successfully done a full system  48
recovery with the help of these CDs, click FINISH 21  The system will reboot once again, and start working.  49
 Chapter 7: Troubleshooting  All readers should become familiar with this chapter.    Knowing what might go wrong can help prevent problems from occurring. This chapter will guide you to quickly identify and solve some of the most common problems you may encounter while using your Scribbler.  Some problems may require you to consult your network administrator or the manufacturer of a software program.    If all else fails, contact Electrovaya.   Stop using the Scribbler immediately when you recognize that a problem exists.    Further action may result in data loss or damage.    You may destroy valuable problem-related information that can help solve the problem.    Stop to observe what is happening on the screen.    Write down what the system is doing and what actions you performed immediately before the problem occurred.      Note!  The questions and procedures offered in this chapter are meant as a guide, they are not definite problem solving techniques.    Many problems can be solved simply, but a few may require technical support.    Consider the simplest solution first. Ensure that all options are set properly in the setup program.  Often the system will give you clues that will help you troubleshoot your problem better.   Ask yourself these questions: Is the operating system configuration set properly?    Check the configuration options. What appears on the display screen?    Does it display any messages or random characters?    Print a copy of the screen if you have a printer attached.    Look up the messages in the software and operating system section.    Check that all connecting cables are correctly and firmly attached.    Loose cables can cause erroneous or intermittent signals.              50
7.1 Simple problems Problem:      Your program stops responding.  Solution:      If the current program fails to respond, the program is likely “frozen”.      It is possible to exit this program without shutting down the entire system.      There are a few methods to close down the program:   Method 1:  1.  Using your stylus pen, press the key button icon (front panel control key).   The Windows Task Manager window will appear. 2. Click the Applications tab.    If a program has stopped responding, the words “not responding” appear beside its name in the list. 3.  Select the program you want to close, click End Task. 4.  Close the remaining programs one by one by selecting the program name, then End Task.   Method 2:   To power off your computer, refer to how to turn off the computer:  Problem:  Your program performs an illegal operation.  Solution:  If you receive the message, “Your program has performed an illegal operation,” you should record the details of the message.     To record the details of the error message:   1. Click the Details button and select the text the operating system displays.   The Details button displays information that the software manufacturer needs to help you solve your problem. 2.  Highlight the message completely using your stylus.    To do this, press your stylus on the screen at the beginning of the message.    Guide the stylus through the entire message, making sure the message is highlighted.     3.  Open up the On Screen Keyboard by pressing [insert stylus into] the screen keyboard icon.   4. On the Input Panel, select the Keyboard tab. 5. On the Keyboard panel, press the Copy button.    This will copy the highlighted text to the clipboard.  51
6. Open Notepad (click Start, point to All Programs, then point to Accessories and click Notepad). 7. On the Input Panel press the Paste button with your stylus.    This will paste the highlighted text from the clipboard into Notepad. 8.  Add a paragraph break and enter some notes describing what you were doing when you received the message. 9.  Save the file and refer to it when you contact the software manufacturer.   7.1.1    Power and the Battery  The Scribbler receives its power through an AC adapter and power cable or from the internal battery.    Power problems are interrelated.    For instance, a faulty AC adapter or power cable will neither power the computer nor recharge the batteries.      Problem:  The AC power light does not come on when you plug in the AC adapter and power cable.  Solution:  Make sure the AC adapter and power cable are firmly plugged into the both the wall outlet and the computer.   If the AC power light still does not come on, check to make sure the wall outlet is working by plugging in another device into it.  7.2  Problems that may occur when you power on the Scribbler  Problem:  The Scribbler will not start. Solution:  Suggestion 1:  Make sure you attached the AC adapter and power cable correctly.   Also be sure that the battery is not dead.      Suggestion 2:     Press and hold down the power button for a few seconds.  Suggestion 3:  If you are using the AC adapter, check that the wall outlet is working by     plugging in another device such as radio.  Problem:  The Scribbler starts, but when you tap on options with the stylus or press a key, nothing happens.  Solution:  Suggestion 1: It is possible that the Scribbler is in Standby mode. Simply turn off the       computer using one of the three options listed earlier.  Suggestion 2:    Please refer to the resource conflict documentation of any external units that   are currently in use  52
 Problem:  The computer is not accessing the hard disk drive or the optional external diskette drive.  Solution:  The Scribbler loads the O/S from the hard disk.    Should a hard disk problem arise, the computer will not be able to start.    Plug in an optional diskette drive, and a USB keyboard and press F12 as soon as the Scribbler boots up.          Problem:  The computer displays the “WARNING RESUME FAILURE” message.  Solution:  The computer was placed in Stand-By mode and the battery has discharged.   Data stored in the computer’s memory has been lost.      To charge the battery, leave the computer plugged into a live wall outlet for several hours.    For more information, see “Power and the battery” section of this chapter.  Problem:  The computer displays the “Non-System disk” or “disk error” message.  Solution:  Make sure there is no diskette in the optional external diskette drive.    If there is one, remove it and press any of the functional keys.      7.3 WINDOWS Operating System Problems  Once you are familiar with the desktop and used to the way the Windows operating system works, problems with the O/S are easily detected.  Common Problems:        1. The operating system fails to start after the “Starting Windows XP” message          appears   2. The operating system takes a long time to start.   3. The operating system responds differently from the normal routine.   4. The screen does not look right.  *Note! Unless a hardware device has failed, problems usually occur when you change the system in some way such as installing a new program.  Solution: If Windows fails to start properly, you may have to change your system’s configuration or verify the startup procedure to correct the problem.    Use the options in the Startup menu to do this.      This section describes each option and when to use the procedure.    To open the Startup menu: 1.  Restart your computer.  53
2. Press F8 on the external USB keyboard when your computer starts.    Refer to your Windows documentation for further explanation.   7.4    Windows XP Operating System Assistance  Problem:  The operating system has started properly, but you still have a problem using your computer.  Solution:   The online Help can assist you in troubleshooting this problem.    To access Windows XP Help and Support: 1. Click Start, then click Help and Support. The Help and Support window appears. 2.  Then do one or both of the following: *In the search field, type in the topic on which you need help and follow the screen instructions. *Select a problem you would like help with from the listings and follow the on-screen instructions.     You can also connect to Support Online by selecting Support from the menu.       7.5  Software Recovery There will be two (2) recovery CD’s sent with each system.    Please refer to the chart below for the appropriate procedure.   Steps Procedures 1  Insert a USB Keyboard and a USB CD DRIVE into the USB drives either on the side or at the top of the Scribbler. 2  Boot up Scribbler 3  Press ESCAPE to go to the BIOS SETUP info 4  Go to BOOT sequence and change the BOOTABLE sequence from CD ROM (by applying + and – keys of your Keyboard) 5  Insert RECOVERY CD #1 (one) in CD drive – systems will boot up from it. 6  Press “R” to display system recovery option 7  Three options will be displayed: 4.  “R” for Standard Systems Recovery Option 5.  “F” to format drive and perform a full system recovery 6.  “Q” to quit and to boot the OS on Hard Disk (Preferably it is better to select “F” for a clean system installation) 8  System Recovery Partition will be created.    Please wait until it is  54
completed. 9  SCRIBBLER SYSTEMS RECOVERY – Step by step, it will finish the installation, no interaction in between is necessary   10  When asked for the RECOVERY CD #2 (two), please insert the relevant CD into the drive and press OK (enter) 11  The system will ask to take out all of the CD’s, please do so, disconnect the CD Drive and reboot the Scribbler 12  “Welcome to Microsoft Windows” screen will pop up, click NEXT 13  Select your Systems setting with relevant REGION-LANGUAGE-TYPE OF KEYBOARD, click NEXT 14  Select your Time Zone (click automatically adjust clock for daylight saving time – if relevant), click NEXT 15  “The End User Licensing Agreement” – screen will pop up click “Yes I Accept” and then click NEXT 16  “What’s your Computer’s Name” will pop up, please fill in the relevant info, and then click NEXT (you have the option to SKIP this screen) 17  System will check your Internet connectivity, click NEXT 18  Register with Microsoft, after that click NEXT 19  “Who will use this computer” – screen will pop up please fill in the relevant fields, and click NEXT 20  CONGRATULATIONS – you have successfully done a full system recovery with the help of these CDs, click FINISH 21  The system will reboot once again, and start working.  7.6    Resolving a Hardware Conflict  Problem:            There is an error message telling you there is a device driver conflict or a              general hardware problem.  Solution:      First, use Windows Help and Support to troubleshoot the problem.   For help on hardware conflicts: 1. Press Start, then click Help and Support. 2. Press the Hardware link.   3. Press the Fixing a hardware problem. 4.  Choose from specific topics and follow the steps.    7.7    Fixing a device problem with Device Manager  *Note!    Device Manager provides a way to check and change the configuration of a device.  Caution:    Changing the default settings using Device Manager can cause other conflicts that make one or more devices unusable.      55
 Problem:    How to disable a device.  Solution:     1. Press Start, Control Panel, Administrative Tools. 2. Press the Computer Management icon. 3.  Select the specific device. 4.  In the toolbar, select icon of a monitor with a strike mark. 5.  Press the icon.   6. Click yes or no.  Problem:  Checking the properties of a Device.  Solution:  Device Manager provides a way to view the properties of a device.    This usually includes the name of the manufacturer, the type of device, the drivers installed, and the system resources assigned to the device.         To check a device’s properties: 1. Press Start, Control Panel, Administrative Tools. 2. Press the Computer Management icon. 3. Press the Device Manager button. 4.  To view the device(s) installed, using the stylus, double tap the device type. 5.  To view the properties, double tap the device.     6. Press troubleshooting.  A Help and Support window appears.    If you require more information about Device Manager, refer to Windows XP online help.  7.8  Help and Support  You can learn more about your Tablet PC and seek answers to your questions from the Help and Support Center.   Go to Start > Help and Support Center               56
7.9 Troubleshooting Checklist Before you contact Electrovaya Technical Support regarding any technical issues, please conduct the following initial checks first:  □  Remove all external devices □  Check the green light indicator on the AC Adapter to see if it is lit □  Make sure all power cords are completely plugged into the power outlet and the Scribbler □  Check the power light indicator to see if it’s on □  Tighten any loose cable connections □  Contact the product’s manufacturer first for problems related to USB CD-ROM drive, scanner, printer, or other external devices.   □  Contact the software vendor first for software-related questions. □  Load the Default Setting from the BIOS Setup after any BIOS update  If you have done all of the above actions, please contact Electrovaya Technical Support.  Ensure that you have the 3 items below ready first.  Product Model & Serial Numbers ♦ ♦ ♦ BIOS Revision (Rev) EC Revision (Rev)   You can find the BIOS Rev and EC Rev information in the Setting Panel.       57
To locate the Setting Panel, follow the steps below.    1. Turn on the Tablet PC.    2. Press the Esc key   when the Electrovaya logo appears on the screen. 3.    Boot Menu appears on the screen.   Use the arrow key to select the Setup Menu   4. Locate and record BIOS & EC Rev information.     Contacting Electrovaya Inc.  ELECTROVAYA CONTACT INFORMATION  Head Office  Electrovaya 2645 Royal Windsor Drive Mississauga, Ontario L5J 1K9 Tel: 905-855-4610 fax: 905-822-7953   Tech Support Number  Customer Service: (Tech Support) 1-800-388-2865  58
 Appendix      59
Limited Warranty  Electrovaya (“Electrovaya”) warrants to the original purchaser (“Customer”) this Tablet PC product (“Scribbler”) to be in good working order under normal use and maintenance for a period (“Warranty Period”) of twelve (12) months from the date of purchase. Electrovaya also warrants Customer battery used in Scribbler (“Battery”) to be in good working order under normal use for Warranty Period of three (3) months from the date of purchase.    During the Warranty Period, should the product, in Electrovaya’s sole opinion, malfunction due to any defect in material and workmanship, the Customer’s sole remedy and Electrovaya’s sole liability shall be, at Electrovaya’s option, to either repair or replace the malfunctioning Scribbler/Battery with a similar product at no charge or reimburse the purchase payment, provided that the malfunctioning product is returned, with proof of purchase in the form of the Customer’s original copy of the sales receipt, within the Warranty Period to the address specified hereon ( the “Limited Warranty”). If a replacement product is issued, the Limited Warranty will apply to the replacement Product dating from the date of replacement. The Limited Warranty shall only be available to the Customer and not to any product that has been transferred and no longer owned by the Customer. This Limited Warranty is void if Electrovaya determines that the Product has been serviced by anyone other than Electrovaya, or one of its authorized service centers damaged from accident, misuse, misapplication, abusive operation, improper use and/or insufficient care or has been operated outside the parameters of the Safety and Instruction manual. THERE ARE NO EXPRESS OR IMPLIED WARRANTIES, REPPRESENTATIONS OR CONDITIONS OTHER THAN THOSE STATED IN THIS LIMITED WARRANTY. This Limited Warranty is made in lieu of all other warranties, representations or conditions, whether expressed or implied, including without limitation, merchantability or fitness for a specific purpose. Some jurisdictions do not allow limitations on implied warranties, representations or conditions, so the above limitations may not apply to you. The remedy set forth herein shall be the sole, exclusive remedy with respect to the Product. No person is authorized to make any other warranty or representation concerning the performance of the Product or extend, or enlarge the Limited Warranty contained herein. Under no circumstances will Electrovaya be liable for any direct, indirect, special incidental or consequential damages (even if Electrovaya is notified of the possibility of such damages) including, but not limited to, any loss of revenue, loss of profit, or loss of data whether based upon any alleged breach of warranty, representation or condition, contract, or any other conduct including negligence (intentional or otherwise), giving rise to such claim. Some jurisdictions do not allow the exclusion or limitation of incidental or consequential damages, so the above exclusion may not apply to you. Electrovaya shall not be liable for any claims  60
made by a third party or made by you for a third party. This Limited Warranty is not transferable. No suit or action shall be brought against Electrovaya more than one year after the accrual of the cause of action. This limited warranty gives you specific legal rights and you may also have other rights which vary from jurisdiction to jurisdiction.     Regulatory Compliance  FCC Compliance  This equipment has been tested and found to comply with the limits for a Class B digital device, pursuant to Part 15D and Part 15C of the FCC Rules. These limits are designed to provide reasonable protection against harmful interference in a residential installation. This equipment generates, uses and can radiate radio frequency energy and, if not installed and used in accordance with the instructions, may cause harmful interference to radio communications. However, there is no guarantee that interference will not occur in a particular installation.   UL Compliance  This device complies with EN55022 Class B/EN55024.      61

Navigation menu