Tatung TTABB12DBG Tablet PC With 802.11 b/g WLAN User Manual
Tatung Company Tablet PC With 802.11 b/g WLAN
UserManual.wiki
>
Tatung
>
TTABB12DBG User Manual
User Manual
Navigation menu
Upload a User Manual
Namespaces
Wiki Guide
HTML
PDF
Info
Views
User Manual
Discussion / Help
Navigation

![When you start to operate your computer, you should understand the following two types of button functions: 1. Primary functions: Pre-set system functions. There is no way for you to reset these. The icon to the side of the actual button represents the primary function. 2. Secondary functions: Additional functions accessed by pressing the [Fn] button: some are user-programmable and some have already been assigned. When the Windows desktop icon ICON appears on the taskbar in the lower right-hand corner of the screen, both kinds of functions described above have been assigned successfully and can be used. The different primary and secondary function settings can help you use your Tablet PC and even improve your work performance.](https://usermanual.wiki/Tatung/TTABB12DBG/User-Guide-396349-Page-10.png)
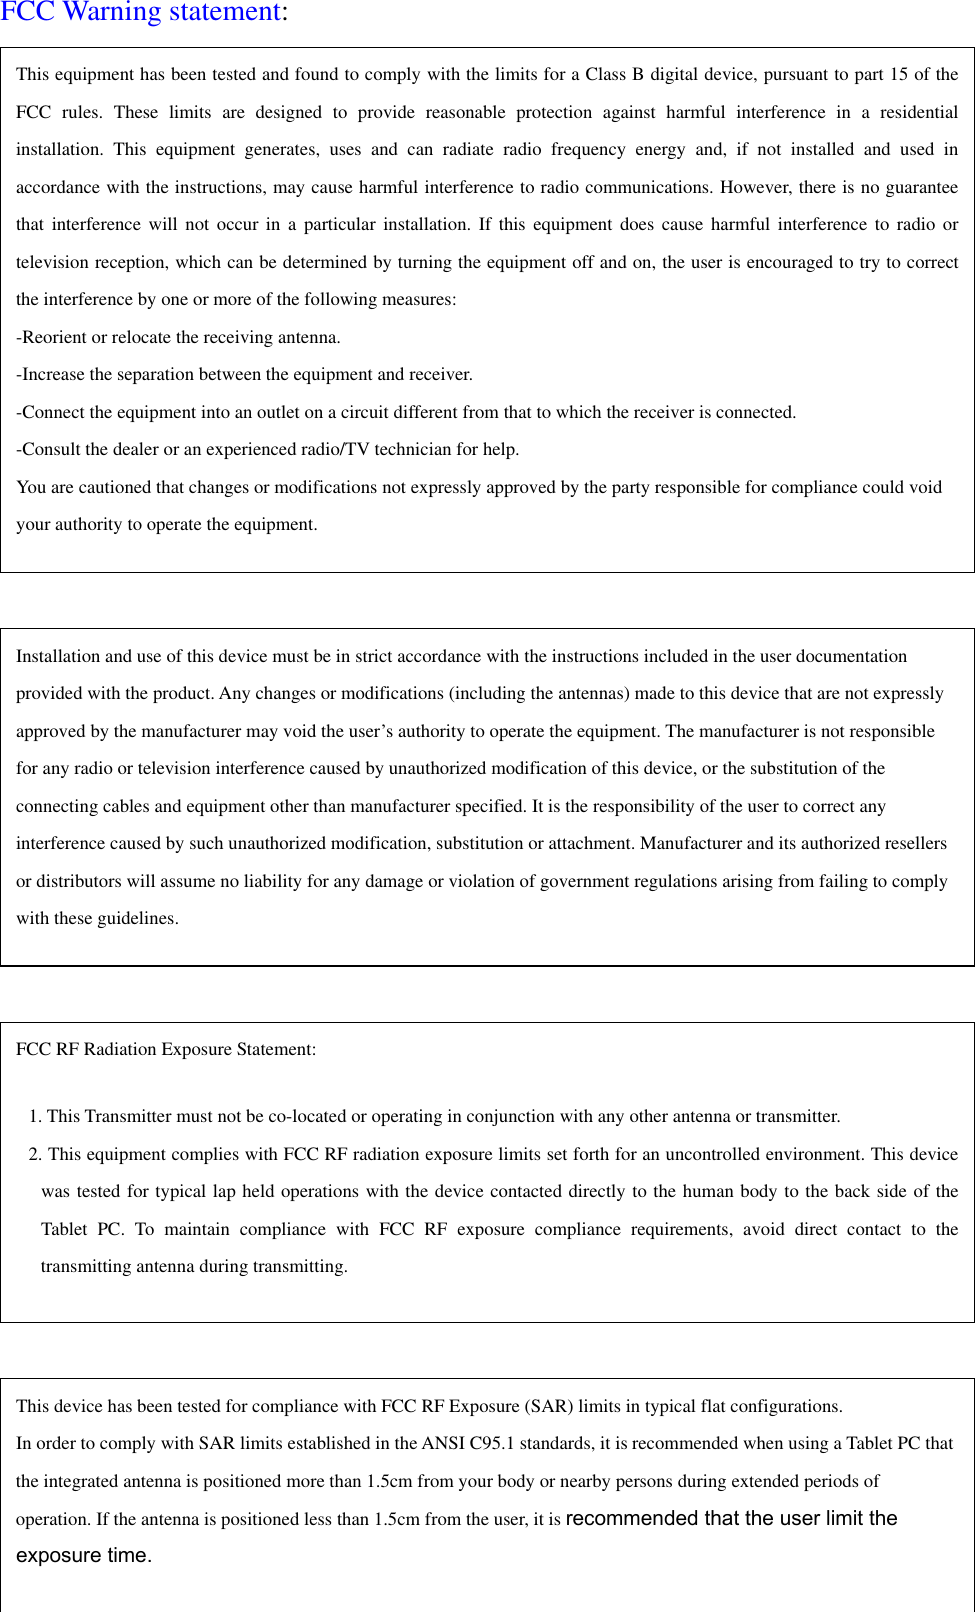
![INTRODUCING THE PRIMARY FUNCTIONS ■ Basic Functions Each button has a basic primary function that has already been defined. These basic functions are described as follows: Button Icon Button Function Power On/Off computer power switch Rotate can rotate the screen among 4 different orientations, user-programmable. ESC the same as a normal keyboard [ESC] key, exits the current application Function activates the secondary functions Wireless activates the wireless network Up Arrow the same as a normal keyboard [Up Arrow] key Dn Arrow the same as a normal keyboard [Dn Arrow] key Right Arrow the same as a normal keyboard [Right Arrow] key Left Arrow the same as a normal keyboard [Left Arrow] key Enter the same as a normal keyboard [Enter] key Tablet PC Input Panel turns the Tablet PC input panel on/off Journal activates “Windows Journal” software Start opens/closes the “Start Menu” Windows Security opens “Windows Task Manager”, i.e. [Ctrl] + [Alt] + [Del] ■ Which Buttons Have Secondary Functions? Aside from the three function buttons listed below, the other buttons either are or can be programmed with secondary functions. The three function buttons that only have primary basic functions are: Power Button–Power On/Off Function Button Windows Security – Windows Task Manager Button Icon Button Secondary Function (Primary button + [Fn]) Rotate Default: Email Client (user-programmable) ESC moves the present work display to background Up Arrow Page Up Dn Arrow Page Down Right Arrow Tab Left Arrow [Shift] + [Tab]](https://usermanual.wiki/Tatung/TTABB12DBG/User-Guide-396349-Page-11.png)
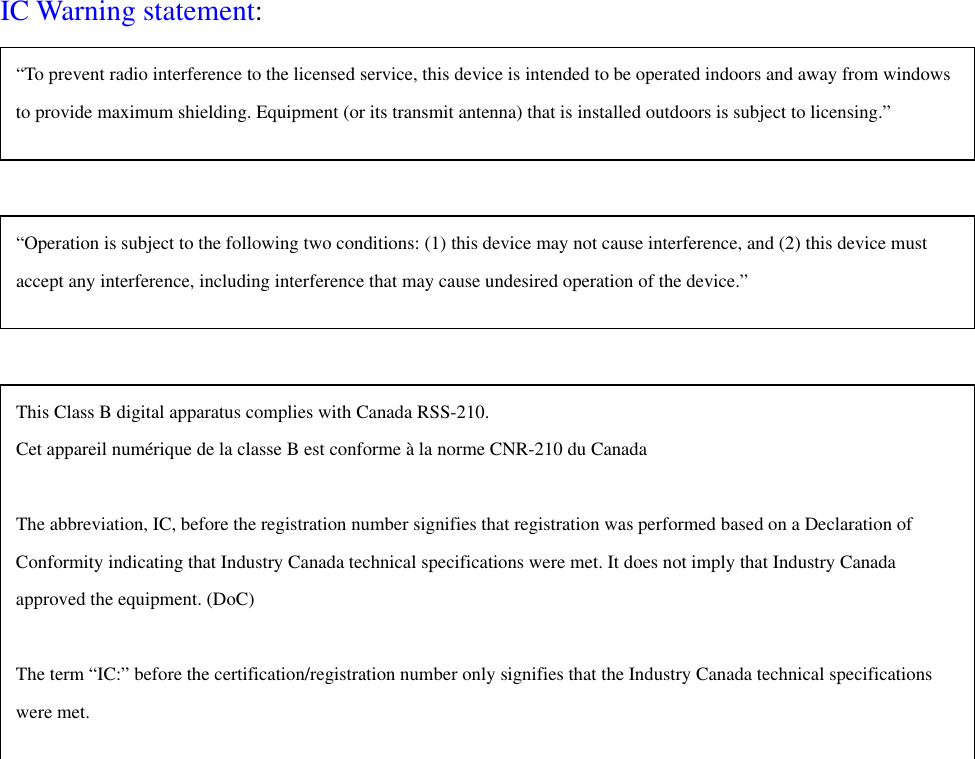
![Enter [Alt] + [Tab]: you may switch between open programs. Journal Default: Volume Up (user-programmable) Tablet PC Input Default: Volume Down (user-programmable) Panel Start Menu Default: Internet Browser (user-programmable) 1. You may set the power switch to make the computer enter Standby or Hibernate mode. (Go to “Control Panel” “Power Options” “Advanced” “Power Buttons” and set as Standby or Hibernate.) 2. The Direction Ball will automatically adjust the other functions along with the 4 different screen rotations. For example, if the screen is rotated from a primary setting to a secondary setting, the arrow orientation will also change.](https://usermanual.wiki/Tatung/TTABB12DBG/User-Guide-396349-Page-12.png)
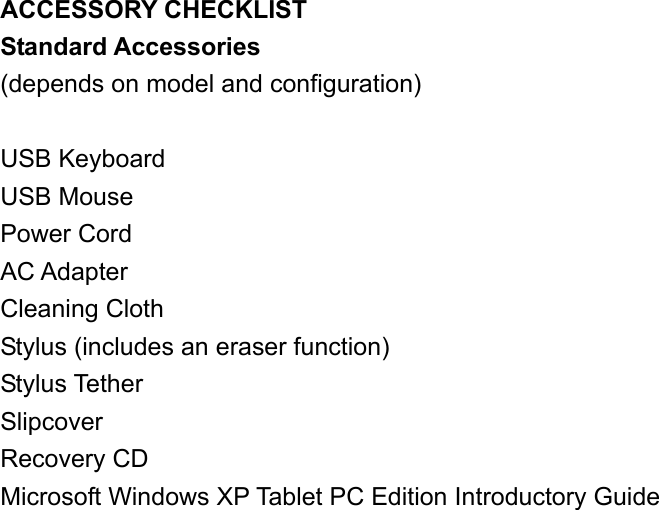
![■ Secondary Functions You only need to press the particular function button to activate its primary function. To activate secondary functions, press the Function [Fn] button. When you press it, the Windows icon taskbar in the lower right-hand corner of the desktop will display the following message: “Tablet and Pen Settings” “’You have activated the Tablet [Function] button.’” How to Assign Secondary Functions to Buttons You can only assign button functions when the Windows “Start Menu” is on-screen. Below, we explain how to assign secondary functions to the four programmable buttons. These 4 buttons not only have primary functions, but also may be assigned secondary functions. 1. Go to “Start” “Control Panel” “Tablet and Pen Settings” “Tablet Buttons.” Or, double-tap the “Change Tablet and Pen Settings” icon on the taskbar ICON in the lower right-hand corner of the desktop. 2. From among the 4 available buttons, select an appropriate one to which to add a secondary function. Below the “Tablet Buttons” heading, you will see the following four options: Fn + Hot1 Button Fn + Journal Button Fn + Input Panel Button Fn + Rotate Button 3. Tap on “Change.” 4. Double-check the “Button Name” in the first row of the “Change Tablet Button Action” dialog box to confirm the button selection. 5. Select a secondary function you often use from among the 54 different options in the “Action” scroll list. 6. Tap “OK” to confirm your selection. “User-programmable” means a secondary function can be assigned to a button by the user. Remember, to activate the secondary button functions, hold down the [Fn] button and then press the specific secondary function button.](https://usermanual.wiki/Tatung/TTABB12DBG/User-Guide-396349-Page-13.png)


![■ How to Replace the Hard Drive 1. First, unscrew the cover on the back of the hard drive. 2. Open the cover and remove the hard drive, holding it level. 3. Insert the new hard drive into the Tablet PC, holding it level. 4. Screw the hard drive cover back down. 5. You have completed the process. ■ How to Recover the Operating System 1. First, connect the Tablet PC to the USB keyboard. 2. When you turn on the computer, press [F10] before entering the operating system to carry out system recovery. Or, after entering the operating system, go to “Start” and select “All Programs.” Execute “System Recovery” to recover the system. 3. Follow the on-screen steps to recover the system. ■ How to Use the Recovery CD 1. First, connect the USB keyboard and the USB CD-ROM to the Tablet PC. Insert Recovery CD 1. 2. Press [F2] while the computer is starting up. Enter the BIOS/ Boot and change to the CD-ROM Drive, pressing [Shift] and [+] to drag the CD-ROM Drive to the top of the list. Save and exit. 3. Recover the system as needed by following the on-screen instructions.](https://usermanual.wiki/Tatung/TTABB12DBG/User-Guide-396349-Page-25.png)

![Before Contacting the Manufacturer Before contacting the manufacturer’s technical support, please carry out the preliminary examination described below. □ Remove all of the external accessories. □ Check to see whether all of the power cords are correctly plugged into the power supply and the computer. □ Check the Power Indicator to see whether the machine is on. □ If a malfunction has occurred with the USB CD-ROM, scanner, printer or any other accessory, please contact the manufacturer of that product. □ If there is a software problem, please contact the software supplier. □ When carrying out any kind of BIOS update, please load default BIOS values first. Before Calling for Assistance If your computer’s technical problem persists even after you have carried out the examination described above, please contact the manufacturer’s technical support as quickly as possible. Before calling, prepare the following three pieces of information: Product model number and product serial number (this information is on the label on the back of the computer) BIOS version (may be obtained from the BIOS Setup screen) EC version (may be obtained from the BIOS Setup screen) ● You may obtain the BIOS and EC versions from the Setup screen, which can be entered as follows: (1). Turn on the Tablet PC (2). When the logo appears on-screen, press [Esc]. (3). Go to “Enter Setup,” and you will find the BIOS and EC versions.](https://usermanual.wiki/Tatung/TTABB12DBG/User-Guide-396349-Page-33.png)