Technicolor Connected Home USA DCI401MCS Audio Video Apparatus User Manual Exhibit D Users Manual per 2 1033 b3
Technicolor Connected Home USA LLC Audio Video Apparatus Exhibit D Users Manual per 2 1033 b3
Exhibit D Users Manual per 2 1033 b3
Red light location
RF Remote Pairing Process:
When multiple remotes work in a shared space, interference
can result. To avoid this problem, the remote must be paired
with the Digital Adapter.
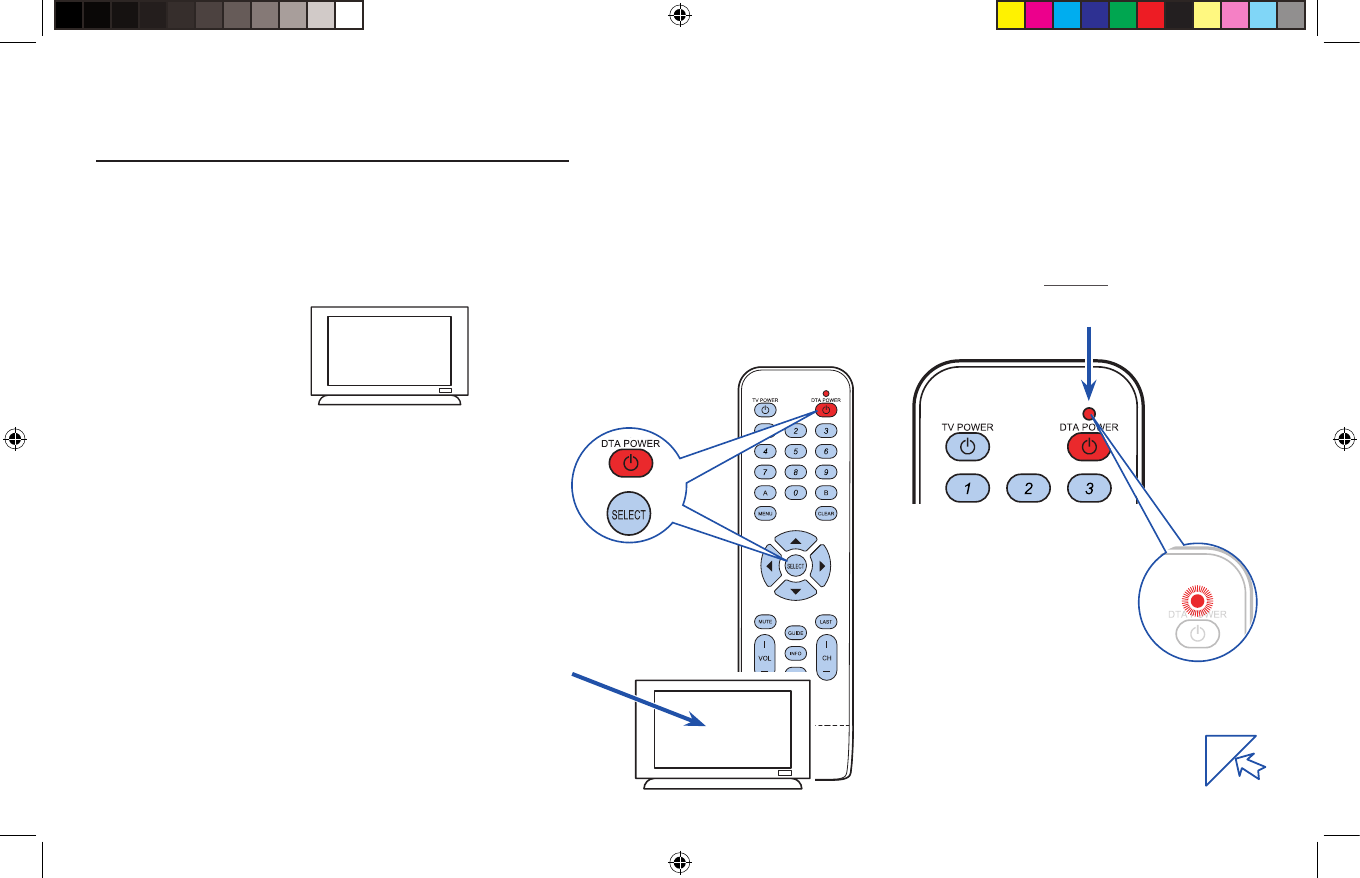
Step 1
Turn on your TV using the buttons
on the TV or the TV remote.
Make sure power is connected
to your Digital Adapter and it is
plugged into the TV.
Note: Your TV must always be set to the proper channel
(Ch 3 or Ch 4) or HDMI Input to match the output channel on
the back of your Digital Adapter.
Step 2
Install the batteries (included in your kit) in your new remote
control.
Step 3
Make certain no other Digital Adapter remote is in the area.
Make sure power is connected to your Digital Adapter.
Turn on your TV using the buttons on the TV or the TV
remote (not a digital adapter remote in this instance).
Setting Up the Remote Control
Code appears on the screen.
123
Step 4
Press and hold both DTA POWER and SELECT keys
at the same time.
Once the red light on the remote turns on, then release
both keys.
Wait 10 seconds, a 3 digit validation code will display
on the TV.
Step 5
Enter the 3 digit code using the Digital Adapter remote.
When remote is successfully paired with the Digital Adapter,
the remote’s red light will blink twice.
Proceed to back of this page to setup the Remote
Control with your television.
Setup Remote to Control the Digital Adapter
Blinks twice
3698714A TIS 1 9/23/11 9:08 AM
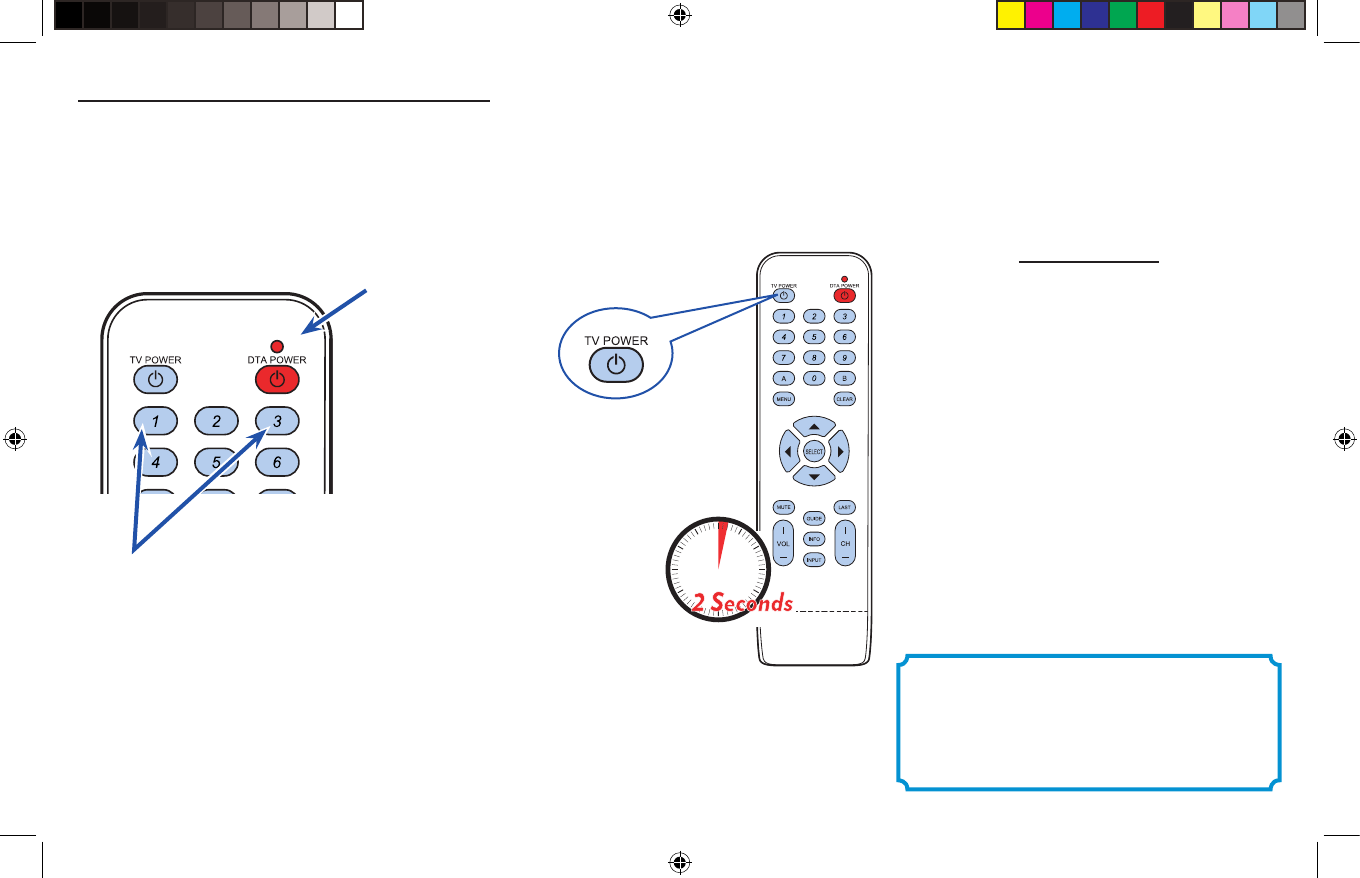
Step 6
Press and hold both Digit 1 and Digit 3 keys together until the
red light turns on.
Release both keys.
Keep your eyes on the Remote so you can watch the red light.
3698714A
Press and hold both buttons at the same time
Keep your eyes
on the remote so
you can watch
the red light.
Setup Remote to Control the Television If you are not successful the first time,
try again.
Two Remotes
If you were unable to program your remote, you will need to use
two remotes to operate your TV:
the Digital Adapter Remote
and
the one that came with your TV.
Setting the Remote Volume
1. Use the remote control that came with your TV to adjust
the volume to a comfortable level. This should be the last
time you’ll use this remote for volume control.
2. Going forward use only your Digital Adapter Remote to
adjust volume up or down.
Caution:
Don’t use your TV remote to change channels.
Your TV must always be set to the proper
HDMI Input, Ch 3 or Ch 4
or you will see a snowy or blank screen.
Step 7
Point the new remote at the TV.
Press and hold the TV POWER key.
The remote will start searching for the right
code while you are holding this key.
When the TV turns o, release the key
within 2 seconds to lock in the code.
Step 8
Point the new remote at the TV.
Press TV POWER on your Remote to turn on your TV.
If your TV responds (turns on), then you have successfully
programmed your Remote.
The setup of the Remote is now complete.
Note: Your TV must always be set to the proper channel
(Ch 3 or Ch 4) or HDMI Input to match the output channel on the
back of your Digital Adapter.
3698714A TIS 2 9/23/11 9:08 AM